

Page 1
Mini Food Chopper
MODEL WST2025ZE
OWNER’S MANUAL
Page 2

IMPORTANT SAFEGUARDS
When using electrical appliances, basic safety precautions should
always be followed including the following:
1. Read all instructions.
2. To protect against risk of electrical shock do not put cord, plugs,
or appliance in water or other liquid.
3. Close supervision is necessary when any appliance is used by or
near children.
4. Unplug from outlet when not in use, before putting on or taking
off parts, and before cleaning.
5. Avoid contacting moving parts.
6. Do not operate any appliance with a damaged cord or plug or
after the appliance malfunctions, or is dropped or damaged in
any manner. Contact Consumer Service for examination, repair
or electrical or mechanical adjustment.
7. The use of attachments not recommended by the manufacturer
may cause a risk of fire, electric shock or injury.
8. Do not use outdoors.
9. Do not let cord hang over edge of table or counter.
10. Do not let cord contact any hot surface, including the stove.
11. Keep hands and utensils away from moving Blades or Discs while
processing food to reduce the risk of severe injury to persons or
damage to the Mini Food Chopper. A scraper may be used but
must be used only when the Mini Food Chopper is not running.
12. Blades are sharp. Handle carefully.
13. To reduce the risk of injury, never place Knife Blade, Disc Post, or
Shredding Disc on Base without the Container properly in place.
14. Be certain Cover is securely locked in place before operating
appliance.
15. Never feed food by hand. Always use Food Pusher.
16. Do not attempt to defeat the Cover Interlock Mechanism.
SAVE THESE INSTRUCTIONS
For Household Use Only
1
Page 3

ADDITIONAL IMPORTANT
SAFEGUARDS
1. All users of this appliance must read and understand this Use
and Care Guide before operating or cleaning this appliance.
2. The cord to this appliance should be plugged into a 120V AC
electrical outlet only.
3. Do not leave this appliance unattended during use.
4. If this appliance begins to malfunction during use, immediately
press the ON/OFF/PULSE Switch to the (O) OFF position and
unplug the cord. Do not use or attempt to repair the
malfunctioning appliance.
5. If this appliance falls or accidentally becomes immersed in
water, unplug it immediately. Do not reach into the water!
Do not use this appliance after it has fallen into or becomes
immersed in water.
6. To reduce the risk of injury to persons or property, never use this
appliance in an unstable position.
7. Do not use this appliance for other than its intended use.
8. Use extreme care when handling the Blade Attachment. Always
insert and remove Blade by using the Hub. Do not touch the
Blades with your fingers. The Blades are very sharp and can
cause injury if touched.
9. This Mini Food Chopper is intended for processing small
quantities of food. It is not intended to prepare large quantities of
food at one time.
10. Never use for extended periods of time. The Mini Food Chopper
does its work in seconds.
11. Do not operate Mini Food Chopper without food contents in
the Container.
12. Do not use if the Container is cracked or chipped.
2
Page 4

POLARIZED PLUG
This appliance has a polarized plug (one blade is wider than the other).
To reduce the risk of electric shock, this plug is intended to fit into a
polarized outlet only one way. If the plug does not fit fully in the outlet,
reverse the plug. If it still does not fit, contact a qualified electrician. Do
not attempt to modify the plug in any way.
SHORT CORD INSTRUCTIONS
A short power-supply cord is provided to reduce the risk resulting from
becoming entangled in or tripping over a longer cord.
Do not use an extension cord with this product.
PLASTICIZER WARNING
CAUTION: To prevent Plasticizers from migrating from the finish of the
countertop or tabletop or other furniture, place NON-PLASTIC
coasters or placemats between the appliance and the finish of the
countertop or tabletop.
Failure to do so may cause the finish to darken, permanent
blemishes may occur or stains can appear.
ELECTRIC POWER
If the electrical circuit is overloaded with other appliances, your
appliance may not operate properly. It should be operated on a
separate electrical circuit from other appliances.
3
Page 5

BEFORE USING FOR THE FIRST TIME
CAUTION: Use extreme care when handling the Blade.
Always insert or remove Blade by using the Hub. Do not
touch the Blades with your fingers. The Blades are very
sharp and can cause injury if touched.
Carefully unpack the Mini Food Chopper and remove all packaging
materials. Handle the Knife Blade and Slicing/Shredding Disc
carefully; they are very sharp. Set the Base on a clean, dry countertop
or table.
Wash all parts except the Base in warm, soapy water. Rinse and dry
thoroughly. The Base may be wiped with a damp cloth. DO NOT
IMMERSE BASE IN WATER.
HELPFUL HINTS
•Fresh, crisp and firm fruits and vegetables process best.
•Fruits and vegetables should be processed at refrigerator
temperature.
•Wash and remove inedible parts of food before processing.
•Process dry ingredients first and moist ingredients second when
using several different foods in a recipe or making several
different recipes at the same time; this reduces the number of
times the Container must be washed and dried.
• When slicing and shredding, cut longer and larger foods to fit the
length and width of the Food Chute.
• When chopping, cut pieces in uniform size pieces. Large pieces
tend to chop unevenly.
• Use a spatula to scrape down the sides of the Container
when necessary.
4
Page 6

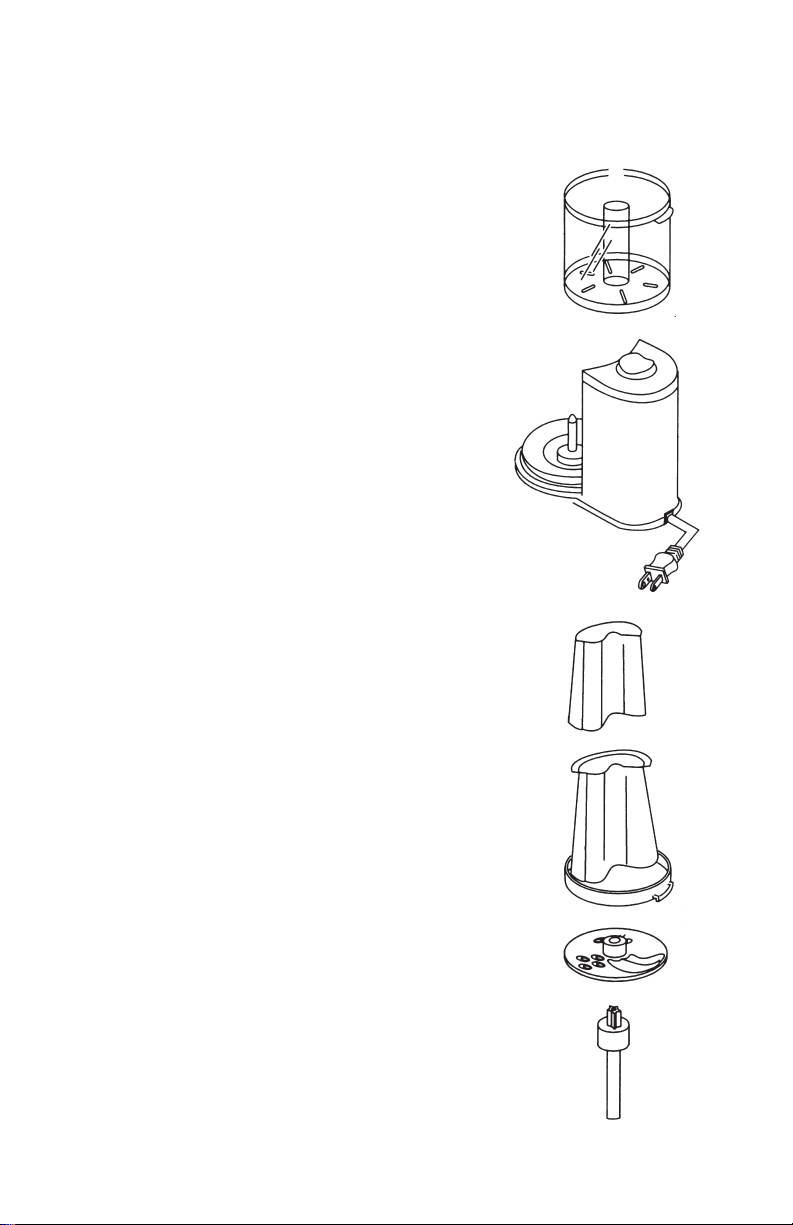
GETTING TO KNOW YOUR
WESTINGHOUSE WST2025ZE
1.
2.
4.
5.
6.
7.
8.
9.
MINI FOOD CHOPPER
PRODUCT MAY VARY SLIGHTLY FROM ILLUSTRATIONS
1. Food Pusher: (P/N 70799) The Food Pusher fits
into the Food Chute. By varying the pressure put
on the Food Pusher, the speed and quality of
processing can be controlled.
2. Food Chute/Cover: (P/N 70796) The Food
3.
Chute/Cover positions ingredients for processing.
The Locking Tabs on the Food Chute/Cover are
part of an Interlock System that assures the unit
will not operate unless the Cover is properly in
place (see “Interlock Mechanism”).
3. Interlock Mechanism: The Interlock Mechanism
is located at the top of the Base and allows the
Tab located on each Cover to slide into it and lock
into place. This insures proper operation and
secure assembly, as the appliance will only
operate if the Cover is positioned correctly in the
Interlock Mechanism.
4. Slicing/Shredding Disc: (P/N 70798) This dual
function Disc allows you to slice food on one side,
then flip it over and use the other side for
shredding. Finger Grips provide safe and easy
handling of the Disc.
5. Disc Post: (P/N 70870) The Disc Post holds the
Slicing/Shredding Disc.
6. Knife Blade: (P/N 70797) The Knife Blade is
used for chopping, mincing and mixing
ingredients.
7. Container: (P/N 70795) This 2-cup Container
locks onto the Base by fitting the Locking Tabs on
the Container into the slots located on the Base.
Turn the Container clockwise to lock into place.
8. Base: The Base houses the motor.
9. ON/OFF/PULSE Switch: This conveniently
located Switch requires only one-finger operation,
making it very easy to operate.
Figure 1
5
Page 7

PROCESSING CONTROLS
Figure 2
USING THE ON/OFF/PULSE SWITCH
The ON/OFF/PULSE Switch is conveniently located on the top of
the Mini Food Chopper. The three positions operate as follows:
ON
When the Switch is pressed to the ON position, the unit will begin
operation. It will continue to operate until the Switch is pressed to
the OFF position. Use the ON position for longer processing tasks,
such as making salad dressings or dips.
PULSE
When the Switch is pressed to the PULSE position and held, the
unit will begin to operate. When the PULSE position is released, the
operation will stop. Use this position for short processing tasks,
such as chopping vegetables or nuts. You will find that the PULSE
position is used more frequently, as it gives you greater control
over your food processing.
OFF
The OFF position is the middle position. Always leave the Switch in
the OFF position while you are preparing foods for processing and
when the unit is not in use.
6
Page 8
OPERATING INSTRUCTIONS
HOW TO SLICE OR SHRED IN
THE CONTAINER
TO ASSEMBLE
1. Take the Container and place it on the
Base. Line up the Locking Tabs and
turn clockwise until the Container locks
into place.
2. Lower the Disc Post onto the Center Post
in the Container.
3. Center the Slicing/Shredding Disc with
desired side facing upward (SLICE or
SHRED) on Disc Post.
4. Line up the Food Chute/Cover with the
Locking Tabs on the Container, making
sure that the Pin in the Food Chute/
Cover is inserted into the top of the Disc
Post. Turn Food Chute/Cover clockwise
until you hear a click.
(Refer to Figure 3):
TO USE:
1. Fill Food Chute/Cover with food.
Position Food Pusher over food.
2. Press down lightly but firmly on Food
Pusher while pressing the desired
ON/PULSE Switch function.
3. After processing food, press Switch to
the OFF position. Allow the Slicing/
Shredding Disc to stop rotating before
adding more food to the Food
Chute/Cover or before removing food
from the Container.
Figure 3
7
Page 9

OPERATING INSTRUCTIONS (Continued
HOW TO CHOP ONLY IN THE
CONTAINER
The Knife Blade’s special design processes
food quickly and evenly. It can perform a
variety of tasks, including chop, grind, mix,
crumb and mince.
TO ASSEMBLE (Refer to Figure 4):
1. Take the Container and place it on the
Base. Line up the Locking Tabs and
turn clockwise until the Container locks
into place.
2. Grasp the Knife Blade by the plastic
part and lower it onto the Center Post.
TO USE:
1. Place the food to be processed into the
Container.
2. Line up the Food Chute/Cover with the
Locking Tabs on the Container, making
sure that the Pin in the Food
Chute/Cover is inserted into the Knife
Blade Hub. Turn Cover clockwise until
you hear a click. Put the Food Pusher
into the Food Chute.
3. Press the desired ON/PULSE Switch
function. Check results and repeat, if
necessary, until the desired consistency
is reached.
4. After processing food, press Switch to
the OFF position. Allow the Knife
Blade to stop rotating before adding
more food or removing the Food
Chute/Cover.
5. Carefully remove the Knife Blade from
the Container before emptying the
contents of the Container.
Figure 4
8
Page 10

OPERATING INSTRUCTIONS (Continued
HOW TO SLICE/SHRED AND
CHOP IN THE CONTAINER
In some particular recipes, you may wish to
slice or shred a food and then chop it into
much finer parts. This can be accomplished in
one continuous action with the Slicing/
Shredding Disc and the Knife Blade used
together. Food passes through the
Slicing/Shredding Disc with final processing
being accomplished by the Knife Blade.
TO ASSEMBLE (Refer to Figure 5):
1. Take the Container and place it on the
Base. Line up the Locking Tabs; turn clockwise until the Container locks into place.
2. Grasp the Knife Blade by the plastic part
and lower it onto the Center Post.
3. Place the Slicing/Shredding Disc onto the
Finger Grips of the Knife Blade with
desired side facing upward (SLICE or
SHRED).
4. Line up the Food Chute/Cover with the
Locking Tabs on the Container, making
sure that the Pin in the Food Chute/Cover
is inserted into the Knife Blade Hub. Turn
Food Chute/Cover clockwise until you
hear a click.
TO USE:
1. Fill Food Chute/Cover with food. Position
Food Pusher over food.
2. Press down lightly but firmly on Food
Pusher while pressing the desired
ON/PULSE Switch function.
3. After processing food, press Switch to the
OFF position. Allow the Slicing/Shredding
Disc and Knife Blade to stop rotating
before adding more food to the Food
Chute or removing the Food Chute/Cover.
9
Figure 5
Page 11

PROCESSING CHART
The 3 functions of your Mini Food Chopper allow you to chop, shred or
slice a wide variety of food quickly and effortlessly.
Blade Attachment Food Result
Knife Blade Bread Crumbs
Carrots Chopped
Celery Chopped/Diced
Onions Chopped/Diced
Chocolate Grated
Garlic Minced
Eggs (Hard Boiled) Chopped
Nuts Chopped, Ground
Parsley, Fresh Herbs Chopped
Hard Fruits Chopped
Sauces/Salad Dressings Blended
Slicing Disc Apples, Pears Sliced
Carrots Sliced
Celery Sliced
Onions Sliced
Potatoes Sliced
Shredding Disc Carrots Shredded
Potatoes Shredded
Zucchini Shredded
NOTE: Certain foods should not be chopped, shredded or sliced. Avoid
slicing raw meat. Attempting to chop ice or to grind coffee beans will
damage the Knife Blade and the Container. Very hard foods that are
impenetrable with an ordinary Knife Blade should also be avoided.
10
Page 12

CHOPPING CHART
Approx.
Food Quantity Preparation Time
(seconds)
Bread 1-2 slices Two slices of bread 5-7
cut into 3/4” cubes
Parsley/Herbs Handful Wash, dry thoroughly 30
Onion 1-2 small Peel onions, 4-6
cut into 6-8 pieces
Garlic 1 or more Peel 5-7
large cloves
Mushrooms 4 small Cut in half PULSE 3
1-1/2 oz.
Pepper 1 medium Clean and quarter 5-6
to fit Container
Eggs Up to 3 eggs Peel, cut into quarters 4-6
(Hard Boiled)
Chocolate 1 or 2 pcs Break each square PULSE 6-8
Square 1 oz. total into 1/2” pieces
(Pulse until desired
texture is reached)
Carrots 1/2 cup Peel and cut into PULSE
1/4” lengths
NOTE: Timing on Chopping Chart above applies to ON Speed
unless designated as PULSE.
11
Page 13

USER MAINTENANCE INSTRUCTIONS
This appliance requires little maintenance. It contains no user
serviceable parts. Do not try to repair it yourself. Any servicing
requiring disassembly other than cleaning, must be performed by a
qualified appliance repair technician.
CLEANING
1. Unplug appliance and allow it to cool.
2. Wash Container, Cover, Knife Blade, Food Chute/Cover, Food
Pusher, Slicing/Shredding Disc and Disc Post in warm, soapy
water and dry thoroughly.
3. Wipe the Base with a damp cloth. NEVER IMMERSE BASE IN
WATER OR ANY OTHER LIQUID.
4.If necessary, wipe exterior surface of the Motor Housing with a
moist cloth or sponge and dry thoroughly with a soft cloth.
Never use scouring pads or harsh cleansers.
CAUTION: Use extreme care when handling the Knife
Blade. Always insert or remove Blade by using the Hub.
Do not touch the Blades with your fingers. The Blades are
very sharp and can cause injury if touched.
STORAGE
1. Unplug and clean unit.
2. Store the Mini Food Chopper and Attachments in the original box
in a cool, dry place.
3. Be sure to store the Knife Blade away from the reach
of children.
4. Never store the Mini Food Chopper while it is plugged in.
12
Page 14

LIMITED ONE-YEAR WARRANTY
Warranty Coverage: This product is warranted to be free from defects in
materials or workmanship for a period of one (1) year from the original purchase
date. This product warranty is extended only to the original consumer purchaser of
the product and is not transferable. For a period of one (1) year from the date of
original purchase of the product, our Repair Center will, at its option, either
(1) repair the product or (2) replace the product with a reconditioned comparable
model. These remedies are the purchaser's exclusive remedies under this warranty.
Warranty Service: To obtain warranty service, you must call our warranty service
number at 1-800-233-9054 for return instructions on how to deliver the product,
in either the original packaging or packaging affording an equal degree of
protection to the Repair Center specified below. You must enclose a copy of your
sales receipt or other proof of purchase to demonstrate eligibility for warranty
coverage.
To return the appliance, ship to: To contact us, please write to, call, or email:
ATTN: Repair Center Consumer Relations Department
708 South Missouri Street PO Box 7366
Macon, MO 63552 USA Columbia MO 65205-7366 USA
1-800-233-9054
E-mail:consumer_relations@toastmaster.com
What Is Not Covered: This warranty does not cover damage resulting from
misuse, accident, commercial use, improper service or any other damage caused
by anything other than defects in material or workmanship during ordinary
consumer use. This warranty is invalid if the serial number has been altered or
removed from the product. This warranty is valid only in the United States
and Canada.
LIMITATION ON DAMAGES: THERE SHALL BE NO LIABILITY FOR ANY
INCIDENTAL OR CONSEQUENTIAL DAMAGES FOR BREACH OF ANY EXPRESS
OR IMPLIED WARRANTY OR CONDITION ON THIS PRODUCT.
DURATION OF IMPLIED WARRANTIES: EXCEPT TO THE EXTENT
PROHIBITED BY APPLICABLE LAW, ALL IMPLIED WARRANTIES AND
CONDITIONS, INCLUDING, WITHOUT LIMITATION, IMPLIED WARRANTIES
AND CONDITIONS OF MERCHANTABILITY AND FITNESS FOR A PARTICULAR
PURPOSE OR USE ON THIS PRODUCT ARE LIMITED IN DURATION TO THE
DURATION OF THIS WARRANTY.
Some jurisdictions do not allow the exclusion or limitation of incidental or
consequential damages, or allow limitations on how long an implied warranty
lasts, so the above limitations or exclusions may not apply to you. This warranty
gives you specific legal rights and you may have other rights under the laws of
your jurisdiction.
For more information on our products, visit our website:
www.maxim-toastmaster.com.
WESTINGHOUSE, and “ You Can Be Sure...If It's Westinghouse” are trademarks of
WESTINGHOUSE ELECTRIC CORPORATION and used under license.
©2005 All rights reserved. P/N 61725ZE
Made in China 6/05
 Loading...