

Page 1
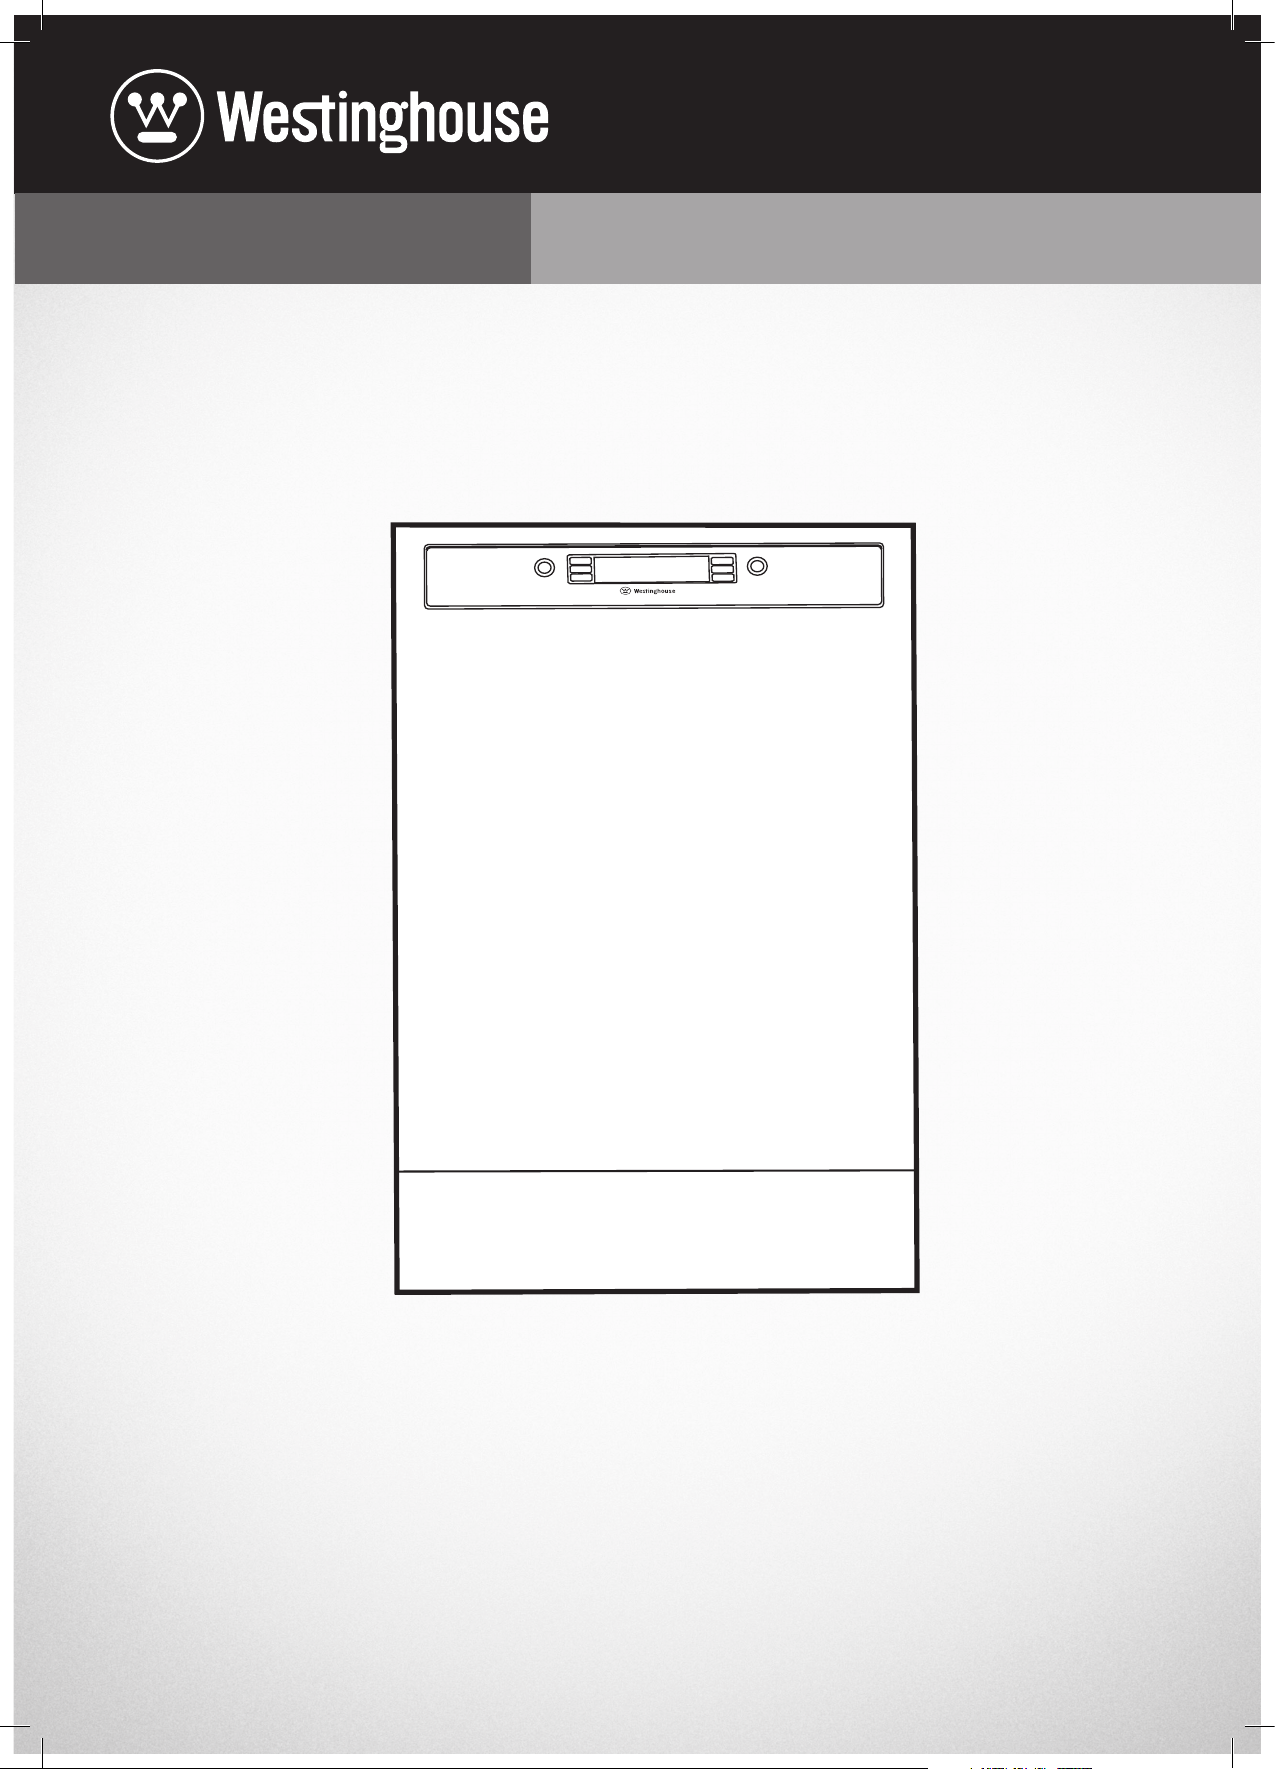
USER MANUAL
DISHWASHER
WSF6738I
WSU6738I
Page 2
WARNING
WARNING
TIPS & INFORMATION
ENVIRONMENTAL TIPS
CONGRATULATIONS
CONTENTS
Dear customer,
Congratulations on the purchase of your new
Westinghouse dishwasher�
Before you use the dishwasher, we recommend that you
read through the whole user manual which provides the
description of the dishwasher and its functions�
To avoid the risks that are always present when you use
an electrical appliance, it is important that the dishwasher
is installed correctly and that you read the safety
instructions carefully to avoid misuse and hazards�
We recommend that you keep this instruction booklet
for future reference and pass it on to any future owners�
After unpacking the appliance, please check it is not
damaged� If in doubt, do not use the appliance but
contact your local Customer Care Centre�
For contact details, refer to the last page of this user
manual�
Conditions of use
This appliance is intended to be used in household
and similar applications such as:
• Staff kitchen areas in shops, offices and other
working environments
• Farm houses
• By clients in hotels, motels and other residential
type environments
• Bed and breakfast type environments
Please ensure you read the instruction manual fully
before you call for service, or a full service fee could
be applicable.
Record model and serial number here:
Safety information �������������������������������������������������������������������������������3
Safety instructions ������������������������������������������������������������������������������ 4
Product description ����������������������������������������������������������������������������5
Technical specifications ��������������������������������������������������������������������5
Control panel ����������������������������������������������������������������������������������������� 6
Control description �����������������������������������������������������������������������������7
Programs ������������������������������������������������������������������������������������������������� 8
Settings ���������������������������������������������������������������������������������������������������� 9
Hints and tips ���������������������������������������������������������������������������������������10
Installation ���������������������������������������������������������������������������������������������� 11
Preparing for use ��������������������������������������������������������������������������������18
Loading ��������������������������������������������������������������������������������������������������20
Maintenance and cleaning ������������������������������������������������������������24
Troubleshooting ���������������������������������������������������������������������������������25
Warranty ������������������������������������������������������������������������������������������������ 27
Please read the user manual carefully and store in a handy
place for later reference�
The symbols you will see in this booklet have
these meanings:
WARNING
This symbol indicates information concerning your
personal safety.
CAUTION
This symbol indicates information on how to avoid
damaging the appliance.
IMPORTANT
This symbol indicates tips and information about use
of the appliance.
Model number:����������������������������������������������������������������������������������������
Serial number: �����������������������������������������������������������������������������������������
PNC: �������������������������������������������������������������������������������������������������������������
2
CONTENTS
ENVIRONMENT
This symbol indicates tips and information about
economical and ecological use of the appliance.
Page 3

WARNING
GENERAL WARNINGS
WARNING
Please read the user manual carefully and store in a handy
place for later reference� Pass the user manual on to
possible new owners of the appliance�
Read the following carefully to avoid damage or injury�
Note: You must read these warnings carefully
before installing or using the appliance. If you need
assistance, contact your Customer Care Department.
The manufacturer will not accept liability, should
these instructions or any other safety instructions
incorporated in this book be ignored.
Children and vulnerable people safety.
WARNING
Risk of injury or permanent disability.
This appliance can be used by children aged from
8 years and above and persons with reduced physical,
sensory or mental capabilities or lack of experience
and knowledge if they have been given supervision or
instruction concerning use of the appliance in a safe way
and understand the hazards involved�
• Do not let children play with the appliance�
• Keep all detergents away from children�
• Keep children and pets away from the appliance door
when it is open�
• Cleaning and user maintenance shall not be made by
children without supervision�
WARNING
It is important to use your appliance safely. Check these
safety points before using your appliance.
General Safety
• Do not change the specification of this appliance�
• The operating water pressure (minimum and maximum)
must be between 0�5 (50) / 8 (800) bar (kPa)
• Obey the maximum number of 15 place settings�
• If the supply cord is damaged, it must be replaced
by the manufacturer, its Authorised Service Centre or
similarly qualified persons in order to avoid a hazard�
• Put knives and cutlery with sharp points in the cutlery
basket with the points down or in a horizontal position�
• Do not leave the appliance door open without
supervision to prevent causing a trip hazard�
• Before maintenance, turn the appliance off and
disconnect the plug from the mains�
• Do not use water spray and steam to clean the
appliance�
• The appliance is to be connected to the water mains
using the new supplied hose-sets� Old hose sets must
not be reused�
• The ventilation openings in the base (if applicable)
must not be obstructed�
• Some dishwasher detergents are strongly alkaline�
They can be extremely dangerous if swallowed� Avoid
contact with the skin and eyes and keep children
away from the dishwasher when the door is open�
• Check that the detergent receptacle is empty after
completion of the wash cycle�
Installation
• Remove all the packaging�
• Do not install or use a damaged appliance�
• Do not install or use the appliance where the
temperature is less than 0°C�
• Obey the installation instruction supplied with the
appliance�
• Make sure that the appliance is installed below and
adjacent to safe structures�
SAFETY INFORMATION 3
Page 4
WARNING
SAFETY INSTRUCTIONS
WARNING
WARNING
WARNING
Risk of fire and electrical shock.
Electrical connection
• The appliance must be earthed�
• Make sure that the electrical information on the rating
plate is the same as the power supply� If not, contact
an electrician�
• Always use a correctly installed shockproof socket�
• Do not use multi-plug adapters and extension cables�
• Make sure not to cause damage to the mains plug
and to the mains cable� Should the mains cable
need to be replaced, this must be carried out by our
Authorised Service Centre�
• Connect the mains plug to the mains socket only at
the end of the installation� Make sure that there is
access to the mains plug after the installation�
• Do not pull the mains cable to disconnect the
appliance� Always pull the mains plug�
Water connection
• Make sure not to cause damage to the water hoses�
• Before you connect the appliance to new pipes or
pipes not used for a long time, let the water flow until
it is clean�
• The first time you use the appliance, make sure that
there is no leakage�
• The water inlet hose has a safety valve and a sheath
with an inner mains cable�
WARNING
Dangerous voltage
• If the water inlet hose is damaged, immediately
disconnect the mains plug from the mains socket�
Contact the Authorised Service Centre to replace the
water inlet hose�
Use
• Do not sit or stand on the open door�
• Dishwasher detergents are dangerous� Obey the
safety instructions on the detergent packaging�
• Do not drink and play with the water in the appliance�
• Do not remove the dishes from the appliance until the
program is completed� There can be detergent on the
dishes�
• The appliance can release hot steam if you open the
door while a program operates�
• Do not put flammable products or items that are wet
with flammable products in, near or on the appliance�
WARNING
Risk of injury or suffocation.
Disposal
• Disconnect the appliance from the mains supply�
• Cut off the mains cable and discard it�
• Remove the door catch to prevent children and pets
to get closed in the appliance�
4 SAFETY INSTRUCTIONS
Page 5
PRODUCT DESCRIPTION
11
10
1
2
6
3
4
9
1
Worktop
2
Upper spray arm
3
Lower spray arm
4
Filters
5
Rating plate
6
Air vent
7
Rinse aid dispenser
8
Detergent dispenser
9
Lower basket
10
Upper basket
11
Cutlery drawer
12
Ceiling spray
13
Turbo drying vent
8
7
5
12
13
TECHNICAL SPECIFICATIONS
MODEL WSF6738I - freestanding WSU6738I - built under
Capacity 15 place settings 15 place settings
Height 850mm Height (without worktop) 820mm 820mm
Width 598mm 598mm
Depth 598mm 570mm
Net weight 53kg 52kg
Electricity input 220-240 V, 50 Hz 220-240 V, 50 Hz
Current 10 A 10 A
Total power 1900W 1900W
Water supply pressure max� 1MPa min� 0�03MPa max� 1MPa min� 0�03MPa
Water supply hot or cold water max� 60°C 10L/min hot or cold water max� 60°C 10L/min
5PRODUCT DESCRIPTION
Page 6
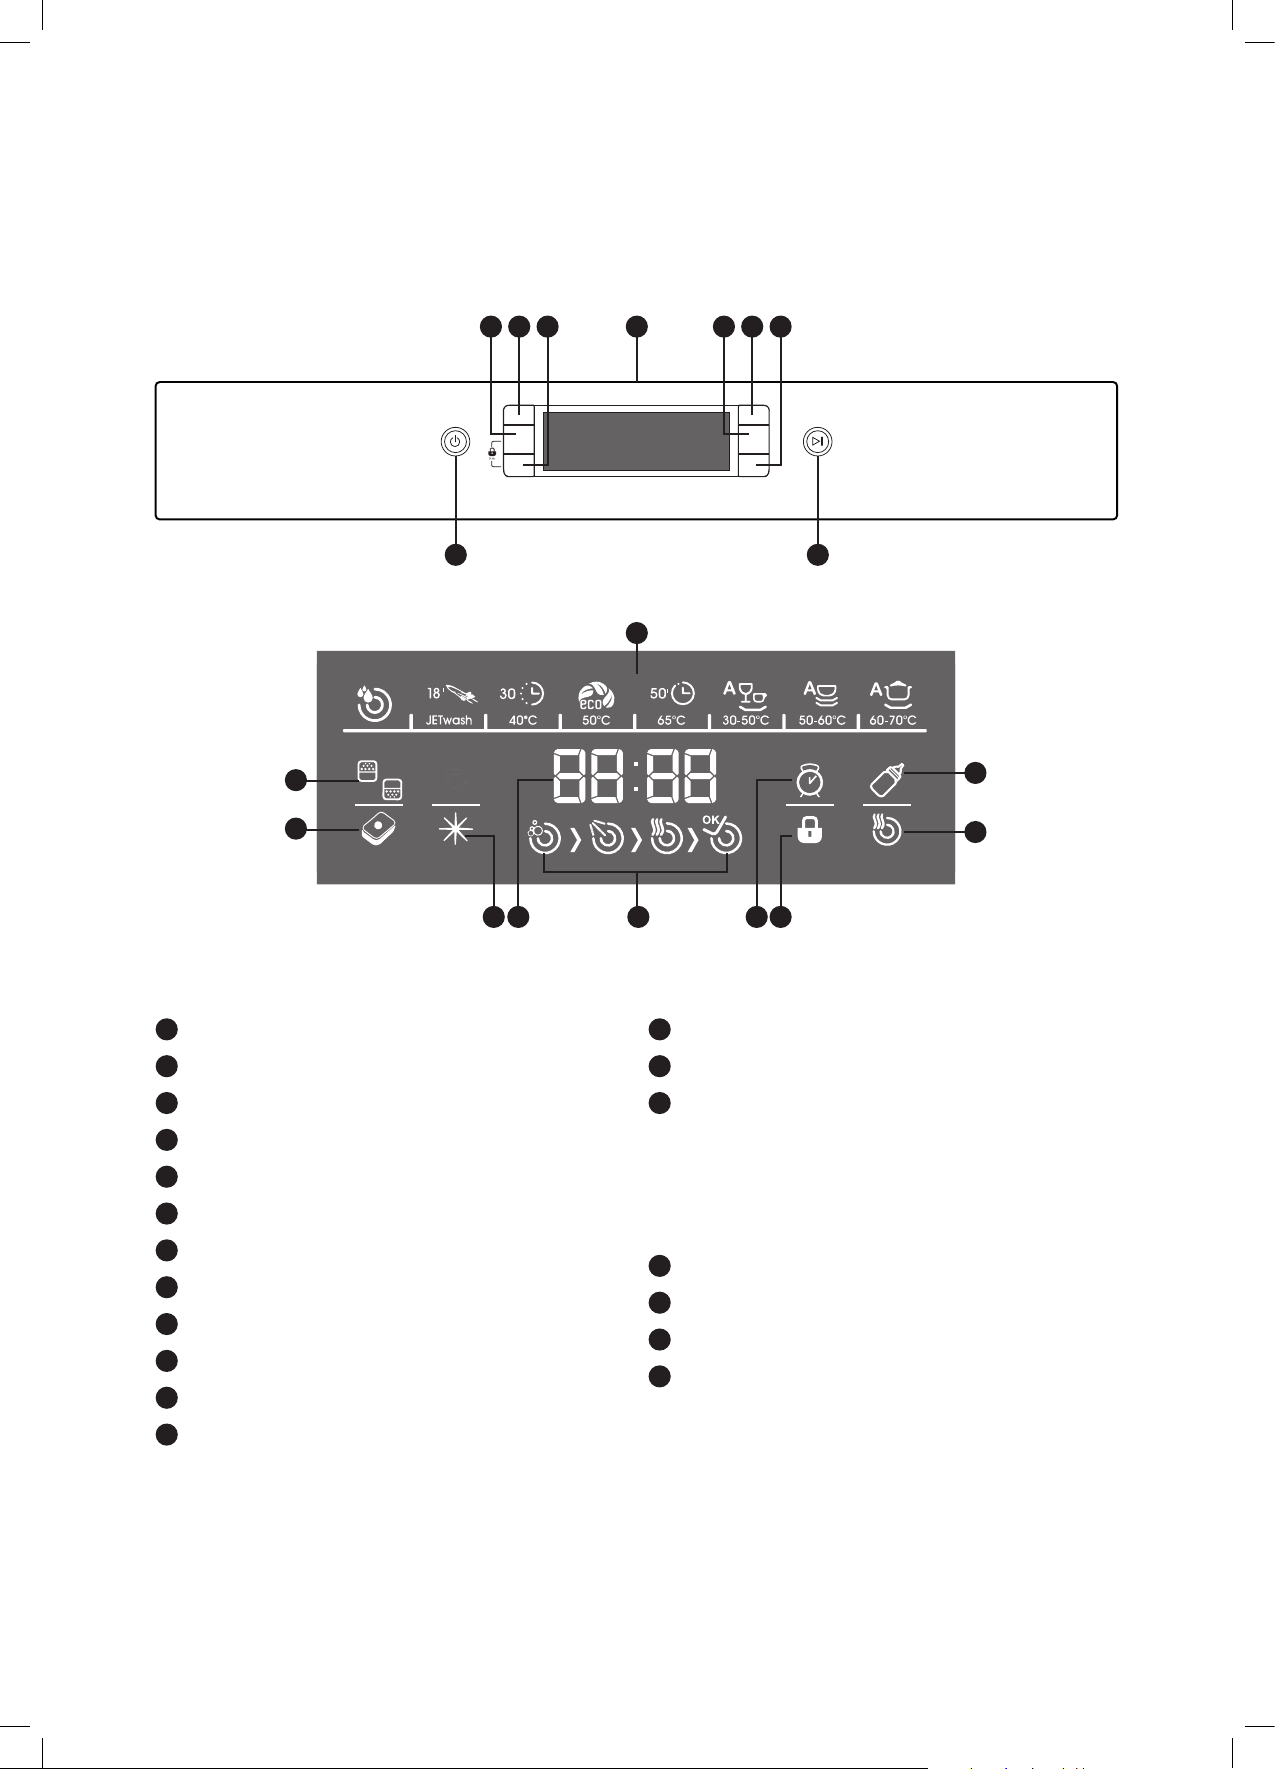
CONTROL PANEL
5
1 3
11
12
2
10
84 76 9
18
19
1
On/off button
2
Door handle
3
Start/standby button
4
FlexZone button
5
Program button
6
Tablet detergent button
7
Hygiene button
8
Delay button
9
Dry Plus button
10
Program displays
11
FlexZone indicator
12
Tablet detergent indicator
161514
1713
13
Rinse aid level warning display
14
Remaining time/delay
15
Progress indicator
• Washing phase
• Rinsing phase
• Drying phase
• End indicator
16
Delay indicator
17
Child Lock indicator
18
Hygiene indicator
19
Dry Plus indicator
6 CONTROL PANEL
Page 7

CONTROL DESCRIPTION
Power on/off button
1
When you press the on/off button, the machine is
switched on and the display shows the Eco 50 program,
the dishwasher is off when the LEDs on the display are off�
Door handle
2
Use the door handle to open/close the door of your
dishwasher�
Start/Standby button
3
When the start/standby button is pressed, the program
selected with the program button will start and the
progress indicator display will show the washing image
15
� The progress indicator display will show the
washing phases�
FlexZone button
15
4
The FlexZone function allows dishes to be washed in the
upper basket only, lower basket only or both upper and
lower baskets to cater for every load size�
If you do not have a full load of dishes in your machine
you can also activate the FlexZone function for some
programs�
If you have dishes in both baskets, press
the FlexZone button and select the position in which both
lamps are highlighted�
If you have dishes only in the upper basket, press the
FlexZone button and select the position in which the
upper image is illuminated� Washing will occur only in the
upper basket of your machine�
If you have dishes only in the lower basket, press the
½ key and select the position in which the lower image is
illuminated� Washing will occur only in the lower basket
of your machine� When using this feature, make sure that
there are no dishes in the upper basket�
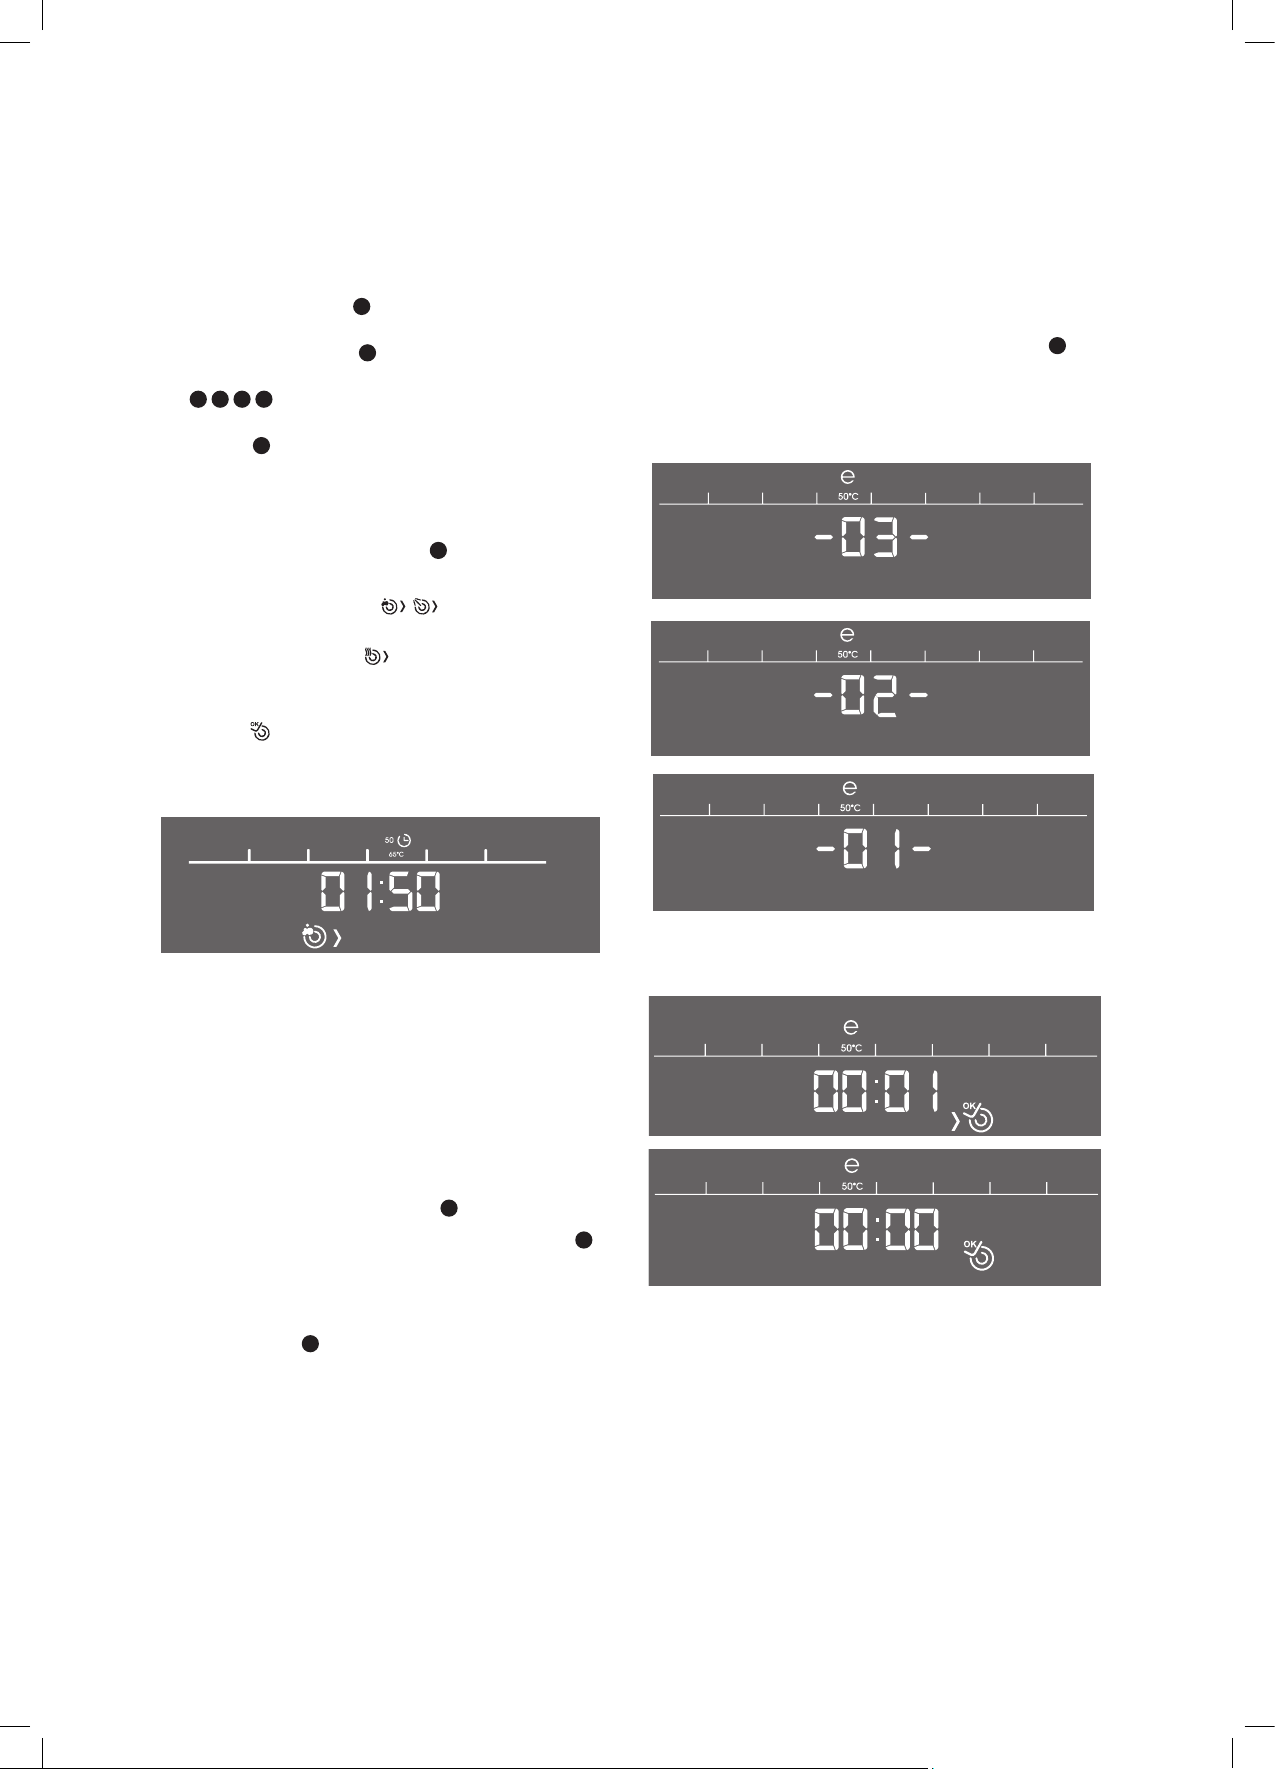
Delay button
8
Once a program is selected and before the program
starts, you may adjust the delay time by pressing the
delay button� The program start can be delayed from 1-24
16
hours� When you press the delay button, indicator
will
be illuminated on the display�
Hygiene button
7
Select this button to obtain extra hygiene, this will alter
the water temperature and washing time of the program
you have selected� When you select the hygiene function,
18
indicator
Rinse aid level warning display
will be illuminated on the display�
13
In order to understand whether the rinse agent in your
machine is sufficient or not, please check the rinse agent
level warning display� If this display is illuminated, fill the
rinse agent section�
Remaining time delay display
14
The remaining time display shows the duration of the
programs and the remaining time while the program is
in operation� If you have selected a delay time, the
display will count down the delay time and then the
program time�
Use of child lock
In order to activate the child lock, press both “tablet
detergent” and “FlexZone” buttons at the same time for
3 seconds� In the meantime, you will see “CL” for 2
seconds on the Remaining time display� In order to
deactivate, press both “tablet” and “FlexZone” buttons at
the same time for 3 seconds� “CL” will flash two times�
Program button
5
Select the appropriate washing program from the display
using the program button�
Tablet detergent button
10
6
Press the tablet detergent button whenever using tablets�
If this button is active for the program you have selected,
12
indicator
Dry Plus button
will be illuminated on the display�
7
Using this button, you may add extra drying to the
program you have selected�
When you select the extra drying function, indicator
19
is illuminated on the display� Using this function, you
may add more drying steps to the program you
have selected and consequently obtain drier dishes�
7CONTROL DESCRIPTIONS
Page 8
PROGRAMS
WARNING
DISPLAY
SYMBOL
PROGRAM PREWASH
WASHING
TEMP
FOOD
RESIDUE
TYPE
SOIL
LEVEL
DETERGENT
AMOUNT
B: 25CM3/15CM
3
A: 5CM
PROGRAM
DURATION
(MINUTES)
Fresh light
contamination,
coffee, milk,
3
tea
Low Low Low Normal Medium High High High
– **A B A+B A+B A+B A+B A+B
15 18 30 155 50 64-92 100-121 111-179
QUICK
18 MINS
35°C 40°C ***50°C 65°C 30-50°C 50-60°C 60-70°C
Fresh light
contamination,
coffee, milk,
tea
FAS T
30 MINS
40°C
Fresh light
contamination,
coffee,
milk, tea,
cold meat,
vegetables
ECO 50°C
Fresh light
contamination,
coffee,
milk, tea,
cold meat,
vegetables
TIMESAVE
50 MINS
Old soups,
sauces,
pastries, egg,
rice potato
and oven
foods,
fried foods
AUTO AUTO AUTO
Old soups, sauces, pastries,
egg, rice potato and
oven foods, fried foods
POWER
CONSUMPTION
WATER
CONSUMPTION
VALUES WHEN FLEX ZONE FEATURE IS USED
PROGRAM
DURATION
(MINUTES)
POWER
CONSUMPTION
WATER
CONSUMPTION
0�02 0�57 0�76 0�79 1�29 0�80-0�99 1�13-1�46 1�30-1�95
4�2 7�7 10�9 13�5 10�7 10�6-17�7 10�9-18�5 12�3-24�6
15 18 30 148 46 62-80 82-101 123-159
0�02 0�57 0�76 0�75 1�25 0�77-0�96 1�10-1�43 1�10-1�43
4�2 7�7 10�9 13�5 10�7 9�9-13�7 10�5-14�3 11�9-19�9
* The Quick 18 minute program can be used for lightly
soiled dishes and suitable for washing 4 place settings�
** The Quick 18 minute program should use only powder
detergent�
*** With this program you have the most efficient use of
water and energy consumption for crockery and cutlery
for normal soil� (This is the standard program for Test
Institutes)�
Information for test institutes
CAUTION
The Quick 18 minute, Fast 30 minute and TimeSave
50 minute programs do not have a drying step�
The values stated above are values that are obtained in
laboratory environment relative to related standards�
These values can change according to the product’s
usage and environment (mains voltage, water pressure,
water inlet temperature and ambient temperature)�
For all the neccessary information for test performance;
send an email to dishwasher@standardtest�info and
provide the model and PNC number on the rating plate�
8 PROGRAMS
Page 9
SETTINGS
Starting the machine
1� Press on/off switch�
1
2� Select the appropriate program for your dishes using
the program button�
5
3� If you prefer, you can select additional functions�
4 6 7 9
4� Start the program by pressing the start/standby
button�
3
Program follow-up
You can follow the progress by the help of the program
follow-up symbols on the display�
15
As the washing proceeds, respective washing and rinsing
symbols will be illuminated�
When the drying symbol is on, the machine remains silent
for about 45–50 minutes�
Do not open the door before the end indicator is
illuminated� When the program finishes, end indicator is
illuminated�
When the program you have selected starts, you may see
the estimated remaining time in the time indicator display�
Cancelling program
If you want to cancel the program once it has started;
• Hold the start/standby button for 3 seconds�
3
• The display will count down from 3 to 1 and when
the countdown is over, the remaining time will be
displayed as 1 minute�
NOTE: The total time that programs take can differ
according to ambient temperature, the temperature of
the mains water and the amount of dishes; therefore the
program may take a different amount of time than that
initially stated.
Program follow-up
Once the selected program starts, should you wish to
change to a different program;
• Press on start/standby button�
• Select the new program using program button�
3
5
• The newly selected program continues from where
the previous one was left�
• Start the program by pressing the start/standby
button again�
3
The machine will empty all the water in this 1 minute; the
time is reset and completion symbol is illuminated�
Switching off the dishwasher
• When the end indicator is illuminated, switch off your
machine by pressing the on/off button�
• Later, unplug your machine and turn off its faucet�
NOTE: To improve drying results with the most efficient
use of energy, open the door approximately 10cm
when the program is finished and the end indicator is
illuminated. Leave door ajar and allow the dishes to cool
for 30–40mins.
If the machine door is opened or a power failure occurs
during washing, the machine will resume the cycle where
it stopped when the door is closed or power is restored.
9SETTINGS
Page 10

TIPS & INFORMATION
HINTS AND TIPS
If one of program monitor lights is on and
start/pause light is flashing
• Your machine’s door is open, shut the door
to continue�
If the program won’t start
• Check if the plug is connected�
• Check your indoor fuses�
• Check that the water inlet tap is turned on�
• Check that you have closed the machine door�
• Check that you switched off the machine by
pressing the power on/off button�
• Check that the water inlet filter and the machine
filters are not clogged�
If the control light is off after a wash operation
• The power on/off button isn’t released yet�
If detergent residues are left in the detergent
compartment
• Detergent has been added when the detergent
compartment was wet�
• Large dishes have blocked the dispenser door�
If water is left inside the machine at the end of the
program
• The water drain hose is clogged or twisted�
• The filters are clogged�
• The program is not finished yet�
IMPORTANT
At the end of the program, water may still remain on the
sides and door of the appliance.
If the machine stops during a wash operation
• Power failure�
• Water inlet failure�
• Program is on standby mode�
If shaking and hitting noises are heard during
a wash operation
• Dishes are placed incorrectly�
• The spray arm is hitting the dishes�
If there are partial food wastes left on the dishes
• Dishes are placed incorrectly into the machine,
sprayed water did not reach related places�
• Basket overloaded�
• Dishes leaning against one another�
• Very small amount of detergent added�
• An unsuitable, rather weak wash program selected�
• Spray arm clogged with food waste�
• Filters clogged�
• Filters incorrectly fitted�
• Water drain pump clogged�
If there are white stains on the dishes
• A very small amount of detergent is being used�
• Rinse aid dosage setting at a very low level�
• Water hardness is very high�
If the dishes won’t dry
• A program without a dry operation selected�
• Rinse aid dosage set too low�
• Dishes unloaded too fast�
• Use a hotter program�
If there is rust on the dishes
• Stainless-steel quality of the dishes washed
is insufficient�
• High level of salt in the wash water�
• Unhealthy mains grounding�
Unloading the baskets
• For improved drying results with the most effective
use of energy, open the door approximately 10cm at
the end of the program�
• Allow the tableware to cool for 30-40 minutes as hot
items can easily be damaged�
• First remove items from the lower basket before
removing the items from the upper basket�
Call an authorised service if the problem still
persists after the controls or in case of any
malfunction not described above.
Useful Information
• Whenever you will not be operating your machine:
- Unplug the machine and then turn water off�
- Leave the door slightly ajar in order to prevent the
formation of unpleasant smells�
• Keep the machine interior clean�
• Correct loading of dishes in the machine, enables
reduced energy consumption and improved washing
and drying performance�
• Remove all large food remnants before you placing
dirty dishes into the machine�
• Operate the machine after it is completely full�
• If the appliance is located in a place where the risk of
freezing exists, you must completely drain the water
that has remained in the machine� Turn off the water
tap, disconnected the water inlet hose from the tap
and allow the interior water to drain�
10 HINTS AND TIPS
Page 11

WARNING
WARNING
WARNING
INSTALLATION
General
• When determining where to put your machine,
choose a place where you can easily load and unload
your dishes�
• Do not put your machine in any location where
there is a probability for the room temperature to
fall below 0°C�
• Before positioning, take the machine out of its
packaging by following the warnings located on
the package�
• Position the machine close to a water tap or
drain� You need to site your machine, taking into
consideration that its connections will not be altered
once they are made�
• Do not grip the machine by the door in order to move it�
• Leave a clearance on all sides of the machine so that
you can comfortably move it back and forth during
cleaning�
• Make sure that the water inlet and outlet hoses
aren’t squeezed while positioning the machine�
Also, make sure that the machine does not stand
on the electrical cable�
• Adjust the machine’s adjustable feet so that it can
stand level and balanced� Proper positioning of the
machine ensures problem-free opening and closing of
the door�
• If the door of your machine does not close properly,
check if the machine is stable on the floor it stands;
if not, adjust the feet and ensure its stable position�
Inlet water supply
• Water pressure: 800kPa max – 50 kPa min�
• Water flow rate 10 L/minute�
• If water pressure is in excess of 800 k Pa, a pressure
reducing valve should be used� Check for leaks�
• If water temperature is in excess of 60°C, a tempering
valve should be used� Check for leaks�
CAUTION
Always use new hoses when you connect the appliance to
the water mains� Old hoses must not be used� The water
inlet hose must be examined at an interval of twelve
months for deterioration and replaced if necessary�
In order to pass the safety valve through the kitchen
cabinets, an opening of at least 45mm x 90mm is needed�
Water connection
Connect the inlet hose to a water tap with an external
BSP thread spout of 3/4”�
For best washing performance it is recommended to
connect the appliance to a cold water supply�
Energy savings can be made by connecting the appliance
to a solar water system and using economy options,
however the water temperature must not exceed 60°C
CAUTION
Only turn the locking nut to secure the hose. Do not
turn the hose.
Water drain hose
min� 4cm
max� 110cm
min� 50cm
The water drain hose can be connected either directly to
the water drain hole or to the sink outlet spigot� Using a
special bent pipe (if available), the water can be drained
directly into the sink via hooking the bent pipe over the
edge of the sink� This connection should be at a minimum
of 50cm and at a maximum of 110cm from the floor�
CAUTION
When a drain hose longer than 4m is used, the dishes
wont be cleaned properly and might remain dirty.
INSTALLATION 11
Page 12

INSTALLATION
Correct
remove
entire internal
membrane
0�5–1�1m
Installing a freestanding dishwasher
If the under counter height is greater than 850mm,
the dishwasher can be installed without removing the
worktop�
If the under counter space is less than 850mm but greater
than 820mm the worktop will need to be removed�
To remove the worktop, remove the screws located at
the rear of the machine, then, from the front, push the
worktop towards the rear and lift�
Incorrect
To ensure stability of the dishwasher in an undercounter
installation, any gap between the dishwasher and the
underside of the countertop should be bridged with a
packing piece� This may be achieved by wedging a piece
of timber between the dishwasher and the underside of
the countertop�
timber
wedging
piece
benchtop
filler piece
to suit
installation
3mm gap
INSTALLATION12
Page 13

INSTALLATION
WARNING
WARNING
In some cases you may need to remove the top concrete
counterwieght and trim the felt with a knife� To remove
the counterweight, follow the steps below�
Finishing the installation
1� Fit the steam protection tape to the underside of the
countertop�
steam protection foil
tape #ES6060 from
spare parts
2� Adjust the dishwasher feet according to the slope of the
floor then carefully slide the dishwasher into the cavity�
CAUTION
If the counterweight has been removed, the dishwasher
must be stabilised by wedging a piece of timber between
the dishwasher and the underside of the countertop.
To remove the felt and the dishwasher support blocks:
Lift and cut felt�
570mm
820mm
min. 600mm*
*recommended opening
CAUTION
When installing the dishwasher into the cavity, take care
not to crush or kink the hoses or electrical cable.
Remove 2 blocks of foam as shown�
INSTALLATION 13
Page 14

INSTALLATION
Installing a built under dishwasher
Built under dishwashers have been designed without
a worktop and fixed plinth for undercounter installation
where the space under the countertop is between
820-870mm� For taller cabinets where the undercounter
space is 870-920mm, longer levelling legs and metal
plinth must be purchased (kit #52075772)� Instructions
are supplied with the kit�
Parts supplied with built under models:
• 1 x steam protection foil tape
• 2 x fixing brackets
• 2 x fixing bracket screws
• 2 x side spacers
Fit the steam protection tape to the underside of the
countertop�
steam protection foil
tape #ES6060
fastening bracket
to countertop
12mm
Ø2mm
Installing under a stone bench
Position, fit and align the 2 fixing brackets to the top
of the dishwasher�
Installing under a wooden bench
Position, fit and align the 2 fixing brackets to the top
of the dishwasher�
fixing bracket aligned for
fastening to countertop
fixing bracket aligned for
fastening to cabinet sides
fastening bracket
to countertop
12mm
Ø2mm
INSTALLATION14
Page 15

INSTALLATION
WARNING
Fit the 2 side spacers�
20mm
20mm
side spacers
Fit the dishwasher by carefully sliding it into the cavity�
570mm
820mm
min. 600mm*
Adjust the legs (both back and front) until the top of the
dishwasher contacts the underside of the countertop and
check that the dishwasher is level�
*recommended
opening
CAUTION
When installing the dishwasher into the cavity, take care
not to crush or kink the hoses or electrical cable.
Open the dishwasher door and fix the brackets with the
screws provided�
secure dishwasher with
brackets and screws
provided
gap on either side should
be equal and no more
than 5mm per side
INSTALLATION 15
Page 16

INSTALLATION
Installing a built under dishwasher
The dishwasher has been designed to allow clearance for
the kitchen cabinet kickboard to be installed in front of
it, or to fit the adjustable metal plinth supplied with the
product.
When installing the kitchen cabinet kickboard, a cutout
is required to provide clearance for the dishwasher door.
After cutting the kitchen kickboard to the dimensions
indicated below, the cut surface must be waterproofed
using a suitable coating.
a
b
600mm (min.)
600mm
40 80 90 100 103 108
50 80 90 100 103 108
60 80 90 100 104 140
B(MM)
70 85 95 105 130 140
80 85 95 105 130 140
90 90 100 11 0 130 140
When installing the adjustable plinth to standard
undercounter height cabinets (820-870mm), attach the
2 adjusting brackets to the metal plinth with the screws
provided.
plinth
100 110 120 130 140
bracket
x
A(MM)
X(MM)
Parts supplied with metal plinth:
• 1 x 80mm high metal plinth
• 2 x plinth brackets
• 2 x screws
• 1 x plastic plinth insert assembly
INSTALLATION16
Page 17

INSTALLATION
Based on the undercounter height, add the required
number of plastic plinth inserts to the metal plinth�
80mm
1 x insert = 90mm
2 x = 100mm
3 x = 110mm
4 x = 120mm
5 x = 130mm
6 x = 140mm
12mm
Use the 2 plastic locking pins to set the position of the
plinth assembly�
Location of services
All dishwasher services should be located in the cabinet
next to the dishwasher opening.
the drain hose should not be
extended by more than 2m
otherwise water pump out
problems could occur
sink
600mm max.
300mm min.
power outlet
remove entire plastic
membrane from sink trap
spigot and fit drain hose
to spigot with clamp
400mm min.
min. 400mm
straight section
When installing the adjustable plinth to undercounter
height cabinets 870-920mm, kit #52075772 must be
purchased�
Parts supplied with metal plinth:
• 1 x 130mm high metal plinth
• 3 x levelling legs
• 1 x instruction sheet
Follow the steps above substituting the 130mm metal
plinth and longer levelling legs as per instructions
supplied
INSTALLATION 17
Page 18

PREPARING FOR USE
Detergent usage
Use a detergent specifically designed for use in domestic
dishwashers� You can find powder, gel and tablet
detergents in the market that have been designed for
household dishwashers� Detergent should be put into the
compartment prior to starting the machine� Keep your
detergents in cool, dry places out of reach of children�
Do not fill detergent into the detergent compartment
more than required; otherwise it may cause scratches
on your glasses as well as lead to a poorly dissolved
detergent� Should you need more information
concerning the detergent you will use, contact
detergent manufacturers directly�
Filling the detergent compartment
1
Push the latch to open the detergent container as
shown in the image 1 � Detergent pod has level lines
inside, measure the detergent amount using these lines�
Detergent pod can take a total of 40cm
3
detergent�
DETERGENT
b
a
2
If your dishes are heavily soiled, pour dishwashing
detergent into the larger compartment
slightly soiled the smaller compartment (15cm3)� If your
dishes have been dirty for a long period, if there is dried
food waste on them and if you have overly loaded the
dishwasher, pour a 5cm3 detergent into the pre-wash
compartment
You may have to add more detergent into your machine,
depending on the degree of soil and on the water
hardness level�
a
and start your machine�
b
(25cm3) or if
Combined detergent
Detergent manufacturers also produce combined
detergents called “2 in 1”, “3 in 1” or “5 in 1” etc� “2 in 1”
detergents contain detergent + rinse aid� When using
“2 in 1” detergents make sure to check the specifications
of the tablet�
Other tablet detergents contain detergent + rinse aid
+ various extra functions�
Generally, combined detergents produce suitable results
under certain usage conditions only�
These detergents contain rinse aid and/or other additives
in preset amounts�
Points to consider when using these type of
products:
• Always make sure to check the specifications of
the product you will use or whether or not it is a
combined product�
• Check if the detergent used is appropriate for the
hardness of mains water that machine relates to�
• Observe the instructions on packaging when using
such products�
• If such detergents are in the form of tablets, never
put them into the interior section or the cutlery
basket of the dishwasher� Always put the tablets
into the detergent compartment in the detergent
dispenser�
• They produce good results for certain types of usage
only� If you are using this type of detergent, you need
to contact the manufacturers and find out about the
suitable conditions of use�
• When the conditions of use of such products and the
machine settings are appropriate, they ensure savings
in salt and/or rinse aid consumption�
• Contact the detergent manufacturer if you are not
obtaining good wash results (if your dishes stay
calcareous and wet) after having used 2 in 1 or 3 in 1
detergents� The scope of warranty for your machine
does not cover any complaints caused by the use of
these types of detergents�
Recommended usage:
For better results while using combined detergents,
add rinse aid into your machine and adjust the rinse aid
setting to the lowest position�
18 PREPARING FOR USE
Page 19

PREPARING FOR USE
WARNING
WARNING
CAUTION
Solubility of the tablet detergents produced by different
companies can vary depending on the temperature
and time� Therefore, it is not recommended to use such
detergents in short programs� It is more suitable to use
powder detergents in such programs�
Should any problem, which you have not encountered
before, arise with the use of this type of detergents,
contact the detergent manufacturers directly�
a
b
2
When you give up using combined detergents
• Fill the salt and rinse aid compartments�
• Adjust the water hardness setting to the highest
position (6) and run an empty-wash�
• Adjust the water hardness level�
• Make the suitable rinse aid setting�
Filling with rinse aid and making the setting
Rinse aid is used to prevent the stay of white water
drops, lime stains, white film strip-shaped stains that
may form on the dishes, as well as to increase the drying
performance� Contrary to the popular beliefs, it is used
not only for obtaining shinier dishes but also for obtaining
sufficiently dried dishes� For this reason, care should
be taken that there is adequate amount of rinse aid in
the rinse aid compartment and only polishing material
produced for use at dishwashers should be used� If the
rinse aid lamp on the control panel becomes on fill the
rinse aid compartment with rinse�
To put rinse aid, remove the rinse aid compartment cap
by turning it� Fill the rinse aid compartment with rinse aid
1
until the rinse aid level indicator becomes dark
;
refit the cap and close it by turning it in a way that the
2
nails will correspond to one another
� By checking the
rinse aid level indicator on the detergent dispenser, you
can understand whether or not your machine needs rinse
b
aid� A dark indicator
compartment, while a light indicator
means that there is rinse aid in the
a
shows that you
need to fill the compartment with rinse aid�
3 4
5
2
6
1
3
The rinse aid level adjuster can be set to a position
between 1 and 6� Factory setting for rinse aid is the
position 3� You need to increase the degree of the
adjuster if water stains form on your dishes after a wash,
whereas you need to decrease the degree if a blue stains
3
left when wiped by hand�
CAUTION
Use only those rinse aid materials which are allowed for
use in the machine� As rinse aid residues left as a result of
overflowing will create extremely high amounts of foam
and thus reduce the washing performance, remove the
excess amount of rinse aid by wiping it with a paper towel
or cloth�
19PREPARING FOR USE
Page 20

WARNING
LOADING YOUR DISHWASHER
If your dishes are correctly placed in the dishwasher,
you will be using it in the best way in terms of energy
consumption, washing and drying performance�
There are two separate baskets for you to load your
dishes into your machine� You can load into the lower
basket such round and deep items as pots with long
handles, pot lids, plates, salad plates, cutlery sets�
The upper basket has been designed for tea plates,
dessert plates, salad bowls, cups and glasses� When
placing long-stem glasses and goblets, lean them against
the basket edge, rack or glass supporter wire and not
against other items� Do not lean long glasses against
one another or they wont remain steady and can be
damaged�
It is recommended that thin narrow items be placed into
the middle sections of baskets� You can place spoons
among the other cutlery sets in order to prevent them
from sticking to one another, use the cutlery grid in order
to obtain the best result�
To avoid any possible injuries, always place long-handle
and sharp-pointed dishes such as serving fork or bread
knife with their sharp points facing down or horizontally
on the baskets�
CAUTION
Place your dishes into your machine in a way that they
will not prevent the upper and lower spray arms from
spinning�
Top basket cup rack
Top basket folding supports
Foldable racks on the upper basket are designed in order
to let you place big items easier such as pots, pans, etc�
If requested, each part can be folded separately, or all of
them can be folded and larger spaces can be obtained�
You can use foldable racks by raising them upwards, or
by folding down�
Top basket height adjustment while it is full
Basket height adjustment mechanism on the top basket
of your machine is designed to let you adjust the height
of your top basket (refer to diagram
(refer to diagram
from your machine when it is full, and create large spaces
at the top or bottom area of your machine as needed�
Basket of your machine is set to upper position in factory
settings�
In order to raise your basket, hold it from both sides and
pull it upwards� In order to lower it, hold it from both sides
again, pull upwards and lower carefully�
Make sure that both sides are in the same position
(up or down)�
2
) downwards, without removing it
1
) upwards or
Height Adjustable Rack
These racks are designed to increase the capacity of the
top basket� You can place your glasses and cups on the
racks� You can adjust the height of these racks� Thanks to
this feature, you can place different sizes of glasses under
these racks�
Thanks to height adjustment plastics mounted on the
basket, you can use your racks in two different heights�
In addition, you can place long forks, knives and spoons
on these racks laterally, so that they do not block the
revolution of propeller�
20 LOADING YOUR DISHWASHER
1 2
Page 21

WARNING
LOADING YOUR DISHWASHER
Upper Cutlery Basket
The upper cutlery basket is designed for you to place
forks, spoons and knives, long and small items�
At completion of program your dishes can be taken
out along with basket�
The upper cutlery basket is composed of two pieces;
if you need to make space for the dishes in the upper
basket, you can take out the left or right part of the
upper cutlery basket in order to create more space�
Alternative basket loads
Lower Basket
Top Basket
WARNING
Knives and other sharp objects must be placed
horizontally in the cutlery basket�
21LOADING YOUR DISHWASHER
Page 22

LOADING YOUR DISHWASHER
Lower Basket Folding Racks
Folding tines (prongs) consisting of four parts that
are located on the lower basket of your machine are
designed in order to let you place big items easier such
as pots, pans, etc� If required, each rack can be folded
separately, or all of them can be folded and larger spaces
created� You can use folding tines (prongs) in the upright
position, or by folding�
1
2
Alternate cutlery basket
An alternate cutlery basket has been provided for
convenience� The cutlery basket handle is adjustable position (a) or (b)� The basket can be used in the upper
or lower dishwasher basket as required�
b
a
22 LOADING YOUR DISHWASHER
Page 23

TIPS & INFORMATION
LOADING YOUR DISHWASHER
Alternative basket loads Lower Basket
* Illustration only
Top Basket
IMPORTANT
Examples of incorrect loading
23LOADING YOUR DISHWASHER
Page 24

MAINTENANCE AND CLEANING
TIPS & INFORMATION
IMPORTANT
Cleaning the machine in regular intervals prolongs the
machine’s service life�
Oil and lime may accumulate in the machine’s
washing section. In case of such accumulation;
• Fill the detergent compartment without loading
any dishes into the machine, select a program that
runs at high temperature, and start the machine� If
this is ineffective, use a specialty dishwasher cleaner
available from most supermarkets�
Cleaning the seals in the machine door
• To clean any accumulated residues in the door seals,
wipe the seals regularly by using a dampened cloth�
Cleaning the machine
• Clean the filters and spray arms at least once a week�
• Unplug your machine and turn off its tap before
starting the cleaning�
• Do not use hard materials when cleaning your
machine� Wipe with a fine cleaning material and a
dampened cloth�
Filters
• Check if any food wastes have remained on the
coarse and fine filters�
• If any food wastes are left, remove the filters and
clean them thoroughly under the water tap�
a
Micro Filter
b
Coarse Filter
c
Metal/Plastic Filter
c
1
3
b
a
2
4
Spray arms
Check whether or not the holes for the upper and lower
spray arms are clogged� If there is any clogging, remove
the spray arms and clean them under water�
You can remove the lower spray arm by pulling it
upwards, while the upper spray arm nut can be removed
by turning the nut to the left�
Be sure that the nut is perfectly tightened when refitting
the upper spray arm�
To remove and clean the filter combination, turn it counter
clockwise and take it out by lifting upwards�
Pull and remove the metal/plastic filter�
Then pull the coarse filter out of the micro filter� 2
Rinse it with lots of water under the tap� Refit the
metal/plastic filter� Insert the coarse filter into the micro
filter in away that the marks will correspond to one
another� Attach micro filter into the metal/plastic filter
and turn to the direction of arrow and it is locked when
the arrow on micro filter can be seen from across�
• Never use your dishwasher without any filter�
• Incorrect fitting of the filter will reduce the washing
effectiveness�
• Clean filters are very important in terms of the proper
running of the machine�
24 MAINTENANCE AND CLEANING
1
3
Hose filter
4
Water is stopped by the inlet hose filter to avoid any
damage to your machine because of any contamination
(sand, clay, rust etc�) that might be occasionally carried in
through the mains water supply or the indoor plumbing,
and to forestall such issues as yellowing and formation
of deposits after washing� Check the filter and the hose
from time to time and clean them if necessary� To clean
the filter, first turn off your tap and then remove the hose�
After removing the filter from the hose, clean it under the
tap� Insert the cleaned filter back into its place inside the
hose� Refit the hose�
Page 25

TROUBLESHOOTING
ERROR CODE ERROR DESCRIPTION CONTROL
F1 Overfill
F2 Not draining�
F3 Inlet valve faulty
F5 Inadequate water supply
• Power off your machine and close the tap�
• Contact the customer service centre�
• Water discharge hose is clogged�
• The filters of your machine might be clogged�
• Power off-on your machine and activate the
program cancellation command�
• If the error continues, contact the Customer
Care Centre�
• Close the tap�
• Contact the Customer Care Centre�
• Make sure the water tap is fully open and that
there is mains water available�
• Close the water tap, disconnect the hose from
the tap and clean the filter at the connection
end of the hose�
• Restart your machine, contact the service if the
error resumes�
F6
F7 Over temperature Contact the Customer Care Centre�
F8 Heating error Contact the Customer Care Centre�
F9 Diverter valve faulty Contact the Customer Care Centre�
FE Power supply problem Contact the Customer Care Centre�
Faulty heater sensor
Contact the Customer Care Centre�
25TROUBLESHOOTING
Page 26

This document sets out the terms and conditions of the product
warranties for Electrolux Appliances. It is an important document.
Please keep it with your proof of purchase documents in a safe place
for future reference should you require service for your Appliance.
1. In this warranty:
(a) ‘acceptable quality’ as referred to in clause 10 of this warranty has
the same meaning referred to in the ACL;
(b) ‘ACL’ means Schedule 2 of the Competition and Consumer Act 2010;
(c) ‘Appliance’ means any Electrolux product purchased by you and
accompanied by this document;
(d) ‘ASC’ means Electrolux authorised service centres;
(e) ‘Electrolux’ means Electrolux Home Products Pty Ltd of 163
O’Riordan Street, Mascot NSW 2020, ABN 51 004 762 341 in
respect of Appliances purchased in Australia and Electrolux (NZ)
Limited (collectively ‘Electrolux’) of 3-5 Niall Burgess Road, Mount
Wellington, in respect of Appliances purchased in New Zealand;
(f) ‘major failure’ as referred to in clause 10 of this warranty has the
same meaning referred to in the ACL and includes a situation when
an Appliance cannot be repaired or it is uneconomic for Electrolux,
at its discretion, to repair an Appliance during the Warranty Period;
(g) ‘Warranty Period’ means the Appliance is warranted against
manufacturing defects in Australia for 24 months and in New Zealand
for 24 months, following the date of original purchase of the Appliance;
(h) ‘you’ means the purchaser of the Appliance not having purchased the
Appliance for re-sale, and ‘your’ has a corresponding meaning.
2. This warranty only applies to Appliances purchased and used in Australia
or New Zealand and used in normal domestic applications and is in
addition to (and does not exclude, restrict, or modify in any way) any
non-excludable statutory warranties in Australia or New Zealand.
3. During the Warranty Period Electrolux or its ASC will, at no extra charge
if your Appliance is readily accessible for service, without special
equipment and subject to these terms and conditions, repair or replace
any parts which it considers to be defective. Electrolux or its ASC may use
remanufactured parts to repair your Appliance. You agree that any replaced
Appliances or parts become the property of Electrolux. This warranty does
not apply to light globes, batteries, lters or similar perishable parts.
4. Parts and Appliances not supplied by Electrolux are not covered by
this warranty.
5. To the extent permitted by law, you will bear the cost of transpor tation,
travel and deliver y of the Appliance to and from Electrolux or its ASC. If you
reside outside of the service area, you will bear the cost of:
(a) travel of an authorised representative;
(b) transportation and delivery of the Appliance to and from Electrolux or
its ASC.
In all instances, unless the Appliance is transported by Electrolux or an
Electrolux authorised representative, the Appliance is transpor ted at the
owner’s cost and risk while in transit to and from Electrolux or its ASC.
6. Proof of purchase is required before you can make a claim under
this warranty.
7. You may not make a claim under this warranty unless the defect claimed is
due to faulty or defective par ts or workmanship. Electrolux is not liable in
the following situations (which are not exhaustive):
(a) the Appliance is damaged by:
(i) accident
(ii) misuse or abuse, including failure to properly maintain or service
(iii) normal wear and tear
(iv) power surges, electrical storm damage or incorrect power supply
(v) incomplete or improper installation
(vi) incorrect, improper or inappropriate operation
(vii) insect or vermin infestation
(viii) failure to comply with any additional instructions supplied with the
Appliance;
(b) the Appliance is modied without authority from Electrolux in writing;
(c) the Appliance’s serial number or warranty seal has been removed
or defaced;
(d) the Appliance was serviced or repaired by anyone other than
Electrolux, an authorised repairer or ASC.
8. This warranty, the contract to which it relates and the relationship between
you and Electrolux are governed by the law applicable where the Appliance
was purchased. Where the Appliance was purchased in New Zealand for
commercial purposes the Consumer Guarantee Act does not apply.
9. To the extent permitted by law and subject to your non-excludable statutory
rights and warranties, Electrolux excludes all warranties and liabilities
(other than as contained in this document) including liability for any loss or
damage whether direct or indirect arising from your purchase, use or non
use of the Appliance.
10. For Appliances and services provided by Electrolux in Australia, the
Appliances come with a guarantee by Electrolux that cannot be excluded
under the ACL. You are entitled to a replacement or refund for a major
failure and for compensation for any other reasonably foreseeable loss or
damage. You are also entitled to have the Appliance repaired or replaced if
the Appliance fails to be of acceptable quality and
the failure does not amount to a major failure. The benets to you given by
this warranty are in addition to your other rights and remedies under a law
in relation to the Appliances or services to which the warranty relates.
11. At all times during the Warranty Period, Electrolux shall, at its discretion,
determine whether repair, replacement or refund will apply if an Appliance
has a valid warranty claim applicable to it.
12. For Appliances and services provided by Electrolux in New Zealand, the
Appliances come with a guarantee by Electrolux pursuant to the provisions
of the Consumer Guarantees Act, the Sale of Goods Act and the Fair
Trading Act.
13. To enquire about claiming under this warranty, please follow these steps:
(a) carefully check the operating instructions, user manual and the terms
of this warranty;
(b) have the model and serial number of the Appliance available;
(c) have the proof of purchase (e.g. an invoice) available;
(d) telephone the numbers shown below.
14. You accept that if you make a warranty claim, Electrolux and its ASC may
exchange information in relation to you to enable Electrolux to meet its
obligations under this warranty.
Warranty
FOR SALES IN AUSTRALIA AND NEW ZEALAND
APPLIANCE: DISHWASHER
Important Notice
Before calling for service, please ensure that the steps listed in clause 13 above have been followed.
FOR SERVICE
or to nd the address of your nearest
state service centre in Australia
PLEASE CALL 13 13 49
For the cost of a local call (Australia only)
SERVICE AUSTRALIA
ELECTROLUX HOME PRODUCTS
electrolux.com.au
FOR SPARE PARTS
or to nd the address of your nearest
state spare parts centre in Australia
PLEASE CALL 13 13 50
For the cost of a local call (Australia only)
FOR SERVICE
or to nd the address of your nearest
authorised service centre in New Zealand
FREE CALL 0800 10 66 10
(New Zealand only)
SERVICE NEW ZEALAND
ELECTROLUX (NZ) Limited
electrolux.co.nz
FOR SPARE PARTS
or to nd the address of your nearest
state spare parts centre in New Zealand
FREE CALL 0800 10 66 20
(New Zealand only)
GDW_Warr_Sep15
NOTES
26 NOTES
Page 27

Warranty
FOR SALES IN AUSTRALIA AND NEW ZEALAND
APPLIANCE: DISHWASHER
This document sets out the terms and conditions of the product
warranties for Electrolux Appliances. It is an important document.
Please keep it with your proof of purchase documents in a safe place
for future reference should you require service for your Appliance.
1. In this warranty:
(a) ‘acceptable quality’ as referred to in clause 10 of this warranty has
the same meaning referred to in the ACL;
(b) ‘ACL’ means Schedule 2 of the Competition and Consumer Act 2010;
(c) ‘Appliance’ means any Electrolux product purchased by you and
accompanied by this document;
(d) ‘ASC’ means Electrolux authorised service centres;
(e) ‘Electrolux’ means Electrolux Home Products Pty Ltd of 163
O’Riordan Street, Mascot NSW 2020, ABN 51 004 762 341 in
respect of Appliances purchased in Australia and Electrolux (NZ)
Limited (collectively ‘Electrolux’) of 3-5 Niall Burgess Road, Mount
Wellington, in respect of Appliances purchased in New Zealand;
(f) ‘major failure’ as referred to in clause 10 of this warranty has the
same meaning referred to in the ACL and includes a situation when
an Appliance cannot be repaired or it is uneconomic for Electrolux,
at its discretion, to repair an Appliance during the Warranty Period;
(g) ‘Warranty Period’ means the Appliance is warranted against
manufacturing defects in Australia for 24 months and in New Zealand
for 24 months, following the date of original purchase of the Appliance;
(h) ‘you’ means the purchaser of the Appliance not having purchased the
Appliance for re-sale, and ‘your’ has a corresponding meaning.
2. This warranty only applies to Appliances purchased and used in Australia
or New Zealand and used in normal domestic applications and is in
addition to (and does not exclude, restrict, or modify in any way) any
non-excludable statutory warranties in Australia or New Zealand.
3. During the Warranty Period Electrolux or its ASC will, at no extra charge
if your Appliance is readily accessible for service, without special
equipment and subject to these terms and conditions, repair or replace
any parts which it considers to be defective. Electrolux or its ASC may use
remanufactured parts to repair your Appliance. You agree that any replaced
Appliances or parts become the property of Electrolux. This warranty does
not apply to light globes, batteries, lters or similar perishable parts.
4. Parts and Appliances not supplied by Electrolux are not covered by
this warranty.
5. To the extent permitted by law, you will bear the cost of transpor tation,
travel and deliver y of the Appliance to and from Electrolux or its ASC. If you
reside outside of the service area, you will bear the cost of:
(a) travel of an authorised representative;
(b) transportation and delivery of the Appliance to and from Electrolux or
its ASC.
In all instances, unless the Appliance is transported by Electrolux or an
Electrolux authorised representative, the Appliance is transpor ted at the
owner’s cost and risk while in transit to and from Electrolux or its ASC.
6. Proof of purchase is required before you can make a claim under
this warranty.
7. You may not make a claim under this warranty unless the defect claimed is
due to faulty or defective par ts or workmanship. Electrolux is not liable in
the following situations (which are not exhaustive):
(a) the Appliance is damaged by:
(i) accident
(ii) misuse or abuse, including failure to properly maintain or service
(iii) normal wear and tear
(iv) power surges, electrical storm damage or incorrect power supply
(v) incomplete or improper installation
(vi) incorrect, improper or inappropriate operation
(vii) insect or vermin infestation
(viii) failure to comply with any additional instructions supplied with the
(b) the Appliance is modied without authority from Electrolux in writing;
(c) the Appliance’s serial number or warranty seal has been removed
(d) the Appliance was serviced or repaired by anyone other than
8. This warranty, the contract to which it relates and the relationship between
you and Electrolux are governed by the law applicable where the Appliance
was purchased. Where the Appliance was purchased in New Zealand for
commercial purposes the Consumer Guarantee Act does not apply.
9. To the extent permitted by law and subject to your non-excludable statutory
rights and warranties, Electrolux excludes all warranties and liabilities
(other than as contained in this document) including liability for any loss or
damage whether direct or indirect arising from your purchase, use or non
use of the Appliance.
10. For Appliances and services provided by Electrolux in Australia, the
Appliances come with a guarantee by Electrolux that cannot be excluded
under the ACL. You are entitled to a replacement or refund for a major
failure and for compensation for any other reasonably foreseeable loss or
damage. You are also entitled to have the Appliance repaired or replaced if
the Appliance fails to be of acceptable quality and
the failure does not amount to a major failure. The benets to you given by
this warranty are in addition to your other rights and remedies under a law
in relation to the Appliances or services to which the warranty relates.
11. At all times during the Warranty Period, Electrolux shall, at its discretion,
determine whether repair, replacement or refund will apply if an Appliance
has a valid warranty claim applicable to it.
12. For Appliances and services provided by Electrolux in New Zealand, the
Appliances come with a guarantee by Electrolux pursuant to the provisions
of the Consumer Guarantees Act, the Sale of Goods Act and the Fair
Trading Act.
13. To enquire about claiming under this warranty, please follow these steps:
(a) carefully check the operating instructions, user manual and the terms
(b) have the model and serial number of the Appliance available;
(c) have the proof of purchase (e.g. an invoice) available;
(d) telephone the numbers shown below.
14. You accept that if you make a warranty claim, Electrolux and its ASC may
exchange information in relation to you to enable Electrolux to meet its
obligations under this warranty.
Appliance;
or defaced;
Electrolux, an authorised repairer or ASC.
of this warranty;
Before calling for service, please ensure that the steps listed in clause 13 above have been followed.
FOR SERVICE
or to nd the address of your nearest
state service centre in Australia
PLEASE CALL 13 13 49
For the cost of a local call (Australia only)
FOR SERVICE
or to nd the address of your nearest
authorised service centre in New Zealand
FREE CALL 0800 10 66 10
(New Zealand only)
GDW_Warr_Sep15
Important Notice
SERVICE AUSTRALIA
ELECTROLUX HOME PRODUCTS
electrolux.com.au
SERVICE NEW ZEALAND
ELECTROLUX (NZ) Limited
electrolux.co.nz
FOR SPARE PARTS
or to nd the address of your nearest
state spare parts centre in Australia
PLEASE CALL 13 13 50
For the cost of a local call (Australia only)
FOR SPARE PARTS
or to nd the address of your nearest
state spare parts centre in New Zealand
FREE CALL 0800 10 66 20
(New Zealand only)
WARRANTY 27
Page 28

For more information on all Westinghouse
appliances, or for dimension and installation
information, call into your retailer, phone or email
our customer care team or visit our website:
AUSTRALIA
phone: 1300 363 640
fax: 1800 350 067
email: customercare@electrolux.com.au
web: westinghouse.com.au
NEW ZEALAND
phone: 0800 436 245
fax: 0800 225 088
email: customercare@electrolux.co.nz
web: westinghouse.co.nz
TOP SERVICE
Top Service encompasses the after sales service
provided by The Electrolux Group to consumers
including delivery, home service and spare parts�
and WESTINGHOUSE are trademarks of Westinghouse Electric Corporation�
Used under license by Electrolux Home Products Pty Ltd� All Rights Reserved�
© 2016 Electrolux Home Products Pty Ltd�
WMAN_6738I_Feb16
 Loading...