

Westinghouse WP2700, WP3000 Owner's Manual
Pressure Washer
Owner’s Manual
Manual del Propietario
WP2700
WP3000
!

California
Proposition 65 Warning
The engine exhaust from this product
contains chemicals known to the state of
California to cause cancer, birth defects
or other reproductive harm.
Proposition 65 Warning
Certain components in this product and its
related accessories contain chemicals
known to the state of California to cause
cancer, birth defects or other reproductive
harm. Wash hands after handling.
California
DISCLAIMERS:
All information, illustrations and specifi cations in this manual are based on the latest information available at
the time of publishing. The illustrations used in this manual are intended as representative reference views only.
Moreover, because of our continuous product improvement policy, we may modify information, illustrations and/or
specifi cations to explain and/or exemplify a product, service or maintenance improvement. We reserve the right to
make any change at any time without notice.
ALL RIGHTS RESERVED:
No part of this publication may be reproduced or used in any form by any means – graphic, electronic or
mechanical, including photocopying, recording, taping or information storage and retrieval systems – without the
written permission of Westpro Power Systems, LLC.
2
CONGRATULATIONS ON OWNING A WESTINGHOUSE
PRESSURE WASHER
!
DANGER
This manual contains important instructions for operating this pressure washer. For your safety
!
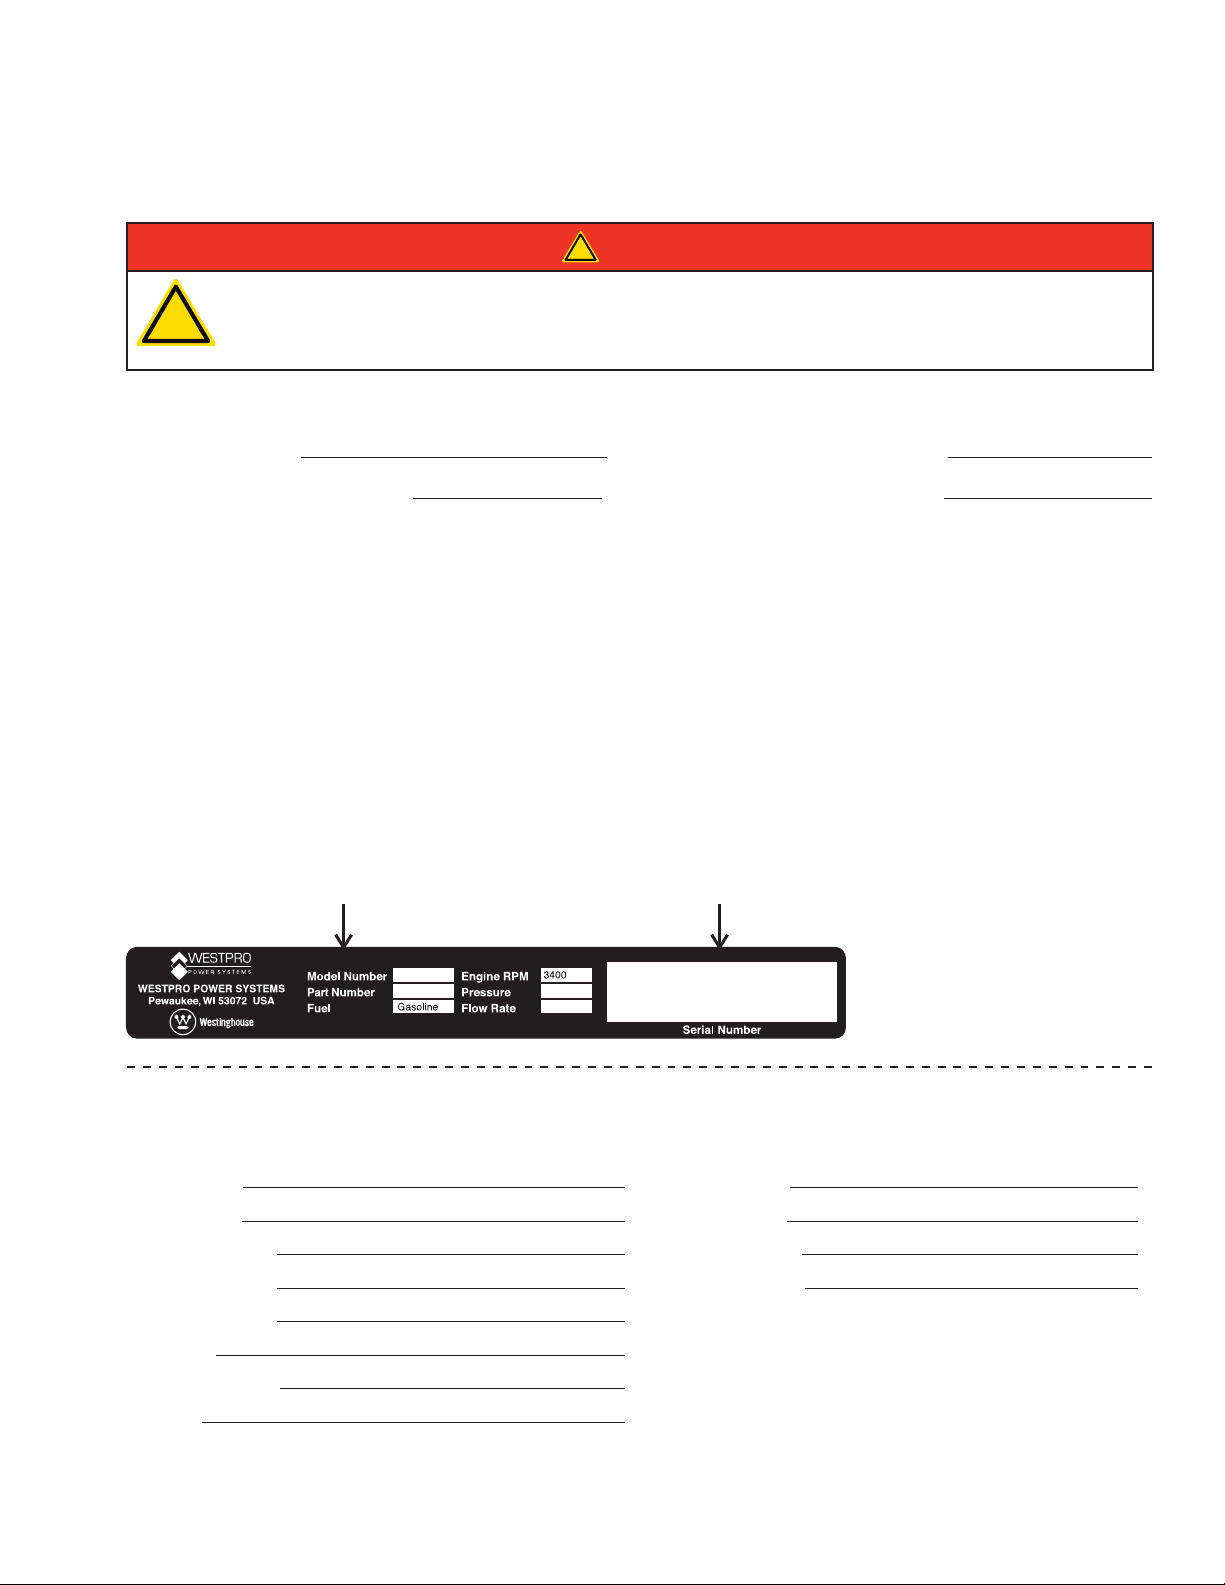
For Your Records
Date of Purchase: Pressure Washer Model Number:
Purchased from Store/Dealer: Pressure Washer Serial Number:
Purchase Receipt: (retain your purchase receipt to ensure trouble-free warranty coverage)
Product Registration
To ensure trouble-free warranty coverage, it is important you register your Westinghouse pressure washer. You can
register your pressure washer by either:
1. Filling in the product registration form below and mailing to:
2. Registering your product online at www.westpropower.com/register.iml
To register your pressure washer you will need to locate the following information:
and the safety of others, be sure to read this manual thoroughly before operating the pressure
washer. Failure to properly follow all instructions and precautions can cause you and others to
be seriously hurt or killed.
Product Registration
Westpro Power Systems, LLC
W237 N2889 Woodgate Road, Unit B
Pewaukee, WI 53072
Model Number Serial Number
WP3000
23000
3000 PSI
2.4 GPM
Product Registration Form
PERSONAL INFORMATION PRESSURE WASHER INFORMATION
First Name: Model Number:
Last Name: Serial Number:
Street Address: Date Purchased:
Street Address: Purchased From:
City, State, ZIP:
Country:
Phone Number:
E-Mail:


TABLE OF CONTENTS
CONGRATULATIONS ON OWNING A WESTINGHOUSE PRESSURE WASHER ...........................................3
For Your Records ..........................................................................................................................................3
Product Registration .....................................................................................................................................3
Product Registration Form ............................................................................................................................3
SAFETY ....................................................................................................................................................................7
SAFETY DEFINITIONS ......................................................................................................................................7
SAFETY SYMBOL DEFINITIONS ......................................................................................................................7
GENERAL SAFETY RULES ...............................................................................................................................8
SAFETY LABELS AND DECALS .....................................................................................................................10
WP2700 ......................................................................................................................................................10
WP3000 ......................................................................................................................................................11
UNPACKING ...........................................................................................................................................................12
UNPACKING THE PRESSURE WASHER ........................................................................................................12
COMPONENTS ................................................................................................................................................12
ASSEMBLY .............................................................................................................................................................13
ASSEMBLY .......................................................................................................................................................13
FEATURES .............................................................................................................................................................17
GENERAL PRESSURE WASHER FEATURES ................................................................................................17
WP2700 ......................................................................................................................................................17
WP3000 ......................................................................................................................................................19
OPERATION ...........................................................................................................................................................21
BEFORE STARTING THE PRESSURE WASHER ...........................................................................................21
ADDING / CHECKING ENGINE FLUIDS AND FUEL .......................................................................................21
Checking and / or Adding Engine Oil ..........................................................................................................21
Adding Gasoline to the Fuel Tank ...............................................................................................................22
CONNECTING THE WATER SUPPLY ..............................................................................................................22
STARTING THE PRESSURE WASHER ...........................................................................................................23
STOPPING THE PRESSURE WASHER ..........................................................................................................25
Normal Operation .......................................................................................................................................25
During an Emergency .................................................................................................................................26
SELECTING NOZZLES ....................................................................................................................................26
Changing the Nozzle ..................................................................................................................................27
SPRAYING TIPS ...............................................................................................................................................27
SPRAYING SOAP .............................................................................................................................................28
RINSING ...........................................................................................................................................................28
CLEANING SOAP SIPHON HOSE ...................................................................................................................28
MAINTENANCE ......................................................................................................................................................29
MAINTENANCE ................................................................................................................................................29
Maintenance Schedule ...............................................................................................................................29
Model WP2700 ..................................................................................................................................... 30
Model WP3000 ..................................................................................................................................... 30
ENGINE OIL MAINTENANCE ..........................................................................................................................31
Engine Oil Specifi cation ..............................................................................................................................31
Checking Engine Oil ...................................................................................................................................31
Model WP2700 ..................................................................................................................................... 31
Model WP3000 ..................................................................................................................................... 31
Adding Engine Oil .......................................................................................................................................32
Changing Engine Oil ...................................................................................................................................32
Model WP2700 ..................................................................................................................................... 32
Model WP3000 ..................................................................................................................................... 33
AIR FILTER MAINTENANCE ............................................................................................................................33
Model WP2700 ...........................................................................................................................................33
Model WP3000 ...........................................................................................................................................34
SPARK PLUG MAINTENANCE ........................................................................................................................35
PRESSURE WASHER COMPONENTS ...........................................................................................................36
Water Filter Screen .....................................................................................................................................36
5

TABLE OF CONTENTS
High-Pressure Hose and Spray Gun ..........................................................................................................36
High-Pressure Hose .............................................................................................................................36
Spray Gun ............................................................................................................................................36
Soap Siphon Hose ......................................................................................................................................37
Nozzle .........................................................................................................................................................37
AFTER EACH USE ...........................................................................................................................................37
LONG-TERM STORAGE ..................................................................................................................................38
Storage Procedure for 1 – 3 Months ...........................................................................................................38
Storage Procedure for Greater Than 3 Months ..........................................................................................38
WINTER STORAGE ..........................................................................................................................................38
Remove and Install the Pump – WP2700 ...................................................................................................38
Remove and Install the Pump – WP3000 ...................................................................................................39
TROUBLESHOOTING ............................................................................................................................................40
TROUBLESHOOTING ......................................................................................................................................40
WARRANTY ............................................................................................................................................................42
WESTPRO POWER SYSTEMS “THREE YEAR” LIMITED WARRANTY .........................................................42
WESTPRO’S RESPONSIBILITY ................................................................................................................42
OWNER’S RESPONSIBILITY ....................................................................................................................42
PRODUCT WARRANTY APPLICATIONS AND PRODUCT WARRANTY PERIODS ................................42
CONSUMER APPLICATION ................................................................................................................42
COMMERCIAL APPLICATION ............................................................................................................42
EXCLUSIONS ......................................................................................................................................43
DISCLAIMER OF IMPLIED WARRANTIES ................................................................................................43
EMISSIONS CONTROL WARRANTY ....................................................................................................................44
FEDERAL AND/OR CALIFORNIA EMISSION CONTROL WARRANTY STATEMENT ....................................44
YOUR WARRANTY RIGHTS AND OBLIGATIONS ....................................................................................44
MANUFACTURER’S WARRANTY COVERAGE: .......................................................................................44
OWNER’S WARRANTY RESPONSIBILITIES: ...........................................................................................44
DEFECTS WARRANTY REQUIREMENTS ................................................................................................44
WARRANTED PARTS: ...............................................................................................................................45
QUESTIONS: ..............................................................................................................................................46
6
SAFETY
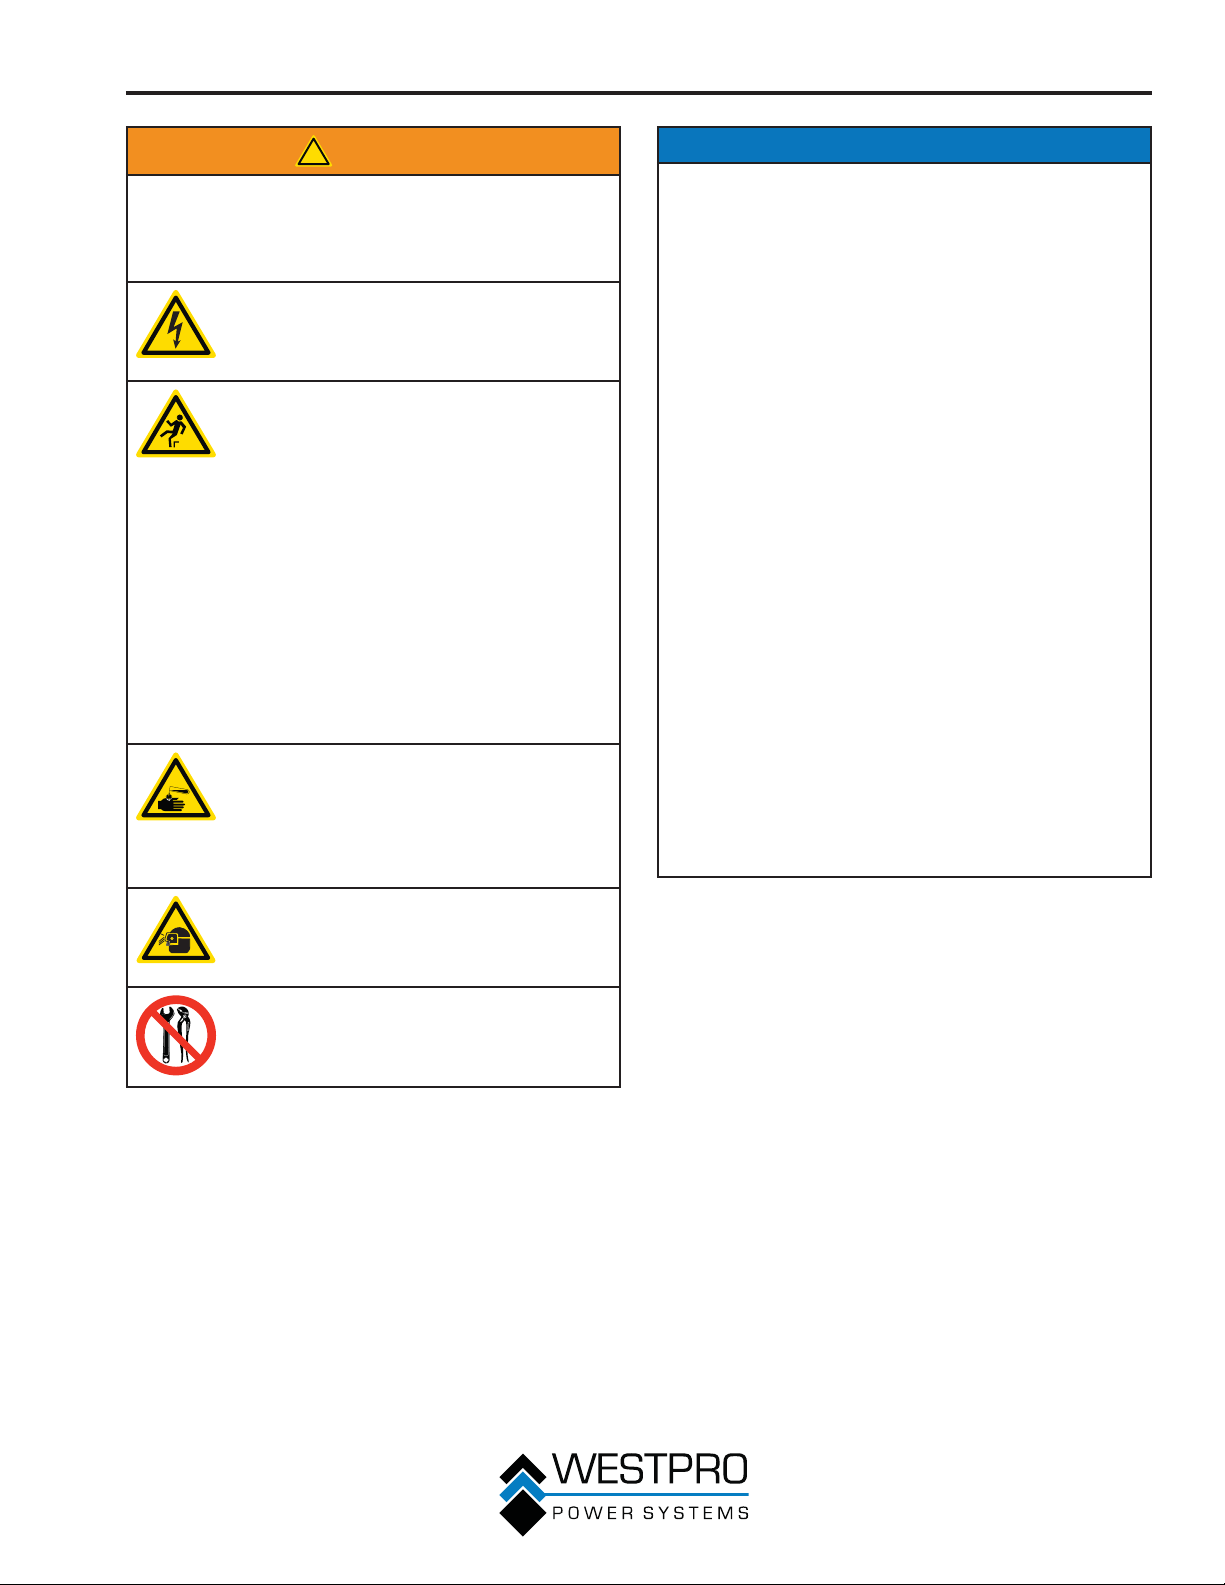
SAFETY DEFINITIONS
The words DANGER, WARNING, CAUTION and
NOTICE are used throughout this manual to highlight
important information. Be certain that the meanings of
these alerts are known to all who work on or near the
equipment.
This safety alert symbol appears
with most safety statements. It
!
Indicates a hazardous situation which, if not
avoided, will result in death or serious injury.
Indicates a hazardous situation which, if not
avoided, could result in death or serious injury.
Indicates a hazardous situation which, if not
avoided, could result in minor or moderate injury.
Indicates a situation which can cause damage to
the pressure washer, personal property and/or the
environment, or cause the equipment to operate
improperly.
means attention, become alert, your
safety is involved! Please read and
abide by the message that follows
the safety alert symbol.
!
DANGER
!
WARNING
!
CAUTION
NOTICE
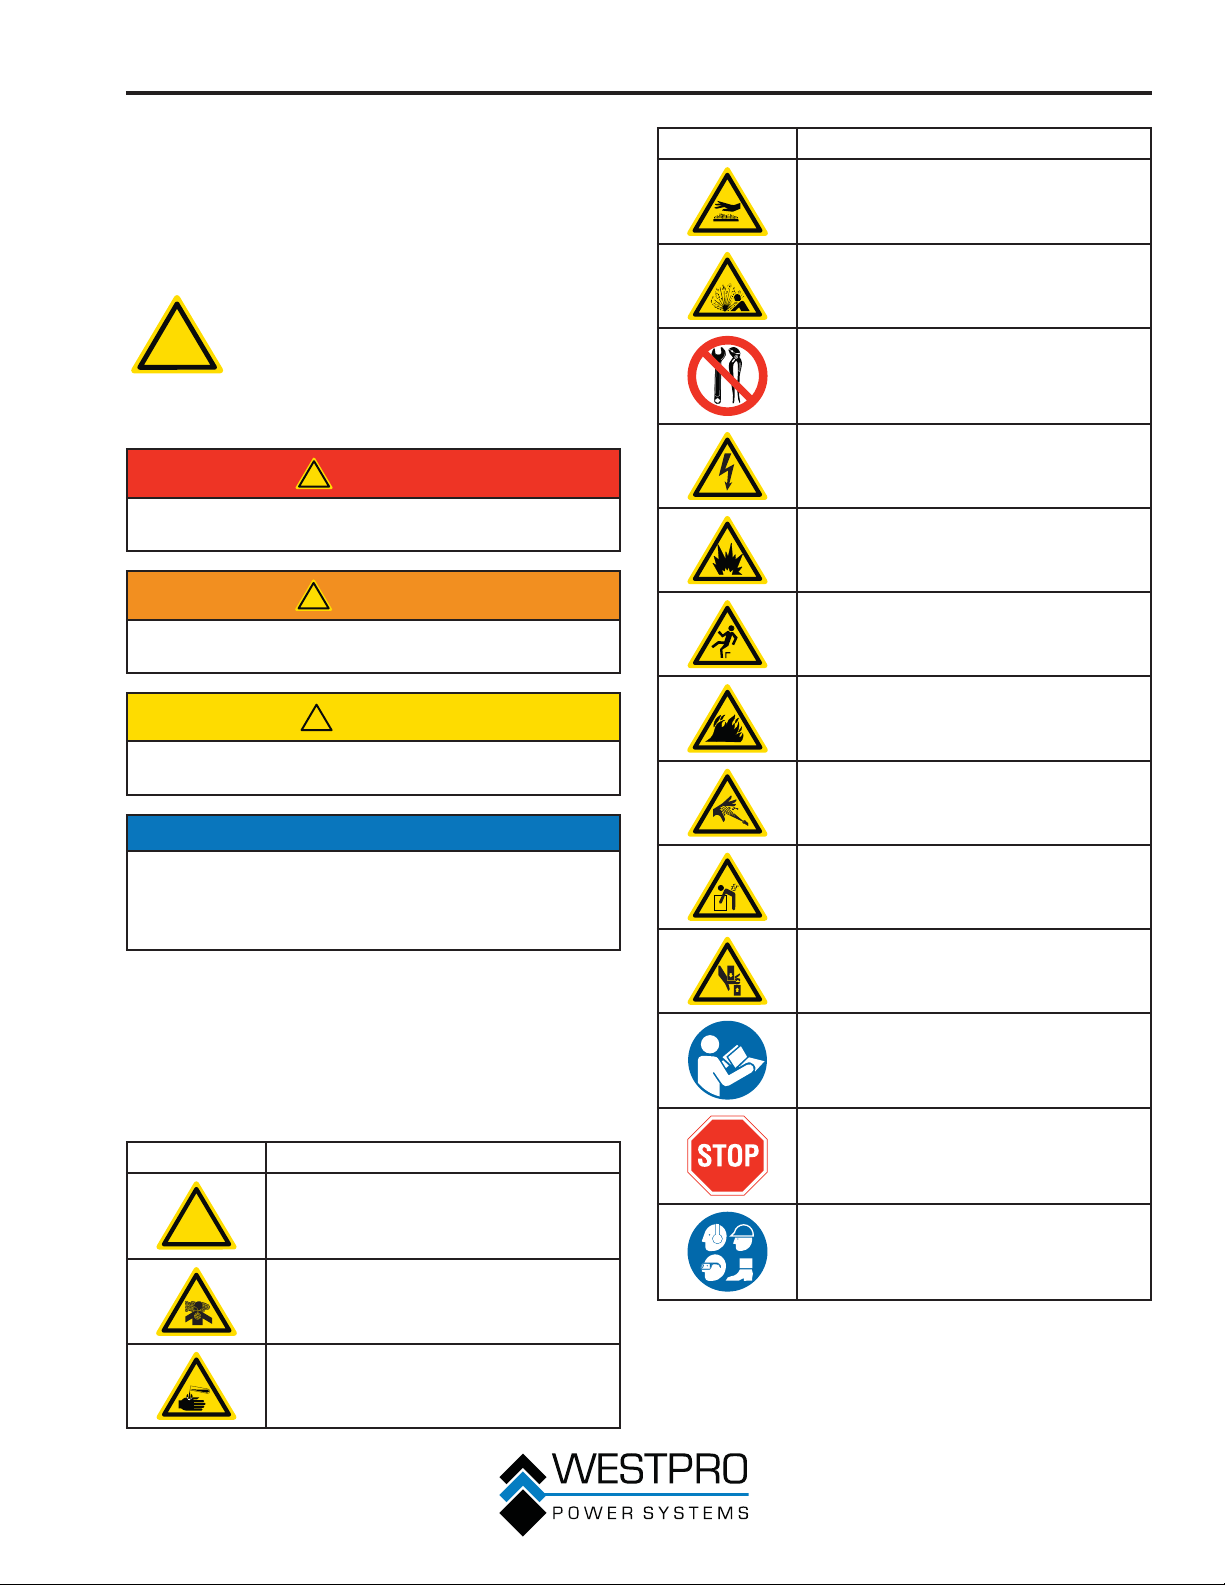
Symbol Description
Burn Hazard
Burst/Pressure Hazard
Don’t leave tools in the area
Electrical Shock Hazard
Explosion Hazard
Fall Hazard
Fire Hazard
High-Pressure Hazard
Lifting Hazard
OTE: N Indicates a procedure, practice or condition that
should be followed in order for the pressure
washer to function in the manner intended.
Pinch-Point Hazard
Read Manufacturer’s Instructions
SAFETY SYMBOL
DEFINITIONS
Symbol Description
!
7
Safety Alert Symbol
Asphyxiation Hazard
Burn Hazard (Chemical)
Read Safety Messages Before
Proceeding
Wear Personal Protective Equipment
(PPE)
SAFETY
GENERAL SAFETY RULES
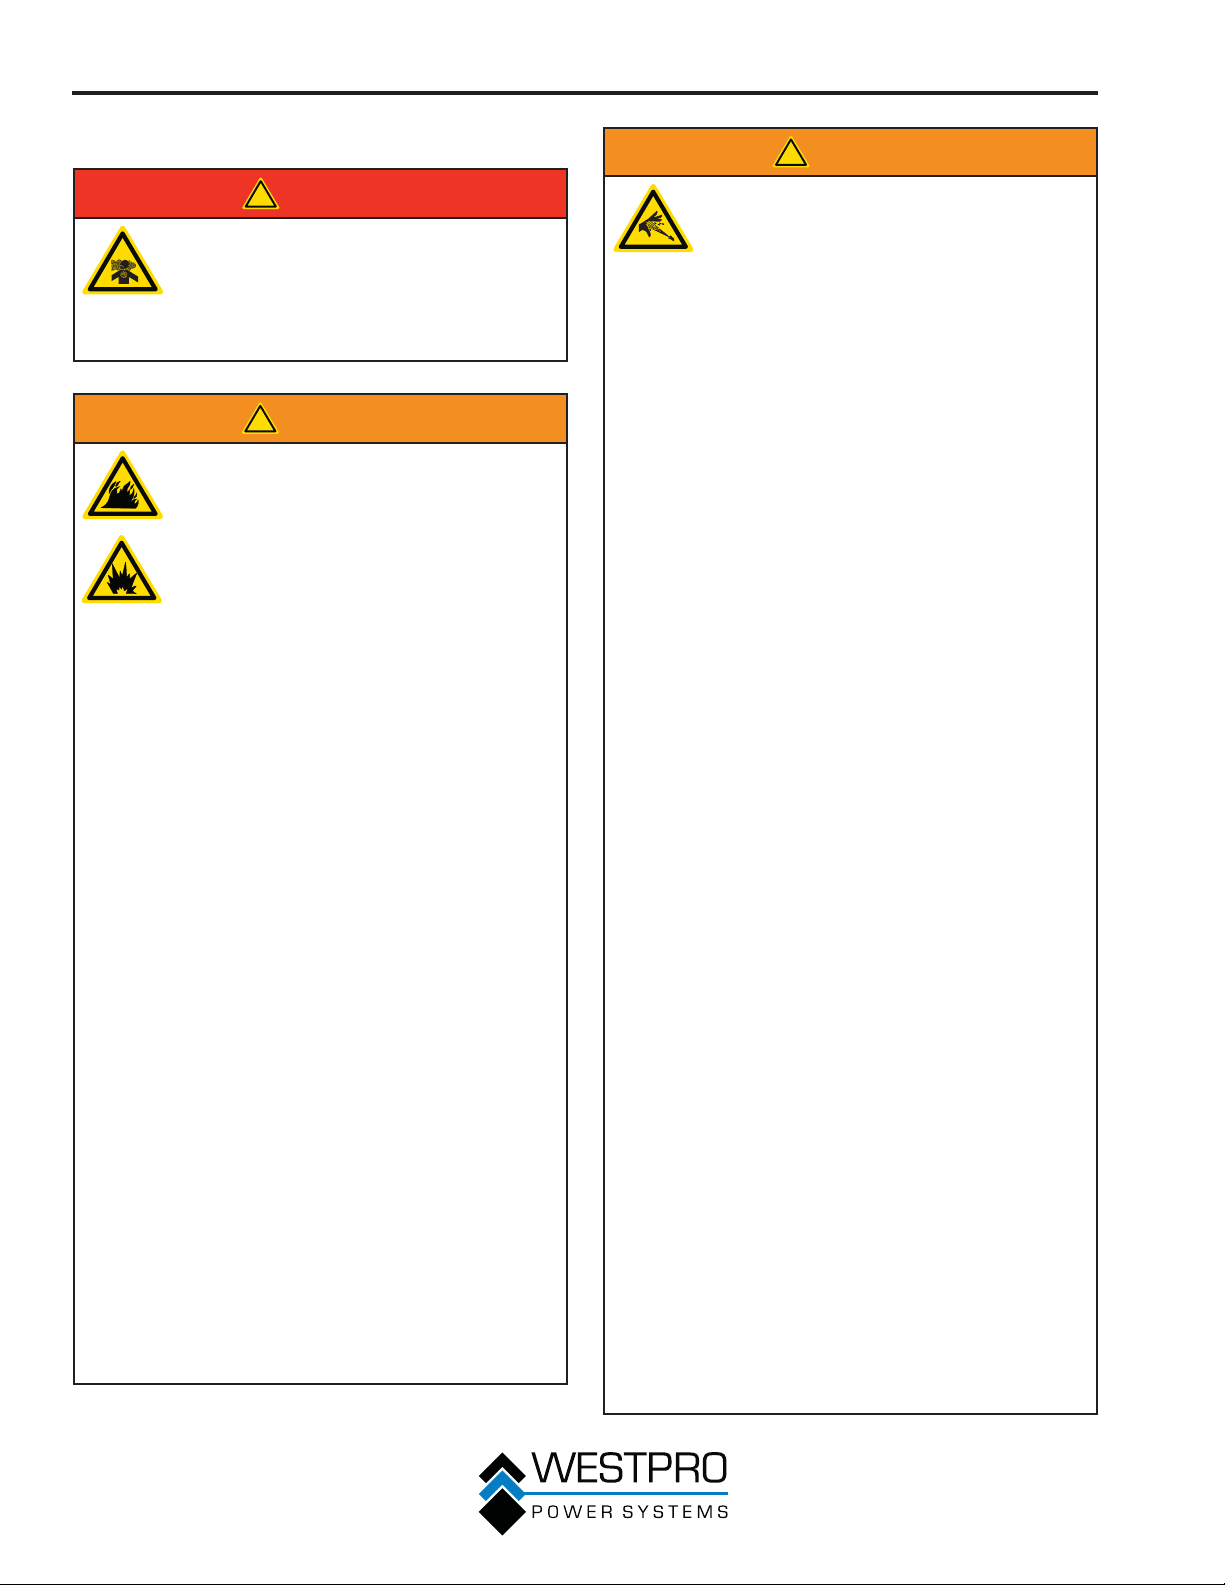
!
DANGER
NEVER operate the pressure washer
in an enclosed area. Engine exhaust
contains carbon monoxide. Only
operate the pressure washer outside
and away from windows, doors and
vents.
!
WARNING
Gasoline and gasoline vapors are
extremely fl ammable and explosive
under certain conditions.
• ALWAYS refuel the pressure washer
outdoors, in a well-ventilated area.
• NEVER remove the fuel cap with the
engine running.
• NEVER refuel the pressure washer
while the engine is running. Always
turn engine off and allow the
pressure washer to cool before
refueling.
• Only fi ll fuel tank with gasoline.
• Keep sparks, open fl ames or other
form of ignition (such as match,
cigarette, static electric source) away
when refueling.
• NEVER overfi ll the fuel tank. Leave
room for fuel to expand. Overfi lling
the fuel tank can result in a sudden
overfl ow of gasoline and result in
spilled gasoline coming in contact
with HOT surfaces. Spilled fuel
can ignite. If fuel is spilled on the
pressure washer, wipe up any
spills immediately. Dispose of rag
properly. Allow area of spilled fuel
to dry before operating the pressure
washer.
• Wear eye protection while refueling.
• NEVER use gasoline as a cleaning
agent.
• Store any containers containing
gasoline in a well-ventilated area,
away from any combustibles or
source of ignition.
• Check for fuel leaks after refueling.
Never operate the engine if a fuel leak
is discovered.
!
WARNING
This equipment produces a stream
of water with enough high pressure
to penetrate skin and its underlying
tissues, which could result in
amputation or other serious injury.
Spray gun traps high-pressure water,
even when engine is stopped and
water is disconnected. Leaks caused
by loose fi ttings or worn or damaged
hoses can result in injection injuries.
DO NOT TREAT FLUID INJECTION
AS A SIMPLE CUT! See a physician
immediately!
• NEVER aim spray gun at people,
animals or plants. Direct spray away
from self and others.
• NEVER place hands in front of nozzle.
• ALWAYS point spray gun in safe
direction while spraying and when
relieving retained high pressure after
stopping engine.
• DO NOT allow CHILDREN to operate
pressure washer.
• NEVER leave spray gun unattended
while machine is running.
• NEVER secure spray gun in open
position.
• DO NOT twist nozzle while spraying.
• NEVER repair a high-pressure hose.
ALWAYS replace it.
• NEVER repair leaking connections
with sealant of any kind. ALWAYS use
factory-recommended repair parts.
• NEVER hold onto the hose or fi ttings
during operation.
• DO NOT allow high-pressure hose to
contact muffl er or other extremely
hot surfaces.
• ALWAYS be certain spray gun,
nozzles and hoses are correctly
attached and in working order.
• NEVER use spray gun if trigger lock
is not in working order.
• ALWAYS use spray gun, hoses and
connections rated for pressure
higher than your pressure washer’s
psi.
• NEVER attach or remove spray gun,
nozzles or hoses while system is
pressurized.
8
SAFETY
!
WARNING
• NEVER modify spray equipment.
• ALWAYS wear protective clothing to
protect eyes and skin from contact
with sprayed materials.
NEVER aim spray in the direction of
power source. Contact with power
source can cause electric shock or
burn.
Unexpected kickback while spraying
can cause you to fall.
• Use of pressure washer can create
slippery surfaces and puddles. The
operating area of this equipment
should have adequate drainage to
reduce the possibility of a fall due to
slippery surfaces.
• Be extremely careful if necessary
to use the pressure washer from
a ladder, scaffolding or any other
similar location.
• Use both hands to fi rmly gasp the
spray gun while in use to avoid injury
from high-pressure kickback.
NEVER use acids, toxic or corrosive
chemicals, poisons, insecticides, or
any kind of fl ammable solvent with
this equipment. Only use detergents,
cleaners and degreasers recommended
for use in this pressure washer.
ALWAYS wear chemical splash safety
goggles that comply with ANSI Z87.1
when operating or in the vicinity of this
equipment.
ALWAYS remove any tools or other
service equipment used during
maintenance from the pressure washer
before operating.
NOTICE
NEVER operate pressure washer with damaged or
missing parts.
NEVER modify any feature or component of pressure
washer.
NEVER spray at glass when using the high-pressure
nozzle (red). High-pressure spray may damage fragile
items including glass.
DO NOT exceed rated pressure when operating
pressure washer.
NEVER move pressure washer by pulling on any
hoses. Always use handle to move pressure washer.
Check components for ice forming on components
when operating in cold weather.
Remove the protective shipping caps from the pump’s
water inlet and outlet.
Be sure the water supply is connected and turned
on before starting the engine. Damage to the pump
could occur and will void the warranty.
Water supply must deliver a minimum of 3.8 gal
(14.3 L) per minute and at least 30 psi (2 bar). Do
not siphon standing water for the water supply. Water
temperature must not exceed 100°F (37.7°C).
DO NOT install a one-way valve, vacuum breaker or
check valve at the pump’s water inlet. Installing one of
these devices at the pump’s water inlet could cause
damage to the pump and will void the warranty. Allow
at least 10 feet (3 m) of unrestricted hose length
between the pump’s water inlet and a one-way valve,
vacuum breaker or check valve.
9
SAFETY
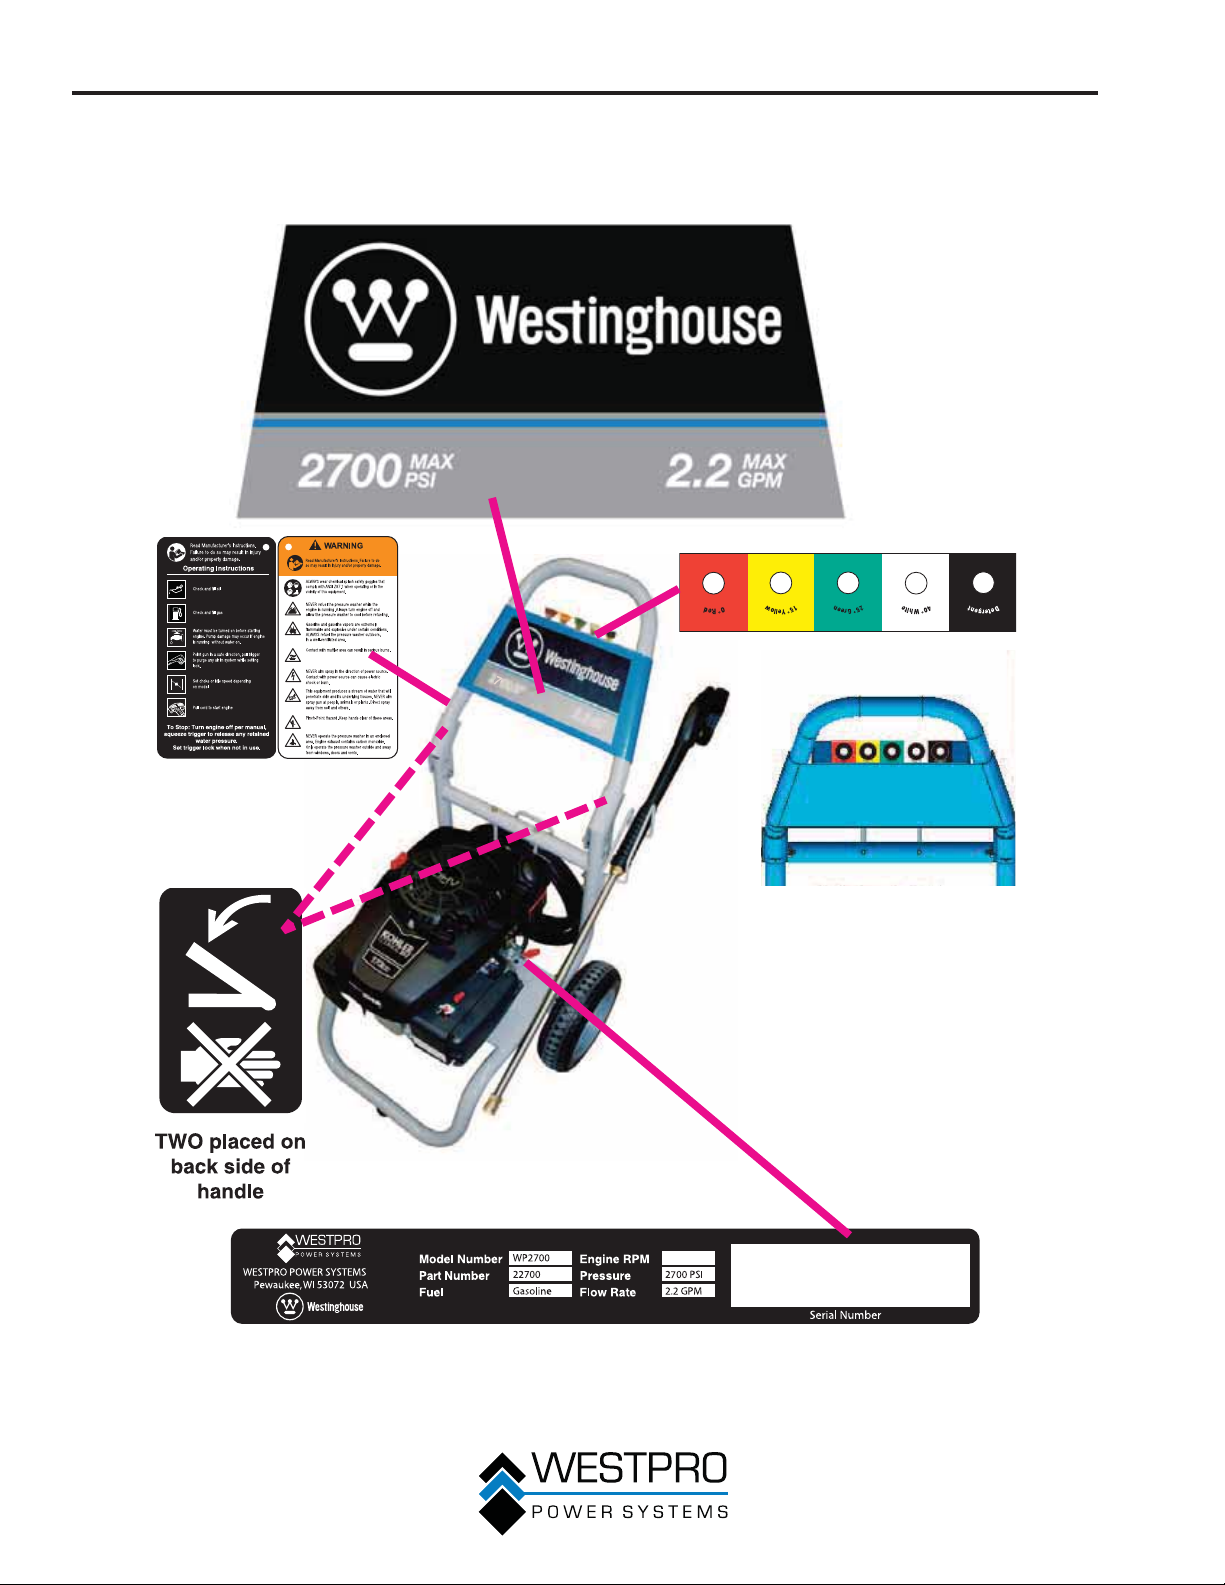
SAFETY LABELS AND DECALS
WP2700
10
3400
Figure 1
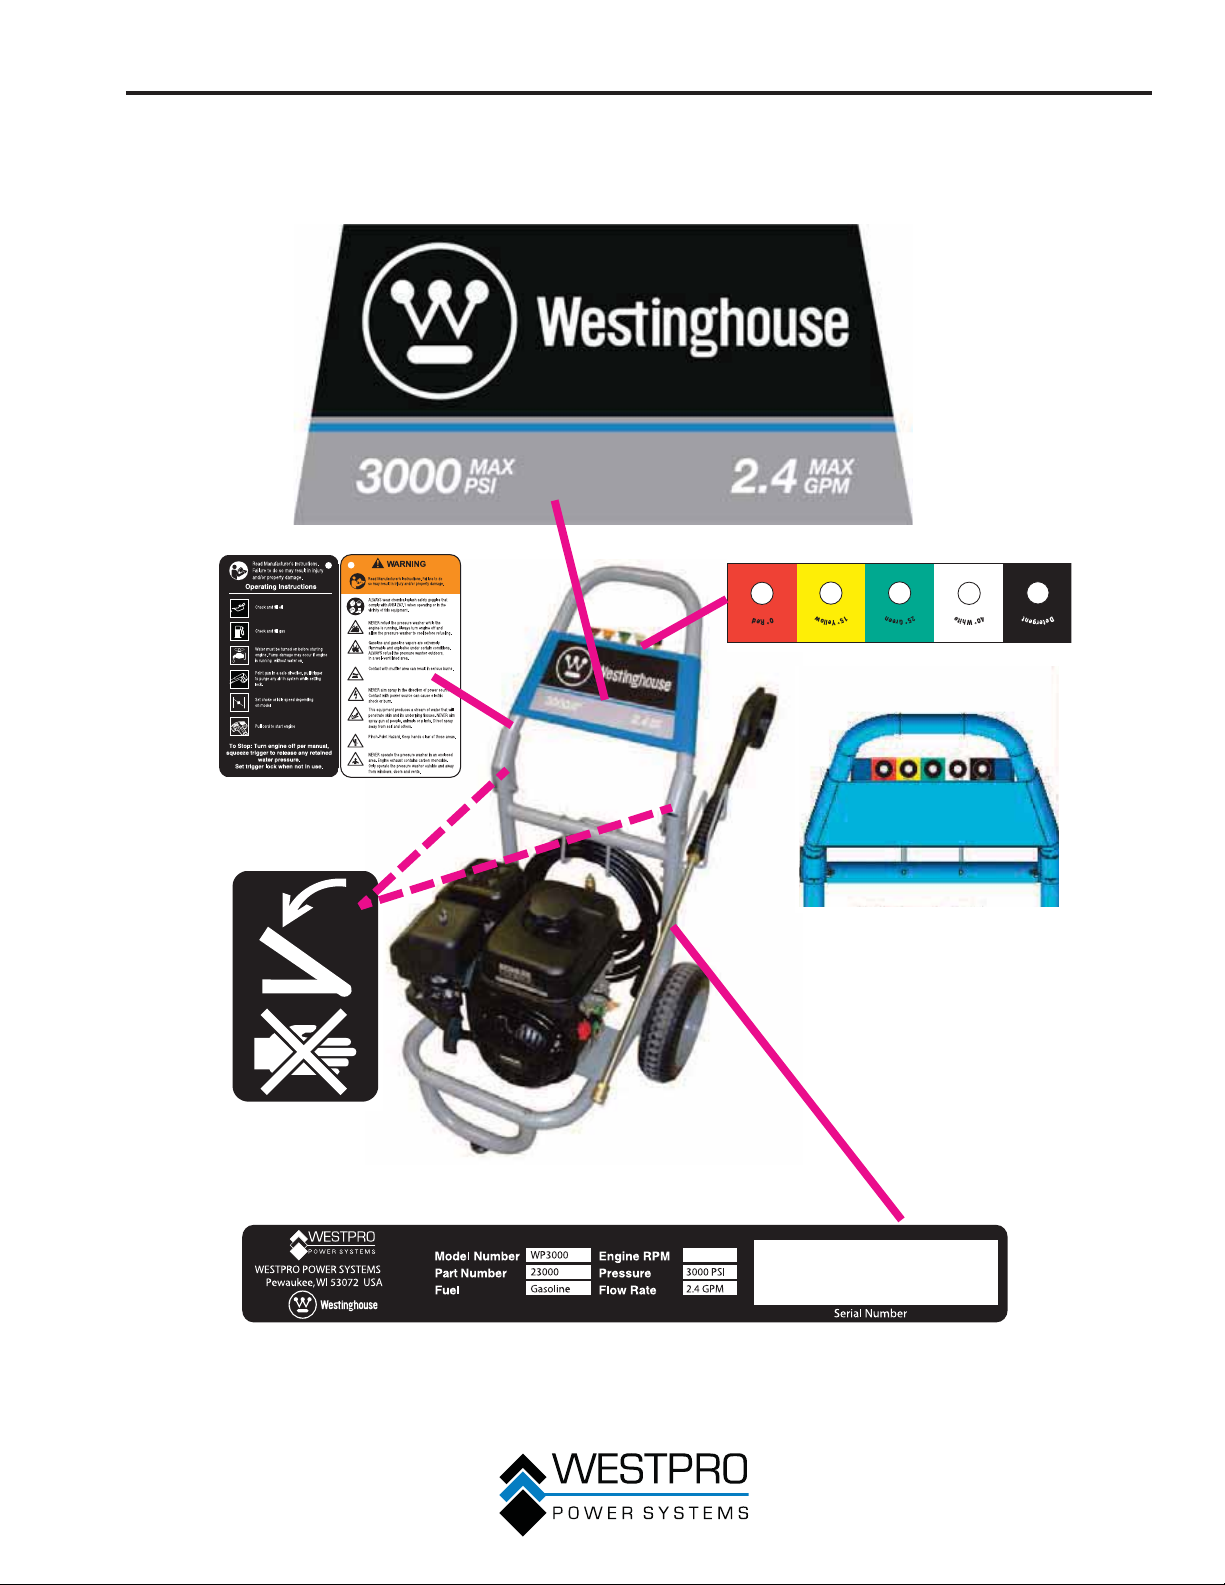
WP3000
SAFETY
TWO placed on
back side of
handle
3400
Figure 2
11
UNPACKING
UNPACKING THE PRESSURE
WASHER
!
CAUTION
Always have assistance when lifting
the pressure washer. The pressure
washer is heavy; lifting it could cause
bodily harm.
Avoid cutting on or near staples to
prevent personal injury.
!
Tthe following tools are required:
x Box cutter or similar device
x 10 mm wrench
1. Carefully cut the packing tape on top of the carton.
2. Fold back top fl aps to reveal the owner’s manual.
Remove owner’s manual and save it for reference.
3. Carefully cut two sides of the carton to remove the
pressure washer.
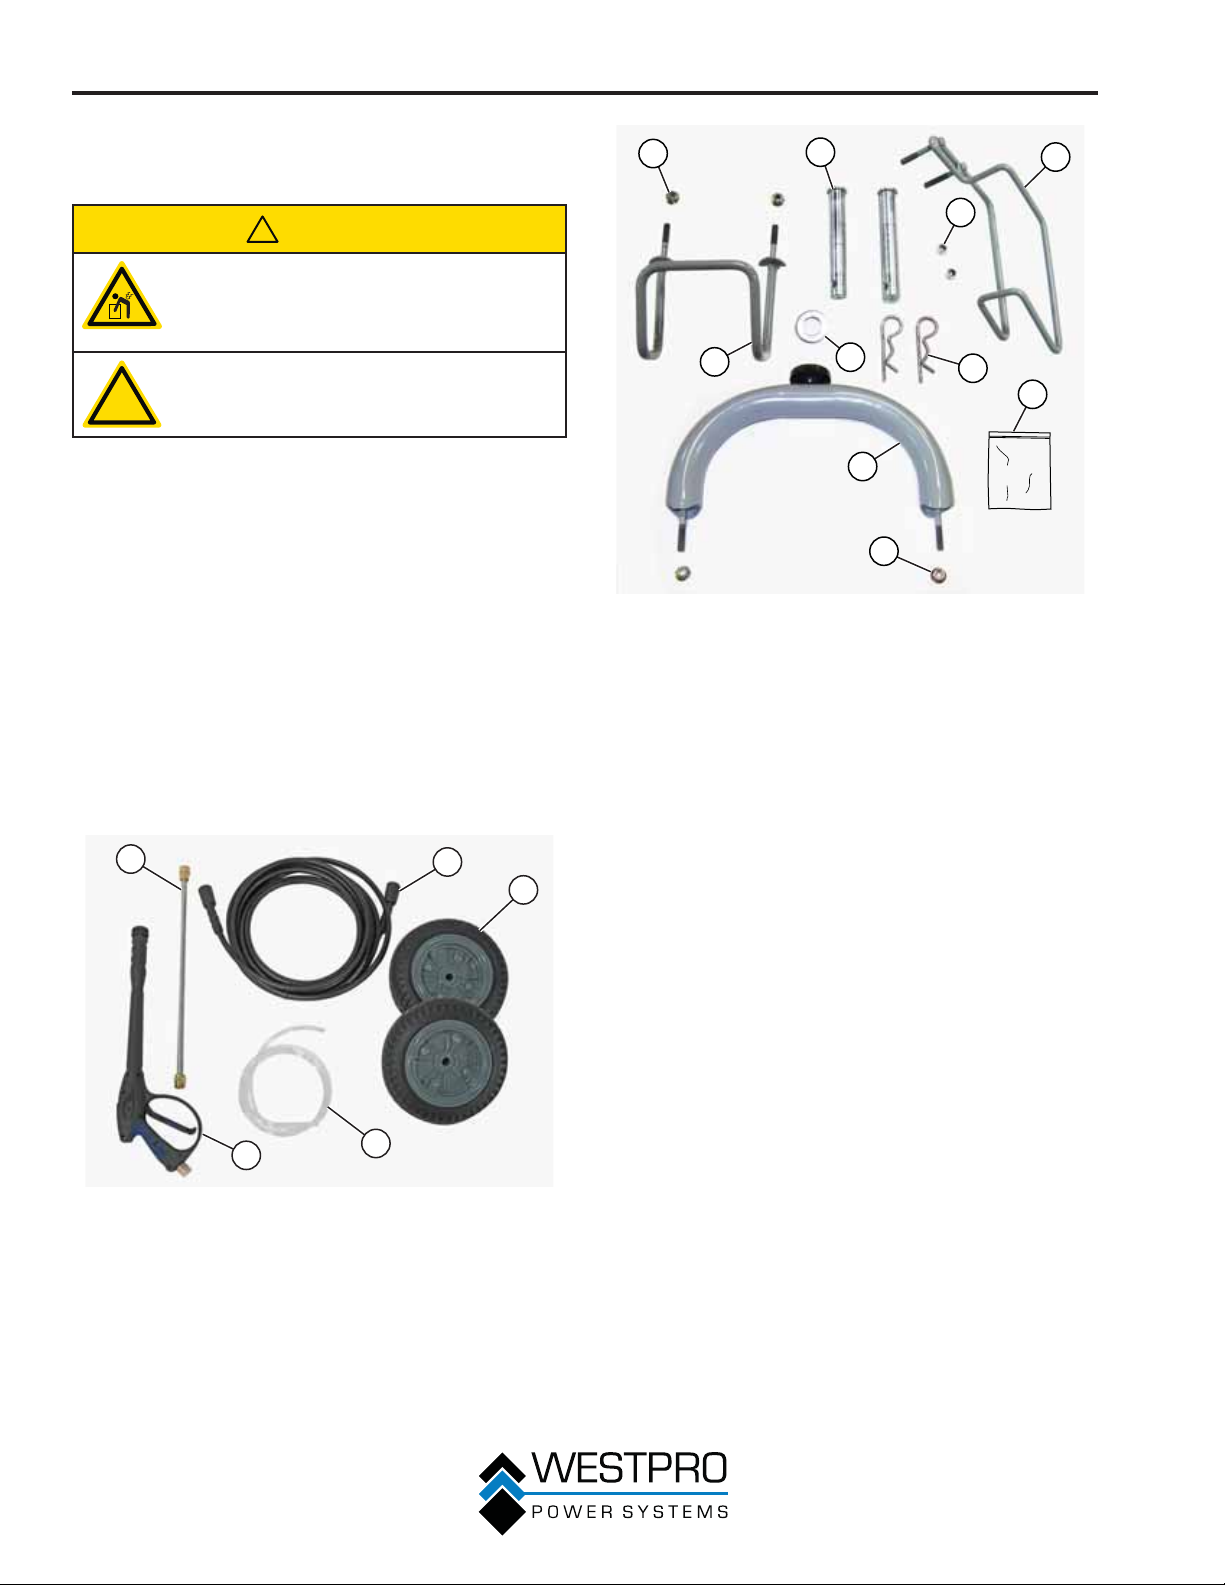
COMPONENTS
Verify the contents against the list below. If any
parts are missing, please locate an authorized
Westinghouse dealer at www.westpropower.com or call
1-855-WHHELP1 (1-855-944-3571).
1
2
3
1
8
Figure 4 – Hardware
1 - Hose Bracket
Nuts M6 (2)
2 - Wheel Axle Pin
16 mm x 105 mm
(2)
3 - Spray Gun
Bracket
4 - Spray Gun
Bracket Nuts M6
(2)
5 - Spare Parts:
High-Pressure
Hose O-Rings (2)
Inlet Screens (2)
2
4
7
9
10
6 - Wheel Axle Lock
7 - Wheel Axle
8 - Hose Bracket
9 - Front Support –
10 - Front Support
6
Pin (2)
Washer (2)
WP3000 only
Nuts M6 (2) –
WP3000 only
3
5
5
Figure 3 – Unpacking
1 - Spray Wand (1)
2 - High-Pressure
Hose (1)
3 - Wheels (2)
OTE: N A 0.6-liter bottle of SAE 10W30 oil is also
included. Soap reservoir is not included.
12
4
4 - Soap Hose (1)
5 - Spray Gun (1)
ASSEMBLY
ASSEMBLY
Before assembling the pressure
washer, review Safety on page 7
and the following safety messages.
!
CAUTION
Never lift the pressure washer without
assistance. The pressure washer is
heavy and lifting without assistance
could result in personal injury.
Never use the handles as a lifting point
!
Assembling the pressure washer will require tipping
the unit. Make sure all engine oil and fuel are drained
from the unit prior to assembling.
Once assembled, the wheels are not intended for
on-road use. The wheels are designed for use on this
pressure washer only.
Never tip the pressure washer after it has been fully
assembled and fi lled with oil and fuel.
to support the entire weight of the
pressure washer. Only use the handles
to move the pressure washer by lifting
the handles and using the wheels to
move the pressure washer.
Use caution when collapsing the
handles. Hands and fi ngers could get
caught and pinched.
NOTICE
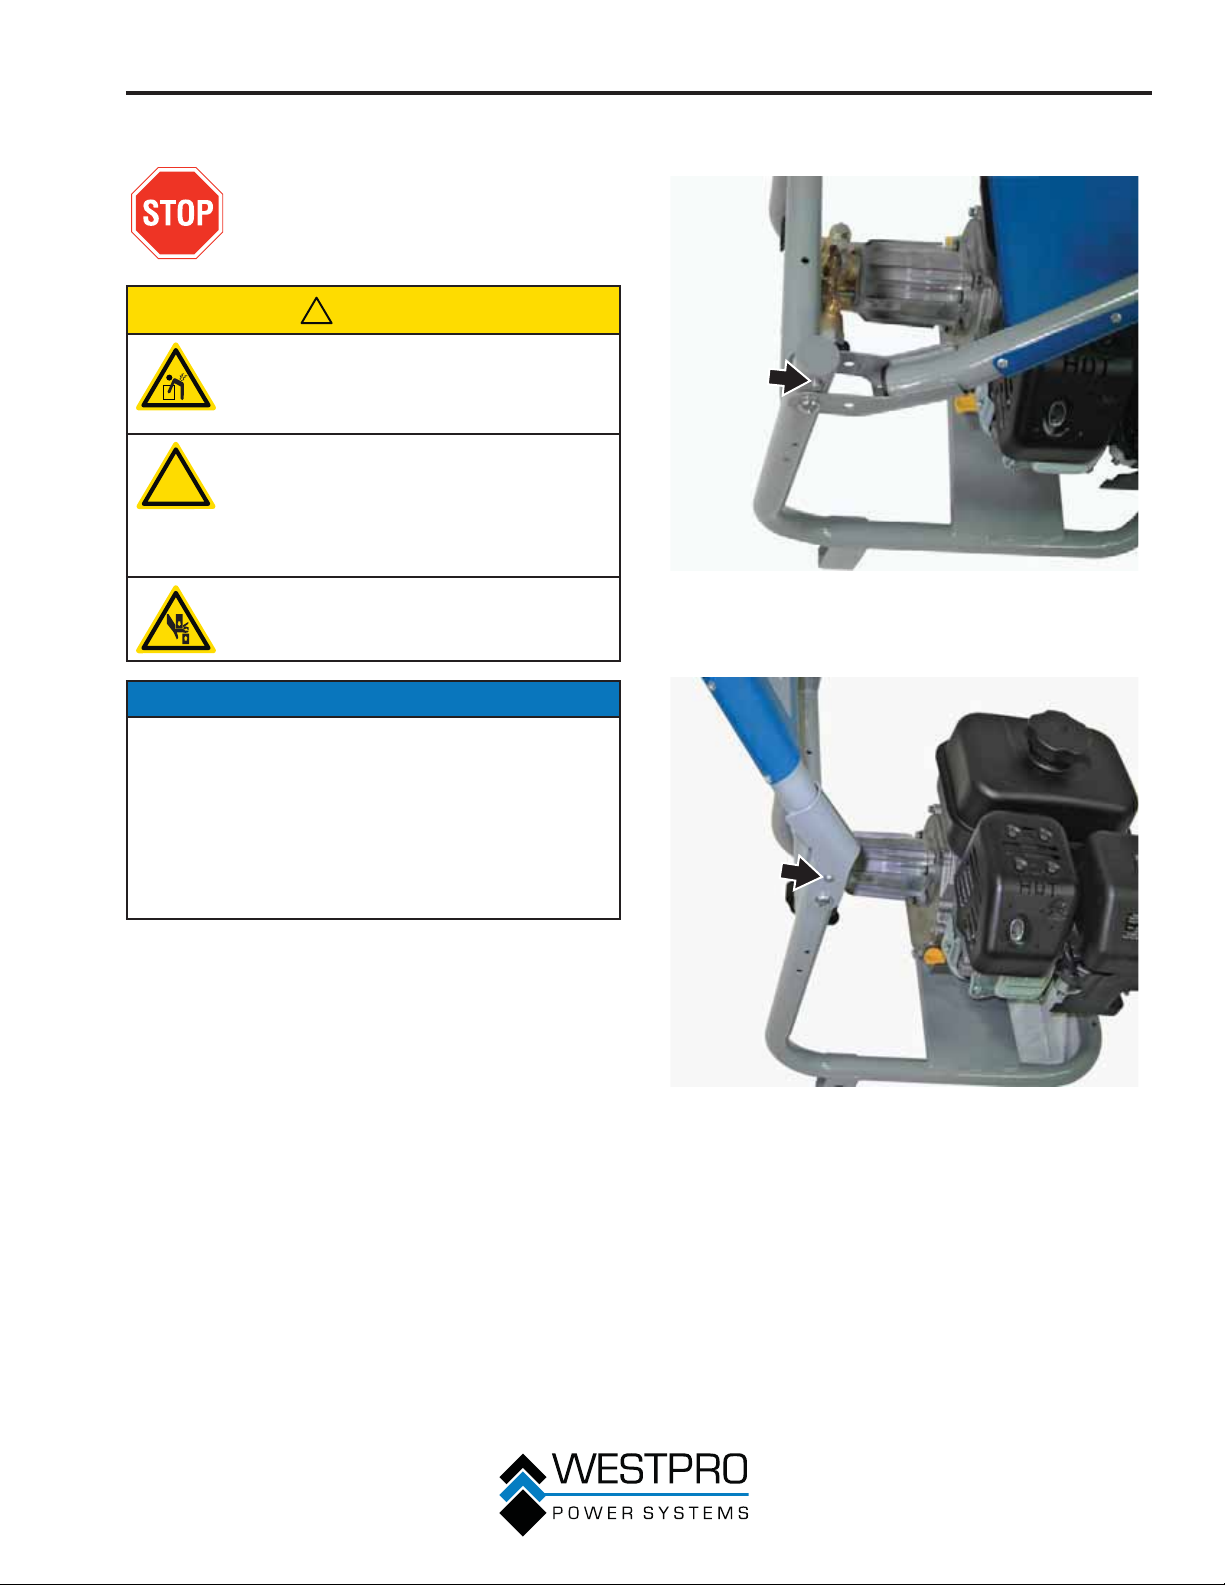
2. Push the lock pin in and raise the handle (see
Figure 5).
Figure 5 – Raising Handle
3. Be sure the handle is locked in position with the pin
protruding through handle hinge (see Figure 6).
1. Place pressure washer on a fl at surface.
Figure 6 – Raising Handle
13
ASSEMBLY
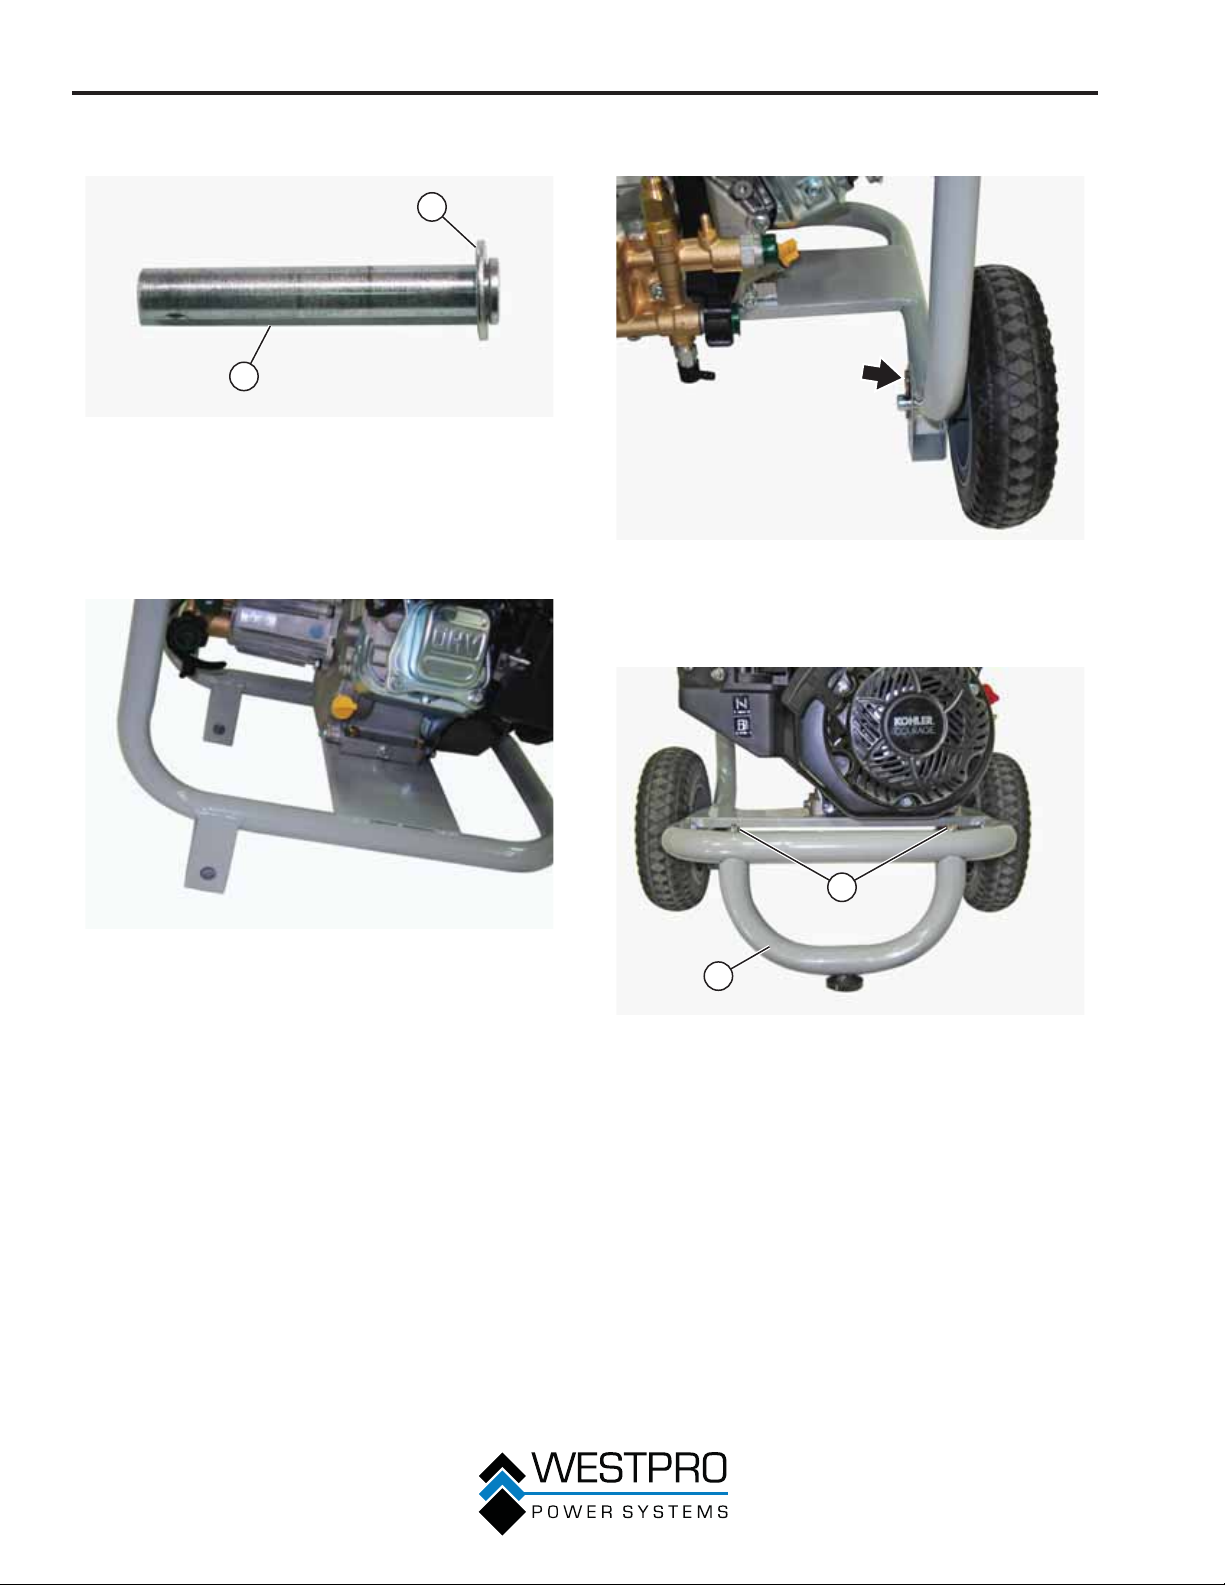
4. Slide the wheel axle washer onto the wheel axle pin
(see Figure 7).
1
2
Figure 7 – Installing Wheel Axle Washer
1 - Wheel Axle
Washer
5. Install the pin into the wheel assembly.
6. Locate the wheel axle mounting holes (see Figure
8). Install the pin through the axle mounting holes.
2 - Wheel Axle Pin
7. Secure the wheel axle pin in position with the wheel
axle lock pin (see Figure 9).
Figure 9 – Installing Wheel Axle Lock Pin
8. WP3000 only – Install the front support using
the two front support nuts (M6). Tighten the nuts
securely (see Figure 10).
Figure 8 – Wheel Axle Mounting Holes
2
1
Figure 10 – Installing Front Support
1 - Front Support 2 - Front Support
Nuts (M6)
14
ASSEMBLY
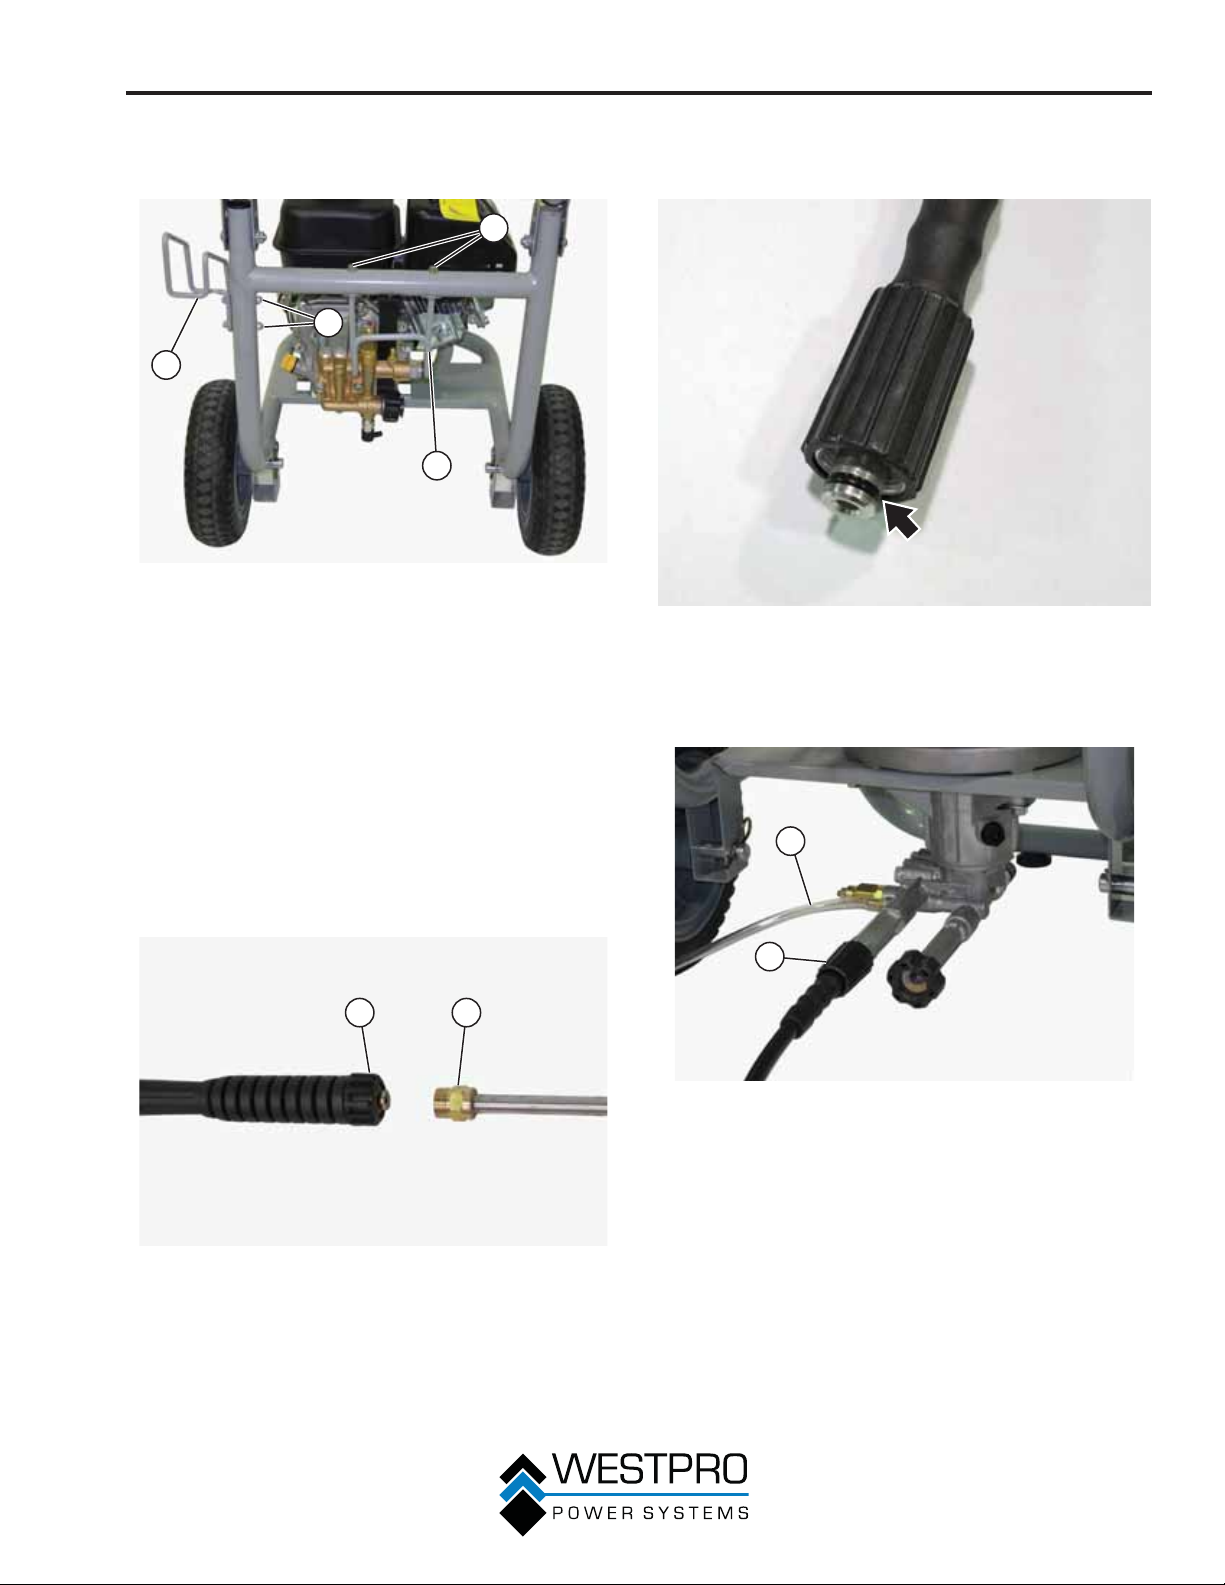
9. Install the spray gun bracket using the two spray
gun bracket nuts (M6). Tighten the nuts securely
(see Figure 11).
4
2
1
3
Figure 11 – Installing Spray Gun Bracket and Hose
Bracket
1 - Spray Gun
Bracket
2 - Spray Gun
Bracket Nuts
(M6)
10. Install the hose bracket using the two hose bracket
nuts (M6). Tighten the nuts securely (see Figure
11).
11. Connect the wand to the spray gun and turn the
fi tting counterclockwise to tighten (see Figure 12).
Do not overtighten. The fi tting only needs to be
hand-tight.
3 - Hose Bracket
4 - Hose Bracket
Nuts (M6)
12. Inspect the O-rings on both sides of the highpressure hose. Moisten the O-rings with water (see
Figure 13).
Figure 13 – High-Pressure Hose O-Rings
13. Connect the high-pressure hose to the pump and
tighten the hose fi tting (see Figure 14 and Figure
15). Do not overtighten. The fi tting only needs to be
hand-tight.
1
2
1 2
Figure 14 – Installing High-Pressure Hose – WP2700
1 - Soap Hose 2 - Hose Fitting
Figure 12 – Connecting Spray Wand
1 - Fitting 2 - Spray Wand
15
ASSEMBLY
1
2
Figure 15 – Installing High-Pressure Hose – WP3000
1 - Soap Hose 2 - Hose Fitting
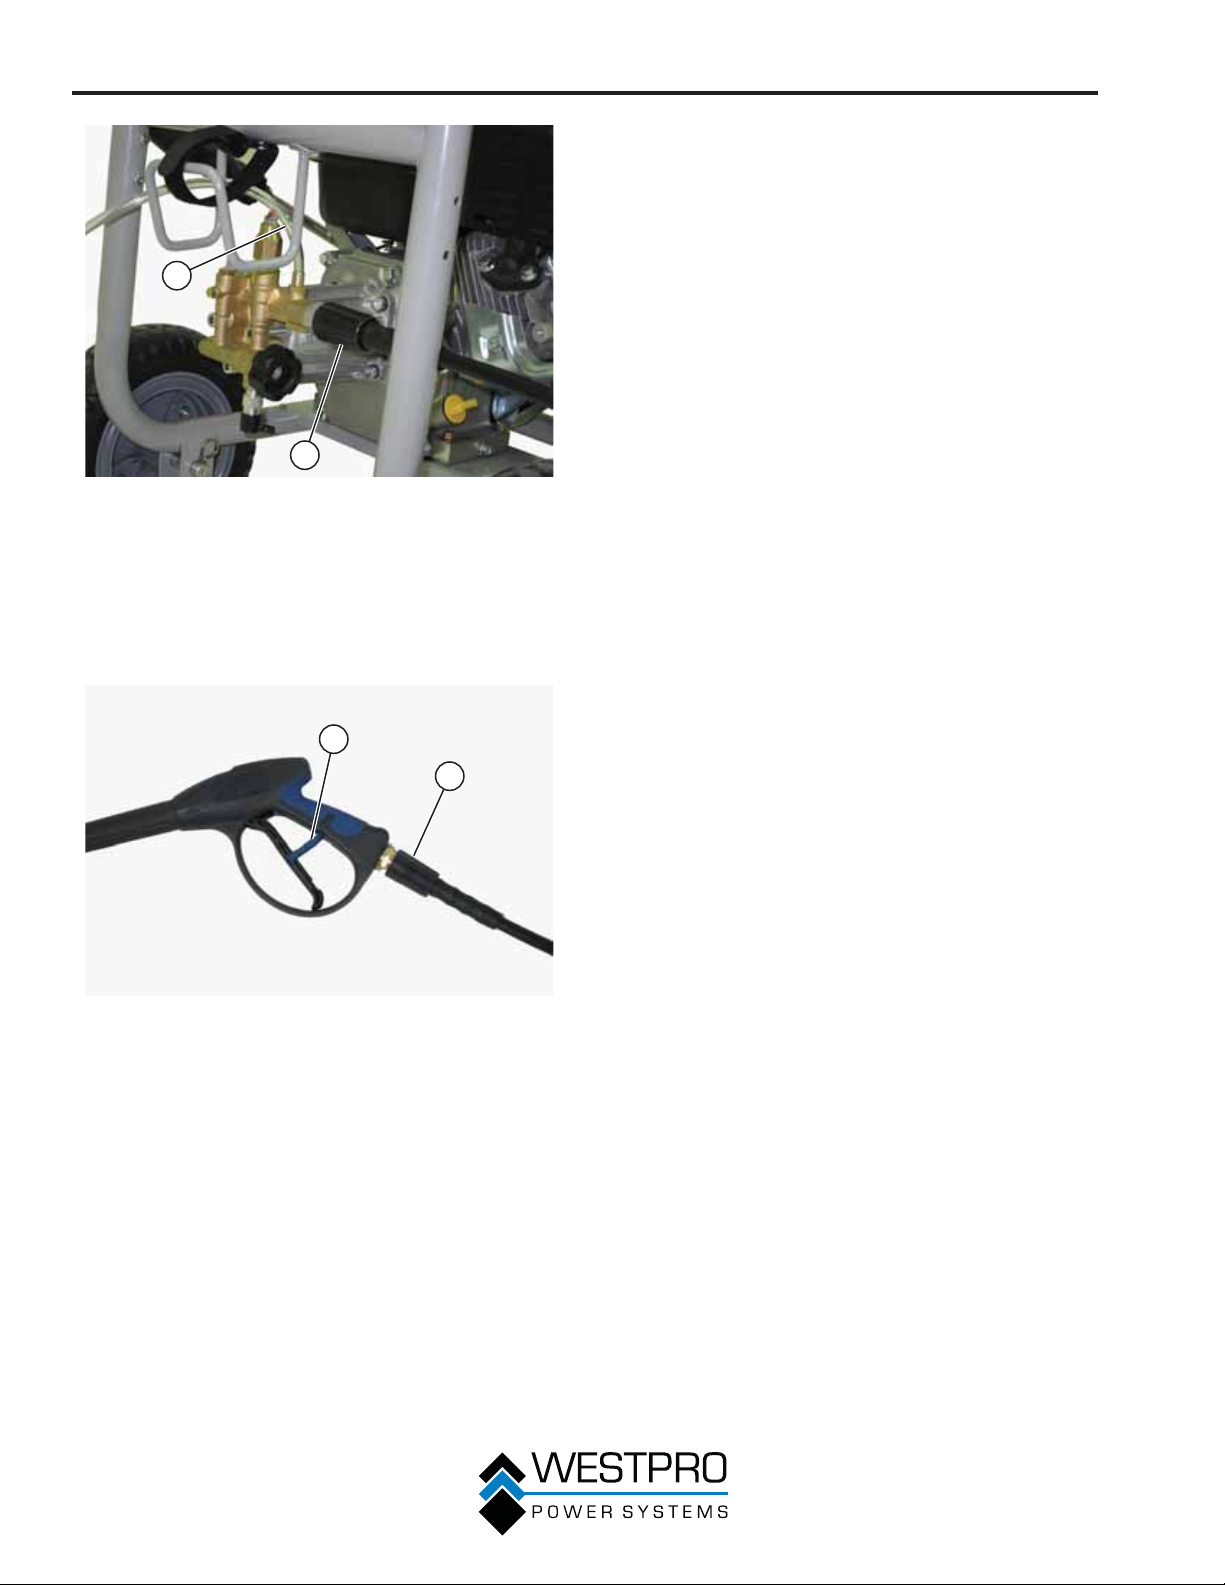
14. Connect the soap hose to the barbed fi tting if you
are going to be using soap (see Figure 14 and
Figure 15).
15. Flip the trigger lock up to lock the trigger in the OFF
position (see Figure 16).
1
2
Figure 16 – Trigger Lock in OFF Position
1 - Trigger Lock 2 - Hose Fitting
16. Install the high-pressure hose to the spray gun
and tighten the hose fi tting (see Figure 16). Do not
overtighten. The fi tting only needs to be hand-tight.
16
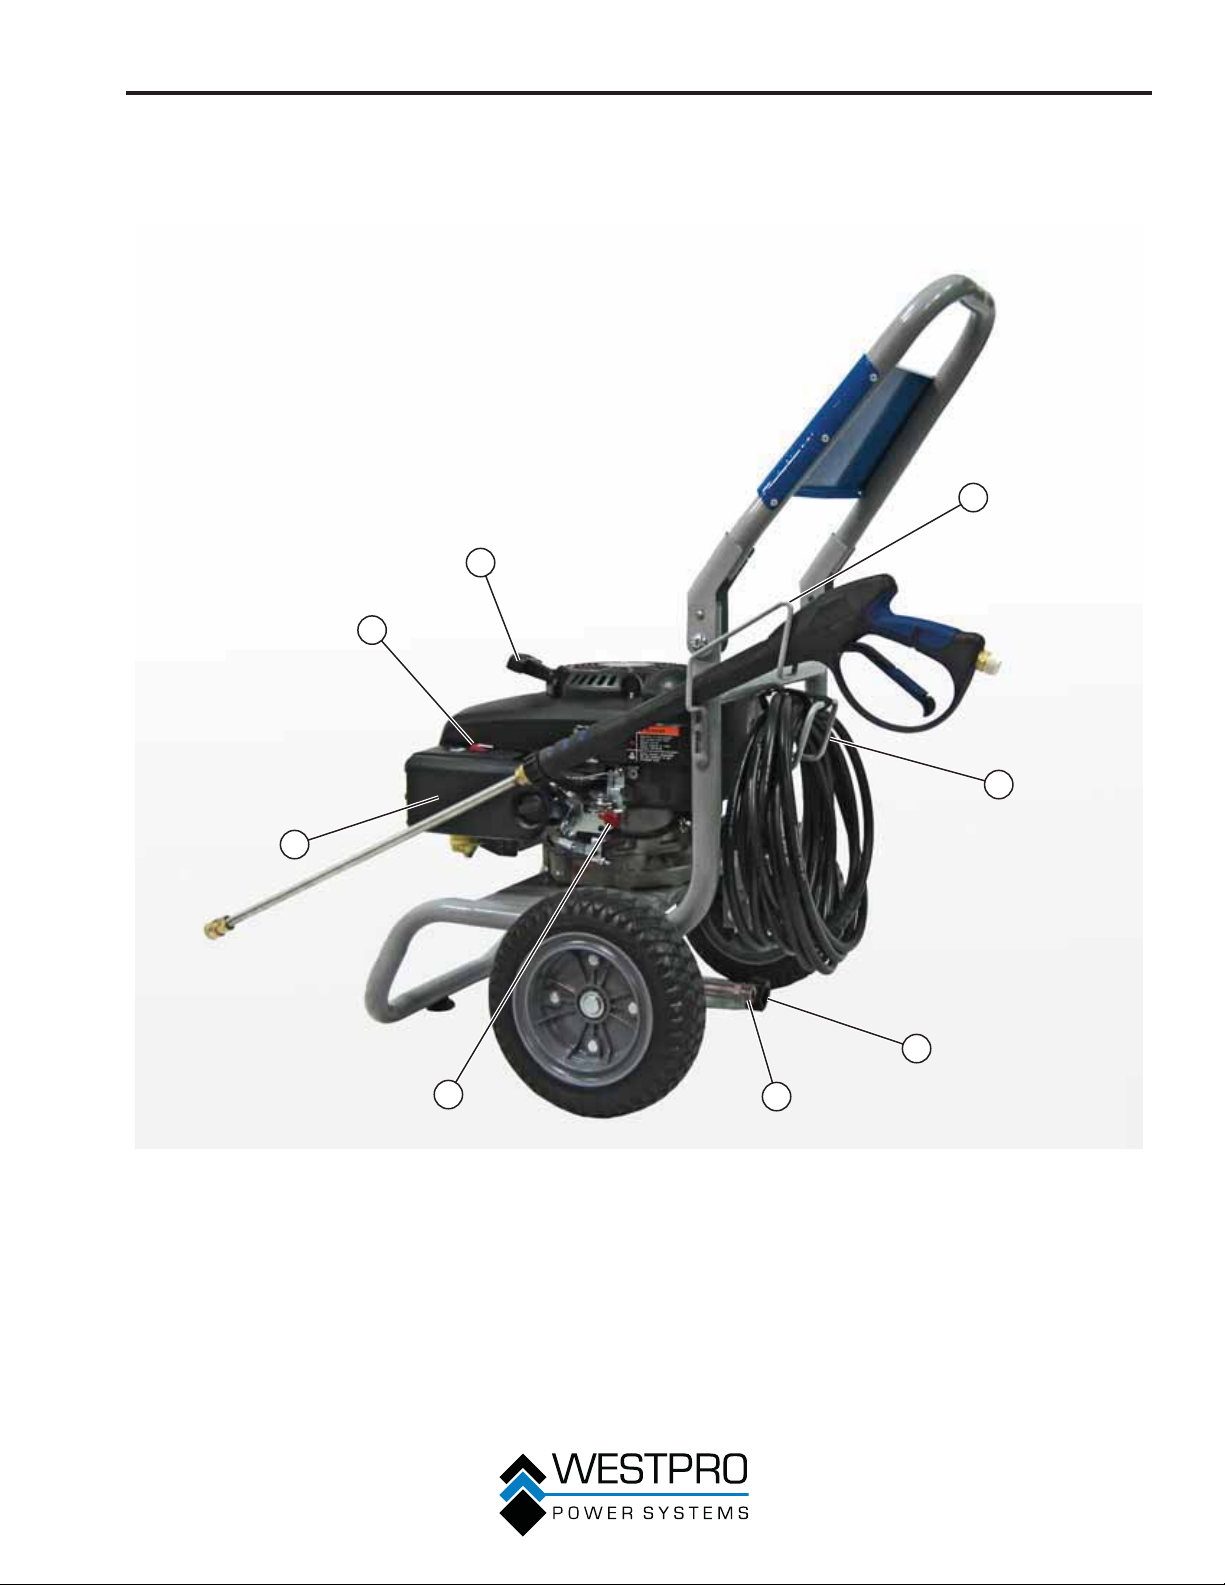
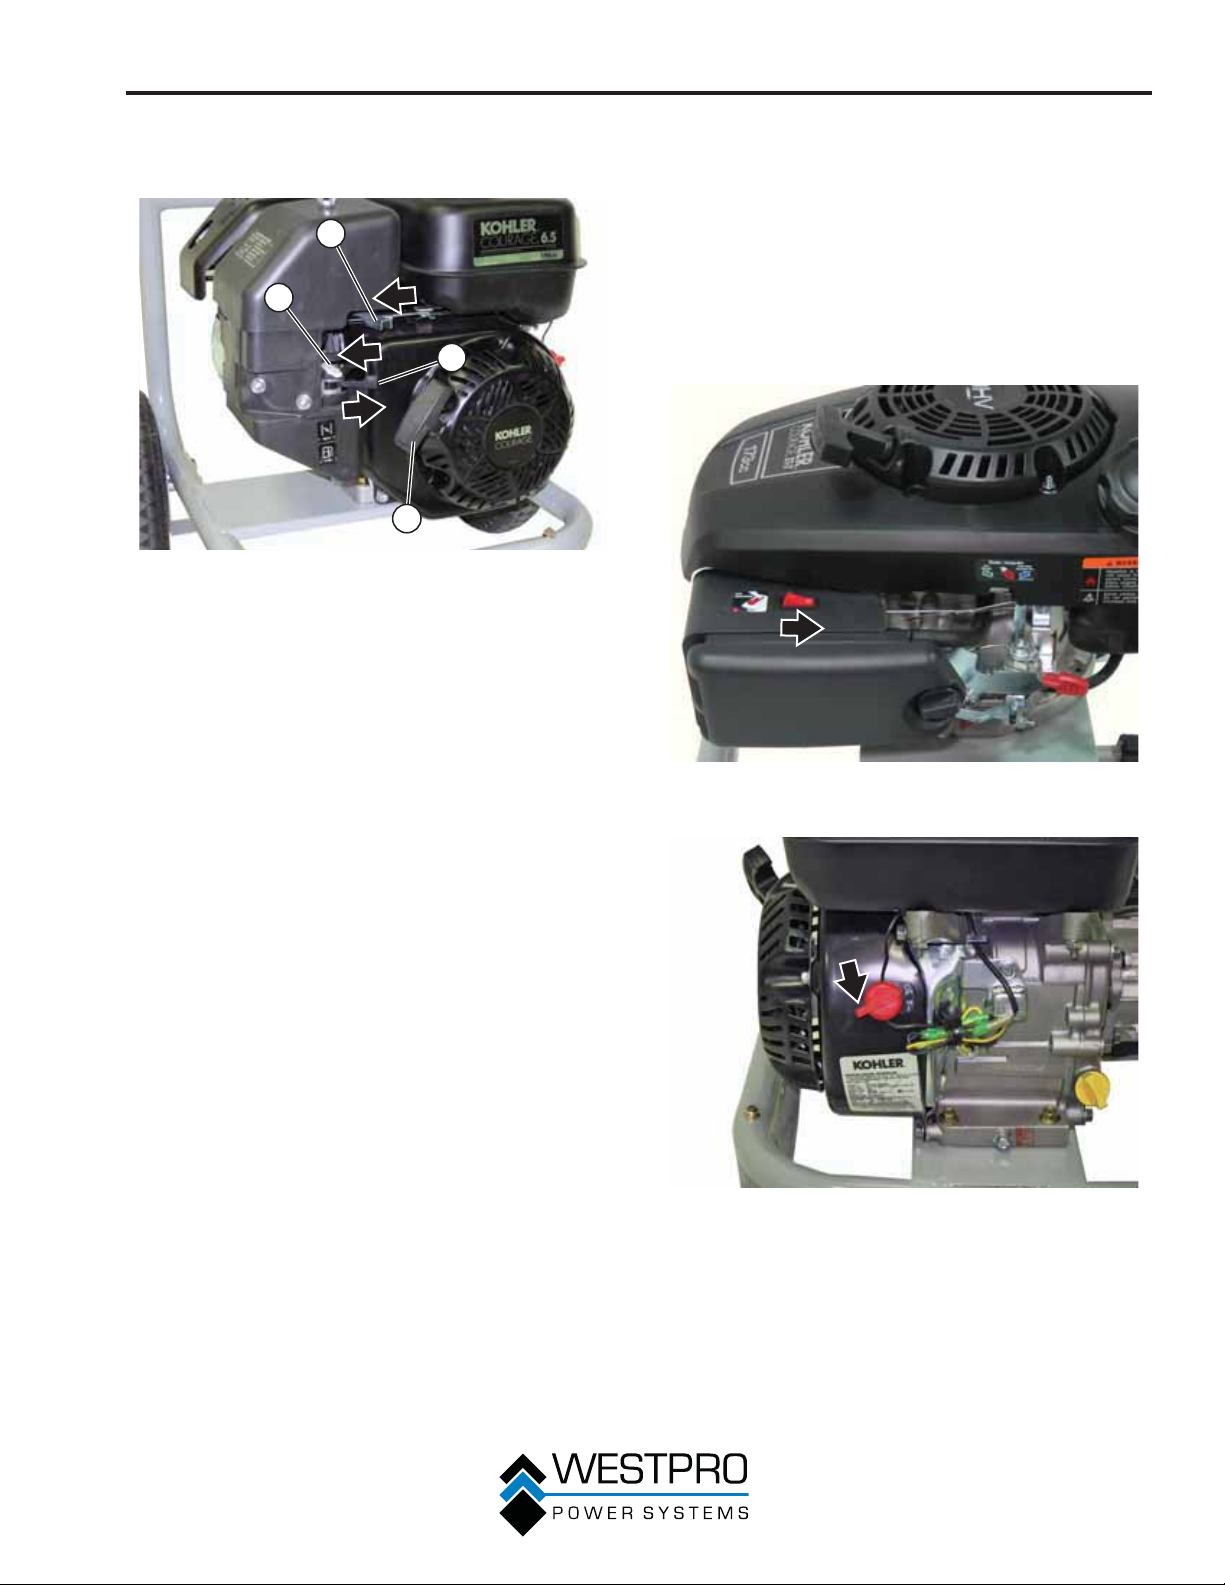
GENERAL PRESSURE WASHER FEATURES
WP2700
2
1
FEATURES
3
8
1 - ON/OFF Switch
2 - Starter Handle
3 - Spray Gun Bracket
4 - Hose Bracket
4
5
7
Figure 17
5 - Water Inlet Fitting
6 - High-Pressure Outlet Fitting
7 - Choke Lever
8 - Air Cleaner
6
17
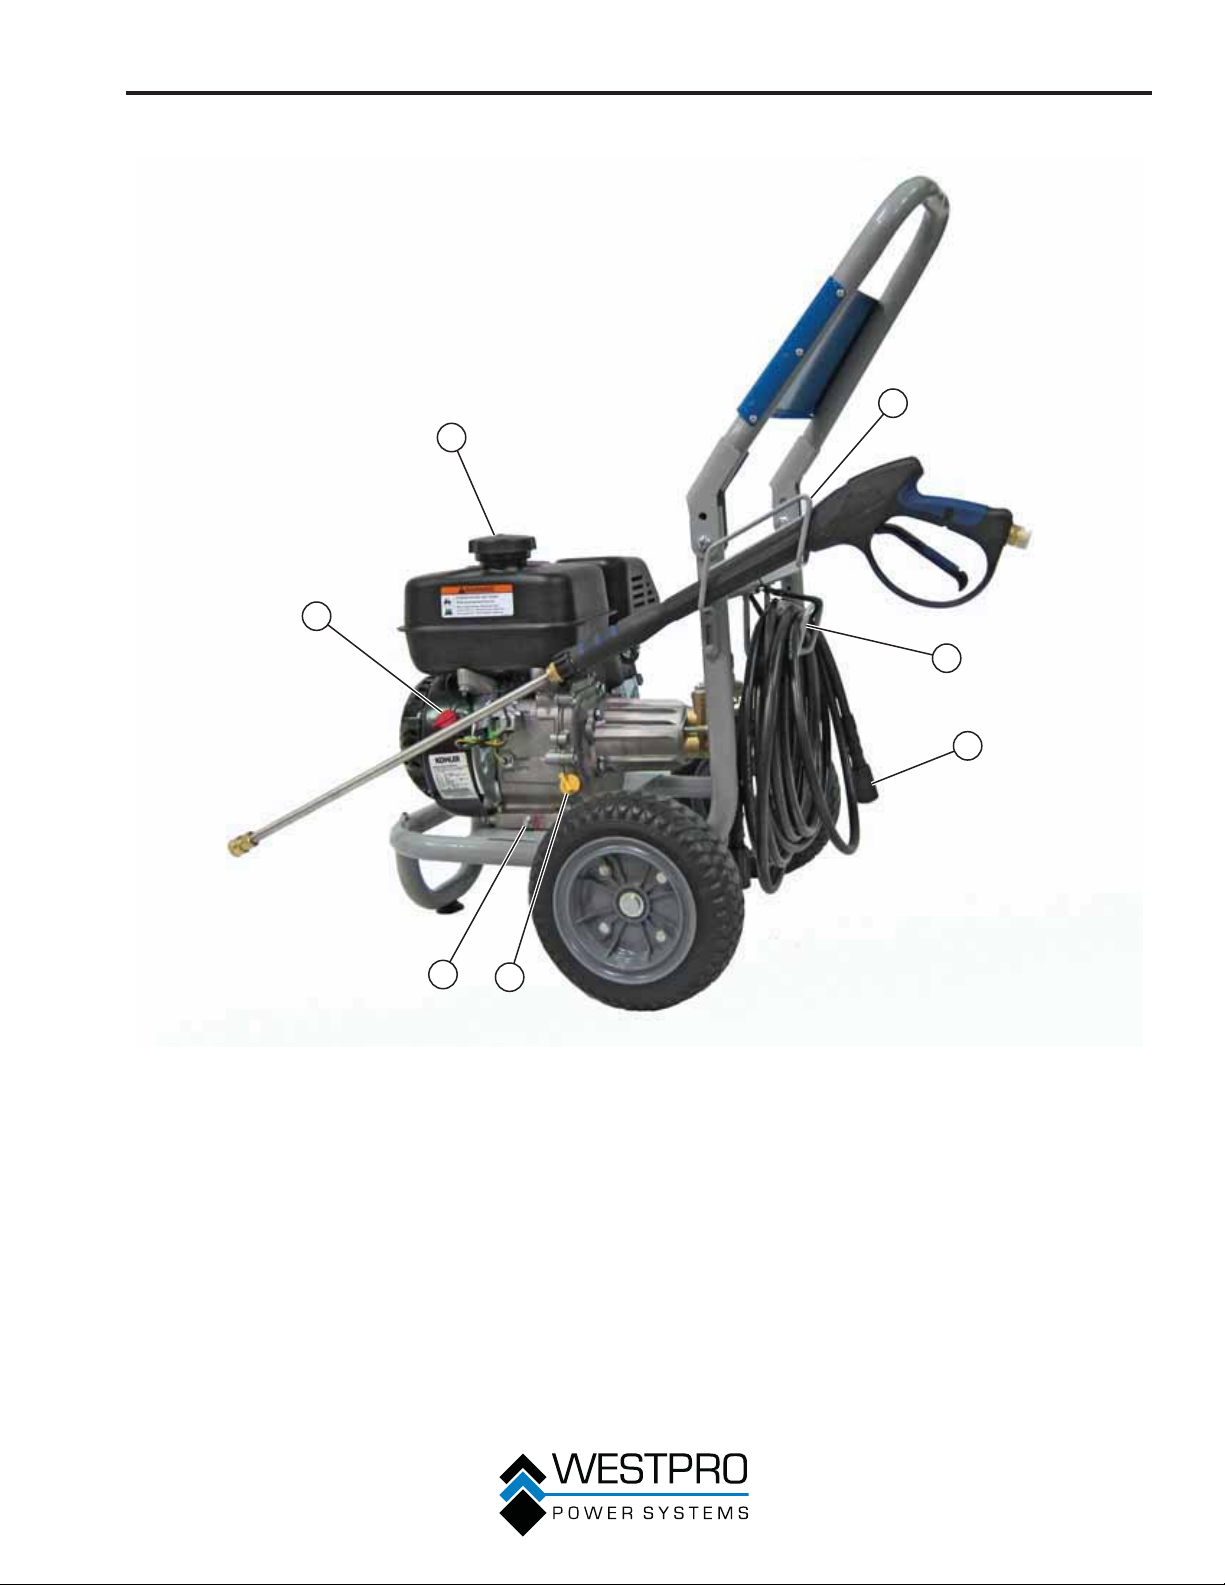
FEATURES
WP2700
1
2
3
7
4
5
6
1 - Spray Gun
2 - Nozzle Storage
3 - Fuel Cap
4 - Engine Oil Fill Plug/Dipstick
18
Figure 18
5 - Spark Plug
6 - Oil Drain Plug
7 - High-Pressure Hose
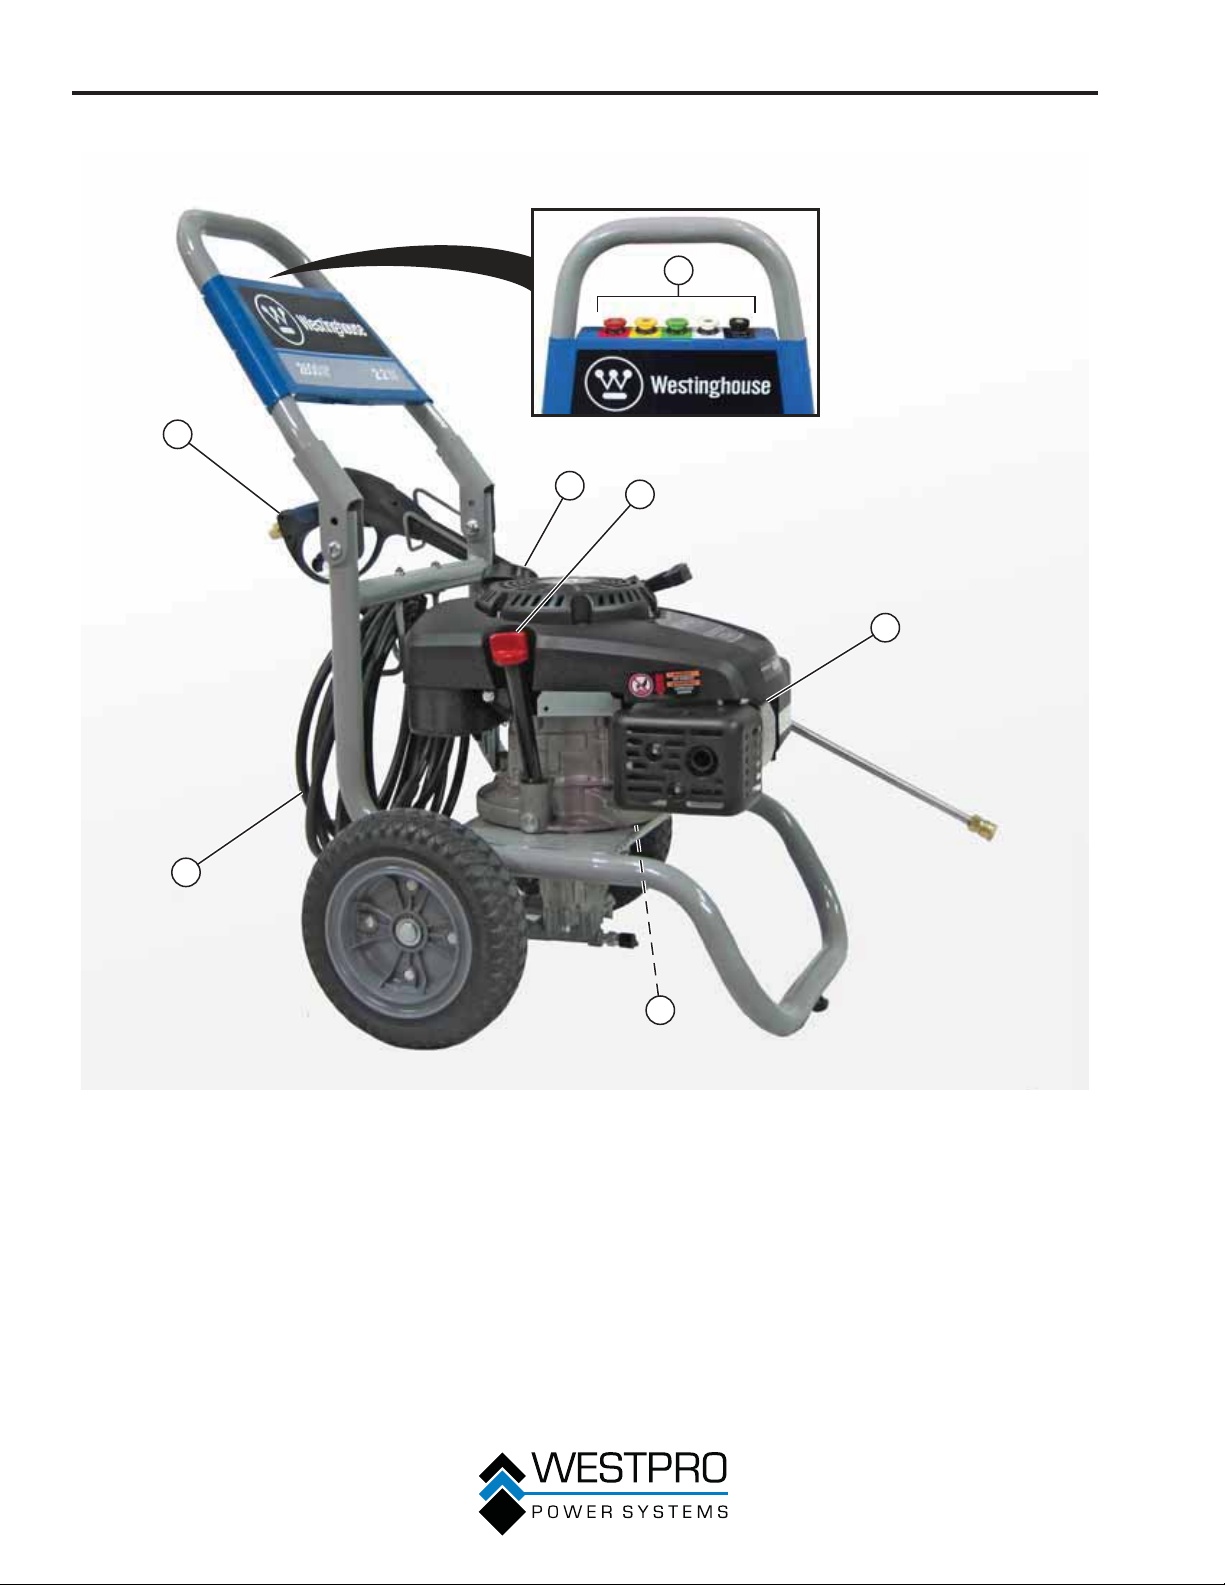
WP3000
FEATURES
3
2
1
1 - ON/OFF Switch
2 - Fuel Cap
3 - Spray Gun Bracket
4 - Hose Bracket
4
5
7
6
Figure 19
5 - High-Pressure Hose
6 - Engine Oil Fill Plug/Dipstick
7 - Oil Drain Plug
19
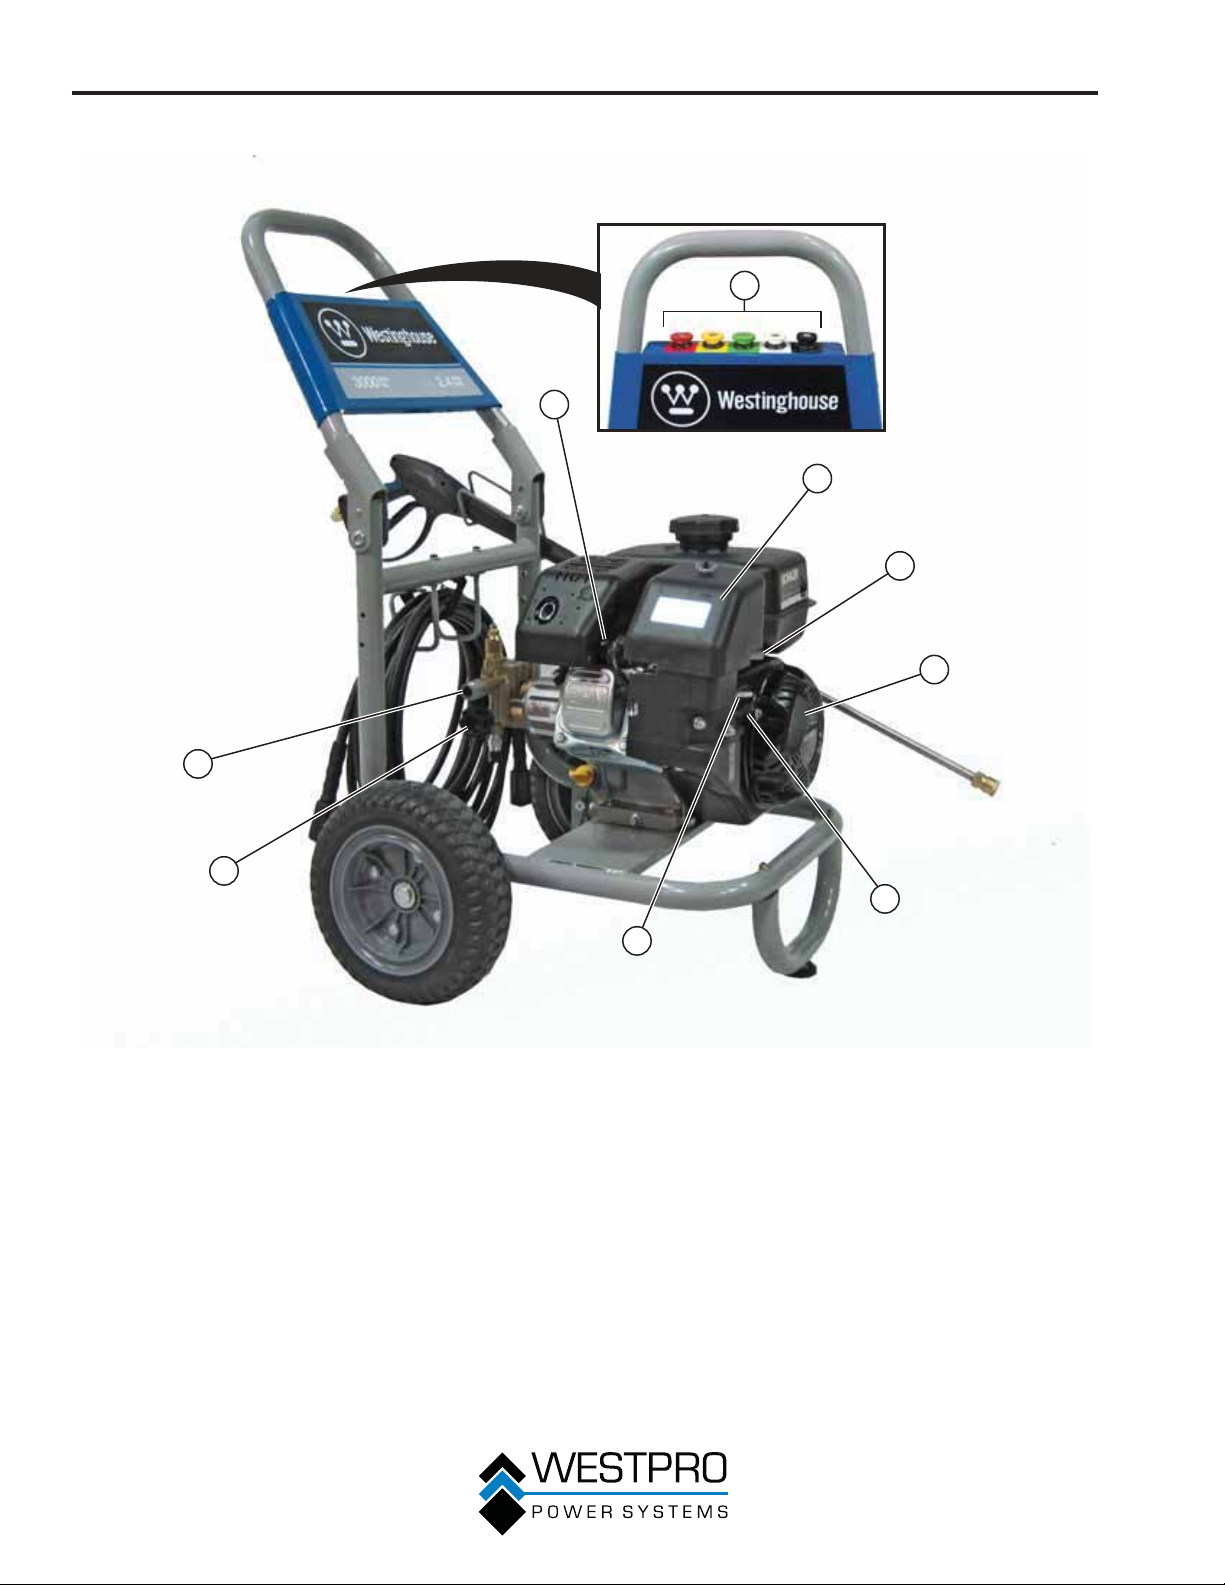
FEATURES
WP3000
2
1
3
4
9
8
1 - Spark Plug
2 - Nozzle Storage
3 - Air Cleaner
4 - Throttle Lever
5 - Starter Handle
5
6
7
Figure 20
6 - Fuel Shutoff Lever
7 - Choke Lever
8 - Water Inlet Fitting
9 - High-Pressure Outlet Fitting
20
OPERATION
BEFORE STARTING THE
PRESSURE WASHER
Before starting the pressure washer,
review Safety on page 7.
Location Selection – Before starting the pressure
washer, avoid exhaust and location hazards by verifying
the following:
x You have selected a location to operate the pressure
washer that is outdoors and well ventilated.
x You have selected a location with adequate drainage
but still level enough to prevent the pressure washer
from tipping over.
x You have selected a location that is at least 5 feet
(1.5 m) away from any building, other equipment or
combustible material.
x If the pressure washer is located close to a building,
make sure it is not located near any windows, doors
and/or vents.
!
WARNING
Always operate the pressure washer on
a surface that will prevent the pressure
washer from tipping over. Placing the
pressure washer on a surface that may
allow the pressure washer to tip over,
could cause fuel and oil to spill. Spilled
fuel can ignite if it comes in contact
with an ignition source such as a very
hot surface.
NOTICE
Operating the pressure washer on a surface with
loose material such as sand or grass clippings can
cause debris to be ingested by the pressure washer
that could:
• Block cooling vents
• Block air intake system
Check the following items before starting the engine:
1. Verify the pressure washer is properly assembled.
2. Check that recommended engine oil has been
added to proper level in the engine crankcase.
3. Add recommended fuel to fuel tank.
4. Check for properly tightened hose connections.
5. Check to make sure there are no kinks, cuts or
damage to high-pressure hose.
6. Provide a proper water supply at an adequate fl ow.
ADDING / CHECKING ENGINE
FLUIDS AND FUEL
Before adding/checking engine
fl uids and fuel, review Safety on
page 7.
!
DANGER
Filling the fuel tank with gasoline
while the pressure washer is running
can cause gasoline to leak and come
in contact with hot surfaces that can
ignite the gasoline.
Before starting the pressure washer, always check the
level of:
x Engine oil
x Gasoline in the fuel tank
Once the pressure washer is started and the engine
gets warm, it is not safe to add gasoline to the fuel tank
or engine oil to the engine while the engine is running
or the engine and muffl er are hot.
Checking and / or Adding Engine Oil
!
WARNING
Internal pressure can build in the
engine crankcase while the engine
is running. Removing the oil fi ll plug/
dipstick while the engine is hot can
cause extremely hot oil to spray out
of the crankcase and can severely
burn skin. Allow engine oil to cool for
several minutes before removing the oil
fi ll plug/dipstick.
The unit as shipped does not contain oil in the
engine. You must add engine oil before starting
the pressure washer for the fi rst time. Use the
entire supplied 0.6-liter container of engine
oil. See Checking Engine Oil on page 31 and
Adding Engine Oil on page 32 for instructions
on checking engine oil level and the procedure for
adding engine oil.
NOTICE
The pressure washer does not contain engine oil
as shipped. Attempting to start the engine without
adding engine oil can permanently damage internal
engine components.
21
OPERATION
Adding Gasoline to the Fuel Tank
!
WARNING
Never refuel the pressure washer while
the engine is running.
Always turn the engine off and allow
the pressure washer to cool before
refueling.
Required Gasoline – Only use gasoline that meets the
following requirements:
x Unleaded gasoline only
x Gasoline with maximum 10% ethanol added
x Gasoline with an 87 octane rating or higher
Filling the Fuel Tank – Follow the steps below to fi ll the
fuel tank:
1. Shut off the pressure washer.
2. Allow the pressure washer to cool down so all
surface areas of the muffl er and engine are cool to
the touch.
3. Move the
4. Clean area around the fuel cap.
5. Remove the fuel cap by rotating counterclockwise.
6. Slowly add gasoline into the fuel tank. Be very
careful not to overfi ll the tank. The gasoline level
should NOT be higher than the bottom of the fi ller
neck.
pressure washer to a fl at surface.
CONNECTING THE WATER
SUPPLY
NOTICE
Do not start the engine without the water supply
connected and turned on. Running the pump without
water will damage the pump.
Water supply must deliver a minimum of 3.8 gal
(14.3 L) per minute and at least 30 psi (2 bar). Do
not siphon standing water for the water supply. Water
temperature must not exceed 100°F (37.7°C).
1. Run water through your garden hose to clear out
any debris that may have been in the hose.
2. Inspect the water inlet screen to make sure it is in
place and free of debris (see Figure 21 and Figure
22). Do not operate the pressure washer with a
missing or damaged inlet screen.
2
NOTICE
Take care when installing the fuel cap. Threads can
be damaged if cap is incorrectly installed.
7. Install the fuel cap by rotating clockwise until it hits
the stop, indicating the cap is completely installed.
!
CAUTION
Avoid prolonged skin contact with
!
gasoline. Avoid prolonged breathing of
gasoline vapors.
1
Figure 21 – Water Connection – WP2700
1 - Water Inlet
Screen
2 - Water Inlet
Fitting
22
2
1
Figure 22 – Water Connection – WP3000
1 - Water Inlet
Screen
2 - Water Inlet
Fitting
NOTICE
Make sure water inlet screen is in place before
attaching hose.
3. Use the shortest hose possible to complete the
job at hand. Using a longer hose may affect
performace. Connect a garden hose that is not
longer than 50 feet (15.2 m) to the water inlet fi tting
(see Figure 21 and Figure 22).
4. Tighten the fi tting onto the hose.
5. Turn the water on and inspect for leaks.
6. Squeeze the trigger on the gun and allow any air to
bleed out of the hoses and the pump before starting
the engine.
7. Connect the soap hose to the soap bottle if using
soap.
OPERATION
STARTING THE PRESSURE
WASHER
Before starting the pressure washer,
review Safety on page 7.
OTE: N Pressure washer may walk or move when used
on hard surfaces. Be sure the unit is secure
during operation.
Before attempting to start the pressure washer, verify
the following:
x The engine is fi lled with engine oil (see Checking
Engine Oil on page 31).
x The pressure washer is situated in a proper location
(see Location Selection on page 21).
!
DANGER
Never operate the pressure washer
in an enclosed area. Engine exhaust
contains carbon monoxide that can kill
in minutes. Only operate the pressure
washer outside and away from
windows, doors and vents.
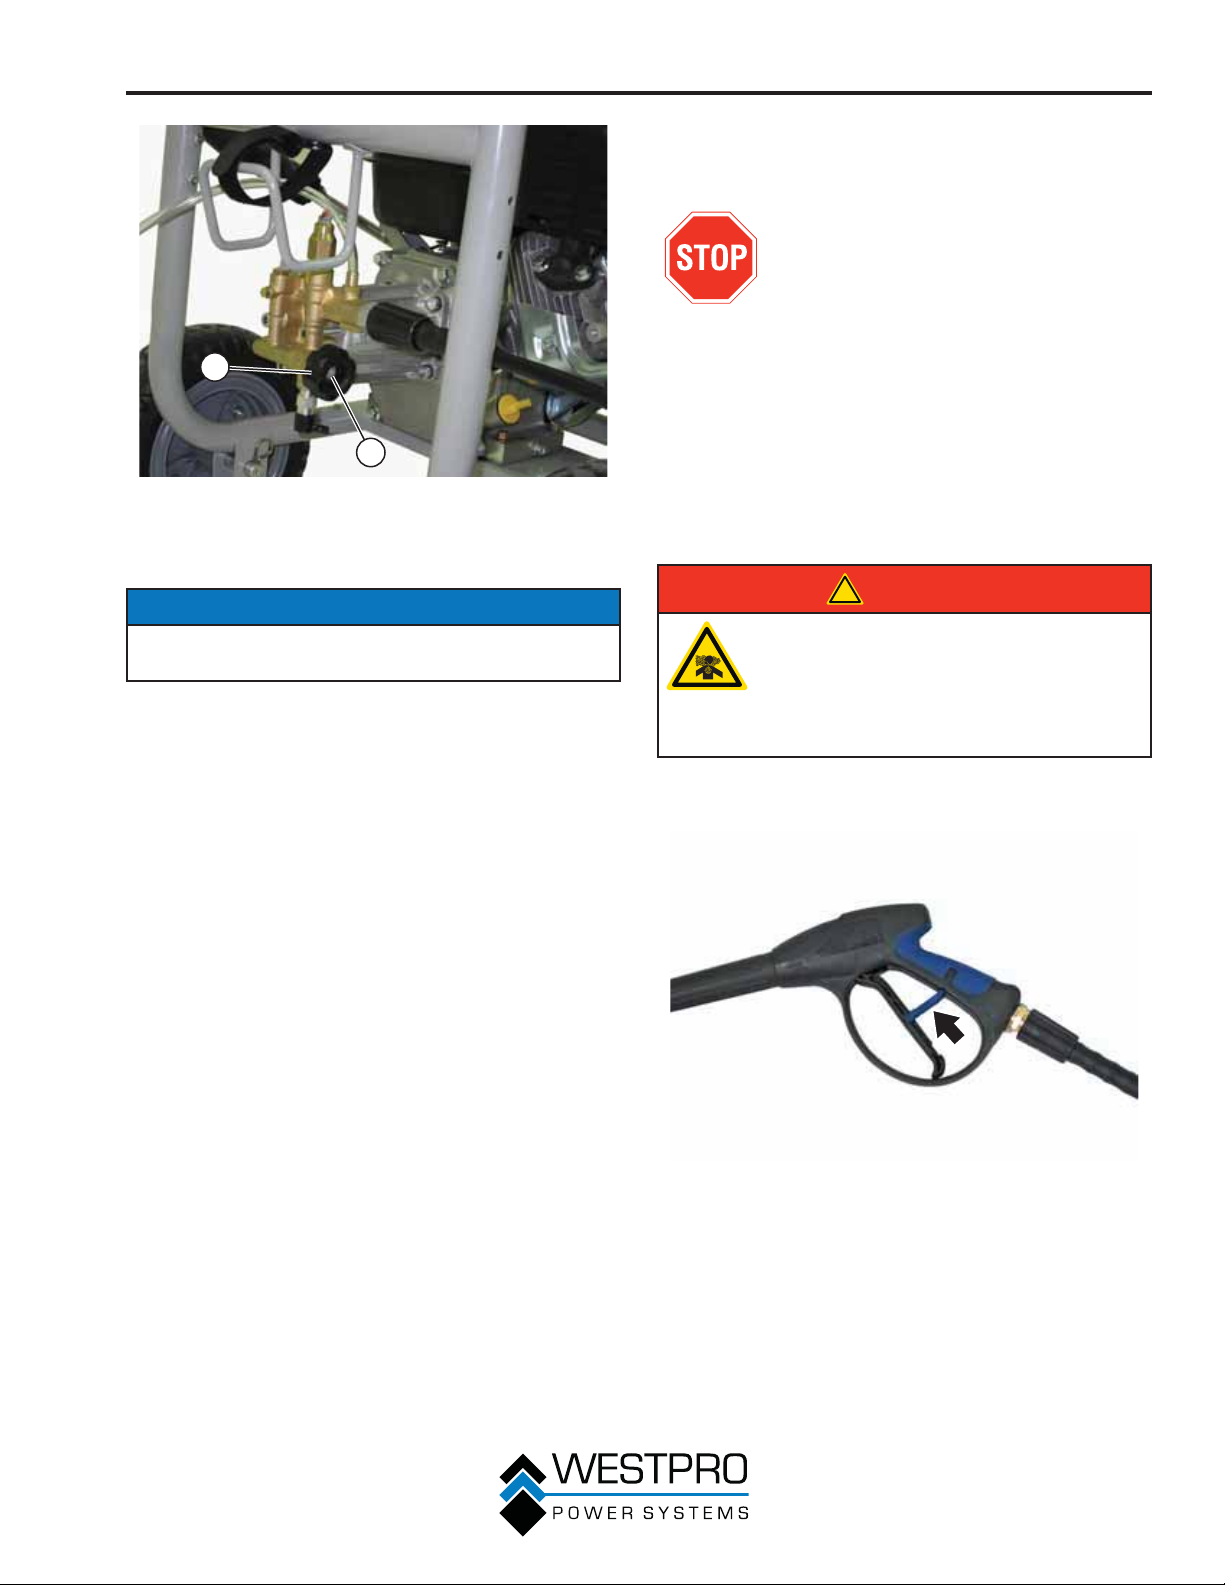
1. Flip the trigger lock lever up and lock the trigger in
the OFF position (see Figure 23).
Figure 23 – Trigger Lock Lever
2. Make sure the water supply is turned on.
23
OPERATION
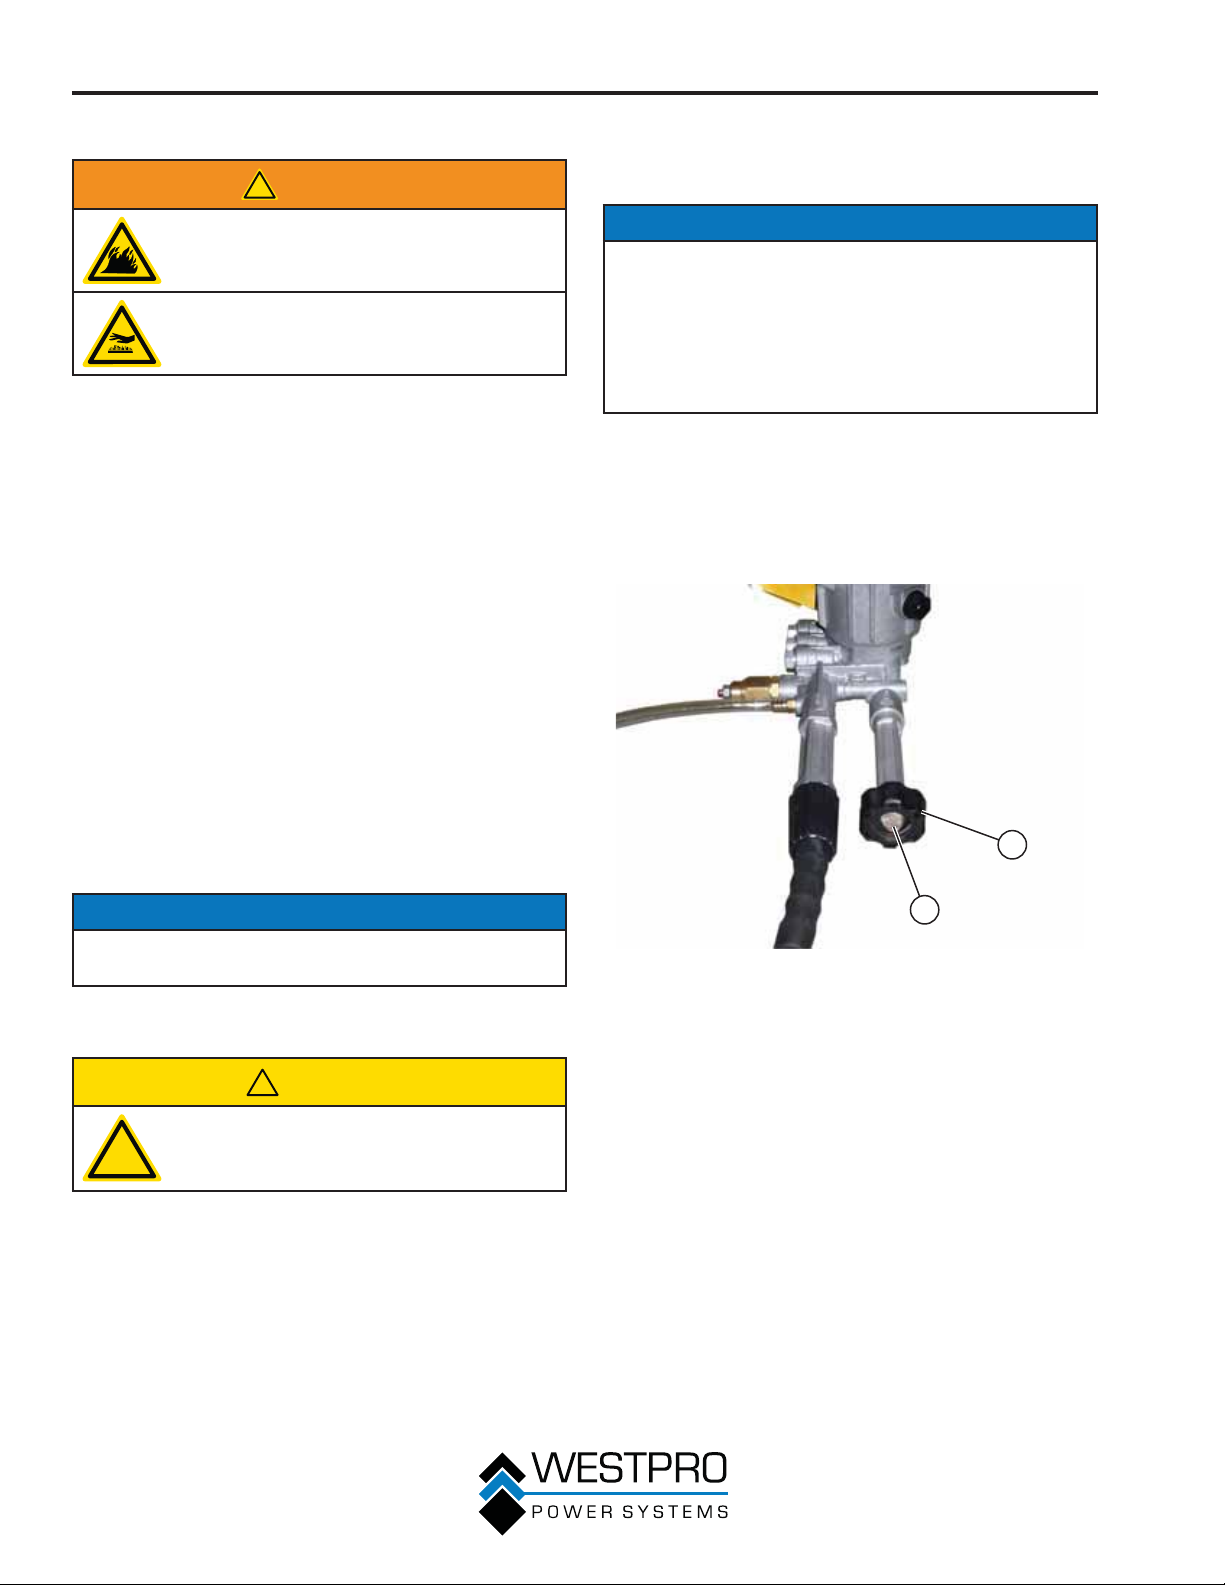
OTE: N The pump is equipped a with a thermo valve
(see Figure 24 and Figure 25). If the pump
is run for an extended period of time without
water fl owing through it, it could overheat. If
the pump gets to a certain temperature, the
thermo valve will open and discharge warm
water out the valve to allow cold water in to
cool the pump.
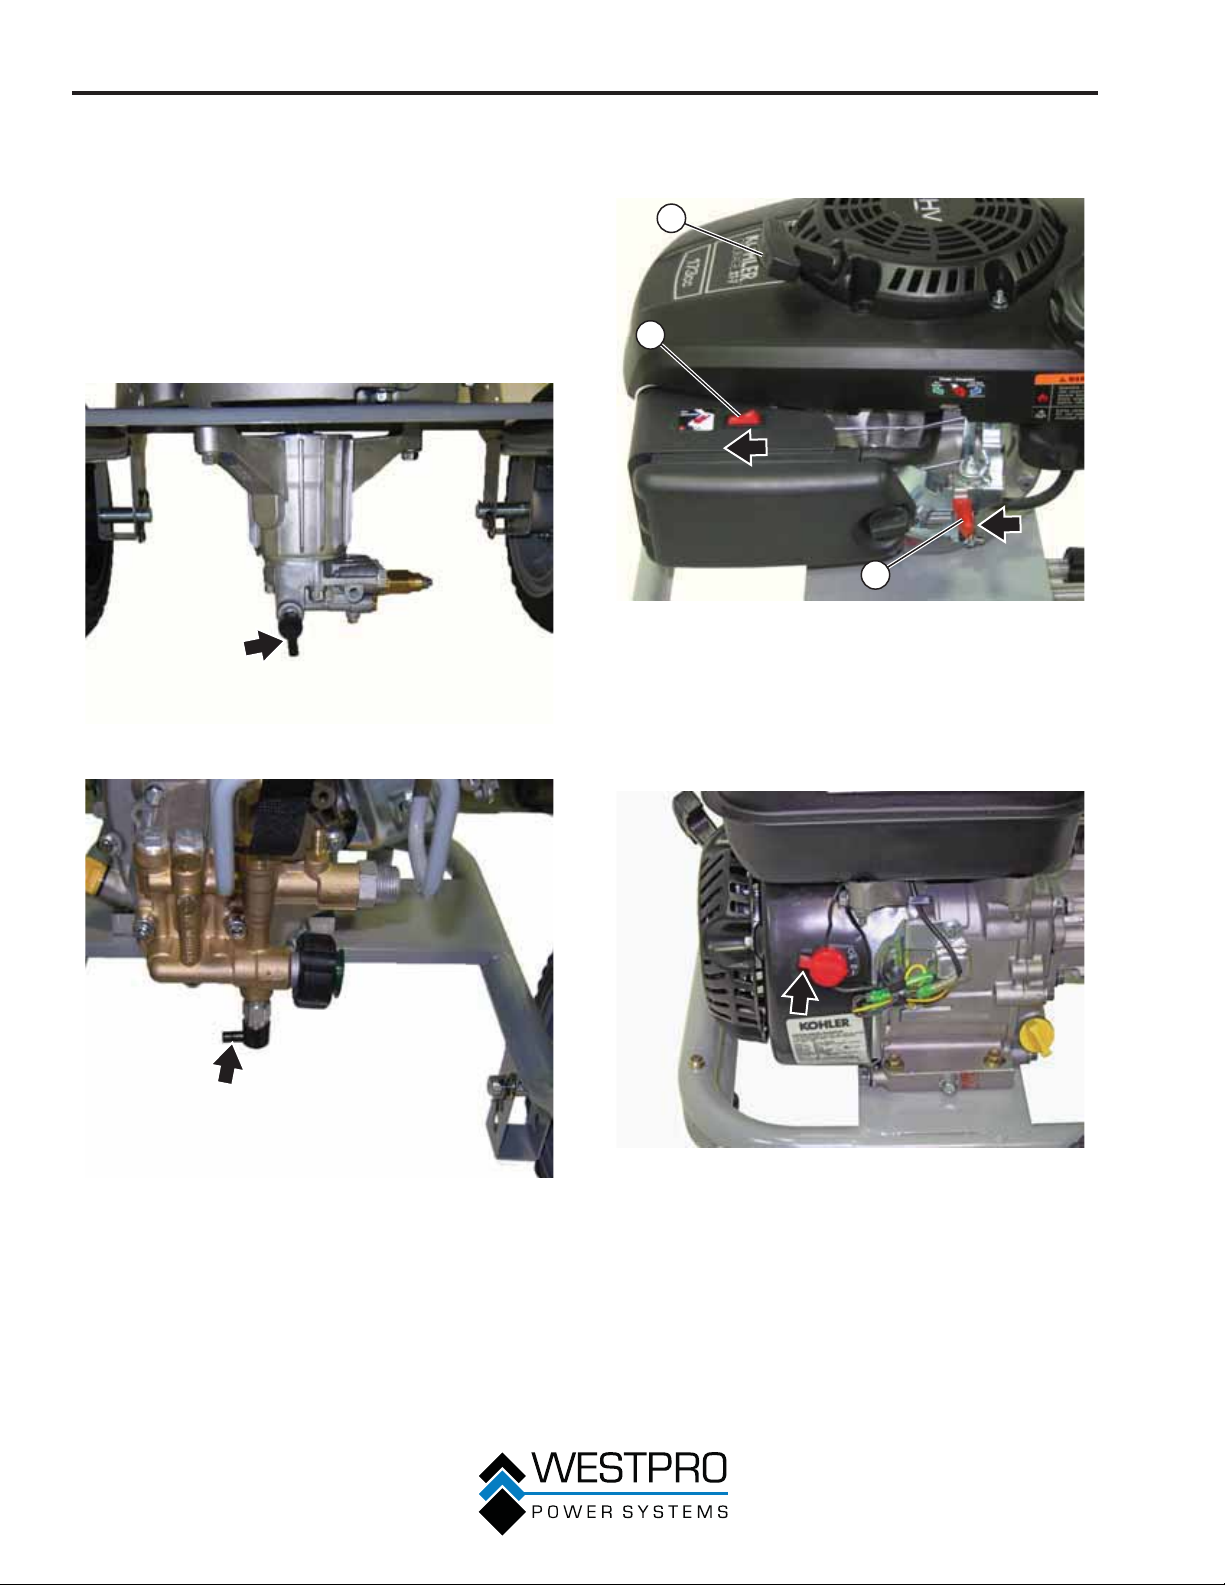
3. Point the thermo valve away from the work area
you are washing to avoid being sprayed with warm
water.
Figure 24 – Pump Thermo Valve – WP2700
4. WP2700 – Move the engine ON/OFF switch to the
ON (I) position (see Figure 26). Move the choke
lever to the choke position.
3
1
2
Figure 26 – Engine ON/OFF Switch – WP2700
1 - Engine ON/OFF
Switch
2 - Choke Lever
5. WP3000 – Move the engine ON/OFF switch to the
ON position (I) (see Figure 27).
3 - Starter Handle
Figure 25 – Pump Thermo Valve – WP3000
24
Figure 27 – Engine ON/OFF Switch – WP3000
OPERATION
6. WP3000 – Move the throttle lever to the full throttle
position (see Figure 28). Move the choke lever to
the choke position. Open the fuel shutoff valve.
1
2
3
4
Figure 28 – Throttle Lever, Choke Lever, Fuel Shutoff
Valve
1 - Throttle Lever
2 - Choke Lever
7. Firmly grasp and pull the starter handle slowly until
you feel increased resistance. At this point, apply a
rapid pull on the starter handle.
OTE: N If the engine starts briefl y and then shuts off,
squeeze the trigger on the spray gun to relieve
the pressure before trying to start the engine
again.
8. Once the engine starts, move the choke lever to the
open position. Allow the engine to warm up slightly
before beginning washing.
3 - Fuel Shutoff
Valve
4 - Starter Handle
STOPPING THE PRESSURE
WASHER
Normal Operation
During normal operation, use the following steps to stop
your pressure washer:
1. Lock the spray gun trigger lock in the OFF position.
2. Move the engine ON/OFF switch to the OFF (O)
position (see Figure 29 and Figure 30).
Figure 29 – Engine ON/OFF Switch OFF Position –
WP2700
OTE: N WP3000 – Always operate the engine at full
throttle position when washing.
Figure 30 – Engine ON/OFF Switch OFF Position –
WP3000
25
OPERATION
3. WP3000 – Close the fuel shutoff valve (see Figure
31).
Figure 31 – Closing Fuel Shutoff Valve – WP3000
4. Turn the water supply off.
5. Unlock the spray gun trigger and squeeze the
trigger to release any pressure in the hoses and
pump.
6. Disconnect the garden hose from the water inlet.
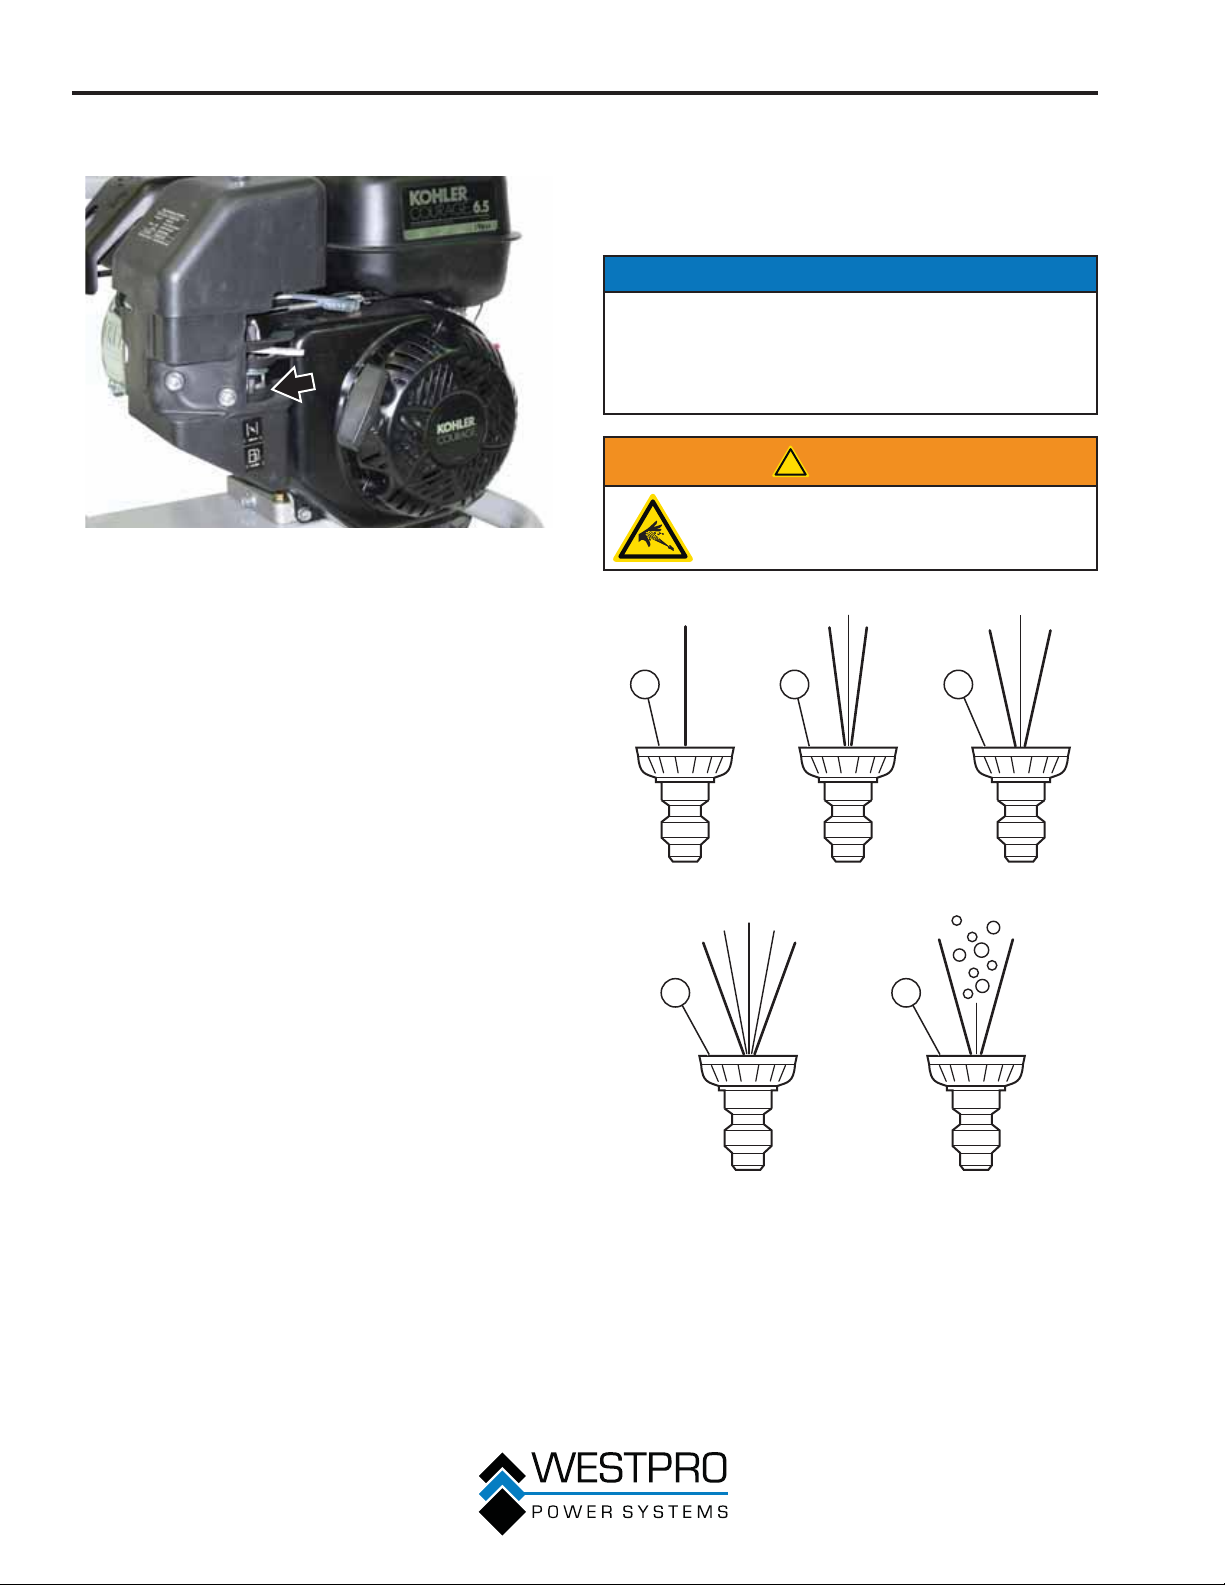
SELECTING NOZZLES
The quick-connect feature allows changing between
nozzles while the pressure washer is running once the
spray gun trigger is locked in the safe position.
NOTICE
Only use the nozzles that were supplied with the
pressure washers. Using any other nozzles can
affect performance and may void the warranty. For
replacement nozzles go to www.westpropower.com
or call (855) 944-3571.
!
WARNING
Always apply the trigger lock to change
a nozzle if the engine is running.
1 2 3
During an Emergency
If there is an emergency and the pressure washer must
be stopped quickly, push the engine control switch to
the OFF (O) position immediately.
4 5
Figure 32 – Nozzle Spray Pattern
1 - Red High
Pressure 0°
2 - Yellow High
to Medium
Pressure 15°
3 - Green Medium
Pressure 25°
4 - White Low
Pressure 40°
5 - Black Soap
26

OPERATION
Table 1: Nozzles
Nozzle Use
1. High Pressure
Nozzle (Red) –
higher pressure
and smallest spray
pattern
NOTICE: The red
nozzle can damage
surfaces if it is held
too close for an
extended time
2. High to Medium
Pressure Nozzle
(Yellow) – high to
medium pressure
with smallest angle
spray pattern
3. Medium Pressure
Nozzle (Green) –
medium pressure and
medium spray pattern
4. Low Pressure Nozzle
(White) – lower
pressure and widest
spray pattern
5. Soap Nozzle (Black)
NOTICE: Only use
pressure washer–
safe soap.
Use to clean hard,
embedded dirt
and grime. Use on
concrete, brick,
driveways and patios.
Use to clean paint,
stain, mildew, oil, and
compacted dirt and
grime. Use on wood
decks, home siding,
driveways and patios.
Use to clean paint,
stain, mildew, oil, and
compacted dirt and
grime. Use on wood
decks, home siding,
driveways and patios.
Use to clean general
loose dirt and grime.
For use on most
surfaces including
cars, wood decks,
patios, outdoor
furniture, home
siding, and lawn and
garden equipment.
Use to apply soap
to cleaning surfaces
in order to provide a
thorough cleaning.
Changing the Nozzle
1. Push up the trigger lock to lock it in the OFF
position (see Figure 33).
Figure 33 – Trigger Lock Locked
2. Pull the quick coupler toward the spray gun (see
Figure 34).
Figure 34 – Installing a Nozzle
3. Push the nozzle into the coupler and push the
coupler away from the spray gun (see Figure 34).
The nozzle will lock into place. Tug on the nozzle to
verify it is locked in place.
SPRAYING TIPS
For most cleaning, keep nozzle 8 – 24 in. (20 – 61 cm)
away from cleaning surface.
x Damage may occur to the cleaning surface if you
spray too close, especially with high-pressure
nozzles.
x When you begin spraying, start farther away and
move closer to avoid damage to the surface.
x When cleaning tires, allow at least 6 in. (15 cm)
between a tire and the nozzle.
NOTICE
Do not get any closer than 6 in. (15 cm). Spraying
closer than 6 in. (15 cm) may damage tire.
To relieve system pressure, shut off engine, turn off water
supply and pull gun trigger until water stops fl owing.
27
OPERATION
SPRAYING SOAP
NOTICE
Only use pressure washer–safe soap.
1. Install the soap nozzle (black).
NOTICE
Only use the soap nozzle to apply soap. Using other
nozzles will not apply soap.
2. Prepare soap solution following manufacturer’s
instructions.
3. Place soap siphon hose into
NOTICE
Do not route soap siphon hose where it can contact
the muffl er while the engine is running.
4. Make sure the garden hose and high-pressure hose
are connected.
NOTICE
All hoses must be connected before starting the
engine.
5. Turn on the water supply.
6. Start the engine and squeeze the trigger.
7. Use long, even overlapping stroke to apply
8. Allow 3 – 5 minutes for the soap to soak in before
washing and rinsing. Do not allow the
dry on the surface before rinsing. Reapply
necessary to maintain a wet surface for the soap to
soak in.
soap container.
soap.
soap to
soap if
RINSING
!
WARNING
Always apply the trigger lock to change
a nozzle if the engine is running.
1. Select the desired nozzle and change nozzle. See
Selecting Nozzles on page 26.
2. Squeeze the trigger and carefully start to spray,
keeping nozzle a safe distance from the cleaning
surface.
3. Starting from the top of the surface, spray a small
area then check surface for damage. If no damage,
continue rinsing by using overlapping strokes
working down the surface. Keep checking surface
for damage while rinsing.
CLEANING SOAP SIPHON
HOSE
If used, clean the soap siphon hose before stopping the
engine.
1. If necessary, install the soap nozzle (black).
2. Use clean water to fl ush the soap siphon hose.
Submerge the soap siphon hose in the clean water.
3. Flush the soap siphon hose for 1 – 2 minutes while
the engine is running.
4. Once clean, stop the engine.
5. Point spray gun in a safe direction. Squeeze the
trigger to release pressure within the system.
NOTICE
Clean the soap siphon hose once done. See
Cleaning Soap Siphon Hose on page 28.
28
MAINTENANCE
MAINTENANCE
Before performing maintenance on
the pressure washer, review Safety
on page 7 and the following
safety messages.
!
WARNING
Avoid accidentally starting the
!
pressure washer during maintenance
by removing the spark plug boot from
the spark plug.
Allow hot components to cool to
the touch prior to performing any
maintenance procedure.
Internal pressure can build in the
engine crankcase while the engine
is running. Removing the oil fi ll plug/
dipstick while the engine is hot can
cause extremely hot oil to spray out
of the crankcase and can severely
burn skin. Allow engine oil to cool for
several minutes before removing the oil
fi ll plug/dipstick.
Always perform maintenance in a wellventilated area. Gasoline fuel and fuel
vapors are extremely fl ammable and
can ignite under certain conditions.
Maintenance Schedule
!
WARNING
Failure to perform periodic
!
maintenance or not following
maintenance procedures can cause the
pressure washer to malfunction and
could result in death or serious injury.
NOTICE
Periodic maintenance intervals vary depending on
pressure washer operating conditions. Operating the
pressure washer under severe conditions, such as
sustained high-load, high-temperature, or unusually
wet or dusty environments, will require more frequent
periodic maintenance. The intervals listed in the
maintenance schedule should be treated only as a
general guideline.
Following the maintenance schedule is important to
keep the pressure washer in good operating condition.
The following is a summary of maintenance items by
periodic maintenance intervals.
!
CAUTION
Avoid skin contact with engine oil or
gasoline. Prolonged skin contact with
engine oil or gasoline can be harmful.
Frequent and prolonged contact with
engine oil may cause skin cancer.
Take protective measures and wear
protective clothing and equipment.
Wash all exposed skin with soap and
water.
29
 Loading...