

Page 1

USER’S MANUAL
MANUEL DE L’UTILISATEUR
MANUAL DEL USUARIO
SK-26H590D
SK-32H590D
Widescreen DVD Combo
Combo Lecteur à Écran Géant
Combo DVD Pantalla Grande
Page 2

INDEX
IMPORTANT INFORMATION............................................................2
1. WARNING.......................................................................................2
2. SAFETY GUIDELINES...................................................................3
3. IMPORTANT SAFETY INSTRUCTIONS........................................4
4. ANTENNA INSTALLATION SAFETY.............................................6
5. CLEANING THE LCD TV.........................................................6
6. DISC.......................................................................................7
PREPARATION............................................................9
1. PACKAGE CONTENTS...................................................9
2. TV CONTROLS..................................................................10
3. TERMINALS.......................................................................11
4. REMOTE CONTROL......................................................................12
INSTALLATION.............................................................................................14
1. INSERT BATTERIES IN THE REMOTE CONTROL...................................14
2. ANTENNA CONNECTION...........................................................................15
3. EXTERNAL DEVICE CONNECTIONS........................................................16
4. POWER CONNECTION..............................................................................18
5. INITIAL SETUP............................................................................................18
BASIC OPERATION.....................................................................21
1. TURNING ON AND OFF THE POWER................................21
2. SOUND VOLUME...............................................................21
3. CHANGING CHANNELS............................................................................22
4. INPUT SELECTION............................................................................22
5. SELECTING MENU ITEMS............................................................23
MENU OPERATION................................................................24
1. VIDEO.............................................................................................25
2. AUDIO..........................................................................................29
3. CHANNELS..................................................................................33
4. LOCKS.............................................................................................37
5. SETTINGS.........................................................................................42
6. ADVANCED..............................................................................52
PLAY DISC...........................................................................56
1. PLAYBACK PROCEDURE......................................................................56
2. SPECIAL PLAYBACK..................................................................57
3. DVD SETTINGS.....................................................................58
MP3/WMA/JPEG CD Playback.......................................................59
1. MP3/WMA/JPEG CD information.............................................59
2. MP3/MWA CD playback..................................................................60
3. JPEG CD playback...................................................................60
SPECIFICATIONS...........................................................................61
TROUBLESHOOTING....................................................................63
APPENDIX.......................................................................................64
APPENDIX A: Remove the base...................................................64
1
Page 3
IMPORTANT INFORMATION
1. WARNING
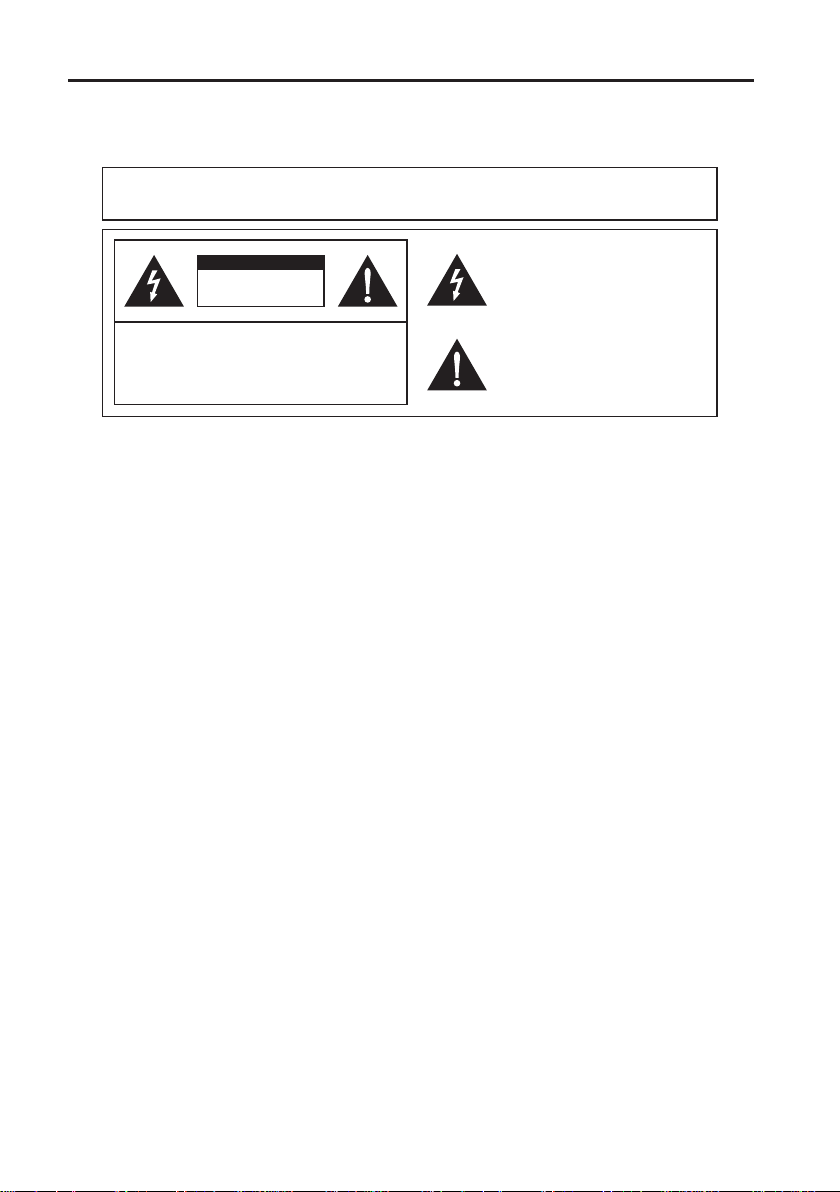
WARNING : TO REDUCE THE RISK OF FIRE OR ELECTRIC SHOCK, DO NOT
EXPOSE THIS PRODUCT TO RAIN OR MOISTURE.
CAUTION
RISK OF ELECTRIC SHOCK
DO NOT OPEN
COUTION: TO REDUCE THE RISK OF ELECTRIC SHOCK,
DO NOT REMOVE COVER (OR BACK).
NO USER-SERVICEABLE PARTS INSIDE.
REFER SERVICING TO QUALIFIED SERVICE
PERSONNEL.
The lightning flash with arrow-head symbol,
within an quilateral triangle, is intended to
alert the user to the presence of uninsulated
“dangerous voltage” within the product’s
enclosure that may be of sufficient magnitude
to constitute a risk of electric shock to persons.
The exclamation point within a triangle is
intended to alert the user to the presence
of important operating and maintenance
(servicing ) instructions in the literature
accompanying the product.
2
Page 4
2. SAFETY GUIDELINES
IMPORTANT INFORMATION
WARNING: This device must be operated with the original power supply.
CAUTION:
Always use the appropriate AC cord that is certifi ed for your specifi c country. Some examples are listed below:
The power supply outlet should be located near the LCD TV and should be easily accessible.
USA..................UL Canada.............CSA
Japan ............... Electric Appliance Control Act
IMPORTANT NOTICE CONCERNING POWER CORD SELECTION
The specific power cord for this LCD TV is enclosed and has been selected according to the country of
destination and must be used to prevent electric shock. Use the following guidelines if it is necessary to
replace the original cord set, or if the cord set is not enclosed. The female receptacle of the cord set must meet
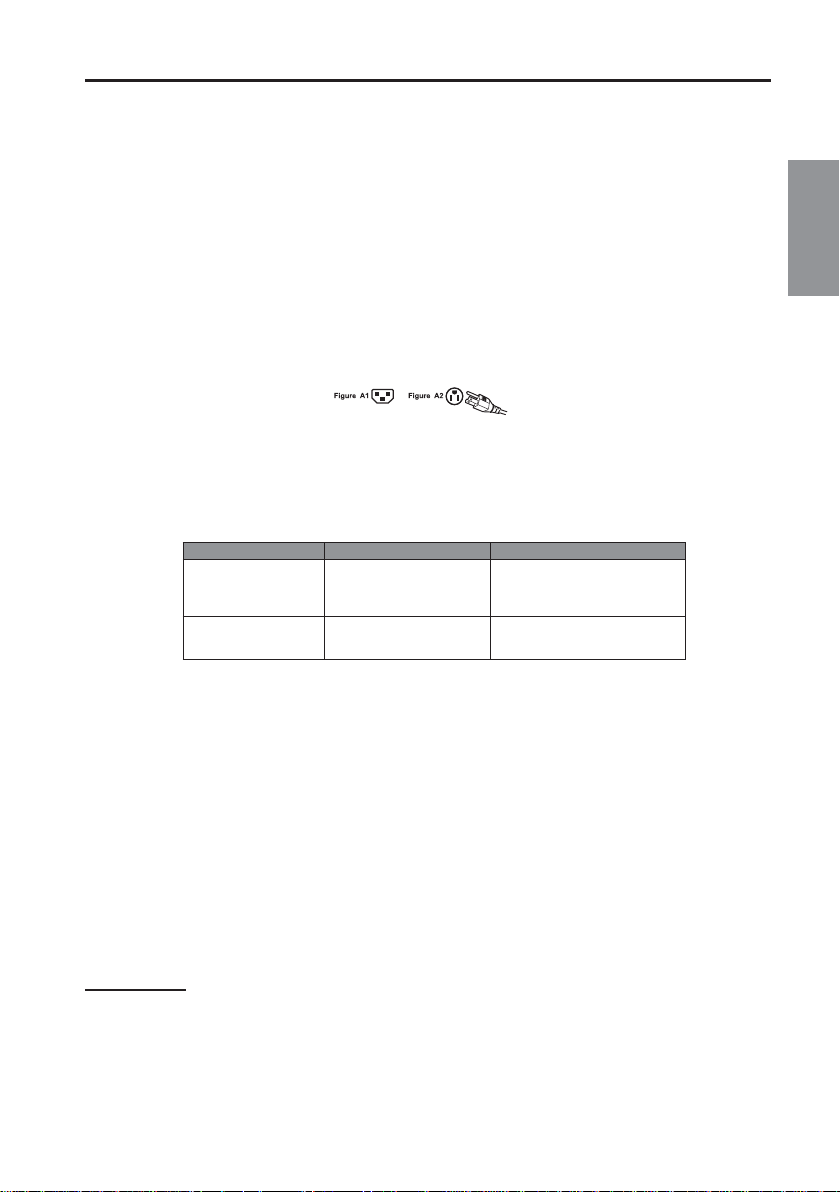
IEC-60320 requirements and should look like Figure A1 below:
•For the United States and Canada
In the United States and Canada the male plug is a NEMA5-15 style (Figure A2), UL Listed, and CSA Labeled.
For LCD TVs that are placed on a desk or table, type SVT or SJT cord sets may be used. For LCD TVs
placed directly on the fl oor, only SJT type cord sets may be used. The cord set must be selected according to
the current rating for the LCD TV. Please consult the table below for the selection criteria for power cords used
in the United States and Canada.
Cord Type Size of Conductors in Cord
18 AWG
SJT
SVT
16 AWG
14 AWG
18 AWG
17 AWG
Maximum Current Rating of Unit
10 Amps
12 Amps
12 Amps
10 Amps
12 Amps
•FCC Compliance Statement
This equipment has been tested and complies with the limits for a Class B digital device, pursuant to part 15
of the FCC Rules. These limits are designed to provide reasonable protection against harmful interference
in a residential installation. This equipment generates, uses, and can radiate radio frequency energy, and
may cause harmful interference to radio communications if not installed and used in accordance with the
instructions. However, there is no guarantee that interference will not occur in a particular installation. If this
equipment does cause harmful interference to radio or television reception, which can be determined by
turning the equipment off and on, the user is encouraged to try to correct the interference by one or more of the
following measures:
·Reorient or relocate the receiving antenna.
·Increase the separation between the LCD TV and receiver.
·Connect the equipment into an outlet on a circuit different from that to which the receiver is connected.
·Consult the Westinghouse Service Center or an experienced radio/TV technician for assistance.
English
FCC Warning
To assure continued FCC compliance, the user must use a grounded power supply cord and the
provided shielded video interface cable with bonded ferrite cores. If a BNC cable used, use only a
shielded BNC (5) cable. Also, any unauthorized changes or modifi cations not expressly approved by
will void the user's authority to operate this device.
3
Page 5

IMPORTANT INFORMATION
3. IMPORTANT SAFETY INSTRUCTIONS
Follow and obey all warnings and instructions marked on the LCD TV. For your safety, please read all the
safety and operating instructions before you operate the LCD TV. Keep this user’s manual for future reference.
(1) Read these instructions.
(2) Keep these instructions.
(3) Heed all warnings.
(4) Follow all instructions.
(5) Do not use the LCD TV near water.
(6) Clean only with a dry cloth.
(7) Do not block any ventilation openings. Install in accordance with the manufacturer’s instructions.
(8) Do not install near any heat sources such as radiators, heat registers, stoves, or other apparatus
(including amplifi ers) that produce heat.
(9) Do not attempt to bypass the safety purpose of the polarized or grounding- type plug. A polarized plug has
two blades with one wider than the other. A grounding-type plug has two blades and a third grounding
prong. If the provided plug does not fi t into your wall outlet, consult an electrician for replacement of the
obsolete outlet.
(10) Protect the power cord from being walked on or pinched particularly at the ends of the cord.
(11) Only use attachments/accessories specifi ed by the manufacturer.
(12) Use only with the cart, stand, tripod, bracket, or table specifi ed by the manufacturer, or sold with
the LCD TV. When a cart is used, use caution when moving the cart to avoid injury or damage.
(13) Unplug the LCD TV during lightning storms or when it is not being used for a long period of
time.
(14) Refer all servicing to qualifi ed service personnel. Servicing is required when the LCD TV
has been damaged in any way, such as the power-supply cord or plug is damaged, liquid has
been spilled or objects have fallen into the LCD TV, it has been exposed to rain or moisture,
it does not operate normally, or the TV has been dropped.
(15) DISC SLOT – Keep your fi ngers well clear of the disc slot as it is closing. It may cause serious personal
injury.
(16) LASER BEAM – Do not look into the opening of the disc slot or ventilation opening of the product to see
the source of the laser beam. It may cause sight damage.
(17) DISC – Do not use a cracked, deformed, or repaired disc. These discs are easily broken and may cause
serious personal injury and product malfunction.
•Overloading
Do not overload wall outlets, extension cords, or power strips. This can result in fi re or electronic shock.
•Power Cord Protection
Power supply cords should be routed so that they are not likely to be walked on or pinched by items placed
upon or against them. Periodically inspect the cords and each end of the cords for damage. The LCD TV shall
be installed a near the wall socket outlet and the plug on power cord shall be readily accessible.
•Ventilation
The slots and openings on the cabinet are provided for necessary ventilation. To ensure reliable operation of
the LCD TV and to protect it from overheating, these slots and openings must never be blocked or covered.
4
Page 6

IMPORTANT INFORMATION
•Never cover the slots and openings with a cloth or other materials.
English
8
8
•Do not block the openings by placing the LCD TV on a bed, sofa, rug or other
similar surface.
•Do not place the LCD TV in a built-in installation such as a bookcase or rack
unless proper ventilation is provided or the manufacturer’s instruction have been
adhered to.
•Other Notices
Avoid exposing the LCD TV to direct sunlight or high temperatures.
・
Avoid exposing the LCD TV to moisture or high humidity
・
Do not attempt repairs yourself. Your warranty does not cover repairs or attempted repairsb by
・
anyone not authorized by Vivitek.
If your LCD TV will not be used for a long period of time, unplug the LCD TV and remove
・
the batteries from the remote control.
•Precautions
Avoid touching the screen by hand or any object.
・
Never remove the rear cover. Your LCD TV contains high-voltage parts. You may be seriously
・
injured if you touch them.
Avoid exposing your LCD TV to direct sunlight or another heat source. Orient your LCD TV
・
away from direct sunlight to reduce glare.
Always handle your LCD TV with care when moving it.
・
Place your LCD TV in a well-ventilated area; don’t place the LCD TV in airtight
・
compartments. Do not place anything on your LCD TV that prevents heat dissipation.
Ensure that the area around the LCD TV is clean and free of moisture.
・
Do not place heavy objects on the LCD TV, audio/video cables, or power cord.
・
If the LCD TV emits smoke, abnormal noise, or a strange odor, immediately turn it off and
・
contact the Vivitek Service Center.
・
WARNING
–
The LCD TV shall not be exposed to dripping or splashing and objects fi lled
with liquids, such as vases, shall not be placed on the TV.
・
WARNING – Don’t use hand or other things to touch the LCD screen.
5
Page 7
IMPORTANT INFORMATION
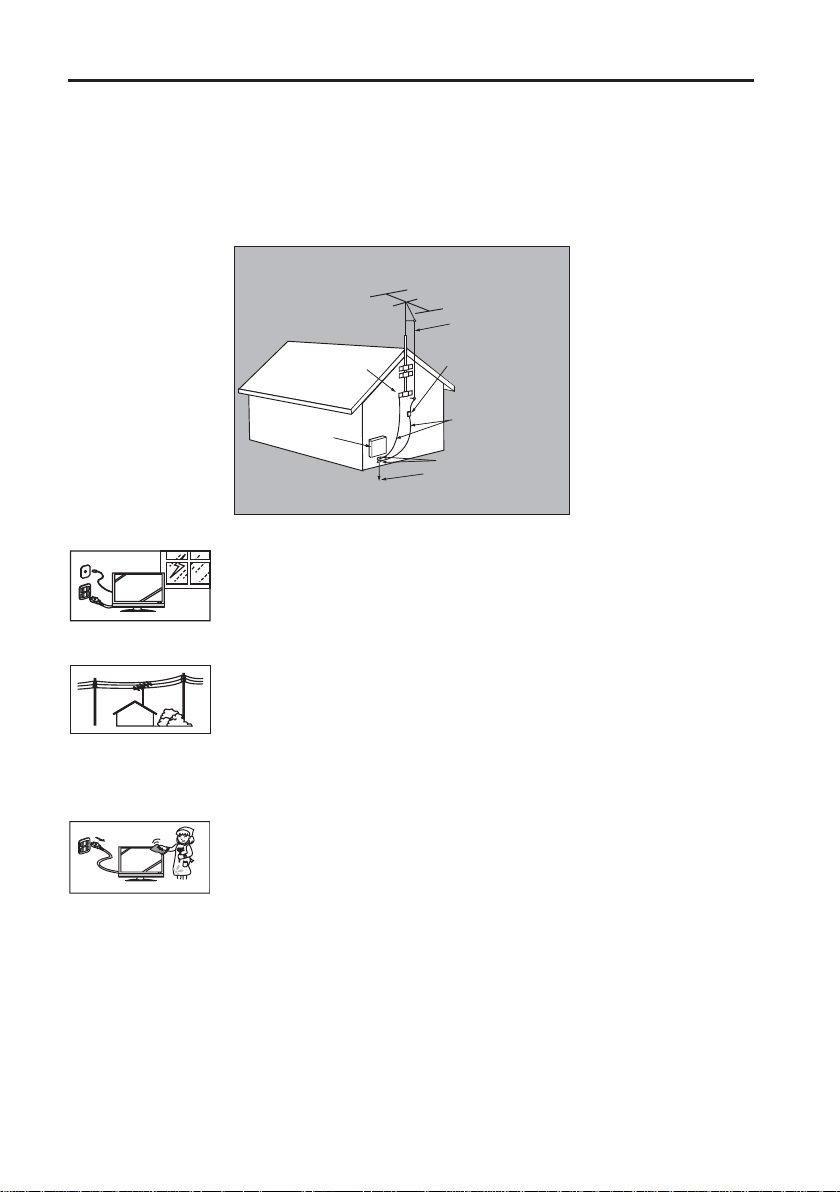
4. ANTENNA INSTALLATION SAFETY
•Outdoor Antenna Grounding
If an outside antenna or cable system is connected to the LCD TV, be sure the antenna or cable system is
grounded to prevent voltage surges and built-up static charges. Article 810 of the National Electrical Code,
ANS/NFPA 70, provides information on proper grounding of the mast and supporting structure, grounding of
the lead-in wire to an antenna discharge unit, connection to grounding electrodes, and requirements for the
grounding electrode.
Antenna Grounding According to the National
Electrical Code, ANSI/NFPA 70
Antenna lead-in wire
Ground clamps
Electric service
equipment
NEC: National Electrical Code
Antenna discharge unit
(NEC Section 810-20)
Grounding conductors
(NEC Section 810-21)
Ground clamps
Power service grounding
electrode system
(NEC Art 250 Part H)
•Lightning
Z
Z
Z
For added protection for the LCD TV during a lightning storm, or when it is left
unattended and unused for long periods of time, unplug it from the wall outlet and
disconnect the antenna or cable system. This will prevent damage to the LCD TV due
to lightning and power-line surges.
•Power Lines
An outside antenna system should not be located in the vicinity of overhead power
lines or other electric light or power circuits, or where it can fall into such power lines
or circuits. When installing an outside antenna system, extreme care should be taken
to keep from touching such power lines or circuits as contact with them might be fatal.
5. CLEANING THE LCD TV
MAKE SURE THE LCD TV IS TURNED OFF AND POWER CORD IS
・
REMOVED.
NEVER SPRAY OR POUR ANY LIQUID DIRECTLY ONTO THE SCREEN OR
・
CASE.
•To clean the screen:
1.Wipe the screen with a clean, soft, lint-free cloth. This removes dust and other particles.
2.If it still is not clean, apply a small amount of non-ammonia, non-alcohol based glass cleaner onto
a clean, soft, lint-free cloth, and wipe the screen.
•To clean the case:
1.Use a soft, dry cloth.
2.If it still is not clean, apply a small amount of non-ammonia, non-alcohol based, mild non- abrasive
detergent onto a clean, soft, lint-free cloth, then wipe the surface.
6
Page 8
IMPORTANT INFORMATION
6. DISC
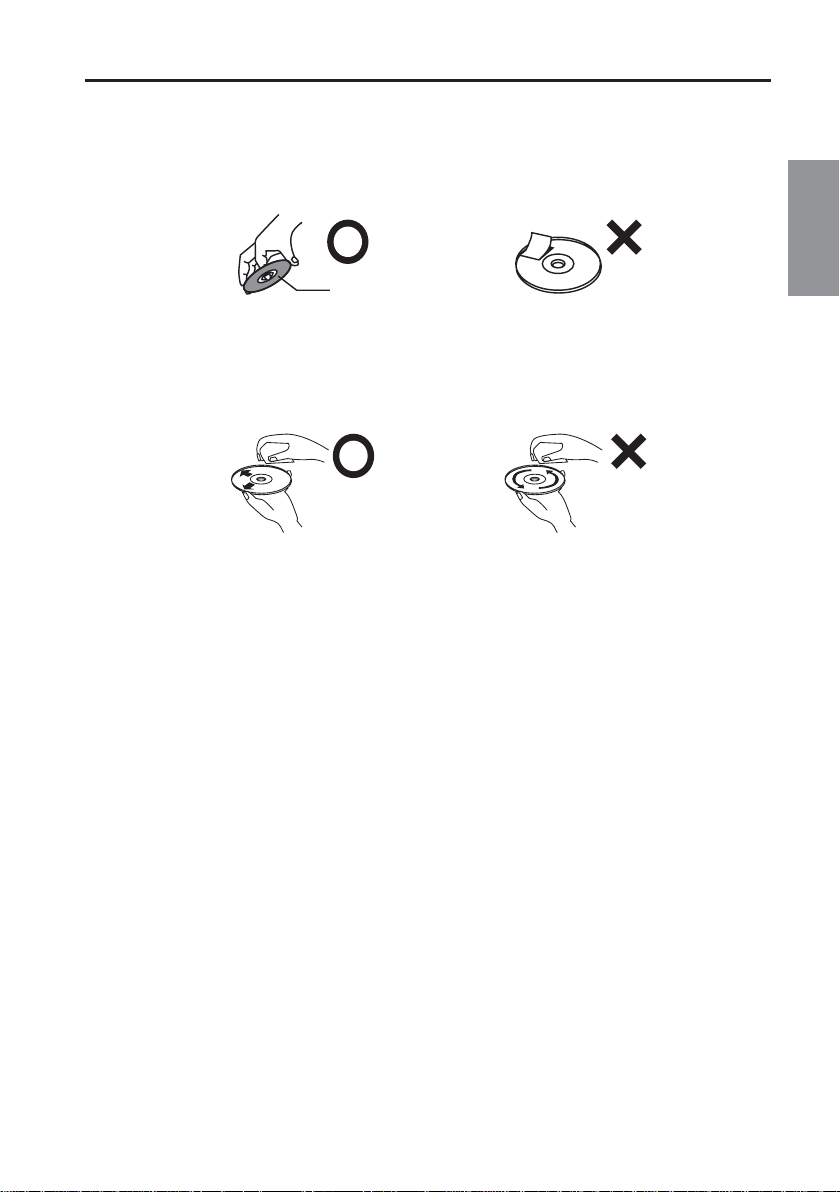
6-1 On handling discs
• Be sure to hold the edge of disc. Do not touch the surface of the disc.
• Do not attach paper or tape to discs.
Playback side
6-2 On cleaning discs
• Wipe the disc with a clean, dry cloth from the center outward toward the edges.
• Do not wipe the disc in a circular motion around the center.
• Do not use liquid or aerosol cleaners.
6-3 ON storing discs
• Store the disc in the case to avoid any risk of scratches, dirt or damage.
• Do not leave the disc exposed to disc exposed to direct sunlight or in hot or humid places.
English
6-4 Playable discs
In this unit, use only discs that meet the standard, such as DVD-Video,DVD-R/RW (Video format
only), Audio CD,CD-R/CD-RW(CD-DA, MP3, WMA or jpeg format) . If you use a non-standard
disc, we cannot guarantee playback. Even if such a disc can be played back, we cannot
guarantee the image or sound quality.
This unit is designed to playback music Compact Discs (CD) that conform to the CD standard.
•
CDs that contain (copy-restriction) signals to protect copyrights cannot be played back.
Some CD-R/RWs and DVD-R/RW cannot be played back depending on the recording
•
conditions.
When you play an 8 cm disc, you need the adapter (not supplied).
•
7
Page 9
IMPORTANT INFORMATION
6-5 Region management information
The region number of this unit is 1. If region numbers, which stand for their playable area, are
printed on your DVD video disc and you do not fi nd " 1 " or " ALL " , disc playback will not be
allowed by the player. (In this case, the unit will display a message on-screen.)
Some DVDs that have no region code label may still be subject to area restrictions and therefore
not playable.
6-6 Structure of disc contents
Normally, DVD video discs are divided into titles, and the titles are sub-divided into chapters.
DVD video disc
Title 1
Chapter 1 Chapter 2 Chapter 1 Chapter 2 Chapter 3
Video CDs and Audio CDs are divided into tracks.
Video CD/Audio CD
Track 1
Track 2 Track 3 Track 5Track 4
Title 2
Each title, chapter or track is assigned a number, which is called “title number”, “chapter number”
or “track number” respectively.
6-7 Notes on copyright
The unauthorized recording, use, distribution, or revision of copyrighted materials including,
without limitation, television programs, videotapes, and DVDs, is prohibited under the Copyright
Laws of the United States and other countries, and may subject you to civil and criminal liability
8
Page 10
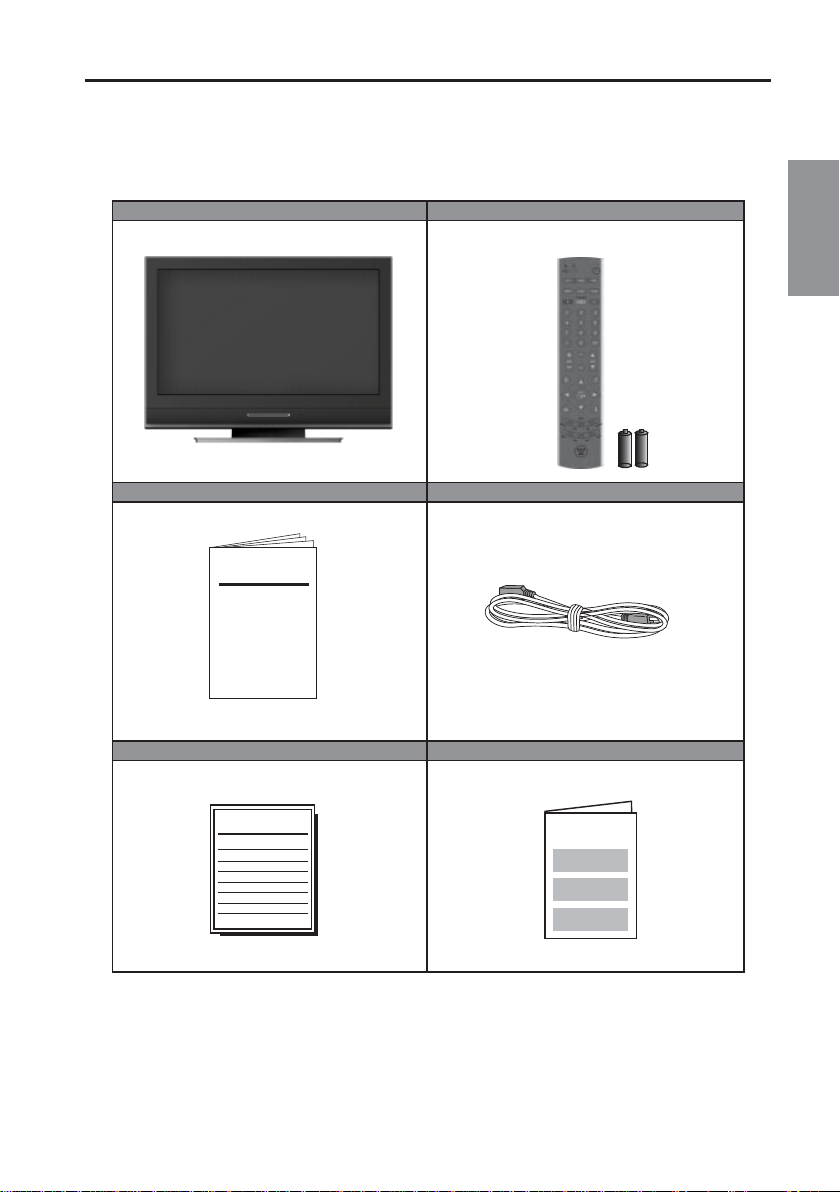
1. PACKAGE CONTENTS
26"/32” LCD TV/DVD COMBINATION Remote Control x1 (with 2 pcs AAA batteries)
User manual x1 Power cord x1
User manual
PREPARATION
English
Quick Connect Guide x1 Warranty card x1
Quick Connect Guide
9
Warranty card
Page 11
PREPARATION
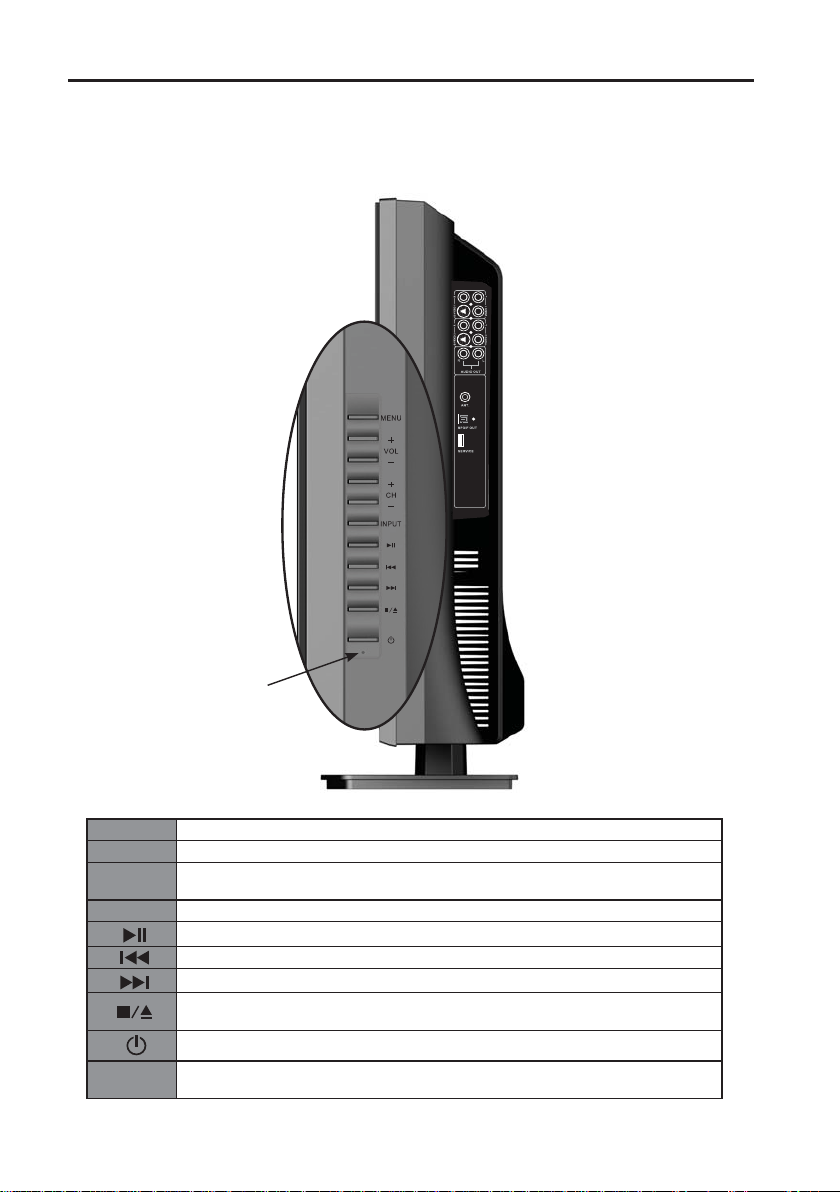
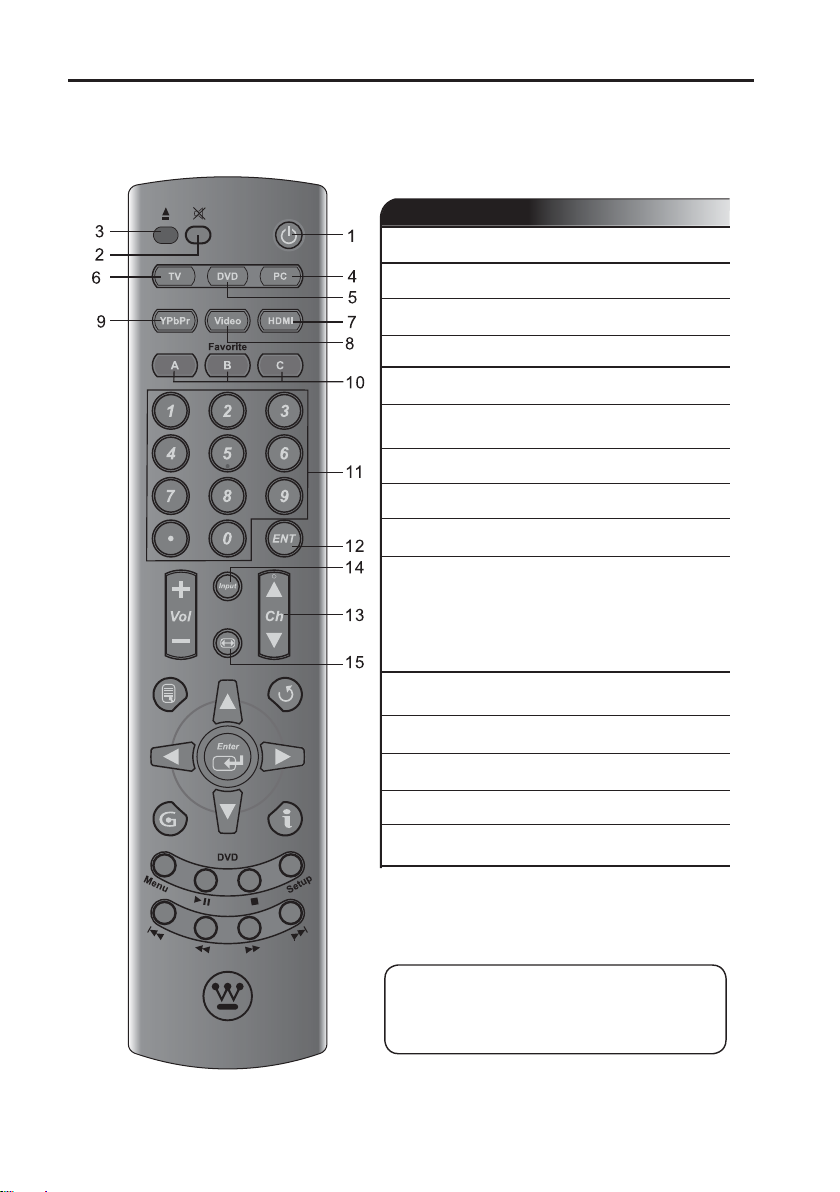
2. TV CONTROLS
1. MENU
2. VOL + / -
3. CH + / -
4. INPUT
5.
6.
7.
8.
9.
10. ●
10
Turn the Menu ON/OFF
Adjust (VOL + / -) sound volume or adjust a highlighted control while in the Menu.
Adjust (CH + / -) channel when input is TV or adjust a highlight control while in the
Menu.
Select Active Video Input or choose a selection while in the MENU.
Play & Pause button, to play or pause
Backward:Press once for fast backward; Press and hold for Chapterbackward
Forward:Press once for fast forward; Press and hold for Chapterforward
Stop button. Press once to stop and remember last position; Press twice or more to
stop and return to top menu after re-playing;Press and hold for 2 sec. to eject the disc.
Power ON/OFF
AC Reset. When the TV Shuts down or the remote control doesn't work. You can push
it with a needle.
10
Page 12
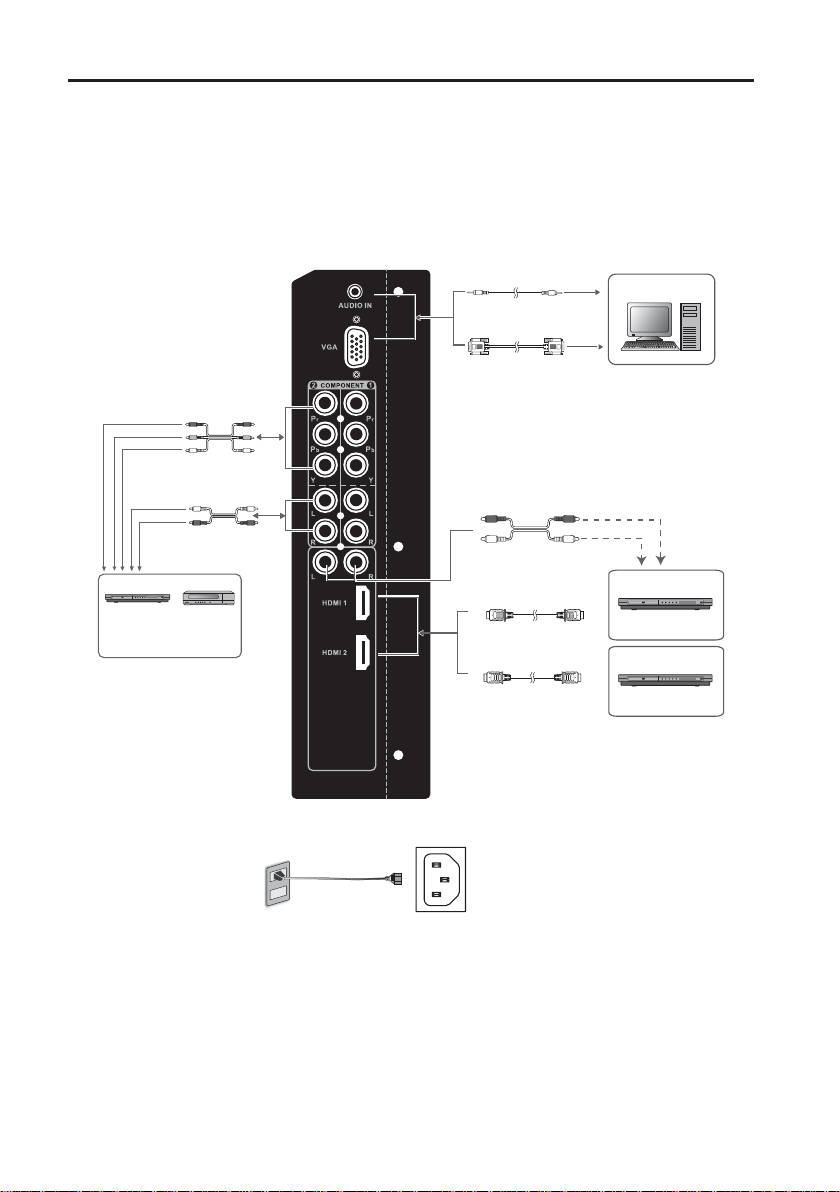
3. TERMINALS
PREPARATION
16
15
13
1
1. VGA Audio IN
Connect to the Audio out (Green) from a
computer.
2
2. VGA
Using a 15-pin VGA cable, connect to a
computer or other device with a VGA output.
4
6
11
3
3. YPbPr1 Input
Connect an external video device with
component output to these jacks.
5
4. YPbPr2 Input
Connect an external video device with
component output to these jacks.
8
5. YPbPr1 Audio 1 Input (Left / Right)
Connect an external audio source to this jack.
7
6. YPbPr2 Audio 2 Input (Left / Right)
Connect an external audio source to this jack.
7. HDMI 1/2
Connect to an external video device such as
DVD players, Game System, Cable, or Satellite
boxes
8. HDMI Audio Input (Right / Lift)
Connect external analog audio to this jack
9
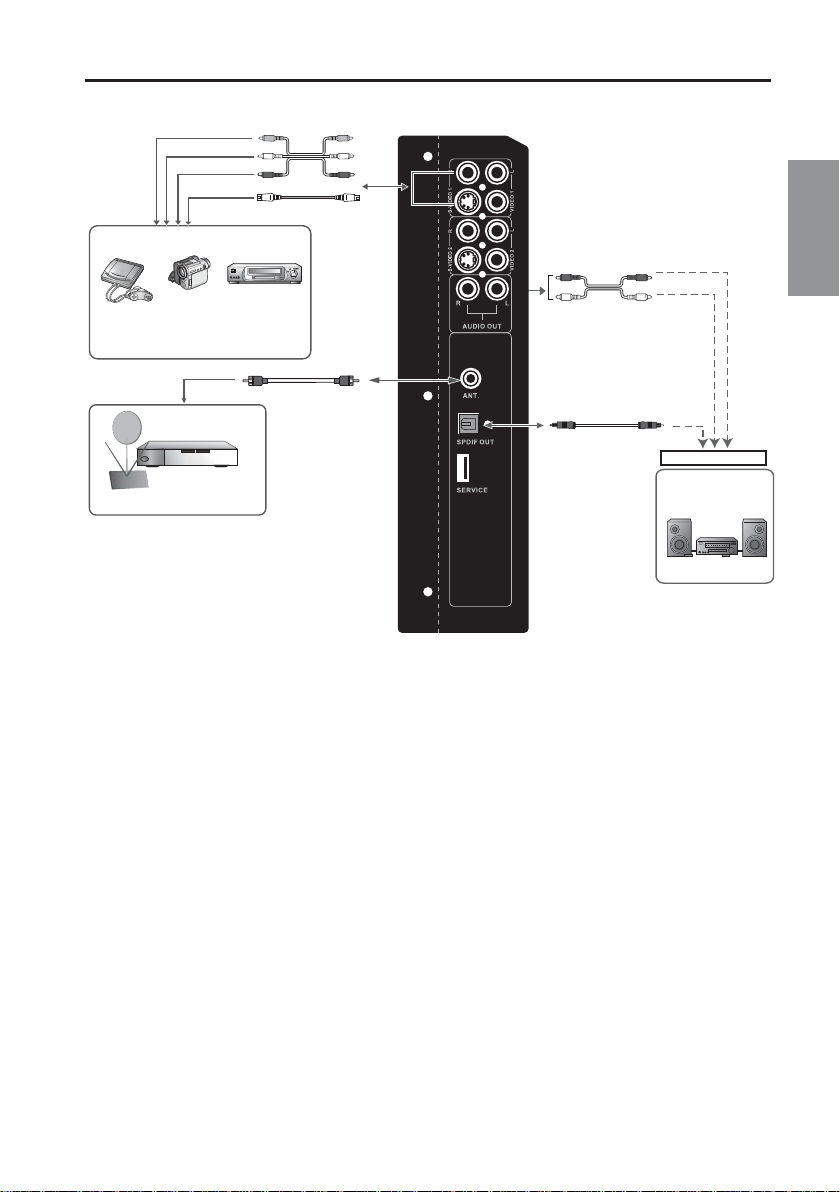
10. Video Input
Connect the Composite Video to an external
video device such as VCR, DVD or video game
12
10
system.
11. S-Video Input
12
Connect to an external video device such as
a digital cable/satellite receiver, VCR, DVD or
14
video game system.
12. Video& S-Video Audio Input (Right / Left)
Connect an external audio source to this jack;
(Audio (R/L)).This connection supports either
S-Video or Video input.
13. SPDIF Audio Output
Connect this output to an external digital audio
receiver.
14. Analog Audio Output (Right / Left)
Connect this output to an external audio
receiver.
15. ANT (RF-input)
Connect the LCD TV to an antenna or cable
service. Such as NTSC, ATSC, or Cable.
English
11
Page 13
PREPARATION
4. REMOTE CONTROL
Remote Control
1.POWER Switch TV power On/Off.
2.Mute Mutes the sound.
3.DVD Eject Eject the DVD disc.
4.PC Select VGA source input.
5.DVD Select DVD source input.
6.TV Select TV (NTSC/ATSC) source
input.
HDMI Select HDMI 1/HDMI 2 source input.
7.
VIDEO Select Video/S-video input.
8.
YPbPr
9.
Favorite
10.
channel.Press Favorite (A, B, C) key
to access favorite list.Use arrow
keys and enter key to select, add
the channel from favorite list.(See
more detail on page 35)
Channel
11.
number keys
Enter Execute a command.
12.
Ch▲/▼ TV Channel Up/ Down adjustment.
13.
Input Select input source.
14.
Aspect Ratio
15.
►Note:
Before setting up favorite channel, please make
sure channel list is saved in TV. If not, perform
channel scan to save a channel list in TV.
Select YPbPr1/YPbPr2 source input.
Select, remove or add your favorite
Select specifi c channel.
Select Video Display format
12
Page 14
PREPARATION
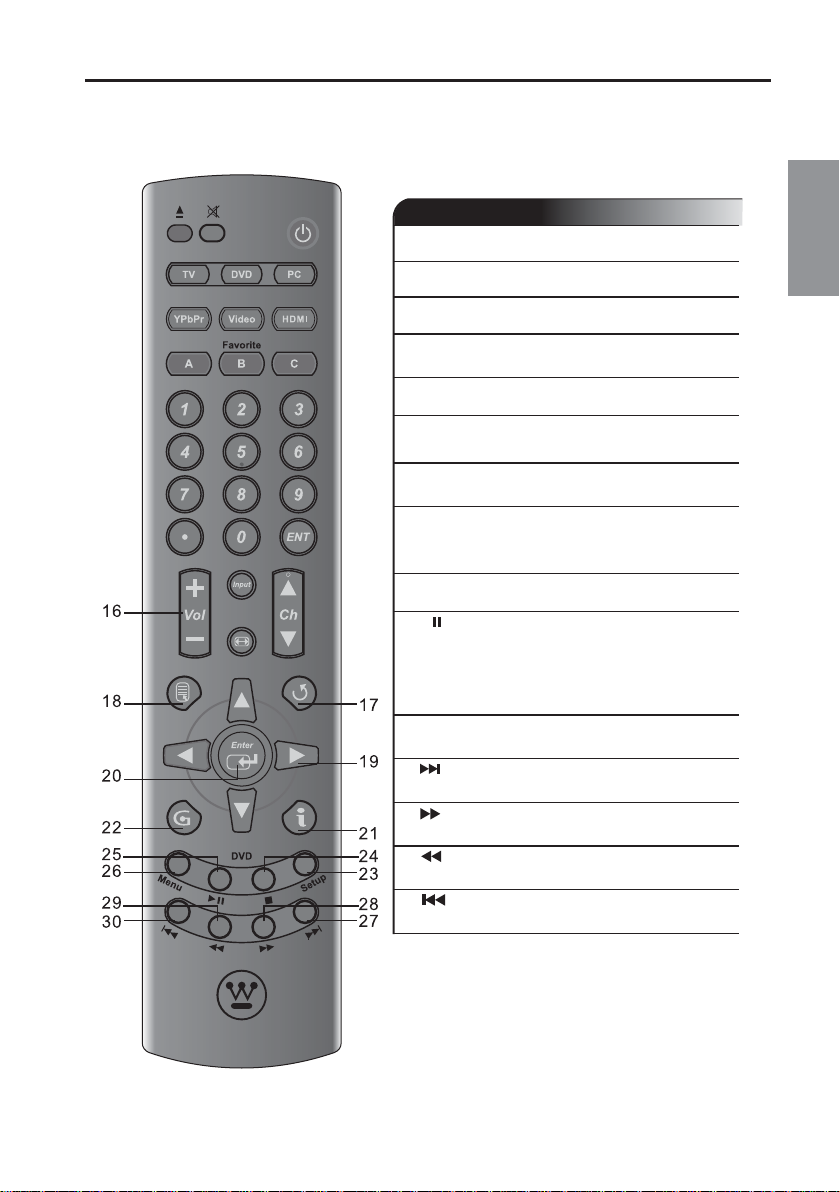
Remote Control
16.Vol +/- Volume Up / Down adjustment.
17.Last CH Switch to previous channel.
18.Menu Display the menu screen.
19.▲/▼/◄/► Selects a desired item on the
screen.
20.
Enter
21.
INFO
information
DVD (Setup) Press when there is a disc in the player
23.
button to open or close the setup screen.
Execute a command.
Display the source and channel
..
English
■
(Stop)
24.
►
25.
playback.
●Pause: Press during playback to
pause. Press again to resume
playback.
DVD Menu Use to display or close the DVD menu
26.
screen.
(Skip Forward)
27.
or tracks.
28.
button scanning.
29.
button scanning.
30.
button tracks.
13
(Play &Pause)
(Fast-Forward)
(Fast-Reverse)
(Skip Reverse)
Press to stop playback.
●Play: Press to start or resume
Skip to the next chapter
Press to perform fast-forward
Press to perform fast-reverse
Skip to the previous chapter or
Page 15
INSTALLATION
1. INSERT BATTERIES IN THE REMOTE CONTROL
(1) Remove the battery cover.
(2) Insert the batteries corresponding to the (+) and (−) marks on the battery compartment.
(3) Re-attach the battery cover.
CAUTION:
(1) Only use AAA batteries.
(2) Do not mix new and old batteries. This may result in cracking or leakage, which may pose a fi re
risk or lead to personal injury.
(3) Insert batteries according to (+) and (−) markings. Inserting the batteries incorrectly may result in
cracking or leakage, which may pose a fi re risk or lead to personal injury.
(4) Dispose of used batteries in accordance with local laws and regulations.
(5) Keep batteries away from children and pets.
(6) When the remote control will not to be used for an extended period, remove the
batteries.
TRANSMISSION RANGE OF REMOTE CONTROL
・
Transmission range depends upon the receive angle, the remote angle coverage is 25° Left/Right,
20° Up/Down from the LCD TV 20 Feet.
14
Page 16
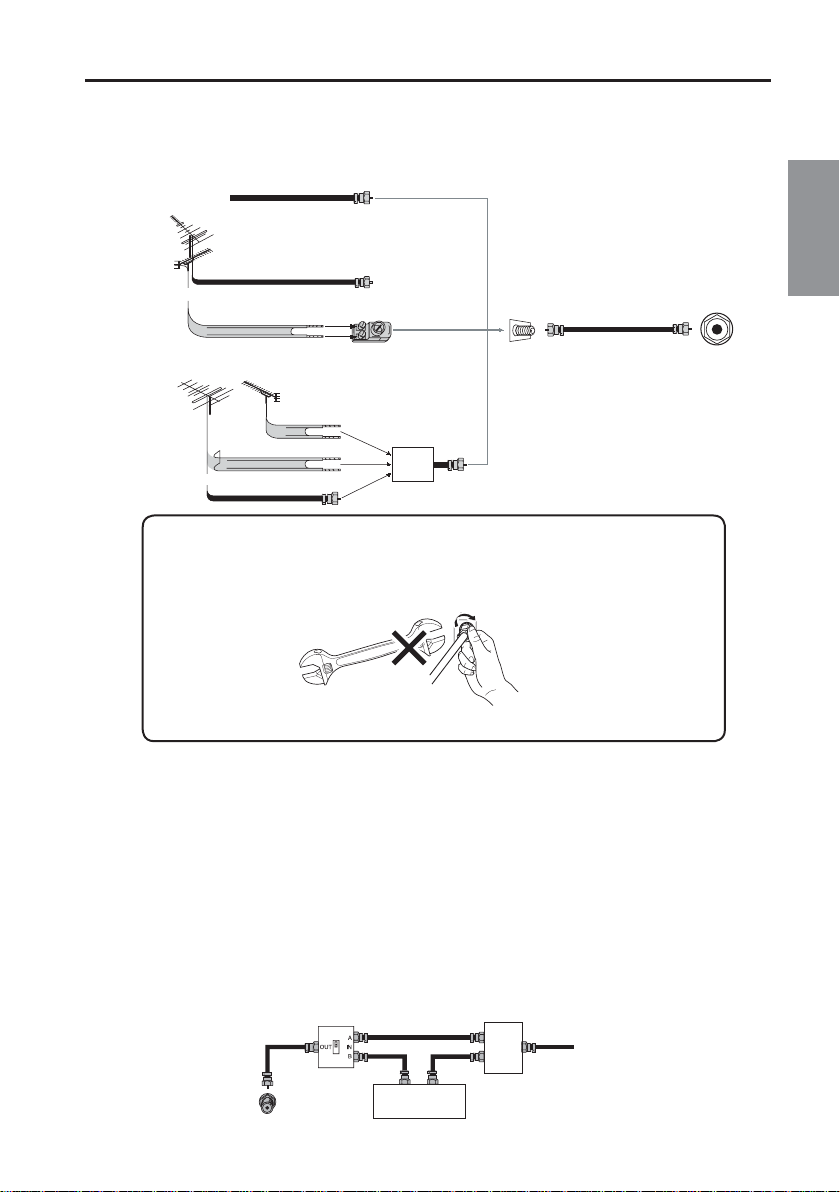
2. ANTENNA CONNECTION
INSTALLATION
2-1 Outdoor Antenna Connection
Cable TV lead-in
VHF, UHF or
VHF/UHF combination
antenna
75 ohm coaxial cable (round)
or
300 ohm twin-lead (flat)
Separate VHF/UHF Antenna
VHF ANTENNA
►Notice:
F-type connector should be fi nger-tightened only.
When connecting the RF cable to the TV set, do not tighten F-type connector with tools.If
tools are used, it may cause damage to your TV set.(The breaking of internal circuit, etc.)
F-type connector
75-ohm coaxial cable
or
UHF ANTENNA
300 ohm twin-lead
300 ohm twin-lead
75 ohm coaxial cable
300-75 ohm ADAPTOR
(Not supplied)
COMBINER
(Not supplied)
IN
OUT
Home Antenna
terminal (75 ohm)
English
RF IN
2-2 Cable TV (CTV/DTV) Connection
A 75 ohm coaxial cable connector is built into the set for easy hookup. When connecting the 75 ohm coaxial
・
cable to the set, screw the 75 ohm cable to the COAXIAL CABLE CONNECTOR.
Some cable TV companies offer “premium pay channels”. Since the signals of these premium pay channels
・
are scrambled, a cable TV converter/ descrambler is generally provided to the subscriber by the cable TV
company. This converter/ descrambler is necessary for normal viewing of the scrambled channels. (Set your
TV on channel 3 or 4. Typically one of these channels is used. If channel is unknown, consult your cable TV
company.) For more specifi c instructions on installing cable TV, consult your cable TV company.
One possible method of utilizing the converter/ descrambler provided by your cable TV company is explained
below.
"A" position on the RF switch (not supplied): You can view all unscrambled channels by using the TV's
channel keys.
"B" position on the RF switch (not supplied): You can view the scrambled channels via the converter/
descrambler by using the converter's channel keys.
RF switch (not supplied)
OUT IN
Cable TV converter/
descrambler
(not supplied)
15
Two-set
signal
splitter
(not
supplied)
Cable TV line
Page 17
INSTALLATION
3. EXTERNAL DEVICE CONNECTIONS
You can enjoy picture and sound by connecting a DVD or video game system to the terminals located on
the rear of the LCD TV set.
When connecting an external device, turn off the power of the LCD TV set fi rst to prevent any possible
damage.
ø 3.5 mm stereo
mini jack cable
Audio
PC
Component cable
Pr
Pb
Y
Audio cable
Audio (L)
Audio (R)
DVD player
* If your external device has a
component terminal, COMPONENT
connection is recommended
(you can view high-quality pictures).
Digital TV tuner
RGB
cable
Audio cable
DVI-HDMI conversion cable
HDMI
HDMI HDMI
VGA
DVI
DVD Player
( with DVI terminal)
DVD Player
( with HDMI terminal)
Note: 100 ~130 VAC
IMPORTANT: Before connect, make sure all devices are turned off.
16
Page 18
Audio/Video cable
Video
Audio (L)
Audio (R)
S-Video
S-Video cable
Home video
game system
* If your external device has an S-video
terminal, S-VIDEO connection is
recommended.
Camcorder
VCR
INSTALLATION
English
Audio/Video cable
Audio (R)
Audio (L)
Antenna cable
Cable system or antenna
Optical fiber cable
AUDIO OUT
Audio amplifier
AUDIO OUTPUT
terminal
• For the cable, use a commercially available audio/video cable.
• For more information about external device connections, see the operation manuals of your external
devices.
• Make sure that the corresponding cables are connected to each terminal. Connecting other cables
may result in a malfunction.
• VIDEO and S-VIDEO terminals: If your external device has an S-VIDEO terminal, S-VIDEO connection
is recommended. S-Video provides a fi ner, more detailed picture. If both terminals are connected,
S-VIDEO terminal takes a priority.
• Component Input (YPbPr): Picture can be displayed only when 480I, 480P, 720P or 1080I signal is
received.
• HDMI Input: Picture can be displayed only when 640×480, 480P, 720P or 1080I signal is received.
• When you connect to the HDMI terminal with the DVI- HDMI conversion cable, it may not be possible
to display the picture correctly.
• This TV does not support DTS audio format. You may not hear proper audio output from TV speakers
if choosing DTS audio format.
Outputting Audio
You can output audio signals from the LCD TV set through the ANALOG AUDIO OUT terminals and the
DIGITAL AUDIO OUT terminal.
17
Page 19
INSTALLATION
4. POWER CONNECTION
Connect the power cord to the DVD combo LCD TV then to a proper AC outlet.
IMPORTANT: The power input voltage is 120VAC, 60 Hz ONLY, Before beginning, make sure all devices
are turned off.
5. INITIAL SETUP
When you setup the LCD TV for the fi rst time or Reset all on OSD menu is pressed, the Setup Wizard will
be initialized. The Setup Wizard provides guided assistance in confi guring the LCD TV to your preference
language, Time Zone, Daylight Saving, RF Input Source and Scanning Channel by sequence. You can select
your favorite settings step by step.
18
Power
Page 20

INSTALLATION
Setup Wizard
(1) Press "▲ / ▼ " to select the language for menu and message showing on your TV, press Enter key to exit
Setup Wizard menu.
Press ENTER to access Time Zone settings.
(2)
Press " / " to select on your time zone.
English
(3) Press ENTER to access Daylight Saving screen.
Press " / " to select “Yes” or “No”, when you observe daylight saving.
19
Page 21

INSTALLATION
(4) Press ENTER to access RF Input Source screen.
Press " / " to select the source for your TV signal.
►Note: Select STD(Standard) for majority of cable systems.
(5) Press ENTER to start the Channel Scan.
Scanning channel searches available digital (HDTV) and analog (SDTV) channels of selected TV source, the
numbers of available channels will show on the OSD menu. It may take a few minutes
20
Page 22

BASIC OPERATION
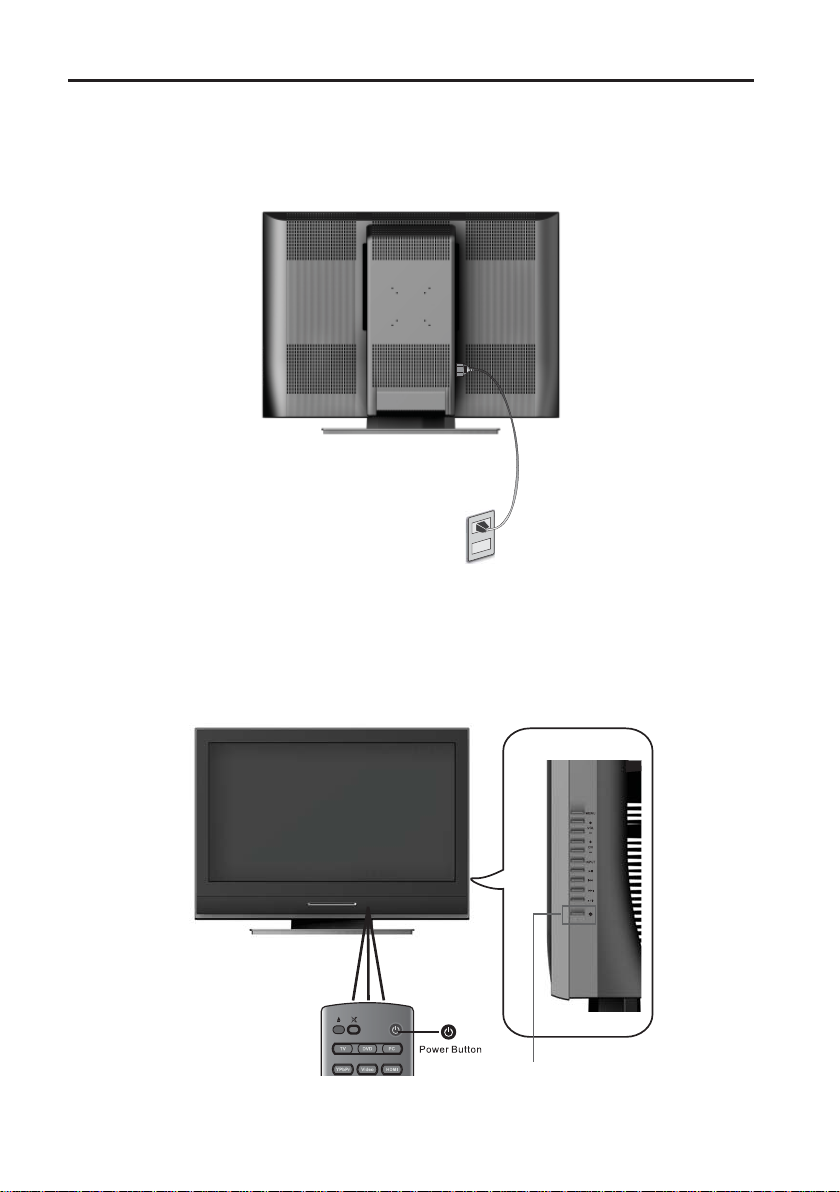
1.TURNING ON AND OFF THE POWER
POWER indicator
Power ON
Power OFF
Power
Turning On the Power
•
Press on the TV or on the remote control.
POWER indicator (Blue): The TV is on.
・
• Turning Off the Power
Press on the TV or on the remote control.
The TV enters standby mode and the image on the screen disappaers.
・
The POWER indicator on the TV turns off.
・
►Note:
If you are not going to use this TV for a long time, be sure to remove the AC power cord from the
・
wall outlet.
Small amount of electric power is still consumed even when the power is turned off.
・
English
Lighting (Blue)
Light Off
2.SOUND VOLUME
To adjust the volume
•
Press VOL (+) to increase the sound volume. The bar indicator shifts right.
・
Mute
Press VOL (
・
•To mute the sound
・
Volume
Press MUTE or VOL (
・
+
Press MUTE to turn off the sound.
)/(–) to turn the sound back to the previous level.
) to decrease the sound volume. The bar indicator shifts left.
–
21
Page 23

BASIC OPERATION
3.CHANGING CHANNELS
You can select channels using Channel Select
・
(0-9, • (DOT), ENT) or CH (+)/(-).
•
Using Channel Select (0-9, • (DOT), ENT)
When selecting the channel using Channel Select, complete input of the channel number by holding down the
button for the last digit for a moment.
•To select a 1- or 2-digit channel number (e.g., Channel 5):
Complete the following procedure within 4 seconds.
1.Press the but ton.
05
2.Press the but ton. 3.Press the but ton.
•To select a 3-digit channel number (e.g. Channel 115):
Complete the following procedure within 4 seconds.
1.Press the button. 2.Press the but ton. 3.Press the but ton. 4.Press the but ton.
To select a digit channel number (e.g. Channel 5.1):
•
Complete the following procedure within 4 seconds.
1.Press the but ton. 2.
115
5 •1
Press the but ton. 3.
Press the but ton. 4.Press the but ton.
ENT
ENT
ENT
Using LAST
•
Press to switch the currently tuned channel to the previously tuned channel.
・
Press again to switch back to the currently tuned channel.
・
4.INPUT SELECTION
1.Press TV,DVD,PC,YPbPr,Video, HDMI on Remote Control directly.
2. a:Press Input on the remote control to display the Input
list.
b:Press ▲/▼ to select the desired source.
c:Press ENTER to switch the input source.
Input
22
Last
Page 24

5.SELECTING MENU ITEMS
BASIC OPERATION
The menus can be used to adjust the various settings of the LCD TV set. Select the desired menu item by
following the steps below.
►NOTE:
•The items displayed differ depending on the setting conditions.
•The item selected is displayed in blue.
•Last setting will be saved in memory.
•Using the remote control
1&4
3
•Using the control panel of the main unit
You can also operate the menu with the control panel of the main unit.
Button operations on the control panel correspond to the ones on the remote control as shown below.
Control panel of the main unit
1. Press on the remote control to display the
Menu screen.
2. Press ▲ / ▼ to select the desired menu item.
2
3. Press Enter to select the menu item.
4. Press to exit.
English
VOL (–)/(+): Cursor ◄/► on the remote control
CH (–)/(+): Cursor ▲/▼ on the remote control
MENU: MENU on the remote control
INPUT: ENTER on the remote control
23
Page 25

MENU OPERATION
•Menu Setting screens
For details of each menu item, refer to the page number indicated below.
►NOTE:
•The illustrations and on-screen displays in this manual are for explanation purposes and may vary
slightly from the actual appearance.
•Depending on the setting condition, such source input , it may not be possible to adjust or set
some items.
Settings
Video
Page
Preset Mode...................................26
Video Settings....................................26
Screen Size....................................27
Color Temp.....................................27
VGA Settings...................................28
Video Reset.............................29
Audio
Page
Bass, Treble & Balance..................29
Optical Out(SPDIF)...........................30
Analog Preference.......................30
Digital Preference...............................31
TV Speaker........................................31
Audio Only..........................................32
Reset Audio.....................................32
Channels
Page
Channels List...........................33
Favorites...................................34
Scan Channels....................................35
Find Channels.....................................36
Edit Channel Name.............................36
Locks
Page
Rating Locks.......................................38
Channel Locks..........................40
Front Panel Lock..........................40
Change PIN................................40
DVD Locks.........................................41
Reset Locks.......................................41
Page
Menu Language..........................42
Date & Time.........................................42
Weekly Timers.....................................45
Sleep Time.....................................46
Closed Captions............................46
Activation............................................46
Input Labels.......................................48
Autosource....................................49
Power Management...........................49
Power on plug....................................49
Power LED.........................................50
DVD Restoration.................................50
System Info...............................51
Reset All......................................51
Advanced
Page
Cinemotion......................................52
3D Comb Filter....................................53
Deinterlaced......................................53
Noise Reduction..................................53
Brightness........................................54
Contrast............................................54
Saturation.......................................54
Hue..................................................54
Sharpness.......................................54
Backlight....................................54
User Color Temp............................54
Reset Advanced...............................55
Guide
Page
24
Page 26

1. VIDEO
MENU OPERATION
•You can adjust the Video to your preference with the following Video settings.
1.Press MENU on the remote control to display the menu screen.
2.Press ► / ▲ / ▼ to select the Video menu.
3.Press Enter to enter the Video meun list.
4.Press ▲ / ▼ to select the desired menu item.
5.Press Enter to select the menu item.
6.Press EXIT to exit after fi nish adjustment.
English
25
1&6: Menu / Exit
2&4: Up
Exit to previous
menu
2: Right
3&5: Enter
2&4: Down
Page 27

MENU OPERATION
1-1 Preset Mode:
Upon the watching program, you can select an appropriate video setting with the preset mode.
Selected Item Description
Movie Controlling the contrast to enable easier viewing of dark images.
Sports
Game
Enhanced Increased color and sharpness for vibrant out of box performance
User
For a clear-cut image emphasizing high contrast for sports
viewing.
Controlling the brightness of video games and other images for
easier viewing.
Allows the user to customize setting as desired. You can set the
preferences for each input source.
1-2 Video Settings:
The Video Settings sub-menu allows adjustments to display settings such as brightness, contrast, saturation,
hue, sharpness and backlight level. Menu options may vary depending on the input source.
26
Page 28

MENU OPERATION
1-3 Screen Size:
The Screen Size sub-menu option adjusts the manner in which source signal formats are displayed on the
screen.
*You can also use on your
remote control for this function.
1-4 Color Temp
English
Selected Item Description
Cool White with bluish tone
Neutral Neutral white
Warm White with reddish tone
User Adjust the color to your preference
27
Page 29

MENU OPERATION
1-5 VGA Setting:
Adjust VGA Setting of your TV (Horizontal, Vertical, Phase, Auto Sync).
►Note:
•Make sure to select the input signal from the following PC Compatibility Chart
before a PC.
Selected Item ◄button ►button
Horizontal
Vertical
Phase Adjust image clarity
Selected Item Description
Auto Sync Automatically adjust the settings for the current input signal
PC / MAC Resolution
Move the image Horizontal position
to the left.
Move the image Vertical position
down.
►Note:
•VGA Setting is only available when selecting the VGA Input.
•PC Compatibility Chart
Move the image Horizontal position
to the right.
Move the image Vertical position up.
Horizontal
Frequency (kHz)
720 x 400 31.5 70
VGA
640 x 480
31.5 60
37.9 72
37.5 75
35.1 56
PC
SVGA 800 x 600
37.9 60
48.1 72
46.9 75
XGA 1024 x 768
WXGA
1360 x 768 47.7 60
1366 x 768 48.45 60
48.4 60
60 75
Vertical
Frequency (Hz)
►Note:
•The numerical values of resolutions and frequencies mentioned above are standard.
They may differ from the values when actually displayed.
28
Page 30

1-6 Video Reset :
Reset all Video sub-menu options to the factory defaults.
2. AUDIO
MENU OPERATION
English
2-1 Bass, Treble & Balance:
Use ▲ / ▼ / ◄ / ► to select or adjust your favorite bass, treble and balance settings.
29
Page 31

MENU OPERATION
2-2 Optical out (SPDIF):
Select the audio format for Optical Out (AC3, PCM).
Selected Item Description
AC3 Select surround audio format
PCM Select stereo audio format
►Note:
•Optical Out (SPDIF) is only available for DVD or when receiving digital broadcasting.
2-3 Analog Preference:
The Analog Preference sub-menu sets the audio output to the desired listening preference. The available
settings are Mono (single stream), Stereo (left and right stream) and SAP (Secondary Audio Programming
such as a foreign language track).
30
Page 32

MENU OPERATION
2-4 Digital Preference:
Select the digital Broadcasting preferred language (English, French, Spanish).
Selected Item Description
English Set Digital Broadcasting preferred language to English
French Set Digital Broadcasting preferred language to French
Spanish Set Digital Broadcasting preferred language to Spanish
►Note:
•Digital Preference is only available when receiving digital broadcasting.
English
2-5 TV Speaker
The TV Speaker sub-menu sets the speaker output preference. The available settings are as follows:
Selected Item Description
Internal Audio from internal speakers only.
External
Mixed Audio from both internal and external speakers.
Audio from external speakers, such as if the TV was connected to a
stereo receiver.
31
Page 33

MENU OPERATION
2-6 Audio Only.
Audio Only is a listening mode by turning off the LCD backlight and allowing the current input’s audio to remain
“on” for listening. You can enable Audio Only mode from OSD menu.
On: enable Audio Only mode.
When Audio Only is on, LED light shows blue.
Note: Volume +, Volume -, Right Arrow, Left Arrow, and Mute on the remote control can still control the
system volume level as a normal operation.
Cancel: disable Audio Only mode
Audio Only model could be disabled via below.
a. Select Cancel on Audio Only sub-menu.
b. Single button push on the remote control or side control keys excluding Volume +, Volume -, Right
Arrow, Left Arrow, and Mute. These buttons function as normal audio adjustment.
c. No Signal Detected
If a source is powered off or video cable is unplugged, Audio Only would be disabled.
d. New signal detected by Autosource
When a new signal is detected by Autosource, Audio Only will be disabled.
e. Rating Locks on Parental Controls are set.
Audio Only is disabled, TV system continues to block both video and audio as normal.
2-7 Reset Audio
Reset all Audio sub-menu options to the factory defaults.
32
Page 34

MENU OPERATION
3. CHANNELS
3-1 Channel List
The Channel List sub-menu defi nes which channels are available for viewing when utilizing the analog/digital
tuner.
English
Selected Item Description
Check All Select all channels from Master Channel List
Uncheck All Unselect all channels from Master Channel List
Analog Only Select all analog channels from Master Channel List
Digital Only Select all digital channels from Master Channel List
33
Page 35

MENU OPERATION
3-2 Favorites
The Favorites sub-menu adds or subtracts channels from the favorite channels list. Channels added to the
list can be accessed by pressing the FAV A,FAV B or FAV C button on the remote control instead of directly
entering the channel number.
The following sub-menu items allow for modifi cation of the favorite channel lists. Use the arrow buttons on the
remote control to scroll through the available channels, then use the ENTER button on the remote control to
add/remove the selected channel.
Selected Item Description
Select List Select the favorite channels list to be edited.
Uncheck All Remove all of channels from the current favorite channel list
Rename List Rename the favorite channel list.
Sort Checked Sort or unsorted checked channels in the list.
34
Page 36

MENU OPERATION
3-3 Scan Channels
The Scan Channels sub-menu automatically scans for available channels based upon the source input
selected. If scanning for OTA (over the air) channels, select Antenna as the input source. If scanning for Cable
channels, select Cable as the input source
After selecting the input source, activate the Scan button to initiate scanning or cancel the scan function by
selecting Stop Scan.
English
When selecting Cable as the scan input source, a sub-menu will appear for selecting a cable TV signal type.
The signal type is determined by the cable provider. If unsure about the proper signal type, use the "Automatic"
option.
35
Page 37

MENU OPERATION
3-4 Find Channel
The Find Channel sub-menu allows for manual addition of user specifi ed channels.
3-5 Edit Channel Name
The Channel Name Edit sub-menu allows for modification of the friendly name of any channel within the
channels list. To modify a channel name, select the Channel Name Edit sub-menu, scroll through the list of
available channels and press the ENTER button to modify the desired channel name.
Enter the new channel name using the on-screen characters. Select the "Done" button to save the new name
and return to the channel list.
36
Page 38

MENU OPERATION
4. LOCKS
The Locks menu provides the ability to set ratings that block programming that may be inappropriate for the
viewing audience such as programs and movies that contain violence, adult language or nudity.
A personal identifi cation number (PIN) will need to be created the fi rst time the Locks menu is accessed. Enter
the new PIN using the remote control, then confi rm the new PIN to save it. Once the PIN has been created, the
PIN Entry box will appear whenever attempting to modify the Locks menu.
English
Once the PIN has been confi gured, the user has access to 6 sub-menu items. (Ratings Locks, Channel Locks,
Front Panel Lock, Change PIN, DVD Locks and Reset Locks)
37
Page 39

MENU OPERATION
4-1 Rating Locks
The Ratings Locks sub-menu blocks programming based upon the TV or Movie rating for the country specifi ed.
►Note: The Ratings Locks are only valid for the North American market.
►Note: The Ratings Locks menu is only applicable when the input source is the TV tuner.
USA TV Ratings as determined by the FCC.
TV-Y Suitable for young children
TV-Y7 May not be suitable for children under 7
TV-G Suitable for all audiences
TV-PG Parental guidance suggested
TV-14
TV-MA Suitable for mature audiences or adults only
Parental guidance suggested for children under
age 14
USA Movie Ratings as determined by the MPAA
(Motion Picture Association of America)
►Note:
•Choosing a lower age-based rating blocks the higher age-based ratings regarless of
content rating settings.
G General audience
PG Parental guidance suggested
PG-13 Parents strongly cautioned
R Restricted
NC 17 No one 17 and under admitted
38
Page 40

Canadian (French) ratings as defi ned by the Regie du Cinema.
MENU OPERATION
G General programming, suitable for all audiences
8 ans+ Children eight years and older
13 ans+ Viewers 13 years and older
16 ans+ Viewers 16 years and older
18 ans + Adult programming
Canadian (English) ratings as defi ned by the Regie du Cinema.
C Children
C8+ Children eight years and older
G General programming, suitable for all audiences
PG Parental guidance
Viewers 14 years and older
14+
Adult programming
18+
English
Block Unrated Shows
Selected Item Description
ON Block all unrated TV programs
OFF No TV program will be blocked
39
Page 41

MENU OPERATION
4-2 Channel Locks
The Channel Locks sub-menu provides individual channel blocking regardless of any ratings lock in place.
4-3 Front Panel Lock
This important feature is for use in an environment where the display’s owner does not want the conditions of
the display changed.You can enable or disable it from OSD menu.
4-4 Change PIN
The Change PIN sub-menu allows the user to set up a new PIN. The original PIN is required to make any
change.
40
Page 42

4-5 DVD Locks
Set restriction of DVD programs with Rating Locks.
Selected Item Description
View All No Lock.
Kid Safe Just release the content appropriate for children under 12
No Adult Just lock the content appropriate for adult.
MENU OPERATION
English
4-6 Reset Locks
Reset all channel and rating locks to the factory defaults. (unlocked)
41
Page 43

MENU OPERATION
5. SETTINGS
5-1 Menu Language
The Menu Language sub-menu toggles the default language for the on-screen display menus.
5-2 Date & Time
Set the current time and date.
1.Press ► to set the current time and date on TV.
42
Page 44

MENU OPERATION
2. Press ▲ to select “Auto-Update Time”.
3.Press ENTER to cancel the check.
Note:When you check the “Auto-Update Time”, you
cannot adjust the date and time.
4. Press ▲ to select “Today’s Date”.
5. Press ENTER to adjust the “Today’s Date”.
6. Press ▲/▼ or number key (0-9) until the correct Month
appears.
7. Press ► to select Date.
8. Repeat item 6 and 7 to adjust Date & Year.
9. Press ENTER to exit after fi nishing adjustment.
English
10. Press to select “Current Time”.
11. Press ENTER to adjust the “Current Time”.
12. Press ▲/▼ or number key (0-9) until the correct Hour
appears.
13. Press ► to select Min.
14. Repeat item 12 and 13 to adjust Minutes & AM/PM.
15. Press ENTER to exit after fi nishing adjustment.
43
Page 45

MENU OPERATION
16. Press▼ to select “Time Zone”.
17. Press ENTER to list to Time Zone.
18. Press ▲ or ▼ to select the Time Zone you stay.
19. Press ENTER to exit.
20. Press▼ to select “Daylight Savings Observed”.
21. Press ENTER to check it if your time zone observes
the daylight saving.
22. Press▼ to select “Done”.
23. Press ENTER or ◄ to exit after fi nishing adjustment.
Note:
•After fi nishing adjustment, please don’t check the “Auto-
Update Time”.
•If you check the “Auto-Update Time”, Time will update by
Antenna source.
•If you don’t check the “Auto-Update Time”, you should
reset it after blackout or you unplug AC power cord.
44
Page 46

MENU OPERATION
5-3 Weekly Timers
This function allows you to set the TV to turn on and off at scheduled time. You can set two different timers.
1.Press ▲ to choose Timer.
2.Press ENTER to select “Timer 1” or “Timer 2”.
3.Press ▼ / ► / ◄ and ENTER to check the days you desired.
4.Press ▼ to set the Start Time.
English
5.Press ENTER to adjust the “Start Time”.
6.Press ▲/▼ or number key (0-9) to set the “Duration”
7.Have a check on “Timer is on”.
8.Press▼ to select “Done”.
9.Press ENTER or to exit after fi nish setting.
45
Page 47

MENU OPERATION
5-4 Sleep Timer
This function allows you to set the sleep time to automatically turn off the TV.
Selected item Description
OFF Set Sleep Time to off
15 minutes Automatically turn off the TV after 15 miuntes
30 minutes Automatically turn off the TV after 30 miuntes
45 minutes Automatically turn off the TV after 45 miuntes
60 minutes Automatically turn off the TV after 60 miuntes
90 minutes Automatically turn off the TV after 90 miuntes
5-5 Closed Captions
Closed Captions provide on-screen text in conjunction with the audio program for those who are deaf or hard
of hearing.
5-5-1 Activation
Activate Closed Caption.
Selected item Description
OFF Set Closed Caption to OFF
ON Set Closed Caption to ON
ON when muted Set Closed Caption to ON when muted.
46
Page 48

MENU OPERATION
5-5-2 Basic Selection
The Basic Selection sub-menu confi gures the video frame fi eld setting for closed captioning content. Most
closed caption content can be found within CC1.
5-5-3 Advanced Selection
The Advanced Selection sub-menu provides enhanced closed caption options for the CC experience.
English
►Note:
•Advanced Selection is only available when receiving digital broadcasting.
5-5-4 Advanced Appearance
The Advanced Appearance sub-menu provides customization of the CC text through font, size, color and
display options.
47
Page 49

MENU OPERATION
5-5-5 Caption preference
The Caption Preference sub-menu sets the default caption. If Automatic, the caption is determined by the
broadcast.
5-5-6 Reset CC
Reset all Closed Caption settings to the factory defaults.
5-6 Input labels
The Input Labels sub-menu allows for modifi cation of the friendly name for the input port list. To modify an input
port label, select the Input Labels sub-menu, scroll through the list of available inputs, choose one of the preselected input port descriptions or create a custom label.
48
Page 50

MENU OPERATION
5-7 Autosource
If the "Autosource" is ON. once you plug in or power on a new source, the TV will detect it and automatically
switch to the new input.
5-8 Power Management
The Power Management sub-menu confi gures the power state of the LCD-TV when turned off.
English
Selected Item Description
Normal The TV into a low power standby state. And the TV can be turned on quickly.
Energy Saving The TV turns off all power. And the TV must be fully booted each time.
5-9 Power On plug
Memorize the DC power status while AC power off.
Selected Item Description
ON
OFF Turn off Power On Plug function.
If last DC power status is on, TV will power on automatically when power is
disconnected then reconnected.
49
Page 51

MENU OPERATION
5-10 Power LED
Set LED indicator on bezel to On or OFF
Selected Item Description
ON Turn on LED indicator
OFF Tuner off LED indicator
5-11 DVD Restoration
DVD Restoration Mode is a functional setting that restores the anamorphic DVD to its original intended viewing
mode. This is done by determining the fl ag setting and adjusting Standard Aspect Mode accordingly. When
the fl ag is set and the current mode is on standard, then the system will follow the DVD Restoration mode
settings
►Note:
This only effects 4:3 Video with Standard
aspect setting.
50
Page 52

MENU OPERATION
5-12 System Info
The System Info sub-menu provides detailed information about the LCD-TV and its operating status.
Information provided includes the system fi rmware version as well as the current input source and signal types
being decoded.
5-13 Reset All
Reset all settings back to factory defaults. Reset All will delete all settings you have made including language,
time zone, channel list....etc. You must run Setup Winzard after a reset, please refer to page 18.
English
51
Page 53

MENU OPERATION
6.ADVANCED
You can adjust the video to your preference with the following settings.
6-1 Cinemotion
Detect a fi lm-based source (originally encoded at 24 frames/second) and then recreate each still fi lm frame to
cinematic picture quality (ON, OFF).
Selected Item Description
ON Set Cinemotion to ON
OFF Set Cinemotion to OFF
52
Page 54

6-2 3D Comb Filter
Select 3D comb fi lter to Off,Low,Medium,High.
Selected Item Description
Low Set 3D Comb Filter to Low level
Medium Set 3D Comb Filter to Medium level
High Set 3D Comb Filter to High level
6-3 Deinterlaced
Select image display to Progressive or Interlace (ON, OFF).
Selected Item Description
MENU OPERATION
English
Off Set 3D Comb Filter to Off
ON Display image in Progressive scan
OFF Display image Interlace
6-4 Noise Reduction
Reduce noise from TV screen.(Off,Low,Medium,High ).
Selected Item Description
53
Off Set Noise Reduction to Off
Low Set Noise Reduction to Low level
Medium Set Noise Reduction to Medium level
High Set Noise Reduction to High level
Page 55

MENU OPERATION
6-5 Brightness
Selected Item ◄button ►button
Brightness For less brightness For more brightness
6-6 Contrast
Selected Item ◄button ►button
Contrast For less contrast For more contrast
6-7 Saturation
Selected Item ◄button ►button
Saturation For less color intensity For more color intensity
6-8 Hue
Selected Item ◄button ►button
Hue Skin tones become purplish Skin tones become greenish
6-9 Sharpness
Selected Item ◄button ►button
Sharpness For less sharpness For more sharpness
6-10 Backlight
Selected Item ◄button ►button
Backlight The screen dims The screen brightens
6-11 User Color Temp
Selected Item ◄button ►button
Red Weaker red Stronger red
Green Weaker green Stronger green
Blue Weaker blue Stronger blue
54
Page 56

MENU OPERATION
6-12 Reset Advanced
Reset Advanced Settings to factory preset values.
7.GUIDE
The Guide menu displays program information for the current channel such as signal strength, audio/video
signal type, channel number, V-Chip support, closed captioning status and program title.
►Note: The Guide menu is only applicable when viewing digital television through the TV tuner.
English
55
Page 57

PLAYING A DISC
1.PLAYBACK PROCEDURE
EJECT
DVD
(1) Press POWER on the unit or on the remote control to turn on the unit.
・Every time you press POWER, the TV/DVD will starts from previous mode.
(2) Press DVD on the remote control to select DVD mode.
・The DVD startup screen will appear on the screen.
(If DVD disc has already loaded, playback will start automatically.)
(3) Load the disc in the disc slot.
Power
・Load the disc in the disc slot with the label side facing upward. (If the disc has a label.)
Hold the disc without touching either of its surfaces, align it with the guides, and place it in position.
・When you play the 8cm disc, you need an adapter (not supplied),or you will damage the DVD
player.
(4) On the TV-screen, “READ” will appear on the upper left side and playback commences.
・A menu screen will appear on the TV screen, if the disc has a menu feature.
・Press ►/ ◄ or ▲ / ▼ to select title, then press ENTER. Title is selected and play commences.
(5) Press STOP to end playback.
・The unit records the stopped point, depending on the disc. “► ”appears on the screen.
Press ► PLAY to resume playback from the scene point.
・If you press STOP again (“ ” appears on the screen.), the unit will clear the stopped point.
(6) Press ▲ EJECT to remove the disc.
►Note:
If a non-compatible disc is loaded, “READ” changes to “■” will appear on the screen. In this case, check your
・
disc again (see pages 7).
Some discs may take a minute or so to start playback.
・
When you set a single-faced disc label downwards (ie. The wrong way up), “READ” will appear on the display for
・
several seconds and then “NO IDSC” appears on the screen and eject the disc automatically.
Some discs may not work the resuming facility.
・
Some playback operations of DVDs may be intentionally fi xed by software producers. Since this unit plays DVDs
・
according to the disc contents the software producers designed, some playback features may not be available.
Also refer to the instructions supplied with the DVDs.
56
Page 58

PLAYING A DISC
2.SPECIAL PLAYBACK
(1).Fast Forward Playback
Press ►► during normal playback.
Each press of ►► will increase the speed of the search
(x 2), (x 4), (x 8), (x 20).
To resume normal playback, press ► to play.
(2).Fast Reverse
Press◄◄ during normal playback.
Each press of ◄◄ will increase the speed of the search
(x 2), (x 4), (x 8), (x 20).
To resume normal playback, press ► to play.
(3).Still Playback
Press ► during normal playback to pause playback.
To resume normal playback, press ► again to play.
►Note:The sound is muted during still playback.
(4).Locating a chapter or track
Press ►► (Skip Forward) or ◄◄ (Skip Reverse) during playback to locate a chapter that you want to
watch. Each time you press the button, a chapter or track is skipped.
English
57
Page 59

PLAYING A DISC
3.DVD SETTINGS
Under DVD source, press Setup on remote control if you want to change the default DVD
settings.
Selected item Description
Down Mix Select DVD Down Mix to Stereo or LT/RT.
Repeat Press ENTER repeatedly to set “Chapter”, “Title”, “All” or “OFF”.
ON: 1.Skip the meun screen to playback.It will be convenient for
display.
Demo Mode
Subtitle
Autowake
Audio Select
Reset DVD
2.When you press “■Stop” during playback, the player will
resume normal playback automatically after two seconds.
OFF: Turn off “Demo Mode” function.
1. Press ENTER during playback. The current language will appear.
2. Press ENTER repeatedly until your desired language appears.
ON: When the TV is off,if you load a disc,TV will power on and play
the disc automatically.
OFF: Turn off “Auto Wake” function.
1. Press ENTER during playback. The current soundtrack language
will appear.
2. Press ENTER repeatedly until the desired language is selected.
YES: Recall the factory default setting of DVD.
NO : Remain the settings you did.
The on screen display will disappear after a few seconds.
・
58
Page 60

MP3/WMA/JPEG CD Playback
This TV/DVD can playback the MP3/WMA/JPEG-data which has been recorded on CD-R or CD-RW.
To produce the MP3/WMA/JPEG-data, you need a Windows-PC with CD-R/RW drive and a
MP3/WMA/JPEG-encoding Software (not supplied).
The Apple-HFS-System cannot be played.
►Note:
This TV/DVD requires discs/recordings to meet certain technical standards in order to achieve
optimal playback quality. Pre-recorded DVDs are automatically set to these standards.
There are many different types of recordable disc formats (including CD-R containing MP3/
WMA fi les). Given the fact that technology in this area is still maturing. This unit cannot
guarantee that all genre of recordable discs will produce optimal playback quality.
The technical criteria set out in this owner’s manual are meant as a guide only.
Please be advised that you must obtain permission from the applicable copyright owners to
download copyrighted content, including music fi les, in any format, including the MP3 and
WMA formats, prior to the downloading thereof.
1. MP3/WMA/JPEG CD information
Limitations on MP3/WMA/JPEG CD playback
MP3/WMA/JPEG CD is the disc that is standardized by ISO9660, its fi le name must include
・
3-digits extension letters, “mp3”, “wma”, “jpg”.
MP3/WMA/JPEG CD must be correspond to the ISO standardized fi les.
・
This TV/DVD can read 600 fi les per disc. If one directory has more that 600 fi les, the remaining fi les will be
・
omitted.
The unit is able to recognize up to a maximum of 50 directories per disc.
・
MP3/WMA/JPEG CDs cannot be used for the purpose of recording.
・
If the CD has both audio tracks and MP3/WMA/JPEG fi les, only audio tracks are played.
・
It may take more than one minute for this unit to read MP3/WMA/JPEG fi les depending on its structure.
・
Music recorded by “Joliet Recording Specifi cation” can be played back, the fi le name is displayed (within 16
・
letters) on the screen. Long fi le names will be condensed.
The music fi les recorded by “Hierarchical File System” (HFS) cannot be played.
・
English
Limitations on display
The maximum number for display is 16 letters.
・
Available letters for display are the following: capital or small alphabets of A through Z, numbers of 0 through
9, and _ (under score).
Other letters than those above are replaced in hyphen.
・
Notes on MP3/WMA/JPEG fi les
To playback MP3/WMA/JPEG CD in the recorded order.
1. Use MP3/WMA/JPEG software that records data alphabetically or numerically.
2. Name each fi le including two-digit or three-digit number (ex. “01” “02” or “001””002”).
3. Refrain from making too many sub-folders.
CAUTION:
Some MP3/WMA/JPEG CDs cannot be played back depending on the recording conditions.
・
The CD-R/RW that has no music data or non MP3/WMA/JPEG fi les cannot be played back.
・
59
Page 61

MP3/WMA/JPEG CD Playback
Standard, sampling frequency, and the bit rate:
MP3 CD
MPEG-1 Audio
32kHz, 44.1kHz, 48kHz
32kbps ~ 320 kbps (constant bit rate or variable bit rate)
The recommend recording setting for a high-quality sound is 44.1kHz of sampling frequency and 128kbps of
constant bit rate.
WMA CD
Upto 4kbps (bit rate)
The fi le recorded by mono, 48kHz, 48kpbs is not available to this unit.
Microsoft, Windows Media, and the Windows Logo are either registered trademarks or trademarks of Microsoft
Corporation in the United States and/or other countries.
2. MP3/MWA CD playback
(1) Load a disc on which MP3 or WMA fi les has been recorded in the disc slot.
(2) “READ” will appear on the TV screen.
Reading time will depend on the number of fi les on the disc.
(3) A fi le menu screen will appear on the screen. Playback begins automatically starting from the fi rst fi le of
fi rst folder.
(4) Press ►/◄ /▲/▼ or ENTER to select the desired folder.
And then playback will begin automatically starting
from the fi rst fi le.
(5) Press STOP to end playback.
・The unit records the stopped point, depending on the disc.
“ ► ”appears on the screen. Press ► PLAY to
resume playback from the scene point.
・If you press STOP again (“ ” appears on the screen.),
the unit will clear the stopped point.
(6) Press ▲ EJECT to remove the disc.
3. JPEG CD playback
(1) Load a disc on which JPEG fi les has been recorded in the disc slot.
(2) “READ” will appear on the TV screen.
Reading time will depend on the number of fi les on the disc.
(3) A fi le menu screen will appear on the screen.
(4) Press ▲/▼ to select the desired folder.
(5) Press ► to preview the fi le.
Press ▲/▼ and ENTER to select the desired fi le.
・When ► PLAY has been pressed after displaying the fi le menu,
playback begins automatically starting from the fi rst fi le.
Press “ STOP” to return the fi le menu.
・When ►► has been pressed after displaying the fi le menu, the next fi le will appear on the screen.
Press “ STOP” to return the preview mode. Press “ STOP” again to return the fi le menu.
(6) Press ▲ EJECT to remove the disc.
60
Page 62

Model Name SK-26H590D
Panel
Type
Color
Viewing Angles 160° (H) / 150° (V)
Input Signal Video/Audio
Output Signal RCA (L/R) Stereo * 1;SPDIF (optical) *1
TV Compatibility 480i, 480P, 720P, 1080i
Video Engine
The best TVs use the best technology: ATI inside your TV for The Ultimate Visual Experience™.
Your new Westinghouse TV is powered by ATI’s Xilleon™ image processing chip for the true high
defi nition cinematic experience. Enjoy your new Westinghouse TV with ATI inside.
Recommended
PC Compatible
Supported
1. 12.7mm-high, Internal Type, Slot Load Mechanism
2 .Support ISO/IEC 11172 MPEG-1,13818 MPEG-2, 14496-2 MPEG-4 Video Sources
DVD Player
3 .Support Dolby Digital, MPEG-I/II Layer 1/2, PCM, LPCM, WMA Audio Formats
4 .Playback discs: DVD-Video, DVD-Audio, DVD+RW, DVD+R, DVD-RW, DVD-R,
CD-DA, VCD, SVCD, ISO9600 (MP3, JPEG, WMA, MPEG4), CD-R, CD-RW
5.Disc Diameter : 12cm (can’t support 8cm DISC)
Speaker Output 9w ( x 2 Channels)
Power Voltage 120 VAC, 60 Hz, 2.0A
Temperature (Note A)
Humidity (Relative). (Note A)
Operating 0 to + 35° C (Hum.<90%)
Storage -20 to +60
Operating 20 to 90% non-condensing.(Ta< 35%)
Storage 10 to 90% non-condensing. (Note A)
Wet-bulb temperature should be 39
Note A: The temperature and relative humidity range is shown in right side
Altitude
Operating 0 to 3,000 m
Storage 0 to 12,000m
Dimensions Physical 26.0" (W) x 19.8" (H) x 7.5" (D)
Weight Net / Gross 11.5 kg/ 14.0kg
Regulations UL/C-UL, FCC-B
On <150w (Blue LED)
Consumption(DC Power)
OFF in Normal (Autowake is on) <23w (LED off)
OFF in Energy saving (Autowake is off) <2w (LED off)
Power saving (Autowake is on) <23w (Amber LED)
26" (26" viewable diagonal area), TFT (Thin Film Transistor), Active Matrix
WXGA LCD, 1366 x 768 vertical stripe
Anti-refl ective coating < 2% refl ection
VGA Analog * 1 (75 ohms, 0.7 Vp-p)/Mini-Stereo *1
H/V separated (TTL) for PC; fh: 30-49 kHz, fv: 50-75 Hz
HDMI- CP *1 / RCA (L/R) stereo *1
TV system antenna / NTSC & ATSC *1 in US
YPbPr * 2 / RCA (L/R) Stereo * 2
Composite * 2 / S–Video * 2 / RCA (L/R) stereo * 2
1360 x 768 @ 60Hz (reduced blanking),
1366 x 768 @ 60Hz (reduced blanking)
1280 x 720 @ 60 Hz 720 x 400 @ 70 Hz
1024 x 768 @ 60 Hz 640 x 480 @ 60, 75 Hz
H = 30~49 KHz V= 50~75 Hz
o
C (Hum.< 35 %)
o
C Max. (Ta> 40oC)
SPECIFICATIONS
Relative Humidity(%RH)
100
90
80
60
Operating Range
40
20
Storage Range
-40 -20 0 20 40 60 80
10
Temperature( C)
English
Preset Timing (Pre-adjusted to reduce blanking: 1366 x 768 at 60Hz)
Warning: Do not set the graphics card in your computer to exceed these refresh rates; doing so may result in permanent
damage to the LCD TV.
►Note: Product Specifi cations are subject to change without notice.
61
Page 63

SPECIFICATIONS
Model Name SK-32H590D
32" (32" viewable diagonal area), TFT (Thin Film Transistor), Active Matrix
Type
Panel
Color
Viewing Angles 176° (H) / 176° (V)
Input Signal Video/Audio
Output Signal RCA (L/R) Stereo * 1;SPDIF (optical) *1
TV Compatibility 480i, 480P, 720P, 1080i
Video Engine
The best TVs use the best technology: ATI inside your TV for The Ultimate Visual Experience™.
Your new Westinghouse TV is powered by ATI’s Xilleon™ image processing chip for the true high
defi nition cinematic experience. Enjoy your new Westinghouse TV with ATI inside.
Recommended
PC Compatible
Supported
1. 12.7mm-high, Internal Type, Slot Load Mechanism
2 .Support ISO/IEC 11172 MPEG-1,13818 MPEG-2, 14496-2 MPEG-4 Video Sources
DVD Player
3 .Support Dolby Digital, MPEG-I/II Layer 1/2, PCM, LPCM, WMA Audio Formats
4 .Playback discs: DVD-Video, DVD-Audio, DVD+RW, DVD+R, DVD-RW, DVD-R,
CD-DA, VCD, SVCD, ISO9600 (MP3, JPEG, WMA, MPEG4), CD-R, CD-RW
5.Disc Diameter : 12cm (can’t support 8cm DISC)
Speaker Output 9w ( x 2 Channels)
Power Voltage 120 VAC, 60 Hz, 2.5A
Temperature (Note A)
Humidity (Relative). (Note A)
Operating 0 to + 35° C (Hum.<90%)
Storage -20 to +60
Operating 20 to 90% non-condensing.(Ta< 35%)
Storage 10 to 90% non-condensing. (Note A)
Wet-bulb temperature should be 39
Note A: The temperature and relative humidity range is shown in right side
Altitude
Operating 0 to 3,000 m
Storage 0 to 12,000m
Dimensions Physical 31.0" (W) x 23.5" (H) x 8.0" (D)
Weight Net / Gross 18.5 kg/ 21.0kg
Regulations UL/C-UL, FCC-B
On <190w (Blue LED)
Consumption(DC Power)
OFF in Normal (Autowake is on) <23w (LED off)
OFF in Energy saving (Autowake is off) <2w (LED off)
Power saving (Autowake is on) <23w (Amber LED)
WXGA LCD, 1366 x 768 vertical stripe
Anti-refl ective coating < 2% refl ection
VGA Analog * 1 (75 ohms, 0.7 Vp-p)/Mini-Stereo *1
H/V separated (TTL) for PC; fh: 30-49 kHz, fv: 50-75 Hz
HDMI- CP *1 / RCA (L/R) stereo *1
TV system antenna / NTSC & ATSC *1 in US
YPbPr * 2 / RCA (L/R) Stereo * 2
Composite * 2 / S–Video * 2 / RCA (L/R) stereo * 2
1360 x 768 @ 60Hz (reduced blanking),
1366 x 768 @ 60Hz (reduced blanking)
1280 x 720 @ 60 Hz 720 x 400 @ 70 Hz
1024 x 768 @ 60 Hz 640 x 480 @ 60, 75 Hz
H = 30~49 KHz V= 50~75 Hz
o
C (Hum.< 35 %)
o
C Max. (Ta> 40oC)
Relative Humidity(%RH)
100
90
80
60
Operating Range
40
20
Storage Range
-40 -20 0 20 40 60 80
10
Temperature( C)
Preset Timing (Pre-adjusted to reduce blanking: 1366 x 768 at 60Hz)
Warning: Do not set the graphics card in your computer to exceed these refresh rates; doing so may result in permanent
damage to the LCD TV.
►Note: Product Specifi cations are subject to change without notice.
62
Page 64

TROUBLESHOOTING
•No Power
・Make sure power button is ON (Blue LED).
・Make sure AC power cord is securely connected to the AC socket.
・Plug another electrical device (such as a radio) to the power outlet to verify that the
outlet is supplying the proper voltage.
•Parental Control Password is “LOST”
・In the unlikely occurrence, select “ PASSWORD EDIT” and enter “0000” to reset the
password.
•AUDIO Interconnection Issues
・Remember that S-Video and Composite (VEDIO) share the same audio source.
•Power is ON but No Screen Image
Make sure the video cable connected to the DVD combo LCD TV is tightly secured to the video output
・
port on the back of the computer. If the other end of the video cable is not attached properly to the DVD
combo LCD TV, secure it tightly.
・Adjust brightness and contrast.
・ If you are using a Macintosh computer older than G3, you need a Macintosh adapter.
・Check input source settings.
•Wrong or Abnormal Colors
・If any colors (red, green, or blue) are missing, check the video cable to make sure it is
connected securely. Loose or broken pins in the cable connector could cause an improper connection.
Connect the DVD combo LCD TV to another computer.
・
•Remote Control Buttons Do Not Work
Press only one button at a time.
・
Replace batteries.
・
•Snow Appears on Screen
Check your antenna connection.
・
Check the TV / CATV selection.
・
•No Sound
Check the audio connection.
・
Press MUTE on the remote control, so that MUTE disappears from the screen.
・
Check the audio settings. The LCD TV audio may be set to SAP or minimum.
・
Press the Volume + (Up) key on the remote control.
・
Make sure that headphones are not connected to the Headphone Jack on the LCD TV.
・
Make sure the speaker setting is set to “internal”.
・
•Remote Control Does Not Work
Make sure batteries are inserted correctly.
・
Replace batteries with new ones if necessary.
・
•Remote Control Code Not Found in a “Universal” Remote
Purchase a separate “learning” remote control.
・
•Image Quality Issues
For the best TV image quality, “Standard Defi nition” TV should be viewed in 4:3 format.
・
•DVD Player Does Not Work
Playback doesn’t start
・ The disc is reversed. Load the disc with the playback side facing backward.
・ No disc is loaded. Load the playable disc.
・The disc may be dirty. Clean the disc.
No picture / sound
・ TV selector is not set correctly.
・Some discs may not perform certain functions.
・The setup may not match your TV system.
No subtitle
・Some discs have no subtitles.
•How Can I Find More Help?
Log on to: www.westinghousedigital.com
・
Contact Westinghouse Customer Service at (866) 287-5555
・
or write us at service@westinghousedigital.com
English
63
Page 65

APPENDIX
APPENDIX A: Remove the base
To lay the front bezel down on a soft and clear area, and please be sure that there is no any foreign object
on it for avoiding any scratch or damage.
Step-2
Step-1
Remove the four screws as shown in thefollowing illustration.
Step-3
Remove the base from LCD TV.
►Note:
Be sure to turn off the LCD TV and disconnect all cables before detaching the base.
・
The LCD TV has VESAÒ FPMPMIä compliant 100x100mm and 75x75mm mounting holes.
・
Be sure to follow the operating instructions supplied with the wall-mount bracket when installing the unit.
・
Be sure to use qualifi ed contractors, when installing or removing the TV on the wall.
・
64
Page 66

Westinghouse Digital Electronics
Santa Fe Springs, CA
www.westinghousedigital.com
SE-UM-2603-0701
 Loading...