

Page 1

USER’S MANUAL
MANUEL DE L’UTILISATEUR
MANUAL DEL USUARIO
SK-26H240S
SK-26H520S
Widescreen HDTV
TVHD à Écran Géant
TVHD Pantalla Grande
Page 2

TABLE OF CONTENTS
IMPORTANT SAFETY AND PRECAUTIONS ......................................................................1
Important Information......................................................................................................1
Safety Precautions..........................................................................................................2
GENERAL INFORMATION...................................................................................................4
Feature............................................................................................................................4
Controls and Ports of the Panel......................................................................................5
Accessories ....................................................................................................................7
Remote Control...............................................................................................................8
INSTALLATION & FUNCTION ADJUSTMENT .................................................................10
Installation.................................................................................................. ……………10
How to remove the Base ........................................................................... ……………13
Function Adjustment .....................................................................................................14
English Español
Français
TROUBLESHOOTING ........................................................................................................25
PC INPUT PRESET TIMMING TABLE ...............................................................................29
PRODUCT SPECIFICATION ..............................................................................................30
I
Page 3
IMPORTANT SAFETY AND PRECAUTIONS
This wide active matrix TFT (thin film transistor) liquid crystal monitor is designed for use as
a stand alone TV as well as a display device for video electronics appliances and personal
computers.
Important Information
Warning : To reduce the risk of fire or electric shock, do not expose this product to rain or
moisture.
CAUTION
Risk of electric
shock. Do not open.
Caution :To reduce the risk of electric shock, do not attempt to disassemble or modify this
device. There are no user-serviceable parts inside. Refer any service issues to
qualified service personnel.
English Español
Français
Caution : FCC/ CSA regulations state that any unauthorized changes or modifications to
this equipment may void the user's authority to operate it.
Important: One Federal Court has held that unauthorized recording of copyrighted TV
programs is an infringement of U.S. copyright laws. Certain Canadian programs may also
be copyrighted and any unauthorized recording in whole or in part may be in violation of
these rights.
Warning : Do not leave stationary images, patterns, PIP windows, or letterbox images
on the screen for prolonged periods of time as this may result in permanent damage
to the LCD panel. This type of damage is not covered under warranty. The following
are examples of, but not limited to, potentially hazardous display output: side bar
images, video game patterns, closed captioning, channel logos and letterbox black
bars. To prevent this type of damage, it is recommended to display constantly moving
images that fill the screen as often as possible.
According to industrial standards for LCD display technology; there are a certain number
of allowable defective pixels. Although we produce panels with more than 99.9% active
cells, there still may be some cells that do not produce light or remain constantly lit. For
further information, please contact sales or technical support.
1
Page 4
Safety Precautions
A
g
1. Cleaning : Unplug the power cord from the AC outlet before cleaning the product.
Use a damp cloth to clean the product. Do not use liquid cleaners or aerosol cleaners.
2. Water and moisture : Do not use the product near water or areas of high moisture
content such as swimming pools, bathtubs or wet basements.
3. Ensure that no water droplets remain on the screen. Water can cause permanent
discoloration.
4. Heat sources : Keep the product away from heat sources such as radiators, heaters,
stoves and other heat-generating products (including amplifiers).
5. For added protection during a lightning storm or for extended periods of non-use,
unplug the power cord from the wall outlet and disconnect the antenna (if used). This
will prevent damage to the product due to power line surges.
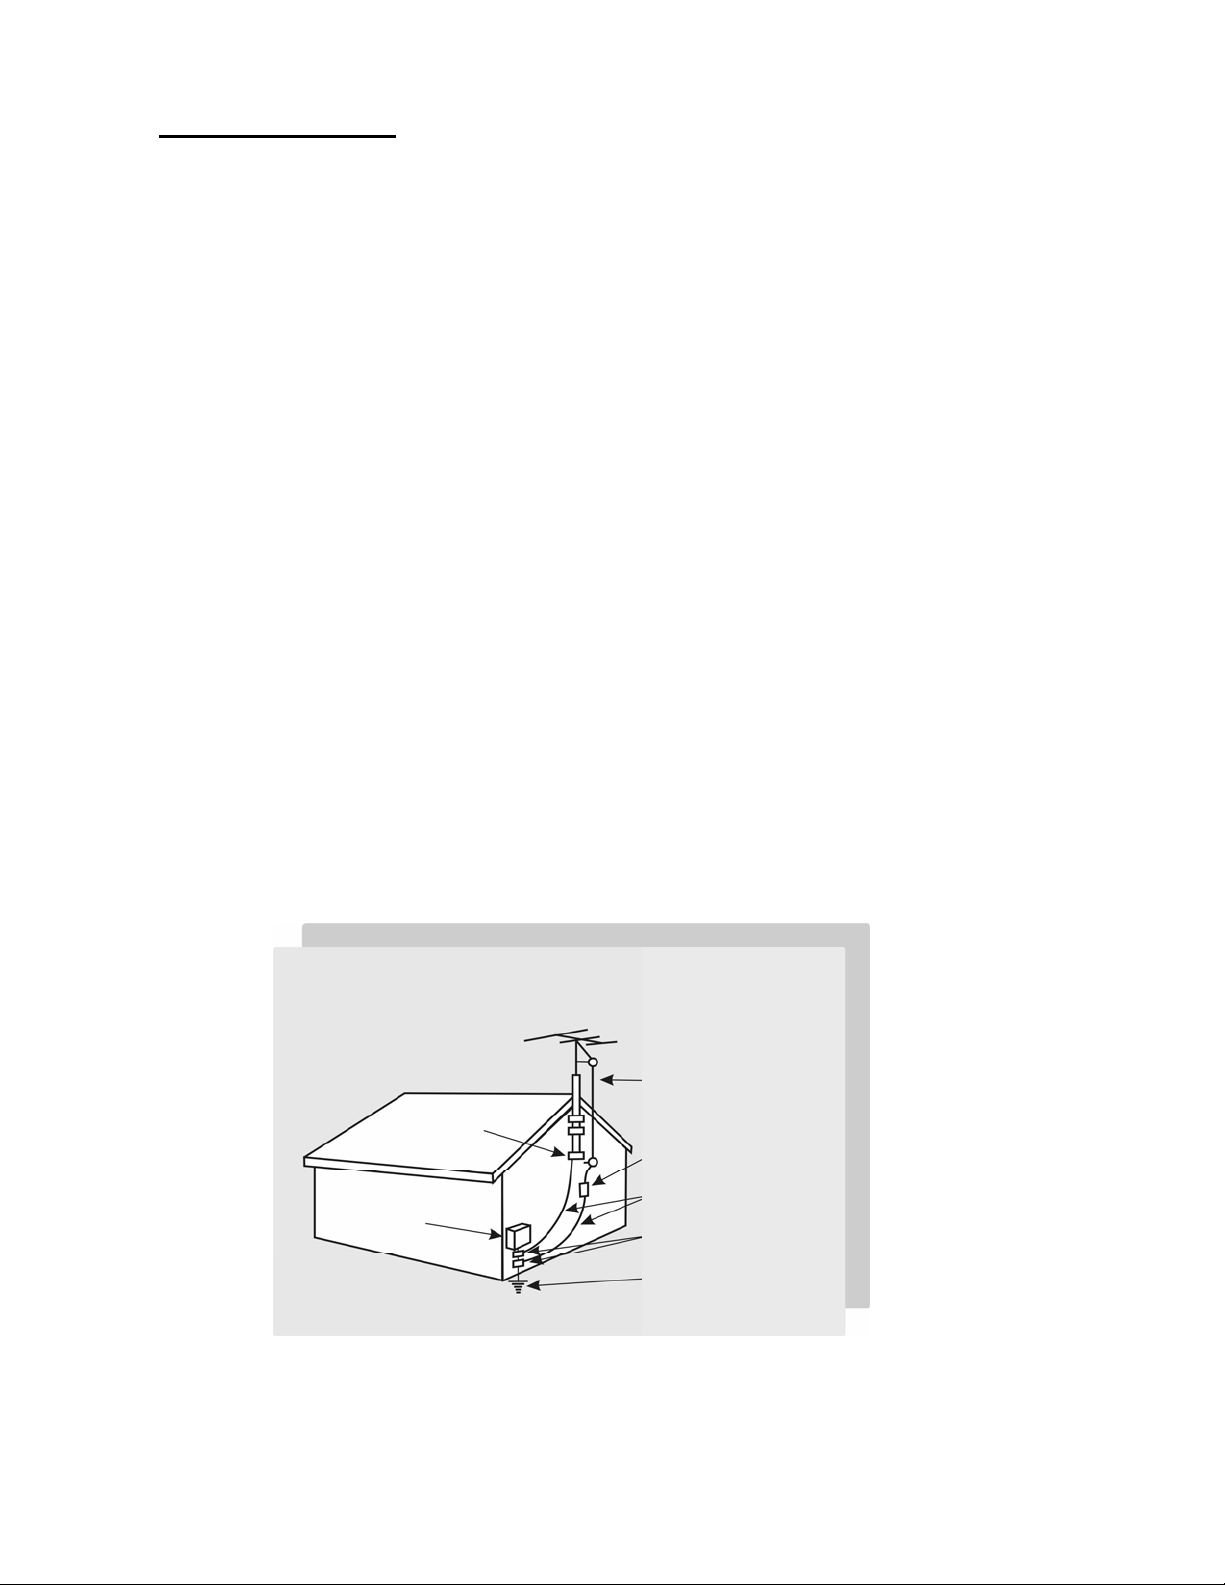
6. If an outside antenna is connected to the product, make sure the antenna is
properly grounded so as to provide some protection against voltage surges.
( Coaxial connector shielding from cable distribution system should be probably
earthed. )
Example of antenna grounding
As per national electrical code
Antenna lead in wire
Ground clamp
ntenna discharge unit
Electric service
equipment
Groundin
Ground clamps
Power service grounding
Electrode system
conductors
2
Page 5

7. Stand : Do not place the product on an unstable
cart, stand, tripod or table. Placing the product
on an unstable base can cause the product to
fall, resulting in serious personal injuries as
well as damage to the product. Use only a cart,
stand, tripod, bracket or table recommended by
the manufacturer or sold with the product. Use
only mounting hardware recommended by the
manufacturer.
8. Use care when moving the product on a rolling cart. Sudden stops, excessive force
and uneven floor surface can cause the product to fall from the cart.
9. Ventilation : The vents and other openings in the cabinet are designed for
ventilation. Do not cover or block these vents and openings as insufficient ventilation
can cause overheating and/or shorten the life of the product. Do not place the product
on a bed, sofa, rug or other similar surfaces since they can block ventilation openings.
This product was not designed to operate in an enclosed environment. Don't place the
product in an enclosed space such as a bookcase or rack, unless proper ventilation is
provided or the manufacturer's instructions are followed.
10. The LCD panel used in this product is made of glass. Therefore, it can break if the
product is dropped or struck.
11. During the LCD panel lifespan it is normal for a few pixels to become defective.
Non-active pixels may appear on the screen as fixed points of red, blue or green.
Refer pixel policy questions to the reseller for further clarification on acceptable loss.
12. An outside antenna system should not be located in the vicinity of overhead power
lines or other electrical conduits. When installing an outside antenna, use extreme
caution to prevent the antenna from coming into contact with said items, as contact
with them may be fatal.
3
English Español
Français
Page 6

GENERAL INFORMATION
Feature
Your TV is designed with the latest technology and is a high-performance unit that includes
the following special feature :
Multi-sources input included RF IN, D-SUB, HDMIx2, Compositex2, S-Videox2, and
Componentx2.
Built-in combo tuner is able to receive ATSC, NTSC and Clear QAM Cable signals.
Built-in 10W dual channel speakers.
Embedded video enhance and noise Reduction features for the colorful and clearest
picture possible.
Provided multi-channel sound decoder for stereo and bilingual broadcasts.
Automatic sleep timer control.
Component video input for high definition TV programming (HDTV ready), resolution up
to 720p, 1080i.
4
Page 7
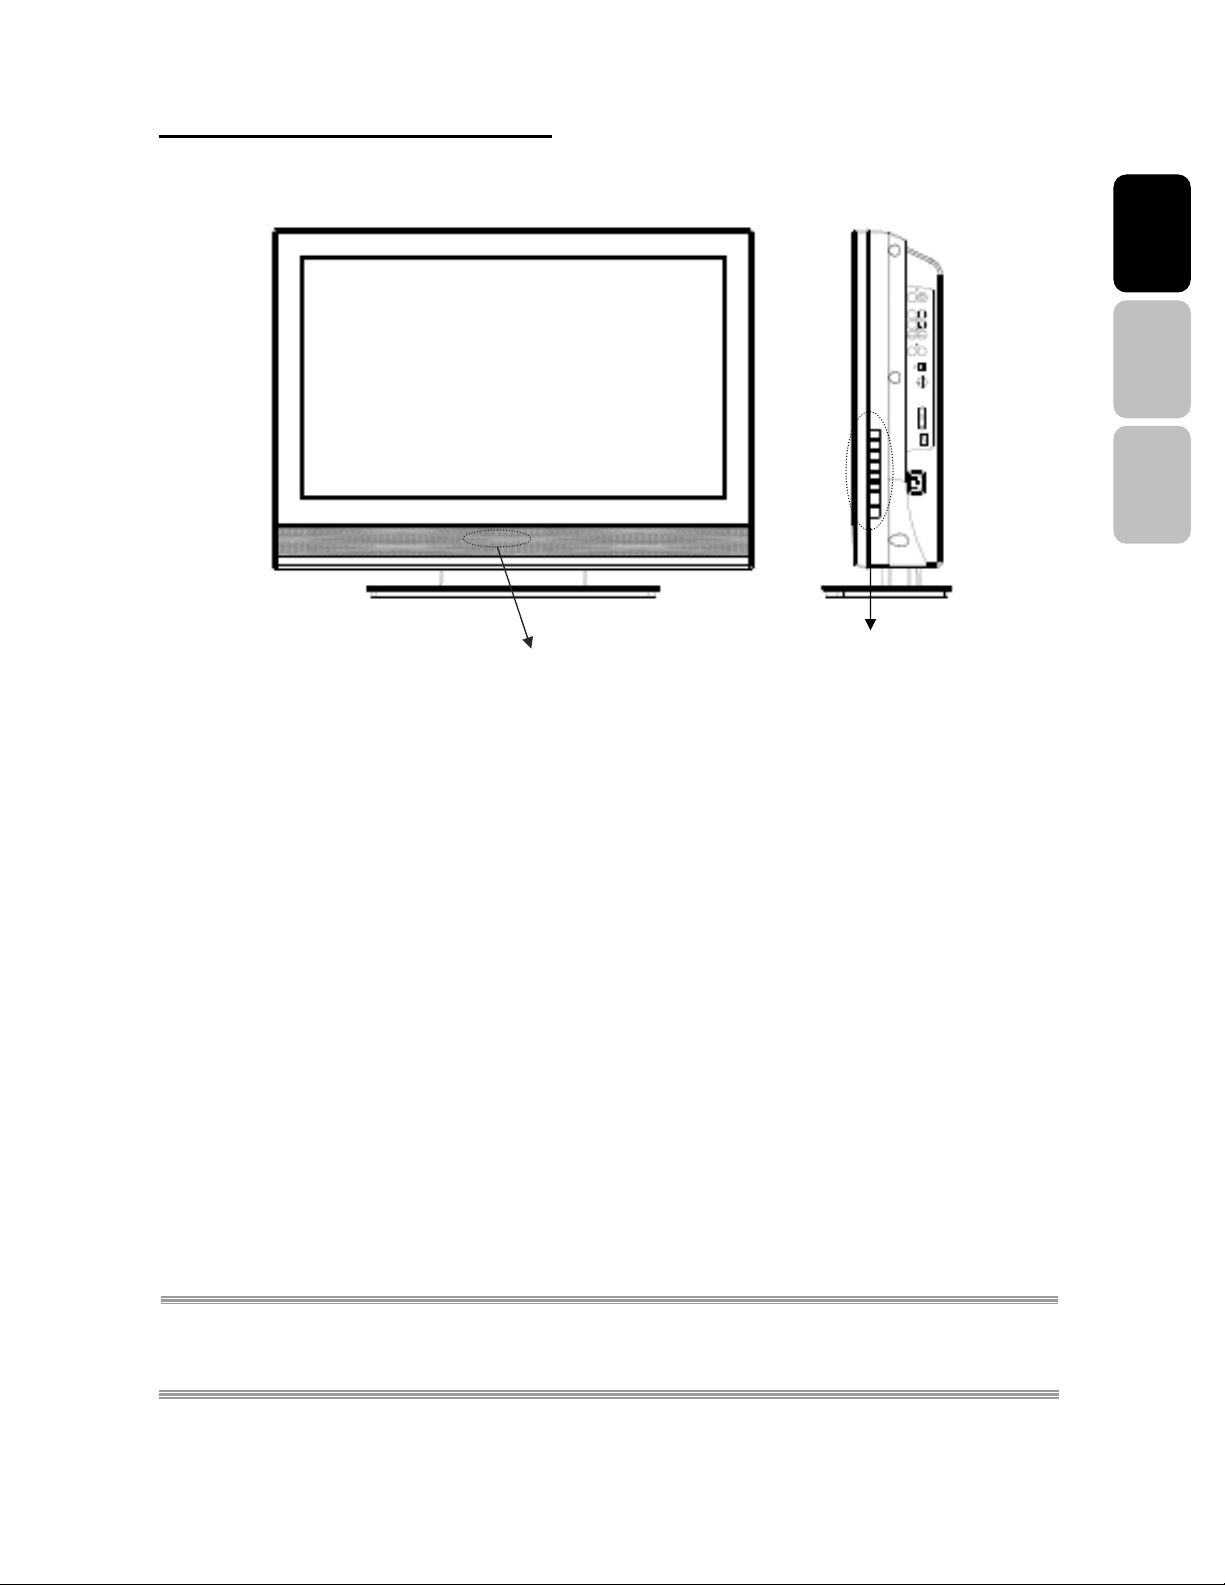
Controls and Ports of the Panel
FFrroonntt PPaanneell VViieewwss
English Español
Français
Remote sensor window & Power indicator
Function Keys
FUNCTION KEYS
1. MENU : Display the main menu. When OSD is appeared, press the button to select or
access the sub-menu.
2. VOLUME (+ / -) : Increase/decrease the volume or be the left/right arrow button for
menu.
3. CHANNEL (+ / -) : Change the channel or be the up/down arrow button for menu.
4. SOURCE : Select the input source ( TV, S-Video1, S-Video2, Video 1, Video 2 , YPbPr
1 , YPbPr 2 , HDMI1, HDMI2, PC ).
5. POWER : Turn the LCD-TV on or off.
6. REMOTE SENSOR WINDOW : aim the remote control towards this spot on the TV.
7. POWER INDICATOR : BLUE LIGHT ─ power on
AMBER LIGHT ─ power sleep
EXTINGUISHED ─ power off
NOTE 1 : These buttons control the basic features of your TV, including the on-screen menu. To use
advanced features, you must use the remote control.
NOTE 2 : The picture of LCD TV display is for reference only.
5
Page 8
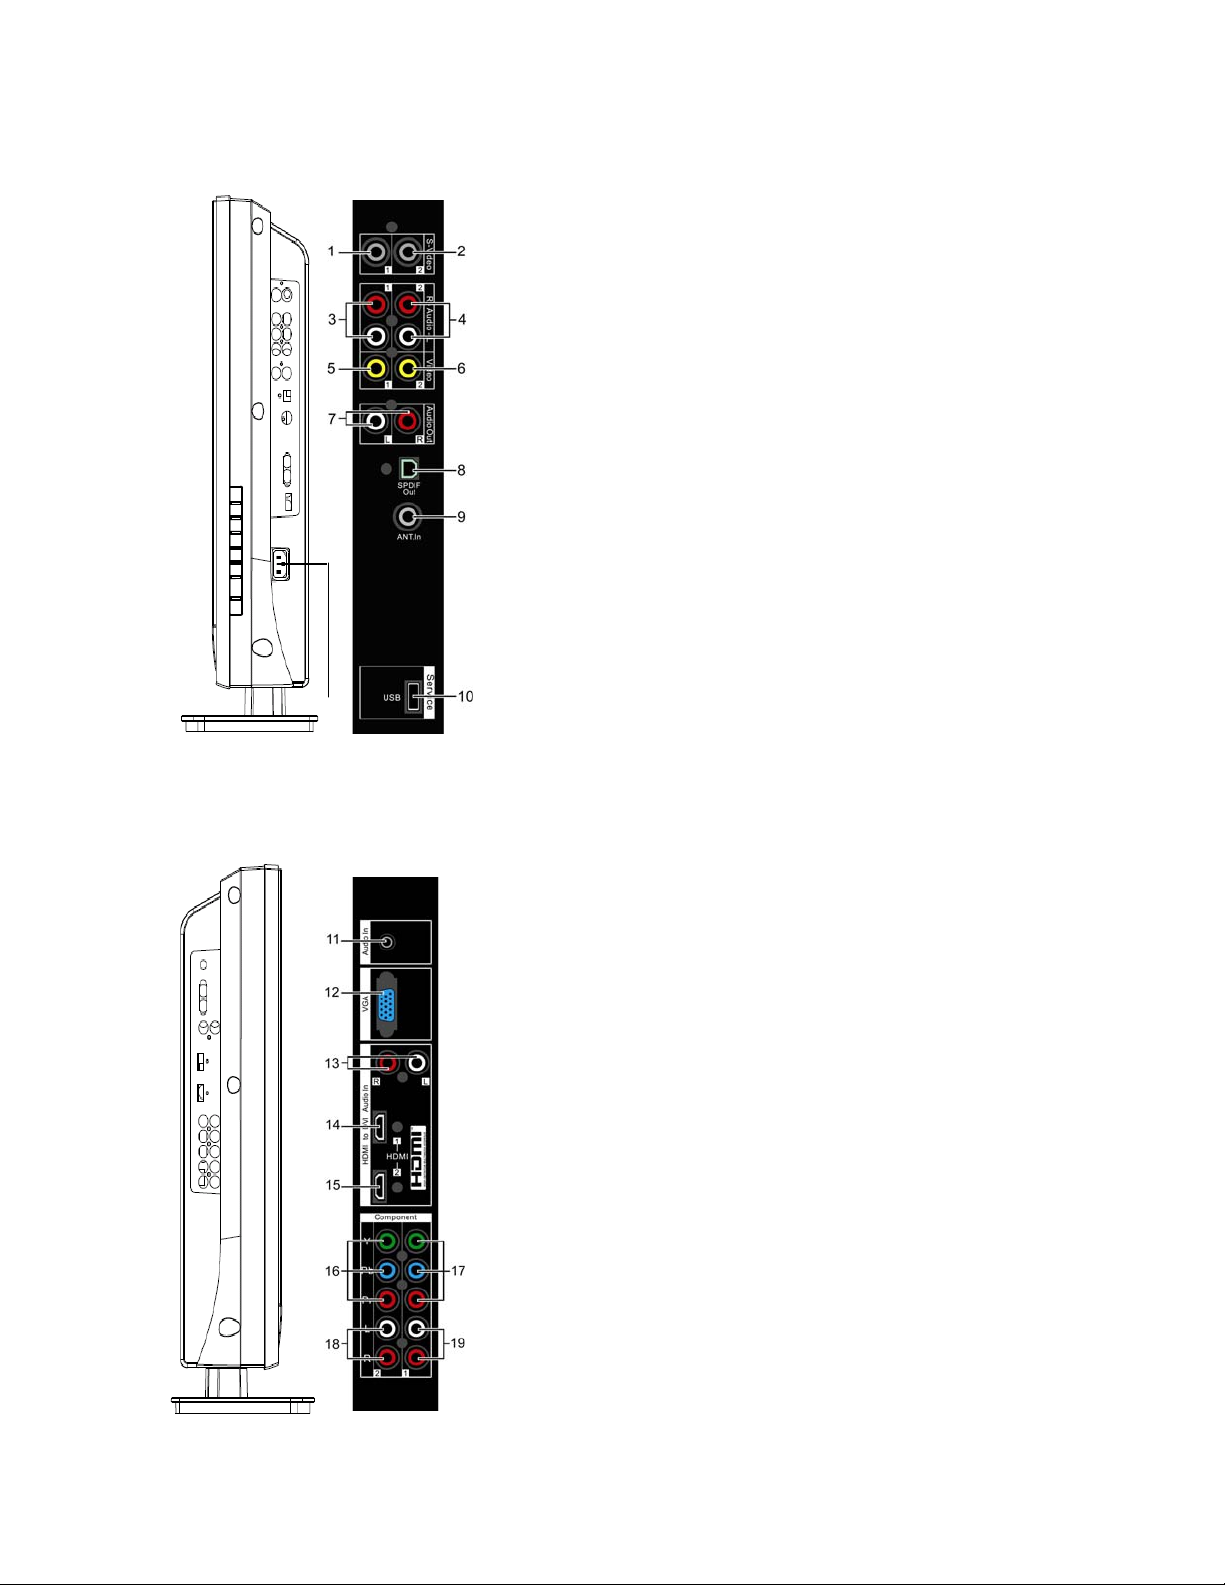
SSiiddee PPaanneell VViieewwss
1. S-Video1 input
Connect to a legacy video device such as a VCR or video game
system.
2. S-Video2 input
3. Video1 & S-Video1 Audio input
Connect an external audio source to this jack.
4. Video2 & S-Video2 Audio input
Connect an external audio source to this jack.
5. Video1 input
Connect the Composite video to a legacy video such as a VCR or
video game system.
6. Video2 input
7. Audio output(R/L)
Connect this output to an external stereo audio amplifier, receiver or
surround sound processor with R/L audio inputs.
8. SPDIF output(Optical)
Connect this output to an external stereo audio amplifier, receiver or
surround sound processor with SPDIF optical input.
20
9. ANT.(RF input)
Connect the LCD TV to an over-the-air antenna or cable service to
view NTSC and ATSC(HDTV) content.
10. USB
Factory service port
11. VGA Audio in
Connect to the audio out(Green) from a computer.
12. VGA
Using a 15-pin VGA cable, connect to a computer.
13. HDMI Audio input(R/L)
Connect the audio input if you using a DVI-to-HDMI converter.
14. HDMI1 input
Connect to an external video device such as HD digital cable/satellite
receiver, HD STB, Media center PC, or DVD player.
15. HDMI2 input
16. YPbPr2 input
Connect an external video device with component output to this jack.
17. YPbPr1 input
18. YPbPr2 Audio2 input(L/R)
Connect an external audio source to this jack.
19. YPbPr1 Audio1 input(L/R)
20. AC power in
Connect power cable to AC inlet.
6
Page 9
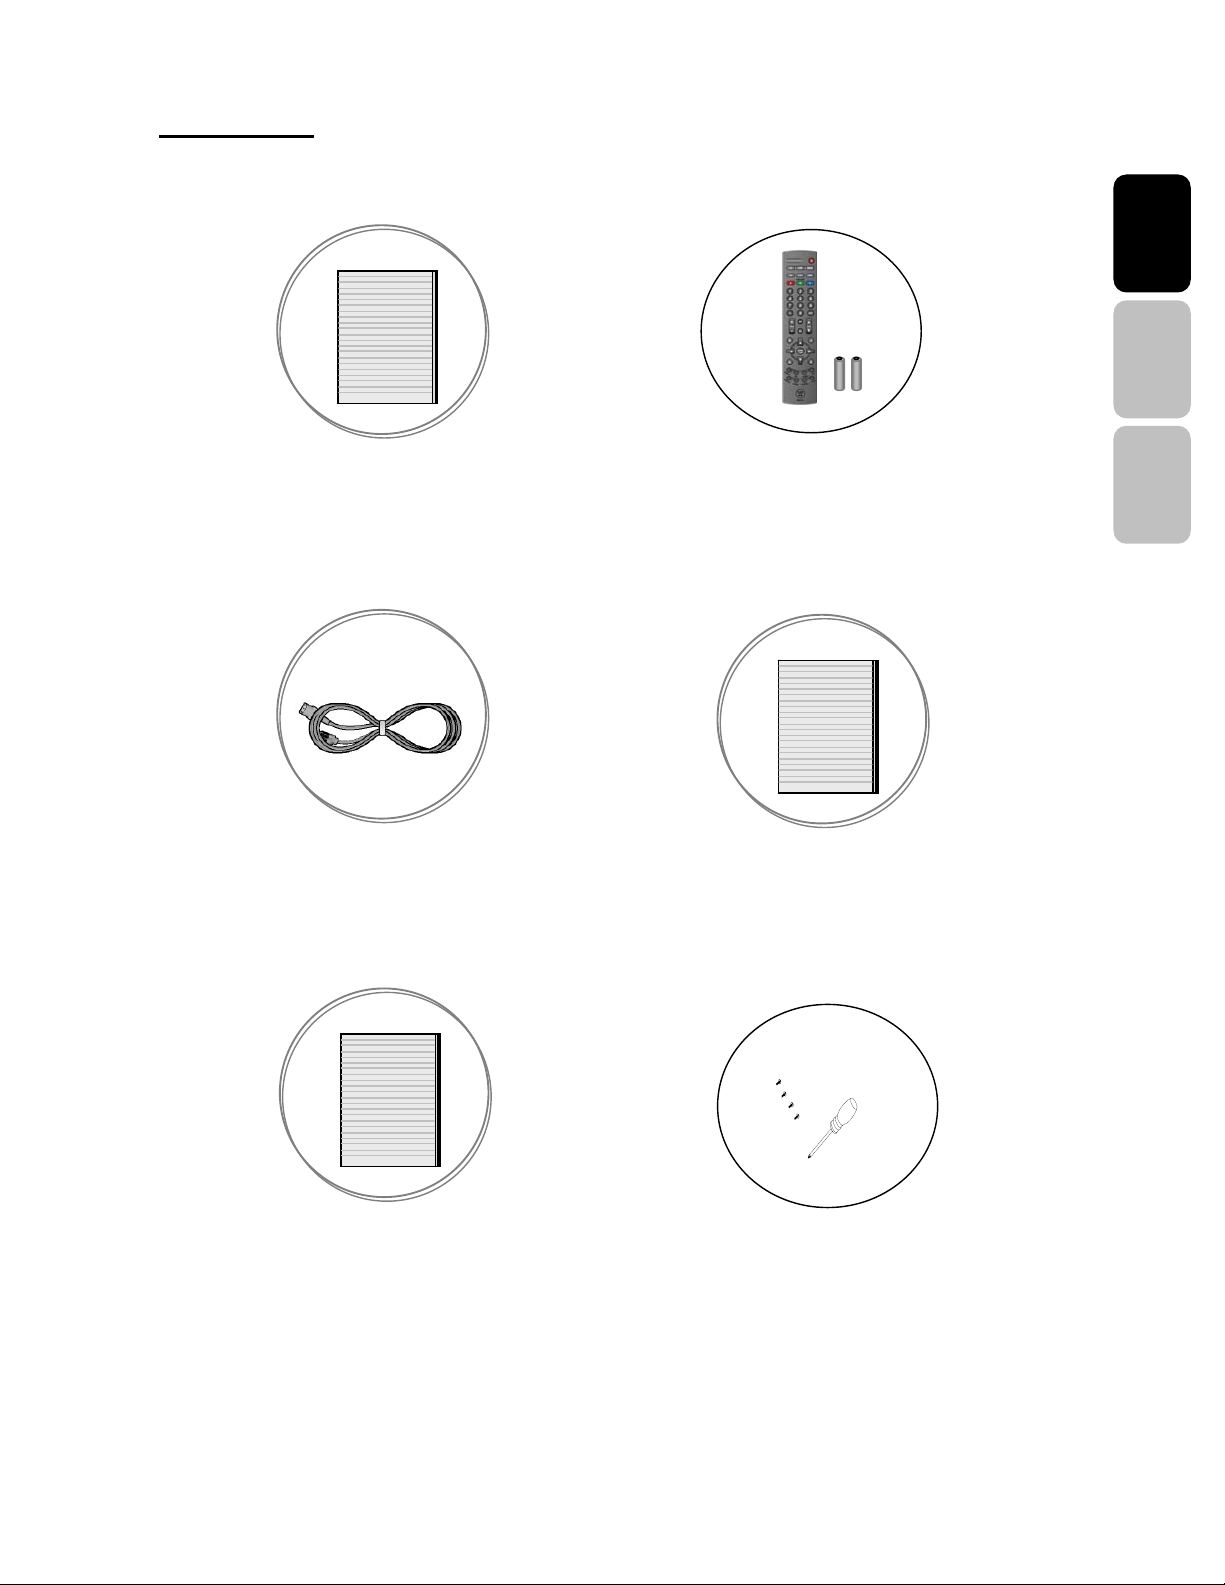
Accessories
English Español
LCD - TV
User’s Manual Remote Control & Batteries
Quick connect
Power Cord
Warranty Card
Quick Connect Guide
Français
Warranty Card
Screw driver & Screws x4(base)
7
Page 10
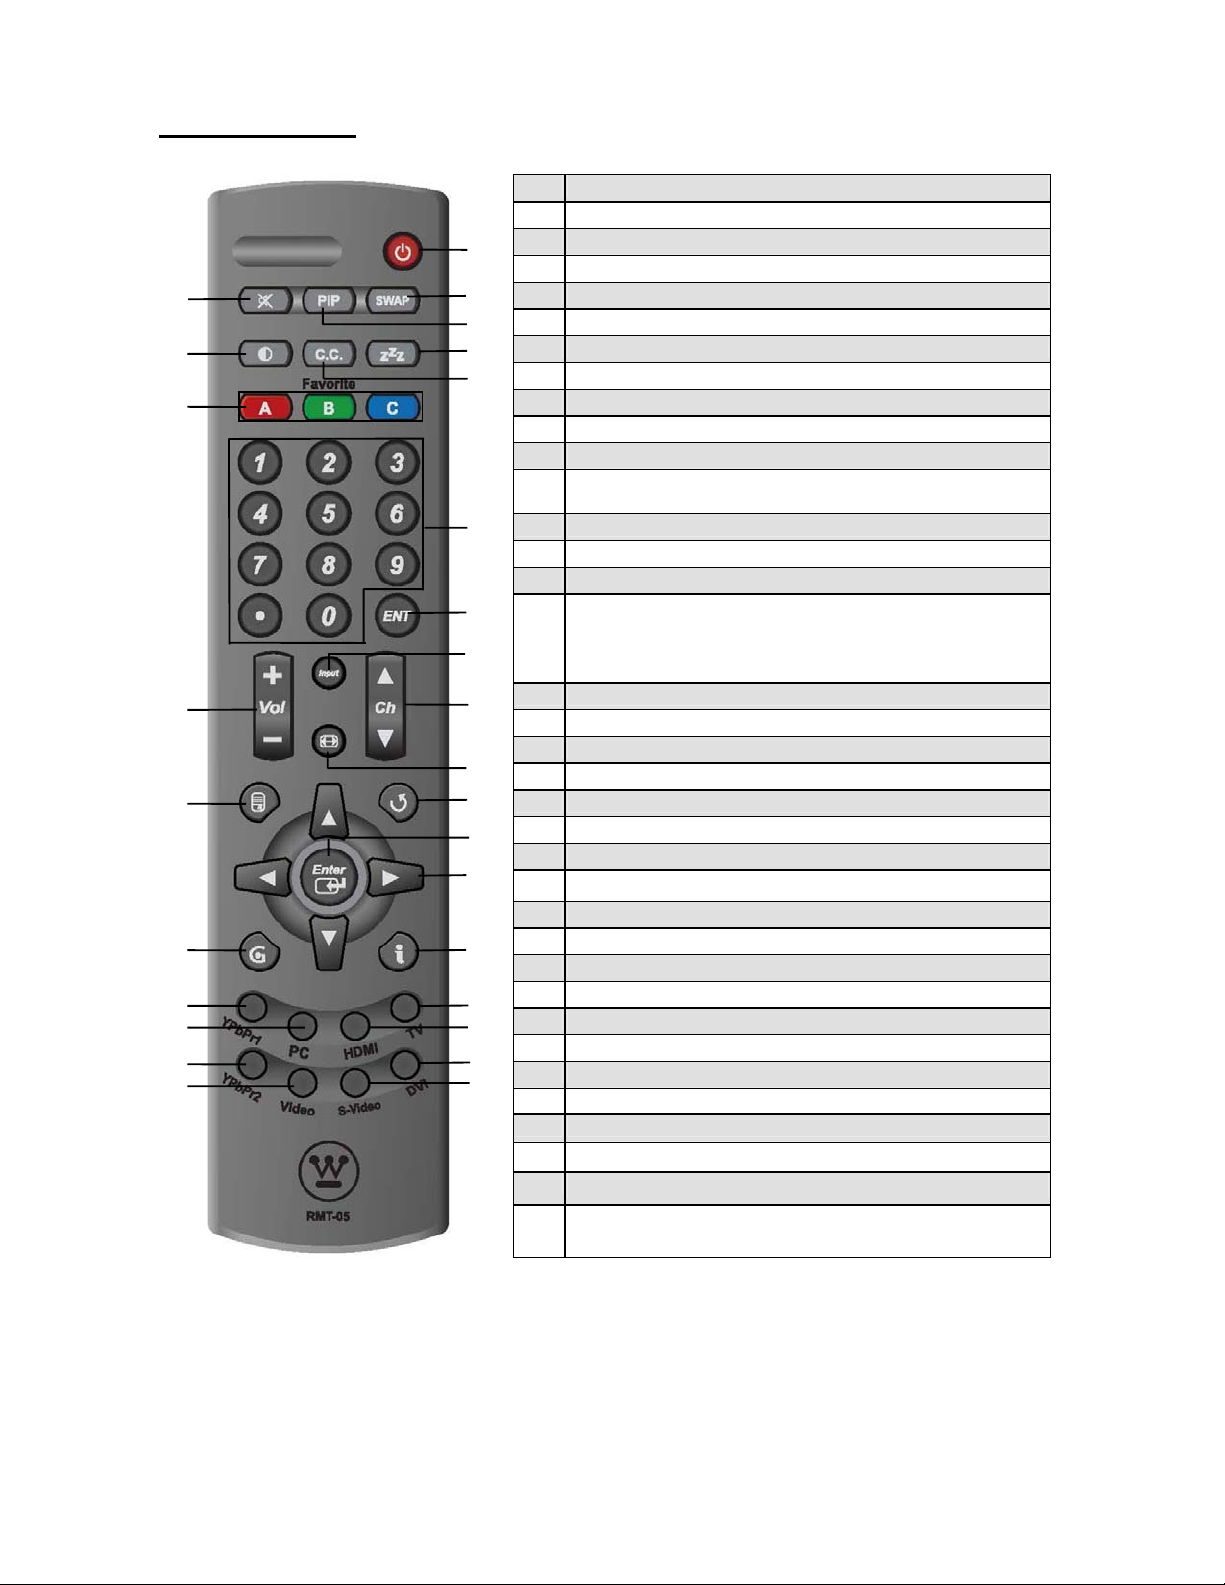
Remote Control
2
5
8
12
15
19
21
23
25
27
1 Power
Switch TV power on/off.
2 Mute
1
3
4
6
7
9
10
11
13
14
16
17
18
20
22
24
26
28
Turn the sound on/off.
3 Swap
No support
4 PIP
No support
5 Backlight
No support
6 Sleep
Press to select a preset time interval for automatic power
down.
7 CC
Press to enable or disabled closed caption.
8 Favorite
Select, remove or add your favorite channel. Press
Favorite(A, B, C)key to access favorite list. Use arrow
keys and enter key to select, add or remove the channel
from favorite list.
9 Channel number keys
Select specific channel.
10 Enter
Execute a command.
11 Input
Select input source.
12 VOL +/-
Volume Up/Down adjustment.
13 CH +/-
TV channel Up/Down adjustment.
14 Screen Fit
Select video display format “Standard” or “Fill”.
15 Menu
Display the User setup menu.
16 Last CH
Switch to previous channel.
17 Enter
Execute a command.
18
▲/▼/◄/►
OSD menual control(▲/▼:TV channel
Up/Down;◄/►:Volume Up/Down)
8
Page 11

12
15
19
21
23
25
27
19
20 Info.
1
Display the source and channel information.
3
2
5
8
21 YPbPr1
4
6
7
9
10
11
13
14
16
17
18
20
22
24
26
28
Select YPbPr1 or 2 source input.
22 TV
Select TV(NTSC/ATSC) source input.
23 PC
Select VGA source input.
24 HDMI
Select HDMI 1 or 2source input.
25 YPbPr2
Select YPbPr2 source input.
26 DVI
No support.
27 Video
Select Video 1 or 2 input.
28 S-Video
b
Select S-Video 1 or 2 input.
English Español
Français
9
Page 12

INSTALLATION AND FUNCTION ADJUSTMENT
Installation
1. Insert Batteries into Remote Control
1) Remove the battery cover.
2) Insert two size AAA batteries corresponding to (+) and (-) marks on the battery
compartment.
CAUTION
‧ Only use AAA batteries.
‧ Do not mix new and old batteries. This may result in cracking or leakage, which may
pose a fire risk or lead to personal injury.
‧ Insert batteries according to (+) and (-) markings. Inserting the batteries incorrectly
may result in cracking or leakage, which may pose a fire risk or lead to personal injury.
‧ Dispose of used batteries in accordance with local laws and regulations.
‧ Keep batteries away from children and pets.
‧ When the remote control will not be used for an extended period, remove the batteries.
10
Page 13

2. Connections
English Español
Français
11
Page 14

3. Connect power cables
Connect the power cord to the LCD TV then to a proper AC outlet.
IMPORTANT: The power input voltage for TV is 120Vac, before beginning; make sure
all devices are turned off.
4. Turn Power On
Press the power button on the right side of the LCD TV, or press the power (Red) button
on the remote control.
5. Select input source for the LCD TV using the OSD menu or remote
control direct select buttons
6. If connecting to Antenna, Cable or other RF source on TV inputs:
See page 19 to scan and edit available channels.
7. If connecting to a PC(VGA):
For the best picture quality, set the timing of your computer to 1366 x 768 at 60Hz.
Refer to the graphic card’s user guide of your computer to set this timing.
12
Page 15

How to remove the BASE
a. Carefully place the TV face down on a soft clean surface.
b. Remove the four screws underneath the BASE.
(See picture below)
c. Pull out the BASE from the TV.
English Español
Français
13
Page 16

Function adjustment
There are four main Setup Menus; these are Settings, Channels, Locks and Guide. All the
functions can be adjusted either by the remote control or by using the control keys on the
LCD TV’s right side.
Viewing OSD Menu
To display the main menu, press the Menu button on the right side of front control keys of
the LCD TV or the MENU key on the remote control. Press arrow keys to select desired
OSD menu and Enter key to select desired setting.
14
Page 17

Menu/Exit
Video
Up
Exit to previous menu
Right
Enter
Down
English Español
Français
Video settings:
Press arrow keys to select or adjust your favorite picture settings. DONE button to
close picture setting menu.
15
Page 18

Screen Fit:
Adjust your TV screen to handle different picture formats.
Standard/Fill/Overscan/DVD Restoration
Color Temp.:
Press arrow keys to select or adjust your preferred color
temperature settings.
Cool/Neutral/Warm/User
3D Comb Filter:
Press arrow keys to select or adjust your preferred settings.
Off/Low/Medium/High
Temporal NR:
Press arrow keys to select or adjust your preferred settings.
Off/Low/Medium/High
Audio Setting
Bass, Treble & Balance
16
Page 19

Use arrow keys to adjust the bass, treble and balance.
Optical Out
Select AC3/PCM
Analog Preference
Select an analog audio preference if TV signal is analog.
Mono/Stereo/SAP
Digital Preference
Select language preference for digital channels.
English/French/Spanish
Settings
English Español
Français
Basic Selection
Close Captions
17
Page 20

Choose the type of closed caption settings to use for
programs broadcast with basic caption.
Advanced Selection
Use arrow keys to adjust closed caption appearance
such as font and size, each change can be
previewed on bottom of menu.
Caption Preference
Select Always Basic/Always Advanced/Automatic.
Timers
Select automatic power-on time.
Date & Time
Set Date & Time.
Menu Language
Use arrow keys to adjust Menu Language
18
Page 21

Input
Autosource
Autosource can detect new source which is plugged in TV
and switch input source setting of your TV to the source
English Español
Français
automatically.
Power Management
Set TV power saving modes(Normal/quick boot-up time, but large
power consumption; Energy saving/longer boot-up time, but small
power consumption.)
Power On Plug
Set TV power on memory when un-plug power cord and re-plug it.(ON/automatic power-on
memory; OFF/no automatic power-on)
19
Page 22

System Info
Display important system info, you may need the information when calling customer
service or troubleshooting such as firmware version and micro version. Press DONE button
or arrow key to previous menu.
RESET ALL
Reset all settings back to factory defaults. Reset will delete all settings you have made
including channel list.
Channels
20
Page 23

Master Channel list
To display which channels have been scanned.
Scan Channels
To auto scan current available channels by using “Antenna or cable” scan.
English Español
Français
Favorites
To display which channels have been set for Favorites.
21
Page 24

Find Channel
Enter channel number via number key then press DONE button to find a channel. You
may be required to enter four digits pin number if pin number was set before.
Channel Name Edit
Edit the channel name in channel list. Enter the edited channel, press “enter” button of
remote control, shows “Change name” menu. You can compile the name you like, then
press “Done” button, the edition is to be finished.
Locks
Lock feature prevents viewers from watching programs that are not age-appropriate, such
as programs containing violence or adult language.
The pin number is required when you want to enter Locks menu, just use the remote
control to key in your pin number. The factory default pin number is 0000.
22
Page 25

Rating Locks
Select which USA or Canada rating you want to set.
USA TV Rating
TV Y All children
TV Y7 For older children
TV G General audience
TV PG Parental guidance suggested
English Español
Français
TV 14 Parental strongly cautioned
TV MA Mature audience only
USA Movie Rating
G General audience
PG Parental guidance suggested
PG-13 Parental strongly cautioned
R Restricted
NC 17 No on 17 and under admitted
X Adult audience only
Canada-French
G General programming, suitable for all audience
23
Page 26

8 ans+ Children eight years and older
13 ans+ Viewers 13 year and older
16 ans+ Viewers 16 year and older
18 ans+ Adult programming
Canada-English
C Children
C8+ Children eight years and older
G General programming, suitable for all audience
PG Parental guidance
14+ Viewers 14 year and older
18+ Adult programming
Channel Locks
To set which channels are locked, use arrow keys to lock one or more channels.
Select button on menu to lock and unlock channels.
24
Page 27

English Español
Français
TROUBLESHOOTING
25
Page 28

There is no picture or sound.
T
▪ Make sure the AC adapter is connected.
▪ Verify that there is a valid source signal.
▪ Make sure the correct input mode is selected.
There is no picture from AV.
▪ Make sure the BRIGHTNESS is properly adjusted.
▪ The florescent lamp may have reached the end of its life.
Contact an authorized service center.
▪ Make sure the video source is plugged into the composite
video-in port.
here is no sound.
▪ Make sure the volume is not set to minimum.
▪ Make sure the sound is not muted
There is no picture or sound, just noise.
▪ The source signal may be weak.
▪ Your provider may be experiencing difficulties.
▪ Check your input connections.
Picture is not clear.
▪ The source signal may be weak.
▪ The provider may be experiencing difficulties.
▪ Check input connections.
26
Page 29

Picture is light or improperly tinted.
▪ Check the Hue, Saturation and Color adjustments.
▪ Reset the TV to the factory default settings.
The picture is too dark.
▪ Select a different Video Preset mode.
▪ Check the Brightness of Picture Settings.
▪ The fluorescent lamp may have reached the end of its life.
Contact an authorized service center.
Remote control does not work.
English Español
Français
▪ Install new batteries.
▪ Make sure the remote sensor window isn’t blocked.
▪ Make sure the system is in the right mode (TV / VCR / CBL /
AUX)
There are stripes on the screen or colors fade.
▪ There may be interference from other appliances.
▪ There may be interference between the video source cable and
the power cable.
▪ Make sure the power and video cables are not touching.
Check the Hue, Saturation and Color adjustments
27
Page 30

The picture is not sharp.
T
▪ The signal source may be weak.
▪ The provider may be experiencing difficulties.
▪ Check input connections.
▪ Check the Sharpness of Picture Settings.
The picture moves.
The picture is doubled or tripled.
▪ The source signal may be weak.
▪ The provider may be experiencing difficulties.
▪ Check input connections.
▪ The source signal may be weak.
▪ Check input connections.
he picture is spotted.
▪ There may be interference from other appliances nearby or
around the LCD TV.
28
Page 31

PC INPUT PRESET TIMMING TABLE
PC / Timing Table
No. Mode Name
Resolution
VGA 70HZ
1
720*400
VGA 60HZ
2
640*480
VGA 67HZ
3
640*480
VGA 72HZ
4
640*480
VGA 75HZ
5
640*480
SVGA 56Hz
6
800*600
SVGA 60Hz
7
800*600
H.Freq.
H. Polarity
V.Fre.
V. Polarity
31.469
70.087 - +
31.469
59.941 - -
35.00
66.667 - -
37.861
72.809 - -
37.5
75.0
35.156
56.25
37.879
60.317 + +
Vert. Bak
Vert.
Display
Line No.
Line No.
Porch
Hor. Syth
CLK No.
Hor. Bck
Pixel
CLK
(MHz)
28.322 900 720 54 108 449 400 35 2
25.175 800 640 48 96 525 480 33 2
30.24 864 640 96 64 525 480 39 3
31.5 832 640 120 40 520 480 20 3
-
-
+
+
31.5 840 640 120 64 500 480 16 3
36.0 1024 800 128 72 625 600 22 2
40.0 1056 800 88 128 628 600 23 4
Hor.
Total
CLK No.
Hor.
Display
CLK No.
CLK No.
Vert.
Total
Line No.
Porch
Vert. Syc
Width
Line No.
English Español
Français
60Hz
60Hz
60Hz
48.077
72.188 + +
46.875
75.0
48.363
60.004 - -
56.476
70.069 - -
60.023
75.029 + +
44.76
60.0
49.68
60.0
47.368
59.959 + -
50.0 1040 800 64 120 666 600 23 6
+
+
-
+
-
+
49.5 1056 800 160 80 625 600 21 3
65.0 1344 1024 160 136 806 768 29 6
75.0 1328 1024 144 136 806 768 29 6
78.75 1312 1024 176 96 800 768 28 3
74.481 1664 1280 192 136 746 720 22 3
83.462 1680 1280 200 136 828 800 24 3
72.0 1520 1360 80 32 790 768 15 5
8
9
10
11
12
13
14
15
SVGA 72Hz
800*600
SVGA 75Hz
800*600
XGA 60Hz
1024*768
XGA 70Hz
1024*768
XGA 75Hz
1024*768
1280*720
1280*800
1360*768
* The resolution and the frequencies are displayed on the screen may not exactly same as
this list.
29
Page 32

PRODUCT SPECIFICATION
ITEMS 26” LCD - TV
Screen Size 26” LCD Panel
Aspect Ratio 16:9
Panel
TV Function
Video Input
PC Input
Audio Input
Audio Output
Feature Function Keys Power , Input , Menu , Up/Down(Channel) , +/-(Volume)
Resolution 1366 x 768
Display colors 16.2M colors
Viewing Angle (CR>10) 170o Hor. / 170o Ver. (typ. )
Broadcasting System Analog : NTSC M / N Digital : ATSC/Clear QAM
Receiving Channel Analog : PLL181Ch., CATV 125Ch Digital : 54M Hz~864M Hz
Sound System Analog : Multi-channel TV Sound Digital : Multi-Track Sound
Resolution Analog : 480i Digital : 1080i, 720p,480p, 480i
Data Broadcasting Close Caption , V - Chip
Composite Signal CVBS x 2
Y, C Signal S-Video x 2
Component Signal Y Pb Pr x 2 (720P / 1080i , HDTV ready )
HDMI Connection HDMI x 2
VGA Connection D-Sub 15 pin
Scanning Frequency f
Audio 1
Audio 2 Component
Audio 3 HDMI to DVI & PC jack in
Speaker ( build-in) 10W + 10W (Average)
RCA Out Left / Right
Digital Audio Out SPDIF (DTV) .
31.5 ~ 60KHz / fV = 56 ~ 75Hz
H =
Composite
S - Video
Video Performance
3D Comb-filter , 3D De-interlace , Aspect Ratio Control (ARC) ,
Auto Picture Control, Noise Reduction
Other Control Sleep Timer, Timer On, Timer Off
Power
Dimension W x H x D
Weight (net) Without Accessories
Power Supply AC 100V ~ 240V , 50 / 60Hz
Power Consumption < 200 W
655 mm * 505 mm * 175 mm
11 K g
30
Page 33

Westinghouse Digital Electronics
Santa Fe Springs, CA
www.westinghousedigital.com
SE-UM-2602-0701
 Loading...