

Page 1
®
WD TV
Live Hub
Media Center
User Manual
™
Page 2

Table of Contents
1 Important User Information . . . . . . . . . . . . . . . . . . . . 1
Important Safety Instructions . . . . . . . . . . . . . . . . . . . . . . . . . . . . . . 1
®
WD
Service and Support . . . . . . . . . . . . . . . . . . . . . . . . . . . . . . . . 2
Recording Your WD Product Information . . . . . . . . . . . . . . . . . . . . 3
Registering Your WD Product . . . . . . . . . . . . . . . . . . . . . . . . . . . . . 3
Accessories . . . . . . . . . . . . . . . . . . . . . . . . . . . . . . . . . . . . . . . . . . 3
2 Product Overview . . . . . . . . . . . . . . . . . . . . . . . . . . . . 4
3 Features and Functions . . . . . . . . . . . . . . . . . . . . . . . 6
Features. . . . . . . . . . . . . . . . . . . . . . . . . . . . . . . . . . . . . . . . . . . . . . 6
Connections . . . . . . . . . . . . . . . . . . . . . . . . . . . . . . . . . . . . . . . . . 7
Power Button and LED Indicator . . . . . . . . . . . . . . . . . . . . . . . . . . . 8
Remote Control . . . . . . . . . . . . . . . . . . . . . . . . . . . . . . . . . . . . . . . . 9
4 Getting Started . . . . . . . . . . . . . . . . . . . . . . . . . . . . . 10
Package Contents . . . . . . . . . . . . . . . . . . . . . . . . . . . . . . . . . . . . 10
Installation Requirements . . . . . . . . . . . . . . . . . . . . . . . . . . . . . . . 10
Operating System Compatibility . . . . . . . . . . . . . . . . . . . . . . . . . .10
Installation Procedure. . . . . . . . . . . . . . . . . . . . . . . . . . . . . . . . . . . 11
5 Operating the Media Center. . . . . . . . . . . . . . . . . . . 22
Using the Remote Control . . . . . . . . . . . . . . . . . . . . . . . . . . . . . . . 22
Using a USB Keyboard . . . . . . . . . . . . . . . . . . . . . . . . . . . . . . . . . 24
Using the Media Center Menu . . . . . . . . . . . . . . . . . . . . . . . . . . . . 26
Media Library Compilation . . . . . . . . . . . . . . . . . . . . . . . . . . . . . . . 29
Locating Your Contents on the Drive . . . . . . . . . . . . . . . . . . . . . . . 31
6 Watching Video . . . . . . . . . . . . . . . . . . . . . . . . . . . . . 36
Video Playback . . . . . . . . . . . . . . . . . . . . . . . . . . . . . . . . . . . . . . . 36
Videos Menu Options. . . . . . . . . . . . . . . . . . . . . . . . . . . . . . . . . . . 38
Video Playback Controls . . . . . . . . . . . . . . . . . . . . . . . . . . . . . . . . 42
Video Playback Options . . . . . . . . . . . . . . . . . . . . . . . . . . . . . . . . . 43
DVD Navigation . . . . . . . . . . . . . . . . . . . . . . . . . . . . . . . . . . . . . . . 48
TABLE OF CONTENTS – i
Page 3

7 Playing Music . . . . . . . . . . . . . . . . . . . . . . . . . . . . . . 50
Music Playback . . . . . . . . . . . . . . . . . . . . . . . . . . . . . . . . . . . . . . . 50
Music Menu Options . . . . . . . . . . . . . . . . . . . . . . . . . . . . . . . . . . . 52
Music Playback Controls . . . . . . . . . . . . . . . . . . . . . . . . . . . . . . . . 54
Music Playback Options. . . . . . . . . . . . . . . . . . . . . . . . . . . . . . . . . 55
Playing Music From Your iPod® . . . . . . . . . . . . . . . . . . . . . . . . . . 57
8 Viewing Photos . . . . . . . . . . . . . . . . . . . . . . . . . . . . . 58
Photo Display. . . . . . . . . . . . . . . . . . . . . . . . . . . . . . . . . . . . . . . . . 58
Digital Camera Support . . . . . . . . . . . . . . . . . . . . . . . . . . . . . . . . . 60
Photos Menu Options . . . . . . . . . . . . . . . . . . . . . . . . . . . . . . . . . . 61
Photo Display Options . . . . . . . . . . . . . . . . . . . . . . . . . . . . . . . . . . 63
Displaying Photo Thumbnails . . . . . . . . . . . . . . . . . . . . . . . . . . . . . 64
Displaying Photo Information . . . . . . . . . . . . . . . . . . . . . . . . . . . . . 65
Photo Slideshow . . . . . . . . . . . . . . . . . . . . . . . . . . . . . . . . . . . . . . 65
9 Files . . . . . . . . . . . . . . . . . . . . . . . . . . . . . . . . . . . . . . 67
Files Options . . . . . . . . . . . . . . . . . . . . . . . . . . . . . . . . . . . . . . . . .68
10 Network Setup. . . . . . . . . . . . . . . . . . . . . . . . . . . . . . 69
Ethernet Network (Wired) Setup . . . . . . . . . . . . . . . . . . . . . . . . . . . 69
Wireless Network Setup. . . . . . . . . . . . . . . . . . . . . . . . . . . . . . . . . 70
Checking the Network Connection. . . . . . . . . . . . . . . . . . . . . . . . . 74
11 Network Services . . . . . . . . . . . . . . . . . . . . . . . . . . . 76
Accessing Media Content from the Network . . . . . . . . . . . . . . . . . 76
Share a Folder on Your Computer . . . . . . . . . . . . . . . . . . . . . . . . . 80
Using the Web UI. . . . . . . . . . . . . . . . . . . . . . . . . . . . . . . . . . . . . . 88
12 Internet Services . . . . . . . . . . . . . . . . . . . . . . . . . . . . 93
Adding a Service to Favorites. . . . . . . . . . . . . . . . . . . . . . . . . . . . . 95
AccuWeather.com . . . . . . . . . . . . . . . . . . . . . . . . . . . . . . . . . . . . 96
Deezer . . . . . . . . . . . . . . . . . . . . . . . . . . . . . . . . . . . . . . . . . . . . . 99
Facebook. . . . . . . . . . . . . . . . . . . . . . . . . . . . . . . . . . . . . . . . . . . 104
Flickr . . . . . . . . . . . . . . . . . . . . . . . . . . . . . . . . . . . . . . . . . . . . . . 109
Flixster . . . . . . . . . . . . . . . . . . . . . . . . . . . . . . . . . . . . . . . . . . . . 116
Live365 . . . . . . . . . . . . . . . . . . . . . . . . . . . . . . . . . . . . . . . . . . . . 117
MLB.TV . . . . . . . . . . . . . . . . . . . . . . . . . . . . . . . . . . . . . . . . . . . . 124
Netflix . . . . . . . . . . . . . . . . . . . . . . . . . . . . . . . . . . . . . . . . . . . . . 128
TABLE OF CONTENTS – ii
Page 4

Pandora (US only) . . . . . . . . . . . . . . . . . . . . . . . . . . . . . . . . . . . . 129
Picasa . . . . . . . . . . . . . . . . . . . . . . . . . . . . . . . . . . . . . . . . . . . . .135
SHOUTcast Radio . . . . . . . . . . . . . . . . . . . . . . . . . . . . . . . . . . . 142
Spotify . . . . . . . . . . . . . . . . . . . . . . . . . . . . . . . . . . . . . . . . . . . . 146
TuneIn . . . . . . . . . . . . . . . . . . . . . . . . . . . . . . . . . . . . . . . . . . . . 153
YouTube . . . . . . . . . . . . . . . . . . . . . . . . . . . . . . . . . . . . . . . . . . . 158
13 Live TV . . . . . . . . . . . . . . . . . . . . . . . . . . . . . . . . . . . 169
Live TV Display. . . . . . . . . . . . . . . . . . . . . . . . . . . . . . . . . . . . . . . 169
14 Games . . . . . . . . . . . . . . . . . . . . . . . . . . . . . . . . . . . 170
Games Display. . . . . . . . . . . . . . . . . . . . . . . . . . . . . . . . . . . . . . .170
15 RSS . . . . . . . . . . . . . . . . . . . . . . . . . . . . . . . . . . . . . . 171
Reading RSS Feeds. . . . . . . . . . . . . . . . . . . . . . . . . . . . . . . . . . . 171
Adding RSS Feeds. . . . . . . . . . . . . . . . . . . . . . . . . . . . . . . . . . . . 171
16 Setup and Advanced Features. . . . . . . . . . . . . . . . 172
Setup Navigation Buttons . . . . . . . . . . . . . . . . . . . . . . . . . . . . . . 173
Audio/Video Output . . . . . . . . . . . . . . . . . . . . . . . . . . . . . . . . . . . 173
Appearance . . . . . . . . . . . . . . . . . . . . . . . . . . . . . . . . . . . . . . . . . 178
Video Settings . . . . . . . . . . . . . . . . . . . . . . . . . . . . . . . . . . . . . . . 182
Music Settings . . . . . . . . . . . . . . . . . . . . . . . . . . . . . . . . . . . . . . . 184
Photo Settings . . . . . . . . . . . . . . . . . . . . . . . . . . . . . . . . . . . . . . 185
Network. . . . . . . . . . . . . . . . . . . . . . . . . . . . . . . . . . . . . . . . . . . . 187
Operation. . . . . . . . . . . . . . . . . . . . . . . . . . . . . . . . . . . . . . . . . . . 193
System . . . . . . . . . . . . . . . . . . . . . . . . . . . . . . . . . . . . . . . . . . . . 195
Mobile Access/WD Photos . . . . . . . . . . . . . . . . . . . . . . . . . . . . . 202
About . . . . . . . . . . . . . . . . . . . . . . . . . . . . . . . . . . . . . . . . . . . . . 205
Media Library . . . . . . . . . . . . . . . . . . . . . . . . . . . . . . . . . . . . . . . 206
17 System Maintenance . . . . . . . . . . . . . . . . . . . . . . . 208
System Firmware Upgrade. . . . . . . . . . . . . . . . . . . . . . . . . . . . . . 208
Troubleshooting . . . . . . . . . . . . . . . . . . . . . . . . . . . . . . . . . . . . .210
Common Error Messages . . . . . . . . . . . . . . . . . . . . . . . . . . . . . . 213
FAQs . . . . . . . . . . . . . . . . . . . . . . . . . . . . . . . . . . . . . . . . . . . . . . 214
TABLE OF CONTENTS – iii
Page 5

18 Appendix . . . . . . . . . . . . . . . . . . . . . . . . . . . . . . . . . 215
Multiformat Content Playback . . . . . . . . . . . . . . . . . . . . . . . . . . . 215
Supported Formats . . . . . . . . . . . . . . . . . . . . . . . . . . . . . . . . . . . 216
Regulatory Compliance . . . . . . . . . . . . . . . . . . . . . . . . . . . . . . . . 220
Warranty Information (All Regions Except Australia/New Zealand) 222
Warranty Information (Australia/New Zealand only) . . . . . . . . . . . . 223
GNU General Public License (“GPL”) . . . . . . . . . . . . . . . . . . . . . . 224
Spotify Third-Party Licenses. . . . . . . . . . . . . . . . . . . . . . . . . . . . . 224
TABLE OF CONTENTS – iv
Page 6

1
WD TV Live Hub Media Center
User Manual
Important User Information
Important Safety Instructions
This device is designed and manufactured to assure personal safety. Improper use
can result in electric shock or fire hazard. The safeguards incorporated into this unit
will protect you if you observe the following procedures for installation, use, and
servicing.
Read these instructions.
Keep these instructions.
Heed all warnings.
Follow all instructions.
Do not use this apparatus near water.
Clean only with dry cloth.
Do not block any ventilation openings. Install in accordance with the
manufacturer’s instructions.
Do not install near any heat sources such as radiators, heat registers, stoves, or
other apparatus (including amplifiers) that produce heat.
Do not defeat the safety purpose of the polarized or grounding-type plug. A
polarized plug has two blades with one wider than the other. A grounding type
plug has two blades and a third grounding prong. The wide blade or the third
prong are provided for your safety. If the provided plug does not fit into your
outlet, consult an electrician for replacement of the obsolete outlet.
Protect the power cord from being walked on or pinched particularly at plugs,
convenience receptacles, and the point where they exit from the apparatus.
Only use attachments/accessories specified by the manufacturer.
Unplug this apparatus during lightning storms or when unused for long periods
of time.
Refer all servicing to qualified service personnel. Servicing is required when the
apparatus has been damaged in any way, such as power-supply cord or plug is
damaged, liquid has been spilled or objects have fallen into the apparatus, the
apparatus has been exposed to rain or moisture, does not operate normally, or
has been dropped.
Carefully read and follow the Quick Install Guide and User Manual.
Do not operate this device outside the temperature range of 5°C–35°C
(41°F–95°F).
Do not drop or shake the device.
Do not move the device when it is powered on.
Power supply cords should be routed so that they are not likely to be walked on
or pinched by items placed upon them or against them.
Do not overload wall outlets.
For additional safety information, refer to www.wdc.com.
IMPORTANT USER INFORMATION – 1
Page 7

WD TV Live Hub Media Center
User Manual
WD® Service and Support
Should you encounter any problem, please give us an opportunity to address it
before returning this product. Most technical support questions can be answered
through our knowledge base or e-mail support service at http://support.wdc.com. If
the answer is not available or, if you prefer, please contact WD at the best telephone
number shown below.
Your product includes 30 days of free telephone support during the warranty period.
This 30-day period starts on the date of your first telephone contact with WD
technical support. E-mail support is free for the entire warranty period and our
extensive knowledge base is available 24/7. To help us keep you informed of new
features and services, remember to register your product online at
http://register.wdc.com.
Accessing Online Support
Visit our product support website at http://support.wdc.com and choose from these
topics:
Downloads - Download drivers, software, and updates for your WD product.
Registration - Register your WD product to get the latest updates and special
offers.
Warranty & RMA Services - Get Warranty, Product Replacement (RMA), RMA
Status, and Data Recovery Information.
Knowledge Base - Search by keyword, phrase, or answer ID.
Installation - Get online installation help for your WD product or software.
WD Community – Share your thoughts and connect with other users.
Contacting WD Technical Support
When contacting WD for support, have your WD product serial number, system
hardware, and system software versions available.
North America
English 800.ASK.4WDC
(800.275.4932)
Spanish 800.832.4778 Europe
Mexico
South America
Chile 1230 020 5871 Australia 1 800 42 9861
Venezuela 0800 100 2855 China 800 820 6682/+65 62430496
Peru 0800-54003 Hong Kong +800 6008 6008
Uruguay 000 413 598 3787 India 1 800 200 5789
Argentina 0800 4440839 Indonesia +803 852 9439
Brazil 0800 7704932 Japan 0120 994 120 / 00531 65 0442
* Toll free number available in the following countries: Austria, Belgium, Denmark, France, Germany, Ireland, Italy,
Netherlands, Norway, Spain, Sweden, Switzerland, United Kingdom.
001 8002754932 Africa
Europe (toll free)*
Middle East
Asia Pacific
Korea 02 703 6550
Malaysia +800 6008 6008/1 800 88 1908/
Philippines 1 800 1441 0159
Singapore +800 6008 6008/+800 608 6008/
Taiwan +800 6008 6008/+65 62430496
00800 ASK4 WDEU
(00800 27549338)
+31 880062100
+31 880062100
+31 880062100
+65 62430496
+65 62430496
IMPORTANT USER INFORMATION – 2
Page 8

WD TV Live Hub Media Center
User Manual
Recording Your WD Product Information
In the following table, write the serial and model numbers of your new WD product.
You can find this information on the label on the bottom of the device. You should
also note the date of purchase. This information may be required when requesting
technical support.
Serial Number:
MAC Address:
Model Number:
Purchase Date:
System and Software Notes:
Registering Your WD Product
Your WD product includes 30 days of free technical support during the applicable
warranty period for your product. The 30-day period commences on the date of
your first telephone contact with WD technical support. Register your WD product
online at http://register.wdc.com.
If your media center has an active network connnection, you can register directly
from the device using the supplied remote control (see “Using the Remote Control”
on page 22) or a USB keyboard (see “Using a USB Keyboard” on page 24). Go to
“Device Registration” on page 199 for instructions.
Accessories
For information on optional accessories for this product, visit:
US www.shopwd.com or www.wdstore.com
Canada www.shopwd.ca or www.wdstore.ca
Europe www.shopwd.eu or www.wdstore.eu
All others Contact WD Technical Support in your region. For a list of Technical Support
contacts, visit http://support.wdc.com and see Knowledge Base Answer
ID 1048.
IMPORTANT USER INFORMATION – 3
Page 9

2
WD TV Live Hub Media Center
User Manual
Product Overview
Thank you for purchasing a WD TV Live Hub media center. This user manual
provides step-by-step instructions for installing and using your new media center.
For the latest WD product information and news, visit our website at
www.westerndigital.com.
The best of the entertainment on your HDTV – Stream hit movies, catch up on
TV shows, watch the latest videos, and stay connected to your social network. Don’t
settle for online entertainment on your small computer screen. With the WD TV Live
Hub media center, you can enjoy it all on your HDTV. See “Internet Services” on
page 93 for more details.
Centralize your media collection – Load up the high-capacity drive with all your
media to create your own media jukebox. In a few clicks, you can play your home
movies, share vacation slideshows, and play your music on the big screen and
sound system in your living room.
Full-HD 1080p video playback; the perfect partner for your HDTV – This is the
real thing; Full-HD 1080p playback. Sit back and enjoy the spectacular picture
quality of brilliant high definition video and the crystal clear sound of digital audio.
Use the included programmable remote control to make your entertainment choices
using our crisp, animated navigation menus.
Play almost any type of media file – WD TV Live Hub supports a wide variety of
the most popular file formats including HD camcorder video formats.
Your entertainment at your fingertips – Control your WD TV experience with the
tap of a soft key or the swipe of a finger using the WD TV Remote™ app. Get onetouch access to your favorite online services, easy text input and a gesture pad for
faster navigation to your favorite content. Download this free app from the Apple®
app store or get the Android™ app on Google Play.
Shoot it on your mobile device, share it on your HDTV – Download
™
WD Photos
Android smartphone. Take a photo or video clip with your mobile device and upload
it directly to the built-in hard drive on your WD TV Live Hub media center. You can
also access all the photos stored on your media center and show them off with your
smartphone or tablet.
Enjoy media from any source – Stream videos, music, and photos from your USB
drive, network drive, and any PC or Mac® computer in your home. Our media library
collects the content from all the drives, so finding the perfect video, song, or photo
to view is easier than ever.
Access media anywhere on your home network – The Ethernet port lets you
connect this media player to your home network so you can access and stream
video, view photos, and play music from any Mac, PC, and network drive in your
house.
, a free photo and video app for your iPad®, iPhone®, iPod touch®, or
Transfer files easily – Copy, move or delete files stored on a USB drive, a network
drive, your camcorder, or a camera to the Live Hub built-in drive using the on-screen
menus.
PRODUCT OVERVIEW – 4
Page 10

WD TV Live Hub Media Center
User Manual
It’s a multi-room media server streaming to any TV in your house – You can
stream any file on the WD TV Live Hub media center to a WD TV Live Plus or WD TV
Live media player or any DLNA/UPnP compatible TV, Blu-ray Disc™ player, or game
console. The system is powerful enough to handle multiple streams so you can
stream a movie to your Blu-ray Disc™ player, while viewing photos on your TV
upstairs.
Bring the arcade to your HDTV – WD TV Live Hub brings casual games to your
big screen TV. Test your skills with classic games such as Rockswap Adventures,
Cosmox, Sudoku, and Memory.
Advanced navigation options
Thumbnail, list, and preview modes – Browse your content by file name or by
thumbnails of photos, album covers, video preview, and movie cover art.
Media Library – This unique feature lets you view all your media by media type in
one menu regardless of its location in folders or drives. You can view your
content by categories such as genre, album, artist and date.
Search – Search by genre, title, artist, filename and partial filename.
Photo viewing
View photos as a slideshow with a variety of transitions and background music
Zoom and pan
Search by filename, partial filename, most recently viewed and date
Movie viewing
Fast forward, reverse, pause, zoom, and pan
View subtitles
Search by filename, partial filename, most recently viewed and date
Music playback
Fast forward, reverse, pause, shuffle, repeat
Search by filename, partial filename, most recently viewed and date.
File Management
Copy files between USB drives and transfer files between a USB drive connected
to the media center and your computer.
S/PDIF digital output – The optical audio output sends digital signals to your AV
receiver for the best surround sound experience.
Ultra-compact design - Fits easily into your entertainment center.
PRODUCT OVERVIEW – 5
Page 11

3
WD TV Live Hub Media Center
User Manual
Features and Functions
Features
Menus
Your media is organized, categorized and ready to play – The WD TV Live Hub
media center finds and categorizes all the media on the built-in drive and any
connected USB drives and displays it in one easy-to-view menu system. If you have
one of our My Book
media on that, too.
Customize your media experience – Customizable screens, themes and favorites
let you personalize the media experience for you and everyone and your home. The
interface also remembers your last selection so you can easily continue the fun.
Choose from a variety of list viewing options – Select thumbnail view, list view
and even see a little preview of your movies in your movie menu. You can add
metatags to your media for better identification.
®
Live™ network drives connected to your network, it will find the
Play photo slideshows with the music you choose
Tag your favorites for instant playback
Supports DVD Navigation – View all the content included on your ripped DVDs,
including complete menu navigation, chapter listings, special features, and subtitles.
Family-ready – Share your family photos, videos, music, and files on your home
network and stream to any screen in the house.
Automatic play – Set the player to play a selected media file automatically when
the unit is turned on. Perfect for living art on your HDTV or for digital signage.
On the computer…
Sync new media – The player automatically synchronizes with watched folders so
new content from any PC, Mac, or USB storage will be added to the WD TV Live
Hub.
Play your media from your computer – This media center is Windows® 7
compatible, so you can use the “Play To” feature to easily stream your Windows 7
computer’s files to your TV through your media center.*
*For more information on Play To, go to:
http://windows.microsoft.com.
Audio/Video Interface
HDMI interface for digital audio and high-definition video.
Component video interface (YPbPr, green/blue/red) for analog video connection.
Composite interface (RCA, yellow/white/red) for analog AV connection.
S/PDIF (optical) audio for high-fidelity digital audio.
Auto source function enables the HD media center to detect and switch to a new
interface connection. For example, the media center automatically switches to
HD mode when it is connected through an HDMI cable.
FEATURES AND FUNCTIONS – 6
Page 12
WD TV Live Hub Media Center
Video output resolution includes 480i, 576i, 480p, 576p, 720i, 720p, 1080i,
1080p.
Stereo or multi-channel digital surround audio output (digital surround sound is
only available when using the HDMI or S/PDIF interfaces).
Wired or wireless Internet connection for access to online media content.
Plug-and-Play USB 2.0 Support*
USB storage device with a USB connector
Portable media centers with USB connector
Digital cameras/camcorders with USB connector
*For a list of tested, compatible USB devices, see Article #5688 in our knowledge base at
http://support.wdc.com.
USB Storage File System Support
NTFS
FAT/FAT32
HFS+
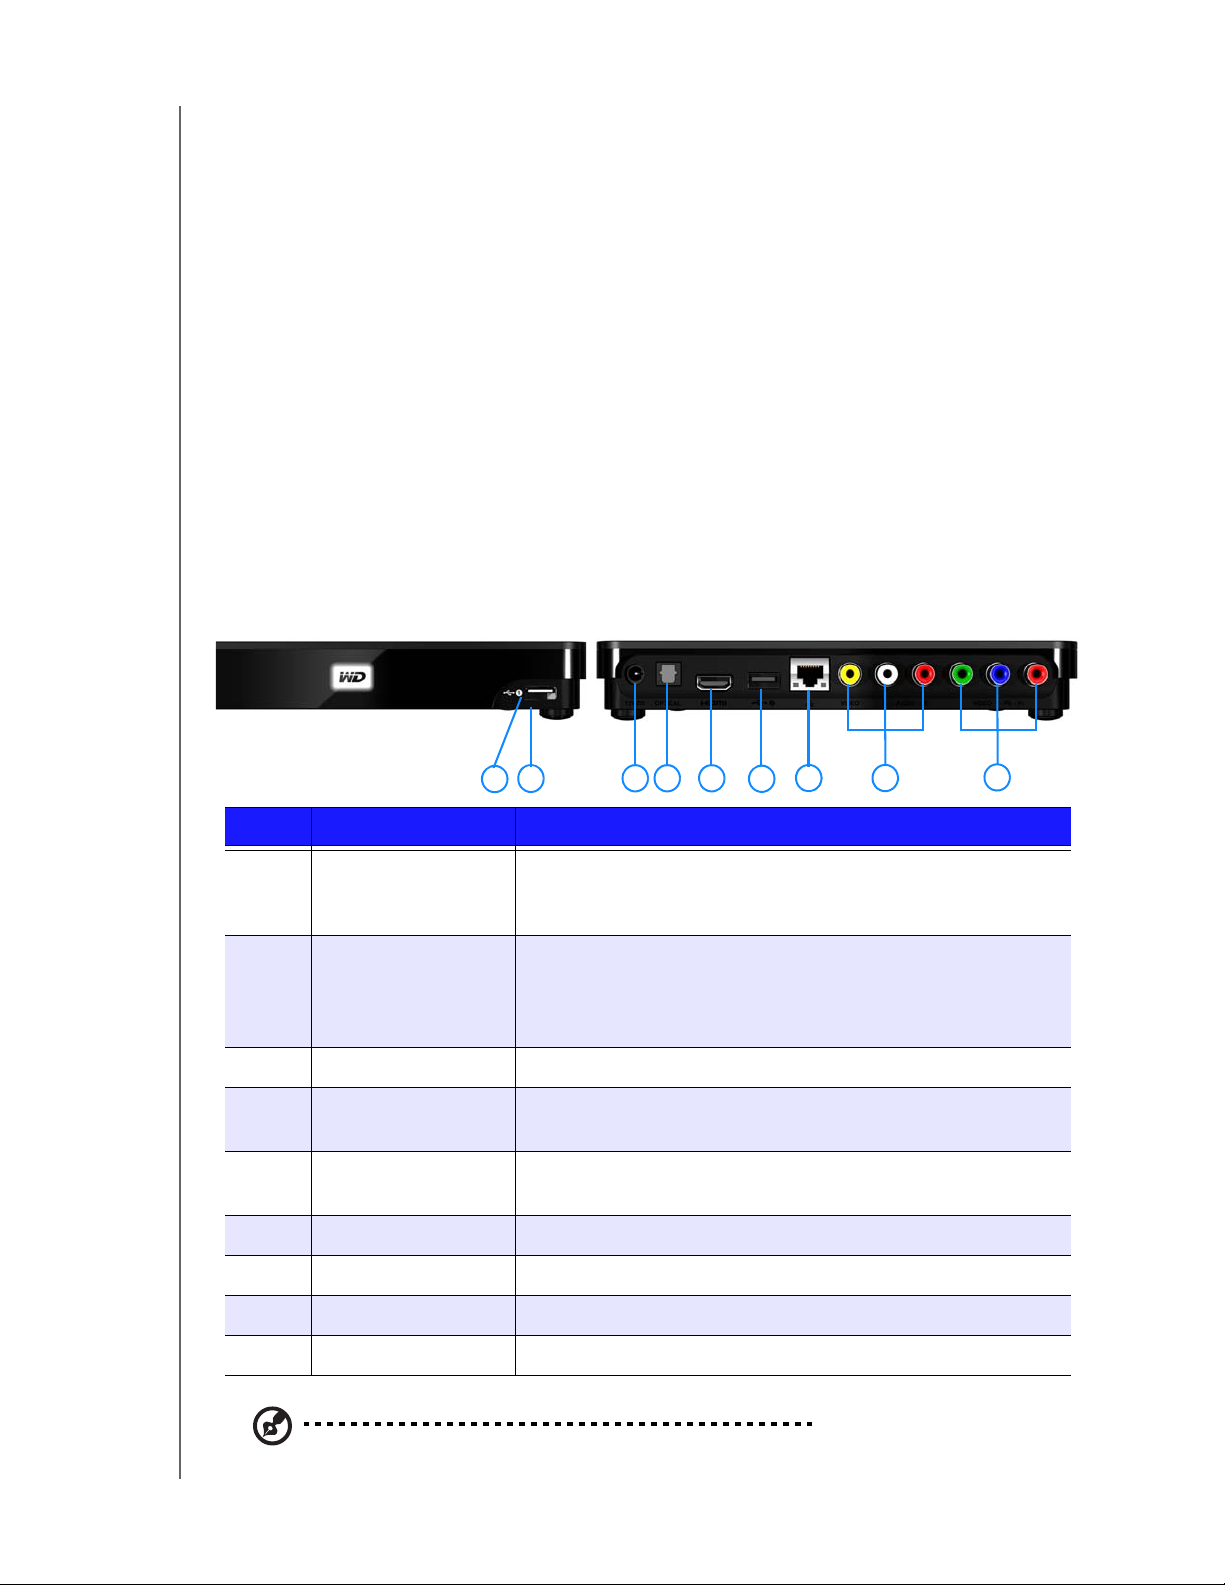
Connections
User Manual
1 2
3 4 5
6
7 8
Item Component Description
1 USB port 1 Supports connection of compatible removable storage
devices, portable media centers, digital cameras with USB
connectors, and USB wireless adapters.
2 Reset button
(bottom of device)
Press for one second to reset to factory defaults (see “Device
Reset” on page 200). Press and hold 10 seconds to toggle
between NTSC and PAL. Use a fine-tipped stylus or the
unfolded end of a paperclip to press the reset switch.
3 Power jack Connects the power cable.
4 S/PDIF (optical)
Connects to your AV receiver (S/PDIF cable sold separately).
audio port
5 HDMI port Connects to your TV’s HDMI port (HDMI cable sold
separately).
6 USB port 2 The same function as USB port 1.
7 Ethernet port Supports LAN connection for wired Internet access.
8 Composite jacks Connect to your TV’s analog video and audio jacks.
9 Component jacks Connect to your TV’s component (YPbPr) terminals.
9
Note: This device does not support USB hubs.
FEATURES AND FUNCTIONS – 7
Page 13
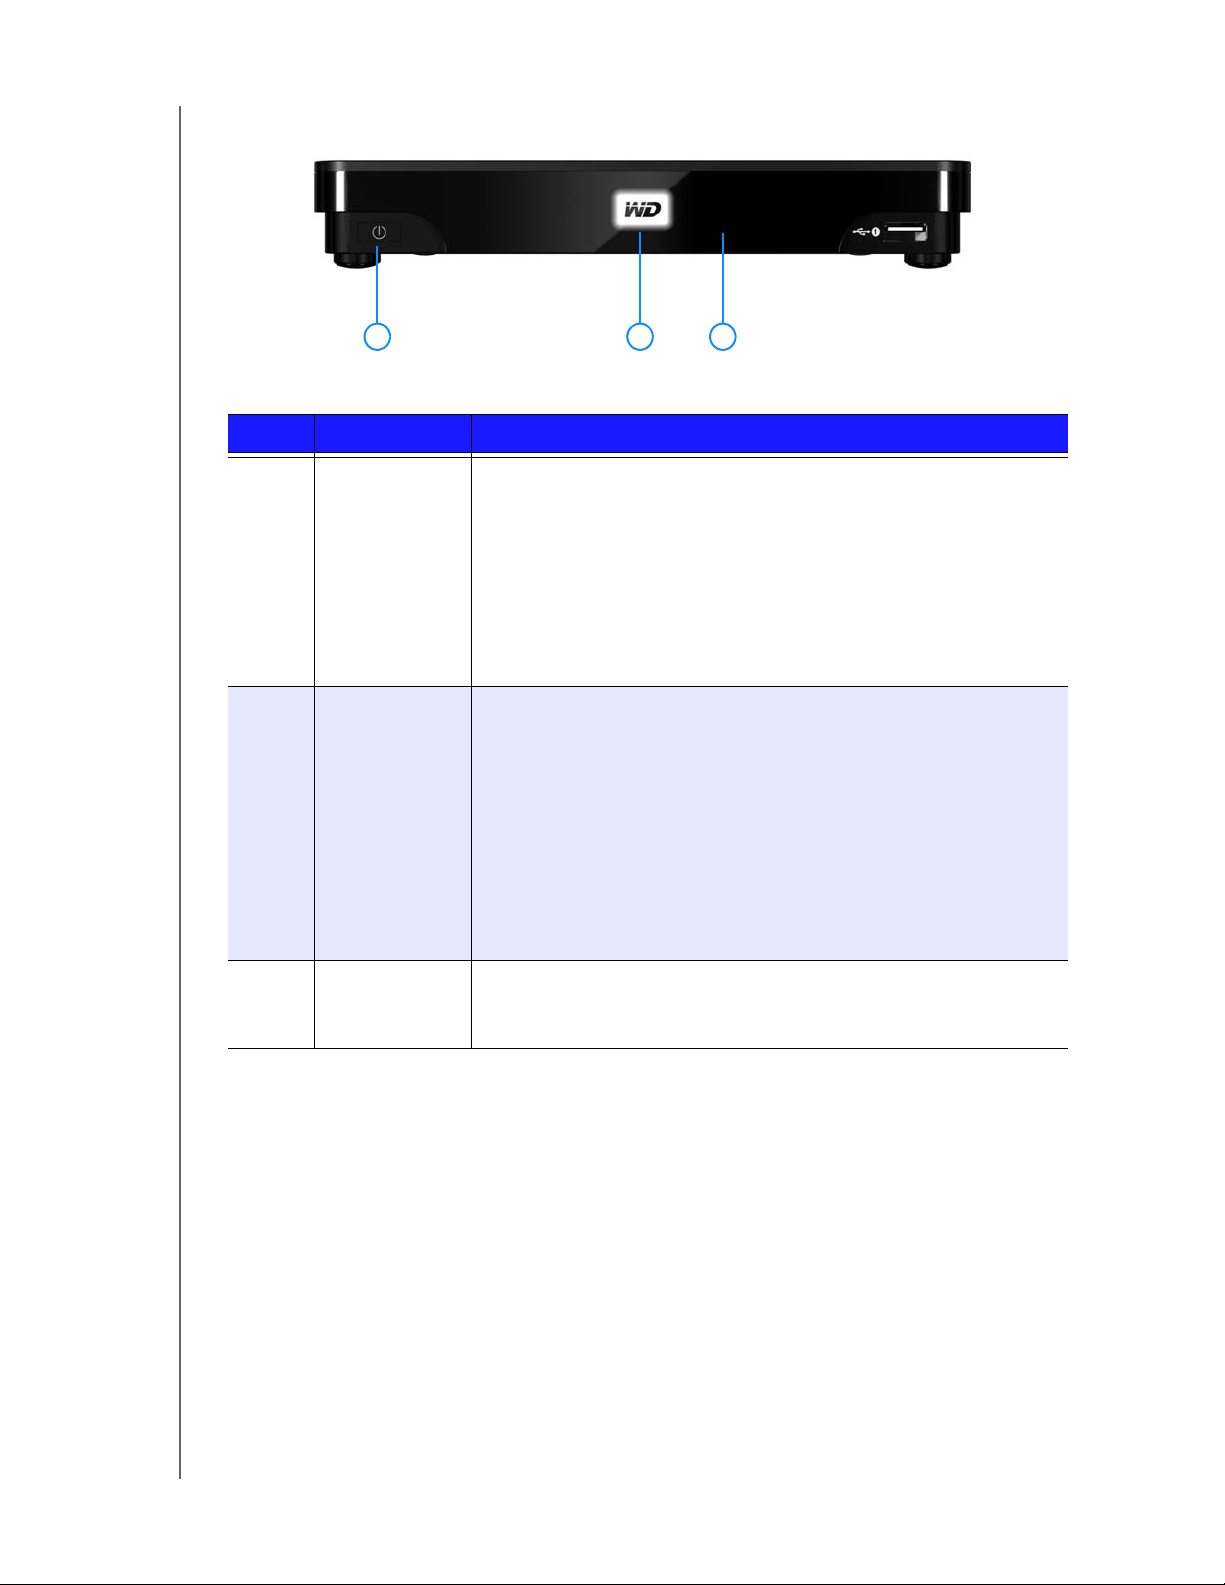
Power Button and LED Indicator
1 32
Item Component Description
1 Power button • When power LED is on:
- Press the power button to power down the media center.
The internal drive is put in sleep mode and other devices
can still access it.
- Press and hold for five seconds to completely shut down
the device and make the internal drive inaccessible.
• When power LED is off—Press the power button to power on
the media center and wake the internal drive.
WD TV Live Hub Media Center
User Manual
2 Power LED
(WD logo)
3 Infrared
receiver
• On—The power cable is connected and the power is on.
• Off—The media center is in standby mode , turned off, or the
power cable is disconnected.
• Steady flashing— A USB device has been discovered and the
unit is being mounted in the system. If the Media Library is set
to On in the Setup options (see “Media Library Compilation” on
page 29), the LED flashes at the same steady constant rate.
• Three short flashes followed by three long flashed followed by
three short flashes—A system diagnostic failure has occurred.
See “Troubleshooting” on page 210.
• Receives signals from the remote control. Point the tip of the
remote control to the infrared receiver and ensure that the path
between the two is unobstructed.
FEATURES AND FUNCTIONS – 8
Page 14
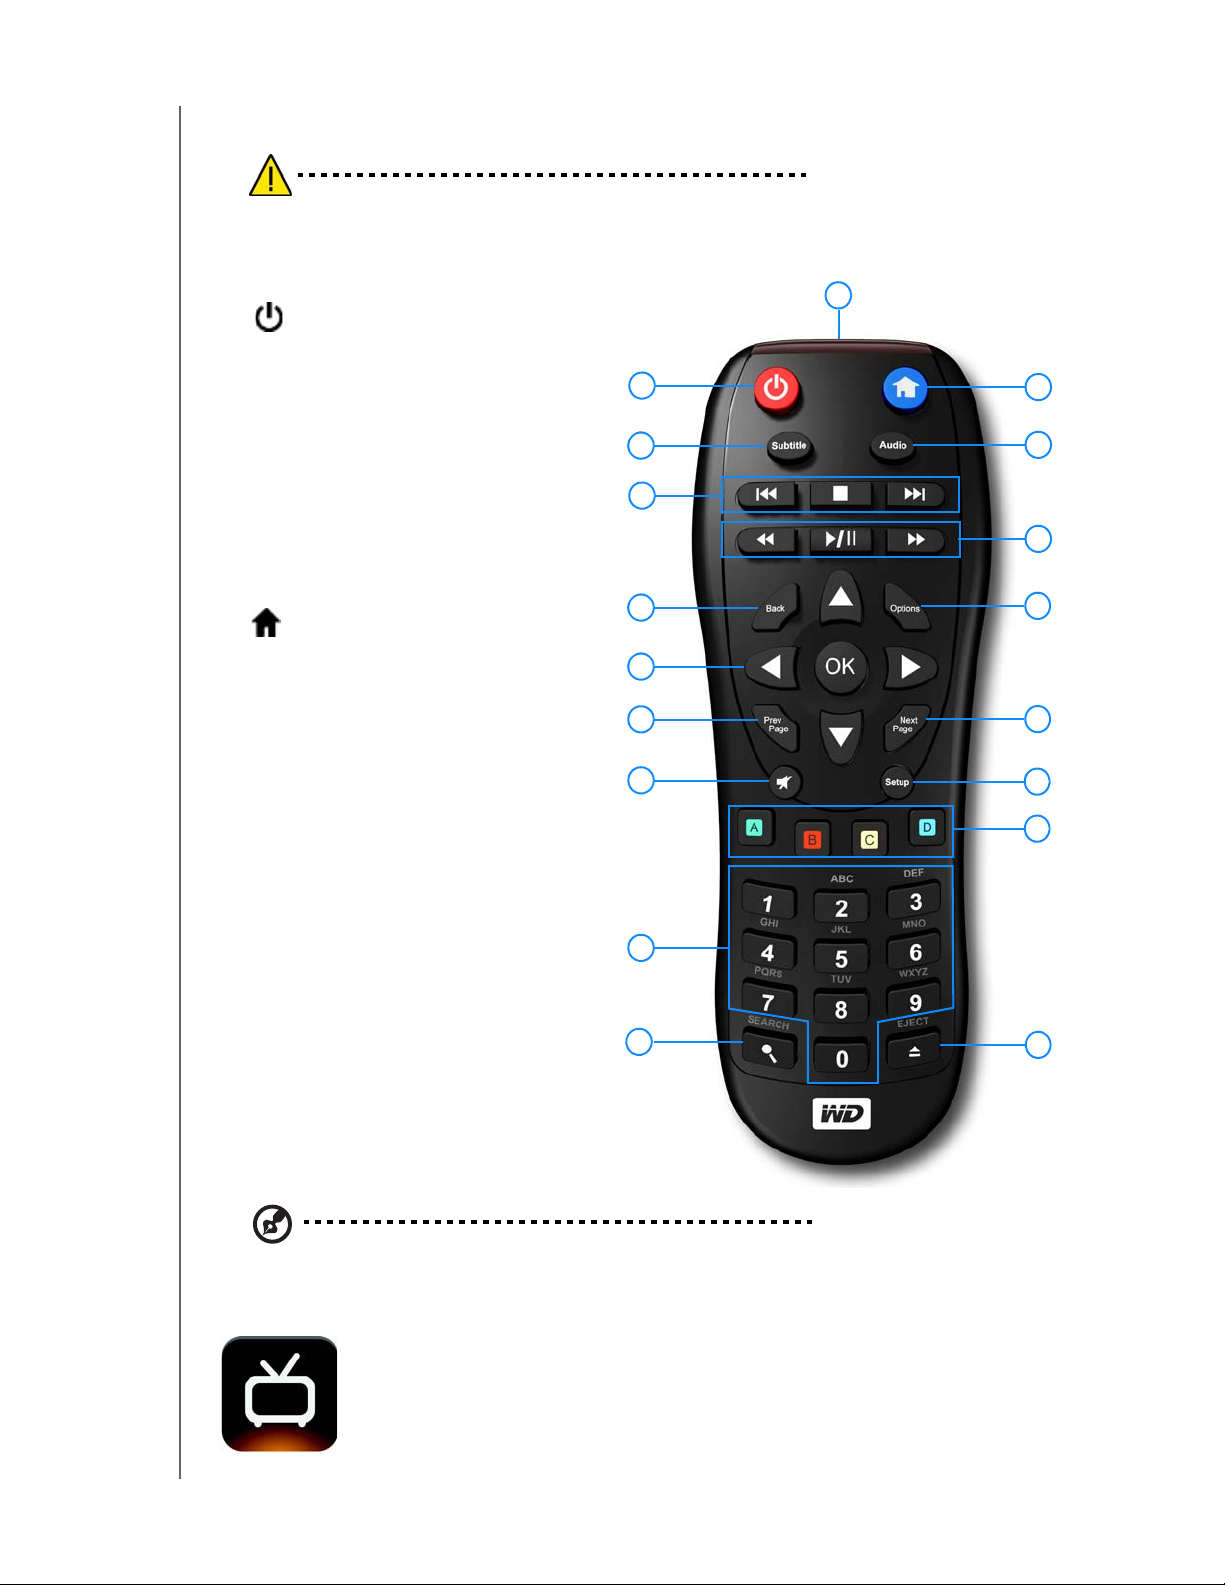
Remote Control
CAUTION: Do not expose the batteries or the remote control with batteries
installed to excessive heat (direct sunlight, fire, etc.).
WD TV Live Hub Media Center
User Manual
1. Infrared transmitter
2. POWER
3. Subtitle
4. PREV (track), STOP, NEXT (track)
5. Back (last screen)
6. Navigation buttons, OK
7. Previous Page
8. MUTE
9. Alpha-numeric keys
10.SEARCH
11. HOME
12.Audio
13.REV, PAUSE/PLAY, FF
14.Options
15.Next Page
16.Setup
17.Shortcut/function keys
18.EJECT (safe removal of attached
storage)
1
2
3
4
5
6
7
8
11
12
13
14
15
16
17
Note: For additional information, see “Using the Remote Control” on page 22.
WD TV Remote
Control your WD TV experience with the tap of a soft key or the swipe
of a finger using the WD TV Remote app. Get one-touch access to
your favorite online services, easy text input and a gesture pad for
faster navigation to your favorite content. Download this free app from
the Apple app store or get the Android app on Google Play.
10
9
18
FEATURES AND FUNCTIONS – 9
Page 15
4
Getting Started
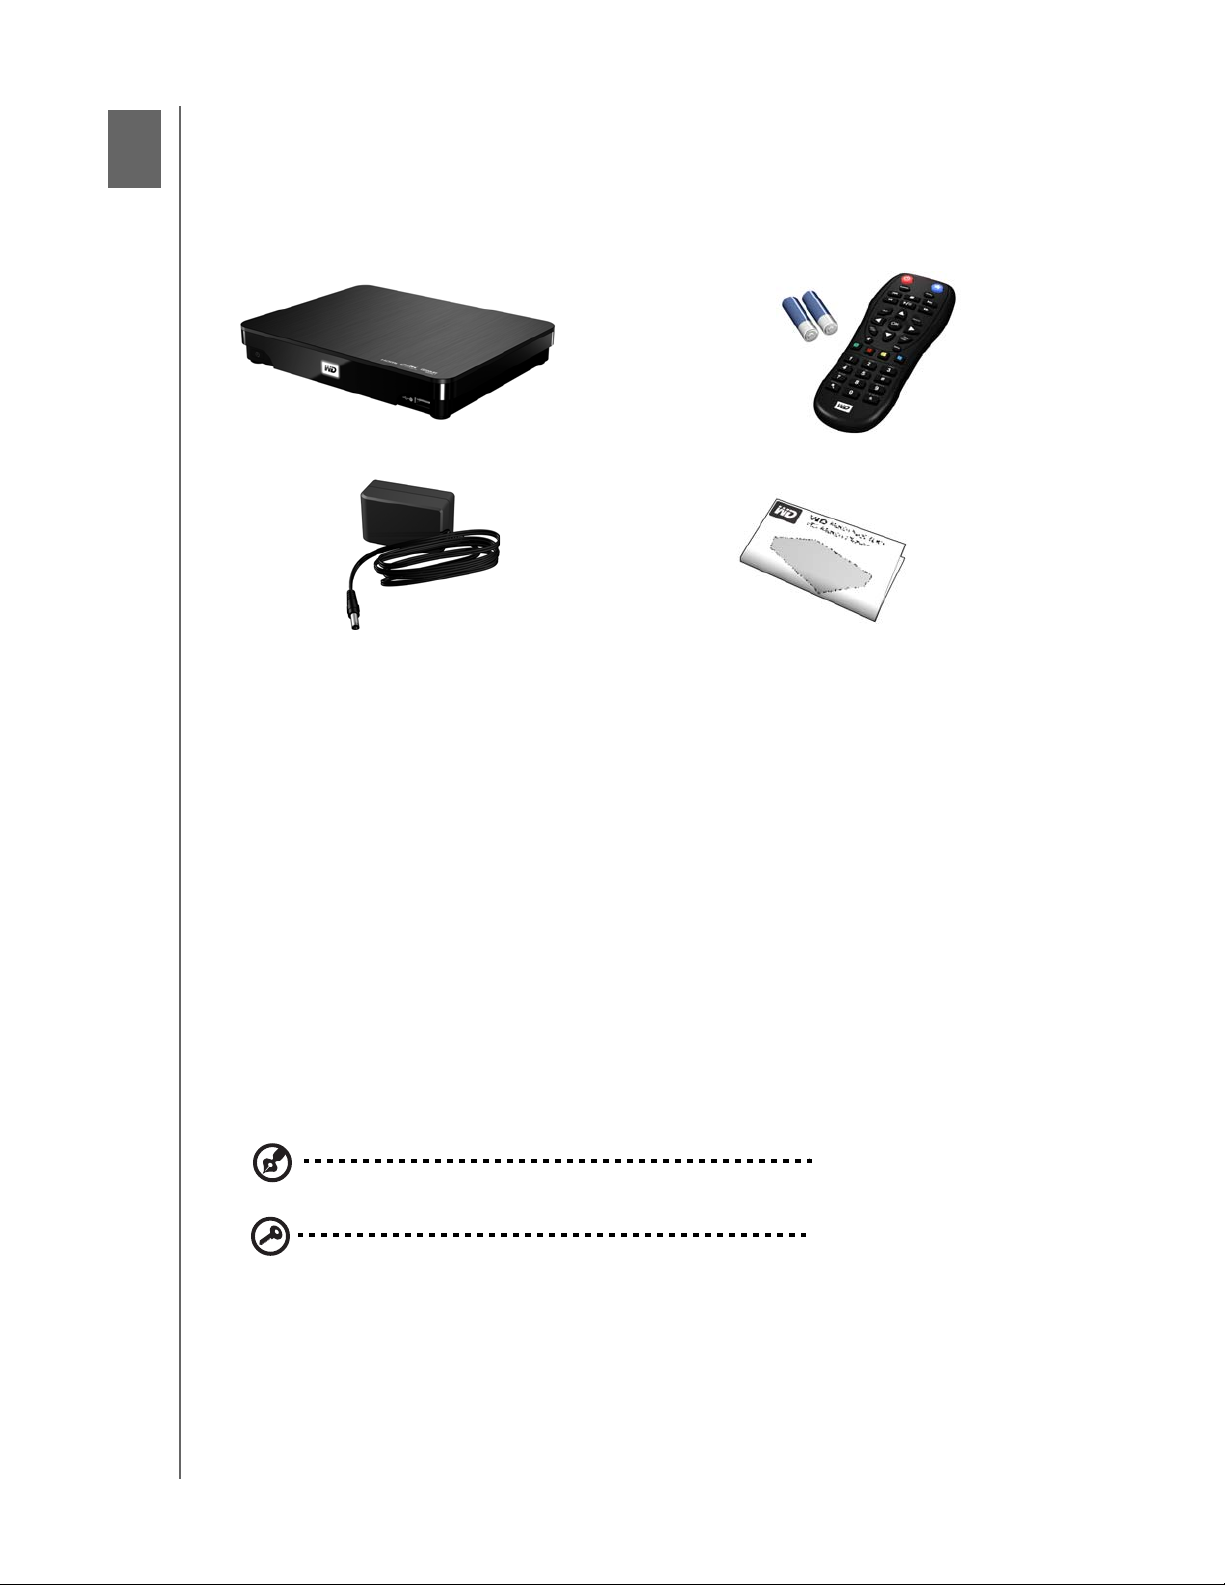
Package Contents
WD TV Live Hub Media Center
User Manual
WD TV Live Hub Media Center
AC power adapter
Remote control and
Two AAA batteries
Quick Install Guide
Installation Requirements
Standard or HDTV with a composite (standard A/V), component (YPbPr), or
HDMI input
An available network connection for online content and services
Optional: TV, stereo, or AV receiver with an optical digital (S/PDIF) or stereo audio
input jack (audio playback only)
Operating System Compatibility
The media center is compatible with the following operating systems:
Windows
®
Windows XP
Windows Vista
Windows 7
Mac® OS X
Leopard
®
Snow Leopard
®
®
®
Note: Compatibility may vary depending on user’s hardware configuration and operating system.
Important: For highest performance and reliability, it is recommended that
you install the latest updates and service pack (SP). For Windows, go to the
Start menu and select Windows Update. For Mac, go to the Apple menu
and select Software Update.
GETTING STARTED – 10
Page 16

WD TV Live Hub Media Center
User Manual
Installation Procedure
The media center installation procedure is outlined below:
1. Connect the power cable.
2. Establish a network connection.
3. Transfer content from your computer to the media center.
4. Connect the media center to your TV or entertainment unit through the desired
interface option.
5. Connect a USB device containing your media content (optional).
Step 1 - Connecting the Power Cable
1. If applicable, connect the power clip to the power cable plug.
The AC power adapter will vary, depending on your location. Some locations do
not require a power plug clip. Units sold in those locations will have a fixed power
plug. Refer to the illustration below.
US/JA/TW
EU/KO
Installing InstallingRemoving Removing
US/JA/TW
EU/KO
2. Connect the power cable to the media center’s DC connector, and then plug the
opposite end into an AC power outlet. The media center powers up
automatically.
GETTING STARTED – 11
Page 17
WD TV Live Hub Media Center
User Manual
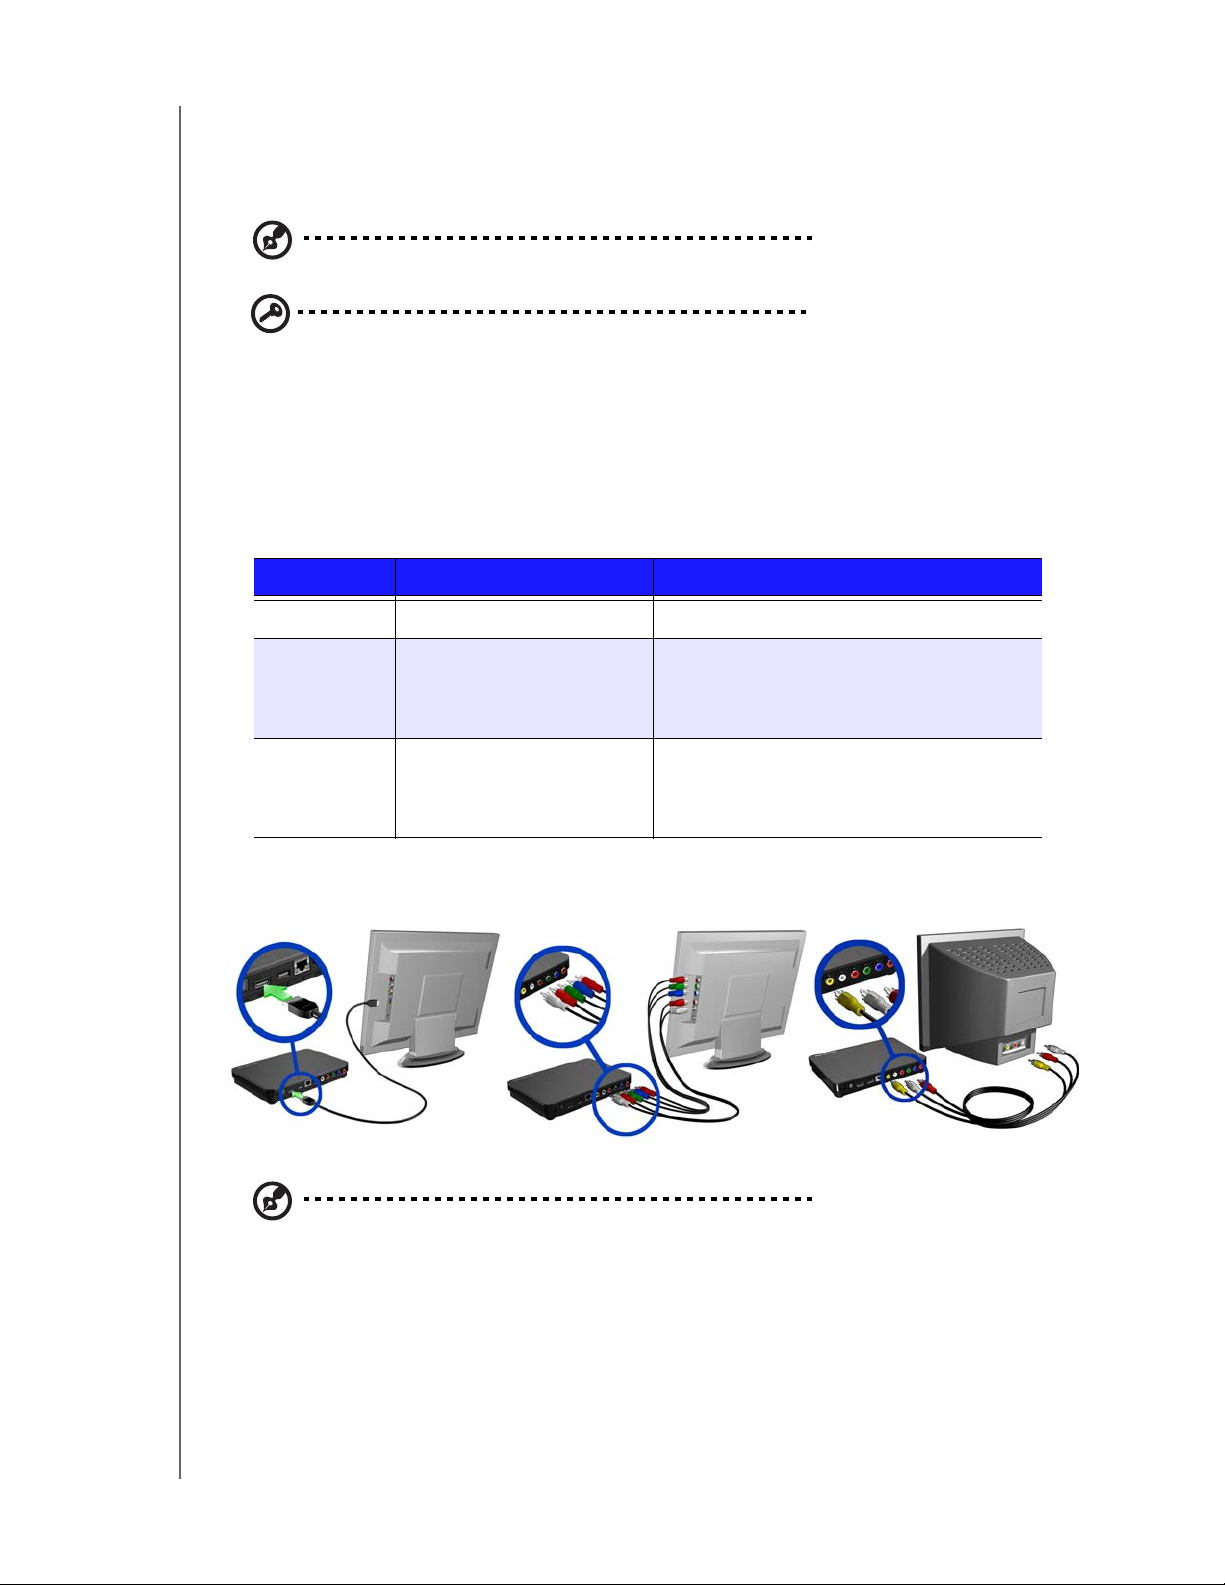
Step 2 - Connecting the Media Center
The following figures illustrate the cable connections supported by the media center.
The standard connection uses the included composite-to-mini AV cables.
Note: HDMI and S/PDIF (optical) cables are sold separately.
Important: Configure the media center’s Audio/Video settings depending
on the type of connection you choose. See “Audio/Video Output” on
page 173 for more information on these settings.
Choosing the Best Connection
The quality of the picture produced by your TV depends on the quality of your TV
and its connection to the media center.
Connection Quality Connectors
HDMI Best (up to 1080p) Specialized, high-definition connector
Component Better (up to 1080i) •Green = Y
• Blue = Pb
• Red = Pr
Composite Good (480i/576i) • Yellow = video
• Red = right audio
• White = left audio
Component (High Definition)HDMI (High Definition)
Note: HDMI, component, and composite cables are not included.
Composite (Standard Definition)
GETTING STARTED – 12
Page 18
WD TV Live Hub Media Center
User Manual
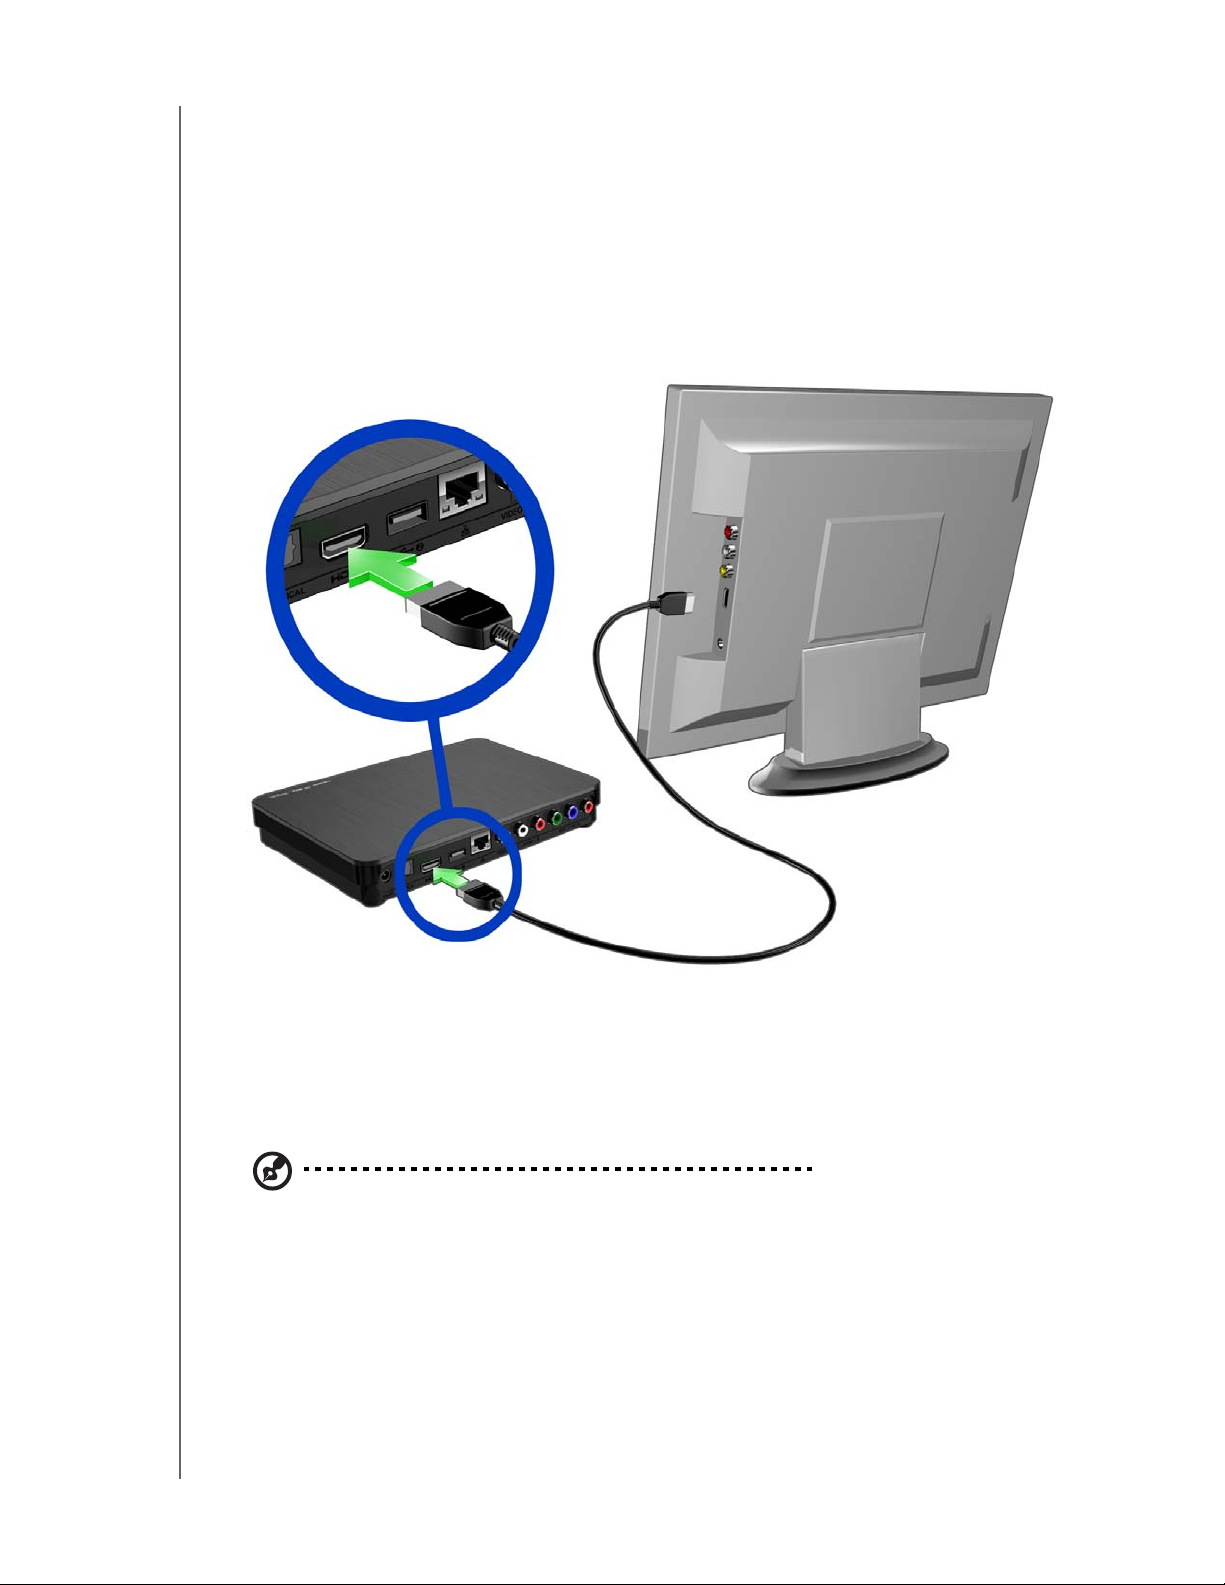
HDMI Video and Audio (High-Definition)
HDMI combines high-definition video, multi-channel audio, and inter-component
control in a single digital cable. This interface provides video quality resolution of up
to 1080p.
To connect your media center using an HDMI cable:
1. Plug an HDMI cable into the HDMI connector on the media center.
2. Plug the opposite end into the HDMI port on your TV or audio/video system (if
available).
Wait a few seconds for your TV to detect the media center. If it is not detected,
you may need to change the input source on your TV to HDMI. Check the user
documentation of your TV for more information.
Once the media center is detected, the splash screen displays to indicate system
bootup, then the home screen of the user interface opens.
Note: HDMI cables are sold separately.
GETTING STARTED – 13
Page 19
WD TV Live Hub Media Center
User Manual
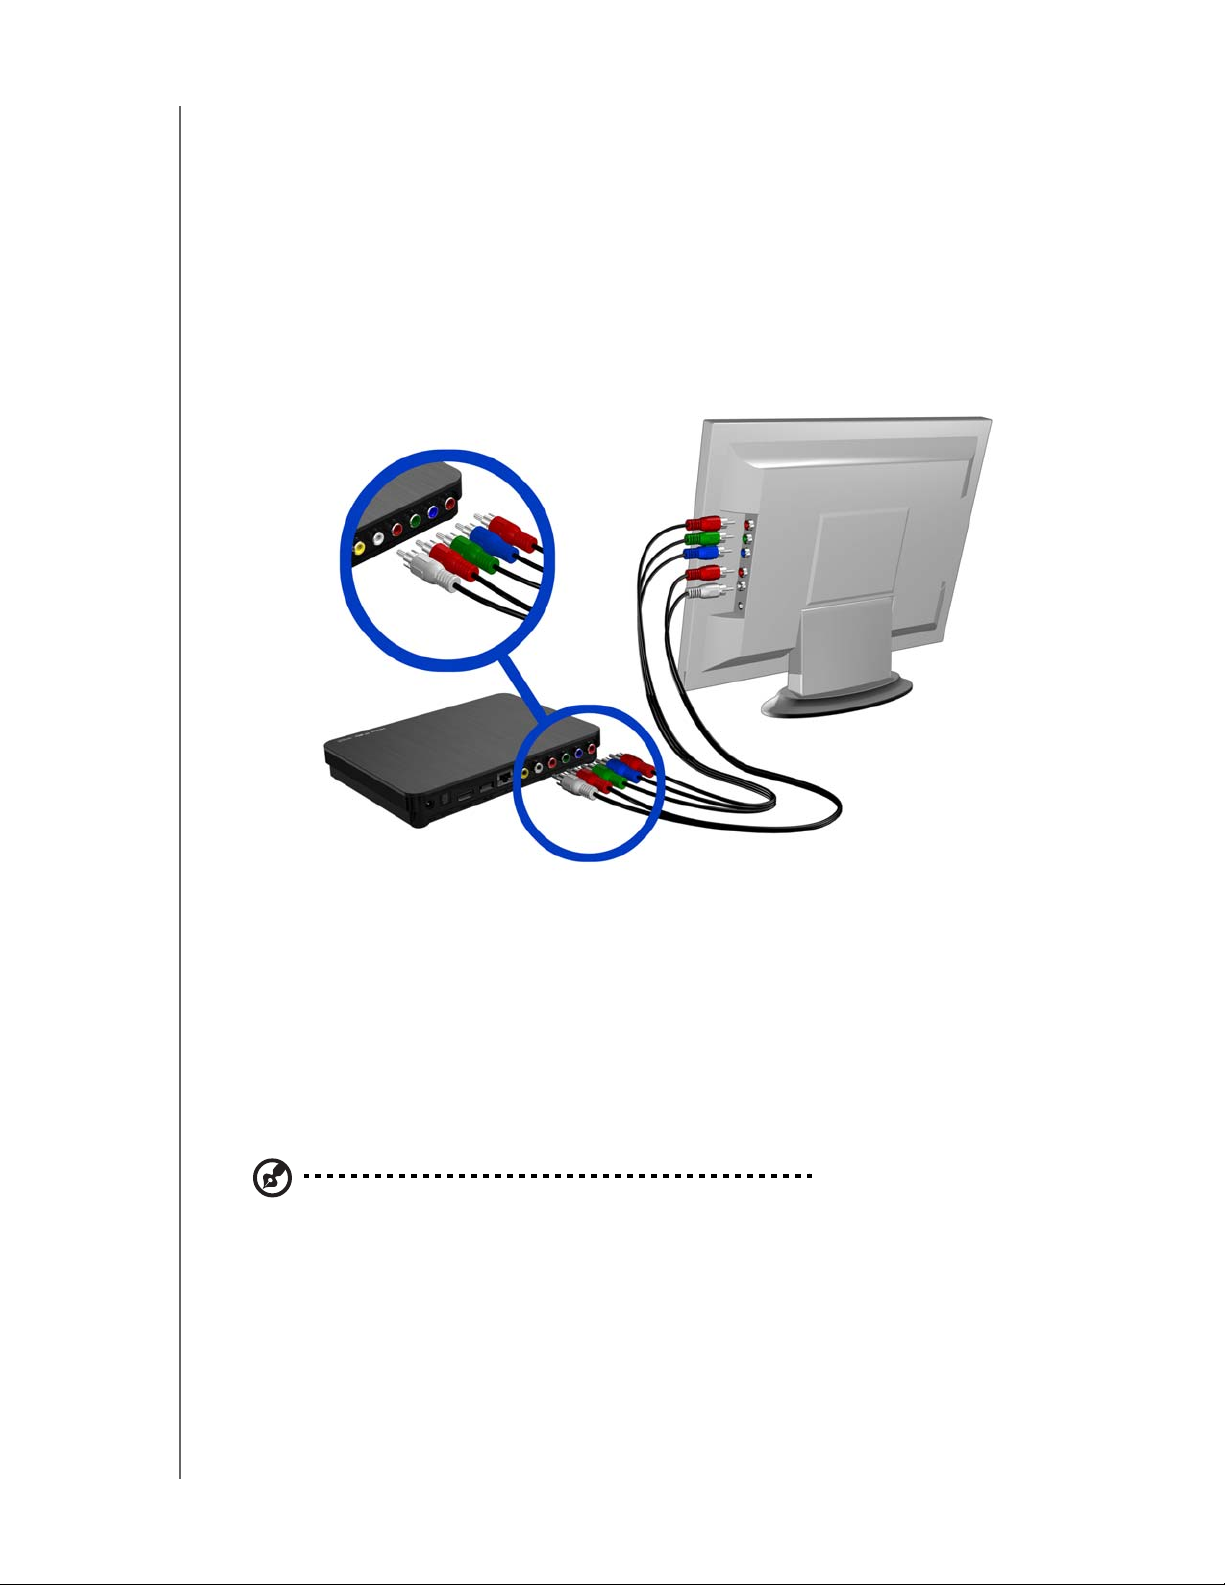
Component Video and Audio (High Definition)
The component connection only provides video signals. You will also need to
connect the composite audio cables to provide sound. This interface provides video
quality resolution of up to 1080i.
To connect your media center using component and audio cables:
1. Plug component cable connectors into the component jacks on the media
center.
2. Plug the opposite ends into the component ports on your TV or audio/video
system (if available), red to red, green to green, and blue to blue as shown below.
3. For audio, plug audio cable connectors into the audio jacks on the media center.
4. Plug the audio connectors on the opposite end of the cable into the audio input
jacks on your TV, red to red and white to white.
Wait a few seconds for your TV to detect the media center. If the media center is
not detected, you may need to change the input source on your TV to
component. Check the user documentation of your TV for more information.
Once the media center is detected, the splash screen displays to indicate system
bootup, then the home screen of the user interface opens.
Note: Component and audio cables are sold separately.
GETTING STARTED – 14
Page 20
WD TV Live Hub Media Center
User Manual
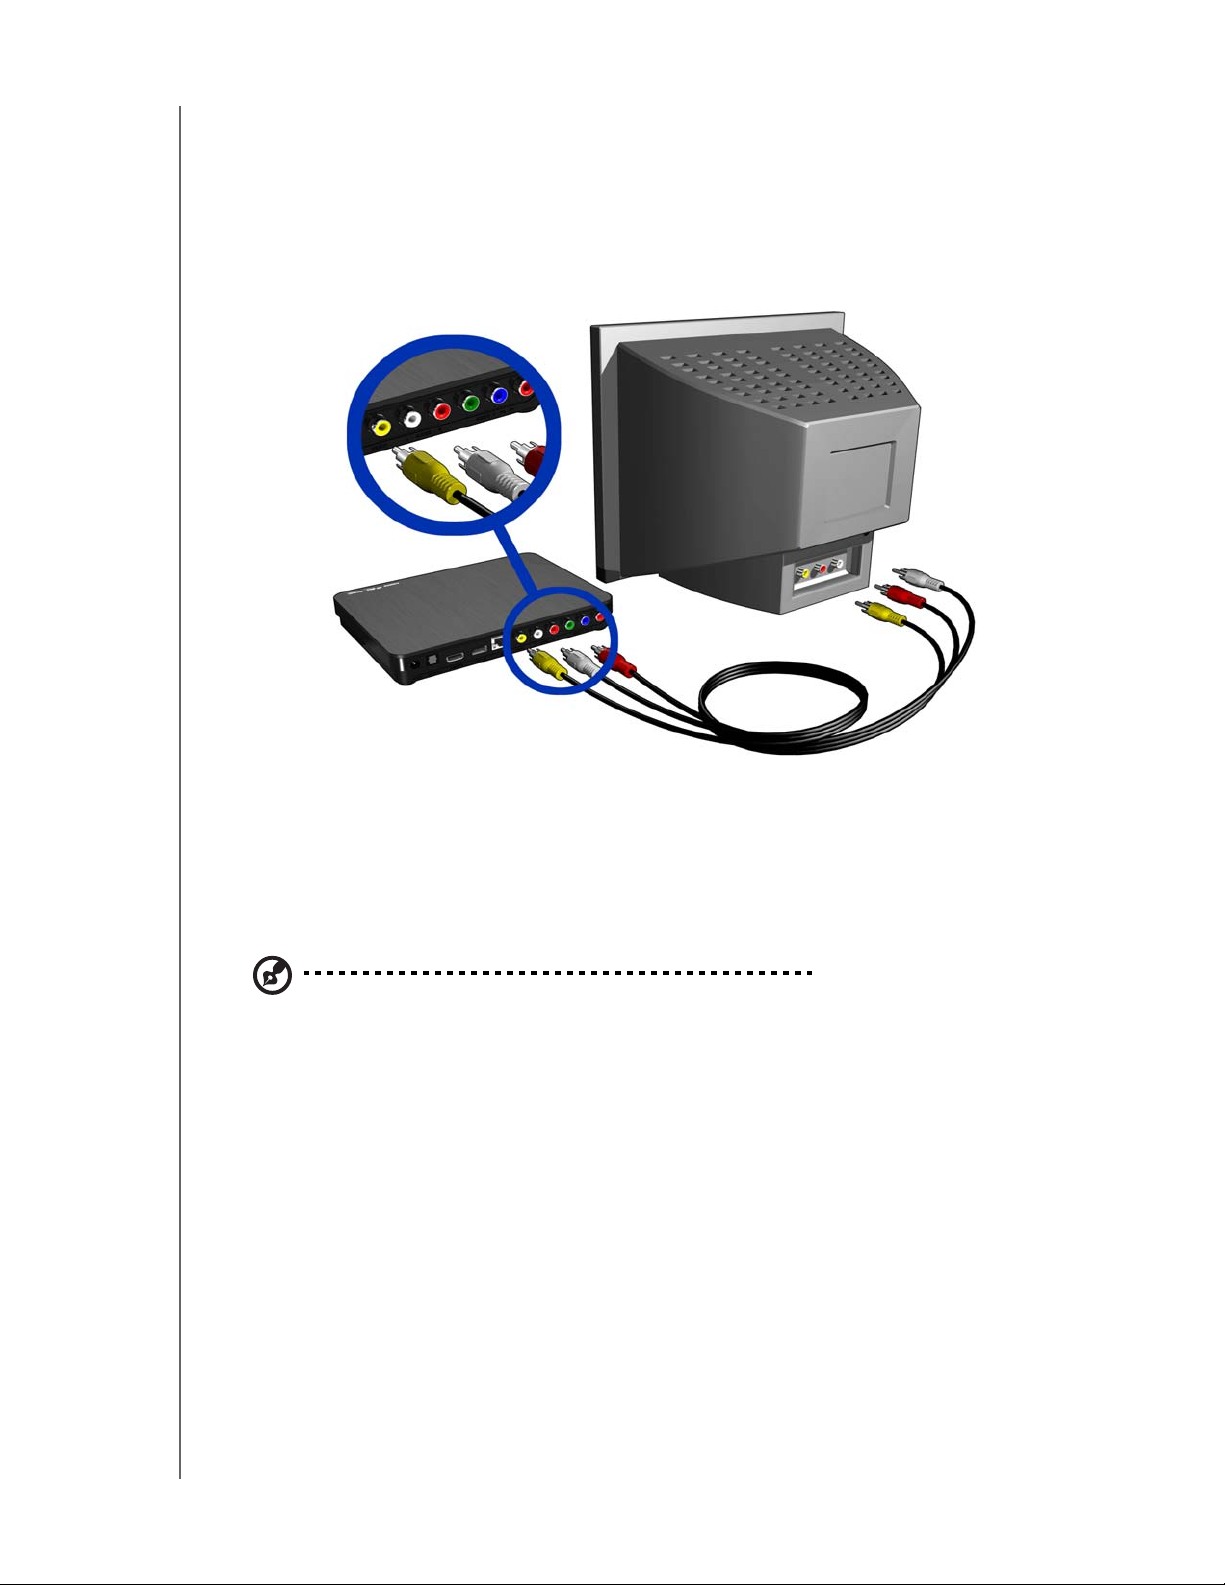
Composite AV Connection (Standard Definition)
To use a composite connection:
1. Plug the composite connectors into the composite jacks on the media center.
2. Plug the opposite ends into the composite input ports on your TV, yellow to
yellow, red to red, and white to white.
3. Select the appropriate TV input source.
Wait a few seconds for your TV to detect the media center. If the media center is
not detected, you may need to change the input source on your TV to
composite. Check the user documentation of your TV for more information.
Once the media center is detected, the splash screen displays to indicate system
bootup, then the home screen of the user interface opens.
Note: Composite cables are sold separately.
GETTING STARTED – 15
Page 21
WD TV Live Hub Media Center
User Manual
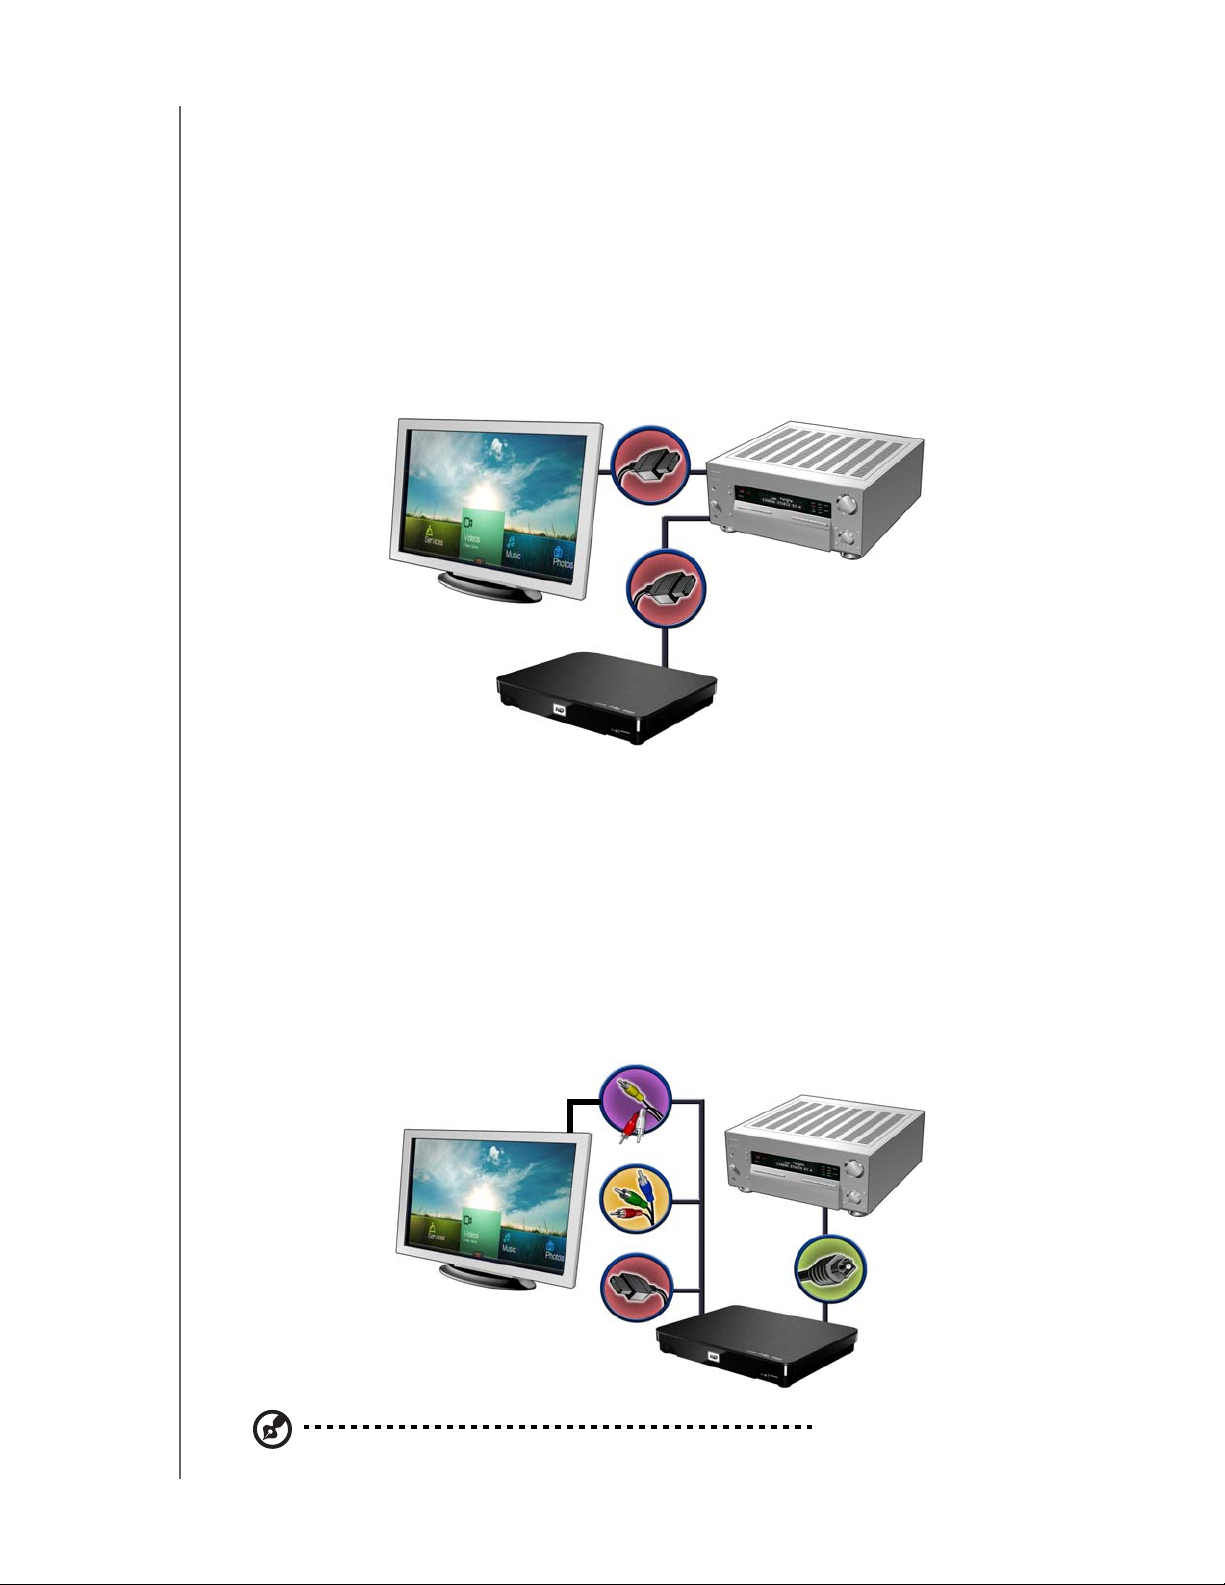
Home Theater (High-Definition)
To connect a home theater system using HDMI:
1. Plug an HDMI cable into the HDMI connector on the media center.
2. Plug the opposite end into the HDMI In port on your A/V receiver.
3. Plug an HDMI cable into the HDMI Out port on your A/V receiver.
4. Plug the opposite end into the HDMI port on your TV (if available).
5. Select the appropriate TV input source.
6. Set the appropriate audio output option on the media center. See “Audio Output”
on page 174.
To connect a home theater system using S/PDIF:
1. Plug a S/PDIF cable into the S/PDIF connector on the media center.
2. Plug the opposite end into the S/PDIF In port on your A/V receiver.
3. Plug HDMI, component, or composite connectors to the appropriate Out ports
on the media center.
4. Plug the opposite end(s) into the appropriate port(s) on your TV.
5. Select the appropriate TV input source.
6. Set the appropriate audio output option on the media center. See “Audio Output”
on page 174.
or
or
Note: HDMI, S/PDIF, component, and composite cables sold separately.
GETTING STARTED – 16
Page 22
WD TV Live Hub Media Center
User Manual
Step 3 - Connecting to Your Network
The media center can be connected to your home network so you can transfer files
back and forth from your networked computer to the media center, and access the
Internet and network storage using a wired or wireless network connection. A
network connection provides access to locally stored and online media content.
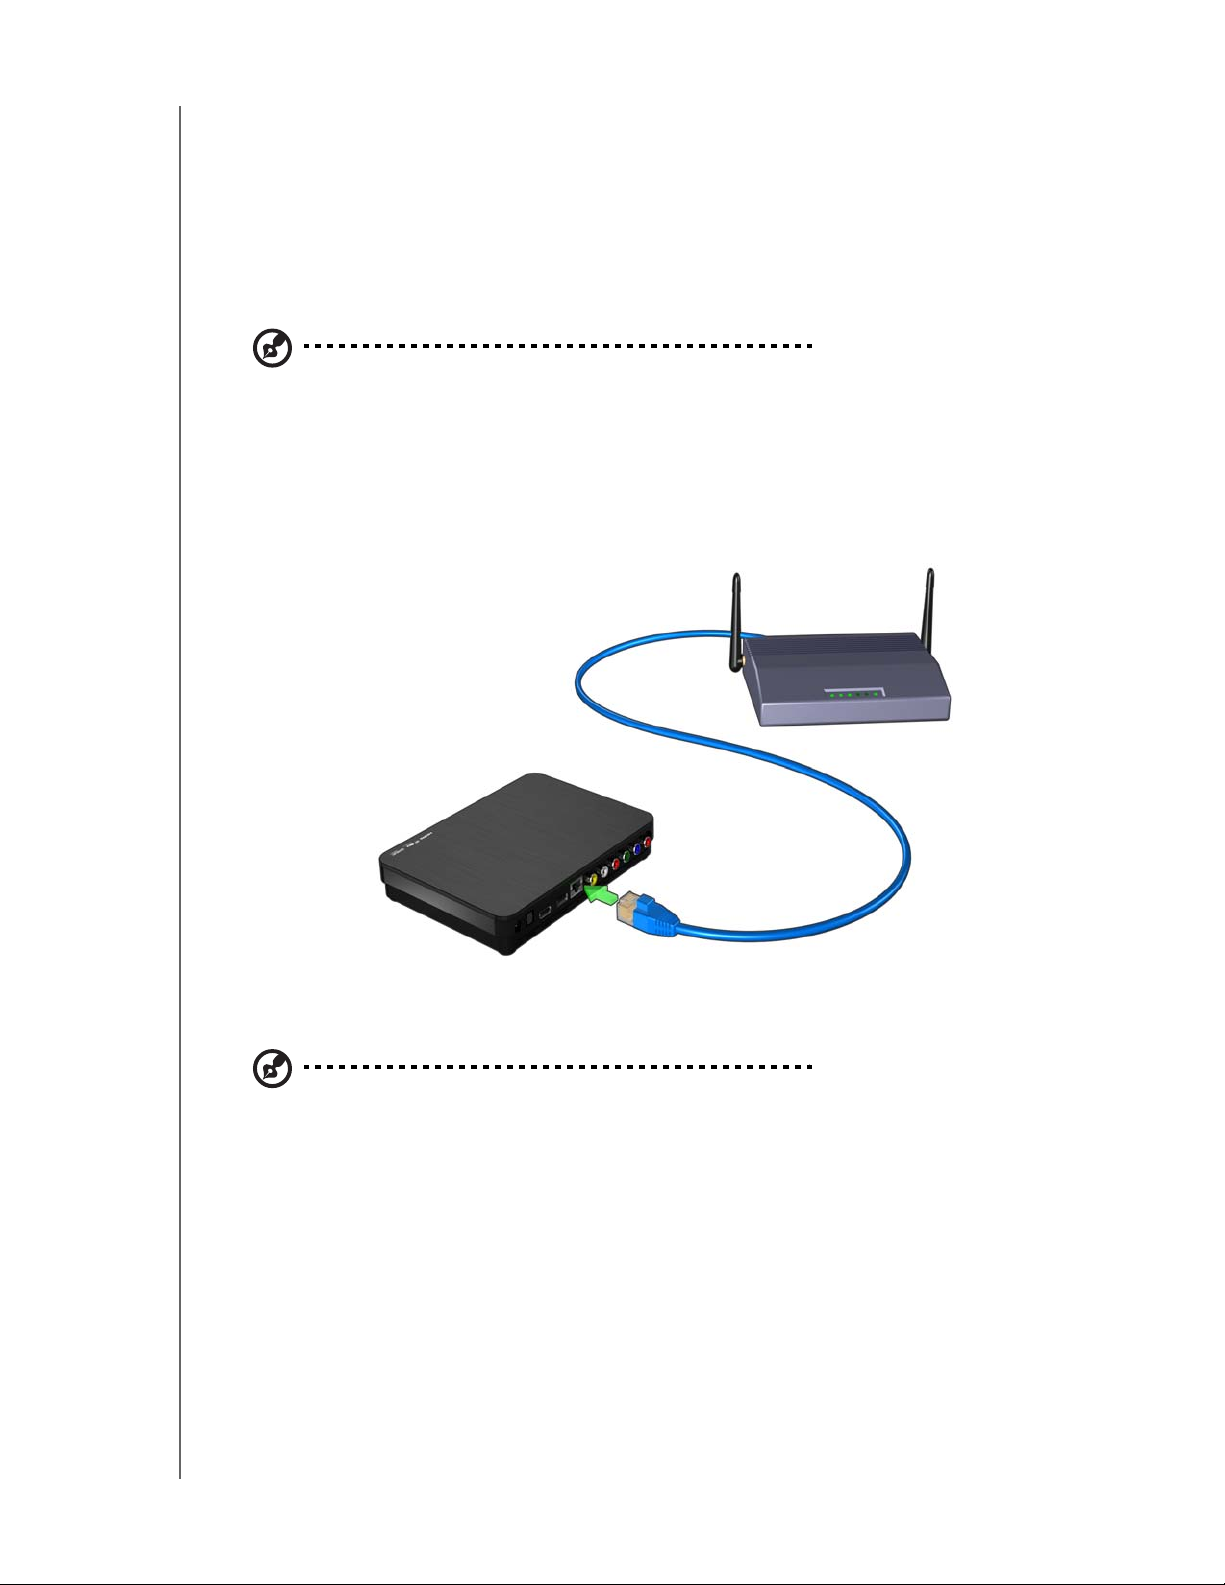
Wired Network Connection
Note: Ethernet cables are sold separately.
To connect to a home network using an Ethernet cable:
1. Plug an Ethernet cable (sold separately) into the Ethernet connector on the
media center.
2. Plug the opposite end of the Ethernet cable directly into a LAN port on a router or
network switch (if using a switch, it must be connected to the router).
For detailed instructions on wireless and wired network connections and
configuration, see “Network Setup” on page 69.
Note: Streaming over Wi-Fi™ may be unstable due to various reasons such as a weak network
connection, signal strength, variable speeds, or other environmental factors. You can create instant
high-speed, wired network connections and gain fast, reliable access to the Internet without running
wires all over your house using WD Livewire™ powerline AV network kit (sold separately). For more
information, visit http://products.wdc.com/WDLivewire.
Transferring Media Content From Your Computer
See “Step 3 - Loading Content On Your Media Center” on page 18.
Accessing Media Content From the Network
See “Network Services” on page 76.
Accessing Online Media Content
See “Internet Services” on page 93.
GETTING STARTED – 17
Page 23
WD TV Live Hub Media Center
User Manual
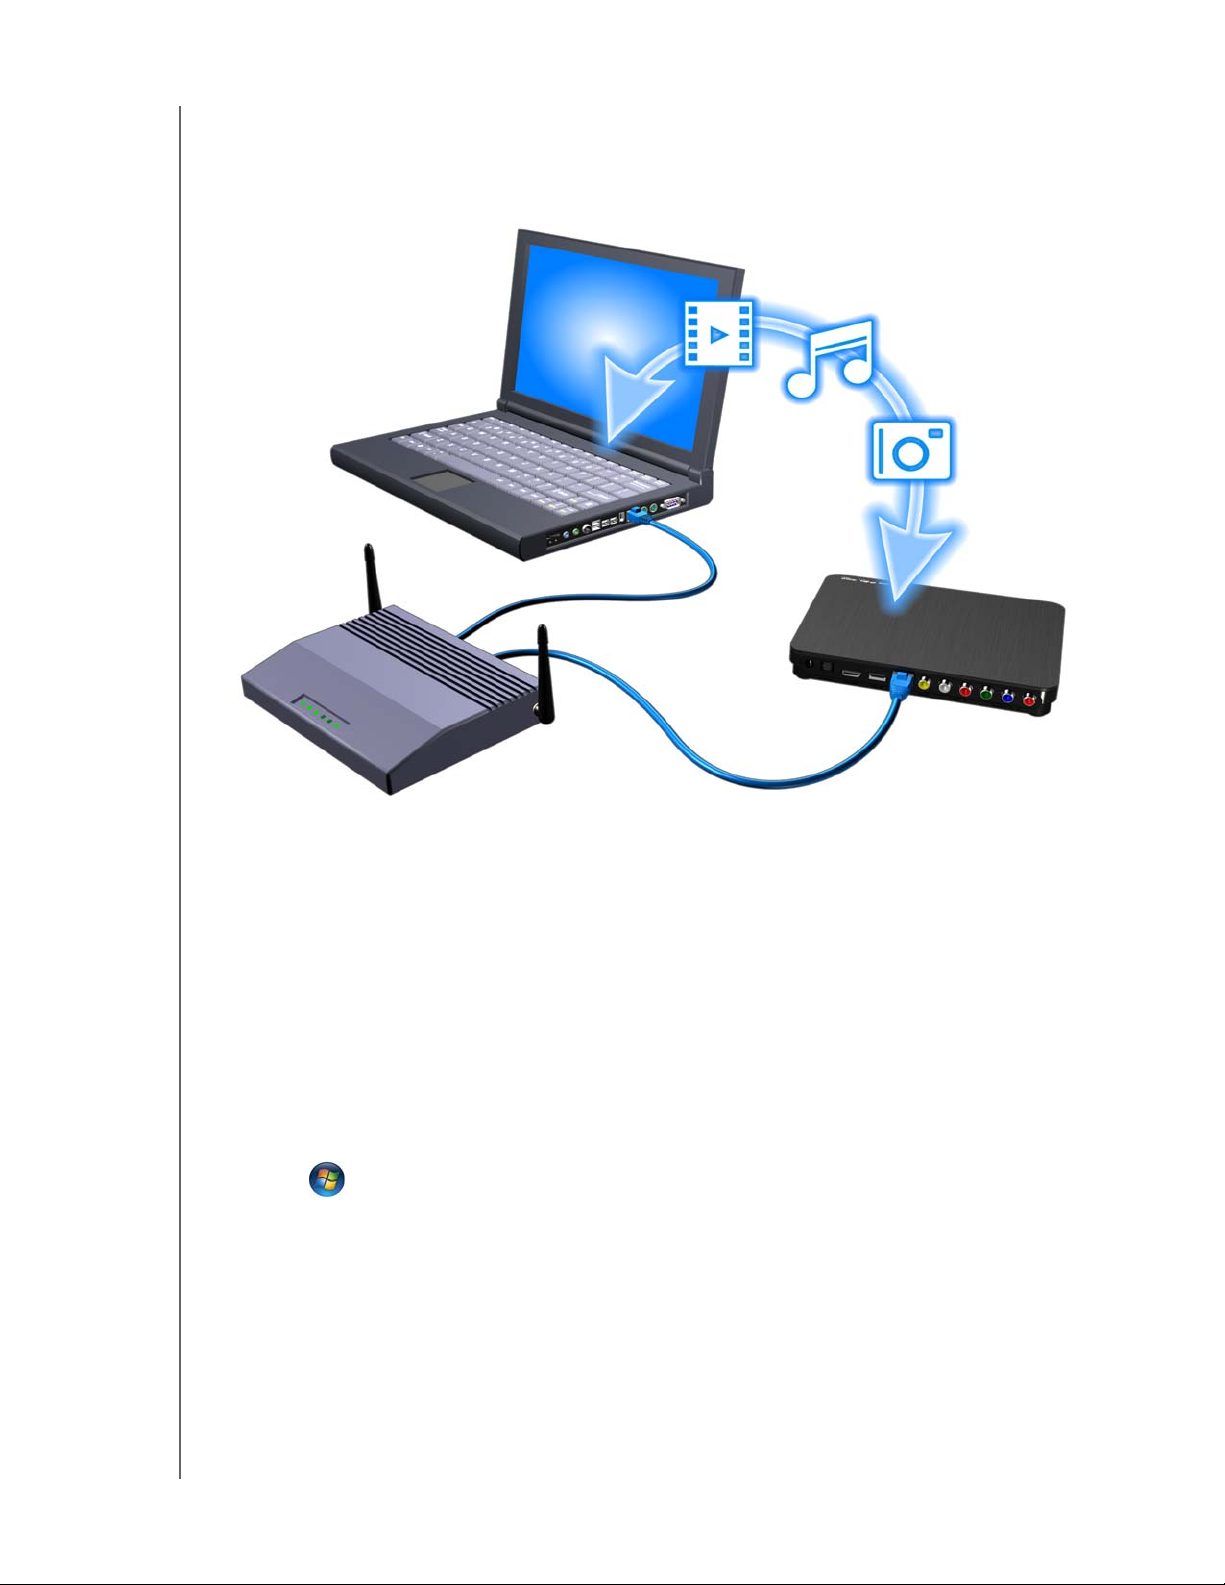
Step 3 - Loading Content On Your Media Center
Transfer your favorite content from your computer to your media center. You can
also transfer files from your media center to your computer.
1. Turn on your computer.
2. Connect the drive’s power cable (see “Step 1 - Connecting the Power Cable” on
page 11).
3. Use Ethernet cables to connect the media center (see “Step 3 - Connecting to
Your Network” on page 17) and a computer to your router as shown above.
Windows
Using WD Link™
1. Download the WD Link tool from http://products.wdc.com/WDTVLiveHub.
2. Double-click on the downloaded installer file and follow the on-screen prompts to
install WD Discovery.
3. Click or Start, then click Programs > WD Link > WD Link.
4. Click WDTVLiveHub in the Network Storage Found list.
5. The media player displays in the Drive Mapping list. Click WDTVLiveHub under
Drive Mapping.
6. Select an available drive letter from the Available Drive Letters list.
GETTING STARTED – 18
Page 24
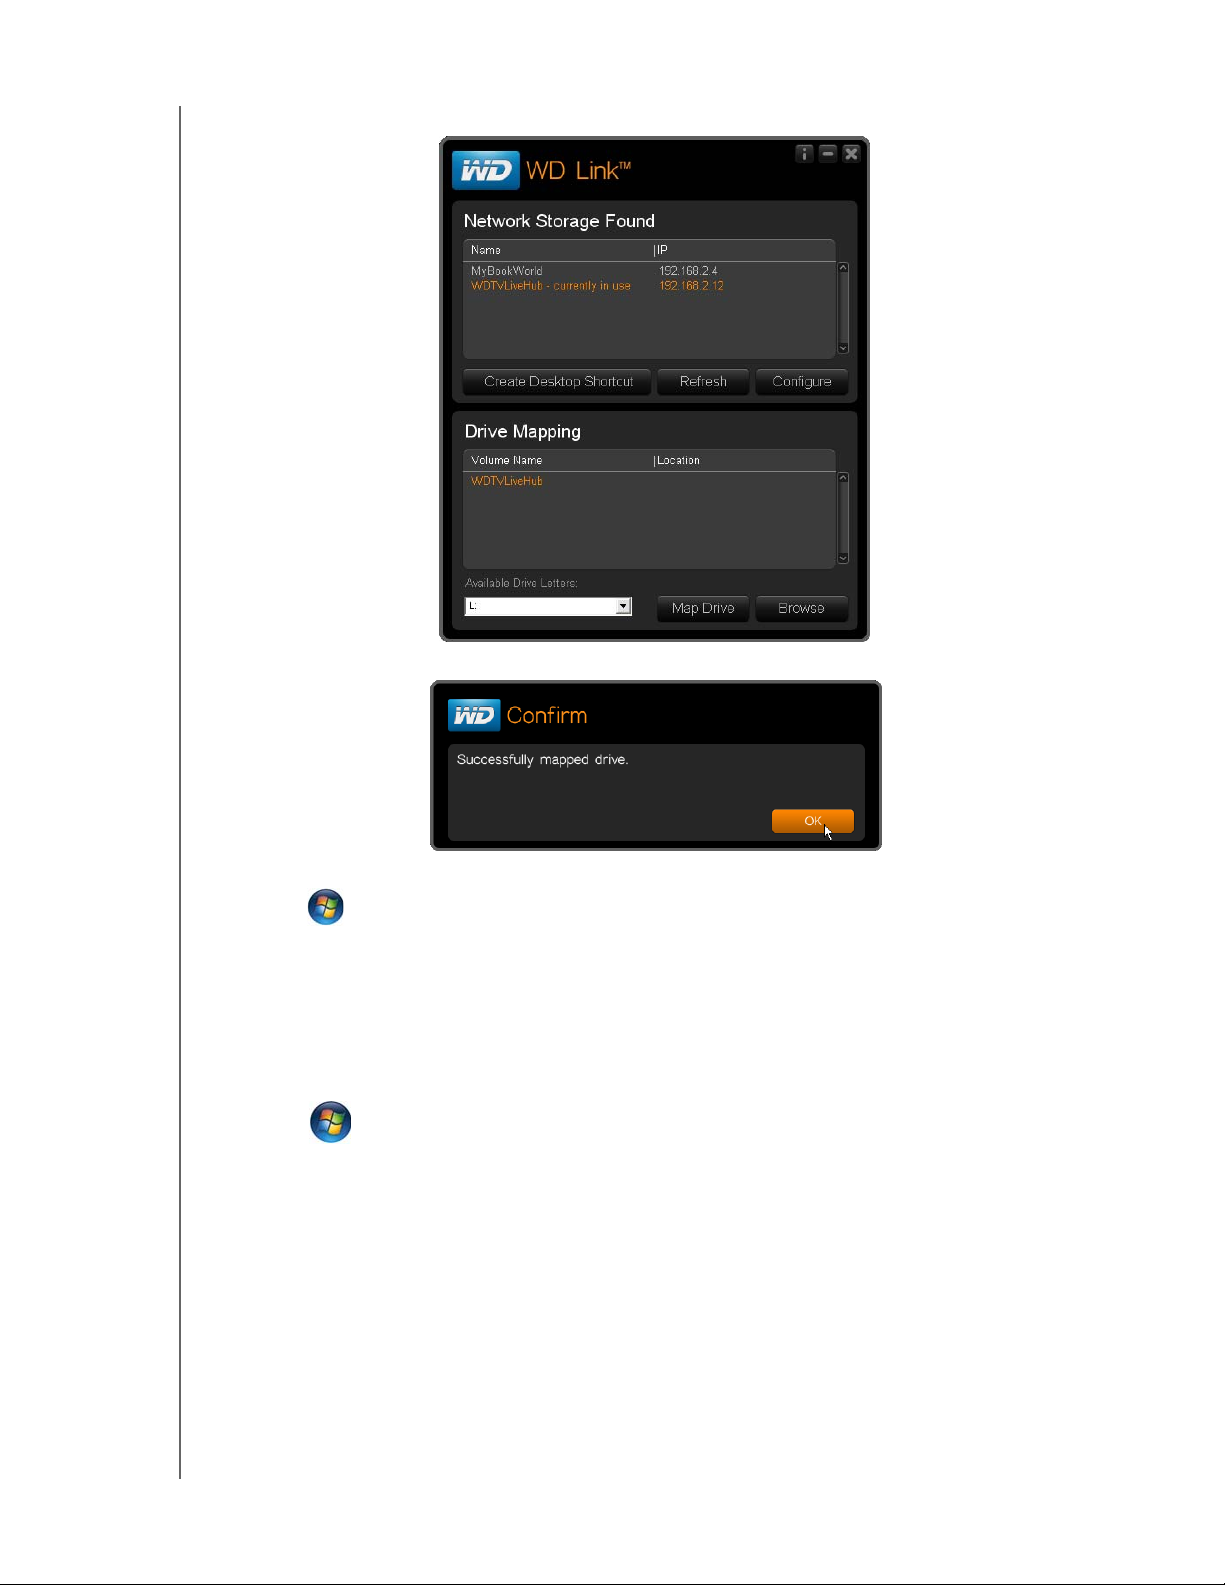
7. Click Map Drive.
WD TV Live Hub Media Center
User Manual
8. Click OK.
9. Close the WD Link Tool.
10.Click or Start and then (My) Computer. The media center root displays. You
can now drag and drop files and folders into the media center’s internal hard
drive using (My) Computer or Windows Explorer.
Using Windows
As an alternative to using WD Link, access the media center as follows:
Windows 7/Vista:
Click > Computer > Network and locate the media center.
Windows XP/Vista/7:
In Windows Explorer or in a Web browser, enter \\wdtvlivehub as the address.
Macintosh
1. Turn on your computer and wait for the operating system to load.
2. Open Finder.
3. Mac OS X Leopard/Snow Leopard: Click the WDTVLiveHub icon under
SHARED.
4. Drag and drop your media files from your computer to the media center or from
the media center to your computer.
GETTING STARTED – 19
Page 25
WD TV Live Hub Media Center
User Manual
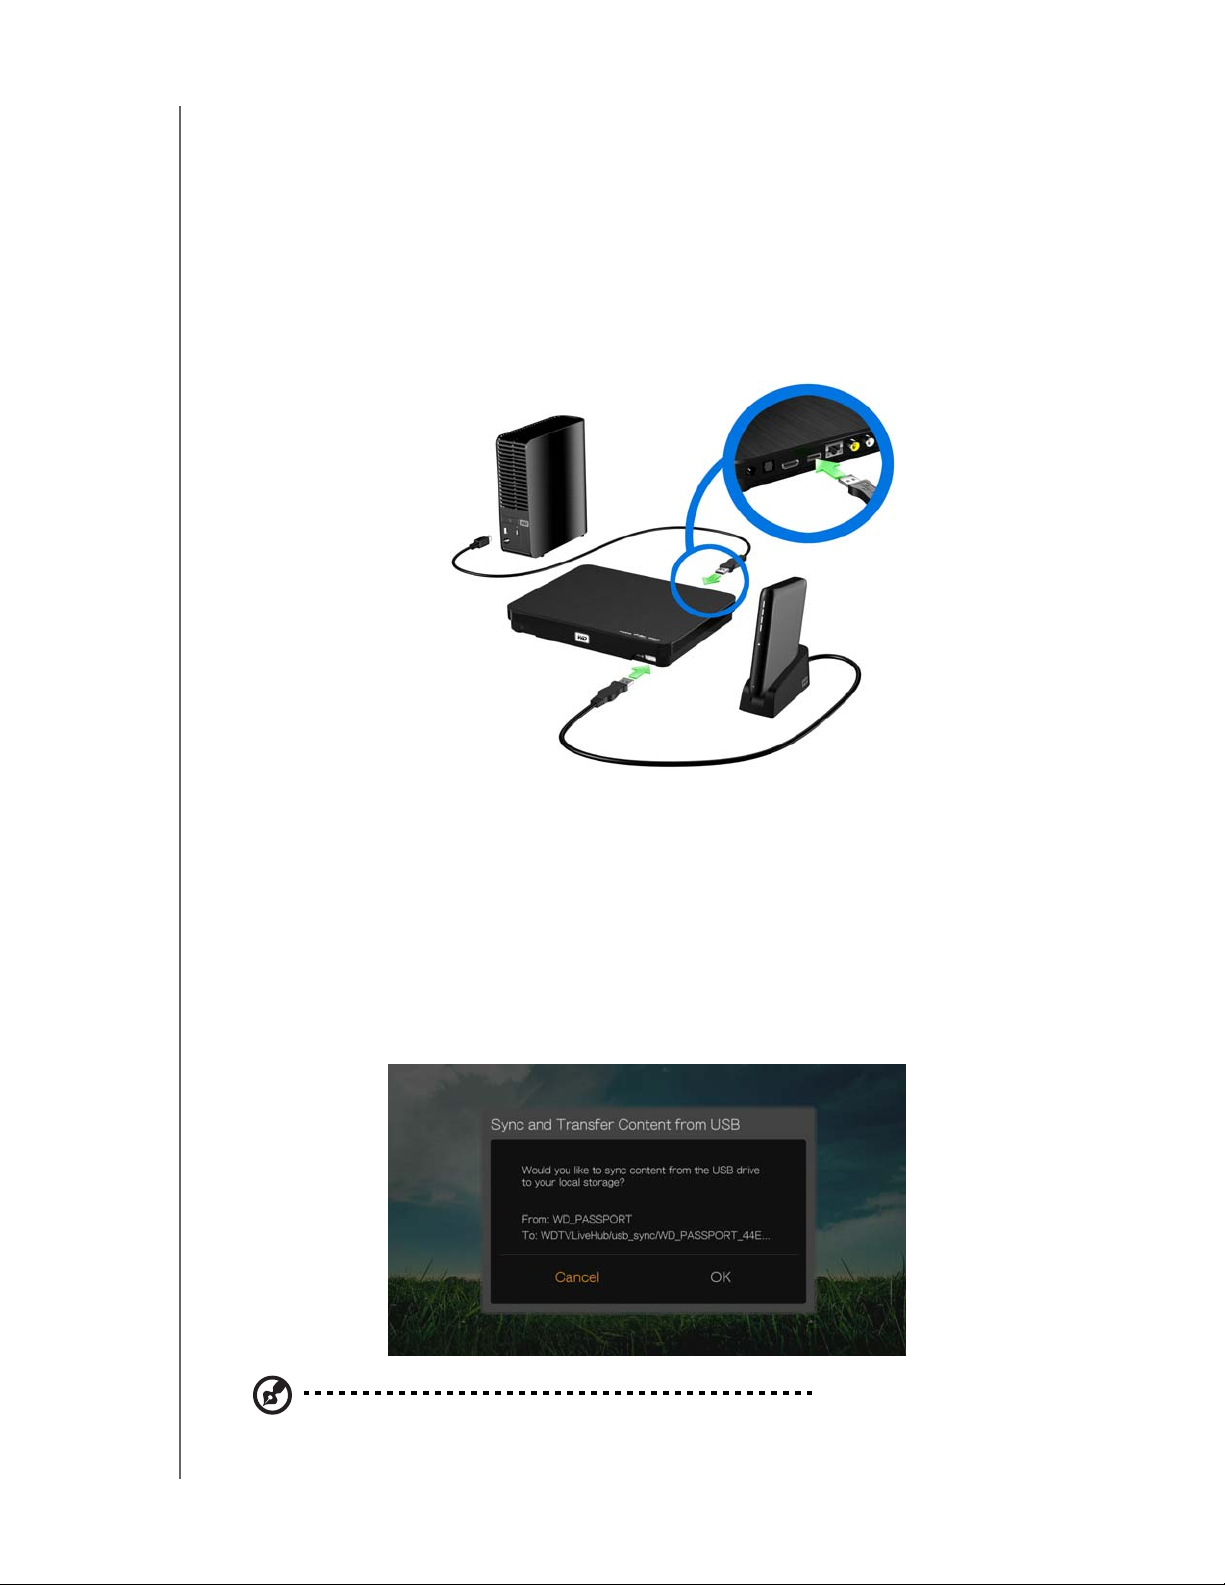
Step 5 - Connecting a USB Device (Optional)
The media center has two USB ports that support playback from WD USB external
drives.*
* For a list of supported WD external drives, see article #5688 in or knowledge base at
http://support.wdc.com.
To connect the USB device:
1. Connect the USB device to either of the media center’s USB ports.
My Book external hard
drive (sold separately)
My Passport
drive and stand (sold
®
portable hard
separately)
2. Wait for a few moments while the media center scans the USB device for media
files. (Scanning is enabled by default. If you want to turn off automatic scanning,
go to “Media Library Compilation” on page 29.)
3. The Sync and Transfer screen appears. Pressing OK copies all the media files
from the USB device into the media center’s internal drive. The files will all be
synced to a designated folder (“USB_Sync”) in the media center’s internal drive.
For each new USB device, a designated folder is created based on the USB
volume name. The media center only syncs and copies files that are new (by date
modified) or different than what’s already stored rather than moving the entire
contents of the external USB device each time.
Note: You can turn off or adjust the Sync and Transfer function in the Setup > Operation menu. See
“Sync From USB Storage” on page 195.
GETTING STARTED – 20
Page 26
WD TV Live Hub Media Center
User Manual
To unlock a locked WD USB device:
A USB device must be unlocked for the media center to access its contents.
1. Navigate to the Home screen, and select the menu for the media content you
wish to access. It can be Music, Videos, or Photo.
2. In the Unlock your WD Drive screen, press / to select OK, then press OK.
3. Use the navigation buttons
to type in the USB drive access password in
the on-screen keyboard. Select Submit, then press OK.
If a wrong password is entered, press
/ to select OK, press OK, then type in
the correct password. If you enter the wrong password five consecutive times,
the USB drive is placed in a hold state. Press OK to close the error message.
Disconnect the USB drive. Power cycle and reconnect the USB drive and type in
the correct access password.
4. Once the USB drive has been unlocked, the menu bar for the selected media
type will appear. Press / to choose a filter option for displaying supported
media contents, then press OK.
Supported content for the selected media type will be displayed.
5. Use the navigation buttons to select the content you wish to access,
then press OK to start media playback.
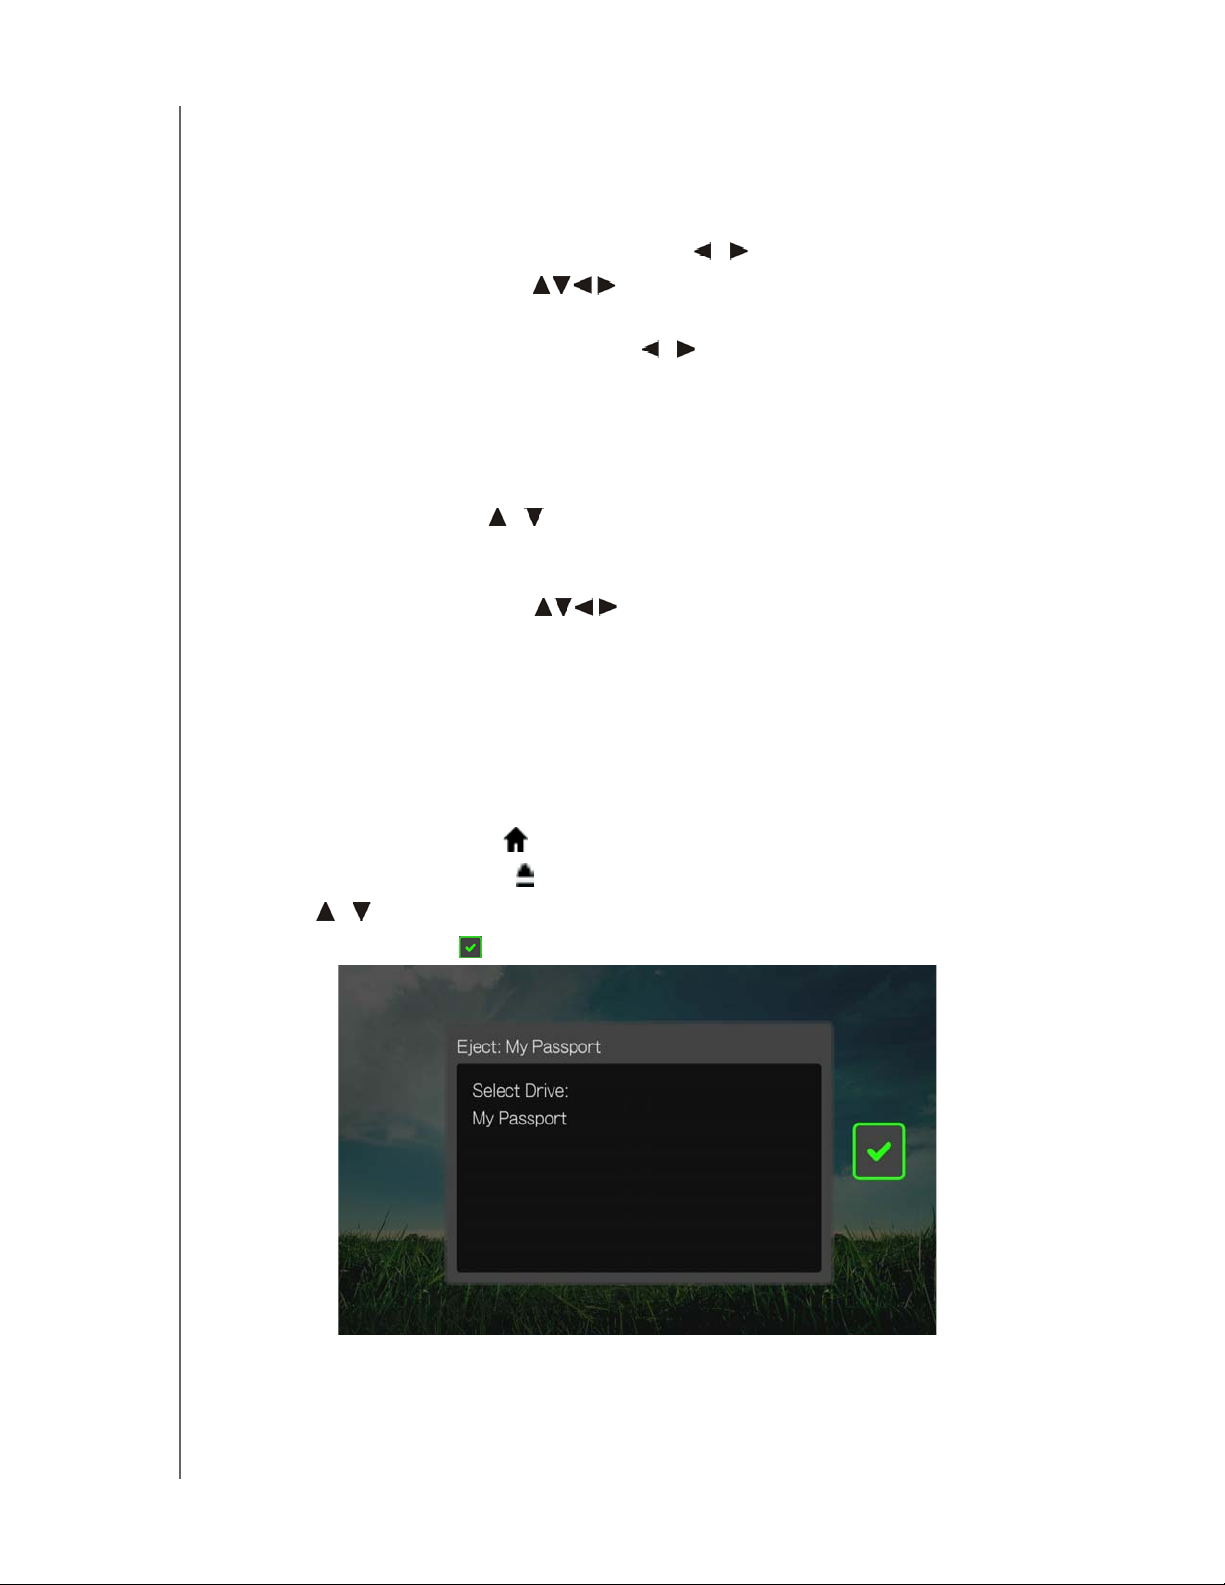
Removing a USB Device
To prevent data loss, it is highly recommended that you first press the EJECT button
on the remote control before removing a USB device.
To remove a USB device:
1. Press the HOME button .
2. Press the EJECT button
3. Press / to select the USB device.
4. Press OK. With the selected, press OK again.
5. Disconnect the USB device from the media center.
GETTING STARTED – 21
Page 27

5
WD TV Live Hub Media Center
User Manual
Operating the Media Center
Using the Remote Control
The media center’s ergonomic remote control lets you navigate the Home screen,
browse for media files, enable playback options, and customize the system settings.
The infrared sensor detects signals from the remote.
Important: Make sure there are no obstructions between the remote
control and the infrared sensor on the media center.
Button Function
HOME
POWER
Navigation
buttons
OK
STOP
Back
REV (reverse)
PREV
Displays the main menu and the various options for playback of files and
device setup.
Suspends the device into sleep mode and turns off video output. Press
and hold the power button for five seconds to completely shut down the
media center.
Navigate through Home options, menu screens, media libraries, on-screen
keyboards, and toolbars.
• Displays the media directories and Settings screens.
• Turns information bar ON or OFF.
• Begins playback of the selected media file.
• Enables the currently selected setting in a Settings option screen.
Discontinues playback.
Goes back to the previous screen.
Scans backward during audio/video playback. Supports the following
speeds: 2×, 4×, 8×, 16×.
• Press once to jump to the start of the audio/video file.
• Press twice to jump to the previous audio/video/image file.
• Press to page up.
• During Video REV mode, press to skip back 10 minutes.
SEARCH
Options
PAUSE /PL AY
FF
(fast forward)
NEXT
Locates a media file in the current folder. This function is only available
when the Media Library setting is enabled. Does not search subfolder.
During playback, displays additional playback options. From an online
media content screen, press to display more service options.
Toggles between pause and playback.
Scans forward through the audio/video playback. Supports the
following speeds: 2×, 4×, 8×, 16×.
• Skips to the next audio, video, or image file.
• Press to page down.
• During Video FF mode, press to skip forward 10 minutes.
OPERATING THE MEDIA CENTER – 22
Page 28

Button Function
WD TV Live Hub Media Center
User Manual
EJECT
Next Page
Prev Page
MUTE
Subtitle
Audio
Setup
Alpha-numeric
keys
A, B, C, D
Switches to safe mode so you can safely remove a USB device.
Displays the next page in the UI. Allows viewing of continued next, more
service icons, etc.
Displays the previous page in the UI.
Turns off the volume output
Switches a video’s subtitles (if applicable)
Switches a video’s audio stream (if applicable)
Brings up the Setup menu
• Pressing any of these keys once inputs the corresponding number.
• Pressing keys 2-9 multiple times inputs the corresponding alpha
characters.
• While listening to a song or music playlist, press and hold any of the
0-9 buttons to create a preset.
User assignable shortcut/function keys. See “Remote Settings” on page
194. Default settings are as follows (only valid when inside the Videos,
Music, or Photos menus):
Pressing activates the sort and filter menu.
Pressing activates the select content source menu.
Pressing activates the change view menu.
Pressing activates the dashboard menu.
OPERATING THE MEDIA CENTER – 23
Page 29

WD TV Live Hub Media Center
User Manual
Using a USB Keyboard
As an alternative to using the remote control, you can plug a USB keyboard into
either of the two USB ports on the media center.
Key or key
sequence
HOME
CTRL + P (Power)
UP, DOWN, LEFT,
& RIGHT ARROWS
ENTER
S (Stop)
ESC (Back)
- (Reverse)
P (Previous)
Function
Displays the main menu and the various options for playback of files and
device setup.
Suspends the device into sleep mode and turns off video output.
Navigate through Home options, menu screens, media libraries, on-screen
keyboards, and toolbars.
• Displays the media directories and Settings screens.
• Turns information bar ON or OFF.
• Begins playback of the selected media file.
• Enables the currently selected setting in a Settings option screen.
Discontinues playback.
Goes back to the previous screen.
Scans backward during audio/video playback. Supports the following
speeds: 2×, 4×, 8×, 16×.
• Press once to jump to the start of the audio/video file.
• Press twice to jump to the previous audio/video/image file.
• Press to page up.
• During Video REV mode, press to skip back 10 minutes.
CTRL + F (Search)
CTRL + O (Options)
SPACE BAR
(Play/Pause)
+ (FF)
N (Next)
CTRL + E (Eject)
M (Mute)
V (Subtitle)
B (Audio)
DELETE
Locates a media file in the current folder. This function is only available
when the Media Library setting is enabled. Does not search subfolder.
During playback, displays additional playback options. From an online
media content screen, press to display more service options.
Toggles between pause and playback.
Scans forward through the audio/video playback. Supports the
following speeds: 2×, 4×, 8×, 16×.
• Skips to the next audio, video, or image file.
• Press to page down.
• During Video FF mode, press to skip forward 10 minutes.
Switches to safe mode so you can safely remove a USB device.
Turns off the volume output
Switches a video’s subtitles (if applicable)
Switches a video’s audio stream (if applicable)
Clears the data entry field.
OPERATING THE MEDIA CENTER – 24
Page 30

WD TV Live Hub Media Center
User Manual
Key or key
sequence
Z (Zoom)
R (Shuffle)
L (Repeat)
BACKSPACE
CTRL + S (Setup)
Alpha-numeric
keys
CTRL + A
CTRL
+ B
CTRL + C
+ D
CTRL
Function
Zooms in on the currently playing video file or photo.
Enables the shuffle function for Videos and Music files.
Repeats the current video or music file.
Deletes the currently selected file.
Brings up the Setup menu
• Pressing the any of these keys once inputs the corresponding letter or
number.
• While listening to a song or music playlist, press and hold any of the
0-9 buttons to create a preset.
User assignable shortcut/function keys. See “Remote Settings” on page
194. Default settings are as follows (only valid when inside the Videos,
Music, or Photos menus):
Pressing
Pressing
Pressing
Pressing
CTRL + A activates the sort and filter menu.
CTRL + B activates the select content source menu.
CTRL + C activates the change view menu.
CTRL + D activates the dashboard menu.
OPERATING THE MEDIA CENTER – 25
Page 31

WD TV Live Hub Media Center
User Manual
Using the Media Center Menu
The Home screen displays when turn on your media center or press HOME on the
remote control. The menu options in this screen let you browse your media library
and configure the media center’s settings.
Home Screen Options
The main Home options are:
Videos
Music
Photos
Files
Setup
Services
Games
Live TV
RSS
New Firmware (automatically detects new firmware and only appears when new
firmware is available)
The Music, Videos, and Photos options represent folders for the different media
types. Media contents will be displayed either as file/file folders in the media center,
network attached storage, or a USB drive directory or as a media library compilation
list based on metadata information. For example, music files can be categorized
based on their genre or the artist’s name.
Setup lets you customize the way you use the media center and set preferences for
media playback. For more information, see “Setup and Advanced Features” on page
172.
Setting Time and Weather
To set the time in the media center screen display, see “Set Time & Country” on
page 195.
To set the temperature in the media center screen display, see
“AccuWeather.com” on page 96.
OPERATING THE MEDIA CENTER – 26
Page 32

Home Screen Navigation
Use the following keys to navigate through the menu screens.
Button Function
WD TV Live Hub Media Center
User Manual
Left/Right arrows
Down arrow
OK
Move from one option to the next
View the dashboard
Launches your selection
Media Center Dashboard
Press at the home screen or navigate to then press OK in the in the Videos,
Music, or Photos menus to launch the dashboard. Press or Back to exit the
dashboard. Your Favorites are shown by default.
Navigate to to filter the media files and internet service links shown on the main
dashboard page by category and media type. For example, to find photos you have
added recently, select New Items and press OK, Photos and press OK, then press
OK again.
Navigate to and press OK to toggle between list and thumbnail views.
OPERATING THE MEDIA CENTER – 27
Page 33

WD TV Live Hub Media Center
User Manual
Press , Use the / navigation buttons, then press OK in the dashboard to
display your media files by the following categories:
Favorites (see “Favorite” on page 39)
New Items (displays media files you have added within a certain date range.
See “Show New Items” on page 181 for details and instructions for adjusting the
date range)
Queue (Use the / navigation buttons then select the Videos, Music, or
Photos icon, then press OK - see “Add to Queue” on page 39)
Recently Viewed (displays media files you have viewed in the last xx days)
After selecting a category, filter the results by media type (Videos, Audio, or Photo).
Then, use the navigation buttons to select a file then press OK to begin playback.
OPERATING THE MEDIA CENTER – 28
Page 34

WD TV Live Hub Media Center
Dashboard Options
With a file selected in any of the dashboard categories, press Options.
User Manual
Dashboard Options - Favorites
Dashboard Options - Queue
Dashboard Options - Last 30 Days or
Recently Viewed
Use the / navigation buttons to select from the following options, then press
OK.
Add to Queue (when a file in Favorites, Last 30 Days, or Recently Viewed is
selected - see “Add to Queue” on page 39).
Rate (see “Rate” on page 39).
Re-Order - use this option to move items up or down in viewing sequence in
both Favorites and Queue categories. Using the navigation buttons, place the
cursor where you want the selected file located.
Favorite (when a file in Queue, Last 30 Days, or Recently Viewed is selected see “Favorite” on page 39).
Copy (see “Move & Copy” on page 40).
Remove from Favorite/Remove from Queue - removes the selected file from
the Favorites or Queue categories.
Delete (see “Delete” on page 40).
Select Multiple (see “Select Multiple” on page 41).
Media Library Compilation
Media Library Compilation refers to the process of scanning and consolidating the
media contents of the media center, network attached storage, or an attached USB
device into one comprehensive database so that you can easily browse and locate
media files based on certain metadata information (e.g., video files are categorized
based on title or release date).
OPERATING THE MEDIA CENTER – 29
Page 35

WD TV Live Hub Media Center
Media Library Compilation Exemptions
The following conditions will prevent the media library compilation process.
The USB device has read-only protection.
There is not enough storage space on the media center, network attached
storage, or USB device.
A drive is locked.
To turn off Media Library Compilation (default is On):
1. Navigate to Home | Setup | System.
2. Select Media Library, and then press OK.
User Manual
3. Select OFF, then press OK.
Note: Clear Media Library clears then rebuilds the media library.
Supported Categories for Media Library Compilation
Once the media library compilation process is completed, all available media files are
organized under their respective media type directory. By default, media contents
are displayed as thumbnails (music album/movie poster art, image thumbnail). The
content categories are listed in the following table.
Media Type Category Description
Music All Tracks Displays a list of all audio files arranged in alphabetical order.
Artist Content is categorized based on the artist name.
Genre Content is categorized based on genre.
Album Content is categorized based on album names.
Date Content is organized by date modified.
Folders Contents are displayed in audio file folders.
Recent Displays a list of audio folders/files that have been accessed
recently.
Playlist Displays a list of music playlists.
OPERATING THE MEDIA CENTER – 30
Page 36

WD TV Live Hub Media Center
Media Type Category Description
Video All Video Displays a list of all video files arranged in alphabetical order.
Date Content is organized by date modified.
Folders Contents are displayed in video file folders.
Recent Displays a list of video folders/files that have been played recently.
Playlist Displays a list of video playlists.
Photo All Pictures Displays a list of all image files arranged in alphabetical order.
Date Content is organized by date modified.
Folders Contents are displayed in image file folders.
Recent Displays a list of image folders/files that have been accessed
recently.
User Manual
Locating Your Contents on the Drive
There are two ways of locating a particular media file depending on whether or not
the media library compilation function is enabled.
Manual Search
You can manually search for a media file by navigating to the specific media section
and browsing through the available file folders. This method is recommended if there
are only a limited number of files to search through. Otherwise, it is better to enable
the media library compilation and use the built-in Search function.
Button Function
Up/Down arrows
Left/Right arrows
OK
Use the navigation buttons to move around a particular folder; press Back to move
between folders.
Thumbnail Support for Media Files
Your media center supports thumbnails in two ways - embedded or external (some
file formats do not support embedded thumbnails).
Select a media type (photos, video, or music) or settings
Select one of the option icons in an Internet service’s submenu bar
Move within a category
Launches your selection
Embedded thumbnails are images that are part of the media file itself. File formats
that support embedded thumbnails:
Music - MP3 and WMA
Photo - JPEG
Video - MP4
OPERATING THE MEDIA CENTER – 31
Page 37

WD TV Live Hub Media Center
User Manual
To add an external thumbnail:
With an individual file or music album selected, press Options, then select Get
Content Info (see “Get Content Info” on page 38). As an alternative, or if the
database did not find any info:
1. Select a JPEG, GIF, or PNG image file that you want to display as a thumbnail of
the music or video file.
2. Save the file in the same location as the file it will represent, according to the
following guidelines:
Folder Thumbnail Guidelines
Music:
Display folder.jpg (the image file must be named “folder.jpg” or thumbnail will not
function)
If no folder.jpg file is found, display the first embedded album art image found in
the folder
If no album art is available, display the first .JPG in the folder
Photo:
Display thumbnail
Video:
Display embedded cover art
If no embedded cover art is available, display image file associated with the video
file to be played (for example video.mkv will be associated with video.JPG)
File Thumbnail View Functions (Defaults)
Music:
Display album art (.MP3 file with embedded .JPG)
If no album art is available, display the image file with the same name as the
audio file to be played. (for example, song.wav will be associated with song.jpg)
Photo:
Display thumbnail
Video:
Display .MP4 with embedded .JPG
Display image file associated with the video file to be played (for example
video.mkv will be associated with video.JPG)
Search Function
You must first enable the Media Library Compilation feature before using the Search
function. Go to “Media Library Compilation” on page 29 for instructions.
To perform a media search:
1. Go to the main browser screen of the type of media you want to search for
(Videos, Music, or Photos).
2. Press on the remote control.
OPERATING THE MEDIA CENTER – 32
Page 38

WD TV Live Hub Media Center
User Manual
3. Select Title, Director, or Actor (Videos); Title, File Name, Album or Artist
(Music); or Title (Photos). Press OK, then to select the . Press OK.
Search Options - Videos
Search Options - Music
Search Options - Photos
4. Select Contains or Starts with, then press OK twice.
OPERATING THE MEDIA CENTER – 33
Page 39

5. Using the on-screen keyboard:
Use the navigation buttons to select a character, then press OK to input it in
the search bar. Alternatives to this method are as follows:
- Use the alpha-numeric keys on the remote control to enter search terms.
For example, press the 2 button a number of times to enter a, b, or c; press
the 3 button a number of times to enter d, e, or f, etc.
- Plug a USB keyboard into the media center as an alternative to the methods
above. See “Using a USB Keyboard” on page 24.
Select or , then press OK to input characters in a different case.
Select , then press OK to display the symbol keyboard for inputting
special keyboard characters.
Select , then press OK to display the symbols for special characters such
as .com, www., .net, .org, etc.
Press Options for multi-lingual/multi-character input (applicable to certain
letters on the keyboard).
If you want to erase the last character entered, navigate to then press
OK.
Navigate to and press OK to move the cursor backward and to move
the cursor forward in the Search field (you can also press to move the
cursor backward and Next Page to move the cursor forward in the Search
field).
WD TV Live Hub Media Center
User Manual
6. Once you define the search parameters, select Submit on the bottom of the
on-screen keyboard, then press OK.
All files with filenames that begin with the characters entered in the search field
will be included in the search results. For example, inputting ‘glo’ will result to a
search results like this:
Global party.mpeg
Glow of the Field.jpg
Gloss.mp3
7. If there are no media files matching the search parameters, press OK to display
the on-screen keyboard again and redefine the search parameters.
OPERATING THE MEDIA CENTER – 34
Page 40

WD TV Live Hub Media Center
User Manual
If media files matching the search parameters you set are found, they will be
listed as shown below (the result of entering ‘bea’ in Photos).
Use the navigation buttons to select the media file you are looking for, and then
press OK or to initiate playback.
OPERATING THE MEDIA CENTER – 35
Page 41

6
Watching Video
You can watch videos on your TV using the media center.
Supported Video Formats
The following video file formats are supported.
AVI (Xvid, AVC, MPEG1/2/4)
MPG/MPEG
VOB/ISO
MKV (h.264, x.264, AVC, MPEG1/2/4)
TS/TP/M2T (MPEG1/2/4, AVC, VC-1)
MP4/MOV (MPEG4, h.264)
M2TS
WMV9 (VC-1)
Video Playback
WD TV Live Hub Media Center
User Manual
To play back video:
1. Navigate to the Home | Videos menu, then press OK.
2. The screen displays available video files and video folders in the media center’s
local drive by default. The display will either be in preview view (default), grid view,
list view, or gallery view, depending on your Browser Display setting (see “Video
Settings” on page 182 for more information on Browser Display settings).
Preview mode displays file size, and file type and genre (if available) for the
selected video.
WATC HING VID EO – 36
Page 42

WD TV Live Hub Media Center
If Media Library is enabled, you can choose to navigate using sorting
(Alphabetical, Date, Ratings, Recently Viewed) and filter options (All Video,
Genre, Playlists, Folder, Favorites) See “Supported Categories for Media Library
Compilation” on page 30 for details.
3. Locate the video file you want to play.
To begin playback of a single video file, highlight the file, and then press OK.
To begin playback of a video playlist, highlight the playlist name, then press
PAUSE /PLAY.
To begin playback of all video files in a folder, highlight a video in that folder,
then press PAU SE/P LAY.
To find a video on a network share or media center, follow the instructions in
“Accessing Media Content from the Network” on page 76.
If you try to open a video file that has been partially played before, you are
prompted to choose whether to play the file from the beginning or resume
playback from the last playback position. Select Resume to resume playback or
Restart to start playback from the beginning.
Sort & Filter Videos
User Manual
You can sort and filter the videos shown in the video menu based on your
preferences using the sorting & filter option.
Filter
1. Press or navigate to the sort and filter content icon , and press OK.
2. Press , then / to select Filter by All, Folders, Genre, Playlist, and Favorites.
Press OK to display videos by the criteria selected.
Note: If you have your media files organized by folder, it may be easier and quicker to find your files by
using the Filter option to only show folders.
3. With the green check mark selected, press OK again.
WATC HING VID EO – 37
Page 43

WD TV Live Hub Media Center
User Manual
Sorting
1. Press or navigate to the sort and filter content icon , and press OK.
2. Press , then / to select Sorting by Date, Alphabetically, by Ratings, or by
Recently Viewed. Press OK to display videos by the criteria selected in either
ascending (arrow up) or descending (arrow down) order.
3. Press . With the green check mark selected, press OK again.
Videos Menu Options
In the main Videos screen, press Options. The Videos menu options display. Press
Back when finished to return to the main menu.
Get Content Info
Press / and select Get Content Info from the list of options prompts the media
center to connect to an online media database to gather information about the file.
For example, Get Info returns the MPAA rating, duration of the movie, genre, studio
photos, and movie trailers based on the movie’s title.
WATC HING VID EO – 38
Page 44

WD TV Live Hub Media Center
User Manual
If a No Content Info Found message displays, navigate to the keyboard icon then
press OK.
Enter the whole title or a portion of the title using the on-screen keyboard, select
Submit, then press OK to associate info with the content. Select a title from the list,
then press OK.
Rescan Info
Press / and select Rescan Info from the list of options after you have
associated content info with a file. The rescan info option updates content info or
allows you to correct content info that was associated with the file in error.
View Info
Press / and select View Info from the list of options after you have associated content info with a file. A synopsis/description of the title info displays.
Add to Queue
Adding videos to the queue provides quick access to these files via the dashboard
(see “Media Center Dashboard” on page 27).
Rate
Rate your videos and other media files so you can sort and filter them by ratings and
access them quickly in the dashboard.
1. Press
2. Press
rating. Five is the highest rating, and one is the lowest.
3. Press OK to confirm your rating.
/ and select Rate Video from the list of options.
/ to highlight the number of stars corresponding to your preferred
Favorite
Favorite your videos other media files so you can sort and filter them by favorite and
access them quickly in the dashboard.
1. Press / and select Favorite from the list of options.
2. Press OK.
WATC HING VID EO – 39
Page 45

WD TV Live Hub Media Center
User Manual
Move & Copy
1. Press / and select Move or Copy from the list of options, then press OK.
2. Select a storage destination for the file you want to move or copy, then press
OK.
3. Use the navigation buttons to select the location where you want to move or
copy the file. When you have selected the location, press OK to place the file
there (if selecting a network or media server location, see “Accessing Media
Content from the Network” on page 76).
4. Press to select the green check mark , then press OK.
Delete
1. Press / and select Delete from the list of options.
2. Select Yes , then press OK to confirm deletion.
Upload to Facebook
You can upload a video to Facebook by selecting this option.
1. Press / and select Upload to Facebook from the list of options.
2. Select the account you want to post the file to then press OK, or select Add
Account to add a Facebook account (see “Facebook” on page 104 for details).
WATC HING VID EO – 40
Page 46

WD TV Live Hub Media Center
User Manual
3. The screen below displays. Press OK to select “Don’t ask me again!” if you do
not want this screen to appear again, then press to select the green check
mark . Press OK.
Select Multiple
Select multiple files then press Options to apply changes to more than file.
1. Press / and select Select Multiple from the list of options.
2. The edit multiple screen displays. Use the navigation buttons to Select All,
Select Page, or Clear All files shown, or Continue to the next group of files,
then press OK.
3. With multiple files selected, press Options to apply changes to more than one
file.
WATC HING VID EO – 41
Page 47

WD TV Live Hub Media Center
Video Playback Controls
Use these buttons on the remote control to control video playback:
Button Function
User Manual
STOP
PAUSE /PL AY
1. Press FF (fast forward) or REV
(reverse) to scan video (press
repeatedly to select the scan speed)
2. Press PAUSE/PLAY to resume
playback on the selected position
NEXT
PREV
Up arrow
Down arrow
Discontinues video playback
Pauses or resumes video playback
Scans the video playback forward or backward
The media center supports the following scan speeds:
2x, 4x, 8x, 16x
• Plays the next video file in the video folder/playlist
• Press during Fast Forward to skip forward 10
minutes.
•Press
• Plays the previous video file in the video folder/
• Press during Fast Reverse to skip back 10 minutes.
• Press
• Move subtitles up on the screen.
• Move subtitles down on the screen.
NEXT to skip to the next chapter (if the
video file supports chapters).
playlist
PREV to skip to the previous chapter (if the
video file supports chapters).
Left arrow
Right arrow
Subtitle
Audio
• Reduce subtitle display speed.
• Increase subtitle display speed.
•
•
WATC HING VID EO – 42
Page 48

WD TV Live Hub Media Center
Video Playback Options
To display the video playback options while playing a video, press Options.
To return to the video, press Back.
Get Content Info
See “Get Content Info” on page 38.
User Manual
View Chapter
If you are viewing a multichapter video file, you can select which chapter to play.
To select the video chapter:
1. Press Options.
2. Highlight View Chapter, then press OK.
3. Press / to highlight your chapter selection, then press OK twice.
Subtitle
Use this option to view subtitles during video playback. Make sure the subtitle files
are located in the same folder as the current video, and that it has the same filename
as the video file.
Note: Subtitle files (specific types that are supported) need to have the exact same file name as the
media they are playing (the extensions will be different) and need to be located in the same folder as
the video file.
WATC HING VID EO – 43
Page 49

WD TV Live Hub Media Center
User Manual
To view subtitles:
1. During video playback, press Subtitle repeatedly until your desired subtitles
display or “Subtitle Off” appears. Or, press Options, highlight Subtitles, then
press OK and follow the steps below.
2. Select your preferred language or Off (to disable subtitles), then press OK.
3. With the green check mark selected, press OK again.
Adjust Subtitles
After selecting subtitles, use this option to adjust subtitles during video playback.
1. During video playback, press Options.
2. Highlight Adjust Subtitles, then press .
Adjust Subtitles submenu options include:
Position & Size - use navigation buttons to adjust position and speed, press OK
repeatedly to adjust size).
Color (of subtitle text) - select fill and border color from the Subtitle Color
menu.
Encoding - see “Additional Encoding Support” on page 198.
Play Mode
Use the play mode option to set video repeat options. Press OK repeatedly until the
repeat icon you want is displayed. Options include:
WATC HING VID EO – 44
Page 50

WD TV Live Hub Media Center
Repeat All – All the video files in the current video folder are played in
User Manual
sequence and repeatedly until you press STOP or Back.
Shuffle – All the video files in the current video folder are played
repeatedly in shuffle mode until you press STOP or Back.
Repeat One – The current video file is played repeatedly until you press
STOP or Back.
Audio Channel Selection
Use this option to select the audio language used in the video playback. This option
is only available if the current video has more than one audio track. Make sure the
audio tracks are located in the same folder as the current video.
To select the audio channel:
1. During video playback, press Audio (or press Options, highlight Audio, then
press OK).
2. Repeat the step above until your desired language or track plays.
Audio Lip Sync
Use this option to adjust the timing of the audio to better match up to the video. This
is useful for adjusting videos where the audio and video are out of sync due to
improper encoding, etc.
1. During video playback, press Options.
2. Select Audio Lip Sync, then press OK.
3. Use the / buttons to adjust audio lip sync in increments of 100 ms from
-2000 ms Delay to 2000 ms Advance.
Favorite
See “Favorite” on page 39.
Rate
See “Rate” on page 39.
Add to Queue
See “Add to Queue” on page 39.
Selecting Video Zoom and Pan Options
Use this option to change the viewing scale of the video playback screen and to pan
the video display.
1. During video playback, press Options.
2. Select Zoom & Pan, then press OK.
3. Press OK repeatedly to cycle through the available zoom options. Use the
navigation buttons to pan the display.
Delete
See “Delete” on page 40.
WATC HING VID EO – 45
Page 51

WD TV Live Hub Media Center
User Manual
Post Comment to Facebook
You can upload a video screenshot or comment to Facebook by selecting this
option.
1. Press / and select Post Comment to Facebook from the list of options.
2. Select Screenshot or Comment Only and press OK.
3. If necessary, enter your Facebook user name and password (see “Facebook” on
page 104 for details).
4. The Post Comment to Facebook screen displays. Select the keyboard icon
and use the on-screen keyboard to make a comment.
5. Select the green check mark , press OK, then press OK again at the Success
screen.
WATC HING VID EO – 46
Page 52

WD TV Live Hub Media Center
User Manual
Displaying the Video Playback Panel
Use this option to display the Video Playback Panel on the bottom of the screen.
This panel shows the following information about the current video:
Video playback progress bar
Elapsed and total
playback times
To view the Video Playback Panel:
1. During video playback, press OK. The video playback panel appears on the
bottom of the screen, showing a progress bar along with the elapsed and total
playback times.
2. Some videos allow you to advance to a specific time. Select Skip to Desired
Time, then click OK. A keyboard displays:
3. Use the navigation buttons to position the cursor under each number in the Hour,
Minute, and Second fields, then select a number from the keyboard. Select
Submit then press OK when finished to advance to the specific time.
Press OK to hide the Video Playback Panel when finished.
WATC HING VID EO – 47
Page 53

WD TV Live Hub Media Center
User Manual
DVD Navigation
In most cases, when the contents of an entire DVD have been successfully saved
and stored in the media center’s internal drive or on an attached USB hard drive or a
networked hard drive connected to the media center, you will experience the same
DVD menu navigation functionality using the buttons on the media center remote as
you would using a DVD remote for a DVD player connected to a television.
Important: For DVD navigation to work, the VOB files must be placed in a
folder named VIDEO_TS.
Note: Video files such as AVI, MP4, MKV, and MT2S are "single track" video files that do not provide
DVD navigation features.
DVD Navigation Controls
Use these buttons on the remote control to control DVD navigation video playback:
Button Function
STOP
PAUSE /PL AY
1. Press FF (fast forward) or REV
(reverse) to scan video (press
repeatedly to select the scan speed)
2. Press PAUSE/PLAY to resume
playback on the selected position
NEXT
PREV
Up arrow
Down arrow
Discontinues video playback
Pauses or resumes video playback
Scans the video playback forward or backward
The media center supports the following scan speeds:
2x, 4x, 8x, 16x
• Press during Fast Forward to skip forward 10
minutes.
•Press
• Press during Fast Reverse to skip back 10 minutes.
• Press
• At the main menu, move between selections such
as Play Movie, Scene Selection, Set Up, Special
Features, etc.
• Move subtitles up on the screen during video
playback.
• At the main menu, move between selections such
as Play Movie, Scene Selection, Set Up, Special
Features, etc.
• Move subtitles down on the screen during video
playback.
NEXT to skip to the next chapter.
PREV to skip to the previous chapter.
WATC HING VID EO – 48
Page 54

Button Function
WD TV Live Hub Media Center
User Manual
Left arrow
Right arrow
• At the main menu, move between selections such
as Play Movie, Scene Selection, Set Up, Special
Features, etc.
• Reduce subtitle display speed during video
playback.
• At the main menu, move between selections such
as Play Movie, Scene Selection, Set Up, Special
Features, etc.
• Increase subtitle display speed during video
playback.
DVD Navigation Playback Options
To display the video playback options, press Options.
To hide the options, press Back or Options again.
Main Menu Selection
To show the main menu in DVD navigation mode:
1. Press Options.
2. Highlight Menu, then press OK. The main menu displays.
Selecting Subtitles
See “Subtitle” on page 43.
Audio Channel Selection
See “Audio Channel Selection” on page 45.
Get Content Info
See “Get Content Info” on page 38.
WATC HING VID EO – 49
Page 55

7
WD TV Live Hub Media Center
Playing Music
You can listen to audio files on your TV/audio system using the media center.
Supported Audio Formats
MP3
WAV/PCM/LPCM
WMA
AAC
FLAC
MKA
AIF/AIFF
OGG
Dolby Digital Plus
DTS
Music Playback
User Manual
1. Navigate to the Home | Music menu, then press OK.
2. The screen displays available music files and folders in the media center’s local
drive by default. The display will either be in grid view (default) or list view,
depending on your Browser Display setting (see “Music Settings” on page 184
for more information on Browser Display settings).
If Media Library is enabled, you can choose to navigate using sorting
(Alphabetical, Date, Ratings, Recently Viewed) and filter options (All, All Tracks,
PLAYING MUSIC – 50
Page 56

WD TV Live Hub Media Center
User Manual
Genre, Artist, Album, Playlists, Favorites) See “Supported Categories for Media
Library Compilation” on page 30 for details.
3. Locate the audio file you want to play.
To begin playback of a single audio file, highlight the file, then press OK.
To begin playback of an album, highlight the album, then press OK. Press OK
again to play the album.
To begin playback of a music playlist, highlight the playlist name, and then
press PAUSE/PLAY.
To begin playback of all audio files in a folder, highlight an audio file in that
folder, and then press PAUS E/PL AY.
To find audio files on a network share or media center, follow the instructions in
“Accessing Media Content from the Network” on page 76.
Sort & Filter Music
You can sort and filter music based on your preferences using the sort & filter option.
Filter
1. Press or navigate to the sort and filter content icon , and press OK.
2. Press , then / to select Filter by All Albums, All Tracks, Genre, Artist,
Folders, Playlist, and Favorites. Press OK to display music by the criteria
selected.
Note: If you have your media files organized by folder, it may be easier and quicker to find your files by
using the Filter option to only show folders.
3. With the green check mark selected, press OK again.
PLAYING MUSIC – 51
Page 57

WD TV Live Hub Media Center
User Manual
Sorting
1. Press or navigate to the sort and filter content icon , and press OK.
2. Press , then / to select Sorting by Date, Alphabetically, Ratings, or by
Recently Viewed. Press OK to display music by the criteria selected in either
ascending (arrow up) or descending (arrow down) order.
3. Press . With the green check mark selected, press OK again.
Music Menu Options
In the main video screen, press Options. The Music menu options display. Press
Back when complete to return to the main menu.
Get Content Info
The Music get content info function is the same as the Videos get content info
function. See “Get Content Info” on page 38.
Rescan Info
The Music rescan info function is the same as the Videos rescan info function. See
“Rescan Info” on page 39.
View Info
The Music view info function is the same as the Videos view info function. See
“Video Playback Controls” on page 42.
PLAYING MUSIC – 52
Page 58

WD TV Live Hub Media Center
User Manual
Favorite
The Music favorite function is the same as the Videos favorite function. See
“Favorite” on page 39.
Rate
The Music rate function is the same as the Videos rate function. See “Rate” on
page 39.
Move & Copy
The Music move and copy functions are the same as the Videos move and copy
functions. See “Move & Copy” on page 40.
Delete
The Music delete function is the same as the Videos delete function. See “Delete” on
page 40.
Edit Multiple
The Music edit multiple function is the same as the Videos edit multiple function. See
“Select Multiple” on page 41.
Preset Music
The Preset Music function allows you to assign a numbered button on the remote to
a song for quick playback.
1. Press / to select Preset Music. Press .
2. Press / to select a numbered remote button, then press OK.
PLAYING MUSIC – 53
Page 59

WD TV Live Hub Media Center
User Manual
Music Playback Controls
Use these buttons on the remote control to control music playback when in the
music playback screen:
Button Function
STOP Stop audio playback
PAUSE/PLAY Pause or resume audio playback
1. Press FF (fast forward) or REV (reverse) to
scan the audio file (press repeatedly to
select the scan speed).
2. Press PLAY to resume playback on the
selected position.
Press PREV (previous track) once. Start playback from the beginning
Press NEXT Play the next audio track in the music folder/
Press PREV (previous track) twice. Play the previous audio track in the music folder/
0-9
Note: If you leave the music playback screen, the only playback controls that work are the STOP
button (to stop music playback) and Options (during photo playback - to jump to the previous or next
track).
Scan the audio playback forward or backward
The media center supports the following scan
speeds: 2×, 4×, 8×, 16×
playlist
playlist
While listening to a song or music playlist, press
and hold any of the 0-9 buttons to create a
preset.
PLAYING MUSIC – 54
Page 60

WD TV Live Hub Media Center
User Manual
Music Playback Screen
The music playback screen displays the following information about the currently
playing album and/or audio file:
Album art (if available)
Audio filename(s)
Album name
Artist
Audio playback
progress bar
Shuffle mode
(if enabled)
Music Playback Options
To display the music playback options, press Options.
To hide the options, press Back or Options again.
Current repeat mode
(if enabled)
Track number/
total tracks
Elapsed time and
total playback
time
PLAYING MUSIC – 55
Page 61

WD TV Live Hub Media Center
User Manual
Get Content Info
The Music get content info function is the same as the Videos get content info
function. See “Get Content Info” on page 38.
Rescan Info
The Music rescan info function is the same as the Videos rescan info function. See
“Rescan Info” on page 39.
View Info
The Music view info function is the same as the Videos view info function. See
“Video Playback Controls” on page 42.
Add to Queue
The Music add to queue function is the same as the Video add to queue function.
See “Add to Queue” on page 39.
Favorite
The Music favorite function is the same as the Video favorite function. See “Favorite”
on page 39.
Rate
The Music rate function is the same as the Video rate function. See “Rate” on
page 39.
Play Mode
Use the music play mode to set repeat and shuffle options.
Repeat
To set the music repeat mode:
1. During music playback, press Options.
2. Select Play Mode, then press OK repeatedly until the repeat icon you want is
displayed. Options include:
Repeat All – All the audio files in the current music folder/playlist are
played in sequence and repeatedly until you press STOP or Back.
Repeat One – The current audio track is played repeatedly until you press
STOP or Back.
Repeat All and Shuffle – All the audio files in the current music
folder/playlist are played repeatedly in sequence and shuffled until you press
STOP or Back.
The icon for the enabled repeat mode will appear below the playback progress
bar.
PLAYING MUSIC – 56
Page 62

WD TV Live Hub Media Center
User Manual
Shuffle
Use this option to set the audio tracks in the current music folder/playlist to play in
random order.
To enable music shuffle mode:
1. During music playback, press Options.
2. Select Play Mode, then press OK repeatedly until the repeat icon you want is
displayed. Options include:
Shuffle – All the audio files in the current music folder/playlist are shuffled
repeatedly until you press STOP or Back.
Repeat All and Shuffle – All the audio files in the current music
folder/playlist are played repeatedly in sequence and shuffled until you press
STOP or Back.
Delete
The Music delete function is the same as the Videos delete function. See “Delete” on
page 40.
Preset Music
See “Preset Music” on page 53.
Playing Music From Your iPod
Apple® uses a proprietary naming scheme and because of this the media center is
unable to display the original names for the folders and files as they are in your iPod.
The media center instead reassigns new names for the folders and files, but only
while in use with the media center. The original file information is preserved in your
iPod. You can view the original file information when you play a file where the screen
will display the metadata.
Note: The media center does not support playback of protected premium content such as movies or
music from the iTunes
To use your iPod with the media center, simply plug your iPod in to the USB port and
navigate through the interface menu.
Note: The media center only supports USB mass storage mode. iPod Touch is not a USB mass
storage device and is therefore not supported.
®
Store, Cinema Now, Movielink®, Amazon Unbox™, and Vongo®.
®
PLAYING MUSIC – 57
Page 63

8
WD TV Live Hub Media Center
User Manual
Viewing Photos
You can view your digital photos both individually and in slideshow mode on your TV
using the media center.
Supported Image File Formats
GIF (Animated GIFs are not supported)
BMP (non-compressed)
JPEG (grayscale, RGB, YCbCy) (does not support CMYK or YCCK)
TIF/TIFF (RGB) (does not support CMYK, YMC, YMCK, or KCMY)
PNG (Non-alpha channel only)
Photo Display
1. Navigate to the Home | Photos menu, then press OK.
2. The screen displays available music files and folders in the media center’s local
drive by default. The display will either be in grid view (default) or list view,
depending on your Browser Display setting (see “Photo Settings” on page 185
for more information on Browser Display settings).
3. If Media Library is enabled, you can choose to navigate using sorting
(Alphabetical, Date, Ratings, Recently Viewed) and filter options (All Pictures,
VIEWING PHOTOS – 58
Page 64

WD TV Live Hub Media Center
User Manual
Date, Folders, Recent). See “Supported Categories for Media Library
Compilation” on page 30 for details.
4. Locate the picture file you want to view.
To open a single picture file for viewing, select the file, and then press OK.
To view the next picture file in the photo folder, press (next).
To view the previous picture file in the photo folder, press (previous).
To find picture files on a network share or media center, follow the instructions
in “Accessing Media Content from the Network” on page 76.
You can also view a slideshow using all picture files in a photo folder. See “Photo
Slideshow” on page 65 for instructions.
Sort & Filter Photos
You can sort and filter photos based on your preferences using the sort & filter
option.
Filter
1. Press or navigate to the sort and filter content icon , and press OK.
2. Press , then / to select Filter by All, Date, Folders, and Favorites. Press OK
to display music by the criteria selected.
Note: If you have your media files organized by folder, it may be easier and quicker to find your files by
using the Filter option to only show folders.
3. With the green check mark selected, press OK again.
VIEWING PHOTOS – 59
Page 65

WD TV Live Hub Media Center
User Manual
Sorting
1. Press or navigate to the sort and filter content icon , and press OK.
2. Press , then / to select Sorting by Date, Alphabetically, Ratings, or by
Recently Viewed. Press OK to display photos by the criteria selected in either
ascending (arrow up) or descending (arrow down) order.
3. Press . With the green check mark selected, press OK again.
Digital Camera Support
You can attach your digital camera to the media center via a USB port and view the
supported image files stored in the camera’s memory card.
To view images from a digital camera:
1. Attach your digital camera to the media center via the USB port.
2. Press OK to close the message (the media center sees the camera’s memory
card as a read-only device).
3. Navigate to the Home | Photos menu.
4. The digital camera is considered a USB device. Use the navigation buttons to
select, then press OK.
The screen displays thumbnails of available picture files and photo folders. Only
image files supported by the media center are displayed.
VIEWING PHOTOS – 60
Page 66

WD TV Live Hub Media Center
User Manual
Photos Menu Options
In the main photo screen, press Options. The Photos menu options display. Press
Back when complete to return to the main menu.
Add to Queue
The Photos add to queue function is the same as the Videos add to queue function.
See “Add to Queue” on page 39.
Favorite
The Photos favorite function is the same as the Videos favorite function. See
“Favorite” on page 39.
Rate
The Photos rate function is the same as the Videos rate function. See “Rate” on
page 39.
Move & Copy
The Photos move and copy functions are the same as the Videos move and copy
functions. See “Move & Copy” on page 40.
Delete
The Photos delete function is the same as the Videos delete function. See “Delete”
on page 40.
Upload to Facebook
The Photos upload to Facebook function is the same as the Videos upload to
Facebook function. See “Upload to Facebook” on page 40.
Upload to Picasa
You can upload a photo to Picasa by selecting this option.
1. Press
/ and select Upload to Picasa from the list of options.
2. If prompted to sign in, select Yes , then press OK, and enter your Picasa
username and password using the on-screen keyboard.
VIEWING PHOTOS – 61
Page 67

WD TV Live Hub Media Center
User Manual
3. The screen below displays. Press OK.
Set as Background
You can set any photo as the system background to replace the default grass field
and sunny sky photo or other photo you have previously selected.
1. Find and select the photo you want to use for the background in the Photos
menu, then press OK.
2. Press Options.
3. Select Set as Background, then press .
4. Select one of the photo scaling options (Keep as Original, Fit to Screen, or
Distort to Screen), then press OK.
Select Multiple
The Photos edit multiple function is the same as the Videos select multiple function.
See “Select Multiple” on page 41.
VIEWING PHOTOS – 62
Page 68

WD TV Live Hub Media Center
User Manual
Photo Display Options
To display the photo options while viewing a photo, press Options.
To return to the photo you were viewing, press Back or Options again.
View Info
Select this option to view info about the photo including source, file size, dimensions,
image number, date and time photo was taken, exposure mode, and flash info.
Play Mode
Use the play mode option to set repeat and shuffle options.
1. During photo playback, press Options.
2. Select Play Mode, then press OK repeatedly until the repeat icon you want is
displayed. Options include:
Repeat All – All the photo files in the current photo folder are played in
sequence and repeatedly until you press STOP or Back.
Shuffle – All the photo files in the current photo folder are shuffled
repeatedly until you press STOP or Back.
Repeat All and Shuffle – All the photo files in the current photo folder
are played repeatedly in sequence and shuffled until you press STOP or
Back.
Rotate Left & Right
1. During photo viewing, press Options.
2. Select Rotate Left or Rotate Right, then press OK.
3. Press Options and select Rotate Left or Rotate Right again as needed until
the rotation you want is set for the photo.
Selecting Photo Zoom and Pan Options
See “Selecting Video Zoom and Pan Options” on page 45.
Upload to Facebook
See “Upload to Facebook” on page 40.
Upload to Picasa
See “Upload to Picasa” on page 61.
VIEWING PHOTOS – 63
Page 69

Set As Background
See “Set as Background” on page 62.
Rate
See “Rate” on page 39.
Favorite
See “Favorite” on page 39.
Add to Queue
See “Add to Queue” on page 39.
Delete
See “Delete” on page 40.
Displaying Photo Thumbnails
WD TV Live Hub Media Center
User Manual
While viewing a photo or slideshow, press to display thumbnails of all your photos.
Use the navigation buttons to select another photo to view, then press OK.
VIEWING PHOTOS – 64
Page 70

WD TV Live Hub Media Center
User Manual
Displaying Photo Information
Use this option to display the Picture Information Panel on the bottom of the screen.
This panel shows the following information about the current picture:
Image filename
Source
Image file size and resolution
Image’s sequence number and the total number of image files in the current
photo folder
To view the photo information panel:
During photo viewing, press OK. Press Back to hide photo information.
Photo Slideshow
The media center allows you to create a slideshow using the contents of a photo
folder.
To start a slideshow:
1. Locate the photo folder containing the image files you want in the slideshow.
(See “Photo Display” on page 58.)
2. Select the photo folder, then press PAUS E/P LAY to start the slideshow.
To listen to background music with a slideshow:
1. Navigate to the music folder containing the audio file/playlist you want to
accompany the slideshow. (See “Music Playback” on page 50.)
2. Select the audio file/playlist, and then press PLAY.
If you selected a single audio file, you may want to enable it to play repeatedly
so it doesn’t stop before the slideshow is done.
If you selected a music playlist, you can choose to enable the repeat or shuffle
mode.
3. Press HOME, and then start the slideshow (as described above).
VIEWING PHOTOS – 65
Page 71

WD TV Live Hub Media Center
Slideshow Playback Controls
Use these buttons on the remote control to control slideshow playback:
Button Function
User Manual
STOP
PAUSE /PL AY
NEXT
PREV
Discontinue the slideshow
Pause or resume the slideshow
Display the next picture file in the slideshow
Play the previous picture file in the slideshow
Repeating and/or Shuffling a Slideshow
Access Setup > Photo settings to repeat and/or shuffle a slideshow. See “Slideshow
Sequence” on page 185.
VIEWING PHOTOS – 66
Page 72

9
WD TV Live Hub Media Center
User Manual
Files
You can view and manage all of your media files in one place using the Files menu.
Files Display
1. Navigate to the Home | Files menu, then press OK.
2. The screen displays all available media files and folders in the media center’s
local drive by default. The display is in list view.
3. Locate a file you want to play.
To play a single file, select the file from the list or by navigating through the
folder structure, then press OK.
Follow the instructions under “Watching Video” on page 36, “Playing Music” on
page 50, or “Viewing Photos” on page 58.
To find files on a network share or media server, follow the instructions in
“Accessing Media Content from the Network” on page 76.
Sorting Files
The Files sorting function is the same as the Videos sorting function. See
“Sorting” on page 38.
FILES – 67
Page 73

WD TV Live Hub Media Center
User Manual
Files Options
To manage files (move, copy, delete, rename, and select multiple), do the following:
With an individual file or folder selected, press Options.
Move & Copy
The Files move and copy functions are the same as the Videos move and copy
functions. See “Move & Copy” on page 40.
Delete
The Files delete function is the same as the Videos delete function. See “Delete” on
page 40.
Rename
To rename a folder or file, select Rename then enter in the new name using the
on-screen keyboard.
Select Multiple
The Files edit multiple function is the same as the Videos select multiple function.
See “Select Multiple” on page 41.
FILES – 68
Page 74

10
WD TV Live Hub Media Center
User Manual
Network Setup
The media center can be connected to the local area network using a wired or
wireless network connection for access to streaming video and online and offline
media content.
Ethernet Network (Wired) Setup
1. Plug an Ethernet cable into the Ethernet connector on the media center.
2. Plug the opposite end of the Ethernet cable directly into a LAN port on a router or
network switch.
3. After connecting the media player to your TV and turning it on, the network setup
wizard starts up. Press / to select your language, then press OK.
NETWORK SETUP – 69
Page 75

WD TV Live Hub Media Center
User Manual
4. The wizard begins automatic network connection. When finished, the following
screen displays. Press OK.
5. To change or manually configure your wired network setup (recommended for
advanced users only), see “Network Setup” on page 187.
Wireless Network Setup
Important: Streaming over Wi-Fi may be unstable due to various reasons
such as a weak network connection, signal strength, variable speeds, or
other environmental factors. You can create instant high-speed, wired
network connections and gain fast, reliable access to the Internet without
running wires all over your house using WD Livewire powerline AV network
kit (sold separately). For more information, visit http://products.wdc.com/
WDLivewire.
1. Connect a USB wireless adapter (sold separately) to the USB port on your media
center.
Note: For a list of tested, compatible wireless USB adapters, see Article #5688 in our knowledge base
at http://support.wdc.com.
NETWORK SETUP – 70
Page 76

WD TV Live Hub Media Center
User Manual
2. After connecting the media player to your TV and turning it on, the network setup
wizard starts up. Press / to select your language, then press OK.
Wireless Setup Options
You have four options for setting up your wireless network:
Automatic – Select an available access point found by the media player.
Manually enter the wireless network name – Use the on-screen keyboard to
input the network name (SSID) manually (when SSID not set to broadcast).
Wi-Fi Proctected Setup (WPS) – Enter a PIN or push the WPS button on the
router (if available).
Windows Pairing Code – This option is only available via the Setup menu. See
“Get Windows Pairing Code (Windows 7)” on page 189
Note: The recommended setting on Wireless N routers is 802.11n-only with a channel width of 20/40
MHz. If you are using a wireless-N access point (AP) and it has been set to operate in 802.11n mode
with a security setting of anything other than WPA2-PSK+AES or None, then media player will operate
at lower 802.11g rates. Disabling wireless security is not recommended.
Auto Search or Manually Enter Wireless Network Name
1. Press / to select your language in the setup wizard Welcome screen, then
press OK.
2. Auto Search: Press
OK. Proceed to step 5.
/ to select your wireless network from the list, and press
Manual: Depending on your wireless network setup, you may want to manually
type in the name of your network. In this case, navigate to the keyboard icon on
the right side of the screen, press OK, and proceed to the next step.
NETWORK SETUP – 71
Page 77

WD TV Live Hub Media Center
User Manual
3. Use the navigation buttons to type in the SSID for the access point you
want to connect to, select Submit, then press OK.
4. Press / to select the wireless network encryption type , then press OK.
5. If necessary, use the navigation buttons to type in the passcode for the
access point, select Submit, then press OK.
6. Once the network is successfully set up, press OK to display the Home screen.
NETWORK SETUP – 72
Page 78

WD TV Live Hub Media Center
User Manual
Wi-Fi Protected Setup (WPS)
1. Press / to select your language in the setup wizard Welcome screen, then
press OK.
2. Navigate to the WPS icon on the right side of the screen, and press OK.
3. Press
/ to select the method you want to use, then press OK.
WPS Button
1. Press the WPS button on your wireless router.
2. Press OK on the remote.
PIN Code
1. Enter the WPS PIN code shown on-screen in your wireless router’s web
configuration page.
NETWORK SETUP – 73
Page 79

WD TV Live Hub Media Center
2. Press OK on the remote.
After performing one of the wireless setup functions above, press OK.
After establishing a network connection, you can:
Use the Internet services integrated into your media player to access
streaming media. See “Internet Services” on page 93 for more information on
these services.
Transfer files between the media center and your computer (PC or Mac).
Procedures for copying and moving files between the media center and your
computer is described in “Step 3 - Loading Content On Your Media Center”
on page 18.
Access your media files on the network. See “Network Services” on page 76.
User Manual
Checking the Network Connection
If you experience network problems, check the network connection to determine the
cause of the problem.
To check the network connection:
1. Press Setup or navigate to the Home | Setup menu bar.
2. Press
3. Press / to select Check connection, then press OK.
/ to select Network Settings, then press OK.
The unit will automatically check the network connection. Once the check is
completed, the results display. A green check mark on these items indicate that
NETWORK SETUP – 74
Page 80

WD TV Live Hub Media Center
User Manual
there is no problem with your network settings. If a problem is indicated, check
your router settings and manual for a solution.
A red cross mark indicates a problem with the network settings. It can either be
the IP address or the DNS server address. If the problem persists, check with
your Internet service provider.
NETWORK SETUP – 75
Page 81

11
WD TV Live Hub Media Center
User Manual
Network Services
Accessing Media Content from the Network
Once the media player has an active network connection, you can access media
content from a Network Attached Storage (NAS) device or shared computer located
on the same network as your media player. You can also access content from USB
storage connected to the media player. The benefits and applications of each
content source type are described below.
To access media content from a network share, media server, USB storage, or
online account:
1. Navigate to the Home screen, and select the menu for media content you wish to
access. It can be Music, Videos, or Photos. Press OK.
2. Press OK to select a new content source or press or / to select Select
Content Source , then press OK.
3. Press / to select the network resource where the media content you want to
access is located, then press OK.
Note: My Media Library does not appear if the media library is turned off (see “Media Library” on page
195).
Content Source Best for accessing...
My Media Library Internal storage, all available network shares, and attached USB storage (slow
scan—depending on the number of files and connection speed, the scanning
time required to compile the media library may be increased).
Local Storage Internal storage and storage devices attached to USB ports 1 and/or 2.
Media Server Network-attached media server devices for ease of use (optimal for DLNA
®
certified server devices such as WD’s My Book
Network Share
Windows Shares Windows network shares, most network attached storage drives, legacy Mac
OS before Lion, and other devices that uses SMB/CIFS protocol.
Linux Shares Linux (NFS) network shares (recommended for advanced power users).
Online Service Photos and videos posted in your Facebook and Picasa online accounts.
™
Live
).
NETWORK SERVICES – 76
Page 82

WD TV Live Hub Media Center
User Manual
My Media Library
The benefit of selecting this option is that it shows all the aggregated content on
your network attached and USB storage together in one view. However, it does take
longer to scan all the storage content compared to selecting a more specific option
for content retrieval.
Internal storage is automatically included in the Media Library. To add additional
source content to My Media Library, please do one of the following:
Attach USB storage to one of the USB ports on the media center and it is
automatically added to media library.
Connect to a Windows or Linux Share (see “Network Share” on page 78). While
browsing the content inside, press Option to add a share folder to the Media
Library.
Use the Media Library Manager for Network Share (see “Media Library Manager
for Network Share” on page 196), and select Add network share to media
library to manually add individual share folders to the media library. A maximum
of 10 shares can be added.
Local Storage
Select Local Storage, then Internal Storage to access media content on the
media center’s internal hard drive.
Select Local Storage, then USB1 or USB2 to access media content on one or
more USB storage devices connected to the media center’s USB 1 or USB 2 ports.
After selecting USB 1 or USB 2, the media player scans the drive to build the media
library by default (if enabled).
NETWORK SERVICES – 77
Page 83

WD TV Live Hub Media Center
User Manual
Media Server
This menu displays network attached UPnP media servers connected to your
network and usage is optimized with DLNA compliant devices such as WD My Book
Live personal cloud storage and other WD TV Live Hub media centers.
The benefit of using a media server is that it aggregates the content together from
the device that is hosting it. The media server hosts a list of supported file formats
with metadata information that allows a client device like the media player to easily
browse and play back the content.
However, using a media server can restrict supported file types and you may not be
able to see all the files stored in the media server. When using a Network Share,
every file is presented to the media player and it does the content filtering based on
what it can support.
Follow the steps below under “Accessing a Shared Folder,” selecting the name of
your media server and referencing your media server documentation for password
setup and administration if necessary.
Network Share
The media player supports Windows (SMB/CIFS), and Linux (NFS) network shares.
Windows Shares
Windows Shares uses Samba (also known as SMB/CIFS), a more common protocol
among devices such as PC, NAS, and Mac (before Lion). If you want to simply
discover and/or share a folder on the network to be accessed by the media player,
Samba is a common method, especially for Windows.
NETWORK SERVICES – 78
Page 84

WD TV Live Hub Media Center
User Manual
Windows Shares display shared computers and network attached storage devices
(such as WD’s My Book Live personal cloud storage NAS drive) connected to your
network via the Samba protocol.
Linux Shares
Linux Shares uses NFS, which is popular with power users and Linux users because
of the increased speed and performance it can provide. NFS is better suited to Linux
since using NFS with Windows requires installation of third party applications.
Follow the steps below under “Accessing a Shared Folder,” selecting the name of
your NAS device or computer and referencing your NAS device or operating system
documentation for password setup and administration if nessesary.
Accessing a Shared Folder
To create a shared folder, follow the instructions under “Share a Folder on Your
Computer” on page 80.
To access a shared folder under Network Share:
1. Select the name of your computer and press OK twice.
2. If necessary, enter your user name and password to access your computer, or
accept the default login. For further information regarding password setup and
administration, refer to your operating system documentation.
3. Press to select OK, then press OK. Supported content for the selected media
type displays.
4. Select the content you wish to access, then press OK to start media playback.
NETWORK SERVICES – 79
Page 85

WD TV Live Hub Media Center
User Manual
Accessing Network Attached Storage
Follow the steps above under “Accessing a Shared Folder,” selecting the name of
your NAS device and referencing your NAS device documentation for password
setup and administration.
Online Service
This menu allows you to connect to media content stored in your Facebook and
Picasa online accounts. Select Facebook or Picasa and enter your user name and
password to access your media content.
Logging in to a Network Resource or Online Account
When accessing a network resource, you need to enter in the user name and
password for the device or account using the on-screen keyboard. In some cases, a
default anonymous login displays if no password is set for the device. When this
happens, accept the default login, select , then press OK.
Select Remember Me and press OK to have the media player remember the user
name and password for the resource.
Share a Folder on Your Computer
You can view and play back digital media content stored on your computer by
sharing one or more folders containing the media.
NETWORK SERVICES – 80
Page 86

WD TV Live Hub Media Center
User Manual
Make sure the media player and your computer are both attached to the network,
then follow the instructions below for your operating system (Windows 7/Vista/XP or
Mac).
Important: Be sure to update your operating system to the latest update or
service pack. Depending on your network's configuration you may need to
disable or adjust your Firewall settings to view your shared folder on your
network. Contact your Firewall manufacturer for assistance.
When finished following the instructions for your operating system, go to
“Accessing a Shared Folder” on page 79.
Windows 7
Change Settings to Allow Folder Sharing
The first thing you need to do to allow folders to be shared with the device is to
determine how your network is configured. Follow the instructions below to
determine what kind of network you have.
1. From the Control Panel, click Network and Internet.
2. Click Network and Sharing Center.
3. Look under View your active networks to determine if your network is Home,
Work, Public, or Domain.W
4. If you have a Work network, proceed to step 6. If you have a Public network,
click the Public network link.
NETWORK SERVICES – 81
Page 87

WD TV Live Hub Media Center
User Manual
5. Click Work network.
6. Click the Choose homegroup and sharing options link.
7. Click the Change advanced sharing settings... link.
8. Ensure that the following options are selected: Turn on network discovery,
Turn on file and printer sharing, Media streaming is off, and Allow
Windows to manage homegroup connections (recommended).
Note: WD does not support streaming from a domain server, or a computer attached to a domain, to
the device. Please contact your domain administrator or Microsoft
®
Support for assistance.
Share a Folder
Follow the instructions below to share a folder in Windows 7.
1. Navigate to the folder you want to share. Once found, right-click on the folder
and select Properties.
2. Click the Sharing tab.
3. Click the Advanced Sharing button.
4. Click the Share This Folder box.
NETWORK SERVICES – 82
Page 88

WD TV Live Hub Media Center
User Manual
5. Enter the name you would like this folder to appear on the network as in the
Share name box.
6. Click the Permissions box.
7. Select the users you would like to give access to and the permissions you would
like to assign to that user, then click OK.
8. Click OK to close the Advanced Sharing window.
9. Finally, click on OK one more time to close the folder properties window and
save your changes.
NETWORK SERVICES – 83
Page 89

WD TV Live Hub Media Center
User Manual
Windows Vista
Change Settings to Allow Folder Sharing
Follow the instructions below to configure your computer for folder sharing in
Windows Vista.
1. Open the Network And Sharing Center from the Control Panel.
2. Next to the name of the network look to see if it is a Private or Public network.
3. If your network is Private skip to step 5 below. Otherwise, click the Customize
link.
4. Click Private, then click OK.
5. If it is set to Off expand the File Sharing field and change it to On.
6. If you want to share the pre-designated Public folders in Windows, expand the
Public folder sharing field under Sharing and Discovery.
7. Select your choice of the two "Turn on sharing..." options.
8. Click Apply.
NETWORK SERVICES – 84
Page 90

WD TV Live Hub Media Center
User Manual
Share a Folder
Follow the instructions below to share a folder in Windows Vista.
1. Navigate to the folder you want to share. Once found, right-click on the folder
and click Share.
2. If your system requires a login to access a shared folder, select a User account to
assign to the share, then click Share. Otherwise, simply click the Share button.
3. Under Sharing and Discovery expand the Public folder sharing field.
4. Depending on your system speed you may or may not see a progress bar while
the permissions on the folder are updated. Click Done.
NETWORK SERVICES – 85
Page 91

WD TV Live Hub Media Center
User Manual
Windows XP
Follow the instructions below to share a folder in Windows XP.
1. Right-click on the folder you want to share and select Sharing and Security.
2. Click Share this folder.
3. Choose a name you want the folder to appear as on your network and enter it in
the Share Name field.
Note: You can also set a maximum number of users able to access your drive at one time. To do this,
click "Allow this number of users: " and set the number in the field to the right.
4. Click OK.
Mac
Follow the instructions below to share a folder within Mac OS 10.5 or 10.6.
1. Open the Apple menu from the upper left corner of your screen and click
System Preferences.
2. Click the Sharing button under the Internet & Wireless group.
NETWORK SERVICES – 86
Page 92

WD TV Live Hub Media Center
User Manual
3. Choose a name for your computer on the network and type it in the Computer
Name field.
4. Click the box next to File Sharing to turn on the file sharing service. Then click
on the + sign button below the Shared Folders box.
5. To share additional folders beyond the default Public folder, select the folder you
would like to share and click the Add button.
6. Click on the red x in the upper left corner to close the window.
NETWORK SERVICES – 87
Page 93

WD TV Live Hub Media Center
User Manual
Using the Web UI
The media center provides a Web-based user interface (UI) that can be used to
control certain functions. You must use a network-connected computer or smart
phone to use the Web UI.
Important: Your media center must be set up on the network (see “Network
Setup” on page 69 for further information) to use the Web UI.
Launching the Web UI
1. Open a Web brower and type in your media’s center’s IP address in the address
field. Press ENTER on your computer keyboard.
Note: To find your media center’s IP address, press Setup on the remote controller and navigate to
Network Settings. Select Network Setup to see the media center’s IP address.
2. The Web UI launch page displays. Enter the default password (“admin”) in the
Password field.
3. Select your preferred language from the Language list.
4. Click I accept END USER LICENSE AGREEMENT. You can also click Keep
me signed in (optional). Click Login.
5. The Web UI menu options display.
NETWORK SERVICES – 88
Page 94

WD TV Live Hub Media Center
User Manual
System
Click System in the Web UI home page to manage the system status of your media
center and view general network information. You can change the password, set
system preferences, and choose date and time settings using these options.
Remote
Click Remote in the Web UI home page to control the media center using your
computer. Click the buttons on the virtual remote controller to control your media
center (see “Using the Remote Control” on page 22 for further information).
Click the Open in separate window link to open the virtual
remote controller in a new browser screen. You can copy the
URL from this browser screen and enter it in a browser on your
smartphone. Then, you can use your smartphone as a virtual
remote controller by touching the buttons on the screen.
Enter on-screen keyboard commands in the Submit field
using your computer or smartphone keyboard, then click or
press Submit when finished.
NETWORK SERVICES – 89
Page 95

WD TV Live Hub Media Center
User Manual
Media
Click Media to enable the Twonky service, launch the Twonky media browser, and
enable the iTunes server to access media on iTunes.
TwonkyMedia
™
Click Enabled, then Launch Twonky to launch the TwonkyMedia server media
browser in a separate browser window. The TwonkyMedia home screen displays.
Navigate through the Music, Photos, and Videos subcategories to find a file to play
back on your computer. Launching a music or video file plays the file back on your
computer’s default media player. Clicking on a photo thumbnail enlarges the photo
on your screen.
During navigation, click to return to the home page shown above, and to go
back to the previous screen.
NETWORK SERVICES – 90
Page 96

WD TV Live Hub Media Center
User Manual
Click to upload a file from your computer to the media center. Click Browse to
locate a file, then send to upload it to the media center.
Click to open the TwonkyMedia server status screen. Here, you can restart the
server, view server status, perform basic and advanced setup, and access support
resources.
Online
Click Online to access sign-up links and information for the listed Internet services
supported by the media center (supported services vary by region and country).
NETWORK SERVICES – 91
Page 97

WD TV Live Hub Media Center
User Manual
RSS
Click RSS to view your RSS subscriptions and category folders. Here, you can add
a new subscription or a new folder to categorize your subscriptions.
Support
Click Support to access Express Customer Support (includes diagnostic test) and
Support Documentation including product documentation, FAQ’s, and a WD TV user
forum.
Status Bar
The status bar at the bottom of the Web UI displays media center status, hard drive
capacity usage, and a graphical representation of the percentage of music, photos,
and video stored on the media center.
Logout
Click the Logout button in the main menu to log out of the Web UI.
NETWORK SERVICES – 92
Page 98

12
WD TV Live Hub Media Center
User Manual
Internet Services
Important: A broadband Internet connection (e.g., DSL or cable) is required
to use Internet services. Availability varies by country. These services may be
changed, terminated, or interrupted at any time.
With WD TV Live Hub, you can stream the best Internet entertainment to your HDTV.
Watch hit movies, catch up on TV shows, stay connected to your social network,
and enjoy on-demand access to your favorite music from your TV. To explore the
complete lineup of online entertainment, go to: http://products.wdc.com/
onlineservices/wdtvlivehub.
After connecting to a network, you can use the media player to access media
content from the following Internet services and more:
AccuWeather.com® – Get local and international forecasts, climate trends, and
the latest news from the world’s weather authority.
Deezer™– A personalized on-demand music service to listen to seven million
tracks anytime, anywhere and one of the most popular Internet and mobile music
offerings in Europe.
Facebook® – Share your status, photos, videos, and your favorite links on
Facebook. Find out the latest news from your social network or the world and so
much more. Access it all on your big screen TV.
Flickr™ – Connect to Flickr using the on-screen menus. View the photos on your
Flickr account and enjoy them on your TV.
Flixster™ – Watch the latest theatrical movie trailers and get critic reviews from
Rotten Tomatoes. Preview movies that are opening this week and see what’s hot
at the box office. See what’s new on DVD and Blu-ray and the top rentals.
Live365®– Listen to thousands of commercial-free Internet radio stations. Easily
browse through popular genres or discover treasures in some of the lesstraveled styles.
MLB.TV – Watch every out-of-market game LIVE or on demand in HD quality.
Almost 100 games are streamed LIVE each week. Choose home or away feeds,
and use quick navigation to run scoring plays or at bats. PLUS, watch over 150
Spring Training Games with no blackout restrictions.*
* MLB.TV Premium subscription required.
Netflix® – Enjoy popular movies, classics, and TV episodes instantly. Access
your Netflix unlimited membership and instantly watch TV episodes and movies
on your big screen.*
*Netflix is available in certain countries. Unlimited membership required. More information at
www.netflix.com.
INTERNET SERVICES – 93
Page 99

WD TV Live Hub Media Center
Pandora® – Free, personalized Internet radio playing only the music you love.
Enter your favorite songs or artists, and enjoy stations created just for you. Rate
songs as they play, because Pandora caters to your tastes and adapts stations
to your feedback on the spot.*
*Pandora available in US only.
Picasa – View, share and enjoy your photographs right from your television.
SHOUTcast Radio – The ultimate directory of online radio stations featuring
over 45,000 music, talk, sports, and community radio stations from around the
world.
Spotify – Enjoy on-demand access to over 15 million tracks and albums. Any
artist, any album, any genre - available instantly on your media player. Spotify is
available in: USA, UK, Sweden, Finland, Norway, France, The Netherlands,
Spain, Austria, Belgium, Switzerland and Denmark.*
*Spotify Premium account required.
Tun eI n – The world’s largest Internet radio guide with access to over 30,000 free
radio stations searchable by location, genre, or format.
YouTube™ – Stream YouTube and watch your favorite videos from the world’s #1
video sharing website on your television.
User Manual
The above services are fully integrated with their web-based counterparts when
accessed via the media center. If you are a registered user of any of these services,
everything you create, rate, or bookmark when using the media center shows up on
your account the next time you sign in to that service from your computer or mobile
computing device.
To access Internet Media:
1. Navigate to the Home | Services menu bar and press OK.
INTERNET SERVICES – 94
Page 100

WD TV Live Hub Media Center
User Manual
2. The list of Internet services display by category. Select a category (choose from
Featured, My Favorites, All, Movies & TV, Web Video, Music, Sports,
Photos, Social, and News and Weather), then press OK.
3. Press / and/or Next Page/Prev Page to make a selection. A brief
description of the service and designer displays when a service is selected.
When finished making your selection, press OK.
Adding a Service to Favorites
You can add a Service to your Favorites so that it’s quickly available via the
dashboard when you are in the Home screen or other screens (when you press
or navigate to in certain screens then press OK). It will also display in the
Services page under the My Favorites category.
1. In the Services screen, press
press Options.
2. Press OK to list the service in the dashboard under Favorites.
/ to select a service you want to favorite, then
INTERNET SERVICES – 95
 Loading...