

Page 1
WD SATA Hard Drive
Quick Instal
l
West er n D
igital
Ha
r
d D
rive
H
ar
d
w
are in
stall
a
tion
f
or you
r
Wes
t
e
r
n
D
ig
ita
l
ha
rd
dr
i
ve
B
e
fore
G
ettin
g
Sta
r
T
h
is
d
o
c
u
m
e
n
t w
a
s
d
e
si
g
ne
d
t
o
a
id
i
n
t
h
e
q
u
i
c
k
in
s
ta
l
y
o
u
r
We
s
t
e
rn
D
ig
i
ta
l
ha
r
d
d
r
i
v
e
.
I
f
y
o
u
e
x
pe
r
ie
n
c
e
p
r
o
b
l
e
m
f
o
ll
o
w
i
ng
t
h
e
s
e
p
r
o
c
e
d
u
r
e
s
o
r
n
e
e
d
f
u
r
t
he
r
i
n
f
o
rm
a
tio
n
r
e
g
a
r
d
in
g
y
o
ur
d
r
i
v
e
,
d
o
w
n
lo
a
d
t
he
f
u
ll
v
e
rs
i
o
n
W
e
st
er
n
D
i
gi
t
a
l
H
a
r
d
D
r
i
v
e
I
n
s
ta
ll
a
tio
n
G
u
i
d
e
f
r
o
m
o
u
r
W
e
b
s
it
e
a
t
w
w
w
.
w
e
s
t
e
rn
d
ig
it
a
l
.
c
o
m
.
O
r
yo
u
m
a
y
c
o
n
ta
ct
W
e
s
t
e
rn
D
i
gi
t
a
l
T
ec
h
n
ic
a
l
S
u
p
p
o
r
t
(s
e
e
t
h
e
b
a
c
k
p
a
ge
f
o
r
c
o
n
ta
ct
i
n
f
o
r
m
a
ti
o
n)
.
N
O
T
E
:
I
n
s
t
al
la
t
i
o
n
i
n
s
t
r
u
c
t
io
ns
f
o
r
t
h
e
M
a
c
in
t
o
s
h
s
y
s
t
e
m
a
r
e
lo
c
a
te
d
o
n
th
e
t
o
p
p
o
r
t
io
n
o
f
th
e
b
a
c
k
p
a
g
e
.
K
it
Con
t
en
t
s
M
o
u
nt
in
g
S
c
r
ew
s
a
n
d
a
J
u
m
p
er
S
h
u
n
t
Da
ta
Li
f
eg
u
ard
T
oo
ls
Di
ske
t
t
e
Ul
tra
I
n
s
H
ar
d
d
ri
v
es
la
r
g
e
r th
a
n
13
7 G
B
i
n
c
lu
de
th
e
f
o
l
S
/
M
:
W
M
X
X
X
X
X
X
X
X
M
D
L
:
W
D
X
X
X
X
X
X
X
D
C
M
:
X
X
X
X
X
X
W
e
ste
rn
D
i
gita
l
H
a
r
d
D
ri
v
e
(10-pin
jump
er bloc
k)
U
ltra
A
T
A
C
on
tr
ol
le
r
C
a
r
d
)
Quick Install Guide
Before Getting Started
This poster is designed to aid in the quick installation of your
WD SATA hard drive. If you experience problems following
these procedures or need further information regarding your
drive, visit support.wdc.com to search our online knowledge
base for frequently asked questions and other common
troubleshooting tips and to download the full version WD SATA
Hard Drive Installation Guide.
Kit Contents
Moun ting Screws
WD SATA Hard Drive
WD SATA Cable
with SecureConnect
(for use only with WD S ATA hard d rives
™
Necessary materials and tools:
" Computer system manual
" Operating system manual
" Operating system installation CD
" Phillips and flat-blade screwdrivers (if applicable)
1. Before performing any hardware installation, back up
your existing data.
2. Before handling the drive or system components, discharge
static electricity by touching the metal chassis of your
computer case or using an antistatic wrist strap.
3. Locate the WD serial number, model number, and date code
on the label on top of your drive, and record them below.
Serial Number:
Model Number: Date:
Unpacking and Handling Procedures
WD hard drives are precision instruments and must be handled with
care during unpacking and installation. Hard drives can be damaged
by rough handling, shock and vibration, or electrostatic discharge
(ESD). Be aware of the following precautions:
! Do not unpack your hard drive until you are ready to install it.
Your hard drive is packaged in an anti-static bag.
! Handle the hard drive only by the sides. Avoid touching circuit
board components on the bottom of the drive.
! To avoid ESD problems, ground yourself by touching the metal
chassis of the computer or by wearing a grounding strap before
handling the hard drive. Articles of clothing generate static
electricity. Do not allow clothing to come in direct contact with
the hard drive or circuit board components.
! Do not stack hard drives or stand your WD drive on its edge.
! Do not drop, shake, or knock down the hard drive.
! Save the original packaging materials and antistatic bag in case
you need to return your hard drive. Your warranty will be void if
your returned drive is shipped in anything other than the original
packaging or WD-approved materials.
Docume ntatio n
Data Lifegua rd Tools CD
(for WD 7200 RPM S ATA hard driv e kits)
™
Operating Systems
WARNING
Using an operating system not listed below
may result in data loss.
The following operating systems are supported:
! Windows
! Windows 2000
®
XP
System Requirements
! SATA interface connector on motherboard, or
SATA controller card (sold separately) installed
in an available 32-bit PCI expansion slot (2.1- or
2.2-compliant).
! 3.5-inch internal drive bay
Online Product Registration
Take advantage of WD offerings by registering your drive at
https://www.westerndigital.com/en/products/registration.
4. Power down the computer and unplug the power cord.
5. Remove the system cover (refer to your system manual for
instructions).
Technical Support
If you need additional information or help during installation or
normal use of this product, visit our product support Web site
at support.wdc.com and choose from these topics:
" Warranty Services — Obtain warranty information,
warranty status, extended warranty, product replacement,
RMA status, and shipping and packaging information.
" Downloads Library — Download installation software
and drivers.
" Technical Information — Access product specifications,
technical tips, and the online forum.
" Knowledge Base — Explore our expert knowledge base
and frequently asked questions (FAQs).
" Service Partners — Find available WD-approved service
and support in your region.
" Contact Support — Contact a support representative by
phone or e-mail.
" Rebates — Check the status of rebate submissions.
" Localized Support — Display service and support
information in various languages.
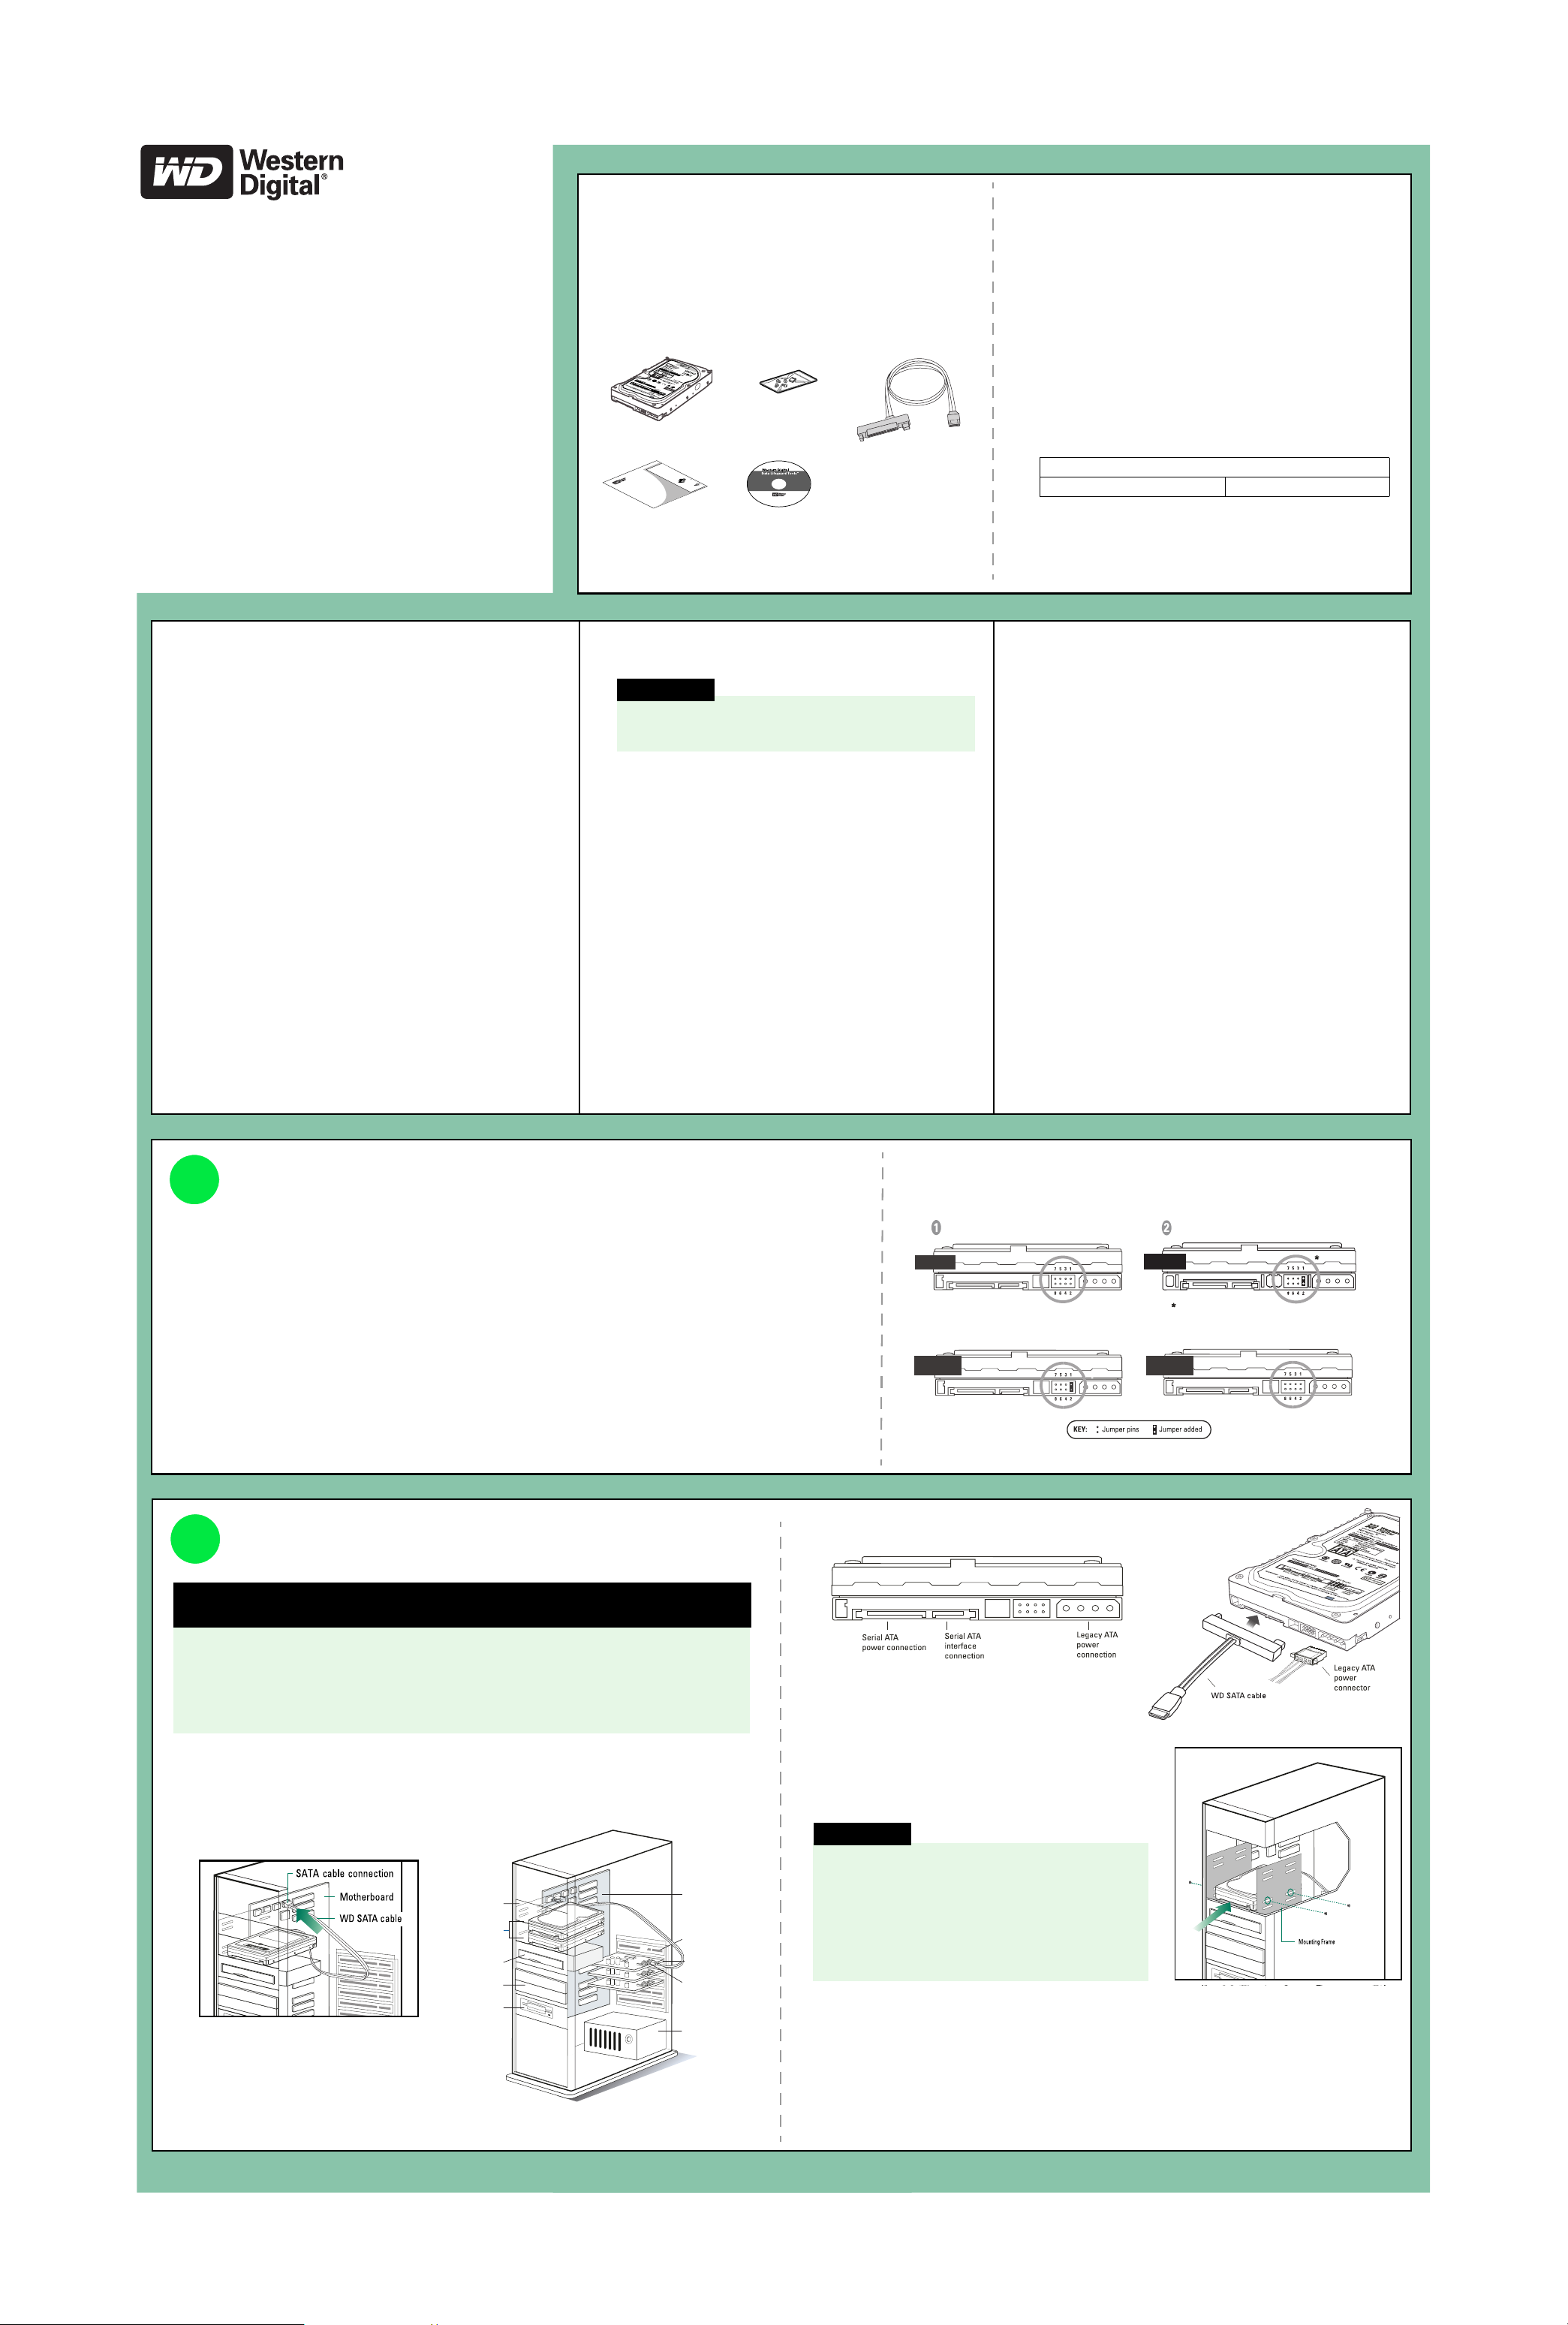
Set the Jumpers
1
The default setting for WD SATA hard drives varies depending on the model. To determine the default setting for
your drive, look at the drive label on the top of the drive.
DO NOT change the default setting if you intend to use the drive in a desktop computer.
Change the jumper settings ONLY if you intend to use the drive in an enterprise storage environment. For more
information on these advanced settings, obtain the full version WD SATA Installation Guide at support.wdc.com.
SSC_DIS Mode (Default) — Enable or disable the spread spectrum clocking feature. Default setting is disabled.
OPT1 — Only for factory use.
OPT2 — Only for factory use.
Install the SATA Hard Drive
2
IMPORTANT: Only for WD 7200 RPM SATA hard drive kits; all other WD SATA
hard drive kits, skip to step 1 below.
If installing your new WD drive as an upgrade from a previously installed hard drive:
To ensure the optimal settings for your drive configuration, WD recommends
running the Installation Tutorial in the Windows version of Data Lifeguard Tools
before hardware installation to generate your custom installation instructions. See
“Data Lifeguard Tools” on the reverse side of this poster.
Note: WD SATA drives ship from the factory with either Default 1 or Default 2 (see below) set as the standard configuration.
Standard configuration 1 (no jumper added - spread
spectrum clocking disabled).
Default 1
Spread spectrum clocking enabled.
SSC enabled
Standard configuration 2 (jumper across pins 1-2 - spread
spectrum clocking disabled).
Default 2
Neutral storage placement. In this position, the jumper has no effect on
hard drive operation.
Spread spectrum clocking enabled.
SSC enabled
SSC enabled
Default 1
PM2 enabled
with SecureConnect
1. Connect the smaller connector on the WD SATA cable to the SATA connector on the
motherboard or SATA controller card.
NOTE: If using a SATA controller card, be sure to follow the instructions that came with the card
to install SATA host drivers.
Motherboard
Expansion Slot
SATA Controller Card
SATA Connector
on Controller Card
Power Supply
SATA Motherboard Configuration
5.25-inch Bay
Hard Drives
(in 3.5-inch Bay)
CD-ROM Drive
Faceplate
3.5-inch
Floppy Drive
SATA Controller Card Configuration
2. Attach the larger end of the WD SATA cable
directly to the SATA interface on the back of the
WD drive as shown above. SATA connectors are
keyed to ensure proper insertion. Also attach the
legacy 4-pin power connector.
CAUTION
The WD SATA cable with SecureConnect™ does not
supply power to the drive. When using the WD SATA
cable, you must also attach the legacy ATA 4-pin
power connector to the SATA drive. When using a
standard SATA interface cable (not included)
instead, DO NOT connect both the standard SATA
cable (not included) and legacy ATA 4-pin power
cable at the same time or the drive may malfunction.
3. Slide the hard drive into an available 3.5-inch drive
bay and secure the drive with the four mounting screws
(two on each side). For proper grounding, install the screws in the hole positions as shown.
4. Verify all cable connections. Replace and secure the system cover. Reconnect the power cord
and power up the computer.
5. If your WD SATA drive came with a Data Lifeguard Tools
™
CD, see “Set Up Your Hard Drive” on
the reverse side of this poster to set up your new hard drive. If your hard drive kit did not
include a Data Lifeguard Tools CD, see “Alternate Instructions for Installing a Drive” on the
reverse side of this poster.
MOUNTING THE HARD DRIVE
Page 2
Using Data Lifeguard Tools
3
IMPORTANT: If your hard drive kit does not include a Data Lifeguard Tools CD, skip to “Alternate
Instructions for Installing a Drive (Windows XP/2000).” You can also obtain the latest version of
Data Lifeguard Tools from our Web site at support.wdc.com.
WD’s Data Lifeguard Tools assists with hard drive installation, management, and diagnostics.
Depending on your setup and configuration, you can use either the Windows or DOS version of
Data Lifeguard Tools.
NOTE: Windows and DOS versions of Data Lifeguard Tools may vary slightly from one another in
text, graphic placement, or color.
Data Lifeguard Tools contents:
! Create a Bootable Diskette — Create a bootable diskette in seconds.
! View Installation Tutorial — Create, view, and print a customized installation manual.
! Set Up Your Hard Drive — Partition and format an installed hard drive.
! Drive-to-Drive Copy — Copy all the files or a specific folder from one hard drive to another;
set a specific hard drive size.
! Hard Drive Information — Configure jumper settings and other technical information regarding
your hard drive.
! Register Your Hard Drive — Register your hard drive online (Internet connection required).
Create a Bootable Diskette
Follow these steps to create a bootable diskette using Data Lifeguard Tools:
1. Insert the Data Lifeguard Tools CD into your CD-ROM drive.
a. If using the Windows version, the CD autoruns on your desktop.
b. If using the DOS version, restart the computer and boot from the CD.
2. When the autorun menu appears, select Create a Data Lifeguard Bootable Installation
Diskette. Follow the directions as prompted.
View Installation Tutorial
Follow these steps to create and print custom hardware installation instructions:
NOTE: The model number of your hard drive is printed on the label on top of the drive.
1. Insert the Data Lifeguard Tools CD into your CD-ROM drive.
a. If using the Windows version, the CD autoruns on your desktop.
b. If using the DOS version, restart the computer and boot from the CD.
2. Select View Installation Tutorial from the setup menu.
3. Depending on whether you run the Windows or DOS version, Data Lifeguard Tools may prompt
you to select your model number or a hard drive configuration. If your hard drive is not listed,
you can manually type in the model number. Follow the instructions as prompted to create your
custom instructions.
4. If using the Windows version, your default Web browser opens automatically and displays your
custom instructions. If using the DOS version, your instructions are displayed in the window.
Click Next to print the instructions.
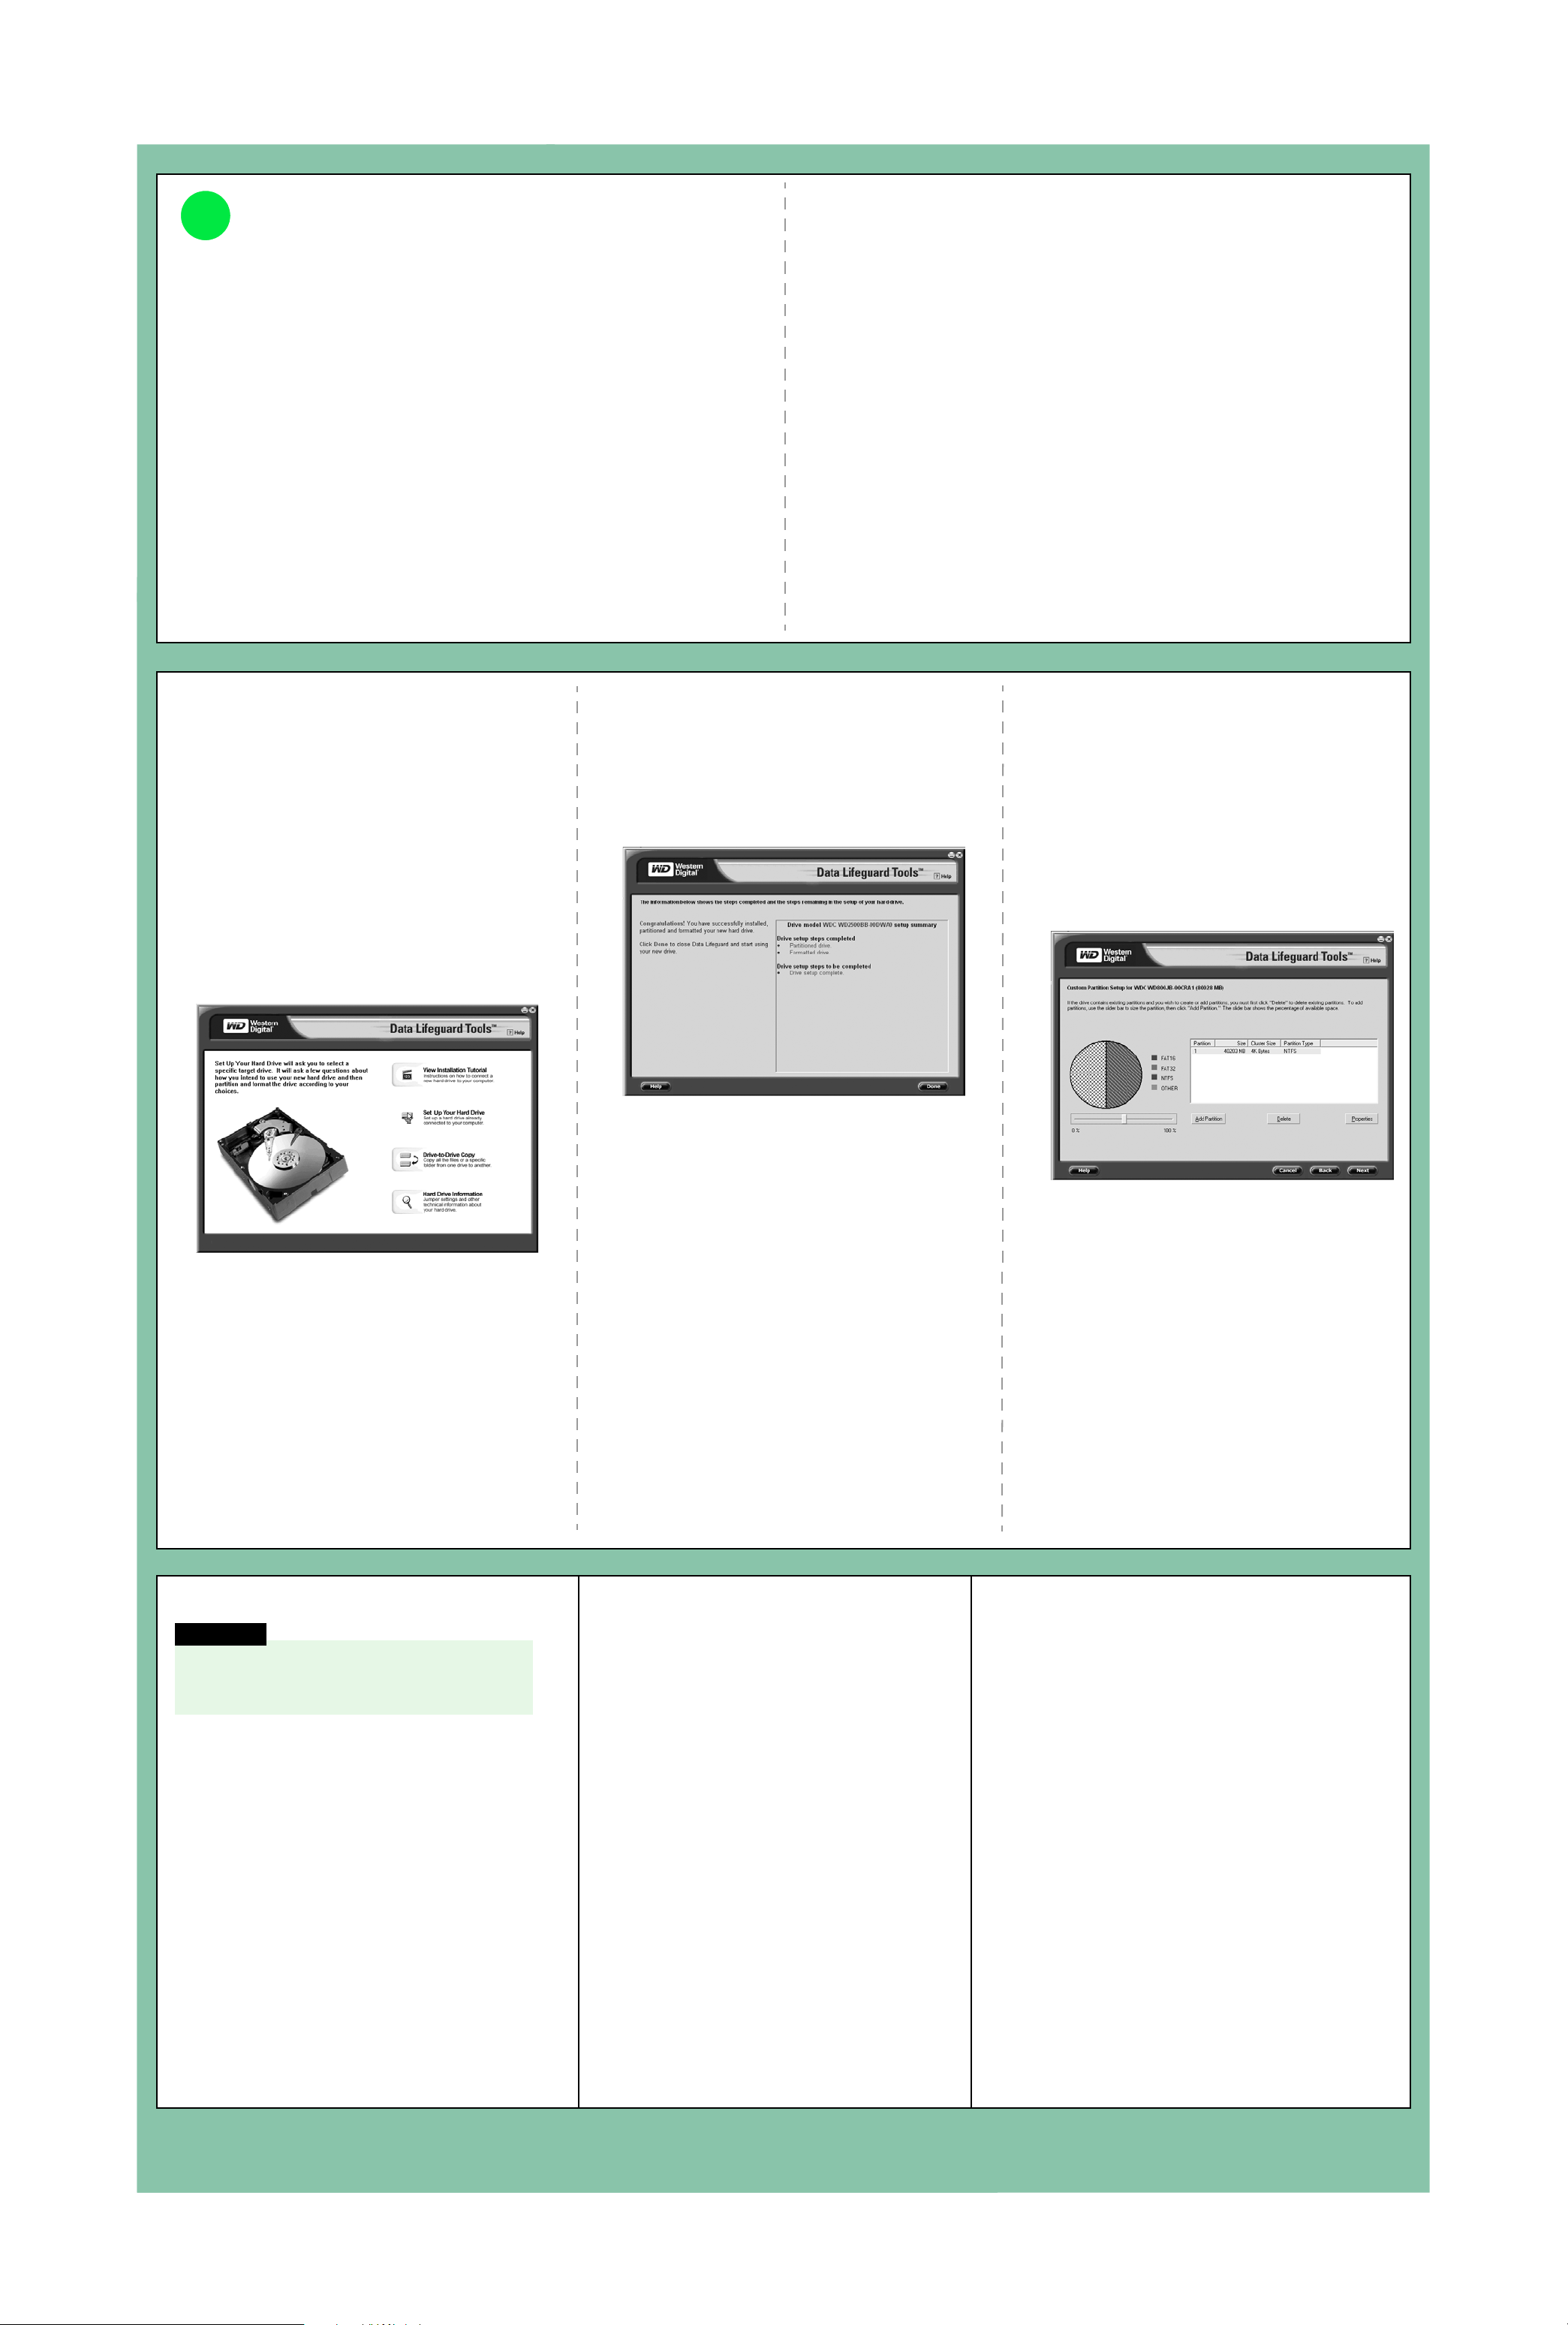
Set Up Your Hard Drive
This section contains instructions for installing your new WD
hard drive either as a new boot drive or as an additional storage
drive.
Install a New Boot Drive
1. Insert the Data Lifeguard Tools CD into your CD-ROM drive.
a. If using the Windows version, the CD autoruns on your
desktop.
b. If using the DOS version, restart the computer and boot
from the CD.
2. Select Run Data Lifeguard Installation Software from the
autorun setup menu.
3. The main menu (shown below) appears after Data Lifeguard
Tools is loaded. Click Set Up Your Hard Drive from the list of
options. Data Lifeguard
for system devices.
4. After Data Lifeguard Tools detects your installed hard
drive(s), select the new drive to be formatted or partitioned
as the new boot drive and click Next. If you are using a SATA
controller card, click the Additional Controllers tab to select
your new drive.
NOTE: Data Lifeguard Tools does not format or partition a
currently installed boot drive (the drive icon is disabled).
5. For Installation Type, select Add the drive as a boot device.
To create customized partitions, select the box to change
advanced options and check Custom Partition.
6. The Custom Partition Setup screen appears. Your hard drive
is automatically partitioned to the largest capacity based on
your operating system limitations. If the drive contains
existing partitions and you want to create or add partitions,
you must first click Delete to remove existing partitions. To
add partitions, use the slider bar to size the partition, then
click Add Partition. After setting the partitions, click Next.
™
may take several moments to scan
7. The next screen outlines your setup options, number of
partitions, file format, and the size of each partition. Data
Lifeguard Tools is now ready to set up your new hard drive.
Click Erase then Next to continue.
CAUTION: All existing data on the hard drive will be erased.
If you are prompted to continue, click Ye s to proceed.
8. After Data Lifeguard Tools completes formatting and
partitioning the drive, the setup summary screen below
outlines all steps completed. Click Done to exit.
9. Remove the Data Lifeguard Tools CD from the CD-ROM drive
and choose from the following options:
a. If installing Windows, insert the Windows installation CD
in the CD-ROM drive and restart the system. Follow the
on-screen instructions to install the operating system.
b. If an operating system is already been installed, restart
the system.
This concludes the hard drive setup process. Your WD SATA
hard drive is now ready to use.
Install an Additional Storage Drive
1. Insert the Data Lifeguard Tools CD into your CD-ROM drive.
a. If using the Windows version, the CD autoruns on your
desktop.
b. If using the DOS version, restart the computer and boot
from the CD.
2. Select Run Data Lifeguard Installation Software from the
setup menu.
3. The main menu appears after Data Lifeguard Tools is loaded.
Click Set Up Your Hard Drive from the list of options. Data
Lifeguard Tools may take several moments to scan for
system devices.
4. After detecting your installed hard drives, select the drive to
be formatted or partitioned as additional storage and click
Next. If you are using a SATA controller card, click the
Additional Controllers tab to select your new drive.
5. For Installation Type, select Add the drive as an additional
device. To create customized partitions, select the box to
change advanced options and check Custom Partition.
6. The Custom Partition Setup screen (shown below) appears.
Your hard drive is automatically partitioned to the largest
capacity up to 137 GB based on your operating system
limitations. If the drive contains existing partitions and you
want to create or add partitions, you must first click Delete
to remove existing partitions. To add partitions, use the slider
bar to set the desired partition size, then click Add Partition.
After configuring the partitions, click Next.
7. The next screen outlines your setup options, number of
partitions, file format, and the size of each partition. Data
Lifeguard Tools is now ready to set up your new hard drive.
Click Erase, then Next.
CAUTION: Continuing will erase all existing data on the
hard drive. If you are certain, click Ye s to proceed with
format and partition.
8. After Data Lifeguard Tools completes formatting and
partitioning the drive, the setup summary screen outlines
all steps completed. Click Done to exit.
9. Remove the CD from the CD-ROM drive to begin using your
new WD hard drive as additional storage. A new drive letter
and icon appear under My Computer.
This concludes the hard drive setup process. Your WD SATA
hard drive is now ready to use.
Drive-to-Drive Copy
CAUTION
Both source and destination hard drives must be
formatted and partitioned before using this utility.
Follow the instructions above to set up your drive.
The Drive-to-Drive Copy utility copies files from one drive to
another. Use this feature when replacing an existing boot
hard drive with a newer, faster hard drive.
1. Insert the Data Lifeguard Tools CD into your CD-ROM
drive. Select Drive-to-Drive Copy from the main menu.
2. Select the Source and Destination paths with the
selected folders. You can click Browse to easily access
folders or files on both hard drives.
NOTE: Existing files on the destination drive are
overwritten if there are files on the source drive
with the same name.
3. After selecting the folder for each path, click Start to
begin copying. The progress bar for the current file
being copied and overall progress is displayed.
4. When copying is completed, click OK to display the
results summary. Click Done to exit Data Lifeguard
To ol s .
5. Remove the CD and restart the computer to use your
new WD hard drive.
Hard Drive Information
This feature allows you to view the drive model number,
serial number, capacity, UDMA mode, and other details
about your WD SATA hard drive.
1. Insert the Data Lifeguard Tools CD into your CD-ROM
drive. Select Hard Drive Information from the main
menu.
2. In the next window, you are given options to select
either View Hard Drive Information or View Jumper
Settings.
a. View Hard Drive Information — Once your drive is
detected, click the tab for either Partition Table or
SATA Information to display information about the
drive format, LBA support, DMA support, firmware
revision, etc.
b. View Jumper Settings — Select the drive model
number and configuration, then click View Jumper
Settings to display the selected jumper setting
diagram in your default Web browser.
Alternate Instructions for Installing
Alternate Instructions for Installing
A Drive (Windows XP/2000)
a Drive (Windows XP/2000)
If your hard drive kit did not include a Data Lifeguard Tools CD, you can
If your hard drive kit does not include a Data Lifeguard Tools CD, you
use Window’s built-in Disk Management utility to format and partition
can use Windows built-in Disk Management utility to format and
your drive. If necessary, refer to your operating system manual for
partition your drive. If necessary, refer to your operating system
detailed instructions.
manual for detailed instructions.
Install a Single Hard Drive:
Install a Single Hard Drive
1. Boot to the Windows XP or Windows 2000 Installation CD.
1. Boot from the Windows XP or Windows 2000 Installation CD.
2. Follow the directions in the installation prompt.
2. Follow the directions as prompted.
Install an Additional Hard Drive:
Install an Additional Hard Drive
Windows XP
Windows XP
1. Click the Start button and point to Control Panel > Performance and
1. Click the Start button and point to Control Panel > Performance and
Maintenance > Administrative Tools.
Maintenance > Administrative Tools.
2. Double-click on the Computer Management icon and select Disk
2. Double-click the Computer Management icon and select Disk
Management on the left side.
Management on the left side.
3. Right-click on your new hard drive and proceed with partitioning
3. Right-click your new hard drive to proceed with partitioning and
and formatting.
formatting.
Windows 2000
Windows 2000
1. Click the Start button and point to Settings > Control Panel >
1. Click the Start button and point to Settings > Control Panel >
Administrative Tools.
Administrative Tools.
2. Double-click on the Computer Management icon and select Disk
2. Double-click the Computer Management icon and select Disk
Management on the left side.
Management on the left side.
3. Right-click on your new hard drive to proceed with partitioning and
3. Right-click your new hard drive to proceed with partitioning and
formatting.
formatting.
© 2005 Western Digital Technologies, Inc. All rights reserved.
Western Digital is a registered trademark; and WD, the WD logo, Data Lifeguard, Data Lifeguard Tools, and SecureConnect are trademarks of Western Digital Technologies, Inc. Other marks may be mentioned herein that belong to other companies.
Specifications subject to change without notice.
2079-001042-A06 07/05
 Loading...