

Page 1
My Book
Pro Edition™ II
User Manual
External Desktop
™
Page 2

Table of Contents
1 Getting Started . . . . . . . . . . . . . . . . . . . . . . . . . . . . . . .1
Kit Contents . . . . . . . . . . . . . . . . . . . . . . . . . . . . . . . . . . . . . . . . . . . . . . . 1
System Requirements . . . . . . . . . . . . . . . . . . . . . . . . . . . . . . . . . . . . . . 1
Updating Your Operating System . . . . . . . . . . . . . . . . . . . . . . . . . . . . . 2
Recording Your WD Product Information . . . . . . . . . . . . . . . . . . . . . . . 2
Registering Your WD Product . . . . . . . . . . . . . . . . . . . . . . . . . . . . . . . . 2
Handling Precautions . . . . . . . . . . . . . . . . . . . . . . . . . . . . . . . . . . . . . . . 2
2 About Your WD Drive . . . . . . . . . . . . . . . . . . . . . . . . . .3
Format and Configuration . . . . . . . . . . . . . . . . . . . . . . . . . . . . . . . . . . . . 3
LED Indicators . . . . . . . . . . . . . . . . . . . . . . . . . . . . . . . . . . . . . . . . . . . . . 3
Power/Activity LED . . . . . . . . . . . . . . . . . . . . . . . . . . . . . . . . . . . . . . . . . 3
Capacity Gauge. . . . . . . . . . . . . . . . . . . . . . . . . . . . . . . . . . . . . . . . . . . . 3
Capacity Gauge Activity . . . . . . . . . . . . . . . . . . . . . . . . . . . . . . . . . . . . . 3
Choosing an Interface. . . . . . . . . . . . . . . . . . . . . . . . . . . . . . . . . . . . . . . 4
Kensington
®
Security Slot . . . . . . . . . . . . . . . . . . . . . . . . . . . . . . . . . . . 4
3 Connecting the Device . . . . . . . . . . . . . . . . . . . . . . . . .5
4 My Book RAID Manager for Mac . . . . . . . . . . . . . . . .7
Configuring RAID . . . . . . . . . . . . . . . . . . . . . . . . . . . . . . . . . . . . . . . . . . 8
RAID Troubleshooting. . . . . . . . . . . . . . . . . . . . . . . . . . . . . . . . . . . . . . . 9
5 My Book RAID Manager for Windows . . . . . . . . . . .11
Configuring RAID . . . . . . . . . . . . . . . . . . . . . . . . . . . . . . . . . . . . . . . . . 12
RAID Troubleshooting. . . . . . . . . . . . . . . . . . . . . . . . . . . . . . . . . . . . . . 13
6 Using EMC Retrospect Express . . . . . . . . . . . . . . . .15
7 Turning Off/Disconnecting the Device . . . . . . . . . .17
Auto-off. . . . . . . . . . . . . . . . . . . . . . . . . . . . . . . . . . . . . . . . . . . . . . . . . . 17
Safe Shutdown™ . . . . . . . . . . . . . . . . . . . . . . . . . . . . . . . . . . . . . . . . . . 17
Safe Removal. . . . . . . . . . . . . . . . . . . . . . . . . . . . . . . . . . . . . . . . . . . . . 17
TABLE OF CONTENTS – i
Page 3

8 Replacing a Drive . . . . . . . . . . . . . . . . . . . . . . . . . . . .18
9 Troubleshooting . . . . . . . . . . . . . . . . . . . . . . . . . . . . .21
Frequently Asked Questions — USB Information. . . . . . . . . . . . . . . . 21
Frequently Asked Questions — Installation. . . . . . . . . . . . . . . . . . . . . 22
10 Appendix. . . . . . . . . . . . . . . . . . . . . . . . . . . . . . . . . . . .23
Regulatory Compliance. . . . . . . . . . . . . . . . . . . . . . . . . . . . . . . . . . . . . 23
Warranty Information. . . . . . . . . . . . . . . . . . . . . . . . . . . . . . . . . . . . . . . 23
WD Service and Support . . . . . . . . . . . . . . . . . . . . . . . . . . . . . . . . . . . 25
Index . . . . . . . . . . . . . . . . . . . . . . . . . . . . . . . . . . . . . . .22
TABLE OF CONTENTS – ii
Page 4
1
MY BOOK PRO EDITION II
USER MANUAL
Getting Started
Thank you for purchasing My Book™ Pro Edition™ II, the storage solution of choice for
creative professionals, workgroups, small offices, and anyone looking for extra
assurance of data safety. This user manual provides step-by-step installation
instructions and other important information regarding your WD product. For the
latest WD product information and news, visit our website at
www.westerndigital.com.
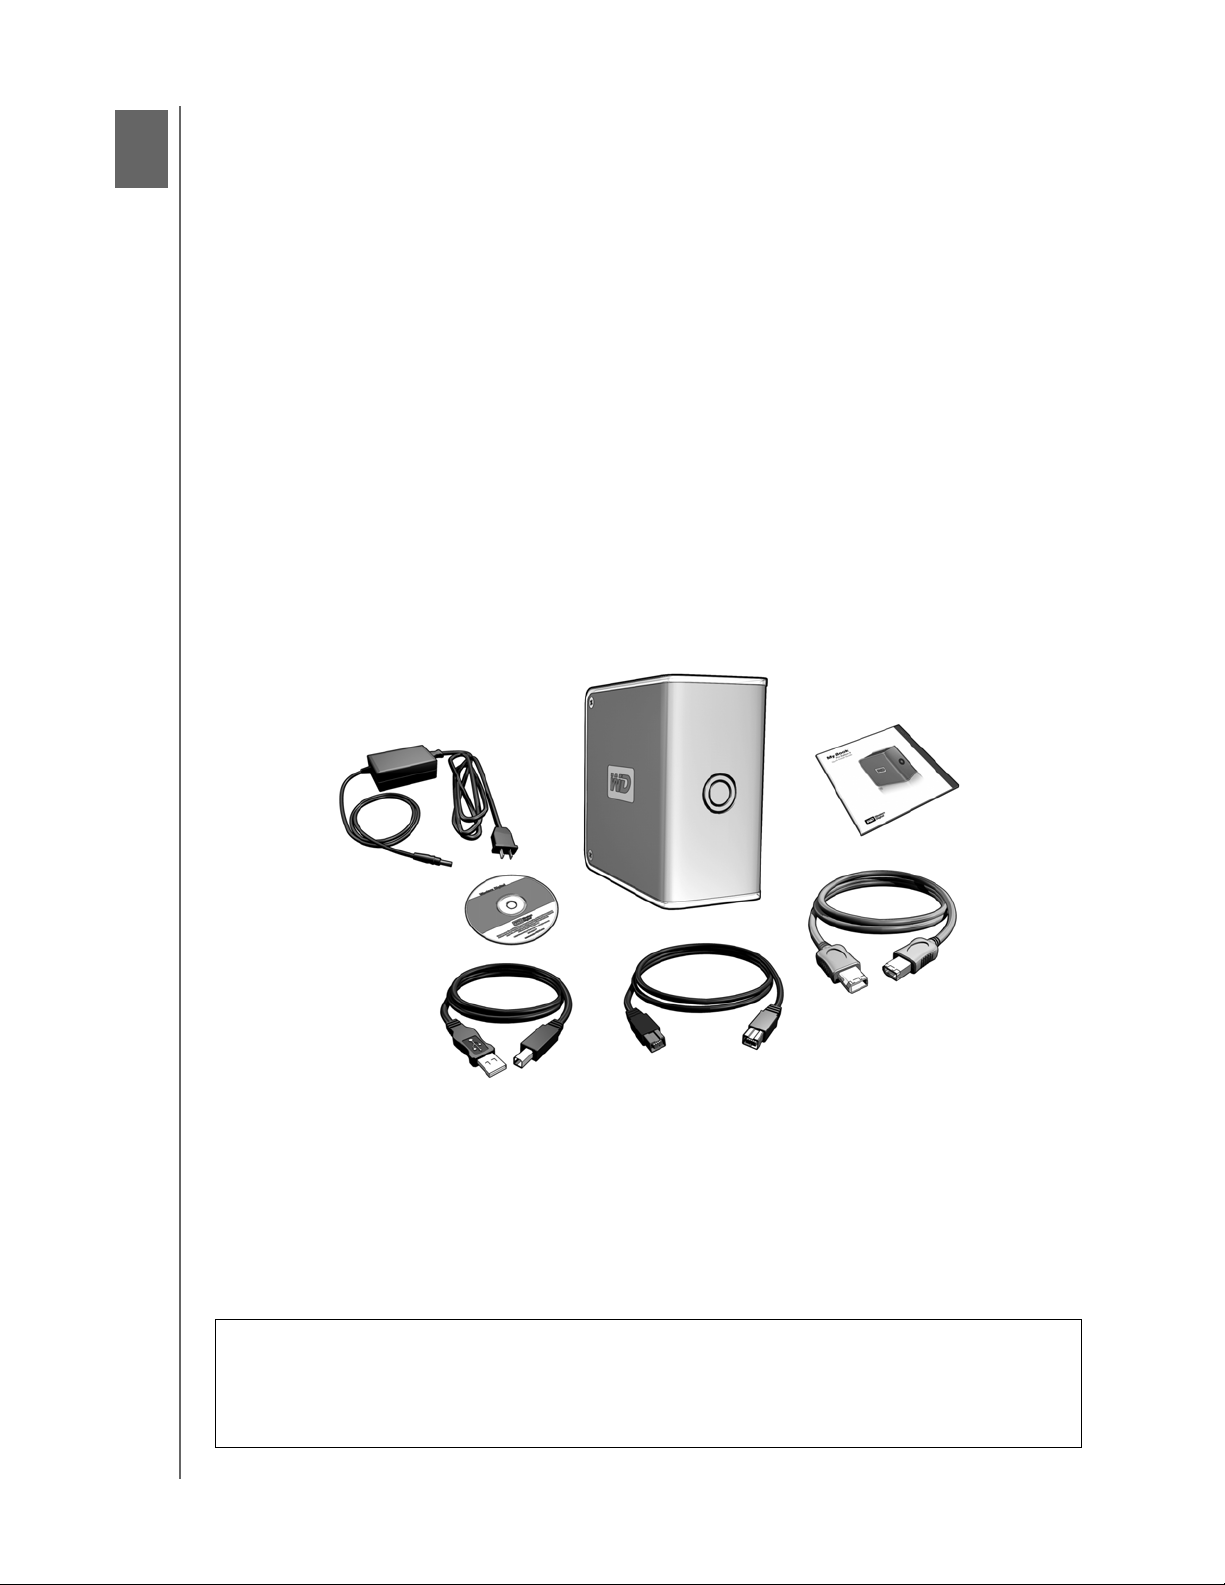
Kit Contents
• Triple interface dual-drive storage system with RAID
•FireWire® 800 cable
• FireWire 400 cable
• USB 2.0 certified cable
• AC adapter with power cord
•Software CD
• Quick Install Guide
My Book Pro Edition II
Quick Install Guide
AC Power Adapter
Software CD
USB Cable
FireWire 800 Cable
FireWire 400 Cable
System Requirements
Macintosh
®
Windows
• An available FireWire or USB port • An available USB or FireWire port
®
•Mac
OS X 10.3 or later • Windows 2000/XP
®
Note: Compatibility may vary depending on user’s hardware configuration and
operating system.
Important: For highest performance and reliability, it is recommended that you
install the latest updates and service pack (SP). For Apple, go to the Apple menu
and select Software Update. For Windows, go to the Start menu and select
Windows Update.
GETTING STARTED – 1
Page 5

MY BOOK PRO EDITION II
USER MANUAL
Updating Your Operating System
Macintosh
Go to the Apple menu and select Software Update. For more information regarding
updating your system, visit apple.com/macosx.
Windows
Go to the Start menu and select Windows update. For more information regarding
updating your system, visit windowsupdate.microsoft.com.
Recording Your WD Product Information
In the following table, write the serial number and model number of your new WD
product found on the large label on the back panel of the device. Also, write the
purchase date and other notes such as your operating system and version. This
information is necessary for setup and technical support.
Serial Number:
Model Number:
Purchase Date:
System and Software Notes:
Registering Your WD Product
Your WD product includes 30 days of free technical support during the applicable
warranty period for your product. The 30-day period commences on the date of your
first telephone contact with WD technical support. Register online at
register.wdc.com.
Handling Precautions
WD products are precision instruments and must be handled with care during
unpacking and installation. Drives may be damaged by rough handling, shock, or
vibration. Be aware of the following precautions when unpacking and installing your
external storage product:
• Do not drop or jolt the device.
• Do not move the device during activity.
• Do not use My Book as a portable device.
• To allow proper ventilation, do not block air slots on the underside, top, or rear of
the enclosure. Do not stack any objects on top of the device that may block
ventilation.
GETTING STARTED – 2
Page 6

2
MY BOOK PRO EDITION II
USER MANUAL
About Your WD Drive
Format and Configuration
My Book Pro Edition II is preformatted for HFS+ (Journaled) and is
pre-configured for RAID 0 (Striped) mode for maximum capacity and accelerated
performance. This product also supports RAID 1 (Mirrored) mode for data protection
with instantaneous and automatic data updates. For more information on this product
including instructions on changing the RAID configuration or drive format, see section
4, My Book RAID Manager for Mac or section 5 for Windows.
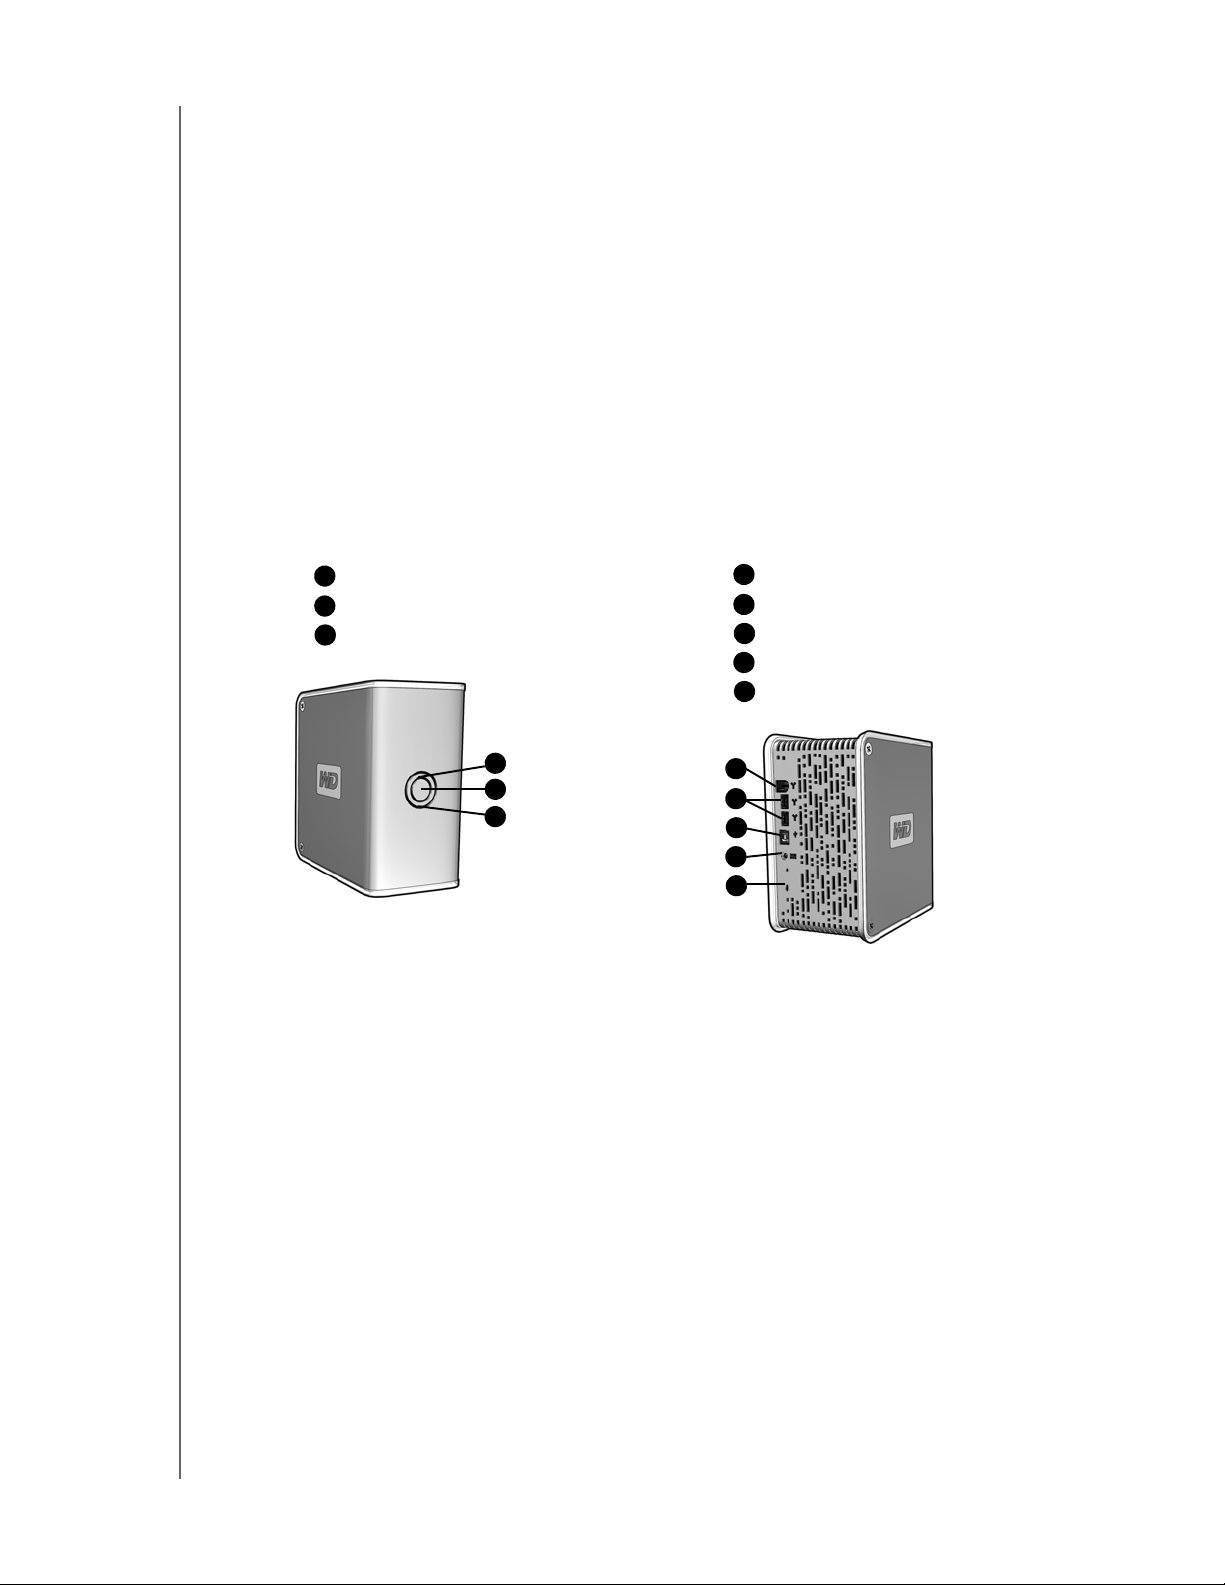
LED Indicators
The Power/Activity and Capacity Gauge LEDs are two concentric rings on the front
panel of the drive. The outer ring is the Power/Activity LED and the inner ring is the
Capacity Gauge LED.
Power/Activity LED
Appearance Description
Steady Power-on state or power-save mode
Fast flashing (for approx. 3 seconds) Transitioning to system standby
Slow flashing (every 5 seconds) System standby
Rotating clockwise Drive in use
Alternate flashing between inner and outer LED rings RAID degraded mode
Rotating inner ring which increments as the rebuild
percentage increases
RAID rebuild mode
Capacity Gauge
The Capacity Gauge (inner LED) consists of six sections which illuminate in a
clockwise direction to indicate space used on the drive. Each section represents
approximately 17 percent of disk space. Because this drive is preformatted and
contains software and utilities, the first section is illuminated upon installation. The
Capacity Gauge is enabled only through installation of its driver from the CD, which
must be installed on each system to which My Book is connected.
Capacity Gauge Activity
The Capacity Gauge is updated automatically upon drive usage. In Windows, you can
manually update the Capacity Gauge by right-clicking the Button Manager icon in the
system tray then click outside the pop-up menu to close it.
ABOUT YOUR WD DRIVE – 3
Page 7
MY BOOK PRO EDITION II
USER MANUAL
Choosing an Interface
My Book Pro Edition II is equipped with three interface types: FireWire 800,
FireWire 400, and USB 2.0. Choose the best interface depending on your system
configuration.
FireWire 800: FireWire 800 has a maximum data transfer rate of 800 Mb/s. It is
backward-compatible with FireWire 400 using an optional adapter.
FireWire 400: FireWire 400 supports data transfer rates up to 400 Mb/s.
USB 2.0: For most PCs, the standard interface is USB. Hi-Speed USB (USB 2.0)
supports data transfer rates up to 480 Mb/s. USB 2.0 is backward-compatible with
USB 1.1. If you connect to a USB 1.1 device, data is transferred at USB 1.1 speed
(up to 1.1 Mb/s).
D
A
Capacity Gauge LED (inner ring)
B
Power Button
C
Power/Activity LED (outer ring)
FireWire 400 Port
E
FireWire 800 Port (x2)
USB Port
F
G
Power Port
H
Kensington Security Slot
A
B
B
C
D
E
F
G
H
Kensington® Security Slot
For drive security, My Book Pro Edition II is equipped with a Kensington Security Slot,
which supports a standard Kensington security cable (sold separately). For more
information on the Kensington Security Slot and available products, visit
www.kensington.com.
ABOUT YOUR WD DRIVE – 4
Page 8
3
Connecting the Device
MY BOOK PRO EDITION II
USER MANUAL
Macintosh
1. Turn on your computer.
2. Insert the software CD into the CD-ROM drive.
3. Double-click the CD-ROM drive icon, the My Book drive icon, then the Mac
folder, which contains the software for this device.
4. Double-click My Book RAID Manager to install this program into the
Applications folder.
5. WD Button Manager Software disk image contains the installer required to enable
the capacity gauge and Safe Shutdown™. Double-click this icon to install the
program into the Applications folder.
6. If you want to install the backup software now, double-click the EMC®
Retrospect® Express icon in the Mac folder and follow the instructions as
prompted.
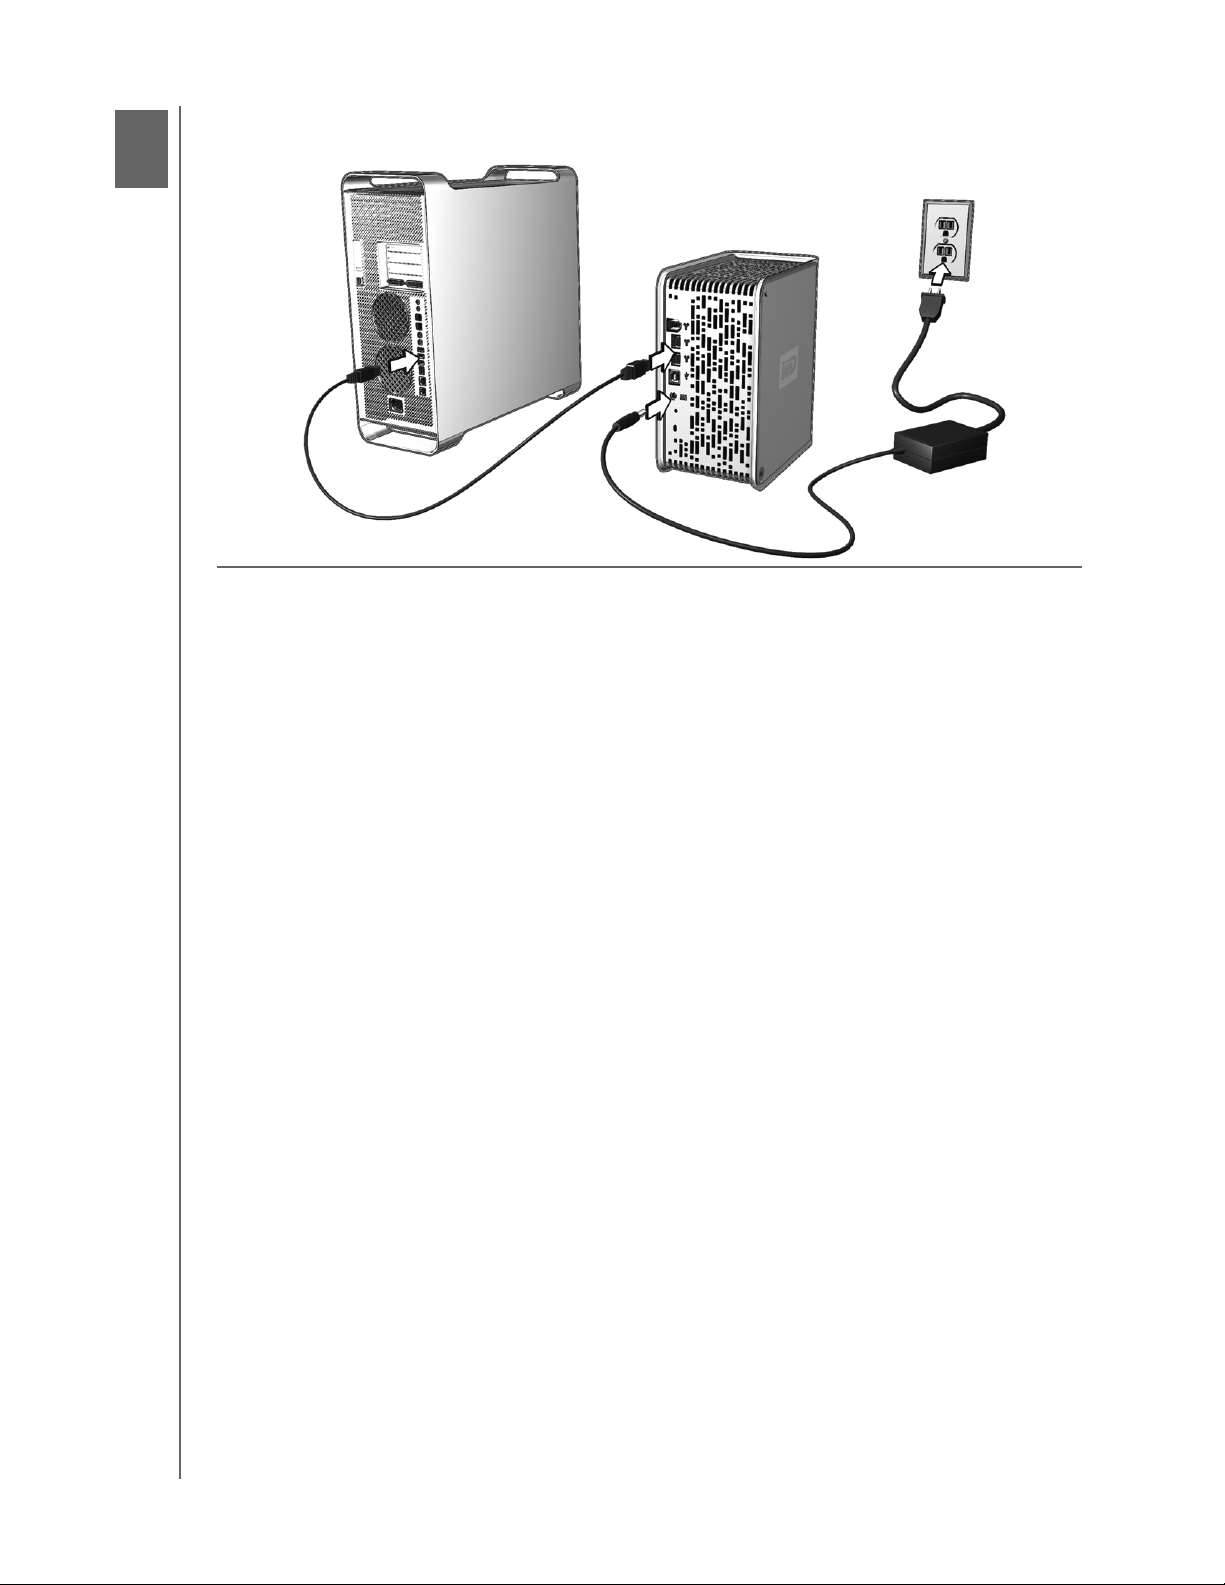
7. Connect the unit’s power cord and interface cable (USB, FireWire 800, or
FireWire 400) as shown above, after which the unit mounts to the system.
®
CONNECTING THE DEVICE – 5
Page 9

MY BOOK PRO EDITION II
USER MANUAL
Windows
Important: You must first install the drivers and utilities on the included CD before
connecting the unit.
1. Turn on your computer.
2. Insert the software CD into the CD-ROM drive.
3. The CD autoruns and Button Manager and drivers are installed automatically. If a
security alert is displayed during this installation, click Accept or Continue.
Note: If AutoPlay is disabled on your computer, you must install the utilities
manually. Go to the desktop. Double-click My Computer, My Book folder,
WD_Windows_Tools folder, and Setup.exe. Then run the CD which installs the
drivers.
4. A menu displays a list of options including software, documentation, and a
registration link. Click My Book RAID Manager to install this utility.
5. When finished, click any other selection of your choice; otherwise, click Quit to
close the menu.
6. Connect the unit’s power cord and interface cable (USB, FireWire 800, or
FireWire 400) as shown above, after which the unit mounts to the system.
Note: If Windows prompts for additional drivers, allow it to perform its search
My Book is now ready for use. To format My Book to Windows NTFS, search our
knowledge base for answer ID 287 at support.wdc.com for instructions.
CONNECTING THE DEVICE – 6
Page 10

4
MY BOOK PRO EDITION II
USER MANUAL
My Book RAID Manager for Mac
My Book RAID Manager is a tool designed to help you easily manage your RAID
system, including changing the RAID configuration and formatting the device. To
install My Book RAID Manager, double-click the CD-ROM icon, the My Book drive
icon, then the Mac folder. Then double-click My Book RAID Manager to install this
program into the applications folder.
MY BOOK RAID MANAGER FOR MAC – 7
Page 11

MY BOOK PRO EDITION II
USER MANUAL
Configuring RAID
My Book Pro Edition II is preformatted for HFS+ (Journaled) and is preconfigured for
RAID 0 (Striped) mode for maximum capacity and accelerated performance. This
product also supports RAID 1 (Mirrored) mode for data protection which dedicates
half the capacity to mirror the data in both drives A and B.
1. To configure or change the RAID setting, click on a device from the menu to
display the popup menu.
2. Select the desired RAID configuration and device format and click Configure.
Important: Before you proceed, make sure to back up all files stored in My Book
onto another storage device.
3. When prompted to confirm, click Configure again.
MY BOOK RAID MANAGER FOR MAC – 8
Page 12

MY BOOK PRO EDITION II
USER MANUAL
4. As standard precaution, the system prompts you for an administrator’s name and
password to authenticate your action. Enter this information and click OK.
When configuring the device, My Book RAID Manager automatically formats the disk
as a single volume to the format you specified
RAID Troubleshooting
My Book RAID Manager monitors the activity of the drives in the RAID system, so at
anytime, you can view the status of each drive and take the appropriate action. To
view the device status as well as the status of each internal hard drive, click on a
device and then click Info, which brings up a drawer on the right hand side of the
main window.
MY BOOK RAID MANAGER FOR MAC – 9
Page 13

MY BOOK PRO EDITION II
USER MANUAL
Condition Messages
My Book RAID Manager reports the following condition messages depending on the
current status of your drive.
Message Description
Healthy Your device is “healthy” and operating.
Degraded Your device is still functioning but the drive in either slot A
or B may have a problem. Refer to section 7 of this manual
for information on how to replace a drive.
Rebuilding Your device is in RAID 1 mode and is rebuilding the data
for a newly replaced disk. The rebuilding process may take
up to 12 hours depending on the capacity of your drive.
Your data in the device is still accessible while it's
rebuilding.
Bad Your device may have a problem. Disconnect then re-
connect the power cable and/or the interface cable. If the
problem persists, visit our WD knowledge base at
support.wdc.com for more information and help.
Setting Mismatched Your device is in RAID 1 mode with both drives detected as
master. You must designate a single master (disk A or B)
using RAID Manager. The data on the master will be
accessed and mirrored to the secondary drive during the
rebuilding process.
Not Configured The RAID setting is not configured. Use RAID Manager to
configure it to either RAID 0 or RAID 1.
Unknown The RAID configuration information is not available. The
driver for My Book interface device may not be installed
properly. Turn off the device, re-install My Book RAID
Manager and/or drivers from the software CD and turn the
device back on. Your system should detect My Book and
prompt you to install the driver. Allow your system to
automatically locate the driver and complete the installation.
MY BOOK RAID MANAGER FOR MAC – 10
Page 14

5
MY BOOK PRO EDITION II
USER MANUAL
My Book RAID Manager for Windows
My Book RAID Manager is a tool designed to help you easily manage your RAID
system, including changing the RAID configuration and formatting the device. To
Install My Book RAID Manager, run the software CD to display the menu below, click
Install My Book RAID Manager, and follow the instructions as prompted.
Important: If you have existing data, make sure to back up all files stored in the
My Book onto another storage device before you proceed.
Note: If AutoPlay is disabled on your computer, you must install the utilities manually.
Go to the desktop. Double-click My Computer, My Book folder, WD_Windows_Tools
folder, and Setup.exe. Then run the CD which installs the drivers.
Launch My Book RAID Manager by double-clicking its icon on the desktop or
system tray.
MY BOOK RAID MANAGER FOR WINDOWS – 11
Page 15

MY BOOK PRO EDITION II
USER MANUAL
Configuring RAID
My Book Pro Edition II is preformatted for HFS+ (Journaled) and is pre-configured for
RAID 0 (Striped) mode for maximum capacity and accelerated performance. This
product also supports RAID 1 (Mirrored) mode for data protection with instantaneous
and automatic data updates.
Important: If you have existing data, make sure to back up all files stored in the
My Book onto another storage device before you proceed.
1. To configure or change the RAID setting, select the device from the menu and
click Next.
2. Select the desired RAID configuration by clicking RAID 0 or RAID 1 (the
following example shows RAID 1). Select Quick NTFS format if you want the
drive formatted automatically following completion of the new RAID setting.
3. Enter the confirmation number provided, then click Yes. When prompted again,
click Yes to confirm.
MY BOOK RAID MANAGER FOR WINDOWS – 12
Page 16

MY BOOK PRO EDITION II
USER MANUAL
4. Click Close when finished.
You can also use the context menu in My Book RAID Manager to run Windows Disk
Management Tool, perform NTFS quick format, or change the RAID configuration.
Right-click on a device in the My Book RAID Manager main screen to view options.
RAID Troubleshooting
My Book RAID Manager monitors the activity of the drives in the RAID system, so at
anytime, you can view the status of each drive and take the appropriate action. To
view the device status, select the device from the menu and click Next. If you don’t
see the device on the menu, click Refresh to search for My Book devices connected
to your computer system. You can also right-click the device and choose Properties.
MY BOOK RAID MANAGER FOR WINDOWS – 13
Page 17

MY BOOK PRO EDITION II
USER MANUAL
Condition Messages
My Book RAID Manager reports the following condition messages depending on the
current status of your drive.
Message Description
Healthy Your device is “healthy” and operating.
Degraded Your device is still functioning but the drive in either slot A
or B may have a problem. Refer to section 7 of this manual
for information on how to replace a drive.
Rebuilding Your device is in RAID 1 mode and is rebuilding the data
for a newly replaced disk. The rebuilding process may take
up to 12 hours depending on the capacity of your drive.
Your data in the device is still accessible while it's
rebuilding.
Bad Your device may have a problem. Disconnect then re-
connect the power cable and/or the interface cable. If the
problem persists, visit our WD knowledge base at
support.wdc.com for more information and help.
Setting Mismatched Your device is in RAID 1 mode with both drives detected as
master. You must designate a single master (disk A or B)
using RAID Manager. The data on the master will be
accessed and mirrored to the secondary drive during the
rebuilding process.
Not Configured The RAID setting is not configured. Use RAID Manager to
configure it to either RAID 0 or RAID 1.
Unknown The RAID configuration information is not available. The
driver for My Book interface device may not be installed
properly. Turn off the device, re-install My Book RAID
Manager and/or drivers from the software CD and turn the
device back on. Your system should detect My Book and
prompt you to install the driver. Allow your system to
automatically locate the driver and complete the installation.
MY BOOK RAID MANAGER FOR WINDOWS – 14
Page 18

6
MY BOOK PRO EDITION II
USER MANUAL
Using EMC Retrospect Express
EMC Retrospect Express is a simple, yet powerful, feature-rich backup and system
recovery software, which provides the tools you need to back up and restore a single
file or your entire system in a few simple steps. The detailed online help is accessible
from any screen.
Protect documents, photos, music, e-mail, contacts, business records, games,
applications, operating systems, device drivers—everything. Store backups and use
government-certified AES 128/256-bit data encryption to prevent unauthorized
access.
Quick and accurate, Retrospect backs up only new or changed data, without timeconsuming weekly full backups or complex procedures. If you accidentally delete files
or lose data because of a computer problem, simply choose a previous point in time,
select the files you need, and let Retrospect do the rest. Retrospect’s smart utility
won’t return unwanted files and folders—just the exact data you need.
Retrospect protects more than just user data. Completely restore a Macintosh or PC.
Retrospect restores the operating system, applications, application settings, data,
and user preferences. Retrospect saves you countless hours reconfiguring the
computer and reinstalling software, including hard-to-locate internet downloads.
USING EMC RETROSPECT EXPRESS – 15
Page 19

MY BOOK PRO EDITION II
USER MANUAL
Whether you need to recover a file or folder, take a computer back to a previous point
in time, or restore a computer that has failed completely, Retrospect has you covered.
To install Retrospect Express, run the software CD, click Install EMC Retrospect
Express, and follow the instructions as prompted.
Launch Retrospect Express by double-clicking its icon on the desktop or system
dock.
Note: This version of EMC Retrospect Express does not support server applications
or server operating systems. For more information visit www.emc.com.
USING EMC RETROSPECT EXPRESS – 16
Page 20

7
MY BOOK PRO EDITION II
USER MANUAL
Turning Off/Disconnecting the Device
Auto-off
My Book turns off automatically when you shut down the computer. You also may
follow these steps to turn off the device.
Important: To prevent data loss, close all active windows, files, and applications
before shutting down the device, which will otherwise prevent successful safe
shutdown.
Safe Shutdown™
The Power button features Safe Shutdown, which prevents the inadvertent powering
down of My Book until all data is written to the device or system. To engage Safe
Shutdown, press the Power button once. You may hear the device power down
before the Power LED turns off. My Book is now shut down properly and may be
safely disconnected.
Safe Shutdown is enabled only through installation of its driver, which must be
installed on each system to which My Book is connected.
Safe Removal
Mac
Drag the My Book icon to the Trash icon for proper dismount. You may hear the
device power down as the Power LED flashes. When the Power LED is steady, you
may press the Power button once or disconnect My Book’s power cord to turn it off
safely.
Windows
Right-click on the WD Button Manager icon in your system tray and point to
My Book... > Safely Remove. You can also right-click the Safely Remove
Hardware icon in your system tray and select Safely Remove Hardware. You
may hear the device power down before the Power LED turns off. My Book is now
shut down properly, and you may disconnect the device safely.
TURNING OFF/DISCONNECTING THE DEVICE – 17
Page 21

8
MY BOOK PRO EDITION II
USER MANUAL
Replacing a Drive
My Book Premium Edition II is a limited user-serviceable product which allows for
servicing of one or both internal hard drives in the enclosure. In the event a fault
occurs and you would like to service the device yourself, visit WD Technical Support
at support.wdc.com and search the knowledge base article 1464 for detailed
instructions on obtaining a replacement drive. When contacting Technical Support,
have the following items ready: My Book serial number, date of purchase, and the
serial number of the internal hard drive(s) which require replacement. Once you have
the replacement drive(s), follow the steps below to service My Book.
Important: To avoid ESD problems, ground yourself by touching the metal chassis
of the computer before handling the device. Because articles of clothing generate
static electricity, do not allow clothing to come in direct contact with the hard drive
or circuit board components.
Before getting started, power off the unit and disconnect all of its cables.
1. On a clean and stable surface, gently turn the unit, power button face down.
2. Using a cross-tip (Phillips) screwdriver, remove all four screws from the unit and
set aside.
3. Lift up the cover to remove it, then set it aside.
4. Gently turn the unit upside down (WD logo upside down).
5. Loosen the screw that secures the drive cage cap.
6. Slide the cage cap away from the screw, lift up to remove, and set aside.
7. Gently pull the connector of the drive interface/power cable until it is
disconnected from the drive and gently push it out of the way.
REPLACING A DRIVE – 18
Page 22

MY BOOK PRO EDITION II
USER MANUAL
8. Pull the drive bracket tabs towards each other and gently slide the bracket and
drive assembly up and out of the unit.
Note: Each drive is designated A or B by a color coded decal. The components
(bracket assembly, cables, connectors) for each drive match the color of the
decal.
9. Gently slide the replacement drive assembly into the unit, decal side up, until the
brackets click into place.
Important: Do not disassemble the drive and slider bracket assembly
components. Return the entire assembly intact to WD.
10.Reconnect the drive interface/power cable.
9
10
11.Replace the cage cap and tighten the screw.
12.Carefully replace the cover by gently sliding it into place and securing it with the
four screws.
CAUTION: DO NOT overtighten the screws. The threaded inserts could be
stripped if overtightened.
11
12
REPLACING A DRIVE – 19
Page 23

MY BOOK PRO EDITION II
USER MANUAL
13.Reconnect the cables and power on the unit.
14.Return the replacement drive following the instructions provided in the WD
knowledge base article 1464.
Important: Do not disassemble the drive and slider bracket assembly
components. Return the entire assembly intact to WD.
REPLACING A DRIVE – 20
Page 24

9
MY BOOK PRO EDITION II
USER MANUAL
Troubleshooting
If you have problems when installing or using this product, refer to this
troubleshooting section or visit our support Web site at support.wdc.com and search
our knowledge base for more help. For further information on the following topics,
search our support website for their answer ID as listed below.
How to Answer ID
• install My Book Pro Edition II on a Windows or Macintosh computer 1466
• service My Book Pro Edition II to replace a hard drive 1464
• change the RAID setting of a WD My Book Pro II 1465
• specifications for the My Book Pro Edition II 1468
Frequently Asked Questions — USB Information
Q: What is Hi-Speed USB?
A: Hi-Speed USB is another name for USB 2.0, which provides transfer rates up to
40 times faster than USB 1.1. Upgrading to USB 2.0 is highly recommended
because of the significant reduction in file transfer time versus USB 1.1.
Q: How do I determine whether or not my system supports USB 2.0?
A: Refer to your USB card documentation or contact your USB card manufacturer.
Note: If your USB 2.0 controller is built-in to the system motherboard, be sure to
install the appropriate chipset support for your motherboard. Refer to your
motherboard or system manual for more information.
Q: What happens when a USB 2.0 device is plugged into a USB 1.1 port or hub?
A: USB 2.0 is backward-compatible with USB 1.1. When connected to a USB 1.1
port or hub, a USB 2.0 device operates at the USB 1.1 full speed of up to 12
Mbps.
Q: Can USB 1.1 cables be used with USB 2.0 devices?
A: Although USB 1.1 cables work with USB 2.0 devices, it is recommended that
USB 2.0 certified cables be used with USB 2.0 peripherals and USB 2.0 PCI
adapter cards.
TROUBLESHOOTING – 21
Page 25

MY BOOK PRO EDITION II
USER MANUAL
Frequently Asked Questions — Installation
Q: Why does the drive not power up?
A: After connecting the power cord, be sure to press the Power button. The area
surrounding the button illuminates blue, and you may hear the drive spin and
power up.
Q: Why is the drive not recognized under My Computer or on the computer
desktop?
A: If your system has a USB 2.0 PCI adapter card, be sure that its drivers are
installed before connecting your WD USB 2.0 external storage product. The drive
is not recognized correctly unless USB 2.0 root hub and host controller drivers
are installed. Contact the adapter card manufacturer for installation procedures.
Q: How do I partition and reformat the drive?
A: For recommended formats for this device, search our knowlege base for answer
ID 207 at support.wdc.com.
Q: Why is the data transfer rate slow?
A: Your system may be operating at USB 1.1 speeds due to an incorrect driver
installation of the USB 2.0 adapter card or a system that does not support
USB 2.0.
If your system includes a PCI slot, you can achieve Hi-Speed USB transfer rates
by installing a USB 2.0 PCI adapter card. Contact the card manufacturer for
installation procedures and more information.
Note: If an additional external drive is connected to the WD product, USB
bandwidth is shared and may affect performance.
TROUBLESHOOTING – 22
Page 26

10
MY BOOK PRO EDITION II
USER MANUAL
Appendix
Regulatory Compliance
FCC Class B Information
This device has been tested and found to comply with the limits of a Class B digital
device, pursuant to Part 15 of the FCC Rules. These limits are designed to provide
reasonable protection against harmful interference in a residential installation. This
unit generates, uses, and can radiate radio frequency energy and, if not installed and
used in accordance with the instructions, may cause harmful interference to radio or
television reception. However, there is no guarantee that interference will not occur in
a particular installation. Any changes or modifications not expressly approved by WD
could void the user's authority to operate this equipment.
The following booklet, prepared by the Federal Communications Commission, may be
helpful: How to Identify and Resolve Radio/TV Interference Problems. This booklet is
Stock No. 004-000-00345-4 available from the US Government Printing Office,
Washington, DC 20402.
CSA Notice
Le prent appareil numérique n'émet pas de bruits radioélectriques dépassant les
limites applicables aux appareils numériques de la classe B préscrites dans le
Règlement sur le brouillage radioélectrique édicté par le ministère des
Communications du Canada.
This digital apparatus does not exceed the Class B limits for radio noise for digital
apparatus set out in the Radio Interference Regulations of the Canadian Department
of Communications.
Underwriters Laboratories Inc.
Approved for US and Canada. CAN/CSA-C22.2 No. 60950-1, UL 60950-1.
Information Technology Equipment - Safety - Part 1: General Requirements (File
E101559).
CE Compliance for Europe
Verified to comply with EN55022 for RF Emissions and EN50082-1 for Generic
Immunity, as applicable.
Warranty Information
This product contains no user-serviceable parts. Refer servicing only to authorized
WD personnel or a WD-approved service center.
Obtaining Service
WD values your business and always attempts to provide you the very best of service.
If this Product requires maintenance, either contact the dealer from whom you
originally purchased the Product or visit our product support Web site at
support.wdc.com for information on how to obtain service or a Return Material
Authorization (RMA). If it is determined that the Product may be defective, you will be
APPENDIX – 23
Page 27

MY BOOK PRO EDITION II
USER MANUAL
given an RMA number and instructions for Product return. An unauthorized return
(i.e., one for which an RMA number has not been issued) will be returned to you at
your expense. Authorized returns must be shipped in an approved shipping container,
prepaid and insured, to the address provided on your return paperwork. Your original
box and packaging materials should be kept for storing or shipping your WD product.
To conclusively establish the period of warranty, check the warranty expiration (serial
number required) via support.wdc.com. WD shall have no liability for lost data
regardless of the cause, recovery of lost data, or data contained in any Product
placed in its possession.
Limited Warranty
WD warrants that the Product, in the course of its normal use, will be free from
defects in material and workmanship for a period of three (3) years, unless otherwise
required by law, and will conform to WD’s specification therefor. This limited warranty
period shall commence on the purchase date appearing on your purchase receipt.
WD shall have no liability for any Product returned if WD determines that the Product
was stolen from WD or that the asserted defect a) is not present, b) cannot
reasonably be rectified because of damage occurring before WD receives the
Product, or c) is attributable to misuse, improper installation, alteration (including
removing or obliterating labels and opening or removing external enclosures, unless
the product is on the list of limited user-serviceable products and the specific
alteration is within the scope of the applicable instructions, as found at
support.wdc.com), accident or mishandling while in the possession of someone other
than WD. Subject to the limitations specified above, your sole and exclusive warranty
shall be, during the period of warranty specified above and at WD’s option, the repair
or replacement of the Product. The foregoing warranty of WD shall extend to repaired
or replaced Products for the balance of the applicable period of the original warranty
or ninety (90) days from the date of shipment of a repaired or replaced Product,
whichever is longer.
The foregoing limited warranty is WD’s sole warranty and is applicable only to
products sold as new. The remedies provided herein are in lieu of a) any and all other
remedies and warranties, whether expressed, implied or statutory, including but not
limited to, any implied warranty of merchantability or fitness for a particular purpose,
and b) any and all obligations and liabilities of WD for damages including, but not
limited to accidental, consequential, or special damages, or any financial loss, lost
profits or expenses, or lost data arising out of or in connection with the purchase, use,
or performance of the Product, even if WD has been advised of the possibility of such
damages. In the United States, some states do not allow exclusion or limitations of
incidental or consequential damages, so the limitations above may not apply to you.
This warranty gives you specific legal rights, and you may also have other rights which
vary from state to state.
APPENDIX – 24
Page 28

MY BOOK PRO EDITION II
USER MANUAL
WD Service and Support
If you need additional information or help during installation or normal use of this
product, visit our product support Web site at support.wdc.com and choose from
these topics:
• Warranty Services — Obtain warranty information, warranty status, extended
warranty, product replacement, RMA status, and shipping and packaging
information.
• Downloads Library — Download installation software and drivers.
• Technical Information — Access product specifications, technical tips, and the
online forum.
• Knowledge Base — Explore our expert knowledge base and Frequently Asked
Questions.
• Service Partners — Find available WD-approved service and support in your
region.
• Contact Support — Contact a support representative by e-mail.
• Rebates — Check the status of rebate submissions.
• Localized Support — Display service and support information in various
languages.
When contacting WD for support, have your WD product serial number, system
hardware, and system software versions available.
support.wdc.com
www.westerndigital.com
800.ASK.4WDC North America
949.672.7199 Spanish
+800.6008.6008 Asia Pacific
+31.20.4467651 EMEA
Western Digital
20511 Lake Forest Drive
Lake Forest, California 92630 U.S.A.
Information furnished by WD is believed to be accurate and reliable; however, no responsibility is assumed by WD for its
use nor for any infringement of patents or other rights of third parties which may result from its use. No license is granted
by implication or otherwise under any patent or patent rights of WD. WD reserves the right to change specifications at
any time without notice.
Western Digital, WD, and the WD logo are registered trademarks; and My Book, Pro Edition, and Safe Shutdown are
trademarks of Western Digital Technologies, Inc. Other marks may be mentioned herein that belong to other companies.
© 2006 Western Digital Technologies, Inc. All rights reserved.
2779-701024-A00 Sep 2006
APPENDIX – 25
Page 29

Index
MY BOOK PRO EDITION II
USER MANUAL
A
Auto-off 17
B
Backup
software 15
C
Capacity gauge 3
CE compliance 23
Compliance, regulatory 23
Configuring RAID 8, 12
CSA Notice 23
D
Device
disconnecting 17
turning off 17
Drive
configuration 3
format 3
replacing 18
E
EMC Retropect Express 15, 17
Europe, CE compliance 23
F
FAQs 21
FCC Class B information 23
Frequently asked questions 21
H
Handling precautions 2
I
Installation, FAQs 22
K
Kit contents 1
L
LED indicators 3
capacity gauge 3
Limited warranty 24
M
Macintosh software update 2
My Book RAID Manager 7, 11
O
Obtaining service 23
Operating system, updating 2
P
Product registration 2
R
RAID
condition messages 10, 14
configuring 8, 12
troubleshooting 9, 13
Registration, product 2
Regulatory compliance 23
Replacing a drive 18
Requirements, system 1
S
Safe removal 17
Safe Shutdown 17
Service packs 2
Service, WD 23, 25
Software
My Book RAID Manager 7, 11
Software, backup 15
Support, WD 25
System requirements 1
T
Troubleshooting 21
Turning off the device 17
U
UL 23
Underwriters Laboratories Inc. 23
Updating, operating system 2
USB information, FAQs 21
W
Warranty 23
Warranty, limited 24
WD
service 25
support 25
Windows, updating 2
INDEX – 26
 Loading...