

Page 1
3 IN 1 COFFEE CENTER
Instruction Manual
Register this and other West Bend® Housewares products through our website:
www.westbend.com
Important Safeguards...............................................................................................2
Heat Precautions...................................................................................................... 2
Electricity Precautions.............................................................................................. 3
Pressure Precautions............................................................................................... 4
Precautions For Use Around Children...................................................................... 4
Glass Carafe Cautions.............................................................................................4
Using Your 3 in 1 Coffee Center – First Use............................................................5
Using Your 3 in 1 Coffee Center – Preparing Coffee ...............................................6
Using Your 3 in 1 Coffee Center – Preparing Espresso...........................................7
Using Your 3 in 1 Coffee Center – Preparing Cappuccino.......................................8
Steaming/Frothing Without Making Espresso ..........................................................9
Pressure – Checking and Releasing......................................................................10
Cleaning Your 3 in 1 Coffee Center .......................................................................10
Decalcifying Your 3 in 1 Coffee Center ..................................................................11
Problems and Causes............................................................................................ 12
Warranty.................................................................................................................13
SAVE THIS INSTRUCTION MANUAL FOR FUTURE REFERENCE
Page 2
IMPORTANT SAFEGUARDS
To prevent personal injury or property damage, read and follow all instructions
and warnings.
When using electrical appliances, basic safety precautions should always be
followed including the following:
• Read all instructions, including these important safeguards and the care and use
instructions in this manual.
• Do not use appliance for other than intended use.
• Do not leave unit unattended while plugged into electrical outlet.
• Do not place on or near a hot gas or electric burner, or a heated oven.
• Do not operate if the appliance is not working properly or if it has been damaged
in any manner. For service information see warranty page.
• The use of accessory attachments not recommended by West Bend®
Housewares may result in fire, electric shock or injury to persons.
• Do not attempt to repair this appliance yourself.
• For household use only.
To prevent burns, personal injury or property damage, read and follow all
instructions and warnings.
HEAT PRECAUTIONS
• Do not touch hot surfaces. Use handles and hot pads or oven mitts if you lift or
carry the 3 in 1 Coffee Center when it is hot.
• Do not move an appliance containing hot food or hot liquids.
• Do not refill the water reservoir or the boiler while the appliance is on. Turn the
machine off and allow to cool before refilling with water.
• Make sure the brew basket is closed properly during the brewing process. If the
brew basket is not closed properly, this may cause hot water/coffee overflow.
• Make sure glass carafe is in place when brewing coffee. If the glass carafe is
not in place this will cause hot water/coffee overflow.
• Do not remove any part of the coffeemaker, other than the carafe, during the
brew cycle as scalding could occur.
• The lid of the carafe must be in place and properly positioned on the coffee
carafe during the brew process or hot water or hot coffee may overflow.
• Always use the proper grind of coffee. Too fine of a grind could clog the filter
and cause hot water/coffee overflow.
• Use caution when removing the espresso filter holder. The metal parts remain
hot after operation. See Pressure Precautions section.
• Allow 3 in 1 Coffee Center to cool completely after use and before before putting
on or taking off parts and before cleaning or storing.
2
Page 3
To prevent electrical shock, personal injury or property damage, read and
follow all instructions and warnings.
ELECTRICITY PRECAUTIONS
• To protect against fire, electric shock and injury to persons, do not immerse cord,
plugs, or other electric parts in water or other liquids.
• Do not operate any appliance with a damaged cord or plug.
• Do not use this appliance outdoors.
• Do not plug cord into electrical outlet unless both switches are in “OFF” position.
• Always position both switches to “OFF” position and unplug the appliance from
electrical outlet when not in use and before cleaning. Allow to cool before putting
on or taking off parts and before cleaning.
• Your 3 in 1 Coffee Center has a short cord as a safety precaution to avoid
pulling, tripping or entanglement. Position the cord so that it does not hang over
the edge of the counter, table or other flat surface area.
• While use of an extension cord is not recommended, if you must use one, make
sure the cord has the same or higher wattage as the 3 in 1 Coffee Center
(wattage is stamped on the underside of the 3 in 1 Coffee Center base). To avoid
pulling, tripping or entanglement position the extension cord so that it does not
hang over the edge of the counter, table or other flat surface area.
• Use an electrical outlet that accommodates the polarized plug on the 3 in 1
coffee center. On a polarized plug, one blade of the plug is wider than the other.
If the plug does not fit fully into the outlet or extension cord, reverse the plug. If
the plug still does not fit fully, contact a qualified electrician. Do not alter the plug.
• Do not use an outlet or extension cord if the plug fits loosely or if the outlet or
extension cord feels hot.
• Keep the cord away from hot parts of the appliance and hot surfaces during
operation.
3
Page 4
To prevent burns or other personal injury, read and follow all instructions and
warnings.
PRESSURE PRECAUTIONS
• Always check to see if system is under pressure (See instructions page 9) before
touching the boiler cap or the espresso filter holder.
• Make sure the espresso filter holder is in the locked position before operating the
espresso function of the appliance.
• Make sure the boiler cap is properly and fully tightened before operating the
espresso function of the appliance.
• Do not touch the boiler cap at any time during the espresso brewing process or
until pressure is completely relieved.
• Do not touch the espresso filter holder at any time during the brewing process or
until pressure is completely relieved.
To prevent burns or other personal injuries to children, read and follow all
instructions and warnings.
PRECAUTIONS FOR USE AROUND CHILDREN
• Always supervise children.
• Do not allow children to operate or be near the 3 in 1 Coffee Center, as the
outside surfaces are hot during use.
• Do not allow cord to hang over any edge where a child can reach it. Arrange cord
to avoid pulling, tripping or entanglement.
.
GLASS CARAFE CAUTIONS
• The carafes are designed for use with this appliance only. Do not use the carafes
provided with this appliance for any other appliance or appli c ation.
• Do not place carafes on hot surfaces, a range top, or in a heated oven.
• Do not put a hot carafe on a wet or cold surface.
• Do not use a cracked carafe or a carafe having a loose or weakened handle.
• Do not clean carafes with cleansers, steel wool pads, or other abrasive materials.
SAVE THESE INSTRUCTIONS
4
Page 5

Steam
Release Valve
Steam Plug Boiler Cap
Filter Basket
Filter Holder
2-Cup Adaptor Steam Wand
Carafe Cover
Espresso cover
Coffee Carafe
Espresso
carafe
Measuring
Spoon
Espresso
Maker Power
Switch
USING YOUR 3 IN 1 COFFEE CENTER –
FIRST USE
1. Place appliance on dry, level, heat-resistant
surface, away from any edge.
2. With both switches in the “OFF” position, plug cord
into a 120 volt AC electric outlet only.
3. We recommend that you get familiar with all the
parts of your coffee machine before using it for the
first time. Read all instructions, cautions and notes
before actually using the appliance.
4. Wash all loose parts in warm soapy water, rinse
thoroughly and dry.
5. To remove any residuals of production that may
reside in the appliance, we recommend making 4
cups of espresso and at least one full pot of coffee
with water only, no coffee grounds. During the brewing cycle, open the steam
valve for 5-10 seconds to clean the steam wand.
• Small amounts of smoke and/or odor may occur upon heating due to the release
of manufacturing oils – this is normal.
• Some minor expansion/contraction sounds may occur during heating and
cooling – this is normal.
Coffee Filter
Holder
Overflow Grid
Base
Coffee Maker
Power Switch
Steam
Wand
Steam
Nozzle
Frothing
Nozzle
5
Page 6

USING YOUR 3 IN 1 COFFEE CENTER – PREPARING COFFEE
1. Place appliance on dry, level, heat-resistant surface, away from any edge.
2. With both switches in the “OFF” position, plug cord into a 120 volt AC electric
outlet only.
3. Swivel out the brew basket and place a #4 paper coffee filter into the brew
basket. Add desired amount of coffee into the filter. We recommend one
measure (measuring spoon provided) of ground coffee for each cup of brewed
coffee to start. After using your coffeemaker a few times, adjust the amount of
coffee to suit your own taste. NOTE: The coffee grind should be appropriate for
a “drip” coffeemaker. Do not use coffee that is ground to a powder like
consistency as this will prevent water from passing through the coffee and may
cause hot water/coffee overflow.
4. Close the brew basket pushing in firmly until the basket touches the side of the
coffee machine and the basket “clicks” into place. If the brew basket is not
closed properly, hot water/coffee may overflow. NOTE: Make sure the filter is
seated properly in the basket and does not fold over itself when closing the brew
basket as this may cause hot water/coffee overflow or it may allow the water to
bypass the coffee grounds producing a very weak coffee brew.
5. Open the hinged water reservoir and pour in the desired quantity of clean cool
water for the number of cups you are brewing. Never pour more water into the
reservoir than the marked maximum level. For maximum flavor do not use warm
or hot water to fill reservoir.
6. Place the coffee carafe with lid in position on the warming plate. Make sure
coffee carafe sits flat on inside circle of warming plate. NOTE: The lid of the
carafe must be properly positioned on the coffee carafe. If the covered carafe is
not in place during the brew process hot water/coffee may overflow.
7. Turn on the coffee machine by using the CAFFE on/off switch. The indicator
light will illuminate indicating that the brewing process has begun. NOTE: As
long as the red indicator light is illuminated, the coffee will be kept warm. If the
coffee carafe is removed before the end of the brew cycle, it must be returned
properly to the warming plate so the coffee may continue to brew and to avoid
hot water/coffee overflow.
8. Unplug cord from electrical outlet after use and allow the 3 in 1 Coffee Center to
cool completely before cleaning.
• Using the Pause ‘n Serve Feature: The Pause ‘n Serve Feature allows you to
pour a cup of coffee while it is still brewing. For optimum flavor, allow half the
quantity of coffee to finish brewing before removing carafe. Return carafe within
30 seconds so the coffee may continue to brew to avoid hot water/coffee
overflow. To prevent scald injury do not remove any part of coffeemaker,
other than carafe, during the brew cycle.
6
Page 7

USING YOUR 3 IN 1 COFFEE CENTER – PREPARING ESPRESSO
The glass espresso carafe has markings for 2 and 4 cups: A cup of espresso is
approximately 2 oz. and does not equal an 8 oz. measuring cup. Use the espresso
carafe markings for all of the following measurements.
• 2 cups of water = 2 cups of espresso
• 4 cups of water = 4 cups of espresso.
1. Place appliance on dry, level, heat-resistant surface, away from any edge.
2. With both switches in the “OFF” position, plug cord into a 120 volt AC electric
outlet only.
3. Place the espresso filter basket into the filter holder. Fill with desired amount of
ground espresso coffee. The filter basket is marked on the inside for 2 and 4
cups. Press the coffee lightly and clear any excess coffee from the rim of the
filter holder. This will assure proper fit to the brewing head. NOTE: Do not press
coffee too tightly or fill more coffee than indicated by the four-cup marking into
the filter basket. This may cause clogging or overflow.
4. Insert the filter holder into the appliance. To insert the filter holder, line up the
arrow located on the thumb guard of the filter holder with the arrow on the left
side of the machine. Flip thumb guard back and out of the way. Raise the filter
holder up into brewing head and turn the filter holder firmly to the right until it
can go no further. The arrow on the filter holder should be as far right in the
lock-range as possible. If the arrow is not at least in the middle of the lock-range
remove the filter holder and insert it again as described above until the arrow is
within the lock-range. Following this procedure will prevent the filter holder from
being dislodged as pressure builds up during the brewing process.
5. Open the hinged lid located on tgop back of coffee center and unscrew the
boiler cap located inside by turning counter clockwise.
Fill the boiler chamber with cold water using the markings indicated on the glass
espresso carafe. NOTE: Never pour water into the boiler chamber while the
appliance is on if the tank is hot. Never fill more than 10oz (300ml) of water into
the boiler chamber. It is very important to fill only the amount of water you need
into the boiler chamber. Your coffee machine will always need to
process all the water until the boiler chamber is empty.
6. Replace and secure the boiler cap by turning it clockwise.
7. Make sure the overflow grid and base are in place. Place espresso
carafe lid on espresso carafe so the lid opening points towards the
pouring spout of the carafe. Place espresso carafe under the filter
holder so the spout of the filter holder is positioned in opening of
carafe. Make sure the steam release valve is fully closed
(clockwise). NOTE: To make espresso directly into two cups, clip the two-cup
adapter onto the filter holder and make sure that the cups are placed directly
underneath the spouts.
8. Turn the ESPRESSO switch to “ON” position. It will take approximately 2
minutes for the water to be heated. The water will then be forced through the
ground coffee into the glass carafe or cups. Wail until all the water in the boiler
chamber has been used. Switch the ESPRESSO switch to the “OFF” position.
• Do not unscrew the boiler cap while the machine is in operation. Wait until
brewing cycle is completed and all water and steam has been used.
• Use caution when removing the filter holder, as the metal parts will still be hot.
To remove the filter holder, turn the filter to the left, past the “lock” marking until
the holder dislodges from the machine.
• Hold thumb guard down while disposing of grounds to keep filter in place.
7
Page 8
USING YOUR 3 IN 1 COFFEE CENTER – PREPARING CAPPUCCINO
• 3 cups of water = 2 cups of espresso, plus steam for frothing milk for
cappuccino
• Maximum capacity (bottom of the metal band around the glass espresso carafe)
= 4 cups of espresso, plus steam for frothing milk for cappuccino.
1. Follow steps 1-7 in the “Preparing Espresso” section of this manual. NOTE: Do
not start brewing until step 3 below.
2. Using a stainless steel, ceramic or high temperature glass pitcher, fill with 4oz of
fresh cold milk. The pitcher should be wide-mouthed and fit under the steam
wand. For best performance the pitcher should be cool or chilled.
3. Turn the ESPRESSO switch to “ON” position. It will take approximately 2
minutes for the water to be heated. The water will then be forced through the
ground coffee into the glass carafe or cups.
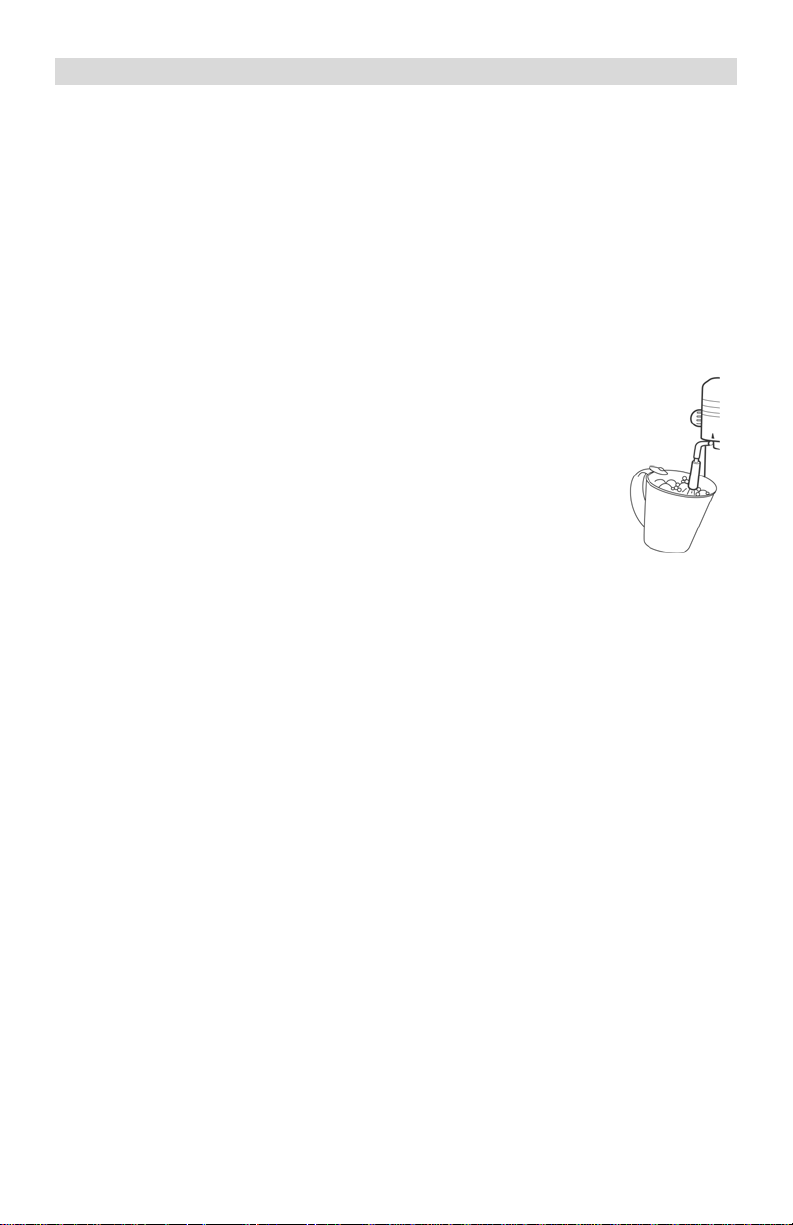
4. As soon as the espresso has filled the espresso carafe to the
foam mark on the carafe, you can start frothing the milk.
Submerse the tip of the frothing nozzle half way into the pitcher
of milk. NOTE: Do not open the steam release valve before
submersing the steam nozzle into the milk or the milk will
splash back.
5. Turn the steam release knob counter clockwise to release
steam into the milk. Keep the pitcher slightly tilted so that you
can always see the position of the nozzle when you froth the
milk. The frothing nozzle should be below the surface of the milk but not so far
as to allow the top of the frothing nozzle into the milk. Your milk will begin to
froth immediately. As the froth rises, keep lowering the pitcher so that the tip of
the frothing nozzle is always just slightly beneath the surface of the rising foam.
6. When the milk has doubled in volume insert the frothing nozzle deeper into the
milk in order to heat the milk. If using a beverage thermometer the ideal
temperature of the milk when finished is 150-170ºF or 66º-77ºC. NOTE: Do not
allow the milk to boil. You know this has happened if there is a sudden growth in
the milk and large bubbles start to form on the surface of the milk.
7. Close the steam release knob by turning it clockwise while the nozzle is still
immersed in the milk. This will avoid splattering of the hot milk. If you prefer a
“stiff” froth, let the frothed milk stand for a minute.
8. Allow the espresso to finish brewing. Move the espresso switch to the
“OFF” position.
9. Pour the espresso into a cup large enough for the espresso/frothed milk
combination. Add the steamed milk and spoon on the frothed milk.
• Do not unscrew the boiler cap while the machine is in operation. Wait until
brewing cycle is completed, all water and steam has been used and the
machine is switched off.
• Use caution when removing the filter holder, as the metal parts may remain hot
for some time.
• Thoroughly clean the steam wand and frothing nozzle after each use to ensure
satisfactory and trouble free frothing.
8
Page 9

STEAMING/FROTHING WITHOUT ESPRESSO (USING STEAM PLUG)
1. Switch both the Espresso and Caffe switches to the “OFF” position. Make sure
your 3 in 1 Coffee Center is cool enough to handle and the pressure has been
released.
2. Insert the steam build-up plug into the filter holder then insert the filter holder
into the appliance. To insert the filter holder, line up the arrow located on the
thumb guard of tie filter holder with the arrow on the left side of the machine.
Raise the filter holder up into brewing head and turn the filter holder firmly to the
right, until it can go no further. The arrow on the filter holder should be as far
right in the lock-range as possible. If the arrow is not at least in the middle of the
lock-range, remove the filter holder and insert it again as described above until
the arrow is within the lock-range. This procedure will prevent the filter holder
from being dislodged as pressure builds up during the brewing process.
3. For steam only, do not fill the glass espresso carafe above the 2-cup marking.
Fill the boiler chamber with cold water. Have your frothing pitcher with 4oz of
fresh cold milk ready to heat.
4. Place glass espresso carafe with lid under filter holder and turn the espresso
switch to the “ON” position. Open the steam release knob immediately.
5. Immerse the frothing nozzle half way into the frothing pitcher filled with milk.
It will take approximately 30 - 60 seconds after turning the machine on for the
steam to come out from the steam nozzle. Keep the pitcher slightly tilted so that
you can always see the position of the nozzle when you frot h the milk. The
frothing nozzle should be below the surface of the milk but not so far as to allow
the top of the frothing nozzle into the milk. Your milk will begin to froth. As the
froth rises, keep lowering the pitcher so that the tip of the frothing nozzle is
always just slightly beneath the surface of the rising foam.
6. When the milk has doubled in volume, insert the frothing nozzle deeper into the
milk in order to heat the milk. NOTE: If using a beverage thermometer the ideal
temperature of the milk when finished is 150-170ºF or 66ºC-77ºC. Do not allow
the milk to boil. You know this has happened if there is a sudden growth in the
milk and large bubbles start to form on the surface of the milk.
7. When finished, close the steam release knob by turning it clockwise while the
nozzle is still immersed in the milk. This will avoid splattering of the hot milk.
If you prefer a "stiff” froth, let the frothed milk stand for a minute.
8. Move the espresso switch to the “OFF” position.
NOTES: If you did not need all the water for steaming, proceed as follows:
1. With the machine off, release the remaining steam pressure into
another container.
2. Do not close the steam release knob before all steam is released; see
“Pressure Precautions” section in this manual.
9
Page 10

PRESSURE - CHECKING AND RELEASING
Pressure Checking
1. Switch Espresso and Caffe switches to the “OFF” position and unplug the
appliance from the electrical outlet.
2. Carefully open the steam release valve by slowly turning the knob
counterclockwise. If steam comes out of the nozzle the boiler is still
under pressure.
3. If there is pressure, close the steam release valve and proceed as follows to
release the pressure.
Pressure Releasing
1. Hold a pitcher of water under the steam wand and immerse the frothing nozzle
into the water.
2. Slowly open the steam release valve and allow the steam to vent into the water.
3. When the steam wand stops releasing steam slowly open the boiler cap.
CLEANING YOUR 3 IN 1 COFFEE CENTER - GENERAL
1. Position all switches to “OFF” position, unplug from electrical outlet and allow
the entire unit to cool completely before cleaning.
2. Remove and discard used espresso grounds and disposable filter containing
used coffee grounds. Clean brewing head with a damp cloth.
3. Remove and clean the espresso filter holder, filter cup, brew basket, overflow
grid, grid base, carafes and covers in a solution of warm water and mild liquid
soap. Rinse thoroughly and dry.
4. If there is water left in the boiler chamber or the coffee water reservoir, empty
through the top opening of the unit by turning upside down. Note: Do not clean
the inside of the water reservoir or boiler chamber with a cloth or paper toweling
as this may leave particles in the chambers that may clog small openings in your
coffeemaker. You only need to rinse with cold water periodically.
5. Remove rubber-frothing nozzle from the steam wand. Clean the frothing nozzle
and the steam wand thoroughly with a solution of warm water and mild liquid
soap. Rinse thoroughly and replace the rubber-frothing no zzle onto the steam
wand.
6. The exterior of the Coffee Center can be wiped clean with a damp cloth.
7. Decalcify the 3 in 1 Coffee Center periodically. See the “Decalcifying Your 3 in 1
Coffee Center” section.
CLEANING YOUR 3 IN 1 COFFEE CENTER - CLEANING THE STEAM NOZZLE
• Milk residuals will build up in the tip of the steam nozzle after frothing milk. It is
very important that after you remove the frothing nozzle, you wipe the steam
nozzle clean with a damp cloth after each use. This will help prevent the steam
nozzle from clogging and will ensure good frothing results. Should the steam
nozzle become clogged, proceed as follows:
1. Ensure switches are in the “OFF” position, unplugged from electrical outlet, all
pressure has been released and the machine has cooled completely.
2. Remove the rubber frothing nozzle and the steam nozzle using the tool on the
end of the coffee measure spoon provided with your machine.
3. Clean the nozzle with warm water and ensure the small hole in the end is clear.
4. Reattach the steam nozzle, tighten steam nozzle securely and slide the rubberfrothing nozzle onto the steam wand.
10
Page 11

DECALCIFYING YOUR 3 IN 1 COFFEE CENTER - GENERAL
• Over time mineral deposits build up on internal parts of the coffeemaker and
effect the operation of the appliance causing the need for decalcification. The
frequency of decalcification depends on the hardness of your water and how
often the unit is used. Indications that decalcifying is necessary are:
o Increased noise during pr oduction
Excessive steaming
o
Longer brewing times
o
The pumping action stops before all of the water has been
o
pumped from the water reservoir
• If usage is regular, decalcifying should be carried out as follows:
o With soft water, decalcify once per year
o With medium water, decalcify every three (3) months
o With hard water, decalcify monthly
• We recommend the use of vinegar for decalcifying.
DECALCIFYING YOUR 3 IN 1 COFFEE CENTER
Espresso Maker
• Release all pressure and allow the entire unit to cool completely before
decalcifying.
• Pour 8 ounces (4-cup mark on espresso carafe) of fresh, cool undiluted white
household vinegar into the boiler chamber.
Following the instructions for “Preparing Espresso” run the vinegar through the
•
espresso making cycle except without the use of coffee grounds.
• Place a cup of cool water under the steam wand. When the solution has pumped
through the unit and is at the 2-cup mark on the espresso carafe, insert the
steam wand into the water and open the boiler valve for 10-15 seconds. Close
the boiler valve and allow the remaining vinegar to be pumped into the carafe.
• Repeat the steps above twice using clear cool water to rinse any remaining
traces of the vinegar from the system.
Coffeemaker
• Release all pressure and allow the entire unit to cool completely before
decalcifying.
• Pour 20 ounces (4-cup mark on coffee carafe) of fresh, cool undiluted white
household vinegar into the water reservoir.
Following the instructions for “Preparing Coffee” run the vinegar through the
•
coffee making cycle except without the use of coffee grounds.
• Repeat the steps above twice using clear cool water to rinse any remaining
traces of the vinegar from the system.
11
Page 12

PROBLEMS AND CAUSES
• Coffee or water leaks from coffee filter basket
o Filter is not properly placed or is folded over
o Basket is not properly closed
o Coffee carafe or carafe cover is not in place
o Too much coffee in filter
o Filter basket valve is dirty, broken or missing
• Coffee does not come out or is very slow
o No water in coffee water reservoir
o No coffee in filter holder
o Basket is not properly closed
o Coffee carafe or carafe cover is not in place
o Filter clogged because coffee is ground too fine or packed too tight
o Appliance needs to be decalcified
• Espresso leaking from the espresso filter holder
o Missing espresso filter
o Filter holder not properly inserted
o Filter holder not in “locked” position
o Coffee grounds not cleaned off the edge of the filter and holder
o Internal gasket in espresso head is dirty and needs to be cleaned
o Internal gasket in espresso head damaged and needs to be
replaced
• Espresso does not come out or is very slow
o No water in boiler reservoir
o No coffee in filter holder
o Filter clogged because coffee is ground too fine or packed too tight
o Appliance needs to be decalcified
• Steam does not come out of steam wand
o No water or not enough water in boiler chamber
o No coffee or steam plug in espresso filter holder
o Clogged steam/frothing nozzle
o Appliance needs to be decalcified
• Not enough froth when frothing milk
o Frothing nozzle too deep in milk or touching bottom of pitcher
o Top openings of frothing nozzle is immersed in the milk
o Pitcher is not cold enough
o Milk is not fresh or cold enough
o Milk is too thick
o Clogged steam/frothing nozzle
12
Page 13

PRODUCT WARRANTY
Appliance 1 Year Limited Warranty
West Bend® Housewares, LLC warrants this appliance from failures in the material and
workmanship for 1 year from the date of original purchase, provided the appliance is operated
and maintained in conformity with the West Bend® Housewares, LLC Instruction Manual. Any
failed part of the appliance will be repaired or replaced without charge at West Bend®
Housewares, LLC discretion. This warranty applies to indoor household use only.
The West Bend® Housewares, LLC warranty does not cover any damage, including
discoloration, to any non-stick surface of the appliance. The West Bend® Housewares, LLC
warranty is null and void, as determined solely by West Bend® Housewares, LLC, if the
appliance is damaged through accident, misuse or abuse, scratching, overheating, or if the
appliance is altered in any way or if used outside of an indoor household setting.
This warranty gives you specific legal rights. You may also have other rights, which may vary
from state to state.
THIS WARRANTY IS IN LIEU OF ALL IMPLIED WARRANTIES, INCLUDING WARRANTIES
OF MERCHANTABILITY, FITNESS FOR A PARTICULAR PURPOSE, PERFORMANCE, OR
OTHERWISE, WHICH ARE HEREBY EXCLUDED. IN NO EVENT SHALL WEST BEND®
HOUSEWARES, LLC BE LIABLE FOR ANY DAMAGES, WHETHER DIRECT, IMMEDIATE,
INCIDENTAL, FORESEEABLE, CONSEQUENTIAL, OR SPECIAL, ARISING OUT OF OR IN
CONNECTION WITH ITS APPLIANCE.
If you think the appliance has failed or requires service within its warranty period, return it to the
original place of purchase. For further details please contact the West Bend® Housewares
Customer Service Department at (262) 334-6949 or e-mail us at housewares@westbend.com.
Return shipping fees are non-refundable. Hand-written receipts are not accepted. West Bend
Housewares, LLC is not responsible for returns lost in transit.
Valid only in USA and Canada
REPLACEMENT PARTS
Replacement parts may be ordered direct from West Bend® Housewares, LLC by ordering
online at www.westbend.com: Replacement Parts. Or you may call or e-mail the service
department at the number/e-mail address listed above, or by writing to us at:
West Bend Housewares, LLC
Attn: Customer Service
P.O. Box 2780
West Bend, WI 53095
Be sure to include the catalog/model number of your appliance (located on the bottom/back of the
unit) and a description and quantity of the part you wish to order. Along with this include your name,
mailing address, Visa/MasterCard number, expiration date and the name as it appears on the card.
Checks can be made payable to West Bend Housewares, LLC. Call Customer Service to obtain
purchase amount. Your state’s sales tax and a shipping/processing fee will be added to your total
charge. Please allow two (2) weeks for delivery.
This manual contains important and helpful information regarding the safe use and care of your new West
Bend® Housewares, LLC product. For future reference, attach dated sales receipt for warranty proof of
purchase and record the following information:
Date purchased or received as gift: _______________________________________________________
Where purchased and price, if known: _____________________________________________________
Item Number and Date Code (shown bottom/back of product): ______________________________________
L5563D 02/06 West Bend® Housewares, LLC A Focus Products Group Company Printed in China
13
Page 14

CENTRE A CAFE 3-EN-1
Manuel d’instructions
Enregistrez ce produit et d’autres produits West Bend® Housewares sur notre site
Web :
www.westbend.com
Mises en garde importantes.....................................................................................2
Précautions liées à la chaleur ..................................................................................2
Précautions liées à l’électricité.................................................................................3
Précautions liées à la pression.................................................................................4
Précautions lors d’une utilisation à proximité d’enfants............................................ 4
Mises en garde relatives à la verseuse en verre......................................................4
Mode d’emploi du centre à café 3-en-1 – Première utilisation..................................5
Mode d’emploi du centre à café 3-en-1 – Préparation de café.................................6
Mode d’emploi du centre à café 3-en-1 – Préparation d’espresso ...........................7
Mode d’emploi du centre à café 3-en-1 – Préparation de cappuccino .....................8
Production de vapeur/mousse sans faire d’espresso...............................................9
Pression – Contrôle et dissipation..........................................................................10
Nettoyage du centre à café 3-en-1.........................................................................10
Détartrage du centre à café 3-en-1 ........................................................................ 11
Problèmes et causes.............................................................................................. 12
Garantie .................................................................................................................13
CONSERVEZ CE MANUEL D’INSTRUCTIONS POUR RÉFÉRENCE FUTURE
Page 15

MISES EN GARDE IMPORTANTES
Pour écarter tout risque de blessure et de dégâts matériels, lisez et suivez
toutes ces instructions et tous ces avertissements.
Lorsque vous utilisez des appareils électriques, prenez toujours les précautions de base,
notamment:
• Lisez toutes les instructions, y compris ces mises en garde importantes et le mode
d’emploi et d’entretien décrit dans ce manuel.
• N’utilisez pas l’appareil pour une autre utilisation que l’utilisation indiquée.
• Ne le laissez pas sans surveillance lorsqu’il est branché sur une prise électrique.
• Ne le placez pas sur ou près d’un brûleur à gaz ou électrique chaud ou dans un four
chauffé.
• N’utilisez pas un appareil qui fonctionne mal ou qui a été endommagé d’une autre
manière. Pour des renseignements concernant les réparations, voir la page de garantie.
• L’utilisation d’accessoires non recommandés par West Bend® Housewares risque de
provoquer un incendie, un choc électrique voire des blessures.
• N’essayez pas de réparer vous-même l’appareil.
• Pour usage domestique uniquement.
Pour écarter tout risque de brûlure, blessure et dégâts matériels, lisez et
suivez toutes ces instructions et tous ces avertissements.
PRECAUTIONS LIEES A LA CHALEUR
• Ne touchez pas les surfaces chaudes. Utilisez les poignées et des maniques ou des gants
de four pour soulever ou transporter le centre à café 3-en-1 lorsqu’il est chaud.
• Ne déplacez pas un appareil qui contient des aliments ou liquides chauds.
• Ne remplissez pas le réservoir d’eau avec l’appareil en marche. Éteignez l’appareil et
laissez-le refroidir avant de le remplir d’eau.
• Assurez-vous que le panier-filtre est correctement fermé durant la préparation du café. Si
ce n’est pas le cas, des projections d’eau ou de café chauds sont possibles.
• Assurez-vous que la verseuse en verre est en place durant le filtrage du café. Si ce n’est
pas le cas, un débordement d’eau ou de café chauds est possible.
• Durant le cycle de filtrage, ne retirez aucune partie de la cafetière, mis à part la verseuse,
sous peine de brûlure.
• Le couvercle de la verseuse doit être en place et correctement positionné sur la verseuse
durant le processus de filtrage pour éviter les projections d’eau ou de café chaud.
• Utilisez toujours la mouture correcte de café. Une mouture trop fine risque de boucher le
filtre et d’entraîner le débordement d’eau ou de café chauds.
• Soyez prudent lors du retrait du porte-filtre à espresso. Les composants métalliques
restent chauds après usage. Reportez-vous à la section «Précautions liées à la pression».
• Laissez la Cafetière 3 en 1 refroidir complètement avant la mise en place ou le retrait de
pièces et avant tout nettoyage ou tout rangement.
6
2
Page 16

Pour écarter tout risque d’électrocution, blessure et dégâts matériels, lisez et
suivez toutes ces instructions et avertissements.
PRECAUTIONS LIEES A L’ELECTRICITE
• Pour vous protéger contre les incendies, les chocs électriques et les blessures,
n’immergez pas le cordon, les fiches ni toute autre pièce électrique dans l’eau ou
dans d’autres liquides.
• N’utilisez pas un appareil dont le cordon ou la fiche est endommagé.
• N’utilisez pas cet appareil à l’extérieur.
• Ne branchez pas le cordon sur une prise électrique si les deux interrupteurs de
l’appareil ne sont pas sur position ARRÊT.
• Placez toujours les deux interrupteurs sur ARRÊT et débranchez l’appareil de la
prise électrique lorsqu’il n’est pas utilisé et avant de le nettoyer. Laissez
l’appareil refroidir avant la mise en place ou le retrait de pièces et avant tout
nettoyage.
• Votre centre à café 3-en-1 est doté d’un cordon court par mesure de précaution
pour éviter que quelqu’un ne tire ou ne trébuche dessus ou ne s’emmêle dedans.
Disposez le cordon pour qu’il ne pende pas d’un comptoir, d’une table ou d’une
autre surface plane.
• Même si l’utilisation d’une rallonge électrique n’est pas recommandée, si vous ne
pouvez pas vous en passer, veillez à ce que le cordon soit au moins de même
puissance que le centre à café 3-en-1 (la puissance est estampillée sous
l’appareil). Pour éviter que quelqu’un ne tire ou ne trébuche dessus, ou ne
s’emmêle dedans, disposez la rallonge pour qu’elle ne pende pas d’ un comptoir,
d’une table ou d’une autre surface plane.
• Utilisez une prise électrique compatible avec la fiche polarisée du ce ntre à café
3-en-1. Sur une fiche polarisée, une lame de la fiche est plus large que l’autre. Si
la fiche n’entre pas à fond dans la prise ou la rallonge, essayez de l’insérer dans
l’autre sens. Si elle ne rentre toujours pas, contactez un électricien qualifié. Ne
modifiez pas la fiche.
• N’utilisez pas une prise électrique ou une rallonge si la fiche est lâche à l’intérieur
de la prise ou si la prise ou la rallonge est chaude.
• Maintenez le cordon à l’écart des pièces à haute température de l’appareil et de
toute surface à haute température pendant l’utilisation.
3
Page 17

Pour éviter tout risque de brûlures et autres blessures, lisez et suivez toutes
ces instructions et tous ces avertissements.
PRECAUTIONS LIEES A LA PRESSION
• Assurez-vous toujours que le système est sous pression (cf. instructions, page 9)
avant de toucher le bouchon du compartiment à eau ou le porte-filtre à espresso.
• Assurez-vous que le porte-filtre est bien bloqué en position avant d’utiliser la
fonction espresso de l’appareil.
• Assurez-vous que le bouchon du compartiment à eau est vissé correctement et à
fond avant d’utiliser la fonction espresso de l’appareil.
• Ne touchez à aucun moment le bouchon du compartiment à eau durant le
processus de préparation de l’espresso ou avant dissipation totale de la
pression.
• Ne touchez à aucun moment le porte-filtre durant le processus de préparation de
l’espresso ou avant dissipation totale de la pression.
Pour éviter tout risque de brûlure et blessure aux enfants, lisez et suivez
toutes ces instructions et tous ces avertissements.
PRECAUTIONS LORS D’UNE UTILISATION AUTOUR D’ENFANTS
• Surveillez toujours les enfants.
• Ne laissez pas les enfants utiliser cet appareil ni se tenir à proximité de l’appareil,
dans la mesure où ses surfaces extérieures chauffent en cours d’utilisation.
• Ne laissez pas pendre le cordon à un endroit accessible à un enfant. Disposez le
cordon de manière à ce que personne ne puisse tirer ou trébucher dessus, ni
s’emmêler dedans.
.
PRECAUTIONS RELATIVES A LA VERSEUSE EN VERRE
• Les verseuses ont été conçues pour être utilisées uniquement avec cet appareil.
N’utilisez pas les verseuses fournies avec un autre appareil ou pour une autre
application.
• Ne placez pas les verseuses sur une surface chaude, un dessus de gamme, ou
dans un four chauffé.
• Ne placez pas la verseuse chaude sur une surface mouillée ou froide.
• N’utilisez pas la verseuse si elle est fêlée ou si sa poignée est mal serrée ou peu
solide.
• Ne nettoyez pas les verseuses avec des nettoyants, tampons de laine d’acier ou
d’autres produits abrasifs.
CONSERVEZ CES INSTRUCTIONS
4
Page 18

Bouchon à
vapeur
Panier-filtre
Porte-filtre
Adaptateur
2 tasses
Couvercle à
espresso
Verseuse à café
Verseuse à
espresso
Cuillère de
mesure
Socle
Interrupteur
d’alimentation de
la machine à
espresso
MODE D’MPLOI DU CENTRE A CAFE 3-
EN-1 – PREMIERE UTILISATION
1. Placez l’appareil sur une surface plane, sèche
et réfractaire, loin du bord du plan de travail.
2. Avec les deux interrupteurs sur ARRÊT,
branchez
le cordon sur une prise de terre de 120 volts (~)
uniquement.
3. Nous vous recommandons de vous familiariser
avec tous les composants de l’appareil avant
de l’utiliser pour la première fois. Lisez toutes
les instructions, mises en garde et remarques
avant d’utiliser l’appareil.
4. Lavez tous les composants amovibles dans de
l’eau savonneuse chaude, rincez bien, puis
essuyez.
5. Pour éliminer les résidus de production
susceptibles de se trouver encore dans
Valve de
dissipation
de vapeur
Bouchon du
compartiment à
eau
Porte-filtre à
café
Tige à vapeur
Couvercle de
verseuse
Grille de
débordement
Interrupteur
d’alimentation
de la cafetière
Tige à
vapeur
Buse à
vapeur
Buse à
vapeur/mousse
l’appareil, nous vous recommandons de faire 4 tasses d’espresso et au moins une
verseuse complète avec de l’eau seulement, sans café moulu. Durant le cycle de
filtrage, ouvrez la valve à vapeur pendant 5 à 10 secondes pour nettoyer la tige à
vapeur.
• Une petite quantité de fumée et/ou une légère odeur pourront se dégager lors de la
chauffe initiale en raison des huiles de fabrication – ceci est normal.
• Vous pourrez entendre des bruits d’expansion/contraction durant la chauffe et le
refroidissement initiaux – ceci est normal.
5
Page 19

MODE D’EMPLOI DU CENTRE A CAFE 3-EN-1 – PREPARATION DE CAFE
1. Placez l’appareil sur une surface plane, sèche et réfractaire, loin du bord du
plan de travail.
2. Avec les deux interrupteurs sur
terre de 120 volts (~) uniquement.
3. Pivotez le panier-filtre vers l’extérieur et placez un filtre à café en papier no. 4
dans le panier-filtre. Ajoutez la quantité de café souhaitée dans le filtre. Au
départ, nous recommandons une mesure (cuillère de mesure fournie) de café
moulu par tasse de café. Une fois que vous aurez pris l’habitude d’utiliser la
cafetière, vous pourrez ajuster la quantité de café en fonction de votre goût.
REMARQUE : Le café moulu doit être approprié pour une cafetière « goutte à
goutte ». N’utilisez pas de café moulu qui a la consistance d’une poudre, car
l’eau chaude ne passera pas au travers et risque de déborder avec le café.
4. Fermez le panier-filtre en le poussant fermement à l’intérieur, jusqu’à ce qu’il
touche la paroi de l’appareil et que vous entendiez un déclic. Si vous ne fermez
pas correctement le panier-filtre, l’eau ou le café chauds risquent de déborder.
REMARQUE : Assurez-vous que le filtre est correctement calé dans le panier et
qu’il ne se replie pas sur lui-même lorsque vous rentrez le panier-filtre sous
peine d’entraîner un débordement d’eau ou de café chauds ou la déviation de
l’eau, qui produira un café très léger.
5. Ouvrez le réservoir à eau et versez-y la quantité désirée d’eau fraîche propre
correspondant au nombre de tasses que vous voulez obtenir. Utilisez la
verseuse à café et ne dépassez jamais le repère de remplissage maximum du
réservoir. Pour un goût maximum, ne remplissez pas le réservoir d’eau chaude.
6. Placez la verseuse avec le couvercle en place sur la plaque chauffante.
Assurez-vous qu’elle est bien à plat à l’intérieur du cercle de la plaque
chauffante. REMARQUE : Le couvercle doit être correctement placé sur la
verseuse à café. Si ce n’est pas le cas, un débordement d’eau ou de café
chauds est possible.
7. Allumez l’appareil en appuyant sur l’interrupteur de marche/arrêt CAFFE. Le
voyant s’allume pour indiquer le début du filtrage. REMARQUE : Tant que le
voyant rouge est allumé, le café restera chaud. Si la verseuse à café est retirée
avant la fin du cycle de filtrage, elle devra être correctement remise en place sur
la plaque chauffante pour que le café puisse continuer à se faire et éviter les
projections d’eau et de café chauds.
8. Débranchez le cordon de la prise électrique après usage et laissez refroidir
complètement le centre à café 3-en-1 avant de le nettoyer.
• Utilisation de la fonction Pause ‘n Serve : La fonction Pause ‘n Serve vous
permet de vous verser une tasse de café avant la fin du cycle de filtrage. Pour un
arôme optimum, attendez que la moitié de la quantité de café soit faite avant de
retirer la verseuse. Remettez la verseuse à sa place sous 30 secondes pour que
le café puisse continuer à se faire et éviter le débordement d’eau ou de café
chauds. Pour éviter les brûlures, durant le cycle de filtrage, ne retirez
aucune partie de la cafetière, mis à part la verseuse.
ARRÊT, branchez le cordon sur une prise de
6
Page 20

MODE D’EMPLOI DU CENTRE A CAFE 3-EN-1 – PREPARATION D’ESPRESSO
Le verre de la carafe à espresso comporte des marques indiquant la mesure pour 2 et 4
tasses
: Une tasse de café express égale environ 2 onces, pas les 8 onces d’une tasse graduée.
Utilisez les marques de la carafe express pour toutes les mesur es su ivantes.
• 2 tasses d’eau = 2 tasses d’espresso
• 4 tasses d’eau = 4 tasses d’espresso.
1. Placez l’appareil sur une surface sèche, plane et résistant à la chaleur, loin du bord.
2. Lorsque les deux interupteurs sont positionnés sur « OFF », branchez le cordon dans une prise
secteur de 120 volts uniquement.
3. Placez le panier-filtre dans le support de filtre. Remplissez-le avec la quantité de café moulu
pour espresso souhaitée. Le panier-filtre est marqué à l’intérieur afin d’indiquer la mesure
correspondant à 2 et 4 tass es. Comprimez légèrement le café et retirez tout excès de café
reposant sur le bord du support de filtre. Cela permettra une adaptation correcte de celui-ci à la
tête de percolation. REMARQUE : Ne serrez pas trop le café ou ne mettez pas plus de café
que l’indique la marque des 4 tasses à l’intérieur du panier-filtre. Ceci risquerait de provoquer
une obstruction ou un débordement.
4. Insérez le support de filtre à l’intérieur de l’appareil. Pour insérer le support de filtre, alignez la
flèche située sur la protection du pouce du support de filtre en face de la flèche située du côté
gauche de la machine. Rabattez la protection du pouce vers l’arrière pour la dégager. Soulevez
le support de filtre à l’intérieur de la tête de percolation puis faites pivoter fermement le support
de filtre vers la droite jusqu’à ce qu’il ne puisse plus pivoter davantage. La flèche sur le support
de filtre devrait se trouver aussi loin à droite dans l’espace de verrouillage que possible. Si la
flèche ne se trouve pas au moins au milieu de l’espace de verrouillage, retirez le support de filtre
puis insérez-le à nouveau comme décrit ci-de ss us ju s qu’à ce que la flèche se trouve dans
l’espace de verrouillage. En suivant cette procédure, vous empêcherez le support de filtre d’être
déplacé lorsque la pression s’accumulera pend an t le proc es su s de pe rcolation.
5. Ouvrez le couvercle à charnière situé en haut à l’arrière de la machine à café puis dévissez le
couvercle de la bouilloire situé à l’intérieur en le tournant dans le sens inverse des aiguilles
d’une montre. Remplissez le compartiment de la bouilloire d’eau froide en utilisant les marques
indiquées sur la carafe à espresso en verre. REMARQUE : Ne versez jamais d’eau à l’intérieur
du compartiment de la bouilloire lorsque l’appareil est en marche si le réservoir est à haute
température. Ne remplissez jamais plus de 10 oz (300ml) d’eau dans le compartiment de la
bouilloire. Il est très important de remplir uniquement la quantité d’eau dont vous avez besoin à
l’intérieur du compartiment de la bouilloire. Votre mac hine à café aura toujours
besoin de tratier toute l’eau jusqu’à ce que le compartiment de la bouilloire soit
vide.
6. Remettez en place puis fixez bien le couvercle de la bouilloire en le tournant dans
le sens des aiguilles d’une montre.
7. Vérifiez que la grille anti-débordement et le socle sont en place. Placez le
couvercle de la carafe à espresso de sorte que l’ouverture du couvercle soit
orientée vers le bec verseur de la carafe. Placez la carafe à espresso sous le
support de filtre de sorte que le bec du support de filtre se trouve dans l’ouverture
de la carafe. Assurez-vous que la vanne de dégagement de la chaleur est totalement fermée
(dans le sens des aiguilles d’une montre). REMARQUE : Pour préparer l’espresso directement
dans deux tasses, fixez l’adaptateur pour deux tasses sur le support de filtre et assurez-vous
que les tasses sont placées directement au-d es so us des becs verseurs.
8. Pos itionnez l’interrupteur ESPRESSO su r « ON ». Il faut environ 2 minutes pour que l’eau
chauffe. L’eau traversera ensuite le café moulu sous la force de la pression jusque dans la
carafe de verre ou les tasses. Patientez jusqu’à ce que toute l’eau du compartiment de la
bouilloire ait été utilisée. Placez l’interrupteur ESPRESSO en position « OFF ».
• Ne dévissez pas le couvercle de la bouilloire pendant que la machine fonctionne. Patientez
jusqu’à la fin du cycle de percolation et jusqu’à ce que la totalité de l’eau et de la vapeur ait été
utilisée.
• Soyez prudent en retirant le support de filtre, car les pièce s m éta lli ques seront encore très
chaudes. Pour retirer le support de filtre, tournez le filtre vers la gauche, au-delà de la marque
de « verrouillage » jusqu’à ce que le support soit dégagé de la machine.
• Tenez la protection du pouce vers le bas pendant que vous jetez les grains de café moulu afin
de maintenir le filtre en place.
7
Page 21

MODE D’EMPLOI DU CENTRE A CAFE 3-EN-1 – PREPARATION DE
CAPPUCCINO
• 3 tasses d’eau = 2 tasses d’espresso, plus la vapeur pour transformer le lait en mousse
pour le cappuccino.
• Capacité maximale (bas de la bande métallique autour de la carafe à espresso en verre) =
4 tasses d’espresso, plus la vapeur pour transformer le lait en mousse pour le
cappuccino.
1. Suivez les étapes 1 à 7 de la section « Préparation de l’espresso » de ce manuel.
REMARQUE : Ne commecez pas la percolation avant l’étape 3 ci-dessous.
2. A l’aide d’un pichet en acier inoxydable, en céramique ou en verre résitant à des
températures élevées, remplissez de 4 oz de lait frais froid. Le pichet devrait avoir un
grand bec et pouvoir s’adapter au-dessous de la tige de production de vapeur. Pour une
meilleure performance, le pichet devrait être frais ou glacé.
3. Positionnez l’interrupteur ESPRESSO sur « ON ». Il faut environ 2 minutes pour que l’eau
chauffe. L’eau traversera ensuite le café moulu sous la force de la pression jusque dans la
carafe de verre ou les tasses.
4. Dès que l’espresso a rempli la carafe à espresso jusqu’à la marque de
la mousse sur la carafe, vous pouvez commencer à transformer le lait
en mousse. Immergez l’extrémité du bec de formation de mousse
jusqu’à la moitié du pichet de lait. REMARQUE : N’ouvrez pas la
vanne de dégagement de la vapeur avant d’avoir immergé le bec de
production de vapeur dans le lait ou celui-ci va éclabousser.
5. Tournez le bouton de dégagement de la vapeur dans le sens inverse
des aiguilles d’une montre pour relâcher la vapeur dans le lait.
Maintenez le pichet légèrement penché afin de toujours pouvoir voir
l’emplacement du bec lorsque vous transformez le lait en mousse. Le
bec de transformation du lait en mousse devrait se trouver au-dessous de la surface du
lait mais pas aussi suffisamment profond pour que le haut du bec de transformation du lait
en mousse se trouve dans le lait. Votre lait va immédiatement commencer à se
transformer en mousse. Au fur et à mesure que la mousse augmente, continuez à
abaisser le pichet de sorte que l’extrémité du bec de transformation du lait en mousse se
trouve toujours légèrement au-dessous de la surface de la mousse qui s’élève.
6. Lorsque le lait a doublé de volume, insérez le bec de transformation du lait en mousse
plus profondément dans le lait afin de le chauffer. Si vous utilisez un thermomètre à
boisson, la température idéale du lait à la fin de cette opration se situe entre 150° F et
170º F ou entre 66ºC et77º C. REMARQUE : Ne laissez pas le lait bouillir. Vous savez
que cela s’est produit si vous remarquez une croissance brusque dans le lait et si de
grosses bulles commencent à se former à la surface du lait.
7. Fermez le bouton de dégagement de la vapeur en le tournant dans le sens des aiguilles
d’une montre pendant que le bec est toujours immergé dans le lait. Ceci évitera toute
projection du lait chaud. Si vous préférez une mousse plus « compacte », laissez le lait
transformé en mousse reposer pendant une minute.
8. Laissez l’espresso terminer sa percolation. Déplacez l’interrupteur de l’espresso vers la
position « OFF ».
9. Versez l’espresso dans une tasse suffisamment grande pour permetre le mélange
espresso/lait transformé en mousse. Ajoutez le lait traité à la vapeur et passez une cuiller
sur le lait transformé en mouse.
• Ne dévissez le couvercle de la bouilloire pendant que la machine fonctionne. Patientez
jusqu’à la fin du cycle de percolation, jusqu’à ce que la totalité de l’eau et de la vapeur ait
été utilisée et que la machine soit hors tension.
• Soyez prudent en retirant le support de filtre car les pièces métalliques peuvent demeurer
à haute température pendant un certain temps.
• Nettoyez méticuleusement la tige de production de vapeur et le bec de transformation du
lait en mousse après chaque utilisation afin de garantir une transformation du lait en
mousse satisfaisante et sans disfonctionnement.
8 9
Page 22

PRODUCTION DE VAPEUR/MOUSSE SANS FAIRE D’ESPRESSO
(AVEC LE BOUCHON DE VAPEUR)
1. Placez les interrupteurs ESPRESSO et CAFFE sur ARRÊT. Assurez-vous que
le centre à café 3-en-1 est assez froid pour être manipulé et que la pression
s’est dissipée.
2. Insérez le bouchon dans le porte-filtre, puis insérez le porte-filtre dans l’appareil. Pour
insérer le porte-filtre, alignez la flèche située le garde-pouce du porte-filtre sur celle
située sur la gauche de l’appareil. Remontez le porte-filtre dans la tête de filtrage et
tournez le porte-filtre fermement vers la droite jusqu’à ce qu’il bute. La flèche du portefiltre doit être le plus à droite possible. Si elle n’atteint pas au minimum le centre de la
plage de blocage, retirez le porte-filtre et réinsérez-le comme indiqué ci-dessus
jusqu’à ce que la flèche se situe dans la plage de blocage. Suivez cette procédure
pour empêcher le déplacement du porte-filtre à mesure que la pression monte durant
le filtrage.
3. Pour une production de vapeur uniquement, ne remplissez pas la verseuse à
espresso en verre au-delà du repère « 2 tasses ». Remplissez le réservoir d’eau
froide. Tenez votre pichet rempli de 120 ml de lait froid prêt à chauffer.
4. Placez la verseuse à espresso en verre avec son couvercle sous le porte-filtre et
placez l’interrupteur espresso sur MARCHE. Desserrez immédiatement le bouton de
dissipation de vapeur.
5. Enfoncez la buse à vapeur à mi-hauteur dans le pichet de lait. Il faut compter 30 à 60
secondes après la mise en marche de l’appareil pour voir la vapeur sortir de la buse.
Tenez le pichet légèrement incliné pour pouvoir toujours voir la position de la buse
lorsque vous faites mousser le lait. La buse à vapeur doit se trouver sous la surface
du lait, mais sans être complètement immergée. Le lait commence à mousser.
Lorsque la mousse monte, continuez à abaisser le pichet pour que l’extrémité de la
buse à vapeur se trouve toujours juste en dessous de la surface de la mousse
montante.
6. Une fois que le lait a doublé de volume, insérez la buse à vapeur plus profondément
dans le lait pour chauffer le lait. REMARQUE : Si vous utilisez un thermomètre à
boissons, la température idéale du lait fini est comprise entre 150 et 170 ºF (66 et
77 ºC). Ne laissez pas bouillir le lait. Le lait bout lorsque son volume augmente
subitement et que de grandes bulles commencent à se former à la surface du lait.
7. Une fois l’opération terminée, desserrez le bouton de dissipation de vapeur en le
tournant dans le sens inverse des aiguilles d’une montre en gardant la buse plongée
dans le lait. pour éviter les projections de lait chaud.
Si vous préférez une mousse « ferme », laissez reposer le lait mousseux pendant une
minute.
8. Placez l’interrupteur espresso sur
REMARQUES : Si vous n’avez pas utilisé toute l’eau pour la production de vap eur,
procédez comme suit :
1. Avec l’appareil éteint, dissipez la vapeur sous pression résiduelle dans un autre
récipient.
2. Ne resserrez pas le bouton de dissipation de vapeur avant d’avoir dissipé toute la
vapeur ; cf. « Précautions liées à la pression » dans ce manuel.
ARRÊT.
Page 23

PRESSION – CONTROLE ET DISSIPATION
Contrôle de pression
1. Placez les interrupteurs espresso et caffe sur
prise électrique.
2. Ouvrez avec précaution la valve de dissipation de pression en tournant lentement le
bouton dans le sens inverse des aiguilles d’une montre. Si de la vapeur sort de la
buse, le réservoir est encore sous pression.
3. Si c’est le cas, resserrez la valve de dissipation de pression et procédez comme suit
pour dissiper la pression.
Dissipation de pression
1. Tenez un pichet d’eau sous la tige à vapeur et plongez la buse dans l’eau.
ARRÊT et débranchez l’appareil de la
2. Desserrez lentement la valve de dissipation de pression et laissez s’échapper la
vapeur dans l’eau.
3. Dès que la vapeur cesse de sortir de la tige, ouvrez lentement le bouchon du
réservoir.
NETTOYAGE DU CENTRE A CAFE 3-EN-1 - GENERALITES
1. Placez les deux interrupteurs sur ARRÊT, débranchez le cordon de la prise
électrique après usage et laissez refroidir complètement le centre à café 3-en-1
avant de le nettoyer.
2. Retirez et jetez le marc de café à espresso et le filtre jetable le contenant. Nettoyez
la tête de filtrage avec un chiffon humide.
3. Retirez et nettoyez le porte-filtre à espresso, le godet, le panier-filtre, la grille de
débordement, la base de la grille, les verseuses et les couvercles dans une solution
d’eau chaude et de savon liquide doux. Rincez soigneusement et séchez.
4. S’il reste de l’eau dans les réservoirs, videz-les par l’ouverture en haut de l’appareil,
en le retournant. Remarque : Ne nettoyez pas l’intérieur des réservoirs d’eau avec
un chiffon ou du papier absorbant sous peine d’y laisser des particules qui risquent
de boucher les petits orifices de la cafetière. Il vous suffit de rincer périodiquement
les réservoirs à l’eau froide.
5. Retirez la buse à vapeur en caoutchouc de la tige à vapeur. Nettoyez
minutieusement la buse et la tige avec une solution d’eau chaude et du savon liquide
doux. Rincez bien et remettez la buse en caoutchouc sur la tige à vapeur.
6. L’extérieur de l’appareil peut être nettoyé avec un chiffon humide.
7. Détartrez périodiquement le centre à café 3-en-1. Reportez-vous à la section
« Détartrage du centre à café 3-en-1 »
NETTOYAGE DU CENTRE A CAFE 3-EN-1 - NETTOYAGE DE LA BUSE A VAPEUR
• Des résidus de lait s’accumuleront dans l’extrémité de la buse après avoir fait
mousser le lait. Il est très important, après avoir retiré la buse à vapeur, de la nettoyer
avec un chiffon humide après chaque utilisation. Cette précaution permet d’empêcher
la buse de se boucher et garantit une mousse de qualité. Si la buse à vapeur se
bouche, procédez comme suit :
1. Assurez-vous que : les interrupteurs sont sur ARRÊT, l’appareil est débranché de la
prise électrique, toute la pression a été dissipée et l’appareil a complètement refroidi.
2. Retirez la buse en caoutchouc et son capuchon à l’aide de l’outil situé à l’extrémité de
la cuillère de mesure du café fournie avec l’appareil.
3. Nettoyez la buse à l’eau chaude et assurez-vous que le petit orifice au bout est
dégagé.
4. Rattachez la buse, fixez-y le capuchon en serrant bien et glissez la buse en
caoutchouc sur la tige à vapeur.
10
Page 24

DETARTRAGE DU CENTRE A CAFE 3-EN-1 - GENERALITES
• Avec le temps, des dépôts calcaires s’accumuleront sur les composants internes de
la cafetière et compromettront le fonctionnement de l’appareil, entraînant la nécessité
d’un détartrage. La fréquence de détartrage dépend de la dureté de l’eau et de la
fréquence d’utilisation de l’appareil. Signes d’une décalcification nécessaire :
o Appareil plus bruyant en cours de fonctionnement
o Vapeur excessive
o Cycles de filtrage plus longs
o Arrêt du pompage avant que toute l’eau n’ait été pompée du réservoir
• Si vous utilisez régulièrement la cafetière, le détartrage doit se faire à la fréquence
suivante :
o Avec de l’eau douce, détartrez une fois par an
o Avec de l’eau de dureté moyenne, détartrez tous les 3 mois
o Avec de l’eau dure, détartrez une fois par mois
• Nous recommandons l’utilisation de vinaigre pour le détartrage.
DETARTRAGE DU CENTRE A CAFE 3-EN-1
Machine à espresso
• Dissipez toute la pression et laissez refroidir complètement l’appareil avant de
détartrer.
• Versez 240 ml (repère 4 tasses de la verseuse à espresso) de vinaigre blanc non
dilué frais dans le réservoir à eau.
•
En suivant les instructions de la section « Préparation d’espresso », passez le
vinaigre en utilisant le cycle espresso, mais sans utiliser de café.
• Placez une tasse d’eau fraîche sous la tige à vapeur. Une fois la solution pompée à
travers l’appareil et au repère « 2 tasses » sur la verseuse à espresso, insérez la tige
dans l’eau et desserrez la valve de dissipation de pression pendant 10 à 15
secondes. Resserrez la valve et attendez que le vinaigre résiduel soit pompé dans la
verseuse.
• Reprenez deux fois la procédure ci-dessus en utilisant de l’eau fraîche et propre pour
rincer toutes les traces résiduelles de vinaigre du système.
Cafetière
• Dissipez toute la pression et laissez refroidir complètement l’appareil avant de
détartrer.
• Versez 600 ml (repère 4 tasses de la verseuse) de vinaigre blanc non dilué frais dans
le réservoir à eau.
•
En suivant les instructions de la section « Préparation d’espresso », passez le
vinaigre en utilisant le cycle café, mais sans utiliser de café.
• Reprenez deux fois la procédure ci-dessus en utilisant de l’eau fraîche et propre pour
rincer toutes les traces résiduelles de vinaigre du système.
11
Page 25

PROBLEMES ET CAUSES
• Du café ou de l’eau fuit du panier-filtre.
o Le filtre est mal installé ou replié
o Le panier n’est pas bien rentré
o La verseuse ou son couvercle ne sont pas installés
o Trop de café dans le filtre
o La valve du panier-filtre est sale, cassé ou manquante
• Le café ne sort pas ou sort très lentement
o Pas d’eau dans le réservoir
o Pas de café dans le filtre
o Le panier n’est pas bien rentré
o La verseuse ou son couvercle ne sont pas installés
o Filtre bouché car le café moulu est trop fin ou trop tassé
o L’appareil doit être détartré
• De l’espresso fuit du porte-filtre
o Pas de filtre à espresso
o Porte-filtre mal inséré
o Porte-filtre non bloqué en position
o Café moulu sur le bord du filtre et du porte-filtre
o Joint interne à la tête à espresso sale et nécessitant un nettoyage
o Joint interne à la tête à espresso endommagée et nécessitant
un remplacement
• L’espresso ne sort pas ou sort très lentement
o Pas d’eau dans le réservoir
o Pas de café dans le filtre
o Filtre bouché car le café moulu est trop fin ou trop tassé
o L’appareil doit être détartré
• La vapeur ne sort pas de la tige à vapeur
o Pas d’eau ou pas assez d’eau dans le réservoir
o Pas de café ni bouchon à vapeur dans le porte-filtre à espresso
o Buse à vapeur bouchée
o L’appareil doit être détartré
• Pas assez de mousse dans le lait
o Buse à vapeur plongée trop profondément dans le lait ou qui touche le
fond du pichet
o Les orifices supérieurs de la buse à vapeur sont plongés dans le lait
o Pichet pas assez froid
o Lait pas assez frais ou froid
o Lait trop épais
o Buse à vapeur bouchée
12
Page 26

GARANTIE DU PRODUIT
Garantie limitée 1 an pour l’appareil
West Bend® Housewares, LLC garantit que cet appareil sera dépourvu de vices de matériel et
de fabrication pendant 1 an à partir de la date d’achat d’origine, à condition de l’appareil soit
utilisé et entretenu conformément au Manuel d’instructions de West Bend® Housewares, LLC.
Tout composant défectueux de l’appareil sera réparé ou remplacé gratuitement, à la discrétion
de West Bend® Housewares, LLC. Cette garantie s’applique uniquement à un usage
domestique intérieur.
La garantie West Bend® Housewares, LLC ne couvre pas les dommages, y compris la
décoloration, de la surface anti-adhésive de l’appareil. La garantie West Bend® Housewares,
LLC sera nulle et non avenue, selon la détermination exclusive de West Bend® Housewares,
LLC, si l’appareil est endommagé suite à un accident, une utilisation abusive, des rayures, une
surchauffe ou si l’appareil est modifié d’une manière quelconque ou utilisé en dehors du cadre
de la maison ou à l’extérieur.
Cette garantie vous donne des droits légaux spécifiques. Vous pourrez également avoir
d’autres droits, variables d’une province à l’autre.
CETTE GARANTIE REMPLACE TOUTES LES GARANTIES TACITES, Y COMPRIS LES
GARANTIES DE QUALITÉ COMMERCIALE, D’ADAPTATION À UN BUT PARTI CULIER, DE
PERFORMANCE OU AUTRES GARANTIES EXCLUES EN CECI. WEST BEND®
HOUSEWARES, LLC. NE POURRA EN AUCUN CAS ÊTRE TENUE POUR RESPONSABLE
DE DOMMAGES, QU’ILS SOIENT DIRECTS, IMMÉDIATS, ACCESSOIRES, PRÉVISIBLES,
INDIRECTS OU SPÉCIAUX, RÉSULTANT DE OU LIÉS À SON APPAREIL.
Si vous pensez que l’appareil est en panne ou exige une maintenance au cours de sa période
de garantie, ramenez-le au lieu d’achat initial. Pour des détails, veuillez contacter le service
clientèle West Bend® Housewares au (262) 334-6949 ou envoyez-nous un courriel à
housewares@westbend.com. Les frais d’affranchissement de retour ne sont pas
remboursables. Les reçus manuscrits ne sont pas acceptés. West Bend Housewares, LLC
n’est pas responsable des retours égarés en cours de transport.
Valable uniquement aux États-Unis et au Canada
PIECES DETACHEES
Des pièces détachées pourront être commandées directement auprès de West Bend® Housewares,
LLC. sur le site www.westbend.com : Replacement Parts. Vous pouvez également appeler ou
envoyer un courriel au service après-vente aux coordonnées indiquées ci-dessous, ou nous écrire à
l’adresse :
West Bend Housewares, LLC
Attn: Customer Service
P.O. Box 2780
West Bend, WI 53095
Veillez à inclure le numéro de référence/modèle de votre appareil (situé en dessous ou au dos de
l’appareil) et une description et la quantité de la pièce que vous voulez commander. Avec ces
informations, fournissez votre nom, votre adresse postale et votre numéro de carte Visa/MasterCard,
avec sa date d’expiration et le nom tel qu’il apparaît sur la carte. Les chèques peuvent être libellés à
l’ordre de West Bend Housewares, LLC. Appelez le service clientèle pour obtenir le montant de
l’achat. La taxe de vente pratiquée dans votre province ainsi qu’un forfait d’expédition seront ajoutés
à votre facture. Comptez deux (2) semaines pour la livraison.
Ce manuel contient des informations importantes et utiles concernant l’utilisation et l’entretien sans risque
de votre nouveau produit West Bend® Housewares, LLC. À titre de référence future, attachez votre
justificatif d’achat daté en cas de réparation sous garantie et notez ici les informations suivantes :
Date d’achat ou de réception comme cadeau : _______________________________________________
Lieu d’achat et prix, si connu : ___________________________________________________________
Numéro de référence de l’article et code de date (en dessous ou au dos du produit) : ________________
L5563D 02/06 West Bend® Housewares, LLC A Focus Products Group Company Printed in China
13
Page 27

CAFETERA 3 EN 1
Manual de instrucciones
Registre éste y otros productos de West Bend® Housewares en nuestro sitio:
www.westbend.com
Precauciones importantes........................................................................................2
Precauciones de calentamiento...............................................................................2
Precauciones eléctricas ...........................................................................................3
Precauciones sobre presión.....................................................................................4
Precauciones de uso cerca de niños........................................................................4
Precauciones sobre la jarra de vidrio.......................................................................4
Uso de la cafetera 3 en 1 – Primer uso.................................................................... 5
Uso de la cafetera 3 en 1 – Preparación de café ..................................................... 6
Uso de la cafetera 3 en 1 – Preparación de café expreso........................................7
Uso de la cafetera 3 en 1 – Preparación de café capuchino....................................8
Vaporización/espumación sin preparar café expreso...............................................9
Presión - Inspección y liberación............................................................................ 10
Limpieza de la cafetera 3 en 1...............................................................................10
Descalcificación de la cafetera 3 en 1.................................................................... 11
Problemas y causas...............................................................................................12
Garantía.................................................................................................................13
CONSERVE ESTE MANUAL DE INSTRUCCIONES COMO
REFERENCIA PARA EL FUTURO
Page 28

PRECAUCIONES IMPORTANTES
Para evitar lesiones personales o daños materiales, lea y acate todas las
instrucciones y advertencias.
Al utilizar aparatos eléctricos, siempre deben acatarse las precauciones básicas de
seguridad incluyendo las siguientes:
• Lea todas las instrucciones, incluyendo estas precauciones importantes, así como las
instrucciones de uso y cuidado en este manual.
• No utilice el aparato para usos distintos del indicado.
• No deje la unidad desatendida cuando esté enchufada en un tomacorriente eléctrico.
• No coloque el aparato sobre ni cerca de un quemador a gas o eléctrico, ni tampoco en un
horno calentado.
• No lo opere cuando no funcione correctamente o haya sido dañado de algún modo. Para
informacion sobre el centro de servicio, refierase a la página de garantía.
• El uso de accesorios no recomendados por West Bend® Housewares pudiera causar
fuegos, descargas eléctricas o lesiones a la personas.
• No trate de reparar este aparato usted mismo.
• Para uso doméstico solamente.
Para evitar quemaduras, lesiones personales o daños materiales, lea y acate
todas las instrucciones y advertencias.
PRECAUCIONES DE CALENTAMIENTO
• No toque las superficies calientes. Use las manijas y tomaollas o guantes para el horno si
va a levantar o trasladar la cafetera 3 en 1 cuando esté caliente.
• No traslade un aparato que contenga alimentos o líquidos calientes.
• No llene el depósito de agua ni el hervidor mientras el aparato esté encendido. Apague la
máquina y deje que se enfríe antes de llenarla con agua.
• Cerciórese de que la cesta esté correctamente cerrada durante el proceso de
preparación. De lo contrario el agua o el café calientes podrían derramarse.
• Cerciórese de que la jarra de vidrio esté en su lugar cuando prepare café. De lo contrario,
el agua o el café calientes se derramarán.
• Durante el ciclo de preparación de café, no retire ninguna pieza de la cafetera aparte de la
jarra, ya que podría quemarse.
• Durante el proceso de preparación de café, la tapa de la jarra debe estar en su lugar y
correctamente situada sobre la misma, porque de lo contrario el agua o el café calientes
podrían derramarse.
• Siempre use café correctamente molido. El usar café demasiado fino podría obstruir el
filtro y hacer que el agua/café calientes se derramen.
• Tenga cuidado al retirar el portafiltro de café expreso. Las piezas metálicas permanecen
calientes tras el funcionamiento. Consulte la sección Precauciones sobre presión.
• Deje que el Café Centro 3 en 1 se enfrie completamente antes de poner o quitar alguna
parte, y antes de limpiar o guardar.
2
Page 29

Para evitar descargas eléctricas, lesiones personales o daños materiales, lea y
acate todas las instrucciones y advertencias.
PRECAUCIONES ELÉCTRICAS
• Como protección contra fuegos, descargas eléctricas y lesiones a las personas,
nunca sumerja el cordón eléctrico, los enchufes o cualquier parte eléctrica en
agua u otros líquidos.
• No opere ningún aparato cuyo cable de alimentación o enchufe estén dañados.
• No use este aparato a la intemperie.
• No conecte el cable en el tomacorriente si los dos interruptores de alimentación
no están en la posición “OFF” (apagada).
• Siempre coloque ambos interruptores en dicha posición y desenchufe el aparato
del tomacorriente cuando no esté en uso y antes de limpiarlo. Deje que se enfrie
antes de poner o quitar alguna parte, y antes de limpiar.
• La cafetera 3 en 1 tiene un cable corto como medida de precaución para im pedir
lesiones que resulten del halar, tropezarse o enredarse en el cable. Coloque el
cable de tal modo que no cuelgue del borde de un mostrador, mesa u otras
superficies.
• No se recomienda usar un cable de extensión, pero si debe hacerlo, cerciórese
de que el vatiaje sea igual o superior al de la cafetera 3 en 1 (el consumo de
vatios está estampado debajo de la base). Coloque el cable de tal modo que n o
cuelgue del borde de un mostrador, mesa u otras superficies a fin de impedir
lesiones que resulten del halar, tropezarse o enredarse en el mismo.
• Use un tomacorriente apto para el enchufe polarizado de la cafetera 3 en 1. En
un enchufe polarizado, una hoja es más ancha que la otra. Invierta el enchufe si
éste no encaja completamente en el tomacorriente o el cable de extensión. Si
todavía no encaja, consulte con un electricista calificado. No altere el enchufe.
• No use un tomacorriente o cable de extensión si el enchufe calza flojamente, o si
el tomacorriente o el cable de extensión se calientan.
• Mantenga el cable alejado de las piezas calientes del aparato y superficies
calientes durante el uso.
3
Page 30

Para prevenir quemaduras u otras lesiones, lea y acate todas las instrucciones
y advertencias.
PRECAUCIONES SOBRE PRESIÓN
• Siempre verifique si el sistema está bajo presión (consulte las instrucciones de la
página 9) antes de tocar la tapa del hervidor o el portafiltro de café expreso.
• Cerciórese de que el portafiltro esté trabado antes de activar la función de café
expreso en el aparato.
• Cerciórese de que la tapa del hervidor esté correcta y totalmente apretada antes
de activar la función de café expreso.
• No toque la tapa del hervidor en ningún momento durante el proceso de
preparación de café expreso; espere hasta que la unidad haya libera do
totalmente la presión.
• No toque el portafiltro de café expreso en ningún momento durante el proceso
de preparación; espere hasta que la unidad haya liberad o totalmente la presión.
Para prevenir quemaduras u otras lesiones en los niños, lea y acate todas las
instrucciones y advertencias.
PRECAUCIONES DE USO CERCA DE NIÑOS
• Siempre supervise de cerca cuando haya niños.
• No permita que los niños usen la cafetera 3 en 1, ni que haya niños en las
inmediaciones de la misma, ya que las superficies exteriores de ésta se
calientan durante el uso.
• No permita que el cable cuelgue de algún borde, donde pueda ser alcanzado por
los niños. Coloque el cable de modo que impida lesiones que resulten del halar,
tropezarse o enredarse en el mismo.
.
PRECAUCIONES SOBRE LA JARRA DE VIDRIO
• Las jarras están diseñadas para usarse exclusivamente con este aparato. No
use las jarras con ningún otro aparato ni les dé un uso distinto de aquel para el
cual están diseñadas.
• No ponga los carafes en las superficies calientes, una tapa de la gama, o en un
horno calentado.
• No coloque una jarra caliente sobre una superficie húmeda o fría.
• No use la jarra si está agrietada o tiene la manija suelta o defectuosa.
• No limpie las jarras con esponjas metálicas ni limpiadores o materiales
abrasivos.
CONSERVE ESTAS INSTRUCCIONES
4
Page 31

Tapón de vapor Válvula de
Cesta para el
filtro
Portafiltro Portafiltro de
Adaptador para
2 tazas
Tapa para café
expreso
Jarra para café
Jarra para café
expreso
Cuchara
dosificadora
Base
Interruptor de
alimentación de
la cafetera
expreso
USO DE LA CAFETERA 3 EN 1 – PRIMER USO
1. Coloque el aparato sobre una superficie seca,
nivelada y resistente al calor, lejos de todo
borde.
2. Con ambos interruptores en la posición “OFF”
(apagado), enchufe el cable sólo en un
tomacorriente de 120 voltios de CA.
3. Familiarícese con todas las piezas de la
máquina antes de usarla por primera vez. Lea
todas las instrucciones, precauciones y notas
antes de usar
el aparato.
4. Lave todas las piezas sueltas en agua caliente
con detergente, enjuáguelas totalmente y
séquelas.
liberación de
vapor
Tapa del
hervidor
café
Varilla de vapor
Tapa de la jarra
Rejilla de
derrame
Interruptor de
alimentación de
la cafetera
Varilla de
vapor
Boquilla
vaporizadora
Boquilla
espumadora
5. Para eliminar los residuos de materiales de
fabricación que pudieran haber quedado en el
aparato, se recomienda preparar 4 tazas de
café expreso y al menos una jarra completa de café de filtro solamente con
agua, es decir, sin agregar café molido. Durante el funcionamiento, abra la
válvula de vapor durante 5 a 10 segundos para limpiar la varilla de vapor.
• Puede notarse algo de humo o un olor extraño debido a los aceites emple ados
en el proceso de fabricación – esto es normal.
• Asimismo, pueden notarse algunos sonidos de expansión o contracción leves
durante el calentamiento o enfriamiento – lo cual también es normal.
5
Page 32

USO DE LA CAFETERA 3 EN 1 – PREPARACIÓN DE CAFÉ
1. Coloque el aparato sobre una superficie seca, nivelada y resistente al calor,
lejos de todo borde.
2. Con ambos interruptores en la posición “OFF” (apagado), enchufe el cable sólo
en un tomacorriente de 120 voltios de CA.
3. Gire hacia afuera la cesta de preparación y coloque un filtro de papel No. 4 en
la cesta. Agregue al filtro la cantidad deseada de café. Para comenzar se
recomienda usar una medida (cuchara dosificadora incluida) de café molido por
cada taza de café. Tras haber usado la cafetera un par de veces, ajuste la
cantidad de café a su gusto. NOTA: Use café que haya sido molido en forma
apta para una cafetera tipo “goteo”. No use café molido que tenga una
consistencia similar al café en polvo, ya que ello impedirá que el agua pas e por
el café, o hará que éste o el agua calientes se derramen.
4. Cierre la cesta firmemente hasta que toque el lado de la máquina y calce en su
lugar emitiendo un chasquido. De lo contrario el agua o el café calientes
podrían derramarse. NOTA: Cerciórese de que el filtro esté correctamente
asentado en la cesta y no se doble sobre sí mismo al cerrarla, ya que el agua o
el café calientes podrían derramarse o no pasar por el café produciendo un café
de calidad deficiente.
5. Abra el depósito de agua abisagrado y vierta la cantidad deseada de agua fría
según la cantidad de tazas de café que preparará. Al usar la jarra, nunca vierta
agua en el depósito más allá del nivel máximo marcado. Para obtener un sabor
óptimo no use agua tibia ni caliente en el depósito.
6. Coloque la jarra tapada en la placa de calentamiento. Cerciórese de que la jarra
quede asentada a ras sobre el círculo interno de la placa. NOTA: La tapa de la
jarra debe estar correctamente situada sobre la misma. De lo contrario el agua
o el café calientes podrían derramarse.
7. Encienda la máquina mediante el interruptor CAFFE. La luz indicadora se
iluminará señalando que se ha iniciado el proceso de preparación. NOTA: El
café se mantendrá tibio mientras la luz indicadora roja permanezca iluminada.
Si se retira la jarra antes de que concluya el ciclo de preparación de café, ésta
luego deberá colocarse correctamente en la placa de calentamiento para que e l
café pueda continuar preparándose e impedir que éste o el agua calientes se
derramen.
8. Desenchufe el cable eléctrico del tomacorriente después de usar la cafetera 3
en 1 y deje que se enfríe totalmente antes de limpiarla.
• Uso de la función Pause ‘n Serve (pausa y servir): Esta función permite
servir una taza de café durante el proceso de preparación. Para obtener un
sabor óptimo, deje que se haya preparado la mitad del café antes de retirar la
jarra. Vuelva a poner la jarra dentro de 30 segundos para que el café pueda
seguir preparándose e impedir que éste o el agua calientes se derramen. Para
impedir lesiones por quemaduras, no retire ninguna pieza de la cafetera
aparte de la jarra durante el funcionamiento.
6
Page 33

USO DE LA CAFETERA 3 EN 1 – PREPARACIÓN DE CAFÉ EXPRESO
La jarra de vidrio para el café exprés tiene marcas para 2 y 4 tazas: Una taza de café
expreso tiene aproximadamente 2 onzas y no es igual a una taza de medición de 8 onzas.
Para todas las mediciones a continuación, use las marcas para café expreso indicadas en la
jarra:
• 2 tazas de agua = 2 tazas de café exprés
• 4 tazas de agua = 4 tazas de café exprés
1. Coloque el artefacto sobre una superficie seca, nivelada, y resistente al calor, lejos de
cualquier borde.
2. Con ambos interruptores en la posición APAGADA ("OFF'"), enchufe el cordón eléctrico
solamente en un tomacorriente de 120 voltios CA.
3. Coloque la cesta del filtro de la cafetera exprés en el portafiltros. Llénelo con la cantidad
deseada de café exprés molido. La cesta del filtro está marcada en la parte de adentro
para 2 y 4 tazas. Comprima levemente al café y elimine cualquier café excedente del
borde del portafiltros. Esto asegurará que el portafiltros encaje bien en el cabezal de la
cafetera. NOTA: No comprima demasiado al café ni ponga más café que el que la marca
de 4 tazas en la cesta del filtro indica. Esto puede ocasionar taponamiento o derrame.
4. Inserte el portafiltros dentro del artefacto. Para insertar el portafiltros, alinee la flecha
ubicada en el protector del pulgar del portafiltros con la flecha en el lado izquierdo de la
máquina. Voltee el protector del pulgar hacia atrás y apártelo. Levante el portafiltros
hasta el cabezal de la cafetera y gírelo firmemente hacia la derecha hasta que no pueda
girar más. La flecha del portafiltros deberá estar lo más a la derecha posible en la zona de
cierre. Si la fecha no está por lo menos en el medio de la zona de cierre, retire el
portafiltros e insértelo de nuevo tal como se indica en el párrafo anterior hasta que la
fecha esté dentro del área de cierre. El acatar este procedimiento prevendrá que el
portafiltros se mueva de su sitio al aumentar la presión cuando se prepara el café.
5. Abra la tapa embisagrada ubicada en la parte superior trasera del centro de café y
desenrosque el tapón del hervidor ubicado adentro girándolo en dirección contraria a las
agujas del reloj. Llene la cámara del hervidor con agua fría usando las marcas indicadas
en la jarra de vidrio para el café exprés. NOTA: Nunca vierta agua en la cámara del
hervidor mientras el artefacto esté encendido si el tanque está caliente. Nunca llene más
de 10 onzas (300ml) de agua en la cámara del hervidor. Es sumamente importante llenar
la cámara del hervidor solamente con la cantidad de agua estrictamente necesaria. Su
máquina de café siempre necesitará procesar toda el agua hasta vaciarse la
cámara del hervidor.
6. Vuelva a colocar el tapón del hervidor y apriételo girándolo en dirección de las
agujas del reloj
7. Asegúrese de que la parrilla contra derrames y la base estén en su sitio. Tape
la jarra del café exprés con su tapa de manera que los puntos de abertura de
la tapa apunten hacia el pico de la jarra. Coloque la jarra del café exprés
debajo del portafiltros de manera que la boquilla del portafiltros quede colocado en la
abertura de la jarra. Asegúrese de que la válvula de liberación del vapor esté totalmente
cerrada (en dirección de las agujas del reloj). NOTA: Para prepara el café exprés
directamente a dos tazas, acople el adaptador de dos tazas al portafiltros y asegúrese de
colocar las tazas directamente debajo de las boquillas.
8. Coloque el interruptor EXPRESSO en la posición "ON" (encendido). Le tomará al agua
aproximadamente 2 minutos en calentarse. El agua entonces será forzada a través del
café molido a la jarra de vidrio o a las tazas. Espere hasta que se haya consumido toda el
agua en la cámara del hervidor. Coloque el interruptor EXPRESSO en la posición "OFF"
(apagado).
No desenrosque el tapón del hervidor mientras la máquina esté en operación. Espere hasta
•
haberse completado el ciclo de preparación y se haya usado todo el agua y vapor.
• Tenga cuidado al retirar el portafiltros, pues las part es metálicas pudieran estar aún calientes.
Para retirar el portafiltros, gírelo hacia la izquierda, más allá de las marcas de "cierre" ("lock")
hasta que el filtro se suelte de la máquina.
• Para mantener al filtro en sitio, apriete el protector de pulgar hacia abajo mientras desecha los
posos de café..
7
Page 34

USO DE LA CAFETERA 3 EN 1 – PREPARACIÓN DE CAFÉ CAPUCHINO
• 3 tazas de agua = 2 tazas de café exprés, más el vapor para espumar la leche para
el capuchino
• Máxima capacidad (parte inferior de la banda de metal alrededor de la jarra de vidrio
para el café exprés) = 4 tazas de café exprés, más el vapor para espumar la leche
para el capuchino.
1. Siga los pasos 1-7 en la sección "Preparación de un exprés" de este manual. NOTA: No
empiece a preparar el café hasta el paso 3 abajo.
2. Llene una jarra de acero inoxidable, cerámica o de vidrio resistente a altas temperaturas
con 4 onzas de leche fresca fría. La jarra deberá de ser de boca ancha y deberá caber
debajo del vástago de vapor. Para un mejor rendimiento la jarra deberá estar fría o
congelada.
3. Coloque el interruptor EXPRESSO en la posición "ON" (encendido). Le tomará al agua
aproximadamente 2 minutos en calentarse. El agua entonces será forzada a través del
café molido a la jarra de vidrio o las tazas.
4. Tan pronto como el café exprés hay llenado la jarra de café hasta la
marca de la espuma en la jarra, podrá comenzar a espumar la leche.
Sumerja la punta de la boquilla para espumar a la mitad de la jarra de
leche. NOTA: No abra la válvula de liberación de vapor antes de
sumergir la boquilla de vapor en la leche o de lo contrario la leche
salpicará.
5. Gire la perilla de liberación de vapor en la dirección contraria a las
agujas del reloj para liberar vapor dentro de la leche. Mantenga la jarra
de leche levemente inclinada de manera que siempre pueda ver la
posición de la boquilla mientras espuma la leche. La boquilla de
espumar deberá mantenerse debajo de la superficie de la leche pero no tan abajo que
permita que la parte superior de dicha boquilla entre en la leche. La leche empezará a
espumarse inmediatamente. En la medida que la espuma suba, siga bajando la jarra de
manera que la punta de la boquilla de espumar siempre se encuentre levemente por
debajo de la superficie de la espuma ascendiente.
6. Cuando se haya doblado el volumen de la leche inserte la boquilla de espumar más
profundamente dentro de la leche con el fin de calentarla. Si usa un termómetro para
bebidas, la temperatura ideal de la leche ya calentada es de 150-170ºF o 66º-77ºC.
NOTA: No permita que hierva la leche. Sabrá que esto ha ocurrido cuando hay un
crecimiento repentino de la leche y se empiezan a formar burbujas grandes en la
superficie de la misma.
7. Cierre la perilla de liberación de vapor girándola en la dirección de las agujas del reloj
mientras la boquilla aún esté inmersa en la leche. Esto evitará que salpique la leche
caliente. Si prefiere una espuma "tiesa", deje reposar la leche espumada durante un
minuto.
8. Permita que el café exprés se termine de colar. Mueva el interruptor EXPRESSO a la
posición "OFF" (apagado).
9. Vierta el café exprés en una taza suficientemente grande para la combinación del café y
la leche. Agregue la leche calentada y cucharee la leche espumada.
• No desenrosque el tapón del hervidor mientras la máquina esté en operación. Espere
hasta completar el ciclo de preparación, que toda el agua y el vapor se hayan usado y la
máquina esté apagada.
• Tenga cuidado al retirar el portafiltros, pues las partes metálicas pudieran permanecer
calientes por un rato.
• Después de cada uso, limpie a fondo el vástago de vapor y la boquilla para espumar para
así asegurar un espumado satisfactorio y sin problemas.
8
Page 35

VAPORIZACIÓN/ESPUMACIÓN SIN PREPARAR CAFÉ EXPRESO
(USANDO EL TAPÓN DE VAPOR)
1. Coloque los interruptores Espresso y Caffe en la posición “OFF” (apagado).
Cerciórese de que la cafetera 3 en 1 esté lo suficientemente fría para
manipularla y que se haya liberado la presión.
2. Introduzca el tapón de acumulación de vapor en el portafiltro y luego coloque
este último en el aparato. Para ello, alinee la flecha situada en la protección
manual del portafiltro con la flecha del lado izquierdo de la máquina. Levante el
portafiltro al interior del cabezal de preparación y gírelo firmemente hacia la
derecha hasta que ya no pueda hacerlo. La flecha del portafiltro deberá quedar
en el margen de cierre máximo posible. Si la flecha no está al menos en el
margen intermedio, retire el portafiltro y vuelva a introducirlo tal como se explicó
anteriormente hasta que la flecha quede dentro del margen de cierre. Este
procedimiento impedirá que el portafiltro se desenganche, a medida que
aumenta la presión durante el proceso
de preparación.
3. Para vaporizar solamente, no llene la jarra para café expreso más allá de la
marca de 2 tazas. Llene la cámara del hervidor con agua fría. Prepare el jarro
con 4 onzas de leche fría lista para calentarla.
4. Coloque la jarra para café expreso con la tapa puesta debajo del portafiltro y
coloque el interruptor Espresso en la posición “ON” (encendido). Abra de
inmediato la perilla de liberación de vapor.
5. Sumerja la boquilla espumadora hasta la mitad del jarro lleno con leche.
Tras encender la máquina, el vapor tardará entre 30 y 60 segundos en salir de
la boquilla vaporizadora. Mantenga el jarro ligeramente i nclinado de modo que
siempre pueda ver la posición de la boquilla al espumar la leche. La punta de la
boquilla espumadora debe estar debajo de la superficie de la leche, pero no
demasiado introducida en la misma. La leche comenzará a espumar. A medi da
que la espuma suba, continúe bajando el jarro de modo que la punta de la
boquilla espumadora siempre esté ligeramente deba jo de la superficie de la
espuma ascendente.
6. Una vez que el volumen de la leche haya aumentado al doble, hunda más la
varilla espumadora para seguir calentando la leche. NOTA: Si va a usar un
termómetro para líquidos, la temperatura ideal de la leche tras calentarla debe
ser de 150-170ºF ó 66º-77ºC. No hierva la leche. Notará que la leche ha hervido
si ésta aumenta repentinamente y comienzan a formarse burbujas grandes en
la superficie de
la misma.
7. Cuando termine, cierre la perilla de liberación de vapor girándola en sentido
horario mientras la boquilla aún esté sumergida en la leche. De esta manera
evitará que salpique la leche caliente. Si prefiere que la leche quede con
espuma “espesa”, deje que la leche repose durante un minuto.
8. Coloque el interruptor para café expreso en la posición “OFF” (apagado).
NOTAS: Haga lo siguiente si no usó toda el agua para vaporizar:
1. Con la máquina apagada, libere el resto de la presión de vapor en otro
recipiente.
2. No cierre la perilla de liberación de vapor sino hasta haber liberado todo el
vapor; consulte la sección “Precauciones sobre presión” en este manual.
9
Page 36

PRESIÓN - INSPECCIÓN Y LIBERACIÓN
Inspección de la presión
1. Coloque los interruptores Espresso y Caffe en la posición “OFF” (apagado) y
desenchufe el aparato del tomacorriente eléctrico.
2. Abra cuidadosamente la válvula de liberación de vapor girando lentamente la perilla
en sentido antihorario. Si sale vapor de la boquilla, significa que el hervidor aún está
bajo presión.
3. De ser así, cierre la válvula y proceda de la siguiente manera para liberar la presión.
Liberación de la presión
1. Sostenga un jarro con agua debajo de la varilla de vapor y sumerja la boquilla
espumadora en el agua.
2. Abra lentamente la válvula de liberación de vapor y deje que el vapor ingrese al
agua.
3. Una vez que la varilla deje de liberar el vapor, abra lentamente la tapa del hervidor.
LIMPIEZA DE LA CAFETERA 3 EN 1 - GENERAL
1. Coloque todos los interruptores en la posición “OFF” (apagado), desenchufe la
unidad del tomacorriente y deje que se enfríe totalmente antes de limpiarla.
2. Retire y elimine los posos de café expreso y el filtro desechable. Limpie el cabezal
de preparación con un paño húmedo.
3. Retire y limpie el portafiltro de café expreso, la copa filtrante, la cesta, la rejilla de
derrame, la base de la rejilla, las jarras y las tapas, en una solución de agua tibia y
detergente líquido suave. Enjuáguelos completamente y séquelos.
4. Si todavía queda agua en la cámara del hervidor o en el depósito de agua, vacíelos
por la abertura superior de la unidad volteando esta última. Nota: No limpie el
interior del depósito de agua ni la cámara del hervidor con un paño o toalla de papel,
ya que pueden dejar partículas en el interior y obstruir las aberturas pequeñas en la
cafetera. Sólo enjuáguelos periódicamente en agua fría.
5. Retire de la varilla de vapor la boquilla espumadora de caucho. Limpie totalmente la
boquilla espumadora y la varilla de vapor en una solución de agua tibia y detergente
líquido suave. Enjuáguelas totalmente y vuelva a colocar la boquilla espumadora en
la varilla de vapor.
6. La parte exterior de la cafetera puede limpiarse pasándole un paño húmedo.
7. Descalcifique periódicamente la cafetera 3 en 1. Consulte la sección
“Descalcificación de la cafetera 3 en 1”.
LIMPIEZA DE LA CAFETERA 3 EN 1 - LIMPIEZA DE LA BOQUILLA VAPORIZADORA
• Tras espumar la leche se acumularán residuos de leche en la punta de la boquilla
vaporizadora. Es muy importante que tras retirar la boquilla espumadora, limpie con
un paño la boquilla vaporizadora después de cada uso. Ello evitará que la boquilla
vaporizadora se obstruya y le permitirá obtener resultados satisfactorios. Haga lo
siguiente si la boquilla se obstruye:
1. Cerciórese de que los interruptores estén en la posición “OFF” (apagado), que la
unidad esté desenchufada del tomacorriente, que se haya liberado toda la presión y
que la máquina se haya enfriado totalmente.
2. Retire la boquilla espumadora de caucho y la boquilla vaporizadora usando la
herramienta en el extremo de la cuchara dosificadora que viene incluida con la
máquina.
3. Limpie la boquilla con agua tibia y cerciórese de que el orificio pequeño del extremo
esté despejado.
4. Vuelva a conectar la boquilla vaporizadora, apriétela firmemente y deslice la boquilla
espumadora de caucho sobre la varilla de vapor.
10
Page 37

DESCALCIFICACIÓN DE LA CAFETERA 3 EN 1 - GENERAL
• Con el tiempo, se acumulan depósitos minerales en las piezas internas de la
cafetera, los cuales afectan el funcionamiento del aparato; ello hace que sea
necesario descalcificar la unidad. La frecuencia de la descalcificación depende de la
dureza del agua y de la frecuencia de uso de la unidad. Indicios de que es necesario
realizar
la descalcificación:
o Aumento del ruido durante la producción
o Vapor excesivo
o Tiempos de preparación más prolongados
o La acción de bombeo se detiene antes de que haya salido toda el
agua del depósito
• Si se usa la cafetera en forma regular, la descalcificación debe llevarse a cabo de la
siguiente manera:
o En condiciones de agua blanda, descalcifique una vez al año
o En condiciones de agua de dureza mediana, descalcifique cada
tres (3) meses
o En condiciones de agua dura, descalcifique mensualmente
• Se recomienda usar vinagre para descalcificar.
DESCALCIFICACIÓN DE LA CAFETERA 3 EN 1
Cafetera expreso
• Libere toda la presión y deje que la unidad se enfríe totalmente antes de
descalcificarla.
• Vierta en la cámara del hervidor 8 onzas (marca de 4 tazas en la jarra) de vinagre
blanco fresco y frío de uso doméstico sin diluir.
•
Siguiendo las instrucciones de la sección “Preparación de café expreso” inicie el cic lo
de preparación, pero sin usar café.
• Coloque una taza de agua fría debajo de la varilla de vapor. Una vez que la solución
haya sido bombeada por la unidad y esté en la marca para 2 tazas en la jarra para
café expreso, introduzca la varilla de vapor en el agua y abra la válvula del hervidor
durante 10 a 15 segundos. Cierre la válvula y deje que el resto del vinagre se vierta
en la jarra.
• Repita los pasos antedichos, pero esta vez use agua fría para enjuagar todos los
restos de vinagre del sistema.
Cafetera
• Libere toda la presión y deje que la unidad se enfríe totalmente antes de
descalcificarla.
• Vierta en la jarra 20 onzas (marca de 4 tazas en la jarra) de vinagre blanco fresco y
frío de uso doméstico sin diluir.
•
Siguiendo las instrucciones de la sección “Preparación de café” inicie el ciclo de
preparación, pero sin usar café.
• Repita los pasos antedichos, pero esta vez use agua fría para enjuagar todos los
restos de vinagre del sistema.
11
Page 38

PROBLEMAS Y CAUSAS
• Hay fugas de café o agua en la cesta filtrante
o El filtro no está correctamente colocado o está doblado
o La cesta no está correctamente cerrada
o La jarra o la tapa de ésta no están en su lugar
o Demasiado café en el filtro
o La válvula de la cesta está sucia, rota o no está instalada
• No sale café, o sale demasiado lento
o No hay agua en el depósito
o No hay café en el portafiltro
o La cesta no está correctamente cerrada
o La jarra o la tapa de ésta no están en su lugar
o El filtro está obstruido porque se usó café demasiado fino o está
atestado de café
o Descalcifique el aparato
• Hay fuga de café expreso en el portafiltro
o El filtro de café expreso no está instalado
o El portafiltro no está correctamente instalado
o El portafiltro no está trabado en su posición
o No se han eliminado los posos de café del filtro y el portafiltro
o La empaquetadura interna del cabezal de café expreso está sucia y
debe limpiarse
o La empaquetadura interna del cabezal de café expreso está dañada y
debe reemplazarse
• No sale café expreso, o éste sale demasiado lento
o No hay agua en el depósito del hervidor
o No hay café en el portafiltro
o El filtro está obstruido porque se usó café demasiado fino o está
atestado de café
o Descalcifique el aparato
• No sale vapor por la varilla de vapor
o No hay agua o no hay suficiente agua en la cámara del hervidor
o No hay café o falta el tapón de vapor en el portafiltro
o La boquilla vaporizadora/espumadora está obstruida
o Descalcifique el aparato
• No se produce suficiente espuma en la leche
o La boquilla espumadora se ha introducido demasiado en la leche o
toca el fondo del jarro
o Las aberturas superiores de la boquilla espumadora están sumergidas
en la leche
o El jarro no está lo suficientemente frío
o La leche no está fresca o suficientemente fría
o La leche está demasiado espesa
o La boquilla vaporizadora/espumadora está obstruida
12
Page 39

GARANTÍA DEL PRODUCTO
Garantía limitada de 1 año para el aparato
West Bend® Housewares, LLC garantiza que este aparato no presentará fallas de material ni
mano de obra durante 1 año a partir de la fecha original de compra, siempre y cuando el
aparato sea operado y mantenido tal como se indica en el manual de instrucciones de West
Bend® Housewares, LLC. Toda pieza del aparato que presente fallas será reparada o
reemplazada sin costo alguno según el criterio de West Bend® Housewares, LLC. Esta
garantía rige para el uso doméstico en interiores solamente.
La garantía de West Bend® Housewares, LLC no cubre ningún daño, incluyendo la
decoloración, de ninguna superficie no adherente del aparato. La garantía de West Bend®
Housewares, LLC. quedará nula e inválida, según lo determine exclusivamente West Bend®
Housewares, LLC, si el aparato resulta dañado debido a accidentes, uso indebido o abuso,
rayaduras, sobrecalentamiento o si es alterado de algún modo o no se usa en forma
doméstica.
Esta garantía le otorga derechos legales específicos. Usted también puede tener otros
derechos, los cuales pueden variar de una jurisdicción a otra.
ESTA GARANTÍA REEMPLAZA A TODAS LAS DEMÁS GARANTÍAS IMPLÍCITAS,
INCLUYENDO AQUÉLLAS DE COMERCIABILIDAD E IDONEIDAD PARA UN FIN O USO EN
PARTICULAR, LAS CUALES QUEDAN EXCLUIDAS MEDIANTE EL PRESENTE
DOCUMENTO. WEST BEND® HOUSEWARES, LLC RECHAZA TODA RESPONSABILIDAD
POR DAÑOS, YA SEAN DIRECTOS, INMEDIATOS, INCIDENTALES, PREVISIBLES,
CONSECUENTES, O ESPECIALES QUE SURJAN DEL USO DEL APARATO O GUARDEN
RELACIÓN CON EL MISMO.
Si dentro del período de garantía usted considera que el aparato presenta fallas o requiere
servicio, devuélvalo al lugar de compra original. Para obtener mayores detalles comuníquese
con el Departamento de Servicio al Cliente al (262) 334-6949 o por correo electrónico a
housewares@westbend.com. Los gastos por devolución no son reembolsables. Los recibos
escritos a mano no son válidos. West Bend Housewares, LLC no se responsabiliza por
productos devueltos que se pierdan durante el transporte.
Válido sólo en EE.UU. y Canadá
REPUESTOS
Solicite repuestos a West Bend® Housewares, LLC directamente en línea en www.westbend.com,
“Replacement Parts”, llamando o enviando un mensaje de correo electrónico al departamento de servicios al
número/dirección antedichos o escribiendo a:
West Bend Housewares, LLC
Attn: Customer Service
P.O. Box 2780
West Bend, WI 53095
Cerciórese de incluir el número de catálogo/modelo del aparato (situado en la parte inferior/posterior de la
unidad) así como la descripción y la cantidad de repuestos que necesita. Junto con esta información, incluya
su nombre, dirección postal, número de tarjeta de crédito Visa o MasterCard, la fecha de vencimiento y el
nombre tal como aparece en la tarjeta. Los cheques deben extenderse a nombre de West Bend
Housewares, LLC. Llame al Departamento de Servicio al Cliente para obtener el monto de la compra. Se
sumará al total el impuesto de venta estatal que corresponda y un cargo por despacho/procesamiento. La
entrega tarda dos (2) semanas.
Este manual contiene información importante y útil sobre el uso seguro y el cuidado de su nuevo producto
de West Bend® Housewares, LLC. Para su propia referencia, archive aquí el recibo fechado que sirve de
comprobante de compra para la garantía, y anote la siguiente información:
Fecha en que compró o recibió la unidad como regalo: ________________________________________
Dónde se efectuó la compra y el precio, si lo sabe: ___________________________________________
Número y código de fecha del producto (aparece en la parte inferior/posterior de la unidad): ________________
L5563D 02/06 West Bend® Housewares, LLC A Focus Products Group Company Printed in China
13
Page 40

 Loading...