


MICROWAVE OVEN
Instruction Manual
Precautions To Avoid Possible Exposure To Excessive Microwave Energy........................ |
2 |
Important Safeguards.................................................................................................................. |
3 |
Setting Up Your Oven.................................................................................................................. |
7 |
Operation...................................................................................................................................... |
9 |
Troubleshooting......................................................................................................................... |
15 |
One Year Limited Warranty....................................................................................................... |
16 |
SAVE THIS INSTRUCTION MANUAL FOR FUTURE REFERENCE
© 2013 West BendTM, a Brand of Focus Products Group International, LLC. www.westbend.com

PRECAUTIONS TO AVOID POSSIBLE EXPOSURE TO EXCESSIVE MICROWAVE ENERGY
(a)Do not attempt to operate this oven with the door open as this can result in harmful exposure to microwave energy. It is important not to tamper with the safety interlocks.
(b)Do not place any object between the oven front face and the door or allow soil or cleaner residue to accumulate on sealing surfaces.
(c)Do not operate the oven if it is damaged. It is particularly important that the oven door closes properly and that there is no damage to the:
(1)DOOR (bent)
(2)HINGES AND LATCHES (broken or loosened)
(3)DOOR SEALS AND SEALING SURFACE
(d)The oven should not be adjusted or repaired by anyone except properly qualified service personnel.
English-2

IMPORTANT SAFEGUARDS
 CAUTION
WARNING |
To reduce the risk of burns, electric shock, fire,injury to |
persons or exposure to excessive microwave oven energy |
|
|
when using your appliance, follow basic safety precautions, |
|
including the following: |
∙ Read all instructions before using the |
may explode and should not be heated |
||
|
appliance. |
in the oven. |
|
∙ Read and follow the specific: "PRECAU- |
∙ Use this appliance only for its intended |
||
|
TIONS TO AVOID POSSIBLE EXPOSURE |
||
|
TO EXCESSIVE MICROWAVE ENERGY" |
uses as described in this manual. Do |
|
|
not use corrosive chemicals or vapors |
||
|
found on page 2. |
||
|
in this appliance. This oven is |
||
∙ As with most cooking appliances, close |
|||
specifically designed to heat, cook |
|||
|
supervision is necessary to reduce the risk |
||
|
or dry food. It is not designed for |
||
|
of a fire in the oven cavity. |
||
|
industrial or laboratory use. |
||
|
|
||
∙ |
To reduce the risk of fire in the oven |
∙ As with any appliance, close |
|
cavity: |
supervision is necessary when used |
||
i). Do not overcook food. Carefully attend |
by children. |
||
the appliance when paper, plastic, or |
∙ Do not operate this oven if it has a |
||
other combustible materials are placed |
damaged cord or plug, if it is not |
||
inside the oven to facilitate cooking. |
working properly or if it has been |
||
ii).Remove wire twist-ties and metal |
damaged or dropped. |
||
handles from paper or plastic |
∙ This appliance should be serviced only |
||
containers/bags before placing them in |
by qualified service technicians. |
||
the oven. |
∙ Contact the nearest authorized service |
||
iii). If materials inside the oven ignite, |
facility for examination, repair or |
||
keep the oven door closed. Turn the |
adjustment. |
||
oven off, and unplug the appliance. |
∙ Do not cover or block any openings on |
||
Disconnect the power cord, shut off |
the oven. |
||
power at the fuse or circuit breaker panel. |
∙ Do not store or use this appliance |
||
iv). Do not use the oven cavity for storage |
outdoors. |
||
purposes. Do not leave paper products, |
∙ Do not use this oven near water, for |
||
cooking utensils, or food in the cavity |
example, near a kitchen sink, in a wet |
||
when not in use. |
basement, near a swimming pool, or |
||
∙ |
This oven must be grounded. Connect |
similar locations. |
|
|
only to properly grounded outlet. See |
∙ Do not immerse cord or plug in water. |
|
|
"GROUNDING INSTRUCTIONS"found |
∙ Keep cord away from heated surfaces. |
|
|
on page 5. |
∙ Do not let cord hang over edge of |
|
∙ |
Install or locate this oven only in |
table or counter. |
|
|
accordance with the installation |
∙ When cleaning interior or exterior |
|
|
instructions provided. |
surfaces, used only mild, nonabrasive, |
|
∙ |
Some products such as whole eggs, |
soaps or detergents applied with a |
|
|
sealed containers, or closed glass jars |
sponge or soft cloth. |
|
English-3
∙ Liquids, such as water, coffee, or tea may overheat beyond the boiling point without appearing to be boiling. Visible bubbling or boiling when the container is removed from the microwave oven is not always present. THIS COULD RESULT IN VERY HOT LIQUIDS SUDDENLY BOILING OVER WHEN THE CONTAINER IS
DISTURBED, OR A SPOON OR OTHER UTENSIL IS INSERTED INTO THE LIQUID.
i)Do not overheat the liquid.
ii)Stir the liquid both before and halfway through heating it.
iii)Do not use straight-sided containers with narrow necks.
iv)After heating, allow the container to stand in the microwave oven for a short time before removing the container.
v)Use extreme care when inserting a spoon or other utensil into the container.
GROUNDING INSTRUCTIONS
DANGER
Electric Shock Hazard Touching some of the internal components can cause serious personal injury or death. Do not disassemble this appliance.
This appliance must be grounded. In the event of an electrical short circuit, grounding reduces the risk of electric shock by providing an escape wire for the electric current. This appliance is equipped with a cord having grounding wire with a grounding plug. The plug must be plugged into an outlet that is properly installed and grounded.
WARNING
Electric Shock Hazard Improper use of the grounding can result in electric shock. Do not plug into an outlet until appliance is properly installed and grounded.
Three-pronged (grounding) plug
Consult a qualified electrician or serviceman if the grounding instructions are not completely understood or if doubt exists as to whether the appliance is properly grounded. If it is necessary to use an extension cord, use only a 3-wire extension cord that has a 3-pronged grounding plug, and a 3-slot receptacle that will accept the plug on the appliance. The marked rating of the extension cord shall be equal to or greater than the electrical rating of the appliance.
English-4

1.A short power-supply cord is provided to reduce the risks resulting from becoming entangled in or tripping over a longer cord.
2.Longer cord sets or extension cords are available and may be used if care is exercised in their use.
3.If a long cord set or extension cord is used:
1)The marked electrical rating of the cord set or extension cord should be at least as great as the electrical rating of the appliance.
2)The extension cord must be a grounding-type 3-wire cord.
3)The longer cord should be arranged so that it will not drape over the countertop or tabletop where it can be pulled on by children or tripped over unintentionally.
SAVE THESE INSTRUCTIONS
Radio Interference
1.Operation of the microwave oven may cause interference to your radio, TV, or similar equipment.
2.When there is interference, it may be reduced or eliminated by taking the following measures:
1)Clean door and sealing surface of the oven
2)Reorient the receiving antenna of radio or television.
3)Relocate the microwave oven with respect to the receiver.
4)Move the microwave oven away from the receiver.
5)Plug the microwave oven into a different outlet so that microwave oven and receiver are on different branch circuits.
CONTAINERS
CAUTION
Personal Injury Hazard
Tightly-closed containers could explode. Closed containers should be opened and plastic pouches should be pierced before cooking.
See the instructions on "Materials you can use in microwave oven or to be avoided in microwave oven." There may be certain non-metallic utensils that are not safe to use for microwaving. If in doubt, you can test the utensil in question following the procedure below.
Utensil Test:
1.Fill a microwave-safe container with 1 cup of cold water (250ml) along with the utensil in question.
2.Cook on maximum power for 1 minute.
3.Carefully feel the utensil. If the empty utensil is warm, do not use it for microwave cooking.
4.Do not exceed 1 minute cooking time.
English-5

Materials you can use in microwave oven
Utensils |
Comments |
|||
|
|
|
|
|
Aluminum foil |
Shielding only. Small smooth pieces can be used to cover thin parts of |
|||
|
|
meat or poultry to prevent overcooking. Arcing can occur if foil is too |
||
|
|
close to oven walls. The foil should be at least 1 inch (2.5cm) away from |
||
|
|
oven walls. |
|
|
Browning dish |
Follow manufacturer's instructions. The bottom of browning dish must be |
|||
|
|
at least 3/16 inch (5mm) above the turntable. Incorrect usage may cause |
||
|
|
the turntable to break. |
|
|
Dinnerware |
Microwave-safe only. Follow manufacturer's instructions. Do not use |
|||
|
|
cracked or chipped dishes. |
|
|
Glass jars |
Always remove lid. Use only to heat food until just warm. Most glass jars |
|||
|
|
are not heat resistant and may break. |
|
|
Glassware |
Heat-resistant oven glassware only. Make sure there is no metallic trim. |
|||
|
|
Do not use cracked or chipped dishes. |
|
|
Oven cooking |
Follow manufacturer's instructions. Do not close with metal tie. Make |
|||
bags |
slits to allow steam to escape. |
|
||
Paper plates |
Use for shor term cooking/warming only. Do not leave oven unattended |
|||
and cups |
while cooking. |
|||
Paper towels |
Use to cover food for reheating and absorbing fat. Use with supervision |
|||
|
|
for a short-term cooking only. |
||
|
Parchment |
Use as a cover to prevent splattering or a wrap for steaming. |
|
|
paper |
|
|
|
|
Plastic |
Microwave-safe only. Follow the manufacturer's instructions. Should be |
|||
|
|
labeled "Microwave Safe". Some plastic containers soften as the food |
||
|
|
inside gets hot. "Boiling bags" and tightly closed plastic bags should be |
||
|
|
slit, pierced or vented as directed by package. |
|
|
Plastic wrap |
Microwave-safe only. Use to cover food during cooking to retain |
|||
|
|
moisture. Do not allow plastic wrap to touch food. |
|
|
Thermometers |
Microwave-safe only (meat and candy thermometers). |
|
||
Wax paper |
Use as a cover to prevent splattering and retain moisture. |
|
||
Materials to be avoided in microwave oven
Utensils |
Comments |
|
Aluminum tray |
May cause arcing. Transfer food into microwave-safe dish. |
|
Food carton with |
May cause arcing. Transfer food into microwave-safe dish. |
|
metal handle |
|
|
Metal or metal- |
Metal shields the food from microwave energy. Metal trim may |
|
trimmed utensils |
cause arcing. |
|
Metal twist ties |
May cause arcing and could cause a fire in the oven. |
|
Paper bags |
May cause a fire in the oven. |
|
Plastic foam |
Plastic foam may melt or contaminate the liquid inside when exposed |
|
|
to high temperature. |
|
Wood |
Wood will dry out when used in the microwave oven and may split |
|
|
or crack. |
|
English-6

SETTING UP YOUR OVEN
Names of Oven Parts and Accessories
Remove the oven and all materials from the carton and oven cavity. |
|
|
Your oven comes with the following accessories: |
|
|
Glass tray |
1 |
A |
Turntable ring assembly |
1 |
|
Instruction manual |
1 |
|
F
|
|
|
|
|
|
|
|
|
|
|
|
|
|
|
|
|
|
|
|
|
|
|
|
|
|
|
|
|
|
|
|
|
|
|
|
|
|
|
|
|
|
|
|
|
|
|
|
|
|
|
|
|
|
|
|
|
|
|
|
|
|
|
|
|
|
|
|
|
|
E D |
C B |
|||||
|
|
|
|
|||||||
|
|
|
|
|
A) Control panel |
|||||
G |
||||||||||
B) Turntable shaft |
||||||||||
|
|
|
|
|
||||||
|
|
|
|
|
C) Turntable ring assembly |
|||||
|
|
|
|
|
D) Glass tray |
|||||
|
|
|
|
|
E) Observation window |
|||||
|
|
|
|
|
F) Door assembly |
|||||
|
|
|
|
|
G) Safety interlock system |
|||||
Turntable Installation
Hub (underside)
Glass tray
Turntable shaft
a.Never place the glass tray upside down. The glass tray should never be restricted.
b.Both glass tray and turntable ring assembly must
always be used during cooking.
c. All food and containers of food are always placed on the glass tray for cooking.
d. If glass tray or turntable ring assembly cracks or breaks, contact your nearest authorized service center.
Turntable ring assembly
English-7

Before Installation
Remove all packing material and accessories. Examine the oven for any damage such as dents or broken door. Do not install if oven is damaged.
Cabinet: Remove any protective film found on the microwave oven cabinet surface.
Do not remove the light brown Mica cover that is attached to the oven cavity to protect the magnetron.
Installation
1.Select a level surface that provides enough open space for the intake and/or outlet vents.
12 inch(30cm)
3.0 inch(7.5cm)
 OPEN 3.0 inch(7.5cm)

A minimum clearance of 3.0 inches (7.5cm) is required between the oven and any adjacent walls. One side must be open.
(1)Leave a minimum clearance of 12 inches (30cm) above the oven.
(2)Do not remove the legs from the bottom of the oven.
(3)Blocking the intake and/or outlet openings can damage the oven.
(4)Place the oven as far away from radios and TV as possible. Operation of microwave oven may cause interference to your radio or TV reception.
2.Plug your oven into a standard household outlet. Be sure the voltage and the frequency is the same as the voltage and the frequency on the rating label.
WARNING: Do not install oven over a range cooktop or other heat-producing appliance. If installed near or over a heat source, the oven could be damaged and the warranty would be void.
English-8
OPERATION
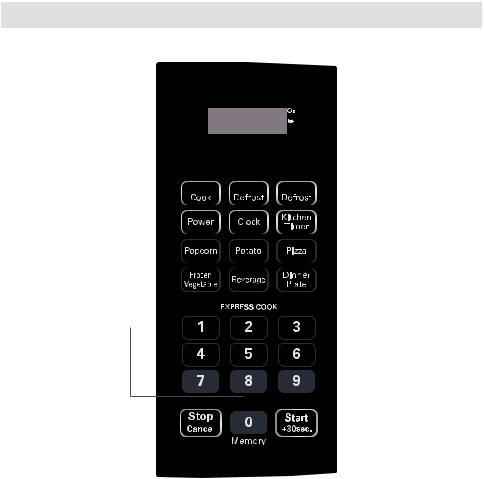
Control Panel and Features
(1) 


 (7)
(7)
(2) |
|
|
|
|
|
|
|
|
|
|
|
|
|
|
|
|
|
|
|
|
|
(3) |
|
|
|
|
|
|
|
|
|
(8) |
(4) |
|
|
|
|
|
|
|
|
|
|
|
|
|
|
|
|
|
|
|
|
|
|
|
|
|
|
|
|
|
|
|
|
(5) |
|
|
|
|
|
|
|
|
|
|
|
|
|
|
|
|
|
|
|
|
|
|
|
|
|
|
|
|
|
|
|
|
|
|
|
|
|
|
|
|
|
|
|
|
|
|
|
|
|
|
|
|
|
|
(6)
(9) |
|
|
|
|
|
|
|
|
|
|
(11) |
|
|
|
|
|
|
|
|
||||
|
|
|
|
|
|
|
|
|
|||
|
|
|
|
|
|
|
|
(1) |
Time Cook |
|
|
(2) |
Time Defrost |
(10) |
|
(3)Power
(4)Clock
(5)Auto menu: Popcorn, Potato, Pizza, Frozen Vegetable, Beverage, Dinner Plate
(6)Number Buttons: 0-9
(7)Weight Defrost
(8)Kitchen Timer function
(9)Stop/Cancel: clears all previous setting pressed before cooking starts. During cooking: press once to stop oven; twice to stop and clear all entries.
(10)Memory function
(11)Start/+30Sec.
English-9

OPERATION
1. Power Level
11 power levels are available.
Level |
10 |
9 |
8 |
7 |
6 |
5 |
4 |
3 |
2 |
1 |
0 |
|
|
|
|
|
|
|
|
|
|
|
|
Power |
100% |
90% |
80% |
70% |
60% |
50% |
40% |
30% |
20% |
10% |
0% |
|
|
|
|
|
|
|
|
|
|
|
|
Display |
PL10 |
PL9 |
PL8 |
PL7 |
PL6 |
PL5 |
PL4 |
PL3 |
PL2 |
PL1 |
PL0 |
|
|
|
|
|
|
|
|
|
|
|
|
2. Clock Setting
(1) Press " CLOCK ," "00:00" will display.
(2) Press the number keys and enter the current time. For example, time is 10:12 now, please press "1,0,1,2" in turn.
(3)Press " CLOCK " to finish clock setting. ":" will flash and the clock will be lighted.
(4)If the numbers input are not within the range of 1:00-12:59, the setting will be invalid until valid numbers are input.
Note: (1) In the process of clock setting, if the " STOP/CANCEL" button is pressed or if there is no operation within 1 minute, the oven will go back to the former setting automatically.
(2) If the clock needs to be reset, repeat steps 1- 3.
3. Kitchen Timer
(1)Press "KITCHEN TIMER ," LED will display "00:00", the first hour figure flashes.
(2)Press the number keys and enter the timer time. (The maximum cooking time is
99 minutes and 99 seconds)
(3) Press " START/+30SEC. " to confirm setting.
(4)When the timer time arrives, the buzzer will ring 5 times. If the clock is set , the LED will display the current time.
Note: 1) The kitchen timer is a timer and will not display the "Clock."
2)When using the kitchen timer, No program can be set.
4.Microwave Cook
(1) Press "TIME COOK" once, LED will display "00:00".
(2)Press number keys to input the cooking time; the maximum cooking time is 99 minutes and 99 seconds.
(3)Press " POWER " once, LED will display "PL10". The default power is 100% power. Now you can press number keys to adjust the power level.
(4)Press " START/+30SEC." to start cooking.
English-10
 Loading...