

Page 1
Mobile Acuity LT
Hardwired System
Installation Guide
Software Version 6.X
™
For additional information, refer to these manuals:
• Acuity LT Hardwired System Directions For Use (810-1608-XX)
• Propaq CS Directions For Use (810-1097-XX)
• Propaq Encore Reference Guide (810-0640-XX)
WARNING Do not attempt to operate the Mobile Acuity LT hardwired system or Propaq monitors without
consulting the Directions For Use or Reference Guide as described above.
WARNING When operating the Mobile Acuity LT system, use caution when adjusting the volume on the laptop
computer. Do not mute or turn off the laptop computer speakers. Reducing the volume could result in failing to
notice Life Threatening audible alarms on the system.
Copyright © 1994-2005, Welch Allyn
®
Welch Allyn
LT™ is a trademark of Welch Allyn. Welch Allyn is protected under various patents and patents pending.
Welch Allyn
8500 SW Creekside Place
Beaverton, Oregon 97008-7107 USA
Manual Part No: 810-1626-03 Rev. A 12/2005
Printed in USA
, Propaq®, Propaq Encore®, Propaq CS®, Acuity®, and Acuity® LT are registered trademarks of Welch Allyn. Mobile Acuity
Within USA, toll free:
Phone: (800) 289-2500
Phone Technical Services: (800) 289-2501
WorldWide:
Phone: (503) 530-7500
Fax: (503) 526-4200
Fax Technical Services: (503) 526-4970
Page 2
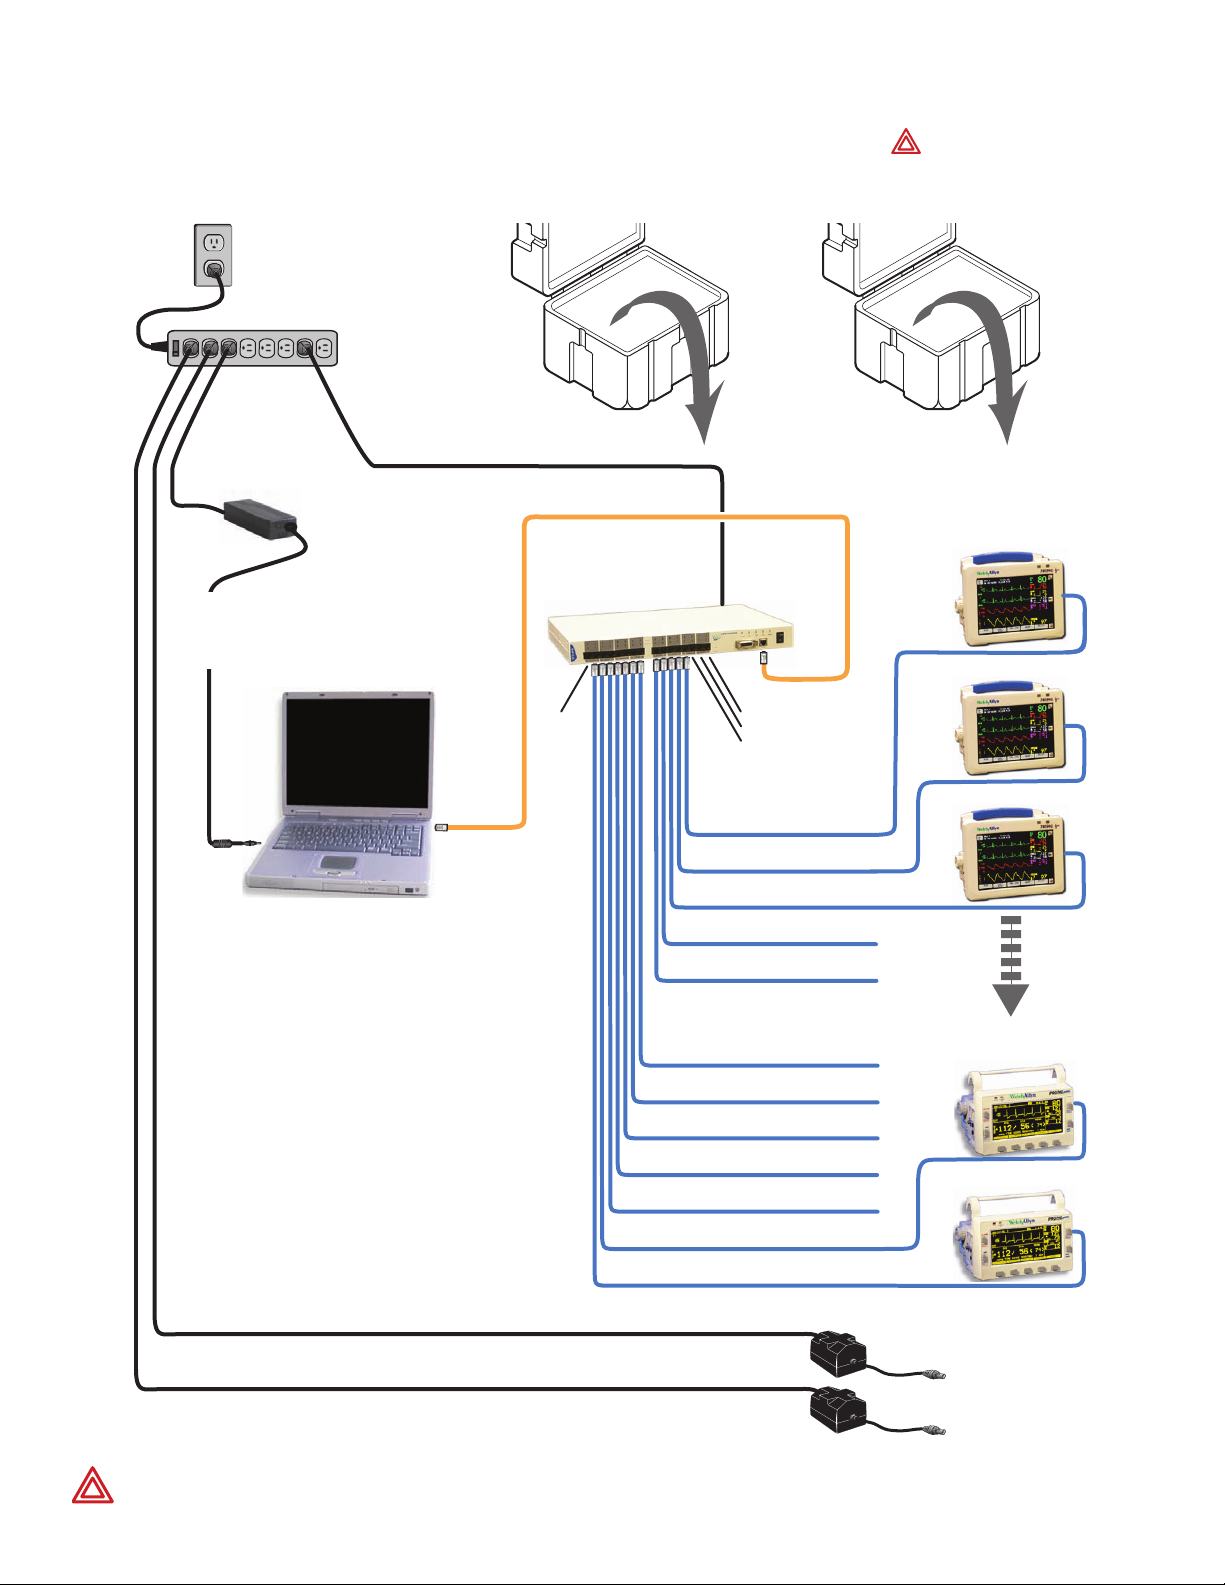
1. Locate AC Power Source On Site
AC Power
Source
Laptop
Power
Supply
“Crossover
” Data
Cable
(orange)
2. Unpack, Setup, and Connect Laptop
and Terminal Server
Hardwired Case Propaq Cases
Terminal
Server
See Warning
below
Propaq CS
Monitors
Laptop
Computer
Por t 1
Not
Used
Data
Cables
(blue color,
25 and 50
feet)
Por ts 14-16
Not Used
Port 13 Patient 12
Port 12 Patient 11
Port 11 Patient 10
Port 10 Patient 9
Port 9 Patient 8
Port 8 Patient 7
Port 7 Patient 6
Port 6 Patient 5
Port 5 Patient 4
Port 4 Patient 3
Port 3 Patient 2
Port 2 Patient 1
Propaq Encore
Monitors
Propaq Power Adapters
To Propaq
To Propaq
WARNING Before setup, inspect all equipment for any signs of damage, cracks, improper mechanical function,
exposed wires, or bent connnectors. Replace any damaged equipment.
Mobile Acuity LT Hardwired System Installation Guide
Page 3

3. Apply Power
5. Connect and Check Monitors
• Make sure AC power source is on and all
power cords are plugged in.
• Apply power to the terminal server (check
front panel power switch).
• Apply power to the laptop computer (power
switch in upper left corner).
• Apply power to Propaq power adapters (if
adapter has power switch, make sure it is
on).
Note
The laptop computer will not operate for more
than about 45 minutes without connection to ac
power. To avoid loss of monitoring, make sure
the laptop is connected to ac power.
4. Check System Operation
Perform these steps to confirm that the system is
operating properly.
• Examine the following devices to make sure
LEDs are active indicating power is
supplied:
--Laptop computer
--Terminal server
--Propaq monitor power adapters
• Confirm that the Mobile Acuity LT displays
a screen similar to the following, and that the
“CHECK NETWORK” message is NOT
displayed.
• Apply power to each monitor by pressing
the right-side power switch.
• Connect a blue data cable from the Terminal
Server to each monitor.
• Confirm that within 2 minutes the Acuity LT
displays for each monitor a waveform
window similar to the following:
• To assign a Patient ID for a new patient, click
the ID icon in the Enter or Confirm Patient
ID Waveform Window.
• Check the monitor model and serial
number and make sure it matches the
monitor connected to your patient
• Enter the Patient ID and Patient name,
then click “Confirm”.
6. Shutdown & Remove Power
• Notify staff members so procedural changes
in patient care can be put into place.
• At the Mobile Acuity LT laptop computer,
move the pointer into the gray area in the
upper right hand corner of the screen, hold
down the “ ” key (between “Fn” and “Alt”
keys) and press the right touch pad key.
• When the System Menu appears in the upper
right corner, click “Shutdown Workstation”,
then click “Confirm”.
• After the system shuts down, turn off power
to all equipment.
Mobile Acuity LT Hardwired System Installation Guide
Page 4

WARNING Before you use a monitor on a new
patient, always turn off the monitor for a few
seconds, then turn it on again. This clears the prior
patient’s trends and alarm limit settings.
Note
If the Mobile Acuity LT central monitor is not
operating, you can still monitor patients at the
bedside with the patient monitors.
Troubleshooting
Symptom Possible Cause and Suggested Response
CHECK
NETWORK
message at
Acuity
CHECK
ACUITY or
NETWORK
FAULT
message at
monitor
No display at
Acuity
Room numbers
at Acuity are
not what is
expected from
the
corresponding
monitors
Monitor is
operating but
not present at
Acuity
Acuity LT detects a problem in the connection
with the terminal server.
• Confirm all data cables are properly
connected to monitors.
• Confirm that the “crossover” data cable
between the laptop and Terminal Server is
plugged into the “10/100” port on the Terminal
Server front panel (far right side) and the
laptop.
• Shutdown and restart entire system.
Communication problem between monitor and
Mobile Acuity LT.
• Confirm that the blue data cable is properly
connected to the monitor and the terminal
server as illustrated in Step 2.
• Try connecting a different blue data cable to
the monitor and terminal server. Replace
cable if needed.
• Shutdown and restart entire system.
Laptop computer may not have power.
• Check power connections to laptop computer;
make sure power switch is on.
• If the laptop computer is operating only on
battery power, the battery may be depleted.
Connect ac power and make sure power
switch is on.
• Shutdown and restart entire system.
Data cables may not be connected to the
appropriate terminal server ports.
• Make sure the data cables from the monitors
are properly connected according to the
diagram in Step 2.
Data cable may not be properly connected to the
monitor and terminal server.
• Make sure the data cable is properly
connected between the monitor and terminal
server.
Note
For more information about troubleshooting the
monitors, refer to the monitor Directions For
Use.
Note
Patient monitoring will discontinue if the terminal
server is disconnected from AC power. Use of a
backup AC power source is recommended to
help prevent interruption in patient monitoring.
Technical Support
• United States 800-289-2501
• Worldwide 503-530-7500
(ask for technical support)
Mobile Acuity LT Hardwired System Installation Guide
 Loading...