

Page 1

Image Capture System
Directions for Use
Page 2

Windows® is a registered trademark of Microsoft Corporation.
®
Welch Allyn
is a registered trademark of Welch Allyn, Inc.
© Copyright Welch Allyn, Inc. 2004
Page 3

Table of Contents
Introduction . . . . . . . . . . . . . . . . . . . . . . . . . . . . . . . . . . . . . . . . . . . . . . . . . . . . . . . . . . . 1
Indications . . . . . . . . . . . . . . . . . . . . . . . . . . . . . . . . . . . . . . . . . . . . . . . . . . . . . . 1
Unpacking Checklist (Welch Allyn Image Capture System only) . . . . . . . . . . . . . 1
Minimum System Requirements . . . . . . . . . . . . . . . . . . . . . . . . . . . . . . . . . . . . . 1
Symbols . . . . . . . . . . . . . . . . . . . . . . . . . . . . . . . . . . . . . . . . . . . . . . . . . . . . . . . . 1
Warnings and Cautions . . . . . . . . . . . . . . . . . . . . . . . . . . . . . . . . . . . . . . . . . . . . 2
Mises en gardes et avertissements . . . . . . . . . . . . . . . . . . . . . . . . . . . . . . . . . . . 2
Setting up the Computer . . . . . . . . . . . . . . . . . . . . . . . . . . . . . . . . . . . . . . . . . . . . . . . . 4
Installing the PCMCIA Card REF 88802 . . . . . . . . . . . . . . . . . . . . . . . . . . . . . . . . 4
Installing the PCI Card REF 88801 . . . . . . . . . . . . . . . . . . . . . . . . . . . . . . . . . . . . 4
Connecting the Welch Allyn Image Capture System . . . . . . . . . . . . . . . . . . . . . . . . . . . 5
Installing the Welch Allyn Image Capture System Software . . . . . . . . . . . . . . . . 7
Setting Up the Welch Allyn Image Capture System . . . . . . . . . . . . . . . . . . . . . . . . . . . 10
System Administrator . . . . . . . . . . . . . . . . . . . . . . . . . . . . . . . . . . . . . . . . . . . . 10
Application User . . . . . . . . . . . . . . . . . . . . . . . . . . . . . . . . . . . . . . . . . . . . . . . . . 11
Entering Patient Sessions . . . . . . . . . . . . . . . . . . . . . . . . . . . . . . . . . . . . . . . . . . . . . . . 15
Adding a New Patient . . . . . . . . . . . . . . . . . . . . . . . . . . . . . . . . . . . . . . . . . . . . 16
Adding a New Session . . . . . . . . . . . . . . . . . . . . . . . . . . . . . . . . . . . . . . . . . . . . 16
Using the Welch Allyn Image Capture System . . . . . . . . . . . . . . . . . . . . . . . . . . . . . . . 17
Freezing an Image . . . . . . . . . . . . . . . . . . . . . . . . . . . . . . . . . . . . . . . . . . . . . . . 17
Capturing an Image . . . . . . . . . . . . . . . . . . . . . . . . . . . . . . . . . . . . . . . . . . . . . . 17
Saving Images . . . . . . . . . . . . . . . . . . . . . . . . . . . . . . . . . . . . . . . . . . . . . . . . . . 17
Displaying Current Images . . . . . . . . . . . . . . . . . . . . . . . . . . . . . . . . . . . . . . . . . 17
Using the Video Colposcope Buttons . . . . . . . . . . . . . . . . . . . . . . . . . . . . . . . . . . . . . . 18
“F” Button (Freeze) . . . . . . . . . . . . . . . . . . . . . . . . . . . . . . . . . . . . . . . . . . . . . . 18
“C” Button (Capture) . . . . . . . . . . . . . . . . . . . . . . . . . . . . . . . . . . . . . . . . . . . . . 18
“V” Button (Freeze / Live Toggle) . . . . . . . . . . . . . . . . . . . . . . . . . . . . . . . . . . . 18
Reviewing Sessions and Images . . . . . . . . . . . . . . . . . . . . . . . . . . . . . . . . . . . . . . . . . 19
Deleting an Image . . . . . . . . . . . . . . . . . . . . . . . . . . . . . . . . . . . . . . . . . . . . . . . 19
Exporting an Image . . . . . . . . . . . . . . . . . . . . . . . . . . . . . . . . . . . . . . . . . . . . . . 20
Printing an Image . . . . . . . . . . . . . . . . . . . . . . . . . . . . . . . . . . . . . . . . . . . . . . . . 20
Copying Sessions . . . . . . . . . . . . . . . . . . . . . . . . . . . . . . . . . . . . . . . . . . . . . . . . . . . . . 21
Maintenance . . . . . . . . . . . . . . . . . . . . . . . . . . . . . . . . . . . . . . . . . . . . . . . . . . . . . . . . . 22
Troubleshooting . . . . . . . . . . . . . . . . . . . . . . . . . . . . . . . . . . . . . . . . . . . . . . . . . . . . . . 22
Page 4

Specifications . . . . . . . . . . . . . . . . . . . . . . . . . . . . . . . . . . . . . . . . . . . . . . . . . . . . . . . . 26
Approvals . . . . . . . . . . . . . . . . . . . . . . . . . . . . . . . . . . . . . . . . . . . . . . . . . . . . . . . . . . .26
Replacement Parts . . . . . . . . . . . . . . . . . . . . . . . . . . . . . . . . . . . . . . . . . . . . . . . . . . . . 26
Emissions and Immunity Information . . . . . . . . . . . . . . . . . . . . . . . . . . . . . . . . . . . . . . 27
Software License Agreement . . . . . . . . . . . . . . . . . . . . . . . . . . . . . . . . . . . . . . . . . . . . 30
Warranty and Service . . . . . . . . . . . . . . . . . . . . . . . . . . . . . . . . . . . . . . . . . . . . . . . . . . 32
Warranty . . . . . . . . . . . . . . . . . . . . . . . . . . . . . . . . . . . . . . . . . . . . . . . . . . . . . . . 32
Service . . . . . . . . . . . . . . . . . . . . . . . . . . . . . . . . . . . . . . . . . . . . . . . . . . . . . . . . 32
Page 5

Introduction
This manual describes the set up, installation, and use of the Image Capture System for Desktop
Computers, REF 88801 and Image Capture System for Notebook Computers, REF 88802.
Indications
The Welch Allyn Image Capture System is intended to capture, display, save, export, and print
images obtained from the Welch Allyn Video Colposcope. The images captured, displayed,
saved, exported, and printed from the Welch Allyn Image Capture System are not intended for
diagnostic purposes. The provider shall use the image on the colposcope monitor for clinical
diagnosis.
Unpacking Checklist (Welch Allyn Image Capture System only)
Welch Allyn Image Capture Software
Welch Allyn Image Capture Directions for Use Manual
DV Converter
IEEE 1394 Cable
S-Video Cable
RS-232 Serial Communications Cable (9-pin)
IEEE 1394 PCI or PCMCIA Card (if purchased)
Registration/Warranty Card
Installation Waiver form
Minimum System Requirements
Pentium/Celeron Family - 800 MHz
256MB RAM
Available IEEE 1394 Port
Available RS-232 Port (for communication with Video Colposcope buttons)
20GB Available Hard Drive Space for image storage
CD ROM drive (for software installation)
Monitor with 1024 x 768 Resolution, 256 Color Minimum
Windows
*Verify your system has a dedicated IEEE 1394 port and a dedicated RS-232 port. The Image
Capture Sy stem doe s not support interf aces that reside on a hub, docking station, port replicator
or adapter (such as a USB to RS-232 adapter).
®
2000 or Windows® XP Operating System
Symbols
Attention, consult Operator’s Manual for additional information
1
Page 6

Warnings and Cautions
WARNING: This de vice is not suitable for use in the presence of a flammable anesthetic mixture
with air or oxygen or nitrous oxide. An explosion may result.
The digital video converter device is ITE (office) equipment only. Keep the device out of the
patient area (6 feet minimum).
This product generates and records ref erence images from inputs obtained from the Welc h Allyn
Video Colposcope. These reference images are not intended for diagnostic purposes. Base any
diagnosis with the images displayed on the colposcope monitor.
HIPAA: If health information containing the identification of the patients to whom the
information relates is stored or used in connection with this product, you should employ
procedures and policies to ensure the confidentiality and integrity of such information in
accordance with regulations implementing the Health Insurance Portability and Accountability
Act (HIPAA) which can be found at 45 CFR parts 160 - 164.
Welch Allyn strongly recommends that the Image Capture System is installed by a trained
Welch Allyn representative.
If you elect to install the Image Capture System application on a PC that does not meet the
specified minimum system requirements, the performance of the product will be impacted.
During use of the Image Capture System there are various warning symbols and caution
statements that identify events that prevent the system from performing properly. Follow any
directions accordingly.
Mises en gardes et avertissements
MISE EN GARDE : Cet appareil n'est pas adapté aux utilisations en présence d'un mélange
anesthésique inflammable contenant de l'air, de l'oxygène ou de l'oxyde nitreux. Une explosion
pourrait se produire.
Le convertisseur de vidéographie numérique est un appareil à mettre dans l'oreille (pour usage
en cabinet) seulement. Conserver l'appareil à une bonne distance (1,83 m au minimum) du
patient.
Ce produit génère et enregistre des images de référence à partir des données reçues du
colposcope de vidéographie Welch Allyn. Ces images de référence ne doive nt pas être utilisées
à des fins de diagnostic. Tout diagnostic doit se fonder sur les images affichées sur l'écran du
colposcope.
HIPAA : Si les informations médicales incluant l'identification des patients considérés sont
conservées ou utilisées par cet appareil, il faut appliquer des procédures et des règles telles que
la confidentialité et l'intégrité de ces informations soient assurées conformément à la
réglementation de mise en œuvre de Health Insurance Portability and Accountability Act (HIP AA)
que l'on peut consulter au 45 CFR parts 160 - 164.
2
Page 7

"Welch Allyn recommande vivement que l’Image Capture System soit installé par un
représentant formé de Welch Allyn."
Si vous décidez d'installer l'application Image Capt ure System sur un PC qui ne satisfait pas aux
spécifications minimales requises par le système, la performance du produit s'en ressentira."
Lors de l’utilisation de l’Image Capture System, divers symboles d’avertissement et de
déclarations de mises en garde apparaissent, permettant d’identifier ce qui empêc he le sy stème
de fonctionner correctement. Suivre les instructions en conséquence.
3
Page 8

Setting up the Computer
If you choose to have a third party setup the computer and install the Image Capture System
software verify that the system works properly, sign and date the warranty card, and return the
card to Welch Allyn.
Installing the PCMCIA Card REF 88802
1. With your notebook computer on, insert
the FireConnect for Notebooks adapter in
the PCMCIA slot.
2. Windows
®
automatically detects the
FireConnect for Notebooks adapter and
installs the drivers. Your installation is
complete.
Installing the PCI Card REF
Slot cover screw
PCMCIA slot
FireConnect™
for Notebooks
adapter
88801
Installing Your PCI Card
Expansion
slot cover
1. Touch a grounded metal object (such as the exposed metal parts on the back of the computer) to discharge any static electricity build-up before handling the card.
2. Turn off pow er to the computer and disconne ct the po wer cord. Open the computer cabinet, following the manufacturer’s instructions.
3. Locate an unused 32-bit or 64-bit PCI expansion slot and remove the expansion slot cover. Save the slot cover screw for use in Step 6.
4. Remove the card from the antistatic packaging.
64-bit PCI slot
32-bit PCI slot
Use the edges or metal bracket to hold the host adapter. Do not touch the gold
connector or any components on the card.
5. Insert the card into the PCI expansion slot. Depending on the tightness of the PCI slot, use gentle but firm force to insert the card. When installed properly, the card should appear level with the expansion slot.
6. Secure the card bracket with the slot cover screw you removed in Step 3.
7. Close the computer cabinet, reattach the power cord, then turn on the computer.
Installing the Driver
1. During startup, Windows automatically detects the new host adapter and loads an embedded driver.
2. Restart your computer if you are prompted to do so.
3. Go to the Windows Device Manager and check to see if the host adapter is installed correctly under the IEEE-1394 Bus Host Controller section.
4
Page 9
Connecting the Welch Allyn Image Capture System
Desktop Computer
1. Unplug the Video Colposcope and the Video Colposcope Monitor from the electrical outlet before making any cable connections.
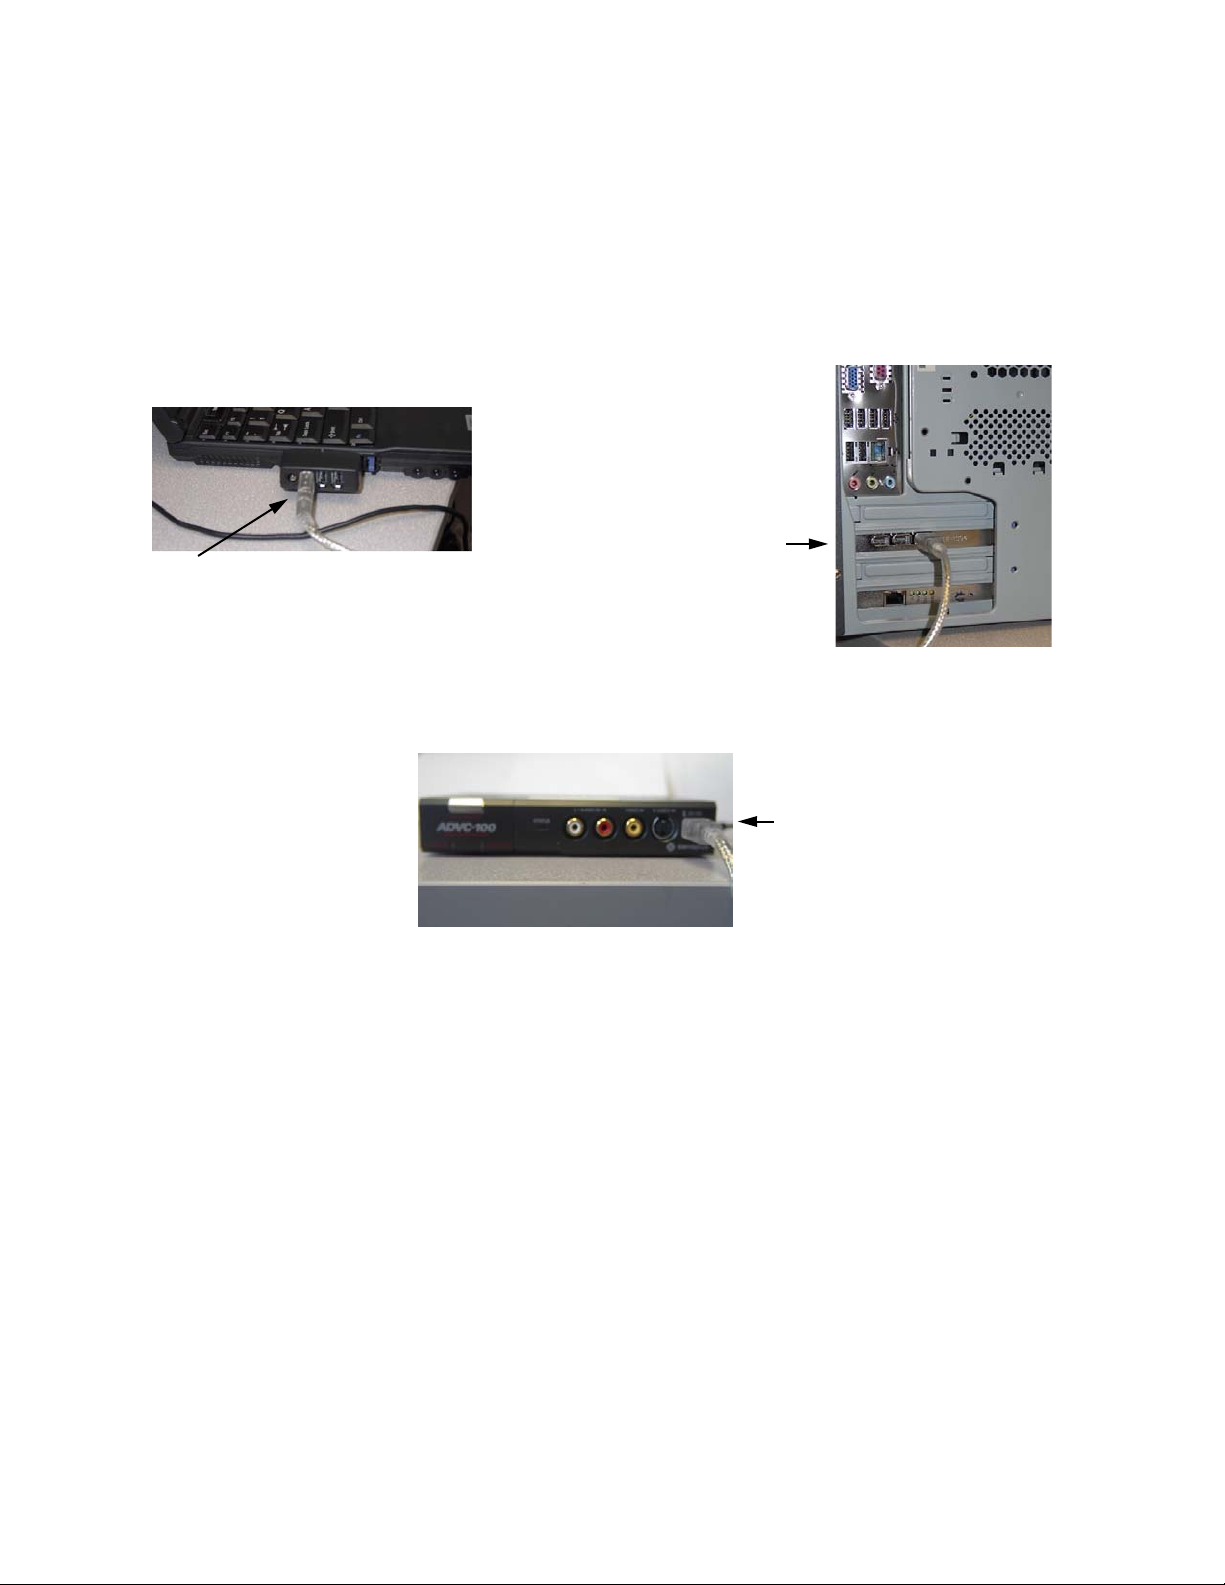
2. Connect the IEEE 1394 cable into the IEEE 1394 port on the computer. Plug the opposite
end of the cable into the port on the DV converter box. Verify that the DV converter box
number 2 and number 6 dip switches are set to on and all other dip switches are set to off.
Also verify that the DV Converter Input Select button is set to analog.
Notebook Computer
IEEE 1394 Cable
to Desktop
IEEE 1394 Cable to
Notebook Computer with
IEEE 1394 card
Computer with
IEEE 1394 card
DV Converter Front
IEEE 1394 Cable
5
Page 10
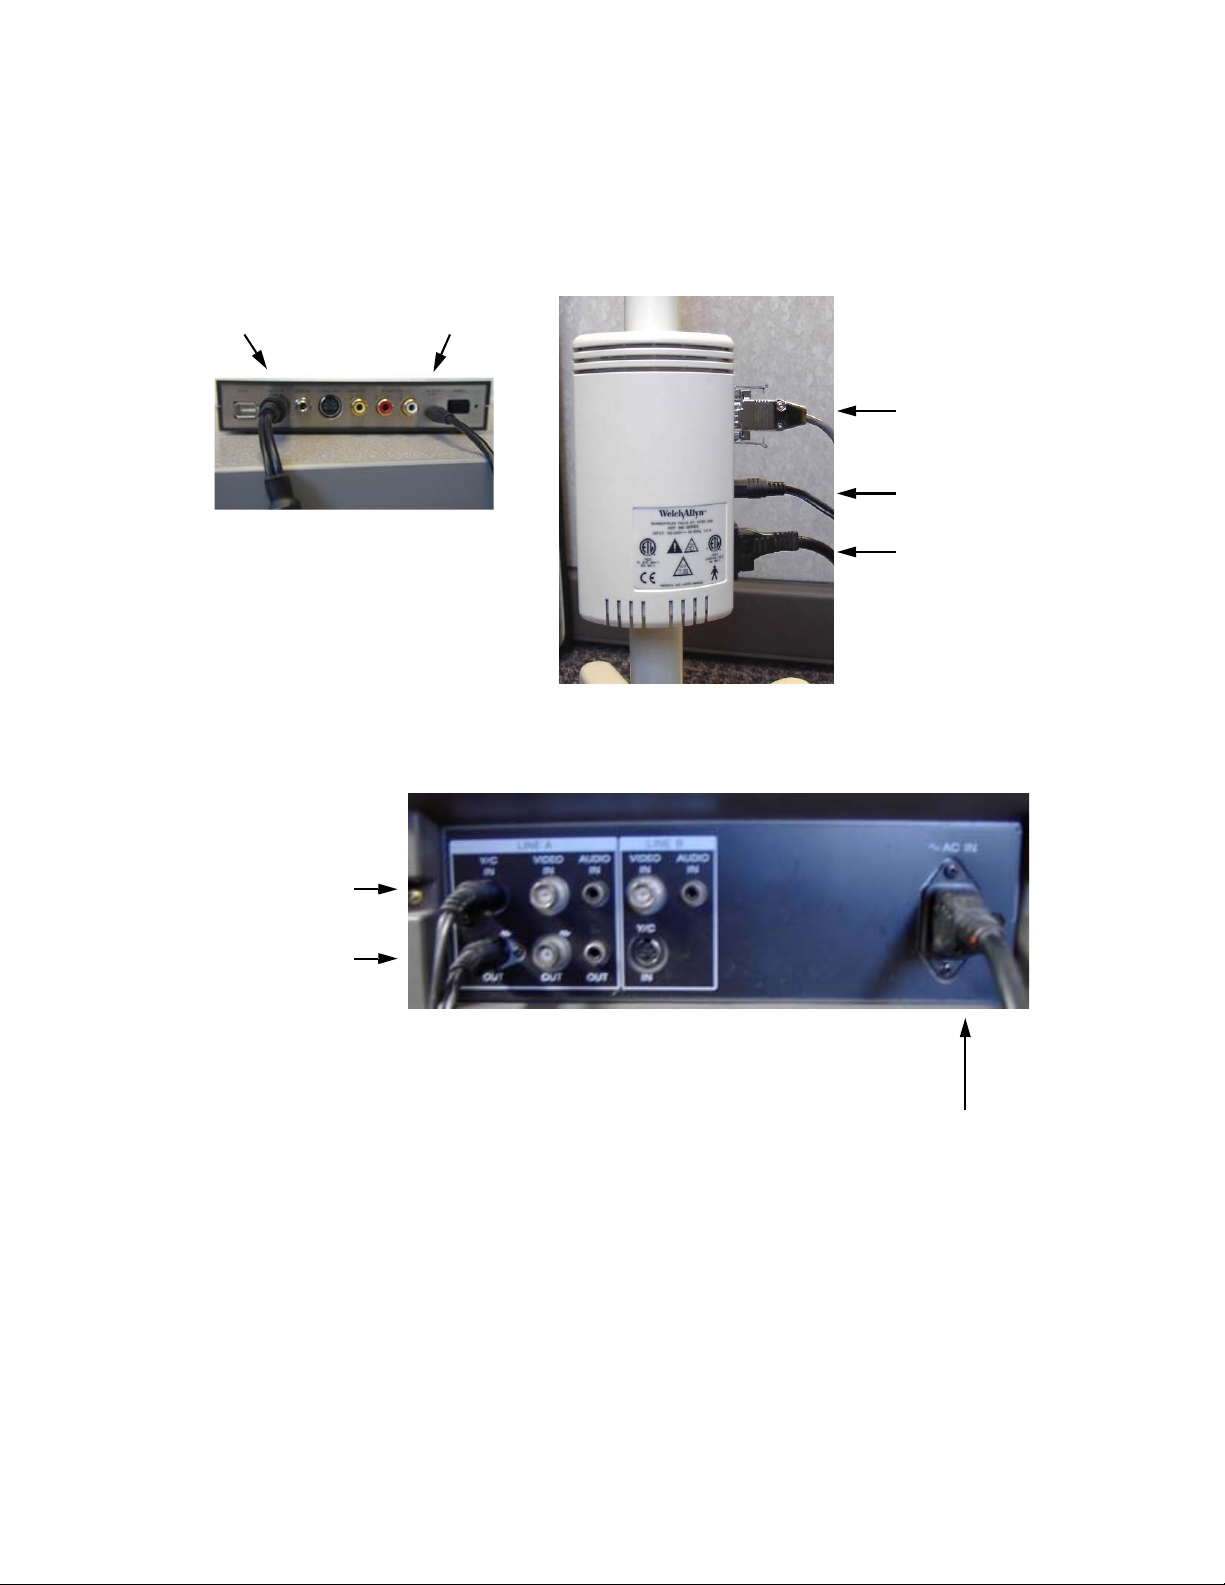
3. To connect the DV Conv erte r to the Video Colposcope, plug one end of the provided S-Video
Video Colposcope
Cable into the Video In on the DV Converter and the opposite end of the cable to the Video
Out on the Video Colposcope Monitor. Verify that the S-Video Cable on the Video
Colposcope is connected to the Video In on the back of the Video Colposcope Monitor.
DV Converter Back
S-Video Cable Power Cable
RS-232 Cable
S-Video Cable
(to monitor)
Power Cable
Y/C In
Y/C Out
(to DV Converter)
Video Colposcope Monitor Back
Power Cable
6
Page 11
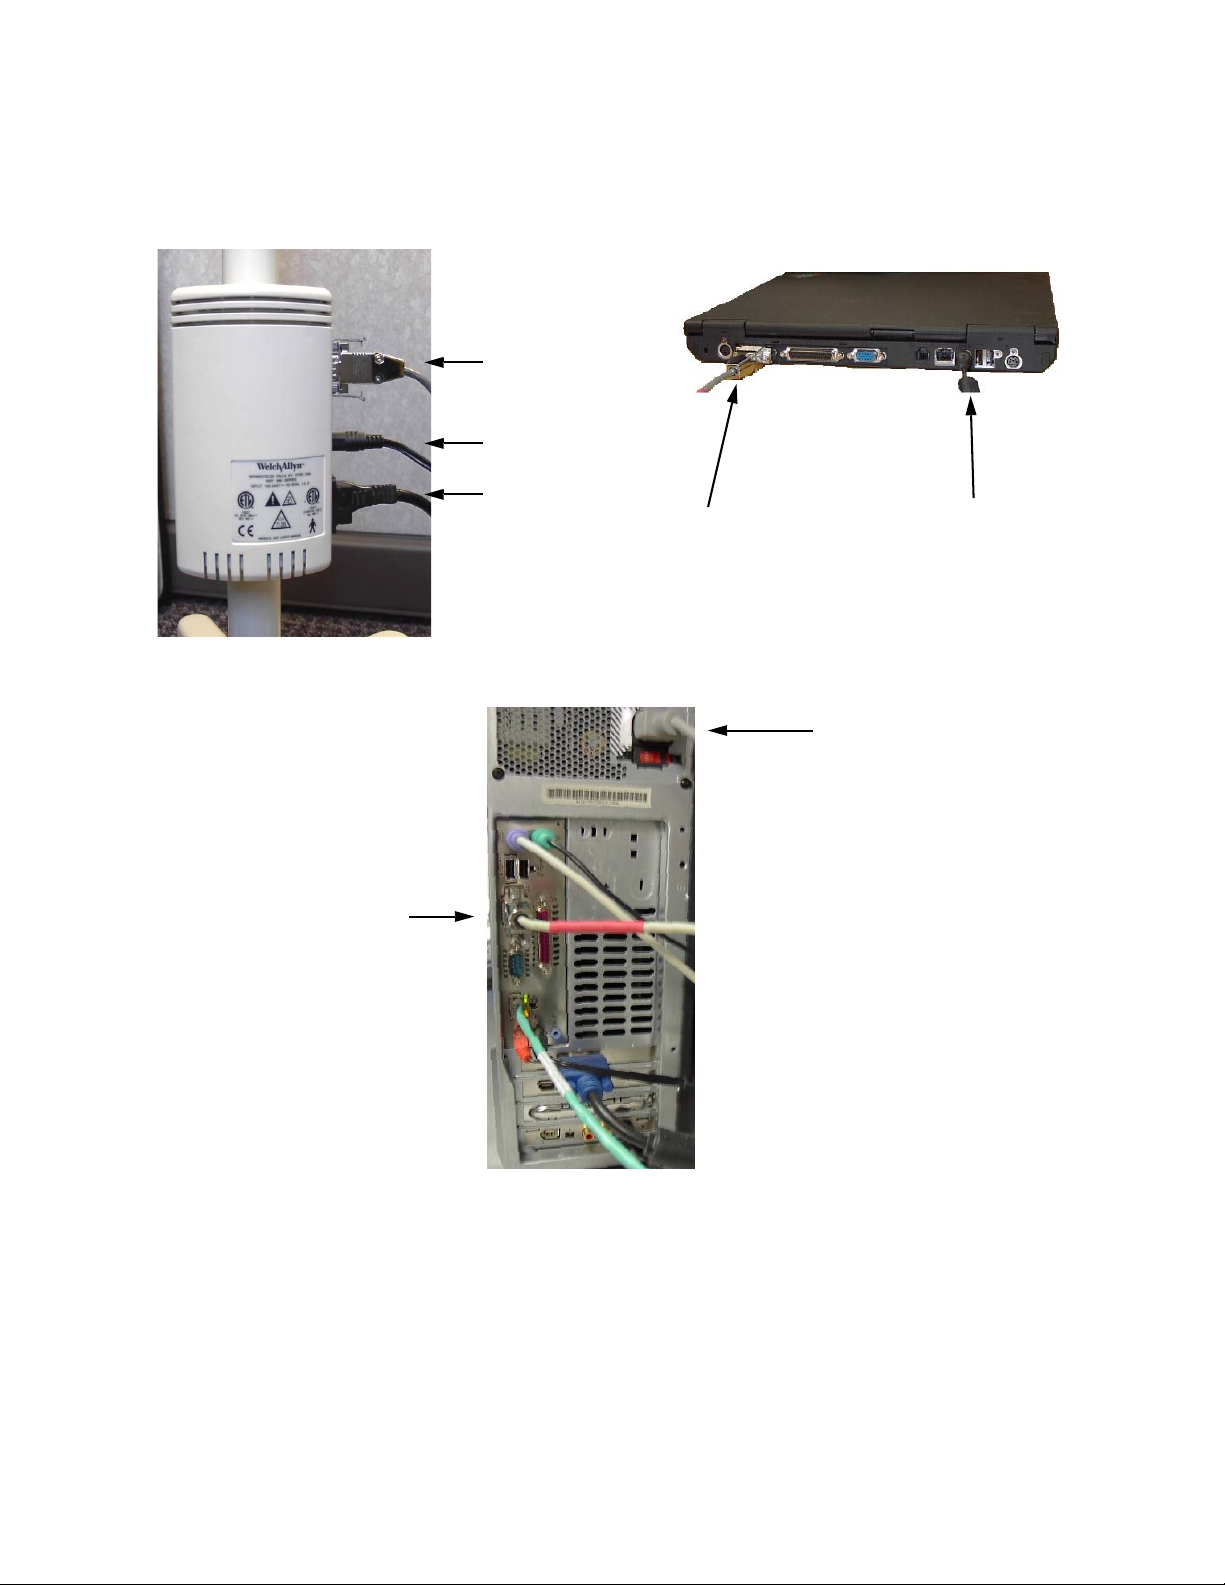
4. To connect the Video Colposcope to the computer, plug one end of the provided RS-232 Cable into the top connection on the Video Colposcope and the opposite end to the RS-232 connection plug on the computer.
Video Colposcope
RS-232 Cable
S-Video Cable
Power Cable
Desktop Computer
Notebook Computer
RS-232 Cable
Power Cable
Power Cable
RS-232 Cable
5. Plug the DV Converter, the Video Colposcope, and the Video Colposcope Monitor power cords into a hospital-grade outlet.
6. Turn on the DV Converter then boot up the computer.
Installing the Welch Allyn Image Capture System Software
Verify that your computer meets the minimum system requirements before installing the Welch
Allyn Image Capture System software. See “Minimum System Requirements" on page 1 if you
have any questions about the specifications. If your computer does not meet the minimum
7
Page 12

system requirements, the software will not work reliably and you will experience problems such
as no video image.
1. Load the Welch Allyn Image Capture System CD into the computer. The CD’s autoplay feature will automatically launch the installation program. If the installation program does NOT start, perform the following steps to manually invoke it.
a. From the task bar, click "Start" then click the "Run" option.
b. Using the drive let ter of the CD-R OM driv e, assuming it is D:, type "D:\Setup.e x e" and
click the "OK" button. This will launch the Image Capture System installation program.
c. To perform the installation, click the "OK" button.
d. The "Please wait..." dialog appears. This step of the procedure will take a few
minutes. If the .NET Framework (1.1) is not installed, then it is installed at this time
and will take several minutes for the process to complete.
e. At the "Welcome" screen, click the "Next" button. At the "License Ag reement" screen,
click "I Agree" then click the "Next" button.
f. At the "Select Installation Folder" screen accept the default location. Change the
installation folder only if necessary.
g. Click the "Everyone" option to make the Image Capture System available to all
Windows accounts. Click the "Just me" option to make the Image Capture System
available to the currently logged in Windows account. Click the "Next" button to
continue.
h. At the "Confirm Installation" screen, click the "Next" button then click the "Close"
button.
i. At the "Setup succeeded" prompt click the "OK" button.
2. Read and accept the User Agreement. T he computer will install the sof tware and create the directories necessary to file your images. The Welch Allyn Image Capture System icon will appear on your desktop.
3. Go to the System Administrator section of the Welch Allyn Image Capture System review the “Setting Up the Welch Allyn Image Capture System" on page 10 to setup passwords, hardware configurations, image settings and print settings.
Microsoft provides the SETUP.EXE and SETTINGS.INI files in the root of the
installation CD to automate the installation of the .NET Framework when using a .NET
Deployment Project (Windows Installer MSI).
The Image Capture System help file was developed for use with Microsoft HTML Help 1.x. It is
compiled in HTML format with the standard .chm file extension. HTML Help is a component of
Internet Explorer. Internet Explorer 4.0 or later is required to view the Image Capture System
help file; Windows 2000 shipped with Internet Explorer 5.01 and Windows XP shipped with
Internet Explorer 6.0.
8
Page 13

DirectX 8.1
The Image Capture System software requires that version 8.1 or later of DirectX is installed on
the computer. Windows 2000 shipped with DirectX 7.0a and Windows XP shipped with DirectX
8.1. Perform the following steps to identify the installed version of DirectX:
1. From the task bar click "Start" then click the "Run" option.
2. Type "dxdiag" then click the "OK" button. The DirectX Diagnostic Tool is loaded. On the
"System" (default) tab, toward the bottom of the "System Information" section, is an item
named "DirectX Version". Verify the value for this item is "DirectX 8.1" or later.
If the version of DirectX is earlier than 8.1, then perform the follo wing steps to install DirectX 8.1
on the computer.
1. Load the Image Capture System CD into an available CD-ROM drive. If the installation program initiates, click the "Cancel" button to shut it down.
2. From the task bar click "Start" and then click the "Run" option.
3. Using the drive letter of the CD-ROM drive, assuming it is D:, type "D:\DirectX 8.1\Win2000 Runtime\DX81NTeng.exe" then click the "OK" button. This will launch the DirectX 8.1 installation program.
4. Click the "Yes" button to continue with the installation then click the "Yes" button to accept the license agreement.
5. When the installation process is complete, click "OK" to restart the computer.
9
Page 14

Setting Up the Welch Allyn Image Capture System
S
k
s
System Administrator
Welch Allyn recommends that the System Administrator for the Welch Allyn Image Capture
System change the login password after the first sign in.
1. Login to the Welch Allyn Image Capture System. Your password brings you to the main Select Session / Create Patient screen.
2. Click on the Settings drop-down menu. Click on the Ad min selection in the drop-do wn menu. This brings you to the Admin Settings screen.
3. The Passw ords tab allows the S ystem Administrator to create a new password or change an existing password that allows access the Welch Allyn Image Capture System. Please keep the following information in mind when setting up the passwords:
a. A typed password is required in the Admin password space. Do not leave this space
blank.
b. A typed password is not required in the Application password space.
c. Make sure that the Application and the Admin passwords are different.
d. All passwords are case sensitive.
ave button
eeps new
ettings.
Cancel button
keeps previous
settings.
This section allows the System
Administrator to create or update
the application password to
access the system.
This section allows the System
Administrator to create or update the
system administrator password to
access the system.
10
Page 15

4. The Hardware tab allows the System Administrator to select the video device, video inputs
S
(the Image Capture System does not use video inputs), and COM port (when applicable). If
all hardware is connected correctly, the computer will automatically detect the video devices
connected to it.
5. Select the appropriate Video Device. Once you choose the correct device, streaming video appears on the computer screen.
ave button keeps new settings.
Cancel button keeps previous settings.
These devices are automatically
detected.
6. Setting the COM port value from 1 to 8 will require a shutdown and restart of the Image Capture System application.
7. Click the Save button to keep the new settings or the Cancel button to keep the previous settings. Clicking either button brings the System Administrator back to the Select Session / Create Patient screen.
8. Go to “Using the Welch Allyn Image Capture System" and f ollo w the directions to capt ure an image. If you can capture an image with the vid eo colposcope button, the system is working properly.
Application User
Any user that is logged into the Welch Allyn Image Capture System can change or update the
Capture Image Time Delay, Image File Format, Timestamp, or Print Filename settings.
1. Login to the Welch Allyn Image Capture System. The password brings you to the Select Session / Create Patient screen.
11
Page 16

2. Click on the Settings drop-down menu. Click on the Application selection in the drop-down menu. This brings you to the Application Settings screen.
3. The Capture tab allows the user to adjust:
a. Capture Image Time Delay Before Return to Live Video Mode. This setting adjusts
the amount of time the user sees the captured image on the computer screen bef ore
returning to live video. Click the drop down arrow to choose between 0 and 2
seconds, the default setting is 0 seconds.
Save button
keeps new
settings.
Cancel but ton
keeps previous
settings.
Drop down menu
allows 0 to 2
second time
delay.
12
Page 17

b. Captured Image File Format. This setting allows the user to choose the saved image
file format. Click the drop down arrow to choose a BMP, JPG, or TIFF format. The
Bitmap File Format (BMP) and Tag(ged) Image File Format (TIFF) are uncompressed
image file formats. Since BMP and TIFF file formats are uncompressed they require
more disk storage space than a compressed file format. To conserve disk storage
space, the Welch Allyn Image Capture System offers a JPEG (Joint Photographic
Experts Group) file format (JPG) which provides for a compressed file format. The
JPG file compression is irreversible. The compression ratio sh all not exceed 10:1 and
is identified in the lower left-hand corner as “10:1 Q:12”.
BMP and TIFF images do not have the compression label applied when they are
created. If either one of these formats is later e xported to JPG, the compression label
is applied to the new JPG file. If a JPG file is exported to BMP or TIFF format, the
BMP or TIFF will show the compression label because it was applied to the JPG
when it was created. Even though BMP and TIFF are not compressed, the conv erted
JPG still has loss and the label will identify this loss.
Save button keeps new settings.
Cancel button keeps previous settings.
Drop down menu
allows the user to
save the images
as a BMP, a JPG
or a TIFF file
format.
13
Page 18

c. Display Destructive Timestamp on Captured Image. The Timestamp setting
permanently marks the current date and time on the image the moment the image is
captured. Check Yes or No if you want to display this information. If you choose Yes,
the Timestamp formats are available for US or European date coding and 12 or 24
hour time coding. The computer’s date and time settings control the date and time
placed on your image.
Save button keeps new settings.
Cancel button keeps previous settings.
Click Yes or No to
enable or disable
Select one of the
date / time formats
available.
the date / time
stamp on the
captured Image.
4. The Print tab allows the user to decide if they want the file name to print on the page with the image.
Save button keeps new settings.
Cancel button keeps previous settings.
Check Yes or No
to print the
filename with the
image.
5. Click the Save button to keep the new settings or the Cancel button to keep the previous settings.
6. Follow these steps to verify the system is functioning as intended:
a. Create a new patient and a new session then capture at least one image.
b. Return to the Create/Select Session screen to select the previously created patient
and session.
c. Confirm that clicking the export button and the print button invoke the Windows
dialog boxes to perform these functions.
14
d. Delete an image.
e. Log out of the application.
Page 19

Entering Patient Sessions
The user can load information for a ne w patient or a ne w session from the same opening screen.
The system always displays the Patient ID and the Date after entering a patient session.
Caution: If health information containing the identification of the patients to whom the
information relates is stored or used in connection with this product, you should employ
procedures and policies to ensure the confidentiality and integrity of such information in
accordance with regulations implementing the Health Insurance Portability and
Accountability Act (HIPAA) which can be found at 45 CFR Parts 160 - 164.
Select Session button brings user
back to the Select Session / Create
Patient screen.
Main Menu
Toolbar
Title Bar
List of
Patient IDs
Logout button terminates the
session for the current user.
Exit button closes the Image
Capture System
List of
previous
Sessions
New Session button begins a
new session for the current date
when an existing Patient ID is
selected.
New Patient button adds a
new Patient ID folder. The
user must name the folder.
Open Session button
opens a selected session
for a selected patient and
allows the user to review
available images.
15
Page 20

Adding a New Patient
To add a new patient in the Welch Allyn Image Capture System:
1. Login to the Welch Allyn Image Capture System. Your password brings you to the Select Session / Create Patient screen.
2. Click the New Patient button. The computer generates a new file folder.
3. Name the new folder with a un ique Patient ID, the system allows combinat ions of alp ha and
numeric characters, and click the Enter key. Do not use the characters \ /:*?"<>| or a series
of periods (...) in your naming conventions as Windows considers these invalid naming
characters.
4. The Welch Allyn Image Capture System creates a session for the current date, is now in Image Capture mode, and ready to take images.
Adding a New Session
To add a new session:
1. Login into the Welch Allyn Image Capture System. Your password brings you to the Select Session / Create Patient screen.
2. At the Select Session / Create Patient screen, click on the Patient ID from the list on the left of the screen then click the New Session button. The Image Capture System creates a new folder with the current date.
If you open a folder with the current date, the system will display “Notice! The Selected
Patient Already Has A Session Folder for Today's Date. Any Previously Captured Images
Will Now Be Loaded”, clicking OK will load the current images and allow the user to add
more images to the folder.
16
Page 21

Using the Welch Allyn Image Capture System
Freeze but ton display s the current
When entering a New Session, the Welch Allyn Image Capture System always begins in Image
Capture Mode. Use the Video Colposcope as usual. The system always displays the current
Patient ID and the Date on the title bar. Use the Welch Allyn Image Capture System to freeze or
capture images taken with the Video Colposcope.
video frame the moment the
option is selected.
Select Session
button b rin gs us er
the back to the
Select Session /
Create Patient
screen.
Capture button places
the current image into a
thumbnail and saves it.
Video button returns the system to
real-time video from Freeze Mode.
Logout button terminates the
session for the current user.
Exit button closes the
Image Capture System
Capture or Display
Software Mode
Reference
Available
thumbnails
for review
Freezing an Image
To display a frame of the current video stream on the screen, click the Freeze button. To return
to Video Mode, click the Video button.
Capturing an Image
To save a frame of the current video stream, click the Capture button. All captured images are
placed in thumbnail views on the right of the computer screen and saved to the session folder.
Saving Images
Your computer saves all images on the hard drive when you click the Capture button. Welch
Allyn recommends that you schedule regular back ups of the hard drive to avoid loss of images
and information due to a system failure.
Displaying Current Images
To review captured images while in Ne w Session mode, click on the thumbnail of the image you
would like to review. The computer will change from Image Capture Mode to Image Display
Mode. Continue to click on additional images for review. See the “Reviewing Sessions and
Images" on page 19 for available computer options. To return to the Image Capture mode, click
on the Video button.
17
Page 22

Using the Video Colposcope Buttons
The W elch Allyn Video Colposcope has three buttons loca ted just ab o v e the handle that allows it
to send commands to the Image Capture System. The buttons are identified on the colposcope
as “F”, “C” and “V”.
“F” Button (Freeze)
The “F” but ton freez e the current fram e of live video
the moment the but ton is pressed. Eac h pre ss of the
button will freez e a ne w (current) frame of liv e video.
The Video Colposcope does not save images with
the “F” button.
“C” Button (Capture)
The “C” button captures the currently frozen frame
or the current frame of live video and saves it to the
patient folder. If an image is currently “frozen”, then
the frozen frame is captured and the system will
continue to display the frozen frame. If the Image
Capture System is currently displaying live video,
then the current frame of live video is captured and
the system will continue to display in live video.
(F)
(C)
(V)
“V” Button (Freeze / Live Toggle)
The “V” button toggles between Freeze and Live
modes. If an image is frozen and the button is pressed, the application returns to Live Mode. If
the Image Capture System is currently displaying live video and the button is pressed, the
application switches to Freeze Mode (displaying a single video frame at the moment the button
is pressed). The Video Colposcope does not save images with the “V” button.
18
Page 23

Reviewing Sessions and Images
s
Captured images are available for the user to delete, export, or print. Pressing the Delete button
will remove the selected image from the Welch Allyn Image Capture System. Pressing the
Export button will save the selected image to another drive / file location, rename the image
(optional), and/or save the image as a different file type. Pressing the Print button will print the
selected image to a local or networked printer. The image thumbnails are sorted by date and
time of image with the most recent image on top. The system always displays the Patient ID
and Date on the title bar.
Delete button
removes the
selected
thumbnail from
the folder.
Select Session
button brings
user back to the
Select Session /
Create Patient
screen.
Main Screen
JPG Image
Compression
and Q Factor
Export button will
save the selected
thumbnail to a
target file/drive
location.
Print but ton will print the
selected thumbnail
Logout button terminates the
session for the current user.
Exit button closes the
Image Capture System
Capture/Display
Software Mode
Reference
Available
thumbnail
for review
Date/Time Stamp
1. Login into the Welch Allyn Image Capture System. Your password brings you to the Select Session / Create Patient screen.
2. At the Select Session / Create Patient screen click on the Patient ID from the list on the left
of the screen then clic k the session you want to revie w listed on the righ t of the screen. See
the “Entering Patient Sessions" on page 15 for more detail.
3. Click the Open Session button or double-click the session folder to open. Thumbnails of the available images in that session are shown on the right side of the screen.
4. Click on any thumbnail to see a larger view of the image in the main screen.
Deleting an Image
1. With the specific image selected, click the Delete button on the Welch Allyn Image Capture System toolbar, menu, or right-click your mouse and select Delete from the context menu.
19
Page 24

2. Answer Yes to verify that you want to remove the image from the session folder. The computer display is cleared of the deleted image and the active thumbnails are refreshed.
3. To undelete the last image deleted, click File from the menu and click the Undelete option. The operator can only recover the last image deleted.
4. Answer Yes if you would like to recover the last image deleted. The Welch Allyn Image Capture System will replace the deleted image to its original file location.
Exporting an Image
1. With an image selected, click the Export button at the Welch Allyn Image Capture System application toolbar, menu, or right-click your mouse and select Export from the context menu. In the Windows dialog box, you can:
a. Save the selected image to a different location. Select the new destination using the
Windows Dialog box.
b. Rename the current image. Highlight the current file name and retype the ne w image
name.
c. Change the format type. Click on the dropdown arrow to see the available output
formats available.
2. Highlight and click on the new output format.
3. Click on the Save button to export the image.
Printing an Image
1. With an image selected, click the Print button at the Welch Allyn Image Capture System application toolbar, menu, or right-click your mouse and select Print from the context menu.
2. Select any available printer using the Windows Dialog box and click the OK button. Printing will now begin.
20
Page 25

Copying Sessions
This feature allows the user to copy or back up all or selected sessions.
Logout button terminates the
session for the current user.
Main Menu
Select Session
button brings
user back to
the Select
Session /
Create Patient
screen.
List of
Patients
Exit button closes the Image
Capture System
List of Sessions.
Operator can choose
one or more sessions
to copy.
Select All button
selects all
sessions of the
selected patient
for copy.
Copy All
Patients
button selects
all patients and
all sessions to
copy to a
selected drive
or folder.
Copy Session(s) button will
copy all selected patient
sessions.
Unselect All
button unse l ects
all sessions of the
selected patient
for copy.
1. Login to the Welch Allyn Image Capture System. Your password brings you to the Select Session / Create Patient screen.
2. Click on Session in the menu and select Copy from the list. To copy all sessions, click on the
Copy All Patients button at the bottom left of the screen and use the Windows Dialog B o x to
designate the destination for the copied files. The folder hierarchy of the copied data is as
follows: destination\Welch Allyn ICS\Patient\Session(s).
3. Click the OK button to start copying the files. A status bar will appear on the screen and the computer will advise when the data is successfully copied.
4. To copy a specific patient or a specific ses sion, highlight an d select th e desir ed Patient ID on
the left side of the screen. Select the specific sessions you want to copy using the available
check boxes or click the Select All button at the bottom of the sessions box to choose all
sessions for that patient.
5. Click the Copy Sessions button and use the Windows Dialog Box to designate the destination for the copied files. The folder hierarchy of the copied data is as follows: destination\Patient\Session(s).
6. Click the OK button to start copying the files. A status bar will appear on the screen and the computer will advise when the data is successfully copied.
The default beha vio r of the cop y op eration is to o verwrite files of the same name. Therefore, if a
copy is performed to a destination where the destination was used for a previous copy
operation, then any encountered files of the same name will be overwritten.
21
Page 26

Maintenance
Check all connection cables once a month for kinks, fraying, or other damage. Replace as
necessary.
Consult the accessory specific manual for the accessory care and maintenance.
Troubleshooting
Problem Cause Solution
Installation program cannot
add files to PC.
No Image or Bad Image
User can’t save, export, or
copy the images.
User can’t print the image.
User doesn’t have correct
permissions on operating
system.
DV Converter not
configured properly.
Power up sequence was
done incorrectly.
User doesn’t have correct
permissions on operating
system.
Printer is not connected or
configured properly.
Contact your System
Administrator to correct the
user permissions.
Verify that the number 2 and
number 6 dip switches on the
DV Converter box are set to on
and all other dip switches are
set to off.
Verify the DV Converter Input
Select button is set to analog.
Turn on the DV Converter, and
then boot up the computer. For
best results, leave the DV
Converter po wered on until the
computer is turned off.
Contact your System
Administrator to correct the
user permissions.
Refer to y our printer instr uction
manual to properly connect the
printer.
Application password
doesn’t work.
22
Printer is off. Verify printer is turned on.
Password is case
sensitive.
Password updated and
forgotten or misplaced.
Check the cur rent stat us of the
Caps Lock Key and re-type the
password.
See the System Administrator.
Page 27

Problem Cause Solution
System Administrator
password doesn’t work.
Image flickers.
Password is case
sensitive.
Password updated and
forgotten or misplaced.
PC constraints.
DV Converter connections.
Check the cur rent stat us of the
Caps Lock Key and re-type the
password.
Contact Welch Allyn Technical
Support (1-800-535-6663) for
assistance.
Initial System Administrator
password is the word “initial”.
Go to the “Minimum System
Requirements" on page 1 and
verify your PC meets these
standards.
Check the DV Converter cable
connections.
Verify that the number 2 and
number 6 dip switches on the
DV Converter box are set to on
and all other dip switches are
set to off.
No Video on PC.
System is givin g a memory
error, delayed response, or
image is not processed.
IEEE 1394 cable doesn’t
work.
PCI or PCMCIA Card is not
installed properly.
Loose cable connection.
Proper video device not
selected.
System does not meet
minimum requirements.
Virtual memory error.
Go to the “Minimum System
Requirements" on page 1 and
verify your PC meets these
standards.
Check that the PCI or PCMCIA
card is properly installed. See
“Setting up the Computer” on
page 4 for more information.
Verify all cable connections are
in place.
Go to the “Setting Up the
Welch Allyn Image Capture
System" on page 10 to select
the proper video device.
Go to the “Minimum System
Requirements" on page 1 and
verify your PC meets these
standards.
Try increasing the computer’s
virtual memory setting.
Add more physical memory to
your computer.
23
Page 28

Problem Cause Solution
Colposcope buttons do not
work, but the Image
Capture Software buttons
do work.
Defective RS-232 cable.
A USB to Serial adapter is
used with the system.
Check your RS-232 cable for
fraying, breakage, or other
damage.
Verify the system has a
dedicated RS-232 port. The
Image Capture System does
not support interfaces that
reside on a hub, docking
station, port replicator or
adapter (such as a USB to
RS-232 adapter).
Conflict with another
program.
Com port not properly set
in software.
Check your system tray for
programs such as Active Sync.
Go to “Setting Up the Welch
Allyn Image Capture System"
and set the Com port to the
proper setting.
24
Page 29

Problem Cause Solution
The Image Capture
System is not working at
all.
You need to install .NET
Framework 1.1
The Image Capture System
application requires version 1.1
of the .NET Framework. The
Image Capture System
installation program checks the
target computer for the
existence of this version of the
framework. If it is found, this
step of the installation process
is skipped. If it is not found,
version 1.1 of the .NET
Framework is installed. If you
must manually install the .NET
Framework from the
installation CD, perform the
following steps:
1. Load the Image Capture System installation CD into an available CD-ROM drive. If the installation program initiates, click the "Cancel" button to shut it down.
2. From the task bar click "Start" and then click the "Run" option.
3. Using the drive let ter of the
CD-ROM drive, assuming it
is D:, type
"D:\NET Framework
1.1\dotnetfx.exe" then click
the "OK" button.
4. This will launch the .NET Framework installation program. When prompted, click "Yes" to continue with the installation.
5. At the "License Agreement" screen, click "I agree" then click the "Install" button. This step of the procedure takes a few minutes. When prompted, click the "OK" button. Installation of the .NET Framework 1.1 is now complete.
25
Page 30

Specifications
DV Converter: See enclosed manual.
Colposcope: See the Video Colposcope manual.
PCI or PCMCIA Card: See enclosed manual.
Cable Lengths:
S-Video cable 20 feet (6 meters)
Composite cable 12 feet (3.5 meters)
Approvals
Listed by TUV Rheinland, NA, to the following standards:
o
f
C
.
c
N
n
o
I
,
r
t
a
h
c
i
A
r
m
e
US
UL60601-1, CAN/CSA C22.2 No.601.1, IEC60601-1-1, IEC60601-1-2
Replacement Parts
Canopus ADVC100, Video Converter 700145
Adaptec Fire Connect 4300, PCI 700147
Adaptec Fire Connect 1430, PCMCIA 700146
S-Video Cable 88600
RS-232 Interface Cable 88500
26
Page 31

Emissions and Immunity Information
Guidance and Manufacturer’s Declaration - Emissions
The Image Capture System is intended for use in the electromagnetic environment specified below. The
customer or user of the Image Capture System should ensure that it is used in such an environment.
Emissions Test Compliance Electromagnetic Environment - Guidance
RF Emissions
CISPR11
RF Emissions
CISPR22, FCC
Harmonics
IEC 61000-3-2
Flicker
IEC 61000-3-3
Radiated and Conducted Emissions were tested on the Elgar po w er source. It complies with the
EN55022 Class B limits, and FCC part 15 which as same limits as EN55011 Group 1, Class B.
Harmonics and Flicker testing was not tested, as the EUT is operated at 120V, 60Hz, which is
beyond the scope of those standards.
Class B
Group 1
Class B
N/A
N/A
The Image Capture System uses RF energy only
for its internal function. Therefore, its RF
emissions are very low and are not likely to cause
any interference in nearby electronic equipment.
The Image Capture System uses RF energy only
for its internal function. Therefore, its RF
emissions are very low and are not likely to cause
any interference in nearby electronic equipment.
For use in domestically and in Canada.
Beyond the scope of the standard.
For use in domestically and in Canada.
Beyond the scope of the standard.
The Image Capture S ystem is suitable for use in all
establishments, including domestic, and those
directly connected to the public low -v oltage power
supply network that supplies buildings used for
domestic purposes.
27
Page 32

Guidance and Manufacturer’s Declaration - Immunity
The Image Capture System is intended for use in the electromagnetic environment specified below. The customer
or user of the Image Capture System should ensure that it is used in such an environment.
Immunity Test
ESD
IEC 61000-4-2
EFT
IEC 61000-4-4
Surge
IEC 61000-4-5
Power Frequency
50/50 Hz
Magnetic Field
IEC 61000-4-8
Voltage dips, short
interruptions and
voltage variations on
power supply input
lines
IEC 61000-4-11
IEC 60601
Test Level
± 6kV Contact
± 8kV Air
±2kV Mains
±1kV I/Os
±1kV Differential
±2kV Common
3 A/M 3 A/M
>95% Dip for 0.5
Cycle
60% Dip for 5
Cycles
30% Dip for 25
Cycles
>95% Dip for 5
Seconds
Compliance Level
± 6kV Contact
± 8kV Air
±2kV
±1kV
±1kV Differential
±2kV Common
>95% Dip for 0.5
Cycle
60% Dip for 5 Cycles
30% Dip for 25
Cycles
>95% Dip for 5
Seconds
Electromagnetic
Environment - Guidance
Floors should be wood,
concrete, or ceramic tile. If
floors are synthetic, the r/h
should be at least 30%.
Mains power quality should
be that of a typical
commercial or hospital
environment.
Mains power quality should
be that of a typical
commercial or hospital
environment.
Power frequency magnetic
fields should at levels
characteristic of a typical
location in a typical
commercial or hospital
environment.
Mains power quality should
be that of a typical
commercial or hospital
environment.
ESD, EFT, and Surge testing were performed on the Schaffner Best EMC multi tester. The
power supplied using the Elgar power source at 120VAC. Voltage Dips were tested at 120VAC /
60 Hz. Magnetic Immunity was tested at 50 and 60 Hz.
28
Page 33

.
Guidance and Manufacturer’s Declaration - Immunity
The Image Capture System is intended for use in the electromagnetic environment specified below. The
customer or user of the Image Capture System should ensure that it is used in such an environment
Immunity Test
IEC 60601
Test Level
3 Vrms
Compliance
Level
Electromagnetic Environment -
Guidance
Portable and mobile communications
equipment should be separated from the EUT
by no less than the distances calculated/listed
below:
D=0.35 (Sqrt P)
Conducted RF
D=0.35 (Sqrt P)
80 to 800MHz
D=0.7 (Sqrt P)
800MHz to 2.5 GHz
Where P is the max power in watts and D is
the recommended separation distance in
meters.
Field strengths from fixed transmitters, as
determined by an electromagnetic site
survey, should be less than 10Vrms or 10V/m.
Interference may occur in the vicinity of
equipment containing a transmitter.
IEC 61000-4-6
Radiated RF
IEC 61000-4-3
150 kHz to
80MHz
3 V/m
80 MHz to 2.5
GHz
3 Vrms
3 V/m
Conducted RFI and Radiated RFI testing was performed on the EUT. Monitoring the output for
drops in voltage; none were detected.
Recommended Separations Distances between portable and mobile RF
Communications equipment and the Welch Allyn Image Capture System
Guidance and Manufacturer’s Declaration - Emissions
The Image Capture System is intended for use in the electromagnetic environment in which radiated
disturbances are controlled. The customer or user of the Image Capture System can help prevent
electromagnetic interference by maintaining a minimum distance between portable and mob ile RF
Communications Equipment and the Image Capture System as recommended below, according to the
maximum output power of the communications equipment.
Separation (m)
Max Output
Power (Watts)
0.0 1 0.035 0.035 0.07
0.1 0.111 0.111 0.221
1 0.35 0.35 0.7
10 1.107 1.107 2.214
100 3.5 3.5 7 .0
150kHz to 80MHz
D=(3.5/V1) (Sprt P)
Separation (m)
80 to 800MHz
D=(3.5/E1) (Sprt P)
Separation (m)
800MHz to 2.5GHz
D=(7/E1) (Sprt P)
29
Page 34

Software License Agreement
The software provided with the Image Capture System (ICS) consists of software written by
Welch Allyn, Inc. (the ICS Software), as well as software written by third parties (the Third-Party
Software). The ICS Software is governed by this license, If any updates are periodically provided
for the ICS Sof twa re or an y T hird-Party Software, such software updates will be governed by the
relevant license for that software unless a different license agreement is provided with the
update.
READ THE TERMS AND CONDITIONS OF THIS LICENSE AGREEMENT CAREFULLY BEFORE
OPERATING THE ICS DEVICE. THE ICS SOFTWARE IS COPYRIGHTED AND LICENSED (NOT
SOLD). BY OPERATING THE ICS DEVICE YOU ARE ACCEPTING AND AGREEING TO THE
TERMS OF THIS LICENSE AGREEMENT IF YOU ARE NOT WILLING TO BE BOUND BY THE
TERMS OF THIS LICENSE AGREEMENT YOU SHOULD PROMPTLY RETURN THE ICS DEVICE
TO WE LCH ALLYN. THIS LICENSE AGREEMENT REPRESENTS THE COMPLETE AGREEMENT
CONCERNING THE ICS SOFTWARE BETWEEN YOU AND WELCH ALLYN, AND IT
SUPERSEDES ANY PRIOR PROPOSAL, REPRESENTATION, OR UNDERSTANDING YOU MAY
HAVE HAD.
END USER LICENSE AGREEMENT FOR ICS SOFTWARE
1. License Grant. Welch Allyn, Inc. (hereinafter Welch Allyn) hereby grants to you, and you
accept, a non-exclusive license to use the machine-readable, object code form of the ICS
Software, whether provided on the media packaged with the ICS device or pre-installed on
the ICS device (collectively referred to as the "Software"), as well as the accompanying User
Instructions or Documentation, only as authorized in this License Agreement. The Software
may be used only on one ICS device. Neither concurrent use on two or more devices or
computers, nor use in a network, is permitted without separate authorization from Welch
Allyn.
• You agree that you will not assign, re-license, transfer, rent, or share your rights under
this License Agreement, except that you may permanently transfer all of your rights
under this License Agreement as part of a sale or other transf er to a third party of the ICS
device with which the Software was packaged and sold, provided that you transfer all of
the Software without retaining a copy, and the transferee agrees to the terms of this
License Agreement.
• You agree that you will not reverse assemble, reverse compile, or otherwise translate
the Software.
• You may use the Software media for backup purposes. No copies of the Software or any
portion thereof may be made by you or any person under your authority or control.
2. Welch Allyn's Rights. You acknowledge and agree that the Software and the User's
Instructions or Documentation are proprietary products of Welch Allyn, protected unde r U .S.
copyright law. You further acknow ledge and agree that all ownership rights and title in and to
the Software, including associated intellectual property rights, are and shall remain with
Welch Allyn. This License Agreement does not convey to you any ownership in or to the
Software, b ut only a limited righ t of use that is rev ocable in accorda nce with the terms of this
License Agreement.
3. License Fees. The Software is licensed to you in consideration of your purchase of the ICS device.
4. Term. This License Agreement is effective upon your operation of the ICS device and shall
continue until terminated. You may terminate this License Agreement by returning the ICS
30
Page 35

device to the dealer from which you purchased it within the time permitted for returns under
your purc hase agreement. Welch Allyn may terminate this License Agreement if y ou violate
any condition of, or default in performing any obligation required by, the License Agreement.
Upon termination by Welch Allyn, you agree to return the Software to Welch Allyn.
5. Limited Warranty. Welch Allyn warrants, for your benefit alone, for a period of 12 months
after the date of commencement of this License Agreement (referred to as the "Warranty
Period") that during the Warranty Period the ICS Software will operate substantially in
accordance with the functional descriptions or specifications in the User's Instructions or
Documentation. Updates to the ICS Software are covered by an Update Warranty Period of
90 days after delivery of the Update to you. Welch Allyn does not warrant that the ICS
Software is free from defects, nor that it will operate error-free or produce results that will
meet your requirements. If during the W arranty P eriod, a defect in the ICS Software appears,
you may return it to Welch Allyn and at Welch Allyn's sole discretion, it will either: 1) fix or
replace the ICS Software, or 2) refund to y ou the price y ou paid for the ICS device. If a defect
in an Update of the ICS Sof tware appears during the Update W a rranty P eriod, y ou ma y notify
Welch Allyn, and Welch Allyn will use all commercially reasonable efforts to fix or replace the
Updated ICS Software. You agree that the foregoing constitutes your sole and exclusive
remedy against Welch Allyn for the failure of any warranties made under this License
Agreement. EXCEPT FOR THE WARRANTIES SET FORTH ABOVE, THE SOFTWARE IS
LICENSED "AS IS," AND WELCH ALLYN DI SCLAIMS ANY AND ALL OTHER WARRANTIES,
WHETHER EXPRESS OR IMPLIED, INCLUDING, WITHOUT LIMITATION, ANY IMPLIED
WARRANTIES OF MERCHANTABILITY OR FITNESS FOR A PARTICULAR PURPOSE.
6. Limitation of Liability. The cumulative liability of Welc h Allyn to y ou or any other party for any
loss or damages resulting from any claims, demands, or actions arising out of or relating to
this License Agreement shall not exceed the price you paid for the ICS device. In no event
shall Welch Allyn be liable for any indirect, incidental, consequential, special, or exemplary
damages or lost profits, even if Welch Allyn has been advised of the possibility of such
damages.
7. Governing Law. This License Agreement shall be construed and governed in accordance with the laws of the State of New York, USA.
8. No Waiver. The failure of either party to enforce any rights under this License Agreement or
to take action against the other party in the event of any breach hereunder shall not be
deemed a waiver by that party as to the subsequent enforcement of such rights.
31
Page 36

Warranty and Service
Warranty
Welch Allyn warrants the Welch Allyn Image Capture System, when new, to be free of defects
in material and workmanship and to perform in accordance with manufacturer's specifications
for a period of one year from the date of pu rchase from Welch Allyn or its authoriz e d distributors
or agents. Welch Allyn will either repair or replace any components found to be defective or at
variance from manufacturer's specifications within this time at no cost to the customer. It shall
be the purchaser's responsibility to return the Welch Allyn Image Capture to Welch Allyn or an
authorized distributor, agent, or service representative. This warranty does not include breakage
or failure due to tampering, misuse, neglect, accidents, modification, or shipping. This warranty
is also void if the instrument is not used in accordance with manuf act urer 's recommendations or
if repaired by other than Welch Allyn or an authorized agent. Purchase date determines warranty
requirements. No other express warranty is given.
IMPORTANT - Return the Product Registration Card
Remember to submit the product registration/warranty card for warranty validation. Complete
the information and mail the pre-addressed card to Welch Allyn.
Service
All repairs on products under warranty must be performed or appro ved by a Welch Allyn Service
Center. Unauthorized repairs will void the warranty
by qualified electronics personnel or a Welch Allyn Service Center.
. Products out of warranty should be repaired
If you hav e an equip ment problem that you cannot resolve, you may call the Welch Allyn Service
Center listed below. T echnical service support is available by telephone on normal business da ys
at the phone numbers listed below.
If you are advised to return a product to Welch Allyn for repair, schedule the repair with the
service center nearest you.
Before returning a product for repair you must obtain authorization from Welch Allyn. A Service
Notification number will be given to you by our service personnel. Be sure to note this number
on the outside of your shipping box. Returns without a Service Notification number will not be
accepted for delivery.
For Service or Repair:
Welch Allyn Inc.
Technical Service Centers
4341State Street Road
Skaneateles Falls, NY 13153
Tel: 800 535-6663
Fax: 315 685-3361
32
Page 37

Page 38

Phone: (315) 685-4560 or (800) 535-6663
Material Number: 700144 Rev E
4341 State Street Road
Skaneateles Falls, NY 13153
Fax: (315) 685-3361
 Loading...