

Page 1

ELSV-60 Light Source 1
What You Have Received
Thank you for purchasing the ELSV-60 Solarc® Hi-Lux Light Source. By
following the use and care instruction in this guide, you will be rewarded with
years of dependable, trouble-free service. Please read these instructions
completely before use.
Table of Contents
System Symbol Defi nitions ..................................................2
Warnings and Precautions ..................................................3
Advertissements et Precautions ..........................................4
System Descriptions ............................................................5
System Setup and Operation ........................................6 - 8
User Maintenance - Lamp Replacement ............................9
User Maintenance - Fuse Replacement, Cleaning ...........10
Troubleshooting Guide .....................................................11
Technical Specifications ....................................................12
Agency Compliance Statements .......................................13
Warranty .........................................................................14
Environmental Compliance ...............................................15
Service Confact Information ..............................................16
www.ge.com/inspectiontechnologies
Page 2
2 ELSV-60 Light Source
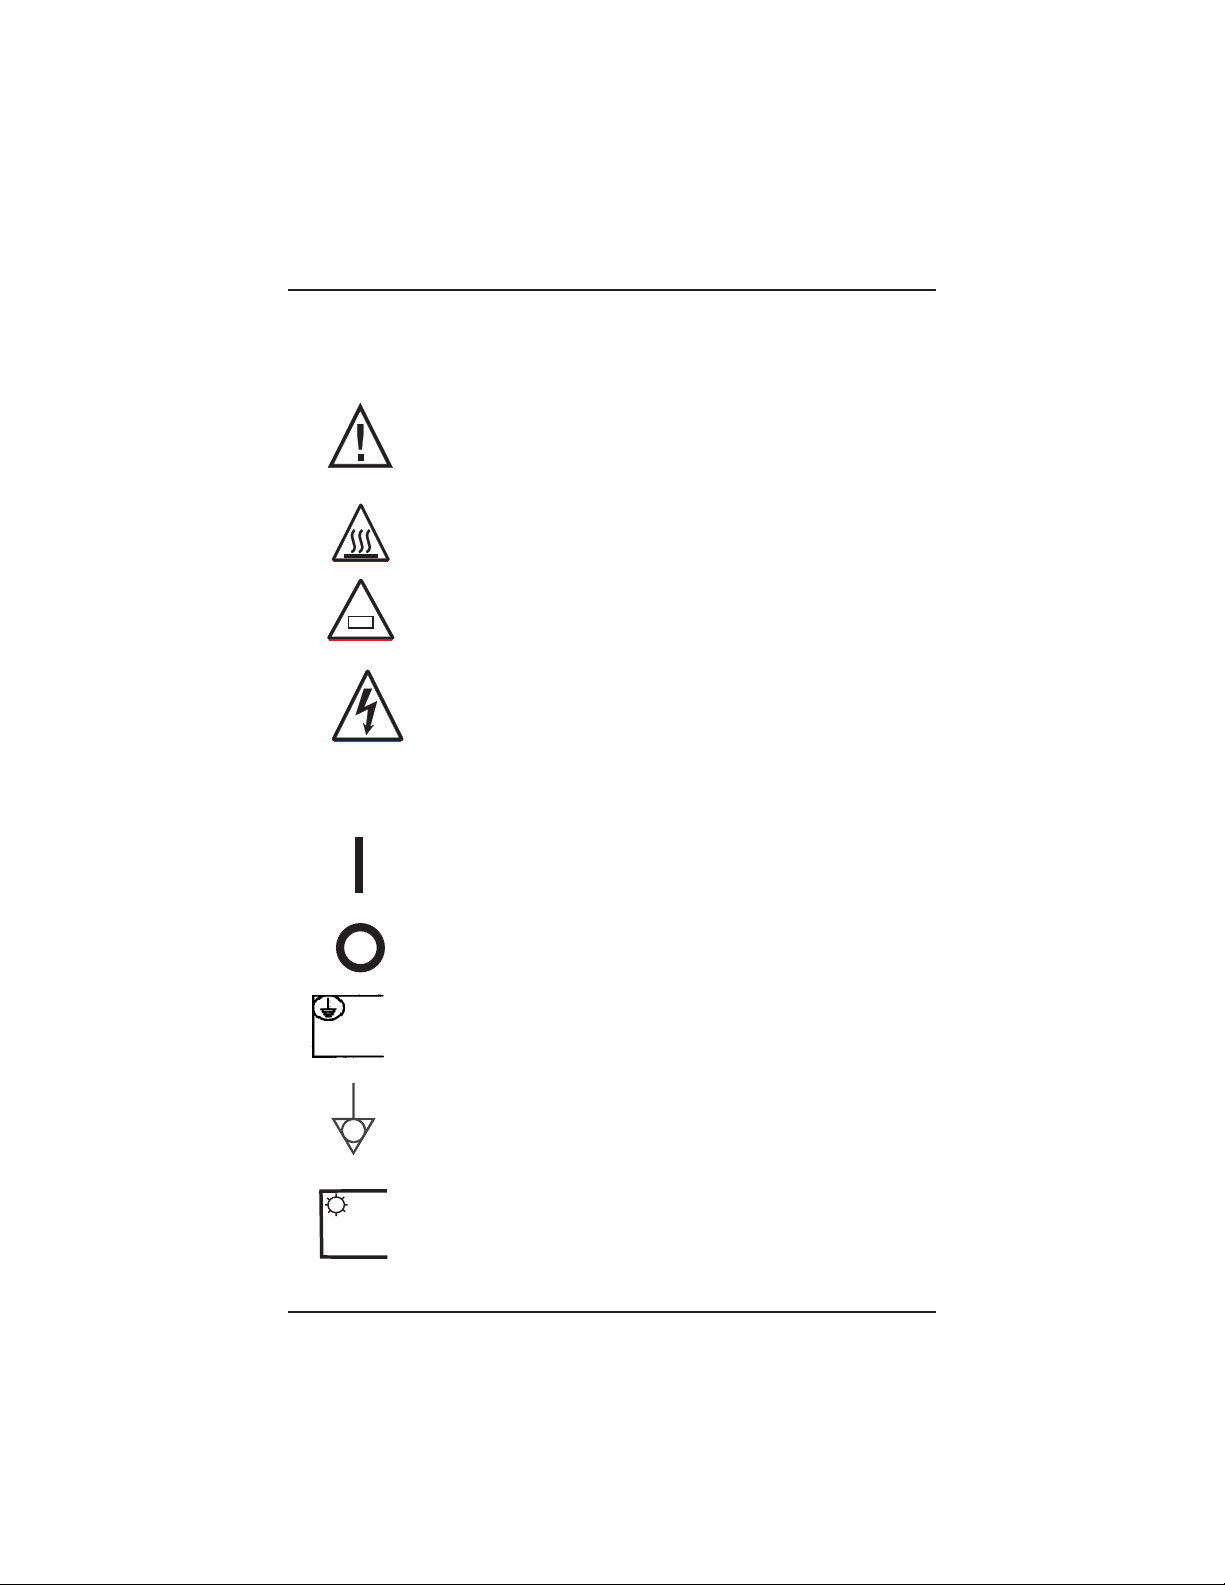
System Symbol Description
Caution: Refer to User’s Manual
Caution: Hot Surface
Replace Fuse as Marked: Type F, 250V, 2A
2A, 250V
Type F
Warning: High Voltage is Present
Symbol in Electrical Rating Signifies AC Mains Power
~
Symbol on Power Switch Indicates Power is On When
Depressed
Symbol on Power Switch Indicates Power is Off When
Depressed
Protective Earth Ground
Equipotential with Ground
High Intensity Light
www.ge.com/inspectiontechnologies
Page 3
ELSV-60 Light Source 3
Warning and Precautions
DIRECT VIEWING OF EXITING LIGHT CAN BE HARMFUL!
The light at the front of the light source and at the tip of a connected
fiber-optic bundle is of high intensity and can result in very high temperatures.
To minimize the risk of injury, avoid direct viewing of the light or contact with
surrounding surfaces. Light includes UV wavelengths which may cause skin
or eye irritation from direct exposures exceeding 15 min./day.
TO PREVENT TEMPORARY BLINDING
and contact with heated parts, always plug the fiber optic bundle into the
light source before turning the power on.
ALWAYS PROVIDE ADEQUATE VENTILATION
to prevent overheating. Do not cover the light source or place the unit
within 7.62 cm (3 in.) of a solid object.
DURING OPERATION, THE LAMP SHOULD BE ENCLOSED
in the light source to prevent injury in the occasional circumstance of the
lamp shattering.
USE CAUTION WHEN REPLACING LAMP.
Allow lamp to cool. Use only GE Inspection Technologies replacement
lamp #SPL-600. For optimum performance, avoid handling the bulb or reflector. Fingerprints or other contaminants on the glass may result in performance degradation.
DO NOT SWITCH THE LIGHT SOURCE ON AND OFF IN RAPID
SUCCESSION. Doing so will dramatically shorten lamp life. After turning
off, wait 15 seconds before turning on again.
The supplied detachable power cord is the means of disconnect from the
power source.
www.ge.com/inspectiontechnologies
Page 4

4 ELSV-60 Light Source
AVERTISSEMENTS ET PRECAUTIONS
L’intensité lumineuse du générateur de lumière et à l’extrémité du guide de
lumière, induit unc température élevée et une forte luminosité. Pour minimiser les risques de blessures, éviter tout contact direct avec les yeux et la
peau.
Afin d’empêcher un aveuglement temporaire et toute brûlure, ilest recommandé de connecter le guide de lumière au générateur avant la mise en
marche de ce dernier.
Ne pas allumer et éteindre le générateur de lumière successivement. Ceci
réduirait considérablement la durée de vie de la lampe. Après l’avoir éteint
patienter 10 à 15 seconds avant de le remettre en marche.
ATTENTION:
utiliser une ventilation adéquate pour éviter toute surchauffe du générateur.
Si vous le sortez de sa sacoche : ne pas l’envelopper dans un tissu et ne pas
le placer à moins de 8 cm de tout objet.
PRECAUTIONS:
à prendre lors du remplacement de la lampe : laisser la lampe refroidir.
Utiliser la lampe GE Inspection Technologies Réf: #SPL-600.
www.ge.com/inspectiontechnologies
Page 5

ELSV-60 Light Source 5
System Description
The ELSV-60 Hi-Lux Light Source provides high quality, white light for industrial borescope and fiberscope inspections. It incorporates a patented and
field-proven lamp technology that has much greater efficiency than halogen
or xenon lamps when transferring light into a small fiber bundle, such as that
found in borescopes and fiberscopes. This greater efficiency allows the lamp
to run at only 60W, which then enables a small and lightweight light source
design. The high efficiency also enables the light source to provide high intensity light without getting very hot, which is an advantage in user safety.
Video inspections are also easy with the ELSV-60. A special video channel
makes setup and operation with our BCAM 1000 C-Mount Camera simple. A
single cable connection provides power to the camera and carries the video
signal from the camera back to the light source. Video outputs carry the
signal to a monitor or other video peripheral devices for image display and/
or recording.
Power On
Power Off
Video Out Port
Video In
Video Out
(Composite)
(S-Video)
www.ge.com/inspectiontechnologies
Port
(Camera)
Light Exit /
Light Guide
Socket
Light Intensity
Control Knob
Page 6

6 ELSV-60 Light Source
System Setup and Operation
CAUTION:
1. Verify that the supply voltage is within the 100-240VAC range specified
for this product.
2. To prevent temporary blinding, insert light guide into socket before turning power ON.
3. The light guide tip and light source socket will be hot when light guide is
removed.
CONTROLS & PORTS
ON/OFF Switch
A two position rocker switch is used to turn the unit on or off. Depressing the
side marked with a ( I ) turns the unit on, while depressing the side marked
with an ( ) turns it off.
Light Intensity Control Knob
This knob on the front panel rotates to adjust the amount of light transferred
into the light guide. Rotating the ring clockwise will increase the amount of
light in the image and rotating the ring counter clockwise will decrease the
amount of light. This manual control is helpful when trying to better illuminate
one part of the image or when trying to reduce blooming.
Light Exit/Light Guide Socket
Socket will accept Olympus style adapter.
Video-In Camera Port
When using a borescope with the BCAM C-Mount Camera, the BCAM power/
video cable connects to the light source here. It carries power from the light
source to the camera, and brings the camera video back to the light source
video channel. It can not be used with cameras other than the BCAM.
Video-Out Ports
When using a borescope with the BCAM C-Mount Camera, the camera video
is accessed at either of these ports. Connect either an S-Video or composite
BNC cable from the appropriate output port to a monitor for display, or other
peripheral device for recording.
www.ge.com/inspectiontechnologies
Page 7

ELSV-60 Light Source 7
System Setup and Operation (continued)
Setup
1. With the power switch in the OFF position, plug the AC power cord into
the power input port on the back of the unit and then into a grounded
receptacle.
2. Plug a light guide with appropriate adapter installed into the light exit
socket.
Note: The light guide is fully inserted when the light guide spring snaps
into the groove cut into the socket.
3. Turn the power switch ON and wait 15 seconds for the lamp to complete
the warm-up cycle.
Note: If the power has just been turned OFF, allow 15 seconds for
complete discharge before turning ON again.
4. Set the light intensity to the desired level by turning the Light Intensity
Control Knob.
Back
Front
www.ge.com/inspectiontechnologies
Page 8

8 ELSV-60 Light Source
System Setup and Operation (continued)
Continue with steps 5 & 6 if you are using the BCAM 1000 C-Mount
Video Camera
5. Connect the BCAM power/video cable from the camera to the VIDEO IN
CAMERA port on the light source front panel.
6. Connect a video cable from either the S-Video or composite videoout port on the light source front panel to a monitor or video recording
device.
BCAM 1000 C-Mount Video Camera
BCAM 1000
Monitor or Video Recording Device
ELSV-60 Hi-Lux Light Source
www.ge.com/inspectiontechnologies
Page 9

ELSV-60 Light Source 9
User Maintenance
Lamp Replacement
CAUTION: Lamp may be Hot! Allow the lamp to cool before replacing.
NOTE: Use only GE Inspection Technologies replacement lamp SPL-600.
AVERTISSEMENT: Pour eviter les rique d’incendie. Utiliser une Lampe de
rechange a GE Inspection Technologies SPL-600.
DO NOT touch the lamp itself or the interior reflective surface, because skin
oils will cause premature lamp failure. If necessary , clean fingerprints with an
alcohol dampened cotton swab. Do not leave lint on the lamp.
1. Turn the unit off and disconnect the power cord from both the wall outlet
and the light source.
2. Loosen finger screw on Lamp Access Panel and pull out Lamp Tray.
3. Remove old lamp by rotating Lamp Spring Retainer away from lamp
spring, pulling lamp back and up and then unplugging lamp connector
from harness.
4. Install new lamp by plugging lamp connector into harness and inserting
the lamp into tray housing, ensuring alignment notches are in the 6:00
and 12:00 positions. Rotate Lamp Spring Retainer back over Lamp
Spring. Use only GE Inspection Technologies replacement lamp SPL-
600.
5. Push Lamp Tray back into light box and lock in position with the finger
screw.
6. Reconnect power cord.
Lamp Spring Retainer
Lamp Tray
www.ge.com/inspectiontechnologies
CAUTION:
Lamp may be
Hot!
Page 10

10 ELSV-60 Light Source
User Maintenance (continued)
FUSE REPLACEMENT
1. Fuse replacement must be completed with power cord disconnected.
2. Fuses are present in fuseholder. Use the same type, same rated fuse as
marked and specified to avoid risk of fire hazard.
Fuse
CLEANING
WARNING: Prior to cleaning, turn power switch OFF and disconnect
the power cord from both the wall outlet and light source.
• Clean the external surfaces of the light source with a cloth dampened in a solu-
tion of mild soap and water. DO NOT IMMERSE! DO NOT GET WATER
INTO PORTS AND CONNECTORS!
• The power cord may be wiped cleaned in the same way, taking care not
to get the prongs wet. DO NOT RECONNECT POWER CORD WHILE
WET!
• DO NOT plug the ELSV-60 light source into a wall outlet until it and the
power cord are completely dry.
www.ge.com/inspectiontechnologies
Page 11

ELSV-60 Light Source 11
Troubleshooting Guide
SYMPTOM PROBABLE CAUSE SOLUTION
• Lamp is not illuminating and fan is
operating.
SYMPTOM PROBABLE CAUSE SOLUTION
• Lamp is not illuminating and fan is
NOT operating...
• Lamp was not given
adequate time to “cool
down” before restarting.
• Light Source has overheated.
• Lamp has burned out. • Replace lamp in accordance
• Power cord not securely
connected to light source
or AC source.
• AC source is not active. • Use another power source or
• Power cord is damaged
(may cause intermittent
operation).
• Light Source power
switch is not turned on.
• Lamp Drawer is not completely closed.
• One or both fuses have
blown.
• Turn unit off and wait 20 seconds
before turning back on.
• Verify environmental temperature does not exceed specifications and allow to cool down for
10 minutes. Check to ensure
vents and fan exhaust are not
obstructed.
with instructions in the USER
MAINTENANCE section of this
manual. Use only GE Inspection
Technologies replacement lamp
part number SPL-600
• Check for secure connections.
restore power to the current
source.
• Replace power cord.
• Turn switch to the ( I ) position.
• Push Lamp Drawer closed and
lock in place by tightening finger
screw.
• Replace both fuses in accordance
with instructions in the USER
MAINTENANCE section of this
manual. If fuses continue to
blow, return unit to service center.
If the above suggestions do not solve the problem, call GE Inspection
Technologies Service Center listed in this manual. DO NOT ATTEMPT
DISASSEMBLY! THERE ARE NO USER SERVICEABLE
COMPONENTS OTHER THAN LAMP.
www.ge.com/inspectiontechnologies
Page 12

12 ELSV-60 Light Source
Technical Specifications
Power In
Fuse Set
Dimensions
Weight
Illumination
System
Lamp
Color Temperature
Median Lamp Life
Intensity Control
Environment
Operating
Temperature
Humidity
Storage
Temperature
Humidity
Video Channel
Input
Output
100-240VAC, 50/60 Hz, 2.0A (@ 120VAC)
2 each 2.0A 250V Type F (Fast Acting)
23 x 23 x 9.3 cm (9.0 x 9.0 x 3.7 in.)
2.42 kg (5.3 lbs.)
Solarc® Metal-Halide, 60W, 60V, Part #SPL-600
6500K
1000 hours
Manual shutter (0% to 100% full output)
-21˚C to 46˚C (-4˚F to 115˚F)
0 to 95% relative humidity
-23˚C to 60˚C (-10˚F to 140˚F)
30 to 75% relative humidity, non-condensing
GE Inspection Technologies BCAM camera cable
S-Video and Composite BNC
Equipment Classifications
Class 1, Type B, Continuous Operation, Pollution Degree 2
Agency Certifications
ETL
CE
FCC Part 15 Class A
EN/IEC61010-1, EN50081-1, EN50081-2, IEC/EN 61326-1
CSA 22.2 NO.1010.1
UL 61010-1
www.ge.com/inspectiontechnologies
Page 13

ELSV-60 Light Source 13
Agency Compliance Statements
This device complies with part 15 of the FCC Rules. Operation is subject to
the following two conditions: (1) this device may not cause harmful interference, and (2) this device must accept any interference received, including
interference that may cause undesired operation.
FCC Class A Compliance Statement
This equipment has been tested and found to comply with the limits for a
Class A digital device, pursuant to part 15 of the FCC Rules. These limits are
designed to provide reasonable protection against harmful interference when
the equipment is operated in a commercial environment. This equipment
generates, uses, and can radiate radio frequency energy and, if not installed
and used in accordance with the instruction manual, may cause harmful interference to radio communications. Operation of this equipment in a residential
area is likely to cause harmful interference, in which case the user will be
required to correct the interference at his own expense.
Caution: Any changes or modifications made to this device that are not
expressly approved by GE Inspection Technologies may void the user’s
authority to operate the equipment.
Note: To maintain compliance with FCC Rules and Regulations, cables connected to this device must be shielded cables, in which the cable shield
wire(s) have been grounded (tied) to the connector shell.
Canadian Notice
This equipment does not exceed the Class A limits for radio noise emissions as described in the Radio Interference Regulations of the Canadian
Department of Communications.
Le present appareil numerique n’emet pas de bruits radioelectriques depassant les limites applicables aux apparelis numeriques de la classe A prescrites
dans le Reglement sur le brouillage radioelectique edicte par le ministere des
Communications du Canada.
www.ge.com/inspectiontechnologies
Page 14

14 ELSV-60 Light Source
Warranty
GE Inspection Technologies warrants the ELSV-60 Light Source to be free of
defects in material and workmanship and to perform in accordance with the
manufacturer’s specifications when subject to normal use and service for a
period of one year from the date of purchase. GE Inspection T echnologies will
either repair or replace components found to be defective or at variance from
the manufacturer’s specifications within this time at no cost to the customer.
It shall be the purchaser’s responsibility to return the instrument to the authorized service center.
This warranty does not apply to the lamp, or cover instrument breakage or
failure due to tampering, misuse, neglect, accidents, improper installation,
modification, shipping, or to improper maintenance, service, and cleaning
procedures. This warranty is also void if the instrument is not used in accordance with the manufacturer’s recommendations or if required service is
performed by anyone other than an GE Inspection Technologies authorized
agent. No other express or implied warranty is given.
www.ge.com/inspectiontechnologies
Page 15

ELSV-60 Light Source 15
Environmental Compliance
The equipment that you bought has required the extraction and use of natural
resources for its production. It may contain hazardous substances that could
impact health and the environment.
In order to avoid the dissemination of those substances in our environment
and to diminish the pressure on the natural resources, we encourage you to
use the appropriate take-back systems. Those systems will reuse or recycle
most of the materials of your end life equipment in a sound way.
The crossed-out wheeled bin symbol invites you to use those systems.
If you need more information on the collection, reuse and recycling systems,
please contact your local or regional waste administration.
Visit www .ge.com/inspectiontechnologies for take-back instructions and more
information about this initiative.
www.ge.com/inspectiontechnologies
Page 16

16 ELSV-60 Light Source
Service Contact Information
USA
GE Inspection Technologies Tel: 888-332-3848
Product Service Dept. 315-554-2000
721 Visions Drive Fax: 315-554-5731
Skaneateles, NY 13152
Germany
GE Inspection Technologies Tel: +49-7471-9882 20
Lotzenäcker 4 Fax: +49 7471-9882 30
72379 Hechigen Email: rvi-infoeuropa@ge.com
Hong Kong
GE Inspection Technologies Tel: +852-2877-0801
Unit 1602, 16/F Sing Pao Building Fax: +852-2877-0868
101 King's Road Email: rvi-infohongkong@ge.com
North Point, Hong Kong
Email: rvi-service@ge.com
www.ge.com/inspectiontechnologies
 Loading...