

Page 1
CP Series
Electrocardiographs
CP 100
Update to Directions for Use
CP 200
Page 2

ii Welch Allyn CP Series Electrocardiographs
Copyright 2011 Welch Allyn
Mat. Number: 717481, Ver: A
Welch Allyn
4341 State Street Road
Skaneateles Falls, NY 13153
USA
www.welchallyn.com
Printed in USA
Canada 1 800 561 8797 China + 86 216 327 9631
European Call Center + 353 46 906 7790 France + 33 155 69 58 49
Germany + 49 695 098 5132 Japan + 81 42 703 6084
Latin America + 1 305 669 9003 Netherlands + 31 202 061 360
Singapore + 65 6419 8100 South Africa + 27 11 777 7555
United Kingdom + 44 20 7365 6780 Sweden + 46 85 853 65 51
USA 1 800 535 6663
+ 1 315 685 4560
Regulatory Affairs Representative
Welch Allyn Limited
Navan Business Park
Dublin Road
Navan, County Meath, Republic of Ireland
Australia + 61 2 9638 3000
Page 3

New Features for this Release
If your CP 100 electrocardiograph has a serial number of 10020000, or greater, or your
CP 200 electrocardiograph has a serial number 20020000, or greater, this update
describes the changes in the operation of your electrocardiograph.
If your electrocardiograph has a serial number that is lower than 1002000 or 2002000, and
your device was recently serviced, it may contain some or all of these new features
depending on the scope of the services performed.
This document supplements information in the following manuals:
• CP 100 12-Lead Resting Electrocardiograph Directions for Use (mat. 708794)
• CP 200 12-Lead Resting Electrocardiograph Directions for Use (mat. 708793)
• CP 200 Spirometry Option Directions for Use (mat. 708795)
1
Battery Deep-Discharge Disconnect Added
A battery deep-discharge disconnect has been added to reduce the likelihood that your
CP 100 or CP 200 electrocardiograph will operate on a deeply discharged battery. The
disconnect prevents permanent damage to the battery when the battery is left uncharged
for long periods of time.
This functions automatically when the electrocardiograph battery voltage is less than
5.25V in sleep mode. Once a battery disconnect has occurred, the electrocardiograph will
not operate on battery power until it is charged to 6.2V or higher. This also protects the
electrocardiograph from operating on a malfunctioning battery that cannot be charged to
6.2V or higher.
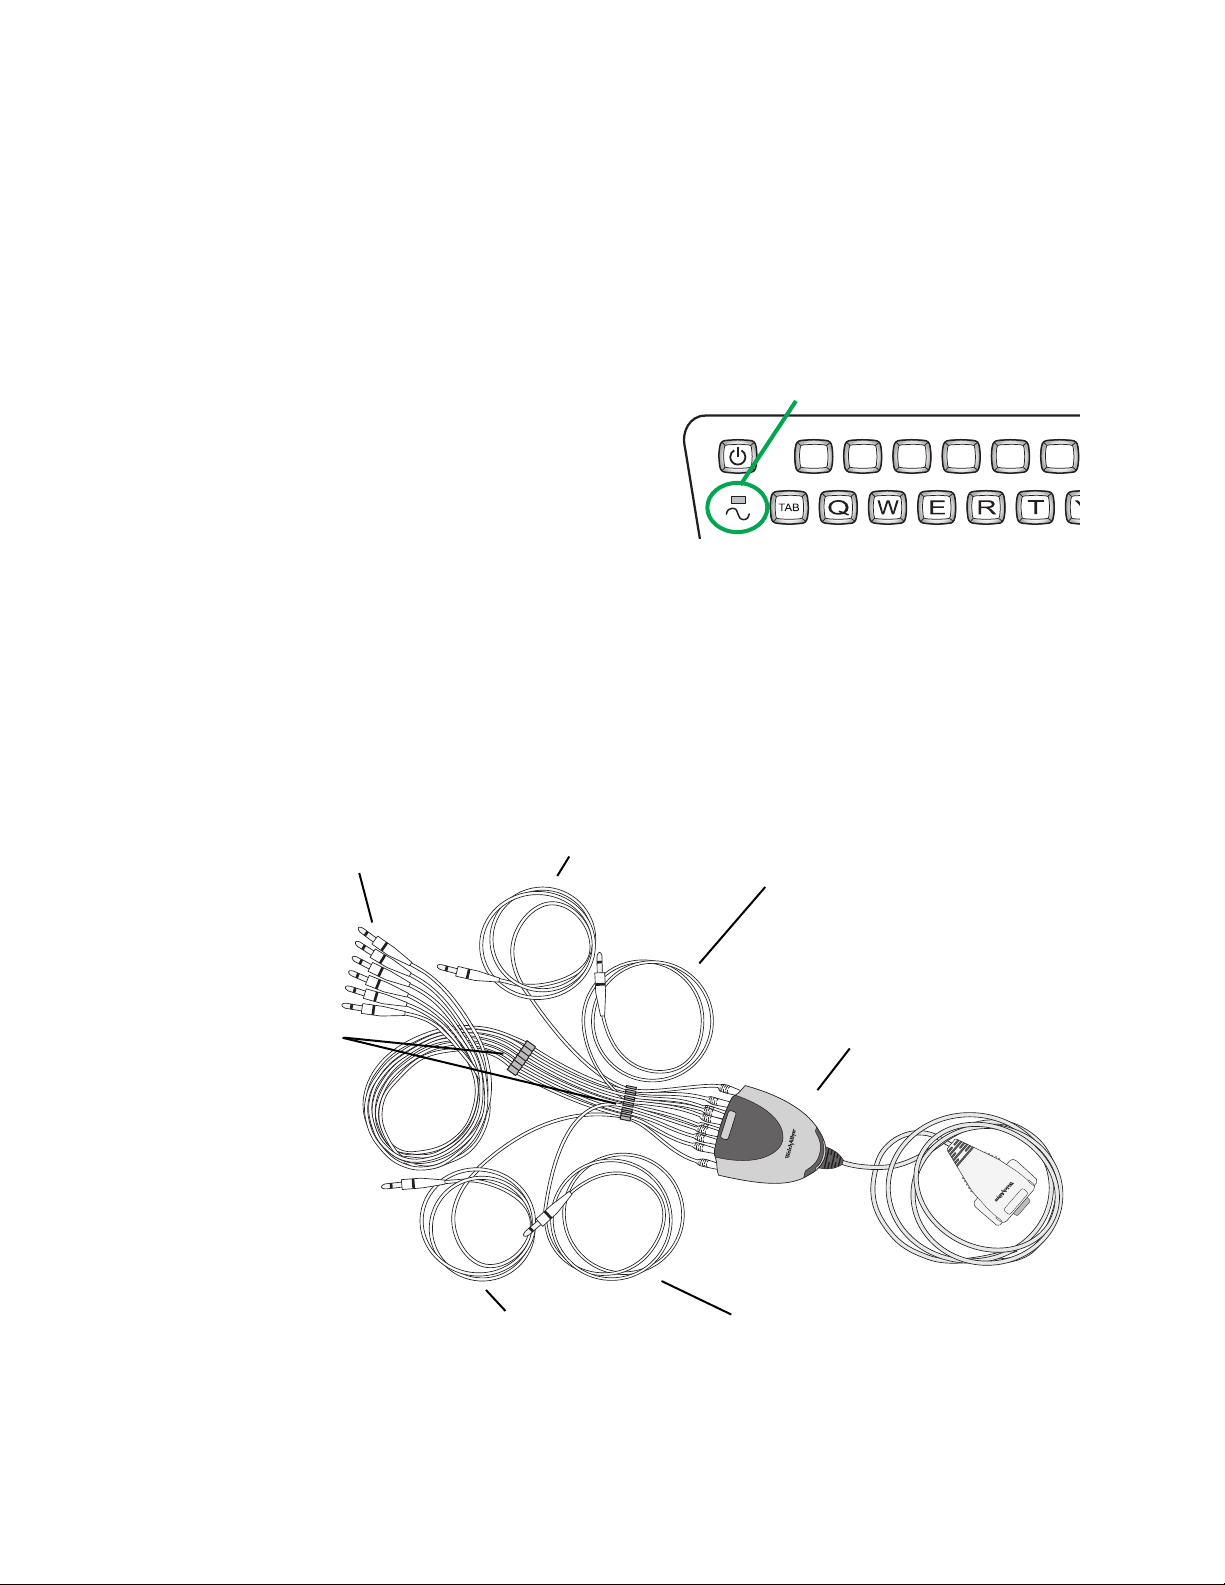
Reset Button
If the electrocardiograph stops functioning, you can press and hold the Power On/Off key
for approximately 7 seconds to restart the electrocardiograph. Release the key once the
restart begins. The key is located on the upper left of the electrocardiograph keyboard.
Figure 1. Reset Button
Press and hold
1!2
@
#
3
4$5%6+7-8
(
*
9
0
@3#
1!2
)
Page 4
2 Welch Allyn CP Series Electrocardiographs
The previous method of resetting the electrocardiograph is still available. Reset the
electrocardiograph by pressing the reset button located on the right side. To press the
reset button, insert a small object, such as small paper clip, into the hole next to the
Spirometry port.
Bi-Colored Keyboard LED
Figure 2. Keyboard LED
The bi-colored LED on the keyboard
Bi-colored LED
indicates the battery status. When green,
the LED indicates that AC power is
present. When yellow, the LED indicates a
low battery that should be charged. The
1!2
@
#
3
4$5
+
%
6
LED is located below the Power On/Off
key on the upper left of the
electrocardiograph keyboard.
Alternate Patient Cable and Leads
The Lead configuration has changed so that all individually replaceable lead wires extend
from the same end of the patient cable. This new configuration is intended to make the
connection of the lead wires easier for you. It is different now then it has been in previous
models where the LL (F) and RL (N) leads attached to the opposite end of the patient
cable with respect to the other leads. See Figure 3“Patient Cable and Leads”.
Figure 3. Patient Cable and Leads
Chest leads
Cable
rakes
Left leg lead
Right leg lead
Left arm lead
Electrocardiograph
connector
Right arm lead
There has been no change to the replaceable lead wires. They remain compatible with
previous models and are equivalent in function.
Page 5

New Features for this Release 3
Connecting the Patient Cable
Insert all leads into their proper positions, as labeled on the connectors. See Figure 4
“Inserting the Leads”.
Figure 4. Inserting the Leads
Updated Information for the CP 100/CP 200
Heart rate monitor operation
The heart rate indicated on the CP 100 or CP 200 LCD display is for reference only. Make
manual measurements of the ECG intervals and magnitudes on printed ECG reports only.
The increased R wave amplitudes that are produced by some patient simulators may
produce heart rate readings two times higher than normal because the R waves can be
counted as T waves.
The CP 100 and CP 200 devices are not intended to be used as heart rate monitors. Heart
rate monitors are covered by other standards for example: ANSI/AAMI standard EC13:
Cardiac monitors, heart rate meters and alarms.
Artifact
A combination of abnormally large R wave amplitude and waveform shapes delivered by
some patient simulators can trigger artifact warnings. These warnings are not consistent
with actual patient morphologies. The noise warning is designed as a guide to limit low
quality ECGs.
The CP 100 and CP 200 devices are compliant to all applicable standards specified in the
device manual for diagnostic electrocardiographs including: IEC/EN 60601-2-51 and ANSI/
AAMI EC11.
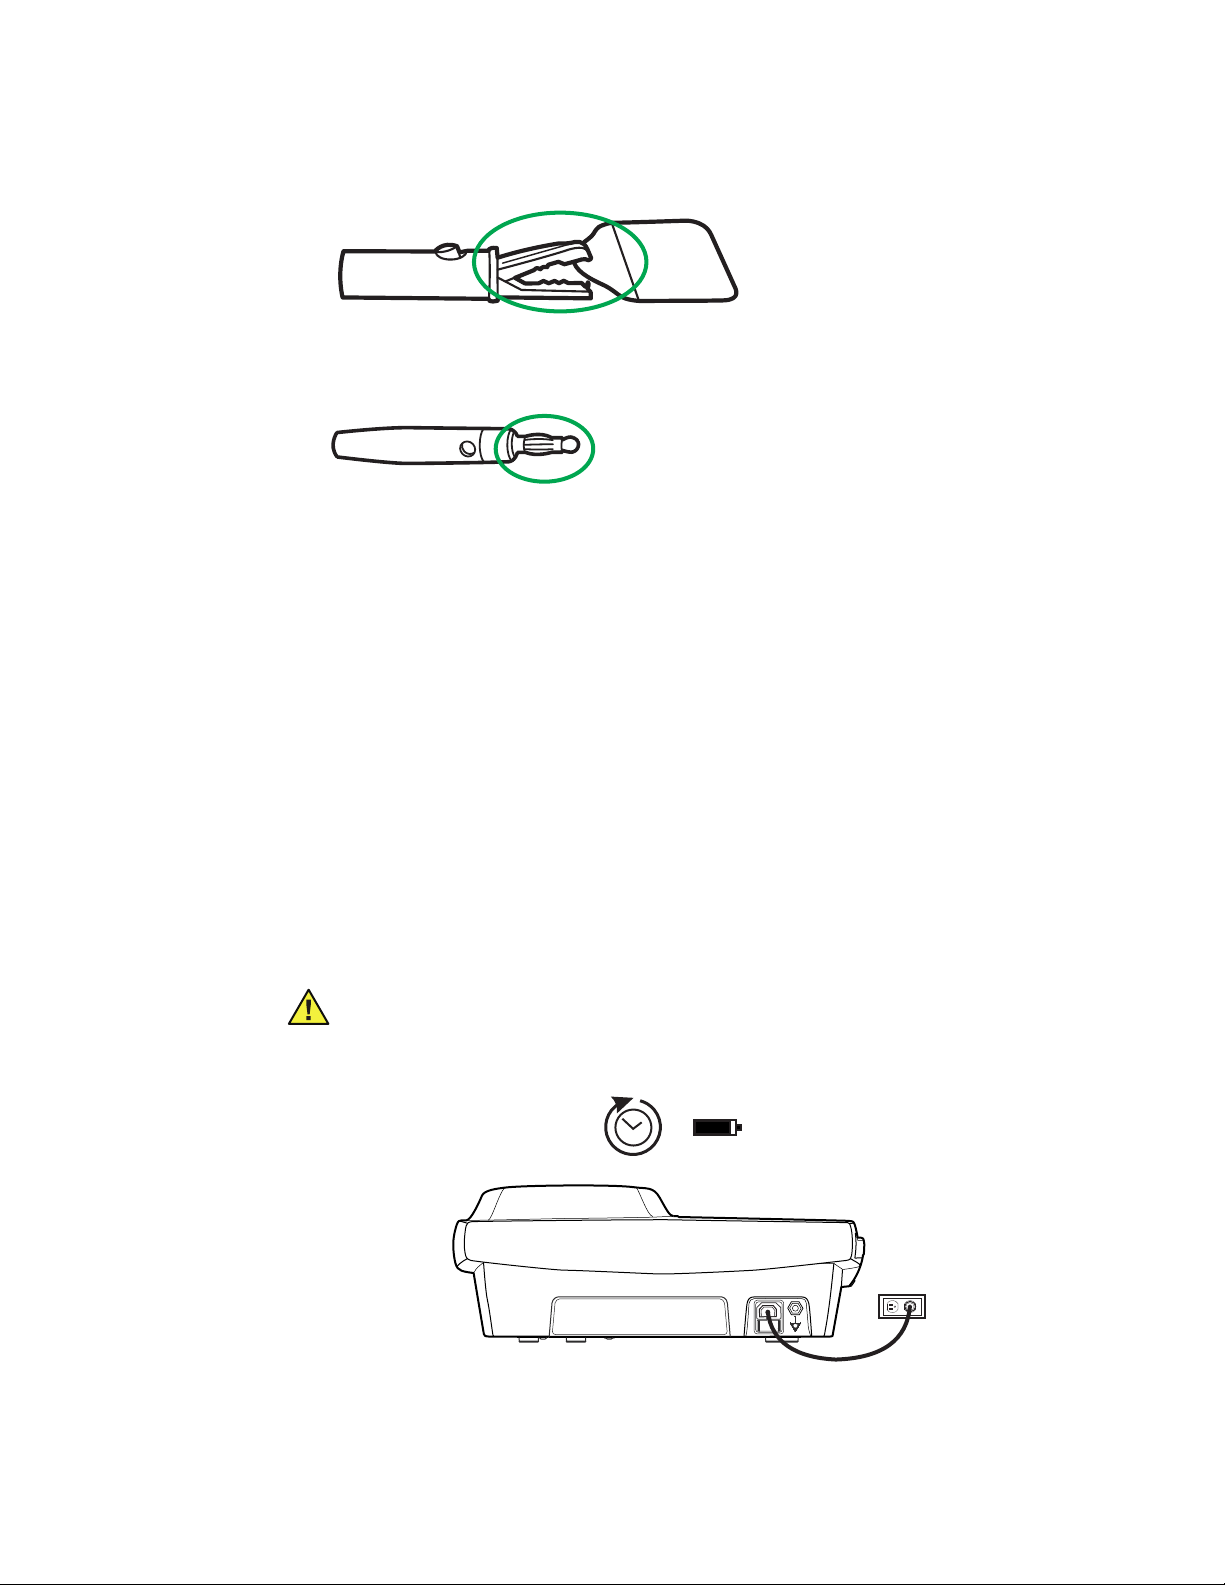
Reducing Artifact
• Use only resting tab electrodes that have not past their product expiration date.
Store only in an air tight pouch within the product recommended environmental
conditions.
• When using the reusable bulbs, limb plates, or clamp electrodes, always replace
expired or dried up electrode gel.
• When using the reusable bulbs, limb plates, or clamp electrodes, use only an
ECG conductive gel to obtain optimum conductivity. Do not use ultrasound gel.
• Orient the adapter (alligator) clips so that the metal from the clip is able to make
contact with the conductive area of the resting tab electrode.
Page 6
4 Welch Allyn CP Series Electrocardiographs
• Replace the patient lead if the banana spring at the end of the lead is broken or
damaged.
Updated Battery Information for the CP 100/CP 200
Electrocardiograph Battery - Preparation and Operation
Battery performance:
The sealed lead-acid battery provides 200 to 300 discharge/charge cycles under normal
operating conditions before it should be replaced. Typical battery usage will require
battery replacement approximately once per year. Reduced battery performance and
longevity will result if the recommendations for maximum battery performance are not
followed.
The electrocardiograph uses a single, rechargeable Sealed Lead Acid (SLA) battery pack. It
is designed to print up to 100 continuous rhythm ECG pages or to print 25 AUTO ECG
tests per full charge. The typical charge time of the sealed lead-acid battery is 12-16 hours,
but can take up to 36 hours for a highly discharged battery.
Prior to using your new electrocardiograph in battery mode:
Caution Charge the Battery. Upon receipt of your new electrocardiograph, it is
important to charge the electrocardiograph's battery for at least 12 hours before
using it in battery mode.
Note
The electrocardiograph is fully functional when connected to AC power,
regardless of the battery charge state. Using the electrocardiograph while
charging the battery does not affect the charge time.
Page 7
New Features for this Release 5
For maximum battery performance and longevity:
• Charge the battery whenever possible by connecting the electrocardiograph to AC
power after each use.
The CP 100/CP 200 provides a trickle charge to keep the battery fully charged.
Continuous charging will maximize the battery performance and longevity and will
not overcharge or degrade the battery.
• Fully recharge the battery immediately after it becomes fully discharged. A fully
discharged battery without an immediate recharge may require an extended charge
time (up to 36 hours) and permanently degrade battery performance and longevity.
• Use only the CP 100/CP 200 electrocardiograph's integral charger to recharge the
battery.
• Use only a Welch Allyn CP 100/CP 200 approved replacement battery (REF 100660).
• Avoid using or storing your electrocardiograph in hot locations or in direct sunlight.
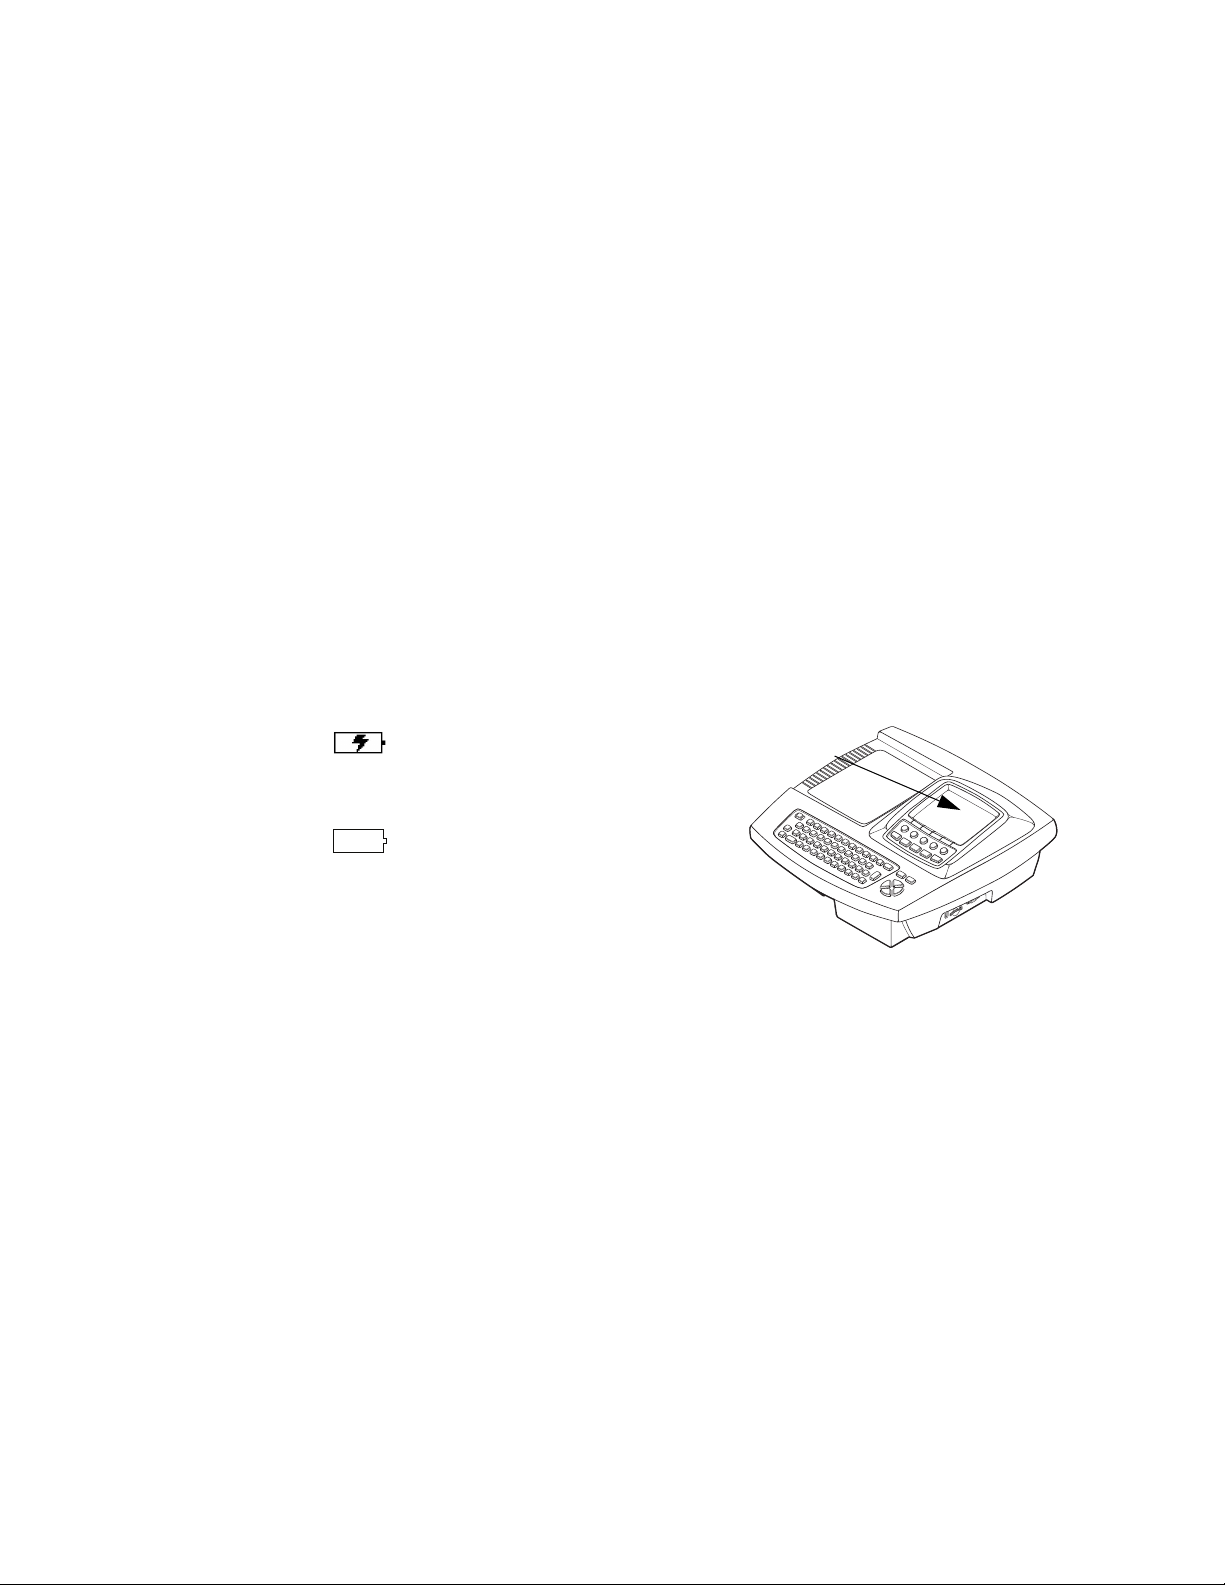
To check the battery charge status:
To fully charge the battery, leave the electrocardiograph plugged into AC power until you
see the fully charged indication on the display. A battery status symbol appears in the top
portion of the electrocardiograph display:
Note
Battery is charging
Electrocardiograph
Display
Battery fully charged (symbol will
appear solid white on the
electrocardiograph display)
Replace your battery if you are unable to perform your expected number of ECGs
per day after a full charge cycle. (12 hour minimum, up to 36 hours if deeplydischarged).
Page 8

6 Welch Allyn CP Series Electrocardiographs
Update Through Software Version 2.5
This update describes changes in operation through software version 2.5 of the CP 100
and CP 200 electrocardiographs and the CP 200 spirometry option. This document
supplements information in the following manuals:
• CP 100 12-Lead Resting Electrocardiograph Directions for Use (mat. 708794)
• CP 200 12-Lead Resting Electrocardiograph Directions for Use (mat. 708793)
• CP 200 Spirometry Option Directions for Use (mat. 708795)
Lead Quality Feedback
CP 100, CP 200
Lead quality messages, which appear on various screens, now include both lead-off and
artifact information.
For good quality recordings, leads must be connected and artifact free. If you print an
Auto ECG despite lead-off or artifact conditions (by overriding the “Waiting for 10 seconds
of quality data” message), the report reflects those conditions. In the case of lead-off
signals, the report shows square waves. In the case of artifact, the report might include a
warning to use the interpretation (if any) with caution.
To eliminate artifact, you might need to re-prep the patient, use fresh electrodes, or
minimize patient motion during the recording.
For additional feedback on lead quality, you can now enable an artifact report. This report,
a 12x1 format with all filters disabled, shows the leads with artifact so that you can
remedy the problem. (The normal Auto ECG report with filters enabled might mask some
of the artifact issues.) When enabled, the artifact report prints automatically with the Auto
ECG report whenever artifact is detected and you override the “Waiting for 10 seconds of
quality data” message.
To enable the artifact report, press the Menu key . Choose ECG Settings >
Auto Report Settings > Artifact Report > On.
Heart Rate
CP 100, CP 200
A four-beat average heart rate (HR) now appears in real time on the screen.
Body Mass Index
CP 100, CP 200
The patient’s body mass index (BMI) now appears on the Enter New Patient screen and
on ECG and spirometry reports when height and weight are entered.
Compliance With 60601-2-51
CP 100, CP 200
The electrocardiograph is in compliance with regulatory standards CAN/CSA C22.2
No. 60601.2.51 and IEC/EN 60601-2-51. For manufacturer's disclosures regarding
60601-2-51, please contact Welch Allyn Customer Service at the phone number listed in
the Directions for Use.
Page 9

Update Through Software Version 2.5 7
Pacemaker Detection Prompt
CP 100, CP 200
If the software detects the possible presence of a pacemaker, it now asks you whether
the patient has a pacemaker. If you say no, interpretation (if purchased) is included in the
report. If you say yes, interpretation is not included in the report. This prompt was added
to prevent false pacemaker pulses caused by environmental interference.
Symbols and International Characters
CP 100, CP 200
You can now enter symbols and international characters using the keyboard.
To enter a symbol, hold the Shift key while pressing a number key. To enter an
international character, hold the Ctrl key while pressing a key with an international
character above it on the keyboard label. To capitalize an international character, hold
Shift + Ctrl while pressing the key.
CAPS Lock
CP 100, CP 200
You can now turn CAPS Lock on and off in the software. This feature works just like a
standard Caps Lock key.
To turn CAPS Lock on or off, press the Menu key .
Choose System Settings > Device Configuration > CAPS Lock > On or Off.
Swedish, Danish, and Finnish Patient ID Processing
CP 100, CP 200
When you enter a valid Swedish, Danish, or Finnish patient ID, the patient’s date of birth/
age, gender, and race are now automatically filled in.
“Repeat Test” Softkey
CP 200
The ECG post-print screen now includes a Repeat Test softkey to let you more efficiently
repeat a test.
Page 10

8 Welch Allyn CP Series Electrocardiographs
Test Directory Usability
• CP 200
More convenient searching
When searching the test directory, you can now enter partial search criteria in the
Patient ID or Last Name fields. For example, to find all patient IDs starting with 12
(including 129374, 12579-125, and 12049-7564), you would enter 12 in the Patient ID
field. To find all patients with last names starting with Jo (including Jones, Johnson,
and Johnston) you would enter Jo in the Last Name field.
Note: Searching is case-insensitive.
• Flexibility in selecting tests from search results
You can now select tests from test directory search results in various ways instead of
all tests being automatically selected.
To select a contiguous group of tests, press and hold Shift while pressing an arrow
key. To select an individual test, press an arrow key. To select all tests, press Ctrl-A.
• Ability to delete saved tests
To delete tests, press the Menu key . Choose Test Directory. Fill in the criteria,
and press Search. In the Search Results screen, choose the tests that you want to
delete. Press the Delete softkey.
External Printer
CP 100, CP 200
You can now connect an external printer. It must be a USB inkjet or laser printer that
supports PCL (printer control language), such as the following:
Vendor Model PCL Version
HP Deskjet 995c PCL 3
HP Deskjet 5650 PCL 3 enhanced
HP Laser 1022 PCL 5E
Dell Laser 1710 PCL 5E & PCL 6
Lexmark Laser E240 PCL 6
Printouts are always black and white.
When the external printer is selected in the Device Configuration screen and is powered
on and connected to the electrocardiograph, it prints the following:
• Auto ECG reports
• Spirometry reports (CP 200 spirometry option only)
• Device settings
• Audit trails (CP 200 only)
• Help pages
Rhythm ECGs always print to the internal printer.
To connect a printer, simply connect one end of a USB cable to the printer’s USB
connector, and connect the other end to the electrocardiograph’s USB connector.
No special software is required.
Page 11

Update Through Software Version 2.5 9
To select a printer, press the Menu key .
Choose System Settings > Device Configuration > Printer Select > Internal or
External.
WARNING All signal input and output (I/O) connectors are intended for
connection of only devices complying with IEC 60601-1, or other IEC standards
(for example, IEC 60950), as appropriate to the device. Connecting additional
devices to the electrocardiograph might increase chassis or patient leakage
currents. To maintain operator and patient safety, consider the requirements of
IEC 60601-1-1. Measure the leakage currents to confirm that no electric shock
hazard exists. In the case of a USB printer, the printer (non-medical electrical
equipment) shall be situated outside the patient environment (reference IEC
60601-1-1). The printer used should be approved to the appropriate safety
standard for non-medical electrical equipment (IEC 60950, or its national variants),
and use of an isolation transformer is recommended. If there is a requirement for
the printer to be situated within the patient environment it is the responsibility of
the user to ensure that the system provides a level of safety in compliance with
IEC 60601-1 and 60601-1-1.
Removable USB Storage Devices
CP 100, CP 200
You can now send tests to removable USB storage devices. If both an SD memory card
and a USB storage device are connected, files are sent to the SD card. The capacity of an
SD card must be >64MB,< 2 GB.
Note
The CP 100 and CP 200 do not support SD card capacities greater than 2 GB
including SDHC and SDXC high capacity SD card formats, or other USB storage
devices that have software applications pre-installed such as SanDisk U3 Smart
technology.
Contact Information for Accessories
CP 100, CP 200
It is now possible to enter contact information that will appear on the accessories
Help page.
To enter or review the contact information, press the Menu key . Choose
System Settings > Device Configuration > Contact Information.
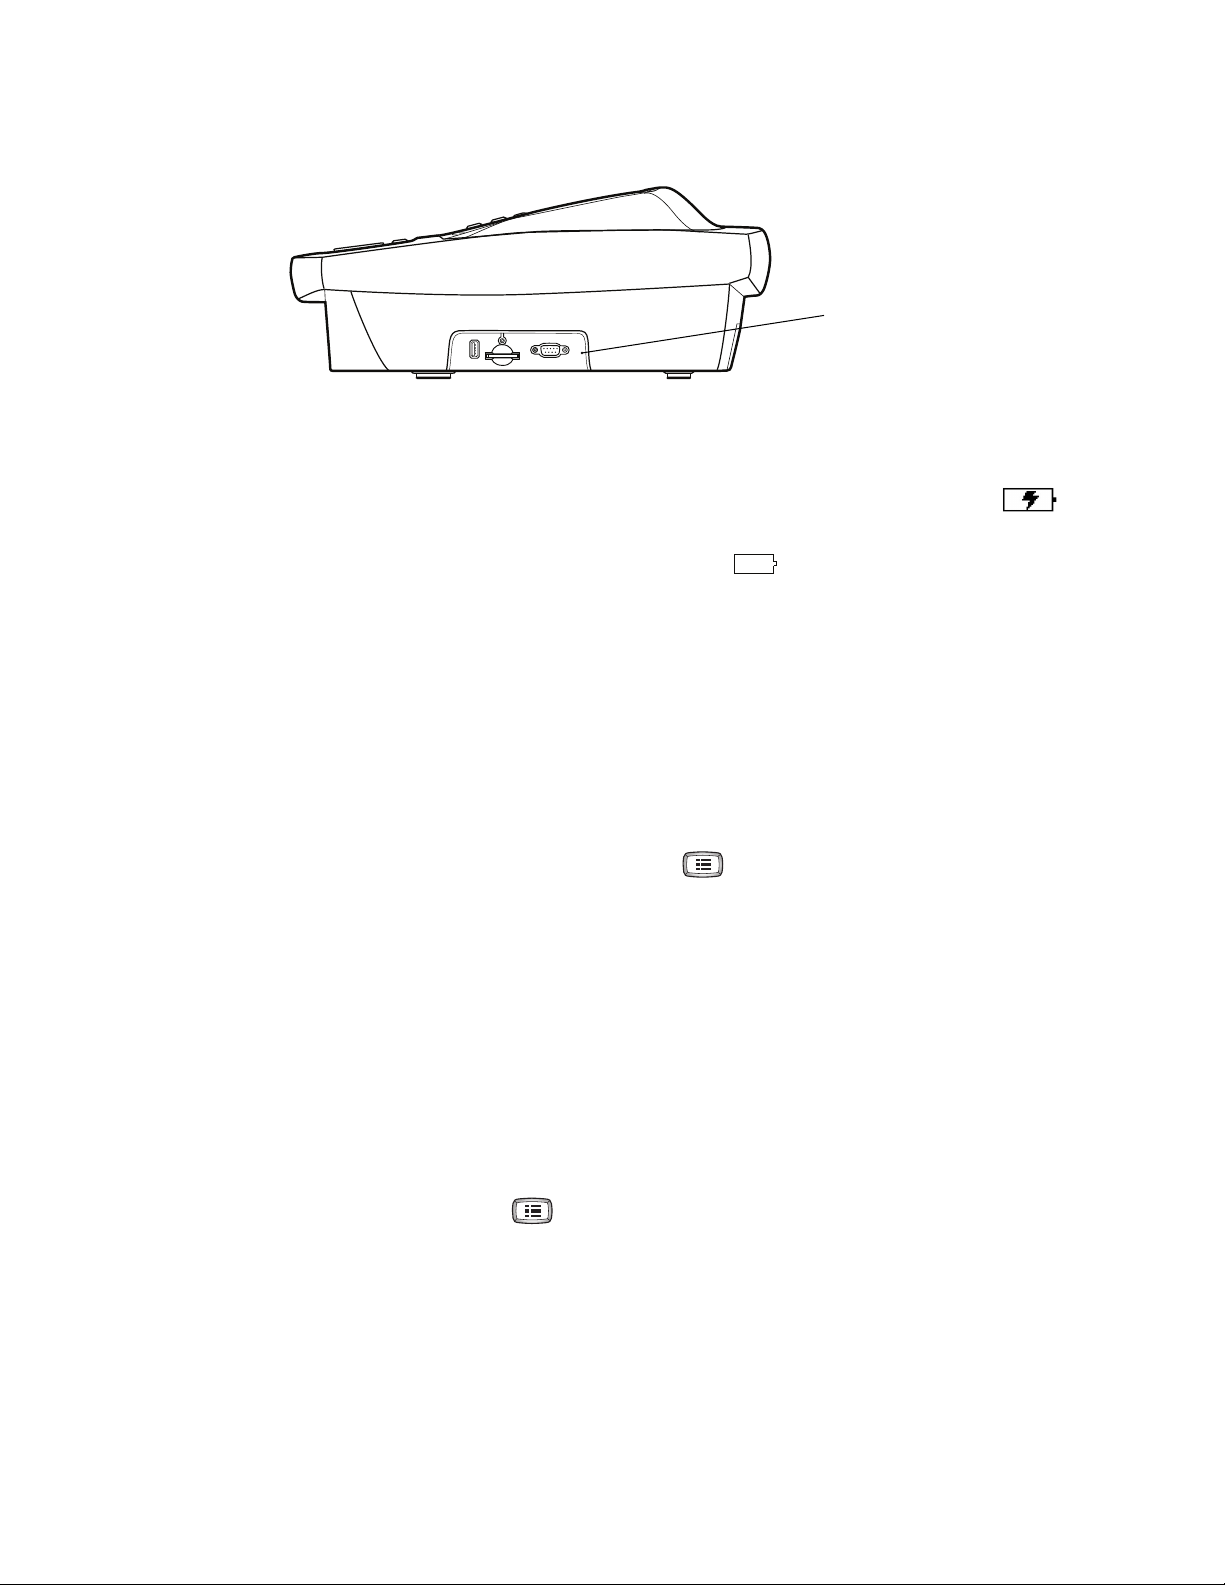
Reset Button
CP 100, CP 200
If the electrocardiograph is unresponsive for an extended time, it might be “frozen.”
If this occurs, reset the electrocardiograph by pressing the reset button located on the
right side. To press the reset button, insert a small object, such as small paper clip, into
the hole.
Page 12
10 Welch Allyn CP Series Electrocardiographs
Reset button
Improved Battery Status Feedback
CP 100, CP 200
Whenever the battery is charging and is not yet fully charged, this icon appears: .
For maximum battery performance, as often as possible leave the electrocardiograph
plugged in until you see the “fully charged” icon: .
New Auto ECG Report Format
CP 100, CP 200
There is a new Auto ECG report format: 2x6 +1R (2 rows x 6 columns+1rhythm lead).
Configurable Default Rhythm Speed
CP 200
You can now change the default rhythm speed: 10, 25, or 50 mm/s.
To change this default, press the Menu key . Choose ECG Settings >
Rhythm Report Settings > Default Rhythm Speed.
Transferable Configurations
CP 100, CP 200
You can now transfer the configuration of one electrocardiograph to another (CP 200 to
CP 200, or CP 100 to CP 100). If you have the spirometry option, its configuration is
included in the transfer.
To transfer a configuration, follow these steps:
1. Insert a storage device (SD memory card or USB flash drive) into an
electrocardiograph that is configured as desired.
2. Press the Menu key .
3. Choose System Settings > Device Info > Manage Settings > Export Files >
Export Configuration Files.
4. The files are copied to the storage device.
5. Remove the storage device, and insert it into another electrocardiograph of the
same model.
6. Choose System Settings > Device Info > Manage Settings > Import Files >
Import Configuration Files.
Page 13

Update Through Software Version 2.5 11
7. The files are copied to the electrocardiograph, and then it reboots.
Configuration file
or
CE Mark Change
Welch Allyn has changed its CE Mark to .
Page 14

12 Welch Allyn CP Series Electrocardiographs
Spirometry Improvements
• CP 200 Spirometry Option
Quicker access to spirometry settings
When the electrocardiograph is in spirometry mode, the Menu key now
immediately opens the Spirometry Settings menu.
• PCP mode adjustments
In PCP mode, the V/T scaling was changed to AUTO, so the PCP printout now fits on
a single page.
• Physician's comments page
You can now choose whether spirometry reports include an additional blank page
(with patient information at the top) for physician to write comments on.
To determine whether this page prints with your reports, while in spirometry mode
press the Menu key . Choose Print Settings > Physician’s Comments >
Yes or No.
• Correction in Viljanen profile
The CP 200 Spirometry Option Directions for Use (mat. number 703411) indicates
that the Viljanen norm supports FEF25. It does not. It supports FEF75.
• Protocol settings disabled
When a spirometry protocol is selected (PCP, NIOSH, OSHA, or SSD), its settings are
now disabled in the settings menus. This change avoids confusion during setup.
• ATS/ERS 2005 compliance
The software is now compliant with ATS/ERS 2005 guidelines.
• Effort automatic stop
The device now stops automatically after meeting the ATS end-of-test criteria. You do
not have to press the Stop softkey.
• Ability to turn off “Smoke Years” and “Packs Per Day”
You can now choose whether the fields “Smoke Years” and “Packs Per Day” will
display and print. To turn these fields on or off, while in spirometry mode press the
Menu key . Choose Patient Data Settings > Smoke Years or Packs Per Day >
On or Off.
• More norms supported
The software now supports these additional predictive norms: Roca 1986,
Hedenström 1986 - females, Falaschetti 2004, Gore 1995, Forche II, Paoletti 1986,
Hibbert 1989, Wang 1993. For details on these norms, see the updated chart on the
following page.
Note
For spirometry tests, the temperature and atmospheric pressure that you enter must be within these ranges:
Temperature: 10–40 C, 50–104 F
Pressure: 600–1100 mbar, 450–825 mmHg, 18–32 inHg, 60–110 kPa
Page 15

Update Through Software Version 2.5 13
Updated norm profiles
Parameters Studied Gender Age Race
Norm Name
(Abbrev.)
Berglund 1963
(be)
Crapo 1981 (cr) XXXXXX X X X No
Dockery 1983
(do)
ECCS/Quanjer
1993 (qu)
Falaschetti 2004
(fa)
Forche II (fo)
Gore 1995 (go)
Gulsvik 2001 (gu) X X X X X X X No
FVC
FEV1
FEV1%
FEV0.5
FEV3
FEV3/FVC
FEV6
FEV1/FEV6
PEF
FEF25-75
FEF75
FEF50
FEF25
FEF0.2-1.2
FEV0.5%
Male
Female
Pediatric
Adult
XXX X X 7 70 X
M:15–91
F:17–84
X X X X 6–11 No 110–160 X X
X X X X X X X X X X No 18–70
XXX
XXX X XXX
XXX XX
X X No 16–94 X
X X 5–17 18–90 X
X X No 18–78 X
M:15–91
F:17–84
Height (cm)
M:155–195
F:145–180
M:157–194
F:146–178
Weight (kg)
Smoke Years
Caucasian
X
XX X
X
Black
Hispanic
Asian
Hedenström
1986 (he)
Hibbert 1989 (hi)
Hsu 1979 (hs) X X X X X X 7–20 No
Knudson 1976 (k) X X X X X X X X 8 90 X
Knudson 1983
(kn)
Koillinen 1998
(kl)
Kory 1961 (ko) X X X X No No 18–66 X
Morris 1971 (mo) X X X X X X No 20–84 X
NHANES III (nh) X X X XXXX X X 8 80 X X X
Paoletti 1986 (pa)
Polgar 1971 (po) X X X X X X 3–19 No 110–170 X
Roca 1986 (ro)
Schoenberg 1978
(sc)
Solymar 1980
(so)
Viljanen 1981 (vi) X X X X X X X X No 18–65 X
Wang 1993 (wa)
Zapletal 1969 (za) X X X X X X X X 6–18 No
X X X X X X X X X No 20–70
XXX X XXX
XXX XXX X X 6
XXXX X X X X X 6–16 No X
XXX XX
XXX XX X
XXX X XX X X 7 18
X X X X X X X X 7–18 No X
XXX
X X X 6–18 No X X
X X 6–18 No
M:85
F:88
X X 8–17 18–64 X
X X No 20–70 X
M:160–196
F:148–183
M:120–190
F:120–176
M:111–200
F:111–180
M:111.8–195.6
F:106.7 –182.9
M:118–181
F:107–173
M:5–55
F:45–94
M:55–109
137.2
11.7–
X
F:2–53
X
XXX
X
XX
X
Page 16

14 Welch Allyn CP Series Electrocardiographs
“Intended use” statement expanded
CP 100, CP 200
The Welch Allyn electrocardiograph and spirometry products (subject devices) are
intended for use by trained operators in health facilities. The subject devices provide the
following diagnostic functions:
• Acquiring, viewing (CP 200), storing (CP 200), and printing ECG waveforms using ECG
front end modules (patient cables) and associated accessories that provide signal
acquisition for up to twelve (12) leads of patient ECG waveforms through surface
electrodes adhered to the body.
• Using optional algorithms to generate measurements, data presentations, graphical
presentations and interpretative statements on an advisory basis. These are
presented for review and interpretation by the clinician based upon knowledge of the
patient, the result of physical examination, the ECG tracings and other clinical
findings.
• Using the optional CP 200 spirometry module and associated accessories to acquire,
view, store and print measures and waveforms of pulmonary function including, but
not limited to, maximal volume and flow of air that can be moved in and out of the
patient's lungs. These measures are used in the diagnosis and monitoring of lung
diseases and interventions for the treatment of certain lung diseases. The spirometer
should only be used with patients able to understand the instructions for performing
the test.
“Indications for use” statement expanded
CP 100, CP 200
The electrocardiograph is one of the tools that clinicians use to evaluate, diagnose, and
monitor patient cardiac function.
The 12-lead ECG interpretive algorithm provides a computer-generated analysis of
potential patient cardiac abnormalities which must be confirmed by a physician with other
relevant clinical information.
The optional CP 200 spirometry module is indicated for use in clinical situations to assess
a patient's pulmonary health status and evaluate symptoms, signs, or abnormal laboratory
test results.
Spirometry is indicated for use in various common clinical situations:
• Assessing health status before a patient begins strenuous physical activity.
• Evaluating the following symptoms, signs, or abnormal laboratory tests:
Symptoms — dyspnea, wheezing, orthopnea, cough, phlegm production, chest pain
Signs — diminished breath sounds, overinflation, expiratory slowing, cyanosis, chest
deformity, unexplained crackles, shortness of breath
Abnormal laboratory tests — hypoxemia, hypercapnia, polycythemia, abnormal chest
radiographs
Page 17

Update Through Software Version 2.5 15
Enhanced pediatric support
CP 100, CP 200
An augmented lead set supports an alternate placement of the precordial leads on
pediatric patients. This lead placement is easier to use on the small chests of infants and
young children. A pediatric algorithm (PEDMEANS) is also provided for automatic ECG
interpretation.The optional CP 200 spirometry module, which previously supported
patients as young as six, now supports patients as young as three.
Configurable rhythm leads
CP 200
You can now configure the order in which leads appear during rhythm printing.
Bar code scanner
CP 200
A bar code scanner is available for easy entry of patient ID numbers.
Practice ID setting
CP 100, CP 200
You can now enter the name (ID) of your practice, clinic, or hospital. This ID prints on all
ECG reports.
New report format
CP 100, CP 200
There is a new Auto ECG report format: 6x2 + 1R (6 rows x 2 columns+1rhythm lead).
Choice of QTc computation method
CP 100, CP 200
You can now choose the computation method of correcting the waveform's QT interval
based on the heart rate: Bazett or Hodges.
More races added
CP 100, CP 200
Four more races are now available for entering patient data: Polynesian, Indian, Aboriginal,
Native American.
Page 18

16 Welch Allyn CP Series Electrocardiographs
New Features With Software Version 2.5
Location of printed date and time changed
The date and time on the ECG printout has been moved from the footer to the header on
the ECG printout to make it easier to see and prevent confusion with other information
printed in the footer.
Support of external memory devices
Drivers have been updated to support USB storage device with memory sizes greater
than 2 GB.
Note
Work flow changes to limit misidentified ECGS
For STAT or Auto ECGs without patient ID or name, the report Print Copy option will not
be available - this is intended to prevent multiple copies of printed ECG reports without
patient identification.
The CP100 and CP200 do not support SD card capacities greater than 2
GB including SDHC and SDXC high capacity SD card formats, or other USB
storage devices that have software applications pre-installed such as
SanDisk U3 Smart technology.
The larger the capacity of the USB storage device, the more time is
needed to transfer files. Several minutes may be required to transfer files
using large capacity USB storage devices. Please be patient.
Appendix A – Specifications
CP100, CP200
Standard Connectivity
Com port for USB cables or removable USB storage devices (>64 MB)
SD memory card slot (for use with SD cards > 64 MB, < 2 GB)
Note
The CP100 and CP200 do not support SD card capacities greater than 2 GB
including SDHC and SDXC high capacity SD card formats, or other USB storage
devices that have software applications pre-installed such as SanDisk U3 Smart
technology.
Page 19

Update Through Software Version 2.5 17
Symbols
CP100, CP200
Operation Symbols
5134 Electrostatic sensitive devices
General Warnings
CP100, CP200
Warnings related to Using the Electrocardiograph
WARNING To avoid the risk of associating ECG reports with the wrong patients,
each report must identify the patient. If any ECG report does not identify the
patient, write the patient identification information on the report immediately
following the ECG test.
General Cautions
CP100, CP200
Caution The Electrostatic sensitive devices symbol marked on the device
indicates devices or connectors that are sensitive to electrostatic discharge
which may result in an interruption of normal operation or damage to the device.
Prior to connecting or disconnecting accessories from the device, touch the
Equipotential stud located on the back of the device for 2 seconds or more to
remove static electricity from your body.
To indicate packages containing electrostatic sensitive devices, or to identify
a device or connector that has not been tested for immunity to electrostatic
discharge.
NOTE: For further information, see IEC 60747-1.
CP100 and CP200 Directions for Use Chapter 5 updates
The following pages replace the applicable Chapter 5 pages in the previous versions of
the CP 100 and CP 200 Directions For Use.
CP 100 12-Lead Resting Electrocardiograph Directions for Use (mat. 708794)
CP 200 12-Lead Resting Electrocardiograph Directions for Use (mat. 708793)
Page 20

18 Welch Allyn CP Series Electrocardiographs
Page 21

Page 22

48 Chapter 5 Performing ECG Tests Welch Allyn CP 100 Electrocardiograph
Recording an Auto ECG
WARNING To avoid the risk of associating ECG reports with the wrong patients,
each report must identify the patient. If any ECG report does not identify the
patient, write the patient identification patient information on the report
immediately following the ECG test.
An Auto ECG is a report typically showing a 10-second acquisition of 12 leads of ECG
information combined with patient data, interpretation, and measurements matrix. Two
user-defined formats are available: Auto Report 1 or Auto Report 2. To learn how to set up
the Auto ECG report format, see “About Auto ECG Reports” in the Directions for Use.
As shown in the following diagram, there are the two types of Auto ECG: normal and stat.
For details, see these procedures:
• “Recording a Normal Auto ECG” on page 49
• “Recording a Stat Auto ECG” on page 53
Figure 31. Auto ECG Testing, Process Diagram
Normal
Press Quickly.
Enter Patient Data.
Stat
Press and hold.
Auto Report prints.
Auto ECG Post-Print
screen.
Press Exit
Page 23

Directions for Use Chapter 5 Performing ECG Tests 49
Recording a Normal Auto ECG
For a normal Auto ECG, you enter patient data and do other optional tasks before printing,
as shown in Figure 31on page 48.
To Record a Normal Auto ECG
1. Press the Auto ECG key quickly.
Do not hold it down, or a stat ECG would begin.
The following screen appears.
Figure 32. “Enter New Patient” Screen
Enter New Patient
Patient ID
Last Name
First Name
Birth Date
Weight
Height
Gender
Use up and down arrows to change fields
//
lb.
ft.
in.
9:17AM Oct 16 05
MM / DD / YYYY
For details about these data fields—
including how to choose which fields
display and print—see “Reviewing the
Patient Data Fields Available” on page 37.
2. Enter the patient data.
3. When finished, select Done (at the end of the list).
The Auto ECG Acquisition screen appears. See Figure 33 on page 50.
Page 24

50 Chapter 5 Performing ECG Tests Welch Allyn CP 100 Electrocardiograph
Figure 33. Auto ECG Acquisition” Screen
Doe, Jane
Doe, Jane
Auto ECG : Acquisition
Auto ECG Acquisition
Printing Report
9:17AM Oct 16 05
9:17AM Oct 16 05
HR 120
The electrocardiograph displays messages here
Collecting Data
Gain: 10 mm/mV
Speed: 25 mm/s
Baseline Filter: ON
Muscle Filter: ON
when it is doing the following:
• Collecting data
• Analyzing data
• Printing the report
4. If prompted, choose whether to wait for the electrocardiograph to acquire 10 seconds
of filtered, processed data before printing.
If you override the wait time and print the available data immediately, be aware that
the printed data will be insufficient in quality or quantity or both.
The report prints.
Note
If you do not enter the patient data, write the patient identification information on
the printed report immediately after the ECG test to avoid associating the ECG
report with the wrong patient.
ECG report Print Copy feature will not be available if no Patient Name or ID are
entered.
If a red stripe appears along the edge of your report, replace the paper. See
“Loading the Thermal Chart Paper” on page 21.
After printing, the Auto ECG Post-Print screen appears. Figure 34 on page 51.
Page 25

Directions for Use Chapter 5 Performing ECG Tests 51
Figure 34.“Auto ECG Post-Print” Screen
Doe, Jane
Auto ECG : Post-Print
1. Exit
2. Print Copy
3. Repeat Test
4. Export Test
9:17AM Oct 16 05
5. Select the desired item.
Item Effect
Exit The Ready screen appears if all leads are connected to the patient.
Print Copy A copy of the test prints.
Note
Print Copy is not available for Stat Auto ECG, or if
there is no Patient Name or ID entered for Auto
To learn how to print multiple copies of all tests automatically, see “Reviewing the
Interpretation and Copy Settings for Auto Reports” on page 36.
Repeat Test The following screen appears.
Figure 35. “Auto ECG Repeat Test” Screen
Doe, Jane
Auto ECG Repeat Test
1. Adjust Gain
2. Adjust Baseline Filter
3. Adjust Muscle Filter
4. Print ECG
1. (Optional) Adjust the waveforms.
See “Adjusting the ECG Waveforms” on page 55.
2. Choose Print ECG.
A new report prints.
Note
If you do not enter the patient data, write the patient
identification information on the printed report
immediately after the ECG test to avoid associating the
ECG report with the wrong patient.
9:17AM Oct 16 05
10 mm/mV
ON
ON
Export Test Sends the test to the memory card. An SD memory card or removable USB storage device
must be in place.
Page 26

52 Chapter 5 Performing ECG Tests Welch Allyn CP 100 Electrocardiograph
6. Press Exit to complete patient testing.
WARNING Failure to follow these instructions could incorrectly associate an
ECG test with the wrong patient.
Caution The requirements of AAMI EC11, Section 3.2.7.2, Frequency and
Impulse Response, for an impulse triangle waveform may be impacted by up
to 5 milliseconds of small amplitude dampened ringing immediately after the
impulse when the muscle filter (35 Hz) is turned on or a small amplitude
offset when the baseline filter (0.5 Hz) is turned on. These requirements are
unaffected by any other combination of filters turned on or off.
Measurements performed by the optional interpretation algorithm are
unaffected by any filter selections.
Page 27

Directions for Use Chapter 5 Performing ECG Tests 53
Recording a Stat Auto ECG
WARNING To avoid the risk of associating ECG reports with the wrong patients,
each report must identify the patient. If any ECG report does not identify the
patient, write the patient identification information on the report immediately
following the ECG test.
A stat Auto ECG is an immediate printout.
Stat mode bypasses patient data entry, as shown in Figure 31 on page 48 in Directions for
Use. A temporary ID number is assigned to the patient to identify stat tests.
To Record a Stat Auto ECG
1. Press and hold the Auto ECG key .
The electrocardiograph begins acquiring ECG data. After it has acquired 10 seconds of
quality data, it prints a report.
Note
2. Go to Step 4 on page 50.
Write the patient identification information on the printed report immediately after
the ECG test to avoid associating the ECG report with the wrong patient.
ECG report Print Copy feature will not be available if no Patient Name or ID are
entered.
Page 28

54 Chapter 5 Performing ECG Tests Welch Allyn CP 100 Electrocardiograph
Recording a Rhythm ECG
A Rhythm ECG is a continuous, real-time printout of three leads at a time.
Rhythm ECGs are printouts only. They cannot be sent to an SD memory card or
removable USB storage device.
Figure 36. Rhythm ECG Testing, Process Diagram
Printing begins.
(Optional) Adjust
To Record a Rhythm ECG
1. Press the Rhythm ECG key .
Printing begins, and the following screen appears.
Figure 37. “Rhythm ECG” Screen
Doe, Jane
Rhythm ECG
1. Change Leads
2. Adjust Gain
3. Adjust Baseline Filter
4. Adjust Muscle Filter
5. Adjust Speed
9:17AM Oct 16 05
HR 120
I, II, III
10 mm/mV
ON
ON
25 mm/s
2. (Optional) Adjust the waveforms.
See “Adjusting the ECG Waveforms” on page 55.
waveforms.
or
3. Press or to stop printing.
The Ready screen appears if all leads are connected to the patient.
Note
Write the patient identification information on the printed report immediately
after the ECG test to avoid associating the ECG report with the wrong
patient.
Page 29

Page 30

56 Chapter 5 Performing ECG Tests Welch Allyn CP 200 Electrocardiograph
Recording an Auto ECG
WARNING To avoid the risk of associating ECG reports with the wrong patients,
each report must identify the patient. If any ECG report does not identify the
patient, write the patient identification information on the report immediately
following the ECG test.
An Auto ECG is a report typically showing a 10-second acquisition of 12 leads of ECG
information combined with patient data, interpretation, and measurements matrix. To
learn how to set up the Auto ECG report format, see “About Auto ECG Reports” on
page 39.
As shown in the following diagram, there are the two types of Auto ECG: normal and stat.
For details, see these procedures:
• “Recording a Normal Auto ECG” on page 57
• “Recording a Stat Auto ECG” on page 62
Figure 36. Auto ECG Testing, Process Diagram
Normal
Press quickly.
(Optional)
Select report
format.
Enter or recall
patient data.
(Optional)
Adjust
waveforms.
Press
Print ECG.
Stat
Press and hold.
Auto Report prints.
Auto ECG Post-Print
screen.
Press Exit
Page 31

Directions for Use Chapter 5 Performing ECG Tests 57
Recording a Normal Auto ECG
For a normal Auto ECG, you enter patient data and do other optional tasks before printing,
as shown in Figure 36 on page 56.
To Record a Normal Auto ECG
1. Press the Auto ECG key quickly.
Do not hold it down, or a stat ECG would begin.
2. If prompted, choose Auto Report 1 or Auto Report 2.
The following screen appears.
Figure 37. “Enter New Patient” Screen
Enter New Patient
Patient ID
Last Name
First Name
Birth Date
Weight
Height
Gender
Search Schedule
//
lb.
ft. in.
Clear
9:17AM Oct 16 05
MM / DD / YYYY
Done
For details about these data fields—
including how to choose which fields
display and print—see “Reviewing the
Patient Data Fields Available for Auto
Reports” on page 44.
3. Enter or recall the patient data.
• If you are using a bar code scanner, scan the patient’s bar code. The patient ID
appears on the screen.
• If you want to enter the patient data, fill in the fields.
Note
If you do not enter the patient data, write the patient identification
information on the printed report immediately after the ECG test to
avoid associating the ECG report with the wrong patient.
ECG report Print Copy feature will not be available if no Patient Name or
ID are entered.
• If you want to recall saved patient data, go to “Recalling Saved Patient Data” on
page 64.
When finished, press the desired softkey:
Clear deletes the entered data and returns to the Patient ID field.
Done accepts the entered data and goes to the Auto ECG Acquisition
screen. See Figure 38 on page 58.
Page 32

58 Chapter 5 Performing ECG Tests Welch Allyn CP 200 Electrocardiograph
Figure 38. Auto ECG Acquisition” Screen
Doe, Jane
Auto ECG Acquisition
I
V
aVR
AUTO ONON
Leads
Gain
Baseline
Filter
9:17AM Oct 16 05
HR 120
Muscle
Filter
Print
ECG
4. Verify ECG quality on the screen.
WARNING Do not perform ST segment analysis on the ECG screen display,
since these ECG representations are scaled. Make manual measurements of
ECG intervals and magnitudes on printed ECG reports only.
5. (Optional) Adjust the waveforms.
See “Adjusting the ECG Waveforms” on page 68.
6. Press Print ECG.
Softkeys for adjusting the
waveforms or printing
7. If prompted, choose whether to wait for the electrocardiograph to acquire 10 seconds
of filtered, processed data before printing.
If you override the wait time and print the available data immediately, be aware that
the printed data will be insufficient in quality or quantity or both.
The report prints.
Note
If you do not enter the patient data, write the patient identification
information on the printed report immediately after the ECG test to avoid
associating the ECG report with the wrong patient.
If a red stripe appears along the edge of your report, replace the paper.
See “Loading the Thermal Chart Paper” on page 23.
After printing, the Auto ECG Post-Print screen appears. Figure 39 on page 59.
Page 33
Directions for Use Chapter 5 Performing ECG Tests 59
Figure 39. “Auto ECG Post-Print” Screen
Doe, Jane
Auto ECG Post-Print
I
V
aVR
Print
Copy
Edit
Test
Manual
Save
9:17AM Oct 16 05
Repeat
Test
8. Press the desired softkey.
Softkey Effect
Print Copy Prints a copy of the test.
Note
To learn how to print multiple copies of all tests automatically, see “Reviewing the
Interpretation and Copy Settings for Auto Reports” on page 43.
HR 120
Softkeys for choosing
Exit
post-printing options
Print Copy is not available for Stat Auto ECG, or if
there is no Patient Name or ID entered for Auto
Edit Test Brings up the Edit Test – Patient Data screen. From here you can edit or confirm the
patient data and interpretation statements. See “To Edit or Confirm a Test Directly
After Printing” on page 61.
Manual Save Saves the test to the electrocardiograph’s test directory. See “Managing Saved Tests
In the Test Directory” on page 70.
This Manual Save softkey appears only when Auto Save is disabled. For more on
Auto Save, see “Reviewing the Miscellaneous ECG Settings” on page 48.
Manual Send (May appear in place of Manual Save in Figure 4 on page 14.) Displays two softkey
options:
• Memory Card
An SD memory card or removable USB storage device must be in place.
• Workstation
Either wireless communications must be configured or a USB cable must connect
the CardioPerfect workstation to the electrocardiograph’s Com port B ( ).
This Manual Send softkey appears only when Auto Save is enabled. For more on
Auto Save, see “Reviewing the Miscellaneous ECG Settings” on page 48.
Repeat Test Lets you repeat a test for the current patient.
Exit The ECG Preview screen appears if all leads are connected to the patient.
9. Press Exit to complete patient testing.
WARNING Failure to follow these instructions could incorrectly associate an
ECG test with the wrong patient.
Page 34

60 Chapter 5 Performing ECG Tests Welch Allyn CP 200 Electrocardiograph
Caution The requirements of AAMI EC11, Section 3.2.7.2, Frequency and
Impulse Response, for an impulse triangle waveform may be impacted by up to 5
milliseconds of small amplitude dampened ringing immediately after the impulse
when the muscle filter (35 Hz) is turned on or a small amplitude offset when the
baseline filter (0.5 Hz) is turned on. These requirements are unaffected by any
other combination of filters turned on or off. Measurements performed by the
optional interpretation algorithm are unaffected by any filter selections.
Page 35

Directions for Use Chapter 5 Performing ECG Tests 61
To Edit or Confirm a Test Directly After Printing
Note
A qualified physician must review and confirm all tests before patients are
treated. If changes are needed for any saved test, you can edit two types of data:
• patient data
• interpretation statements
1. From the Auto ECG Post-Print screen (Figure 39 on page 59), press Edit Test.
The Edit Test – Patient Data screen appears.
2. (Optional) Edit the patient data.
3. Press the desired softkey.
Softkey Effect
Interp Saves any changes, and displays the Edit Test – Interpretation screen.
1. (Optional) Edit the interpretation statements to be saved with the test.
2. Press the desired softkey:
• Patient Data saves any changes, and returns to the Edit Test – Patient Data
screen.
• Confirm saves any changes, sets the test status to “confirmed,” and returns to the
Auto ECG Post-Print screen.
• Cancel discards any changes, and returns to the Auto ECG Post-Print screen.
• Done saves any changes, and returns to the Auto ECG Post-Print screen.
For details on interpretation, see “Automatic ECG interpretation” on page 5.
Cancel Discards any changes, and returns to the Auto ECG Post-Print screen.
Done Saves any changes, and returns to the Auto ECG Post-Print screen.
Page 36

62 Chapter 5 Performing ECG Tests Welch Allyn CP 200 Electrocardiograph
Recording a Stat Auto ECG
WARNING To avoid the risk of associating ECG reports with the wrong patients,
each report must identify the patient. If any ECG report does not identify the
patient, write the patient identification information on the report immediately
following the ECG test.
A stat Auto ECG is an immediate printout in Auto Report 1 format.
Stat mode bypasses patient data entry, as shown in Figure 36 on page 56. A temporary ID
number is assigned to the patient to identify stat tests. After printing, you may enter the
patient data by editing the test.
In stat mode, Auto Send and Auto Save are always disabled, even if they are enabled in
the ECG settings. If you want to send or save a stat Auto ECG, you may do so manually
after you print.
To Record a Stat Auto ECG
1. Press and hold the Auto ECG key .
The electrocardiograph begins acquiring ECG data. After it has acquired 10 seconds of
quality data, it prints a report.
Note
2. Go to Step 7 on page 58.
Write the patient identification information on the printed report immediately after
the ECG test to avoid associating the ECG report with the wrong patient.
ECG report Print Copy feature will not be available if no Patient Name or ID are
entered.
Continue the procedure as if you have just pressed the Print ECG softkey.
Page 37

Directions for Use Chapter 5 Performing ECG Tests 63
Recording a Rhythm ECG
A Rhythm ECG is a continuous, real-time printout of a rhythm strip with a user-defined
lead arrangement. For details on reviewing or changing the lead arrangement in your
reports, see “Reviewing the Rhythm Report Settings” on page 47.
Rhythm ECGs are printouts only. They cannot be saved or sent electronically.
Figure 40. Rhythm ECG Testing, Process Diagram
Printing begins.
(Optional) Adjust
waveforms.
or
To Record a Rhythm ECG
1. Press the Rhythm ECG key .
Printing begins.
The screen displays 3 leads at a time from the leads currently printing. The printout
includes either 3, 6, or 12 leads at a time. To find out how to change this number, see
“Reviewing the Rhythm Report Settings” on page 47.
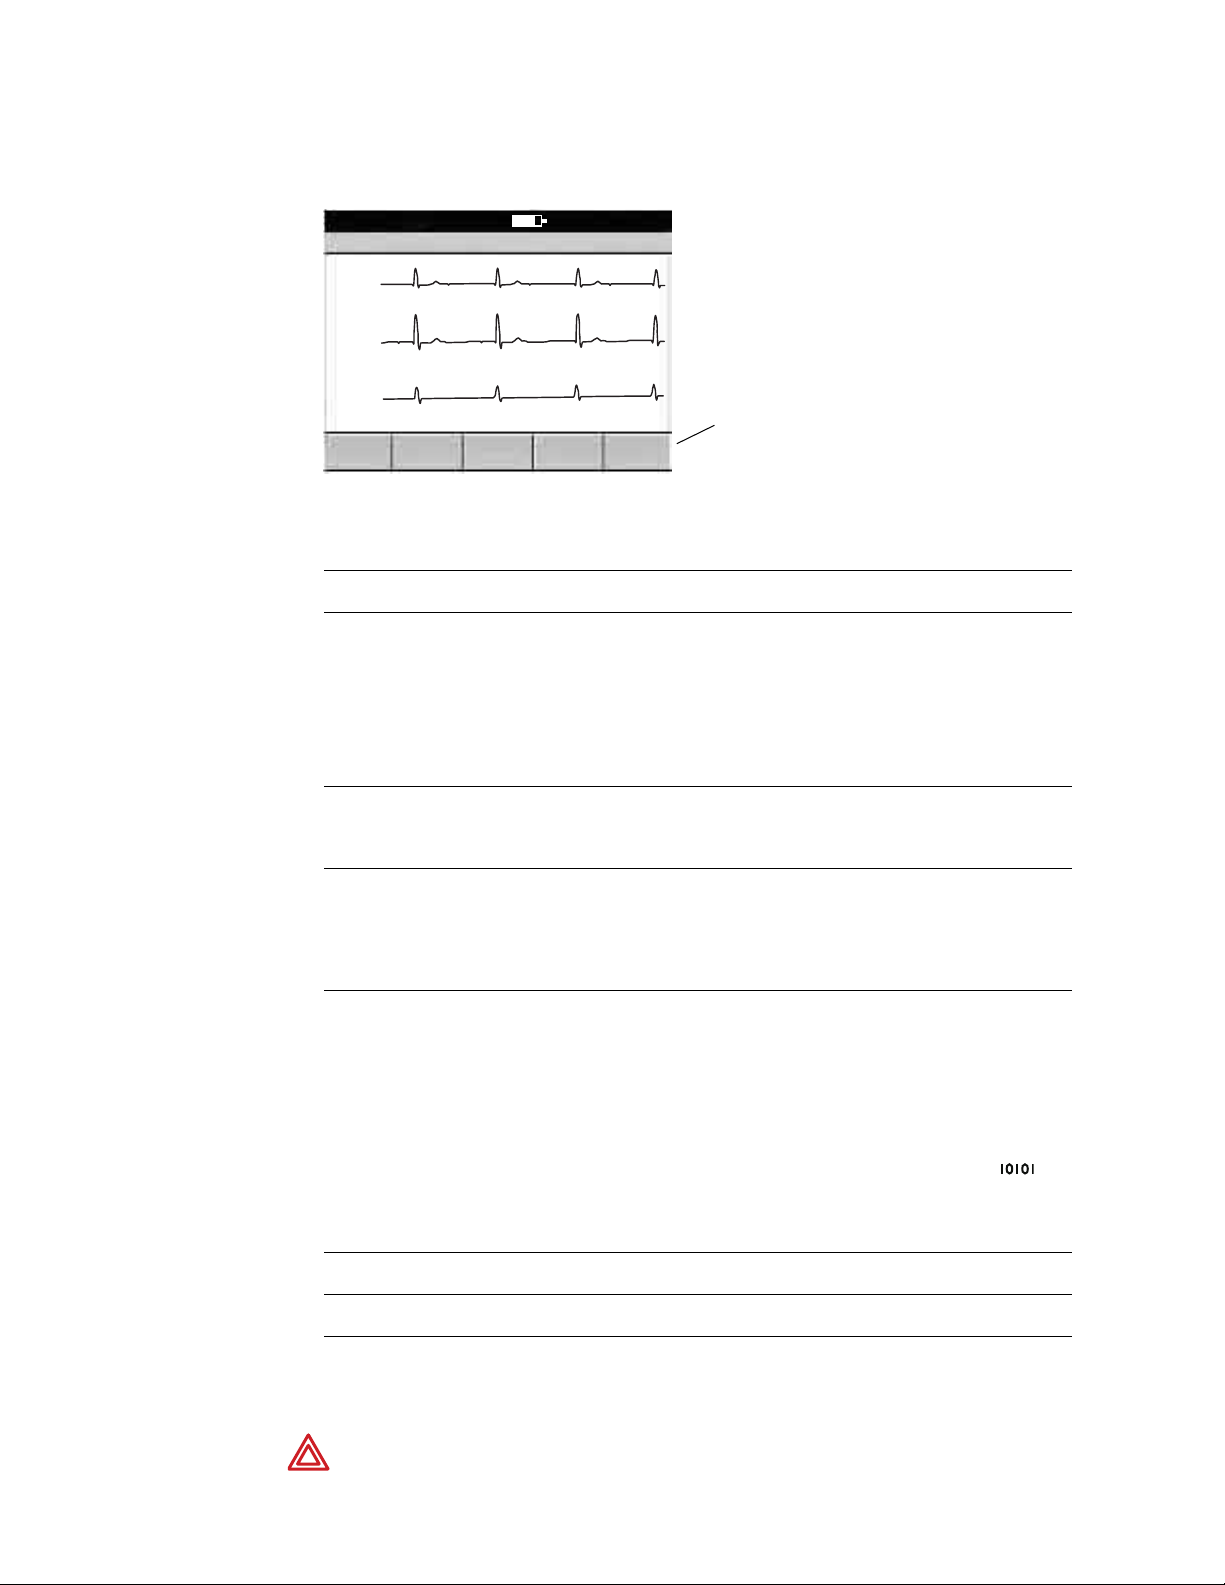
Figure 41. “Rhythm ECG” Screen
Doe, Jane
Rhythm ECG
I
V
aVR
10 mm/mV
Gain
Baseline
Filter
9:17AM Oct 16 05
HR 120
25 mm/sONON
Muscle
Filter
SpeedLeads
Softkeys for adjusting
waveforms while printing
2. (Optional) Press the softkeys to adjust the waveforms.
See “Adjusting the ECG Waveforms” on page 68.
3. Press or to stop printing.
The ECG Preview screen appears if all leads are connected to the patient.
Page 38

Page 39

Page 40

4341 State Street Road, PO Box 220, Skaneateles Falls, NY 13153-0220 USA
1 800 535 6663, + 1 315 685 4560 www.welchallyn.com
Mat. Number: 717481, Ver: A
 Loading...