

Page 1
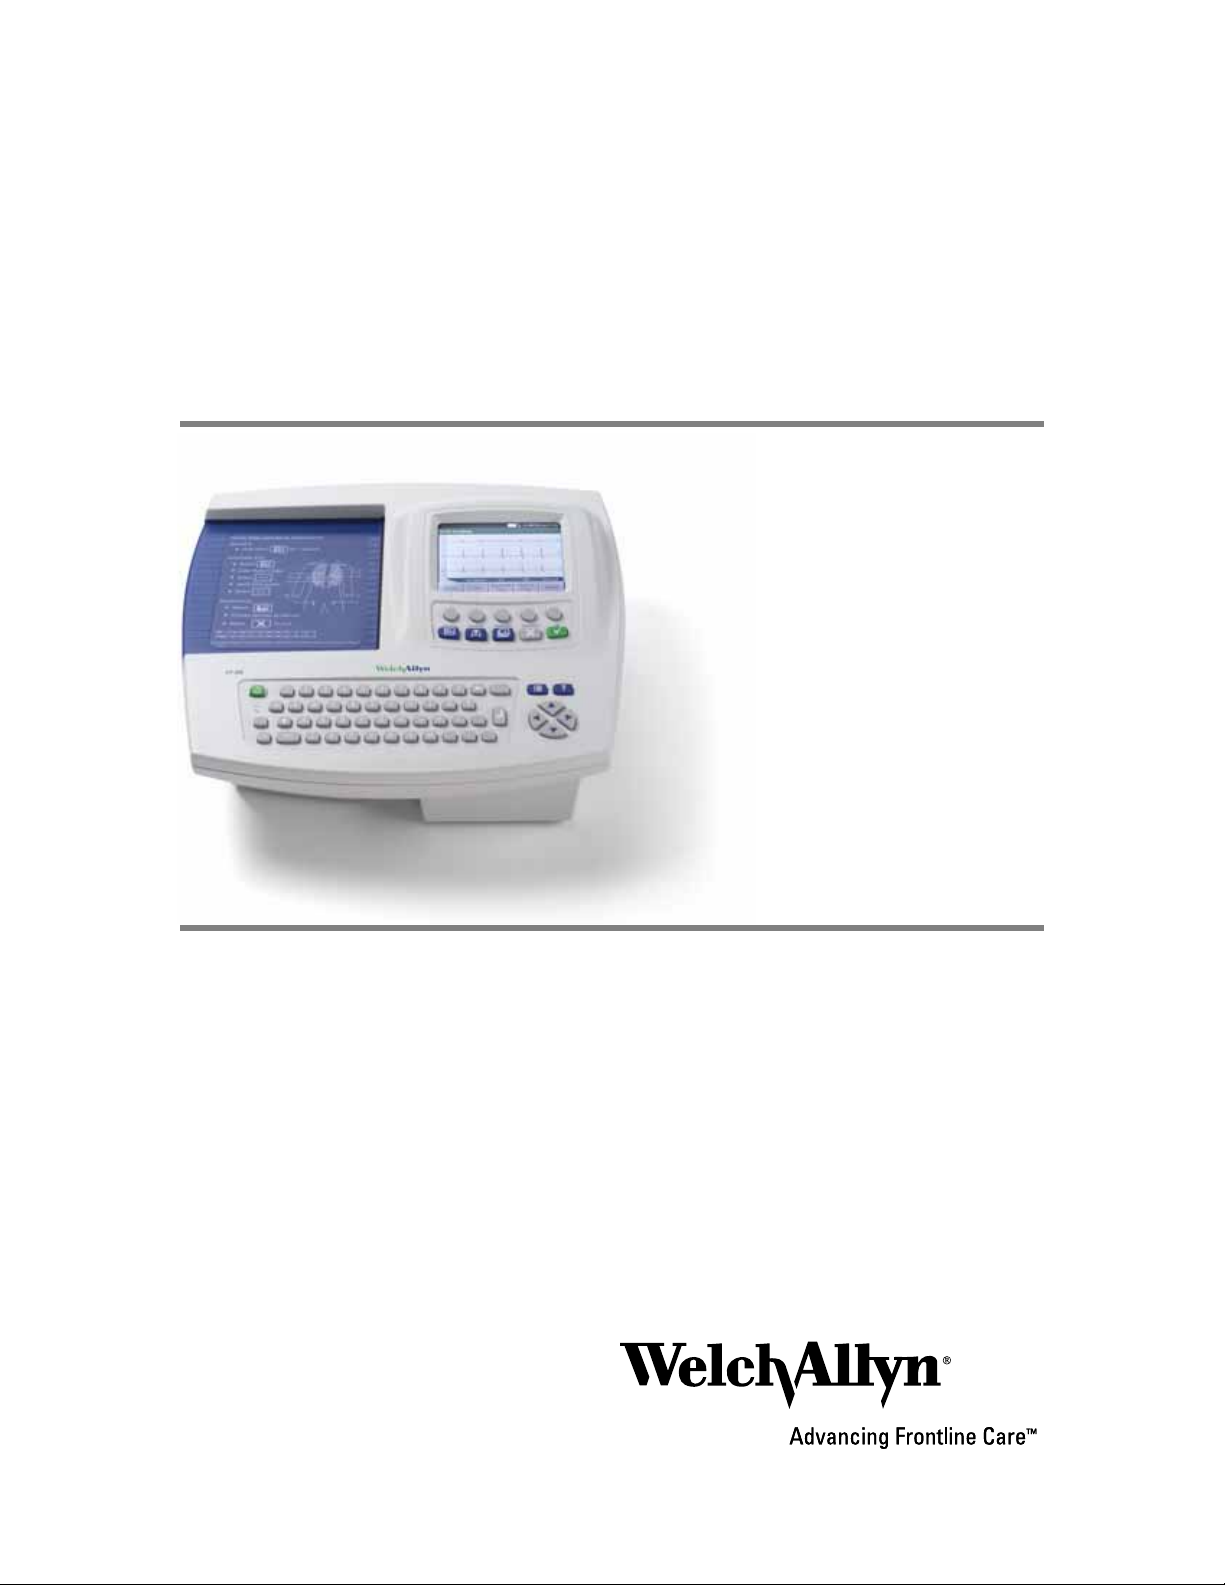
CP 200™ 12-Lead Resting
Electrocardiograph
Directions for Use
Page 2

ii Welch Allyn CP 200 Electrocardiograph
Copyright 2008, Welch Allyn. All rights are reserved. No one is permitted to reproduce or duplicate, in any
form, this manual or any part thereof without permission from Welch Allyn.
Caution: Federal US law restricts sale of the device identified in this manual to, or on the order of, a
licensed physician.
Welch Allyn assumes no responsibility for any injury, or for any illegal or improper use of the product, that
may result from failure to use this product in accordance with the instructions, cautions, warnings, or
indications for use published in this manual.
Welch Allyn is a registered trademark of Welch Allyn, Inc., and CP 200 and CardioPerfect are trademarks of
Welch Allyn, Inc.
SD is a trademark of Toshiba.
Software in this product is copyright Welch Allyn or its vendors. All rights are reserved. The software is
protected by United States of America copyright laws and international treaty provisions applicable
worldwide. Under such laws, the licensee is entitled to use the copy of the software incorporated within
this instrument as intended in the operation of the product in which it is embedded. The software may not
be copied, decompiled, reverse-engineered, disassembled or otherwise reduced to human-perceivable
form. This is not a sale of the software or any copy of the software; all right, title and ownership of the
software remains with Welch Allyn or its vendors.
For information about any Welch Allyn product, please call Welch Allyn Technical Support:
USA 1 800 535 6663
+ 1 315 685 4560
Canada 1 800 561 8797 China + 86 216 327 9631
European Call Center + 353 46 906 7790 France + 331 6009 3366
Germany + 49 747 792 7186 Japan + 81 33 219 0071
Latin America + 1 305 669 9003 Netherlands + 31 15 750 5000
Singapore + 65 6419 8100 South Africa + 27 11 777 7555
United Kingdom + 44 207 365 6780 Sweden + 46 85 853 6551
Australia + 61 29 638 3000
Reorder Number (multi-language CD): 401151
Mat. Number (manual only): 708793, Ver: F
Welch Allyn
4341 State Street Road, PO Box 220
Skaneateles Falls, NY 13153-0220
Welch Allyn LTD.
Navan Business Park
Dublin Road
Navan, County Meath, Republic of Ireland
Tel.: 353-46-90-67700
Fax: 353-46-90-67755
www.welchallyn.com
Printed in USA
Page 3

Contents
1 - Introduction . . . . . . . . . . . . . . . . . . . . . . . . . . . . . . . . . . . . . . . . . . . . . 1
iii
About This Manual . . . . . . . . . . . . . . . . . . . . . . . . . . . . . . . . . . . . . . . . . . . . . . . . 2
Product Overview . . . . . . . . . . . . . . . . . . . . . . . . . . . . . . . . . . . . . . . . . . . . . . . . . 2
Intended Use . . . . . . . . . . . . . . . . . . . . . . . . . . . . . . . . . . . . . . . . . . . . . . . . . . . . 2
Indications for Use . . . . . . . . . . . . . . . . . . . . . . . . . . . . . . . . . . . . . . . . . . . . . . . . 3
Standard Features & Benefits. . . . . . . . . . . . . . . . . . . . . . . . . . . . . . . . . . . . . . . . 3
Options . . . . . . . . . . . . . . . . . . . . . . . . . . . . . . . . . . . . . . . . . . . . . . . . . . . . . . . . . 5
Accessories . . . . . . . . . . . . . . . . . . . . . . . . . . . . . . . . . . . . . . . . . . . . . . . . . . . . . 6
Controls, Indicators, and Connectors . . . . . . . . . . . . . . . . . . . . . . . . . . . . . . . . . . 7
About the Main Menu. . . . . . . . . . . . . . . . . . . . . . . . . . . . . . . . . . . . . . . . . . . . . 11
Moving Through the Menus . . . . . . . . . . . . . . . . . . . . . . . . . . . . . . . . . . . . . . . . 12
About the Patient Cable and Leads. . . . . . . . . . . . . . . . . . . . . . . . . . . . . . . . . . . 13
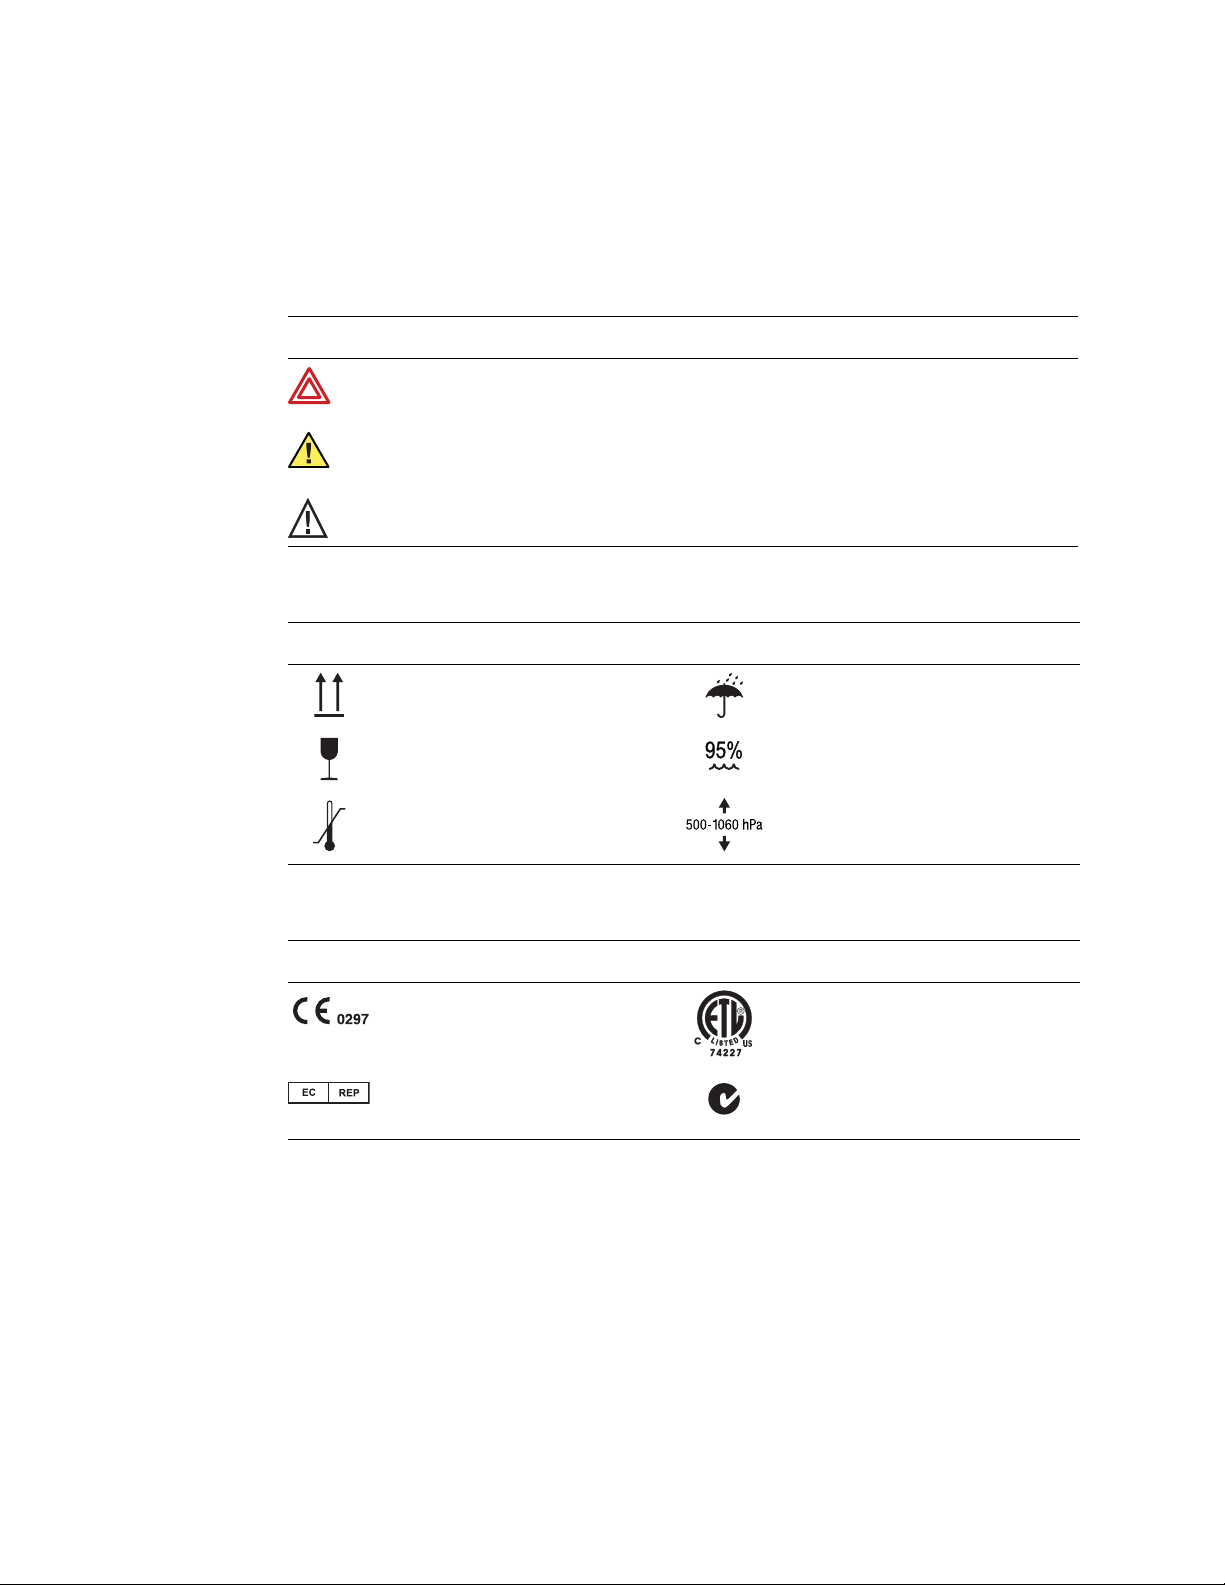
Symbols . . . . . . . . . . . . . . . . . . . . . . . . . . . . . . . . . . . . . . . . . . . . . . . . . . . . . . . 14
Using the Electrocardiograph Safely . . . . . . . . . . . . . . . . . . . . . . . . . . . . . . . . . . 16
General Warnings. . . . . . . . . . . . . . . . . . . . . . . . . . . . . . . . . . . . . . . . . . . . . 16
General Cautions . . . . . . . . . . . . . . . . . . . . . . . . . . . . . . . . . . . . . . . . . . . . . 18
Getting Help . . . . . . . . . . . . . . . . . . . . . . . . . . . . . . . . . . . . . . . . . . . . . . . . . . . . 19
2 - Setting Up the Electrocardiograph . . . . . . . . . . . . . . . . . . . . . . . . . 21
Inspecting the Electrocardiograph . . . . . . . . . . . . . . . . . . . . . . . . . . . . . . . . . . . 22
Connecting the Patient Cable . . . . . . . . . . . . . . . . . . . . . . . . . . . . . . . . . . . . . . . 22
Loading the Thermal Chart Paper . . . . . . . . . . . . . . . . . . . . . . . . . . . . . . . . . . . . 23
Powering the Electrocardiograph . . . . . . . . . . . . . . . . . . . . . . . . . . . . . . . . . . . . 24
Verifying Proper Operation . . . . . . . . . . . . . . . . . . . . . . . . . . . . . . . . . . . . . . . . . 25
Connecting an External USB Printer (Optional). . . . . . . . . . . . . . . . . . . . . . . . . . 26
3 - Reviewing the System Settings . . . . . . . . . . . . . . . . . . . . . . . . . . . . 27
“System Settings” Menu Tree . . . . . . . . . . . . . . . . . . . . . . . . . . . . . . . . . . . . . . 28
Reviewing the Device Configuration Settings. . . . . . . . . . . . . . . . . . . . . . . . . . . 29
Reviewing the Device Information . . . . . . . . . . . . . . . . . . . . . . . . . . . . . . . . . . . 31
Reviewing the Connectivity Settings . . . . . . . . . . . . . . . . . . . . . . . . . . . . . . . . . 32
Reviewing the Medication List . . . . . . . . . . . . . . . . . . . . . . . . . . . . . . . . . . . . . . 33
Reviewing the History List . . . . . . . . . . . . . . . . . . . . . . . . . . . . . . . . . . . . . . . . . 34
Transferring a Configuration to Another Electrocardiograph . . . . . . . . . . . . . . . . 35
Configuring the Electrocardiograph for Wireless Communication . . . . . . . . . . . 36
4 - Reviewing the ECG Settings. . . . . . . . . . . . . . . . . . . . . . . . . . . . . . . 37
“ECG Settings” Menu Tree . . . . . . . . . . . . . . . . . . . . . . . . . . . . . . . . . . . . . . . . 38
About Auto ECG Reports . . . . . . . . . . . . . . . . . . . . . . . . . . . . . . . . . . . . . . . . . . 39
Page 4

iv Contents Welch Allyn CP 200 Electrocardiograph
Reviewing the Format Settings for Auto Reports. . . . . . . . . . . . . . . . . . . . . 41
Reviewing the Interpretation and Copy Settings for Auto Reports. . . . . . . . 43
Reviewing the Patient Data Fields Available for Auto Reports . . . . . . . . . . . 44
Reviewing the Auto Report Settings. . . . . . . . . . . . . . . . . . . . . . . . . . . . . . . . . . 46
Reviewing the Rhythm Report Settings . . . . . . . . . . . . . . . . . . . . . . . . . . . . . . . 47
Reviewing the Miscellaneous ECG Settings. . . . . . . . . . . . . . . . . . . . . . . . . . . . 48
Turning the Augmented Pediatric Lead Set On and Off . . . . . . . . . . . . . . . . . . . 49
5 - Performing ECG Tests . . . . . . . . . . . . . . . . . . . . . . . . . . . . . . . . . . . . 51
Connecting the Leads to the Patient . . . . . . . . . . . . . . . . . . . . . . . . . . . . . . . . . 52
Recording an Auto ECG . . . . . . . . . . . . . . . . . . . . . . . . . . . . . . . . . . . . . . . . . . . 56
Recording a Normal Auto ECG . . . . . . . . . . . . . . . . . . . . . . . . . . . . . . . . . . . 57
Recording a Stat Auto ECG . . . . . . . . . . . . . . . . . . . . . . . . . . . . . . . . . . . . . 62
Recording a Rhythm ECG . . . . . . . . . . . . . . . . . . . . . . . . . . . . . . . . . . . . . . . . . . 63
Recalling Saved Patient Data . . . . . . . . . . . . . . . . . . . . . . . . . . . . . . . . . . . . . . . 64
Adjusting the ECG Waveforms . . . . . . . . . . . . . . . . . . . . . . . . . . . . . . . . . . . . . . 68
6 - Performing Administrative Tasks. . . . . . . . . . . . . . . . . . . . . . . . . . . 69
Managing Saved Tests In the Test Directory . . . . . . . . . . . . . . . . . . . . . . . . . . . 70
Managing the Scheduled Patients List . . . . . . . . . . . . . . . . . . . . . . . . . . . . . . . . 74
Managing Data Security . . . . . . . . . . . . . . . . . . . . . . . . . . . . . . . . . . . . . . . . . . . 75
Working With the User List and User Login. . . . . . . . . . . . . . . . . . . . . . . . . 76
Working With the Audit Trail. . . . . . . . . . . . . . . . . . . . . . . . . . . . . . . . . . . . . 78
7 - Maintaining the Electrocardiograph . . . . . . . . . . . . . . . . . . . . . . . . 79
Inspecting the Equipment. . . . . . . . . . . . . . . . . . . . . . . . . . . . . . . . . . . . . . . . . . 80
Cleaning the Equipment . . . . . . . . . . . . . . . . . . . . . . . . . . . . . . . . . . . . . . . . . . . 80
Testing the Equipment . . . . . . . . . . . . . . . . . . . . . . . . . . . . . . . . . . . . . . . . . . . . 81
Recharging a Fully Discharged Battery . . . . . . . . . . . . . . . . . . . . . . . . . . . . . . . . 82
Replacing the Battery . . . . . . . . . . . . . . . . . . . . . . . . . . . . . . . . . . . . . . . . . . . . . 83
Replacing the Battery (DC) Fuse. . . . . . . . . . . . . . . . . . . . . . . . . . . . . . . . . . . . . 85
Replacing the AC Fuses . . . . . . . . . . . . . . . . . . . . . . . . . . . . . . . . . . . . . . . . . . . 86
Storing the Equipment . . . . . . . . . . . . . . . . . . . . . . . . . . . . . . . . . . . . . . . . . . . . 87
Discarding the Equipment . . . . . . . . . . . . . . . . . . . . . . . . . . . . . . . . . . . . . . . . . 87
8 - Troubleshooting . . . . . . . . . . . . . . . . . . . . . . . . . . . . . . . . . . . . . . . . 89
Problem-Solving Suggestions . . . . . . . . . . . . . . . . . . . . . . . . . . . . . . . . . . . . . . . 90
Limited Warranty . . . . . . . . . . . . . . . . . . . . . . . . . . . . . . . . . . . . . . . . . . . . . . . . 93
Service Policy . . . . . . . . . . . . . . . . . . . . . . . . . . . . . . . . . . . . . . . . . . . . . . . . . . . 94
A - Specifications . . . . . . . . . . . . . . . . . . . . . . . . . . . . . . . . . . . . . . . . . . 95
B - EMC Guidance and Manufacturer’s Declarations . . . . . . . . . . . . . 97
Glossary . . . . . . . . . . . . . . . . . . . . . . . . . . . . . . . . . . . . . . . . . . . . . . . . 101
Index . . . . . . . . . . . . . . . . . . . . . . . . . . . . . . . . . . . . . . . . . . . . . . . . . . . 103
Page 5

1
1
Introduction
About This Manual . . . . . . . . . . . . . . . . . . . . . . . . . . . . . . . . . . . . . . . . . . . . . . . 2
Product Overview . . . . . . . . . . . . . . . . . . . . . . . . . . . . . . . . . . . . . . . . . . . . . . . . 2
Intended Use . . . . . . . . . . . . . . . . . . . . . . . . . . . . . . . . . . . . . . . . . . . . . . . . . . . . 2
Indications for Use. . . . . . . . . . . . . . . . . . . . . . . . . . . . . . . . . . . . . . . . . . . . . . . . 3
Standard Features & Benefits. . . . . . . . . . . . . . . . . . . . . . . . . . . . . . . . . . . . . . . 3
Options . . . . . . . . . . . . . . . . . . . . . . . . . . . . . . . . . . . . . . . . . . . . . . . . . . . . . . . . . 5
Accessories . . . . . . . . . . . . . . . . . . . . . . . . . . . . . . . . . . . . . . . . . . . . . . . . . . . . . 6
Controls, Indicators, and Connectors. . . . . . . . . . . . . . . . . . . . . . . . . . . . . . . . . 7
About the Main Menu . . . . . . . . . . . . . . . . . . . . . . . . . . . . . . . . . . . . . . . . . . . . 11
Moving Through the Menus . . . . . . . . . . . . . . . . . . . . . . . . . . . . . . . . . . . . . . . 12
About the Patient Cable and Leads . . . . . . . . . . . . . . . . . . . . . . . . . . . . . . . . . 13
Symbols . . . . . . . . . . . . . . . . . . . . . . . . . . . . . . . . . . . . . . . . . . . . . . . . . . . . . . . 14
Using the Electrocardiograph Safely . . . . . . . . . . . . . . . . . . . . . . . . . . . . . . . . 16
Getting Help . . . . . . . . . . . . . . . . . . . . . . . . . . . . . . . . . . . . . . . . . . . . . . . . . . . . 19
Page 6

2 Chapter 1 Introduction Welch Allyn CP 200 Electrocardiograph
About This Manual
This manual is written for clinical professionals with a working knowledge of medical
procedures and terminology as required for monitoring cardiac patients.
Before using the CP 200 electrocardiograph for clinical applications—or before setting up,
configuring, troubleshooting, or servicing the electrocardiograph—you must read and
understand this manual and all other information accompanying the electrocardiograph
and related options or accessories.
Product Overview
The Welch Allyn CP 200 electrocardiograph can display, print, save, and send ECGs
electronically. It features a full alphanumeric keyboard, a color display to preview ECGs
and edit settings, storage for up to 50 ECG and 50 spirometry records, full-size userprogrammable reports, and the ability to operate on either battery or AC power.
For centralized ECG data storage, the CP 200 electrocardiograph can connect to a Welch
Allyn CardioPerfect™ workstation, which in turn can connect with other electronic patientinformation systems, such as billing and medical records.
For details, see the following sections:
• “Standard Features & Benefits” on page 3
• “Options” on page 5
• “Specifications” on page 95
Intended Use
The Welch Allyn electrocardiography and spirometry products (subject devices) are
intended for use by trained operators in health facilities. The subject devices provide the
following diagnostic functions:
• Acquiring, viewing, storing, and printing ECG waveforms using ECG front end
modules (patient cables) and associated accessories that provide signal acquisition for
up to twelve (12) leads of patient ECG waveforms through surface electrodes adhered
to the body.
• Using optional algorithms to generate measurements, data presentations, graphical
presentations and interpretative statements on an advisory basis. These are
presented for review and interpretation by the clinician based upon knowledge of the
patient, the result of physical examination, the ECG tracings and other clinical
findings.
• Using the optional spirometry module and associated accessories to acquire, view,
store and print measures and waveforms of pulmonary function including, but not
limited to, maximal volume and flow of air that can be moved in and out of the
patient's lungs. These measures are used in the diagnosis and monitoring of lung
diseases and interventions for the treatment of certain lung diseases. The spirometer
should only be used with patients able to understand the instructions for performing
the test.
Page 7

Directions for Use Chapter 1 Introduction 3
Indications for Use
The electrocardiograph is one of the tools that clinicians use to evaluate, diagnose, and
monitor patient cardiac function.
The 12-lead ECG interpretive algorithm provides a computer-generated analysis of
potential patient cardiac abnormalities which must be confirmed by a physician with other
relevant clinical information.
The optional spirometry module is indicated for use in clinical situations to assess a
patient's pulmonary health status and evaluate symptoms, signs, or abnormal laboratory
test results.
Standard Features & Benefits
Full alphanumeric keypad
Enter or search for patient information quickly and easily.
Color LCD display
View and adjust the ECG waveforms prior to printing, to save time and paper.
With spirometry option, also view patients’ spirometry efforts and results.
Storage for up to 50 ECG and 50 spirometry records
Review, edit, print, or save recent records.
Unlimited storage on removable media
Use SD™ memory cards or removable USB storage devices to save as many ECG or
spirometry records as you like. (Media are not included.) If both an SD memory card and a
USB storage device are connected, files are sent to the SD card. For media specifications,
see “Standard connectivity” on page 96.
Battery operation
Use the electrocardiograph almost anywhere. On battery power, you can print up to 100
ECGs continuously before needing to recharge.
User-definable ECG report formats
Customize one or two formats for efficient reporting.
Removable leads for ECG patient cable
Replace leads individually if needed.
Compatibility with CardioPerfect workstation software
Store and manage data electronically by transferring records to a Welch Allyn
CardioPerfect workstation:
• via an SD memory card or removable USB storage device (media not included)
• via a hardwired connection (cable not included)
• via a wireless connection
Compatibility with external printer
You can connect an external printer. For details, see “Connecting an External USB Printer
(Optional)” on page 26.
Page 8

4 Chapter 1 Introduction Welch Allyn CP 200 Electrocardiograph
Pacemaker detection
If the software detects the possible presence of a pacemaker, it asks you whether the
patient has a pacemaker. If you say no, interpretation (if purchased) is included in the
report. If you say yes, interpretation is not included in the report, and a message
indicating that a pacemaker was detected is displayed on the report.
Support for augmented pediatric lead set
The augmented pediatric lead set, an alternate placement of the precordial leads on
pediatric patients, is easier to use on the small chests of infants and young children.
It provides optimal vectors for early development of the heart for the change of right-toleft ventricular dominance. For electrode placement locations, see Figure 33 on page 54.
Page 9
Directions for Use Chapter 1 Introduction 5
Options
These options are available both for initial purchases and for upgrades.
• Spirometry
With a disposable, single-use flow transducer, the optional spirometer performs FVC
and SVC tests.
• Automatic ECG interpretation
The optional MEANS interpretation algorithm, developed by the University of
Rotterdam in the Netherlands, provides automatic analysis of ECG tests. For more
information, see the MEANS Physicians' Manual or the PEDMEANS Physicians’
Manual on the CD that came with your electrocardiograph. The MEANS algorithm is
used for adult patients 18 years and older. The PEDMEANS algorithm is used for
pediatric patients from 1 day through 17 years old.
•Carts
Two specially designed carts are available for convenient transport and use of the
electrocardiograph, as shown here with the optional cable arm and shelf.
Figure 1. Office Cart Figure 2. Hospital Cart
Cable arm and
shelf (optional)
Free-motion
plastic wheels
• Bar code scanner
A bar code scanner is available for easy entry of patient ID numbers. This option
includes a stand for mounting the bar code scanner to the cart.
• Wireless connectivity kit
Cable arm and
shelf (optional)
Durable, highquality, rubber
wheels with locks
This option provides a radio and PC software to enable wireless communication
between your information network and the electrocardiograph. You can use the
wireless link to send tests to the Welch Allyn CardioPerfect workstation, retrieve
patient demographic information, or process orders from your EMR system via a
Welch Allyn HL7 interface.
Page 10

6 Chapter 1 Introduction Welch Allyn CP 200 Electrocardiograph
Accessories
To order accessories, call Welch Allyn. For phone numbers, see page ii.
Item Customer Order Number Quantity
Resting tab electrodes
Resting tab electrode adaptors
Thermal chart paper (1 case = 5 pads, 200 sheets each)
Welch cup
Limb lead clamps, IEC
Limb lead clamps, AHA
Patient cable (Figure 12 on page 13)
•AHA
•IEC
• IEC, vacuum adapter
• Vacuum system
Lead wires (10 wires per set)
• AHA banana
• IEC banana
• AHA pinch
• IEC pinch
Battery (Figure 51 on page 83)
Dust cover
Carts
• Utility cart
•Office cart (Figure 1 on page 5)
•Hospital cart (Figure 2 on page 5)
• Cable arm & shelf option (page 5)
Connectivity kit to the CardioPerfect workstation
Wireless USB radio kit
Bar code scanner kit
45008-0000
58581-0000
94018-0000
RE-ELEC-CUP
RE-ELEC-CLP
401432
400293
400294
100920
VAC-DT100-CP
401129
401122
401123
401124
100660
701586
08265-0000
401393
401394
401161
100638
102103
102014
1000
10
1 case
1
4
4
1
1
1
1 set
1 set
1 set
1 set
1
1
1
1
1
1
1
1
1
Interpretation upgrade option 100623 1
Spirometry option 100400 1
Product information
• Electrode placement wall poster 71300-0000 1
• CP 200 12-Lead Resting Electrocardiograph Directions
for Use
• CP 200 product information multi-language CD 401151 1
708793 1
Page 11
Directions for Use Chapter 1 Introduction 7
Controls, Indicators, and Connectors
This section describes the controls, indicators, and connectors that are part of the
electrocardiograph.
Figure 3. Top
Softkeys and functions keys
See Figure 8 on page 10.
)
1!2
@3#
4$5%6+7-8
(
*
9
0
Keyboard
See Figure 1 on page 9.
Figure 4. Back
AC power inlet
Equipotential stud
AC fuses
Page 12
8 Chapter 1 Introduction Welch Allyn CP 200 Electrocardiograph
Figure 5. Right Side
Com port B (USB) SD memory card
Figure 6. Front
(for patient cable)
slot
Com port A
Spirometry port
Reset
button
Figure 7. Left Side
Paper tray latch
Page 13
Directions for Use Chapter 1 Introduction 9
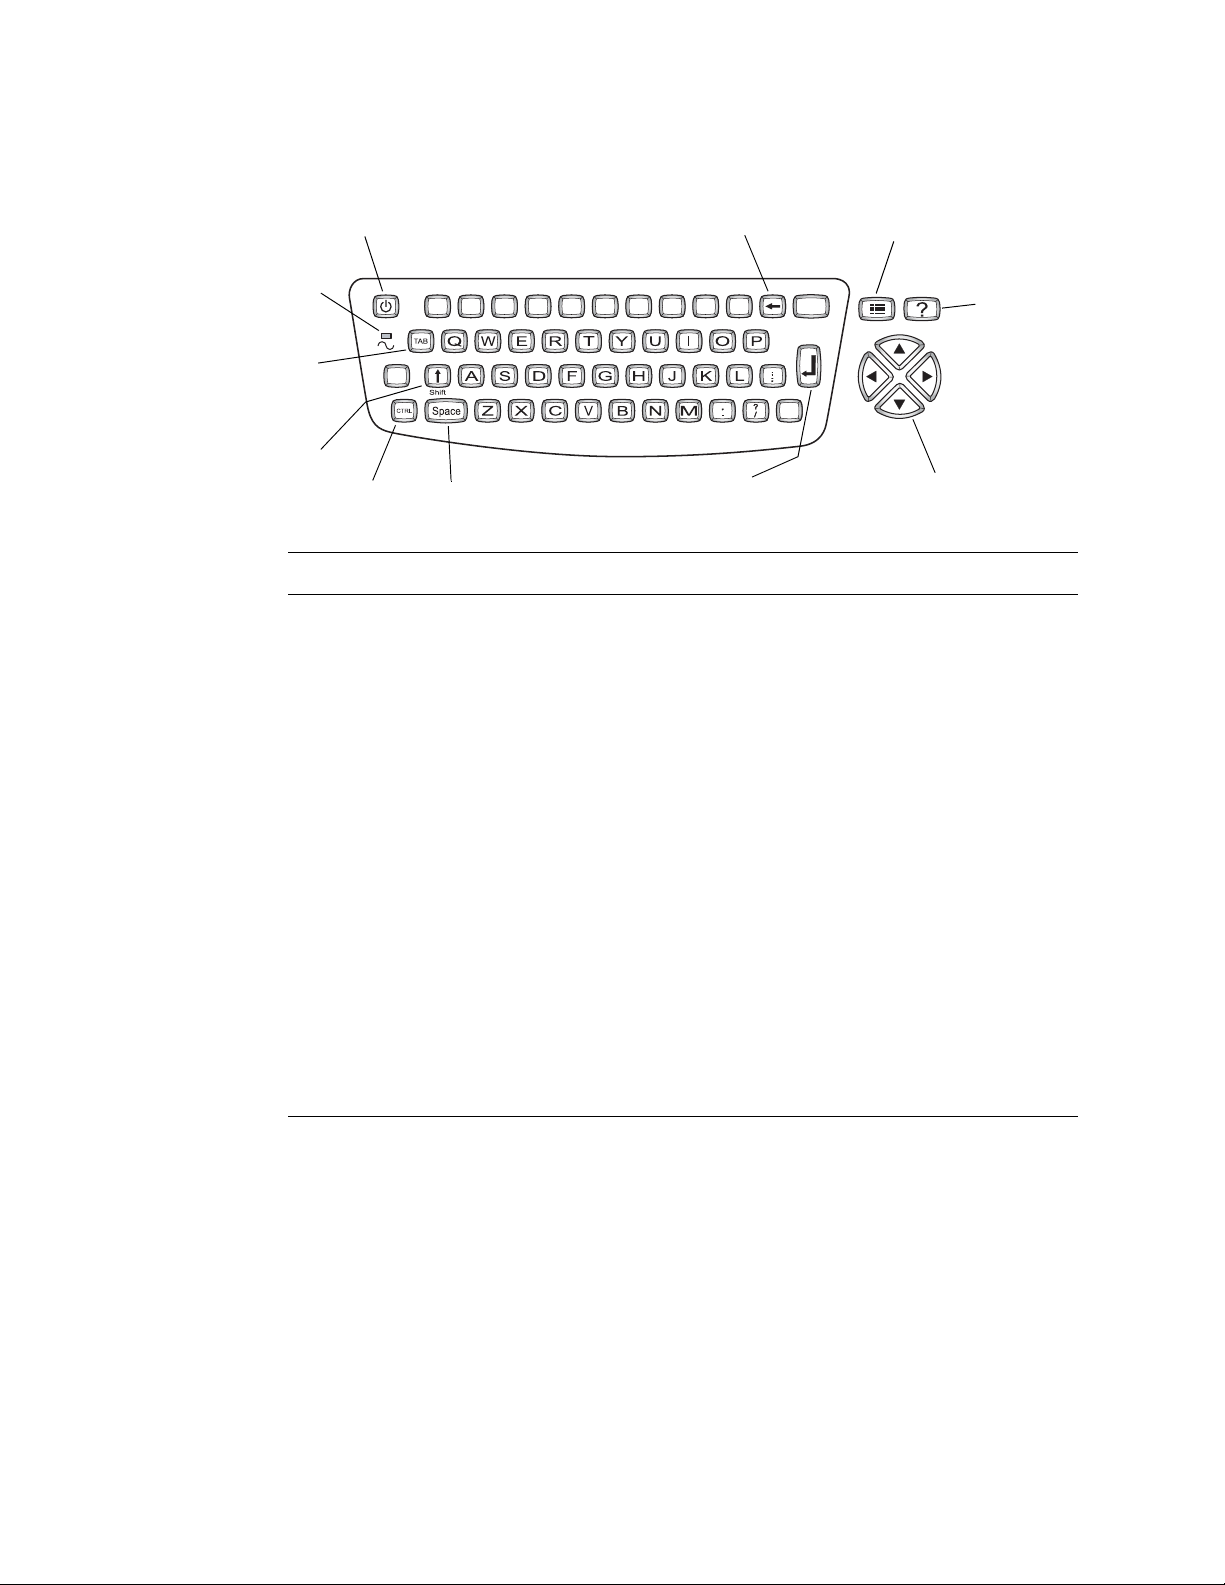
Table 1. Keyboard
A
K
1!2
@3#
4$5%6+7-8
B
)
(
*
9
0
J
I
G FH
Key Function
A. On/Off See “Powering the Electrocardiograph” on page 24.
B. Backspace Deletes the character to the left of the cursor.
C. Menu See “About the Main Menu” on page 11.
D. Help See “Getting Help” on page 19.
E. Navigation arrows See “Moving Through the Menus” on page 12.
C
D
E
F. E nt e r S ee “Moving Through the Menus” on page 12.
G. Space Enters a space.
H. Control (Applicable only for keyboards with characters above certain keys.) To enter a
character above a key, hold the Ctrl key while pressing that key. To capitalize the
character, hold Shift + Ctrl while pressing the key.
I. Shift Capitalizes letters. Also, you can enter a symbol (%, #, etc.) by holding the Shift key
while pressing a number key.
J. Tab Moves through the data-entry fields.
K. Green LED Lights up when the electrocardiograph is connected to AC power.
Page 14
10 Chapter 1 Introduction Welch Allyn CP 200 Electrocardiograph
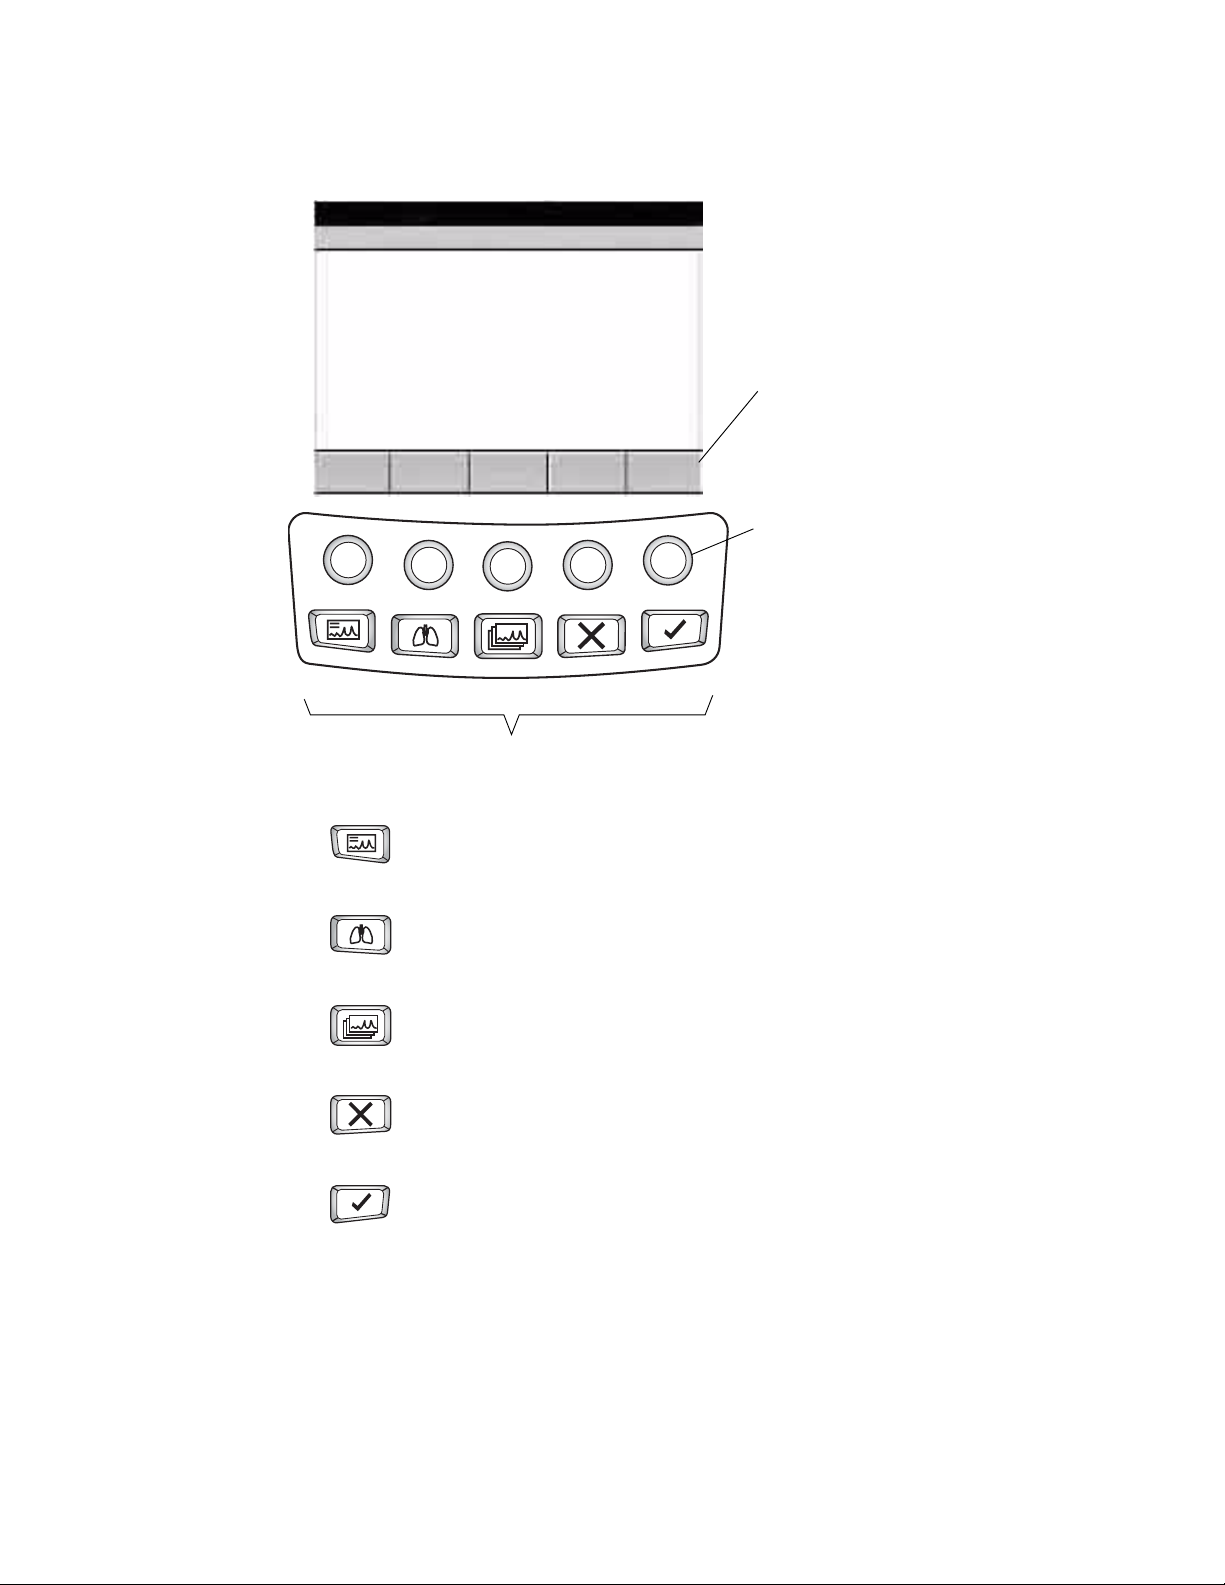
Figure 8. Softkeys and Function Keys
Softkeys
These softkeys display text or images that
correspond to the unlabeled buttons below
them. The content changes from screen to
screen.
Softkey buttons
These buttons activate the functions displayed
above them. If a softkey is blank, pressing its
Auto ECG Spirometry Rhythm ECG Stop/Cancel OK
button has no effect.
Function Keys
Auto ECG
Begins Auto ECGs, normal and stat.
See “Recording an Auto ECG” on page 56.
Spirometry
Begins spirometry tests.
See spirometry manual.
Rhythm ECG
Begins Rhythm ECGs.
See “Recording a Rhythm ECG” on page 63.
Stop/Cancel
Stops any current activity.
See “Moving Through the Menus” on page 12.
OK
Accepts data that you have entered, or chooses a highlighted item.
See “Moving Through the Menus” on page 12.
Page 15
Directions for Use Chapter 1 Introduction 11
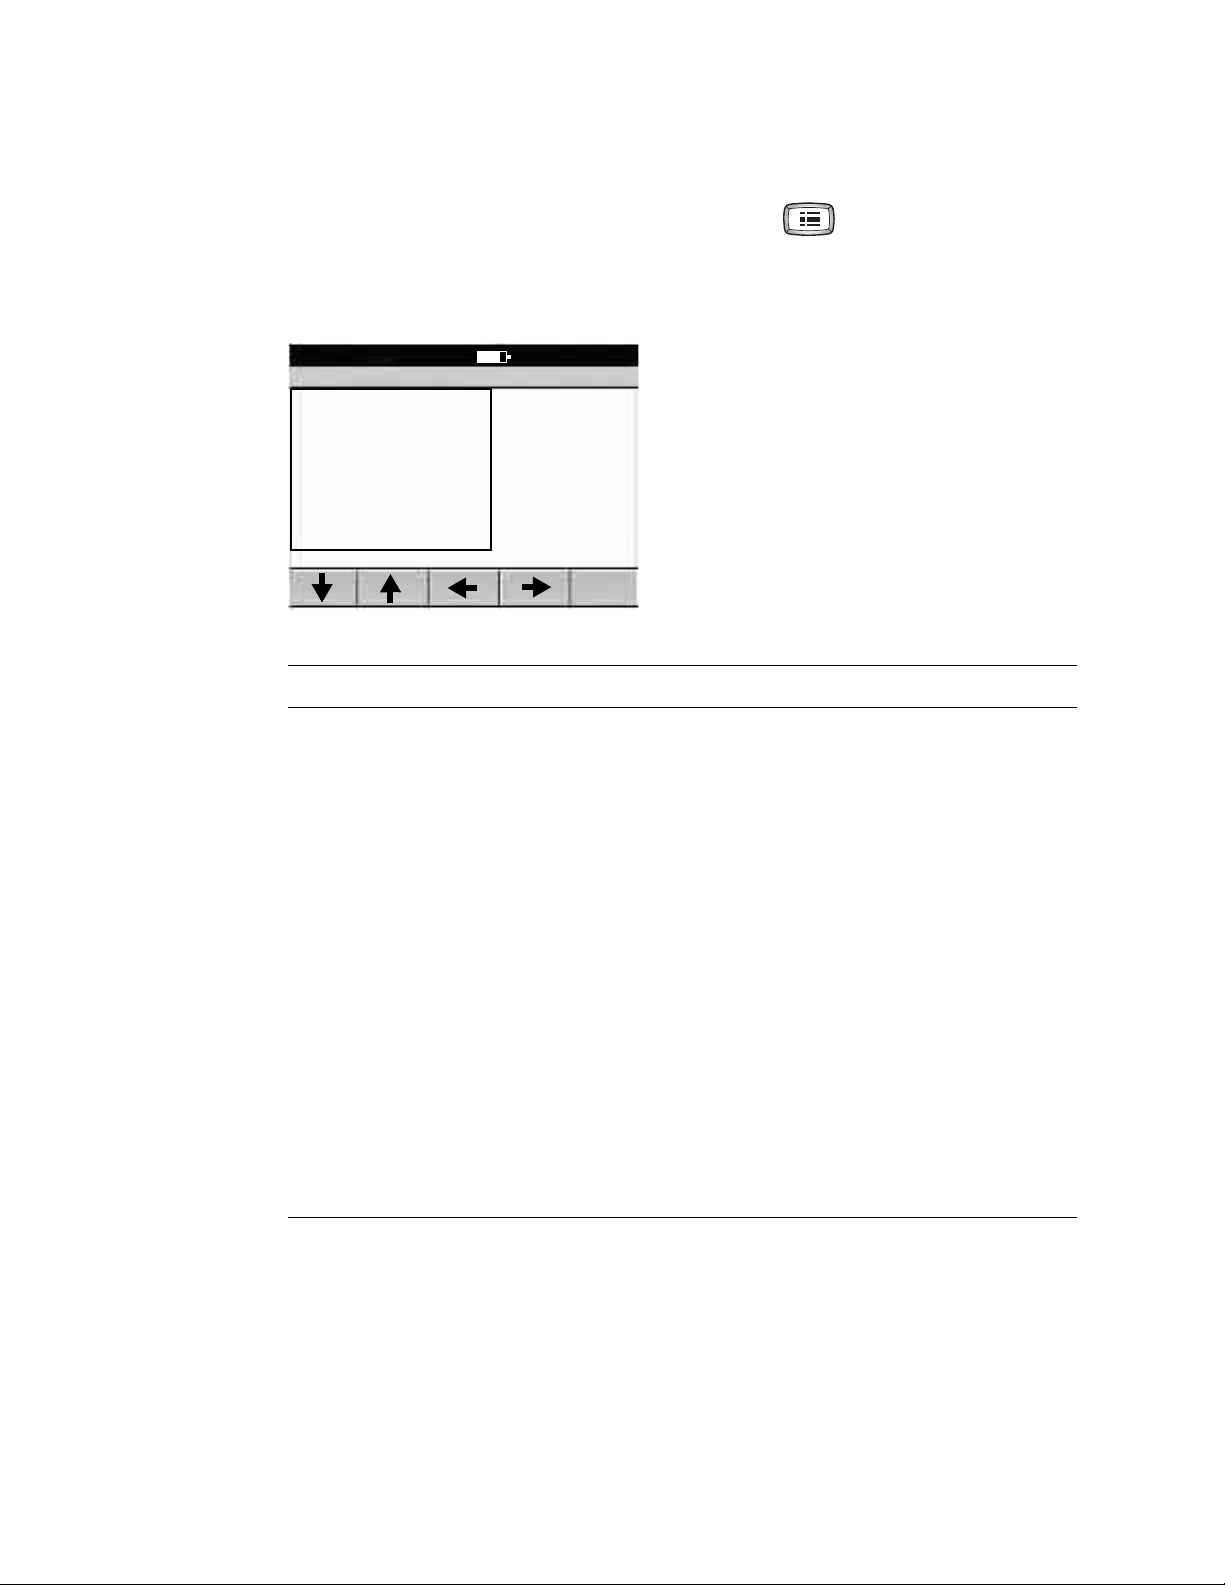
About the Main Menu
The main menu appears when you press the Menu key . (If you are in spirometry
mode when you press this key, the Spirometry Settings menu appears.)
Figure 9. Main Menu
Main Menu
1 Test Directory
2 Scheduled Patients
3 ECG Settings
4 Spirometry Settings
5 System Settings
6 Edit Medication List
7 Edit History List
0 Exit
9:17AM Oct 16 08
Submenu Purpose Procedure
Test Directory Edit, confirm, print, or send saved tests. See “Managing Saved Tests In the Test
Directory” on page 70.
Scheduled Patients View the scheduled patients list, add
patients to the list, or delete patients from
See “Managing the Scheduled Patients List”
on page 74.
the list.
ECG Settings Review or change ECG settings: Auto
Report format, Rhythm Report format, and
See “Reviewing the ECG Settings” on
page 37.
so on.
Spirometry Settings Review or change spirometry settings:
display settings, print settings, and so on.
System Settings Review or change system settings: device
configuration, device info, user setup, and
so on.
Edit Medication List Edit the list of medication choices available
to choose during patient data entry.
Edit History List Edit the list of clinical conditions available to
choose during patient data entry.
See spirometry manual.
See “Reviewing the System Settings” on
page 27.
See “Reviewing the Medication List” on
page 33.
See “Reviewing the History List” on page 34.
Page 16
12 Chapter 1 Introduction Welch Allyn CP 200 Electrocardiograph
Moving Through the Menus
Figure 10. Standard Menu Figure 11. Parent Menu With Submenu
Edit Auto Report 1
1 Format
2 Interp Settings
3 Patient Data
0 Previous Menu
9:17AM Oct 16 08
Format
1 Lead Arrangement
2 Rhythm Lead 1
3 Rhythm Lead 2
4 Rhythm Lead 3
5 Extended Measurements
6 Average Cycles
0 Previous Menu
Desired Actions Keys to Press
To move up or down a list or (keyboard or softkey arrows)
To open a standard menu (Figure 10)
or or
or item’s number or letter
To move from parent menu to submenu on same
screen (Figure 11)
To perform an action
or
To accept data
To check or uncheck a checkbox
9:17AM Oct 16 08
3x4
3x4 +1R
3x4 +3R
6x2
12x1
6x2 50 mm/s
6x2 Ext.
2x6+1R
To return to parent menu from submenu on same
screen (Figure 11) or
or
(To select the highlighted submenu
item.)
(To make no change.)
To move back through the menus or zero key
To move through data-entry fields or
To return to the ECG Preview screen from a standard
menu (Figure 10)
Note
Keyboard and softkey arrows work the same way.
Page 17

Directions for Use Chapter 1 Introduction 13
About the Patient Cable and Leads
The patient cable processes the patient’s ECG data and transmits it to the
electrocardiograph. To make handling convenient, the ten leads are arranged to point
toward the appropriate parts of the body. The cable rake, which slides easily, prevents the
chest leads from tangling.
Figure 12. Patient Cable and Leads
Chest leads
Cable
rake
Right arm lead
Left arm lead
Left leg lead
Electrocardiograph
connector
Right leg lead
Page 18
14 Chapter 1 Introduction Welch Allyn CP 200 Electrocardiograph
Symbols
The symbols illustrated on the following pages may appear on the electrocardiograph, on
the packaging, on the shipping container, or in this manual.
Documentation Symbols
WARNING Indicates conditions or practices that could lead to illness, injury, or
death.
Caution In this manual, indicates conditions or practices that could damage the
equipment or other property.
Caution On the product, means “Consult accompanying documentation.”
Shipping, Storing, and Environment Symbols
-20°C
This end up Keep dry
Fragile Relative humidity limit
+49°C
Temperature limits Altitude limits
Certification Symbols
Meets essential requirements of European
Medical Device Directive 93/42/EEC
European Regulatory Manager Australian registered importer
N344
Complies with applicable U.S. and Canadian
medical safety standards
Page 19

Directions for Use Chapter 1 Introduction 15
For details on the keys, see Figure 1 on page 9.
Operation Symbols
On/standby (off) Help
Navigation arrows Backspace
Enter Shift
Auto ECG Menu
Rhythm ECG Stop/Cancel
Spirometry OK
Spirometry port Com port B (USB)
SD memory card slot Com port A
(for patient cable)
Alternating current Battery charge level
Battery is charging. Battery is charged.
T2.0A/250V
Dangerous voltage Direct current
AC fuse replacement information Ground equipotential
Do not reuse.
Do not dispose of this product as unsorted
Sealed lead-acid battery
Recycle.
municipal waste. Prepare this product for
reuse or separate collection as specified by
Directive 2002/96/EC of the European
Parliament and the Council of the European
Union on Waste Electronic and Electrical
Equipment (WEEE). If this product is
contaminated, this directive does not apply.
For more specific disposal information, see
www.welchallyn.com/weee, or contact
Welch Allyn Customer Service at +44 207
Defibrillation-proof Type CF applied parts.
(While the electrocardiograph is safety-rated
“CF” for direct cardiac contact, it is not
intended to be connected directly to the
patient’s heart. Only surface contact with the
patient’s skin is intended.)
Type BF applied part
365 6780.
Page 20

16 Chapter 1 Introduction Welch Allyn CP 200 Electrocardiograph
Using the Electrocardiograph Safely
Before using or servicing the electrocardiograph, you must read and understand the
following safety-related information.
General Warnings
The following warning statements apply to electrocardiograph use in general. Warning
statements that apply specifically to particular procedures, such as connecting the patient
cable or performing an ECG test, appear in the corresponding sections of the manual.
Warning statements indicate conditions or practices that could lead to illness, injury, or
death.
Warnings Related to the Environment
WARNING To ensure patient and device safety, leave 5 feet (1.5 meters) of
open area around the patient.
WARNING To avoid a possible explosion, do not use the electrocardiograph in
the presence of flammable anesthetics: mixtures containing air, oxygen, or
nitrous oxide.
WARNING When transporting the electrocardiograph on a cart, tuck the patient
cable away from the wheels so that it does not present a hazard.
Warnings Related to Accessories and Other Equipment
WARNING For operator and patient safety, peripheral equipment and
accessories that can come in direct patient contact must be in compliance with
all appropriate safety, EMC, and regulatory requirements. See “EMC Guidance
and Manufacturer’s Declarations” on page 97.
WARNING All signal input and output (I/O) connectors are intended for
connection of only devices complying with IEC 60601-1, or other IEC standards
(for example, IEC 60950), as appropriate to the device. Connecting additional
devices to the electrocardiograph might increase chassis or patient leakage
currents. To maintain operator and patient safety, consider the requirements of
IEC 60601-1-1. Measure the leakage currents to confirm that no electric shock
hazard exists. In the case of a USB printer, the printer (non-medical electrical
equipment) shall be situated outside the patient environment (reference IEC
60601-1-1). The printer used should be approved to the appropriate safety
standard for non-medical electrical equipment (IEC 60950, or its national
variants), and use of an isolation transformer is recommended. If there is a
requirement for the printer to be situated within the patient environment it is the
responsibility of the user to ensure that the system provides a level of safety in
compliance with IEC 60601-1 and 60601-1-1.
WARNING The electrocardiograph has not been designed for use with highfrequency (HF) surgical equipment and does not protect against hazards to the
patient.
Page 21

Directions for Use Chapter 1 Introduction 17
Warnings Related to Using the Electrocardiograph
WARNING This device captures and presents data reflecting a patient’s
physiological condition. When reviewed by a trained physician or clinician, this
data can be useful in determining a diagnosis. However, the data should not be
used as a sole means for determining a patient’s diagnosis.
WARNING To avoid serious injury or death, take these precautions during
patient defibrillation:
• Avoid contact with the electrocardiograph, patient cable, and patient.
• Verify that the patient leads are properly connected. See “Connecting the
Patient Cable” on page 22.
• Place defibrillator paddles properly in relation to electrodes.
• After defibrillation, pull each patient lead out of the patient cable and inspect
the tips for charring (black carbon marks). If there is any charring, the patient
cable and individual leads must be replaced. If there is no charring, fully
reinsert the leads into the patient cable. (Charring can occur only if a lead is
not fully inserted into the patient cable before defibrillation.)
WARNING To prevent the spread of infection, take these precautions:
• Dispose of single-use components (for example, electrodes) after using
them once.
• Regularly clean and disinfect all components that come in contact with
patients. See “Cleaning the Equipment” on page 80.
• Avoid ECG testing for patients with open, infectious sores.
WARNING Avoid positioning any leads or cables so that they could easily trip
someone or become wrapped around a patient’s neck.
WARNING Satisfactory maintenance procedures must be implemented, or
equipment failure and health hazards may result.
WARNING Only qualified service personnel should attempt to repair the
electrocardiograph. In case of a malfunction, call Technical Support and precisely
describe the problem. For phone numbers, see page ii.
Page 22

18 Chapter 1 Introduction Welch Allyn CP 200 Electrocardiograph
General Cautions
The following caution statements apply to electrocardiograph use in general. Caution
statements that apply specifically to particular procedures, such as connecting the patient
cable or performing an ECG test, appear in the corresponding sections of the manual.
Caution statements indicate conditions or practices that could damage the equipment or
other property.
Caution When removing the electrocardiograph from storage, allow it to
thermally stabilize to surrounding environmental conditions before using it.
Caution To prevent possible damage to the keypad, do not use sharp or hard
objects to press keys. Only use fingertips.
Caution Do not expose the patient cable to strong ultra-violet radiation.
Caution Do not pull or stretch the patient cable. Doing so could result in
mechanical or electrical failures. Form the patient cable into a loose loop before
storing.
Caution Avoid positioning the patient cable where it might get pinched or
stepped on. If the cable’s impedance is altered, measurements might no longer
be accurate, and repair might be necessary.
Caution Using the equipotential terminal for anything but grounding purposes
may contribute to damage of the device.
Caution Use only parts and accessories supplied with the device and available
through Welch Allyn. The use of accessories other than those specified may
result in degraded performance of this device.
Caution Portable and mobile RF communications equipment can affect the
performance of the electrocardiograph.
Caution The electrocardiograph meets the Class A requirements of IEC 606011-2:2000 regarding incidental emission of radio frequency interference. As such it
is suitable for use in commercial grade electrical environments. If the
electrocardiograph is used in residential grade electrical environments and you
experience incidental interference with other equipment that uses radio
frequency signals to operate, minimize the interference as described under
“EMC Guidance and Manufacturer’s Declarations” on page 97.
Caution Other medical equipment—including but not limited to defibrillators,
ultrasound machines, pacemakers, and other stimulators—may be used
simultaneously with the electrocardiograph. However, such devices may disturb
the electrocardiograph signal.
Caution The power cord must be disconnected from AC power before cleaning,
maintaining, or servicing.
Page 23

Directions for Use Chapter 1 Introduction 19
Getting Help
You can get help with the electrocardiograph in a variety of ways beyond this manual.
• Press the Help key from the ECG Preview screen or Lead Status screen for a
list of topics available to print.
• Review the other information that came with the electrocardiograph. For list, see
“Product information” on page 6.
• Contact Welch Allyn. For phone numbers, see page ii.
Page 24

20 Chapter 1 Introduction Welch Allyn CP 200 Electrocardiograph
Page 25

21
2
Setting Up the Electrocardiograph
Inspecting the Electrocardiograph . . . . . . . . . . . . . . . . . . . . . . . . . . . . . . . . . . 22
Connecting the Patient Cable . . . . . . . . . . . . . . . . . . . . . . . . . . . . . . . . . . . . . . 22
Loading the Thermal Chart Paper. . . . . . . . . . . . . . . . . . . . . . . . . . . . . . . . . . . 23
Powering the Electrocardiograph. . . . . . . . . . . . . . . . . . . . . . . . . . . . . . . . . . . 24
Verifying Proper Operation . . . . . . . . . . . . . . . . . . . . . . . . . . . . . . . . . . . . . . . . 25
Connecting an External USB Printer (Optional) . . . . . . . . . . . . . . . . . . . . . . . 26
Page 26
22 Chapter 2 Setting Up the Electrocardiograph Welch Allyn CP 200 Electrocardiograph
Inspecting the Electrocardiograph
1. Look for obvious signs of shipping damage. If you find any damage, contact Technical
Support. For phone numbers, see page ii.
2. Verify that you have received all appropriate options and accessories. See “Options”
on page 5 and “Accessories” on page 6.
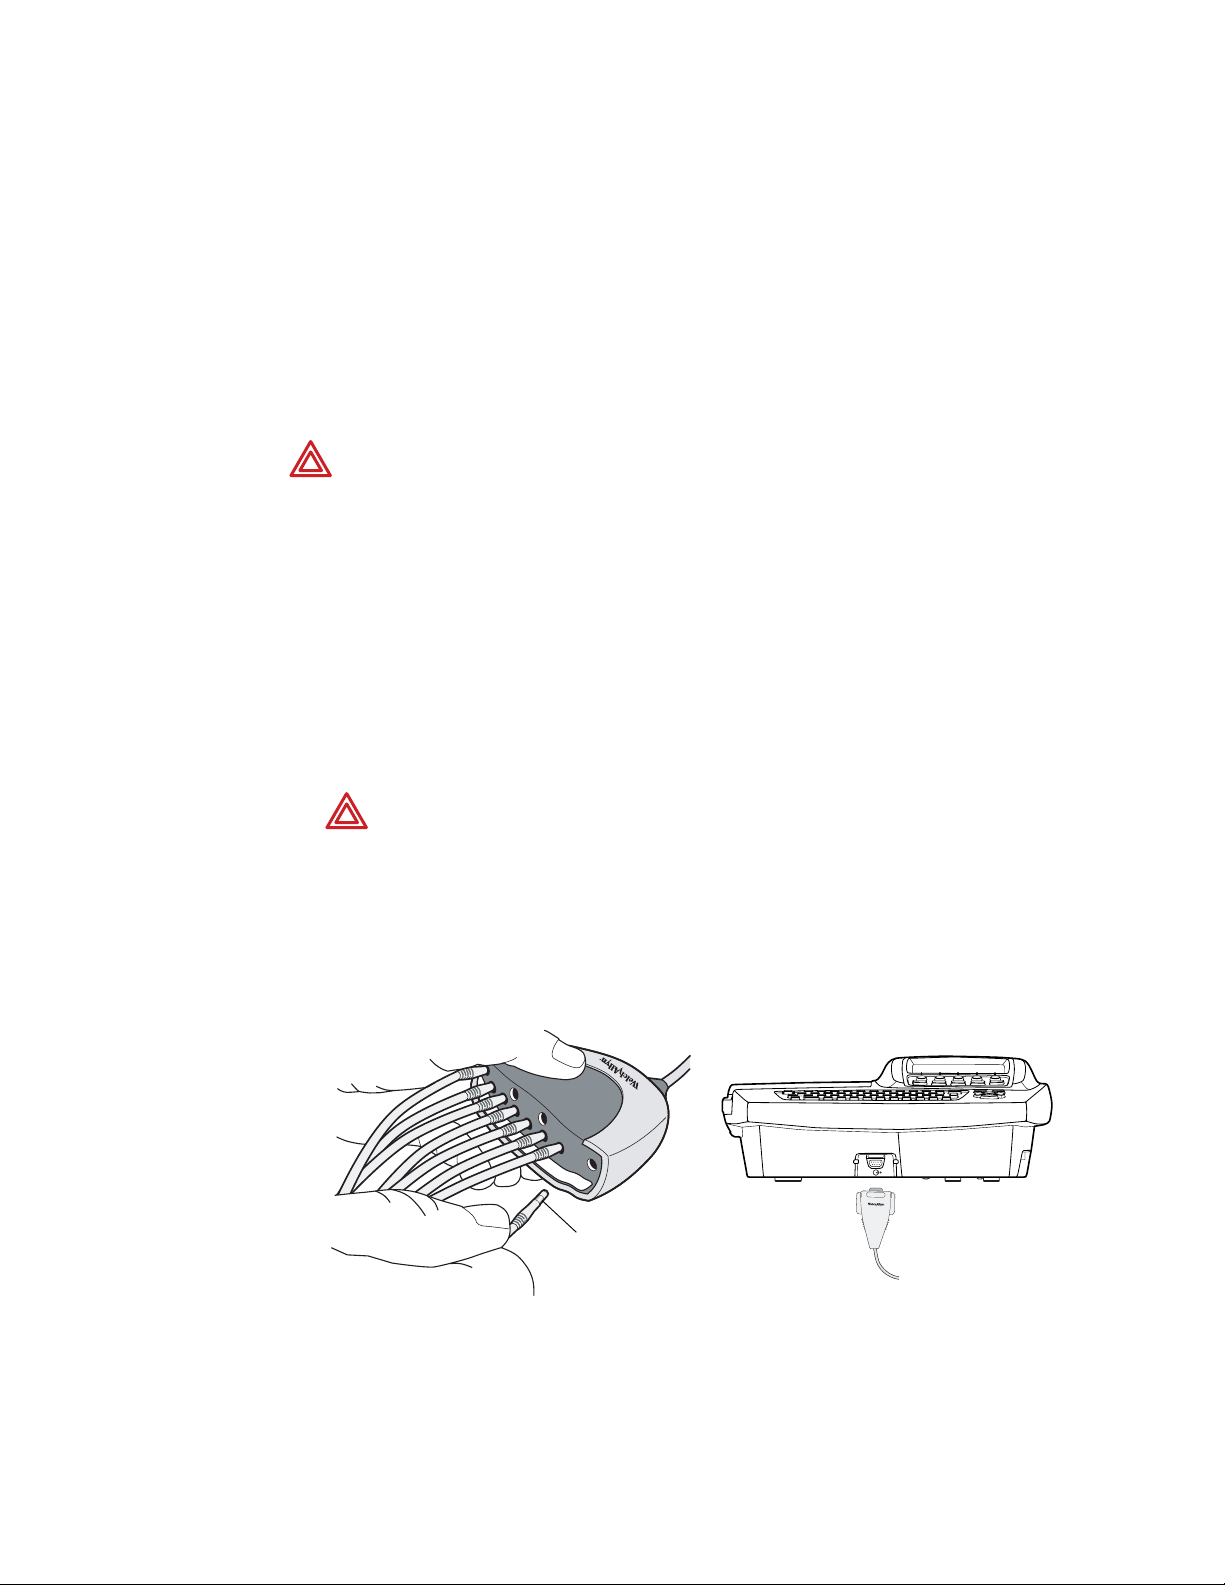
Connecting the Patient Cable
WARNING Conductive parts of the patient cable, electrodes and associated
connections of defibrillation-proof Type CF applied parts, including the neutral
conductor of the patient cable and electrode, should not come into contact with
other conductive parts, including earth ground.
WARNING To avoid injury to the patient or damage to the device, never plug
patient leads into any other device or wall outlet.
1. Insert all leads into their proper positions, as labeled on the connectors.
Insert connectors fully so that no part of the metal ring remains exposed.
For example, see Figure 13. (To see the whole patient cable with all leads inserted,
see Figure 12 on page 13.)
WARNING Failure to insert all connectors fully may result in a loss of energy
being delivered to the patient during defibrillation and damage to the patient
cable itself. For other warnings related to defibrillation, see page 17.
2. Plug the patient cable into the port on the front of the electrocardiograph.
See Figure 14.
Figure 13. Inserting the Leads Figure 14. Plugging in the Connector
Metal ring
Page 27
Directions for Use Chapter 2 Setting Up the Electrocardiograph 23
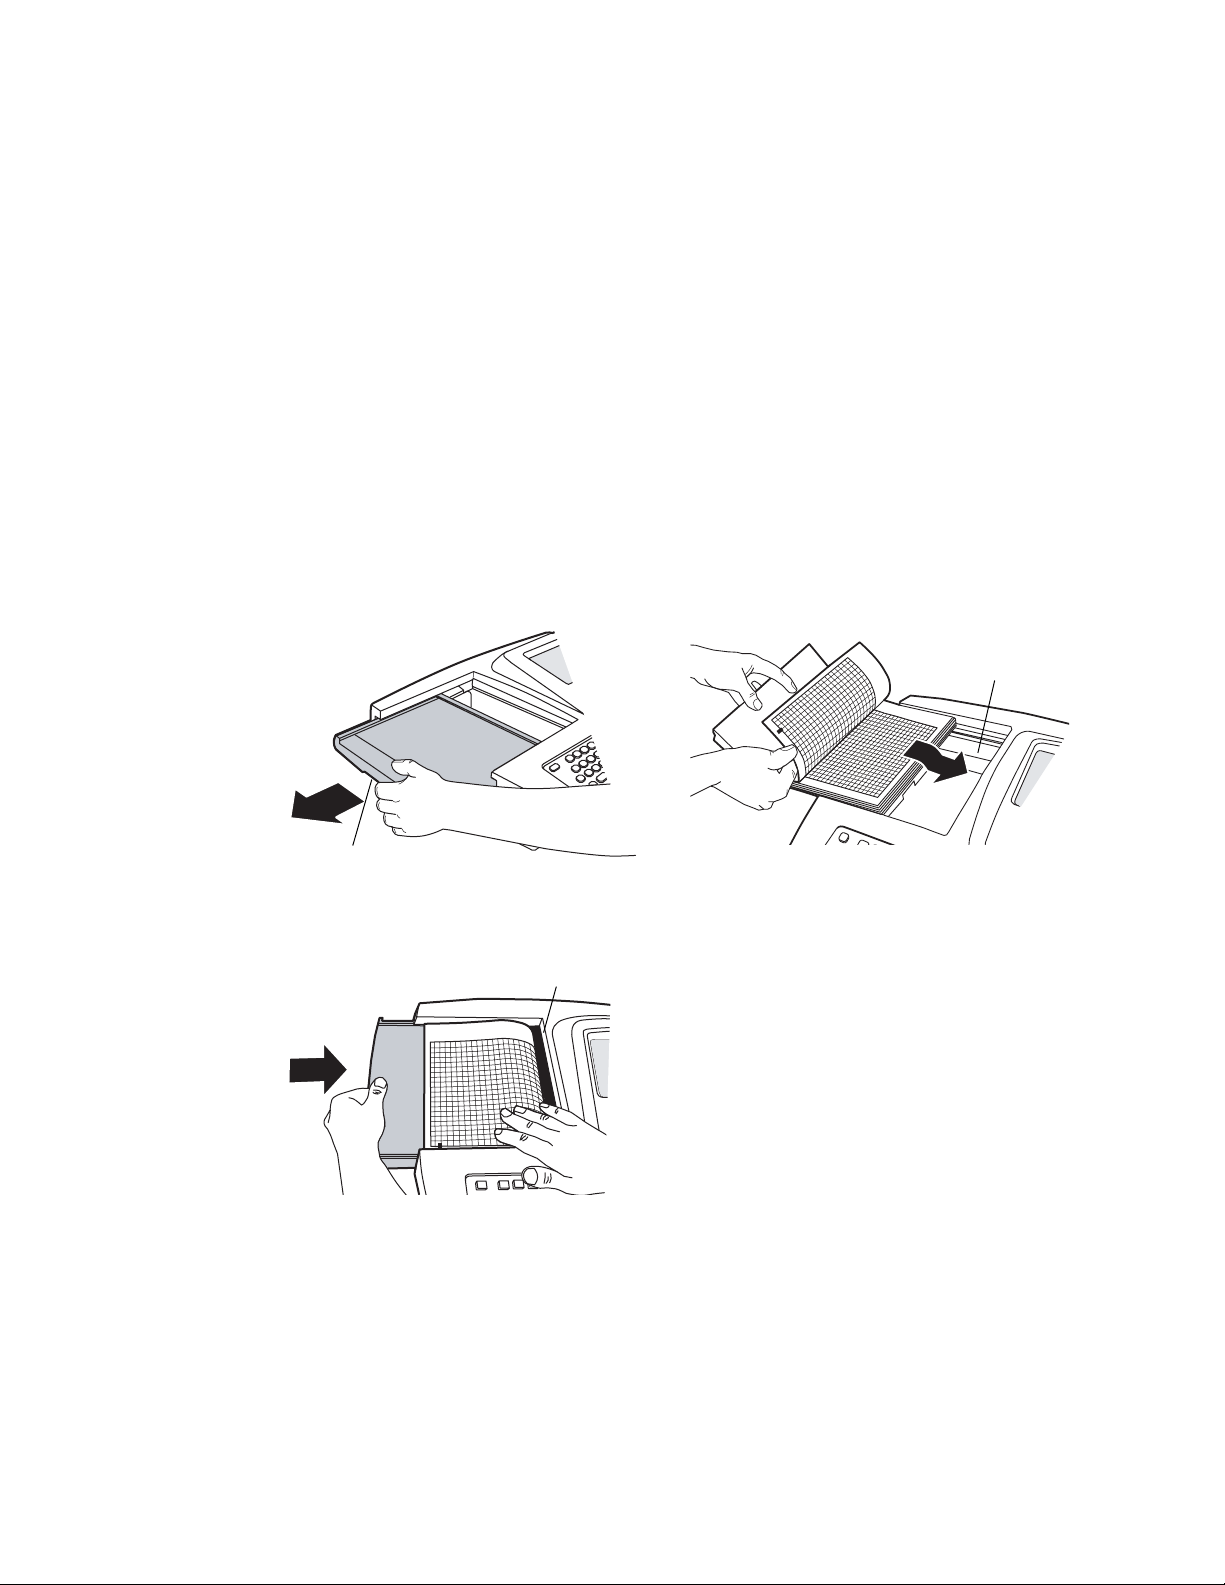
Loading the Thermal Chart Paper
1. Squeeze the latch. Pull the paper door to the left. See Figure 15.
If any paper remains in the tray, remove it.
2. Remove the outer packaging, including the cardboard bottom, from a new pack of
paper. Pull the top sheet back so that the paper’s grid side faces up and the Welch
Allyn name is on the bottom of the paper.
3. Slide the paper into the tray. See Figure 16.
If humidity is high, remove up to 10 sheets so that the paper fits properly.
4. Lay the top sheet over the paper door. Push the door to the right until it clicks.
See Figure 17.
Figure 15. Opening the Paper Door Figure 16. Loading the Paper
Latch
Figure 17. Closing the Paper Door
Tea r bar
Paper tray
Tips for handling thermal paper:
• Store in a cool, dry, dark place.
• Avoid exposure to bright light or UV sources.
• Avoid exposure to solvents, adhesives, or cleaning
fluids.
• Do not store with vinyls, plastics, or shrink wraps.
Page 28
24 Chapter 2 Setting Up the Electrocardiograph Welch Allyn CP 200 Electrocardiograph
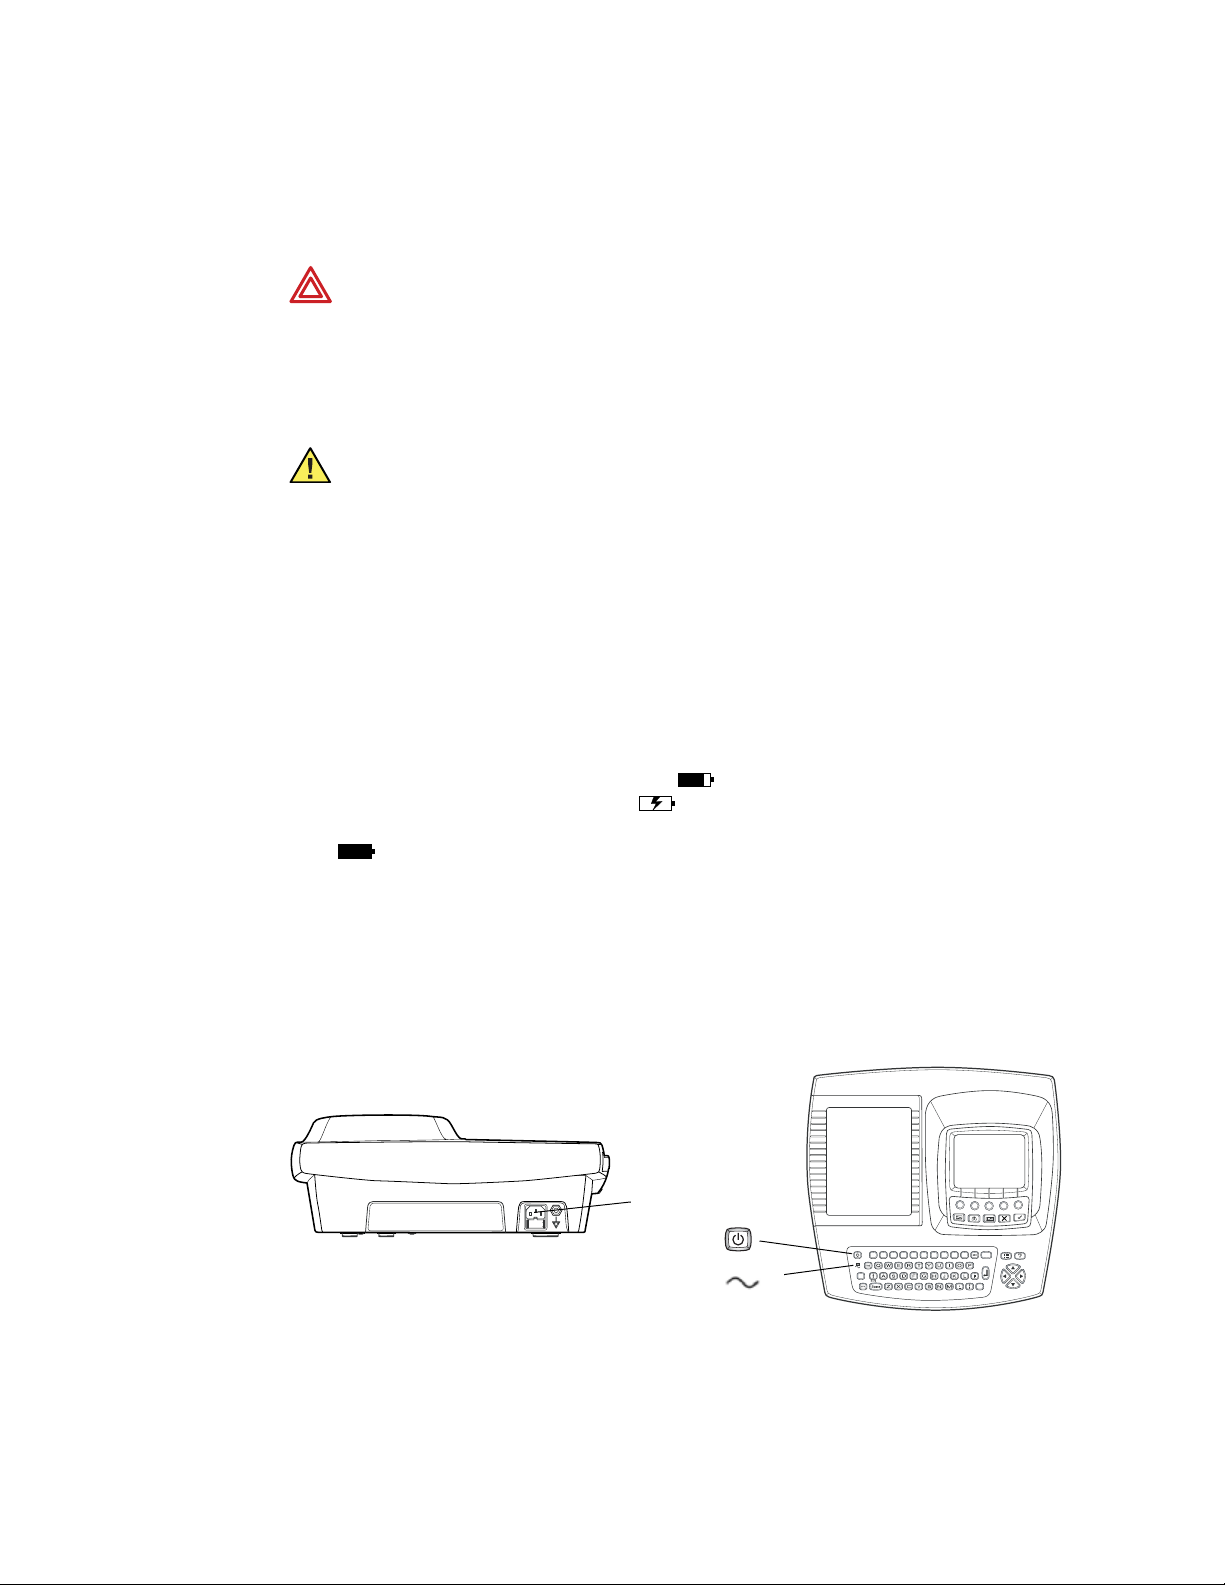
Powering the Electrocardiograph
The electrocardiograph can run on AC or battery power.
WARNING To ensure that electrical safety is maintained when using AC power,
the device must be plugged into a hospital-grade outlet.
WARNING Where the integrity of external protective earth conductor
arrangement is in doubt, use battery power.
Caution Medical electrical equipment needs special precautions regarding EMC
and must be installed and used according to the information provided in “EMC
Guidance and Manufacturer’s Declarations” on page 97.
To Connect to AC Power
Plug one end of the power cord into the electrocardiograph’s AC power inlet. Plug the
other end into an AC outlet. The green LED on the keyboard lights up, indicating that
power is connected. See Figure 18.
To Keep the Battery Charged
Leave the electrocardiograph connected to AC power whenever possible. Battery charge
status is indicated on the screen by an icon: . Whenever the battery is charging and is
not yet fully charged, this icon appears: . For maximum battery performance, as often
as possible leave the electrocardiograph plugged in until you see the “fully charged”
icon: .
When the charge gets low, the icon flashes. When the charge gets too low to operate, a
warning message appears and the electrocardiograph beeps every 15 seconds for 1
minute, then it turns off.
For more, see “Recharging a Fully Discharged Battery” on page 82.
Figure 18. AC Power Inlet and Green LED
AC power inlet
On/Off key
Green LED
@3#
1!2
4$5%6+7-8
)
(
*
9
0
Page 29

Directions for Use Chapter 2 Setting Up the Electrocardiograph 25
To Turn the Electrocardiograph On
Press .
To Turn the Electrocardiograph Off
Press and hold.
Note
If Power-Save is enabled, the electrocardiograph turns off automatically after
several idle minutes. To learn how to enable or disable Power-Save, see
“Reviewing the Device Configuration Settings” on page 29.
Verifying Proper Operation
Once your electrocardiograph is set up, verify proper operation by using an ECG simulator
to acquire and print a standard 12-lead ECG of known amplitude. See Step 2 on page 81.
Note
As part of your initial set-up, you may want to adjust the display contrast. To learn
how, see “Reviewing the Device Configuration Settings” on page 29.
You may also want to change other software settings, as described in the
following chapters:
• “Reviewing the System Settings” on page 27
• “Reviewing the ECG Settings” on page 37
Page 30

26 Chapter 2 Setting Up the Electrocardiograph Welch Allyn CP 200 Electrocardiograph
Connecting an External USB Printer (Optional)
If desired, you can connect an external printer. It must be a USB inkjet or laser printer that
supports PCL (printer control language), such as the following:
Vendor Model PCL Version
HP Deskjet 995c PCL 3
HP Deskjet 5650 PCL 3 enhanced
HP Laser 1022 PCL 5E
Dell Laser 1710 PCL 5E & PCL 6
Lexmark Laser E240 PCL 6
No special software is required.
The external printer prints the following (always in black and white):
• Auto ECG reports
• Spirometry reports (spirometry option only)
• Device settings
• Audit trails
• Help pages
Rhythm ECGs always print to the internal printer.
See the warning regarding signal I/O connectors on page 16.
To Connect a Printer
Connect one end of a USB cable to the printer’s USB connector, and connect the other
end to the electrocardiograph’s USB connector: . For connector location, see Figure 5
on page 8.
To learn how to enable the external printer in the settings, see “Reviewing the Device
Configuration Settings” on page 29.
Page 31

27
3
Reviewing the System Settings
“System Settings” Menu Tree . . . . . . . . . . . . . . . . . . . . . . . . . . . . . . . . . . . . . 28
Reviewing the Device Configuration Settings. . . . . . . . . . . . . . . . . . . . . . . . . 29
Reviewing the Device Information . . . . . . . . . . . . . . . . . . . . . . . . . . . . . . . . . . 31
Reviewing the Connectivity Settings . . . . . . . . . . . . . . . . . . . . . . . . . . . . . . . . 32
Reviewing the Medication List . . . . . . . . . . . . . . . . . . . . . . . . . . . . . . . . . . . . . 33
Reviewing the History List . . . . . . . . . . . . . . . . . . . . . . . . . . . . . . . . . . . . . . . . 34
Transferring a Configuration to Another Electrocardiograph . . . . . . . . . . . . 35
Configuring the Electrocardiograph for Wireless Communication. . . . . . . . 36
This chapter documents the system settings, which affect both ECG and spirometry
functions. For information on the following related tasks, see the procedures identified
here:
• Reviewing ECG settings
See “Reviewing the ECG Settings” on page 37.
• Reviewing spirometry settings
Spirometry manual.
• Printing all settings
See “Reviewing the Device Information” on page 31.
Page 32

28 Chapter 3 Reviewing the System Settings Welch Allyn CP 200 Electrocardiograph
“System Settings” Menu Tree
System Settings
Device
Configuration
Set Date/Time
Language
Date Format
Time F ormat
Weight Unit
Height Unit
Power-Save
Practice ID
Device ID
Audio Beeper
Flow Unit*
Pressure Unit*
Temperature*
Increase Display Contrast
Decrease Display Contrast
Contact Information
Printer Select
CAPS Lock
*
Applicable for spirometry only.
Device
Info
About
Print Settings
Manage Settings
Enable Options
Upgrade Software
Service Info
Device
Administration
See “Managing Data
Security” on page 75.
Connectivity
Settings
Connectivity Mode
Network Settings
Wireless Settings
Auto Send (ECG)
Auto Send (Spirometry)
Auto Save (ECG)
View Available Networks
Test Connectivity Settings
Page 33

Directions for Use Chapter 3 Reviewing the System Settings 29
Reviewing the Device Configuration Settings
1. Press the Menu key .
2. Choose System Settings > Device Configuration.
The following screen appears.
Figure 19. “Device Configuration” Screen
Device Configuration
1 Set Date/Time
2 Language
3 Date Format
4 Time Format
5 Weight Unit
6 Height Unit
7 Power-Save
8 Practice ID
9 Device ID
A Audio Beeper
9:17AM Oct 16 08
3. Change any desired settings.
Setting Description
Set Date/Time Current date and time.
Language List of languages available. Changes take effect when the next screen appears.
Date Format MM/DD/YY (month/day/year)
Time Format 24-hour or AM/PM.
Weight Unit Kilograms (kg) or pounds (lb).
Height Unit Centimeters (cm), inches (in), or feet and inches (ft, in).
Power-Save On or off. When on, the electrocardiograph turns itself off after several idle minutes.
Practice ID Name of the practice, clinic, or hospital. This ID prints on all ECG reports. When this
Device ID Electrocardiograph identification. Enter up to 20 characters. This ID prints on all ECG
DD/MM/YY (day/month/year)
field is filled in for multiple electrocardiographs, a connected EMR system can direct
work orders appropriately via a Welch Allyn HL7 interface.
reports. When this field is filled in for multiple electrocardiographs, a connected EMR
system can direct work orders appropriately via a Welch Allyn HL7 interface.
Audio Beeper On or off. When on, beeps to indicate errors, such as incorrect input, improper external
connections, or a printer error. Beeps may also indicate a low battery.
Flow Unit L/sec or L/min. For spirometry only. Determines the y-axis units for flow/volume curves.
Page 34

30 Chapter 3 Reviewing the System Settings Welch Allyn CP 200 Electrocardiograph
Setting (Continued) Description (Continued)
Pressure Unit mmHg, mbar, inHg, kPa. For spirometry only. Determines the units for the calibration
menu’s atmospheric pressure values.
Temperature Fahrenheit or Celsius. For spirometry only. Determines the units for the calibration menu’s
temperature values.
Increase Display
Contrast
Decrease Display
Contrast
Contact Information Your office. Enter up to 40 characters. This information will appear on the accessories
Printer Select Internal or External. When “External” is selected — and when an external printer is
CAPS Lock On or off. Works just like a standard CAPS Lock key.
Each time you select this choice, the display contrast immediately increases until you
reach maximum contrast.
Each time you select this choice, the display contrast immediately decreases until you
reach minimum contrast.
Help page.
connected and turned on — reports will print to that printer. For details, see “Connecting
an External USB Printer (Optional)” on page 26.
Page 35

Directions for Use Chapter 3 Reviewing the System Settings 31
Reviewing the Device Information
1. Press the Menu key .
2. Choose System Settings > Device Info.
The following screen appears.
Figure 20. “Device Info” Screen
Device Info
1 About
2 Print Settings
3 Manage Settings
4 Enable Options
5 Upgrade Software
6 Service Info
0 Previous Menu
9:17AM Oct 16 08
3. Select the desired item:
Item Description
About Displays the following information about the electrocardiograph:
• serial number
• modules configured
• version numbers
Print Settings Prints your ECG, spirometry, and system settings as well as medication & history
lists.
Manage Settings See “Transferring a Configuration to Another Electrocardiograph” on page 35.
Enable Options Contact Technical Support. For phone numbers, see page ii.
Upgrade Software Contact Technical Support. For phone numbers, see page ii.
Service Info Accessible to service support only.
Page 36

32 Chapter 3 Reviewing the System Settings Welch Allyn CP 200 Electrocardiograph
Reviewing the Connectivity Settings
See also “Configuring the Electrocardiograph for Wireless Communication” on page 36.
1. Press the Menu key .
2. Choose System Settings > Connectivity Settings.
The following screen appears.
Figure 21. “Connectivity Settings” Screen
Connectivity Settings
1 Connectivity Mode
2 Network Settings
3 Wireless Settings
4 Auto Send (ECG)
5 Auto Send (Spirometry)
6 Auto Save (ECG)
7 View Available Networks
8 Test Connectivity Settings
0 Previous Menu
9:17AM Oct 16 08
3. Select the desired item. Note that Auto Send and Auto Save cannot both be on.
Item Description
Connectivity Mode Wired (USB), wireless, or none.
Network Settings DHCP, IP address, subnet mask, gateway.
Wireless Settings SSID, authentication mode, encryption, authentication type, network key,
Auto Send
(ECG or Spirometry)
Auto Save (ECG) On or off. Applies to ECG mode only; spirometry tests are always automatically
802.11 authentication.
Workstation, memory card, or off. Automatically sends all ECGs (except stat ECGs)
to the option of your choice. Systems with the spirometry option have separate
Auto Send settings for ECG mode and spirometry mode.
If set to memory card, an SD memory card or removable USB storage device must be
in place during testing.
If set to workstation, either wireless communications must be configured or a USB
cable must connect a CardioPerfect workstation to the electrocardiograph’s Com port
B ( ).
saved. When on, the electrocardiograph automatically saves all ECGs (except stat
ECGs) to its test directory. When off, every time you print an ECG test you are asked
if you want to save. For a description of the test directory, see “Managing Saved
Tests In the Test Directory” on page 70.
View Available Networks Displays all available wireless networks within range.
Test Connectivity Settings Tests the network and wireless parameters.
• Ping Test pings an IP address.
• Server Test verifies the connection to a CardioPerfect workstation.
Page 37

Directions for Use Chapter 3 Reviewing the System Settings 33
Reviewing the Medication List
The medication list determines which medications are available to choose during patient
data entry.
1. Press the Menu key .
2. Choose Edit Medication List.
The following screen appears.
Figure 22. “Edit Medication List” Screen
Edit Medication List
Medication Name
ACE Inhibitors
Albuterol
Alpha Blockers
Amiodarone
Beclomethasone
Beta Blocker
Bitolterol
Add Delete Exit
3. Press the desired softkeys:
•Add
Lets you add medications, up to a total of 40.
•Delete
Deletes the highlighted medication.
•Exit
Returns to the main menu.
9:17AM Oct 16 08
Page 38

34 Chapter 3 Reviewing the System Settings Welch Allyn CP 200 Electrocardiograph
Reviewing the History List
The history list determines which clinical conditions are available to choose during patient
data entry.
1. Press the Menu key .
2. Choose Edit History List.
The following screen appears.
Figure 23. “Edit History List” Screen
Edit History List
History Name
Acute Bronchitis
Acute Respiratory Failure
Allergies/Sneezing
Asphyxia
Asthma
Bronchiolitis
Bronchitis
Add Delete Exit
3. Press the desired softkeys:
•Add
Lets you add conditions, up to a total of 40.
• Delete
Deletes the highlighted condition.
•Exit
Returns to the main menu.
9:17AM Oct 16 08
Page 39

Directions for Use Chapter 3 Reviewing the System Settings 35
Transferring a Configuration to Another Electrocardiograph
You can transfer your configuration from one CP 200 electrocardiograph to another. If you
have the spirometry option, its configuration is included in the transfer.
To Transfer a Configuration
1. Insert a storage device (SD memory card or removable USB device) into an
electrocardiograph that is configured as desired.
2. Press the Menu key .
3. Choose System Settings > Device Info > Manage Settings > Export Files >
Export Configuration Files.
The files are copied to the storage device.
4. Remove the storage device, and insert it into another CP 200 electrocardiograph.
5. Choose System Settings > Device Info > Manage Settings > Import Files >
Import Configuration Files.
The files are copied to the electrocardiograph, and then it reboots.
Figure 24. Configuration File Transfer
Configuration file
or
Page 40

36 Chapter 3 Reviewing the System Settings Welch Allyn CP 200 Electrocardiograph
Configuring the Electrocardiograph for Wireless Communication
Before you configure the electrocardiograph for wireless communication, verify the
following:
• A wireless radio is installed in the electrocardiograph’s USB slot according to the
instructions that were shipped with the radio.
• The CardioPerfect workstation software is installed according to the instructions that
were shipped with that CD.
• The CardioPerfect workstation connectivity kit is installed according to the
instructions that were shipped with that CD.
To Configure the Electrocardiograph for Wireless Communication
1. At the electrocardiograph, press the Menu key .
2. Choose System Settings > Connectivity Settings > Connectivity Mode >
Wireless.
3. Under Network Settings, do one of the following:
• Select the Use DHCP? checkbox. Press Done.
• Enter the IP address, subnet mask, and gateway. Press Done.
4. Under Wireless Settings, fill in the fields — SSID, encryption, authentication,
network key, 802.1X auth, and EAP type — per your network administrator.
5. Test the connectivity settings. See “Test Connectivity Settings” on page 32.
Page 41

37
4
Reviewing the ECG Settings
“ECG Settings” Menu Tree . . . . . . . . . . . . . . . . . . . . . . . . . . . . . . . . . . . . . . . . 38
About Auto ECG Reports. . . . . . . . . . . . . . . . . . . . . . . . . . . . . . . . . . . . . . . . . . 39
Reviewing the Auto Report Settings . . . . . . . . . . . . . . . . . . . . . . . . . . . . . . . . 46
Reviewing the Rhythm Report Settings . . . . . . . . . . . . . . . . . . . . . . . . . . . . . . 47
Reviewing the Miscellaneous ECG Settings . . . . . . . . . . . . . . . . . . . . . . . . . . 48
Turning the Augmented Pediatric Lead Set On and Off . . . . . . . . . . . . . . . . . 49
This chapter documents the ECG settings. For information on the following related tasks,
see the procedures identified here:
• Reviewing system settings (which affect both ECG and spirometry functions)
See “Reviewing the System Settings” on page 27.
• Reviewing spirometry settings
Spirometry manual.
• Printing all settings
See “Reviewing the Device Information” on page 31.
Page 42

38 Chapter 4 Reviewing the ECG Settings Welch Allyn CP 200 Electrocardiograph
“ECG Settings” Menu Tree
ECG Settings
Edit
Auto Report
1 or 2
Format
Lead Arrangement
Rhythm Lead 1
Rhythm Lead 2
Rhythm Lead 3
Extended Measurements
Average Cycles
Interp Settings
Print Interpretation?
Copies
Copies With Interp
Reason Statements
Unconfirmed Report
Abnormal ECG
Patient Data
Auto Report
Settings
Baseline Centering
Lead Timing
Auto Report 2
Artifact Report
QTc Method
Rhythm Report
Settings
Lead Arrangement
Default Rhythm Speed
Standard Lead Order
Augmented Lead Order
Miscellaneous
Lead Configuration
Electrode Labels
Default Gain Setting
Default Baseline Filter
Default Muscle Filter
Mains Filter
Augmented
Lead Set
First Name
Middle Initial
Age/Birth Date
Weight
Height
Gender
Race
Medication
History
Blood Pressure
Comments
Custom 1
Custom 1 Label
Custom 2
Custom 2 Label
Page 43

Directions for Use Chapter 4 Reviewing the ECG Settings 39
About Auto ECG Reports
An Auto ECG is a report of ECG data in one of two user-defined formats: Auto Report 1 or
Auto Report 2. For an example, see Figure 25. To learn how to set up or interpret a report,
see the references on page 40.
Note
If you want a second predefined format to be available, enable Auto Report 2.
To learn how, see “Reviewing the Miscellaneous ECG Settings” on page 48.
Figure 25. Auto Report Example — 3x4 +3R Lead Arrangement
A. Patient data B. ECG measurements C. Interpretation (optional)
D. Report status label
E. 3 rows, 4 columns
O. Calibration
pulse
M Gain
L. Frequency rangeN. Paper speed
K. AC filter
F. Rhythm leads
G. Software version
H. Device ID
I. Practice ID
J. Date and time
Page 44

40 Chapter 4 Reviewing the ECG Settings Welch Allyn CP 200 Electrocardiograph
Item (in Figure 25 on page 39) Description
A. Patient data See “Reviewing the Patient Data Fields Available for Auto Reports” on page 44.
B. ECG measurements Standard.
C. Interpretation (optional) See “Reviewing the Interpretation and Copy Settings for Auto Reports” on
page 43.
D. Report status label See “Reviewing the Interpretation and Copy Settings for Auto Reports” on
page 43.
E. 3 rows, 4 columns See “Reviewing the Format Settings for Auto Reports” on page 41.
F. Rhythm leads See “Reviewing the Format Settings for Auto Reports” on page 41.
G. Software version See also “Reviewing the Device Information” on page 31.
H. Device ID See “Device ID” on page 29.
I. Practice ID See “Practice ID” on page 29.
J. Date and time See “Set Date/Time” on page 29.
K. AC filter See “Mains Filter” on page 48.
L. Frequency range Lower limit: baseline filter on = 0.5, off = 0.3
MGain See “Gain” on page 68.
N. Paper speed See “Speed” on page 68.
O. Calibration pulse Amplitude reference — represents the current height of a one-millivolt signal.
Upper limit: muscle filter on = 35, off = 150
See “Baseline Filter” on page 68 and “Muscle Filter” on page 68.
Is adjusted for the selected gain:
5 mm/mV = 0.5 x
10 mm/mV = 1 x
20 mm/mV = 2 x
Page 45

Directions for Use Chapter 4 Reviewing the ECG Settings 41
Reviewing the Format Settings for Auto Reports
1. Press the Menu key .
2. Choose ECG Settings > Edit Auto Report 1 (or 2) > Format.
The following screen appears.
Figure 26. Auto Report “Format” Screen
Format
1 Lead Arrangement
2 Rhythm Lead 1
3 Rhythm Lead 2
4 Rhythm Lead 3
5 Extended Measurements
6 Average Cycles
0 Previous Menu
9:17AM Oct 16 08
3. Change any desired settings.
For a report example, see Figure 25 on page 39.
Setting Description
Lead Arrangement Arrangement of the leads on the report.
• 3x4 3 rows x 4 columns
• 3x4 +1R 3 rows x 4 columns + 1 rhythm lead
• 3x4 +3R 3 rows x 4 columns + 3 rhythm leads
• 6x2 6 rows x 2 columns
• 12x1 12 rows x 1 column
• 6x2 50 mm/s 6 rows x 2 columns, 50 mm/s
• 6x2 Ext. 6 rows x 2 columns, extended printouts
• 2x6 +1R 2 rows x 6 columns + 1 rhythm lead
• 6x2 +1R 6 rows x 2 columns + 1 rhythm lead
• No Print No report prints
(two pages, 20 seconds of ECG data)
Rhythm Lead 1 Rhythm lead to print at the bottom of all “+R” reports.
Rhythm Lead 2 Second rhythm lead to print at the bottom of 3x4 +3R reports.
Rhythm Lead 3 Third rhythm lead to print at the bottom of 3x4 +3R reports.
Extended
Measurements
On or off. When on, an additional page prints with the report. Extended measurements
include the values for several common parameters, such as Q, R, and S amplitude and
ST values. The amplitudes are expressed in microvolts. The durations are expressed in
milliseconds. The measurements cannot be edited.
Page 46

42 Chapter 4 Reviewing the ECG Settings Welch Allyn CP 200 Electrocardiograph
Setting (Continued) Description (Continued)
Average Cycles If desired, an additional page prints with the report. Average cycles show the dominant
waveforms for all 12 leads.
• 3x4 50 mm/s + 3R 3 rows x 4 columns + 3 rhythm leads, 50 mm/s
• 6x2 50 mm/s + 6R 6 rows x 2 columns + 6 rhythm leads, 50 mm/s
• No Print Average cycles page does not print.
Page 47

Directions for Use Chapter 4 Reviewing the ECG Settings 43
Reviewing the Interpretation and Copy Settings for Auto Reports
1. Press the Menu key .
2. Choose ECG Settings > Edit Auto Report 1 (or 2) > Interp Settings.
The following screen appears.
Figure 27. “Interpretation Settings” Screen
Interp Settings
1 Print Interpretation?
2 Copies
3 Copies With Interp
4 Reason Statements
5 Unconfirmed Report
6 Abnormal ECG
0 Previous Menu
9:17AM Oct 16 08
3. Change any desired settings.
For a report example, see Figure 25 on page 39.
Setting Description
Print Interpretation? On or off. Determines whether interpretation is printed and saved with reports.
Copies Number of copies to print automatically in addition to the original report:
Copies With Interp On or off. Determines whether interpretation is printed on the automatic copies.
0, 1, 2, 3, 4, or 5.
Reason Statements On or off. Determines whether reasons (criteria) are printed with the interpretation
statements.
Unconfirmed Report On or off. Determines whether the label “Unconfirmed Report” is printed on reports.
Abnormal ECG On or off. Determines whether the label “Abnormal ECG” is printed on reports.
Available only for systems using automatic interpretation.
Page 48

44 Chapter 4 Reviewing the ECG Settings Welch Allyn CP 200 Electrocardiograph
Reviewing the Patient Data Fields Available for Auto Reports
You can determine which fields appear during patient data entry for Auto ECGs.
Note
Spirometry tests use a separate set of data-entry fields, as described in the
spirometry manual.
To Choose the Fields
1. Press the Menu key .
2. Choose ECG Settings > Edit Auto Report 1 (or 2) > Patient Data.
The following screen appears.
Figure 28. “Patient Data” Screen for ECGs
Patient Data
1 First Name
2 Middle Initial
3 Age/Birth Date
4 Weight
5 Height
6 Gender
7 Race
8 Medication
9 History
A Blood Pressure
9:17AM Oct 16 08
The Patient ID and Last Name fields always
appear on the Enter New Patient screen, as
shown in Figure 37 on page 57. Since these two
fields cannot be disabled, they do not appear
on this user-selectable list.
3. Change any desired settings.
Disabled items (set to off or no) neither display nor print.
Field Description
First Name Yes or no. If yes, this field is enabled.
Middle Initial Yes or no. If yes, this field is enabled.
Age/Birth Date Birth Date, age, or off. Determines whether and how this data is labeled and entered. If
Weight Yes or no. If yes, this field is enabled for entering patients’ weight. For instructions on
Height Yes or no. If yes, this field is enabled for entering patients’ height. For instructions on
Gender Yes or no. If yes, this field is enabled. Data-entry choices: Male, Female, or Unknown.
Race Yes or no. If yes, this field is enabled. Data-entry choices: Blank, Caucasian, Black,
you’ll be testing patients from 1 day through 17 years old, select Birth Date for most
accurate results. If “age” is selected, age will be entered in years and months.
changing the weight units (kg or lb), see “Reviewing the Device Configuration Settings”
on page 29.
changing the height units (cm, in., or ft and in.), see “Reviewing the Device Configuration
Settings” on page 29.
Hispanic, Asian, Unknown.
Page 49

Directions for Use Chapter 4 Reviewing the ECG Settings 45
Field (Continued) Description (Continued)
Medication Yes or no. If yes, this field is enabled. During data entry, choose up to three items from
the list of patient medications. To learn how to edit this list, see “Reviewing the
Medication List” on page 33.
History Yes or no. If yes, this field is enabled. During data entry, choose up to three items from
the list of patient clinical conditions. To learn how to edit this list, see “Reviewing the
History List” on page 34.
Blood Pressure Yes or no. If yes, this field is enabled for entering blood pressure in standard ### / ###
format.
Comments Yes or no. If yes, this field is enabled for entering comments.
Custom 1 Yes or no. If yes, this field is enabled for entering data of your choice.
Custom 1 Label You may define a label for the Custom 1 field if desired.
Custom 2 Yes or no. If yes, this field is enabled for entering data of your choice.
Custom 2 Label You may define a label for the Custom 2 field if desired.
Page 50

46 Chapter 4 Reviewing the ECG Settings Welch Allyn CP 200 Electrocardiograph
Reviewing the Auto Report Settings
1. Press the Menu key .
2. Choose ECG Settings > Auto Report Settings.
The following screen appears.
Figure 29. “Auto Report Settings” Screen for ECG Settings
Auto Report Settings
1 Baseline Centering
2 Lead Timing
3 Auto Report 2
4 Artifact Report
5 QTc Method
0 Previous Menu
9:17AM Oct 16 08
3. Change any desired settings.
Setting Description
Baseline Centering On or off. When on, aligns the isolectric line of all leads.
Lead Timing Simultaneous or sequential. “Simultaneous” prints ECG data that was captured
simultaneously for all lead groups. “Sequential” prints ECG data that was captured at
sequential intervals for each lead group in turn.
Auto Report 2 On or off. When on, a second predefined report format is available.
Artifact Report On or off. When on, the electrocardiograph automatically prints an artifact report with
the Auto ECG report whenever artifact is detected and you override the “Waiting for
10 seconds of quality data” message. This report, a 12x1 format with all filters
disabled, shows the leads with artifact so that you can remedy the problem. (The
normal Auto ECG report, with filters enabled, might mask some of the artifact issues.)
QTc Method Bazett or Hodges. Computation method of correcting the waveform’s QT interval
based on the heart rate. The corrected number, expressed in milliseconds, is called
the QTc interval. This setting affects only the QTc interval displayed in the ECG
measurements portion of the ECG report.
Page 51

Directions for Use Chapter 4 Reviewing the ECG Settings 47
Reviewing the Rhythm Report Settings
1. Press the Menu key .
2. Choose ECG Settings > Rhythm Report Settings.
The following screen appears.
Figure 30. ”Rhythm Report Settings” Menu
Rhythm Report Settings
1 Lead Arrangement
2 Default Rhythm Speed
3 Standard Lead Order
4 Augmented Lead Order
0 Previous Menu
9:17AM Oct 16 08
3. Change any desired settings.
Setting Description
Lead Arrangement Choose the number of leads you want to print at a time: 3, 6, or 12.
For instructions on cycling through 3-lead or 6-lead groupings while printing a rhythm
report, see Step 2 on page 63.
Default Rhythm Speed Choose the default rhythm speed: 10, 25, or 50 mm/s.
Standard Lead Order Configure the order in which leads appear during rhythm printing when the standard
lead set is in use.
Augmented Lead Order Configure the order in which leads appear during rhythm printing when the
augmented pediatric lead set is in use. For electrode placement locations, see
Figure 33 on page 54.
Page 52

48 Chapter 4 Reviewing the ECG Settings Welch Allyn CP 200 Electrocardiograph
Reviewing the Miscellaneous ECG Settings
1. Press the Menu key .
2. Choose ECG Settings > Miscellaneous.
The following screen appears.
Figure 31. “Miscellaneous” Screen for ECG Settings
Miscellaneous
1 Lead Configuration
2 Electrode Labels
3 Default Gain Setting
4 Default Baseline Filter
5 Default Muscle Filter
6 Mains Filter
0 Previous Menu
9:17AM Oct 16 08
These three default settings—gain, baseline
filter, and muscle filter—determine the
values used every time you begin a new test,
even if these values have been temporarily
changed during ECG testing.
3. Change any desired settings.
Setting Description
Lead Configuration Standard (I II III, aVR aVL aVF, V1 V2 V3, V4 V5 V6) or
Cabrera (aVL I –aVR, II aVF III, V1 V2 V3, V4 V5 V6).
Electrode Labels AHA or IEC.
Default Gain Setting 5 mm/mV, 10 mm/mV, 20 mm/mV, or Auto. (AUTO is available for Auto ECGs only, not
rhythm ECGs. AUTO is usually the best setting, but some waveforms may be easier to
read on other settings.) For details, see “Gain” on page 68.
Default Baseline Filter On or off. For details, see “Baseline Filter” on page 68.
Default Muscle Filter On or off. For details, see “Muscle Filter” on page 68.
Mains Filter Off, 50 Hz, 60 Hz. Use of this filter is recommended. For suggestions on eliminating AC
interference, see page 91.
Page 53

Directions for Use Chapter 4 Reviewing the ECG Settings 49
Turning the Augmented Pediatric Lead Set On and Off
For a description of the augmented pediatric lead set, see page 4.
1. Press the Menu key .
2. Choose ECG Settings > Augmented Lead Set > On or Off.
When this option is turned on, the system will prompt you to select the lead set —
standard or augmented — each time you perform a test on a new patient.
Page 54

50 Chapter 4 Reviewing the ECG Settings Welch Allyn CP 200 Electrocardiograph
Page 55

51
5
Performing ECG Tests
Connecting the Leads to the Patient . . . . . . . . . . . . . . . . . . . . . . . . . . . . . . . . 52
Recording an Auto ECG. . . . . . . . . . . . . . . . . . . . . . . . . . . . . . . . . . . . . . . . . . . 56
Recording a Rhythm ECG . . . . . . . . . . . . . . . . . . . . . . . . . . . . . . . . . . . . . . . . . 63
Recalling Saved Patient Data . . . . . . . . . . . . . . . . . . . . . . . . . . . . . . . . . . . . . . 64
Adjusting the ECG Waveforms . . . . . . . . . . . . . . . . . . . . . . . . . . . . . . . . . . . . . 68
Page 56

52 Chapter 5 Performing ECG Tests Welch Allyn CP 200 Electrocardiograph
Connecting the Leads to the Patient
1. Help the patient get comfortable. Patient preparation is important for a successful
ECG.
a. Describe the procedure. If desired, press the Help key and print the page
entitled “What Is An ECG?” for the patient to read.
b. Help the patient get warm and relaxed. Excessive patient movement could
interfere with the operation of the electrocardiograph.
c. Put the patient in a reclining position with the head slightly higher than the heart
and legs.
WARNING ECG electrodes could cause skin irritation. Examine the skin
for signs of irritation or inflammation.
2. Prepare electrode locations. See Figure 32 on page 53 or Figure 33 on page 54.
a. Shave if necessary.
b. Clean with alcohol or acetone.
c. Allow to dry.
3. Attach the electrodes and lead wires securely.
• For reusable electrodes:
Straps must neither slide nor be so tight as to cause discomfort.
The electrode paste, gel, or creme must cover an area the size of the electrode
but no larger, especially on the chest.
• For disposable tab electrodes:
Place the electrode tab between the “jaws” of the electrode adapter, keeping the
tab flat.
Gently tug on the adapter to ensure that it is properly placed on the electrode.
(Each time you remove and reattach an electrode, the conductive gel becomes
weaker and less effective.)
Page 57

Directions for Use Chapter 5 Performing ECG Tests 53
Figure 32. Electrode Placement Locations — Adult and Standard Pediatric
B
A
C
D
E
F
J
I
AHA IEC Locations
A V1
B V2
yellow
C V3
green
D V4
blue
E V5
orange
F V6
purple
G LA
black
H LL
I RL
green
J RA
white
red
red
Electrodes
C1
red
C2
yellow
C3
green
C4
brown
C5
black
C6
purple
L
yellow
F
green
N
black
R
red
G
H
Fourth intercostal space at right sternal border.
Fourth intercostal space at left sternal border.
Midway between V2 and V4.
Fifth intercostal space at left of midclavicular line.
Anterior axillary line at same horizontal level as V4.
Mid-axillary line on same horizontal level as V4 and V5.
Just above left wrist on inside of arm.
Just above left ankle.
Just above right ankle.
Just above right wrist on inside of arm.
Page 58

54 Chapter 5 Performing ECG Tests Welch Allyn CP 200 Electrocardiograph
Figure 33. Electrode Placement Locations — Augmented Pediatric
J
I
H
AHA IEC Locations
A V1
B V2
yellow
C V4
blue
D V7
orange
E V6
purple
F LA
black
G LL
H RL
green
I RA
white
J V3R
green
A
red
red
Electrodes
B
C1
red
C2
yellow
C4
brown
C7
black
C6
purple
L
yellow
F
green
N
black
R
red
C3R
green
C
D
E
F
Fourth intercostal space at right sternal border.
Fourth intercostal space at left sternal border.
Fifth intercostal space at left of midclavicular line.
Posterior axillary line at the same horizontal level as V4.
Mid-axillary line on same horizontal level as V4.
Just above left wrist on inside of arm.
Just above left ankle.
Just above right ankle.
Just above right wrist on inside of arm.
Mirror position to standard V3 placement with respect to the midsternal line.
To use the augmented pediatric lead set, you
must enable it in the settings. See “Turning the
Augmented Pediatric Lead Set On and Off” on
page 49.
G
Page 59

Directions for Use Chapter 5 Performing ECG Tests 55
4. If the electrocardiograph’s display is blank, press .
5. If prompted to select a lead set type, select Standard or Augmented.
For a description of the augmented pediatric lead set, see page 4.
6. If the Lead Status screen appears, as shown here, reattach any leads that are
flashing.
Figure 34. “Lead Status” Screen
9:17AM Oct 16 08
Lead Status
Check lead
V1
V2
The term “Artifact” might also appear on this screen. To eliminate artifact, you might
need to re-prep the patient, use fresh electrodes, or minimize patient motion during
the recording.
The most common ECG problems are poor electrode contact and loose leads.
When all leads have been connected for several seconds, the following screen
appears.
Figure 35. “ECG Preview” Screen
ECG Preview
I
II
III
AUTO 25 mm/s
Gain
OFF
Baseline
Filter
9:17AM Oct 16 08
OFF
Muscle
Filter
HR: 75
SpeedLeads
7. (Optional) Use the softkeys as desired.
For details, see “Adjusting the ECG Waveforms” on page 68.
8. Go to the procedure for the type of ECG test you want to perform.
• “Recording an Auto ECG” on page 56
• “Recording a Rhythm ECG” on page 63
Page 60

56 Chapter 5 Performing ECG Tests Welch Allyn CP 200 Electrocardiograph
Recording an Auto ECG
An Auto ECG is a report typically showing a 10-second acquisition of 12 leads of ECG
information combined with patient data, interpretation, and measurements matrix. Two
user-defined formats are available: Auto Report 1 or Auto Report 2. To learn how to set up
the Auto ECG report format, see “About Auto ECG Reports” on page 39.
As shown in the following diagram, there are the two types of Auto ECG: normal and stat.
For details, see these procedures:
• “Recording a Normal Auto ECG” on page 57
• “Recording a Stat Auto ECG” on page 62
Figure 36. Auto ECG Testing, Process Diagram
Normal
Press quickly.
(Optional)
Select report
format.
Enter or recall
patient data.
(Optional)
Adjust
waveforms.
Press
Print ECG.
Stat
Press and hold.
Auto Report prints.
Auto ECG Post-Print
screen.
Page 61

Directions for Use Chapter 5 Performing ECG Tests 57
Recording a Normal Auto ECG
For a normal Auto ECG, you enter patient data and do other optional tasks before printing,
as shown in Figure 36 on page 56.
To Record a Normal Auto ECG
1. Pr es s t he Auto ECG key quickly.
Do not hold it down, or a stat ECG would begin.
2. If prompted, choose Auto Report 1 or Auto Report 2.
The following screen appears.
Figure 37. “Enter New Patient” Screen
Enter New Patient
Patient ID
Last Name
First Name
Birth Date
Weight
Height
Gender
Search Schedule
//
lb.
ft. in.
Clear
9:17AM Oct 16 08
MM / DD / YYYY
Done
For details about these data fields—
including how to choose which fields
display and print—see “Reviewing the
Patient Data Fields Available for Auto
Reports” on page 44.
3. Enter or recall the patient data.
• If you are using a bar code scanner, scan the patient’s bar code. The patient ID
appears on the screen.
• If you want to enter the data, fill in the fields.
• If you want to recall saved patient data, go to “Recalling Saved Patient Data” on
page 64.
When finished, press the desired softkey:
Clear deletes the entered data and returns to the Patient ID field.
Done accepts the entered data and goes to the Auto ECG Acquisition
screen. See Figure 38 on page 58.
Page 62

58 Chapter 5 Performing ECG Tests Welch Allyn CP 200 Electrocardiograph
Figure 38. “Auto ECG Acquisition” Screen
Doe, Jane
Auto ECG Acquisition
I
V
aVR
AUTO ONON
Leads
Gain
Baseline
Filter
9:17AM Oct 16 08
HR: 75
Muscle
Filter
Print
ECG
4. Verify ECG quality on the screen.
WARNING Do not perform ST segment analysis on the ECG screen display,
since these ECG representations are scaled. Make manual measurements of
ECG intervals and magnitudes on printed ECG reports only.
5. (Optional) Adjust the waveforms.
See “Adjusting the ECG Waveforms” on page 68.
6. Press Print ECG.
Softkeys for adjusting the
waveforms or printing
7. If prompted, choose whether to wait for the electrocardiograph to acquire 10 seconds
of filtered, processed data before printing.
If you override the wait time and print the available data immediately, be aware that
the printed data will be insufficient in quality or quantity or both.
The report prints.
Note
If a red stripe appears along the edge of your report, replace the paper.
See “Loading the Thermal Chart Paper” on page 23.
After printing, the Auto ECG Post-Print screen appears. Figure 39 on page 59.
Page 63

Directions for Use Chapter 5 Performing ECG Tests 59
Figure 39. “Auto ECG Post-Print” Screen
Doe, Jane
Auto ECG Post-Print
I
V
aVR
9:17AM Oct 16 08
HR: 75
Softkeys for choosing
Print
Copy
Edit
Test
Manual
Save
Repeat
Test
Exit
post-printing options
8. Press the desired softkey.
Softkey Effect
Print Copy Prints a copy of the test.
To learn how to print multiple copies of all tests automatically, see “Reviewing the
Interpretation and Copy Settings for Auto Reports” on page 43.
Edit Test Brings up the Edit Test – Patient Data screen. From here you can edit or confirm the
patient data and interpretation statements. See “To Edit or Confirm a Test Directly
After Printing” on page 61.
Manual Save Saves the test to the electrocardiograph’s test directory. See “Managing Saved Tests
In the Test Directory” on page 70.
This Manual Save softkey appears only when Auto Save is disabled. For more on
Auto Save, see “Reviewing the Miscellaneous ECG Settings” on page 48.
Manual Send (May appear in place of Manual Save in Figure 39 on page 59.) Displays two softkey
options:
• Memory Card
An SD memory card or removable USB storage device must be in place.
• Workstation
Either wireless communications must be configured or a USB cable must connect
the CardioPerfect workstation to the electrocardiograph’s Com port B ( ).
This Manual Send softkey appears only when Auto Save is enabled. For more on
Auto Save, see “Reviewing the Miscellaneous ECG Settings” on page 48.
Repeat Test Lets you repeat a test for the current patient.
Exit The ECG Preview screen appears if all leads are connected to the patient.
Page 64

60 Chapter 5 Performing ECG Tests Welch Allyn CP 200 Electrocardiograph
Caution The requirements of AAMI EC11, Section 3.2.7.2, Frequency and
Impulse Response, for an impulse triangle waveform may be impacted by up
to 5 milliseconds of small amplitude dampened ringing immediately after the
impulse when the muscle filter (35 Hz) is turned on or a small amplitude
offset when the baseline filter (0.5 Hz) is turned on. These requirements are
unaffected by any other combination of filters turned on or off.
Measurements performed by the optional interpretation algorithm are
unaffected by any filter selections.
Page 65

Directions for Use Chapter 5 Performing ECG Tests 61
To Edit or Confirm a Test Directly After Printing
Note
A qualified physician must review and confirm all tests before patients are
treated. If changes are needed for any saved test, you can edit two types of data:
•patient data
• interpretation statements
1. From the Auto ECG Post-Print screen (Figure 39 on page 59), press Edit Test.
The Edit Test – Patient Data screen appears.
2. (Optional) Edit the patient data.
3. Press the desired softkey.
Softkey Effect
Interp Saves any changes, and displays the Edit Test – Interpretation screen.
1. (Optional) Edit the interpretation statements to be saved with the test.
2. Press the desired softkey:
• Patient Data saves any changes, and returns to the Edit Test – Patient Data
screen.
• Confirm saves any changes, sets the test status to “confirmed,” and returns to the
Auto ECG Post-Print screen.
• Cancel discards any changes, and returns to the Auto ECG Post-Print screen.
• Done saves any changes, and returns to the Auto ECG Post-Print screen.
For details on interpretation, see “Automatic ECG interpretation” on page 5.
Cancel Discards any changes, and returns to the Auto ECG Post-Print screen.
Done Saves any changes, and returns to the Auto ECG Post-Print screen.
Page 66

62 Chapter 5 Performing ECG Tests Welch Allyn CP 200 Electrocardiograph
Recording a Stat Auto ECG
A stat Auto ECG is an immediate printout in Auto Report 1 format.
Stat mode bypasses patient data entry, as shown in Figure 36 on page 56. A temporary
ID number is assigned to the patient to identify stat tests. After printing, you may enter
the patient data by editing the test.
In stat mode, Auto Send and Auto Save are always disabled, even if they are enabled in
the ECG settings. If you want to send or save a stat Auto ECG, you may do so manually
after you print.
To Record a Stat Auto ECG
1. Press and hold
The electrocardiograph begins acquiring ECG data. After it has acquired 10 seconds of
quality data, it prints a report.
2. Go to Step 7 on page 58.
Continue the procedure as if you have just pressed the Print ECG softkey.
the Auto ECG key .
Page 67

Directions for Use Chapter 5 Performing ECG Tests 63
Recording a Rhythm ECG
A Rhythm ECG is a continuous, real-time printout of a rhythm strip with a user-defined
lead arrangement. For details on reviewing or changing the lead arrangement in your
reports, see “Reviewing the Rhythm Report Settings” on page 47.
Rhythm ECGs are printouts only. They cannot be saved or sent electronically.
Figure 40. Rhythm ECG Testing, Process Diagram
Printing begins.
(Optional) Adjust
waveforms.
or
To Record a Rhythm ECG
1. Pr es s t he Rhythm ECG key .
Printing begins.
The screen displays 3 leads at a time from the leads currently printing. The printout
includes either 3, 6, or 12 leads at a time. To find out how to change this number, see
“Reviewing the Rhythm Report Settings” on page 47.
Figure 41. “Rhythm ECG” Screen
Doe, Jane
Rhythm ECG
I
V
aVR
10 mm/mV
Gain
Baseline
Filter
9:17AM Oct 16 08
HR: 75
25 mm/sONON
Muscle
Filter
SpeedLeads
Softkeys for adjusting
waveforms while printing
2. (Optional) Press the softkeys to adjust the waveforms.
See “Adjusting the ECG Waveforms” on page 68.
3. Press or to stop printing.
The ECG Preview screen appears if all leads are connected to the patient.
Page 68

64 Chapter 5 Performing ECG Tests Welch Allyn CP 200 Electrocardiograph
Recalling Saved Patient Data
During an ECG or spirometry test, instead of entering patient data manually you can recall
saved patient data in either of two ways:
• Search by entering a patient’s name or ID.
See “To Search by Entering a Patient’s Name or ID” on page 65.
• Choose a patient from the scheduled patients list.
See “To Choose a Patient from the Scheduled Patients List” on page 67.
The following diagram illustrates the procedure for both types of data recall.
Figure 42. Patient Data Recall, Process Diagram
Go to
Enter New Patient
screen.
Press
Search.
Enter patient’s
last name or ID.
Press
Schedule.
Choose a patient.
Patient data is filled in on the screen.
Proceed with ECG or
spirometry test.
Page 69

Directions for Use Chapter 5 Performing ECG Tests 65
To Search by Entering a Patient’s Name or ID
1. From the Enter New Patient screen (Figure 37 on page 57), press Search.
If prompted to log in, enter your user ID and password.
The following screen appears.
Figure 43. “Search for Patient” Screen
Search for Patient
Patient ID:
Last Name:
9:17AM Oct 16 08
Brings up any matching names
that have been saved.
New
Patient
Schedule
Search
2. Enter the patient’s identification number or last name (partial or complete).
3. Press Search.
The electrocardiograph searches its own scheduled patients list, then it searches the
database of a connected CardioPerfect workstation (if any), then it searches its own
test directory. If one or more patients match your entry, their names appear.
Note
The other two softkeys exit this search:
• New Patient returns to the Enter New Patient screen. See Figure 37 on
page 57.
• Schedule brings up the Scheduled Patients List screen. Go to “To
Choose a Patient from the Scheduled Patients List” on page 67.
Page 70

66 Chapter 5 Performing ECG Tests Welch Allyn CP 200 Electrocardiograph
Figure 44. “Patient Search Results” Screen
Patient Search Results
Patient ID
Back
9:17AM Oct 16 08
Patient Name
Select
4. Take the desired action.
•Press Back. The Search for Patient screen reappears.
• Highlight a patient name, and press Select.
The next screen in your procedure appears. Most of the patient’s data is
automatically filled in. Some data fields — medications, blood pressure,
comments, history, height, weight — will be blank because this information
varies over time.
For ECG tests, go to Step 4 on page 58. For spirometry tests, see the spirometry
manual.
Your search results (matching
names from saved patient data).
Page 71

Directions for Use Chapter 5 Performing ECG Tests 67
To Choose a Patient from the Scheduled Patients List
1. From the Enter New Patient screen (Figure 37 on page 57), press Schedule.
If prompted to log in, enter your user ID and password.
The electrocardiograph searches its own scheduled patients list. If there is no
scheduled patients list, then it searches for orders in a connected EMR system (if any)
via a Welch Allyn HL7 interface. If one or more scheduled patients match your entry,
their names appear.
Figure 45. “Scheduled Patient List” Screen (for Recalling Data)
Scheduled Patient List
Patient ID
New
Patient
9:17AM Oct 16 08
Patient Name
Search
Today’s scheduled patients.
Select
2. Highlight the desired name. Press Select.
The next screen in your procedure appears. Most of the patient’s data is automatically
filled in. Some data fields — medications, blood pressure, comments, history, height,
weight — will be blank because this information varies over time.
For ECG tests, go to Step 4 on page 58. For spirometry tests, see the spirometry
manual.
Note
The other two softkeys exit this search:
• New Patient returns to the Enter New Patient screen. See Figure 37 on
page 57.
• Search brings up the Search for Patient screen. Go to “To Search by
Entering a Patient’s Name or ID” on page 65.
Page 72

68 Chapter 5 Performing ECG Tests Welch Allyn CP 200 Electrocardiograph
Adjusting the ECG Waveforms
The following softkeys appear on the Auto ECG Acquisition and Rhythm ECG screens
(Figure 38 on page 58 and Figure 41 on page 63). Use these softkeys before printing an
Auto ECG or while printing a rhythm ECG.
Softkey Effect
Leads Cycles through the leads in groups of three on the screen. For rhythm reports, also cycles through the lead groups that are
Gain Cycles through the gain settings in mm/mV (5, 10, 20, AUTO), zooming in and out. (AUTO is available for Auto ECGs only,
Baseline Filter Toggles between the two baseline filter settings (on or off). This filter reduces “wandering baseline,” an upward and
Muscle Filter Toggles between the two muscle filter settings (on or off). This filter reduces muscle tremor interference: random,
printing (if <12). To learn how to change the number of leads per group—3, 6, or 12—on rhythm reports, see “Reviewing
the Rhythm Report Settings” on page 47. To learn how to change between standard and Cabrera lead groupings, see
“Reviewing the Miscellaneous ECG Settings” on page 48.
not rhythm ECGs. AUTO is usually the best setting, but some waveforms may be easier to read on other settings.) To learn
how to change the gain’s default setting, see “Reviewing the Miscellaneous ECG Settings” on page 48.
5 mm/mV 20 mm/mV
downward fluctuation of the waveforms. It is preferable, if possible, to eliminate or reduce wandering baseline by
addressing the causes, as explained on page 90. To learn how to change the filter’s default setting, see “Reviewing the
Miscellaneous ECG Settings” on page 48. Caution: You cannot perform ST segment analysis on waveforms that were
recorded with the baseline filter turned on. For details, see the caution on page 60.
irregular voltage superimposed on the waveforms. It is preferable, if possible, to eliminate or reduce muscle tremor by
addressing the causes, as explained on page 90. To learn how to change the filter’s default setting, see “Reviewing the
Miscellaneous ECG Settings” on page 48. Caution: You cannot perform ST segment analysis on waveforms that were
recorded with the muscle filter turned on. For details, see the caution on page 60.
10 mm/mV
Wandering baseline
Speed
(available for
Rhythm ECGs only)
Muscle tremor interference
Cycles through the paper speed settings in mm/sec (10, 25, 50).
25 mm/sec 10 mm/sec
50 mm/sec
Page 73

69
6
Performing Administrative Tasks
Managing Saved Tests In the Test Directory . . . . . . . . . . . . . . . . . . . . . . . . . . 70
Managing the Scheduled Patients List. . . . . . . . . . . . . . . . . . . . . . . . . . . . . . . 74
Managing Data Security . . . . . . . . . . . . . . . . . . . . . . . . . . . . . . . . . . . . . . . . . . 75
Page 74

70 Chapter 6 Performing Administrative Tasks Welch Allyn CP 200 Electrocardiograph
Managing Saved Tests In the Test Directory
The test directory is the collection of tests saved in the electrocardiograph’s memory. This
directory holds up to 50 ECG and 50 spirometry tests. When the directory gets full, the
electrocardiograph prompts you to delete the oldest tests before saving new ones.
When performing Auto ECG or spirometry tests, you may recall patient data from this
directory rather than manually entering their data at the time of the test. For details, see
“To Search by Entering a Patient’s Name or ID” on page 65.
This section explains how to manage — edit, confirm, print, send, and delete — saved
tests. These tasks are all accomplished through the Test Directory menu, as illustrated
here.
Figure 46. ”Test Directory” Menu Tree
Print Directory
Delete
Test Directory*
Search
Search Results
Auto Report 1
Auto Report 2
* Password is required if user
login is enabled.
Edit
Patient Data
Interpretation
Print
Send
Memory Card
Workstation
Page 75

Directions for Use Chapter 6 Performing Administrative Tasks 71
To Print, Send, or Delete Saved Tests
1. Press the Menu key .
2. Choose Test Directory.
If prompted to log in, enter your user ID and password.
The following screen appears.
Figure 47. Test Directory “Search” Screen
Search
9:17AM Oct 16 08
Unprinted Tests
Unconfirmed Tests
Unsent Tests
All Tests
Date From
Date To
Patient ID
Last Name
Print
Directory
//
//
Clear
MM / DD / YYYY
MM / DD / YYYY
Search
Use these criteria to find and perform actions
on a batch
of tests.
Use these criteria (partial or complete) to find
and perform actions on a single
test.
3. (Optional) Press Print Directory to print the contents of the test directory.
4. Select or fill in the search criteria, as explained in Figure 47.
To clear all entries, press Clear.
5. Press Search.
If any saved tests match your criteria, the Search Results screen appears.
6. Select the desired tests.
• To select a continguous group of tests, press and hold the Shift key while
pressing an arrow key.
• To select an individual test, press an arrow key.
• To select all tests, press Ctrl-A.
7. Press the desired softkey.
• Back — returns to the search screen so you can create a new search.
• Delete — deletes the selected test(s).
• Print — prints the selected test(s).
• Send — sends the selected test(s) to your choice:
Memory Card
An SD memory card or removable USB storage device must be in place.
Workstation
Either wireless communications must be configured or a USB cable must
connect a CardioPerfect workstation to the electrocardiograph’s Com port B
().
Page 76

72 Chapter 6 Performing Administrative Tasks Welch Allyn CP 200 Electrocardiograph
To Edit or Confirm Saved Tests
Note
A qualified physician must review and confirm all tests before patients are
treated. If changes are needed for any saved test, you can edit two types of
information:
• patient data
• interpretation statements
For an example of each type of information as it appears on a report, see
Figure 25 on page 39.
1. Select the desired test(s) from the test directory.
For instructions, see “To Print, Send, or Delete Saved Tests” on page 71, Step 1
through Step 6.
2. Press Edit.
The Edit Test – Patient Data screen appears.
If you have selected one test, the patient data displays for that test. If you have
selected multiple tests, the patient data displays for the first test.
3. (Optional) Edit the patient data.
4. Press the desired softkey.
Softkey Effect
Interp Saves any changes, and displays the Edit Test – Interpretation screen for the same test.
1. (Optional) Edit the interpretation.
2. Press the desired softkeys:
• Patient Data saves any changes, and returns to the Edit Test – Patient Data
screen for the same test.
• Confirm saves any changes, sets the test status to “confirmed,” and displays patient
data for the next test, if any.
• Previous Test saves any changes, and displays patient data for the previous test.
Appears only when previous tests are available in your search results.
• Next Test saves any changes, and displays patient data for the next test. Appears
only when next tests are available in your search results.
• Done saves any changes, and returns to the Test Directory Search screen.
Page 77

Directions for Use Chapter 6 Performing Administrative Tasks 73
Softkey Effect (Continued)
Previous Test Saves any changes, and displays the previous test. Appears only when previous tests are
available in your search results.
Next Test Saves any changes, and displays the next test. Appears only when next tests are available in
your search results.
Done Saves any changes, and returns to the Test Directory Search screen.
Page 78

74 Chapter 6 Performing Administrative Tasks Welch Allyn CP 200 Electrocardiograph
Managing the Scheduled Patients List
The scheduled patients list identifies patients whose data has been entered into the
electrocardiograph’s memory for an ECG or spirometry test that day.
When performing Auto ECG or spirometry tests, you may select patients from this list
rather than manually entering their data at the time of the test.
To View or Edit the Scheduled Patients List
1. Press the Menu key .
2. Choose Scheduled Patients.
If prompted to log in, enter your user ID and password.
The scheduled patients list appears.
Figure 48. “Scheduled Patients” Screen (for Editing)
Scheduled Patients
Patient ID
AddSchedule
Delete
Patient Name
Delete All
3. Press the desired softkeys:
• Schedule
Lets you download scheduled patients (orders) from an EMR system via a Welch
Allyn HL7 interface.
•Add
Brings up the Enter New Patient screen, shown in Figure 37 on page 57.
Enter the patient’s data as described on that page.
• Delete
9:17AM Oct 16 08
Today’s scheduled patients.
Exit
Deletes the highlighted patient name.
• Delete All
Deletes all patient names in the list.
•Exit
Returns to the main menu.
Page 79

Directions for Use Chapter 6 Performing Administrative Tasks 75
Managing Data Security
The CP 200 electrocardiograph incorporates security features that can keep patient data
private and confidential. To implement your data security plan, use the Device
Administration menu, which is illustrated here and described in the following pages.
Figure 49. “Device Administration” Menu Tree
System Settings
User Login
(Enable/Disable)
Edit User List
Device
Administration*
* Administrative-level password is
required if user login is enabled.
Audit Trail
(Enable/Disable)
Print Audit Trail
Page 80

76 Chapter 6 Performing Administrative Tasks Welch Allyn CP 200 Electrocardiograph
Working With the User List and User Login
The user list identifies all individuals who are authorized to access patient data.
The user list can hold up to 25 users. After the list reaches 25 users, you can add names
only if some names are set to inactive status. New names replace inactive names. If all 25
names are active, you receive a message that the user list is full.
Two levels of access can be assigned:
•User level
When the user login feature is enabled, all users on the user list have access to the
test directory and the scheduled patient list, including searching and editing
privileges.
• Administrator level
When the user login feature is enabled, only administrator-level users have access to
the administrative functions. For an outline of these functions, see menu tree in
Figure 49 on page 75.
To Enable or Disable User Login
1. Press the Menu key .
2. Choose System Settings > Device Administration.
If prompted to log in, enter an administrator-level user ID and password.
3. Choose User Login.
4. Follow the prompts to enable or disable user login.
To Change a Password
You can change a password in either of two ways:
• At any User Login screen, press Change Password.
Follow the prompts.
• Ask an administrator-level user to change the password.
See “To Review or Edit the User List” on page 77.
Page 81

Directions for Use Chapter 6 Performing Administrative Tasks 77
To Review or Edit the User List
1. Press the Menu key .
2. Choose System Settings > Device Administration.
If prompted to log in, enter an administrator-level user ID and password.
Note
If no administrator-level password has been assigned, the system’s default
user ID and password — available from Welch Allyn — works here.
These defaults exist solely to provide access to the user list in the event that
user login is enabled before an administrator is assigned.
3. Choose User List.
The user list appears.
4. Press the desired softkeys.
Softkey Effect
Add Lets you add new users. For each user, provide the following information:
• User ID (1 to 10 characters)
• Password (5 to 10 characters, displayed as asterisks for security)
• Password Expiration
- Never
- 180 days
•User’s Name
• User Level
- User
- Administrator
• Active?
- Yes (user cannot be replaced)
- No (user can be replaced when list is full)
Edit Lets you edit the information for the highlighted user.
Exit Returns to the Device Administration screen.
Page 82

78 Chapter 6 Performing Administrative Tasks Welch Allyn CP 200 Electrocardiograph
Working With the Audit Trail
An audit trail, a collection of information about user activity, may be helpful or even
required for record-keeping. It tracks who did what when, including these types of
activity:
• Accessing the test directory
• Searching the scheduled patient list
• Editing patient data
• Accessing administrative functions
When the audit trail is enabled, the electrocardiograph collects this type of information in
a file in its memory. When the allotted memory begins to get full, you receive prompts to
print the audit trail. You must print the audit trail to delete (purge) this information and
make room for new information to be collected.
To Enable or Disable the Audit Trail
1. Press the Menu key .
2. Choose System Settings > Device Administration.
If prompted to log in, enter an administrator-level user ID and password.
3. Choose Audit Trail.
4. Follow the prompts to enable or disable the audit trail.
To Pr i n t a n Au d it Tra i l
1. Press the Menu key .
2. Choose System Settings > Device Administration.
If prompted to log in, enter an administrator-level user ID and password.
3. Choose Print Audit Trail.
4. Follow the prompts.
After you verify that printing was successful, the audit information is deleted.
Page 83

79
7
Maintaining the Electrocardiograph
Inspecting the Equipment . . . . . . . . . . . . . . . . . . . . . . . . . . . . . . . . . . . . . . . . . 80
Cleaning the Equipment . . . . . . . . . . . . . . . . . . . . . . . . . . . . . . . . . . . . . . . . . . 80
Testing the Equipment. . . . . . . . . . . . . . . . . . . . . . . . . . . . . . . . . . . . . . . . . . . . 81
Recharging a Fully Discharged Battery . . . . . . . . . . . . . . . . . . . . . . . . . . . . . . 82
Replacing the Battery . . . . . . . . . . . . . . . . . . . . . . . . . . . . . . . . . . . . . . . . . . . . 83
Replacing the Battery (DC) Fuse . . . . . . . . . . . . . . . . . . . . . . . . . . . . . . . . . . . . 85
Replacing the AC Fuses. . . . . . . . . . . . . . . . . . . . . . . . . . . . . . . . . . . . . . . . . . . 86
Storing the Equipment . . . . . . . . . . . . . . . . . . . . . . . . . . . . . . . . . . . . . . . . . . . 87
Discarding the Equipment . . . . . . . . . . . . . . . . . . . . . . . . . . . . . . . . . . . . . . . . 87
Page 84

80 Chapter 7 Maintaining the Electrocardiograph Welch Allyn CP 200 Electrocardiograph
Inspecting the Equipment
WARNING To ensure patient safety and proper operation, perform the
following inspections daily.
• Verify that patient leads are fully inserted. For details, see “Connecting the Patient
Cable” on page 22.
• Check for cracked or broken patient cable, patient leads, power cord,
communications cables, display, and enclosure.
• Check for bent or missing pins on all cables.
• Check all cable and cord connections; reseat if any connectors are loose.
Cleaning the Equipment
WARNING To prevent the spread of infection, the electrocardiograph and
patient cable must be kept clean, especially the components that come in
contact with patients.
Caution Do not let soap or water come into contact with the
electrocardiograph’s internal printer, connectors, or jacks.
Do not attempt to clean the electrocardiograph or the patient cable by
submersing them in liquid, autoclaving, or steam cleaning. Do not pour alcohol
directly on the equipment or soak any components in alcohol. If alcohol or liquids
spill into the electrocardiograph while cleaning, arrange to have it checked before
using it again. For Welch Allyn phone numbers, see page ii.
Monthly, or more often if needed, follow these cleaning instructions:
1. Disconnect the power plug from the AC outlet.
2. Wipe the exterior of the patient cable and electrocardiograph and with a damp cloth
using mild detergent diluted in water.
3. Use 70% isopropyl alcohol to disinfect patient cable, lead wires, and equipment.
4. Dry all components with a clean, soft cloth or paper towel.
5. Wait at least 10 minutes to allow all traces of alcohol to evaporate before turning the
electrocardiograph back on.
Page 85

Directions for Use Chapter 7 Maintaining the Electrocardiograph 81
Testing the Equipment
WARNING Only qualified service personnel should perform leakage current
tests.
Whenever the electrocardiograph is serviced or problems are suspected, Welch Allyn
recommends the following test procedures:
1. Verify continued electrical safety of the device, using IEC 60601-1 or ANSI/AAMI ES1
methods and limits. Test for the following:
• Patient leakage current
• Chassis leakage current
• Earth leakage current
• Dielectric strength (AC and patient circuits)
2. Verify that the electrocardiograph is working properly, using an ECG simulator to
acquire and print a standard 12-lead ECG of known amplitude.
• Printing should be dark and even across the page.
• There should be no evidence of print-head dot failure (no printing breaks forming
horizontal streaks).
• Paper should move smoothly and consistently during printing.
• Waveforms should appear normal, with proper amplitude, and without distortion
or excessive noise.
• Paper should stop with perforations near the tear bar, indicating proper cue-
sensor operation. For tear-bar location, see Figure 17 on page 23.
Page 86

82 Chapter 7 Maintaining the Electrocardiograph Welch Allyn CP 200 Electrocardiograph
Recharging a Fully Discharged Battery
If the electrocardiograph does not turn on when unplugged, the battery may be fully
discharged.
Note
To Recharge the Battery
1. Plug the electrocardiograph into AC power.
2. Verify that the green LED on the keyboard lights up. (See Figure 18 on page 24.)
3. Keep the electrocardiograph plugged in for 12 hours.
The first time you turn the electrocardiograph on after a full battery discharge, you are
prompted to reenter the date and time.
If the electrocardiograph still does not turn on when it is unplugged from AC power, you
may need to replace the battery or battery fuse. See “Replacing the Battery” on page 83
or “Replacing the Battery (DC) Fuse” on page 85.
Regardless of the battery condition, you can use the electrocardiograph
whenever it is plugged in.
If the LED does not light up, go to “Replacing the AC Fuses” on page 86.
Page 87

Directions for Use Chapter 7 Maintaining the Electrocardiograph 83
Replacing the Battery
If you have recharged the battery and the electrocardiograph still does not turn on when
unplugged, or if the battery loses its charge quickly, replace the battery as follows.
(For part number, see “Accessories” on page 6.)
1. Unplug the electrocardiograph from AC power if connected.
2. Turn the electrocardiograph upside-down.
3. Unscrew and remove the battery door. See Figure 50.
4. Lift out the battery. See Figure 51.
Figure 50. Removing the Battery Door Figure 51. Lifting Out the Battery
5. Inspect the fuse. See Figure 52.
• If the “Z” wire is intact, go to Step 6.
• If the “Z” wire is broken or dark, replace the fuse. See “Replacing the Battery
(DC) Fuse” on page 85.
Figure 52. Battery Fuse Plugged In
“Z” wire
Page 88

84 Chapter 7 Maintaining the Electrocardiograph Welch Allyn CP 200 Electrocardiograph
6. Unplug the two battery connectors. See Figure 53.
You may need to pull hard. Use pliers gently if necessary.
Figure 53. Battery Connectors
7. Connect a new battery by matching connector sizes. Do not force connectors to
mismatch.
8. Carefully tuck in all cables. Place the battery into the battery compartment. Fold the
strap so that it will not stick out when you replace the battery door. See Figure 54.
Figure 54. Folding the Battery Strap
Page 89

Directions for Use Chapter 7 Maintaining the Electrocardiograph 85
9. Replace the battery door and screws. Turn the electrocardiograph rightside-up.
It turns on automatically and displays a prompt to enter date and time.
10. Enter the date and time.
The electrocardiograph is ready to use.
11. Discard the old battery appropriately.
• In the USA, call 1-800-SAV-LEAD for instructions on how to recycle it.
• International users, contact your local authorities concerning recycling.
Replacing the Battery (DC) Fuse
If the battery (DC) fuse requires replacing, as described in Step 5 on page 83, follow these
steps. For the fuse value, see “Fuses” on page 95.
1. Remove and discard the fuse. See Figure 55.
You may need to pull hard. Use pliers gently if necessary.
2. Connect a new fuse. It goes in either way.
3. Go to Step 8 on page 84.
Figure 55. Battery Fuse Removed
Page 90

86 Chapter 7 Maintaining the Electrocardiograph Welch Allyn CP 200 Electrocardiograph
Replacing the AC Fuses
If the green LED on the keyboard does not light up when the electrocardiograph is
connected to AC power, you may need to replace one or both of the AC fuses, as follows.
For the fuse value, see “Fuses” on page 95.
1. Unplug the electrocardiograph from AC power if connected.
WARNING Failure to unplug could result in electrocution.
2. Use needle-nosed pliers to remove the fuse case. See Figure 56.
3. Inspect the fuses. If either fuse is dark or has a broken wire, replace the fuse.
See Figure 57.
4. Insert the fuse case. Line it up with the opening; it goes in only one way.
Figure 56. Removing AC Fuse Case Figure 57. AC Fuses Removed
Page 91

Directions for Use Chapter 7 Maintaining the Electrocardiograph 87
Storing the Equipment
When storing the electrocardiograph, cords, and accessories, observe the environmental
storage conditions. See “Specifications” on page 95.
Discarding the Equipment
Discard the old battery appropriately.
• In the USA, call 1-800-SAV-LEAD for instructions on recycling it.
• International users, contact your local authorities concerning recycling.
Discard the electrocardiograph, cords, and accessories according to local laws.
Do not dispose of this product as unsorted municipal waste. Prepare this product for
reuse or separate collection as specified by Directive 2002/96/EC of the European
Parliament and the Council of the European Union on Waste Electronic and Electrical
Equipment (WEEE). If this product is contaminated, this directive does not apply. For
more specific disposal information, see www.welchallyn.com/weee, or contact Welch
Allyn Customer Service at +44 207 365 6780.
Page 92

88 Chapter 7 Maintaining the Electrocardiograph Welch Allyn CP 200 Electrocardiograph
Page 93

89
8
Troubleshooting
Problem-Solving Suggestions . . . . . . . . . . . . . . . . . . . . . . . . . . . . . . . . . . . . . 90
Limited Warranty . . . . . . . . . . . . . . . . . . . . . . . . . . . . . . . . . . . . . . . . . . . . . . . . 93
Service Policy . . . . . . . . . . . . . . . . . . . . . . . . . . . . . . . . . . . . . . . . . . . . . . . . . . . 94
Page 94

90 Chapter 8 Troubleshooting Welch Allyn CP 200 Electrocardiograph
Problem-Solving Suggestions
This section includes several tables:
• Lead quality problems (Ta bl e 2 on page 90)
• System failure problems (Tabl e 3 on page 91)
• System messages (Tab le 4 on page 92)
If you try these suggestions and still have problems, contact Technical Support. For phone
numbers, see page ii.
Table 2. Lead Quality Problems
Condition Causes Actions
A red dot is flashing on the Lead Status
screen.
OR
Lead-off information is displayed on the
screen.
OR
One or more leads prints as a square
wave:
Wandering baseline (an upward and
downward fluctuation of the waveforms):
Muscle tremor interference (random,
irregular voltage superimposed on the
waveforms). May resemble or coincide
with AC interference:
• Electrode contact may be poor.
• A lead may be loose.
Note: Square waves may indicate that the
electrocardiograph is inoperative, but they
are more likely to indicate loose leads.
• Electrodes that are dirty, corroded,
loose, or positioned on a bony area.
• Insufficient or dried electrode gel.
• Oily skin or body lotions.
• Rising and falling of chest during rapid
or apprehensive breathing.
• Patient is uncomfortable, tense,
nervous.
• Patient is cold and shivering.
• Exam bed is too narrow or short to
comfortably support arms and legs.
• Arm or leg electrode straps are too
tight.
• Reattach the lead.
• Replace the electrode.
• Verify that the electrode area has been properly
prepared: shaved, cleaned with alcohol or
acetone, allowed to dry.
• Verify that electrodes have been properly stored
and handled.
• Clean skin with alcohol or acetone.
• Reposition or replace electrodes.
• Help patient relax.
• If wandering baseline persists, turn the baseline
filter on. See “Baseline Filter” on page 68.
• Help patient get comfortable.
• Check all electrode contacts.
• If interference persists, turn the muscle-tremor
filter on. See “Muscle Filter” on page 68.
• If interference still persists, the problem is
probably electrical in nature. See the following
suggestions for reducing AC interference.
Page 95

Directions for Use Chapter 8 Troubleshooting 91
Table 2. Lead Quality Problems (Continued)
Condition Causes Actions
AC interference (even-peaked, regular
voltage superimposed on the waveforms).
May resemble or coincide with muscletremor interference.
• Electrodes that are dirty, corroded,
loose, or positioned on a bony area.
• Insufficient or dried electrode gel.
• Patient or technician touching an
electrode during recording.
• Patient touching any metal parts of an
exam table or bed.
• Broken lead wire, patient cable, or
power cord.
• Electrical devices in the immediate
area, lighting, concealed wiring in
walls or floors.
• Improperly grounded electrical outlet.
• Incorrect AC filter frequency setting or
AC filter is turned off.
• Check all electrode contacts and lead wires.
• Verify that the patient is not touching any metal.
• Verify that the AC power cable is not touching
• Verify that the proper AC filter is selected. See
• If interference persists, unplug the
• If interference still persists, the noise may be
Table 3. System Failure Problems
Condition Causes Actions
Won't turn on when plugged into AC
power.
Won't turn on when unplugged from AC
power.
• Faulty AC power connection.
• Blown AC fuses.
•No AC power.
• Battery disconnected or incorrectly
connected.
• Battery low, not charging, depleted, or
bad.
• Blown battery fuse.
• Check the AC power source.
• Check the AC fuses. See “Replacing the AC
• Check battery connections. See “Replacing the
• Recharge the battery. See “Recharging a Fully
• Replace battery. See “Replacing the Battery” on
• Replace battery fuse. See “Replacing the Battery
the patient lead cable.
“Mains Filter” on page 48.
electrocardiograph from AC power and run it on
the battery. If this solves the problem, you’ll
know that the noise was introduced through the
power line.
caused by other equipment in the room or by
poorly grounded power lines. Try moving to
another room.
Fuses” on page 86.
Battery” on page 83.
Discharged Battery” on page 82.
page 83.
(DC) Fuse” on page 85.
Shuts down during printing Battery low or bad. • Recharge the battery. See “Recharging a Fully
Prints fewer than 10 reports on a full
battery charge.
Unresponsive for an extended time. System frozen. Press the reset button by inserting a small object,
The screen is too dark or too light. The contrast is to high or too low. Press Ctrl-R. The contrast resets to its default value.
Degraded battery. Replace battery. See “Replacing the Battery” on
Discharged Battery” on page 82.
• Replace battery. See “Replacing the Battery” on
page 83.
page 83.
such as a paper clip, into the hole.
Reset button
Page 96

92 Chapter 8 Troubleshooting Welch Allyn CP 200 Electrocardiograph
Table 4. System Messages (alphabetical order)
System Message Problems Actions
“A test is being printed that has not been
saved and will be lost. Continue
shutdown?”
“Audit Trail is too large. Please print and
purge.“
“Insufficient battery power to begin.
Please connect AC power and try again.”
“Insufficient space available” Not enough space on memory card
“Memory card error” Problem writing to memory card
“Out Of Paper” • Printer is out of paper.
“Paper Error” Paper was loaded incorrectly. Reload the paper. See “Loading the Thermal Chart
was pressed while printing an
Auto ECG.
Audit information is approaching its
maximum allotted storage.
Battery low or bad. • Recharge the battery. See “Recharging a Fully
or removable USB storage device.
or removable USB storage device.
• Printer door is open.
To shut down without saving the test, press .
To cancel the shutdown, press .
Print and purge the audit trail. See “Working With the
Audit Trail” on page 78.
Discharged Battery” on page 82.
• Replace battery. See “Replacing the Battery” on
page 83.
• Delete some tests from the card or USB storage
device at a PC.
• Use a different card or USB storage device.
• Verify that the write-protect tab is in the
unprotected position.
• Reseat the card in its slot.
• Use a different card or USB storage device.
• Load paper. See “Loading the Thermal Chart
Paper” on page 23.
• Close the printer door. See “Loading the Thermal
Chart Paper” on page 23.
Paper” on page 23.
“Powering down” Low battery. Recharge the battery. See “Recharging a Fully
Discharged Battery” on page 82.
“Problem loading the following settings:
<System>
<ECG>
*
*
*
Using default settings.”
“Shutdown?” was pressed while printing a
“Temperature Error” Printer head temp is too high. Allow to cool, then try again.
“Test has not been saved. Continue
shutdown?”
“Unable to communicate with
workstation“
Problem loading your settings at startup.
May indicate memory problems.
Rhythm ECG.
was pressed after printing an
Auto ECG.
• Configuration not correct.
• Cable and/or wireless radio not
properly connected.
Contact Technical Support. For phone numbers, see
page ii.
To shut down, press .
To cancel the shutdown, press .
To shut down without saving the test, press .
To cancel the shutdown, press .
• Verify communication settings on the PC.
• Check cable and/or wireless radio connections.
Page 97

Directions for Use Chapter 8 Troubleshooting 93
Limited Warranty
Welch Allyn, Inc., warrants that the Cardiopulmonary line of electrocardiographs, including
the CP 100 and CP 200 models (the Products) meet the labeled specifications of the
Products and will be free from defects in materials and workmanship that occur within 3
years after the date of purchase, except that accessories used with the Products are
warranted for 90 days after the date of purchase. Such accessories include: lead wires,
cabling, electrodes, and battery.
The date of purchase is: 1) the date specified in our records, if you purchased the Product
directly from us, 2) the date specified in the warranty registration card that we ask you to
send to us, or 3) if you don’t return the warranty registration card, 30 days after the date
on which the Product was sold to the dealer from whom you bought the Product, as
documented in our records.
This warranty does not cover damage caused by: 1) handling during shipping, 2) use or
maintenance contrary to labeled instructions, 3) alteration or repair by anyone not
authorized by Welch Allyn, and 4) accidents.
If a Product or accessory covered by this warranty is determined to be defective because
of defective materials, components, or workmanship, and the warranty claim is made
within the warranty period described above, Welch Allyn will, at its discretion, repair or
replace the defective Product or accessory free of charge. If your Product requires repairs
covered by this warranty, upon your request Welch Allyn will loan to you, at no cost, a
substitute Product for use until your repaired Product is returned.
You must obtain a return authorization from Welch Allyn to return your Product before you
send it to Welch Allyn’s designated service center for repair. Contact Welch Allyn
Technical Support. For phone numbers, see page ii.
THIS WARRANTY IS IN LIEU OF ALL OTHER WARRANTIES, EXPRESS OR IMPLIED,
INCLUDING BUT NOT LIMITED TO THE IMPLIED WARRANTIES OF MERCHANTABILTY
AND FITNESS FOR A PARTICULAR PURPOSE. WELCH ALLYN’S OBLIGATION UNDER
THIS WARRANTY IS LIMITED TO REPAIR OR REPLACEMENT OF PRODUCTS
CONTAINING A DEFECT. WELCH ALLYN IS NOT RESPONSIBLE FOR ANY INDIRECT OR
CONSEQUENTIAL DAMAGES RESULTING FROM A PRODUCT DEFECT COVERED BY
THE WARRANTY.
Page 98

94 Chapter 8 Troubleshooting Welch Allyn CP 200 Electrocardiograph
Service Policy
All repairs on products under warranty must be performed or approved by Welch Allyn.
Unauthorized repairs will void the warranty. In addition, whether or not covered under
warranty, any product repair shall exclusively be performed by Welch Allyn certified
service personnel.
If the product fails to function properly—or if you need assistance, service, or spare
parts—contact the nearest Welch Allyn Technical Support Center. For phone numbers,
see page ii.
Before contacting Welch Allyn, try to duplicate the problem, and check all accessories to
ensure that they are not causing the problem. When calling, please be prepared to
provide:
• Product name and model number and complete description of the problem.
• Serial number of your product (if applicable).
• Complete name, address and phone number of your facility.
• For out-of-warranty repairs or spare parts orders, a purchase order (or credit card)
number.
• For parts orders, the required spare or replacement part numbers.
If your product requires warranty, extended warranty, or non-warranty repair service,
please call first the nearest Welch Allyn Technical Support Center. A representative will
assist you troubleshooting the problem and will make every effort to solve it over the
phone, avoiding potential unnecessary returns.
In case a return cannot be avoided, the representative will record all necessary
information and will provide a Return Material Authorization (RMA) number, as well as the
appropriate return address. An RMA number must be obtained prior to any return.
If you have to return goods for service, follow these recommended packing instructions:
• Remove all hoses, cables, sensors, power cords, and ancillary products (as
appropriate) before packing, unless you suspect they are associated with the
problem.
• Wherever possible use the original shipping carton and packing materials.
• Include a packing list and the Welch Allyn Return Material Authorization (RMA)
number.
It is recommended that all returned goods be insured. Claims for loss or damage to the
product must be initiated by the sender.
Page 99

95
A
Specifications
Item Specification
Dimensions
Weight 11.6 lb (5.3 kg)
Keyboard type Elastomer keypad with complete alphanumeric keys
Paper type 8.25 x 11 inches (21 x 28 cm), Z-fold thermal paper, 200 sheets
Thermal printer (internal) Computer-controlled dot array, 8 dots/mm
USB printer (external) Inkjet or laser printer that supports PCL (printer control language)
Thermal paper speeds 10, 25, 50 mm/s
Gain settings:
Auto ECGs
Rhythm ECGs
16.2 in
(41.1 cm)
6.2 in
(15.7 cm)
15.6 in
(39.7 cm)
Soft-key menu and dedicated function keys
5, 10, 20 mm/mV, AUTO
5, 10, 20 mm/mV
Report print formats:
Auto ECGs
Rhythm ECGs
Average cycles
ECG storage Up to 50 ECGs
Frequency range 0.3 to 150 Hz
Digital sampling rate > 1,000 samples/second/channel
Pacemaker detection ANSI/AAMI EC11
Power requirement Universal AC power supply 100–240 V ~, 50/60 Hz ~, 2.2 A maximum
Fuses
AC
DC (battery fuse)
Lead configurations Standard, Cabrera
3x4, 3x4+ 1R, 3x4 +3R, 6x2, 12x1, 6x2 50 mm/s, 6x2 Ext., 2x6 +1R, 6x2 +1R
3, 6, or 12 leads at a time
3x4 50 mm/s + 3R, 6x2 50 mm/s + 6R
Time-delay type, 2 amp 250 V rating, Littlefuse 0215002 or equivalent.
Fast-acting type, 10 amp 32 V rating, Bussman ATC-10 or equivalent.
Page 100

96 Appendix A Specifications Welch Allyn CP 200 Electrocardiograph
Item (Continued) Specification (Continued)
Rechargeable battery Lead acid gel, 6 volt, 5 AH
Prints up to 100 continuous ECGs per charge
12-hour recharging
Filters 0.5 Hz high-performance baseline filter
Safety, EMC, and regulatory
compliance
Standard connectivity Com port for USB cables or removable USB storage devices ( ≥ 64 MB, < 2 GB)
Connectivity with electronic medical
records
Electrodes Rigorously tested for conductivity, adhesion, and hypoallergenic qualities, and
Cables and wires Meet or exceed IEC 60601
Environmental operating conditions:
Temperature
Relative humidity
Altitude
Environmental storage conditions:
Temperature
Relative humidity
Altitude
35 Hz muscle-tremor filter
AC-interference filter 50 Hz or 60 Hz
ANSI/AAMI EC11* UL60601-1
CAN/CSA C22.2 No. 601.1 IEC/EN 60601-1
CAN/CSA C22.2 No. 601.1.1 IEC/EN 60601-1-1
CAN/CSA C22.2 No. 601.1.2 IEC/EN 60601-1-2
CAN/CSA C22.2 No. 601.1.4 IEC/EN 60601-1-4
CAN/CSA C22.2 No. 601.2.25 IEC/EN 60601-2-25
CAN/CSA C22.2 No. 601.2.51 IEC/EN 60601-2-51
SD memory card slot (for use with cards ≥ 64 MB, < 2 GB)
Supported through the Welch Allyn CardioPerfect workstation software
exceed all AAMI standards
+10° C to +40° C (+50° F to +104° F)
15 – 95% noncondensing
700 – 1060 hPa
-20° C to +49° C (-4° F to +120° F)
15 – 95% noncondensing (30 – 70% for printing)
500 – 1060 hPa
Protection against electric shock Class I, internally powered
Typ e BF
Protection against ingress of water,
per IEC 60529
Mode of operation Continuous
*Per AAMI EC11:1991/(R)2001 Diagnostic Electrocardiographic Devices, Section 3.1.2.1 Disclosure of cautionary
information/ performance characteristics paragraph c) Accuracy of input signal reproduction, the manufacturer shall
disclose the methods used to establish overall system error and frequency response. Welch Allyn has used methods A & D,
as prescribed in section 3.2.7.2 and 4.2.7.2 of this same standard, to verify overall system error and frequency response.
Because of the sampling characteristics and the asynchronism between sample rate and signal rate, digital ECG systems
such as the CP 100 and CP 200 may produce a noticeable modulating effect from one cycle to the next, particularly in
pediatric recordings. This phenomenon is not physiologic.
Specifications are subject to change without notice.
IPX0
 Loading...