

Page 1
Programmable Logic Controller
PLC300
User’s Manual
Motors | Automation | Energy | Transmission & Distribution | Coatings
Page 2

Page 3

User’s Manual
Series: PLC300
Language: English
Document Number: 10004642446 / 00
Models: with and without HMI
Publishing Date: 04/2017
Page 4

Page 5

Index
1 SAFETY INSTRUCTIONS ....................................................................... 1-1
1.1 SAFETY WARNINGS IN THIS MANUAL ...................................................... 1-1
1.2 SAFETY WARNINGS IN THE PRODUCT .................................................... 1-1
1.3 PRELIMINARY RECOMMENDATIONS ....................................................... 1-2
2 INTRODUCTION TO PLC300 ................................................................ 2-1
3 CONNECTORS ........................................................................................3-1
3.1 CONNECTORS PINOUTS ............................................................................3-2
4 CONNECTIONS ......................................................................................4 -1
4.1 SUPPLY .......................................................................................................... 4-1
4.2 CAN NETWORK ............................................................................................ 4 -1
4.3 DIGITAL INPUTS .......................................................................................... 4 -1
4.4 DIGITAL OUTPUTS ....................................................................................... 4-2
4.5 ANALOG INPUT ............................................................................................ 4-3
4.6 ANALOG OUTPUT ........................................................................................4-4
4.7 ENCODER INPUT .........................................................................................4-5
4.8 RS-232 INTERFACE ..................................................................................... 4-7
4.9 RS-485 INTERFACE .....................................................................................4-8
4.10 ETHERNET INTERFACE ............................................................................. 4-9
5 DESCRIPTION OF THE KEYS ..............................................................5-1
6 EXPANSIONS ..........................................................................................6-1
7 CONFIGURATION OF THE PLC300 ......................................................7-1
7.1 SET CLOCK .................................................................................................. 7-1
7.2 LANGUAGE SELECTION .............................................................................. 7-2
7.3 LCD CONTRAST ........................................................................................... 7-2
7.4 KEYBOARD BEEP ......................................................................................... 7-2
7.5 ANALOG INPUT ............................................................................................ 7-2
7.6 IOA CARD (AOS) ........................................................................................ 7-3
7.7 ENCODER SUPPLY ...................................................................................... 7-3
7.8 RS-232 SETUP .............................................................................................. 7-3
7.9 RS-485 SETUP .............................................................................................. 7- 4
7.10 CAN SETUP ................................................................................................ 7-5
7.11 LAN SETUP ................................................................................................. 7- 5
7.12 MB TCP SETUP ........................................................................................... 7-6
7.13 SD CARD – BACKUP HMI VERSION ......................................................... 7-7
7.14 USER PROGRAM ...................................................................................... 7-10
7.15 SETUP MENU PASSWORD ...................................................................... 7-10
7.16 WATCHDOG ................................................................................................7-11
8 I/O STATUS..............................................................................................8 -1
9 DESCRIPTION OF THE PLC300 OPERATION .....................................9-1
9.1 SCREEN MANAGEMENT ............................................................................. 9-1
9.1.1 Levels of Access .................................................................................. 9 -1
9.1.2 Function Keys: F1...F12.......................................................................9-2
Page 6

Index
9.1.3 Composition of a Screen ...................................................................9-3
9.1.4 Text Component: Writing of Static Text ...........................................9-3
9.1.5 Numeric Input Component: Data Numeric Input ............................9-3
9.1.6 Numeric Output Component: Data Numeric Output ......................9-5
9.1.7 Message Component: Output with Texts for a Variable ................ 9-5
9.1.8 Bar Graph Component: Bar Graph ................................................... 9-6
9.1.9 Text Output .......................................................................................... 9-7
9.1.10 Text Input ........................................................................................... 9-7
9.2 AUTOMATIC SOFTWARE RECOVERY - ASR ............................................ 9-7
10 ALARMS ..............................................................................................10-1
10.1 INTERNAL ALARMS ................................................................................. 10 -1
10.2 USER ALARMS ......................................................................................... 10-2
10.3 ALARM SCREENS .................................................................................... 10-2
11 OPERATION OF THE LEDS ................................................................ 11-1
12 BATTERY REPLACEMENT ................................................................12-1
13 DESCRIPTION OF THE MODELS .....................................................13 -1
14 SELF-TEST ..........................................................................................14 -1
15 TECHNICAL SPECIFICATIONS .........................................................15 -1
15.1 STANDARDS MET ..................................................................................... 15-3
16 DIMENSIONS ......................................................................................16 -1
16.1 MECHANICAL MOUNTING ...................................................................... 16-3
Page 7
Safety Instructions
PLC300 | 1-1
1 SAFETY INSTRUCTIONS
This manual contains the information for the correct use of the programmable controller
PLC300.
It was developed to be used by people with proper technical training or qualification to
operate this kind of equipment.
1.1 SAFETY WARNINGS IN THIS MANUAL
In this manual, the following safety warnings are used:
DANGER!
The procedures recommended in this warning have the purpose of protecting
the user against death, serious injuries and considerable material damages.
ATTENTION!
The procedures recommended in this warning have the purpose of avoiding
material damages.
NOTE!
The information mentioned in this warning is important for the proper
understanding and good operation of the product.
1.2 SAFETY WARNINGS IN THE PRODUCT
The following symbols are attached to the product, serving as safety notices:
High voltages are present.
Components sensitive to electrostatic discharge.
Do not touch them.
Mandatory connection to the protective earth (PE).
Page 8
Safety Instructions
1-2 | PLC300
1.3 PRELIMINARY RECOMMENDATIONS
DANGER!
Only qualified personnel, familiar with PLC300 and related equipment must
plan or perform the installation, commissioning, operation and maintenance
of this equipment.
The personnel must follow the safety instructions described in this manual
and/or defined by local standards.
The noncompliance with the safety instructions may result in death risk
and/or equipment damage.
NOTE!
For the purposes of this manual, qualified personnel are those trained in
order to be able to:
1. Install, ground, power up and operate the PLC300 in accordance with
this manual and the safety legal procedures in force.
2. Use the protective equipment in accordance with the standards.
3. Give first aid.
DANGER!
Always disconnect the general power supply before touching any electrical
device associated to the PLC.
ATTENTION!
The electronic cards have component parts sensitive to electrostatic
discharge. Do not touch directly the component parts or connectors.
NOTE!
Fully read this manual before installing or operating this equipment.
Page 9

Introduction to PLC300
PLC300 | 2-1
2 INTRODUCTION TO PLC300
PLC300 is a PLC with integrated HMI, developed to meet the need of interface with the
user on panels and machines and at the same time a complete expandable PLC, fast
and with several communication ports, enabling the product to be master of CANopen
networks (CAN network) and/or Modbus RTU (RS-485 network) as well as Modbus TCP
(Ethernet network).
Some important characteristics:
High processing speed:
The PLC300 uses a 32 bit ARM Cortex-M3 processor, running at 120 MHz, which provides
a high processing speed.
HMI - Human-Machine Interface:
The PLC300 has an integrated HMI with LCD display with backlight of 4 lines and 20
characters each, in addition to the keyboard with function keys programmed by the user,
all with LEDs, <ALARM> key, <HOME> key, etc., and alpha-numeric keyboard.
Version without HMI:
It is possible to assemble the PLC on a DIN rail, in a version without HMI (keyboard and
display). In this case, the back part of the product becomes the front and features a small
display of 2 lines and 16 characters with a button to check the I/O status.
Programming:
In addition to the ladder programming, the WPS allows the assembly of the screens,
graphically, configuration of the alarms, assignment of the function keys, configuration of
the equipment, besides the firmware, which can be updated directly via PC.
The programming can be done via USB, Ethernet or Serial RS232 and RS485.
Hot Download:
Allows hot loading of the resource, that is, it is possible to change the ladder program,
screens, alarms and logs with the current program running, and after the conclusion of
the download, the new program is executed automatically. For further information, refer
to the WPS manual.
Large memory capacity:
The PLC300 features a static RAM memory with battery and capacity of 1 MByte to store
screens, alarms, program and other user’s data. The memory allocation can be configured
by the user via the WPS.
Bootloader:
The bootloader is an auxiliary program that executes the main firmware of the PLC300,
which, in turn, executes all the functionalities.
It is through the bootloader that new firmware can be saved to the PLC300 via USB or Serial.
Page 10

Introduction to PLC300
2-2 | PLC300
If during the update/saving of the firmware, the process is interrupted for some reason,
the message “Bootloader V6.xy” will be displayed on the screen and the red LEDs of the
Status, CAN and Serial will keep flashing. If that happens, just download the updated
firmware via WPS.
SD memory card (Secure Digital):
The PLC300 allows saving data and program, logging events, recipes in a SD memory card.
The memory card must be SD type with FAT32 formatting with capacity up to 32G. The
faster the card (class of the card), the shorter the recording time. This is important in case
of regular variable log recordings, for instance. It is recommended the use of class 10 cards.
Automatic Software Recovery - ASR:
It automatically recovers the PLC300 software, including configurations and retentive
markers.
See Section 9.2 AUTOMATIC SOFTWARE RECOVERY - ASR on page 9-7 of this manual.
RTC – Real Time Clock:
Real time clock that allows recording events such as alarms and logs, besides specific
blocks such as alarms or interruptions.
Digital, PWM and analog outputs:
8 digital, galvanically insulated, protected, 500 mA (each), 24 Vdc, PNP outputs.
The 10 bit analog output has independent terminals for current or voltage.
Fast output up to 300 kHz with capacity of 100 mA in 24 Vdc can be programmed in PWM.
It can be used as standard digital output.
Digital and analog inputs:
Ten isolated, digital inputs are available, at 24-Vdc level, able to produce interruption.
Two of them are fast and can be used to count pulses of up to 100 kHz, or as encoder
input in quadrature.
A 12-bit, differential, analog input is also available.
Encoder input:
Quadrature encoder input, with additional signals and detection of split cable with optional
alarm.
Maximum frequency: 100 kHz.
Page 11

Introduction to PLC300
PLC300 | 2-3
Watchdog:
The PLC300 has a user-configurable watchdog with minimum time of 300 ms.
In case of watchdog, the state of the outputs can be configured, as well as an output for
exclusive use of the watchdog.
Expansion modules:
Up to 2 I/O expansion modules can be connected to the PLC300. The following modules
are compatible:
IOA-01: 1 analog input of 14 bits in voltage and current; 2 digital inputs; 2 analog outputs
of 14 bits in voltage and current; 2 open collector digital outputs.
IOB-01: 2 analog inputs insulated in voltage and current; 2 digital inputs; 2 analog outputs
insulated in voltage and current (same output programming of the standard CFW-11); 2
open collector digital outputs.
IOC- 01: 8 digital inputs; opto-coupled; 24 Vdc; high/low level actuation; 4 digital outputs;
relay NO contacts; capacity of 240 Vac/1 A.
IOC-02: 8 digital inputs; opto-coupled; 24 Vdc; high/low level actuation; 8 digital outputs,
open collector; 24 V/0.1 A.
IOC-03: 8 digital inputs; optocoupled; 24 Vdc; configurable, high/low level actuation;
7 PNP, protected outputs; 24 Vdc; 500 mA.
IOE-01: 5 inputs of single or triple PTC thermistors with reinforced insulation compared
to the 0 V of the PLC300.
IOE-02: 5 inputs of PT100 thermistors with reinforced insulation compared to the
0 V of the PLC300.
IOE-03: 5 thermistor inputs type KTY84 with reinforced insulation in relation to the
0 V of PLC300.
Communication interfaces:
The PLC300 has the following communication interfaces:
RS-485 insulated with Master/Slave Modbus RTU protocol.
CAN insulated with Master/Slave CANopen protocol.
RS-232 with Modbus RTU protocol for monitoring and remote programming, via modem
on telephone line, and ASCII protocol for bar code readers.
USB to communicate with the computer.
Ethernet 10/100 with Modbus TCP protocol.
Page 12

Introduction to PLC300
2-4 | PLC300
Power Supply:
The PLC300 needs external supply of 24 Vdc +/-15 % with capacity of at least 500 mA.
Internally, there is an insulated DC/DC converter that provides the voltages necessary for
the product. Being insulated, it allows the user to use the same source to supply other
devices, such as the digital inputs and outputs.
Keys with functionalities at power on:
If some keys are pressed when switching on the PLC300, the following functions are
executed:
Key
Pressed Time
at Power on (t)
Functionality
SETUP t > 5 seconds. Loads factory default.
ALARM t > 5 seconds. Stops user program.
DEL t > 5 seconds. Cleans memory (deletes application, screens, …).
F6 -- Performs self-diagnosis, further details in Chapter 14 SELF-TEST
on page 14-1.
Important Note:
From the V1.50, in order to upload the factory default, stop the user’s program or clean the memory by mean
of the power on, it is necessary to type the SETUP current password for the function to be executed.
Type the current SETUP password and then press <ENTER>. In case the password is incorrect or if you
press <ESC>, the action will not be executed.
Note that when you upload the factory default or clean the memory, the SETUP password goes back to the
factory default value: '0000'.
NOTE: to clean the memory (deletes application, screens, etc.) on versions without HMI (BP and BS), turn on
the PLC300 holding the button and release it after the message “Release the Key” appears. Press the button
again for two seconds and release.
Page 13
Connectors
PLC300 | 3-1
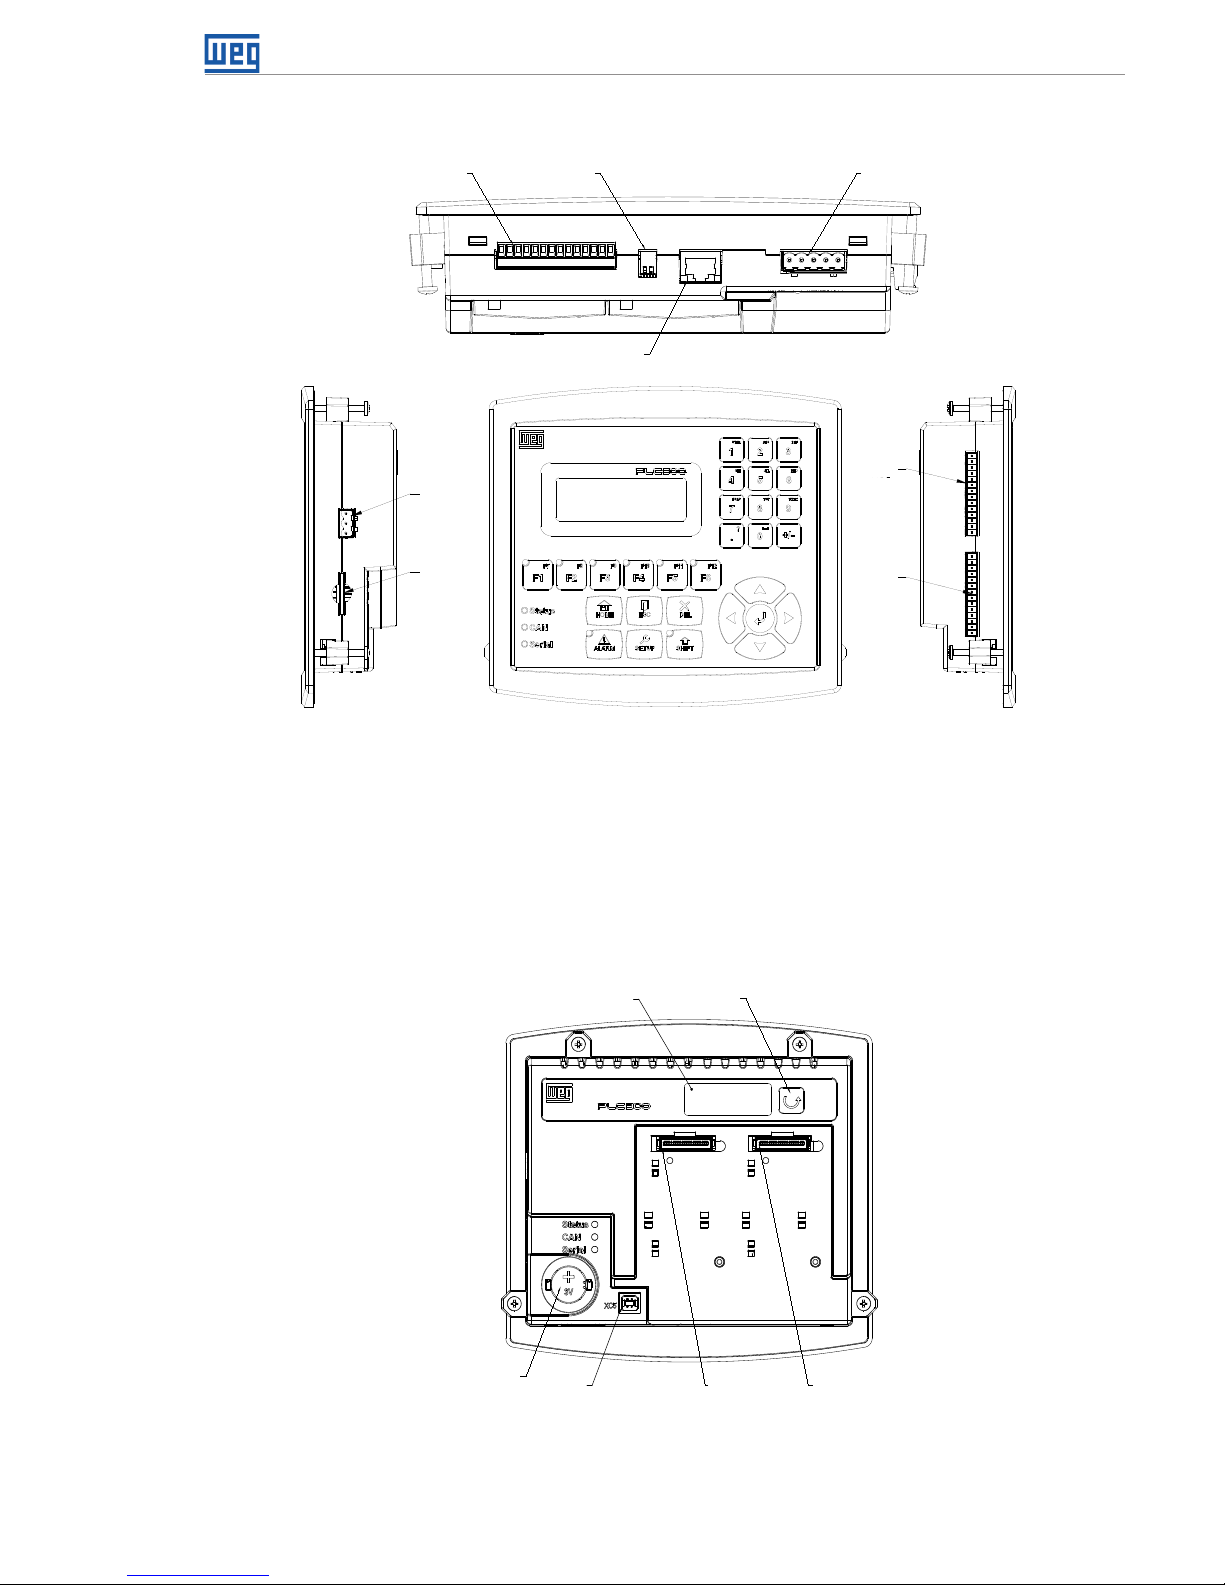
3 CONNECTORS
a)
XC3 S1 XC6
XC4
XC1
XC8
XC7
XC2
XC1 – digital and analog inputs.
XC2 – digital, PWM and analog outputs.
XC3 – encoder RS-232 and RS-485 input.
XC4 – Ethernet.
XC5 – USB.
XC6 – CAN.
XC7 – SD card.
XC8 – Power input 24 Vdc.
S1 – Turn on/off RS-485 termination resistors.
b)
Battery
Back
display
Back
key
XC11
Slot1
XC12
Slot2
XC5
XC11 – expansion slot 1
XC12 – expansion slot 2
Figure 3.1 (a) and (b) - Position of the connectors
Page 14
Connectors
3-2 | PLC300
3.1 CONNECTORS PINOUTS
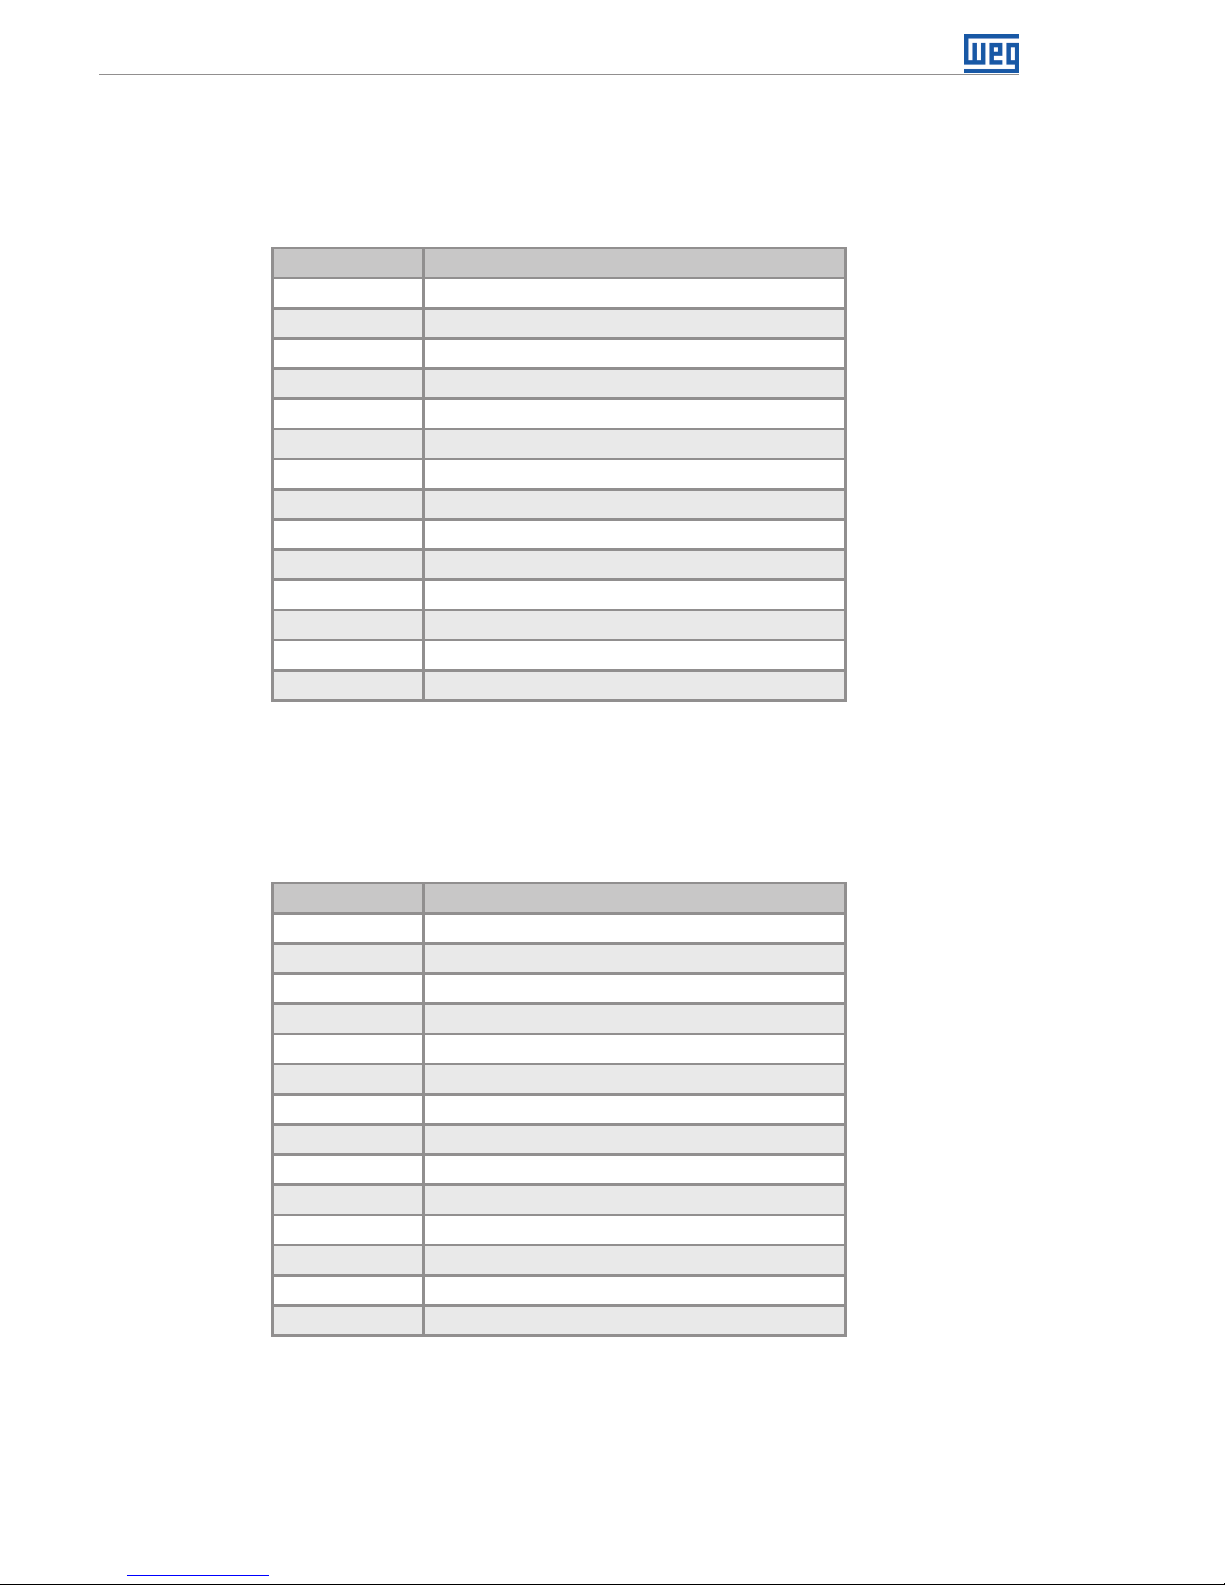
XC1 – Digital and Analog Inputs
Tab l e 3 .1: Function of the digital and analog input pins
Pin Function
1 DI1 - digital input 1.
2 DI2 - digital input 2.
3 DI3 - digital input 3.
4 DI4 - digital input 4.
5 DI5 - digital input 5.
6 DI6 - digital input 6.
7 DI7 - digital input 7.
8 DI8 - digital input 8.
9 DI9 - digital input 9 (fast)
(*)
.
10 DI10 - digital input 10 (fast)
(*)
.
11 Common of the inputs DI1...DI8.
12 Common of the inputs DI9...DI10.
13 (AI1+) analog input 1 (+).
14 (AI1-) analog input 1 (-).
(*) DI9 and DI10 can be used for reading encoder signals, A and B,
respectively.
XC2 – Digital, PWM and Analog Outputs
Table 3 . 2: Function of the digital, PMW and analog output pins
Pin Function
1 DO1 - digital output 1.
2 DO2 - digital output 2.
3 DO3 - digital output 3.
4 DO4 - digital output 4.
5 DO5 - digital output 5.
6 DO6 - digital output 6.
7 DO7 - digital output 7.
8 DO8 - digital output 8.
9 DO9 - fast output 9 (PWM).
10 GNDBB – 0 V digital outputs.
11 VBB – (20...30 Vdc) for the digital outputs.
12 AO1(V) – analog output 1 in voltage.
13 AO1(I) – analog output 1 in current.
14 AO1 – common.
Page 15
Connectors
PLC300 | 3-3
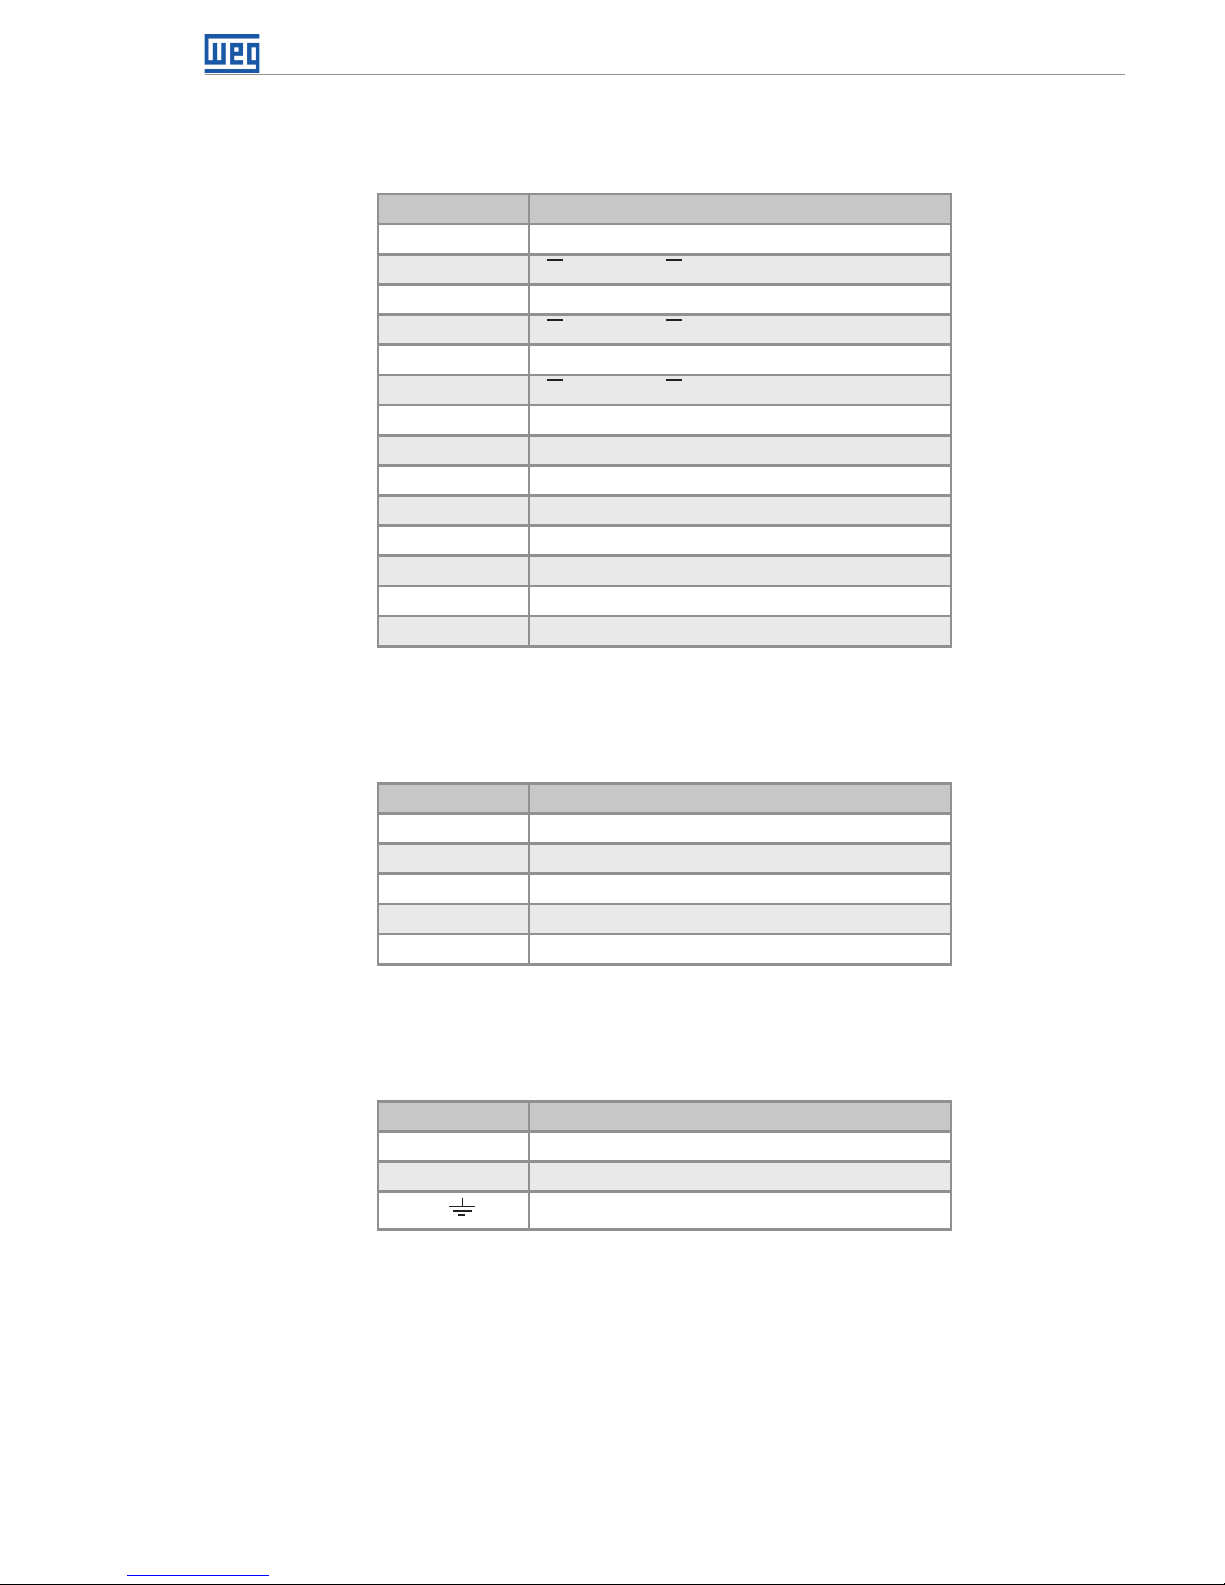
XC3 – Encoder input, RS-232 and RS-485
Table 3 . 3: Function of the pins of the encoder, RS-232 and RS-485 input
Pino Função
1 A - encoder A signal.
2
A - encoder A signal.
3 B - encoder B signal.
4
B
- encoder B signal.
5 Z - encoder Z signal.
6
Z - encoder Z signal.
7 +5/12 Vdc - encoder supply.
8 0 V – encoder supply.
9 RS-232 rate.
10 RS-232 RX.
11 RS-232 GND.
12 RS-485 signal A (-).
13 RS-485 signal B (+).
14 RS-485 GND (insulated).
XC6 – CAN
Table 3 . 4 : Function of the pins of the XC6 - CAN
Pin Function
1 V -
2 CANL
3 SHIELD
4 CANH
5 V + (11 to 30 Vdc)
XC8 – Power Supply
Table 3.5: Function of the pins of the XC8 - Power Supply
Pin Function
1 V+ (20 to 28 Vdc)
2 GND
3 Ground
XC4 – Ethernet
Ethernet standard connector.
Page 16

Connectors
3-4 | PLC300
Page 17
Connections
PLC300 | 4-1
4 CONNECTIONS
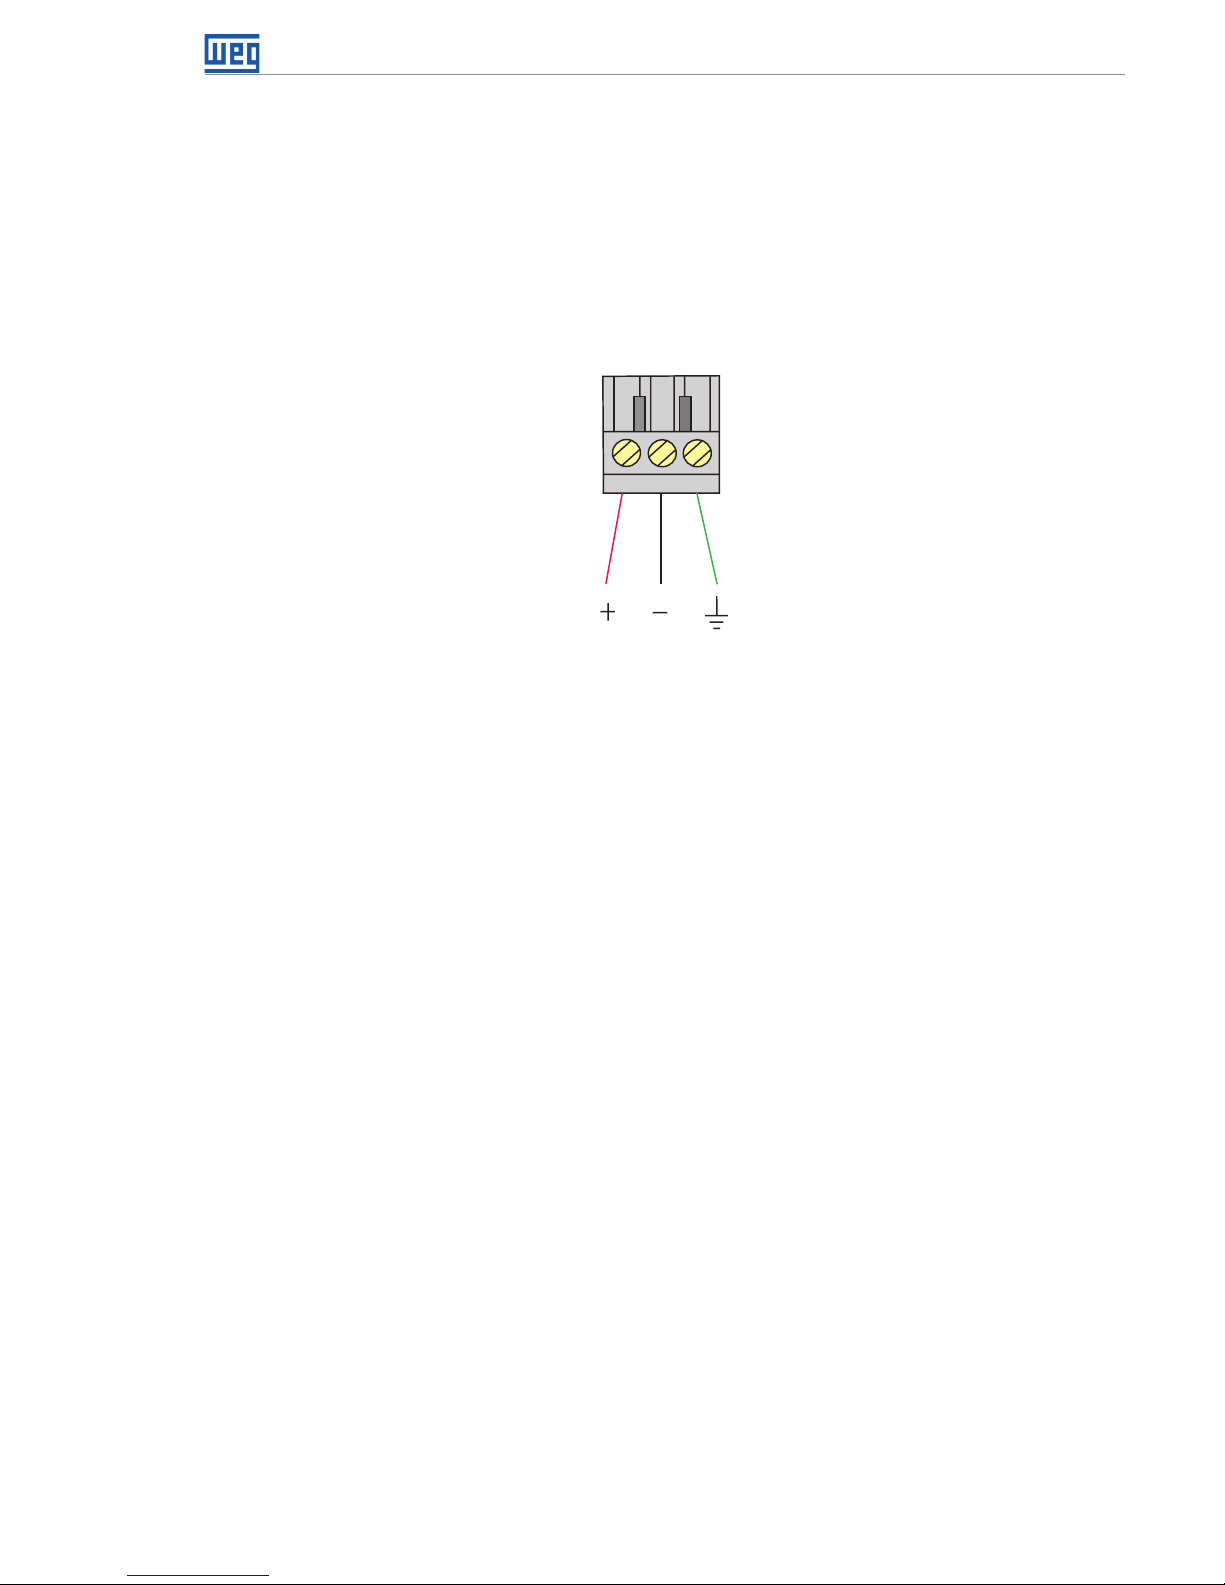
4.1 SUPPLY
The PLC300 must be powered by a power supply of 24 Vdc ± 15 % with capacity of at
least 500 mA.
The grounding connection is important.
1 2 3
Figure 4.1: XC8: Power connector of the PLC300
4.2 CAN NETWORK
See the CANopen manual.
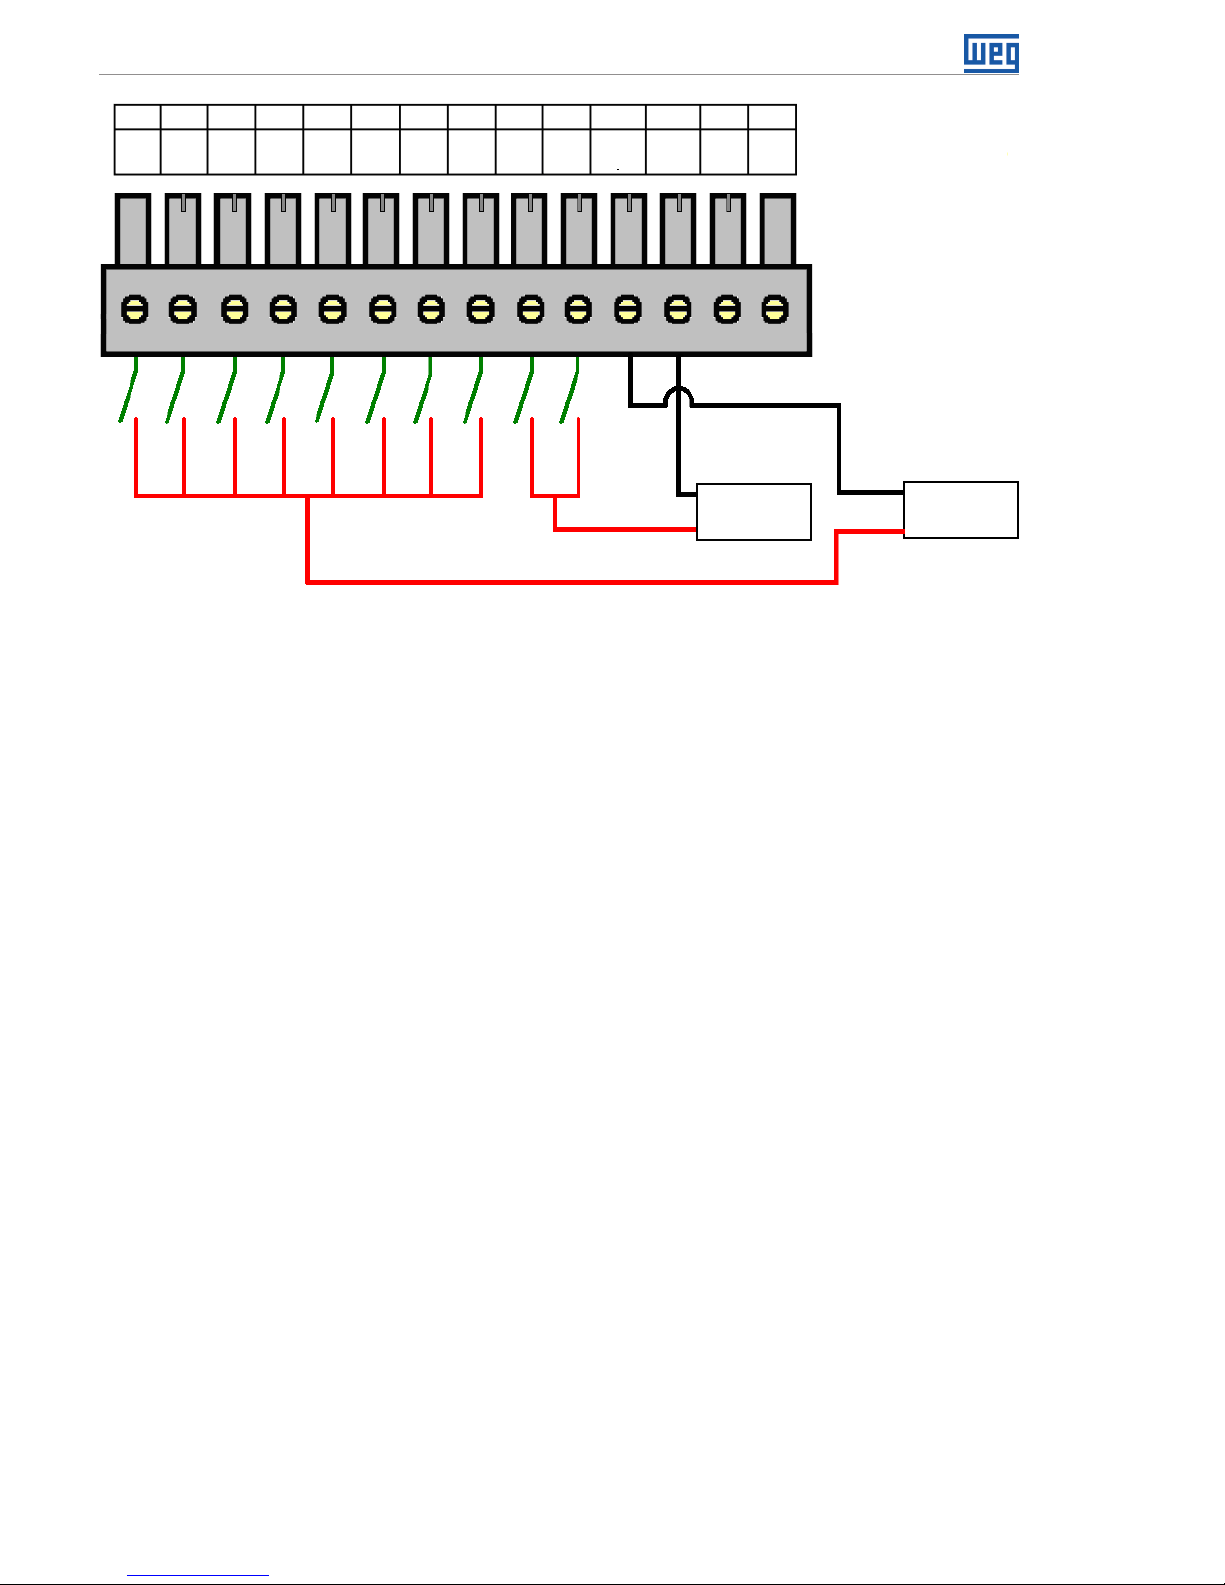
4.3 DIGITAL INPUTS
The 10 insulated digital inputs must be excited by an external source of 24 Vdc. The inputs
are bidirectional, which means the input common can be connected to either the GND or
the VDC of the supply.
Two common pins are provided: one for DI1 to DI8 and another for DI9 to DI10.
Thus, you can connect one group in VDC and another in the GND, providing more flexibility
to the project by allowing both contacts NPN and PNP of any device to be connected to
the PLC300 inputs.
All the DIs can generate interruption in the user program and can be used as count task.
The DIs 9 and 10 are faster and can read a signal of up to 100 kHz, and they can also
operate as encoder input. The other DIs can count up to 4 kHz.
The drive levels for the DIs are from 10 to 30 Vdc for high level and less than 3 Vdc for
low level.
Page 18
Connections
4-2 | PLC300
24 Vcc
XC1
24 Vcc
PNP
XC1
PNP or NPN
DI
1
1 74 102 85 11 12 13 143 96
DI
9
DI
5
DI
3
COM1COM2AI1
(+)
AI1
(-)
DI
7
DI
2
DI
10
DI
6
DI
4
DI
8
(-)
(-)
(+)
(+)
Figure 4.2: Example of connection of the digital inputs (XC1)
Notes about the example:
1. Inputs DI1 to DI8 are bidirectional, that is, they can operate as NPN or PNP. The fast
inputs DI9 and DI10 are PNP.
2. PNP is the type of input whose common is connected to the GND and the input is
excited by the VDC.
3. NPN is the type of input whose common is connected to the VDC and the input is
excited by the GND.
Encoder function DI9 and DI10:
Inputs DI9 and DI10 can also operate for the reading on an encoder in quadrature or to
count pulses.
In case of quadrature, connect signal A of the encoder to the input DI9, and signal B to
input DI10.
For pulse count, input DI9 will determine the count direction (incrementing or decrementing)
and input DI10 will receive the pulses.
Those configurations should be performed via WPS.
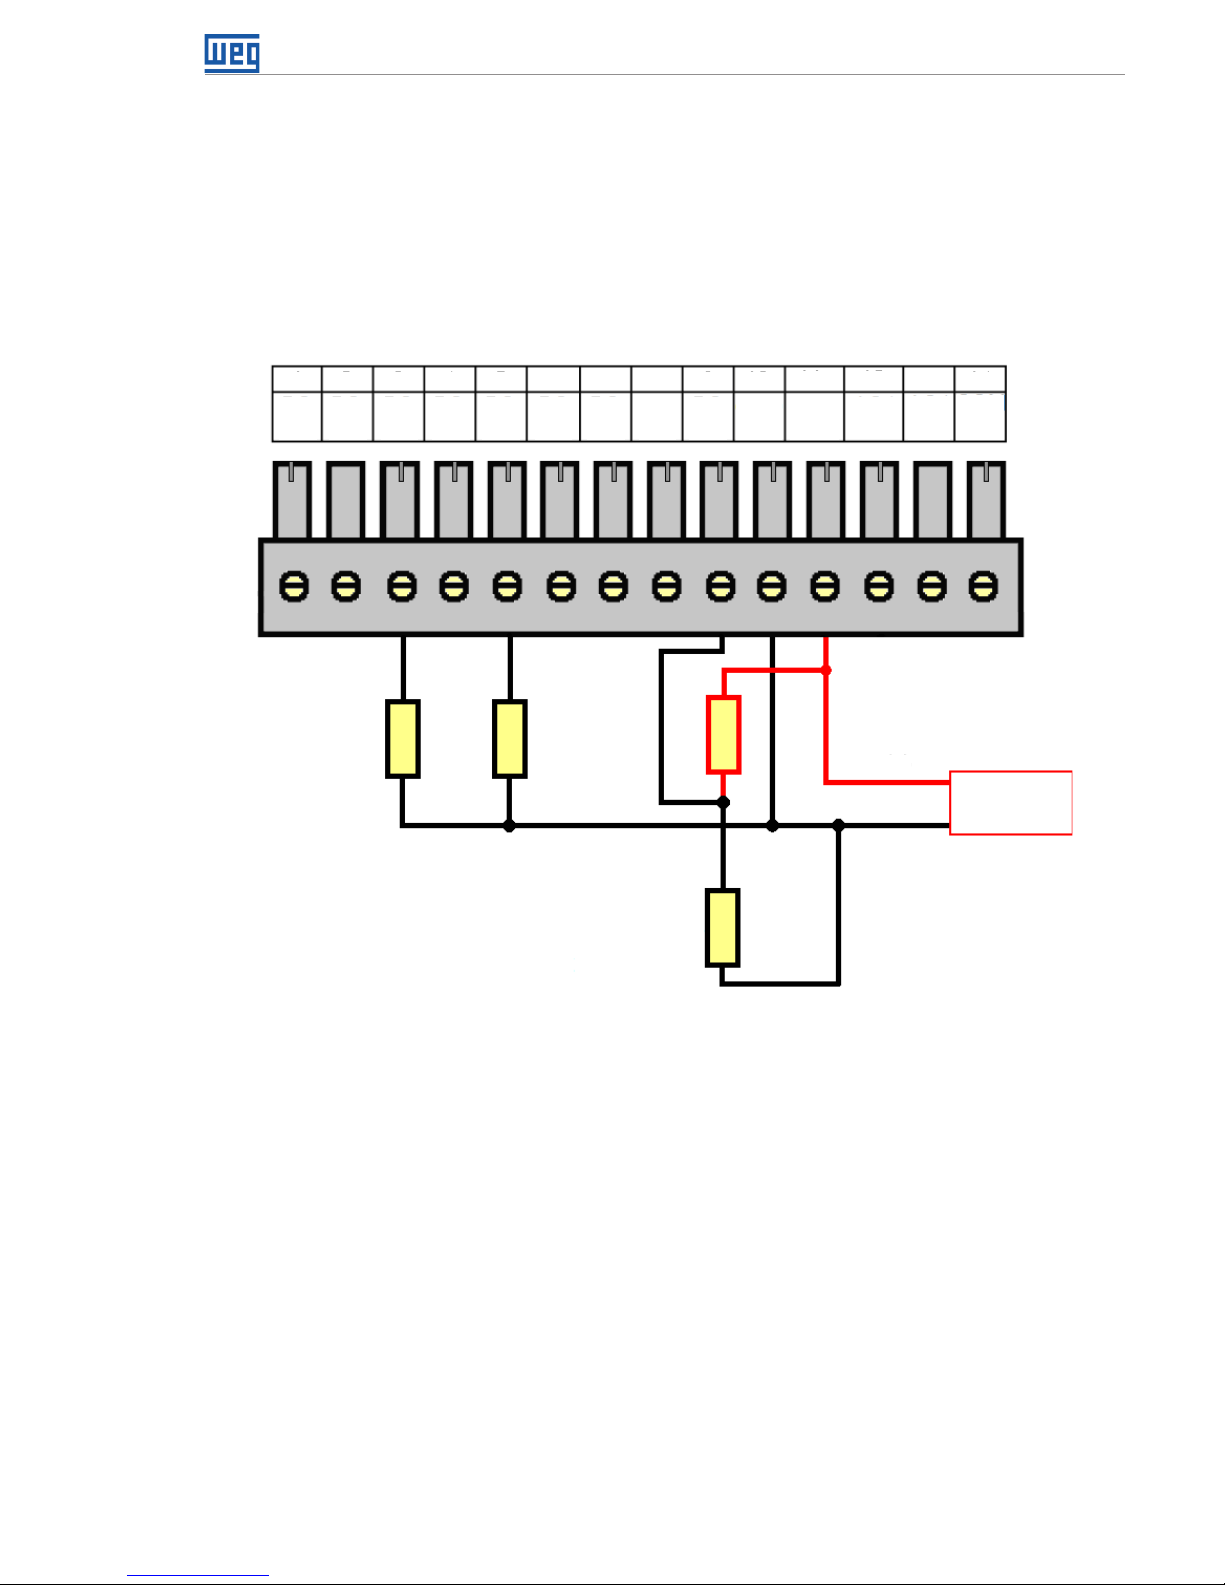
4.4 DIGITAL OUTPUTS
The PLC300 has eight insulated and protected digital outputs, besides a fast PWM output
that can generate pulses of up to 300 kHz with variable duty cycle from 0 to 100 %.
This output can also be used as a standard digital output, but it is not protected.
Page 19
Connections
PLC300 | 4-3
The circuit of the digital outputs must be externally powered by a supply of 24 Vdc,
connected to the pins VBB(+) and GNDBB(-)
(1)
.
The outputs DO1 to DO8 are of PNP
(2)
type and can provide a current of up to 500 mA each.
DO9 is a Push-Pull
(3)
output, PWM type, and can supply up to 100 mA.
(1) See description of XC2.
(2) PNP Output: activate load connected to GNDBB.
(3) Push-Pull Output: Bi-directional, i.e., activates the load connected to GNDBB or to VBB.
Supply
24 Vdc
XC2
L1 L2 L3
L4
DO
1
1 74 102 85
11 12
13
143 96
DO
9
DO
5
DO
3
VBB
COM
AO1
AO1
(I)
AO1
(V)
DO
7
DO
2
GND
BB
DO
6
DO
4
DO
8
(-)
(+)
Figure 4.3: Example of connection of the digital outputs (XC2)
Notes about the example:
1. The example shows two standard loads, L1 and L2, connected to the DO3 and DO5
outputs, which, when driven, apply VBB to the load (PNP outputs).
2. Loads L3 and L4 are connected to DO9, in push-pull format, i.e., when L3 is energized,
L4 is not, and vice-versa.
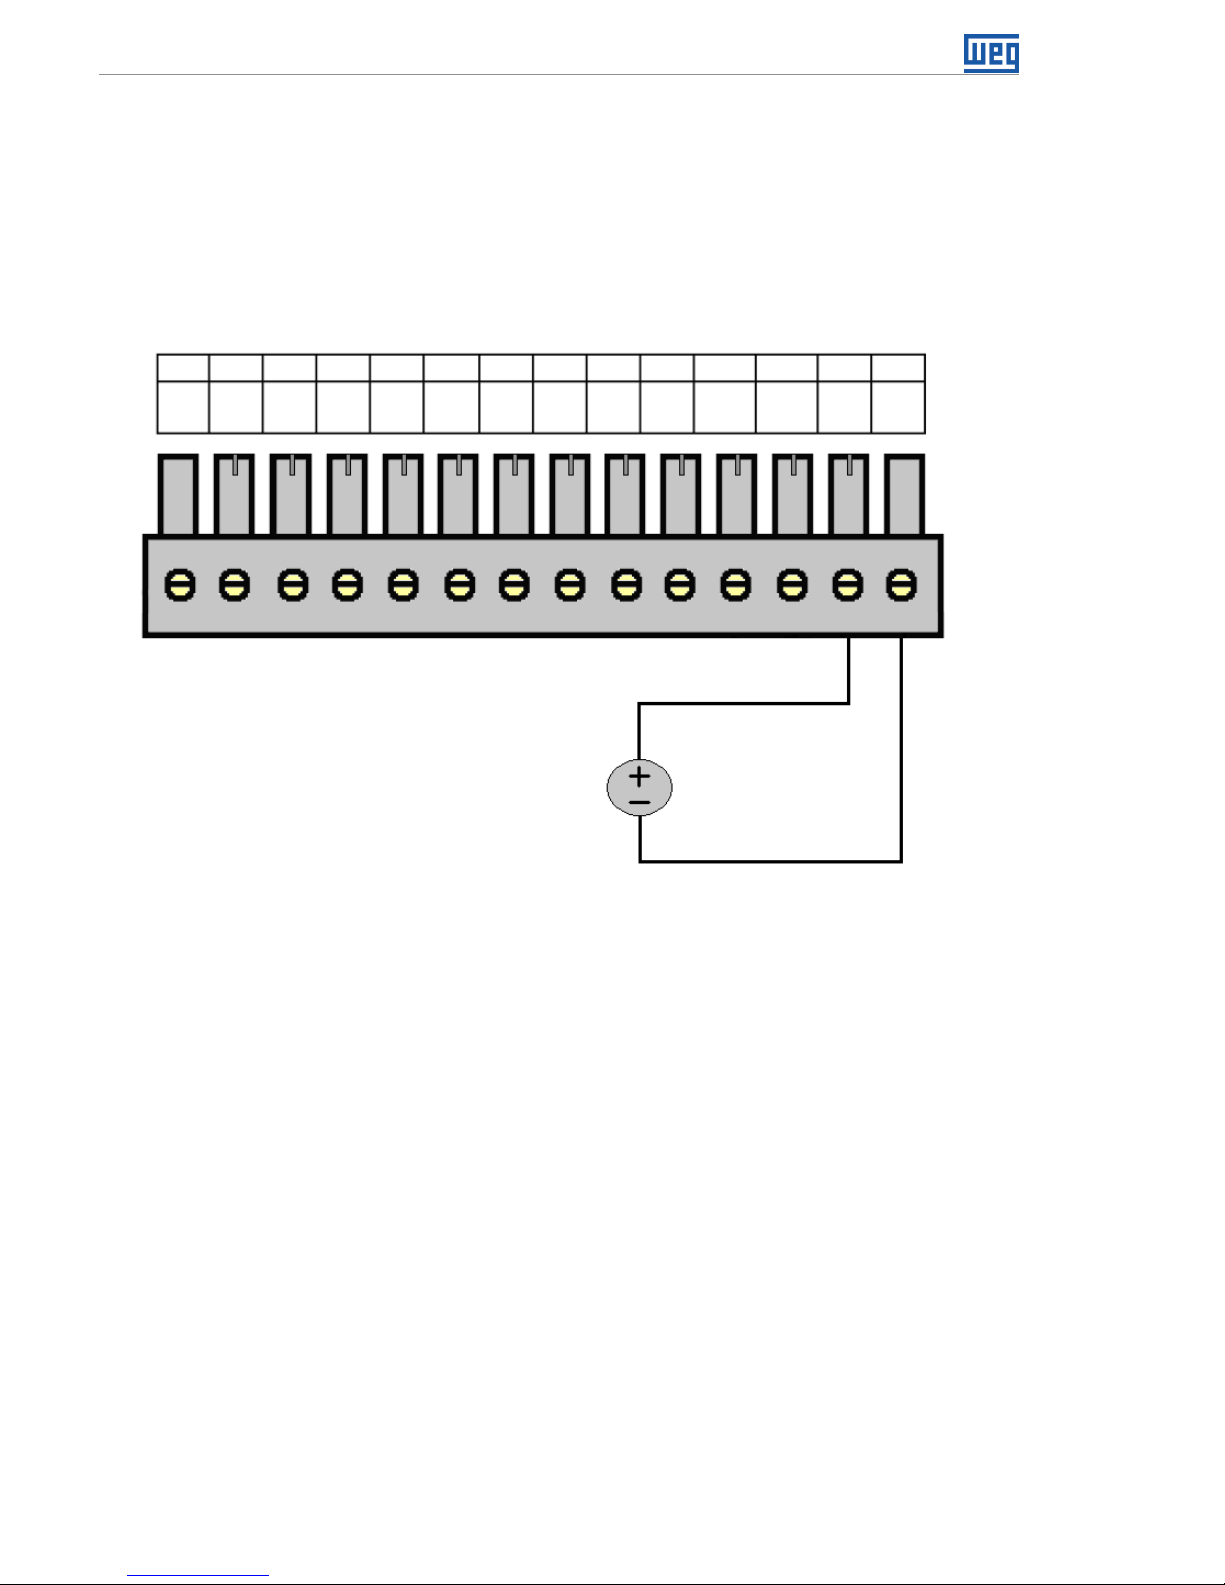
4.5 ANALOG INPUT
The analog input AI1 is differential, 12 bits, and can read signals from a voltage or current
source. If the signal source is far from the PLC, it is advisable to use a shielded cable.
Page 20
Connections
4-4 | PLC300
By means of the equipment setup, you can choose among the modes: voltage 0 to 10 V,
current 0 to 20 mA or current 4 to 20 mA.
When in current mode 4 to 20 mA, a broken wire alarm can be programmed. In this case,
if the input signal is below 2 mA, the alarm is generated, indicating the opening of the
current loop.
Below, a simple example of connection.
0 to 10 V
0 to 20 mA,
or
4 to 20 mA,
XC1
DI
1
1 74 102 85
11 12
13 143 96
DI
9
DI
5
DI
3
COM1COM2AI1
(+)
AI1
(-)
DI
7
DI
2
DI
10
DI
6
DI
4
DI
8
Figure 4.4: Example of connection of the analog input (XC1)
Note: AI1 operating mode must be chosen in the PLC setup: ‘Voltage 0 to 10 V’, ‘Current
0 to 20 mA’ or ‘Current 4 to 20 mA’.
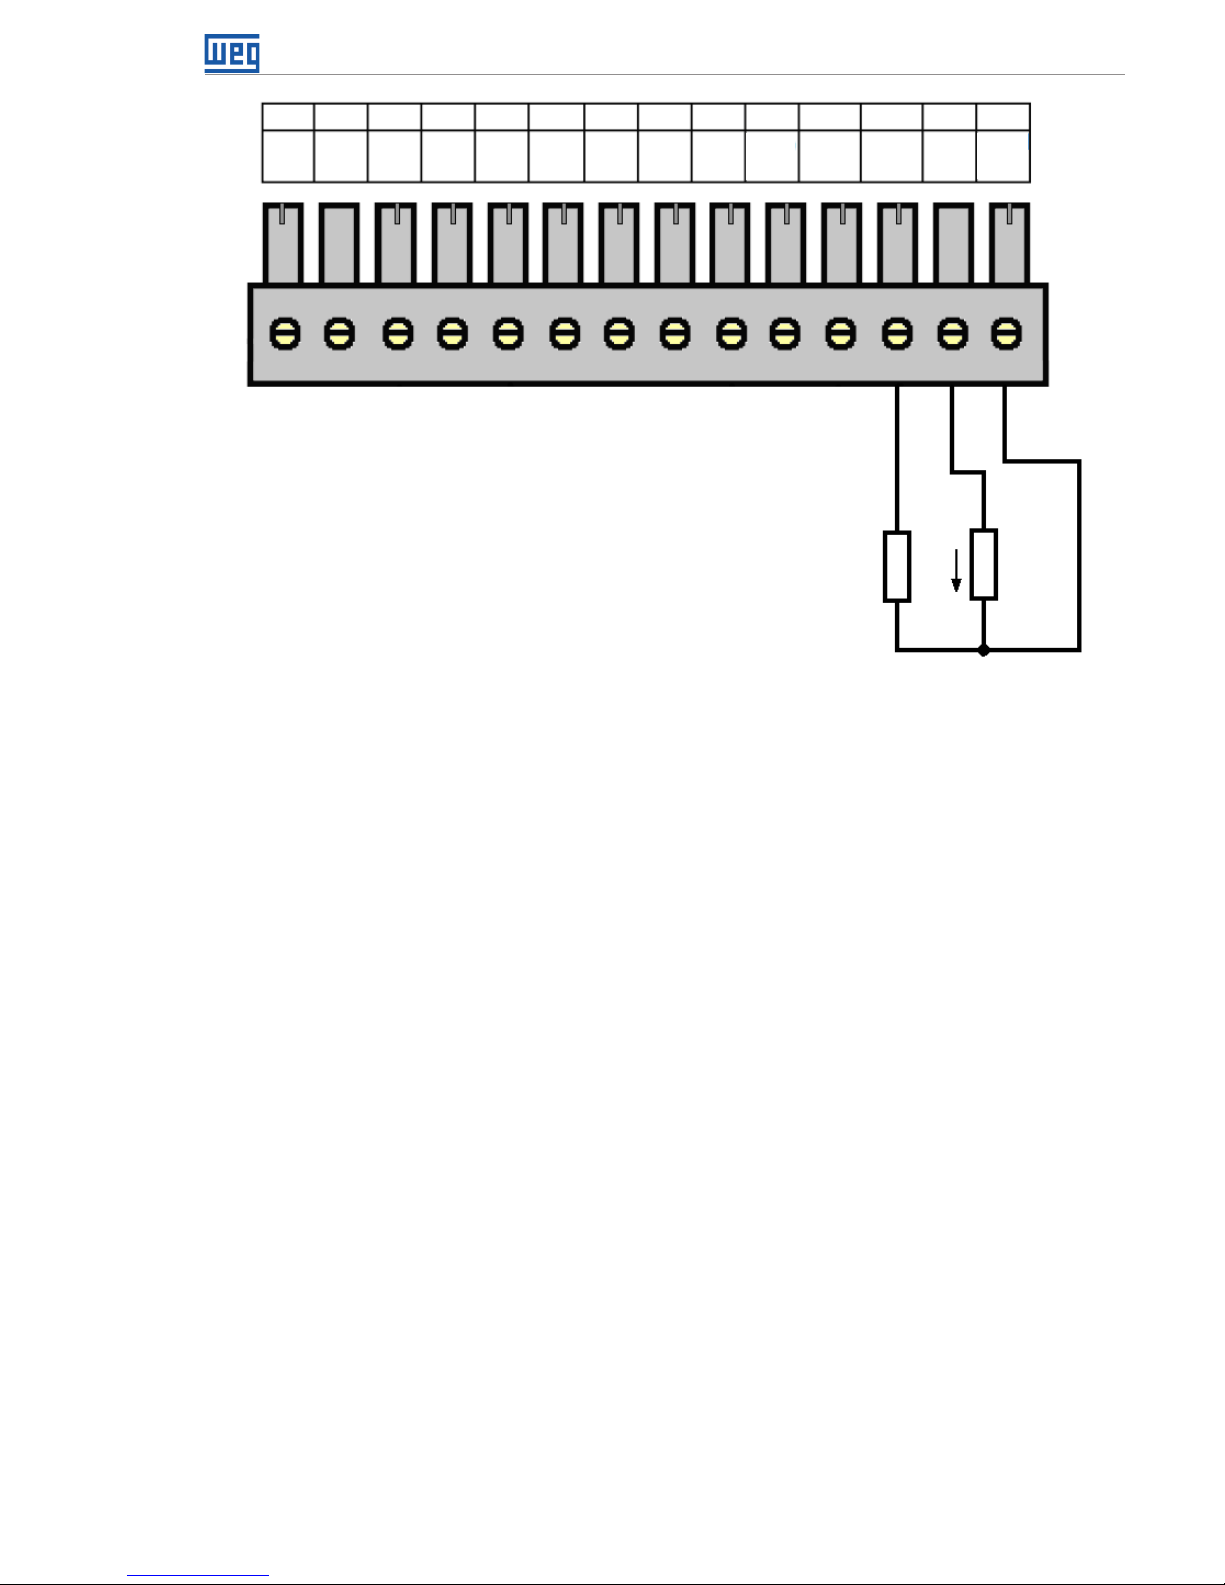
4.6 ANALOG OUTPUT
The analog output AO1, 10 bit resolution, has output in current and/or voltage, with
independent terminals, which means there is no need to configure the operating mode;
simply connect the load to the correct terminal, in voltage or current.
In voltage, the output varies between 0 and 10 V. In current, the output range is from 0 to
20 mA, for a resistive load lower or equal to 500 Ω.
The voltage and current outputs can be used simultaneously, but obviously with the same
value, since they are the same output, just in different ways.
Page 21
Connections
PLC300 | 4-5
XC2
L2
I
L1
+
V
-
DO
1
1 74 102 85 11 12 13 143 96
DO
9
DO
5
DO
3
VBB
COM
AO1
AO1
(I)
AO1
(V)
DO
7
DO
2
GND
BB
DO
6
DO
4
DO
8
Figure 4.5: Example of connection of the analog output (XC2)
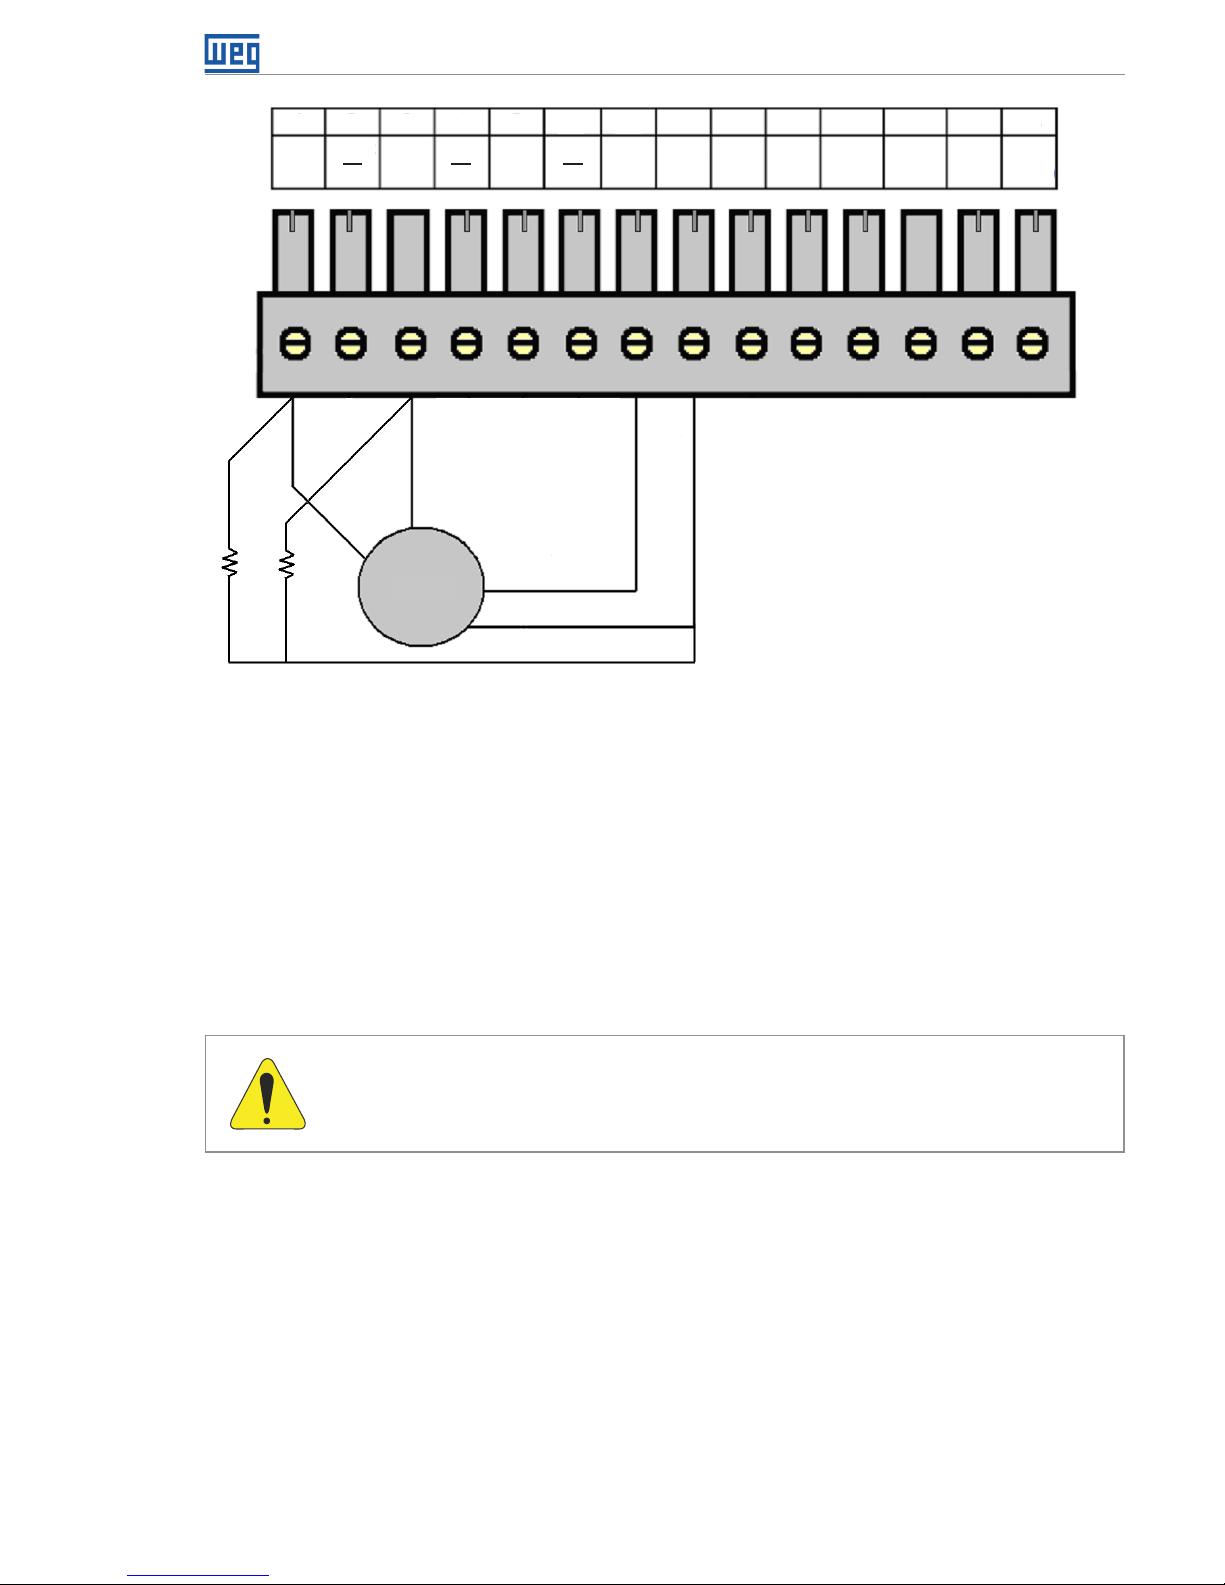
4.7 ENCODER INPUT
The PLC300 features an insulated input for differential encoder, with its own supply of 5 or
12 V. The maximum frequency of the pulses is 100 kHz. Maximum length of the encoder
cable: 30 m. This input has a circuit that detects fault in the encoder signals, in case of
encoder with complementary signals. This fault can generate an alarm that must be
enabled on the WPS. A non-complementary encoder can also be used, but, in this case,
the fault circuit must remain disabled.
An internal insulated supply of 5 or 12 Vdc, with capacity of up to 300 mA, is available for
the encoder. The selection between 5 or 12 V must be done in the PLC setup. The default
value is 5 V.
The ladder offers a READENC block (encoder counter), that must be used to count.
A system marker indicates the encoder speed in hertz (Hz). The direction of rotation is also
informed by a system marker.
Page 22

Connections
4-6 | PLC300
(*)
5/12 V
A A B B Z Z 0 V
ENC
XC3
+V*
ENC
A
ENC
A
ENCBENCBENCZENCZENC
+V*
ENC
0 V
232TX232RX232
GND
485A485B485
GND
1 74 102 85 11 12 13 14
3
96
Figure 4.6: Encoder connection
24 V Encoder : You can connect a 24 V encoder, since externally powered and only signals
A, B, and Z are used.
The 0 V of the encoder must be connected to 0 V of XC3 (pin 8)
A, B and Z
signals are NOT tolerant to 24 V.
The signals A, B and Z can be used to fast counting and interrupts, also in 24 V.
Encoder PNP: if an encoder with PNP outputs is used, resistors of 1 K ohm must be
connected from the used signals to the 0 V.
E.g.: PNP encoder with A and B signals.
Page 23
Connections
PLC300 | 4-7
A
1KR 1KR
B
0 V
(*)
5/12 V
ENC
XC3
+V*
ENC
A
ENC
A
ENCBENCBENCZENCZENC
+V*
ENC
0 V
232TX232RX232
GND
485A485
B
485
GND
1
7
4
10
2 85
11 12
13
14
3
9
6
Figure 4.7: PNP encoder connection with signals A and B
4.8 RS-232 INTERFACE
This non-insulated RS-232 serial interface is intended to point-to-point communication.
It was developed for remote connection, through a modem connected to the telephone
line. All the operations performed by the USB via WPS, can be done by this interface, i.e.,
programming, monitoring, setup, etc.
The configuration of this interface is done by the setup menu.
ATTENTION!
Do not connect the GND of the RS232 (pin 11) to the ground of the system.
Page 24

Connections
4-8 | PLC300
Modem
RS232
RX
TX
GND
XC3
ENC
A
ENC
A
ENCBENCBENCZENCZENC
+V*
ENC
0 V
232TX232RX232
GND
485A485
B
485
GND
1
7
4 102 85 11 12 13 14
3
9
6
Figure 4.8: Connecting the RS-232
Note: For further information, consult the manual for serial communication, available for
download on the website: www.weg.net.
4.9 RS-485 INTERFACE
Insulated, multipoint serial interface intended for network communication. It can operate
as master or slave with the Modbus RTU protocol.
The S1 key allows the connection of termination resistors.
The configuration of this interface is done by the setup menu.
Page 25

Connections
PLC300 | 4-9
Twisted pair
Bus RS-485
GND
A
B
XC3
ENC
A
ENC
A
ENCBENCBENCZENCZENC
+V*
ENC
0 V
232TX232RX232
GND
485A485
B
485
GND
1
7
4
10
2
8
5
11
12
13
14
3
9
6
Figure 4.9: Connecting the RS-485
Note: For further information, consult the manual for serial communication, available for
download on the website: www.weg.net.
4.10 ETHERNET INTERFACE
See the Modbus TCP communication manual, available for download on the website:
www.weg.net.
Page 26

Connections
4-10 | PLC300
Page 27

Description of the Keys
PLC300 | 5-1
5 DESCRIPTION OF THE KEYS
Alpha-numeric keyboard
The twelve keys in the upper right part enter numbers, letters and symbols.
The input of letters or symbols it is allowed from firmware version 2.10 up.
Function keys
There are six keys with LED indicators <F1>…<F6>, which implement up to twelve functions,
being <F7>…<F12> activated with the <SHIFT> key.
When a function key has some assignment on the current screen, the respective LED
turns on.
The function keys can be used for BIT functions:
Set bit.
Clear bit.
Toggle bit.
Momentary On.
The function keys can also access a certain screen programmed by the user.
<HOME> key
Goes to ‘HOME’ screen, or the user zero screen.
<ESC> key
Used to abandon or abort certain internal operations, such as setup, to leave internal
screens, to abandon editing, etc.
<DEL> key
Deletes the digit under the cursor when entering numerical data.
When in the alarm history, if pressed for t>3s, clears all the alarm history, after confirmation.
<ALARM> key
When an alarm is activated, the key LED flashes to indicate a new active alarm.
By pressing the <ALARM> key, the list of active alarms is shown and the LED stops flashing,
indicating the acknowledgement of the alarm.
If the alarm is normalized, it leaves the list of active alarms and goes to the alarm history,
which can be seen by pressing <SHIFT><ALARM>.
Page 28

Description of the Keys
5-2 | PLC300
<SETUP> key
Three functions can be accessed by means of this key: when pressed normally, it enters
the status of the I/Os (Status PLC300); when pressed for t>3s, it enters the PLC300 setup;
when pressed after the <SHIFT> key, it shows the opening screen of the product, where
you can see the firmware version.
<SH IF T> key
When pressed once, it enables the second function of the keys, the LED keeps on until
any key is pressed. If pressed twice in a row, it locks the second function of the keys, in
this case, the LED keeps flashing until the <SHIFT> key is pressed again, turning off the
second function.
Page 29

Expansions
PLC300 | 6-1
6 EXPANSIONS
Up to two expansions can be connected to the PLC300. These expansions are the I/O type
of the CFW11 (Frequency Inverter WEG 11). The detection of the expansions is automatic
and the status of the I/Os can be checked by pressing SETUP and browsing with the
arrows <> and <>.
Address of the I/Os of the expansions
The digital and analog inputs and outputs of the expansions have fixed physical address
ranges, according to the slot where the expansion is placed, i.e.:
Slot 1 – XC11
Digital inputs: start at DI101
Digital outputs: start at DO101
Analog inputs: start at AI101
Analog outputs: start at AO101
Slot 2 – XC12
Digital inputs: start at DI201
Digital outputs: start at DO201
Analog inputs: start at AI201
Analog outputs: start at AO201
The following modules are available:
IOA-01: 1 analog input of 14 bits in voltage and current; 2 digital inputs; 2 analog outputs
of 14 bits in voltage and current; 2 open collector digital outputs. The analog input can be
in voltage (0 to 10 V / -10 to 10 V) or in current (0 to 20 mA / 4 to 20 mA).
The value read in AI101, for example, will be between-32768 and 32767. Further information
can be found in the expansion installation guide.
IOB-01: 2 analog inputs insulated in voltage and current; 2 digital inputs; 2 analog outputs
insulated in voltage and current; 2 open collector digital outputs. One of the analog inputs
is 0 to 10 V and the other -10 to 10 V when configured for voltage. If configured for current,
they can be 0 to 20 mA or 4 to 20 mA. The value read in AI101, for example, will be -32768
and 32767 for the configuration -10 to 10 V or 0 to 32767 for the other configurations.
Further information can be found in the expansion installation guide.
IOC-01: 8 Digital inputs; opto-coupled; 24 Vdc; configurable, high/low level actuation; 4
digital outputs; NO-contacts relay; capacity 240 Vac/1 A.
IOC-02: 8 Digital inputs; opto-coupled; 24 Vdc; configurable, high/low level actuation; 8
digital outputs; open collector; 24 V/0.1 A.
IOC-03: 8 digital inputs; optocoupled; 24 Vdc; configurable, high/low level actuation; 7 PNP,
protected outputs; 24 Vdc; 500 mA.
IOE-01: 5 inputs of single or triple PTC thermistors, with reinforced insulation compared
to the 0 V of the PLC300.
Page 30

Expansions
6-2 | PLC300
IOE-02: 5 inputs of PT100 thermistors with reinforced insulation compared to the 0 V of
the PLC300.
IOE-03: 5 inputs of KTY84 thermistors with reinforced insulation compared to the 0 V of
the PLC300.
NOTE: For the expansion modules IOE-01, IOE-02 and IOE-03, the value read in AI101...105
or AI201...205 will be the temperature in °C multiplied by 10, that is, for a temperature of
32.1 °C, the value read will be 321.
For further information, refer to the expansion module installation guide.
Page 31

Configuration of the PLC300
PLC300 | 7-1
7 CONFIGURATION OF THE PLC300
Setup Function via HMI keyboard
In order to access the setup function via keyboard, press the <SETUP> key until an internal
screen appears and prompts to enter a password.
[ SE TU P ]
Ty pe 4 d i g Pa s s wo rd .
Pa sw d: __ __ (ES C ab t)
The initial password of the setup function is ‘0000’, and can be modified after entering
the setup.
The arrows <> and <> browse through the functions of the setup. <ENTER> selects
the function to be edited. <ESC> returns to the screen previous to the setup.
[ -- SE TU P PL C30 0- - ]
-- -- -- -- -- - - - -- -- -- -
>S et C lo ck
La ng ua ge S el e c t io n
7.1 SET CLOCK
When entering the screen of the adjustment of the clock, the current date and time are
shown. The cursor on the day of the month shows the item to be edited. The arrows <>
and <> browse between the fields.
By pressing <ENTER>, the cursor flashes indicating the editing of the field. To enter the
new value, you can use the numeric keyboard directly, or the arrows <> and <>.
The year can vary between 00 and 99, i.e., from 2000 to 2099.
The day of the week is calculated considering the date, and shown on the lower line.
The <DEL> key returns to the initial value, with no change.
Press <ENTER> to exit and save.
If you want to abort the editing, press <ESC>.
Press <ESC> to return to the main menu of the setup.
Cl oc k Ad ju st
-- -- -- -- -- - - - -- -- -- -
29 /0 9/ 09 14 :0 6: 55
Tu es da y
Page 32

Configuration of the PLC300
7-2 | PLC300
7.2 LANGUAGE SELECTION
It allows selecting the language of internal screens and messages between Portuguese
(PT) or English (EN).
The home screen shows the current language 'PT' or 'EN'; by pressing any arrow, the
language is switched.
To exit, press ESC to abort the selection or ENTER to accept it.
La ng ua ge S el e c t io n
-- -- -- -- -- - - - -- -- -- -
EN
7.3 LCD CONTRAST
The adjustment screen of the LCD contrast shows a bar graph indicating the level of
contrast of the display. The arrows <> and <> increase the contrast and the arrows
<> and <> decrease it.
Press ESC or ENTER to exit.
LC D Co nt ra st
-- -- -- -- -- - - - -- -- -- -
LC D: [ .. .. .. . . ]
7.4 KEYBOARD BEEP
Enables the beep of the keys.
The initial screen shows the current state, the standard is OFF. The arrows toggle between
on and off.
Press <ESC> or <ENTER> to exit.
Ke yb oa rd B ee p
-- -- -- -- -- - - - -- -- -- -
Of f
7.5 ANALOG INPUT
Selects one of the three operating modes of the AI1 analog input: ‘Voltage 0 to 10 V’,
‘Current 0 to 20 mA’ or ‘Current 4 to 20 mA’.
In the option 4 to 20 mA, the value that the ladder sees is a proportional, standardized
value, that is, 4 to 20 mA → 0 to 32767.
Page 33

Configuration of the PLC300
PLC300 | 7-3
The arrows select the mode that is activated only if <ENTER> is pressed.
<ESC> exits without changing the mode.
An al og I np ut
-- -- -- -- -- - - - -- -- -- -
Vo lt ag e 0 to 1 0V
7.6 IOA CARD (AOS)
Selects one of the four operating modes of the analog outputs (AOs) of the IOA accessories
installed, seeing that the AOs 101 and 102 are the AOs 1 and 2 of the IOA card installed in
the slot 1 of the PLC300, and the AOs 201 and 202 are the AOs 1 and 2 of the IOA card
installed in the slot 2.
IO A Ca rd ( AO S)
-- -- -- -- -- - - - -- -- -- >A O1 01 :0 t o 10 V
AO 10 2: 0 to 1 0V
The arrows <> and <> select the AO to be changed. By pressing <ENTER>, the cursor
flashes in the operating mode to be changed.
The arrows <> and <> browse through the possible operating modes:
0 to 20 mA, 4 to 20 mA, 0 to 10 V and -10 to +10 V.
<ENTER> accepts the changed value. <ESC> aborts.
<ESC> returns to the main menu of the setup.
7.7 ENCODER SUPPLY
Selects the power supply of the encoder between 5 or 12 V.
The arrows select the wanted voltage, which becomes valid only if <ENTER> is pressed.
<ESC> exits without changing the encoder voltage.
En co de r Su pp l y
-- -- -- -- -- - - - -- -- -- -
En co de r 12 V
7.8 RS-232 SETUP
It is possible to configure the baud rate, the parity and the number of stop bits of the RS232 serial interface.
Page 34

Configuration of the PLC300
7-4 | PLC300
RS 232 S e t up
-- -- -- -- -- - - - -- -- -- >B au d Ra te :9 6 0 0 bp s
Pa ri ty :N O
St op B it s: 1s b
The arrows <> and <> select the option to be changed. By pressing <ENTER>, the
cursor flashes in the operating mode to be changed.
The arrows <> and <> browse through the possible values:
Baud rate: 1200, 2400, 4800, 9600,19200, 38400 or 57600 b ps.
Parity: N O,O D D,E V EN .
Stop bits: 1 or 2sb.
<ENTER> accepts the changed value. <ESC> aborts.
<ESC> returns to the main menu of the setup.
7.9 RS-485 SETUP
It is possible to configure the baud rate, the parity and the number of stop bits, the mode
(master/slave/telegram1) and the address of the PLC300 in a Modbus RTU network by
means of the RS-485 serial interface.
RS 48 5 Se tu p
-- -- -- -- -- - - - -- -- -- >B au d Ra te :1 9 2 0 0b ps
Pa ri ty :N O
St op B it s: 1s b
Mo de :M as te r
Ad dr es s : 00 1
The arrows <> and <> select the option to be changed. By pressing <ENTER>, the
cursor flashes in the operating mode to be changed.
The arrows <> and <> browse through the possible values:
Baud rate: 1200, 2400, 4800, 9600, 19200, 38400 or 57600b ps.
Parity: N O,O D D,E V EN .
Stop bits: 1 or 2sb.
Mode: Master, Slave or Telegra m.
(1) There are two modes reserved for future aplications.
Page 35

Configuration of the PLC300
PLC300 | 7-5
Address: 1 to 24 7.
In the editing of the address, in addition to the upward and downward keys, the number can be
typed directly by the numeric keyboard. The <DEL> key returns to the initial value, with no change.
<ENTER> accepts the changed value. <ESC> aborts.
<ESC> returns to the main menu of the setup.
7.10 CAN SETUP
It is possible to configure the baud rate and the address of the PLC300 in a CANopen
network, through the CAN Interface.
The arrows <> and <> select the option to be changed. By pressing <ENTER>, the
cursor flashes in the operating mode to be changed.
CA N Se tu p
-- -- -- -- -- - - - -- -- -- -
>B au d Ra te :1 M b p s
Ad dr es s : 00 1
The arrows <> and <> browse through the possible values:
Baud rate: 20, 50, 100, 125, 250, 500 (Kbps), 1 Mbps
Address: 1 to 127
In the editing of the address, in addition to the upward and downward keys, the number
can be typed directly by the numeric keyboard. The <DEL> key returns to the initial value,
with no change.
<ENTER> accepts the changed value. <ESC> aborts.
<ESC> returns to the main menu of the setup.
7.11 LAN SETUP
It is possible to configure the IP address, subnet mask, default gateway, DHCP, speed and
duplex mode of the PLC300 in an Ethernet network.
LA N Se tu p
-- -- -- -- -- - - - -- -- -- -
>I P Ad dr es s:
19 2. 16 8. 00 0 . 0 10
Su bn et :
25 5. 25 5. 25 5 . 0 00
Ga te wa y:
00 0. 00 0. 00 0 . 0 00
DH CP :
Di sa bl ed
Sp ee d/ Du pl e x :
Au to
Page 36

Configuration of the PLC300
7-6 | PLC300
The arrows <> and <> select the option to be changed. By pressing <ENTER>, the
cursor flashes in the operating mode to be changed.
In the editing of the IP address, subnet mask and default gateway, the number can be
typed directly by the numeric keyboard. The <DEL> key deletes the last digit.
IP Address: 4 bytes of address that identify the PLC300 in the IP network;
Subnet: 4 bytes that identify the subnet to which the PLC300 belongs in the IP network;
Gateway: 4 address bytes that identify the default gateway to access other subnets in the
IP network;
The arrows <> and <> browse through the possible values:
DHCP: Disabled, Enabled.
Speed/Duplex: Auto, 10MBps Full Duplex, 10MBps Half Duplex, 100MBps
Full Duplex, 100MBps Half Duplex.
<ENTER> accepts the changed value. <ESC> aborts.
<ESC> returns to the main menu of the setup.
7.12 MB TCP SETUP
It is possible to configure the TCP port, Unit ID, IP authentication and timeout of the Gateway
Modbus TCP/RTU of the PLC300 in an Ethernet network by using the Modbus TCP protocol.
MB T CP C on fi gu r a t io n
-- -- -- -- -- - - - -- -- -- >T CP P or t:
00 50 2
Un it ID :
25 5
IP a ut he nt ic a t i on :
00 0. 00 0. 00 0 . 0 00
GW T im eo ut
01 00
The arrows <> and <> select the option to be changed. By pressing <ENTER>, the
cursor flashes in the operating mode to be changed.
The arrows <> and <> browse through the possible values:
TCP Port: 0 to 65535.
Unit ID: 1 to 255.
Gateway Timeout: 20 to 5000 ms.
Page 37

Configuration of the PLC300
PLC300 | 7-7
In the editing of the TCP port, in addition to the upward and downward keys, the number
can be typed directly by the numeric keyboard. The <DEL> key returns to the initial value,
with no change.
In the editing of the authentication of the IP address, the number can be typed directly by
the numeric keyboard. The <DEL> key deletes the last digit.
IP Authentication: 4 address bytes that identify the only remote IP address that can connect
to the PLC300. All the fields in zero disable the IP authentication and any remote address
can connect to PLC300.
<ENTER> accepts the changed value. <ESC> aborts.
<ESC> returns to the main menu of the setup.
7.13 SD CARD – BACKUP HMI VERSION
It allows to record (PLC300 -> SD card) or upload (SD card -> PLC300) a resource, setup
configurations and firmware in the SD card connected to the PLC300.
For protection of the user’s data, a protection password for the SD card can be programmed
in the WPS. In this case, a screen to enter a password of up to eight digits will be displayed.
In order to access the functions of backup and data restoration, the password must be
entered correctly.
SD C ar d - Ba ck up
-- -- -- -- -- - - - -- -- -- -
Un lo ck P as sw o r d :
The memory card must be of the SD type with FAT32 formatting. The faster the card (class
of the card), the shorter the recording time. This is important in case of regular variable
log recordings, for instance.
The arrows <> and <> select the option to be performed.
SD C ar d - Ba ck up
-- -- -- -- -- - - - -- -- -- -
>E qu ip .N um . :
Sa ve R es ou rc e
Lo ad R es ou rc e
Sa ve S et up
Lo ad S et up
Sa ve Fi r m wa re
Lo ad Fi r m wa re
Sa ve Fu l l B ac ku p
Lo ad Fu l l B ac ku p
The ‘Equip. Num.:’ or number of the equipment indicates the folder where the files of the
selected function will be recorded or from where they will be uploaded. It may vary from
0001 to 9999.
Page 38

Configuration of the PLC300
7-8 | PLC300
When selecting the functions of recording resource, setup, firmware or general, the files are
recorded in the following folders, respectively, according to the number of the equipment.
\PLC300\0001\Resource
\PLC300\0001\Setup
\PLC300\0001\Firmware
Important: The existing files in the destination folders will be overwritten when executing
the recording functions.
When selecting the functions of upload of resource, setup, firmware or general, the existing
files in the respective folders will be uploaded to the PLC300.
To select the wanted option, place the cursor (>) on the option and press <ENTER>; at this
point the character ‘?’ is shown at the end of the line and the block type cursor flashes,
waiting for confirmation or cancellation. Press <7> (PQRS) and <ENTER> to confirm. Any
other key is considered as NOT. <ESC> cancels the confirmation.
After its confirmation, the operation is performed and a screen is shown with the result,
error or success.
Possible error causes:
Invalid or nonexistent files.
Review of the files incompatible with the firmware version of the PLC300.
Folder with the equipment number different from that configured in the setup.
SD card without space for writing or with writing protection activated.
Version of the bootloader will not allow to upload the firmware through the SD card; check
if the marker %SW0016 (bootloader version) is equal to or above 200.
In case of firmware upload, after the confirmation and upload, the PLC is reinitialized.
The general backup is merely all the operations in sequence, that is, firmware, setup and
resource.
In case of upload of general backup, first the firmware is uploaded, and then the PLC is
reinitialized. Before starting the user’s program, the setup and the resource are uploaded,
displaying a screen with the result of the upload, success or fault.
SD CARD – BACKUP (BLIND VERSION, WITHOUT HMI)
In the versions without HMI (models BP and BS), the display and the back key are used
to perform upload/backup.
Long strokes on the back key are used to enter the backup menu and also to select
(confirm) the operation.
Page 39

Configuration of the PLC300
PLC300 | 7-9
A beep is emitted every time the key is pressed for a long period, indicating that the key
can already be released.
With the equipment in operation, press the key for some seconds, then a timed screen
will appear:
SD C ar d - Ba ck up
-- -- -- -- -- - - - -- -- -- -
If the memory card is not present or with an invalid format, an error message will be shown:
In va li d SD C ar d
or n ot P re se nt .
In order to protect the user’s data, a protection password for the SD card can be set on
the WPS. In the case of the PLC300 Blind (without HIM), the unlocking must be done by
means of the menu ‘Communication-> Online Commands’, on the WPS.
In case an attempt to access protected data occurs, the following screen is shown:
SD C ar d - Ba ck up
Bl oc ke d (W PS ) .
In case it is blocked or if it was unblocked by the WPS, the menu with the options
is presented:
>E qu ip .N um . : 0 00 1
Sa ve R es ou rc e
Lo ad R es ou rc e
Sa ve S et up
Lo ad S et up
Sa ve Fi r m wa re
Lo ad Fi r m wa re
Sa ve Fu l l B kp .
Lo ad Fu l l B kp .
Short strokes on the key will browse through the circular options, that is, when reaching
the last option, goes back to the first.
The key must be pressed for some seconds to select an option and then the selected
option is executed.
After executing some operation, a success or an error message is shown in case, for
instance, of success when recording the resource:
Re so ur ce :
Su cc es sfu l W r i t e
This message remains on the display for about two seconds and then returns to the SD card
menu.
Page 40

Configuration of the PLC300
7-10 | PLC300
The menu output is executed by timeout, i.e., in about 10 s without operation, the PLC300B
display will show the status of the I/Os again.
EDITING OF THE EQUIPMENT NUMBER (BLIND VERSION, WITHOUT HMI)
To edit the number of the equipment, press the key for some seconds, then the cursor
flashes on the number.
The number of the equipment always goes back to 0001 when it enters the editing mode
in the blind version (without HMI).
Short strokes on the key will increment the number; if the key remains pressed, the number
is increased rapidly.
To accept the entered value, simply release the key; in about five seconds the editing mode
is completed, maintaining the current value and returning to the backup menu.
7.14 USER PROGRAM
Allows to stop or execute the user program.
The current status of the program is also shown.
The <ENTER> key selects between ‘Stop’ or ‘Run’.
Us er P ro gr am
-- -- -- -- -- - - - -- -- -- St at us :R un n i n g
>S to p
In the option ‘Stop’ or ‘Execute’ ENTER or arrows, toggles the value, that is, if the program
is running the message ‘Stop’ changes to ‘Execute’ and the program is stopped.
<ESC> returns to the main menu of the setup.
7.15 SETUP MENU PASSWORD
Allows changing the password of the setup function.
The standard password is ‘0000’. The new password must be a number with four digits.
Ch an ge SE TU P Pa ss w d
-- -- -- -- -- - - - -- -- -- -
Ne w pa ss wo rd :
Type the new password and press <ENTER>.
The arrow <> or <DEL> keys serve as backspace.
Page 41

Configuration of the PLC300
PLC300 | 7-11
The new password must be confirmed on the next line.
Ch an ge SE TU P Pa ss w d
-- -- -- -- -- - - - -- -- -- Ne w pa ss wo rd : * * **
Re ty pe : ** **
If there is a typo and the confirmation fails, the new password is requested again, until it
is confirmed or <ESC> is pressed.
If there is a confirmation of the new password, the message is shown:
PASSWORD REDEFINED.
Indicating success in the operation. In this case, the screen to change the password is
abandoned, returning to the main menu of the setup.
<ESC> returns to the main menu of the setup without changing the password.
The arrow <> or <DEL> keys work as backspace.
7.16 WATCHDOG
It allows configuring the watchdog of the PLC300.
Wa tc hd og
-- -- -- -- -- - -- -- -- -- >T im e WD :0 05 0 0m s
Re se t PL C: No
WD O ut pu t: No n e
Ou tp ut St :T u rn o ff
The arrows <> and <> select the option to be changed. By pressing <ENTER>, the
cursor flashes in the operating mode to be changed.
The arrows <> and <> browse through the possible values:
WD Time: allows configuring the watchdog overflow time from 300 ms to 99999 ms.
Reset PLC: defines whether the occurrence of WD will reset the PLC and run the
application again, or it will go to a safe state, configured in the following options.
WD Output: allows choosing an output of exclusive use for the WD, which can be DO8
or DO9. The writing on it via Ladder will have no effect; it will remain in high level until the
occurrence of the watchdog.
Output St.: allows configuring whether the other outputs will keep the state or will turn
of in the occurrence of the WD.
Page 42

Configuration of the PLC300
7-12 | PLC300
<ENTER> accepts the changed value. <ESC> aborts.
<ESC> returns to the main menu of the setup.
Page 43

I/O Status
PLC300 | 8-1
8 I/O STATUS
By pressing the <SETUP> key rapidly, we enter the check screen of the I/O status. The
arrows <> and <> browse through the status screens. These screens depend on the
hardware, if there is expansion or not, and the function of the digital output DO9, for instance.
Internal digital Inputs and outputs
You can check on the first screen the level of the ten internal digital inputs: DI1 to DI10 and
of the internal digital outputs.
[- S TA TU S PL C30 0 - ]
10 .. 7. .4 .. 1
I1 0. .0 1: 0 01 0 0 0 10 11
00 9. .0 1: 10 00 11 00 0
In the example, the outputs 1, 2, 4 and 8, as well as the outputs 4, 5 and 9 are active.
If the digital output 9 is programmed as PWM output, instead of 0 or 1, the letter ‘P’ is shown.
[- S TA TU S PL C30 0 - ]
10 .. 7. .4 .. 1
I1 0. .0 1: 0 01 0 0 0 10 11
00 9. .0 1: P0 00 11 00 0
Internal analog input and output
By pressing the arrow <>, we go to the next status screen, which shows the internal
analog input and output:
[- S TA TU S PL C30 0 - ]
AI 1: 9 .1 V 18 .2 m A
Ao 1: 10 .0 V 20 . 0 m A
The example screen above shows the voltage at the analog input AI1, of 9.1 V, or, if you
are measuring current, 18.2 mA.
In the option 4 to 20 mA, for input AI1, the value that the ladder sees is a proportional,
standardized value, that is, 4 to 20 mA → 0 to 32767, but the status shows the real value
of the current.
The analog output AO1, is with 10 V or 20 mA, simultaneously, depending on the physical
output that is being used (see XC2).
Digital output DO9 in PWM
If he digital output DO9 is programmed as PWM, by pressing the key <>, we can see
the screen that shows this output data:
[- S TA TU S PL C30 0 - ]
DO 9 - PW M
FR EQ UE NC Y :1 0 . 1 2k Hz
DU TY C YC LE :8 4 . 9 0%
Page 44

I/O Status
8-2 | PLC300
Expansions
If there are expansions, we access the screens that show their status by pressing <>.
The expansion screens depend on the kind of I/O that each expansion contains.
For instance, an IOA-01, which has 1 analog input, 2 analog outputs, 2 digital inputs and
2 digital outputs:
[- S TA TU S PL C30 0 - ]
10 8. .. 4. .1
I1 08 .. 10 1: 0 0 0 0 00 11
O1 08 .. 10 1: 0 0 0 0 00 10
The example screen shows the digital inputs and outputs of the expansion IOA-01, in the
slot 1, where the inputs DI101 and DI102, as well as the output DO102, are active.
By pressing the arrow <>, again, we can see the analog inputs of this expansion:
[- S TA TU S PL C30 0 - ]
AI 10 1: -1 0. 0V - 1 9 . 0m A
AI 10 2: 8 .3V 16 .6 mA
←
AI102 only in the IOB card
By pressing the arrow <>, again, the analog inputs of this expansion are shown:
[- S TA TU S PL C30 0 - ]
AO 10 1: 8.3V 1 6 .6 mA
AO 10 2: 1 .0 V 2 .0 mA
IOE Card (thermistor reading):
The IOE cards have five inputs for reading PTC, PT-100 or KTY-84 thermistors.
In the user program (ladder), the thermal sensors are treated as analog inputs (AI101...
AI105 or AI201...AI205).
The status screens show the temperature in each sensor, between -20 °C and +200 °C.
If the monitored temperature is lower than -20 °C the thermal sensor is probably with a
broken wire, which is indicated by the symbol: “=/=(FP)”.
[- S TA TU S PL C30 0 - ]
S1 01 : 1 05oC
S1 02 : - 13oC
S1 03: = / =(FP )
By pressing the key <> again, the other two temperatures are shown:
[- S TA TU S PL C30 0 - ]
S1 04 : 58oC
S1 05 : 27oC
Page 45

I/O Status
PLC300 | 8-3
Status of the Ethernet Interface
You may check on the last screen, the MAC Address of the PLC300 and its current IP
address.
[- S TA TU S PL C30 0 - ]
MA C Ad dr es s
38 -31 - A C- 00 -0 0- 00
IP : 19 2. 16 8. 0 . 1
Date, time and Scan cycle
After the ethernet status, a screen shows the scan cycle of the user’s program, as well as
the date and time of the RTC.
[- S TA TU S PL C30 0 - ]
Sc an C yc le : 5.7 ms
06 /0 2/ 12 1 6: 1 8 : 06
Mo nd ay
BAC K DIS PLAY
The back display, which has two lines with 16 characters each, always shows the I/O status.
It serves mainly for the case of the PLC300 mounted without HMI (keyboard and front
display). If there is a front display, it helps check the status from the inside of the panel door.
The initial screen shows the status of the internal digital I/Os, that is, DI10 to DI01 and
DO09 to DO01.
By pressing the back key, we alternate the status screens. Those screens depend on
the hardware, for instance, whether there is expansion or not, and the DO9 digital output
function.
Internal digital inputs and outputs
The level of the ten internal digital inputs can be checked on the first screen: DI10 to DI1
and of the internal digital outputs.
I1 0- 1: 00 10 0 0 1 01 1
O0 9- 1: 1 00 01 1 0 0 0
In the example, the outputs 1, 2, 4 and 8, as well as the outputs 4, 5 and 9 are active.
If the digital output 9 is programmed as PWM rapid output, instead of 0 or 1, the letter
‘P’ is shown.
I1 0- 1: 00 10 0 0 1 01 1
O0 9- 1: P 00 01 1 0 0 0
Page 46

I/O Status
8-4 | PLC300
Internal analog input and output
By pressing the back key, we go to the next status screen, which shows the internal analog
input and output:
AI 1: 9 .1 V 18 .2 m A
AO 1: 10 .0 V 20 . 0 m A
The example screen above shows the voltage at the analog input AI1, of 9.1 V, or, if you
are measuring current, 18.2 mA.
In the option 4 to 20 mA, the value that the ladder sees is a proportional, standardized
value, that is, 4 to 20 mA → 0 to 32767, but the status shows the real value of the current.
The analog output AO1, is with 10 V or 20 mA, simultaneously, depending on the physical
output that is being used (see XC2).
Digital output DO9 in PWM
If the digital output DO9 is programmed as PWM, by pressing the back key, we can see
the screen that shows this output data:
FR EQ .: 1 0. 12 k H z
DU TY : 8 4. 90 %
Expansions
If there are expansions, we access the screens that show their status by pressing the
back key. The expansion screens depend on the type of I/O that each expansion contains.
For instance, an IOA-01, which has 1 analog input, 2 analog outputs, 2 digital inputs and
2 digital outputs:
I1 08 -0 1: 00 0 0 0 01 1
O1 08 -0 1: 00 0 0 0 01 0
Note that, due to the lack of space, the numbers are abbreviated. ‘I108-01’ means the
digital inputs of the slot 1, ranging from 108 to 101. Likewise, ‘O108-01’ indicates the digital
outputs of the slot 1, ranging from 108 to 101.
The example screen shows the digital inputs and outputs of the expansion IOA-01, in
the slot 1, where the inputs DI101 and DI102, as well as the output DO102, are active, by
pressing the rear key again, we can see the analog inputs and outputs of this expansion,
one per screen:
AI 10 1: -1 0. 0V
20 .0 mA
AO 10 1: -1 0. 0V
20 .0 mA
AO 10 2: 9. 0V
18 .0 mA
Page 47

I/O Status
PLC300 | 8-5
IOE Card (thermistor reading):
The IOE cards have five inputs for reading PTC, PT-100 or KTY-84 thermistors.
In the user program (ladder), the thermal sensors are treated as analog inputs (AI101...AI105
or AI201...AI205).
The status screens show the temperature in each sensor, between -20 °C and +200 °C.
If the monitored temperature is lower than -20 °C, the thermal sensor is probably with a
broken wire, which is indicated by the symbol: “=/=(FP)”.
S1 01 : 1 05oC
S1 02 : - 13oC
The two following temperatures will be shown by pressing the <> key.
S1 03: = / =( FP )
S1 04 : 58oC
By pressing the <> key again, the last temperature is shown.
S1 05 : 27oC
Status of the Ethernet Interface
You may check on the last two screens, the MAC Address of the PLC300 and its current
IP address.
MA C Ad dr es s:
3831 A C 0 0 0 0 00
IP A dd re ss :
19 2. 16 8. 0. 1
Date, time and Scan cycle
After the Ethernet status, we can see a screen that shows the user program scan cycle,
besides the RTC date and time:
Sc an : 99 9. 9 ms
06 /0 2/ 12 1 6: 1 8
Page 48

I/O Status
8-6 | PLC300
Page 49

Description of the PLC300 Operation
PLC300 | 9-1
9 DESCRIPTION OF THE PLC300 OPERATION
WPS Software (Weg Programming Suite)
The PLC300 programming is done by means of the WPS software. With this tool, you can
develop and monitor the ladder program.
The screens and the alarms are also programmed by the WPS, by means of the screen
editor.
The configuration of the equipment, described previously, can be executed by the WPS,
particularly useful when the version without HMI is being used.
Startup
When connected, the PLC300 displays an opening screen for about 2 s which shows the
firmware version of the equipment:
[ PL C30 0 ]
[ WE G ]
[- -- -- -- -- - - - -- -- -- ]
[ PT V4 .0 0 ]
After the opening, the PLC goes to the HOME screen, or zero screen of the user. In case
there are no uploaded screens, a default screen is shown:
De fa ul t HO ME .
User Program
When the PLC300 is energized, it is checked if there is a valid ladder program in the
memory; if any, the program is started immediately.
9.1 SCREEN MANAGEMENT
Up to 512 screens can be used by the user. These screens characterize the application,
by means of menus, data input and variable monitoring, etc. The screens interact with the
ladder program by means of markers (ladder variables), as well as with the user via keyboard.
The browsing between the screens is executed by the function keys, which must be properly
programmed to go to the wanted screen.
The <HOME> key always goes to the initial screen of the user (zero screen).
9.1.1 Levels of Access
Except for the zero screen (HOME), the other screens can be programmed with an access
password. Up to nine levels of access can be programmed to allow different kinds of
users with access to certain screens. The level of access zero means that the screen has
free access.
The higher the level of access, the greater the privilege. To access a level-five screen, it is
Page 50

Description of the PLC300 Operation
9-2 | PLC300
necessary to have a password of higher level or equal to the level 5.
In addition to the property of the level of access, you can set the ‘auto logoff’, which resets
the password entered to access level prior to the screen that has just left.
When trying to access a screen with level of access higher than zero, the following screen
is shown, waiting to enter the password.
[A CC ES S TO SC N: 0 02 ]
[A CC ES S LE VE L : 5]
[6 D IG IT P AS SW O R D ]
▓
The password must have six numerals. Arrows <> or <DEL> delete the typed character.
After typing the six numerals, press <ENTER> to access the screen. If you do not have the
level of access, press <ESC> to return to the previous screen.
In case of an invalid password, either by a typo or level of access lower than the required,
the following message appears flashing:
** IN VA LI D PA S S W OR D* *
returning to the password entry screen.
9.1.2 Function Keys: F1...F12
The function keys can be programmed to execute BIT or SCREEN functions. The
programming of each function key is independent for each screen, that is, the same
function key can have different actions for each screen. When the function key has a certain
assignment on the current screen, the LED corresponding to the key goes on.
The BIT actions are:
ON: turns on a certain Boolean variable (bit marker).
OFF: turns off a certain Boolean variable (bit marker).
Toggle: inverts the status of a certain Boolean variable (bit marker).
Momentary ON: turns on a certain Boolean variable (bit marker) only while the key is
pressed; when you release the key, the marker returns to zero.
In the SCREEN function, when the key is pressed, the programmed screen appears.
Page 51

Description of the PLC300 Operation
PLC300 | 9-3
9.1.3 Composition of a Screen
The screen can be composed by Text, Input, Output, Message and Bargraph elements.
Each element is placed in a certain position, forming a layout defined by the user.
Example of user’s screen:
F1 :G o to s cr ee n 5
Ra di us :1 .23cm
En co de r:3032 4p
Te mp .: [ . .. . . . .]
This screen shows the following components:
Tex t: “F1: Go to screen 5”, “R ad iu s:”, “cm”, “Enco der:”, “p” and “Te m p .:”
Input: “1.23”, numeric input which goes to a certain marker.
Output: “30324”, monitoring value of a certain variable.
Bar graph: “[▌▌▌▌▌.......]” bar graph proportional to a certain variable.
9.1.4 Text Component: Writing of Static Text
Fixed texts that compose the screen, such as help, units and information in general.
The properties of this component are: line (y), column (x), width and blink.
For further details, consult the WPS online help.
9.1.5 Numeric Input Component: Data Numeric Input
Allows the user to enter a number. The content goes to a marker defined by the user. The
input data can be Boolean, integer or floating point.
When it is not being edited, the input field shows the current value of the variable.
The input field is indicated by the line cursor, underlining the far right digit of the current
value of the variable.
When there is more than one input field on the same screen, the arrows <> and <>
are used to select the field that will be edited. The line cursor underlines the value that
will be edited.
To enter numbers, it is necessary to press <ENTER>, then the data filed can be incremented
or decremented using the arrows < > and <>, respectively. It is also possible to change
the digits using the arrows <> and <>. In case some number is typed, the field will be
erased and the new number entered.
Page 52

Description of the PLC300 Operation
9-4 | PLC300
Only numbers are allowed, including sign and decimal point. After typing the number, press
<ENTER> to update the value. The <DEL> key deletes the character under the cursor.
<ESC> exits without changing the value.
Properties of the input component: line (y), column (x), width, data type, maximum and
minimum and number of decimal digits.
The width must provide sign (in case of variable with sign) and the decimal point, if present.
In case of a integer variable with decimal places, the maximum and minimum values do
not consider the point. For instance: WORD with two decimal places: 0.00 to 655.35, but
the minimum and the maximum are: 0 and 65535.
Variable types: BOOL, SINT, USINT (BYTE), INT, UINT (WORD), DINT, UDINT (DWORD)
and REAL.
If the entered value is out of the maximum or minimum limits, the value is not accepted
and a warning screen appears:
[- -- -- -- -- - - - -- -- -- ]
[ VA LU E OU T ]
[ OF R AN GE . ]
[- -- -- -- -- - - - -- -- -- ]
The number of decimal places limits the display of places after the decimal point.
Examples:
Number of decimal places: 2
Variable type: REAL (floating point)
Typed number: 1.2258
Displayed value (after the <ENTER>): 1.23
Value stored in the marker: 1.2258
Number of decimal places: 3
Variable type: WORD (16-bit whole):
Typed number: 1.2258
Displayed value (after the <ENTER>): 1.225
Value stored in the marker: 1225
NOTE!
A maximum of 12 inputs can be placed in each screen.
Notes:
in the REAL variable, the typed value is completely stored, though only two decimal
places are shown, with rounding.
Page 53

Description of the PLC300 Operation
PLC300 | 9-5
in the WORD variable, the typed value is truncated (not rounded) and as this is a integer
number, the stored value is multiplied by 1000, which is the power 103, where 3 is the
number of decimal places.
9.1.6 Numeric Output Component: Data Numeric Output
It shows the value of a variable on the display. The allowed types are: BOOL, SINT, USINT
(BYTE), INT, UINT (WORD), DINT, UDINT (DWORD) and REAL.
The properties of the output component are: line (y), column (x), width, update period,
blink, data type, and number of decimal digits.
The width must foresee sign (in case of variable with sign) and the decimal point, if there is.
The blink property makes the displayed value blink.
The update period is the time in milliseconds (ms) to update the displayed value with the
content of the variable.
Example:
Number of decimal places: 2
Variable type: WORD (16-bit integer)
Value stored in the marker: 12258
Displayed value: 122.58
9.1.7 Message Component: Output with Texts for a Variable
Shows texts for certain values of a variable. The allowed types are: BOOL, SINT, USINT
(BYTE), INT, UINT (WORD), DINT and UDINT (DWORD). The properties of the output
component are: line (y), column (x), width, update period, data type and a table with the
values and texts.
The width must be sufficient to hold the texts that will be shown.
This component is particularly useful for variables that store status, for instance, a boolean
variable. It can be shown: ‘ON’ or ‘OFF’.
The values which do not appear on the table will be shown numerically.
The update period is the time in milliseconds (ms) to update the displayed value with the
content of the variable.
Page 54

Description of the PLC300 Operation
9-6 | PLC300
Example:
Variable type: BYTE (8 bit integer)
Table Count:
Tab l e 9.1: Example of text for values of the variable
Index Value Tex t
1 0 “Sunday”
2 1 “Monday”
3 2 “Tuesday”
4 3 “Wednesday”
5 4 “Thursday”
6 5 “Friday”
7 6 “Saturday”
In this example, the PLC300 will show the texts, which are the days of the week, for variable
values between 0 and 6; if the content of the variable is out of these values, the proper
number will be shown.
NOTE!
A maximum of 12 outputs (output + message) can be placed on each screen.
9.1.8 Bar Graph Component: Bar Graph
It shows a bar built with block type characters, proportional to the value of a variable.
The allowed types are: SINT, USINT (BYTE), INT, UINT(WORD), DINT, UDINT(DWORD)
and REAL.
Properties of the bar graph: line(y), column (x), width, data type, maximum and minimum.
The width must be sufficient for the bar plus two delimiting characters,
‘[‘ and ‘]’.
It corresponds to 0 %, that is, the minimum value:
Te mp .: [. .. . . . .. ]
It corresponds to 50 % of the value between the minimum and maximum.
Te mp .: [ . .. . ]
It corresponds to 100 %, that is, the maximum value:
Te mp .: [ ]
Note: “T e m p.:” is a Text component, it is not part of the bar graph.
Page 55

Description of the PLC300 Operation
PLC300 | 9-7
NOTE!
A maximum of 4 bargraphs can be placed on each screen.
9.1.9 Text Output
Shows text (string) on the ‘Ouput’ function of the screens of the PLC300 with HMI. This
option only accepts STRING.
The string is terminated with the NULL (0) character and is shown in one line of the display,
being then limited to 20 characters. The excess will be truncated.
9.1.10 Text Input
The Text Input component, from firmware version 2.10 up, allows the input of STRING
variables, and they can contain letters, numbers, signals, etc.
In order to insert letters, just use the <SHIFT> key after entering the field. If pressed twice,
the shift function will remain selected, enabling the entering of several letters. The arrows
<> and <> toggle from high to low case.
9.2 AUTOMATIC SOFTWARE RECOVERY - ASR
When energizing the PLC300, if it is detected that the Resource, CANopen Configuration
or Setup are invalid (battery fault, for instance), the corresponding files contained in the
flash memory will be loaded. Those files will be automatically created at the moment of
the download of the Resource and CANopen Configuration or in case there is a change
in the Setup by the HMI or WPS.
At the power-up, a backup of the retentive markers and recipe will be made so that, if
there is data loss in the memory, the configuration of the last power on will be recovered.
If the recovery of the software occurs, an alarm will be generated indicating that the
Resource was invalid, and it was recovered from the Flash memory; the system marker
that indicates the alarm can be used for some treatment in the Resource.
Important: When the software recovery occurs, the retentive variables and recipes will
be restored to the state of the last valid power on.
Page 56

Description of the PLC300 Operation
9-8 | PLC300
Page 57

Alarms
PLC300 | 10-1
10 ALARMS
The alarms are an important tool in process automation, allowing the user to monitor its
plant, checking critical points and signaling to the operator. In the PLC300, the alarms can
be programmed by the user, being activated by a bit marker that can be set on the ladder.
For instance, when an analog input exceeds a certain value, indicating an abnormal
condition or when a digital input is activated by some sensor.
Some result of a mathematical operation, a counter that exceeds a value, etc.
When an alarm occurs, the red LED of the <ALARM> key flashes indicating that there is
a new active alarm.
The internal alarms are not programmable and inform unwanted conditions in the equipment
hardware. They can be disabled by the user, except for the low battery alarm.
10.1 INTERNAL ALARMS
They are alarms related to some hardware components of the PLC300. They are not
programmed by the user. They have fixed texts.
They occupy the internal memory, not the user memory, except by the history.
They can generally be disabled by the WPS, except for the ‘Low Battery’ alarm, which
informs that the battery that keeps the data in the memory must be changed.
Enabling and disabling the internal alarms is also executed by the WPS.
Description of the internal alarms:
Digital Outputs Fault – indicates that some problem is occurring in some of the outputs
DO1 to DO8, DO101 to D0108 or DO201 to DO208. It can be overheating caused by a
short circuit, or overload in the outputs.
Broken Wire – when the analog input is in current mode, 4 to 20 mA and the current is
below approximately 2 mA, the alarm goes off. The normalization of this alarm happens
when the current increases to above the 3 mA again.
Encoder Fault – if any of the encoder signals is missing, this alarm is activated. After the
normalization of the fault, the system must be reset.
Can Supply – the CAN Interface needs a voltage between 11 and 30 Vdc for its correct
operation. In the absence of this voltage, this alarm is activated.
Low Battery – indicates that the battery that keeps the data in the memory must be
changed. This alarm cannot be disabled by the user. This alarm is generated when the
battery voltage is below 2.0 V, and it is deactivated when the voltage is above 2.5 V.
Page 58

Alarms
10-2 | PLC300
IMPORTANT: Information can be lost in case the PLC300 is turned off and the battery
voltage is below 1.9 V.
Automatic Software Recovery (ASR) - Indicates the user’s software was considered
invalid and was recovered from the SD card.
Watchdog Tasks – when Watchdog is detected in any task of the user, the program
stops and an alarm occurs, indicating which task generated Watchdog. Simultaneously
the Reading System Marker corresponding to the task is set (System Markers %SB0050
to %SB0055). The configuration of the Watchdog of the tasks is executed by means of
the WPS.
Nonexistent or Invalid SD Card – error in the attempt to write or read the SD Card
through the Event Log, Alarm Log or Recipes.
10.2 USER ALARMS
They are the alarms programmed by the user, using the WPS. They are activated by a bit marker.
Programming of the User Alarms
The user alarms must be configured by the WPS programming software. The user enters
the bit marker that will activate the alarm; it indicates if the actuation will be in the low or
high level of the bit and the texts of the alarm.
Other common data to all these alarms are also set by the WPS, such as: maximum number
of alarms and size of the alarm history.
These data affect the available memory, so they must be optimized for the user needs.
It is possible to show the content of a variable, formatted, in the second line of the alarm.
10.3 ALARM SCREENS
The PLC300 has two internal screens that help in the verification of the alarms, both internal
and the user’s. The List of Active Alarms and the Alarm History.
List of Active Alarms
By pressing the <ALARM> key, the alarm is acknowledged, making the LED stop flashing.
The screen of active alarms is open, showing at the top, the last active alarm.
For instance:
AC TI VE AL AR MS
>0 02 :A ct ua t o r 1 Fa il
00 1: Ov er te m p . K 1
In this example, the alarm “Actuator1 Fault” was the last to happen, seeing that there
is still another active alarm. “Overtemp. K1”.
Page 59

Alarms
PLC300 | 10-3
The arrows <> and <> browse through the active alarms. By pressing <ENTER> on
the selected alarm, a more detailed screen is shown:
Ac tu at or 1 Fa i l
Ch ec k ci rc ui t 1
A: 16 /1 0/ 09 1 0 : 5 7: 58
The first line shows the text displayed in the list of the active alarms. This text can have up
to 15 characters and is a simple description of the alarm.
The second line can show some explanation or action to take in relation to the alarm and
can have up to 20 characters.
The third line shows the day and the time the alarm was activated.
Press <ESC> to return to the list of the active alarms.
Press <ESC> to exit the list of the active alarms and return to the previous screen.
Alarm History
By pressing <SHIFT><ALARM>, a history of the alarms that have been normalized is
shown. An alarm is normalized when the bit marker that activated it returns to the previous
state. For instance, when a temperature being measured by the analog input lowers, a
comparison block disconnects the bit that was activated.
For instance:
AL AR M- HI ST O R Y
>0 03: A c tu at or 1 Fa il
00 2: CA N Po we r O f f
00 1: Ov er te m p . K 1
This screen shows the alarms that have already been normalized, that is, have left the
alarm condition.
The arrows <> and <> browse through the normalized alarms. By pressing <ENTER>
on the selected alarm, a more detailed screen is shown.
Ac tu at or 1 Fa i l
Ch ec k Ci rc ui t 1
A: 16 /1 0/ 09 1 0 : 5 7: 58
N: 16 /1 0/ 09 13:4 0: 23
In addition to the information already explained in the active alarms, the date and time in
which the alarm was normalized appear on the fourth line.
Page 60

Alarms
10-4 | PLC300
Press <ESC> , <ENTER> to return to alarm history.
Press <ESC> to exit the alarm history and return to the previous screen.
The size of the alarm history is configured by the user in the WPS.
The alarm history is retentive, i.e., it is kept when you disconnect the equipment.
The history is deleted if the <DEL> key is pressed for 2 s or more and confirmed by
pressing ‘Y’.
The history is also deleted when transmitting a project by the WPS.
Page 61

Operation of the LEDs
PLC300 | 11-1
11 OPERATION OF THE LEDS
The PLC300 has 3 bicolor LEDs, on the keyboard left, that are repeated on the back panel of
the equipment. These LEDs inform status on the PLC300 and the CAN and serial networks.
Here is described the operation of the LED status. The operation of the CAN and Serial
LEDs is described in the manuals of communication.
LED Status
Tab le 11.1: Description of the operation of the LED status
Red LED Green LED Status Description
Off. On . RUN. Application running.
On . Off. ST O P. Application stopped.
Blinking 1 Hz. Off. File Fault. Download of invalid file
(application, screens or alarms).
Blinking 8 Hz. Off. Low battery. Change battery.
On . Blinking 4 Hz. Download. Indicates download in progress.
Page 62

Operation of the LEDs
11-2 | PLC300
Page 63

Battery Replacement
PLC300 | 12-1
12 BATTERY REPLACEMENT
When the PLC300 generates a low battery alarm, or if there isn’t HMI, and the Status LED
flashes in red rapidly, it’s time to replace the battery.
The battery used is the CR2032 of 3 V.
To perform the replacement you must do the following:
1. Open the compartment that contains the battery.
2. With a small screwdriver or tweezers, press the Eject button, as in Figure 12.1 on page
12-1 below, and remove the old battery.
3. Insert the new battery, with the negative (smaller disk) facing the PLC300.
4. Close the compartment.
Figure 12.1: Removal of the old battery
Page 64

Battery Replacement
12-2 | PLC300
Figure 12.2: Insertion of the new battery
Page 65

Description of the Models
PLC300 | 13-1
13 DESCRIPTION OF THE MODELS
The PLC300 is available in six different models. With or without HMI; standard or plus
and one version with HMI, but without the frontal overlay membrane, where the user can
customize the appearance of the PLC, following specifications in document 1000990528,
available for download on the website: www.weg.net.
The identification of the PLC300 is made by a suffix of two or three letters.
The letters have the following meaning:
H: HMI.
B: Blind (without HMI).
P: Plus.
S: Standard.
C: Custom (without membrane).
Specifications PLC300HP PLC300BP PLC300HS PLC300BS PLC300HPC PLC300HSC
Code WEG 13798125 13798049 13798126 13798168 13798081 13798082
HMI
--
--
Membrane
--
-- -- --
Ethernet
-- --
--
Encoder
-- --
--
Expansion
-- --
--
SD Card
CAN
RS-485
RS-232
USB
PWM Output
Digital I/O
Analog I/O
Page 66

Description of the Models
13-2 | PLC300
Page 67

Self-test
PLC300 | 14-1
14 SELF-TEST
You can execute internal routines of self-test in the PLC300. The way you enter this test is
different for some models due to the presence or not of the HMI.
How to enter the self-test:
In the models with HMI (HP, HS, HSC and HPC), the PLC must be turned on with the F6
key pressed.
In the models without HMI (BS and BP), you must turn on the PLC with the button
pressed, In the models without HMI (BS and BP), you must turn on the PLC with the
button pressed, release it when the "Release Key" appears, and press it quickly once
more.
Description of the self-test for the models with HMI (HP, HS, HSC and HPC):
1. LEDs and Display test: characters of the block type are shown in all positions of the
display; all the LEDs blink; to exit, press any key.
2. RAM memory test: the user program memor y is tested; to finish, press any key.
3. Flash memory test: the flash memory used for the ASR is tested; to end, press any key.
4. Keyboard and buzzer test: when you enter this test, you must press all the PLC300
keys and check by the message if it is correct. Besides, a beep must be heard with
each pressed key, indicating that the buzzer is working properly. Press the ESC key
three times to leave the keyboard test.
5. When leaving the keyboard test, the PLC starts running normally.
Description of the self-test for the models without HMI (BP and BS):
1. LEDs and Display test: characters of the block type are shown in all positions of the
display; all the LEDs flash; to finish, press the button.
2. RAM Memory Test: the user’s program memory is tested; to finish, press any key.
press .
3. Flash memory test: the flash memory used for the ASR is tested; to end, press .
4. Buzzer test: the beep was emitted each time the button was pressed in the
previous operations.
Page 68

Self-test
14-2 | PLC300
Page 69

Technical Specifications
PLC300 | 15-1
15 TECHNICAL SPECIFICATIONS
Supply:
Voltage: 24 Vdc ±15 %.
Consumption of the PLC300 in 24 V: 250 mA.
Approximate consumption of each expansion: 30 mA.
Operating temperature
0 °C to 50 °C.
Degree of protection
IP65.
DI1 to DI10 Digital Inputs:
Bidirectional inputs.
Maximum input voltage 30 Vdc.
High level: Vin ≥ 10 V.
Low level: Vin ≤ 3 V.
Consumption in 24 V: 10 mA.
Maximum frequency DI1 to DI8: 4 kHz.
Maximum frequency DI9 and DI10: 100 kHz.
Insulation voltage: 500 V.
Delay time DI1 to DI8: 0→1: 20 µs; 1→0: 60 µs.
Delay time DI9 to DI10: 0→1: 8 µs; 1→0:32 µs.
DO1 to DO8 Digital Outputs:
PNP Outputs.
Maximum voltage in Vbb: 30 Vdc.
Maximum current of each output: 500 mA.
Delay time DO1 to DO8: 0→1: 40 us; 1→0: 125 us.
PWM DO9 Output:
Push-pull output.
Maximum voltage in Vbb: 30 Vdc.
Maximum current: 100 mA.
Maximum frequency: 300 kHz.
Note:
To use it as PWM, the maximum frequency must be 50 kHz so that the duty-cycle is correct.
Analog Output
10-Bit Resolution.
Independent terminals for voltage and current.
Voltage output from 0 to 10 V.
Current output from 0 to 20 mA.
Maximum load 500 Ω for current output.
Page 70

Technical Specifications
15-2 | PLC300
Analog Input:
12- Bit Resolution.
Differential analog input.
Input impedance in voltage mode: 40 kΩ.
Input impedance in current mode: 500 Ω.
Access time of digital inputs and outputs using the remote CANopen Weg RUW01
The data update time via CANopen interface depends on the baud rate used, the amount
of data transmitted over the network and the settings done to transmit the data. Some
reference values are supplied below so as to indicate the update time based on one
standard configuration.
Considering a minimum CANopen network with a PLC300 as master and one RUW01
and single slave, using a baud rate of 1 Mbps and configuring the minimum Event Time
rate, that is, 1 ms (one millisecond), we have a delay of up to 2 ms (two milliseconds) until
the information reaches the PLC300. It must also be considered the scan cycle of the
user’s program.
CANopen Network:
1 PLC300.
1 RUW01.
Rate: 1 Mbps.
Event Time: 1 ms.
Maximum delay (I/O): 2 ms.
If we have more RUW01 units as slaves, or the baud rate is lower, we recommend increasing
the "Event Time" period so as to avoid occupying the busbar more than the data amount
to be transmitted. As a safety value, in the “Event Time” you can use multiples of 1 ms for
each RUW on the network. In this case, the update time would be the value of the “Event
Time” more 1 ms for the transmission and processing.
Encoder Input:
Maximum frequency: 100 kHz.
Encoder power supply: 5 or 12 Vdc.
Encoder maximum current: 300 mA.
Maximum length of the encoder cable: 30 m.
Update Time of Screens:
100 ms.
CAN interface:
Power Supply: 11 to 30 Vdc.
Maximum consumption in 24 V: 50 mA.
Memory:
SRAM Memory with battery, capacity of 1 MByte.
Page 71

Technical Specifications
PLC300 | 15-3
Up to 512 screens are programmed by the user.
Dynamic allocation of the area of application, markers, screens and alarms.
Scan Cycle for 1000 Program steps
For a simple program, done with 500 lines with contacts and coils, which resulted in 1000
instructions, the PLC300 presents the following characteristics:
Scan cycle, by KB of program: 133 µs/KB.
Occupied size: 12 KB.
Total scan cycle: 1.6 ms.
15.1 STANDARDS MET
Electromagnetic
compatibility
standard
EN/IEC* 61131-2: Programmabla controllers – Part 2: Equipment
requirements and tests – Third edition – 2007
EN/IEC* 61000-4-2: Electromagnetic compatibility (emc) - part 4-2: Testing
and measurement techniques - Electrostatic discharge immunity test – Edition
2.0 – 2008
EN/IEC* 61000-4-3: Electromagnetic compatibility (emc) - part 4-3: Testing
and measurement techniques – Radiated, radio-frequency, electromagnetic
field immunity test – Edition 3.2 - 2010
EN/IEC* 61000-4-4: Electromagnetic compatibility (emc) - part 4-4:
Testing and measurement techniques – Electrical fast transient/burst
immunity test – Edition 3.0 – 2012
EN/IEC* 61000-4-5: Electromagnetic compatibility (emc) - part 4-5: Testing
and measurement techniques – Surge immunity test –Edition 3.0 – 2014
EN/IEC* 61000-4-6: Electromagnetic compatibility (emc) - part 4-6:
Testing and measurement techniques – Immunity to conducted
disturbances, induced by radio-frequency fields – Edition 4.0 – 2013
Standard of low
tension
EN/IEC* 61131-2: Programmable controllers – Part 2: Equipment
requirements and tests – Third edition – 2007
*
EN and IEC are equivalent standards.
Page 72

Technical Specifications
15-4 | PLC300
Page 73

Dimensions
PLC300 | 16-1
16 DIMENSIONS
56.65
(2.23)
49.35
(1.93)
210 (8.26)
191 ( 7. 51)
187.15 ( 7. 3 6 )
150.08 (5.90)
Page 74

Dimensions
16-2 | PLC300
187.13 ( 7. 3 7 )
52.53
(2.06)
150.13 (5.91)
174.65 (6.87)
Ø 4.8 (0.19)
178.97 (7.09)
166.17 (6.54)
Figure 16.1: Dimensions of the PLC300
Page 75

Dimensions
PLC300 | 16-3
16.1 MECHANICAL MOUNTING
Mounting on Panel (DIN rail or screw)
Figure 16.2: Mounting on panel
Mounting on the Panel Door
Note: dimensions of the slot for mounting on the panel door: 189 x 152 mm
Figure 16.3: Mounting on the panel door
Page 76

Dimensions
16-4 | PLC300
Back view of the panel door:
Figure 16.4: Back view of the panel door
 Loading...