

WAVES
MASERATI GTi
User Guide

TABLE OF CONTENTS
CHAPTER 1 – INTRODUCTION.............................................................................................................3
WELCOME.......................................................................................................................................3
1.1
1.2
PRODUCT OVERVIEW.......................................................................................................................3
A FEW WORDS FROM TONY MASERATI.............................................................................................4
1.3
COMPONENTS .................................................................................................................................4
1.4
CHAPTER 2 – QUICKSTART GUIDE....................................................................................................5
CHAPTER 3 – INTERFACE AND CONTROLS...................................................................................... 6
INTERFACE......................................................................................................................................6
3.1
CONTROLS......................................................................................................................................7
3.2
CHAPTER 4 – THE WAVESYSTEM ....................................................................................................12
THE WAVESYSTEM TOOLBAR.........................................................................................................12
4.1
4.2
PRESET HANDLING........................................................................................................................ 12
INTERFACE CONTROLS.................................................................................................................. 14
4.3
WAVES PREFERENCES (PRO TOOLS ONLY)....................................................................................16
4.4
Waves Maserati GTi
User Guide
2

Chapter 1 – Introduction
1.1 Welcome
Thank you for choosing Waves! In order to get the most out of your Waves processor, please
take the time to read through this manual.
In conjunction, we also suggest that you become familiar with www.wavesupport.net
will find an extensive Answer Base, the latest Tech Specs, detailed Installation guides, new
Software Updates, and current information on Authorization and Registration.
By signing up at www.wavesupport.net
registered products, reminders when updates are available, and information on your
authorization status.
, you will receive personalized information on your
. There you
1.2 Product Overview
The Waves Signature Series is our exclusive line of application-specific audio processors,
created in collaboration with the world’s top prod
Signature Series plug-in has been precision-crafted to capture the artist’s distinct sound and
production style. For experienced and aspiring audio professionals alike, the Waves Signature
Series allows you to dial up the sound you’re looking for quickly, without interrupting the creative
ucers, engineers, and mixing engineers. Every
flow.
The Tony Maserati Collection consists of seven plugins, each designed to handle a specific
production task:
¾ Vocals
¾ Drums: Maserati DRM
¾ Bass: Maserati B72 Bass Phattener
¾ Electric Guitars
¾ Acoustic Guitars: Maserati ACG Acoustic Guit
¾ Keyboards/Strings: Maserati HMX Harmonics Generator
¾ Groups/Stem
: Maserati VX
s: Maserati GRP Group Processor (new in V7.2)
1 Vocal Enhancer
Drum Slammer
: Maserati GTi Guitar Toner
ar Designer
Waves Maserati GTi
User Guide
3

1.3 A Few Words from Tony Maserati
"The GTi was created with all the different guitar players I've admired in mind. I tried to find
settings that would be a starting place for getting their sound, from the ‘Clean’ in-your-face
sound of, say, Elliott Smith to the wide chorus-y spread of The Police's Andy Summers using
the 'Clean Chorus' setting. On the 'Heavy' setting, a bit of level and EQ help your already
crunched guitar sound scream through any thick instrumentation you've got. ‘Thick Rhythm' lets
you to subtly or substantially make your rhythm guitar sound livelier; it also works great on
Wurlis and Horns. The 'Soft Flange' setting is just that; it adds interesting and subtly audible
filtering to legato notes or sustained electric guitars. My intention was to make these effects
usable in a wide variety of applications. The wild and crazy FX are out there; you already got
'em if you need 'em!"
1.4 Components
WaveShell technology enables us to split Waves processors into smaller plug-ins, which we call
components. Having a choice of components for a particular processor gives you the flexibility
to choose the configuration best suited to your material.
The Waves Maserati GTi has two components:
• Maserati GTi m>s – Mono in to Stereo out component
• Maserati GTi stereo – Stereo in to Stereo out component
Waves Maserati GTi
User Guide
4

Chapter 2 – Quickstart Guide
• Insert the Maserati GTI plug-in on a guitar track.
• Toggle between the different guitar types until you find a suitable starting point.
• Adjust the Sensitivity control until you achieve proper levels, as indicated by the
Sensitivity LED.
• Adjust the FX control when available (Clean Chorus, Thick Rhythm, Soft Flange).
• Shape tonality and dynamics using the Presence and Tame controls.
Waves Maserati GTi
User Guide
5

Chapter 3 – Interface and Controls
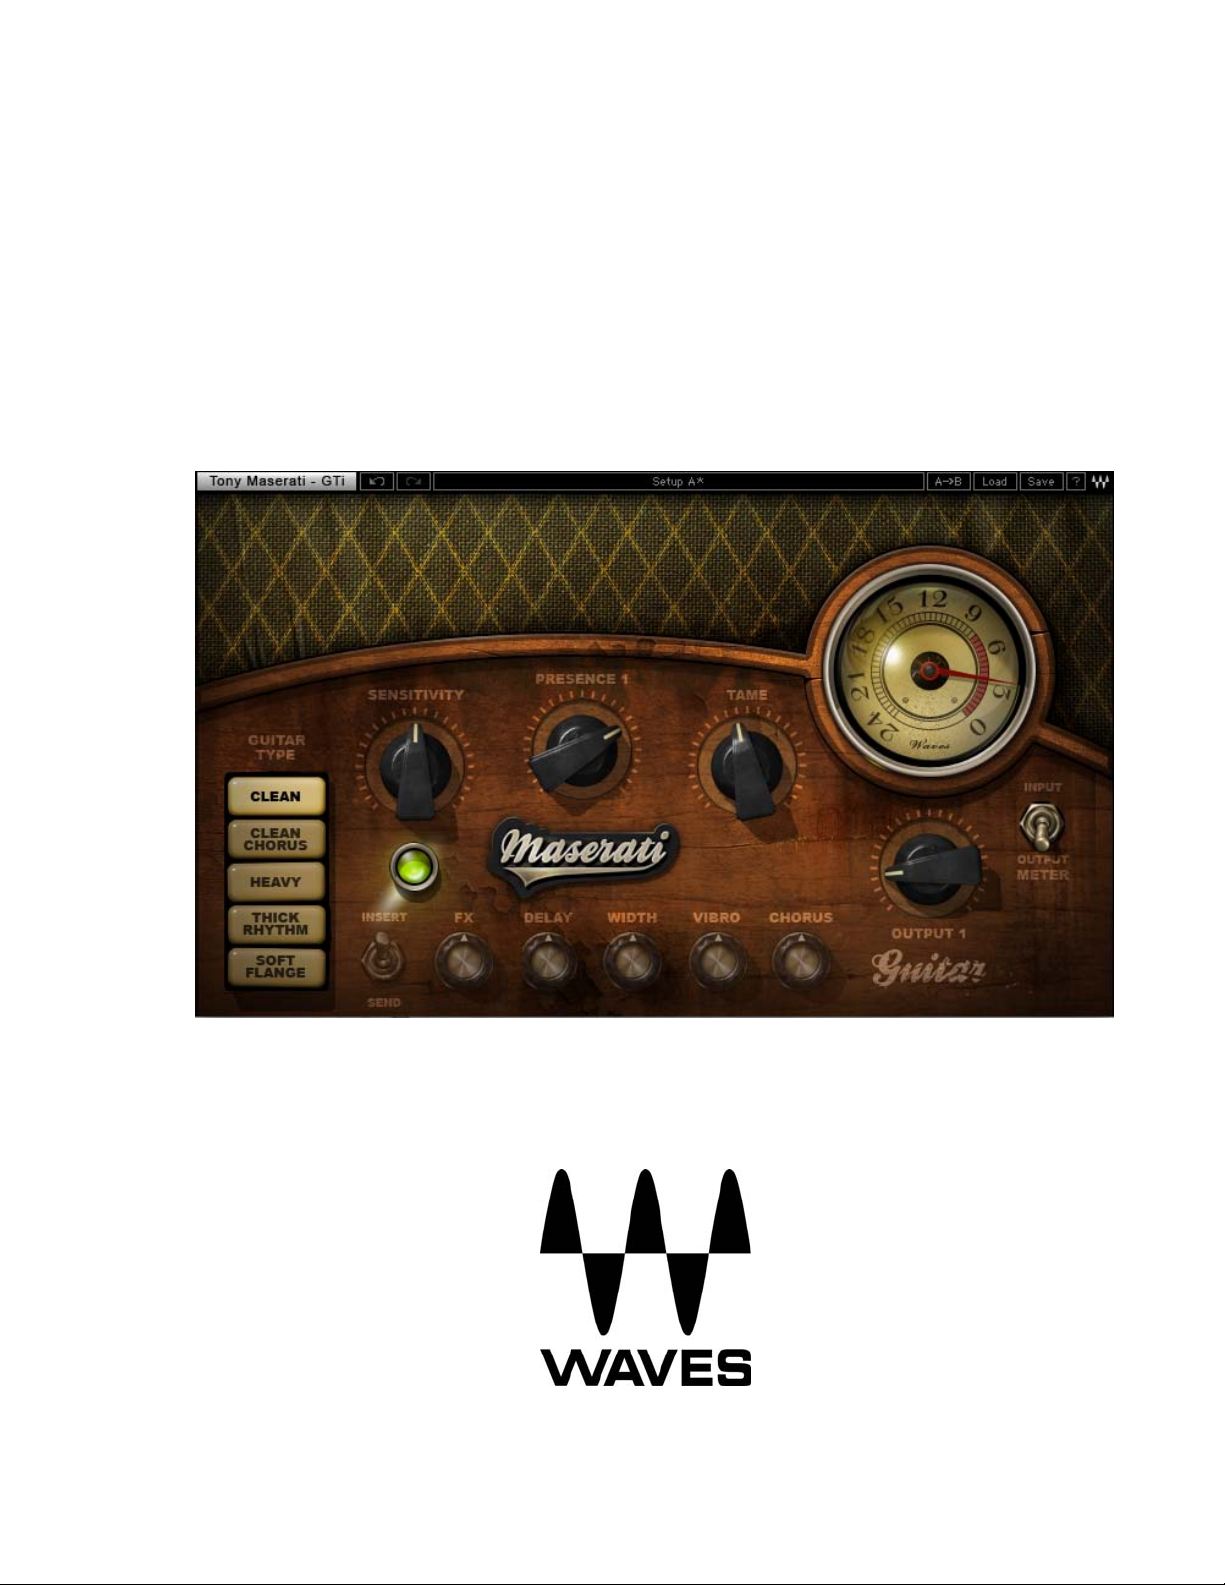
3.1 Interface
Waves Maserati GTi
User Guide
6

3.2 Controls
GUITAR TYPE is used to toggle bet
Range: Clean, Clean Chorus, Heavy, Thick Rhythm, Soft Flange
ween the 5 guitar types.
SENSITIVITY controls input levels.
Range: +/- 50 (in 0.1 steps)
SENSITIVITY LED indicates the pres
Range: Green (good), Yellow (optimal), Red (very hot)
ence of nominal levels.
Waves Maserati GTi
User Guide
7

OUTPUT controls the output level.
Range: 0 – 100 (in 0.1 steps) Min – Max
OUTPUT 2 controls the
Range: +/- 12 (in 0.
output level.
1 steps)
PRESENCE controls guitar presence.
Range: +/- 50 (in 0.1 steps)
Please note: For automation purposes, Clean, Clean Chorus, and Heavy Types are
; Th
labeled “Presence 1”
ick Rhythm and Soft Flange are labeled “Presence 2.”
TAME controls dynamics. (Not available in Thick Rhythm)
Range: 0 – 100 (in 0.1 steps) Min – Max
DEPTH controls the depth of the chorus effect. (Clean Chorus only)
Waves Maserati GTi
User Guide
8

Range: 0 – 100 (in 0.1 steps) Min – Max
MIX controls the amount of chorus effect. (Clean Chorus only)
Range: 0 – 100 (in 0.1 steps) Min – Max
INSERT/SEND Switch toggles between two modes Insert and Send modes. (Thick Rhythm
and Soft Flange Types only)
o Insert mode
o Send mode,
send/return configuration
Please note: In Send mode, certain controls will be unavailable, and appear “grayed out.” If
toggling between Types in Send m
, which utilizes all processing, including compression, EQ, and effects
which includes only the effects section of the plugin, to be used in a
ode, the plugin will remain in Send mode when applicable.
FX controls the amount of signal sent to the effect. (Thick Rhythm and Soft Flange only)
Range: -inf – 0 (in 0.1 steps)
Waves Maserati GTi
User Guide
9

WIDTH controls the width of the stereo effect. (Thick Rhythm and Soft Flange only)
Range: 0 – 100 (in 0.1 steps) Min – Max
DELAY controls the delay time. (Thick Rhythm only)
Range: 300- 1000 (in 1ms steps)
VIBRO controls the depth of the vibrato effect. (Thick Rhythm only)
Range: 0 – 100 (in 0.1 steps) Min – Max
CHORUS toggles the chorus on or off. (Thick Rhythm only)
Range: On/ Off
PRESS controls the dynamics of the signal sent to the effect. (Soft Flange only)
Range: 0 – 100 (in 0.1 steps) Min – Max
Waves Maserati GTi
User Guide
10

RANGE controls the freq
uency range of the flanger effect. (Soft Flange only)
Range: 0 – 100 (in 0.1 steps) Min – Max
RATE controls the rate/speed of the flanger effect. (Soft Flange only)
Range: 0 – 100 (in 0.1 steps) Min – Max
METER displays input or output.
Range: -24dBFS – 0dBFS
METER Switch toggles meter monitoring between input and output modes.
Waves Maserati GTi
User Guide
11

Chapter 4 – The WaveSystem
4.1 The WaveSystem Toolbar
All Waves processors feature the WaveSystem toolbar which takes care
functions yo
WaveSystem toolbar are the same on practically all Waves processors, so familiarity with its
features will be helpful whichever processor you are using.
u will encounter while working with your Waves software. The features of the
Toolbar Functions
Undo Undoes the last 32 actions.
Redo Redoes the last 32 undone actions.
Setup A/B
Copy A->B Copies the current settin
Load Recalls presets from file
Save Saves presets in the Wa
? Opens the manual for the processo
Toggles bet
parameter settings
ween two presets. This is useful for close comparison of different
gs to the second preset register
ves file formats
r you are using
4.2 Preset Handling
of most administrative
Preset Types
Factory Presets are permanent presets in the Load menu. Factory presets cannot be over-
written or deleted. When applicable
presets.
User Presets are your favorite settings of the plug-in saved as a preset in the Load menu,
under ‘User Presets’. User Presets can be over-written and deleted.
Setup Files may contain more than one preset.
presets for a session. When you open a Setup File, all its setups become part of your Load popup menu for fast access. This can be particularly useful with multiple instances of a plug-in in a
single session. By saving all the settings you create into a single Setup File, they can all be
quickly available for every instance of that plug-in.
, different component plug-ins may have different factory
For example
, a single file can contain all the
Waves Maserati GTi
User Guide
12

Loading Presets and Setups
Click on the Load button
to see the Load pop-up menu. The menu is divided into four sections.
If a section is not currently available it will not appear in the Load pop-up menu.
Open Preset File…
Select to op
en any setup or preset file, whether from the Library or your
own creations.
‘Filename.xps’: Displays any currently loaded Setup File and its presets.
Factory
Presets: Displays the default Factory Presets.
User Presets: Displays any loaded User Presets.
Saving Presets and Setups
Click on the Save button to see the Save pop-up menu. Four options are available. If an option
is not curren
tly available it will be gra
Save to New File… Select this to start a ne
Save ‘File Name’ – “Preset Name” Overwrites the settings
Save to ‘File Name’ As… Saves the current settin
Put into Preset Menu As…
yed out and inaccessible.
w Setup file. There are two prompts
- first for the setup filename, then for the preset name. You
must provide a name for both the setup file and the preset.
Click OK (ENTER) to complete the save. It is a good idea
to create a folder in which to save several setup files for a
project.
of the loade
d preset (whether a
User Preset or a preset from a Setup File) with the current
settings. If a Setup File is currently loaded, the name of the
Setup File is displayed followed by the name of the preset
itself. If a User Preset is loaded, its name is displayed.
gs as a new preset into the Setup
file that is open (if one is not open, the option is grayed
out). You will be prompted to give the preset a name.
Save the current setting
s into a User Preset that will
always be in your Load menu (until deleted). You will be
prompted to give this preset a name. User Presets are
stored in the plug-in’s preference file.
Waves Maserati GTi
User Guide
13

Deleting Presets
You may delete User Presets and presets within a Setup File. Factory Presets and Setup
Library files cannot be d
1. Hold the Command (Mac)/Control (PC) key down.
2. Click-and-hold the Load button to see the pop-up menu.
3. While still holding the Command/Control key, select the preset or setup to delete.
4. A confirmation box will appear, allowing you to cancel or ‘OK’ the deletion.
eleted or overwritten.
A/B Comparison and Copying
The Setup A/Setup B button may be clicked to compare two settings. If you load a preset in the
Setup B position, this will not affect the preset lo
If you want to slightly modify the settings in Setup
on the Copy to B button, then alter Setup A and compare with the original Setup B.
The name of the current setup will be shown in the title bar (on platforms which support it), and
will switch as
Note: an asterisk will be added to the preset name when a change is made to the preset.
you change from Setup A to Setup B.
aded into the Setup A position, and vice-versa.
A, you can copy them t
o Setup B by clicking
4.3 Interface Controls
Controls can be in one of three states:
• Not Selected where the control is
• Selected where the con
• Selected and Active where the control is the tar
trol is the target of mouse control entry only
Toggle Buttons
Toggle buttons display the state of a control, and allow switching between two or more states.
Single-click to change the control’s
updates with the current setting, and others (bypass, solo, or monitoring toggles) illuminate
when the control is active.
Some processors have l
adjustment while retaining the offset between the controls.
ink buttons between a pair of toggle buttons, allowing click-
not the target of any user entry
get for both mouse and keyboard entry
state. Some toggle buttons have a text display which
and-drag
Waves Maserati GTi
User Guide
14

Value Window Buttons
Value windows display the value of a control and allow click-and-drag
control via the keyboard.
• Using the mouse, click-and-drag
support left/r
you know which direction of movement that button supports).
• Using the arrow
up/down – left/right (depending on the direction supported by that button) to move in the
smallest incremental steps across the button’s range (holding down the arrow keys will
move faster through the range).
• Using key
the value from your keyboard. If you enter an out of range number, the button stays
selected but remains at the current setting (system beeps? If system sounds are on?)
Some processors have l
adjustment while retaining the offset between the controls.
ight, some up/down (as you hover over a button, arrows will appear to let
s, click once with mouse to select the button, and then use
key
entry, double click on the button to open the value window, and directly enter
ink buttons between a pair of value windows, allowing click-
on the value window to adjust. Some value windows
adjustment, or direct
and-drag
Sliders
Click on the slider itself or anywhere within the sliders track. The numerical value of the slider
settings is displayed in a hover window above/below the slider path.
Hover Box
Hovering boxes will appear and display the control value when hovering with the mouse over
the control.
TAB Functions
TAB moves the ‘selected’ status to the next control, with shift-TAB moving in the reverse
direction.
Additionally, the Mac has an option-TAB function for ‘down’ movement and shift-option-TAB for
‘up’ movement where applicable.
If you have several Value Window Buttons selected, TAB functions will take you through the
selected co
Hitting Esc or Return will return the 'focus' to the DAW application.
ntrols
only.
Waves Maserati GTi
User Guide
15

4.4 Waves Preferences (Pro Tools only)
When launching Pro Tools, hold Shift to view the Waves plug-in Preferences window. The
following options are available:
• Don't use AudioSuite plug-ins
• Dont use RTAS plug-ins
• Don't use TDM plug-ins
• Rescan all plug-ins
• HUI control surfaces support (low res)
• Enable single-click text entry
Waves Maserati GTi
User Guide
16
 Loading...