

Page 1
Quick Start
1 Emotion LV1 Mixer | Quick Start
Page 2

Table of Contents
Introduction ............................................................................................................................................................................................4
Getting Started.......................................................................................................................................................................................6
Step 1: Install Hardware and Software ........................................................................................................7
Hardware Components ..................................................................................................................................................................7
Connecting the Hardware .............................................................................................................................................................7
Installation examples ......................................................................................................................................................................8
Typical Mixer Setup ..........................................................................................................................................................................8
Add Stage I/Os ...................................................................................................................................................................................9
Install Software ............................................................................................................................................................................... 11
Step 2: Setup Window—Network, I/Os, and Preferences ..........................................................................12
System Inventory Page — Congure SoundGrid Network Resources ....................................................................... 13
Work Oine ...................................................................................................................................................................................... 15
Save Session ................................................................................................................................................................................... 15
Mixer Settings Page: System-Wide Preferences ................................................................................................................... 16
User Interface Settings Page ....................................................................................................................................................... 17
Step 3: Patch Window—Set Internal and External Routing .......................................................................18
Patch Direction ................................................................................................................................................................................ 18
Patching Inputs................................................................................................................................................................................ 18
Patching Channel Direct Outputs and Mix Outputs ......................................................................................................... 20
Internal Routing ............................................................................................................................................................................. 20
Patching Between Devices .......................................................................................................................................................... 21
Delay Groups .................................................................................................................................................................................... 21
2 Emotion LV1 Mixer | Quick Start
Page 3

Step 4: Show Window—Create Sessions and Scenes ..................................................................................22
Sessions .............................................................................................................................................................................................. 23
Scenes ................................................................................................................................................................................................ 24
Recall Safe .......................................................................................................................................................................................... 25
Auto-Save Sessions and Scenes................................................................................................................................................. 25
Step 5: Channel Window—Adjust Channel Specics ..................................................................................26
Using the Channel View ............................................................................................................................................................... 27
Channel Window: Touch-and-Slide Controller .................................................................................................................... 30
Step 6: Mixer Window—Control All Channels .............................................................................................31
Mixer Window Navigation ........................................................................................................................................................... 31
Channel Selection ........................................................................................................................................................................... 34
User-Assignable Keys and Mute Groups................................................................................................................................. 35
Aux Channel “Sends on Faders” .................................................................................................................................................36
Additional Information ................................................................................................................................................................. 37
3 Emotion LV1 Mixer | Quick Start
Page 4
INTRODUCTION
Thank you for choosing the eMotion LV1 mixer from Waves. In order to get the most out of this product, please take some time to
read this manual.
4 Emotion LV1 Mixer | Quick Start
Page 5

eMotion LV1 is a software mixer designed to meet the needs of FOH and monitor engineers. It provides a complete solution for live
mixing, from the smallest gig to the largest production.
The eMotion LV1 mixer is available in three congurations: 16, 32, or 64 channels.
eMotion LV1 is compatible with Windows and Mac operating systems, and supports industry-standard control surfaces as well
as multi-touch devices. It can run on multiple screens on both wired and wireless networks, allowing you to design your work
environment however you want. Whether you are using a single laptop with a mouse or multiple touchscreen and control surfaces,
the eMotion LV1 user interface will feel familiar and intuitive.
Powered by low-latency Intel-based Waves SoundGrid DSP servers, eMotion LV1 utilizes the SoundGrid network for connecting
multiple mixers, stage boxes, I/O interfaces, playback/recording hosts, and all other SoundGrid-compatible devices. This allows for
fast, exible conguration with standard network components.
eMotion LV1 is a one-stop shop for all of your processing needs. With eight inserts on each channel for SoundGrid-compatible
Waves and third-party plugins, eMotion LV1 saves you the need to use outboard gear for top-tier processors. eMotion LV1 also lets
you share plugin presets and rack processing chains between your studio and any other platforms or consoles that run MultiRack.
The eMotion LV1 manual is divided into two documents:
> This Quick Start guide, which explains the mixer’s setup, workow, and basic controls.
> A User Guide, which is a comprehensive tour of the mixer. It combines an inventory of controls and displays with in-depth
instructions about the system. Appendices provide specications and up-to-date product information.
We suggest that you become familiar with the Waves support site: http://www.waves.com/support. There you’ll nd an extensive
answer base, the latest tech specs, detailed installation guides, software updates, and current information about authorization and
registration.
5 Emotion LV1 Mixer | Quick Start
Page 6

GETTING STARTED
This document takes you through the steps necessary to get you up and running. It’s a quick start guide, not a comprehensive
description of all the elements of the eMotion LV1 mixer. Please refer to the eMotion LV1 User Guide for detailed information.
To set up the mixer, follow these steps:
1. Install hardware and software.
2. Congure network and I/Os.
3. Patch audio inputs, outputs and routing within the mixer and between devices.
4. Create sessions and scenes.
5. Set up processing and aux sends for each channel.
6. View and control all channels in a familiar mixing environment.
6 Emotion LV1 Mixer | Quick Start
Page 7
STEP 1: INSTALL HARDWARE AND SOFTWARE
The eMotion LV1 mixer can process a very large number of plugins at the same time, with very low latency. To make this possible,
all plugin processing is carried out on a high-speed server, not on the host computer. This server works as part of a Waves
SoundGrid network, so the rst step in setting up the mixer is to congure the network.
Hardware Components
A SoundGrid network consists of at least four hardware elements:
> Host computer: The mixer and the SoundGrid network run on Mac and Windows. Visit the Waves website for hardware and
operating system requirements.
> SoundGrid server
> At least one SoundGrid I/O device
> SoundGrid 1Gb Ethernet switch
Connecting the Hardware
Use a SoundGrid Ethernet switch and Cat 5e, Cat 6, or Cat 7 Ethernet cables to connect all hardware components. Sync is carried
over Ethernet, so there is usually no need for external clock cables. Consult the Waves support site for cable specications.
Essential Elements of an eMotion LV1 System
1
Host Computer
1
2
7 Emotion LV1 Mixer | Quick Start
3
4
2
SoundGrid Server
3
Ethernet Switch
4
SoundGrid I/O
Page 8
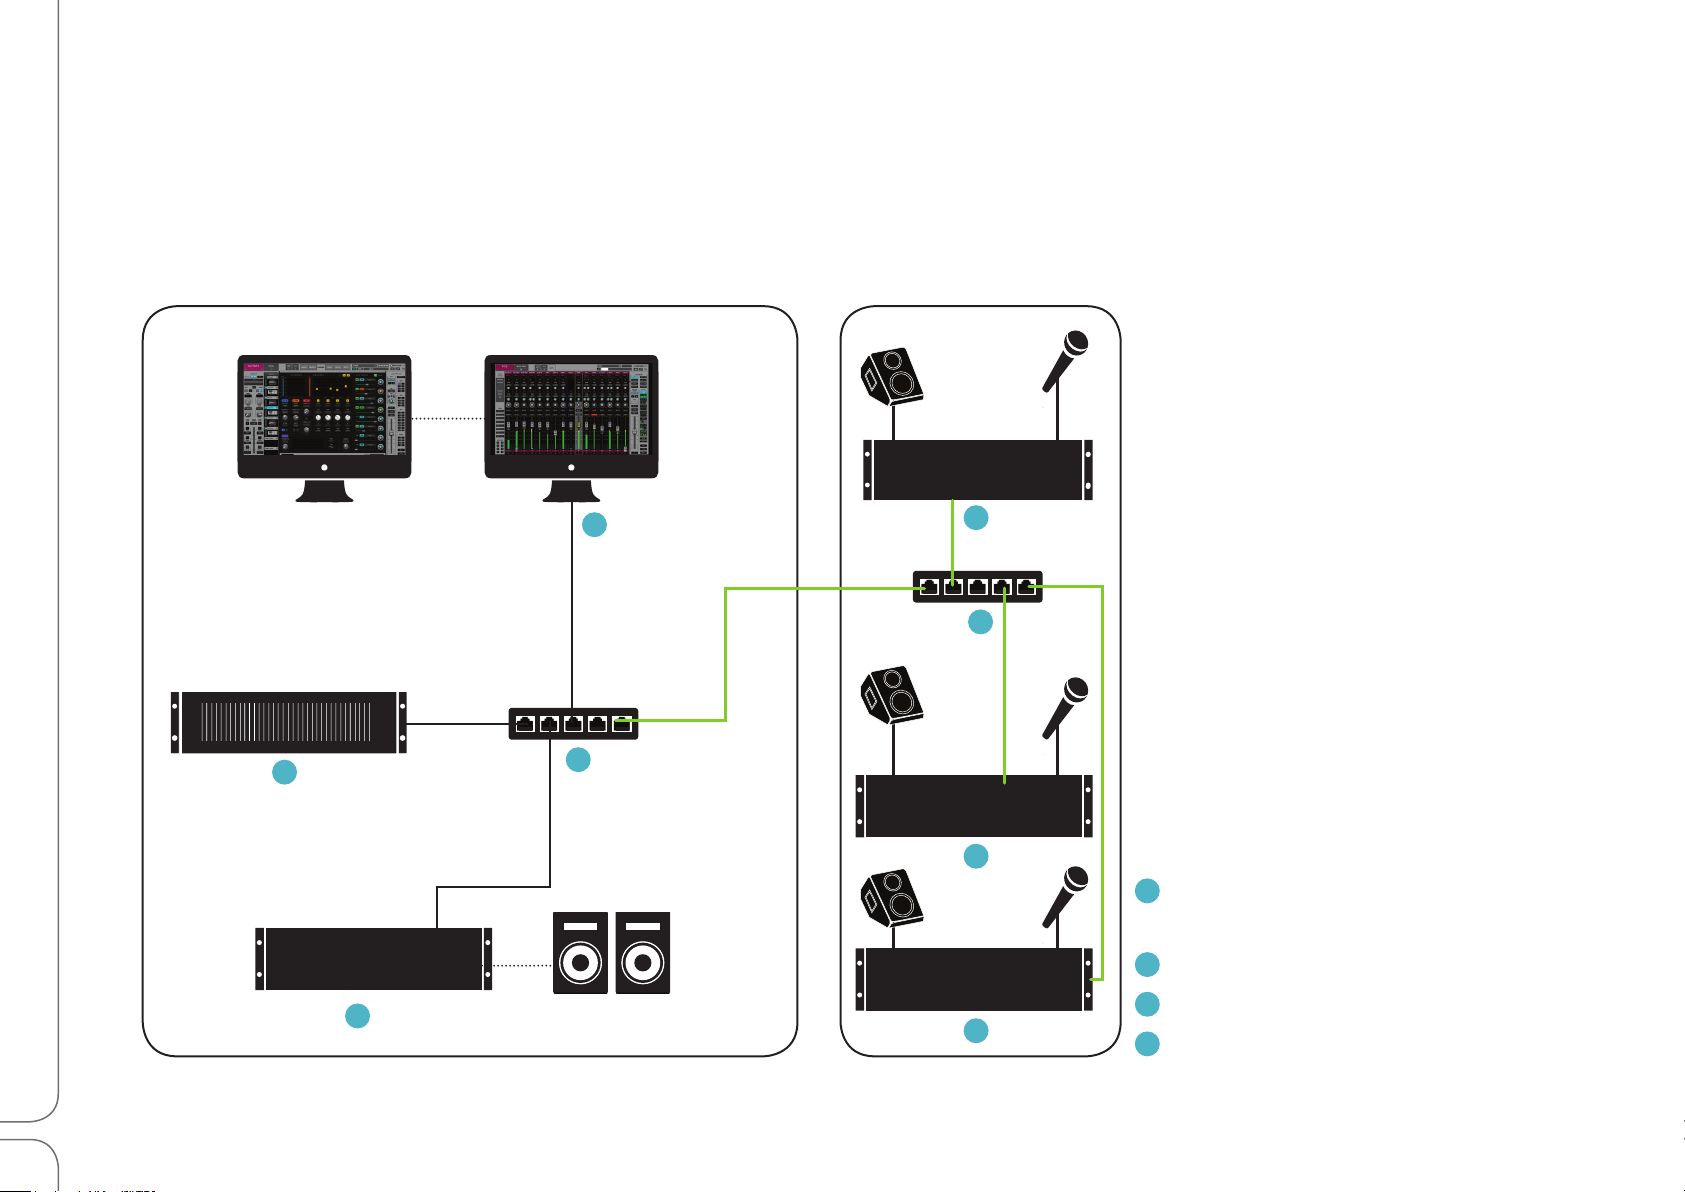
Installation examples
Mixer congurations can be quite large or quite small. System size is limited only by the number of I/Os and the scope of your
license. Below are three suggested mixer setups.
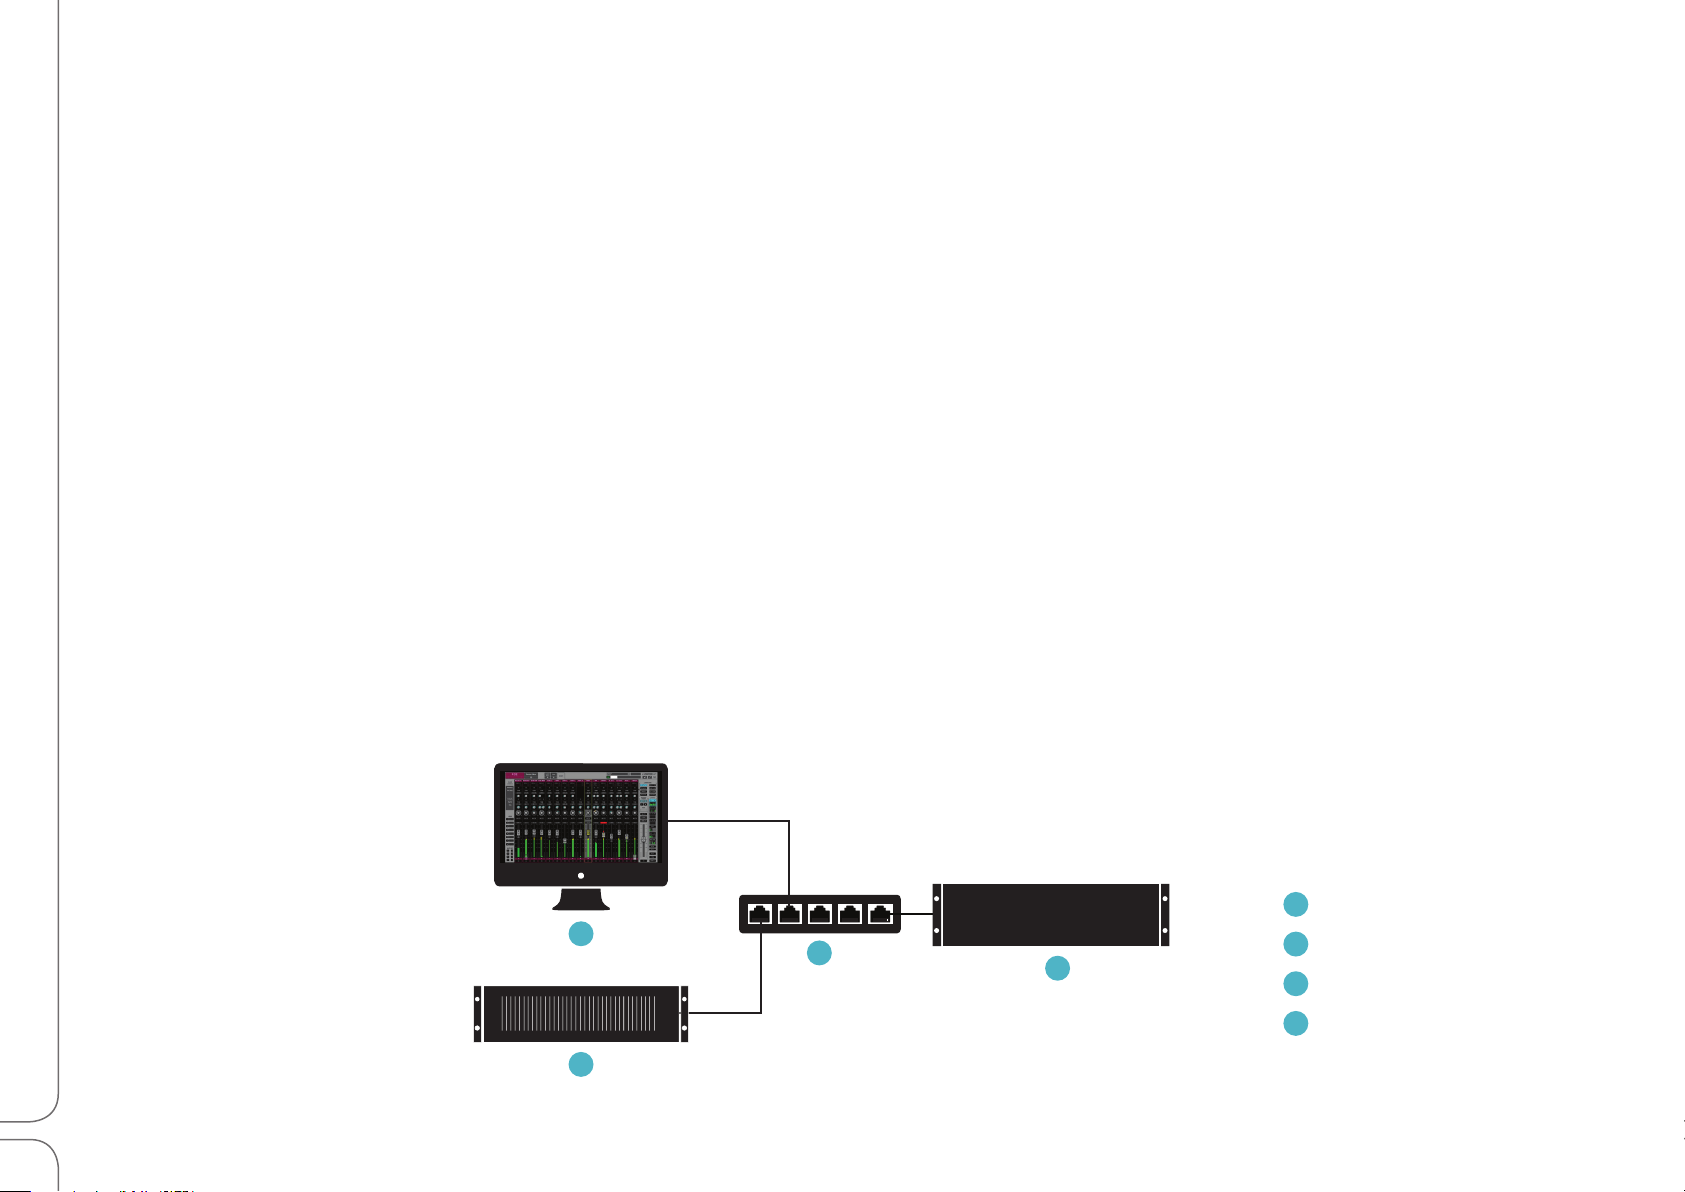
Typical Mixer Setup
This is the basic eMotion LV1 system. One or more onstage I/O devices provide for mics and monitors. Another I/O in the FOH isfor
engineer monitoring and PA. The system can be controlled with a multi-touch screens, a mouse, or a hardware controller. This
conguration is well suited for smaller venue installations that don’t require a large number of I/Os. It also works well for temporary
or mobile productions, since it is easy to transport and quick to set up.
FOH Stage
1
2
3
4
1
Host Computer
with Additional Display
2
SoundGrid Server
3
Ethernet Switch
4
SoundGrid I/O
4
8 Emotion LV1 Mixer | Quick Start
Page 9
Add Stage I/Os
The system is completely scalable. Playback, record, and control devices can be added. Small servers can be replaced with larger
ones, and up to 16 I/Os can be assigned to one mixer system.
FOH
1
2
3
4
3
4
1
Host Computer
with Additional Display
2
SoundGrid Server
3
4
4
Ethernet Switch
4
SoundGrid I/O
9 Emotion LV1 Mixer | Quick Start
Page 10
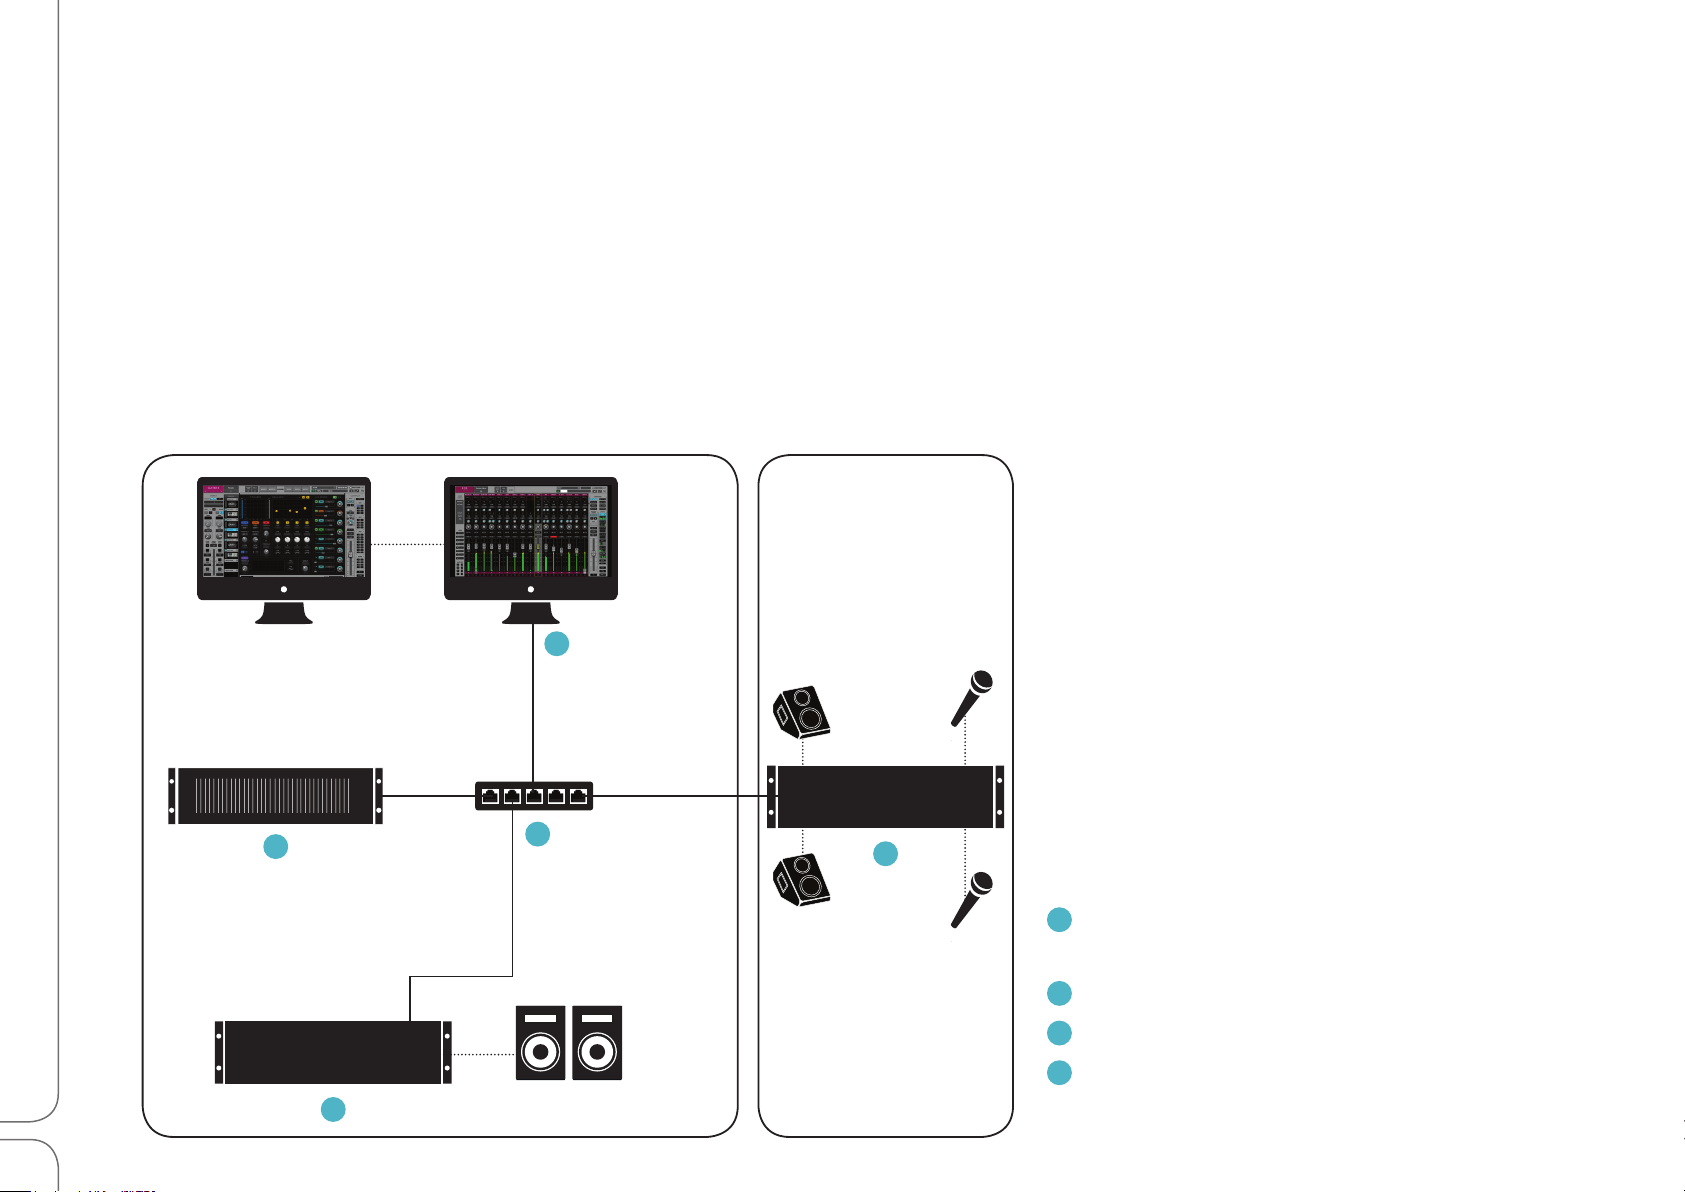
Larger Installation
This is a relatively large installation that includes several onstage I/O devices and another I/O in the FOH. There is an additional
computer with a DAW to record the event and to provide playback for virtual soundcheck. Plus there’s a redundant server to enable
uninterrupted service in the event of a fault.
This conguration is actually an expansion of the smaller system. There are more stage I/Os and more devices in the FOH, but
otherwise the setup is the same. The mixer has up to 64 mono/stereo channels (depending on license), with 128 inputs.
FOH
2
9
3
4
9
5
1
Stage
7
6
7
1
Host Computer
2
Additional Display
3
SoundGrid Server
4
Redundant Server
5
Main Ethernet Switch
6
Secondery Switch
7
SoundGrid I/O
8
DAW for Recording
9
External Controller
SoundGrid
7
10 Emotion LV1 Mixer | Quick Start
8
7
Analog
Page 11

When multiple devices are used on stage, it is advisable to connect all of them to a single switch that connects to the main switch.
Daisy chaining ethernet connections in these setups is not advisable.
Install Software
Create a free Waves account if you don’t already have one (www.waves.com/create-account). This account is used to manage your
Waves products and licenses.
1. Register your Waves products at www.waves.com/support. The product serial number (also called a license number) can be found
on your purchase invoice, in an email from your dealer, or in an envelope containing the registration form. Once your registration is
complete, a product license will be deposited in your license cloud.
2. Download Waves Central from the Waves website. Waves Central is an application that manages software downloads and
installations, and administers product licensing.
3.Download and install the eMotion LV1 mixer and any selected plugins. Next, move your licenses from your license cloud to the
computer you are using or to a USB ash drive.
4. If the host computer on which you’ll be running eMotion LV1 is not connected to the Internet, you can create an oine installer.
Learn more about Waves Central at www.waves.com/support.
5. Launch eMotion LV1.
Windows Users: The Widows Power Plan must be set to High Performance.
Open Control Panel\Hardware and Sound\Power Options window. Select the High Performance plan and re-launch eMotion LV1.
11 Emotion LV1 Mixer | Quick Start
Page 12

STEP 2: SETUP WINDOW—NETWORK, I/OS, AND PREFERENCES
The Top Bar is a navigation and management tool visible from all views. From here you can:
Access Channel Presets and sessions
• Save and recall and scenes
• Engage talkback and clear all solos.
• Monitor network and processor status.
• Lock the mixer interface.
• Select a channel.
Use the tabs on the Top Bar to open the Setup window.
This window is used to congure network devices, establish mixer behavior, and set user preferences.
•
The Setup window consists of three pages, which are accessed by tabs on the left-hand side of the screen.
Go rst to the System Inventory page.
12 Emotion LV1 Mixer | Quick Start
Page 13

System Inventory Page — Congure SoundGrid Network Resources
As its name suggests, the System Inventory page displays and controls network resources: hardware and software I/O devices,
servers, and control devices. Plus, it manages the network itself. Each device is represented by an icon in a rack slot, from which you
can assign and remove I/Os, update rmware, and access the device’s control panel.
Before you start, make sure that all network devices are connected and powered on.
Network port control
Device racks
I/O devices racks
Servers rack
Controllers rack
13 Emotion LV1 Mixer | Quick Start
Page 14

Identify the network port: Select the host computer network port that is being used by the
SoundGrid network.
Add, remove, or assign I/O devices: Use Racks A and B to assign hardware I/O devices and
software I/Os, such as the SoundGrid ASIO/ Core Audio drivers. Drivers can be assigned to the
local machine or to a remote computer for remote recording or to serve as a playback source for
a mixer session.
Click the down arrow on the right side of a device slot, then use the drop-down menu to
add or remove devices. Up to 8 I/Os can be assigned to each rack.
The status (On/O), sample rate, and clock source are indicated on the device icon. The rst I/O assigned to a system is
by default the clock master. A network master is colored blue, a slave green. If an icon is red, then its device is
oine, not available, or incompatible with the version of SoundGrid that you are running.
FW indicates the status of the device’s rmware. Status indications are color-coded. Refer to the eMotion LV1 User Guide for
details. To update device rmware, click on the FW button. This will initiate a scan of the hardware and then oer options.
Click the ID button to identify the hardware associated with a device icon. This illuminates the device’s front panel lights. You
can also identify a device from its software control panel.
Click on the Gear button to open the device’s control panel, set up preamps and adjust other I/O parameters.
Rack B
Racks A and B are identical. Assign hardware I/O devices and devices in either. You may choose
to assign stage devices in one rack and FOH devices in another, or to divide the assignments in
other ways. But this is not necessary.
14 Emotion LV1 Mixer | Quick Start
Page 15

Add or remove servers. Servers are listed in the Servers Rack. Use the drop-down menu
to add or remove a server. Two servers (one main, one redundant) can be assigned to a
host computer. If no server is present, the mixer can function in an oine mode.
Assign control devices. Use the drop-down menu to choose a control protocol or type
of controller. Open its control panel to establish mixer assignments and to set up device
options.
Work Oine
The mixer can also be used oine, without a server, to prepare sessions.
> Set up and name channels.
> Insert plugins.
> Import plugin parameters from eMotion LV1 sessions or from presets saved with the
WaveSystem Toolbar.
> Assign groups, mute groups, and matrix routing.
> Patch mixer channels.
> Virtually congure disconnected I/O devices.
All sessions, scenes, and patching parameters created oine will be available to you
immediately when you connect the mixer to the server and the other required hardware.
Save Session
Use the Preset menu to save the session. A session includes all session data, including I/O inventory and patching, mixer parameters,
and plugin presets. You can also save the session as a template, which saves all session data except I/O inventory.
15 Emotion LV1 Mixer | Quick Start
Page 16

Mixer Settings Page: System-Wide Preferences
The Mixer Settings page sets the basic behavior of the mixer. It controls session size, mixer history and startup condition, and delay
compensation preferences.
The mixer can have 16, 32, or 64 channels, with 8 stereo groups, 16 stereo aux channels, an L/R/C/M main buss, and an 8-channel
stereo matrix. Your eMotion LV1 license determines the maximum mixer conguration.
Use the Mixer Conguration section to set the size of the mixer for the current session.
Mixer size is stored as part of a session and can be changed at any time.
The Mixer Settings page is also used to establish the rules of delay compensation and delay groups. Refer to the eMotion LV1 User
Guide for information concerning delay management.
Mixer size is stored as part of a session and can be changed at any time, but settings will be lost on channels that are not included in
the reduced mixer size.
16 Emotion LV1 Mixer | Quick Start
Page 17

User Interface Settings Page
This page controls the behavior of meters and other displays. It is also used to establish user-assignable shortcut keys. The default
settings provide a good starting point, and you can always adjust them later.
17 Emotion LV1 Mixer | Quick Start
Page 18

STEP 3: PATCH WINDOW—SET INTERNAL AND EXTERNAL ROUTING
The Patch window establishes the routing of audio within
the mixer, between the mixer and I/Os, and among devices.
> Patch stage boxes and other sources to the mixer with
SoundGrid I/Os.
> Patch mix outputs and channel direct outs to any device
on the network.
> Route audio between input channels, groups, and auxes.
> Play from another computer on a SoundGrid network.
> Patch between network devices, bypassing the mixer.
> Establish delay groups.
Patch Direction
When patching mixer inputs, the signal ow is from top to left. Mixer outputs and device-to-device connections are from left to top.
A small arrow indicates signal ow for the current Patch page.
Patching Inputs
> Select a Channel Input patch page.
> From the top of the patch section, choose the device you want to patch audio from. This reveals the device’s output channels.
> Patch a device channel to a mixer input channel on the left. You can patch one I/O device output to several mixer inputs, but a
mixer input can patch to only one I/O channel.
> Each mixer channel has two inputs, A and B, which are independent of one another.
18 Emotion LV1 Mixer | Quick Start
Page 19

Input channels can be mono or stereo. Stereo tracks appear as two separate channels that can be patched independently. Doubleclick on the channel button to toggle an input channel between mono and stereo modes. Change a track’s name by double-clicking
on the Name window. I/O device channel names are set by the device driver and cannot be changed.
Patching information is stored as part of a session.
Conguration templates chosen in the Setup window include patches based on available I/O devices and user needs. When you
save a session or a session template, these patch settings will be preserved.
19 Emotion LV1 Mixer | Quick Start
Page 20

Patching Channel Direct Outputs and Mix Outputs
Output patching works in the same manner as input patching, except that signal ow is from left to top. Examples of patches:
> Patch channel direct outs to a recorder.
> Patch mixer Main outs, FX, MON, Matrix and Cue to I/Os.
> Stream to a driver channel on another SoundGrid ASIO/Core Audio driver for remote recording or backup.
There are four send sources:
INP After input gain, before processing
PRE Pre-fader, after processing
PST Post-fader, after processing
PSP Post-fader, after panner
Click on the Source button to toggle between choices.
The mono/stereo condition of an output channel is shown here. This cannot
be changed.
Internal Routing
Connections within the mixer are made in the Internal Routing page. Patch between input channels, channel direct outs, mix outs,
groups, aux sends, and matrix.
Internal patching conventions:
> Patch audio between channels and groups, main outs, and matrix.
> Patch between groups and main outs and matrix.
> Patch main outs to the matrix.
You can also patch any channel or buss to control groups that are not audio
busses, such as links and mute groups.
20 Emotion LV1 Mixer | Quick Start
Page 21

Patching Between Devices
The Device-to-Device patch page is like a network patch bay. It enables you to connect between devices anywhere on the network.
I/O devices appear on both the vertical and the horizontal axes of the patch, listed in the order in which they are assigned in the
device racks. Signal ow is from left to top.
An I/O cannot the patched directly to itself.
However, this can be accomplished in the mixer:
1. Patch I/O channels to mixer inputs.
2. Patch that mixer channel’s direct out to the desired I/O device channel.
Delay Groups
Mixer outputs can be organized in delay groups. This serves two purposes:
> To allow control of latency compensation within dened groups of mixer
outputs.
> To add additional specied delays to these separate groups of channels.
The Delay Groups page shows the relationship between I/O channels and
delay groups. It provides an overview of all delay groups and displays the
delay of each. A delay group can consist of several mixer outputs, but an
individual I/O can be a member of only
one delay group.
Delay groups are discussed in detail in the User Guide, Appendix E.
21 Emotion LV1 Mixer | Quick Start
Page 22

STEP 4: SHOW WINDOW—CREATE SESSIONS AND SCENES
Use the Show window to create, recall, and edit snapshots of mixer settings and congurations. These snapshots are organized in
two levels: Sessions and Scenes. Consider a session the setup for an entire concert or event, while a scene is a song or a group of
songs or part of a play.
eMotion LV1 sessions and scenes are organized and saved in a hierarchy. Loading a session can alter every mixer setting. A scene
change aects only certain settings.
22 Emotion LV1 Mixer | Quick Start
Page 23

Sessions
Sessions contain everything about a mixer setup, including all the scenes. They can be built upon
previous sessions or session templates, or made from scratch by loading a blank template.
The Sessions List shows the sessions that have been created or modied in the Session Page, (but not
cleared from the list) or have been opened from another location. It is used to select, copy, and load
sessions. The highlighting color of a session indicates its status.
• A selected scene is highlighted blue, whether it is the recalled scene or not. A highlighted scene is
not active until it is recalled.
• If the current scene is not selected, then it will be highlighted green and the selected one blue.
Above the Scenes list are two arrows used to recall scenes before or after the current one. Unlike like
the Scenes menu, selecting an arrow recalls the scene immediately.
Notes for the selected scene are shown in the Notes section.
Loading a Session
• Select a session and click on Load.
• To load a session that is not displayed in the list, click Open. Navigate to the session you wish to load.
• You can also load a template, which is a complete session without I/O inventory assignment.
Saving a Session
• Select a session and choose Save. This overwrites the current session.
• Save As creates a new session from the existing mixer condition.
• Save Template creates a new complete session that does not include I/O conguration.
23 Emotion LV1 Mixer | Quick Start
Page 24

Sessions can be saved at any user-dened location. An eMotion LV1 session uses the extension emo. There is an optional home folder
provided for saving sessions.
Mac: Users\Shared\Waves Audio\eMotion\sessions
Windows: Users\Public\Waves\eMotion\session
Sessions and scenes can also be saved and loaded with the Preset menu in the Top Bar. In the Sessions folder there are always these two
sessions, “CurrentLV1.emo” and “CurrentLV1.emo-journal.” These are the recovery les. Do not delete or move them.
Scenes
Scenes are organized in a list and can be recalled directly by selecting a scene name and clicking Recall, by
clicking the left and right arrows, or by using the Scenes drop-down menu on the Top Bar.
A scene can also be recalled using an external control device.
New creates a new scene. Store overwrites a scene to reect
the current mixer condition.
The Scenes page includes a Scope section for determining
which control parameters will change when a scene is
recalled. Only enabled parameters will be aected with
the scene change. Unselected parameters will remain
unchanged from their previous state. Change-enabled
parameters are colored blue.
24 Emotion LV1 Mixer | Quick Start
Page 25

You can lter parameter changes further by selecting which channels can change when the scene is recalled. Use the channel
numbers at the bottom of the section to set which channels will be included when the selected parameters change.
Scope is global for the scene and is not set channel by channel.
Each scene can have its own scope.
Recall Safe
Recall Safe prevents a parameter from changing when a scene is recalled, even if the parameter is within the scope of a scene.
Recall Safe parameters are stored as part of a session and may change when a new session is loaded.
Auto-Save Sessions and Scenes
The mixer can save a comprehensive history of each session with all of its nested scenes. You can choose to save sessions at specied
intervals and with each new action performed in the mixer. This behavior is set in the Mixer Settings page.
25 Emotion LV1 Mixer | Quick Start
Page 26

STEP 5: CHANNEL WINDOW—ADJUST CHANNEL SPECIFICS
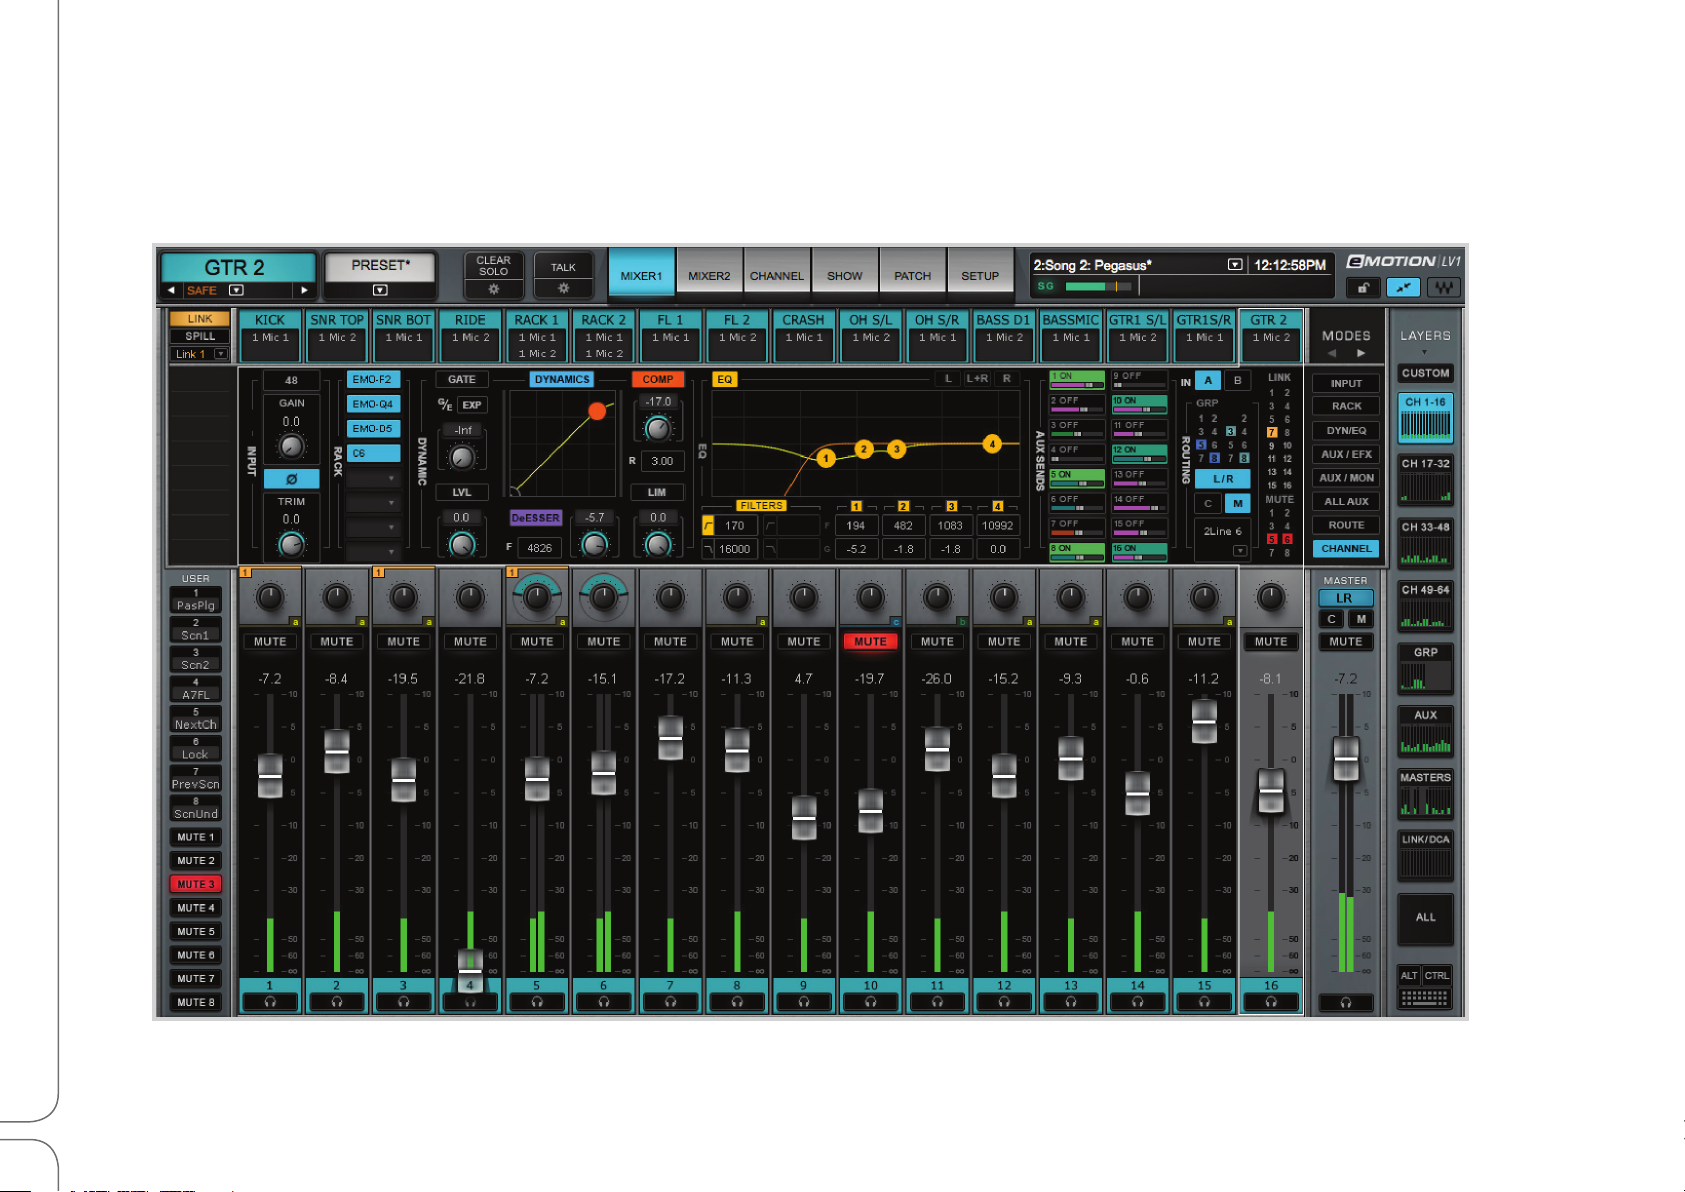
The Channel Window provides a centralized view of all important channel functions. Use it control input, output, assignments,
sends, and processing for a selected channel.
Input section
Plugin racks
Main section: Dynamics controls
Main section: EQ controls
26 Emotion LV1 Mixer | Quick Start
EFX and Monitor aux sends
Outputs and assignments
Direct outputs
Page 27

Using the Channel View
Signal ow is from left to right, so we suggest you proceed in this order:
1. Set input audio
(a) Choose the input source and I/O channel. This can also be set in the Patch window.
(b) For analog input, set phase, 48v phantom, and preamp level. Stereo preamp channel levels can be adjusted
separately or linked together. Set channel trim.
(c) Adjust lters. If lters are not available, then load a lter plugin in the Plugin Rack. See next chapter for details.
(d) Set delays to align input signals (compensating for acoustic mic distance dierences, for example). This value is
not considered in plugin delay compensation.
The Channel window controls one selected channel. From any mixer view,
use the left and right arrows beneath the Channel name to move up or
down by one channel. Or navigate directly to a channel with the drop-down
Channel menu.
In the Mixer window, touch the top channel name cell or anywhere on the
bottom part of a channel strip to select that channel.
27 Emotion LV1 Mixer | Quick Start
Page 28

2. Select and adjust plugins
Up to eight plugins can be inserted on any type of channel: input, group, aux, master, etc.
(a) Click on the down arrow in a rack slot. Use the drop-down menu to select a plugin or an external insert.
The plugin’s icon will appear in the slot.
(b) Click on the icon to open the plugin pane. This is the plugin’s complete user interface, with all its controls.
(c) Adjust plugin parameters and close the pane by clicking again on the icon.
(d) Rack processing signal ow is from top to bottom. Drag a plugin icon to change its rack position and its place in the processing
sequence.
The Back to Main button at the top of the window returns the view to the Main processing section. This section is disabled until an
assignable plugin has been added to the rack.
28 Emotion LV1 Mixer | Quick Start
Page 29

3. Assign plugins for the Main section and the Mixer window
Any plugin that supports LV1 mapping can be assigned to—and viewed in—the Main processing section. Plugins can be assigned
or unassigned using the same drop-down menu used to add plugins.
A dynamics processor seen in the Plugin pane. The same plugin, along with an EQ processor,
in the Main section
4. Adjust aux sends
There are 8 Eects and 8 Monitor stereo auxiliary busses.
(a) Select which bank of aux sends to adjust (AUX/EFX or AUX/MON ).
(b) Turn on the aux sends you wish to use.
(c) Select send source:
> Input
> Pre-fader, after processing
> Post-fader, after processing
> Post-fader, after panner
(d) Adjust level and pan.
29 Emotion LV1 Mixer | Quick Start
Page 30

5. Set channel mix outputs (left-hand side of the Output section)
(a) Assign outputs: main stereo mix out, center, mono, matrix.
(b) Set channel level and panning/rotation.
• Pan L/R for mono signals.
• Rotate stereo images left and right.
• Change width and symmetry of stereo images.
6. Establish channel direct outs (right-hand side of the Output section)
(a) Open the Direct window to assign the channel to I/Os. Add and delete device
assignments here.
(b) Assign delay groups. This enables you to control latency compensation within
user-assigned delay groups and to delay these groups. Individual outputs can
be delayed without joining a delay group.
(c) Assign the channel to Link groups.
(d) Send channel to groups and to the output matrix.
(e) Make the channel a member of a mute group.
Channel Window: Touch-and-Slide Controller
Use the horizontal fader at the bottom of the Channel window for greater resolution when using faders and knobs.
Touch a variable controller—input or output gain, panner, imager, lter, or delays—and you can control
it from this large fader. Switches are controlled from the blue button to the right of the slider.
The name of the parameter and its current value are displayed.
The channel is now congured. Repeat this for all channels, or use the Mixer window to set multiple channels.
30 Emotion LV1 Mixer | Quick Start
Page 31

STEP 6: MIXER WINDOW—CONTROL ALL CHANNELS
The Mixer window is inspired by traditional mixing consoles. It provides a broad, multichannel view of all mixer controls—routing,
plugins, assignments, and channel parameters. At the same time, a detailed view of a selected channel is always available. Once the
mixer is congured and parameters are set in other windows, this is where most of the mixing is done.
Mixer Window Navigation
The Mixer window is organized in Layers and Layer Modes.
A mixer layer is a set of channels that are viewed together. The channels that make up a layer are always of the same type (input,
group, aux, etc.) and are accessed from the buttons on the right-hand side of the window.
> Custom
> Channels 1–16
> Channels 17–32
> Channels 33–48
> Channels 49–64
> Groups 1–8
> Aux 1–16
> Masters
> Links 1–16
> All
The ALL layer displays an overview of all mixer channels. Faders, mutes, and cues can be controlled for each channel.
The number of channels available depends on your eMotion LV1 license and on the Mixer Conguration setting.
Unavailable mixer layers are grayed out.
31 Emotion LV1 Mixer | Quick Start
Page 32

Layer Modes are mixer views used to control channels on the current layer. Each layer mode provides a specic signal ow or
processing control. Layer modes represent sections of the Channel window
Input Select input source, control preamp and digital trim.
Dyn/EQ View and control dynamics and EQ plugins as assigned in the Channel window.
Rack Insert up to 8 plugins per channel. Plugins can be inserted on any channel layer, including Mains, Cue, and Talkback.
Route Assign Input channels and groups, route to matrix, direct outs, and Main outs.
AUX/EFX;
View and control sends to auxiliary busses.
AUX/MON;
ALL AUX
Dugan Control a group of live microphones in multi-speaker environments.
32 Emotion LV1 Mixer | Quick Start
Page 33

The Channel layer mode combines the controls of all of other mixer modes into one view. This is particularly suited for
congurations with one display monitor, since most Channel window controls are accessible without leaving the Mixer window.
33 Emotion LV1 Mixer | Quick Start
Page 34

Channel Selection
Mixer controls address one selected channel. To select a channel, touch its fader or use the Channel ID box in the upper-left corner
of the Mixer and Channel windows.
Remember that only the selected channel is being controlled, even if it is not currently seen on the display. For this reason it’s
a good habit to refer to the Channel ID box to conrm that your actions are addressing the right channel.
Multiple Fader Control
The mixer interface enables you to control several faders simultaneously when using a multi-point touchscreen or an external
controller. You can move as many faders as you can touch, either as a block or while moving certain faders independently. Multifader behavior on external control devices and touchscreen displays varies by manufacturer.
34 Emotion LV1 Mixer | Quick Start
Page 35

User-Assignable Keys and Mute Groups
You can create up to eight User-Assignable Keys to speed up often-used actions. Assign these keys in the U/I Settings page of the
Setup window. Recall assigned keys with the buttons on the left-hand side of the Mixer window or with a control surface.
User-assignable keys can execute actions in the Mixer window and in most other views.
Mute Groups are activated with the eight buttons on the left-hand side of the Mixer window.
A channel can be assigned to several dierent mute groups. To create a mute group:
1. Select a channel you wish to add to a mute group.
2. Go to the Channel window and click on the group to which you wish to assign the channel. You can also assign a channel to a
mute group: do this from the Channel mode of the Mixer window, from the Patch window, or from a control surface.
3. Follow the same procedure for all channels you want to add to the mute group.
4. To remove a channel from a mute group, select it and touch once again the Channel window’s mute group assignment button.
Optimizing Multi-touch Displays
For optimal performance, we recommend that you calibrate your multi-touch displays.
1. In Windows, open Tablet PC Settings in the Control Panel.
2. Choose “Setup” to select which displays are multi-touch.
3. Select “Calibrate” to coordinate the image and touch aspects of the display.
For details about this operating system adjustment, please refer to the user manual for your display.
35 Emotion LV1 Mixer | Quick Start
Page 36

Aux Channel “Sends on Faders”
Use the Aux layer mode to adjust aux sends from input channels, groups, and AUX/EFX.
Adjust aux sends for a mixer channel by moving the small faders. Click on the aux send number to turn the aux on and o for the
selected channel.
To make it easier to adjust aux sends, use the “Sends on Faders” mode. In this state, channel
faders no longer control channel level, but rather the level of the selected aux send on that
channel. The master fader now controls the level of the aux channel rather than the main out.
To control Aux sends with large faders
1. Select an Aux layer mode (AUX/EFX 1–8 or AUX/MON 1–8).
2. In the Sub Views section on the left, click the name of the aux channel whose sends you wish
to adjust. The mixer changes appearance to indicate that the channel faders have ipped
function. The name of the selected aux channel now appears above the master fader.
3. Use the channel fader to adjust the send at the intersection of the aux channel and the mixer
channel.
4. The master fader now maps the AUX/EFX or AUX/MON output. Use this to adjust channel
level. The Aux channel name appears above the master fader. Clicking the Cue button sends
the EFX or MON channel to the cue buss.
To return to normal faders, click on the Aux send name, either on the left side of the panel or
above the master fader.
36 Emotion LV1 Mixer | Quick Start
Page 37

Additional Information
Learn more about eMotion LV1 at waves.com.
• Video tutorials and webinars that specically address FOH issues
• Interviews, articles, and tips from the greats of live sound
• How-to information about all Waves plugins
Plus, you’ll nd current software and driver versions, system upgrades, and technical assistance.
For detailed descriptions of mixer sections and controls, please refer to the eMotion LV1 User Guide.
37 Emotion LV1 Mixer | Quick Start
 Loading...