


 Loading...
OVox
Vocal ReSynthesis
User Guide

Contents |
|
Introduction ......................................................................................................................... |
3 |
Getting Started with OVox................................................................................................... |
4 |
Setup ............................................................................................................................................................................................. |
4 |
Learning OVox .............................................................................................................................................................................. |
5 |
Signal Flow ........................................................................................................................... |
6 |
Interface: Two Views ........................................................................................................... |
7 |
OVox Main View ........................................................................................................................................................................... |
7 |
OVox Expanded View.................................................................................................................................................................... |
8 |
Components.................................................................................................................................................................................. |
8 |
Controls Common to Both Views ........................................................................................ |
9 |
Top Bar.......................................................................................................................................................................................... |
9 |
Top Bar: Input Section................................................................................................................................................................................ |
9 |
Top Bar: Notes Generator........................................................................................................................................................................ |
10 |
Top Bar: Arpeggiator ............................................................................................................................................................................... |
11 |
Note Mapper .............................................................................................................................................................................. |
12 |
Note Map Editor....................................................................................................................................................................................... |
13 |
Main View Controls............................................................................................................ |
15 |
OVox 1 and OVox 2..................................................................................................................................................................... |
15 |
Mixer Section .............................................................................................................................................................................. |
16 |
Expanded View Controls.................................................................................................... |
18 |
OVox 1 and OVox 2..................................................................................................................................................................... |
18 |
Formant Filter Section ................................................................................................................................................................ |
20 |
Synth Settings Section ................................................................................................................................................................ |
22 |
Mixer Section .............................................................................................................................................................................. |
23 |
Modulators ................................................................................................................................................................................. |
26 |
Modulation Types....................................................................................................................................................................... |
27 |
MODs 1–4................................................................................................................................................................................................. |
28 |
ADSR 1 and ADSR 2 .................................................................................................................................................................................. |
31 |
ORS Modulators ....................................................................................................................................................................................... |
32 |
EQ................................................................................................................................................................................................ |
34 |
MIDI Control Change Modulation.............................................................................................................................................. |
35 |
Effects.......................................................................................................................................................................................... |
36 |
Macros ........................................................................................................................................................................................ |
37 |
2 |
Waves OVox / User Guide |
|

Introduction
Waves OVox is a next-generation vocal processing and synthesizing suite that combines flexibility and unsurpassed sound quality. Built on Waves Organic ReSynthesis technology (ORS), OVox lets you create voice-based musical effects without using a keyboard. OVox uses the human voice to modulate another sound—typically a synthesizer— to create a new sound that tracks the voice and preserves its characteristics. This is called vocoding, a familiar vocal effect that’s been used on countless rock and pop recordings. But vocoding is just the beginning— OVox combines several processing sections, which together open up a new world of vocal processing. Pitch correction, doubling, automatic harmonization, and chord building from voice signals are easily achieved. OVox is also a great tool for sound design and postproduction voice effects.
How Does it Work?
The OVox input section detects what makes up a note, based on pitch and time values. These incoming notes can be mapped to other notes (or to several notes, to map a chord or harmonic) and then processed. There are two main processing units. Each unit includes an oscillator, noise generator, formant filter, and dynamic control. The formant filter analyzes the formant of the modulator (what we call Voice). This is used to generate a complex filter, which is then applied to the carrier signal (what we call Synth).
The original amplitude envelope of the voice can be forced onto the carrier. This creates an effect similar to vocoding with further adjustment possibilities. The vocal cords of the vocalist are effectively replaced by oscillators. The influence of the amplitude envelope of the modulator can, on the other hand, be reduced. This emphasizes more of the carrier and produces a looser correlation with the voice. Rich EQ, modulation, and effects processors can be applied to the carrier to construct a very wide array of unique sounds.
The combination of advanced ORS processing and powerful, flexible controls makes Waves OVox a voice processor unlike any other.
3 |
Waves OVox / User Guide |
|

Getting Started with OVox
Setup
PLUG AND PLAY
The fastest way to get started with OVox is to simply open the plugin on an audio track and let it automatically generate the carrier signal for you. No additional routing is needed. Use the Voice Input controls, Gate, and Gain, to avoid low level artifacts, spill, mic feedback, and to set the input level. You can also use OVox in conjunction with a MIDI controller.
USING A MIDI KEYBOARD/CONTROLLER
To use OVox as an instrument:
1.Open OVox on a MIDI/Instrument track.
2.Set the Note Source to MIDI or leave it set to Auto.
3.Set the Voice Source to Sidechain.
4.In your DAW, route the vocal track to the plugin’s sidechain input.
To use OVox as a MIDI-controlled audio plugin:
1.Open OVox on an audio track.
2.Set the Note Source to MIDI.
3.In your DAW, open a new MIDI/Instrument track.
4.Route the MIDI track to the plugin’s MIDI input.
USING AN EXTERNAL CARRIER
OVox can also be used to manipulate external carriers. This option will turn off the plugin’s built-in synthesizer. It allows you to patch any instrument and manipulate it using the vocals—much like a talk box.
1.Open OVox on an audio track.
2.Set the Synth Source to Sidechain.
3.In your DAW route the external carrier to the plugin’s sidechain input.
4.Use the Synth Input controls, Drive, and Gain to adjust the level and the harmonic content of the carrier.
4 |
Waves OVox / User Guide |
|
Learning OVox
There are two ways to get familiar with OVox:
•Insert OVox on a DAW audio track, play some voice material, and experiment with the controls. You’ll likely manage just fine.
•You can also use factory presets to set up a number of common, and not so common, voice effects. Adjust from there.
Either way, you’ll get to the same place; it’s just a matter of how you like to work.
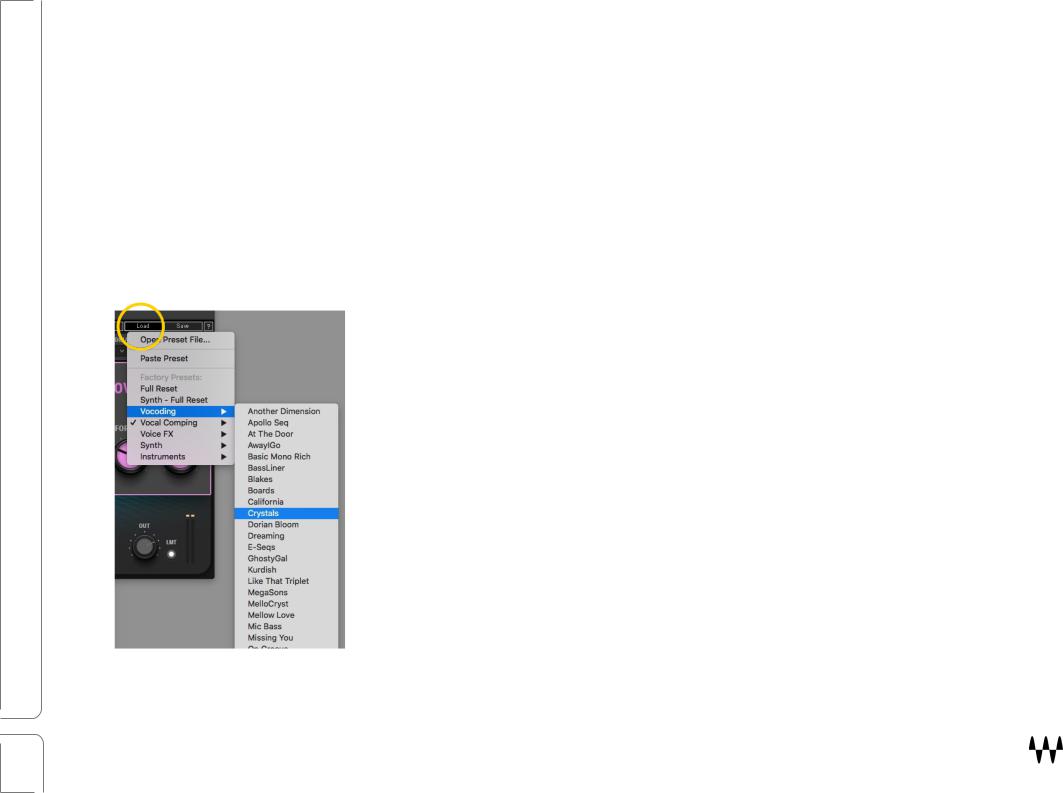
PRESETS
Presets are very handy. In many cases, you’ll find just the right effect by loading a preset whose name sounds like (or “feels” like) what you’re looking for. Starting with a preset has two advantages:
It’s fast. Begin with a preset whose name makes sense for what you want to do. This might be all you need.
It’s a good way to learn. Load a preset and see how the controls are set. Listen, change some settings, and notice how it affects the sound. Load another preset, note the settings, make some changes, and listen. Do this a few times and you’ll understand what the controls do and how the sections work together.
Load and save presets with the WavesSystem Toolbar, which is just above the OVox interface (circled here). Download the WaveSystem Toolbar user guide from the Waves Download Page on our web site.
5 |
Waves OVox / User Guide |
|
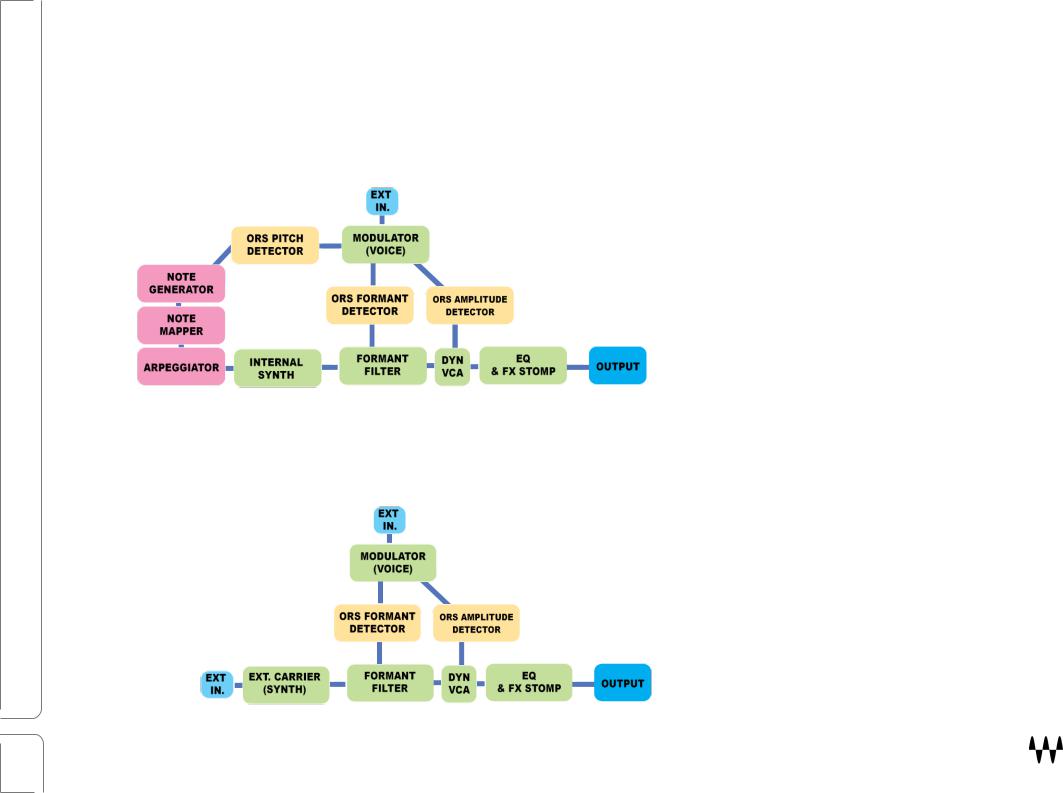
Signal Flow
OVox can operate as a plugin to process audio signals without special routing requirements, using its built-in modules. It can also accept external input signals to provide further control and manipulation. Signal flow is the same for both carrier models, aside from sync note generation and pitch detection.
INTERNAL SYNTH
EXTERNAL CARRIER
6 |
Waves OVox / User Guide |
|
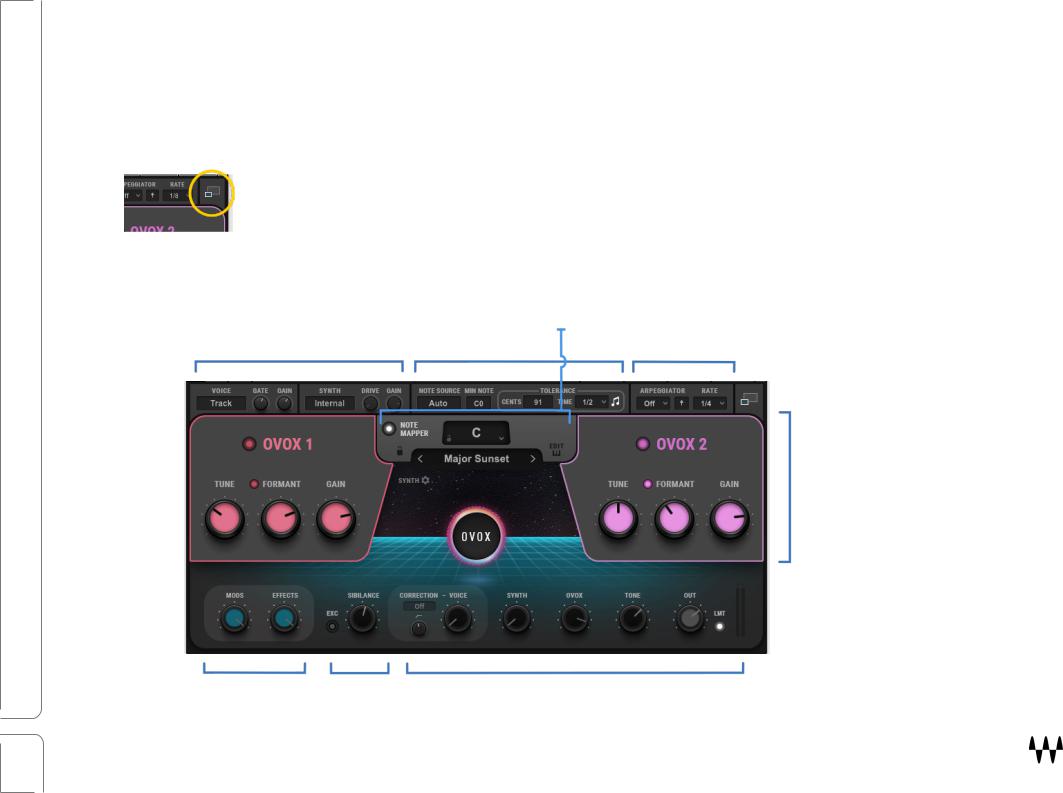
Interface: Two Views
OVox has two views: A Main view with the essential controls that you need to create and manipulate most voice effects, and an Expanded view that includes advanced features for greater control. Both views use the OVox Top Bar for input, synth source, notes detection, and arpeggiation.
Toggle between views with the Expand/Collapse button in the upper-right corner.
OVox Main View
|
Note Mapper |
|
Input |
Note Detector |
Arpeggiator |
Main Processing Units
Mod/FX Levels Sibilance Mix and Output
7 |
Waves OVox / User Guide |
|

OVox Expanded View
Input |
|
Note Detector |
|
Arpeggiator |
|
|
|
|
|
|
|
|
|
|
Top Bar
Note Mapper
Access Synth
Controls
Access Note
Editor
Mixer
Oscillators
Main Processing Units (2)
Formant Controls
Dynamics
EQ, Effects, and Modulators
Components
There are two Vocal ReSynthesis components: Stereo and Mono-to-Stereo. Their interfaces are identical. There is also a standalone application, that lets you use OVox without a DAW.
8 |
Waves OVox / User Guide |
|
Controls Common to Both Views
Top Bar
The Top Bar serves three purposes: the left side controls the input of the modulator and the carrier; the middle section governs note source attributes and conditions for note generation, and on the right are the arpeggiator controls.
Top Bar: Input Section
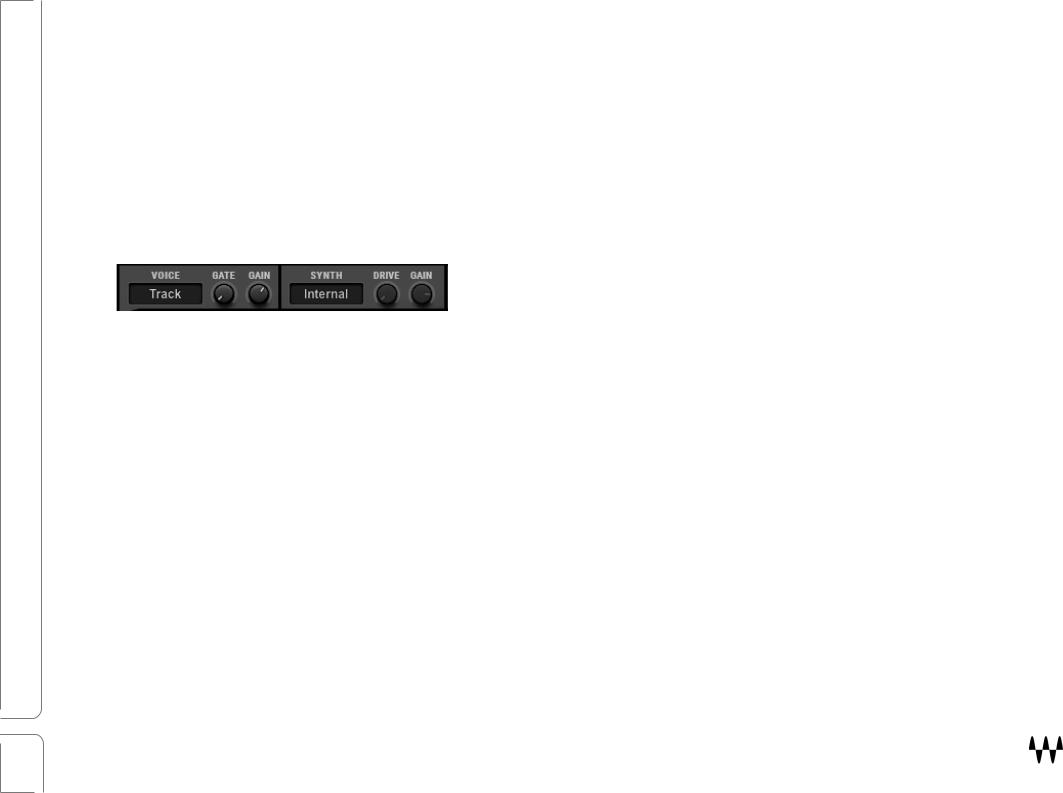
VOICE INPUT
Selects the signal to be used as the modulator: Track or Sidechain. Range: Track or Sidechain
GATE
Applies a gate to the input signal to provide better detection when voice signal is noisy. Range: -144 dB to 0 dB
GAIN
Controls the input gain of the modulator: Track or Sidechain. Range: -30 dB to +18 dB
SYNTH INPUT
Determines which signal will be used as the carrier. Traditionally, the carrier is the internal synthesizer sound. The built-in synth (Internal) has many features, such as note generation, note mapping, and the character filters— designed to provide an interesting and rich soundscape. You can, however, use other signals as the carrier (e.g., guitars, drums, or other instruments).
When Synth is set to Track or Sidechain, the Note Generator, Note Mapper, Arpeggiator, and built-in Synth are unavailable. Range: Internal, Track, Sidechain
9 |
Waves OVox / User Guide |
|
GAIN AND DRIVE
The Gain and Drive controls are active when Synth is set to Track or Sidechain. They control the texture of the carrier input. Drive lets you push the input signal into clipping, which generates more harmonics. This makes the carrier richer, with greater definition, when processed by the modulator (Voice Input). Gain sets the input level of the modulator input.
Drive and Gain controls are unavailable when Synth Input is set to Internal.
Top Bar: Notes Generator
New notes will always be generated when energy greater than complete silence is detected (unpitched audio). The Note Generator allows you to further control what is defined as a note in order to determine which notes are sent to the Note Mapper, built-in Synth, and ADSR envelopes.
Note: Note Generation is about defining what a note is.
Note Mapping concerns what to do with notes once they’ve been defined.
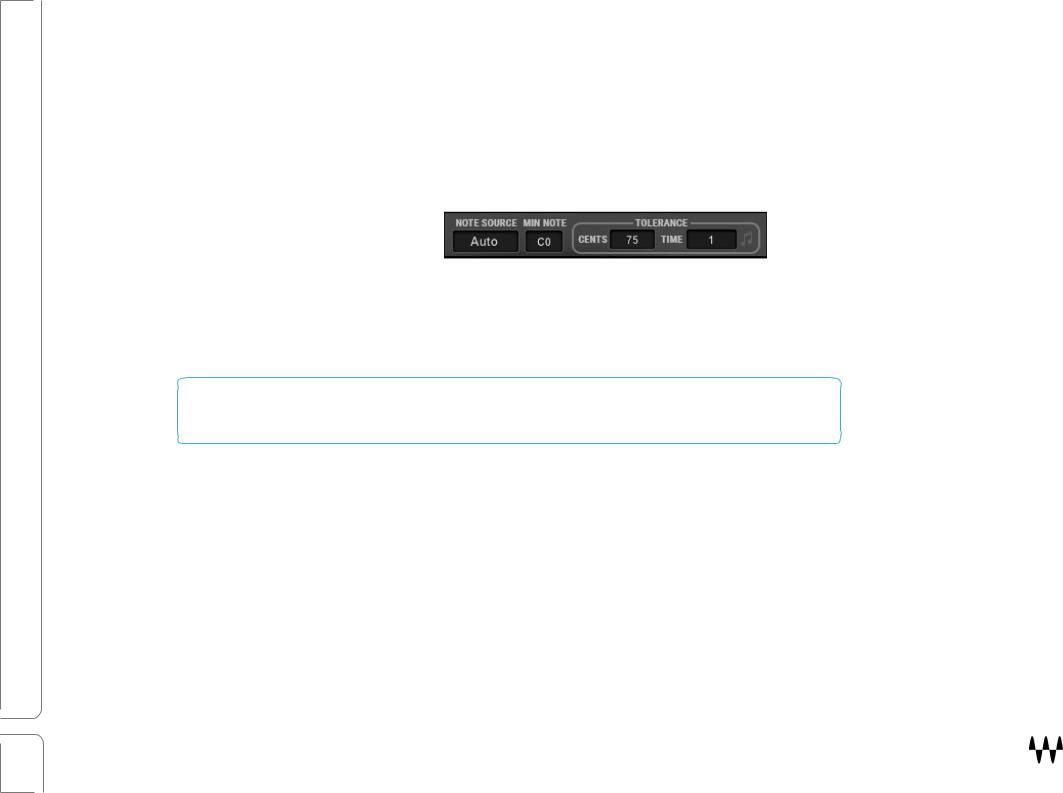
NOTE SOURCE
Selects the source of the notes that feed the synth.
•When Voice is selected, the pitch detector analyses the pitch of the voice input and then generates notes that are sent to the synth. You can control the sensitivity using the Tolerance controls.
•Choose MIDI when you connect a MIDI keyboard/controller to the plugin. Route a MIDI track to the plugin (make sure your host supports it). In some hosts you can simply open the plugin on an instrument track.
•Auto mode is a mix of MIDI and Voice note sources. When a voice signal is detected, the plugin generates notes based on the input signal. When incoming MIDI notes are detected (including the Note Mapper), they will take over the voicegenerated notes and straight away be played by the synth.
10 |
Waves OVox / User Guide |
|
MIN NOTE
Determines the lowest note that will be detected. Low-frequency notes below this value will not be played, which can help the pitch detector achieve more reliable results.
Example: the singer never sings in the lowest register. Set the Min Range to C1. This can reduce the likelihood of artifacts during note detection.
Range: C0 to C2
TOLERANCE CENTS
Determines the difference (in cents) from the currently playing note that is required for a new note to be generated.
Example: If Cents Tolerance is set to 100 or higher, the currently playing note is C1 and the incoming pitch is C#1. A new note will not be generated, since the incoming pitch is within the range of tolerance. If, however, the incoming pitch is D1 (a difference of 200 cents), a new note will be generated: D1.
Range: 50 cents to 200 cents, Off
TOLERANCE TIME
Determines the minimum time that has to pass (in milliseconds or in note intervals when synced) from the moment the pitch
detector exceeds the Cents range before generating a new note.
Range: (time) 1 millisecond to 1000 milliseconds (note intervals) 1/64T to 4 bars
Toggle between time and note intervals using the note symbol on the right.
Top Bar: Arpeggiator
The Arpeggiator receives a chord or a note and generates a melody pattern based on its mode, direction, and rate.
ARP MODE
Determines the range in which the arpeggiator operates.
When choosing 1 Octave, the arpeggiator will generate melody based only on the notes that are currently played.
When choosing 2 Octave or above, the arpeggiator will generate the notes played, as well as their corresponding notes in the upper octaves.
Range: Off, 1 Oct, 2 Oct, 3 Oct, 4 Oct
11 |
Waves OVox / User Guide |
|
ARP DIRECTION
Defines the direction of arpeggiation.
Up |
Plays notes from lowest to highest. |
Down |
Plays notes from highest to lowest. |
Up Down |
Plays Up pattern, and then Down pattern. |
Down Up |
Plays Down pattern, and then Up pattern. |
Up Down 2 |
Same as Up Down, but it plays the highest note only once. |
Down Up 2 |
Same as Down Up, but it plays the lowest note only once. |
ARP RATE |
|
Determines the rate of arpeggiator note generation.
Range: 1/64T to 4 bars
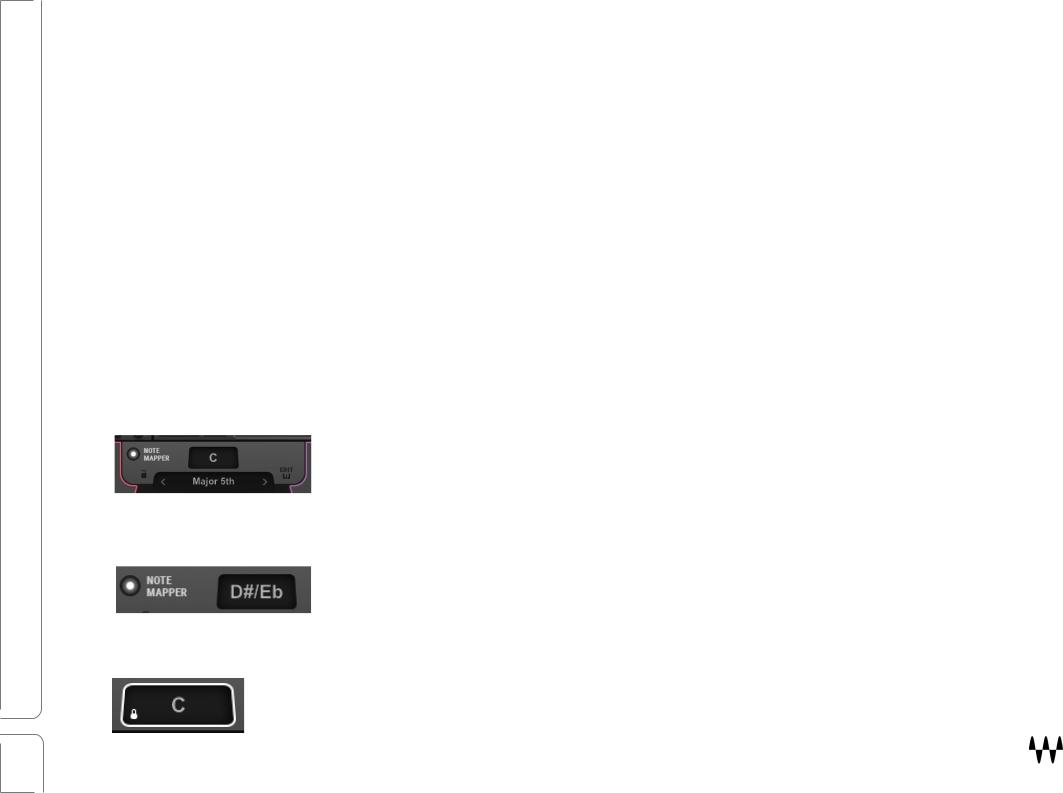
Note Mapper
The Note Mapper section enables you to map a single incoming sung note or MIDI note to one or more notes. It determines how notes will be sent to the built-in synth and the voice pitch corrector. Depending on note mapper settings, an input note can be:
•Left unchanged
•Assigned to another note
•Used to create chord, scales, and harmonies
To turn Note Mapping on or off, click the white button to the left of the Root Scale display.
NOTE MAPPER ROOT
Slide vertically over the Root Note value box to transpose the map according to the selected root. Set this value to fit the key of your song.
ROOT LOCK
Prevents the selected root from changing when loading plugin presets.
12 |
Waves OVox / User Guide |
|
Loading...