


CLA MixHub
User Guide

Contents |
|
Introduction...................................................................................................................... |
3 |
Components........................................................................................................................................................... |
4 |
Views...................................................................................................................................................................... |
4 |
Channel View ................................................................................................................................................................................... |
5 |
Bucket View...................................................................................................................................................................................... |
6 |
Quick Start ........................................................................................................................ |
7 |
Interface ........................................................................................................................... |
9 |
Channel View Layout............................................................................................................................................. |
9 |
Bucket View Layout.............................................................................................................................................. |
10 |
Using Channel View.............................................................................................................................................. |
11 |
Using Buckets View .............................................................................................................................................. |
12 |
The Buckets Panel .......................................................................................................................................................................... |
12 |
Track Menu .................................................................................................................................................................................... |
14 |
The WaveSystem Toolbar: Manage Plugin Presets........................................................................................................................ |
15 |
Controls .......................................................................................................................... |
17 |
Processing Modules ............................................................................................................................................. |
17 |
Top Section (Common to Input, EQ, and Dynamics Modules)........................................................................................................ |
17 |
Input Module.................................................................................................................................................................................. |
20 |
EQ Module ..................................................................................................................................................................................... |
21 |
Dynamics Module .......................................................................................................................................................................... |
22 |
Using the Side Chain ...................................................................................................................................................................... |
24 |
Channel View Output Section .............................................................................................................................. |
26 |
EQ Module Solo.............................................................................................................................................................................. |
27 |
CLA MixHub / User Guide
2

Introduction
CLA MixHub from Waves is an innovative mixing tool that helps you to better visualize, understand, control, and mix your tracks. It’s the first plugin that lets you arrange your tracks side by side in one window and work with them together. This workflow comes naturally on analog mixing consoles, since channel strip modules are usually mounted in the console frame in sections of eight or more channels. These groups of adjacent channel strips came to be known as “buckets,” and organizing tracks by buckets was a natural way to control tracks that should be mixed at the same time.
This is what MixHub provides. One plugin can control eight buckets of eight tracks—up to 64 DAW tracks—so you can see, compare, and mix many tracks from one plugin instance. This lets you interact with your tracks in the same way you do on a mixing console.
MixHub was developed in close collaboration with multiple Grammy® winner Chris Lord-Alge, who has mixed a steady flow of rock masterpieces. To make his mixes more productive and focused, Chris developed a workflow that groups together the tracks he needs to concentrate on simultaneously, so he can mix them in context. In other words, he mixes with buckets. This helps him understand and control how his mix elements work together.
Organization alone does not make for a good mix. You need great tools to make a great mix. With that in mind, Waves precisely modeled Chris’s mixing console to provide a plugin that helps you find his signature sound and use it as part of your own. When Chris began working with Waves to bring his mixing technique to a plugin, he decided to add a few more features to his tried-and-true console:
•The Gate/Expander section was improved to have a continuous attack time and a hold control, as well as a ducker mode for full control over the envelope of the gate/expander process.
•There are two compressor types: Desk and Bluey. These modes have different dynamic behaviors and distinct sonic signatures. These processing modes make up much of the character of CLA MixHub’s dynamics processing.
•There is a dedicated sideband EQ section that does not hijack channel EQ.
CLA MixHub / User Guide
3

You can use the MixHub processors in buckets or as a channel strip with all of one track’s processors in one view. When you adjust a MixHub track, you’re actually controlling a high-quality channel strip plugin. You can think of a bucket as a virtual controller of the eight separate plugins. All processing takes place on the individual plugin inserts, not in the buckets themselves. Every move you make in MixHub can be automated on the plugin and saved with the session.
Any track with the CLA MixHub plugin is available for assignment to a bucket and is displayed in the Bucket Assignment menu. Once tracks are assigned, the Input, EQ, Dynamics, and Output sections of all members of the bucket are shown together and organized by processor type.
Components
•CLA MixHub mono
•CLA MixHub Stereo
Mono and stereo instances can be assigned within the same bucket.
Views
There are three views:
•Channel View shows all sections of a selected CLA MixHub track insert.
•Bucket View shows the Input, Dynamics, EQ, and Output sections of all the tracks that make up a bucket.
•Expanded View is a focused view of a processor. On stereo tracks, the Expanded Mode shows L/R (or M/S) on separate panels. With dynamics processors, side chain EQ processing and dynamics are on separate panels.
CLA MixHub / User Guide
4

Channel View
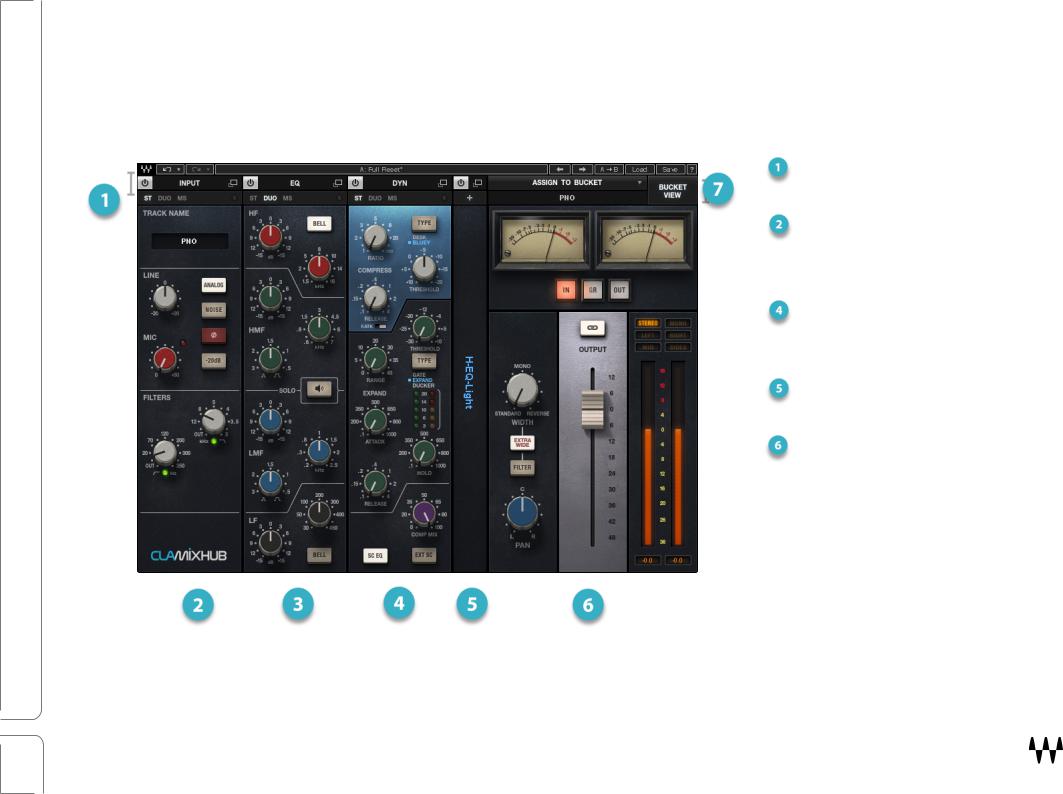
The Channel View displays one channel strip from Chris Lord-Alge’s analog mixing console. Signal flow in the console is from left to right. Drag an EQ, dynamics, or insert module to change its place in the signal flow. Input and Output modules cannot be repositioned.
Input
Insert Slot
EQ
The Channel View (above)—Shows all of the processors in a typical analog console channel strip.
The Bucket View (far right) shows four layers of processors, with up to eight tracks per bucket.
Dynamics
Output (Buckets) |
Output (Channel) |
CLA MixHub / User Guide
5
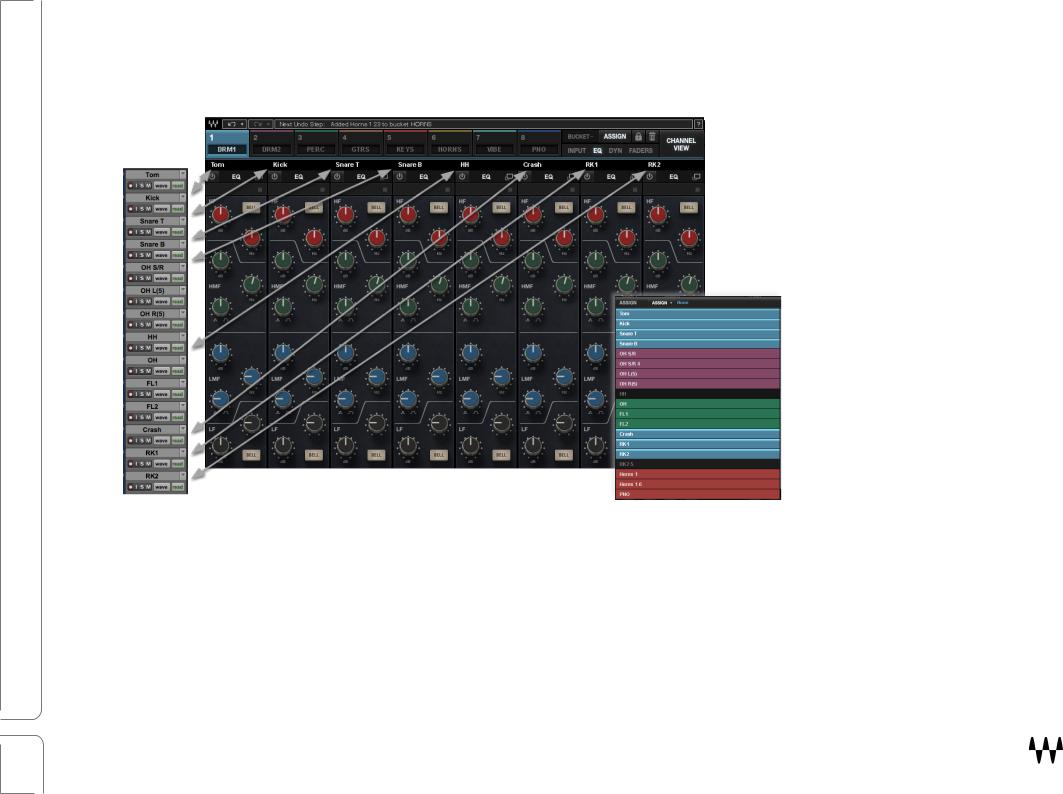
Bucket View
In this example, eight tracks in the host DAW are assigned to one CLA MixHub bucket. Note the corresponding track names. With supported hosts, track names will automatically copy to the MixHub assignment menu. If not, rename the tracks from within MixHub. To the right is the Track Assign list used to add tracks to the bucket. Track assignment does not need to be sequential. Tracks in a bucket can be mono or stereo and these can be mixed together in one bucket.
Click on a bucket tab to move between buckets. Double-click on a bucket name box to rename the bucket.
CLA MixHub / User Guide
6

Quick Start
This quick start shows you the basics of setting up mixing buckets with CLA MixHub. The MixHub interface is a controller. It’s not processing sound, but rather it’s controlling the parameters of the plugins that are assigned to each bucket.
1.Prepare your DAW session. We recommend that you use track names that contain six characters or less. MixHub must abbreviate longer track names, so start out with something short that makes sense to you. If this is not possible, you can rename the tracks from within the plugin.
2.Insert a CLA MixHub plugin on every DAW track that you will assign to buckets. You can mix mono and stereo tracks. MixHub can control up to 64 host tracks. You can also insert MixHub on other DAW tracks, just to use its channel strip. If this is first time you’ve opened this instance, MixHub will open with the Channel View of that track—you will see that track’s complete channel strip. The name of the current track is shown in the Input module; the processing modules are identified at the top. Signal flow of the Channel View is from left to right. Drag an EQ, dynamics, or insert module to change its position in the signal flow. Feel free to use the
Channel View as you would any channel strip.
3.Adjust the input level. Use the Analog and Noise controls to add THD to the signal. These are important elements of the console’s character, so we advise that you use them unless you are seeking a very clean sound.
4.Experiment with the two compressor types (Desk and Bluey) and the Gate/Expander/Ducker types.
5.Click Bucket View and select one of the Modes (i.e., Input, EQ, Dynamics, Output). If this is a new session, all buckets will be empty.
6.Name each bucket by double-clicking on a bucket name. This helps you organize your tracks.
7.Click the Assign button to open a list of all the tracks in the session that you can assign to buckets.
8.Assign the tracks to the open bucket. If you’re just getting started, this will be Bucket 1. Assigned tracks are color-coded to match their bucket’s color.
9.Repeat this for as many buckets as you need. Click again on the Assign button to exit the Assign Mode.
10.Choose a processing mode using the four Bucket View buttons. This displays the same processing mode for all tracks in the selected bucket. Use the Bucket Select buttons to move between buckets.
CLA MixHub / User Guide
7

11.If you like, click the Channel View button to adjust the entire processing chain for one channel. To make sure that you’re controlling the correct channel, note the Track Name box in the Input Section.
12.To see a module’s Expanded View, click the small expand icon at the top of any processor. This is a focused view of the track’s processing. Stereo tracks are shown L/R (or M/S) and side chain processing is revealed in the Dynamics mode.
CLA MixHub / User Guide
8
Interface
Channel View Layout
(Stereo component shown)
9
Stereo Mode Select—Sets
input format: L/R, Duo, M/S.
Input—Controls input level and filters.
 EQ—Four-band EQ section
Dynamics—Compressor, gate/expander/ducker, and SC EQ
Plugin Insert—Insert an
additional Waves Plugin.
Output—Select meters: in, out, or gain reduction; control pan and stereo width; output matrix.
 Control Panel—Move between Bucket and Channel views, select bucket, and add current track to a bucket.
CLA MixHub / User Guide
 Loading...