

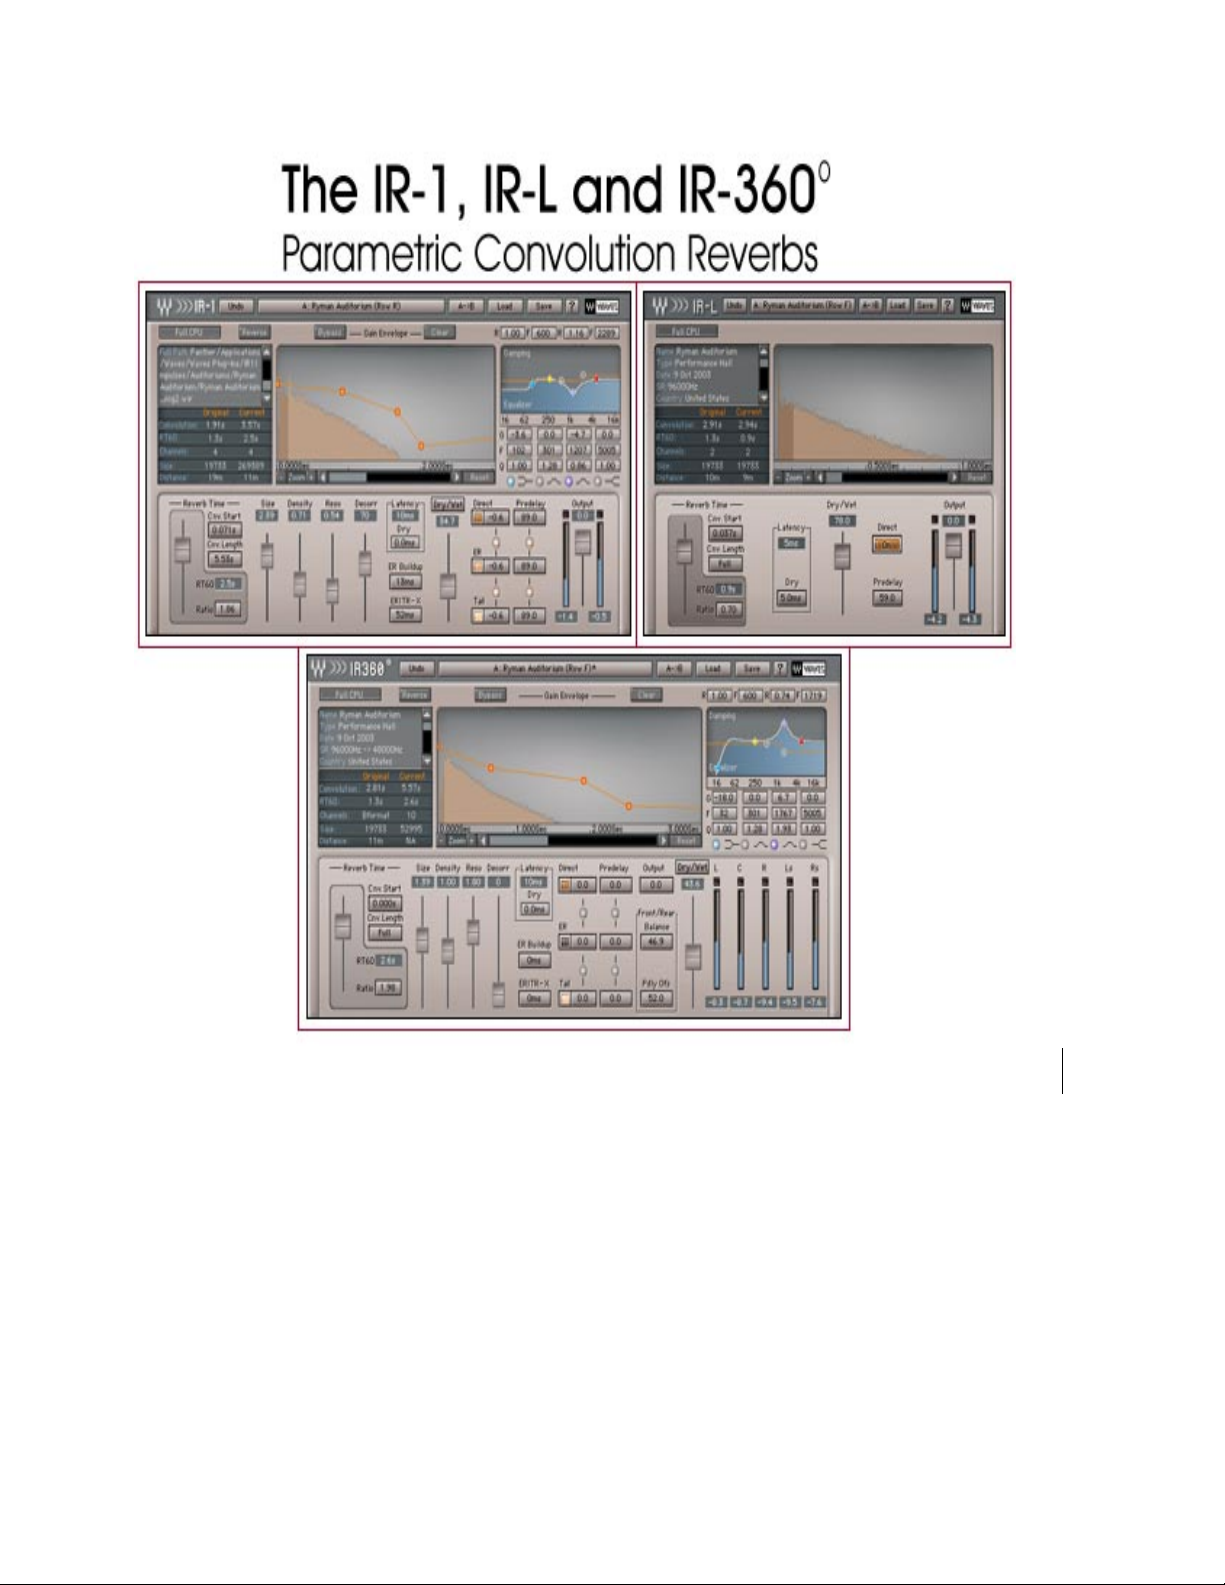
Waves Parametric Convolution Reverb
IR-1, IR-L and IR-360
User’s Guide
Waves IR-1 software guide page 1 of 40

TABLE OF CONTENTS
Overview
Synthetic Digital Reverberation
Sampled-Acoustics Convolution Reverberation
The Perfect Hybrid
The Impulse Responses
IR Library
Factory Presets
Sampled Acoustics V2
Virtual Acoustics - Devices and Synthetic
Import Impulse Response from File…
Import Sweep Response from File…
Tips for Sampling an Acoustic Space
MEASURING VINTAGE PLATES, SPRING REVERBS OR ANY REVERB UNIT
MEASURING HALLS, ROOMS
IR-series plug-in channel components
About the IR-360:
IR-series Controls and Displays
About the IR-L
Reverb Time
Convolution start:
Convolution Length
Ratio
RT60
Dry/Wet control
Direct:
Offline Calculation indicator
IR-1 and IR-360 Controls and Displays
Reverb Time
Convolution start:
Convolution Length
Ratio
RT60
Reverb Control Parameters
Reverb Density
Reverb Resonance
Decorrelation control
Dry/Wet control
Wet Properties
Direct Signal
Early Reflections
Reverb Tail
Direct:
Direct Gain
Direct Predelay
ER
ER Gain
ER Predelay
Tail
Offline Calculation Indicator
More About Reverb Damping
Damping
HF damping
Waves IR-1 software guide page 2 of 40

LF damping
Reverb EQ
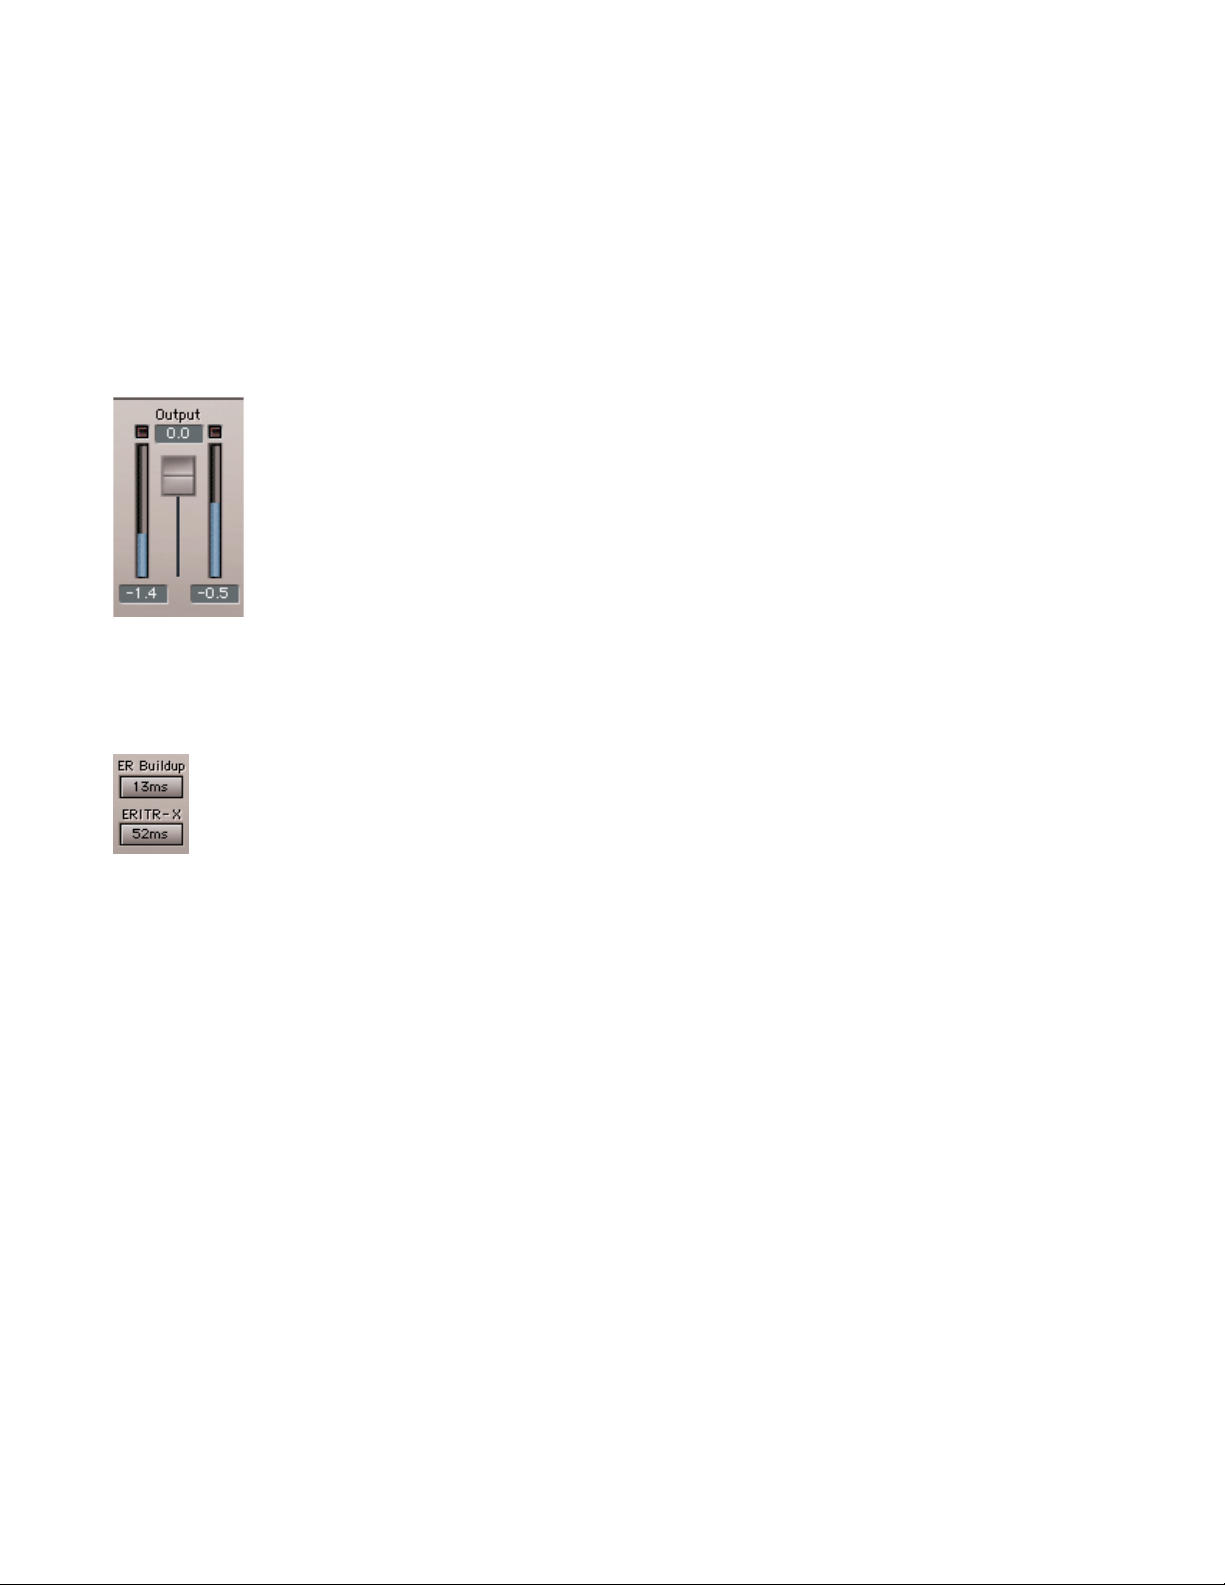
ER Buildup
ER/TR-X Crossover
IR-360 Controls
Toolbar WaveSystem Controls
Loading Impulse Responses
Saving
Importing Impulse Responses
IR Info and Properties
Notes on “Flat Points” or Unity Gain Settings for Controls
System Requirements
Notes CPU about Optimization
IR-1 HTDM
Waves IR-1 software guide page 3 of 40

Introduction
The Waves IR-1, IR-L and IR-360 plug-ins create extremely high quality replicas of
acoustical spaces and synthetic reverbs. They also allow the user to alter many
aspects of the sound of these reverbs.
For the purpose of this Manual, when discussing attributes shared by the Waves IR-1,
IR-L and IR-360 Parametric Convolution Reverb plug-ins, we will simply refer to them
all as the IR-series.
Overview
The Waves IR-series are convolution-based reverb processors. They give the user
total control of a reverb's properties. Impulse Response Convolution is the process of
forcing a certain acoustic signature on any incoming audio signal. An Impulse
Response (IR) is created by feeding a very short pulse (Impulse) into a linear system
and measuring the resultant output (Response).
Synthetic Digital Reverberation
Historically, most digital reverberation processors have used a synthetic reverberation
engine for high efficiency. This would usually consist of two reverberation generators:
• The Early Reflections Generator. This generator is based on a short Finite
Impulse Response (FIR) filter with less than 100 reflections. A short stage of
convolution is performed with this FIR.
• The Reverberation Tail Generator. This is based on a recursive Infinite Impulse
Response (IIR) filter. The IIR comprises a feedback loop with a decay factor and
inner dispersion filters. It makes the reverb more complex, less resonant, and
more rich and natural sounding.
The tail generator is efficient. It can generate a one-second reverberation time or a fivesecond reverberation time using the same amount of processing power. Such reverbs
usually allow a great deal of control over the reverberation properties. These controls
have become classics. They include Reverb Time (RT), Predelay, Size, High and Low
Frequency Damping, and Diffusion.
Typically, the goal for using a reverb is to emulate the acoustics of natural spaces such
as rooms or halls, or to add "wet" reflections to "dry" sources for creative and aesthetic
reasons.
Examples of these reverb processors include the Waves TrueVerb and Renaissance
Reverb.
Waves IR-1 software guide page 4 of 40

Sampled-Acoustics Convolution Reverberation
In math, the term convolution means an integral which expresses the amount of overlap
of one function x as it is shifted over another function y. In the literal sense, it means to
“roll together” or to “fold together”. A convolution reverb blends together an input signal
with another type of audio signal called an impulse response.
Sampled-acoustics convolution processors are a different type of digital reverb than the
digital reverbs that preceded them. They are much more calculation-intensive, but offer
the ability to faithfully convolve any given impulse response with any input signal.
The Impulse Response (IR) of a certain reverb hardware setup or the acoustics of a
real space can be captured and imported into the sampled acoustics reverb. It will use
the Impulse Response as a filter consisting of thousands of reflections. The longer the
IR, the more intensive the calculation, and thus the more processing power that will be
required.
The result is that running a dry signal through a typical sampled acoustics reverb will
sound much like running it through the original device with the same settings, or like
recording the signal in the sampled space with a microphone setup similar to the one
used for capturing the acoustics. These reverbs usually offer very little control of the
reverberation properties and are essentially designed to faithfully super-impose the
sampled acoustics.
The Perfect Hybrid
The Waves IR-series plug-ins are designed to bridge the gap between synthetic digital
reverberation and sampled acoustics convolution reverberation. They provide a
convolution-based reverb processor with total control of the reverb parameters. The IR-
series uses the impulse response as raw material. This allows the user to process the
impulse response with controls that are similar to those offered in classic digital
reverbs.
The process is power intensive. However, the manipulations performed on the impulse
response are calculated offline so that they don’t consume all of the CPU’s power.
Then they are applied by way of straightforward convolution.
The result is that you have the natural and high-quality sound of sampled space
acoustics as well as the controls to shape the sound to your needs. These
manipulations go beyond those offered in regular digital reverbs.
Waves IR-1 software guide page 5 of 40

The Impulse Responses
Another major part of the IR-series is the Impulse Response (IR) Library. The library
offers a set of high-definition IR’s. Waves paid special attention to this part of the
product because it is the basic reverb sound of the IR-series reverbs. We established a
special recording setup and method specifically for IR recording. This method provides
exceptional signal-to-noise ratio, very low harmonic distortion, and a wide frequency
bandwidth (20Hz-32kHz). Thus, it offers optimal sonic depth and dimension.
This method for taking acoustical measurements was developed by Waves in
collaboration with Professor Angelo Farina of the University of Parma in Italy. The basis
of the acoustic capture method was documented and presented in the AES (Audio
Engineering Society) paper Recording Concert Hall Acoustics for Posterity. To see this
article, please check out the following link:
http://www.waves.com/objects/pdf/general/article_farina05.pdf
IR Library
The library that is included with the purchased IR-series covers all of the reverberation
needs of the most demanding studio professionals. It consists of 4 main parts:
• The Basic IR set is installed with the IR-series. It is available in the
downloadable demo as well as in the full product.
• Sampled Acoustics V2 contains a set of world-class Concert Halls, Opera
Houses, Cathedrals, Studios and more. These are natural spaces captured in
the USA, Italy, Japan, the UK, Israel, Australia, and more. Our original Sampled
Acoustics library has been reprocessed with enhanced quality, and new micing
techniques were added. In accordance with our vision of continuously expanding
the IR library, new venues have also been added to the library.
• Virtual Acoustics - Devices contains Sampled IR’s from classic reference
reverb hardware.
• Virtual Acoustics – Synthetic contains synthetically generated or pre-
processed IR’s.
Waves IR-1 software guide page 6 of 40

Accessing these IRs is easy. Select the desired preset from the plug-in’s “Load” button,
which will present the menu as follows:
Factory Presets is the first section. It is available with the installation of the IR-series,
even for demo purposes. The IR data for these presets resides in the folder
"IR1Impulses V2" in a directory called Basic.
The Path is:
Waves Plug-Ins dir/IR1Impulses V2/Basic.
The Custom Setup group contains presets that only have settings. These presets can
be loaded onto any IR.
Waves IR-1 software guide page 7 of 40

Sampled Acoustics V2
The presets in this section are based on samples of real places. The contents of the
Sampled Acoustics V2 folder on the DVD have to be copied into the IR1Impulses V2
folder inside the Waves Plug-Ins folder. You can add or delete folders from this
directory. Each time upon loading, the Plug-In will scan the directory and dynamically
build its preset menu according to the folder hierarchy.
Virtual Acoustics - Devices and Synthetic
The presets in the Virtual Acoustics-Devices section are samples of a reference
hardware Reverb Unit. The Virtual Acoustics-Synthetic presets are synthetically
generated and processed IR’s. The contents of the Virtual Acoustics folder on the DVD
have to be copied into the IR1Impulses folder inside the Waves Plug-Ins folder. You
can copy the Devices and/or Synthetic folders into the IR1Impulses folder, and the
Plug-In will scan them upon loading.
Import Impulse Response from File…
The IR-series allows you to import your own IR’s. You can sample them yourself,
download them from the Internet, or find them elsewhere.
Import Sweep Response from File…
The IR-1 and IR-360 allow you to import the Sweep Response that you record in an
acoustical space or hardware device. The plug-in will then process that Sweep
Response into a new IR.
Here are step by step instructions to make your own IR:
- Play your sweep file supplied on the CD and also downloadable from the Waves
website
(a 15 second sweep followed by 10 seconds of silence) through
speakers in the room to be captured.
- Record the result with 1 or more microphones to 1 or more tracks.
- Create a new folder (We'll name it "My Sweeps") inside your "IR1Impulses V2".
folder, where the plug-in searches for new IRs.
- Put your recorded sweep files inside your new "My Sweeps" folder.
- Load the IR-1 or IR-360; Press Import Sweep Response From File…
- Guide the browser to the "My Sweeps" folder.
- Load the .wav files one by one as you are prompted by the plug-in.
- After some calculations, an Impulse Response .wir file will be automatically
saved next to your sweep files in the "My Sweeps" folder.
- To save this new IR as a preset, press Save, then select Save to New File.
- Navigate to the "My Sweeps" folder.
- Reload the IR-1 or IR-360; The new preset will appear in the load menu.
- Congratulations! You have created a new IR! You may now optionally delete the
recorded sweep files from the "My Sweeps" folder.
Waves IR-1 software guide page 8 of 40

Tips for Sampling an Acoustic Space
When sampling an acoustic space, a typical setup includes a multi-track recorder, an
amplifier and speaker to play the sweep signal into the space, and one or more
microphones (and mic preamplifier(s), if needed) to capture the sound.
Ideally, the speaker, amplifier, microphone(s), and microphone preamplifier(s) used
should be as transparent as possible, having flat frequency responses. A microphone
of any polar pattern will work, although we recommend cardioid or omni-directional
microphones for optimal results.
In most venues, the speaker that plays the sweep tone should be placed where the
performers would be; on stage in a concert hall, for example. The microphone should
be placed somewhere in audience area; naturally, a microphone placed closer to the
stage will capture more direct sound and less reverberation than a microphone placed
in the last row. Keep in mind that the presence of a full audience, as well as musicians
or musical equipment on the stage, will absorb sound and dramatically change the
reverberation quality of the acoustic space.
M
EASURING VINTAGE PLATES, SPRING REVERBS OR ANY REVERB UNIT
The measuring procedure is quite similar to a normal voice processing (via the plate or
the spring unit). The difference is that we do not use an aux send. Instead we connect
the output of our sweep playback device directly to the plate or spring reverb device.
SET UP:
Connect the output of your source (Pro-Tools HD card, etc…) directly to the input of the
measured unit. As for the output of the measured unit, connect it directly to the
recording device (HD card, etc…)
Output source (HD card, etc…) Æ Input of the plate.
Output of the Plate Æ Input of the recording device (HD card, etc…).
SESSION:
Create two different channels. The first channel will be the sine sweep channel. We use
a simple sweep signal, which is a pure tone whose frequency is changed continuously
from low to high frequency. The second channel should record the wet signal, which we
receive from the plate reverb. If there is more than one setting on the unit please
measure them all. For instance, reverb settings (1-5), mono-to-mono, mono to stereo,
and stereo to stereo.
Waves IR-1 software guide page 9 of 40

p
p
M
EASURING HALLS, ROOMS
The measuring procedure of a venue is slightly different than that of measuring
devices. Measuring venues requires a larger setup, which includes a playback device,
a microphone and a loudspeaker. We can use the same session we were using for the
device recordings, only instead, we connect the output of our playback device to a
speaker, and a microphone should be assigned to the input of our recording device.
S
ET-UP:
Connect the output of your source (HD card etc…) directly to or through the mixing
console to the loudspeaker. For the input, connect the microphone cable directly to or
through the microphone pre amp to the recording device.
Output source (HD card etc…)Æ Input of the speaker.
Microphone cable Æ Input of the recording device (HD card etc…).
You can use a microphone of any kind, with any polar patterns. We recommend a
cardiod or omni-directional microphone. After deciding which microphone to use, set up
the microphone with the speaker located in front of the microphones, to achieve the
best results.
M
ONO SESSION:
To make a Mono IR, create two different channels. The first channel will be the sine
sweep channel and should be assigned to the loudspeaker. The second channel
should record the microphone signal.
M
ONO TO STEREO SESSION:
Simultaneously record one speaker (Center) with the Left and Right mics.
ULL STEREO SESSION:
F
To create a 4 convolution IR, Record your Left speaker with the Left mic (LL) and Right
mic (LR). Then record the Right speaker with the Left mic (RL) and the Right mic (RR).
IR-SERIES PLUG-IN CHANNEL COMPONENTS
The IR-series is available in several channel configurations as follows:
Mono to Mono: 1 convolution
Mono
In
ut
Convolution
Mono
Out
ut
Waves IR-1 software guide page 10 of 40
p
p
p
p
p
Mono to Stereo: 2 convolutions: 1 left, 1 right.
Convolution
Mono
In
ut
Convolution
Efficient Stereo: 2 convolutions: Left in to Left out and Right In to Right Out. This
component does multi-mono processing.
Left
Out
Right
Out
ut
ut
• With Efficient Stereo, the added control for input channel Crosstalk can keep the
channels separate, or sum the wet path input. This component is very practical
for stereo-to-stereo reverberation. It provides beautiful reverberation with all the
depth and dimension that you might need on an auxiliary stereo reverb.
Full Stereo to Stereo: 4 convolutions, Left Channel to Stereo, and Right Channel to
Stereo. This component presents a more purist approach to Stereo Reverberation than
Efficient Stereo, but will use twice the CPU.
Left
Out
ut
Right
Output
Left
In
ut
Right
Input
Convolution
Convolution
Convolution
Convolution
= Summing
Waves IR-1 software guide page 11 of 40
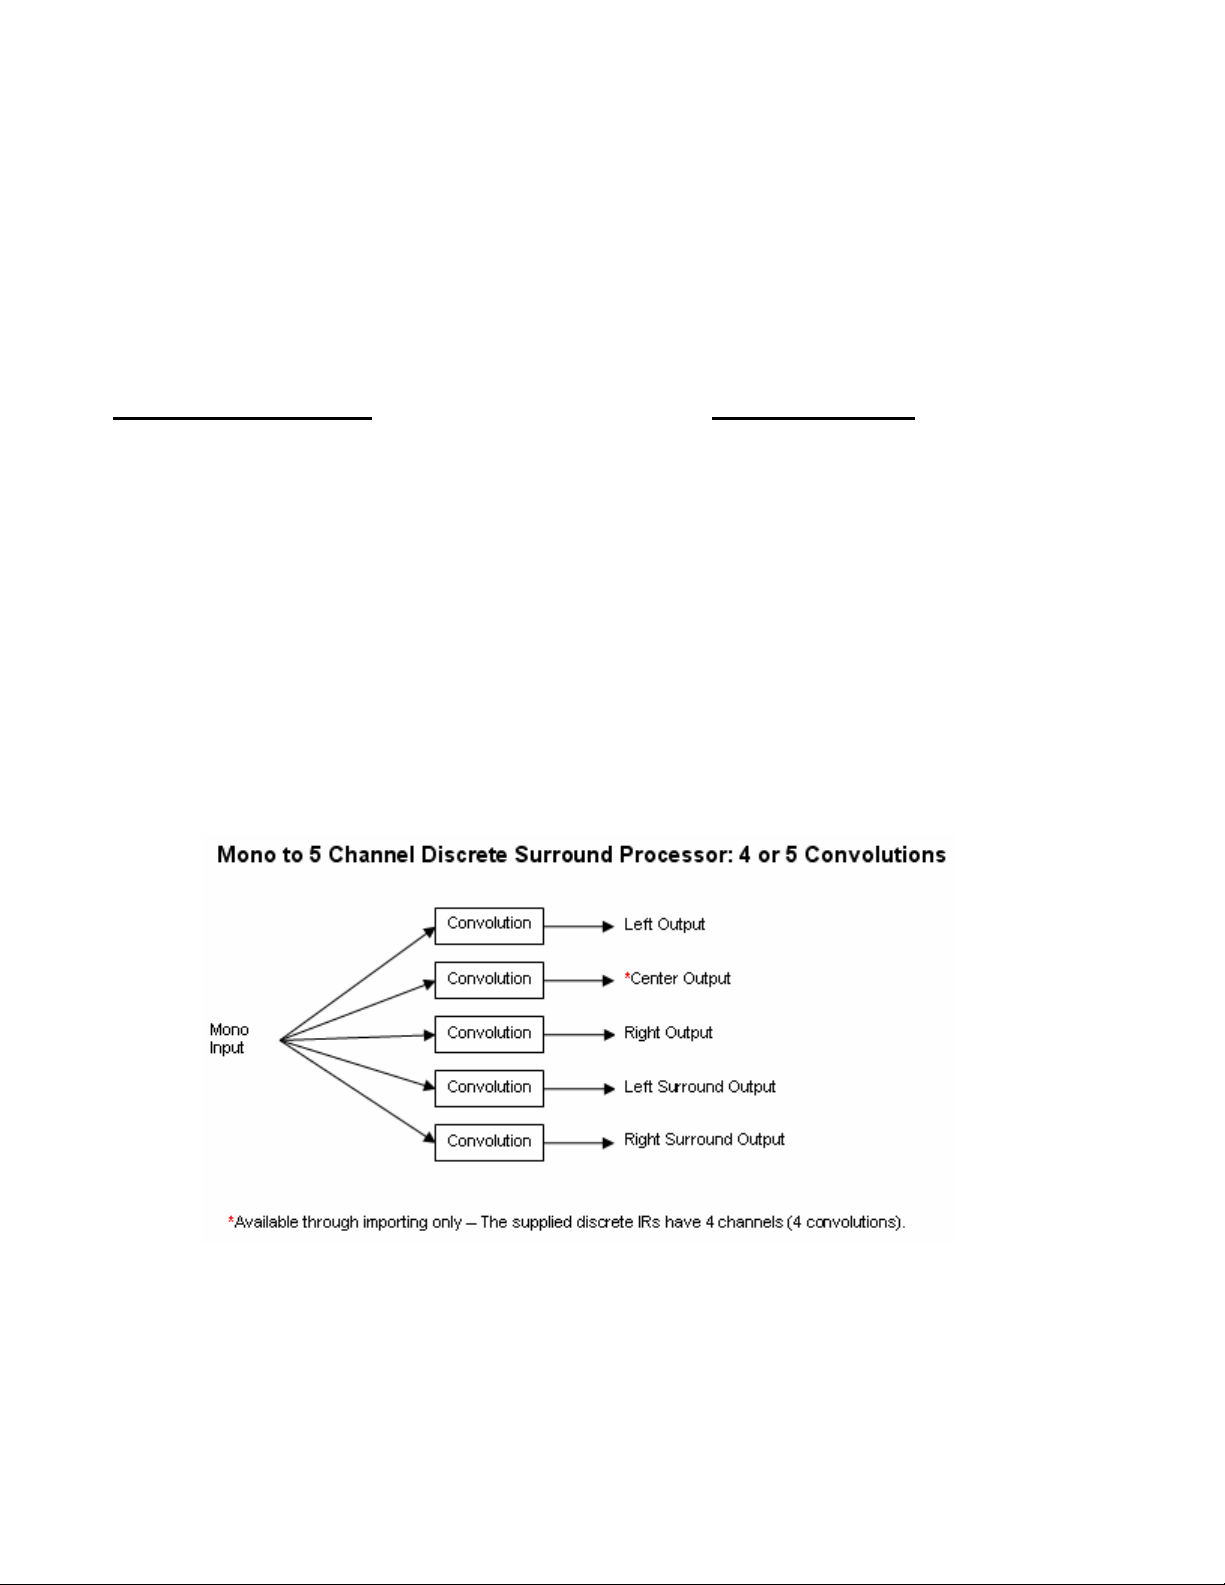
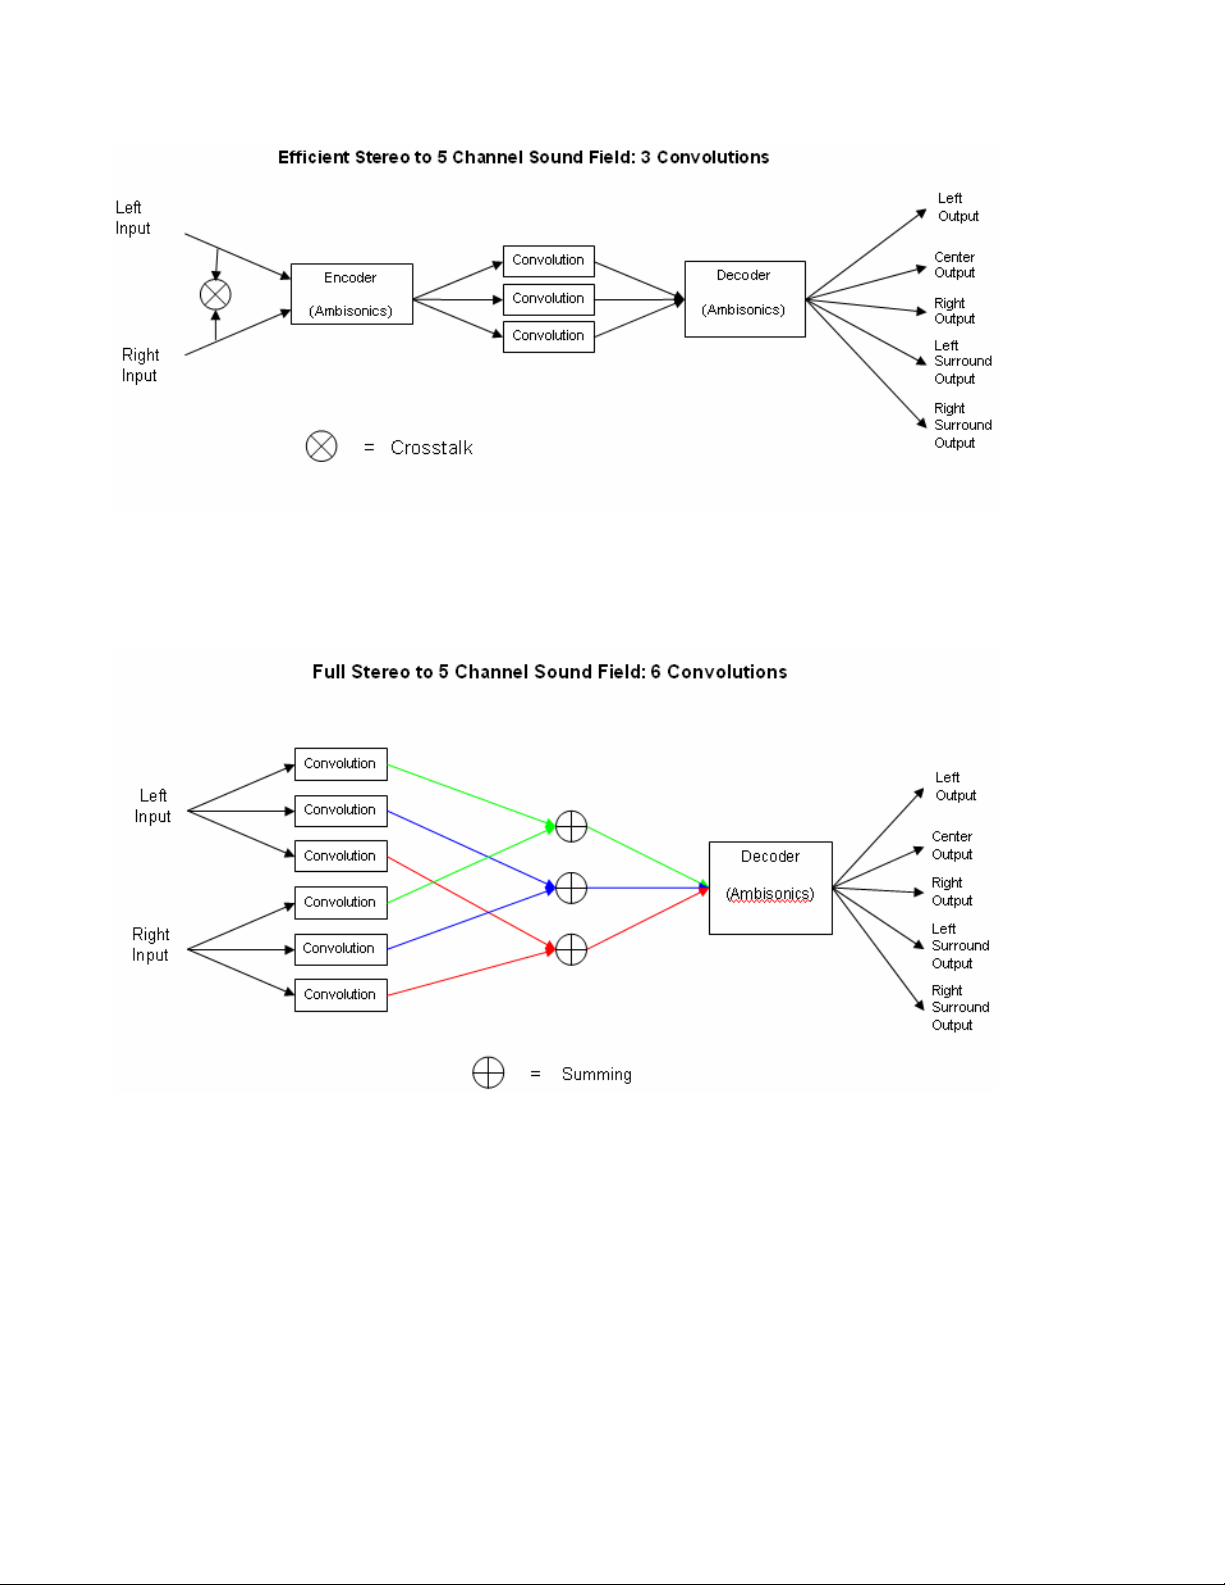
About the IR-360:
The IR-360 is the surround sound version of the IR-1. The IR-360 is HTDM for Pro
Tools TDM Users. IR-360 owners will also receive an IR-1 included in the purchase.
Supported channel configurations of the IR-360:
Channel Configuration
Mono to 5 Channel Discrete Surround processor 4 or 5
Efficient Stereo to 5 Channel Discrete Surround processor 4 or 5
Mono to 5 Channel Sound Field 3
Efficient Stereo to 5 Channel Sound Field 3
Full Stereo to 5 Channel Sound Field 6
Sound Field Surround to Surround 6
Efficient Discrete Surround to Surround 4 or 5
Diagrams of these channel configurations are shown below:
# of Convolutions
Waves IR-1 software guide page 12 of 40

Waves IR-1 software guide page 13 of 40
Waves IR-1 software guide page 14 of 40

Waves IR-1 software guide page 15 of 40

IR-
SERIES CONTROLS AND DISPLAYS
The IR-series has a large main window with controls similar to those of a standard
digital reverb. Most of the values are displayed as a ratio of the nominal value of the
original IR. The IR-360 has the most adjustable parameters, followed by the IR-1 and
then the IR-L.
About the IR-L
The IR-L is essentially an IR-1 with fewer adjustable parameters. It has the same high
sound quality as the IR-1. The IR-L can be upgraded at any time to an IR-1 or IR-360.
IR-L
CONTROLS AND DISPLAYS
(IR-1 and IR-360 users can skip to the following section labeled "IR-1 and IR-360
Controls and Displays" on page 17)
T
HE IR GRAPH
The IR graph shows dB level on the vertical axis and time on the horizontal axis. The
range of the IR display is from 0dB at the top to –90dB at the bottom.
The scroll bar on the bottom allows you to zoom in and out horizontally as well as scroll
back and forth. Note that while IRs are limited to six seconds in length, the window itself
has a maximum length of ten seconds.
Waves IR-1 software guide page 16 of 40

Reverb Time
The Reverb Time section includes these 4 parameters:
C
ONVOLUTION START: Range: 0 TO 1 second; Default: 0 seconds
The Convolution Start determines the starting point of the convolution process. It
enables you to remove unwanted pre-delay at the beginning of an IR.
C
ONVOLUTION LENGTH: Range: 0 seconds to 6 seconds; Default: Full
This control sets the length of the process filter. By default it is set to Full, which means
that the IR-L will convolve the input with the whole Impulse Response. However, if the
IR is longer than 6 seconds then it will be cut to 6 seconds. This will be indicated in the
IR Properties display. You can also set the Convolution length manually to be shorter
than the RT60 Reverb time which will save some CPU. This will make the Impulse
Response stop at some point down the slope, creating a “Gated” reverb sound. The
default Full setting will only use the amount of CPU it needs for the loaded IR, so there
is nothing to gain by manually setting it to 2 seconds for a 2 second IR.
R
ATIO: Range: .25 to 1.00; Default: 1.00
The Reverb Time Fader controls the Reverb Time Ratio. The resulting reverb time will
be the original RT60 multiplied by the ratio.
RT60:
level of a sound to drop by 60dB in gain once the source has been shut off. It is actually
a slope factor. RT60 is a term that is commonly used in building construction and
architecture to describe a room’s acoustic properties.
This field shows the reverb’s current RT60. It is the original RT60 multiplied by the
Reverb Time Ratio. To determine what the original RT60 is, set the Ratio to 1.00. The
original RT60 is calculated by analysis of the loaded IR.
The RT60 display is active only when RT60 may be computed on the IR. There is a
minimum IR length (about 100 ms) for computing RT60 as well as for activating the
reverb time ratio.
RT60 (Reverb Time, 60dB) is defined as the time it takes the sound pressure
Waves IR-1 software guide page 17 of 40

DRY/WET CONTROL: Range: 0 to 100% wet; Default: 100% wet
This control sets the balance between the “Dry” signal and the convolved signal. A 50%
Wet setting is the “natural” balance point.
The IR-series lets you work either with the recorded Direct signal, or with the Dry signal
(that is, the unprocessed input to IR-1). When the Direct signal is turned off, and
Dry/Wet is set to 50%, the Dry signal will have the same level and relative delay as the
recorded Direct signal, so the Dry will replace the Direct. This is useful if you do not
want any coloration of the Dry signal. When working with the Dry signal, it is generally
recommended to turn off the Direct.
DIRECT: Range: ON/OFF; Default: Off
This switches the direct signal on or off.
P
RE-DELAY: Range: 0-500ms; Default: 0
This controls the amount of time that the entire IR is delayed.
L
ATENCY:
The IR-series does not declare any inherent latency. The reason for this is that the Dry
path goes to the output without any actual latency. The process, however, does have
some latency: 11.6 ms at 44.1 to 48kHz and 5.3 ms at 88.2 to 96kHz.
Since reverbs are commonly used in an aux send configuration and since most host
applications cannot compensate for the delay for plug-in latency on auxiliary
sends/returns, the Wet path latency is shown within the plug-in and regarded as a
nominal predelay.
Waves IR-1 software guide page 18 of 40

DRY: Range: 0-30ms; Default: 0ms
When working as an insert, the Dry latency control can be used to align the dry signal
to the wet signal or even to advance it ahead.
CPU
MODE: Range: Full CPU or Low CPU. Default: Full CPU
This control allows you to select between Full CPU (Central Processing Unit) or Low
CPU. Low CPU presents an option to slightly compromise the resolution of the
convolution process while saving up to 45% of the CPU cycles (depending on the IR
length and Sample rate). The average savings is about 20%.
Offline Calculation indicator
Manipulating the impulse response to reflect new controls settings requires
recalculation of the whole impulse response. This calculation process can take up to
several seconds. While the impulse response calculation is taking place, the Reverb
IR graph displays “Calculating…” and the audio is muted. After the calculations are
performed, the graph updates and the audio un-mutes.
O
UTPUT GAIN: Range: 0dB to –50dB; Default: 0dB
This controls the overall output level of the IR-1.
CROSSTALK : Range: 0.0 to 100.0; Default: 0.0
This control is only available in the Efficient Stereo component.
It controls how much Crosstalk is allowed between the IR-series’ input channels. When
the Crosstalk is 0.0 the process is multi-mono, convolving left to left and right to right.
When crosstalk is 100.0, the plug-in will convolve a summed stereo input. The dry
signal is not affected, so the reverb will have elements from the left channel in the
reverb of the right channel and vice versa.
Waves IR-1 software guide page 19 of 40

IR-1 AND IR-360 CONTROLS AND DISPLAYS
(IR-L users can skip this section and resume reading at Toolbar Wavesystem
Controls on page 30)
T
HE IR GRAPH
The IR graph shows dB level on the vertical axis and time on the horizontal axis. The
range of the IR display is from 0dB at the top to –90dB at the bottom. The display
incorporates an envelope curve (in orange). The scaling of the envelope curve is
different: its flat bypass point is two-thirds of the graph’s height and its range is from
+30dB to –60dB.
The scroll bar on the bottom allows you to zoom in and out horizontally as well as scroll
back and forth. There’s a Reset button on the right of the scroll bar that sets the window
to its maximum length. Note that while IRs are limited to six seconds in length, the
window itself has a maximum length of ten seconds.
Above the IR window are buttons for bypassing and clearing the envelope curve.
Clearing the envelope curve resets it to its flat point of 0dB (two-thirds of the graph’s
height). To the left and above the IR window is the Reverse button which flips the IR
front-to-back.
Waves IR-1 software guide page 20 of 40

Reverb Time
The Reverb Time section includes these 4 parameters:
C
ONVOLUTION START: Range: 0 TO 1 second; Default: 0 seconds
The Convolution Start control determines the starting point of the convolution process.
It enables you to remove unwanted pre-delay at the beginning of an IR.
C
ONVOLUTION LENGTH: Range: 0 seconds to 6 seconds; Default: Full
This control sets the length of the process filter. By default it is set to Full, which means
that the IR-series will convolve the input with the whole Impulse Response. However, if
the IR is longer than 6 seconds then it will be cut to 6 seconds. This will be indicated in
the IR Properties display. You can also set the Convolution length manually to be
shorter than the RT60 Reverb time in order to save some CPU. This makes the
Impulse Response stop at some point down the slope, creating a “gated” reverb sound.
This gating effect can be avoided by using the Envelope to make the IR fade out
earlier. The default Full setting will only use the amount of CPU it needs for the loaded
IR, so there’s nothing to gain by manually setting it to 2 seconds for a 2 second IR.
R
ATIO: Range: .25 to 4.00; Default: 1.00
The Reverb Time Fader controls the Reverb Time Ratio. The resulting reverb time will
be the original RT60 multiplied by the ratio.
RT60: (Reverb Time, 60dB) is defined as the time it takes the sound pressure level of a
sound to drop by 60dB in gain once the source has been shut off. It is actually a slope
factor. RT60 is a term that is commonly used in building construction and architecture
to describe a room’s acoustic properties.
This field shows the reverb’s current RT60. It is the original RT60 multiplied by the
Reverb Time Ratio. To determine what the original RT60 is, set the Ratio to 1.00. The
original RT60 is calculated by analysis of the loaded IR.
Waves IR-1 software guide page 21 of 40

The RT60 display is active only when RT60 may be computed on the IR. There is a
minimum IR length (about 100 ms) for computing RT60 as well as for activating the
reverb time ratio.
Reverb Control Parameters
SIZE: Range: .25 to 4.00; Default: 1.00
The Size is a ratio of the original IR, and controls the dimensions and volume of the
actual room. This defines the traveling time of sound between reflections. The Size
value will be indicated in the IR Properties display.
R
EVERB DENSITY: Range: 0.25 to 4.00; Default: 1.00
The Density control is a ratio of the density in the original IR. Reducing density will
usually result in a more grainy sound; increasing density will usually create a thicker
and smoother sound. The outcome will vary according to the nature of the reflections
in the original reverb.
R
EVERB RESONANCE: Range: .25 to 4.00; Default: 1.00
Resonance extends or reduces any existing resonances in the original IR.
D
ECORRELATION CONTROL: Range: 0 to 100%. Default = 0%
The Decorr control increases spaciousness by increasing the Decorrelation between
channels.
You can use this control to make a stereo output out of a mono-recorded IR. To
achieve this, load a single-channel IR into a stereo or mono Æ stereo plug-in
component. Then, cancel the "import” dialog when the plug-in asks for the second
channel.
Waves IR-1 software guide page 22 of 40

DRY/WET CONTROL: Range: 0 to 100% Wet; Default: 100% Wet
This sets the balance between the “Dry” signal and the convolved signal. 50% Wet
setting is the “natural” balance point.
The IR-series lets you work either with the recorded Direct signal, or with the Dry signal
(that is, the unprocessed input to IR-1). When the Direct signal is turned off, and
Dry/Wet is set to 50%, the Dry signal will have the same level and relative delay as the
recorded Direct signal, so the Dry signal will replace the Direct signal. This is useful if
you do not want any coloration of the Dry signal. When working with the Dry signal, it is
generally recommended to turn off the Direct.
Wet Properties
The Wet Properties section has separate on/off, gain and delay controls.
The IR-1 engine analyzes the impulse response loaded into it, and separates from it the
'Direct', 'Early Reflections', and 'Reverb Tail' portions. Each part has its own Gain and
Predelay value. All of these parts make up the original loaded IR. So, in order to use
the original IR in its pure state, all parts should be On and the Dry/Wet control should
be at 100% Wet. To use a specific IR as a reverb, it is recommended to turn off the
Direct signal and use the Wet/Dry control to reach the desired balance between source
and reverb. In aux send configurations, the IR-1 is best used with the Direct Off and
100% Wet (the default status).
Waves IR-1 software guide page 23 of 40

D
IRECT SIGNAL
Please Note: The Direct signal is not the dry signal! The dry signal is the input signal to
the plug-in.
The Direct signal is the direct arrival of the sound source to the listener, traveling the
shortest straight-line path between them. The Direct signal is the signal that was
directly emitted from the speaker and recorded by the microphone. It is the input signal
convolved with the first reflection in the IR. The direct signal differs from the Dry signal
(that is, the unprocessed input to the IR-1) since it includes the effects of air damping in
the original room and the transfer function of speakers and microphones used. For
purist simulation of the sampled acoustics, you should turn the Direct On, and set the
Wet control to fully wet.
Since most of the time you will be using it as a reverb, the default setting of the IRseries has the Direct signal Off. The idea is that in a reverb, it is more likely to use the
Dry signal rather than the Direct, especially when working in send mode. The Direct is
not the Reverb and therefore it is Off by default.
Note that IRs that are sampled from Reverb devices at 100% wet do not have a direct
signal. The IR-series is programmed to auto detect if a direct signal is available or not.
If the imported IR has no direct signal, then the direct signal On/Off control will be
disabled.
In some cases, when importing an IR that doesn’t have a direct signal, the IR-1 may
mistake the first Early Reflection as a direct signal. In this event, the direct On/Off will
be enabled and should be turned On. Otherwise, you may loose the first Early
Reflection of your IR.
If you reduce the “Direct Gain” to “Off”, it will only attenuate that parameter of the IR.
However, if you switch the Direct to “Off” by using its “On/Off” button, the Direct will be
completely cut from the beginning of the IR and the whole IR will be shortened and realigned so that the wet signal is aligned with the latency (the IR will start with the true
direct arrival time). This enables the user to delete any unnatural pre-delay caused by
the pre-roll of the impulse response.
E
ARLY REFLECTIONS
The early reflections start at the first reflection after the Direct, and extend several tens
of milliseconds. They maintain their discrete echo sound. The IR-1 separates them by
analysis of the IR and you can still move the ER/Tail separation point using the ER/TRX control. Early reflections are mostly responsible for a natural-sounding room and the
perception of localization and distance.
Waves IR-1 software guide page 24 of 40

Sometimes shutting off the ERs or reducing their level vs. the tail level will leave a lot of
reverb, but will sound less distant so that the signal sounds close and wet.
You can also apply different Predelay values to the ERs and Tail. Note that the division
is implemented by crossfade, so sliding the ER Predelay only slightly will produce some
comb filtering in the part that overlaps with the tail reflections. Turning the ERs off will
result in the reverb going straight to the Tail part, which will give less of the perception
of a room sound. This will sound less true-to-life, but that may be just what you are
looking for.
R
EVERB TAIL
The reverb Tail is everything after the early reflections.
The Tail is the most diffused part of the reverb. The reflections are totally dispersed,
and the sound is like a smooth smearing of the input. It is the longest and most
significant part of the reverb and its decay. The Reverb Tail has a spectral damping
signature that is unique to each IR. The Tail can be used without Early reflections and
you can also apply negative Predelay to have it closer in time to the source.
D
IRECT: Range: ON/OFF; Default: Off
This switches the direct signal on or off.
D
IRECT GAIN: Range: 0.0dB to Off; Default: 0.0dB
Direct Gain controls the level of the direct signal.
DIRECT PREDELAY: Range: 0ms to 500ms; Default: 0ms
This controls the amount of time that the direct signal is delayed. Direct delay is bound
by the ER delay and cannot exceed it. When you apply separate gains or pre-delays to
different parts of the IR, automatic cross-fades are used by the plug-in when needed.
ER: Range:
On/Off; Default: On
This switches the Early Reflections On or Off.
ER
GAIN: Range: 0.0dB to Off; Default: 0.0dB
ER Gain controls the level of the early reflections.
ER
PREDELAY: Range: 0ms to 500ms; Default: 0ms
This controls the amount that the early reflections are delayed.
Waves IR-1 software guide page 25 of 40

T
AIL: Range: On/Off; Default: On
Tail switches the reverb tail on or off.
Tail Gain: Range: 0.0dB To Off; Default 0.0dB
Tail Gain controls the level of the reverb tail.
T
AIL PREDELAY: Range: -100ms to 500ms; Default: 0.0ms
This controls the amount of time that the reverb tail is delayed.
The Tail Predelay can be used to make the reverb Predelay longer but it is always in
addition to the inherent process latency and to any Predelay embedded into the original
IR file.
In non-reverse mode you can take the tail backwards in time to overlap the ER. Shifting
the tail to negative Predelay values does not increase latency. Also, link mode must be
off to shift the ER tail backwards.
L
INK: Range: On/Off; Default: On
All elements have link controls so that all gains can move together as if in multiselection. When an offset is made, re-linking will preserve the offset and limit the range
to the extreme denominator.
L
ATENCY:
The IR-1 Plug-In does not declare any inherent latency. The reason for this is that the
Dry path goes to the output without any actual latency. The process, however, does
have some latency: 11.6 ms at 44.1 to 48kHz and 5.3 ms at 88.2 to 96kHz.
Since reverbs are commonly used in an aux send configuration and since not all host
applications cannot compensate for the delay for plug-in latency on auxiliary
sends/returns, we show the Wet path latency within the plug-in and regard it as a
nominal predelay.
When working as an insert, the Dry Latency control can be used to align the dry signal
to the wet signal or even advance it ahead up to 30ms.
Waves IR-1 software guide page 26 of 40

CPU MODE: Range: Full CPU or Low CPU; Default: Full CPU
This control allows you to select between Full CPU and Low CPU. Low CPU presents
an option to slightly compromise the resolution of the convolution process and saves up
to 45% of the CPU cycles depending on the IR length and Sample rate. The Average
savings is about 20%.
R
EVERSE: Range: ON/OFF; Default: Off.
This will simply reverse the convolution filter to create true reverse reverbs. All
Predelays become negative, but continue to display and function normally. In Reverse
Mode, you can adjust the Convolution control to align the reversed IR with the dry
signal. This is useful for avoiding a slow ramp up of the IR resulting from the reversed
slow delay of the original IR.
R
EVERB ENVELOPE
This control allows you to change the nature of the IR to achieve non-linear responses,
such as faster or slower decay, gated response or special creative gain manipulations.
The control has a gain line representing Time on the X-axis and Gain on the Y-axis.
The line can be edited to change over time. Double clicking adds and deletes points
and dragging them to a time and gain coordinate will create a curve that will alter the
gain of the original IR. The lines between points are always decaying exponentially and
are indicated as a straight line because the vertical scale is in dB.
Double Clicking an existing point will delete it. This is useful because some hosts will
not work well with the Delete button and will either delete items in the host or just ignore
and not pass the event to the IR-1 Plug-In.
If you bypass the Reverb Envelope, you can make several adjustments without having
to wait for each change to calculate. When you enable the Reverb Envelope, it will
calculate all of the changes at once.
Waves IR-1 software guide page 27 of 40

Offline Calculation Indicator
Manipulating the impulse response to reflect the controls settings requires recalculation
of the whole impulse response. This calculation process can take up to several
seconds. While the impulse response calculation is taking place, the reverb envelope
graph displays “Calculating…” and the audio is muted. After the calculations are
performed, the graphs are updated and the audio un-mutes.
ENVELOPE BYPASS: Range: ON/OFF. Default: Off.
This control bypasses all Envelope manipulations and allows you to audition the IR
without Gain Envelope manipulations. This does not bypass any of the IR
manipulations such as size or density; only the Gain Envelope is bypassed.
C
LEAR ENVELOPE
This control deletes all envelope points and resets the envelope to its default unity gain.
R
EVERB DAMPING
This section controls the relative reverb time of the high and low frequencies.
The Reverb Damping controls allow you to modify the Low and Hi Frequency decay
times of the IR relative to its overall Reverb Time.
The controls are grouped together in a line, immediately above the Frequency
Response graph. From left to right you’ll see the low frequency ratio and frequency
value (Hz), then the high frequency ratio, and frequency value (Hz). This arrangement
allows for easy modification of both Ratios at the same time, by shift-clicking them and
dragging to change values.
Please Note: The Ratios are relative to the spectral properties of the original IR. For
example, an IR (remember: it is the measured response of a real space) may have a
long low-frequency decay time, but the low-frequency ratio would indicate the number
“1”. This is different from synthetic digital reverbs which use these types of controls to
define the frequency response of a room’s reverberation. With a synthetic reverb, the
low frequency ratio would have to be greater than “1”.
Waves IR-1 software guide page 28 of 40

LOW FREQUENCY DAMPING RATIO: Range: 0.10 to 2.00; Default: 1.00
This control defines the ratio by which the frequencies below the Low Damping
Frequency will decay in relation to IR’s general Reverb Time. Values of less than 1.00
are shorter than the IR’s Reverb Time, and values greater than 1.00 are longer than the
IR’s Reverb Time.
L
OW DAMPING FREQUENCY: Range: 16Hz to 1600Hz; Default: 600Hz
This defines the frequency below which the Reverb time is controlled by the Low
Damping Ratio Control.
H
I FREQUENCY DAMPING RATIO: Range: 0.10 to 2.00; Default: 1.00
This defines the ratio by which the frequencies above the Hi Damp Frequency will
decay in relation to the IR’s Reverb Time. Values of less than 1.00 are shorter than the
IR’s Reverb Time, and values greater than 1.00 are longer.
H
I DAMPING FREQUENCY: Range: 1000Hz to 21000Hz; Default: 2500Hz
This defines the frequency above which the Reverb time is controlled by the Hi
Damping Ratio Control.
MORE ABOUT REVERB DAMPING
Damping is the frequency response of a room’s reverberation. This information is
captured in the Impulse Response. The total decay time of a room might be 2 seconds,
but high frequencies might have a decay time of 1 second. In this case, the high
frequencies would have one-half the total time. This can be expressed as a Ratio. For
this example, the HF ratio would be 0.5 (that is, 2 seconds multiplied by 0.5 = 1
second). A room with hard, reflective walls, such as a bathroom with tiles, can have a
HF ratio greater than 1, giving longer decay times (and a very bright sound).
HF damping is the reduction of reverberation time at high frequencies due to
absorption of high frequencies by the air and absorption in the walls. Generally
speaking, this high frequency reduction in reverberation time is necessary to avoid a
very splashy or sibilant sound. The degree of HF damping actually changes in real
rooms according to furnishings, audience size, air temperature and humidity.
• Typical HF damping frequencies may be between 4 and 7 kHz.
• Very dry air increases HF damping. Stone walls, such as in many churches, give less
HF damping than do wooden or furnished rooms.
Waves IR-1 software guide page 29 of 40

LF damping is the reduction of reverberation time at low frequencies, due to low
frequency transmission in the walls. Most rooms with solid walls have little low
frequency damping. In general, the reason for this is that a wall with more LF
transmission has a greater level of “noise nuisance” caused by bass sounds leaking out
of the room and outside bass sounds leaking into the room. If noise nuisance isn’t a
problem, (and it won’t be in a virtual room!) then LF damping increases the clarity of
sounds, giving a clearer bass, especially on speech and orchestral music.
• Many rooms actually have a longer reverberation time in the bass than at middle
frequencies. If you want some extra warmth, set the LF damping at slightly greater than
1.00x.
Reverb EQ
The IR-1 has a 4-band Paragraphic EQ section with a Low Shelf filter, 2 Bell-Shaped
filters and a High Shelf filter. All 4 bands have a variable Q that controls bell bandwidth
as well as overshoot resonance for the shelves.
The EQ section operates on the Wet signal only.
L
OW SHELF FILTER
• Gain: Range: –24dB to +12dB; Default: 0
• Frequency: Range: 16Hz to 1600Hz; Default: 100Hz
• Q: Range: 0.71 to 1.41 Default: 1
LOW BELL-SHAPED FILTER
• Gain: Range: –24dB to +12dB; Default: 0
• Frequency: Range: 16Hz to 1600Hz; Default: 301 Hz
• Q: Range : 0.26 to 6.50; Default: 1.28
IGH BELL-SHAPED FILTER
H
• Gain: –24dB to +12dB; Default: 0
• Frequency: Range: 1000Hz to 21000kHz; Default: 1200 Hz
• Q: Range : 0.26 to 6.50; Default: 1.64
Waves IR-1 software guide page 30 of 40
H
IGH SHELF FILTER
• Gain: Range –24dB to +12dB; Default: 0
• Frequency Range: 1000Hz to 21000Hz; Default: 5005 Hz
• Q: Range: 0.71 to 1.41; Default: 1
O
UTPUT GAIN: 0dB to –50dB; Default: 0dB
The Output Gain controls the overall output level of the IR-1.
ER BUILDUP: Range: 0 to 150ms; Default: 0ms
The Early Reflections Buildup allows control of the buildup slope of the early reflections.
It determines a transient (abrupt) or smooth attack for the early reflections. The control
is effective only when the Direct control is set to Off.
ER/TR-X
CROSSOVER: Range ±100ms; Default: 0ms
This control allows you to modify the time reference point that splits the Tail Reflections
(TR) from the Early Reflections (ER).
When using the IR library, this control will get its nominal value from the IR properties.
When importing a user IR, the IR-series will attempt to define the crossover point
automatically.
When you load an IR, the plug-in attempts to locate the Direct signal, Early Reflections
(ER), and Tail Reflections (TR) automatically, so that they can be manipulated
separately.
Waves IR-1 software guide page 31 of 40

In natural IRs, there is no distinct delineation between ER and TR; the definition of
where the best ER/TR-X crossover point is subjective. The user is allowed to modify
the automatic decision of the plug-in by using the ER/TR-X control, in milliseconds,
relative to the automatic crossover point.
In IRs where the direct signal is not found, the Direct Gain and Predelay become
disabled.
If the direct signal has already been removed by the user before importing an IR, or if
the source of the IR is not acoustically natural, and the direct path is not a part of it,
then the plug-in may detect the first early-reflection as direct.
In that case, the user should make sure that the Direct On/Off button is On. In some
cases, if the IR is too short or if its behavior is not acoustically natural, the plug-in may
fail to detect the Direct, ER, or Tail as separate parts.
This is typical of small rooms or spaces with a reflective floor. The direct signal and the
ER cannot be separated, theoretically, since the first ER arrives before the direct path
response terminates. They appear as mixed in the IR. In such cases the plug-in
presents the best separation, possible, but the direct would appear to include some
reflections.
CROSSTALK : Range: 0.0 to 100.0; Default 0.0
This control is only available in the "Efficient" components.
This controls how much Crosstalk is allowed between the IR-series’ input channels.
When the Crosstalk is 0.0 the process is multi-mono, convolving left to left and right to
right.
When Crosstalk is at 100.0, the plug-in will convolve a summed stereo input. The dry
signal is not affected, so the reverb will have elements from the left channel in the
reverb of the right channel and vice versa.
Waves IR-1 software guide page 32 of 40

IR-360 Controls:
These Controls are exclusive to the IR-360:
FRONT/REAR BALANCE: Range: Front to Rear; Default 50.0
The Front/Rear Balance control determines how much of the reverb is going to the front
vs. the rear speakers. For instance, if the control is set to 65, then 65% of the Reverb
will be put in the front speakers and 35% will be put in the rear speakers.
P
RE-DELAY OFFSET: Range: 0 to 80ms; Default: 0
This control adds a time delay to the reverb on the rear speakers. It can create an
effect similar to that of a digital delay plug-in.
O
UTPUT METERS VIEW: Range: -30 to 0 dB
These meters show how much total signal (combined wet and dry) is going into each
surround channel.
Toolbar WaveSystem Controls
There is a view of the Toolbar WaveSystem Controls on the following page:
Waves IR-1 software guide page 33 of 40

Loading Impulse Responses
The IR-1 load menu is the same load menu used in all WaveSystem plug-ins. Use
“Open preset file…” to load a Waves setup file *.xps. Use “Import Impulse Response
from WAV...” to import IR’s either from standard .wav files or from Waves Impulse
Response (.wir) files.
Under “Factory Presets” you can select “IR-1 Full Reset…” to load the default IR, “Hall 1”, by choosing “Impulse Response and Reset”. This loads the IR and resets all plug-in
settings to the factory defaults. You can also choose to load just the default IR by
choosing “Impulse Response”. This leaves all other parameters unchanged.
Full Reset sets the plug-in to a flat setting that allows for auditioning the original
Impulse Response, with two exceptions:
• The Direct On/Off switch will be set to “Off”. To audition pure convolution, you
will need to set it to On, unless the control is disabled.
• The Wet/Dry slider is untouched by the Full Reset factory preset. To audition
pure convolution, make sure it is set to 100% Wet.
Note that for most studio work, you should use the IR with auto-removal of its acoustic
direct portion (set Direct to Off) and with the dry signal replacing the acoustic direct.
Waves IR-1 software guide page 34 of 40

The next three factory presets: Room – 1, Studio – 1, and Plate – 1 are from the Waves
basic IR library. This IR Library is available with any install of the IR-1 plug-in.
Most Factory Presets offer two load options:
• Impulse Response and Reset
• Impulse Response
The first option will load the IR and reset all parameters to their default state. The latter
will load the selected preset’s IR into the current setup, automatically applying the
current parameters to the newly loaded IR.
Again, you can audition the pure convolution using the original impulse response by
loading the “IR-1 Full reset" factory-preset (or the "Impulse Response and Reset"
option in each IR sub-menu), and setting Wet/Dry to 100% wet and Direct On/Off to On.
The Impulse Responses supplied with the IR-series include the product’s basic IR set
and two IR Libraries on CD’s. This gives you almost One Gigabyte of Impulse
Responses with 32-bit 96kHz quality.
The IR library is installed into the Waves Plug-Ins folder in a sub-folder called
IR1Impulses. The Impulse files are stored in a proprietary Waves format and use the
extension .wir (Waves Impulse Response). The .wir files cannot be opened in normal
Audio Editors, but they can be imported into the IR-1.
Saving
The Save operation will always save all data: Control Settings, IR properties and a
pointer to the IR file. This is true whether saving to a new file or to a user preset.
The impulse response data is stored in a .wir file, separate from the IR-1 .xps preset
file. The .xps preset file contains the file name of the relevant .wir file. A complete
preset is valid only if the related .WIR file is found. In the event that the .wir file
specified in the preset is not found, a dialog box saying: “Please locate: Filename”
opens. You can browse and navigate to the file, point to a different file, or cancel.
Canceling returns to the plug-in without loading a setup and will show a message “IR
was not loaded”. Pointing to a different file will load that file in place of the one saved
with the preset, and a note on the IR Graph “Different IR loaded to preset” will be
displayed.
Importing Impulse Responses
Waves IR-1 software guide page 35 of 40

You can import IRs in .wav and .wir formats (supported bit-depths: 16, 24 and 32floating point, with sample rates between 44.1kHz and192kHz). The plug-in will
automatically sample-rate convert the IR to the sample rate you are working in (session
sample rate is 96kHz maximum).
Note: an imported .wav is not saved. If you want to move your session to another
system, you will need to include in your backup any IRs and .wav(s) you need for the
session.
When importing IRs the IR-series will normalize loud peaks to –12dB. If the imported
IR's peak is lower than –12, then no normalization will take place, and the IR will be
imported as is. The –12dB norm is applied in order to allow some headroom for the
expected peak growth and clipping that will occur when convolving a hot signal with a
hot IR. This may still prove to be too high, especially when importing IRs that do not
have a Direct signal. In this case, it is recommended to scale the IR level using the
Direct/ER/Tail gains. A recommended approach is to try to reach the point where the
perceived loudness of the fully wet signal is similar to that of the fully dry signal.
Depending upon the channel component of the plug-in, IR-series will expect a certain
number of channels to be imported. If you select an IR with fewer channels than
expected, for example loading a stereo file to the IR-series Full Stereo (4 convolutions),
the result will be another dialog box saying, “IR requires 2 more channels. Please
select a file.” You can create some wild sound effects by loading in completely different
impulse files.
If the user chooses to cancel rather than open more files, the IR-series will use what it
has and multiply it for the missing channels. The IR-1’s graph screen will show the
following message: “IR was loaded using fewer files”.
IR Info and Properties
IR Properties are stored in the IR-1 presets and are loaded along with the IR. Some of
the properties are fixed and are shown in the top left pane (IR info) of the display.
Properties that can be modified using the Plug-In’s controls are displayed beneath the
fixed properties section (IR properties).
The IR info pane shows:
Waves IR-1 software guide page 36 of 40

• Name – Name of the location.
• Type – Location type i.e. Concert Hall, Theatre, Opera House, etc.
• Date – Date the location was measured.
• SR – Sample rate of the IR and the sample rate of session you are working in.
• Country – Country of the sampled location.
• City – City of the sampled location.
• Emitter type – Playback loudspeaker used in the measurement of the location.
• Receiver Type – Microphone used in the measurement of the location.
• Source Location – Where the emitter was placed in the location (i.e. Stage.)
• Mic Location – Where the microphone was recording i.e. 5
• Dimensions – The dimensions of the location in meters.
• Full Path – Shows the full path to the loaded IR file of the current setup.
The IR properties pane shows Original and Current (manipulated) values for:
• Convolution – length of the convolution filter for the current IR. The output length
may differ from the input length due to one of the following reasons:
1. Convolution user control gating (i.e. lowering the Convolution control
shortens the length of the IR, thus “gating” it and saving CPU resources)
2. Sample rate conversion upon import
3. The imported IR is longer than 6 seconds
4. IR manipulations (reverb-time, resonances, size, etc.).
• RT60 – the decay time value in seconds according to the RT60 standard
• Channels – the number of convolution used vs. the number channels of
convolution provided in the IR file
• Size – the size of the location in cubic meters
• Distance – the distance of the source from the receiver in meters
For imported IRs, the IR properties (Distance, Size, and RT60) will remain blank if the
information is not available, and will display "NA" when the value is not applicable.
th
row, seat 24.
NOTES ON “FLAT POINTS” OR UNITY GAIN SETTINGS FOR CONTROLS
Waves IR-1 software guide page 37 of 40

• For Reverb controls having a ratio scale of 0.25 to 4 (Reverb Time, Density,
Resonance, Size) the flat point is 1.
• For Reverb controls having a percentage scale of 0% to 100% (Decorrelation,
Crosstalk, Dry/Wet), the flat point is 0%.
• Predelay reverb controls (Direct Predelay, ER Predelay, Tail Predelay, ER/TR-X,
Dry latency) have a flat point of 0.
• Flat point for Direct/ER/Tail gains and switches is 0dB with all switches “On”.
• For Full-CPU/Low-CPU, the flat point is Full-CPU.
• In the Gain-Envelope graph, the flat point is obtained by using the Gain
Envelope
• Bypass control or by using the Gain Envelope Clear control.
• In the Damping Filters section, set the ratios to 1 for the flat point.
• In the EQ filters section, the flat point is obtained by setting all bands to Off, or
by setting all the gains to 0dB.
• You can set the flat point of any control by option-clicking (Mac) or alt-clicking
(PC) on that control. The only exception is the Wet/Dry control. Opt or alt-clicking
the Wet/Dry control sets it to 100% (but the flat point is 0%).
S
YSTEM REQUIREMENTS
Minimal system requirements for running at least 1 instance of the Full Stereo in real
time at 48kHz:
Native:
MAC G4 867, 512Mb RAM.
PC Intel - P4, Celeron 1.4 Gig and P3-700, or AMD Athlon XP, 512Mb RAM.
NOTES CPU ABOUT OPTIMIZATION
Waves IR-1 software guide page 38 of 40

Here are a few points to use in order to increase performance, sorted by priority:
B
UFFER SIZE: This doesn't compromise any aspect of audio quality. Thus it is the first
place the user should try to optimize system performance.
A buffer of 512 is optimal. Lower buffer sizes will increase the peak CPU consumption.
Higher Buffer sizes may reduce the average CPU consumption, but the peaks will be
similar.
Beware that not all hosts have friendly default buffer settings. In fact, ASIO host users
use small buffers for lower latency, as do people who use virtual instruments.
CPU
MODE SWITCH
The CPU Mode switch at the top left allows switching to low CPU mode. This can cut
peak consumption by a third. This mode gives excellent results, and the quality
difference will be negligible for most applications. It is not the purist path, but it is a fine
way to convolve the original sample with good accuracy.
C
OMPONENTS
Efficient Stereo consumes the same amount of resources as the Mono to Stereo, and
about half of what the Full Stereo consumes. While it presents a compromise on the
purist natural reverb, the overall sound quality isn't compromised in any way, and it is
often a more practical choice. You may like Efficient Stereo as much as the Full Stereo
in most cases.
C
ONVOLUTION LENGTH
You can set the convolution control to a shorter time. While the compromise is obvious
(shortening the Reverb Tail decay time or gating it at a certain level where it would
naturally continue to decay), please note that the noise floor in IR-1 is around –92dB to
-106dB, and there is no compromise in sound quality.
The original convolution length shows in the IR properties display. Sometimes
shortening by a bit presents negligible compromise on sound and meaningful savings in
CPU, but the savings is in steps.
In other words, while not every millisecond will free some CPU, every 100ms should.
You can get great results by using a shortened convolution length and using the
envelope to smooth the slope so that it doesn't sound gated. On continuous material it
Waves IR-1 software guide page 39 of 40

sounds like the rich reverb that it is, and it is a “mix-friendly” optimization.
It is important to distinguish between Reverb Time RT60 and Convolution length. The
ear is more sensitive to the slope at the higher gains, so while shortening RT60 will
sound like a smaller reverb, shortening the Convolution length will simply sound less
linear at the lower IR gains.
IR-1
HTDM
There are two different Digidesign stream managers (HTDM Enablers), and the one that
many HTDM Instruments install and use is 128 rather than 512. For better performance
with IR-1 the 512 Stream Manager is required.
Waves IR-1 software guide page 40 of 40
 Loading...