

Page 1
Waves R360° Surround Reverb
Software Audio Processor
Users Guide
Waves R360 software guide page 1 of 8
Page 2

Introduction
Introducing the Waves 360° Surround Reverb.
This Software audio processor is dedicated to creating rich, smooth reverb tails
that are pitch-preserving and perfectly de-correlated between all channels.
This Reverb unit generates only Reverb Tails and does not generate Early
Reflections, making it perfect to complement or complete the room emulation
effect for sound sources that are “Distance panned” using the S360° Surround
Imager.
Waves have paid particular attention to making the reverb tail be as high-quality
as possibl. The result is very similar to the reverb tail of the Waves Renaissance
Reverb from which the R360° inherited its tail generation technology.
The R360° includes controls for the Reverb “Sound” properties and “MIX”
properties specially designed for 5.1 surround productions.
The R360° has a “Compact” component that is capable of running in true 96kHz
sample rate. That means it is capable of reaching true surround reverberation at
96kHz without down-sampling or other tricks. Operation at 96kHz requires
considerably more power and will present some compromise in sound in
comparison to the full component available up to 48kHz, but the compact
component can also save DSP horsepower when working in 44.1 or 48kHz and it
does sound superb.
Basic Operation
R360° can be used as a track insert, send effect or group/path insert. It is
designed to provide the best performance as a send effect or group insert. This
saves DSP resources and provides more consistent virtual space emulation.
The R360 is quite easy to set up.
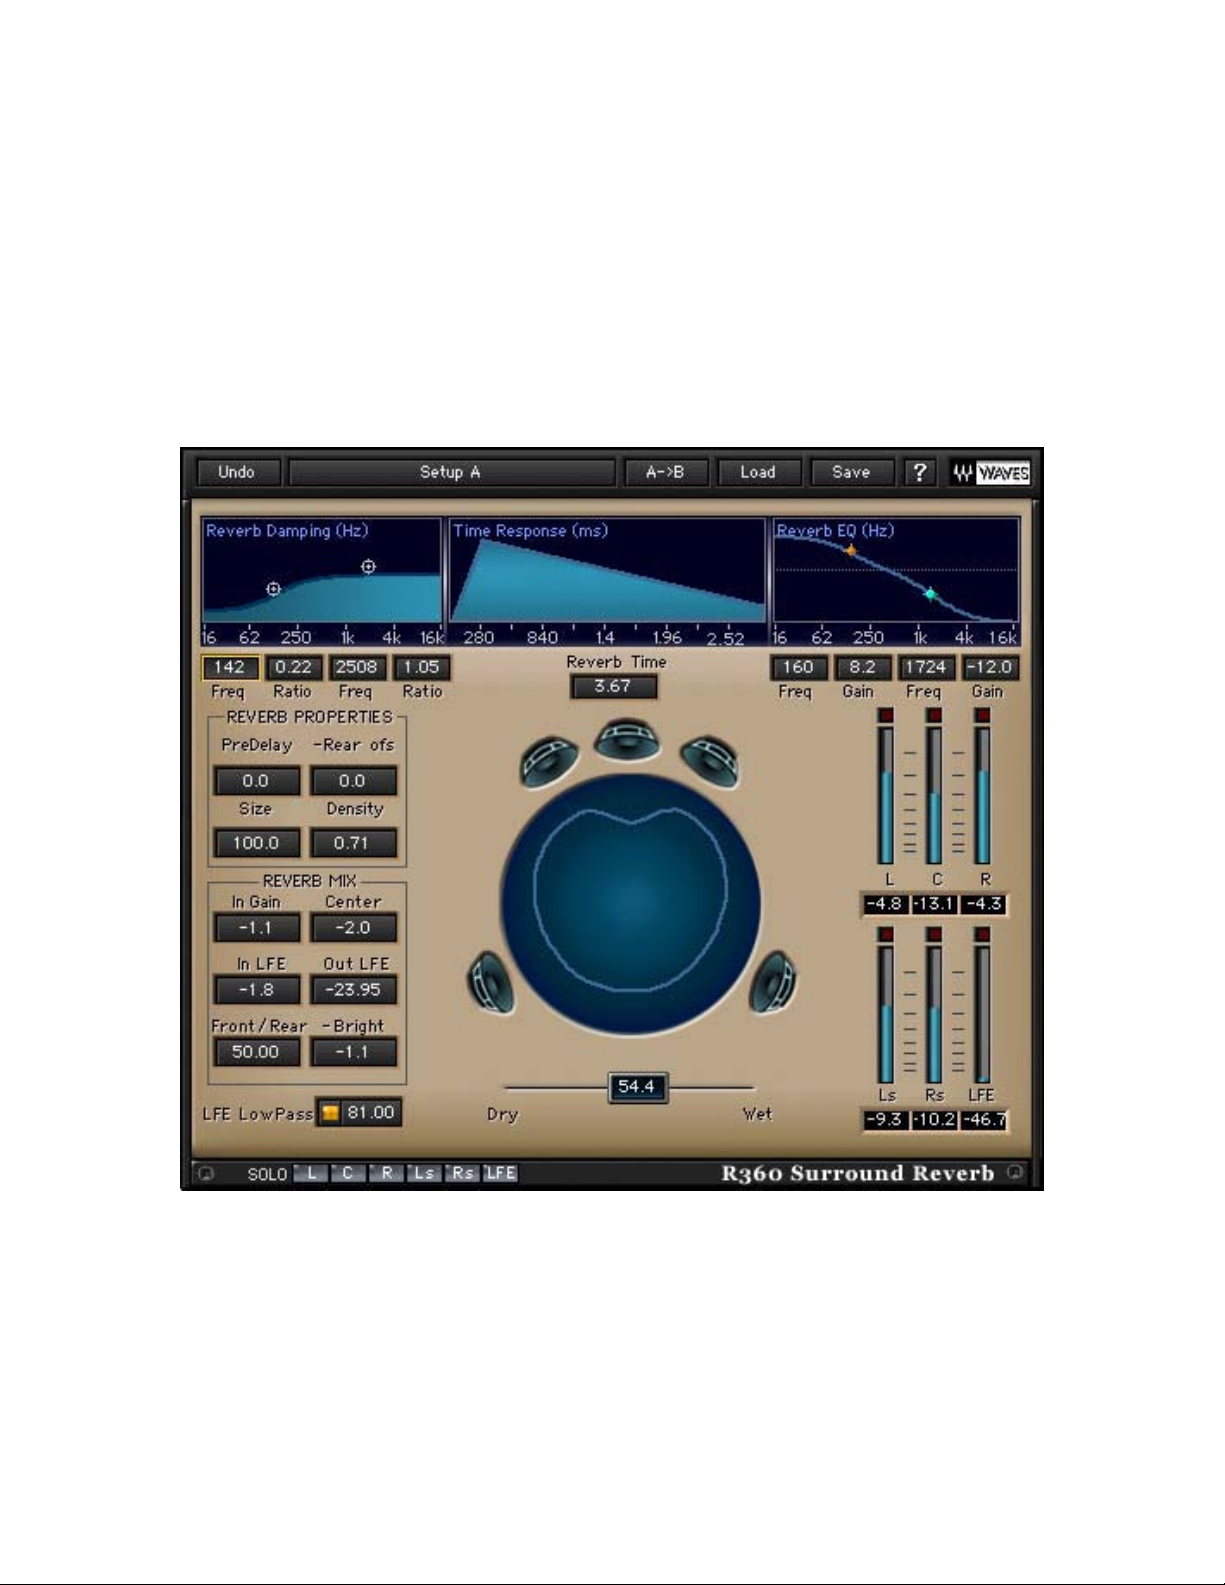
The top row lets you control the main time and color of the Reverb. In the middle
is the Reverb Time control where you specify the time it will take the
Reverberation to drop by 60dB (RT
To the left of the Reverb Time control are the Damping controls which specify
how the high or low frequencies will decay in relation to the overall reverb time.
To the right of the Reverb Time control there is a high and low EQ shelf section,
to modify the general reverb color. This will not affect the “Direct” signal path.
In the Reverb Properties section, you can set the following controls:
Waves R360 software guide page 2 of 8
) from its peak.
60
Page 3

• Pre-delay - Specifies how much time should pass between the source sound
and the reverb generation.
• Front/Back - Creates an offset of the pre-delay for the front and back.
• Size - Sets the size of the virtual space, bigger or smaller.
In the Reverb Mix section you can set the relation between some of the elements
that make the reverb sound:
• In Gain – Adjusts the Input Gain to the reverb. Use this control to help
eliminate clipping (indicated above the output meters of the R360°).
• In LFE – Specifies how much the audio in the LFE input channel will drive the
whole reverberation sound.
• Center – Specifies the Center channel’s reverb output. It is useful for lowering
or completely eliminating reverb in the Center channel.
• Front/Rear – Balances the Reverb between the front and back sound stages.
• LFE LowPass – Controls the output of the reverb in the LFE channel.
Because the LFE may be dedicated to low frequency content, R360° allows
assigning a low-pass filter, with an adjustable frequency, to the LFE channel’s
reverb output.
At the bottom, directly beneath the surround soundfield display, you will find the
Wet/Dry control.
The R360° is equipped with presets that can serve as great starting points. You
can tweak them and store them later to suit your preferences.
Read on in this manual for more information on how to achieve good Room
Reverberation using the S360° Surround Imager with the R360° Surround
Reverb.
Room Emulation and virtual spaces
When we speak about room emulation in digital reverberation, we usually refer to
an effect made by combining two separate stages of reflections.
Early Reflections are the first to be heard. These are usually a couple of discrete
echoes representing the first bounces off the walls for the initial 40 – 180ms of
the reverberation, depending on the size of the room and distance of the source
from the closest wall. Tail Reflections are the ones that make the thicker, more
dispersed, and longer part of the reverberation effect. These represent the stage
in which we hear a mass of echoes which cannot be perceived as discrete.
R360° is designed to provide the latter type of reflections and does not provide
any early reflections. To complete the Room emulation, you should first use the
S360° Surround Imager with its distance panning feature. This will assure that
Waves R360 software guide page 3 of 8
Page 4

the early reflections are generated with the proper order to increase source
localization and make a bigger sweet spot.
The user can place S360° Imagers on all the tracks that are intended to be within
the same virtual space. Each source will have its own virtual coordinates within
the space, controlled by the rotation and distance of the imager. Route the output
of all these tracks to a multichannel “path” that can be referred to as a group, or
send the sources to a multichannel bus, while their direct path is routed to the
main multichannel output. The R360° can be inserted on the Group or bus to
provide the reverb tail that will complement the Imager’s distance panning with
beautiful, rich and smooth reverb tails. The reverb tail will not affect the
localization of the sources at all. It will add a feeling of depth, atmosphere and
spatiality.
To achieve the most natural sounding results the user should make sure to
specify a common RoomSize in all the instances of the Imager designated to pan
within the same virtual space. Then you should set the R360° pre-delay control
relative to the RoomSize specified in the Panner. Paying careful attention to
these settings will assure maximum realism and “True to life” room emulation.
Otherwise, you can use the same controls to reach creative results that may be
bigger than life or just different than life.
Both the R360° Reverb and S360° Imager have a Virtual Spaces presets group
in their factory presets menu with the same preset names. These presets are
designed to be used individually or together to create natural sounding room
emulations.
Presets that use both S360° and R360° can be further tweaked for a wide variety
of possibilities. For example, take a look at the Preset named “Concert Hall”
given with different perspectives such as “Concert Hall Far”, which provides a
sound typical to a listener sitting in a far row, and “Concert Hall Close”, which
provides the sensation of sitting very close to the performers. Most of the general
characteristics of the Early Reflections (ER) and Reverb tail are the same. To
change the virtual place of the sound around the listener, just change the
damping and filters, Pre-delay, distance and front/rear balances.
A great thing to try is sending different dry sources panned with the S360 Panner
or Imager, with different rotations and ERs, to the R360. Take some time to
explore the presets and the possibilities in combining S360 distance panning and
R360 Reverberation.
Waves R360 software guide page 4 of 8
Page 5

Controls and Displays
CONTROLS
TIME: 0.10 – 20.00sec. Default: 2.00
Reverb time in seconds, defines how many seconds it will take any sound to
decay by 60dB (RT60).
W
ET/DRY: 0=Dry,100=Wet. Default:100.
This controls the balance between the Dry input signal and the generated Reverb
signal. In Send scenarios it is common to use the fully wet output.
Reverb Damping Controls
The Reverb Damping controls define longer or shorter decay for the Hi or Low
Frequencies in relation to the main Reverb Time.
L
OW DAMP FREQ: 16 – 1600Hz. Default:160Hz
Defines the frequency below which the Reverb time is controlled by the Low
Damping Ratio Control .
L
OW DAMPING RATIO: 0.10 – 2.00. Default :1.10
Defines the ratio by which the frequencies below the Low Damp Frequency will
decay in relation to the general Reverb Time. Values less than 1.00 are shorter,
and values greater than 1.00 are longer than the general Reverb Time.
H
I DAMP FREQ: 1000 – 21000Hz. Default: 2625Hz
Defines the frequency above which the Reverb time is controlled by the Hi
Damping Ration Control.
H
I DAMPING RATIO: 0.10 – 2.00. Default: 1.10
Defines the ratio by which the frequencies above the Hi Damp Frequency will
decay in relation to the general Reverb Time. Values less than 1.00 are shorter,
and values greater than 1.00 are longer than the general Reverb Time.
Waves R360 software guide page 5 of 8
Page 6

Reverb Filters
These are Hi and Low 6dB per Octave Shelves which affect the overall reverb
sound. In this case, they are similar to normal EQ filters with the exception that
they affect only the reverb, or the wet signal. These two shelves do not affect the
direct signal.
L
OW SHELF FREQ:16 – 1600Hz. Default: 160Hz.
Sets the cutoff frequency, which will be in the middle of the curve of this 6dB per
octave filter.
L
OW SHELF GAIN: +12 to –24dB. Default: 0dB.
Sets the gain of the Low Shelf filter.
H
I SHELF FREQ:1000 – 21000Hz. Default :2625Hz.
Sets the cutoff frequency, which will be in the middle of the curve of this 6dB per
octave filter.
H
I SHELF GAIN: +12 to –24dB. Default: –8dB.
Sets the gain of the Hi Shelf filter. At –24dB, this filter increases order
(steepness) and becomes more like a Low Pass filter, so don’t be surprised if you
hear a drop between –23.9 and –24; it just drops.
Reverb Properties
PREDELAY: 0 – 131.9ms. Default: 0.
The Predelay control sets the time in milliseconds that will pass between the
direct sound and the arrival of the reverb tail.
R
EAR OFS: 0 – 30ms. Default:0.
This control sets an offset between the predelay to the front channels and rear
channels so that the rear channels can have a slightly longer predelay. If you
have first applied all available predelay in the overall predelay control, then the
offset control will decrease the overall predelay by the amount of offset you
specify.
Waves R360 software guide page 6 of 8
Page 7

S
IZE: 0 –100%. Default;100%.
Controls the size of the virtual space.
D
ENSITY: 0.0 – 0.71. Default:0.71
Controls how smooth vs. how discrete the reverb echoes will sound. The lower
the density, the more discrete the echoes of the reverb. Higher values will make
the reverb sound much more dispersed.
Reverb Mix
IN GAIN: –24 to 0dB. Default:0dB.
Controls the input gain of the signal into the R360.
C
ENTER: Out, –36 to 0dB. Default:0dB.
This control is a gain for the Center channel’s output. When you want to take the
reverb out of the center speaker you can use this control to remove it or specify
the gain for the Reverb that will play out of the Center speaker.
I
N LFE: Out, –36 to 0dB. Default:0dB.
This controls how much of the LFE signal will be fed into the Reverb. Since the
reverb is designed to mix and de-correlate input from all channels, feeding the
LFE signal may not be beneficial. This control allows you to specify if and how
much the reverb should use the LFE input. This will not affect the data in the
Direct LFE channel.
O
UT LFE: –24 to 24dB. Default:0dB.
Controls the gain for the reverb output of the LFE channel.
F
RONT/REAR: 0 – 100. Default:50.
This controls the output balance between the front and rear sound stages. 100 is
fully to the front and 0 is fully to the back.
B
RIGHT: 12 to –12dB. Default 0dB
Brightness offset for the rear stage allows you to adjust + or −12dB of the Hi
Shelf filter in the reverb filters section. This allows the user to create a brighter or
darker rear stage.
LFE
LOWPASS: On/Off. Freq:60 – 120Hz. Default:Off, 80Hz.
Waves R360 software guide page 7 of 8
Page 8

This allows only Low Frequency audio output to the LFE channel. Otherwise the
R360 will output the full-range reverb signal to the LFE channel.
Waves R360 software guide page 8 of 8
 Loading...