

Page 1
WAVES
H-EQ
HYBRID EQUALIZER
USER GUIDE
Page 2

TABLE OF CONTENTS
CHAPTER 1 – INTRODUCTION ......................................................................................
1.1
WELCOME.................................................................................................................3
PRODUCT OVERVIEW.................................................................................................3
1.2
CONCEPTS AND TERMINOLOGY..................................................................................4
1.3
COMPONENTS ...........................................................................................................7
1.4
CHAPTER 2 – QUICK START GUIDE.............................................................................
CHAPTER 3 – INTERFACE AND CONTROLS ...............................................................
INTERFACE................................................................................................................9
3.1
CONTROLS..............................................................................................................10
3.2
CHAPTER 4 – THE WAVESYSTEM..............................................................................
4.1
THE WAVESYSTEM TOOLBAR...................................................................................20
PRESET HANDLING..................................................................................................20
4.2
INTERFACE CONTROLS............................................................................................23
4.3
WAVES PREFERENCES (PRO TOOLS ONLY)..............................................................25
4.4
3
8
9
20
Page 3

Chapter 1 – Introduction
1.1 Welcome
Thank you for choosing Waves! In order to get the most out of your Waves processor,
please take the time to read through this manual.
In conjunction, we also suggest that you become familiar with www.wavesupport.net
There you will find an extensive Answer Base, the latest Tech Specs, detailed
Installation guides, new Software Updates, and current information on Authorization
and Registration.
By signing up at www.wavesupport.net
your registered products, reminders when updates are available, and information on
your authorization status.
, you will receive personalized information on
.
1.2 Product Overview
Waves H-EQ is a powerful Hybrid Equalizer which features:
• Vintage and modern equalization curves inspired by the finest British and
American consoles
• Seven different filter types per band, including a newly-devel
oped, one-of-a-kind
asymmetrical bell filter
• An intuitive keyboard graphic that lets you choose frequencies by clicking on
notes
• An exclusive MS matrix mode so you can apply different EQ to Mid and Side
content
• A flexible real-time frequency spectrum analyzer with multiple display options
Waves H-EQ
User Guide
3
Page 4

1.3 Concepts and Terminology
The H-EQ has five parametric bands plus high and low pass filters,
with seven different
EQ types available for each band: US Vintage, UK Vintage 1, UK Vintage 2, US Modern,
UK Modern, Digital 1 and Digital 2.
Modes
• Linked/Stereo
– Both left and right channels receive the same EQ processing, as
with any stereo EQ.
• Unlinked/Dual – Different EQ processing may be applied to the left and r
ight
channels.
• MS Matrix – An MS matrix is applied which separates the stereo input
(Mid) and S (Sides), thus enabling you to apply different EQ to
into M
the M and S channels. This is helpful in mastering situations where centerpanned information may require different EQ processing than side-panned
content, or when you need to correct the stereo imaging of sources such as drum
overheads.
The Analog section provides control over the level of harmonics, hum, and noise levels
added to the
signal.
Anal
yzer
The H-EQ’s frequency analyzer presents a real-time graphical display of your input
signal, outp
ut signal or
both, as well as the EQ curve currently applied to your signal.
Waves H-EQ
User Guide
4
Page 5
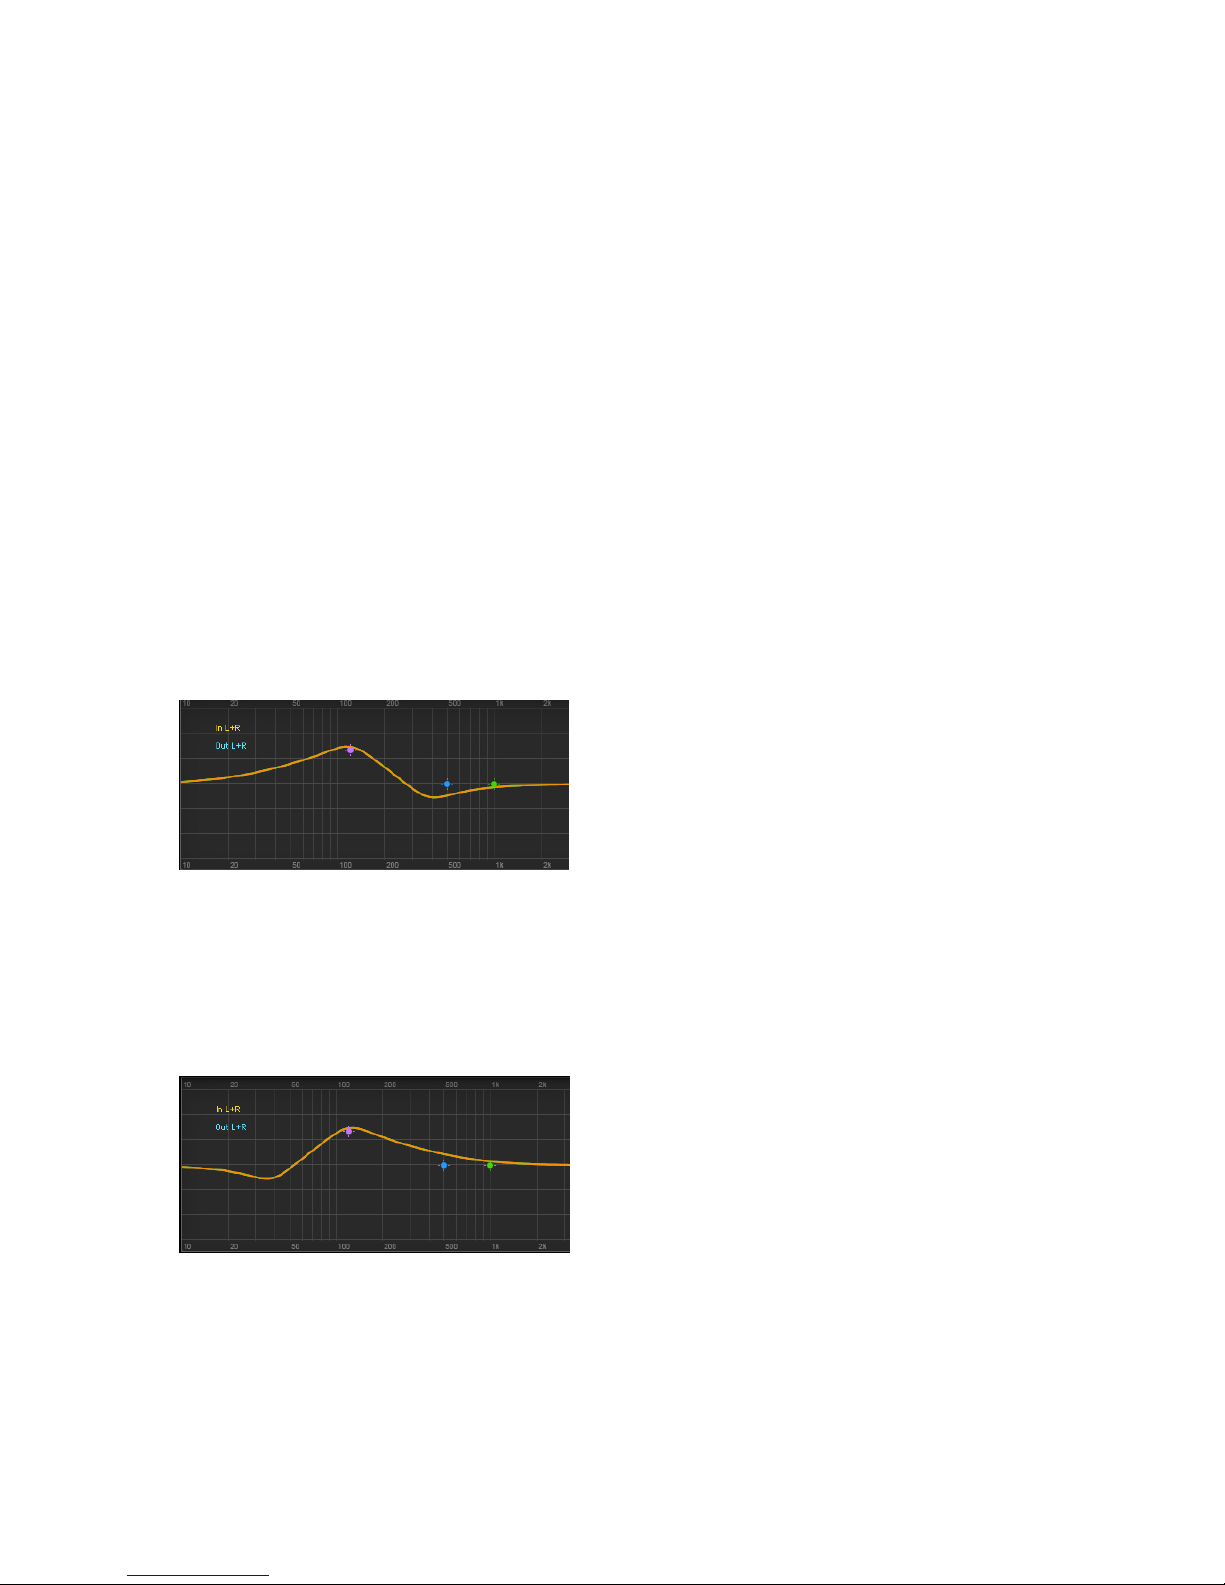
Asymmetrical Filter
The H-EQ includes a newly-developed, one-of-a-kind asymmetrical bell filter (Digital 1),
which we have found ideally-suited for creative equalization
. It's important to note that
the Q for this filter does not change the width of the bell; rather, it controls the “tilt” of the
filter. Lower Q values are especially effective on low frequency signals like bass, kick
drum, and piano, while high Q settings work well on high frequency content such as
cymbals, strings, acoustic guitar, vocals and the like.
For example, when the Q is set all the way counter-clockwise (Q=1), the slope toward
the cutoff po
int is much
more gentle than the slope coming down from the cutoff point,
which is much steeper, scooping out some of the low mids. This creates a very musical
bell shape that is ideal for boosting or cutting low frequencies.
.
When the Q is set all the way clockwise (Q=100), it creates a mirrored slope where the
left side of t
he curve rises sharply and scoops out a bit before reaching the cutoff point,
with a very gentle slope descending toward the higher frequencies.
.
Waves H-EQ
User Guide
5
Page 6

Keyboard
The Keyboard is a unique feature of the H-EQ which lets you choose frequencies by
clicking on n
otes. Until now, all EQs have been frequency-based, making them easier to
use for engineers who are used to manipulating frequencies, but less for musicians who
are accustomed to dealing with notes. For example, many people know that A4 = 440
Hz; putting this information to practice and building on it while mixing is considerably
more complex. This is where the power of the Keyboard comes into play; you can now
move comfortably in both musical and engineering terms.
Let’s take a look at a couple of examples:
o You are a musician, and you hear a low E1 that’s somewhat out of control
coming from the bass gu
itar. Simply select the LF frequency control, click on E1
on the Keyboard, and the band frequency will snap to 41 Hz = E1. Or, you can
grab the blue note (LF marker) on the Keyboard and sweep it down to E1.
o You are an engineer, and your client (producer or musician) says that when the
sampled violins hit F6
it becomes harsh and painful. To turn down the offending
notes, select the HMF frequency, click F6 (1397 Hz) on the Keyboard, and
presto.
You can also create narrow notches that correspond to specific musical keys, and
in
automate them to produce interest
g resonant effects. The Keyboard opens up a new
world of creative and experimental EQ possibilities.
Waves H-EQ
User Guide
6
Page 7

1.4 Components
WaveShell technology enables us to split Waves processors into smaller plug-ins, which
we call components. Having a choice of components for a particular processor gives
the flexibility to choose the configuration best suited to your material.
H-EQ has two components:
• H-EQ Mono
• H-EQ Stereo
you
Waves H-EQ
User Guide
7
Page 8

Chapter 2 – Quick Start Guide
• Insert H-EQ on track.
• Select the Mode: Linked, Unlinked, or MS
• Select a Filter Type for each band. Toggle between the types and get to know
them, each has its own
unique-soun
ding curve.
• Adjust the Frequency, Q, and Gain parameters as with any EQ.
• Turn on Analog and toggle between types to find the one that adds the color
you find mo
st pleasing.
• Play back the song and watch the Analyzer to better understand your
frequency spectrum spread.
• Adjust the EQ accordingly.
Waves H-EQ
User Guide
8
Page 9

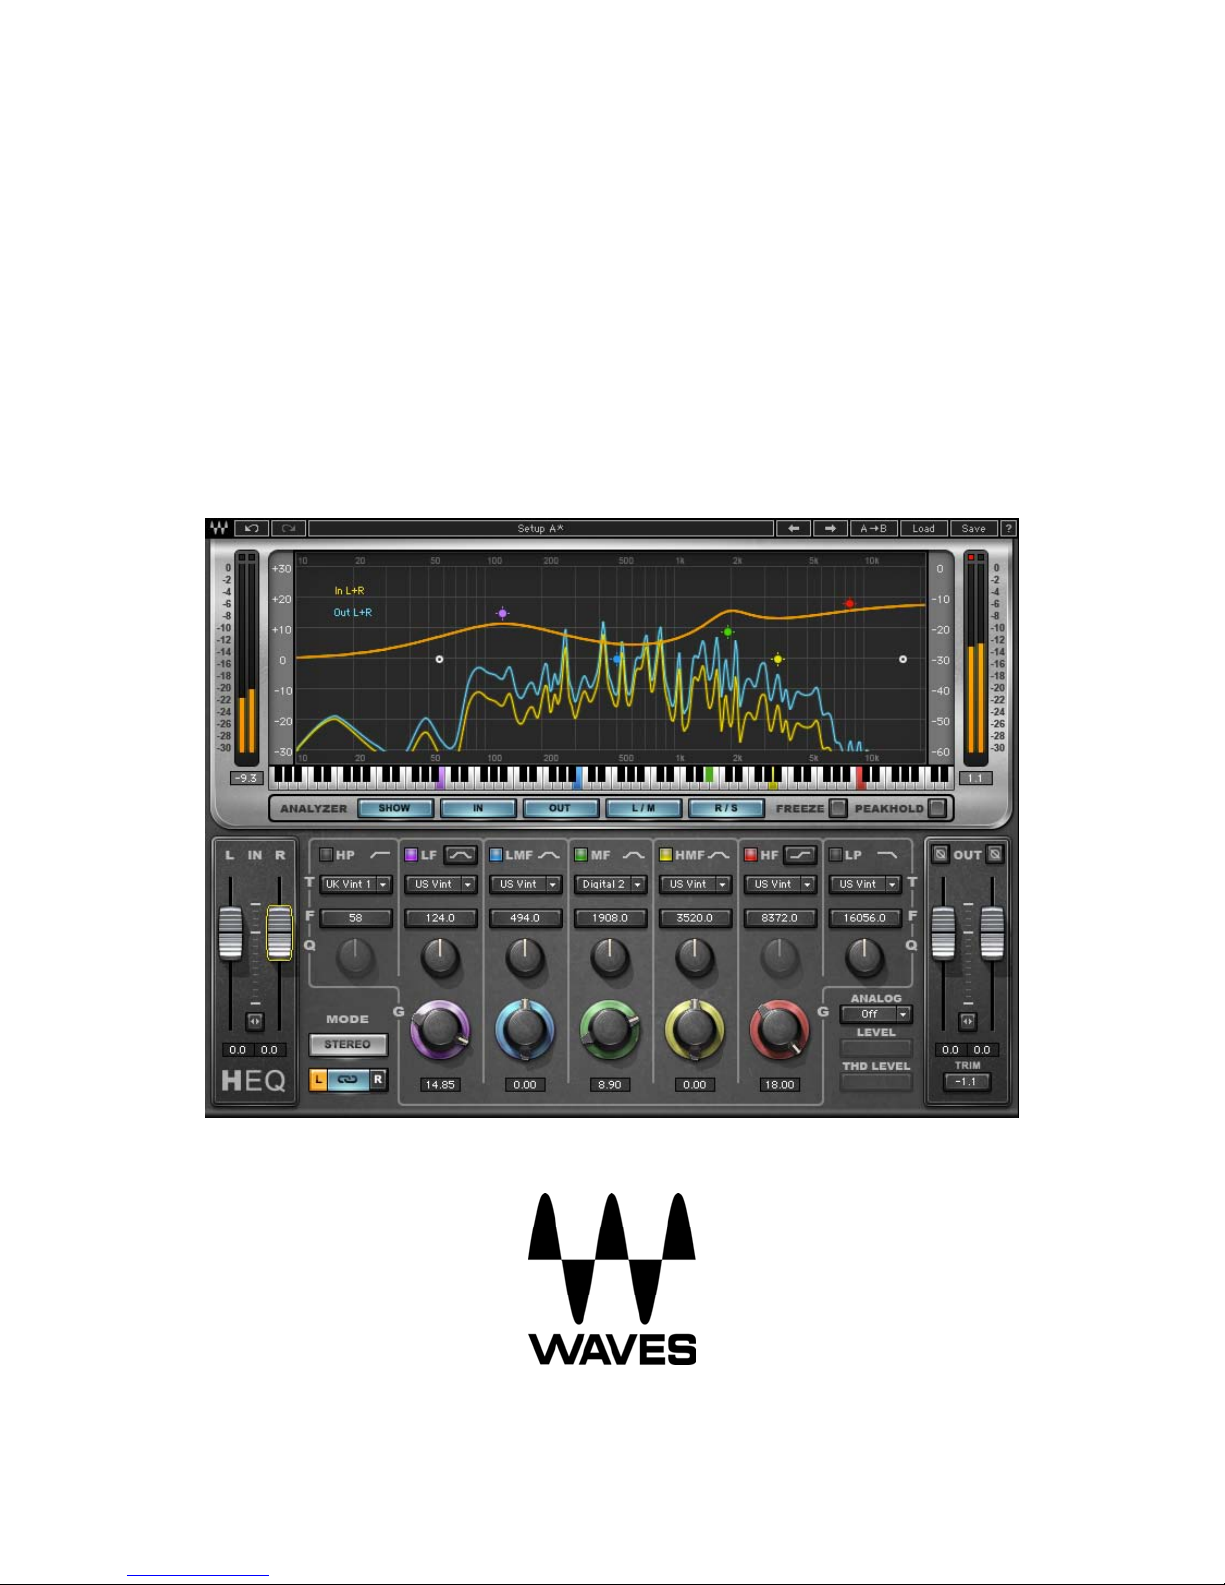
Chapter 3 – Interface and Controls
3.1 Interface
Waves H-EQ
User Guide
9
Page 10

3.2 Controls
Input Fader controls the
signal input level.
Range
: +12/ -30
In the H-EQ
o
stereo component, separ
ate left and r
ight channel faders are
available.
o In MS mode, the left fader controls the M (Mid) level, while the right fader controls
the S (Sides) level.
For more information on MS mode, please see th
Waves H-EQ
User Guide
e MS Mode section below.
10
Page 11

EQ Mode Section
Stereo/Linked
In Stereo/Linked mode, both left and right channels receive the same EQ processing, as
with any stereo EQ.
Dual/Unlinked
In Dual/Unlinked mode, different EQ processing may be applied to the left and right
channels.
o Input and output faders a
re unlinked to enable level control for each channel.
o The small buttons to the left and right of the link control determine which channel
is currently
affected by the EQ section. When L is selected, only the left channel
is affected and represented in the EQ graph by the orange curve; when R is
selected, only the right channel is affected and represented by the light green
curve.
Waves H-EQ
User Guide
11
Page 12

MS Mode
o The M (Mid) channel is represented in the EQ graph by the orange curve; the
S (Sides) channel is represented by the light green curve.
o The control beneath the Mode selector becomes a Listen control, represented by
a speaker i
con. Clicking the speaker icon while M is selected, you will hear the M
information coming from both output channels as mono; when S is selected, you
will hear the S information coming from both output channels as mono.
o The buttons to the left and right of the Listen control determine which channel is
affected by the EQ section.
Waves H-EQ
User Guide
12
Page 13

EQ Section
All bands have a color-coded On/Off switch.
HP – High pass filter
T
ype Range: US Vintage, UK Vintage 1, UK Vintage 2, US Modern, UK Modern,
Digital 1, Digital 2
Frequency Range: 16 Hz – 21096 Hz
Q Range: 1
– 100
(Not available in UK Vintage 1, UK Vintage 2, US Modern,
Digital 1)
LF – Low frequency
Type Range: US Vintage, UK Vintage 1, UK Vintage 2, US Modern, UK Modern,
Digital 1, Digital 2
Shape Range: Shelf/Bell (selec
ted using the toggle control)
Frequency Range: 22 Hz – 21096 Hz
Q Range (Bell): 1 – 100
Q Range (Shelf): 1 – 100 (Available
(Not available in UK Vintage 2, US Modern, UK Modern)
in Digital 1 and Digital 2 only)
Waves H-EQ
User Guide
13
Page 14

LMF – Low mid frequency
Type Range: US Vintage, UK Vintage 1, UK Vintage 2, US Modern, UK Modern,
Digital 1, Digital 2
Shape Range: Bell only
Frequency Range: 22 Hz – 21096 Hz
Q Range: 1
– 100
(Not available in US Modern)
MF – Mid frequency
Type Range: US Vintage, UK Vintage 1, UK Vintage 2, US Modern, UK Modern,
Digital 1, Digital 2
Shape Range: Bell only
Frequency Range: 22 Hz – 21096 Hz
Q Range: 1
– 100
(Not available in US Modern)
HMF – High mid frequency
T
ype Range: US Vintage, UK Vintage 1, UK Vintage 2, US Modern, UK Modern,
Digital 1, Digital 2
Shape Range: Bell only
Frequency Range: 22 Hz – 21096 Hz
Q Range: 1
– 100
(Not available in US Modern)
Waves H-EQ
User Guide
14
Page 15

HF – High frequency
Type Range: US Vintage, UK Vintage 1, UK Vintage 2, US Modern, UK Modern,
Digital 1, Digital 2
c
Shape Range: Shelf/Bell (sele
ted using the toggle control)
Frequency Range: 22 Hz – 21096 Hz
Q Range (Bell): 1 – 100
(Not available in UK Vintage 2, US Modern)
Q Range (Shelf): 1 – 100 (Available
in Digital 1 and Digital 2 only)
LP – Low pass filter
Type Range: US Vintage, UK Vintage 2, US Modern, UK Modern, Digital 1, Digital 2
(UK Vintage 1 not available)
Frequency Range: 21096 Hz – 16 Hz
Q Range: 1 – 100
(Not available in UK Vintage 2, US Modern, Digital 1)
Waves H-EQ
User Guide
15
Page 16

Analog Section
Analog Type toggles between analog characteristic types.
Range: Off, US Vintage, UK Vintage 1, UK Vintage 2, US Mo
dern, UK Modern
Analog Level controls the level of the combined noise and
hum: US Vintage = 60 Hz,
UK Vintage 1 & 2 = 50 Hz (Not available in Digital 1, Digital 2; Hum not available in US
Modern, UK Modern)
Range: 0% – 200%
Default: 100%
THD Level controls the
level of harmonic distor
tion added to the signal.
Range: 0% – 1000%
Default: 100%
Keyboard lets you choose frequen
cies by clicking on notes.
Range: F0 – E10
For more information, please refer to Section 1.3 above, Concepts and Terminology.
Waves H-EQ
User Guide
16
Page 17

Display Section
Analyzer presents a real
-time graphical display of your input signal, output signal or
both, as well as the EQ curve currently applied to your signal.
Please note:
• Turning the Analyzer off
or closing the H-EQ graphic interface removes it from
your CPU load, thus enabling a greater number of H-EQ instances.
• The Analyzer displays th
e signal before the Analog section, so any changes
caused by the Analog section are not shown in the Analyzer.
Show turns the Analyzer on/off.
In displays the input signal, post-input fader, represented in yellow.
Out displays the output signal, post-output fader, represented in blue.
L/M turns on the display of the left side only in
Stereo mode, or the M in M/S mode.
R/S turns on the display of the right side only in Stereo mode, or the S
Please note: Switching off both L/M and R/S turns the Analyzer off.
in M/S mode.
Waves H-EQ
User Guide
17
Page 18

Freeze – Clicking the Freeze button stops the frequency graph. To release it and return
to real-time graphing, click the button again, or click any other Analyzer control.
Peak Hold – Clicking Peak hold sto
ps the frequency graph at its highest peak point, the
maximum measured level.
s
Analyzer Scale display
the energy level measured by the Analyzer.
Range: 0 – 60
Please note: Complex waveforms will usually clip before the total energy on the analyzer
reaches 0 because it d
isplays peak clipping rather than steady level reading. On
sustained material or sine waves at 0 dBFS, the Analyzer will reach 0 when the actual
signal reaches 0.
EQ Scale displays the EQ curve being applied t
o the signal. You can click and drag the
scale with the mouse to increase the resolution of the curve graph; use this option when
applying small amounts of EQ to your signal.
Range: +/- 30 dB linear
Range Extended: +/- 30 dB (+/- 3 dB for first 2/
3 of the scale)
Band Mark
ers allow you to manipulate the EQ bands. Each marker corresponds to
certain band and is color coded.
The following keyboard shortcuts may be used to control Band Markers:
• Option/Alt – Hold Option (Alt) and click the mark
er to control Q; locks Frequency
and Gain in place.
• Control/Ctrl – Hold, click and drag the marker vertically to control Gain, lock
Frequency and Q in place; Hold, click and drag t
he marker horizontally to control
Frequency, lock Gain and Q in place.
• Command/Win– Hold Command a
nd Click the marker to toggle filter type.
Waves H-EQ
User Guide
18
a
Page 19

Output Section
Output fader controls signal output
o In the H-EQ Stereo component, separate left and right channel faders are
available.
o In MS and Unlinked modes, the faders move separately to accommodate for
level.
left/M and right/S chann
el level differences. Faders may be momentarily re-linked
using the fader link control to enable output level adjustment for both channels
simultaneously.
Phase flips the phase of
the signal by 180 degrees.
o In the H-EQ Stereo component, there are separate left and right controls to
adjust the p
hase on each channel independently.
Trim displays the maximum peak level of the output signal and its distance from 0 dBFS.
Clicking on t
he trim valu
e button resets it to 0, and applies the differential to the input
level.
Waves H-EQ
User Guide
19
Page 20

Chapter 4 – The WaveSystem
4.1 The WaveSystem Toolbar
All Waves plugins feature the WaveSystem toolbar which takes care of most
administrativ
features of the WaveSystem toolbar are the same on practically all Waves plugins, so
familiarity with its features will be helpful whichever plugin you are using.
Toolbar Functions
Opens the plugin About box
Undo Undoes the last 32 actions
Redo Redoes the last 32 undone actions
Setup A/B Toggles bet
L/R Arrows Move to the previous or next preset
y A→B
Cop
Load Recalls presets from file
Save Saves presets in the Wa
? Opens the PDF manual for the plugin you are using
e functions you will encounter while working with your Waves software. The
ween two presets, useful for comparison of parameter
settings
Copies the current settings to the second preset register
ves file formats
4.2 Preset Handling
Preset Types
Factory Presets are permanent presets in the Load menu. Factory presets cannot be
overwritten or deleted. When applicable, different component plugins may have different
factory presets.
User Presets are your favorite settings of the plugin saved as a preset in the Load
menu, under ‘User Presets’. User Presets can b
e overwritten and deleted.
Waves H-EQ
User Guide
20
Page 21

Setup Files may contain more than one preset. For example, a single file can contain all
the presets for a session. When you open a Setup File, all its setups become part of
your Load pop-up menu for fast access. This can be particularly useful with multiple
instances of a plugin in a single session. By saving all the settings you create into a
single Setup File, they can all be quickly available for every instance of that plugin.
Loading Presets and Setups
Click on the Load button to see the L
oad pop-up menu. The menu is divided into four
sections. If a section is not currently available it will not appear in the Load pop-up menu.
Open Preset File… Select to op
en any setup or preset file, whether from the Library or
your own creations.
‘Filename.xps’: Displays any currently loaded Setup File and its presets.
Factory
Presets: Displays the default Factory Presets.
User Presets: Displays any loaded User Presets.
Saving Presets and Setups
Click on the Save button to see the Save pop-u
p menu. Four options are available. If an
option is not currently available it will be grayed out and inaccessible.
Save to New File… Select this t
o start a ne
w Setup file. There are two
prompts - first for the setup filename, then for the
preset name. You must provide a name for both the
Save ‘File Name’ – “Preset Name” Overwrites the settings of the loade
setup file and the preset. Click OK (ENTER) to
complete the save. It is a good idea to create a
folder in which to save several setup files for a
project.
d preset
(whether a User Preset or a preset from a Setup
File) with the current settings. If a Setup File is
Waves H-EQ
User Guide
21
Page 22

currently loaded, the name of the Setup File is
displayed followed by the name of the preset itself.
If a User Preset is loaded, its name is displayed.
Save to ‘File Name’ As… Saves the current settin
gs as a new preset into the
Setup file that is open (if one is not open, the option
is grayed out). You will be prompted to give the
preset a name.
Put into Preset Menu As… Save the current setting
s into a User Preset that
will always be in your Load menu (until deleted).
You will be prompted to give this preset a name.
User Presets are stored in the plugin’s preference
file.
Deleting Presets
You may delete User Presets and presets within a Setup File. Factory Presets and
Setup Library files cannot be deleted
or overwritten.
1. Hold the Command (Mac)/Control (PC) key down.
2. Click-and-hold the Load button to see the pop-up menu.
3. While still holding the Command/Control key, select the preset or setup to delete.
4. A confirmation box will appear, allowing you to cancel or ‘OK’ the deletion.
A/B Comparison and Copying
The Setup A/Setup B button may be clicked to compare two settings. If you load a preset
in the Setup
B position, t
his will not affect the preset loaded into the Setup A position,
and vice-versa.
If you want to slightly modify the settings in Setup A, you can copy them t
o Setup B by
clicking on the Copy to B button, then alter Setup A and compare with the original Setup
B.
Waves H-EQ
User Guide
22
Page 23

The name of the current setup will be shown in the title bar (on platforms which support
it), and will switch as you change from Setup A to Setup B.
Note: an asterisk will be added to the preset name when a change is made to the preset.
4.3 Interface Controls
Controls can be in one of three states:
1. Not Selected where the control is
2. Selected where the con
trol is the target of mouse control entry only
3. Selected and Active where the control is the tar
not the target of any user entry
get for both mouse and
keyboard entry
Toggle Buttons
Toggle buttons display the state of a control, and allow switching between two or more
states. Sing
le-click to change the control’s state. Some toggle buttons have a text
display which updates with the current setting, and others (bypass, solo, or monitoring
toggles) illuminate when the control is active.
Some plugins have link buttons between a pair of toggle buttons, allowin
g click-and-
drag adjustment while retaining the offset between the controls.
Value Window Buttons
Value windows display the value of a control and allow click-and-drag
direct control via the keyboard.
Using the mouse, click-and-drag
windows support left/rig
will appear to let you know which direction of movement that button supports).
You may also use your mouse-wheel to adjust parameter values.
Using the arrow keys, click once with mouse to select the button, and then use
up/down – left/right (depending on the direction supported by that button) to
move in the smallest incremental steps across the button’s range (holding down
adjustment, or
on the value window to adjust. Some value
ht, some up/down (as you hover over a button, arrows
Waves H-EQ
User Guide
23
Page 24

the arrow keys will move faster through the range).
Using key
entry, double click on the button to open the value window, and
directly enter the value from your keyboard. If you enter an out of range number,
the button stays selected but remains at the current setting. (System beeps if
system sounds are on.)
Some plugins have link buttons between a pair of value windows, allowing click-and
drag adjust
ment while retaining the offset between the controls.
-
Sliders
Click or scroll the mouse-wheel on the slider itself or anywhere within the sliders track.
The numerical value of the slider set
tings is
displayed in a hover window above the
slider path.
Hover Box
Hovering boxes will appear and display the control value when hovering with the mouse
over the control.
Multiple Control Selection
One of the most powerful features of the WaveSystem is the ability to select and adjust
multiple controls simulta
neously. Using the mouse, drag-select the desired group of
buttons or graphic controls by clicking and holding at a point outside the controls, and
forming a rectangle that includes the controls you wish to adjust. Alternatively, press and
hold Shift while clicking the mouse on any control you wish to link. This method is useful
when you want to select two or more controls that are not adjacent to one another.
Waves H-EQ
User Guide
24
Page 25

TAB Functions
TAB moves the ‘selected’ status to the next control, with shift-TAB moving in the reverse
direction.
Additionally, the Mac has an option-TAB function for ‘down’ movement and shift-optionTAB for ‘up’ movement
where applicable.
If you have several Value Window Buttons selected, TAB functions will take you through
the selected controls on
ly.
Hitting Esc or Return will return the 'focus' to the DAW application.
4.4 Waves Preferences (Pro Tools only)
When launching Pro Tools, hold Shift to view the Waves plugin Preferences window.
The followin
g options ar
• Don't use AudioSuite plugins
• Don’t use RTAS plugins
• Rescan all plugins
• HUI control surface support (low resolution)
e available:
• Enable single-click text entry
Waves H-EQ
User Guide
25
 Loading...