

Page 1

ANASOFT
User’s Guide
Watlow Controls
1241 Bundy Blvd.
Winona, MN 55987
Customer Service
Phone: (800) 414-4299
Fax: (800) 445-8992
Technical Support
Phone: (507) 494-5656
Fax: (507) 452-4507
Email:
Part No. 21902-00, Revision 2.1
January 1996
wintechsupport@watlow.com
Page 2

Copyright © 1996
Watlow-Anafaze
Information in this manual is subject to change without n otice. No part of this publication m ay be
reproduced, stored in a retrieval system, or transmitted in any form without written permission
from Watlow-Anafaze.
Warranty
Watlow-Anafaze, Incorporated warrants that the products furnished under this Agreement will be
free from defects in material and w orkmanshi p for a per iod of t hree yearsf rom the dat e of shipm ent.
The customer shall provide notice of any defect to Watlow-Anafaze, Incorporated within one week
after the Customer's discovery of such defect. The sole obligation and liability of Watlow-Anafaze,
Incorporated under this warranty shall be to repair or replace, at its option and without cost to the
Customer, the defective product or part.
Upon request by Watlow-Anafaze, Incorporated, the product or part claimed to be defective shall
immediately be returned at the Customer's expense to Watlow-Anafaze, Incorporated. Replaced or
repaired products or parts will be shipped to the Customer at the expense of Watlow-Anafaze,
Incorporated.
There shall be no warranty or liability for any product s or parts that ha ve been subject to m isuse,
accident, negligence, failure of electric power or modification by the Customer without the written
approval of Watlow-Anafaze, Incorporated. Final determination of warranty eligibility shall be
made by Watlow-Anafaze, Incorporated. If a warranty claim is considered invalid for any reason,
the Customer will be charged for services performed and expenses incurred by Watlow-Anafaze,
Incorporated in handling and shipping the returned unit.
If replacement parts are supplied or repairs made during the original warranty period, the warranty
period for the replacement or repaired part shall terminate with the termination of the warranty
period of the original product or part.
The foregoing warranty constitutes the sole liability of Watlow-Anafaze, Incorporated and the customer's sole remedy with respect to t he products. I t is in lieu of all other warranties, liabilities , and
remedies. Except as thus provided, Watlow-Anafaze, Inc. disclaims all warranties, express or
implied, including any warranty of merchantability or fitness for a particular purpose.
Please Note: External safety devices must be used with equipment.
Page 3

Contents
Introduction 1
ANASOFT Versions .......................................................2
Computer Requirements .................................................3
Installation 5
Quick Installation ............................................................5
ANASOFT Files .............................................................5
File Locations .................................................................6
Installation Program ........................................................7
Installation Menu ............................................................8
Directory Paths ...............................................................9
Software Key Installation ...............................................10
Grouping Loops ..............................................................10
Start Up 13
Quick Start Up ................................................................13
Start Up Optional Modes ................................................13
Start Up Sequence ...........................................................14
Default Start Up Values ..................................................15
Start Up Errors ................................................................16
General Screen Displays 21
Changing Data ................................................................21
Print Screen .....................................................................22
Loop Overview 23
Getting Here ....................................................................23
Options ............................................................................23
Function Keys .................................................................25
Edit 27
Getting Here ....................................................................27
Function Keys .................................................................28
Loop Setup 29
Getting Here ....................................................................29
Function Keys .................................................................30
Parameters .......................................................................30
ANASOFT User’s Guide i
Page 4

System Setup 35
Getting Here ....................................................................35
System Errors ..................................................................36
System Software .............................................................37
Passwords ........................................................................38
System Parameters ..........................................................39
System Terminate ...........................................................41
System Start Up ..............................................................42
Data Logging ..................................................................44
Controller Comm. ...........................................................45
Digital Output Polarity ....................................................46
AIM Fail Output (MLS only) .........................................47
Job Setup 49
Getting Here ....................................................................49
Function Keys .................................................................49
View Alarms 51
Getting Here ....................................................................51
Function Keys .................................................................51
Alarm Screen Auto Switch .............................................52
Audible Alarm ................................................................52
Trend Plot 53
Getting Here ....................................................................53
Function Keys .................................................................54
Trend Plot Setup Screen .................................................54
Getting Here ....................................................................54
Print Trend Plot Screen ...................................................56
Appendix A: PID Tuning and Control 57
Introduction .....................................................................57
Control Modes ................................................................57
Control Outputs ...............................................................60
Digital Output Control Forms .........................................60
Setting Up and Tuning PID Loops .................................63
General PID Constants by Application ...........................65
Appendix B: Input Scaling 67
ii ANASOFT User’s Guide
Linear Input Scaling ........................................................67
Page 5

Appendix C: ANASOFT-RS 69
What is Ramp/Soak? .......................................................69
ANASOFT-RS Features .................................................69
Hardware Requirements .................................................70
Profile Assignment Screen ..............................................70
Getting Here ....................................................................70
Function Keys .................................................................70
Profile Edit Screens ........................................................71
Getting Here ....................................................................71
Function Keys .................................................................73
R/S Time Base ................................................................73
R/S Loop Face Plate Display ..........................................73
Power Failure Recovery ..................................................74
Glossary 75
ANASOFT User’s Guide iii
Page 6

iv ANASOFT User’s Guide
Page 7

Overview
Using This Guide
This manual describes how to install, setup, and operate ANASOFT.
ANASOFT is a DOS-based software program that allows you to
program and monitor multiple controllers from a single PC. Included is
data logging and trend plotting.
This guide is intended for both experienced and inexperienced users.
Experienced users may find some parts of this guide very simplistic; if
that’s you, please at least skim these parts to make sure you don’t miss
anything vital. If you’re an inexperienced user, please read this guide
carefully.
The following describes each section.
•
Introduction: Describes ANASOFT 3 and ANASOFT4 dif ferences
and computer requirements.
•
Installation: Covers how to install and setup ANASOFT.
•
Startup: Describes program loading and startup errors.
•
General Screen Displays: Provides an overview of the screen and
typical screen responses.
•
Loop Overview: Describes loop overview screen.
•
Edit: Describes the edit screen.
•
Loop Setup: Gives an overview of the loop setup screen. Included
are descriptions of control parameters.
•
System Setup: Describes the system setup screen.
•
Job Setup: Describes the job setup screen.
•
View Alarms: Describes alarms and how to view them.
•
Trend Plot: Covers tre nd plotting and reviewing trend plots.
•
Appendix A: Gives tips on tuning and control features.
•
Appendix B: Describes input scaling examples.
•
Appendix C: Describes the Ramp and Soak option.
ANASOFT User’s Guide v
Page 8
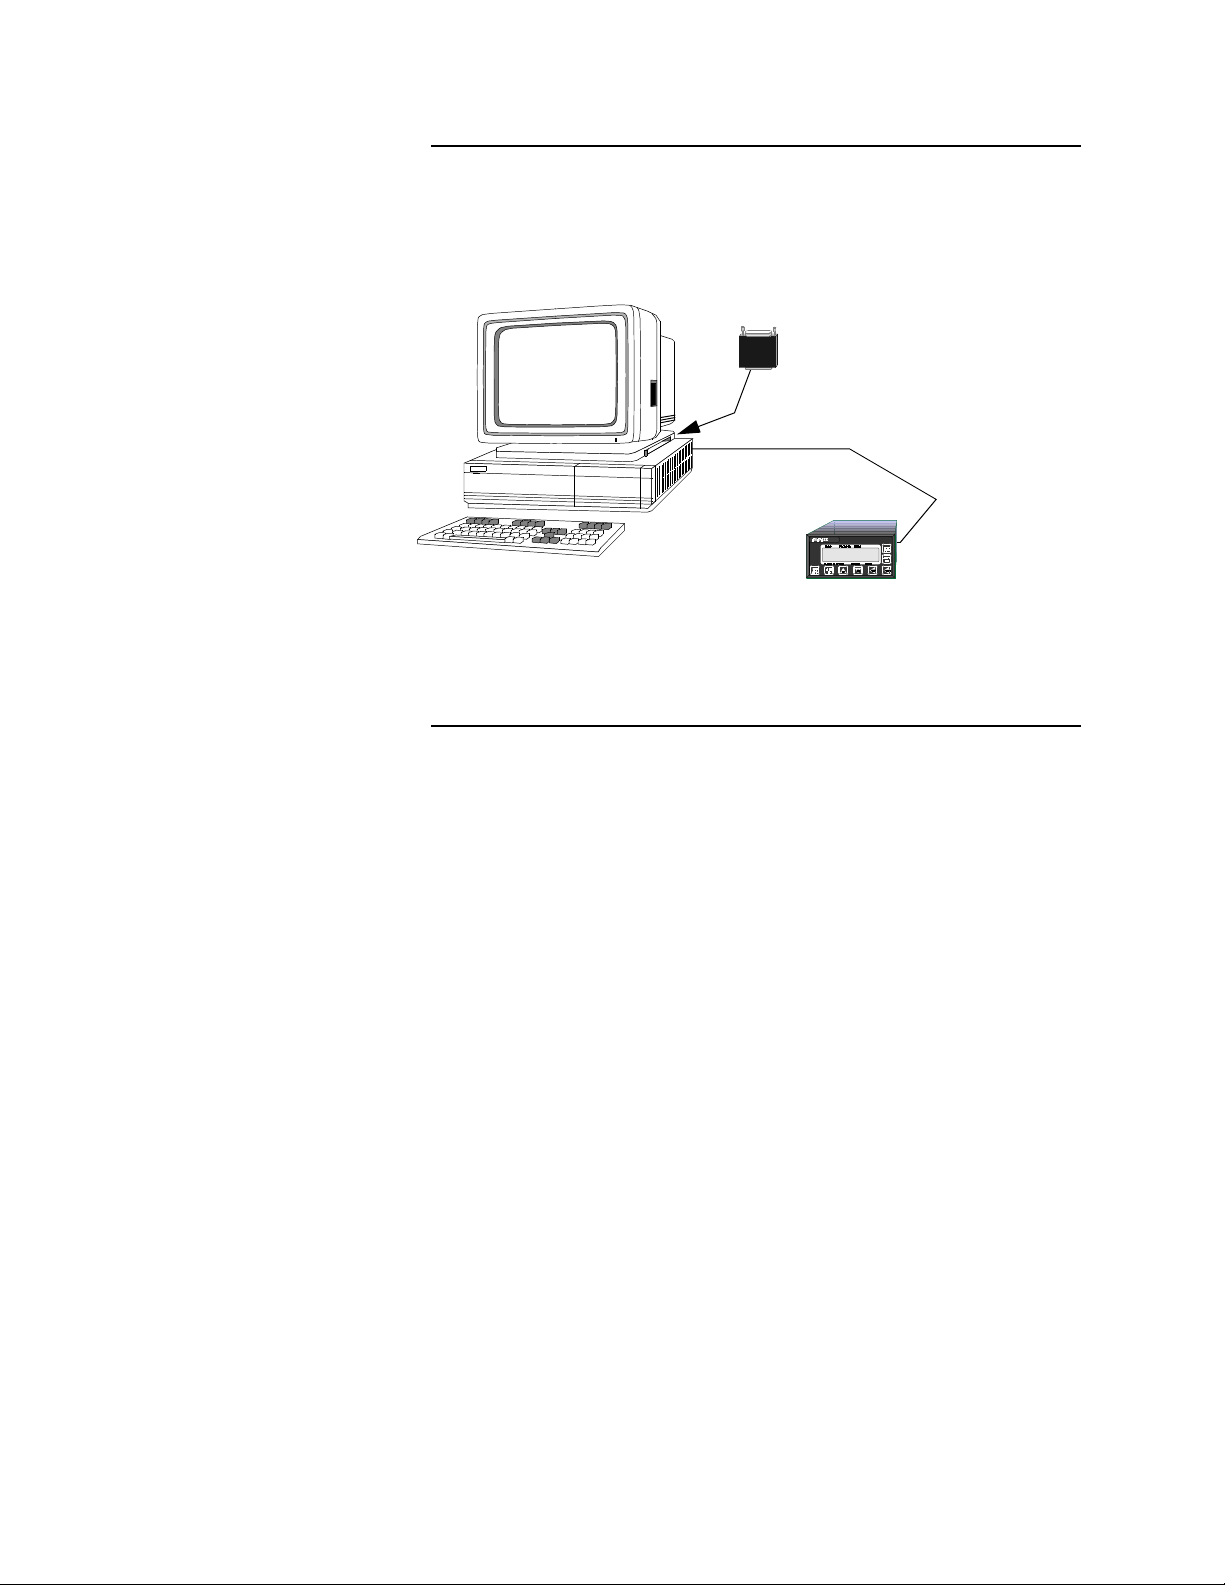
System Block Diagram
The following shows how the PC interface (with ANASOFT) to several
controllers.
Software Key (parallel port)
Communications
Cable (serial port 1 or 2)
1 or more controllers
Parts List
The following parts are included with ANASOFT.
•
ANASOFT on 3.5 inch Diskette. (5.25 in diskettes are available
upon request)
•
Software Key
•
RS-232 or RS-485 communications cable
vi ANASOFT User’s Guide
Page 9

Safety
Watlow-Anafaze has made efforts to ensure the reliability and safety of
ANASOFT. Note that in any application failures can occur.
Good engineering practices, electrical codes, and insurance regulations
require that you use independent external safety devices to prevent
potentially dangerous or unsafe conditions. Assume that ANASOFT can
fail or that other unexpected conditions can occur.
For additional process safety, program a computer or other host device
to automatically reload your desired operating parameters after a power
failure. However, this safety feature does not eliminate the need for
other external, independent safety devices in dangerous conditions.
In the event of a controller reset, ANASOFT will reload the controller
with the current values in computer memory. The user must ensure that
this reset will be safe for the process. Use of ANASOFT does not
eliminate the need for appropriate external, independent safety devices.
Please contact Watlow-Anafaze immediately if you have questions
about system safety.
ANASOFT User’s Guide vii
Page 10

viii ANASOFT User’s Guide
Page 11

Introduction
ANASOFT is a user friendly, menu driven software package. It
provides a powerful computer supervised measurement and control
system with data acquisition.
ANASOFT is the general name for two products: ANASOFT3 and
ANASOFT4. This User’s Guide is for the two products. It uses the
general name ANASOFT when referring to both.
Each product communicates with different controllers, as shown below:
ANASOFT 3
ANASOFT 4
Introduction
Watlow-Anafaze 8LS
Watlow-Anafaze 12LS
Watlow-Anafaze SYSTEM 32
Watlow-Anafaze MLS
Watlow-Anafaze CLS
Watlow-Anafaze IRC2
The choice of controller type is selected when the installation program
is run. At present, controllers cannot be mixed on the same system.
NOTE
Watlow-Anafaze controllers are purchase d with vari ous options for mounting, input/output configurability
and application options. Make sure your controller’s
version and options match your ANASOFT v ersio n.
The system may have only one Watlow-Anafaze controller or a plant
wide system with numerous controllers. ANASOFT includes numeric
and graphic displays, data and alarm printing, data and alarm logging in
text or LOTUS compatible files, and graphic trending. It runs on an
IBM AT 286, 386, or 486, and true compatible computers. A question
and answer format enables users to quickly define and setup any
measurement or control application.
NOTE
ANASOFT is sold with a license agreement and can
be operated only on one computer. The license agreement requires registration with Watlow-Anafaze.
Watlow-Anafaze will send updates at no charge only
to registered users.
ANASOFT User’s Guide 1
Page 12

Introduction
ANASOFT Versions
ANASOFT-EV
•
Process overview screens (3 different formats)
•
Loop setup screen, individual loop parameters editing
•
Maintaining a directory of job files
•
Displaying and logging process variable alarms
•
Password protection for various levels of program
•
Software grouping of Loops
•
Graphic trend plotting of process variabilities points and output val-
ues in real time
•
Definable startup sequences
•
Power failure recovery
•
Printer and disk data and alarm logging
This version is recommended for central process supervision, data
acquisition, or any application where the computer is operated on-line
with an Watlow-Anafaze system.
ANASOFT-RS
provides timed control of Setpoints. Use this version with WatlowAnafaze 8LS, 12LS, CLS Ramp and Soak controllers.
- Expanded Version - provides these features:
is the Ramp Soak version of the ANASOFT-EV; it
Computer Requirements
ANASOFT-CP
it provides control of carbon control systems as used in the heat treating
industry. Use this version with Watlow-Anafaze 8LS and MLS carbon
controllers.
ANASOFT-CV
meet customer’s special requirements for any application. Please
contact Watlow-Anafaze or its representatives to provide pricing and
delivery on custom software packages.
Watlow-Anafaze sets these computer requirements for running
ANASOFT:
1. IBM AT 286, 386, 486 or other IBM Compatible Computer
2. DOS Version 3.3 or higher
is the Carbon Potential version of the ANASOFT-EV;
is a custom version of ANASOFT; it is designed to
2 ANASOFT User’s Guide
Page 13

Introduction
3. Speed: 25MHz or higher
This speed provides the best performance of the ANASOFT program; it enhances the response of the system to changes and maintains the best screen updates. However, it is not a factor in the
performance of the control system since this is maintained independently in each Watlow-Anafaze controller.
4. Memory: 580K bytes free memory or larger
5. Disk Drives: One 40MB hard disk. One 5.25 inch or 3.5 inch floppy
disk
6. Graphics Interface: EGA/VGA
7. RS-232 or RS-485 Serial Interface
The serial communication link required to communicate with more
than one Watlow-Anafaze controller or with a communication cable
longer than 50 feet is RS-485. Watlow-Anafaze recommends using
the standard serial interface of RS-232 with an external RS-485 converter.
A converter recommended by Watlow-Anafaze is the B&B Electronics RS-232/RS-485 optically isolated converter P/N 485OIC. This
converter has screw terminals for connecting the RS-485 wires and
the DB-25 Male connector for the RS-232 side.
Another recommended converter is the B&B Electronics optically
isolated with surge suppressors P/N 485OISPR. This converter has a
DB-25 Male connector for the RS-485 communication wires and a
DB-25 Female connector for the RS-232 side.
These converters are for both 2-wire/4-wire systems and may be used
with all Watlow-Anafaze controllers. The optical isolation should be
used with the MLS and CLS controllers, and it must be used with the
16CLS controller.
Other recommendations are the Black Box RS-232/RS-485 non-isolated converter P/N ME-836A. The ME-836A connections are the
same except the terminals are labeled with an X instead of a D. The
converter is used for both 2-wire/4-wire systems.
To provide optical isolation, the addition of Black Box opto-isolator
P/N SP400A is highly recommended. The SP400A will normally use
the factory DIP switch settings. All that needs to be done is to connect the cable and the power supply. The SP400A has been used
without any power supplies required as it will draw its power from
the computer and the ME-836A. Always use equi pment m anuf acture
factory recommendations.
T o us e a PC internal m oun ted RS-4 85 card, the B l ack Box Corp. P/N
IC030 has been used successfully in Watlow-Anafaze installations.
Caution must be taken when other communication devices are
installed so as not to conflict with the address or interrupt.
Another recommended PC internal optically isolated RS-485 serial
card is the B&B Electronics 3PXOCC1A
ANASOFT User’s Guide 3
Page 14

Introduction
8. Printer Parallel Interface
The printer parallel interface port is required for the Watlow-Anafaze
software key . The Watlow-Anafaze software key must be installed on
the printer port. System operation of the controllers is not possible
without the software key. [See Software key installation].
9. Battery backed up real time clock (usually battery backed CMOS
chip)
10. EGA/VGA Monitor
The EGA interface card will allow color trend plotting even with a
CGA monitor. The EGA/VGA monitor used with the EGA/VGA
interface provides improved text displays making all the screens easier to read. For systems that require frequent operator changes and
frequent observation, full EGA or VGA is recommended.
11. IBM Graphics Compatible Printer
This graphics printer is required for printing data and alarm logging
features of ANASOFT-EV. The printer is not needed for the software
key to operate, but if the printer is used, it must be ON LINE to operate ANASOFT.
4 ANASOFT User’s Guide
Page 15

Installation
Quick Installation
•
Create a new directory for ANASOFT.
•
Change directory to the one you have created and type Anasoft.exe. This self-extr actin g f ile contains the operating pr ogram
and the support files.
•
Type ANAINSTL from your ANASOFT directory. After pressing Enter, Installation Menu appears.
•
Change inputs in the Installation Menu by moving the cursor to
the desired parameters.
•
Install the Software Key.
•
You are ready for start up.
Installation
ANASOFT Files
WARNING
It is your responsibility to ensure that the entire
system is safe. Read the warning in the front of this
manual. If there is any possibility of an unsafe condition, use independent safety devices.
ANASOFT is provided on various floppy con figurations. Depen ding on
the version of ANASOFT, the disks include the following files:
README.BAT - contains information on how to install th e so ftwa re.
ANASOFT.EXE - a self-extracting file which contains
following files and all the support files:
•
ANA-EV.EXE - ANASOFT EV operating program
•
ANA-RS.EXE - ANASOFT-RS operating program
•
ANA-CP.EXE - ANASOFT-CP operating program
one
of the three
Support files:
ANAINSTL.EXE - ANASOFT installatio n program
INSTAL.DAT - installation parameters data file
LPGRP.DAT - loop group ing start up dat a file
SYSSU.DAT - system setup data file
ANASOFT User’s Guide 5
Page 16

Installation
STATUS.DAT - system start up status file
DIGIO.DAT - digital I/O screen data
DLOG.DAT - data logging data file
GRPINFO.DAT - group set up data file
HDR.WK1 - Lotus header set up file
PLOT.DAT - plot parameters data file
The following list contains files created from the software:
XXXXXXXX.J## - group job directory data file
NEWXX.PLT - plot files which were created within the last 24 hours.
OLDXX.PLT - older plot files
PXXXXXXX.TXT or WK1 process logging files
File Locations
AXXXXXXX.TXT or WK1 alarm logging files
ANASOFT-RS also includes:
XXXXXXXX.R## - R/S program assigned data file
XXXXXXXX.PRF - R/S program data file
WARNING
Make copies of disks before running the program,
and store the original ANASOFT disks in a safe
place. Use the copies to operate the system.
360k dual floppy disk system:
Watlow-Anafaze recommends that you store the ANASOFT operating
program file and the INSTAL.DAT file on drive A, and all other files on
drive B. Once the program ANAINSTL is run, you can remove
ANAINSTL.EXE from drive B to allow more room for data. Do not
remove files from the master disk.
6 ANASOFT User’s Guide
720k or higher floppy disk system:
Watlow-Anafaze recommends that you store all files of the ANASOFT
operating program on one drive such as A. Use the B drive to store all
recording data by setting up directories as shown in the hard disk
systems recommendations.
Page 17

Installation Program
Installation
Hard disk systems:
Watlow-Anafaze recommends setting up directories as follows:
ANASOFT - to contain the operating program, system data and job files
DATALOG - to contain data logging files generated by ANASOFT
ALARMLOG - to contain alarm logging files generated by ANASOFT
For easy removal of recorded data, you may install the DATALOG and
ALARMLOG directories on the B drive. If you use A drive for data
recording, you will not be able to use the automatic reboot
Copy all the supplied files to the ANASOFT directory.
The installation program, ANAINSTL.EXE, customizes each
ANASOFT p rogram for the application. When typing C:ANAINSTL (if
it’s on the hard disk), or B:ANAINSTL (if it’s on drive B), The
installation screen appears and enables you to select parameters used by
ANASOFT.
ANAINSTL.EXE stores the program setup parameters in a file called
INSTAL.DAT. When Run, the ANAINSTL program reads the
INSTAL.DAT fil e from the defau lt disk direct ory. If both files are on the
same disk directory, enter the directory and type ANAINSTL.
If the ANAINSTL.EXE and INSTAL.DAT file are on different
directories, enter the disk directory containing INSTAL.DAT and type
ANAINSTL preceded by the path to the disk directory containing
ANAINSTL. For example, if INSTAL.DAT is on drive A and
ANAINSTL.EXE on drive B, type :
B:>A: [Enter] to change the current default drive to A
A:>B:ANAINSTL [Enter] to start the installation program
If the installation program cannot find INSTAL.DAT, an error message
appears. Verify the location of INSTAL.DAT file.
ANASOFT User’s Guide 7
Page 18
Installation
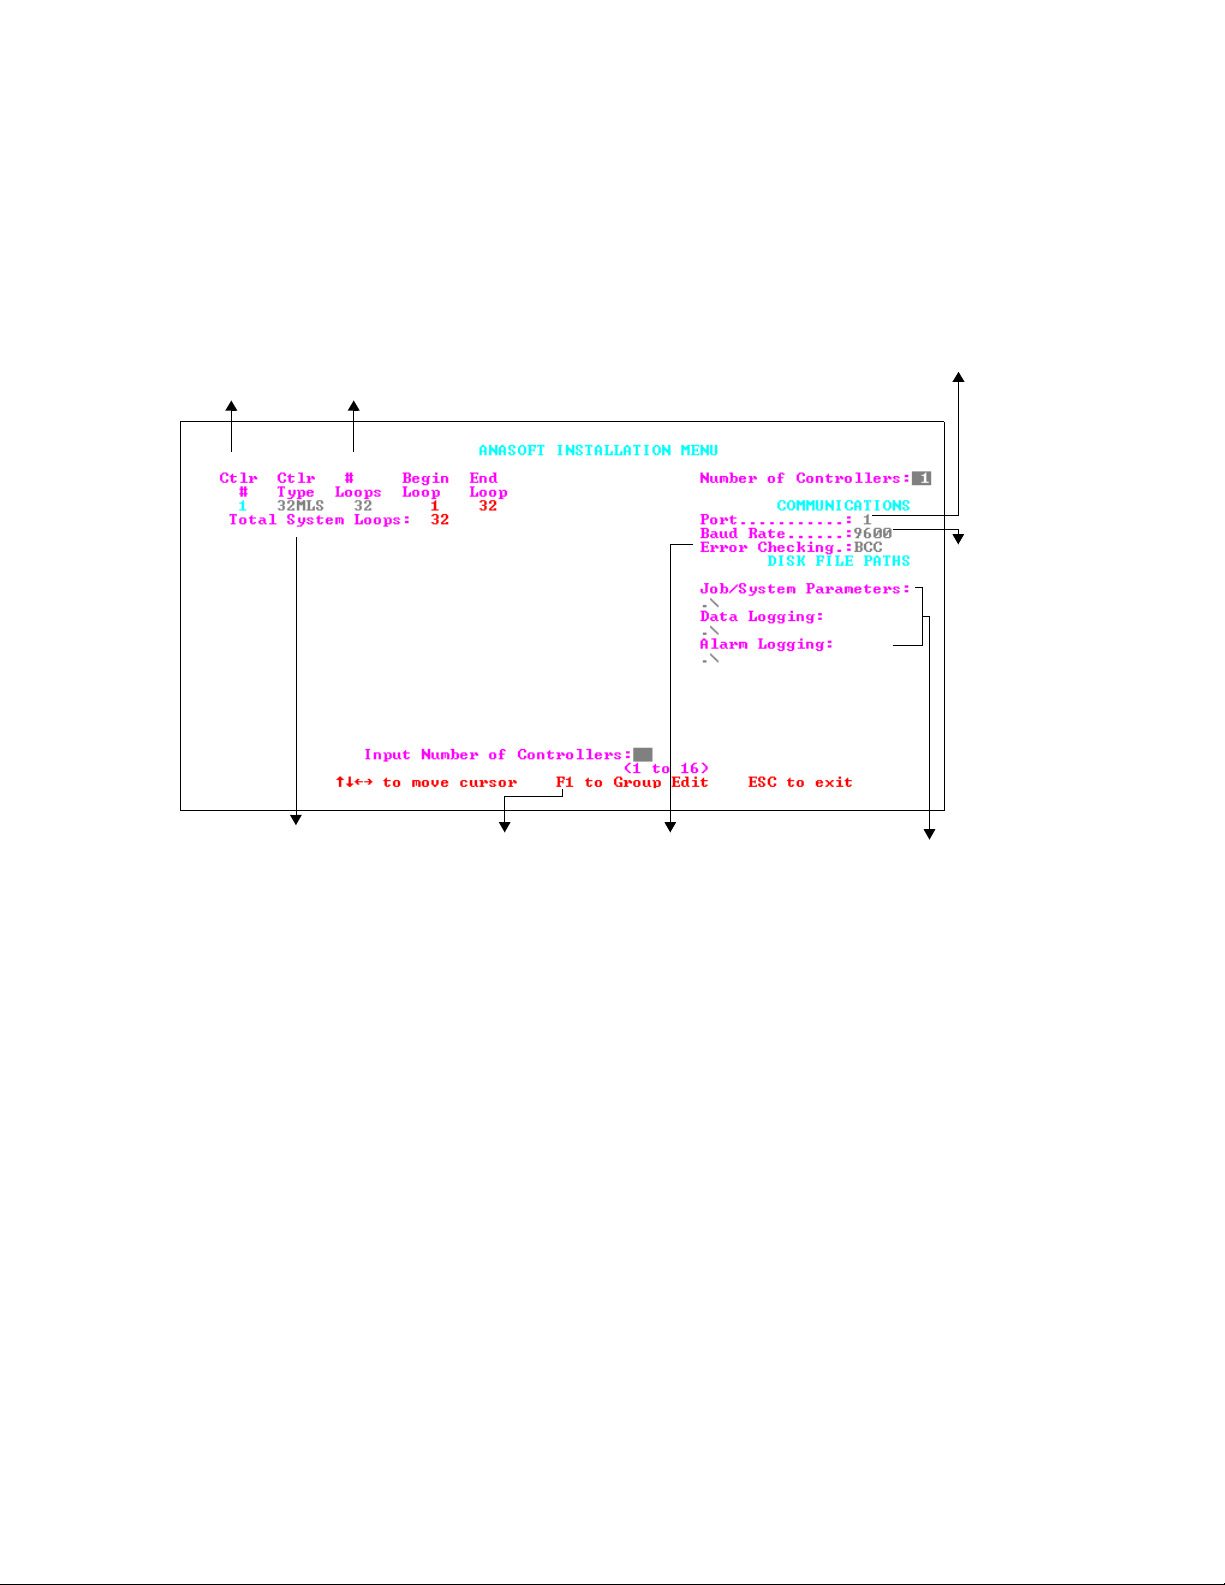
Installation Menu
1 to 16
This value is fixed for
each controller. See
table on the next page.
The computer’s serial
communication port to the
controller. Can be only 1
Can be either
2400 0r 9600.
Set all controllers to the
same value.
Only one type. Chan ging
one controller’s type
would change all others’.
Change the
screen to the
Loop group Edit
screen. See
Grouping Loops
in this section.
Set to either BCC (Block Check
Character) or CRC (Cyclic
Redundancy Check). Use BCC
for standard applications. CRC
ensures a higher degree of security but decreases the overall
communication rate. Use CRC
only when you anticipate severe
communication noise.
For these paths see the
next page.
8 ANASOFT User’s Guide
Page 19

Number of loops
Installation
controller’s type
8LS 8
12LS 12
SYSTEM32* 16 or
16MLS 17
32MLS 33
4CLS** 5
8CLS** 9
16CLS** 17
* For SYSTEM 32, loop numbers greater than 32 are data acquisition
channels only, and cannot be used as control loops.
** In CLS controllers, the last loop is a pulse control loop.
ANASOFT d isplays the loops with system numbers. The system loop
numbers associated with the controller loops are indicated in the
installation program as the Begin Loop and End Loop for each
controller.
Number of
loops
32 or
48 or
64
Directory Paths
Job/Parameters path
This is the path to the disk directory containing the Job and System
Parameters Data Files. The path would normally be:
B:\ANASOF T\ or .\ current directory (If the system files are on drive B)
C:\ANASOFT\ or .\ current directory (If the system files are on the
hard disk). Notice that the last “\” is added automatically.
Data logging path
This is the path to the disk directory containing the LOTUS or text
[ASCII] data logging files generated by ANASOFT. This directory must
exist before running ANASOFT and turning on data logging.
B:\ANASOFT\DATALOG\ (for floppy disks)
C:\ANASOFT\DATALOG\ or.\DATALOG\ (for hard disks). Notice
that the last “\” is added automatically.
ANASOFT User’s Guide 9
Page 20

Installation
Software Key Installation
Alarm logging path
This is the path to the disk directory containing the Lotus or Text
(ASCII) alarm record files generated by ANASOF T. This directory must
exist before running ANASOFT and turning On alarm logging.
B:\ANASOFT\ALARMLOG\ (for floppy disks)
C:\ANASOFT\ALARMLOG\ or .\ALARMLOG\ (for hard disks).
Notice that the last “\” is added automatically.
Install the software key on the computer printer port.
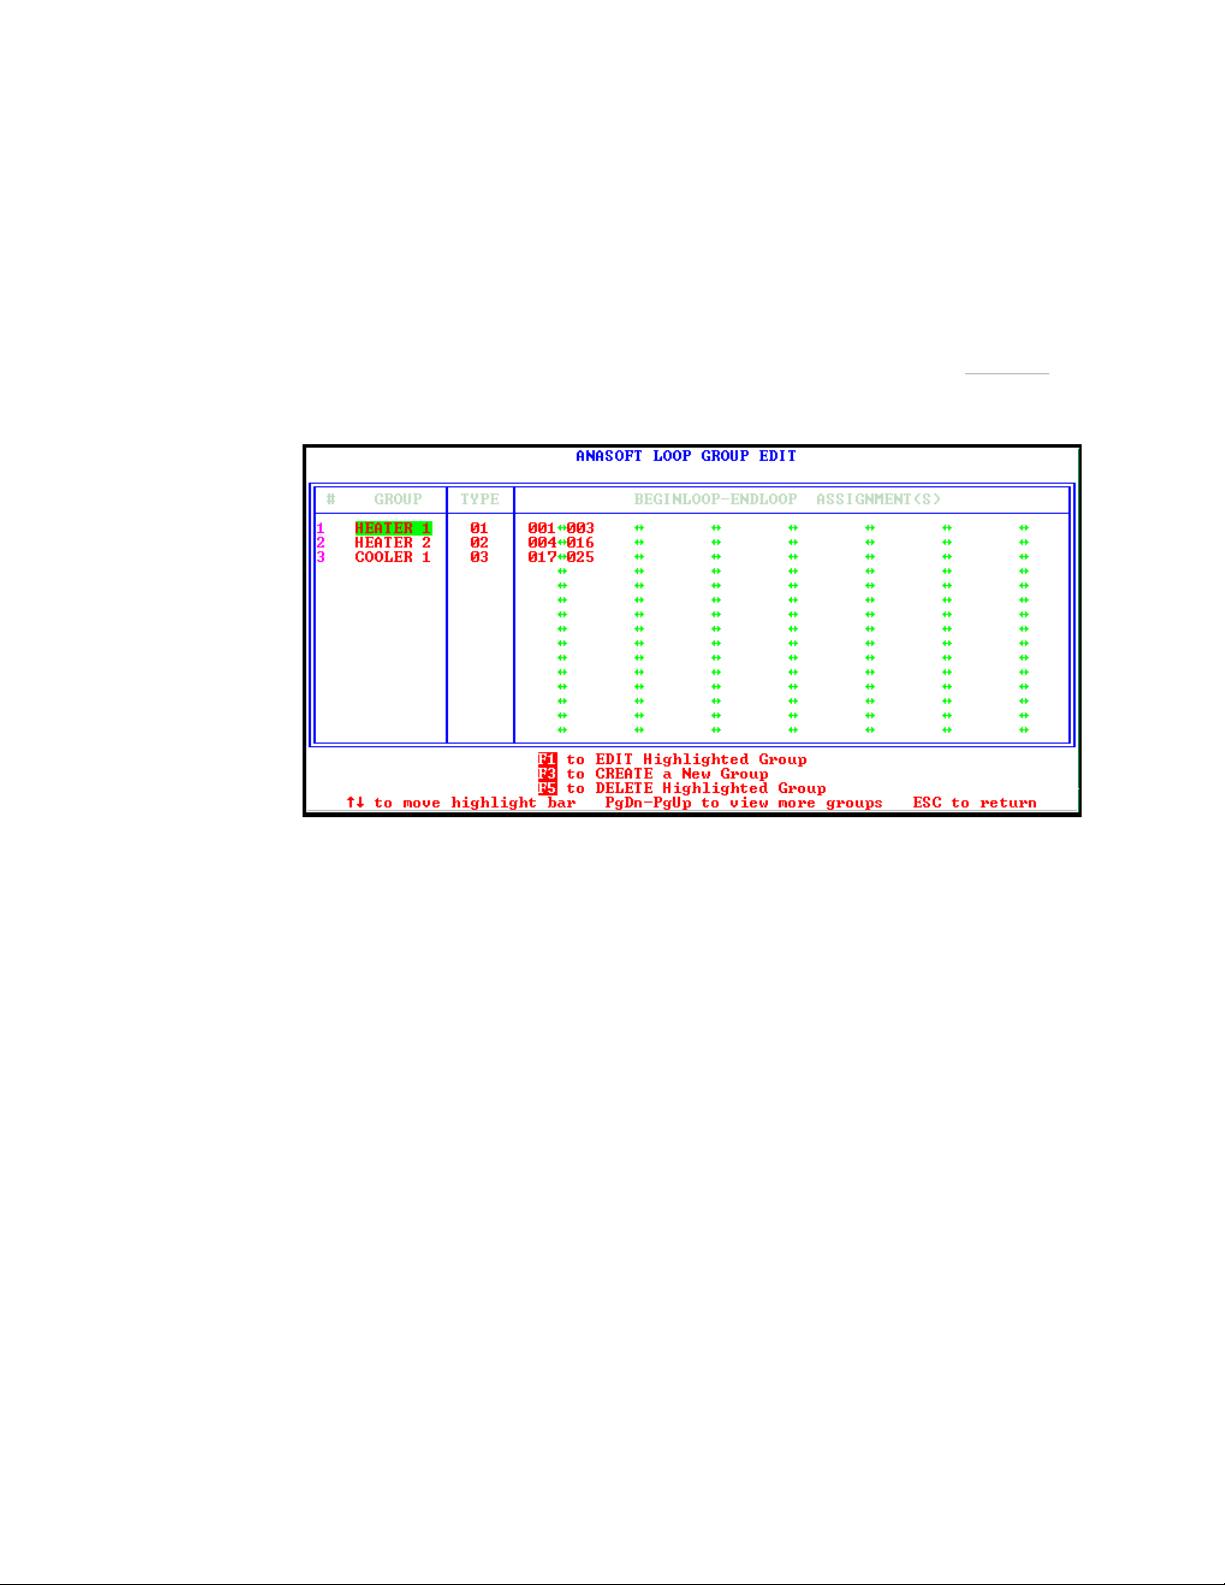
Grouping Loops
If you are planning to use a pri nte r , f irst inst all the s oftwar e key and then
install the printer cable into the software key. Some computers require
that the printer should be O n Line before the software key will work.
When no software key is installed, an error message appears, and
ANASOFT termin ates.
Grouping inputs allows you to divide your system into subsystems. You
can group loops with a common purpose according to your specific
application requirements. One group might be for a furnace or a group
of furnaces; another group might be for common Jobs controllers share.
Only the loops of one group are displayed on the Overview screen at a
time. The job parameters are uploaded or downloaded to an individual
group independently. The number of controllers with their total number
of loops must match the number of loops in the grouping. The loop
numbering depends upon the type of controller selected in the
ANAINSTL program. The system loops are in a numerical sequence of
1 to 8 for the first 8LS controller and 9 to 16 for the second 8LS
controller, etc. The 12LS sequence is 1 to 12 for the first 12LS
controller, 13 to 24 for the second 12LS controller, etc. The SYSTEM
32 loop sequence is in units of 16 depending on the make-up of the
SYSTEM 32 Hardware. Loops of 16, 32, 48, or 64 may be available.
The same applies for the MLS, CLS and IRC2 controllers regardin g the
number of loops per controller.
10 ANASOFT User’s Guide
Page 21
Installation
After assigning the loop numbers from any controller in the system to
the group, select a type number of two digits up to 99. This number is
the job directory number for th e gro up and i ts l o ops . Al l gro ups w it h the
same type number will be assigned to the same job directory. Creating a
new type number creates a new job directory number in the ANASOFT
program.
Group menu
General grouping rules
•
Create a group when you need to have the loops on the same Over-
view screen.
•
Assign the loops to the group you want to have on the same Over-
view screen.
•
Create a new type number for the new gro up. This ty pe number may
be assigned to more than one group, when the jobs that are saved to
the Job Directory are to be common to the groups that it is assigned
to.
When using the same type number for groups, the number of
loops must match. Otherwise a new type number must be used.
Grouping example
The application has two furnaces, one with four loops and one with two
loops in two separate areas. There are three presses with two loops each,
that share common ramp soak jobs. And, finally, an oven with two loops
of ramp soak control that has nothing in common with the presses ramp
soak jobs.
ANASOFT User’s Guide 11
Page 22

Installation
The hardware consists of the following:
Two Watlow-Anafaze 8LS-P-RS controllers.
Controller #1 will be installed to handle furnace 2A with four loops of
PID control in Area A, two loops of R/S oven control also located in
Area A. The last two loops of controller #1 will be used to p rovide R/S
control for one of the presses located in Area A.
Controller #2 will be installed in Area B for two loops of PID control for
furnace 5B and four loops of R/S control of the two presses located in
Area B. Two loops of the controller will not be used at this time.
•
Create group AREA A with Loops 1 to 6 and the type number 01.
This will provide an overview screen with four loops from controller #1 for Fu rn 2A and two Loops from controller #1 for oven in
AREA A.
•
Create group AREA B with Loops 9 to 10 and the type number 02.
This will display two Loops from controller #2 for Furn 5B on an
overview screen in AREA B.
•
Create group PRESS with Loops 7 to 8 and 11 to 14 and the type
number 03. This will display two Loops from controller #1 for the
press in AREA A, with four loops from controller #2 for the two
presses in AREA B.
12 ANASOFT User’s Guide
Page 23

Start Up
Quick Start Up
•
•
•
•
•
•
Start Up
Make sure the software key is installed.
Set correctly time and date in your computer.
Type: ANA-EV or ANA-RS or ANA-CP depending on your
ANASOFT version. Job Select screen appears.
Type a job’s name. When starting the first time, enter DEFAULT.
Type D for downloading parameters to the controller, or U for
uploading. For initial testing in the Edit mode, enter D.
Overview screen appears.
Start Up Optional Modes
You can s tart ANASOFT in certain modes by adding parameters to the
command at start up. These command line options include:
•
/e
Operates the program in Edit mode. The program operates no rmally
but it does not communicate with the controllers or require the software key. You can operate the program in Edit mode without any
hardware connected to the computer. This mode is useful for initial
familiarization, training, and Off Line job editing.
•
/c
Forces the graphics display into CGA mode. This is necessary on
some computers which are not truly IBM compatible.
•
/d
Operates the program in the Debug mode. This is useful in debugging communications probl ems. Don’t use it for normal operations. All communications between the computer and controllers
are displayed on the printer. Therefore, in order to use this mode,
the printer must be connected and ready.
You can use capital or small letters in the command line, and more
than one command line option at a time. For example: Typing
ANA-EV /E /C [enter] will operate the program in Edit mode with
CGA graphics.
ANASOFT User’s Guide 13
Page 24
Start Up
Start Up Sequence
•
The program checks the computer system hardware, the access to
the system disk files, and the presence of the software key.
•
The program verifies communications to the controllers in the sys-
tem and the version of the controllers.
•
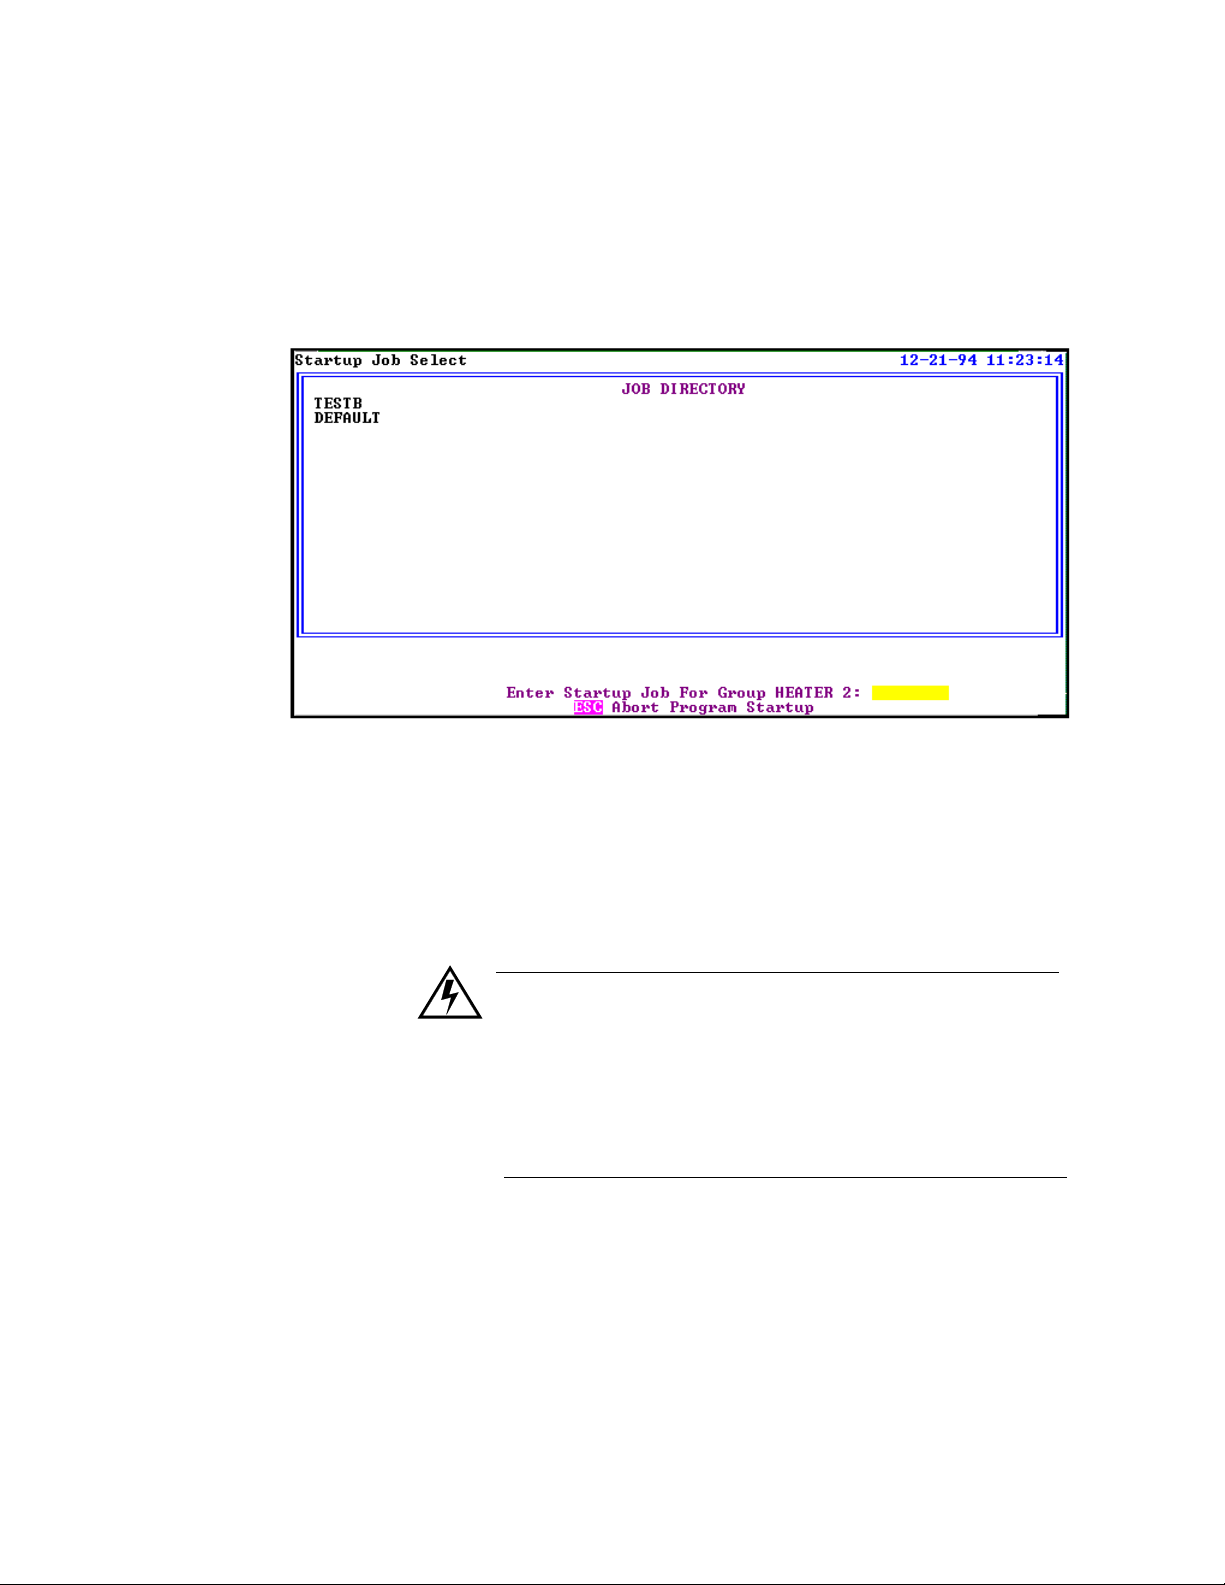
Job Directory screen appears.
•
The program prompts for the job to run. ANASOFT program is sup-
plied with a j ob named DEFAULT which contains all default control parameters and sets all control outputs off. When starting the
first time, enter the job name DEFAULT.
•
For systems with 8LS, 12LS, CLS, or MLS contro llers, the program
prompts whether to download parameters to the controllers or
upload parameters from the controllers. When SYSTEM 32 controllers are in the system, it automatically downloads.
WARNING
When controllers are in control of a process,
upload to install parameters into the ANASOFT
operating program. Downloading will install factory default values that will shut down the control
of the process. For Initial testing in the Edit mode,
enter Download.
•
After the downloading sequence is complete, the program displays
the Overview screen. If there is a problem in the program start up,
see start up errors in this section.
14 ANASOFT User’s Guide
Page 25

Default Start Up Values
Start Up
The program is shipped to you containing several parameters which are
set to initial factory default values. These should be set to desired values
by supervisory personal, and they include:
•
Passwords
•
Program startup sequences
•
Data logging parameters
•
Trend plotting parameters
See System Setup for detailed information.
ANASOFT User’s Guide 15
Page 26

Start Up
Start Up Errors
During Start up, various error messages may appear. The following
tables describe these messages, their causes and solutions.
Memory allocation errors
ANASOFT al locates computer memory for the loop parameters, based
on the number of loops and options in the system. When ANASOFT
reads in the system data files and finds there isn’t sufficient memory,
these messages may appear:
Message Cause Solution
•
Insufficient Memory
Not enough memory to allocate
data arrays required to run the program. The program cannot run and
it terminates.
Check the memory by
running the DOS command CHKDSK. At least
580K should be free.
•
Make sure your computer
has 640K memory, and
remove any memory resident programs and drivers. Check
AUTOEXEC.BAT file to
see if it runs any memory
resident programs. After
removing these programs,
re-boot the computer.
MEM ERROR:
Alarm Queue
Trend Logging
Disabled
Not enough memory to allocate the
alarm log memory . The prog ram
operates, but the view alarms
screen doesn’t display alarm queue.
Not enough memory to allocate
some or all of the trend logging
memory queues. The program
operates normally, but the trend
plotting i s not available.
Same as above.
•
Same as above.
•
Try running the program
and turning off scan outputs. This will save some
memory, but the program
will not plot the. Control
output values.
16 ANASOFT User’s Guide
Page 27

Disk file errors
While reading in the system files, several reading errors can occur. The
system files are SYSSU.DAT, INSTAL.DAT, and PLOT.DAT.
ANASOFT can not run without these files.
Message Cause Solution
Start Up
ERROR WHILE
READIN G DATA
FILE: xxxxxxxI
FILE NOT FOUND
ERROR WHILE
READIN G DATA
FILE:xxxxxxx
Drive not ready
Read fault
General failure
or
Access failure
ERROR WHILE
READIN G DATA
FILE:xxxxxxx
Path not valid
or
Invalid disk drive
INVALID DATA
FOUND ON DA TA
FILE:xxxxxxx
The system file does
not exist on the indicated disk and directory path.
There is a disk drive
hardware access failure.
The data disk path
that you set in the
ANAINSTL installation program is not
valid
There is corrupted or
invalid data in the
disk file.
The INSTAL.DAT file should be on the
default drive and directory. The other system files should be on the data file drive
and directory path as set in the installation
program. If these files are not in the right
directories, copy the system files from the
backup disks to the appropriate directories .
Run CHKDSK or other diagnostic program in order to verify that there is no disk
drive error.
For a floppy drive: make sure that there is
a disk in the right drive and that the drive
door is closed.
Run ANAINSTL and verify that the drive
and directory path exist and are valid.
Don’t forget to verify that “\” is at the end
of the path entry.
Copy the original data file sent with ANASOFT from the backup disks.
ANASOFT User’s Guide 17
Page 28

Start Up
Extended start up sequence errors
ANASOFT reads in the status file STATUS.DAT which contains
information saved by ANASOFT th e last time it was running. Several
errors can occur when reading this file.
Message Cause
Could not
find STATUS.DAT
start up file
Invalid data
value on
STATUS.DAT
start up file
Power Failure Recovery
System
clock Error
The file could
not be found
on the data file
disk directory
set by
ANAINSTL.
The file may
have been
erased or corrupted.
The file contains some
invalid data,
and ANASOF T assumes
that the file
was corrupted.
The current
system time/
date as saved
in the STATUS.DAT file
were not in a
valid range .
The computer
system clock
is not set to
valid time a nd
date.
Program
Action
ANASOF T continues with the start
up, but since there
is no power failure
information available, ANASOFT
assumes the Over
Power Failure
Recovery time
Limit action and
starts in that mode.
Same as above. Same as above
Same as above. The automatic power failure
As the program is running, the
STATUS.DAT file will be established. Therefore, subsequent
starts shoul d have no problem.
recovery feature of ANASOFT
requires a correct clock/calendar
system. While the computer boots
up, verify the following:
•
There is a battery backed up
clock/calendar in the system.
•
The battery is good.
•
Time and date values are correctly loaded.
Solution
18 ANASOFT User’s Guide
Page 29

Software key problems
Message Cause Solution
Start Up
Software Key not
found on printer
port.
Cannot operate
program without
key.
1. Attempting to run the operating program without a software
key installed on the computer.
2. Installing the software key on
a computer connector other than
a valid printer port.
3. Installing an incorrect key
version. T here’s a single controller version and a multiple
controller version for accessing
more than one controller.
4. Attempting to run the program while the printer is not On
Line. (Rare).
Make sure you have installed the
software key properly on the
printer port.
Verify that you have the multiple
controller version if you want to
access more than one controller.
Communications problems
Message Cause Solution
failed Communications to
controller____
Abort start up
(Y/N):_____
ANASOFT can not
communicate with
one of the controllers
during the initial system communications
check or during the
job downloading/
uploading.
Verify that the communications por t set in
ANAINSTL is the one actually connected to
the controllers.
Verify that the communications parameter s
(baud rate and error checking mode) set in the
installation program are those set in the controllers. The 8L S, 12LS, MLS, and CLS communications parameters are set using the front
panel keys while in th e GLOBAL menu and the
SYSTEM 32, parameters are set by DIP
switches.
Verify that the address of each controller is
unique (for multiple controller systems).
Verify that you have the multi-controller key if
more than one controller is hooked up.
Verify that the correct version of ANASOFT is
running for the controllers being used.
Verify that the wiring is done correctly to the
controllers and the computer.
:
ANASOFT User’s Guide 19
Page 30

Start Up
NOTE
See the respective controller hardware manual for
assistance in checking the communication parameters
and verifying the communication wiring.
•
If there is more than one controller in the system, ANASOFT wil l
try supervising thos e co ntrol l ers whi ch are op erat i ng and co mmu ni cating correctly. After start up ANASOFT periodically re-checks
communications to the failed controller.
•
By continuing the start up, the controllers not communicating will
be listed by address on the System Errors window in the System
Setup screen. Check the controllers listed on the screen. Be sure the
address is correct as set on the controllers.
EPROM version error
If 8LS, 12LS, MLS, or CLS controllers are in the system, ANASOFT
checks the controller EPROM version at start up and verifies that it’s
acceptable to the version of ANASOFT. The following message may
appear:
Message Cause Solution
Unacceptable
controller
EPROM version
The EPROM version is
not acceptable to the
version of ANASOFT.
.
Contact Watlow-Anafaze to obtain
EPROM upgrade
20 ANASOFT User’s Guide
Page 31

General Screen Displays
General Screen Displays
Certain characteristics are maintained on all ANASOFT screens as
follows:
Title line. Includes screen’s name, current group and job, time
and date. When in Edit mode, the words “Edit Mode” appear.
Process status box. Four possible
messages:
1. Process OK (green).
2. Process warning (yellow).
There’s a warning on at least one
loop.
3. Process alarm (blinking red). An
alarm condition on at least one loop
hasn’t been acknowledged.
4. Process alarm (red). An alarm
condition on at least one loop. All
Changing Data
System status box. Re ports problems
of communications, printer access or
data logging disk access. T w o possible messages:
1. System OK.
2. In case of a problem, the appropri-
ate message (red).
•
Use the cursor to enter data in the editing screens.
•
Move the cursor to the variable you want to change. An editing
prompt appears at the bottom of the screen with a blue background
new value box. The allowable range of the variable is listed below
the new value box.
ANASOFT User’s Guide 21
Page 32

General Screen
Print Screen
•
Type the new desired value into the new value box.
•
Press Enter. The new value will be displayed over the original one,
and will be downloaded to the controller. If you made a mistake in
entering the value and have not pressed Enter yet, use the backspace key to correct.
•
Use the F4 Key to enter the Job Setup screen and save the changes.
If you don’t, upon a new start up, the Job data file will be read from
the disk along with the old parameter.
NOTE
The new value is sent first to the respective controller.
The display changes only after the controller accepts
the new value. This may cause a slight delay a fter
entry, especially on slow computers or when a large
number of controllers is connected.
•
You can print all ANASOFT screens on an IBM graphics compati-
ble dot matrix printer.
•
Use the PRTSC key. When the print scr een is initiated, the copy of
the current screen is transferred to a buffer and the screen will be
printed as a background task. The program continues operat ing and
you can display other screens while printing a screen.
•
When printing the Trend Plot screen, you will be asked for a title
before printing the screen.
22 ANASOFT User’s Guide
Page 33

Loop Overview
The Loop Overview screen provides an overview of the process
information. It is not password protected and is available at all times for
anyone who wishes to monitor the process variables.
Getting Here
This screen appears automatically after start up.
Options
The Overview screen has four display screens. Use the F6 key to switch
between displays.
1. Four-loop graph display.
Loop Overview
Single loop display *
* The single loop display is a detailed
front panel of a single loop. It includes
the loop’s name, setpoint and process
variable, setpoint spread for dual output
loops, alarm messages, manual/auto status with percent output, warning and
alarm setpoints, and optional r/s status.
ANASOFT User’s Guide 23
Page 34

Loop Overview
Single loop display
2. 16 loop display in a loop table with 7 loop parameters. 1 selectable
loop controller face plate.
Loop table. A list of 16, 32, or 48 loops. Includes the setpoint, process
variable, control status, alarm condition. For the 16-loop format it
includes also the loops’ names and alarm massages
3. 32 or 48 loop display in a loop table w ith 4 Loop para meters. 1 select able loop controller face plate.
Loop tableSingle loop display
24 ANASOFT User’s Guide
Page 35

Loop Overview
4. Digital I/O screen. This screen isn’t available with SYSTEM 32 controllers.
Function Keys
For an easy access from the Overview screen to all other screens, use
the function keys as shown below:
Key Function
TAB Change group. Switch to a new group in any screen. You
don’t need to go back to Overview screen.
F1 Edit screen. Change setpoint, manual/auto control status, and
set percent output manually.
F2 Loop Setup screen. Display and edit all loop parameters.
F3 System Setup screen. Display and edit various system
parameters (passwords, disk and printer data logging, start
up, etc.)
F4 Job Setup screen. Select, save and delete jobs.
F5 View alarms. Display on-screen alarm log. System Setup
allows selecting automatic switching to this screen in case of
an alarm.
ANASOFT User’s Guide 25
Page 36

Loop Overview
Key Function
F6 Switch displays. Change the Overview screen display to one
of its 4 options.
F7 Trend logging. display the graphic trend plot.
F8 (only in RS version) Display the r/s program for editing and assigning r/s profiles
to loops.
•
press ESC to view the next Group Overview screen. If you wish to
view another group, move the cursor to that group and press ESC.
•
If not all the loops are visible (in a large system), use the PgUp/
PgDn keys to view the other loops.
•
The Overview screen is automatically updated as data is collected
from the controllers. Measured data is displayed in engineering
units.
•
Normal readings are green, warnings are yellow, and alarms are
red.
•
If you edit the 8LS, 12LS, MLS or CLS controllers at their front
panels, the program displays the word “locked” in the single loop
Face plate and puts the letter “L” beside the process variable in the
Loop Table for the loops on the edited controller. Once the front
panel editing is complete, the display returns to normal.
26 ANASOFT User’s Guide
Page 37

Edit
Edit
The Edit screen enables you to change these three parameters in the
single loop display you have selected:
1. loop’s setpoint
2. Manual or Automatic control operation
3. Percent control output (only in Manual control).
The Edit screen uses the same format as the Overview screen, only here
you can move the cursor to change the values. This screen is not
password protected.
The Edit screen performs nearly the same functions as the change
setpoint and manual/auto keys on the 8LS, 12LS, MLS, or CLS
controllers front panel.
Getting Here
Press F1 from the Overview screen. You will enter an Edit screen with
the same display as the screen you were in before pressing F1. The
screen below is an Edit screen for the 16 loop display.
ANASOFT User’s Guide 27
Page 38

Edit
Function Keys
Key Function
PgUp/PgDn Display other loops for editing.
Tab Reach loops of other groups.
ESC Return to Overview screen.
28 ANASOFT User’s Guide
Page 39

Loop Setup
Getting Here
Loop Setup
The Loop Setup screen permits a total access to all the parameters of the
input, output, alarm settings and alarm functions of the single loop
display you have selected. Use this screen to change all available loop
parameters.
Watlow-Anafaze recommends that you protect this screen with a
password. Use the F3 System Setup screen Password window.
Press F2 from the Overview screen.
ANASOFT4
Loop graph display Input and output parameters
Alarm parameters and controller information
ANASOFT3
ANASOFT User’s Guide 29
Page 40

Loop Setup
Function Keys
NOTE
The Loop Setup screen in ANASOFT 3 looks slightly
different due to differences in parameters location on
the screen. However, the parameters are mostly the
same, unless indicated otherwise.
Key Function
F1 Copy all loop parameters into the loop currently displayed.
F7 Display the Graphic Trend Plot of the loop. Press Esc to return to the loop
Setup screen.
PgUp/
PgDn
TAB Change the display to other groups. Available only when there is more than
ESC Return to Overview screen.
Change the display to other loops within the group.
one group.
Parameters
To review all the parameters available in this screen, we have divided it
into three sections (shown in previous page): loop graph display, I/O
parameters, and alarm parameters and controller information.
Loop graph display
Output control action. Set to Manual, Auto, or
Process variable
Setpoint. Set to any value between the HiPV and
LoPV of the input type. Changing SP changes
deviation alarms and warnings.
An expression of the input type.
T/C or RTD--F or C.
Linear input--any three characters.
Loop title
Output levels. Edit only
when the loop is in manual
control.
Bar graph deviation
30 ANASOFT User’s Guide
Page 41

Process offset. Use it to make
up for input signal’s inaccu-
Digital filter. The average PV
over number of scans selected.
The spread between the heat
output and the cool output.
Enable or disable the output.
When controlling a process, at
least one loop should be
Set to Direct or Reverse.
Reverse action causes the output to increase while PV
decreases. Normally used in
heating control. Direct action
causes the output to increase
while PV increases. Normally
Loop Setup
Input and Output parameters
Input type. See table on the next
Proportional Band, Reset,
Rate. See PID Tuning.
TP--Time Proportioning
DZC--Distributed Zero Crossi ng
On/Off Control
ANA--Analog control (8LS)
Cycle time. Set in seconds the
time a controller takes to complete one on/off cycle. Use only
with TP output type.
Limits the PID control output for
heating and cooling.
Sets a time limit for the output
limit. Set between 1 and 999 seconds.
Nonlinear outputs. Use it to
match control outputs to special situations.The output
curves provide a gentle onset
of control action near the setpoint. Set to 0 for linear outputs, and to 1 or 2 according to
The output percentage when the
controller failed back to manual
mode.
NOTE
Set input type first. All Loop pertinent parameters are
in reference to the input type and engineering unit.
The input must be correct before setting SP, PB,
alarms SP etc.
ANASOFT User’s Guide 31
Page 42

Loop Setup
Input type
The input types you can select depend on the type and options installed
in the controllers. The input types available are displayed in the input
type editing prompt. Input types available in Watlow-Anafaze
controllers include:
•
Thermocouple: Various types are available. The range is deter-
mined in firmware and by the Engineering Units selected.
•
RTD: Four ranges are available for the 100 ohm Platinum Element
DIN Curve RTD. The range is determined in firmware and by the
Engineering Units selected. See 7.0.1 & 7.0.3.
•
Linear: This is a linear voltage input type. it can be used with any
linear output sensor that can be scaled to the linear input voltage
range of the Watlow-Anafaze controller.
•
Pulse: This allows devices which generate digital pulse signals such
as optical encoders to be connected to the loop.
The table below describes the input types and ranges.
Input Type F Range C Range
J -350 to 1400 -212 to 760
K -450 to 2500 -268 to 1371
T -450 to 750 -268 to 399
S 0 to 3200 -18 to 1760
R 0 to 3210 -18 to 1765
N -450 to 2370 -268 to 1299
B 150 to 3200 66 to 1760
RTD 1 -148.0 to 572.0 -100.0 to 300.0
RTD 2 -184 to 1544 -120 to 840
RTD 3 -76 to 572 -60 to 300
Standard IR (IR 1) -100 to 1600 -73 to 871
Heavy Duty IR (IR 2) -100 to 1600 -73 to 871
Skip loop is not scanned or displayed
Linear See appendix B.
Pulse 0-2KHz
32 ANASOFT User’s Guide
Page 43

Alarm digital output. Can be set for
g
g
high process, low process, high
deviation alarm, and low deviation
alarm. You can set these parameters
to one of three options:
The high and low values for your
high and low process alarms.
Loop Setup
Alarm parameters and controller information
The text you see on the Alarm
screen (F5). It’s the user
selected massage for alarms.
Alarm deadband. Applies to
the high process, low process, high deviation, and low
deviation. Use it to avoid
repeated or nuisance alarms
as the PV cycles slightly
The spread from setpoint for your
high and low deviation alarms.
Hi
High Alarm Limit
SP + Deviation
Setpoint
SP - Deviation
High deviation alarm on
The diagram below shows the different alarm types.
h process alarm on
Hi
h deviation alarm off
Controller information
High process alarm off
Low deviation alarm on
Delays all the alarms until the
alarm condition exists longer
than the delay time you set.
Low deviation alarm off
Deadband
}
Deadband
}
Deadband
}
Deadband
Low Alarm Limit
Low process alarm on
Low process alarm off
}
ANASOFT User’s Guide 33
Page 44

Loop Setup
34 ANASOFT User’s Guide
Page 45

System Setup
The System Setup screen enables you to
1. Monitor system errors and reset these errors.
2. View the version and options of your ANASOFT.
3. Protect your screens using passwords.
4. Edit various system parameters, such as video control and alarm display screen.
5. Terminate the program.
6. Choose additional options for Start Up sequence.
7. Control data logging feature.
8. View the controller communication status (enabled or disabled).
9. Set the polarity of the digital outputs used for alarms.
10. In MLS controllers: select the digital output that will be activated in
case communication fails between the MLS-AIM and the MLS-PM.
System Setup
Getting Here
The screen is divided into two sections: the left part of the screen is a list
of the available windows, depending on your ANASOFT version. An
arrow is pointing to the window currently d isplayed. The right part of
the screen displays one of the 8, 9, or 10 available windows. Each one
contains parameters for editing or viewing. You can view only one
window at a time.
Each window, except the System Errors window, can be either Locked
or Unlocked. If the window is Unlocked, you can change the
parameters. If the window is Locked, you can only view the p arameters.
You can unlock a window by entering the password.
Press F3 from the Overview screen.
ANASOFT User’s Guide 35
Page 46

System Setup
System Errors
•
This window describes any system error along with the date and
time it occurred. It also allows you to reset these errors.
•
If a printer error message is displayed, printer data logging is sus-
pended until you reset this error from the window. Similarly, if a
disk error message is displ ayed, disk data logging and statu s logging is suspended until you reset this error. Communications errors
are also displayed on this screen but you cannot reset them.
•
If there is a failed communication with a controller in the system,
ANASOFT will repeatedly retry communicating with the controller. While there is failed communication, an error message is displayed. When communication is established, the error message is
erased.
36 ANASOFT User’s Guide
Page 47

System Software
System Setup
Information about ANASOFT
Information about the controllers
•
This window display s the version and options of t he so ft wa re in th e
system.
•
The upper part of the window displays information about ANA-
SOFT. The lower part displays information about the controllers in
the system. The version number of the controllers in the system is
displayed only if they are communicating with ANASOFT.
ANASOFT User’s Guide 37
Page 48

System Setup
Passwords
•
This window allows you to edit passwords and lock the Syst em
Setup windows and some other ANASOFT screens.
•
Each window or screen can be either p assword protected ( LOCKED
status) or accessible for all (UNLOCKED status).
•
The passwords are all set to “PASSWORD” when ANASOFT is
shipped. Change the password status and password before running
a process.
•
Loosing or misplacing the Passwo rd Window password will require
an on-site service call by Watlow-Anafaze personnel.
NOTE
Passwords are not required for ANASOFT to function. However, we recommend that you protect
critical screens.
38 ANASOFT User’s Guide
Page 49

System Parameters
System Setup
•
This window allows you to edit various system parameters as
described below.
Video control
•
High Intensity.
taining a CGA monitor or better (as Watlow-Anafaze recommends), set to True. For some LCD or monochrome displays the
cursor display and prompt display may not appear correctly. In this
case, set to False.
•
Video Access.
access allows fast screen displays but produces “snow” on some
CGA video systems. BIOS access prevents “snow” but is slower.
Set to eithe r
Set to either
True
Direct
False
or
access or
. For most systems con-
BIOS
access. Direct
Alarm display screen
•
Auto Switch. Set to On or Off. When on, the screen automatically
switches to the View Alarms screen whenever a new alarm condition occurs. This calls maximum attention to a new alarm, and Watlow-Anafaze recommends automatic switching for normal
operation. When setting up a new process or for a short time, when
the process is first started, you may set automatic switching to Off.
The large alarm block will still indicate by flashing each new alarm,
but the system will not automatically switch to the alarm screen.
•
Audible Alarm. Set to On or Off. When on, the computer emits an
audible warning for each new alarm.
ANASOFT User’s Guide 39
Page 50

System Setup
Save to EPROM (SYSTEM 32 only)
To save all operating parameters to the EPROM memory of the
controllers, move the cursor to the Save Parameters and press Enter.
When the controllers are powered up, they will operate with the
operating parameters saved in the EPROM memory.
WARNING
The operating parameters saved in the EPROM
memory should be safe operating values. When
powered up, the controllers operate at these
parameters until the ANASOFT program is
started and download operating parameters. Watlow-Anafaze recommends saving to EPROM a job
with all outputs set to manual and outputs at zero
percent as a safe power up condition.
Controller parameters
•
Pulse Sample Time: This is the time base of the Pulse input (PLS).
It is adjustable from 1 to 20 seconds.
•
R/S Time Base: This is the time base for the Ramp Soak profiles
and is only available in the RS and CP versions. The range may be
in 999 hour:59 minute o r 999 minu te:5 9 second. It appli es to all t he
r/s profiles and all loops in r/s.
40 ANASOFT User’s Guide
Page 51

System Termin ate
System Setup
•
This window allows you to terminate ANASOFT.
•
Terminate Program (Y/N)?
If you have edited the current job without saving to disk, the following
message appears:
NOTE: The current job has been changed. To save changes to job file,
use the Save Job function of the Job Setup screen before terminating
the program.
If you entered Y, you will be asked whether to turn all outputs Off
before terminating.
Set Control Outputs Off (Y/N)?
Enter
Press
sage. The program prompts as follows:
when the cursor is on the “Terminate Program” mes-
WARNING
Turning control outputs off will shut down the
entire process.
•
The program terminates and returns to the operating system.
ANASOFT User’s Guide 41
Page 52

System Setup
System Start Up
WARNING
Do not terminate the program with SYSTEM 32
control outputs On, unless safe operation is absolutely certain without the computer.
•
If you terminate the program only for a short time, to change a disk
or to fix a computer problem, and safety devices are in the process,
you can leave the controllers On.
42 ANASOFT User’s Guide
This window allows you to set the two start up conditions:
•
Normal start-up
•
Power failure recovery:
under time limit
over time limit
For each of these conditions, you can select one of three start up actions:
Operator Select.
1.
you for the job to run.
Download Profile.
2.
fied profile.
Upload Profile.
3.
profile.
The program displays the job directory and prompts
The program automatically downloads the speci-
The program automatically uploads the specified
Page 53

System Setup
When you choose Download Profile or Upload Profile, you will be
asked for a job’s name. This can be either a specific job or the last job
running when ANASOFT was terminated.
Normal start up action
This is the start up action when the program starts up normally.
Power failure recovery
When the program starts up following a power failure, it determines the
time between the power failure and the start up. If the time is less than
the power failure recovery time limit, the program takes the under limit
start up action. If the time is greater than the power failure recovery time
limit, the program takes the ov er limit start up action. The time limit is
entered in hours and minutes.
NOTE
In order for the power fai lure recovery se quence to
operate, ANASOFT must be started automatically
when the computer is powered up. This is done using
an AUTOEXEC.BAT file which contains commands
which the computer executes at power up. See DOS
operating manual for description of
AUTOEXEC.BAT files. The file should contain as its
last commands:
1) a command to enter the disk directory containing
ANASOFT.
2) a command to stated executing the ANASOFT pro-
gram.
When recording data to floppy disk, use only the B
drive.
ANASOFT User’s Guide 43
Page 54

System Setup
Data Logging
Sets the logging function On or Off.
Directs the printer data logging
to one of the two printers that can
be connected to the computer.
Process logging interval. Set in
hours:minutes:seconds. The range
for disk logging is 00:00:05 to
99:59:59, and for printer logging--
•
This window controls the data logging features of ANASOFT.
•
Two types of logging are available:
1. Periodic process variable logging - periodically records the process
variable for all the loops in the system.
2. Alarm logging - records alarm conditions as they occur in the proces s.
Alarms are recorded on alarm occurrence, alarm acknowledge, and
alarm clearing.
Disk file name for the data
logging. Any DOS file
name up to 8 characters.
The name must not include
an extension since ANASOFT adds an extension
depending on the file’s
Lotus or Text. Lotus
files have WK1 extension and they can be
read directly in Lotus
123. T ext files have
TXT extension and they
can be printed or read
directly into a standard
44 ANASOFT User’s Guide
Page 55

Controller Comm.
System Setup
•
This window allows you to disable or enable the communication to
a controller.
•
Disable the communication i f you don’t want to send changes to the
controller.
•
When changing the status to Enabled, you are asked whether to
download or upload parameters.
ANASOFT User’s Guide 45
Page 56

System Setup
Digital Output Polarity
•
This window allows you to set the polarity of the digital outputs
used for alarms.
•
Two options are available when digital output is On:
1. O -- normally open (high)
2. C -- normally closed (low)
46 ANASOFT User’s Guide
Page 57

Aim Fail Output (MLS only)
System Setup
•
This window allows you to select the digital output that will be acti-
vated if communications fail between the MLS-Analog Input Module (AIM) and the MLS-processor Module (PM).
•
You can enter output number between 1 and 34 or N for None.
•
For more information on this feature, see the
MLS User’s Guide
.
ANASOFT User’s Guide 47
Page 58

System Setup
48 ANASOFT User’s Guide
Page 59

Job Setup
Getting Here
Job Setup
The Job Setup screen enables you to
1. Load a Job from the disk and download the parameters to the controllers.
2. Save the currently running job on the disk.
3. Delete a job from the disk.
The Job Setup screen displays a directory of up to 112 job names for
each group configured in the ANAINSTL as a different type number.
Press F4 from the Overview screen.
Function Keys
TAB Change to other groups in the system.
F1 Load a job from the disk, and download parameters to the con-
F2 Save job on disk. If the job name already exists, you will be
F3 Delete job from disk.
ESC Return to Overview screen.
Key Function
trollers.If you edited the current job after loading, you will be
asked to save before loading.
asked whether to overwrite the existing file.
ANASOFT User’s Guide 49
Page 60

Job Setup
50 ANASOFT User’s Guide
Page 61

View Alarms
The View Alarms screen offers an overview on the alarm and warning
conditions by providing detailed information on when they occurred,
acknowledged, or cleared. This screen also enables you to acknowledge
the alarms and warnings.
Getting Here
Press F5 from the Overview screen.
View A l arms
Four possible messages:
“Alarm Message”--alarm has occurred. You see
the message defined on the Loop Setup screen.
Alarms Acked--alarms acknowledged from
ANASOFT.
Alarms Remote Acked--alarms acknowledged
from the controllers.
Function Keys
F1 Clear log. Press after all alarms are acknowledged.
ESC Return to Overview screen.
Six possible types:
HP--high process
LP--low process
HD--high deviation alarm
LD--low deviation alarm
HW--high deviation warning
LW--low deviation warning
Key Function
ANASOFT User’s Guide 51
Page 62

View Alarms
Alarm Screen Auto Switch
Audible Alarm
If you set the Auto Switch On in the System Parameters menu, the
Alarm screen appears automatically for each new alarm. You will be
asked to acknowledge each alarm. After doing that you can press Esc to
return to the last screen displayed before the alarm condition occurred.
Acknowledging the alarms from View Alarms screen also
acknowledges the alarms at the controller. Acknowledging the alarms at
the controllers will acknowledge the alarms on the View Alarms screen.
If you set the Audible Alarm On in the System Parameters menu, the
computer emits an audible warning for each new alarm. Press Enter to
silence this alarm.
52 ANASOFT User’s Guide
Page 63

Trend Plot
Getting Here
Trend Plot
The Trend Plot screen offers graphic trending for both real time and past
history of up to 48 hours. Three parameters can be plotted: process
variable, output value, and setpoint. You can use any combination of
these values. You can also combine loops, and plot up to three different
loops at the same time.
The screen is a combination of past and real time trend plotting. The
past is on the left 5/6 of the screen and the real time is on the right 1/6.
If an EGA video card is installed in th e computer, the screen will be
colored for easier identification. If a CGA video card is installed, the
plot will be displayed in black and white only.
Press F7 from the Overview screen or the Loop Setup screen.
A legend for the
parameters being
plotted
One segment out of six in the time
scale. Set in minutes or hours.
Appears when the output value is plotted.
Ranges from -100% to
+100% for dual output
loops, and 0% to 100%
for others.
ANASOFT User’s Guide 53
Page 64

Trend Plot
Function Keys
Trend Plot Setup Screen
Getting Here
Key Function
F1 Plot setup. Enter the Plot Setup screen.
F2 Single loop. Display the trend plot for the loop being edited
when you entered the Trend Plot screen.
F3 Combine loops. Display the trend plot for the first group of
combined loops defined on the Plot Setup screen
ESC Return to the screen the trend plot was entered from.
The Plot Setup screen allows editing scales and parameters and
combining loops.
Press F1 from the Trend Plot screen. The screen is shown on the next
page.
54 ANASOFT User’s Guide
Page 65

Trend Plot
Information on 8 loops. You cannot
edit this part!
Window parameters: date,
time, size.
Combine up to 3 loops in
one graphic display.
Type in loop numbers
separated by spaces.
Edit here the loop plot range and
the three parameters of the plot.
Press N if you do not wish to plot
one of these parameters.
If you set to YES,
the output values
will be saved and
available for plot-
Values are recorded in
periodic intervals according to this time scale. The
available range is 1 to 255
seconds.
If you set to YES,
the plot will be displayed on a fine grid
for a quick referenc-
Indicates the density
of the print screens.
Set to single, double,
or quad.
ANASOFT User’s Guide 55
Page 66

Trend Plot
Print Trend Plot Screen
•
T o print the T rend P lot screen, you need an IBM graphic compat ible
printer.
•
Press
the Print Screen key. The program will ask for a title for the
print out.
•
Type
the title and press Enter. This title will be displayed at the
lower center of the screen and will be printed with the plot screen.
The printing of the screen at the moment of pressing Enter will be
transferred to a buffer and the screen will be printed as a background task. The Trend Plot screen will be updating and other
screens may be accessed.
•
Be sure
error will appear on the Systems Error window.
your printer is powered and On Line; otherwise, a printer
56 ANASOFT User’s Guide
Page 67

Appendix A: PID Tuning and
Appendix A: PID Tuning and
Control
Introduction
This chapter explains PID control and supplies some starting PID values
and tuning instructions, so that you can use control parameters
appropriate for your system. If yo u woul d li ke mor e infor mat ion on PID
control, consult the Watlow-Anafaze Practical Guide to PID.
The control mode dictates how the controller responds to an input
signal. The control mode is different from the type of control output
signal (like analog or pulsed DC voltage). There are several control
modes available: On/Off, Proportional (P), Proportional and Integral
(PI), Proportional with Derivative, and Proportional wi th Integral and
Derivative (PID). P, PI, or PID control are necessary when process
variable (PV) cycling is unacceptable or if the process or s etpoint (SP) is
variable.
Control Modes
NOTE
For any of these control modes to function, the lo op
must be in automatic mode.
The next sections explain the different modes you can use to control a
loop.
ANASOFT User’s Guide 57
Page 68

Appendix A: PID
On/Off Control
On/Off control is the simplest way to control a process; a controller
using On/Off control turns an output on or off when the process variable
reaches a certain limit above or below the desired setpoint. You can
adjust this limit, since Watlow-Anafaze controllers use an adjustable
spread. For example, if your setpoint is 1000
º
is 20
F, the output switches On when the process variable goes below
º
980
F and Off when the process goes above 1000ºF. (The next di agr a m
shows a process under On/Off control.)
º
F, and your limit (spread)
Proportional Control
A process using On/Off control frequently cycles around the setpoint.
When process variable cycling is unacceptable or the process or setpoint
are variable, use proportional control. Proportional control, or Gain,
eliminates cycling by increasing or decreasing the outpu t propor tional to
the process variable's distance from the setpoint.
The limits of proportional control are defined by the Proportional Band
(PB); outside this band of control, the output is either 100% or 0%. For
example--using the same values from the example above and a PB of
º
20
--the output is:
•
50% when the process variable is 990ºF
•
75% when the process variable is 985ºF
•
100% when the process variable is 980ºF or below.
58 ANASOFT User’s Guide
Page 69

Appendix A: PID Tuning and
However, a process which uses only Proportional control may settle at a
point above or below the setpoint; it may never reach the setpoint at all.
This behavior is known as “offset” or “droop”. (This diagram shows a
process under proportional control only.)
Proportional and Integral Control
For Proportional and Integral control, use the Integral term, or Reset,
with Proportional control. The Integral term corrects for offset by
repeating the Proportional band's error correction until there is no error.
For example, if a process tends to settle about 5
use Integral control to bring it to the desired setting. (The next diagram
shows a process under proportional and integral control.)
º
F below the setpoint,
ANASOFT User’s Guide 59
Page 70

Appendix A: PID
Proportional, Integral and Derivative Control
For an improved level of control, use Derivative control with
Proportional or Proportional and Integral control. Derivative control
corrects for overshoot by anticipating the behavior of the process
variable and adjusting the output appropriately. For example, if the
process va riable is rapi dly appr oachin g the se tpoint, Derivat ive co ntrol
reduces the output, anticipating that the process variable will reach
setpoint. Use it to eliminate the process variable overshoot common to
PI control. (This figure shows a process u nder full PID control).
Control Outputs
The CLS provides a 5 Vdc digital output signal for PID control outputs.
These outputs normally control the process using relays. WatlowAnafaze can also provide a Serial Digital to Analog converter (SDAC)
for 0-5 Vdc, 0-10 Vdc, or 4-20 mA analog output signals.
Digital Output Control Forms
The next section explains different modes for c ontrol outputs.
On/Off
On/Off output is very simple: it turns the output on or off according to
the control signal of the On/Off control.
60 ANASOFT User’s Guide
Page 71

Appendix A: PID Tuning and
Time Proportioning (TP)
Time Proportioning attempts to digitally simulate an analog output
percentage by turning the output on or off for each time step so that the
cumulative average of the output is the desired setting. You must enter a
cycle time for TP outputs. The cycle time is the time over which the
output is proportioned, and it can be any value from 1 to 255 seconds.
For example, if the output is 30% and the Cycle Time is 10 seconds,
then the output will be on for 3 seconds and off for seven seconds. The
figure below shows typical TP and DZC graphs.
Distributed Zero Crossing (DZC)
DZC output is essentially a Time Proportioning output. However, for
each AC line cycle the controller decides whether the power should be
On or Off. There is no Cycle Time since the decision is made for each
line cycle. Since the time period for 60 Hz power is 16.6 ms, the
switching interval is very short and the power is applied uniformly.
Switching is done only at the zero crossing of the AC line, which helps
reduce electrical “noise”.
DZC output is primarily used for very fast actin g electrical heating loads
using Solid State Relays (SSRs). For instance, the open air heater coil is
an example of a fast acting load. Do not use DZC output for
electromechanical relays.
The combination of DZC output and a solid state relay can
inexpensively approach the effect of analog phase angle fired control.
Analog Outputs
The Serial DAC is an optional analog output module for the CLS. It lets
the controller output precision analog voltages or currents--typically for
precision open-loop control, motor or belt speed control, or phase angle
fired control. To use it, set the output type for the appropriate loop to
SDAC.
ANASOFT User’s Guide 61
Page 72

Appendix A: PID
Output Digital Filter
The output filter digitally filters the PID control output signal. It has a
range of 0-255 levels, which gives a time constant of 0-127.5 seconds.
Use the output filter if you need to filter out erratic output swings due to
extremely sensitive input signals, like a turbine flow signal or an open
air thermocouple in a dry air gas oven.
The output filter can also enhance PID control. Some processes are very
sensitive and require a high PB, so normal control methods are
ineffective. You can use a smaller PB- and get better control- if you use
the digital filter to reduce the high and low process output swings.
You can also use the filter to reduce output noise when a large derivative
is necessary, or to make badly tuned PID loops and poorly designed
processes behave properly.
Reverse and Direct Action
Reverse action is an output control action in which an increase in the
process variable causes a decrease in the output. Direct action is an
output control action in which an increase in the process variable causes
an increase in the output. Heating applications normally use reverse
action and cooling applications usually use direct action.
62 ANASOFT User’s Guide
Page 73

Setting Up and Tuning PID Loops
After you have installed your control s ystem, tune each control loop and
then set the loop to automatic control. (When you tune a loop, you
choose PID parameters that will best control the process.) If you don't
mind minor process fluctuations, you can tune the loop in automatic
control mode. This section gives PID values for a variety of heating and
cooling applications.
If you don't know the PID values that are best for your process, try the
CLS' Autotune feature. The autotune feature is accessible from the
controller's Man/Auto key. (For more information about Autotune, see
Chapter 3: Using the CLS.)
NOTE
Tuning is a slow process. After you have adjusted a
loop, allow about 20 minutes for the change to take
effect.
Appendix A: PID Tuning and
Proportional Band (PB) Settings
The table below shows PB settings for various temperatures in
degrees F.
Temperature
Setpoint
-100 to 99 20 1100 to 1199 75 2200 to 2299 135
100 to 199 20 1200 to 1299 80 2300 to 2399 140
200 to 299 30 1300 to 1399 85 2400 to 2499 145
300 to 399 35 1400 to 1499 90 2500 to 2599 150
400 to 499 40 1500 to 1599 95 2600 to 2699 155
500 to 599 45 1600 to 1699 100 2700 to 2799 160
600 to 699 50 1700 to 1799 105 2800 to 2899 165
700 to 799 55 1800 to 1899 110 2900 to 2999 170
800 to 899 60 1900 to 1999 120 3000 to 3099 175
900 to 999 65 2000 to 2099 125 3100 to 3199 180
1000 to 1099 70 2100 to 2199 130 3200 to 3299 185
PB
As a general rule, set the PB to 10% of the setpoint below 1000
of the setpoint above 1000
Temperature
Setpoint
PB
º
. This setting is useful as a starting value.
Temperature
Setpoint
º
and 5%
PB
ANASOFT User’s Guide 63
Page 74

Appendix A: PID
Integral Term (TI) Settings
This table shows TI settings vs. Reset settings.
TI
(secs./repeat)
30 2.0 210 0.28
45 1.3 240 .25
60 1.0 270 .22
90 .66 300 .20
120 .50 400 .15
150 .40 500 .12
180 .33 600 .10
As a general rule, use 60, 120, 180, or 240 as a starting value for the TI.
Reset
(repeats/min)
TI
(secs./repeat0
Reset
(repeats/min)
Derivative Term (TD) Settings
This table shows Derivative term (TD) versus Rate Minutes (RM);
Rate=TD/60.
TD
(secs./repeat)
5.08 35.58
10 .16 4 0 .66
15 .25 4 5 .75
20 .33 5 0 .83
25 .41 5 5 .91
30 .50 60 1.0
Rate
(repeats/min)
TD
(secs./repeat)
Rate
(repeats/min)
64 ANASOFT User’s Guide
As a general rule, set the TD to 15% of TI as a starting value.
Page 75

General PID Constants by Application
This section gives PID values for many applications. They are useful as
control values or as starting points for PID tuning.
Proportional Band Only (P)
PB: Set the PB to 7% of the setpoint (SP) (Example: Setpoint = 450, so
Proportional Band = 31).
Proportional with Integral (PI)
PB: Set the PB to 10% of SP (Example: Setpoint = 450, so PB = 45).
Set TI to 60.
Set TD to Off.
Set the Output Filter to 2.
PI with Derivative (PID)
Appendix A: PID Tuning and
PB: Set the PB to 10% of the SP (Example: Setpoint = 450, so PB = 45).
Set the TI to 60.
Set the TD to 15% of the TI (Example: TI = 60, so TD = 9).
Set the Output Filter to 2.
The next table shows general PID constants by application.
Application PB TI TD Filter
Electrical heat w/ SSR
Electrical heat w/ EM
relays
Cool w/ solenoid valve
Cool w/ fans
Electric heat w/ open
heat coils
Gas heat w/ motorized
valves
SP>1200
Electric heat w/ phase
angle controlled SCR
Extuders w/ cooling
gas heat w/ SSR (set
spread to 8)
50
50
70
10
30
60
100
60
50
60 15 4 TP 3 Reverse
º
60 15 6 TP 20 Reverse
º
500 90 4 TP 10 Direct
º
off 10 4 TP 10 Direct
º
20 off 4 DZC - Reverse
º
120
º
2402540
º
60 15 4 DAC or
º
300 120 4 TP 3 Reverse
º
Output
Type
8 DAC or
SDAC
SDAC
Cycle
Time
- Reverse
- Reverse
Action
ANASOFT User’s Guide 65
Page 76

Appendix A: PID
66 ANASOFT User’s Guide
Page 77

Appendix B: Input Scaling
Appendix B: Input Scaling
All inputs use the automatic scaling function of the Mx+B calcul ation.
The end points of that calculation are set by HiPV, LoPV, HiRDG, and
LoRDG. The default values are set by the input Type selection. Do not
adjust these values until you completely understand what those
adjustments will do.
The T/C and RTD ranges are set in the firmware, and you don’t need to
adjust those ranges for a proper operating hardware or software. The
default values provide correct operating parameters as to stated
accuracy, PID control and Alarm settings.
For Linear inputs the scaling of the input is required to obtain correct
engineering units of the input. This m ust be done before set ting SP, PB,
and Alarm settings.
Linear Input Scaling
A linear input of 60 mv or less is scaled according to the engineering
unit and mv range of the input signal. Watlow-Anafaze controllers have
a -10 to 60 mvdc analog input range. All linear inputs must be scaled to
that range by scaling resistors on the input.
The HiPV and LoPV is the range of the engineering unit, while the
HiRDG is the % of the Hi end signal level mv with reference to 60 mv
and the LoRDG is the % of the Lo end signal level with reference to 60
mv. The % is expressed as 1000 equals 100.0. Thus 83.3% would be set
as 833 on the RDG scaling.
Example 1:
The input sign al is 4-20 madc repr esenting a range of 0-250 PSI. The
scaling resistor is 3 ohms, thus full scale reading of the 20 madc signal
would be 60 mv. The Lo end signal of 4 ma would give a reading of 12
mv.
60 mv input of 60 mv range = 100%
12 mv input of 60 mv range = 20%
HiPV = 250
HiRDG = 1000(100.0)
LoPV = 0
LoRDG = 200(20.0)
ANASOFT User’s Guide 67
Page 78

Appendix B: Input
Example 2:
The input signal is 0-50 mvdc representing a range of 2-14 Ph. There is
no scaling resistor as the maximum input is less then 60 mv.
50 mv input of 60 mv range = 83.3%
0 mv input of 60 mv range = 0.0%
HiPV = 14
HiRDG = 833
LoPV = 2
LoRDG = 0
68 ANASOFT User’s Guide
Page 79

Appendix C: ANASOFT-RS
Appendix C: ANASOFT-RS
This appendix explains the Ramp/Soak (r/s) feature of ANASOFT. Use
the ANASOFT User’s Guide as the reference to the standard functions
of ANASOFT. Fo r a complete description of the ramp and soak profile
and cycle operation, see Watlow-Anafaze Controller Hardware
Installation and Operating Manual .
What is Ramp/Soak?
The r/s feature turns your controller into a powerful and flexible batch
controller. You can program your controller to change a process’
setpoint in a preset pattern over time. This pattern, or temperature
profile, consists of several segments. During a segment, the
temperature goes from the previous segment’s setpoint to the current
segment’s setpoint.
ANASOFT-RS Features
•
If the current segment’s s etpoin t is larger or smaller than the prev i-
ous segment’s setpoint, it’s a ramp segment.
•
If the current segment’s setpoint is the same as the previous seg-
ment’s setpoint, it’s a soak segment.
Each segment can have up to two triggers which are digital inputs
assigned to the segment. At least one of these triggers must be true
before the segment can start. While the input isn’t true, the profile waits
(Trigger wait state). You can use the same trigger for more than one
loop or one profile.
Each segment can also have up to four events which are digital out p ut s.
The events occur at the end of the segment.
•
Control r/s cycles: start, run, hold, or terminate.
•
View the status of running cycles.
•
Edit profile’s parameters.
•
Assign new r/s profiles or conv ert r/s loops into st andard control
loops.
•
Save profiles on the disk in a special directory.
ANASOFT User’s Guide 69
Page 80

Appendix C: ANASOFT-RS
Hardware Requirements
Profile Assignment Screen
Getting Here
In order to operate ANASOFT-RS, all Watlow-Anafaze controllers in
the system should i nclude the r/s option. Cu rren tly, only 8LS, 12LS, and
CLS controllers have this option. During start up, ANASOFT-RS
checks each controller in the system to verify that the r/s option is
installed. If a controller doesn’t have the r/s option, an error message
appears, and the program will not operate with the r/s feature.
Use this screen to assign loops to profiles.
Press F8 from the Overview screen.
Function Keys
F1 Enter the Edit screen.
F2 Delete a profile.
HOME / END Flip the pages in the profile directory.
PgUp / PgDn View more loops in the system.
ESC Return to Overview screen.
70 ANASOFT User’s Guide
Each loop is either
Assigned
assigned loop operates as a standard
control loop.
as a r/s loop. An un-
Key Function
Assigned
or
Not
A directory of profil e name s
saved on the disk. Can contain up to 128 names shown
on four display pages.
Page 81

Profile Edit Screens
Getting Here
Appendix C: ANASOFT-RS
These screens enable you to edit the profile. The changes you make on
both screens take affect only after you exit the relevant screen and save
the profile.
Press F1 from the Profile Ass ignment screen. You will be asked for the
profile name to edit. After entering the name, The first editing screen
appears. This Screen displays the setpoint and the event outputs you
want before the profile starts.
The other pages of the Profile Edit screen show the running segments of
the profile. Up to 20 segments can be defined. The different parameters
are described on the next page.
ANASOFT User’s Guide 71
Page 82

Appendix C: ANASOFT-RS
Accumulation of all previous segments up to the edited segment. Chan ging Total Time also changes Segment Time.
Segment’s time duration. Set in minutes:seconds or
hours:minutes, depending on the time base defined in the
System Setup screen, System Parameters window.
.
Setpoint at the end of the
segment.
Setpoint’s tolerance. If the difference between
the PV and the setpoint is greater than the tolerance, the loop goes into tolerance wait status
until the PV is back within setpoint tolerance.
Set to -99 to +99 or to OPEN for no tolerance for
the segment.
Up to two triggers per segment. Each trigger can
be On or Off. Triggers can be latched or
unlatched. A latched trigger, once it becomes
active, is not checked again for the duration of
the segment. An unlatched trigger is checked
continuously during the segment.
An alarm is set when the PV is out of setpoint
tolerance for longer than the Timeout Tolerance.
Number of cycles repeated automatically. Set between 1 to 99 or Continues for continuous cycling.
Up to four events per segment.Set
to On or Off.
72 ANASOFT User’s Guide
Page 83

Function Keys
Key Function
F1 Copy this profile to another profile name.
PgUp / PgDn Change segments.
ESC Return to Profile Assignment screen.
R/S Time Base
R/S Loop Face Plate Display
Appendix C: ANASOFT-RS
Use the System Parameters window of the System Setup screen to select
the r/s time base. The time base can be either minutes:seconds or
hours:minutes. The time base affects all the other time units of all
profiles in the system (Time Remaining, Total Time, etc.).
When you assign a r/s profile loop to a system loop, r/s cycle
information will be displayed in the loop face plate display. Below is a
part of the Lo op Ov er vie w sc re en di sp la yi ng one s ta nda rd l oop a nd on e
r/s loop.
Standard control loop Assigned r/s loop
Cycle’s status. Five options.
See table on the next page.
Profile’s name
Current segment’s name
Cycle time remaining.
The time left until the
end of the segment.
Cycle total time. Total
time since the beginning of the cycle.
Cycle number. displays the
cycle’s number out of the total
cycles. In this example the loop
is in the first cycle out of one
cycle.
ANASOFT User’s Guide 73
Page 84

Appendix C: ANASOFT-RS
Status Description
Start The loop is ready to start running a cycle.
Run The loop is in cycle and the cycle clock is running.
Hold The loop is in cycle but the clock isn’t running. You must con-
Tol Wait The loop is in cycle but the clock isn’t running because the pro-
Trg Wait The loop is in cycle but the clock isn’t running because the trig-
tinue the cycle to start the clock.
cess variable is out of setpoint tolerance.
ger’s conditions are not being met.
The only r/s parameter you can edit in the loop face plate is the r/s
status. You can edit it in the Overview Edit screen or the Loop Setup
screen. The status is only displayed and can be edited if a profile has
been assigned to the loop. The status you can select depends on the
current status as described below:
Power Failure Recovery
Current Status Selectable Status
Start Run
Run Hold, Start
Hold Continue, Start
Tol Hold, Trg Wait Start, Hold
You can set ANASOFT-RS to recover automatically from system
power failures, and continue any previously running r/s cycles, by
setting the power failure recovery action to upload the last running job.
The 8LS controllers, when powering up, automatically continue with
any previously running cycle as recorded in the battery backed memory,
and ANASOFT-R S will display the current cycle information if the job
is uploaded at start up. If the last running job is downloaded at start up,
any previously running cycles will be terminated and set to the Start
state.
74 ANASOFT User’s Guide
Page 85

Glossary
q
y
y
y
g
p
g
p
g
A
AC
See Alternating Current.
AC Line Fre
The frequency of the AC power line measured in
Hertz (Hz), usually 50 or 60 Hz.
Accurac
Closeness between the value indicated by a measuring instrument and a physical constant or
known standards.
Action
The response of an output when the process variable is changed. See also Direct action, Reverse
action.
Address
A numerical identifier for a controller when used
in computer communications.
Alarm
A signal that indicates that the process has
exceeded or fallen below a certain range around
the setpoint. For example, an alarm may indicate
that a process is too hot or too cold. See also:
Alarm Dela
The lag time before an alarm is activated.
Alternatin
An electric current that reverses at regular intervals, and alternates positive and negative values.
uenc
Deviation Alarm
Failed Sensor Alarm
Global Alarm
High Deviation Alarm
High Process Alarm
Loop Alarm
Low Deviation Alarm
Low Process Alarm
Current (AC)
Ambient Tem
The temperature of the air or other medium that
surrounds the components of a thermal system.
American Wire Gau
A standard of the dimensional characteristics of
wire used to conduct electrical current or signals.
AWG is identical to the Brown and Sharpe
(B&S) wire gauge.
Ammeter
An instrument that measures the magnitude of an
electric current.
ere (Amp)
Am
A unit that defines the rate of flow of electricity
(current) in the circuit. Units are one coulomb
(6.25 x 10¹⁸ electrons) per second.
Analo
Automatic Mode
Autotune
Output
A continuously variable s i gnal t hat i s us ed to rep resent a value, such as the process value or setpoint value. Typical hardware configurations are
0-20mA, 4-20mA or 0-5 Vdc.
A feature that allows the controller to set PID
control outputs in response to the Process Variable (PV) and the setpoint.
A feature that automatically sets temperature
control PID values to match a particular thermal
system.
erature
e (AWG)
B
Bandwidth
A symmetrical region above and below the setpoint in which proportional control occurs.
Baud Rate
The rate of information transfer in serial communications, measured in bits per second.
ANASOFT User’s Guide 75
Page 86

Glossary
Block Check Character (BCC)
A serial communications error checking method.
An acceptable method for most applications,
BCC is the default method. See CRC.
Bumpless Transfer
A smooth transition from Aut o (closed loop) to
Manual (open loop) op erat ion . Th e co nt ro l ou tput
does not change during the transfer.
C
Calibration
The comparison of a measuring device (an
unknown) against an equal or better standard.
Celsius (Centigrade)
Formerly known as Centigrade. A temperature
°
scale in which water freezes at 0
°C
100
at standard atmospheric pressure. The for-
mula for conversion to the Fahrenheit scale is:
°
F=(1.8x°C)+32.
Central Processing Unit (CPU)
The unit of a computing system that includes the
circuits controlling the interpretation of instructions and their execution.
Circuit
Any closed path for electrical current. A configuration of electrically or electromagnetically-connected components or devices.
Closed Loop
A control system that uses a sensor to measure a
process variable and makes decisions based on
that feedback.
C and boils at
Communications
The use of digital computer messages to link
components.
See Serial Communications.
See Baud Rate.
Control Action
The response of the PID control output relative to
the error between the process variable and the
setpoint. For reverse action (usually heating), as
the process decreases below the setpoint the output increases. For direct action (usually cooling),
as the process increases above the setpoint, the
output increases.
Control Mode
The type of action that a controller uses. For
example, On/Off, time proportioning, PID, Automatic or manual, and combinations of these.
Current
The rate of flow of electricity. The unit of measure is the ampere (A).
1 ampere = 1 coulomb per second.
Cycle Time
The time required for a controller to complete
one on-off-on cycle. It is usually expressed in
seconds.
Cyclic Redundancy Check (CRC)
An error checking method in communications. It
provides a high level of data security but is more
difficult to implement than Block Check Character (BCC).
See Block Check Character.
Cold Junction
Connection point between thermocouple metals
and the electronic instrument.
Common Mode Rejection Ratio
The ability of an instrument to reject electrical
noise, with relation to ground, from a common
voltage. Usually expressed in decibels (dB).
76 ANASOFT User’s Guide
D
Data Logging
A method of recording a process variable over a
period of time. Used to review process performance.
Page 87

Glossary
Deadband
The range through which a variation of the input
produces no noticeable change in the output. In
the deadband, specific conditions can be placed
on control output actions. Operators select the
deadband. It is usually above the heating proportional band and below the cooling proportional
band.
Default Parameters
The programmed instructions that are permanently stored in the microprocessor software.
Derivative Control (D)
The last term in the PID algorithm. Action that
anticipated the rate of change of the process, and
compensates to minimize overshoot and undershoot. Derivative control is an instantaneous
change of the control output in the same direction
as the proportional error. This is caused by a
change in the process variable (PV) that
decreases over the time of the derivative (TD).
The TD is in units of seconds.
Deutsche Industrial Norms (DIN)
A set of technical, scientific and dimensional
standards developed in Germany. Many DIN
standards have worldwide recognition.
Distributed Zero Crossing (DZC)
A form of digital output control. Similar to burst
fire.
E
Earth Ground
A metal rod, usually copper, that provides an
electrical path to the earth, to prevent or reduce
the risk of electrical shock.
Electrical Noise
See Noise.
Electromagnetic Interference (EMI)
Electrical and magnetic noise imposed on a system. There are many possible causes, such as
switching ac power on inside the sine wave. EMI
can interfere with the operation of controls and
other devic es.
Electrical-Mechanical Relays
See Relay, electromechanical.
Emissivity
The ratio of radiation emitted from a surface
compared to radiation emitted from a blackbody
at the same temperature.
Deviation Alarm
Warns that a process has exceeded or fallen
below a certain range around the setpoint.
Digital to Analog Converter (DAC)
A device that converts a numerical input signal to
a signal that is proportional to the in put in some
way.
Direct Action
An output control action in which an increase in
the process variable, causes an increase in the
output. Cooling applications usually use direct
action.
Direct Current (DC)
An electric current that flows in one direction.
Engineering Units
Selectable units of measure, such as degrees Celsius and Fahrenheit, pounds per square inch,
newtons per meter, gallons per minute, liters per
minute, cubic feet per minute or cubic meters per
minute.
EPROM
Erasable Programmable, Read-Only Memory
inside the controller.
Error
The difference between the correct or desired
value and the actual value.
ANASOFT User’s Guide 77
Page 88

Glossary
g
g
p
q
y
g
g
g
g
g
g
g
F
Fahrenheit
The temperature scale that sets the freezing point
º
of water at 32
standard atmospheric pressure. The formula for
conversion to Celsius is:
Failed Sensor Alarm
Warns that an input sensor no longer produces a
valid signal. For example, when there are thermocouple breaks, infrared problems or resistance
temperature detector (RTD) open or short failures.
Filter
Filters are used to handle various electrical noise
problems.
Di
ital Filter
response of a system when inputs change unrealistically or too fast. Equivalent to a standard
resistor-capacitor (RC) filter
Di
ital Adaptive Filter
high frequency input signal noise (noise spikes).
Heat/Cool Out
the change in the response of the heat or cool output. The output responds to a step change by
going to approximately 2/3 its final v alue within
the numbers of scans that are set.
F and its boiling point at 212ºF at
º
C=5/9 (ºF-32ºF).
—
(DF)
ut Filter
A filter that allows the
—
A filter that rejects
—
A filter that slows
Global Alarm
Alarm associated with a global digital output that
is cleared directly from a controller or through a
user interface.
Global Di
Ground
ital Outputs
A pre-selected digital output for each specific
alarm that alerts the operator to shut down critical
processes when an alarm condition occurs.
An electrical line with the same electrical potential as the surrounding earth. Electrical systems
are usually grounded to protect people and equipment from shocks due to malfunctions. Also
referred to a "safety ground".
H
Hertz(Hz)
Frequency, measured in cycles per second.
h Deviation Alarm
Hi
Warns that the process is above setpoint, but
below the high process variable. It can be used as
either an alarm or control function.
Hi
h Power
(As defined by ANAFAZE) Any voltage above
24 VAC or Vdc and any current level above 50
mAac or mAdc.
Fre
uenc
The number of cycles over a specified period of
time, usually measured in cycles per second. Also
referred to as Hertz (Hz). The reciprocal is called
the period.
G
Gain
The amount of amplification used in an electrical
circuit. Gain can also refer to the Proportional (P)
mode of PID.
78 ANASOFT User’s Guide
Hi
h Process Alarm
A signal that is tied to a set maximum value that
can be used as either an alarm or control function.
h Process Variable (PV)
Hi
See Process Variable (PV).
h Readin
Hi
An input level that corresponds to the high process value. For linear inputs, the high reading is a
percentage of the full scale input range. For pulse
inputs, the high reading is expressed in cycles per
second (Hz).
Page 89

Glossary
p
p
g
p
g
g
p
y
q
p
g
p
I
Infrared
A region of the electromagnetic spectrum with
wavelengths ranging from one to 1,000 microns.
These wavelengths are most suited for radiant
heating and infrared (noncontact) temperature
sensing.
In
ut
Process variable information that is supplied to
the instrument.
ut Scalin
In
The ability to scale input readings (readings in
percent of full scale) to the engineering units of
the process variable.
In
ut Type
The signal type that is connected to an input, such
as thermocouple, RTD, linear or process.
ral Control (I)
Inte
Control action that automatically eliminates offset, or droop, between setpoi nt and act ual pr oces s
temperature.
See Auto-reset.
J
Linearit
The deviation in response from an expected or
theoretical straight line value for instruments and
transducers. also called Linearity Error.
Li
uid Crystal Display (LCD)
A type of digital display made of a material that
changes reflectance or transmittance when an
electrical field is applied to it.
Load
The electrical demand of a process, expressed in
power (watts), current (amps), or resistance
(ohms). The item or substance that is to be heated
or cooled.
Loo
Alarm
Any alarm system that includes high and low process, deviation band, deadband, digital outputs,
and auxiliary control outputs.
Low Deviation Alarm
Warns that the process is below t he setpoint, but
above the low process variable. It can be used as
either an alarm or control function.
Low Process Alarm
A signal that is tied to a set minimum value that
can be used as either an alarm or control function.
Job
A set of operating conditions for a process that
can be stored and recalled in a controller’s memory. also called a Recipe.
Junction
The point where two dissimilar metal conductors
join to forma thermocouple.
L
La
The delay between the output of a signal and the
response of the instrument to which the signal is
sent.
Linear In
ut
A process input that represents a straight line
function.
Low Readin
An input level corresponding to the low process
value. For linear inputs, the low reading is a percentage of the full scale input range. For pulse
inputs, the low reading is expressed in cycles per
second (Hz).
M
Manual Mode
A selectable mode that has no automatic control
aspects. The operator sets output levels.
Manual Reset
See Reset.
Milliam
ere (mA)
One thousandth of an ampere.
ANASOFT User’s Guide 79
Page 90

Glossary
pp
p
p
p
p
p
p
y
p
N
No Key Reset
A method for resetting the controller's memory
(for instance, after an EPROM change).
Noise
Unwanted electrical signals that usually produce
signal interference in sensors and sensor circuits.
See Electromagnetic Interference.
Noise Su
Non Linear
ression
The use of components to reduce electrical interference that is caused by making or breaking
electrical contact, or by inductors.
Through ANAFAZE software, the Non Linear
field sets the system to linear control, or to one of
two non linear control o pt ions . Input 0 for Linear,
1 or 2 for non linear.
O
Offset
The difference in temperature between the setpoint and the actual process temperature. Offset
is the error in the process variable that is typical
of proportional-only control.
On/Off Control
A method of control that turns the output full on
until setpoint is reached, and then off until the
process error exceeds the hysteresis.
O
en Loo
A control system with no sensory feedback.
O
erator Menus
The menus accessible from the front panel of a
controller. These menus allow operators to set or
change various control actions or features.
O
tical Isolation
Two electronic networks that are connected
through an LED (Light Emitting Diode) and a
photoelectric receiver. There is no electrical continuity between the two networks.
Out
ut
Control signal action in response to the differ ence
between setpoint and process variable.
ut Type
Out
The form of PID control output, such as Time
Proportioning, Distributed Zero Crossing,
SDAC, or Analog. Also the description of the
electrical hardware that makes up the output.
Overshoot
The amount by which a process variable exceeds
the setpoint before it stabilizes.
P
Panel Lock
A feature that prevents operation of the front
panel by unauthorized people.
PID
Proportional, Integral, Derivative. A control
mode with three functions:
Proportional action dampens the system
response, Integral corrects for droops, and Derivative prevents overshoot and undershoot.
Polarit
The electrical quality of having two opposite
poles, one positive and one negative. Polarity
determines the direction in which a current tend s
to flow.
Process Variable
The parameter that is controlled or measured.
Typical examples are temperature, relative
humidity, pressure, flow, fluid level, events, etc.
The high process variable is the highest value of
the process range, expressed in engineering units.
The low process variable is the lowest value of
the process range.
Pro
ortional (P)
Output effort proportional to the error from setpoint. For example, if the proportional band is
º
20
and the process is 10º below the setpoint, the
heat proportioned effort is 50%. The lower the
PB value, the higher the gain.
80 ANASOFT User’s Guide
Page 91

Glossary
Proportional Band (PB)
A range in which the proportioning function of
the control is active. Expressed in units, degrees
or percent of span.
See PID.
Proportional Control
A control using only th e P (proportional) value of
PID control.
Pulse Input
Digital pulse signals from devices, such as optical encoders.
R
Ramp
A programmed increase in the temperature of a
setpoint syste m.
Range
The area between two limits in which a quan tity
or value is measured. It is usually described in
terms of lower and upper limits.
Recipe
See Job.
—
Automatic Reset
PI or PID temperature controller that adjusts the
process temperature to the setpoint after the system stabilizes. The inverse of integral.
Automatic Power Reset
ing limit controls that
Resistance
Opposition to the flow of electric current, measured in ohms.
Resistance Temperature Detector (RTD)
A sensor that uses the resistance temperature
characteristic to measure temperature. There are
two basic types of RTDs: the wire RTD, which is
usually made of platinum, and the thermistor
which is made of a semiconductor material. The
wire RTD is a positive temperature coefficient
sensor only, while the thermistor can have either
a negative or positive temperature coefficient.
Reverse Action
An output control action in which an increase in
the process variable causes a decrease in the output. Heating applications usually use reverse
action.
The integral function of a
—
A feature in latch-
Reflection Compensation Mode
A control feature that automatically corrects the
reading from a sensor.
Relay
A switching device.
—
Electromechanical Relay
device that completes or interrupts a circuit by
physically moving electrical contacts into contact
with each other. Not recommended for PID control.
Solid State Relay (SSR)
A power switching
— A switching
device with no moving parts that completes or interrupts a circuit electrically.
Reset
Control action that automatically eliminates offset or droop between setpoint and actual process
temperature.
See also Integral.
RTD
See Resistance Temperature Detector.
S
Serial Communications
A method of transmitting information between
devices by sending all bits serially over a si ngle
communication channel.
—
RS-232
(EIA) standard for interface between data terminal equipment and data communications equipment for serial binary data interchange. This is
usually for communications over a short distance
(50 feet or less) and to a single device.
An Electronics Industries of America
ANASOFT User’s Guide 81
Page 92

Glossary
RS-485
(EIA) standard for electrical characteristics of
generators and receivers for use in balanced digital multipoint systems. This is usually used to
communicate with multiple devices over a common cable or where distances over 50 feet are
required.
Setpoint (SP)
The desired value programmed into a controller.
For example, the temperature at which a system
is to be maintained.
Shield
A metallic foil or braided wire layer surroundi ng
conductors that is designed to prevent electrostatic or electromagnetic interference from external sources.
Signal
Any electrical transmittance that conveys information.
Solid State Relay (SSR)
See Relay, Solid State.
Span
The difference between the lower and upper limits of a range expressed in the same units as the
range.
—
An Electronics Industries of America
TD (Timed Derivative)
The derivative function.
Thermistor
A temperature-sensing device made of semiconductor material that exhibits a large change in
resistance for a small change in temperature.
Thermistors usually have negative temperature
coefficients, although they are also available with
positive temperature coefficients.
Thermocouple (T/C)
A temperature sensing device made by joining
two dissimilar metals. This junct ion produces an
electrical voltage in proportion to the difference
in temperature between the hot junction (sensing
junction) and the lead wire connection to the
instrument (cold junction) .
TI (Timed Integral)
The Integral term.
Tran sm it ter
A device that transmits temperature data from
either a thermocouple or RTD by way of a twowire loop. The loop has an exter nal power supply.
The transmitter acts as a variable resistor with
respect to its input signal. Transmitters are desirable when long lead or extension wires produce
unacceptable signal degradation.
Spread
In heat/cool applications, the +/- difference
between heat and cool. Also known as process
deadband.
See deadband.
Stability
The ability of a device to maintain a constant output with the application of a constant input.
T
T/C Extension Wire
A grade of wire used between the measuring
junction and the reference junction of a thermocouple. Extension wire and thermocouple wire
have similar properties, but extension wire is less
costly.
82 ANASOFT User’s Guide
U
Upscale Break Protection
A form of break detection for burned-o ut thermo couples. Signals the operator that the thermocouple has burned out.
Undershoot
The amount by which a process variable falls
below the setpoint before it stabilizes.
Page 93

V
g
Volt (V)
The unit of measure for electrical potential, voltage or electromotive force (EMF).
See Voltage.
e (V)
Vo lt a
The difference in electrical potential between two
points in a circuit. It’s the push or pressure behind
current flow through a circuit. One volt (V) is the
difference in potential required to move one coulomb of charge between two points in a circuit,
consuming one joule of energy. In other words,
one volt (V) is equal to one ampere of current (I)
flowing through one ohm of resistance (R), or
V=IR.
Z
Glossary
Zero Cross
Action that provides output switching only at or
near the zero-voltage crossing points of the ac
sine wave.
ANASOFT User’s Guide 83
Page 94

Glossary
84 ANASOFT User’s Guide
Page 95

Glossary
ANASOFT User’s Guide 85
 Loading...