

Page 1

10-TRAY FOOD DEHYDRATOR
DESHIDRATADOR DE ALIMENTOS
DE DIEZ BANDEJAS
DÉSHYDRATEUR ALIMENTAIRE
À DIX PLATEAUX
WDH10
For your safety and continued enjoyment of this product,
always read the instruction book carefully before using.
Para su seguridad y para disfrutar plenamente de este producto, siempre lea
cuidadosamente las instrucciones antes de usarlo.
An que cet appareil vous procure en toute sécurité beaucoup de satisfaction, lire
attentivement le mode d’emploi avant de l’utiliser.
Page 2

IMPORTANT SAFEGUARDS
When operating electric appliances, especially when children are
present, basic safety precautions should always be taken, including
the following:
1. READ ALL INSTRUCTIONS
BEFORE OPERATING
2. Always unplug appliance from outlet when not in use or before
cleaning. Allow plenty of time to cool before adding or removing
parts.
3. CAUTION, HOT SURFACE: The dehydrator does get hot to
the touch.
4. Children should be supervised to ensure that they do not play
with the appliance.
5. To avoid electric shock, never immerse plugs, cord, or the base
assembly in any liquids.
6. Never operate any appliance with a damaged cord or plug,
or one that has malfunctioned or been damaged in any way.
Immediately return the appliance to the nearest authorized
service facility for analysis.
7. Using accessory attachments not recommended or sold by
the appliance manufacturer may cause electric shock, injury,
or re.
8. Do not use outdoors.
9. Never let the cord hang over the edge of a table or counter or
touch hot surfaces.
10. Never place appliance on or near a hot gas or electric burner or
in a heated oven.
11. DO NOT block the vent holes in the back of the food
dehydrator. CAUTION: Back panel may become hot during use.
12. Never use this appliance for any use other than that for which it
is intended.
13. To disconnect, rst push the ON/OFF button and make sure
unit is OFF, then unplug from electrical wall outlet.
14. Never pour liquids into the appliance.
15. Never operate near combustible or pressurized spray cans.
2
Page 3

16. This appliance is not intended for use by persons (including
children) with reduced physical, sensory or mental capabilities,
or lack of experience and knowledge, unless they have
been given supervision or instruction concerning use of the
appliance by a person responsible for their safety. Children
should be supervised to ensure that they do not play with
the appliance.
SAVE THESE INSTRUCTIONS
APPROVED FOR COMMERCIAL USE
CONTENTS
Important Safeguards ..... ........................................................................2
Grounding Instructions ......... ...................................................................4
Introduction .............................................................................................. 4
Parts .......................... ...............................................................................5
Before First Use ..... .................................................................................. 6
Operating Instructions ...... .......................................................................6
Helpful Hints ............................................................................................. 8
Dehydrating Guide .................................................................................. 9
Cleaning & Maintenance ...................................................................... 10
Food Selection ..... ................................................................................. 10
Vegetable Preparation & Treatment. .....................................................11
Fruit Preparation & Treatment ...............................................................13
Nut Preparation & Treatment .................................................................15
Herb & Flower Preparation & Treatment ....... .......................................16
Food Storage ...........................................................................................16
Recipes ....................................................................................................17
3
Page 4
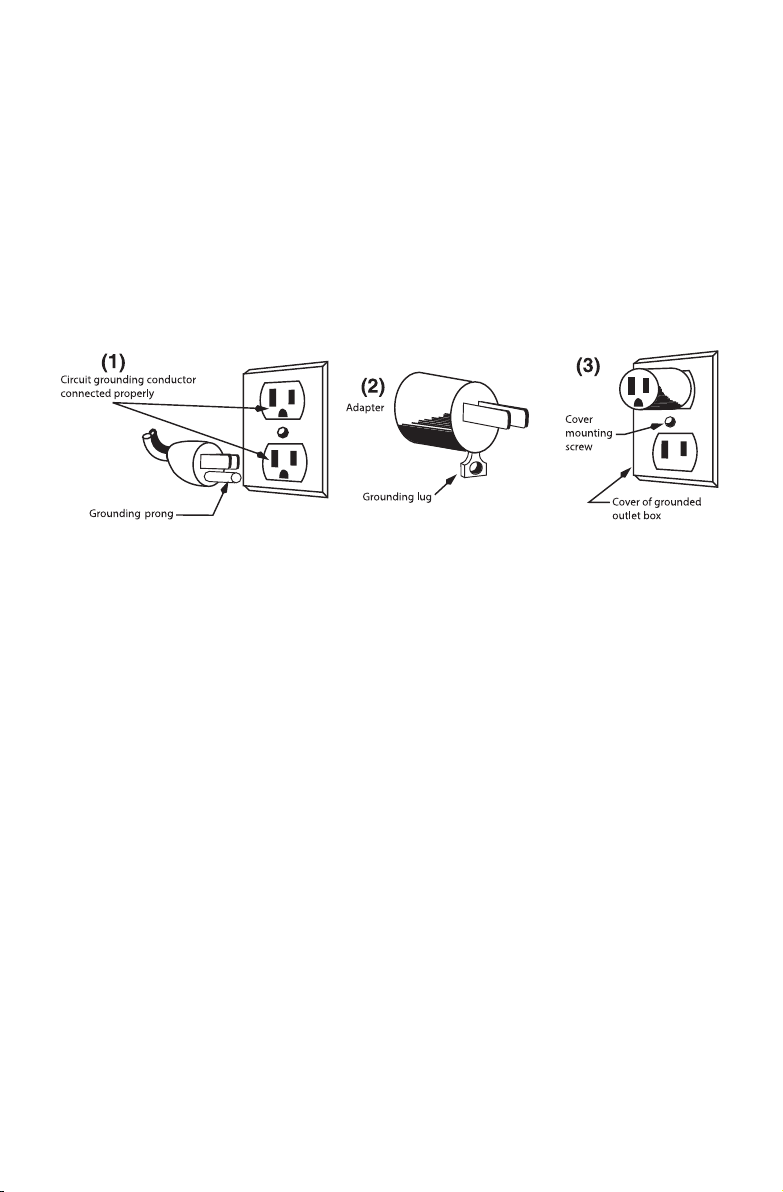
GROUNDING INSTRUCTIONS
For your protection, the Waring® Commercial 10-Tray Dehydrator is
equipped with a 3-conductor cord set that has a molded 3-prong
grounding-type plug, and should be used in combination with a
properly connected grounding-type outlet as shown in Figure 1.
If a grounding-type outlet is not available, an adapter, shown in
Figure 2, may be obtained so that a 2-slot wall outlet can be used
with a 3-prong plug. Referring to Figure 3, the adapter must be
grounded by attaching its grounding lug under the screw of the
outlet cover plate.
INTRODUCTION
Thank you for purchasing the Waring® Commercial 10-Tray Food
Dehydrator! The dehydration of fruits and vegetables is one of the
earliest methods of food preservation. Since their discovery and
cultivation, plums and grapes have been sun-dried into prunes
and raisins. These dried fruits and vegetables make great snacks
or desserts, and it’s easy to dehydrate different meats to make
jerky. Dehydration is a healthy way of preserving food because
bacteria growth is inhibited by the removal of moisture. You can
even use your food dehydrator to dry owers and make potpourri!
Before using your food dehydrator, be sure to take time to read the
Important Safeguards and all other instructions in this manual.
4
Page 5

PARTS
5
7
1
4
2
3
a
1. Housing
2. Trays (10)
3. Drip Tray
4. Door
5. Door Handle
6. Power Cord (not shown)
7. Control Panel
a. Power ON/OFF – turns on power to the machine
b. START/STOP – starts or stops the timed cycle
c. Temperature Range – 90ºF–180°F/32ºC–82°C
d. Timer – set up to 40 hours
e. Programs M1–M5
b
c
d
e
5
Page 6

BEFORE YOUR FIRST USE
1. Unpack the dehydrator with care.
2. Wash all of the trays in warm, soapy water. Rinse well and
dry completely.
3. Wipe the dehydrator base with a clean and dry, soft cloth
or sponge. Never immerse housing, plug or cord in water or
any other liquids.
OPERATING INSTRUCTIONS
1. Position the dehydrator so that the air vents at the rear of the
dehydrator are not blocked. Keep the dehydrator at least 3 feet
away from any wall to allow for proper air circulation. DO NOT
operate the dehydrator on or near ammable surfaces such
as carpeting.
CAUTION: DO NOT block the intake holes in the back of the
food dehydrator or the exhaust vent above the door on the
front of the unit.
2. Wash and slice food as needed.
3. Arrange food on trays; do not overload trays. Trays can
accommodate a variety of food sizes with small adjustments.
4. Plug the dehydrator into a standard 120V wall outlet and
press power ON/OFF to turn machine on. To turn off, hold the
POWER button for 3 seconds.
5. Temperature setting defaults to 140°F. Timer defaults
to 8 hours.
6. To change the temperature, use the plus and minus arrows
below temperature display. Hold down arrow for fast scroll.
7. Set the timer using the plus and minus arrows below
timer display.
8. Press START.
Allow the food to dry for the recommended length of time
(drying time depends on the food type).
9. Monitor the food while it is dehydrating and check it for
desired doneness. Leave the pieces that are not yet done in
the dehydrator and monitor them until done.
10. When the timer elapses, the machine will beep once and turn
heat off. Note that the fan will continue to run for one minute
to help cool the unit. Then the unit will shut down completely.
To turn off, hold the POWER button for 3 seconds.
6
Page 7

11. Remove the trays and allow the food to cool. Once cooled,
remove individual pieces. Serve or store in food-safe
containers or plastic bags, preferably airtight. For vacuum
seal machines, visit our website.
12. Store the pieces that are not going to be eaten in the next few
days in the refrigerator. When storing food in the freezer, use
containers or bags designed specically for freezer storage.
Selecting/Setting Custom Programs M1–M5
1. Press SELECT/SET underneath the Programs buttons. As you
press, an LED will illuminate to show which program you have
selected.
2. For your convenience, we provided these set programs –see
the chart below for reference:
Memory Location Food Type Temperature Time
M1 Beef Jerky 150 ˚ F/65˚C 8 hours
M2 Fruit 140˚F/60˚C 12 hours
M3 Vegetables 130˚F/55˚C 10 hours
M4 Herbs 100 ˚ F/38˚C 6 hours
M5 Seafood 145˚F/63˚C 12 hours
3. To set a new program, press SELECT/SET until you reach the
program you wish to set.
4. Use the plus and minus arrows to reach your desired
temperature.
5. To set the timer, use the arrows to reach your desired time.
A time must be set. The unit will not operate indenitely unless
timer is set.
6. To exit programming mode and save setting, press and hold
the SELECT/SET button for 3 seconds. Unit will beep to
conrm program has been set.
Changing from F to C
This machine defaults to degrees Fahrenheit. If you wish to switch
to Celsius, hold down both the plus and minus arrows below
temperature display for 3 seconds.
7
Page 8

HELPFUL HINTS
Drying times may vary based on many circumstances, including but
not limited to: the relative humidity of the room; the temperature of
the food at the beginning of the drying process; the amount of food
in the dehydrator, the leanness of the meat, etc.
• Wash and clean the dehydrator before using if it has been stored
for a long time.
• Fresh vegetables and fruits are best for dehydrating; canned
goods do not dehydrate well.
• All vegetables and fruits should be cleaned before preparation
and pretreatment.
• Prepare and pretreat fruits and vegetables as outlined in this
manual for best results.
• It is usually not dangerous to leave the dehydrator on for a long
time period when required, but make sure that it is in a safe
location. Read the Important Safeguards in this manual, and
exercise caution when using the dehydrator.
• Keeping your own notes on the type of food, weight before and
after drying, total drying time, and nal results will enable you to
achieve the desired outcome, every time!
• Most recipes will work well with dried foods. By experimenting
with the recipes offered in this manual, you will soon discover
your own unique ways of using dried foods.
8
Page 9

DEHYDRATING GUIDE*
Food Temp
HERBS 100 ºF / 3 8º C 4–6 hours Arrange herbs on tray(s)
FRUITS
Apples
Bananas 20 hours
Blueberries 36 hours Arrange whole blueberries on tray(s)
Grapes 48 hours Slice seedless grapes in half and arrange on tray(s)
Mango 5 hours
Pineapple 8.5 hours
Raspberries 26 hours Arrange whole raspberries on tray(s)
Strawberries 9 hours
Tomatoes 7 hours Slice tomatoes ¼ inch thick and arrange on tray(s)
VEGETABLES
Beets
Bell Peppers 12 hours Slice peppers ¼ inch thick and arrange on tray(s)
Broccoli 4 hours
Carrots 4.5 hours Slice carrots 1⁄8 inch thick and arrange on tray(s)
Celery 4 hours Slice celery ¼ inch thick and arrange on tray(s)
Kale 4 hours Arrange kale leaves on tray(s)
Mushrooms 4 hours
Summer Squash 5 hours
Yams 4.5 hours Slice yams ¼ inch thick and arrange on tray(s)
MEAT, FISH & JERKY
Beef Jerky
Fish Jerky 8 hours
Poultry Jerky 170 ºF / 76 ºC 12 hours
140ºF/60ºC
130ºF/55ºC
15 0 º F /6 5º C
*Drying times are dependent on how thick items are sliced, how fresh foods
are, initial food moisture content, how much food is on the trays, ambient room
temperature, and ambient humidity. Results and personal tastes may vary; the
above information is based on approximate dehydrating times.
Approximate
Drying Times
6.5 hours Slice apples ¼ inch thick and arrange on tray(s)
Slice ripe bananas ¼ inch thick and arrange on
tray(s)
Slice fresh mango 1⁄8 inch thick and arrange on
tray(s)
Slice fresh pineapple ¼ inch thick and arrange
on tray(s)
Slice whole strawberries ½ inch thick and arrange
on tray(s)
5 hours
8 hours
Peel fresh beets, slice 1⁄8 inch thick and arrange
on tray(s)
Break up broccoli florets into small pieces and
arrange on tray(s)
Slice fresh mushrooms ¼ inch thick and arrange
on tray(s)
Slice yellow squash ¼ inch thick and arrange on
tray(s)
Trim fat off top round roast, slice ¼ thick and arrange on tray(s)
Slice fresh salmon ¼ inch thick and arrange on
tray(s)
Semi-freeze chicken breast, slice ¼ inch thick and
arrange on tray(s)
Preparation
9
Page 10

CLEANING & MAINTENANCE
Before performing any cleaning and maintenance operations,
be sure that the food dehydrator is OFF, unplugged and cool.
1. Dehydrator trays are dishwasher safe. Depending on what you
are dehydrating, you may need to pre-soak trays to release
stubborn foods.
2. Wipe the housing and door clean using a damp cloth.
Dry thoroughly with a clean cloth.
Any other servicing should be performed by an authorized
service representative.
FOOD SELECTION
Select foods for dehydration that are in good condition. Fruits
should have just become ripe since they contain the highest
natural amount of sugar and provide the best results. Vegetables
should be fresh and crisp. Avoid fruits that are not ripe; they yield
unpredictable results and often have a at, bitter taste. Overripe
fruits and vegetables with spoiled portions should also be avoided.
Cut off any bruised or marred portions of the fruits and vegetables
before dehydration. Meat, poultry and sh should be fresh and lean.
Preparation, dehydration time and their storage method will also
inuence their quality and taste. Follow preparation, dehydration
and storage instructions in this manual to ensure the best-tasting,
highest quality dried foods.
IMPORTANT—If you suspect food contamination, do not attempt to
use. Discard the food.
10
Page 11

VEGETABLE PREPARATION & TREATMENT
Vegetables are low in acid and have less sugar than fruits, so they
require a little more effort. Some vegetables are better frozen than
dried, so remember to be selective in the vegetables you choose.
PREPARATION
Only the highest quality vegetables should be selected for drying.
Wash them carefully just before dehydrating to remove dirt and
bacteria. Most vegetables should be peeled, trimmed, cut or
shredded prior to drying.
PRETREATMENT
Blanching vegetables prior to drying is recommended. This destroys
the enzymes that can produce “off” avors when stored and lead
to poor texture and poor dehydration. Steam blanching is a better
method than water blanching because more avor and vitamins are
retained. Vegetables can also be microwaved.
STEAM BLANCHING
Layer prepared vegetables in the top portion of a steamer or a
steamer insert and steam until the vegetables are heated through,
but are not cooked enough to eat (usually 2 to 3 minutes). Stir to
ensure all vegetables are evenly blanched. Quickly transfer steamed
vegetables directly to drying trays.
MICROWAVE BLANCHING
Microwave ovens can easily be used to blanch fresh vegetables.
Prepare vegetables the same way as for steam blanching. Place
vegetables in a covered casserole dish with a small amount of
water (refer to your microwave oven cooking chart). Cook for
¼ to ¹/3 the time listed in the chart, stirring after half of the blanching
time. Vegetables blanched in a microwave will be more brightly
colored than those that are steam blanched. Quickly transfer
blanched vegetables directly to drying tray.
11
Page 12

VEGETABLE PREP
Asparagus Divide tips from stems by snapping in half.
Tips are best for drying, but dried stems can
be crushed and used for seasoning.
Beans Snip off ends and cut as desired. Blanch,
(green) then place in the freezer for 30 to 45 minutes.
Beets Trim, leaving about an inch of the top and
root. Blanch, allow to cool, then cut off the
top and root. Slice.
Broccoli Trim and cut into pieces. Steam for about
4 to 5 minutes.
Carrots Wash, peel, and cut into ½-inch-long pieces.
Steam for about 4 to 5 minutes.
Corn Remove husk, wash and steam blanch the
whole piece of corn. Allow to cool, then
shear the corn from the cob.
Celery Break leaves off their stems. Place leaves
separate from stalks in tray(s).
Chives Wash, dry, and mince.
Cucumber Wash, trim and slice about ¼ inch thick.
Garlic Separate and peel cloves. Cut cloves into
halves or slices.
Mushrooms Remove any soil and remove stem. Dry the
mushroom whole, cut in half or slice.
Onions Trim off the ends and peel. Cut into rings
or dice.
Peppers Wash and remove core and seeds. Cut into halves,
(pimentos) quarters, rings or strips.
Peppers Wash and dry whole.
(jalapeños)
12
Page 13

Potatoes Wash, peel, and cut or slice as desired;
steam blanch. Rinse under cold water
and pat dry before placing on tray(s).
Note: If you wish to leave the skin on, you
must wash and scrub the potato and remove
all the eyes and scars with the tip of a potato
peeler or paring knife.
Tomatoes Wash and remove stems. Using a ladle or tongs,
dip into boiling water and then into an ice water
bath. You will be able to remove the skin easily.
Cut into halves or quarters.
FRUIT PREPARATION & TREATMENT
FRUIT
Nearly all fruits can be dried at home, but some will require more
drying time than others; the guidelines offered here will help get you
started. It is recommended that you select fruits that are in season
and experiment with those rst.
Preparation
Wash and inspect fruits and remove any bruised or overripe parts.
Peel if desired. Cut larger fruits in half. If the pieces vary too much in
size, slice them to ³/8" to ½" thick for even drying. Smaller fruits such
as grapes and cherries may be dried whole. Remove pits or stones
from fruits such as plums, cherries, apricots, etc. Always peel fruits
that have been articially waxed. Peeling is optional with other fruits
– for instance, dried pear skin tends to be grainy, and peach skin
peels are a little fuzzy.
Most fruits, like pineapples, grapes, strawberries, and plums can be
placed directly on the drying trays as they are prepared. However,
some fruits will turn brown when exposed to air (apples, apricots,
peaches, and pears). Following the guidelines set below, you can
pretreat these fruits to slow this browning and to prevent loss of
vitamins A and C. To pretreat them, the cut pieces should be kept
in a holding solution until you have sufcient fruit to dry.
13
Page 14

Pretreatment
Below are several optional methods of pretreatment. You
don’t always need to pretreat food in order to dry it; however,
pretreatment can make food look better, increase the shelf life and
even enhance the nutritional value. Experiment with both treated
and untreated food to see which will work best. Remember, proper
storage is critical to the quality of the nal product, whether treated
or untreated.
Sodium Bisulfite
Use food-safe (USP) grade only. Dissolve 1 teaspoon of sodium
bisulte in one quart of water. Dip small amounts of fruit in the
solution for 2 minutes. This helps prevent loss of vitamin C and
maintains a bright color. Sodium bisulte is available in most
pharmacies/drugstores.
Natural Pre-Dips
With their high vitamin C content, pineapple and lemon juice are
natural alternatives to other pretreatments to reduce browning. Slice
fruit directly into juice. Remove after about 2 minutes and place
on trays. Fruits may also be dipped in honey, lime or orange juice,
gelatin powders or sprinkled with coconut to give them an exotic
avor. Use your imagination!
When drying fruit halves, especially apricots, it has been suggested
that popping the back (“inside out”) will speed drying time. This
is true, but it also results in the loss of the nutritional juices to the
bottom of the dehydrator. Instead, cut each half in half again to give
the end product more nutritional value, a brighter color, and faster
reconstitution capabilities.
Apples Wash thoroughly and peel if you wish.
Cut in half and core, then slice into
smaller pieces. Pretreat with lemon juice
to prevent browning.
Apricots Wash, cut open and remove pit. If desired,
cut into quarters.
Bananas Peel and slice. Pretreat with lemon juice to
prevent browning.
14
Page 15

Cherries Wash and remove pits.
Coconut Drain the milk, open shell and remove
coconut meat. Dry and cut into small
chunks.
Figs Wash, remove stems and cut into halves or
quarters. Place dry skin side up.
Grapes Remove stems, wash and slice or leave whole,
as desired.
Papaya Wash, peel and cut into chunks.
Peaches Wash, slice in half and remove pit. If desired,
peel and cut into quarters.
Pears Wash, peel, slice in half to remove core.
Cut into chunks or slices. Pretreat with lemon
juice to prevent browning.
Pineapple Remove spiny skin, core and cut into chunks
or wedges.
Plums Wash, cut in half and remove pit. If desired,
cut into quarters.
Strawberries Wash and slice or leave whole, as desired.
NUT PREPARATION & TREATMENT
To dry nuts, rst shell and rinse them with warm water. Pat dry and
spread out on trays. Most nuts will take approximately 20 to 30
hours to dehydrate and they should be allowed to dehydrate until
brittle.
Allow them to cool after dehydrating. Any nuts that will not be
consumed within a few days should be frozen to ensure freshness.
Allow them to defrost before eating.
15
Page 16

HERB & FLOWER PREPARATION & TREATMENT
To dry herbs and owers, rst rinse and pat dry. Remove any dead,
mushy or discolored portions, leaving the stem intact. Spread herbs
or owers on tray and allow to dehydrate for about 2 to 7 hours,
depending on their type and size. Remove from tray and allow to
cool when drying is complete. Remove the leaves or buds from stem
and break them apart. Crush if desired.
For best results, pick owers after the rising sun evaporates the
morning dew and before the cool evening mist settles on the petals.
Be aware of owers that have been sprayed with insecticides or
other harmful chemicals; do not use these. If you are dehydrating
owers at the same time as herbs, place owers on the bottom trays
and herbs on the top trays; this prevents any debris from the owers
falling on the herbs.
FOOD STORAGE
Packaging
In order to keep well, dried foods must be carefully packaged. Pack
dried foods in plastic freezer bags, squeezing out as much air as
possible. (You can also use heat-sealable bags.) Store plastic bags
inside airtight metal, plastic or glass containers. When you store
foods in rigid containers without putting them into freezer bags rst,
you expose the dried foods to air, which will negatively impact them.
Vacuum packaging will greatly extend the shelf life of your dried
foods. For vacuum sealing machines, visit our website.
Storage Conditions
Store appropriately packaged dried foods in a cool, dark place. The
colder the food is kept, the longer the quality will be maintained. For
every 18˚F drop in temperature, the shelf life increases 2 to 3 times,
so if you have room in a refrigerator or freezer, keep your dried foods
there. If not, nd the coolest place in your home to store dried foods.
Light also causes the quality and nutritive value to deteriorate, so
keep dried foods in opaque or dark-colored containers.
16
Page 17

Shelf Life
Because fruits have a naturally high sugar and acid content, they
dry well and store for longer periods of time than vegetables.
When properly packaged and stored at room temperature or below
(70˚F or less), most fruits will maintain a high quality and nutritional
value up to a year. Most vegetables are best when eaten within six
months. FRUITS AND VEGETABLES KEPT BEYOND THE
RECOMMENDED TIME MAY NOT BE AS NUTRITIOUS OR
TASTE AS GOOD, BUT WILL NOT SPOIL UNLESS THE
PACKAGING IS NO LONGER INTACT.
RECIPES
Beef Jerky
8 servings
1½ pounds flank steak
1⁄3 cup Worcestershire sauce
2 tablespoons liquid smoke
¼ cup light soy sauce
2 tablespoons light brown sugar
2 cloves fresh garlic
¼ teaspoon fresh ground black pepper
Place meat on a plate and freeze for 1 hour. This will make it easier to
slice the meat into thin strips. Slice meat into ¼-inch-wide strips, cutting
against the grain. Combine remaining ingredients. Marinate beef strips for
a minimum of 30 minutes in the refrigerator. Place strips on the trays. Do
not overcrowd; leave enough space so that pieces are not touching. Cover
and dehydrate on 150ºF or on the M1 setting for approximately 8 hours,
or until desired doneness, flipping strips once, about halfway through.
Store beef jerky in an airtight container in the refrigerator or freezer.
Calories 165 • carb. 6g • pro. 18g • fat 7g • sat. fat 3g
• chol. 34mg • sod. 423mg • calc. 39.9mg • fiber 0g
Nutritional information per serving:
17
Page 18

Tuna Jerky
6 servings
1 pound fresh tuna steak
1 tablespoon fresh, grated ginger
2 teaspoons crushed fresh garlic
¼ cup light soy sauce
¼ cup orange juice
2 tablespoons rice wine vinegar
1 teaspoon light brown sugar
Place the tuna steak flat on a cutting board and cut in half. Place the tuna
on a plate and freeze for 1 hour. This will make it easier to cut the tuna
into thin strips. Stand tuna up with flat, cut edge on the board. Slice into
¼-inch pieces, then cut into about 1-inch-wide strips. Combine ginger,
garlic, soy sauce, orange juice, rice wine vinegar and brown sugar.
Marinate tuna for a minimum of 30 minutes in the refrigerator. Place strips
on trays. Do not overcrowd; leave enough space so that pieces are not
touching. Cover and dehydrate on 150ºF or on the M1 setting for
approximately 8 hours, or until desired doneness, flipping strips once,
about halfway through. Store tuna jerky in an airtight container in the
refrigerator or freezer.
Calories 124 • carb. 3g • pro. 18g • fat 4g • sat. fat 1g
• chol. 28mg • sod. 384mg • calc. 11.6mg • fiber 0g
Nutritional information per serving:
18
Page 19

Spicy Beef Sticks
About 15 servings, 2 sticks each
3 pounds ground beef
1 tablespoon paprika
1½ teaspoons cayenne pepper
1½ teaspoons crushed red pepper
1 tablespoon garlic powder
4 tablespoons Worcestershire sauce
2 teaspoons curing salt
In a large bowl, combine all ingredients until just incorporated. To make
the sticks, form a small piece of the meat mixture into a ball and then roll
into 5-inch by ½-inch sticks. Place the sticks on a sheet pan. Refrigerate
overnight, uncovered. Place the sticks on the dehydrating trays. Do not
overcrowd; leave enough space so that pieces are not touching. Cover
and dehydrate on 150ºF or on the M1 setting for approximately 5 hours,
or until desired doneness. Store beef sticks in an airtight container in
the refrigerator or freezer.
Calories 201 • carb. 2g • pro. 17g • fat 14g • sat. fat 5g
Nutritional information per serving:
• chol. 61mg • sod. 182mg • calc. 20mg • fiber 0g
Teriyaki Chicken Jerky
8 servings
2½ pounds boneless, skinless chicken breasts
½ cup teriyaki sauce, your favorite brand
¾ cup pineapple juice
1½ tablespoons liquid smoke
¾ teaspoon crushed red pepper
Trim the chicken breast of any fat. Place trimmed breasts on a sheet pan
and freeze for 1 hour. This will make it easier to slice the chicken into thin
strips. Slice the chicken into ¼-inch strips. Combine teriyaki sauce,
pineapple juice, liquid smoke, and crushed red pepper. Marinate chicken
strips for a minimum of 1 hour in the refrigerator. Place strips on trays.
Do not overcrowd; leave enough space so that pieces are not touching.
Cover and dehydrate on 170ºF for approximately 20 hours, or until desired
doneness, flipping strips once, about halfway through. Store chicken jerky
in an airtight container in the refrigerator or freezer.
Calories 179 • carb. 5g • pro. 33g • fat 2g • sat. fat 0g
Nutritional information per serving:
• chol. 81mg • sod. 340mg • calc. 22mg • fiber 0g
19
Page 20

“Sun”-Dried Tomato Basil Spread
10 servings, ¼ cup each
10 Roma tomatoes, all close in size
8 ounces ¹/3-less-fat cream cheese
½ cup light mayonnaise
¾ cup light sour cream
1 garlic clove, crushed
¼ cup fresh-grated Parmesan cheese
2 tablespoons chopped fresh basil
2 scallions, light to dark green, chopped
Salt and pepper, to taste
Quarter the tomatoes and place on trays, cut side up. Cover and
dehydrate on 140ºF or on the M2 setting for approximately 7 hours, or
until dry and leathery. Chop the dehydrated tomatoes into smaller pieces.
Combine tomatoes, cream cheese, and mayonnaise in a food processor
until the tomatoes are incorporated and it becomes a consistent mixture.
Move the tomato mixture to a large bowl. Stir in sour cream, garlic,
Parmesan, basil, scallions, and salt and pepper. Serve with your favorite
bread or crackers.
Calories 124 • carb. 6g • pro. 4g • fat 10g • sat. fat 4g
Nutritional information per serving:
• chol. 18mg • sod. 320mg • calc. 83mg • fiber 1g
Yogurt Roll-Ups
Makes 2 roll-ups
1 8-ounce cup vanilla yogurt, your favorite brand
2 tablespoons jam, your favorite flavor
Combine yogurt and jam. Using a rubber spatula, spread the yogurt in an
even, thin layer on the fruit roll-up sheet. Place the sheet on a tray. Cover
and dehydrate on 150ºF or on the M1 setting for approximately 5 hours,
or until the yogurt is no longer gooey throughout. Peel leather from sheet
and cut in half. The leather may be rolled up in plastic wrap and stored
at room temperature for later use.
*Fruited yogurt can be substituted for vanilla, but fruit chunks do not
easily spread evenly.
Nutritional information per half sheet roll-up:
Calories 152 • carb. 29g • pro. 6g • fat 1g • sat. fat 1g
• chol. 6mg • sod. 81mg • calc. 198mg • fiber 0g
20
Page 21

Spiced Apple Trail Mix Leather
Makes 2 fruit leathers
²/3 cup unsweetened applesauce
Pinch ground cinnamon
Pinch ground nutmeg
½ teaspoon honey
¼ teaspoon fresh lemon juice
1 tablespoon dried cranberries, chopped fine
1 tablespoon walnuts, chopped fine
In a medium bowl, combine the applesauce, cinnamon, nutmeg, honey,
and lemon juice. Using a rubber spatula, spread the applesauce in a thin,
even layer on the fruit roll-up sheet. Sprinkle evenly with dried cranberries
and walnuts. Lightly press the cranberries and walnuts into the
applesauce. Cover and dehydrate on 140ºF or on the M2 setting for
4 hours, or until the applesauce is no longer wet throughout. Peel leather
from sheet and cut in half. The leather may be rolled up in plastic wrap
and stored at room temperature for later use.
Nutritional information per half sheet fruit leather:
Calories 94 • carb. 15g • pro. 0g • fat 3g • sat. fat 0g
• chol. 0mg • sod. 2mg • calc. 8mg • fiber 1g
Strawberry Banana Leather
Makes 2 fruit leathers
¾ cup fresh strawberries, hulled and chopped
½ fresh banana, sliced
½ tablespoon honey
½ teaspoon fresh lemon juice
Cooking spray
Combine all ingredients except cooking spray in a blender and purée until
smooth. Lightly spray a paper towel with cooking spray and rub over the
fruit roll-up sheet. Pour the strawberry mixture evenly on the sheet. Cover
and dehydrate on 150ºF or on the M1 setting for approximately 5 hours,
or until the purée is no longer wet throughout. Peel leather from sheet and
cut in half. The leather may be rolled up in plastic wrap and stored at
room temperature for later use.
Nutritional information per half sheet fruit leather:
Calories 63 • carb. 16g • pro. 1g • fat 0g • sat. fat 0g
• chol. 0mg • sod. 1mg • calc. 12mg • fiber 2g
21
Page 22

Tropical Granola
7 servings, ½ cup each
3 cups old-fashioned oats
¾ cup coconut, shredded and dried
½ cup wheat germ
1⁄3 cup brown sugar
½ cup dried cranberries
½ cup dried pineapple, small chunks
½ cup banana chips, small pieces
1 cup pecans, chopped
1 tablespoon orange zest
1 tablespoon vanilla extract
¼ cup butter, melted
2 tablespoons agave nectar, or honey
1⁄3 cup maple syrup
¼ teaspoon salt
In a large bowl, combine the dry ingredients and vanilla. In a small bowl
combine the butter, agave or honey, maple syrup and salt. Pour the
butter/syrup mixture over the oat mixture. Stir to combine. Divide the
granola mixture among three dehydrating trays, using parchment paper
to line the trays. Clump the mixture in your hand as you divide it to
form clusters. Cover and dehydrate on 150ºF or on the M1 setting for
approximately 3 hours, or until the granola is no longer wet. Store the
granola in an airtight container at room temperature.
Calories 318 • carb. 44g • pro. 8g • fat 13g • sat. fat 5g
Nutritional information per serving:
• chol. 9mg • sod. 59mg • calc. 45.8mg • fiber 6g
22
Page 23

Salt and Vinegar Potato Crisps
4 servings
3 medium-size russet potatoes, skin removed if desired
1 cup apple cider vinegar
2 tablespoons olive oil
Coarse salt to taste
Cut the potatoes into thin slices about ¹/8 inch thick, creating round chips.
Soak the potatoes in the vinegar for 8 to 12 hours. This step is necessary
so the potatoes do not taste chalky. Drain the potato slices well, transfer
to a bowl, and toss with olive oil. Lay the potatoes in a single layer on
parchment paper-lined trays. Sprinkle with salt. Cover and dehydrate on
150ºF or on the M1 setting for approximately 8–12 hours, or until desired
crispiness. Store the crisps in an airtight container at room temperature.
Calories 198 • carb. 29g • pro. 3g • fat 7g • sat. fat 1g
Nutritional information per serving:
• chol. 0mg • sod. 302mg • calc. 25mg • fiber 2g
23
Page 24

MEDIDAS DE SEGURIDAD
IMPORTANTES
Al usar aparatos eléctricos, especialmente en presencia de niños,
siempre debe tomar precauciones básicas de seguridad, entre ellas
las siguientes:
1. LEA TODAS LAS INSTRUCCIONES
ANTES DE USARLO
2. Siempre desenchufe el aparato cuando no esté en uso y antes
de limpiarlo. Permita que se enfríe antes de instalar/sacar
piezas.
3. PRECAUCIÓN: SUPERFICIE CALIENTE. El deshidratador de
alimentos se pone muy caliente al tacto.
4. No permita que los niños jueguen con este aparato.
5. Para evitar el riesgo de descarga eléctrica, nunca sumerja
el cable, el enchufe, ni el aparato en agua ni en ningún otro
líquido.
6. No utilice este aparato si el cable o el enchufe están dañados,
después de un mal funcionamiento, después de que se haya
caído o si está dañado; regréselo inmediatamente a un centro
de servicio autorizado para su revisión, reparación o ajuste.
7. El uso de accesorios no recomendados o vendidos por el
fabricante presenta un riesgo de incendio, descarga eléctrica o
heridas.
8. No lo utilice en exteriores.
9. No permita que el cable cuelgue del borde de la encimera o de
la mesa, ni que tenga contacto con superficies calientes.
10. No coloque el aparato sobre o cerca de un quemador a gas o
de una hornilla eléctrica caliente, ni en un horno caliente.
11. NO obstruya los respiraderos en la parte trasera del aparato.
PRECAUCIÓN: el panel trasero se pone muy caliente durante
el funcionamiento.
12. No utilice el aparato para ningún fin que no sea el indicado.
13. Para desconectar el aparato, oprima el botón ON/OFF primero
para cerciorarse de que está apagado, y luego desenchúfelo.
24
Page 25

14. Nunca vierta líquidos en el aparato.
15. Nunca lo utilice cerca de combustibles o aerosoles.
16. Los niños o las personas que carezcan de la experiencia o
de los conocimientos necesarios para manipular el aparato,
o aquellas cuyas capacidades físicas, sensoriales o mentales
estén limitadas, no deben utilizar el aparato sin la supervisión o
la dirección de una persona responsable por su seguridad. No
permita que los niños jueguen con este aparato.
GUARDE ESTAS INSTRUCCIONES
APROBADO PARA USO COMERCIAL
ÍNDICE
Medidas de seguridad importantes ................................................... 24
Instrucciones de puesta a tierra ...... ................................................... 26
Introducción ...... .................................................................................... 26
Piezas ......... .............................................................................................27
Antes del primer uso ....... ..................................................................... 28
Instrucciones de operación ...... ........................................................... 28
Consejos útiles ...................................................................................... 30
Guía de deshidratación ........................................................................ 31
Limpieza y mantenimiento ....... ............................................................ 32
Selección de los alimentos....... ........................................................... 32
Preparación de los vegetales ............. ................................................ 33
Preparación de las frutas ........ ............................................................ 35
Preparación de las nueces/frutos secos ............................................ 37
Preparación de las hierbas y flores ........ ............................................ 37
Conservación de los alimentos ....... ................................................... 38
Recetas .................................................................................................. 39
25
Page 26

INSTRUCCIONES DE PUESTA A TIERRA
Para su protección, su aparato está equipado con un cable de
puesta a tierra, con clavija de tierra, la cual debe ser conectada a
una toma de corriente debidamente puesta a tierra (Fig. 1).
Si una toma de corriente con toma de tierra no está disponible, se
podrá usar un adaptador para conectar el aparato a una toma de
corriente sin toma de tierra (Fig. 2). El adaptador debe ser puesto
a tierra mediante un tornillo de metal que conecte la lengüeta del
adaptador a la placa de la toma de corriente (Fig. 3).
INTRODUCCIÓN
¡Gracias por haber elegido el deshidratador de alimentos de
10 bandejas Waring® Commercial! La deshidratación de frutas/
vegetales es uno de los más antiguos métodos de conservación
de alimentos. Los pueblos más antiguos ya secaban las ciruelas
y las uvas al sol. Las frutas y los vegetales deshidratados son
sabrosos tentempiés o postres. También es fácil deshidratar carne.
La deshidratación es una forma saludable de conservación de
alimentos, porque el crecimiento de bacterias es inhibido por la
eliminación de la humedad. ¡Incluso puede utilizar su deshidratador
de alimentos para secar flores y hacer popurrí! Antes de utilizar
el deshidratador de alimentos por primera vez, tómese el tiempo
de leer la sección “Medidas de seguridad importantes” y otras
instrucciones a continuación.
26
Page 27

PIEZAS
5
7
1
4
2
3
a
1. Carcasa
2. Bandejas (10)
3. Bandeja de goteo
4. Puerta
5. Asa de la puerta
6. Cable (no ilustrado)
7. Panel de control
a. Botón POWER ON/OFF: enciende y apaga la unidad
b. Botón START/STOP: inicia o interrumpe el ciclo de deshidratación
c. Flechas debajo de “TEMPERATURE”: permiten ajustar la
temperatura, desde 90 °F (32 °C) hasta 180 °F (82 °C)
d. Flechas debajo de “TIMER”: permiten ajustar el tiempo, hasta 40
horas
e. Botón SELECT/SET: permite seleccionar un programa, de M1 a
M5, o modificar los programas
b
c
d
e
27
Page 28

ANTES DEL PRIMER USO
1. Desembale el aparato con cuidado.
2. Lave las bandejas en agua jabonosa tibia. Enjuague y seque
las piezas completamente.
3. Limpie la carcasa con una esponja o un paño humedecido.
Nunca sumerja la carcasa, el enchufe o el cable en agua ni en
ningún otro líquido.
INSTRUCCIONES DE OPERACIÓN
1. Coloque el deshidratador en el lugar deseado, cerciorándose
de no obstruir las ventilaciones traseras. Deje un espacio
de por lo menos 3 pies (90 cm) entre el aparato y cualquier
pared para permitir que el aire circule libremente alrededor
de la unidad. NO haga funcionar el aparato sobre o cerca de
superficies inflamables, tales como alfombras.
PRECAUCIÓN: NO obstruya los respiraderos en la parte
trasera del aparato o los arriba de la puerta en la parte
delantera de la unidad.
2. Lave y rebane los alimentos que desea deshidratar.
3. Disponga los alimentos en las bandejas, sin superponerlos ni
sobrecargar las bandejas. Las bandejas son perfectas para
una gran variedad de alimentos con pequeños ajustes.
4. Enchufe la unidad en una toma de corriente de 120V y oprima
el botón POWER ON/OFF para encender el aparato. Para
apagarlo, presione el botón POWER por 3 segundos.
5. La temperatura por defecto es 140 °F (60 °C), y el tiempo por
defecto es 8 horas.
6. Para cambiar la temperatura, utilice las flechas +/- debajo
de la pantalla “TEMPERATURE”. Para desplazarse más
rápidamente, mantenga oprimido la flecha deseada.
7. Para programar el temporizador, utilice las flechas +/- debajo
de temporizador pantalla “TIMER”.
8. Oprima el botón START/STOP.
Permita que los alimentos se deshidraten (el tiempo de
deshidratación dependerá del tipo de alimentos).
9. Compruebe los resultados a menudo durante el proceso de
deshidratación. Si alimentos requieren más tiempo, déjelos en
las bandejas y siga deshidratándolos, monitoreando el proceso
de deshidratación hasta que estén al gusto.
28
Page 29

10. Al final del tiempo, la unidad emitirá un pitido y apagará el
calor. Nota: el ventilador seguirá funcionando durante un
minuto para enfriar la unidad. Luego, la unidad se apagará.
Para apagarla, presione el botón POWER por 3 segundos.
11. Retire las bandejas y permita que los alimentos se enfríen.
Tras enfriarse, saque los alimentos de las bandejas. Guárdelos
en recipientes herméticos o bolsas herméticas de grado
alimenticio. Nota: también puede envasar los alimentos
deshidratados al vacío (visite nuestro sitio Web para más
información sobre nuestras envasadoras al vacío).
12. Conserve los alimentos que no van a ser consumidos dentro
de los próximos días en el refrigerador, usando recipientes o
bolsas diseñadas específicamente para este propósito.
PROGRAMACIÓN Y USO DE LOS PROGRAMAS M1–M5
1. Oprima repetidamente el botón SELECT/SET situado debajo
de “PROGRAMS”; el indicador luminoso del programa
correspondiente se encenderá.
2. Para su conveniencia, los programas han sido
preprogramados en la fábrica (véase la tabla a continuación).
Memoria Tipo de alimento Temperatura Tiempo
M1 Carne seca 150 ˚F/65 ˚C 8 horas
M2 Frutas 140 ˚F/60 ˚C 12 ho r a s
M3 Vegetales 130 ˚F/57 ˚C 10 hor a s
M4 Hierbas 100 ˚F/38 ˚C 6 horas
M5 Pescados/
Mariscos
145 ˚F/63 ˚C 12 h o r a s
3. Para cambiar un programa, oprima repetidamente el botón
SELECT/SET hasta que el indicador luminoso del programa
deseado se encienda.
4. Utilice las flechas debajo de “TEMPERATURE” para ajustar la
temperatura al nivel deseado.
5. Utilice las flechas debajo de “TIMER” para ajustar el tiempo.
Nota: debe fijar un tiempo, o el programa no funcionará.
6. Para guardar el nuevo programa y salir del modo de
programación, mantenga oprimido el botón SELECT/SET por
3 segundos; la unidad emitirá un pitido para confirmar que el
programa ha sido configurado.
29
Page 30

Cómo cambiar la unidad de temperatura
La unidad de temperatura por defecto es el grado Fahrenheit. Para
cambiar la unidad de temperatura al grado Celsius, mantenga
oprimidas las flechas +/- situadas debajo de la pantalla de
temperatura por 3 segundos.
CONSEJOS ÚTILES
El tiempo de deshidratación puede variar dependiendo de muchos
factores, incluyendo la humedad ambiente, la temperatura inicial
de los alimentos, la cantidad de alimentos en el deshidratador, lo
magra que es la carne, etc.
• Lave y seque las bandejas antes de usarlas si no ha usado el
deshidratador por mucho tiempo.
• Utilice frutas/vegetales frescos; los alimentos enlatados no se
deshidratan bien.
• Lave las frutas y los vegetales antes de prepararlos.
• Para obtener resultados óptimos, prepare las frutas y los
vegetales según se indica en este manual.
• Por lo general, no es peligroso dejar el aparato encendido por un
largo período de tiempo; sin embargo, asegúrese de que está en
un lugar seguro. Lea y siga las medidas de seguridad incluidas al
principio de este manual.
• Tomar notas acerca del tipo de alimento, de su peso antes y
después de la deshidratación, del tiempo de deshidratación, y de
los resultados finales le ayudará a obtener el resultado deseado
cada vez.
• Frutas/vegetales frescos pueden sustituirse con frutas/vegetales
deshidratados en la mayoría de las recetas. Experimente con las
recetas incluidas en este manual; no tardará en descubrir formas
creativas de utilizar alimentos deshidratados.
30
Page 31

GUÍA DE DESHIDRATACIÓN*
Alimento
Temperatura
deshidratación
Preparación
aproximado
HIERBAS 100 °F/38 °C 4 a 6 horas Disponer las hierbas en la(s) bandeja(s).
FRUTAS
Tiempo de
Manzanas
Bananas 20 horas
Arándanos azules 36 horas Disponer los arándanos enteros en la(s) bandeja(s).
Uvas 48 horas
Mango 5 horas
Piña 8.5 horas
Frambuesas 26 horas Disponer las frambuesas enteras en la(s) bandeja(s).
Fresas 9 horas
Tomates 7 horas
VEGETALES
Remolachas
Pimientos dulces 12 horas
Brécol/Brócoli 4 horas
Zanahorias 4.5 horas
Apio 4 horas
Col rizada 4 horas Disponer las hojas de col rizada en la(s) bandeja(s).
Champiñones/
Hongos
Calabacín amarillo
(“summer squash”)
Ñames/Boniatos 4.5 horas
140 °F/60 °C
130 °F/55 °C
6.5 horas
5 horas
4 horas
5 horas
Cortar las manzanas en rodajas de ¼ de pulgada
(5 mm) y disponer estas en la(s) bandeja(s)
Cortar en las bananas maduras rodajas de ¼ de
pulgada (5 mm) y disponer estas en la(s) bandeja(s)
Cortar uvas sin semillas a la mitad y disponer las
mitades en la(s) bandeja(s)
Cortar el mango en tajadas de 1⁄8 de pulgada (3 mm)
y disponer estas en la(s) bandeja(s).
Cortar la piña en rodajas de ¼ de pulgada (5 mm) y
disponer estas en la(s) bandeja(s)
Cortar fresas enteras en rodajas de ½ pulgada
(1.5 cm) y disponer estas en la(s) bandeja(s)
Cortar los tomates en rodajas de ¼ de pulgada
(5 mm) y disponer estas en la(s) bandeja(s)
Cortar remolachas peladas en rodajas de 1⁄8 de
pulgada (3 mm) y disponer estas en la(s) bandeja(s).
Cortar los pimientos dulces en rodajas de ¼ de
pulgada (5 mm) y disponer estas en la(s) bandeja(s)
Separar los cogollos del brécol en pedazos pequeños
y disponer estos en la(s) bandeja(s)
Cortar las zanahorias en rodajas de 1⁄8 de pulgada
(3 mm) y disponer estas en la(s) bandeja(s).
Cortar el apio en rodajas de ¼ de pulgada (5 mm) y
disponer estas en la(s) bandeja(s)
Cortar los champiñones frescos en rodajas de ¼ de
pulgada (5 mm) y disponer estas en la(s) bandeja(s)
Cortar el calabacín amarillo en rodajas de ¼ de
pulgada (5 mm) y disponer estas en la(s) bandeja(s)
Cortar los ñames en rodajas de ¼ de pulgada
(5 mm) y disponer estas en la(s) bandeja(s)
*El tiempo de deshidratación depende del espesor de las rodajas/tajadas, de la frescura
de los alimentos, del contenido de humedad inicial de los alimentos, de la cantidad de
alimentos puesta en las bandejas, de la temperatura ambiente y de la humedad ambiente.
Los resultados y los gustos personales pueden variar; la información más arriba es
aproximada.
31
Page 32

GUÍA DE DESHIDRATACIÓN* (CONTINUACIÓN)
Alimento
CARNE, PESCADO,
POLLO
Carne seca
Pescado seco 8 horas
Pollo seco 170 °F/76 °C 12 hor as
*El tiempo de deshidratación depende del espesor de las rodajas/tajadas, de la frescura
de los alimentos, del contenido de humedad inicial de los alimentos, de la cantidad de
alimentos puesta en las bandejas, de la temperatura ambiente y de la humedad ambiente.
Los resultados y los gustos personales pueden variar; la información más arriba es
aproximada.
Temperatura
150 °F/65 °C
Tiempo de
deshidratación
aproximado
8 horas
Preparación
Quitar la grasa del asado, cortar en tajadas de ¼ de
pulgada (5 mm) y disponer estas en la(s) bandeja(s)
Cortar salmón fresco en tajadas de ¼ pulgada (5
mm) y disponer estas en la(s) bandeja(s)
Congelar una pechuga de pollo brevemente, cortarla
en tajadas de ¼ pulgada (5 mm) y disponer estas en
la(s) bandeja(s)
LIMPIEZA Y MANTENIMIENTO
Antes de efectuar cualquier operación de limpieza o mantenimiento,
cerciórese de que el aparato está apagado (“OFF”), desenchufado y frío.
1. Las bandejas son aptas para lavavajillas. Dependiendo de lo
que deshidrató, puede que sea necesario remojar las bandejas
antes de lavarlas para despegar los residuos.
2. Limpie la carcasa del aparato y la puerta con un paño
ligeramente humedecido.
Seque todas las piezas con un paño limpio.
Cualquier otro servicio debe ser realizado por un técnico
autorizado.
SELECCIÓN DE LOS ALIMENTOS
Elija alimentos que estén en buenas condiciones. Las frutas deben
acabar de madurarse, puesto que es cuando contienen máximo
nivel de azúcar y logran los mejores resultados. Los vegetales
deben ser frescos y crujientes. Evite utilizar frutas verdes; esto
logra resultados imprevisibles y produce un sabor insípido y
amargo. También evite utilizar frutas/vegetales estropeados. Corte
las partes estropeadas de las frutas y de los vegetales antes de
deshidratarlos. La carne, las aves (p. ej., el pollo) y el pescado
deben ser frescos y magros. La calidad y el sabor del producto final
también dependen de la preparación, del tiempo de deshidratación
32
Page 33

y del método de almacenaje. Para obtener resultados óptimos,
siga las instrucciones de preparación, deshidratación y almacenaje
incluidas en este manual.
IMPORTANTE: si sospecha que los alimentos están contaminados,
no intente deshidratarlos; tírelos.
PREPARACIÓN DE LOS VEGETALES
Los vegetales contienen menos ácido y azúcar que las frutas; esto
hace que requieren un poco más de preparación. Algunos vegetales
son mejores congelados que secos, así que sea selectivo en los
vegetales que usted elija.
Preparación
Use solamente vegetales de la más alta calidad. Lávelos
cuidadosamente, justo antes de deshidratarlos, para eliminar la
suciedad y las bacterias. La mayoría de los vegetales deben ser
pelados y cortados/rallados antes de ser deshidratados.
Pretratamiento
Se recomienda escaldar los vegetales antes de deshidratarlos; Esto
destruye las enzimas que pueden modificar el sabor y la textura de
los alimentos e impedir la reconstitución. Escaldar los alimentos al
vapor es el mejor método para conservar el sabor y las vitaminas,
pero también puede escaldar los vegetales al microondas.
Escaldado al vapor
Disponga los vegetales limpios y cortados en la parte superior de
una olla de vapor o en una cesta de cocción al vapor, y cocínelos
por 2 a 3 minutos, hasta que estén muy calientes, pero no
completamente cocinados. Revuelva para asegurar que todos los
vegetales se escalden uniformemente. Disponga los vegetales en
las bandejas.
Escaldado al microondas
El microondas es muy práctico para escaldar los vegetales frescos.
Limpie y corte los vegetales. Coloque los vegetales en una fuente
apta para microondas, junto con una pequeña cantidad de agua, y
tape la fuente. Cocine los vegetales ¼ a ¹/3 del tiempo del tiempo
de cocción regular, revolviendo a la mitad del tiempo. Los vegetales
33
Page 34

escaldados al microondas tendrán colores más vivos que los
escaldados al vapor. Disponga los vegetales escaldados en las
bandejas.
PREPARACIÓN DE LOS VEGETALES
Espárragos Cortar las puntas. Las puntas/cabezas deshidratadas son mejores
que los tallos; sin embargo, estos también pueden deshidratarse y
machacarse para usarse para sazonar.
Judía verde Cortar las puntas y cortar en pedazos si desea. Escaldar, y luego
congelar por 30 a 45 minutos.
Remolacha Cortar, dejando aprox. 1 pulgada (2.5 cm) de tallo y raíces.
Escaldar, dejar enfriar y luego cortar la parte de arriba y abajo.
Cortar en rodajas.
Brécol Limpiar y cortar en pedazos. Cocinar al vapor por 4 a 5 minutos.
Zanahorias Lavar, pelar y cortar en trozos de ½ pulgada (1.5 cm).
Escaldar al vapor por 4 a 5 minutos.
Maíz Quitar las hojas, lavar y escaldar al vapor. Dejar enfriar, y luego
separar el maíz de la mazorca.
Apio Separar las hojas de los tallos. Colocar las hojas y los tallos en
bandejas diferentes.
Cebollino Lavar, secar y picar.
Pepino Lavar, pelar si desea y cortar en rodajas de ¼ pulgada (5 mm).
Ajo Pelar. Cortar a la mitad o en rodajas.
Champiñones Limpiar y quitar los tallos. Secar y cortar a la mitad o en rodajas.
Cebollas Cortar los extremos y pelar. Picar o cortar en aros.
Pimientos dulces Lavar y quitar las semillas. Cortar a la mitad, en cuartos, en aros o
en tiras.
Pimientos Lavar; deshidratar enteros.
picantes
(jalapeños)
34
Page 35

Papas Lavar, pelar y cortar en cubos o rodajas; escaldar al vapor. Lavar
en agua fría y secar antes de colocar en las bandejas.
Nota: si no desea pelar las papas, lavarlas, restregarlas y quitar los
ojos y las marcas con la punta de un cuchillo.
Tomates Lavar y quitar los tallos. Escaldar en agua hirviendo, usando un
cucharón o pinzas, y luego enfriar en un baño de hielo. Pelar.
Cortar en dos o cuatro.
PREPARACIÓN DE LAS FRUTAS
Casi todas las frutas pueden deshidratarse, pero algunas requieren
más preparación que otras. Las instrucciones a continuación
pueden servir de pauta para preparar una gran variedad de frutas.
Le aconsejamos que experimente con frutas de temporada.
Preparación
Lave las frutas y corte las partes magulladas o muy maduras.
Pélelas si desea. Corte las frutas grandes a la mitad. Si los pedazos
de frutas varían mucho en tamaño, córtelos en rodajas de ⅜ a ½
pulgada (1 a 1.5 cm). Frutas pequeñas, tales como las uvas y las
cerezas, no necesitan cortarse. Quite las pepas o los huesos de las
ciruelas, cerezas, albaricoques/chabacanos/damascos, etc. Si las
frutas están cubiertas de cera, siempre pélelas. Pelar otras frutas
es opcional; si desea, pele las peras, cuya piel es granosa, y los
duraznos, cuya piel es velluda.
La mayoría de las frutas, tales como la piña, las uvas, las
fresas y las ciruelas, pueden ser colocadas directamente en las
bandejas tras cortarse. Otras frutas, tales como las manzanas, los
albaricoques, los duraznos y las peras, que se ponen marrones
cuando están expuestas al aire, deben ser pretratadas. Esto
conservará su color, así como las vitaminas A y C.
Pretratamiento
Hay varios métodos para pretratar los alimentos. No siempre es
necesario pretratar los alimentos antes de deshidratarlos. Sin
embargo, hacerlo puede mejorar su apariencia, aumentar su
conservación e incluso aumentar su valor nutricional. Pruebe varios
métodos de deshidratación, con o sin tratamiento previo, para
determinar cuál método le conviene. Recuerde: que hayan sido
35
Page 36

pretratados o no, es imprescindible conservar los alimentos de
manera adecuada para garantizar su calidad.
Pretratamiento con bisulfito sódico
Utilice productos de grado alimenticio solamente. Disuelva 1
cucharadita de bisulfito sódico en 1 cuarto de galón (945 ml) de
agua. Sumerja los pedazos de fruta en esta solución durante 2
minutos; esto evitará la pérdida de vitamina C y mantendrá un color
brillante. El bisulfito sódico está disponible en la mayoría de las
farmacias/boticas.
Pretratamientos naturales
El jugo de piña y el jugo de limón, por su alto contenido en
vitamina C, son alternativas naturales a otros pretratamientos para
evitar que las frutas se pongan marrones. Ponga las frutas en
el jugo inmediatamente después de cortarlas. Sacarlas del jugo
después de aprox. 2 minutos y dispóngalas en las bandejas. Las
frutas también pueden meterse en miel o jugo de lima/naranja, o
esparcirse con polvo de gelatina o coco rallado para darle un sabor
más exótico. ¡Utilice su imaginación!
A veces se recomienda darles la vuelta a las mitades de fruta,
especialmente los albaricoques/chabacanos/damascos, para que se
sequen más rápidamente. Esto es cierto, pero también desperdicia
jugo, alta fuente de nutrientes. En vez de hacer esto, corte las frutas
en cuartos; esto conservará sus nutrientes y su color, y facilitará su
reconstitución en agua.
Manzanas Lavar bien; pelar si desea. Cortar a la mitad, quitar el
corazón y luego cortar en pedazos más pequeños.
Pretratar con jugo de limón.
Albaricoques Lavar, abrir y quitar el hueso. Cortar en cuartos si desea.
Bananas Pelar y cortar en rodajas. Pretratar con jugo de limón.
Cerezas Lavar y sacar los huesos.
Coco Tirar la leche, abrir y sacar la carne. Secar y cortar en
pedacitos.
Higos Lavar, sacar el tallo y cortar a la mitad o en cuartos. Poner
a secar con la piel apuntando hacia arriba.
36
Page 37

Uvas Lavar; cortar a la mitad si desea.
Papaya Lavar, pelar y cortar en trozos.
Duraznos Lavar, cortar a la mitad y quitar el hueso. Pelar y cortar en
cuartos si desea.
Peras Lavar, cortar a la mitad y quitar el corazón. Cortar en
pedazos o en rodajas. Pretratar con jugo de limón.
Piña Pelar, quitar el corazón y cortar en pedacitos.
Ciruelas Lavar, cortar a la mitad y quitar el hueso. Cortar en cuartos
si desea.
Fresas Lavar; cortar en rodajas si desea.
PREPARACIÓN DE LAS NUECES/FRUTOS SECOS
Antes de deshidratar nueces/fritos secos tales como avellanas,
almendras, etc., quite la cáscara, y enjuáguelos en agua tibia.
Séquelas y dispóngalas sobre las bandejas. La mayoría de las
nueces demorarán entre 20 y 30 horas en secarse. Permita que se
deshidraten hasta que se vuelvan quebradizas.
Permita que se enfríen después de deshidratarlas. Las nueces
que no se van a consumir dentro de los días siguientes deben ser
congeladas. Descongélelas antes de comerlas.
PREPARACIÓN DE LAS HIERBAS Y FLORES
Lave y seque las hierbas aromáticas y las flores antes de secarlas.
Quite las partes muertas, blandas o descoloridas, dejando los
tallos intactos. Disponga las hierbas o las flores sobre las bandejas
y permita que se sequen durante 2 a 7 horas, dependiendo del
tipo de hierbas/flores y de su tamaño. Retírelas de las bandejas
y permita que se enfríen. Quite las hojas y separe los capullos si
desea. Macháquelas si desea.
Para obtener resultados óptimos, recoja las flores en la mañana,
después de que el sol haya secado el rocío, o al atardecer, antes
de que la bruma empañe los pétalos. No utilice flores que hayan
sido tratadas con insecticidas u otras sustancias químicas dañinas.
Si desea deshidratar flores y hierbas al mismo tiempo, coloque las
flores en las bandejas de abajo y las hierbas en las bandejas de
37
Page 38

arriba; esto evitará que residuos de flores caigan en las hierbas.
CONSERVACIÓN DE LOS ALIMENTOS
Envoltorios
Los alimentos deshidratados deben ser envasados con mucho
cuidado. Guárdelos en bolsas herméticas, sacando un máximo de
aire (también puede usar bolsas termosellables). Guarde las bolsas
en recipientes herméticos de metal, plástico o vidrio. Conservar
los alimentos deshidratados directamente en un recipiente, sin
colocarlos previamente en una bolsa hermética, los expone al aire,
lo que puede tener consecuencias negativas. Envasar los alimentos
deshidratados al vacío es un excelente método de conservación.
Visite nuestro sitio Web para más información sobre nuestras
envasadoras al vacío.
CONDICIONES DE ALMACENAJE
Guarde los alimentos deshidratados en un lugar fresco y oscuro.
Cuanto más frías sean las condiciones de almacenaje, más largo
será el tiempo de conservación. El tiempo de conservación es 2 a 3
veces más largo por cada bajada de temperatura de 18°F (10°C).
Por lo tanto, si tiene espacio en su refrigerador o congelador,
guarde los alimentos deshidratados allí. Si no, busque el lugar más
fresco en su casa para almacenarlos. La luz también puede hacer
que la calidad y el valor nutritivo de los alimentos deshidratados se
deterioren; por lo tanto, guárdelos en recipientes opacos o de color.
TIEMPO DE CONSERVACIÓN
Debido a su alto contenido en azúcar y ácido, las frutas se
conservarán durante más tiempo que los vegetales. Siempre que
hayan sido envasadas debidamente y almacenadas a temperatura
ambiente (70°F/21 °C) o menos, las frutas conservarán su valor
nutricional y su calidad por hasta un año. La mayoría de los
vegetales se conservarán por hasta 6 meses. AUNQUE LAS
FRUTAS Y LOS VEGETALES GUARDADOS MÁS ALLÁ DEL
TIEMPO RECOMENDADO NO ESTÁN TAN NUTRITIVOS NI
SABROSOS, NO SE ECHARÁN A PERDER A MENOS QUE
EL ENVASE YA NO ESTÉ INTACTO.
38
Page 39

RECETAS
Carne seca
Rinde 8 porciones
1½ libras (680 g) de bistec de falda/arrachera/entraña
(“flank steak”)
1⁄3 taza (80 ml) de salsa Worcestershire
2 cucharadas de salsa barbacoa ahumada
¼ taza (60 ml) de salsa de soya baja en sodio
2 cucharadas de azúcar rubia (azúcar de caña integral)
2 dientes de ajo
¼ cucharadita de pimienta negra recién molida
Poner la carne en un plato y congelar por 1 hora; esto permitirá cortarla
en tiras delgadas más fácilmente. Cortar la carne en tiras de ¼ de
pulgada (5 mm), en contra del grano. Mezclar los ingredientes restantes.
Colocar la carne en la mezcla y dejar marinar en el refrigerador por un
mínimo de 30 minutos. Escurrir y disponer las tiras sobre las bandejas,
sin permitir que se toquen. Deshidratar en 150 °F (65 °C) por 8 aprox.
horas (o usar el programa M1), hasta obtener el resultado deseado, dando
vuelta a las tiras una vez a mitad de tiempo. Conservar en el refrigerador
o en el congelador, en un recipiente hermético.
Calorías 165 • Carbohidratos 6g • Proteínas 18g • Grasa 7 g • Grasa saturada 3g
Colesterol 34mg • Sodio 423mg • Calcio 40mg • Fibra 0g
Información nutricional por porción:
39
Page 40

Atún seco
Rinde 6 porciones
1 libra (455 g) de bistec de atún fresco
1 cucharada de jengibre fresco rallado
2 cucharaditas de ajo machacado
¼ taza (60 ml) de salsa de soya baja en sodio
¼ taza (60 ml) de jugo de naranja
2 cucharadas de vinagre de vino de arroz
1 cucharadita de azúcar rubia (azúcar de caña integral)
Poner el bistec de atún sobre una tabla de picar y cortarlo a la mitad.
Poner el atún sobre un plato y congelarlo por 1 hora; esto permitirá
cortarla en tiras delgadas más fácilmente. Sostener el atún verticalmente,
el lado cortado encima de la tabla de picar. Cortar en lonjas de ¼ de
pulgada (5 mm), y luego en tiras de 1 pulgada (2.5 cm) de ancho. Mezclar
los ingredientes restantes. Colocar el atún en la mezcla y dejar marinar en
el refrigerador por un mínimo de 30 minutos. Escurrir y disponer las tiras
en las bandejas, sin permitir que se toquen. Deshidratar en 150 °F (65 °C)
por aprox. 8 horas (o usar el programa M1), hasta que tenga la
consistencia deseada, dando vuelta a las tiras una vez a mitad de tiempo.
Conservar en el refrigerador o en el congelador, en un recipiente
hermético.
Calorías 124 • Carbohidratos 3g • Proteínas 18g • Grasa 4 g • Grasa saturada 1 g
Colesterol 28mg • Sodio 384mg • Calcio 12mg • Fibra 0g
Información nutricional por porción:
40
Page 41

“Salchichas” de res picantes
Rinde 15 porciones (30 “salchichas”)
3 libras (1.35 kg) de carne de res molida
1 cucharada de páprika
1½ cucharaditas de pimienta de Cayena
1½ cucharaditas de hojuelas de pimiento rojo
1 cucharadita de ajo en polvo
4 cucharadas de salsa Worcestershire
2 cucharaditas de sal de salmuera
Revolver todos los ingredientes en un tazón grande. Separar una pequeña
porción de carne. Formar una bola, y luego extenderla para formar una
“salchicha” de 5 x ½ pulgadas (12 x 1.5 cm). Poner las “salchichas” en
una bandeja de hornear. Refrigerar por una noche, sin cubrir. Disponer las
“salchichas” en las bandejas de deshidratación, sin permitir que se
toquen. Deshidratar en 150 °F (65 °C) por aprox. 5 horas (o usar el
programa M1), hasta que tenga la consistencia deseada. Conservar en el
refrigerador o en el congelador, en un recipiente hermético.
Calorías 201 • Carbohidratos 2g • Proteínas 17g • Grasa 14g • Grasa saturada 5g
Colesterol 61mg • Sodio 182mg • Calcio 20mg • Fibra 0g
Información nutricional por porción:
Pollo Teriyaki seco
Rinde 8 porciones
2½ libras (1.1 kg) de pechuga de pollo deshuesada y sin piel
½ taza (120 ml) de salsa Teriyaki
¾ taza (175 ml) de jugo de piña
1½ cucharadas de salsa barbacoa ahumada
¾ cucharadita de hojuelas de pimiento rojo
Quitar la grasa del pollo. Poner el pollo en una bandeja y congelarlo por 1
hora; esto permitirá cortarlo más fácilmente en tiras delgadas. Cortar el
pollo en tiras de ¼ de pulgada (5 mm). Mezclar los ingredientes restantes.
Colocar las tiras de pollo en la mezcla y dejar marinar en el refrigerador
por un mínimo de 30 minutos. Escurrir y disponer las tiras en las
bandejas, sin permitir que se toquen. Deshidratar en 170 °F (77 °C) por
aprox. 20 horas o hasta obtener el resultado deseado, dando vuelta a las
tiras a mitad de tiempo. Conservar en el refrigerador o en el congelador,
en un recipiente hermético.
Calorías 179 • Carbohidratos 5g • Proteínas 33g • Grasa 2g • Grasa saturada 0 g
Colesterol 81mg • Sodio 340mg • Calcio 22mg • Fibra 0g
Información nutricional por porción:
41
Page 42

Crema para untar de tomates
deshidratados y albahaca
Rinde 10 porciones
10 tomates Roma del mismo tamaño
8 onzas (225 g) de queso crema bajo en grasa
½ taza (120 ml) de mayonesa baja en grasa
¾ taza (175 ml) de crema agria baja en grasa
1 diente de ajo, machacado
¼ taza (25 g) de queso Parmesano rallado
2 cucharadas de albahaca fresca picada
2 cebolletas (“scallions”), picadas
Sal y pimienta, a gusto
Cortar los tomates en cuartos y disponerlos en las bandejas, la parte
cortada apuntando hacia arriba. Deshidratar en 140 °F (60 °C) por aprox.
7 horas (o usar el programa M2), hasta que estén secos y curtidos. Picar
los tomates deshidratados. Poner los tomates, el queso crema y la
mayonesa en el bol de una procesadora de alimentos; procesar hasta
obtener una mezcla homogénea. Colocar la mezcla en un tazón grande.
Agregar la crema agria, el ajo, el queso Parmesano, la albahaca, los
cebollinos, la sal y la pimienta; revolver. Servir con su pan o galletas
saladas favoritos.
Calorías 124 • Carbohidratos 6g • Proteínas 4g • Grasa 10g • Grasa saturada 4g
Colesterol 18mg • Sodio 320mg • Calcio 83mg • Fibra 1g
Información nutricional por porción:
Rollitos de yogur
Rinde 2 rollitos
8 onzas (235 ml) de yogur de vainilla
2 cucharadas de su mermelada favorita
Revolver el yogur con la mermelada. Usando una espátula, esparcir la
mezcla en una capa delgada en la hoja para preparar “cuero” de fruta.
Colocar la hoja en una de las bandejas. Deshidratar en 150 °F (65 °C) por
aprox. 5 horas (o usar el programa M1), hasta que el yogur ya no esté
húmedo y pegajoso. Despegar la lámina de la hoja y cortarla a la mitad.
Enrollar cada mitad y guardar en papel film/plástico, a temperatura
ambiente.
Nota: también puede usar yogur de fruta, pero pedazos de frutas pueden
hacer que la mezcla no se esparza uniformemente.
Calorías 152 • Carbohidratos 29g • Proteínas 6 g • Grasa 1g • Grasa saturada 1 g
Información nutricional por rollito (media hoja):
Colesterol 6mg • Sodio 81mg • Calcio 198mg • Fibra 0g
42
Page 43

Rollitos de compota de manzana
y fruto seco
Rinde 2 rollitos
²/3 taza (160 ml) de compota de manzana sin azúcar
1 pizca de canela en polvo
1 pizca de nuez moscada rallada
½ cucharadita de miel
¼ cucharadita de jugo de limón fresco
1 cucharada de arándanos agrios secos, finamente picados
1 cucharada de nueces, finamente picadas
Mezclar la compota de manzana, la canela, la nuez moscada, la miel y el
jugo de limón en un tazón mediano. Usando una espátula, esparcir la
mezcla en una capa delgada en la hoja para preparar “cuero” de fruta.
Esparcir los arándanos agrios y las nueces encima, y hundirlos
ligeramente. Deshidratar en 150 °F (65 °C) por 4 horas (o usar el
programa M2), hasta que la compota de manzana ya no esté húmeda.
Despegar la lámina de la hoja y cortarla a la mitad. Enrollar cada mitad y
guardar en papel film/plástico, a temperatura ambiente.
Calorías 94 • Carbohidratos 15g • Proteínas 0g • Grasa 3g • Grasa saturada 0 g
Información nutricional por rollito (media hoja):
Colesterol 0mg • Sodio 2mg • Calcio 8mg • Fibra 1g
Rollitos de banana y fresa
Rinde 2 rollitos
¾ taza (150 g) de fresas, picadas
½ banana fresca, en rodajas
½ cucharada de miel
½ cucharadita de jugo de limón fresco
Spray vegetal
Poner todos los ingredientes, excepto el spray vegetal, en la jarra de una
licuadora y licuar hasta obtener una mezcla suave. Rociar un poco de
spray vegetal sobre una toallita de papel y engrasar la hoja para preparar
“cuero” de fruta. Esparcir el puré de fruta en la hoja. Deshidratar en 150
°F (65 °C) por aprox. 5 horas (o usar el programa M1), hasta que el puré
ya no esté húmedo. Despegar la lámina de la hoja y cortarla a la mitad.
Enrollar cada mitad y guardar en papel film/plástico, a temperatura
ambiente.
Calorías 63 • Carbohidratos 16g • Proteínas 1g • Grasa 0g • Grasa saturada 0 g
Información nutricional por rollito (media hoja):
Colesterol 0mg • Sodio 1mg • Calcio 12mg • Fibra 2g
43
Page 44

Muesli tropical
Rinde 7 porciones
3 tazas (240 g) de copos de avena (no utilice avena instantánea)
¾ taza (65 g) de coco rallado
½ taza (55 g) de germen de trigo
1⁄3 taza (65 g) de azúcar moreno
½ taza (60 g) de arándanos agrios secos
½ taza (80 g) de trocitos de piña deshidrata
½ taza (30 g) de chips de banana, pedacitos
1 taza (100 g) de pacanas, picadas
1 cucharada de ralladura de naranja
1 cucharada (15 ml) de extracto natural de vainilla
¼ taza (55 g) de mantequilla, derretida
2 cucharadas de néctar de agave o de miel
1⁄3 taza (80 ml) de jarabe de arce/maple
¼ cucharadita de sal
Colocar los ingredientes secos y la vainilla en un tazón grande; revolver.
Colocar la mantequilla, el néctar de agave o la miel, el jarabe de arce y la
sal en un tazón pequeño; revolver. Agregar la mezcla de mantequilla/
jarabe a los ingredientes secos. Revolver para mezclar. Forrar tres
bandejas con papel sulfurizado y dividir la mezcla entre las bandejas,
formando montoncitos de muesli con los dedos. Deshidratar en 150 °F
(65 °C) por aprox. 3 horas (o usar el programa M1), hasta que el muesli ya
no esté húmedo. Conservar a temperatura ambiente, en un recipiente
hermético.
Calorías 318 • Carbohidratos 44g • Proteínas 8g • Grasa 13g • Grasa saturada 5g
Colesterol 9mg • Sodio 59mg • Calcio 46mg • Fibra 6g
Información nutricional por porción:
44
Page 45

Papas crujientes con sabor a vinagre
Rinde 4 porciones
3 papas “Russet” medianas, peladas si desea
1 taza (235 ml) de vinagre de sidra de manzana
2 cucharadas de aceite de oliva
Sal gruesa, a gusto
Cortar las papas en rodajas delgadas de ¹/8 de pulgada (3 mm). Dejar
macerar las papas en vinagre por 8 a 12 horas; esto evitará que las papas
tengan un sabor pastoso. Escurrir las papas, colocarlas en un tazón y
revolverlas con el aceite de oliva. Forrar las bandejas con papel
sulfurizado y disponer las rodajas en ellas, sin superponerlas. Rociar con
sal. Deshidratar en 150 °F (65 °C) por aprox. 8 a 12 horas (o usar el
programa M1), hasta que estén crujientes al gusto. Conservar a
temperatura ambiente, en un recipiente hermético.
Calorías 198 • Carbohidratos 29g • Proteínas 3g • Grasa 7g • Grasa saturada 1 g
Colesterol 0mg • Sodio 302mg • Calcio 25mg • Fibra 2g
Información nutricional por porción:
45
Page 46

IMPORTANTES CONSIGNES
DE SÉCURITÉ
L'utilisation d'appareils électriques, notamment en présence
d’enfants, requiert la prise de précautions élémentaires, parmi
lesquelles les suivantes :
1. LIRE TOUTES LES INSTRUCTIONS
AVANT D'UTILISER L'APPAREIL
2. Débrancher l'appareil lorsque vous ne l'utilisez pas et avant de
le nettoyer. Le laisser refroidir complètement avant d'installer
ou de retirer des pièces.
3. ATTENTION : SURFACE CHAUDE. Le déshydrateur alimentaire
devient très chaud au toucher.
4. Veiller à ce que les enfants ne jouent pas avec l'appareil.
5. An d'éviter les risques de choc électrique, ne jamais placer la
base, le cordon ou la che dans l’eau ou tout autre liquide.
6. Ne pas utiliser l'appareil si le cordon d’alimentation ou la che
sont endommagés, s’il ne fonctionne pas correctement, s’il est
tombé ou s’il est abîmé; le renvoyer à un service après-vente
autorisé an qu’il soit inspecté.
7. L’utilisation d’accessoires non recommandés ou vendus par le
fabricant peut présenter un risque d'incendie, d'électrocution
ou de blessure.
8. Ne pas utiliser l'appareil à l’extérieur.
9. Ne pas laisser le cordon pendre au bord d'une table ou d'un
plan de travail, ni entrer en contact avec des surfaces chaudes.
10. Ne pas mettre l’appareil sur ou à proximité d'une plaque à gaz
ou électrique, ni dans un four chaud.
11. NE PAS obstruer les évents à l'arrière de l'appareil. MISE EN
GARDE: l'arrière de l’appareil peut devenir très chaud pendant
l'utilisation.
12. Ne pas utiliser cet appareil à des ns autres que celles pour
lesquelles il a été conçu.
13. Pour déconnecter l'appareil, appuyer d'abord sur le bouton
ON/OFF pour vous assurer qu'il est éteint, puis le débrancher.
46
Page 47

14. Ne jamais verser de liquide sur ou dans l'appareil.
15. Ne pas utiliser à proximité de matériaux combustibles ou de
bouteilles aérosols.
16. Cet appareil ne devrait pas être utilisé par des enfants ou
des personnes atteintes de certains handicaps physiques,
mentaux ou sensoriels, ou qui ne disposent pas des
connaissances ou de l'expérience nécessaires, à moins qu'une
personne responsable de leur sécurité leur en ait expliqué le
fonctionnement ou les encadre. Veiller à ce que les enfants ne
jouent pas avec l'appareil.
GARDER CES INSTRUCTIONS
USAGE COMMERCIAL AUTORISÉ
TABLE DES MATIÈRES
Importantes consignes de sécurité ........ ............................................ 46
Instructions de mise à la terre ................ ............................................ 48
Introduction ........................................................................................ 48
Pièces ..................................................... ............................................ 49
Avant la première utilisation ............................................................... 50
Directives d’utilisation......................................................................... 50
Conseils utiles .................................................................................... 52
Guide de déshydratation .................................................................... 53
Nettoyage et entretien ........................................................................ 54
Sélection des aliments ....................................................................... 54
Préparation des légumes ................................................................... 55
Préparation des fruits ............................. ............................................ 57
Préparation des fruits à coque ............... ............................................ 59
Préparation des herbes et des eurs ..... ............................................ 59
Conservation des aliments ..................... ............................................ 60
Recettes ................................................. ............................................ 61
47
Page 48

INSTRUCTIONS DE MISE À LA TERRE
Pour votre protection, cet appareil est équipé d'une che à trois
broches. Cette che doit être branchée dans une prise de terre
correctement congurée (Fig. 1).
Vous pouvez utiliser un adaptateur temporaire (Fig. 2) pour brancher
l’appareil dans une prise polarisée jusqu’à ce que vous fassiez
installer une prise de terre par un électricien. An d'assurer la mise à
la terre, la languette de l’adaptateur doit être xée au boîtier par une
vis en métal (Fig. 3).
INTRODUCTION
Merci d’avoir acheté le déshydrateur alimentaire à 10 plateaux
Waring® Commercial. La déshydratation des fruits et des légumes et
une des méthodes de conservation des aliments les plus anciennes.
On sèche les prunes et les raisins au soleil depuis des siècles. Les
fruits et les légumes séchés/déshydratés font de délicieux desserts
ou encarts. Il est aussi facile de sécher/déshydrater une variété de
viande. Les bactéries ont besoin d'humidité pour se développer; la
déshydratation est donc une méthode de conservation saine. Vous
pouvez même utilisez votre déshydrateur pour sécher des eurs et
faire des pots-pourris ! Avant d'utiliser l'appareil pour la première
fois, prenez le temps de lire les précautions d'emploi et autres
instructions contenues dans ce manuel.
48
Page 49

PIÈCES
5
7
1
4
2
3
a
1. Boîtier
2. Plateaux (10)
3. Bac d’égouttement
4. Porte
5. Poignée de porte
6. Cordon d'alimentation (non illustré)
7. Bloc commande
a. Bouton POWER ON/OFF : allume et éteint l’appareil
b. Bouton START/STOP : commence ou interrompt le cycle
de déshydratation
c. Flèches sous “TEMPERATURE” : permettent de régler
la température, de 90 °F (180 °F) à 32 °C (82° C)
d. Flèches sous “TIMER” : permettent de régler le temps,
jusqu’à 40 heures
e. Bouton SELECT/SET : permet de sélectionner un programme,
de M1 à M5, ou modier les programmes
b
c
d
e
49
Page 50

AVANT LA PREMIÈRE UTILISATION
1. Déballer l'appareil avec soin.
2. Laver les plateaux à l'eau savonneuse tiède. Rincer et bien
sécher.
3. Nettoyer le boîtier à l'aide d'un linge doux sec ou d'une éponge
légèrement humide. Ne jamais mettre le boîtier, la che ou le
cordon dans l'eau ou tout autre liquide.
DIRECTIVES D’UTILISATION
1. Installer le déshydrateur à l'endroit voulu, en veillant à ne pas
obstruer les évents arrières. Laissez un espace d'au moins
3 pieds (90 cm) entre l'appareil et tout mur pour permettre à
l'air de circuler librement autour de l'appareil. NE PAS utiliser
l'appareil sur ou à proximité de surfaces inammables, telles
qu’un tapis ou de la moquette.
MISE EN GARDE: NE PAS obstruer les évents à l'arrière de
l'appareil ou au-dessus de la porte à l'avant de l'appareil.
2. Laver et trancher les aliments que vous souhaitez déshydrater.
3. Placer les aliments sur les plateaux, sans les superposer
ni surcharger les plateaux. Les plateaux sont parfaits pour
déshydrater une grande variété d'aliments, avec un minimum
de préparation.
4. Brancher l’appareil dans une prise de 120 V et appuyer sur
le bouton POWER ON/OFF pour le mettre en marche. Pour
l’éteindre, appuyer sur le bouton POWER ON/OFF pendant 3
secondes.
5. La température par défaut est de 60 °C (140 °F) et la durée par
défaut est de 8 heures.
6. Pour changer la température, utiliser les èches +/- situées
sous l’afcheur de température. Pour avancer plus rapidement,
garder le doigt sur la touche.
7. Pour régler le temps, utiliser les èches +/- situées sous le
minuteur.
8. Appuyer sur le bouton START/STOP.
Laisser sécher les aliments pendant le temps recommandé
(le temps de déshydratation dépend du type d'aliments).
9. Surveiller le processus de déshydratation et vérier la texture
avant d'arrêter l'appareil. Laisser les morceaux qui ne sont pas
complètement déshydratés dans l'appareil jusqu'à ce qu'ils
soient secs, en surveillant le processus de déshydratation.
50
Page 51

10. À la n du temps, l’appareil sonnera et éteindra la chaleur. Le
ventilateur restera allumé pendant une minute pour refroidir
l’appareil. Ensuite, l'appareil s'éteindra. Pour l’éteindre, appuyer
sur le bouton POWER ON/OFF pendant 3 secondes.
11. Retirer les plateaux et laisser refroidir les aliments. Une fois
refroidis, retirer les aliments des plateaux. Les conserver dans
des contenants ou sachets hermétiques à usage alimentaire.
Remarque : vous pouvez également emballer les aliments sous
vide (visiter notre site Internet pour plus d'informations sur nos
emballeuses sous vide).
12. Réfrigérer les aliments que vous n'allez pas manger dans les
jours qui suivent. Si vous souhaitez congeler les aliments,
utiliser des contenants ou des sachets pour la congélation.
PROGRAMMATION ET UTILISATION DES PROGRAMMES
M1–M5
1. Appuyer à plusieurs reprises sur le bouton SELECT/SET situé
sous “PROGRAMS” ; le voyant lumineux du programme
correspondant s’allumera.
2. Pour votre commodité, les programmes ont été
préprogrammés en usine (voir le tableau ci-dessous).
Mémoire Type d’aliment Température Temps
M1 Bœuf séché 150 ˚F/65 ˚C 8 h
M2 Fruits 140 ˚F/60 ˚C 12 h
M3 Légumes 130 ˚F/55 ˚C 10 h
M4 Herbes 100 ˚F/38 ˚C 6 h
M5 Fruits de mer 145 ˚F/63 ˚C 12 h
3. Pour changer un programme, appuyer sur le bouton SELECT/
SET jusqu’à ce que le voyant lumineux correspondant au
programme s’allume.
4. Utiliser les èches +/- sous l’afcheur de température pour
régler la température au niveau voulu.
5. Utiliser les èches +/- sous le minuteur pour régler le temps.
Remarque : il vous faudra régler le temps, ou le programme ne
fonctionnera pas.
6. Pour garder le programme en mémoire et sortir du mode de
programmation, appuyer sur le bouton SELECT/SET pendant
3 secondes ; l'appareil émettra un bip sonore pour conrmer
que le programme a été conguré.
51
Page 52

Comment changer l’unité de température
L’unité de température par défaut est le degré Fahrenheit. Pour
changer l’unité de température au degré Celsius, appuyer
simultanément sur les èches +/- situées sous l’afcheur de
température pendant 3 secondes.
CONSEILSUTILES
Le temps de déshydratation peut varier en fonction de nombreux
facteurs, y compris l'humidité ambiante, la température initiale des
aliments, la quantité d'aliments dans le déshydrateur, la maigreur de
la viande, etc.
• Laver et sécher les plateaux avant l'utilisation si vous n'avez pas
utilisé le déshydrateur depuis longtemps.
• Utiliser des fruits et des légumes frais ; les aliments en conserve
ne se déshydratent pas bien.
• Toujours laver les fruits et les légumes avant la préparation.
• Pour obtenir des résultats optimaux, préparer les fruits et les
légumes selon les instructions contenues dans ce manuel.
• Laisser le déshydrateur allumé pendant longtemps n'est
généralement pas dangereux ; toutefois, veiller à ce qu’il se
trouve dans un endroit sûr. Lire et suivre les consignes de
sécurité au début de ce manuel.
• Noter le type d'aliment, son poids avant et après la
déshydratation, le temps de déshydratation et le résultat nal
vous aidera à déterminer la meilleure méthode de déshydratation
pour toujours obtenir le résultat voulu.
• On peut remplacer les fruits/légumes frais par des fruits/légumes
secs dans de nombreuses recettes. Expérimentez avec les
recettes à la n de ce manuel ; vous ne tarderez pas à découvrir
des manières créatives d'utiliser les aliments déshydratés.
52
Page 53

GUIDE DE DÉSHYDRATATION*
Temps de
Aliment Température
HERBES 100 °F/38 °C
FRUITS
Pommes
Bananes 20 heures
Bleuets/Myrtilles 36 heures Disposer les bluets/myrtilles entiers sur le(s) plateau(x)
Raisin 48 heures
Mangue 5 heures
Ananas 8,5 heures
Framboises 26 heures Disposer les framboises entières sur le(s) plateau(x)
Fraises 9 heures
Tomates 7 heures
LÉGUMES
Betteraves
Poivrons 12 heures
Brocoli 4 heures
Carottes 4,5 heures
Céleri 4 heures
Chou frisé 4 heures Disposer les feuilles de chou frisé sur le(s) plateau(x)
Champignons 4 heures
Courgettes
jaunes
Ignames 4,5 heures
*Le temps de déshydratation dépend de l'épaisseur des tranches/rondelles, de la fraîcheur
des aliments, du taux d'humidité initial des aliments, de la quantité d'aliments sur les
plateaux, de la température ambiante et de l'humidité ambiante. Les résultats et les goûts
personnels peuvent varier; les informations ci-dessus sont approximatives.
140 °F/60 °C
130 °F/55 °C
déshydratation
approximatif
4 à 6
heures
6,5 heures
5 heures
5 heures
Préparation
Disposer les herbes sur le(s) plateau(x)
Couper les pommes en tranches de ¼ po. (5 mm) et
disposer ces-dernières sur le(s) plateau(x)
Couper les bananes mûres en rondelles de ¼ po.
(5 mm) et disposer ces-dernières sur le(s) plateau(x)
Couper des grains de raisin sans pépins en deux et
disposer les moitiés sur le(s) plateau(x)
Couper la mangue fraîche en tranches de 1⁄8 po.
(3 mm) et disposer ces-dernières sur le(s) plateau(x)
Couper l’ananas frais en tranches de ¼ po. (5 mm) et
disposer ces-dernières sur le(s) plateau(x)
Couper les fraises entières en rondelles de ½ po.
(1,5 cm) et disposer ces-dernières sur le(s) plateau(x)
Couper les tomates en rondelles de ¼ po. (5 mm) et
disposer ces-dernières sur le(s) plateau(x)
Peler les betteraves fraîches, les couper en rondelles
de 1⁄8 po. (3 mm) et disposer ces-dernières sur le(s)
plateau(x)
Couper les poivrons en rondelles de ¼ po. (5 mm) et
disposer ces-dernières sur le(s) plateau(x)
Séparer les fleurons de brocoli en petits morceaux et
les disposer ces-derniers sur le(s) plateau(x)
Couper les carottes en tranches de 1⁄8 po. (3 mm) et
disposer ces-dernières sur le(s) plateau(x)
Couper le céleri en rondelles de ¼ po. (5 mm) et
disposer ces-dernières sur le(s) plateau(x)
Couper les champignons frais en rondelles de ¼ po.
(5 mm) et disposer ces-dernières sur le(s) plateau(x)
Couper les courgettes jaunes en rondelles de ¼ po.
(5 mm) et disposer ces-dernières sur le(s) plateau(x)
Couper les ignames en rondelles de ¼ po. (5 mm) et
disposer ces-dernières sur le(s) plateau(x)
53
Page 54

GUIDE DE DÉSHYDRATATION* (SUITE)
Temps de dés-
Aliment Température
VIANDE,
POISSON ET
VOLAILLE
Bœuf séché
150 °F/65 °C
Poisson sec 8 heures
Volaille 170 °F/76 °C 12 heures
*Le temps de déshydratation dépend de l'épaisseur des tranches/rondelles, de la fraîcheur
des aliments, du taux d'humidité initial des aliments, de la quantité d'aliments sur les
plateaux, de la température ambiante et de l'humidité ambiante. Les résultats et les goûts
personnels peuvent varier; les informations ci-dessus sont approximatives.
hydratation
approximatif
8 heures
Préparation
Enlever le gras du rôti, le couper en tranches de ¼ po.
(5 mm) et disposer ces-dernières sur le(s) plateau(x)
Couper le saumon frais en tranches de ¼ po. (5 mm)
et disposer ces-dernières sur le(s) plateau(x)
Congeler brièvement le blanc de poulet, le couper en
tranches de ¼ po. (5 mm) et disposer ces-dernières
sur le(s) plateau(x)
NETTOYAGE ET ENTRETIEN
Veiller à ce que l'appareil soit éteint (“OFF”), froid et débranché
avant toute opération de nettoyage ou d’entretien.
1. Les plateaux de déshydratation sont lavables au lave-vaisselle.
Selon ce que vous avez déshydraté, il peut être nécessaire
de faire tremper les plateaux avant de les laver pour ôter les
résidus.
2. Essuyer le boîtier de l’appareil et la porte à l’aide d’un chiffon
légèrement humide.
Bien sécher avec un chiffon propre.
Toute autre opération d'entretien ou de réparation doit être
effectuée par un technicien autorisé.
SÉLECTION DES ALIMENTS
Choisir des aliments en bon état. Utiliser des fruits tout juste mûrs,
car c'est le moment où ils contiennent le plus haut niveau de
sucre et offrent les meilleurs résultats. Utiliser des légumes frais et
croquants. Éviter d'utiliser des fruits verts; cela donne des résultats
imprévisibles et souvent sans saveur et amers. Éviter également
d'utiliser des fruits trop mûrs ou abîmés. Enlever les parties abîmées
des fruits et des légumes. Utiliser de la viande, de la volaille et
du poisson frais et maigres. La qualité et le goût du produit nal
dépendra aussi de la préparation, du temps de déshydratation et de
la méthode de conservation. Suivre les instructions de préparation,
54
Page 55

déshydratation et conservation inclues dans de manuel pour obtenir
des résultats optimaux.
IMPORTANT : si vous soupçonnez que les aliments sont
contaminés, ne pas essayer de les déshydrater; les jeter.
PRÉPARATION DES LÉGUMES
Les légumes contiennent moins d'acide et de sucre que les fruits ;
ils demandent donc un peu plus de préparation. Certains légumes
sont meilleurs congelés que déshydratés; soyez donc sélectifs dans
votre choix.
Préparation
Utiliser des légumes de la plus haute qualité. Laver soigneusement
les légumes, juste avant de les déshydrater, pour éliminer la terre et
les bactéries. La plupart des légumes devront être épluchés, pelés,
coupés ou râpés avant d'être déshydratés.
Prétraitement
Il est conseillé de blanchir les légumes avant de les déshydrater.
Cela détruit les enzymes qui peuvent changer leur goût et leur
texture une fois déshydratés et rendre la reconstitution difcile.
Blanchir les légumes à la vapeur est la meilleure méthode pour
préserver le goût et les vitamines, mais on peut également les
blanchir au micro-ondes.
Blanchiment à la vapeur
Placer les légumes coupés en morceaux dans le panier d'un cuiseur
vapeur et les faire cuire à la vapeur pendant 2 à 3 minutes, jusqu'à
ce qu'ils soient bien chauds, mais pas complètement cuits. Remuer
de temps en temps pour assurer un blanchiment uniforme. Disposer
les légumes sur les plateaux de déshydratation.
Blanchiment au micro-ondes
Le micro-ondes est très pratique pour blanchir les légumes frais.
Laver et couper les légumes. Mettre les légumes dans un plat à
micro-ondes, ajouter un peu d'eau et placer un couvercle sur le plat.
Faire cuire pendant ¼ à ¹/3 du temps de cuisson normal, en remuant
à la moitié du temps. Les légumes blanchis au micro-ondes auront
une couleur plus vive que ceux blanchis à la vapeur. Disposer les
légumes sur les plateaux de déshydratation.
55
Page 56

PRÉPARATION DES LÉGUMES
Asperges Couper les têtes. Les têtes sont meilleures que les tiges,
mais celles-ci peuvent aussi être déshydratées puis
réduites en miettes pour servir d'assaisonnement.
Haricots verts Équeuter et couper comme désiré. Blanchir et congeler
pendant 30 à 45 minutes.
Betteraves Éplucher en laissant environ 1 po. (2,5 cm) de tige et de
racines. Blanchir, laisser refroidir, puis couper la tête et le
pied. Couper en rondelles.
Brocoli Éplucher et couper en morceaux. Cuire à la vapeur pendant
4 à 5 minutes
Carottes Laver, peler et couper en rondelles de ½ po. (1,5 cm).
Cuire à la vapeur pendant 4 à 5 minutes
Maïs Retirer les feuilles, laver et blanchir. Laisser refroidir et
égrainer.
Céleri Séparer les feuilles des tiges. Placer les feuilles et les tiges
sur des plateaux différents.
Ciboulette Laver, sécher et émincer.
Concombres Laver, éplucher et couper en rondelles de ¼ po. (5 mm).
Ail Séparer et peler les gousses. Couper les gousses en deux
ou en rondelles.
Champignons Laver et retirer les pieds. Sécher, puis couper en deux ou
en rondelles.
Oignons Couper les pointes et éplucher. Couper en rondelles ou
émincer.
Poivrons Laver, équeuter et égrainer. Couper en deux, en quatre, en
rondelles ou en lamelles.
Piments Laver et sécher (entiers).
(jalapeño)
56
Page 57

Pommes de terre Laver, éplucher et couper en tranches; blanchir à la vapeur.
Rincer à l'eau froide et bien sécher avant de les disposer
sur le(s) plateau(x). Remarque: si vous ne souhaitez pas
éplucher les pommes de terre, bien les frotter et éliminer
les germes et les cicatrices avec la pointe d'un couteau.
Tomates Laver et équeuter. Plonger dans l'eau bouillante, puis dans
l'eau glacée à l'aide d'une louche ou de pinces. Peler.
Couper en deux ou en quatre.
PRÉPARATION DES FRUITS
La plupart des fruits peuvent êtres déshydratés, mais certains
demandent plus de temps que d'autres. Utiliser les instructions
suivantes comme guide pour déshydrater la plupart des fruits. Nous
vous conseillons d'expérimenter avec des fruits de saison.
Préparation
Laver les fruits et retirer les parties abîmées ou trop mûres. Les
peler si vous le souhaitez. Couper les gros fruits en deux. S'il y a
une grande différence entre les morceaux, les couper en rondelles
de ³/8 po. à ½ po. (1 à 1,5 cm) pour une déshydratation uniforme.
Il n'est pas nécessaire de couper les petits fruits, comme le raisin
et les cerises. Retirer les noyaux des prunes, cerises, abricots, etc.
Peler les fruits qui ont été cirés. Peler les autres fruits est facultatif ;
si vous les souhaitez, peler les poires dont la peau est granuleuse et
les pêches dont la peau est duveteuse.
La plupart des fruits, comme l'ananas, le raisin, les fraises et les
prunes, peuvent se déshydrater immédiatement après avoir été
coupés. D'autre fruits, comme les pommes, les abricots, les pêches
et les poires, noircissent lorsqu'on les expose à l'air et doivent être
prétraités. Cela préservera la couleur et les vitamines A et C.
Prétraitement
Il y a plusieurs méthodes de prétraitement. Il n'est pas toujours
nécessaire de prétraiter les aliments avant de les déshydrater.
Néanmoins, cela peut améliorer leur aspect, augmenter la durée
de conservation, et même la valeur nutritionnelle. Essayer plusieurs
méthodes de déshydratation, avec ou sans prétraitement, et
57
Page 58

comparer les résultats. Important : traités ou non, il est essentiel
de conserver les aliments de manière adéquate an de garantir leur
qualité.
Prétraitement au bisulfite de sodium
Utiliser des produits de qualité alimentaire uniquement. Dissoudre
une c. à thé de bisulte de sodium dans 945 ml d'eau. Faire tremper
les morceaux de fruits dans cette solution pendant 2 minutes ; cela
aidera à préserver la vitamine C et la couleur. Le bisulte de sodium
est généralement disponible en pharmacie.
Prétraitements naturels
Le haut contenu en vitamine C du jus d'ananas et du jus de citron
fait d'eux une excellente option de prétraitement pour éviter que les
fruits ne noircissent. Plonger les fruits dans le jus immédiatement
après les avoir coupés. Après 2 minutes, les retirer du jus et les
disposer sur les plateaux. On peut aussi tremper les fruits dans
du miel, du jus de citron vert ou d'orange, ou bien encore les
saupoudrer de poudre de gélatine ou de noix de coco râpée pour
leur donner un goût exotique. Utilisez votre imagination!
Il est parfois conseillé de retourner les oreillons de fruits
(spécialement les abricots) pour qu'ils sèchent plus vite. Bien
que cela soit certain, cela leur fait aussi perdre du jus, source de
vitamines. Au lieu de retourner les oreillons, nous vous conseillons
de les couper en deux ; cela préservera leur valeur nutritionnelle et
leur couleur, et facilitera la reconstitution.
Pommes Bien laver et éplucher si désiré. Couper en deux, retirer le
trognon et couper en rondelles. Prétraiter au jus de citron.
Abricots Laver, couper en deux et dénoyauter. Couper en quatre si
désiré.
Bananes Éplucher et couper en rondelles. Prétraiter au jus de citron.
Cerises Laver, équeuter et dénoyauter
Noix de coco Vider le lait, ouvrir la noix de coco et retirer la chair. Sécher
et couper en petits morceaux.
Figues Laver, équeuter et couper en deux ou en quatre. Faire
sécher, la peau en haut.
58
Page 59

Raisin Séparer les grains de raisin, laver ; couper en rondelles ou
laisser entiers.
Papaye Laver, éplucher et couper en morceaux.
Pêches Laver, couper en deux et dénoyauter. Couper en quatre si
désiré.
Poires Laver, couper en deux et retirer le trognon.
Couper en morceaux ou en rondelles. Prétraiter au jus de
citron.
Ananas Éplucher, retirer le cœur et couper en morceaux.
Prunes Laver, couper en deux et dénoyauter. Couper en quatre si
désiré.
Fraises Laver ; couper en rondelle si désiré.
PRÉPARATION DES FRUITS À COQUE
Pour déshydrater les noix, noisettes, amandes et autres fruits à
coque, les décortiquer et les rincer à l'eau tiède. Les sécher, puis les
étaler sur les plateaux. Les déshydrater jusqu'à ce qu'ils soient bien
secs et fragiles, en général de 20 à 30 heures.
Une fois déshydratés, les laisser refroidir. Congeler les fruits à
coque que vous n'allez pas manger dans les jours qui suivent pour
préserver leur fraîcheur. Les décongeler avant de les manger.
PRÉPARATION DES HERBES ET DES FLEURS
Laver et sécher les herbes aromatiques et les eurs avant de les
déshydrater. Retirer les parties abîmées, molles ou décolorées.
Laisser les feuilles et les eurs sur les tiges. Étaler sur les plateaux
et déshydrater pendant 2 à 7 heures, selon le type d'herbe ou de
eur et leur taille. Une fois déshydratées, les retirer des plateaux
et les laisser refroidir. Retirer les feuilles ou les eurs des tiges si
désiré. Les écraser si désiré.
Pour obtenir de meilleurs résultats, cueillir les eurs le matin, après
que le soleil ait séché la rosée, ou bien le soir avant que la brume
59
Page 60

ne mouille les pétales. Ne pas utiliser de eurs ayant été traitées
à l'insecticide ou autre substance chimique. Si vous souhaitez
déshydrater des herbes aromatiques et des eurs en même temps,
placer les eurs sur les plateaux du bas et les herbes sur ceux du
haut ; cela évitera que des poussières de eur ne tombent sur les
herbes.
CONSERVATION DES ALIMENTS
Emballages
Les aliments séchés doivent être emballés avec soin. Les mettre
dans des sachets de congélation en plastique, en expulsant un
maximum d'air. Remarque : vous pouvez également utiliser des
sachets thermosoudables. Mettre les sachets en plastique dans
un récipient hermétique en métal, plastique ou verre. Garder
les aliments directement dans un récipient, sans les placer au
préalable dans des sachets de congélation, les expose à l'air, ce
qui peut avoir des conséquences négatives. Emballer les aliments
déshydratés sous vide prolongera considérablement leur durée de
conservation. Visiter notre site Internet pour plus d'informations sur
nos emballeuses sous vide.
Conditions de conservation
Une fois emballés, garder les aliments déshydratés dans un endroit
sombre et frais. Plus la température est basse, plus la durée de
conservation sera longue. La durée de conservation augmente
de 2 à 3 fois par baisse de 18 °F (10 °C). Il est donc conseillé
de conserver les aliments déshydratés au réfrigérateur ou au
congélateur si vous avez de la place. Si ce n'est pas le cas, garder
les aliments déshydratés dans l'endroit le plus frais de votre maison.
La lumière peut aussi détériorer l'aspect et la valeur nutritionnelle
des aliments; il est donc conseillé de conserver les aliments
déshydratés dans des récipients opaques ou de couleur.
Durée de conservation
Les fruits se conserveront plus longtemps que les légumes, du
fait de leur haut contenu en sucre et en acide. Bien emballés et
conservés à température ambiante (70 °F/21 °C) ou moindre, les
fruits conserveront leur aspect et leur valeur nutritionnelle jusqu'à
un an. Il est conseillé de consommer la plupart des légumes dans
60
Page 61

les 6 mois suivant leur déshydratation. LES FRUITS ET LES
LÉGUMES CONSERVÉS PENDANT PLUS LONGTEMPS
N'AURONT PAS AUSSI BON GOÛT ET NE CONTIENDRONT
PAS AUTANT DE VITAMINES, MAIS ILS NE POURRIRONT
PAS TANT QUE LEUR EMBALLAGE EST INTACT.
RECETTES
Bœuf séché
Quantité : 8 portions
1½ livre (680 g) de bavette de bœuf
1⁄3 tasse (80 ml) de sauce Worcestershire
2 c. à table de sauce barbecue fumée
¼ tasse (60 ml) de sauce de soja
2 c. à table de sucre blond
2 gousses d'ail
¼ c. à thé de poivre noir moulu
Mettre la viande sur une assiette et la congeler pendant 1 heure ; cela la
rendra plus facile à couper en lamelles. Couper la viande en lamelles de
¼ po. (5 mm) de large, contre le grain. Mélanger le reste des ingrédients.
Mettre les lamelles de viande dans le mélange et laisser mariner au
réfrigérateur pendant au moins 30 minutes. Égoutter et disposer les
lamelles sur les plateaux, sans qu'elles ne se touchent. Déshydrater à
150 °F (65 °C) pendant environ 8 heures (ou bien utiliser le programme
M1), jusqu'à obtention du résultat voulu, en retournant les lamelles une
fois à la moitié du temps. Conserver dans un récipient hermétique, au
réfrigérateur ou au congélateur.
Calories 165 • Glucides 6g • Protéines 18g • Lipides 7g • Lipides saturés 3g
Cholestérol 34mg • Sodium 423mg • Calcium 40mg • Fibres 0 g
Analyse nutritionnelle par por tion:
61
Page 62

Thon séché
Quantité : 6 portions
1 livre (455 g) de thon frais (steak)
1 c. à table de gingembre râpé
2 c. à thé d'ail écrasé
¼ tasse (60 ml) de sauce de soja
¼ tasse (60ml) de jus d'orange
2 c. à table de vinaigre de vin de riz
1 c. à thé de sucre blond
Couper le steak de thon en deux. Mettre le thon sur une assiette et le
congeler pendant 1 heure ; cela le rendra plus facile à couper en lamelles.
Placer le thon sur le flan, le côté coupé sur la planche à découper. Couper
en morceaux de ¼ po. (5 mm), puis en lamelles de 1 po. (2,5 cm). Mettre
le gingembre, l'ail, la sauce de soja, le jus d'orange, le vinaigre de vin de
riz et le sucre dans un bol ; mélanger. Mettre le thon dans le mélange et
laisser mariner au réfrigérateur pendant au moins 30 minutes. Égoutter et
disposer les lamelles sur les plateaux, sans qu'elles ne se touchent.
Déshydrater à 150 °F (65 °C) pendant environ 8 heures (ou bien utiliser le
programme M1), jusqu'à obtention du résultat voulu, en retournant les
lamelles une fois à la moitié du temps. Conserver dans un récipient
hermétique, au réfrigérateur ou au congélateur.
Calories 124 • Glucides 3g • Protéines 18g • Lipides 4g • Lipides saturés 1g
Cholestérol 28mg • Sodium 384mg • Calcium 12mg • Fibres 0g
Analyse nutritionnelle par por tion:
“Saucisses” de bœuf piquantes
Quantité : 15 portions (30 “saucisses”)
3 livres (910 g) de viande hachée
1 c. à table de paprika
1½ c. à thé de poivre de Cayenne
1½ c. à thé de flocons de piment rouge
1 c. à table de poudre d'ail
4 c. à table de sauce Worcestershire
2 c. à thé de sel de saumure
62
Page 63

Mélanger tous les ingrédients dans un saladier. Former des “saucisses”
de 5 x ½ po. (12 cm x 1,5 cm). Placer les “saucisses” sur une plaque.
Réfrigérer pendant 8 à 12 heures, sans couvrir. Disposer les “saucisses”
sur les plateaux, sans qu'elles ne se touchent. Déshydrater à 150 °F
(65 °C) pendant environ 5 heures (ou bien utiliser le programme M1),
jusqu'à obtention du résultat voulu. Conserver dans un récipient
hermétique, au réfrigérateur ou au congélateur.
Calories 201 • Glucides 2g • Protéines 17g • Lipides 14g • Lipides saturés 5g • Cholestérol
61mg • Sodium 182mg • Calcium 20mg • Fibres 0g
Analyse nutritionnelle par por tion:
Poulet Teriyaki séché
Quantité : 8 portions
2½ livres (1.1 kg) de blancs de poulet désossés et sans peau
½ tasse (120 ml) de sauce Teriyaki
¾ tasse (175 ml) de jus d'ananas
1½ c. à table de sauce barbecue au goût fumé
¾ c. à thé de flocons de piment rouge
Retirer la graisse du poulet. Mettre le poulet sur une plaque et le congeler
pendant 1 heure ; cela le rendra plus facile à couper en lamelles. Couper
le poulet en lamelles de ¼ po. (5 mm). Mélanger le reste des ingrédients.
Mettre les lamelles de poulet dans le mélange et laisser mariner au
réfrigérateur pendant au moins 1 heure. Égoutter et disposer les lamelles
sur les plateaux, sans qu'elles ne se touchent. Déshydrater à 170 °F
(77 °C) pendant environ 20 heures, ou jusqu'à obtention du résultat voulu,
en retournant les lamelles une fois à la moitié du temps. Conserver dans
un récipient hermétique, au réfrigérateur ou au congélateur.
Calories 179 • Glucides 5g • Protéines 33g • Lipides 2g • Lipides saturés 0g
Cholestérol 81mg • Sodium 340mg • Calcium 22mg • Fibres 0g
Analyse nutritionnelle par por tion:
63
Page 64

Pâte à tartiner aux tomates séchées
et au basilic
Quantité : 10 portions
10 tomates Roma de la même taille
8 onces (255 g) de fromage à la crème demi-écrémé
½ tasse (120ml) de mayonnaise allégée
¾ tasse (90g) de crème allégée
1 gousse d'ail écrasée
¼ tasse (25 g) de Parmesan râpé
2 c. à table de basilic frais haché
2 échalotes émincées
sel et poivre, au goût
Couper les tomates en quatre et les placer sur les plateaux, le côté coupé
vers le haut. Déshydrater à 140 °F (60 °C) pendant environ 7 heures (ou
bien utiliser le programme M2), jusqu'à ce qu’elles soient caoutchouteuses.
Couper les tomates déshydratées en petits morceaux. Mettre les tomates,
le fromage à la crème et la mayonnaise dans un robot de cuisine, et mixer
jusqu'à obtention d'un mélange homogène. Mettre le mélange dans un
saladier. Ajouter la crème, l'ail, le Parmesan, le basilic, l'échalote, le sel et
le poivre. Servir avec votre pain ou biscuits salés favoris.
Analyse nutritionnelle par por tion:
Calories 124 • Glucides 6g • Protéines 4g • Lipides 10g • Lipides saturés 4g
Cholestérol 18mg • Sodium 320mg • Calcium 83mg • Fibres 1g
Rouleaux de yogourt
Quantité : 2 rouleaux
8 onces (235 ml) de yogourt à la vanille
2 c. à table de votre confiture préférée
Mélanger le yogourt et la confiture. Étaler une couche fine sur la plaque
pour “cuirs” de fruit à l'aide d'une spatule en caoutchouc. Mettre la
plaque sur un des plateaux. Couvrir et déshydrater à 150 °F (65 °C)
pendant environ 5 heures (ou bien utiliser le programme M5), jusqu'à ce
que le yogourt ne soit plus humide et collant. Décoller de la plaque et
couper en deux. Rouler chaque moitié et conserver dans du film étirable,
à température ambiante.
Remarque : on peut aussi utiliser du yogourt aux fruits.
Calories 152 • Glucides 29g • Protéines 6g • Lipides 1g • Lipides saturés 1g
Cholestérol 6mg • Sodium 81mg • Calcium 198mg • Fibres 0g
Analyse nutritionnelle par rouleau :
64
Page 65

Rouleaux épicés de pomme
et de fruits secs
Quantité : 2 rouleaux
²/3 tasse (160 g) de compote de pomme sans sucre
1 pincée de cannelle en poudre
1 pincée de noix de muscade râpée
½ c. à thé de miel
¼ c. à thé de jus de citron
1 c. à table d'airelles/canneberges séchées, finement émincées
1 c. à table de noix, finement émincées
Mélanger la compote, la cannelle, la noix de muscade, le miel et le jus de
citron dans un bol moyen. Étaler une couche fine sur la plaque pour
“cuirs” de fruit à l'aide d'une spatule en caoutchouc. Couvrir d'airelles/
canneberges et de noix, et presser légèrement dans la compote. Couvrir
et déshydrater à 150 °F (65 °C) pendant 4 heures (ou bien utiliser le
programme M2), jusqu'à ce que la compote de pomme ne soit plus
humide. Décoller de la plaque et couper en deux. Rouler chaque moitié et
conserver dans du film étirable, à température ambiante.
Calories 94 • Glucides 15g • Protéines 0g • Lipides 3g • Lipides saturés 0g
Cholestérol 0mg • Sodium 2mg • Calcium 8mg • Fibres 1g
Analyse nutritionnelle par rouleau :
Rouleaux fraise banane
Quantité : 2 rouleaux
¾ tasse (150 g) de fraises en petits morceaux
½ banane, en rondelles
½ c. à table de miel
½ c. à thé de jus de citron
Spray végétal
Mettre tous les ingrédients (sauf le spray végétal) dans un mélangeur et
mixer jusqu'à obtention d'un mélange homogène. Vaporiser un peu de
spray végétal sur une serviette en papier et frotter légèrement la plaque
pour “cuirs” de fruit. Étaler le mélange sur la plaque. Couvrir et
déshydrater à 150 °F (65 °C) pendant environ 5 heures (ou bien utiliser le
programme M1), jusqu'à ce que le mélange ne soit plus humide et collant.
Décoller de la plaque et couper en deux. Rouler chaque moitié et
conserver dans du film étirable, à température ambiante.
Calories 63 • Glucides 16g • Protéines 1g • Lipides 0g • Lipides saturés 0g
Cholestérol 0mg • Sodium 1mg • Calcium 12mg • Fibres 2g
Analyse nutritionnelle par rouleau :
65
Page 66

Muesli tropical
Quantité : 7 portions
3 tasses (240 g) de flocons d'avoine à l'ancienne
¾ tasse (65 g) de noix de coco râpée
½ tasse (55g) de germe de blé
1⁄3 tasse (65 g) de cassonade/sucre roux
½ tasse (60 g) d'airelles/canneberges séchées
½ tasse (80 g) d'ananas séché en petits morceaux
½ tasse (30 g) de chips de banane, en morceaux
1 tasse (100 g) de noix de pecan émincées
1 c. à table de zeste d'orange
1 c. à table d'extrait de vanille
¼ tasse (55 g) de beurre fondu
2 c. à table de sirop d'agave ou de miel
1⁄3 tasse (105 g) de sirop d'érable
¼ c. à thé de sel
Mélanger les ingrédients secs et la vanille dans un saladier. Dans un bol,
mélanger le beurre, le sirop d'agave ou le miel, le sirop d'érable et le sel.
Verser le mélange de beurre/sirop sur les ingrédients secs. Mélanger.
Recouvrir trois plateaux de papier sulfurisé et diviser le mélange entre les
plateaux, en formant des petits tas avec les doigts. Couvrir et déshydrater
à 150 °F (65 °C) pendant environ 3 heures (ou bien utiliser le programme
M1), jusqu'à ce que le muesli ne soit plus humide. Conserver à
température ambiante, dans un récipient hermétique.
Calories 318 • Glucides 44g • Protéines 8g • Lipides 13g • Lipides saturés 5g
Cholestérol 9mg • Sodium 59mg • Calcium 46mg • Fibres 6g
Analyse nutritionnelle par por tion:
66
Page 67

Chips au vinaigre
Quantité : 4 portions
3 pommes de terre “Russet Burbank” moyennes, épluchées
si désiré
1 tasse (235 ml) de vinaigre de cidre de pomme
2 c. à table d'huile d'olive
Gros sel, au goût
Couper les pommes de terre en rondelles fines de ¹/8 po. (3 mm). Faire
macérer dans le vinaigre pendant 8 à 12 heures ; cela évite que les chips
aient un goût pâteux. Bien égoutter et mélanger avec l'huile d'olive.
Recouvrir les plateaux de papier sulfurisé et disposer les rondelles de
pomme de terre sur ces-derniers, sans les superposer. Saupoudrer de
sel. Déshydrater à 150 °F (65 °C) pendant environ 8 à 12 heures (ou bien
utiliser le programme M1), jusqu'à ce qu’elles soient croustillantes.
Conserver à température ambiante, dans un récipient hermétique.
Calories 198 • Glucides 29g • Protéines 3g • Lipides 7g • Lipides saturés 1g
Cholestérol 0mg • Sodium 302mg • Calcium 25mg • Fibres 2g
Analyse nutritionnelle par por tion:
67
Page 68

Trademarks or service marks of third parties referred to herein
are the trademarks or service marks of their respective owners.
Todas las marcas registradas, comerciales o de servicio mencionadas
en este documento pertenecen a sus titulares respectivos.
Toutes les marques déposées, commerciales ou de service ci-incluses
appartiennent à leurs propriétaires respectifs.
©2019 Waring Commercial
314 Ella T. Grasso Ave.
Torrington, CT 06790
www.waringcommercialproducts.com
Printed in China
Impreso en China
Imprimé en Chine
WDH10 IB
19WC060922
IB -16253
 Loading...