


Semi-Automatic Sport Pistol
Cal. .380 Auto
rear sight |
extractor |
loaded chamber |
|
|
indicator |
front sight |
|||
|
|
 muzzle
 accessory rail
lock
takedown lever
trigger lock |
trigger |
slide |
magazine catch |
grip |
SAFETY AND OPERATING INSTRUCTIONS
manual safety
hammer
magazine
GB
D
F
E
I
SAFETY AND OPERATING INSTRUCTIONS
CONTENTS
Important instructions for the use of firearms
It should be remembered that even the safest gun is potentially dangerous to you and others when it is not properly handled.
First of all read and understand the operating instructions and learn how the weapon works and is to be handled. Always treat an unloaded weapon as if it were loaded.
! WARNING: Always bear in mind: Keep your finger away from the trigger unless you really intend to fire. Always keep your weapon pointing in a safe direction so that you and others cannot be endangered.
Do not use force when disassembling or assembling your weapon. A gun can only be safe as long as it is in a flawless technical condition. Incorrect handling and lack of maintenance may lead to malfunctions and reduced safety of the weapon. Always be aware of possible risks from dropping your pistol or from corrosion or other external influences. In such cases, have your weapon inspected by a competent gunsmith before using it again. Unauthorized modifications to the mechanism, damage caused by the application of force and modifications effected by third parties will release the manufacturer from any warranty claims. Only an authorized and qualified gunsmith is allowed to work on a gun. Always wear ear protectors and if necessary safety glasses, even in practice shooting. Remind any persons stationed behind you that they should wear ear protectors.
|
|
no. |
Contents |
page |
1 |
Operating Instructions |
3 - 4 |
||
2 |
Inspection |
5 |
||
|
|
|
|
|
|
3 |
Loading the pistol |
6 |
|
|
4 |
Loading the chamber with the first cartridge |
6 |
|
|
|
|
|
|
5 |
Firing |
7 |
||
6 |
Decocking the hammer |
7 |
||
|
|
|
|
|
7 |
Pistol with empty magazine |
7 |
||
8 |
Unloading the pistol |
8 |
||
|
|
|
|
|
9 |
Clearing misfires |
8 |
||
|
|
Disassembling and assembling the pistol |
9 |
|
|
10 |
|||
|
|
|
|
|
|
11 |
Adjusting the rear sight |
9 |
|
|
|
Cleaning |
10 |
|
12 |
||||
|
|
|
|
|
13 |
Storage |
10 |
||
14 |
Repairs |
10 |
||
|
|
|
|
|
15 |
Warranty |
11 - 12 |
||
16 |
Technical data |
13 |
||
|
|
|
|
|
17 |
Accessories |
13 |
||
18 |
Parts/exploded view |
14 - 15 |
||
|
|
|
|
|
|
|
|
Contact |
back |
|
|
|
|
|
02

! WARNING: Always leave the manual safety engaged until you intend to fire.
1.1 Manual safety |
|
|
|
|
|
|
|
||
SAFE position |
|||||||||
fig. 1 |
|
fig. 2 |
FIRE position |
||||||
SAFE POSITION |
- rotate the safety lever to lower position (fig. 1). |
|
|
|
|
|
|
|
|
|
|
|
|
|
|
|
|||
|
|
|
|
|
|
|
|||
FIRE POSITION |
- rotate the safety lever to upper position (fig. 2). |
|
|
|
|
|
|
|
|
F
1.2 Trigger lock
Use the supplied key to lock the trigger mechanism of the PK380 (fig. 3). The pistol cannot be opened without the key. This greatly reduces the risk of use by an unauthorized person.
Lock position: Push the key into |
fig. 3 |
fig. 4 |
SAFE position |
|
fig. 5 |
FIRE position |
the lock and make a quarter |
|
|
|
|
|
|
|
|
|
|
|
|
|
turn counter-clockwise (90°). |
|
|
|
|
|
|
(Fig. 4) |
|
|
|
|
|
|
Unlocked position: Turn the key |
|
|
|
|
|
|
by a quarter turn clockwise (90°). |
|
|
|
|
|
|
(Fig.5) |
|
|
|
|
|
|
SAFETY AND OPERATING INSTRUCTIONS
03

INSTRUCTIONS OPERATING AND SAFETY
1.3 Drop safety
The drop safety (firing pin safety) is only disengaged when the trigger is pulled. If, after a fall, the hammer was released, then the firing pin would not be activated.
1.4 Loaded chamber indicator |
fig. 6b |
A small slot above the extractor allows inspection
of the chamber to see if there is a round in the chamber (fig. 6a) or not (fig. 6b).
! WARNING: NEVER RELY SOLELY ON MECHANICAL FEATURES - always be extremely careful and avoid situations which could lead to an accident.
fig. 6a
04

2 Inspection
! WARNING: Make sure that the pistol is unloaded for inspection, that the safety is in the safe position and that the pistol is pointed in a safe direction.
Functional inspection |
fig. 7 |
|
1.Remove the magazine, pull back the slide and make sure that the chamber is empty. Let go of the slide and let it glide all the way back. Empty the magazine as described in section 8 (p. 8).
! WARNING: Grip from above or from the back when pulling the slide (fig. 7). Never put your hand in front of the muzzle (fig. 8).
2.Insert the empty magazine and pull back the slide. The slide should be locked in its rearmost
position. |
fig. 8 |
3.Remove the magazine, pull the slide back slightly and release it. The slide must then close all the way.
!WARNING: Never put your hand in front of the muzzle.
INSPECTION
05
LOADING
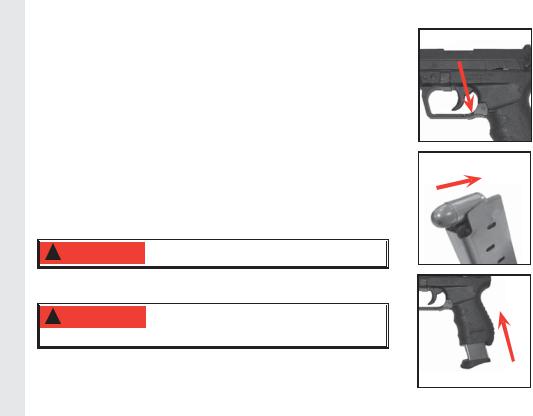
3 Loading the pistol
Depress the magazine catch and remove the empty magazine (fig. 9). Insert a cartridge under the magazine lips, thus pushing down the follower (fig. 10). Do not use force. Repeat this procedure until the magazine is fully loaded. Push the loaded magazine into the magazine well until the magazine catch engages (fig. 11).
4 Loading the chamber with the first cartridge
Pick up the pistol with your shooting hand and point the muzzle in a safe direction. Use your other hand to retract and release the slide (fig. 13). Never put your hand in front of the muzzle. As the slide travels forward it inserts the first round into the chamber. The hammer is now cocked. Leave the safety in the safe position until you are ready to fire.
!WARNING: Never put your hand in front of the muzzle.
!WARNING: The pistol is ready to fire. Leave your finger off the trigger
and out of the trigger guard until you are ready to fire.
06
fig. 9
fig. 10
fig. 11

5 Firing
Push the manual safety to the fire position. Aim at a safe target. Squeeze the trigger slowly and maintain the pressure until the round is fired.
6 Decocking the hammer
Point the pistol in a safe direction. Engage the safety and remove the magazine. Pull back the slide and make sure that the chamber is empty (fig. 13). Aim in a safe direction and release the safety. While holding the hammer with your thumb, pull the trigger and let the hammer slowly move forward.
! WARNING: Keep the pistol pointing in a safe direction when decocking.
Failure to do this can result in serious injury or death.
7 Pistol with empty magazine
After the last round has been fired, the slide stop holds the slide in the open position. Place the |
|
||
manual safety in the safe position. If you intend to continue shooting, replace the empty magazine |
fig. 12 |
||
with a full one. Pull slide rearward and release (fig. 12); the slide will travel forward and load the |
|
||
chamber with the first round. Keep your pistol in your shooting hand and pointed in a safe direction |
fig. 13 |
||
so that there is no danger to other persons. |
|
||
|
|
|
|
|
! WARNING: |
The pistol is ready to fire. Leave your finger off the trigger |
|
|
and out of the trigger guard until you are ready to fire. |
|
|
If shooting is not to continue, remove the magazine and inspect the chamber to verify it does not |
|
||
contain any ammunition (fig. 13). Close the slide and decock hammer, as described in chapter 6. |
|
||
FIRING / DECOCKING / EMPTY MAGAZINE
07

MISFIRES CLEARING / UNLOADING
8 Unloading the pistol
Point the muzzle in a safe direction. Lock the safety. Remove the magazine and pull back the slide. If there is a round in the chamber, it will be ejected.
! WARNING: Make a visual inspection of the barrel! (fig. 13)
Point the muzzle in a safe direction and allow the slide to travel forward and decock the hammer, described in chapter 6. Unload the magazine by removing the cartridges one after the other by pushing toward the front.
9 Clearing misfires
! WARNING: If your firearm gives any indication that it is not performing properly or the operation of your firearm has changed “the way it feels or sounds”, stop firing. Make sure the firearm is pointed in a safe direction, unload the firearm and have it inspected and test fired by a gunsmith qualified to perform service on Walther firearms.
-If a cartridge fails to fire, wait at least 30 seconds while keeping the muzzle pointed in a safe direction.
-Keep your finger off the trigger and out of the trigger guard.
-Remove the magazine. Place the manual safety in the safe position
-Grasp the slide and briskly pull it fully rearward to eject the misfired round. Check the barrel chamber and bore visually for any obstructions.
You must be certain there are no cartridges in the chamber or obstructions in the barrel. Remember that any time you release the slide while a magazine containing cartridges is in the pistol, you will have reloaded the pistol and it will be capable of firing.
! WARNING: Never try to use a misfired cartridge again.
08

10 Disassembling and assembling the pistol
! WARNING: Always follow the disassembly instructions exactly. Never do anything beyond what you are specifically instructed to do in this manual. Never alter or modify the parts in your firearm.
! WARNING: Before disassembling the pistol, decock it and lock the safety. Remove the magazine and make sure that the pistol is not loaded.
To remove the slide, use the key to turn the lock on the left side of the pistol counter-clockwise by 135° (fig. 14). Pull the takedown lever straight down (fig. 15). Slowly pull off the slide with the barrel (fig. 16). To assemble, reverse the steps. The key cannot be removed when the lock is open. To remove the key, one must first assemble the pistol and lock it.
fig. 17 |
11 Adjusting the rear sight |
|
|
The rear sight is connected by a pin. The windage is adjusted by |
|
|
moving the rear sight to the right or left (fig. 17): |
|
|
S |
|
|
If the pistol shoots to the right: |
Push the sight to the left. |
|
If the pistol shoots to the left: |
Push the sight to the right. |
fig. 14
135°
fig. 15
fig. 16
DISASSEMBLY / REASSEMBLY / ADJUSTMENT
09

REPAIR / STORAGE / CLEANING
12 Cleaning
In order to keep the pistol functional and to extend its service life, the Walther PK 380 should be cleaned and maintained at regular intervals.
! WARNING: Place the manual safety in the safe position, remove the magazine, open the slide, and inspect the chamber to
make sure it is empty.
Disassemble the pistol. Remove fouling from breech, barrel, magazine lips, follower, and |
fig. 18 |
frame with a brush and a cloth (fig. 18). Clean the barrel with an oil-soaked brush and |
|
then dry it with cleaning patches; always begin at the chamber. Repeat until barrel is |
|
clean. Apply a thin coat of oil to all metal parts. Use only high-quality gun oil. |
|
Reassemble pistol and check for proper function. |
|
13 Storage
! WARNING: Never leave a loaded firearm unattended! Make sure that the pistol does not fall into the hands of unauthorized persons.
Always keep and store your pistol in an unloaded condition with the safety in the safe position. Keep this pistol and ammunition away from children and unauthorized persons. Observe all legal regulations concerning the storage of firearms and ammunition.
14 Repairs
CAUTION! A firearm which fails to function properly is dangerous. It should be safely stored in a way that prevents its use before it is repaired.
! WARNING: Only an authorized and qualified gunsmith should inspect and repair your firearm!
10
15 Warranty
Within the first year after the date of purchase, WALTHER will repair or replace your defective firearm free of charge provided the defect was not caused by your misuse or negligence.
WALTHER firearms are warrantied to be free from defects in material and workmanship. Any such defects of which WALTHER receives written notice within one year from the date of purchase by the original owner, will be remedied by WALTHER without charge within a reasonable time after such notification and delivery of the firearm as provided below. If possible, return the firearm to WALTHER’s warranty service in its original packaging. Observe all laws related to the transport and shipment of firearms. Warranty claims must be in writing and include a copy of the bill of sale in the owner’s name indicating the date of purchase.
! WARNING: When transporting a firearm, make sure that it is unloaded and that the safety is in the safe position.
Warranty claims must specify the model and serial number of the pistol and include a description of the malfunction. It is recommended that shipments be insured by the owner, since WALTHER will accept no responsibility for loss or damage in transit. WALTHER will bear the costs of return shipment and insurance if the claim falls under the warranty.
This is a limited warranty and it replaces all other warranties as well as any warranties that are verbal or implied.
No warranty shall be given for general suitability or for fitness to serve a specific purpose. No liability shall be accepted if statutory warranty regulations or provisions are violated.
Under no circumstances shall WALTHER assume responsibility for incidental or consequential damages, whether involving economic loss, injury, death or property damage, when they arise through breach of this warranty, carelessness or otherwise.
WALTHER will not be responsible for: |
|
|
- Defects or malfunctions resulting from careless handling, unauthorized adjustments or modifications made or attempted by anyone other |
|
|
than a qualified gunsmith following WALTHER authorized procedures, or disassembly beyond the Field Stripping instructions in this manual. |
WARRANTY |
|
- Use of defective or improper ammunition, corrosion, neglect, abuse, ordinary wear and tear, or unreasonable use. |
||
|
||
- Criminal misuse, negligence, resale, use under the influence of drugs or alcohol. |
|
11

DATA TECHNICAL / SHIPPING & CONTACT / WARRANTY
WALTHER reserves the right to determine what constitutes ordinary wear and tear. This warranty gives you specific legal rights. You may also have other rights that vary from state to state. Note: All liability is excluded in the event that the instructions in this manual are not observed.
CONTACT & SHIPPING |
|
|
|
Carl WALTHER GmbH |
|
Service |
|
Postfach 4325 |
D - 89033 Ulm |
Im Lehrer Feld 1 |
D - 89081 Ulm |
Tel. +49 (0) 731 / 15 39 0 |
Fax +49 (0) 731 / 15 39 109 |
12 |
|
16 Technical Data
caliber |
.380 Auto (9 mm Browning short) |
|
|
trigger |
SA; DA |
magazine capacity |
8 rounds |
dimensions (length/height/width) |
6.5 / 5.2 / 1.2 inch |
|
(165 / 133 / 30.5 mm) |
|
|
barrel length |
3.7 inch (93 mm) |
|
|
sight radius |
5.4 inch (136 mm) |
width of rear sight notch |
0.2 inch (5 mm) |
front sight width |
0.14 inch (3.6 mm) |
|
|
weight (incl. magazine) |
19.8 oz (560 g) |
|
|
magazine weight (empty) |
1.8 oz (51 g) |
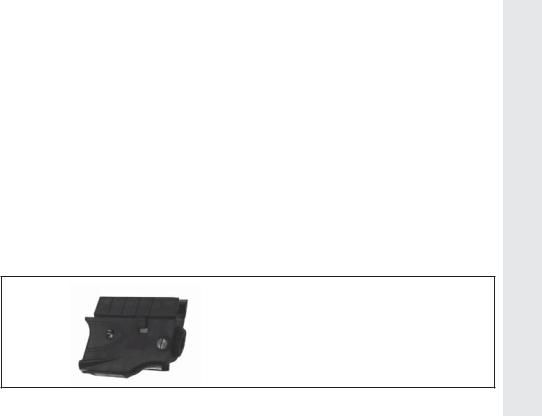
17 Accessories
Walther laser
This laser was developed by WALTHER especially for the PK380 and is designed to be a perfect fit. The quick-release catch allows the laser to be mounted instantly without the need for additional tools. LEDs on either side of the laser show when the laser is on. Supplied with batteries and adjustment wrench.
Purchase is subject to applicable restrictions.
ACCESSORIES
13

18 Exploded view/ Parts
VIEW EXPLODED
14

18 Exploded view/ Parts
1
2
3
4
5
6
7
8
9
10
11
12
13
14
15
16
17
18
19
20
21
22
23
24
276 93 87 |
slide |
276 93 85 |
pin |
276 94 09 |
rear sight |
266 09 97 |
ball |
267 08 10 |
spring |
276 94 41 |
safety lever, left |
276 94 50 |
spring |
266 09 89 |
screw |
276 94 76 |
firing pin |
276 94 84 |
spring |
276 94 92 |
firing pin safety |
276 95 06 |
safety block |
276 95 14 |
safety lever, right |
276 95 22 |
spring |
266 09 20 |
pin |
276 95 49 |
extractor |
276 95 57 |
barrel |
276 95 65 |
spring guidance rod |
277 18 70 |
spring |
276 95 81 |
key for trigger lock |
276 95 90 |
lock |
276 96 03 |
trigger bar guide |
276 96 11 |
pin connex |
266 08 31 |
spring |
25 |
266 07 76 |
pin |
50 |
266 05 47 |
pin |
26 |
276 96 46 |
takedown lever |
51 |
276 71 39 |
magazine |
27 |
276 96 54 |
spring |
52 |
260 83 32 |
simulating device |
28 |
276 96 62 |
pin |
53 |
277 28 33 |
pin |
30 |
276 96 89 |
grip |
54 |
266 09 11 |
spring |
32 |
266 08 14 |
spring |
|
|
|
33 |
277 48 87 |
magazine catch |
|
|
|
34 |
266 84 75 |
pin |
|
|
|
35 |
276 97 43 |
sideplate, left |
|
|
|
36 |
276 97 51 |
spring |
|
|
|
37 |
276 97 60 |
pin |
|
|
|
38 |
266 06 44 |
sear |
|
|
|
39 |
276 97 86 |
pin |
|
|
|
40 |
266 06 01 |
spring |
|
|
|
41 |
276 98 08 |
hammer assembly |
|
|
|
42 |
276 98 41 |
sideplate, right |
|
|
|
43 |
266 05 12 |
screw |
|
|
|
44 |
276 98 67 |
pin connex |
|
|
|
45 |
276 98 75 |
ejector |
|
|
|
46 |
276 98 83 |
trigger lock |
|
|
|
47 |
276 98 91 |
slide stop lever |
|
|
|
48 |
276 99 56 |
spring |
|
|
|
49 |
276 99 48 |
trigger assembly |
|
|
|
PARTS
15


Selbstladepistole
Cal. 9 mm Browning kurz
(Cal. .380 Auto)
Visier |
Auszieher |
Ladeanzeige |
Korn |
Sicherung |
Mündung
Hahn
Zubehörschiene
Verriegelung
Demontagebügel
Abzugschloss |
Abzug |
Verschluß |
Magazinhalter |
Griff |
Magazin |
GEBRAUCHSANWEISUNG
GB
D
F
E
I
GEBRAUCHSANWEISUNG
17
INHALT
Wichtige Hinweise für den Umgang mit Waffen
Gehen Sie davon aus, dass auch die sicherste Waffe durch unsachgemäßen Umgang für Sie und andere gefährlich werden kann. Machen Sie sich zunächst anhand der Bedienungsanleitung mit der Funktion und Handhabung der Waffe vertraut. Gehen Sie auch mit der ungeladenen Waffe so um, als wenn sie geladen wäre.
! ACHTUNG: Beachten Sie stets: Keinen Finger an den Abzug, außer zur gewollten Schussabgabe. Halten Sie die Waffe immer so, dass Sie und Unbeteiligte nicht gefährdet sind.
Wenden Sie bei der Bedienung, beim Zerlegen und beim Zusammenbau nie Gewalt an. Sicherheit ist nur gewährleistet, solange sich die Waffe in einem einwandfreiem Zustand befindet. Unsachgemäße Handhabung und mangelnde Pflege können die Funktion und Sicherheit der Waffe beeinträchtigen. Beachten Sie, dass die Waffe bei Einwirkung von außen, z.B. Korrosion, Herunterfallen usw., von einer fachkundigen Person überprüft werden muss. Unsachgemäße Eingriffe in den Mechanismus, durch Gewalt hervorgerufene Beschädigungen und Veränderung durch Dritte entbinden den Hersteller von jeglichen Gewährleistungsund Garantieansprüchen. Arbeiten an der Waffe dürfen nur von autorisierten Fachleuten vorgenommen werden. Vergessen Sie selbst beim Übungsschießen nie den Gehörschutz und gegebenenfalls die Schutzbrille. Machen Sie Personen, die sich ausschließlich im rückwärtigen Bereich aufzuhalten haben, auf das Tragen eines Gehörschutzes aufmerksam.
Nr. |
Inhalt |
Seite |
1 |
Bedienelemente |
19 - 20 |
2 |
Prüfung vor Gebrauch |
21 |
|
|
|
3 |
Laden der Pistole |
22 |
4 |
Zuführen der ersten Patrone |
22 |
|
|
|
5 |
Schießen |
23 |
6 |
Entspannen des Hahnes |
23 |
|
|
|
7 |
Pistole bei leergeschossenem Magazin |
23 |
8 |
Entladen der Pistole |
24 |
|
|
|
9 |
Zündversager entfernen |
24 |
10 |
Montage/Demontage |
25 |
|
|
|
11 |
Visier einstellen |
25 |
12 |
Reinigen |
26 |
|
|
|
13 |
Lagerung |
26 |
14 |
Reperatur |
26 |
|
|
|
15 |
Garantie |
27 - 28 |
16 |
Technische Daten |
28 |
|
|
|
17 |
Zubehör |
29 |
18 |
Explosionsdarstellung/Teileliste |
30 - 31 |
|
|
|
|
Kontakt |
Umschlagrücken |
|
||
|
|
|
18

1.1 Manuelle Sicherung |
|
|
|
|
|
|
|
||
gesichert |
|||||||||
Fig. 1 |
|
Fig. 2 |
feuerbereit |
||||||
GESICHERT |
- drehen Sie die Sicherung in die untere Position (Fig. 1). |
|
|
|
|
|
|
|
|
|
|
|
|
|
|
|
|||
FEUERBEREIT |
- drehen Sie die Sicherung in die obere Position (Fig. 2). |
|
|
|
|
|
|
|
|
F
1.2 Abzugschloss
Mit dem beiliegenden Schlüssel verriegeln Sie das Abzugsystem der PK380 (Fig. 3). Ohne den Schlüssel lässt sich die Waffe nicht aufschließen. Sie verringern so deutlich die Gefahr der unbefugten Benutzung ihrer Waffe.
GESICHERTDrücken Sie den |
|
|
|
|
|
|
|
Fig. 3 |
Fig. 4 |
gesichert |
|||||
|
Fig. 5 |
feuerbereit |
|||||
Schlüssel in das Schloss auf der |
|
|
|
|
|
|
|
|
|
|
|
|
|
||
rechten Seite der Waffe und |
|
|
|
|
|
|
|
drehen Sie ihn eine viertel |
|
|
|
|
|
|
|
Umdrehung nach links (90°). |
|
|
|
|
|
|
|
(Fig. 4) |
|
|
|
|
|
|
FEUERBEREITDrehen Sie den
Schlüssel um eine viertel
Umrehung zurück (90°). (Fig. 5)
GEBRAUCHSANWEISUNG
19

GEBRAUCHSANWEISUNG
1.3 Fallsicherung
Die Sicherung wirkt beim Fall der Pistole aus unterschiedlichen Fallhöhen und Fallpositionen. Sie verhindert ein ungewolltes Zünden der Patrone, wenn der Abzug nicht durchgezogen ist.
1.4 Ladeanzeige
Die Aussparung über dem Auszieher ermöglicht eine visuelle Prüfung zur Kontrolle, ob sich eine Patrone im Patronenlager befindet (Fig. 6a), oder nicht (Fig. 6b).
! ACHTUNG: VERLASSEN SIE SICH NIE AUF MECHANISCHE SICHERUNGEN - denken Sie vorrausschauend und vermeiden Sie Situationen, die zu einem Unfall führen könnten!
20
Fig. 6b
Fig. 6a
2 Prüfung vor Gebrauch
! ACHTUNG: Stellen Sie sicher, dass die Waffe entladen ist, die manuelle Sicherung aktiviert ist und die Waffe in eine sichere Richtung zeigt.
Funktionsprüfung |
Fig. 7 |
|
1.Entfernen Sie das Magazin, ziehen Sie den Verschluss nach hinten und stellen Sie sicher, dass das Patronenlager leer ist. Lassen Sie los, damit der Verschluss wieder vollständig nach vorne gleiten kann. Leeren Sie das Magazin wie in Kapitel 8 beschrieben (S.24).
! ACHTUNG: Greifen Sie den Verschluss stets von oben oder hinten (Fig. 7). Halten sie niemals ihre Hand vor die Mündung (Fig. 8).
2. |
Führen Sie das leere Magazin ein und ziehen Sie den Verschluss zurück. Der Verschluss sollte in |
Fig. 8 |
|
seiner hintersten Position gehalten werden. |
|
3. |
Entfernen Sie das Magazin, ziehen Sie den Verschluss etwas zurück und lassen Sie ihn los. Der |
|
|
Verschluss muss danach wieder vollständig geschlossen sein. |
|
! ACHTUNG: Halten Sie niemals Ihre Hand vor die Mündung.
PRÜFUNG VOR GEBRAUCH
21

3 Laden der Pistole
Drücken Sie den Magazinhalter und entnehmen Sie das leere Magazin (Fig. 9.) Schieben Sie die Patrone unter die Magazinlippen und somit den Zubringer nach unten (Fig. 10.) Wenden Sie keine Gewalt an. Wiederhohlen Sie den Vorgang, bis das Magazin vollständig geladen ist. Schieben Sie das gefüllte Magazin bis zum Einrasten des Magazinhalters in die Pistole (Fig. 11).
4 Zuführen der ersten Patrone
Greifen Sie die Pistole mit Ihrer Schießhand und halten Sie die Mündung in eine sichere Richtung. Mit der anderen Hand greifen Sie den Verschluss. Ziehen Sie den Verschluss zurück und lassen Sie ihn nach vorn schnellen (Fig. 12). Halten Sie niemals Ihre Hand vor die Mündung. Während sich der Verschluss nach vorn bewegt, wird die erste Patrone in das Patronenlager eingeführt. Der Hahn ist nun gespannt. Lassen Sie die manuelle Sicherung gesichert, bis Sie zum Schießen bereit sind.
!ACHTUNG: Halten Sie niemals Ihre Hand vor die Mündung.
!ACHTUNG: VORSICHT! Ihre Pistole ist nun feuerbereit. Halten Sie den
Finger vom Abzug und außerhalb des Abzugbügels, bis Sie zum Schießen bereit sind.
LADEN
Fig. 9
Fig. 10
Fig. 11
22

5 Schießen
Entsichern Sie die Waffe. Richten Sie die Waffe auf ein sicheres Ziel. Ziehen Sie den Abzug langsam und mit gleichmäßigem Druck durch, bis der Schuss bricht.
6 Entspannen des Hahnes
Halten Sie die Waffe in eine sichere Richtung. Sichern Sie die Waffe und entnehmen Sie das Magazin. Ziehen Sie den Verschluss zurück und stellen Sie sicher, dass das Patronenlager leer ist (Fig. 13). Zielen Sie in eine sichere Richtung und entsichern Sie die Waffe. Halten Sie mit dem Daumen den Hahn fest, betätigen Sie den Abzug und lassen Sie den Hahn langsam nach vorne gleiten.
! ACHTUNG: Halten Sie die Pistole während des Entspannens in eine sichere Richtung. Nichtbeachtung kann zu schweren Verletzungen oder sogar zum Tod führen.
7 Pistole bei leergeschossenem Magazin
Nach Abgabe des letzten Schusses hält der Verschlussfang den Verschluss in geöffneter Stellung. Soll |
|
weitergeschossen werden, ersetzen Sie das leere gegen ein gefülltes Magazin. Ziehen Sie den Verschluss |
Fig. 12 |
kurz zurück und lassen Sie ihn wieder nach vorne gleiten (Fig. 12). Der Verschluss lädt das Patronenlager |
|
mit der ersten Patrone. Halten Sie dabei die Waffe mit Ihrer Schießhand in eine sichere Richtung, so dass |
Fig. 13 |
eine Gefährdung von Personen ausgeschlossen ist. |
|
! ACHTUNG: VORSICHT! Ihre Pistole ist nun feuerbereit. Halten Sie den Finger vom Abzug und ausserhalb des Abzugbügels, bis Sie zum Schießen bereit sind.
Soll nicht weitergeschossen werden, entfernen Sie das Magazin und kontrollieren Sie, dass das Patronenlager leer ist (Fig. 13). Schließen Sie den Verschluss und entspannen Sie den Hahn, wie in Punkt 6 beschrieben.
SCHIESSEN / ENTSPANNEN / LEERES MAGAZIN
23

ENTFERNEN ZÜNDVERSAGER / ENTLADEN
8 Entladen der Waffe
Richten Sie die Mündung in eine sichere Richtung. Sichern Sie die Waffe. Entnehmen Sie das Magazin und ziehen Sie den Verschluss zurück. Eine im Patronenlager befindliche Patrone wird ausgeworfen.
! ACHTUNG: Kontrollieren Sie, ob der Lauf leer ist! (Fig. 13).
Richten Sie die Mündung in eine sichere Richtung, schließen Sie den Verschluss und entspannen Sie den Hahn wie in Kapitel 6 beschrieben. Entladen Sie das Magazin, indem Sie eine Patrone nach der anderen nach vorn herausschieben.
9 Zündversager entfernen
! ACHTUNG: Unterbrechen Sie das Schießen, falls Sie das Gefühl haben, Ihre Waffe funktioniert nicht richtig, oder die Art, wie sie sich anfühlt oder klingt, hätte sich verändert. Richten Sie die Waffe in eine sichere Richtung, entladen Sie sie und geben Sie sie zur Inspektion und zum Test zu einem Büchsenmacher, der für Reparaturen an Walther-Schusswaffen qualifiziert ist.
-Bei einem Zündversager warten Sie 30 Sekunden, während Sie die Mündung weiterhin in eine sichere Richtung gerichtet halten.
-Halten Sie Ihren Finger vom Abzug entfernt und außerhalb des Abzugbügels.
-Entfernen Sie das Magazin. Sichern Sie die Waffe.
-Greifen Sie den Verschluss und ziehen Sie diesen ruckartig bis zum Anschlag zurück, um die Patrone auszuwerfen. Prüfen Sie durch Sichtkontrolle, ob Patronenlager und Lauf frei sind. Sie müssen sicherstellen, dass sich keine Patrone im Patronenlager befindet und der Lauf frei ist. Denken Sie daran: Immer wenn Sie den Verschluss schließen, während ein geladenes Magazin in der Pistole ist, wird dadurch die Pistole fertig geladen und ist somit feuerbereit.
! ACHTUNG: WICHTIG! Versuchen Sie niemals, eine Patrone mit Zündversager noch einmal zu verwenden!
24
 Loading...