

Page 1
Operation instructions
Umarex P22
Laser sight
We wish to congratulate you and thank you very much for having chosen
this laser sight Umarex P22. It is the advantage of a laser sight that there is
no need to align foresight and rear sight with the target, so both eyes can
be left open.
Caution
A laser sight is no toy, it must only be used under the supervision of an
adult. Improper use or careless use may cause severe injuries, especially
affected are the eyes.
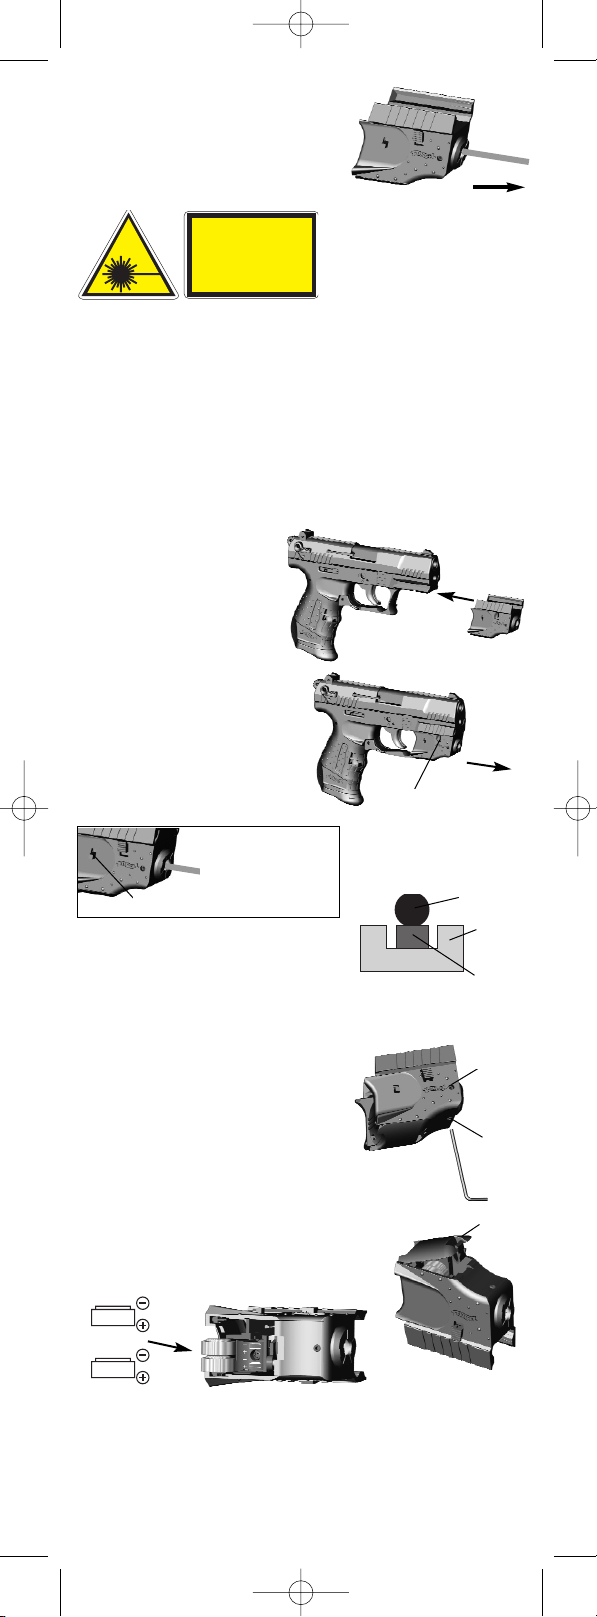
Mounting
Caution: In order to avoid injury, switch the laser off during the
mounting of the unit.
Mount the laser sight as shown
in the illustration. It is to be
put on the mounting rail with
the laser beam aperture to the
front (muzzle side) and is to be
pushed fully home until it
locks.
Dismounting
To dismount the sight, press the
locking lever down and remove
the sight from the mounting rail.
locking lever
Operation
Switch on the laser and take aim
with it.
Windage- and elevation adjustment
Use foresight and rear sight to aim at a safe
target. The laser dot should now be in the
center of a line made by rear sight and foresight (see illustration).
If this is not the case, make the following adjustments by using
an Allen key (SW 1.3):
Windage adjustment
laser too far left turn anti-clockwise
laser too far right turn clockwise
Elevation adjustment
laser too high turn anti-clockwise
laser too low turn clockwise
Laserdot
rear
sight
blade
foresight
circuit switch
Windage
adjustment
Elevation
adjustment
Battery change
This laser sight comes with two batteries
2xSR44 Silver Oxide.
1. Open battery compartment
2. Insert batteries (mind their polarities!)
3. Close battery compartment.
battery compartment
switch in the
upper position – off
switch in the
lower position – on
Technical data
Laser class 2
Wave length 650 nm
Batteries 2 x round cells silver oxide SR44 or
SR44W ø11.6 x 5.4 / 1.55 V
Mounting snap connection on Weaver rail
Special features LED display on the rear side
Weight/size 35 g / 48 x 27 x 39 mm
LASERBEAM
DO NOT STARE INTO
THE BEAM!
LASER CLASS 2
DIN EN60825-1:2001.11
Laser Diode
Wavelength 650 nm
Max. Output < 1mW
Class 2 Laser Product
Laser
LaserP22umarex_DIN.qxd 02.03.2004 14:46 Seite 1
Page 2

Manual de instrucciones
Umarex P22
Visor Laser
Le felicitamos por la compra del visor láser Umarex P22 y se lo agradecemos.
El aventaje de este apuntamiento láser es que no tiene que orientar la alza y
el guión con la mira y que de ese modo puede dejar los dos ojos abiertos.
Atención
Un apuntamiento láser no es un juguete y se lo puede utilizar únicamente
bajo vigilancia de adultos. Un empleo contrario al reglamento o desatento
puede provocar heridas graves , particularmente al nivel de los ojos.
Montaje
Atención: Para evitar heridas apague el láser durante el montaje.
Empuje el visor láser en el carril
con, como representado, el orificio de salida del láser por
delante hasta que encaje el
bulón de cierre.
Desmontaje
Para deshacer empuje el bulón de
cierre hacia abajo y retire el visor
láser del carril.
Bulón de cierre
Manejo
Poner en circuito el láser y visar
con el láser
Regulación vertical y lateral (Ajuste)
Vise con la alza y el guión a un objetivo seguro. Ahora el punto lasérico debería encontrarse exactamente centrado en la línea formada por la alza y el
guión (véase ilustración). Si no es así se arregla el visor láser con
una llave hexagonal (SW 1,3) como sigue:
Regulación lateral
Láser demasiado a la izquierda –
en el sentido contrario de las agujas del reloj
Láser demasiado ala derecha –
en el sentido de las agujas del reloj
Regulación vertical
Láser demasiadoalto –
en el sentido contrariode las agujas del reloj
Láser demasiado bajo –
En el sentido de las agujas del reloj
Punto
lasérico
Alza
Guión
Conmutador
Regulación
lateral
Regulación
vertical
Cambio de batería
Se suministra este láser con baterías 2xSR44 Silver
Oxide (óxido de plata).
1. Abrir la cámara para pilas
2. Colocar las baterías. (¡Fijarse en la polaridad!)
3. Cerrar la cámara para pilas.
Cámara para
pilas
Interruptor arriba - apagado
Interruptor abajo - conectado
Datos técnicos
Láser Clase 2
Longitud de onda 650 nanómetros
Baterías 2x pilas redondas óxido de plata SR44 o
SR44W ø11,6 x 5,4 / 1.55 V
Fijación Conexión rápida en carril Weaver
Particularidad Indicadora de funcionamiento trasera
(diodos emisores de luz)
Peso / Tamaño 35 g / 48 x 27 x 39 mm
RADIACIÓN
LASÉRICA ¡NO MIRE
EN EL RAYO!
CLASE DE LÁSER 2
DIN EN60825-1:2001.11
Diodo Láser
Longitud de Onda 650 nm
Máx. Salida < 1mW
Producto Láser Clase 2
Laser
LaserP22umarex_DIN.qxd 02.03.2004 14:47 Seite 2
Page 3

Istruzioni per l'uso
Umarex P22
Mirino laser
Ringraziandovi per la fiducia accordataci, ci congratuliamo con voi per l'acquisto del mirino laser Umarex P22. Utilizzando il mirino laser non occorre
più allineare con il bersaglio la tacca di mira ed il mirino, il che significa che
si possono tenere aperti entrambi gli occhi.
Attenzione
Un mirino laser non è un giocattolo per cui deve essere usato esclusivamente da adulti o sotto la supervisione di un adulto. L'uso non corretto del mirino laser potrebbe causare gravi lesioni, specialmente agli occhi.
Montaggio
Attenzione: prima di iniziare il montaggio del mirino, spegnere il laser
per evitare eventuali lesioni.
Assicurarsi che l'apertura di
uscita laser sia rivolta in avanti.
Spingere il mirino laser sulla
guida fino a sentire il click di
blocco del dispositivo di bloccaggio (come illustrato qui
accanto).
Smontaggio
Per smontare il mirino laser spingere
in basso il dispositivo di bloccaggio
e rimuovere il mirino dalla guida.
Dispositivo di
bloccaggio
Uso
Accendere il laser ed iniziare la
mira con il laser.
Regolazione laterale e dell'altezza
(aggiustaggio)
Allineare la tacca ed il mirino con un bersaglio
sicuro. Assicurarsi che il punto laser sia centrato sulla linea formata dalla tacca e dal mirino (vedi figura accanto).
In caso contrario, regolare il mirino laser con una chiave esagonale (apertura chiave 1,3):
Regolazione laterale
Laser troppo a sinistra in senso antiorario
Laser troppo a destra in senso orario
Regolazione dell'altezza
Laser troppo in alto in senso antiorario
Laser troppo in basso in senso orario
Punto laser
Tacca
Mirino
Interruttore on/off
Regolazione
laterale
Regolazione
dell'altezza
Sostituzione delle batterie
Nella fornitura del mirino laser sono comprese 2
batterie tipo SR44 all'ossido d'argento.
1. Aprire lo scomparto batterie.
2. Inserire le batterie (accertandosi di rispettare
le corrette polarità).
3. Chiudere lo scomparto batterie.
Scomparto batterie
Interruttore in alto – off
Interruttore in basso – on
Dati tecnici
Laser classe 2
Lunghezza onda 650 nm
Batterie n. 2 batterie tipo SR44 o SR44W, ossido
d'argento a bottone ø11,6 x 5,4 / 1,55 V
Fissaggio collegamento a scatto sulla guida Weaver
Particolarità indicazione di servizio sul retro (LED)
Peso / Grandezza 35 g / 48 x 27 x 39 mm
RAGGI LASER
NON GUARDARE IL
RAGGIO LASER!
LASER CLASSE 2
DIN EN60825-1:2001.11
Diodo laser
Lunghezza onda 650 nm
Potenza di uscita
max. < 1 mW
Prodotto laser di classe 2
Laser
LaserP22umarex_DIN.qxd 02.03.2004 14:47 Seite 3
Page 4

Mode d'emploi
Umarex P22
Viseur laser
Nous vous félicitons à l'occasion de l'achat du viseur laser P22 et nous vous
en remercions. L'avantage de ce pointage laser est que vous n'êtes pas obligé d'orienter le guidon et la hausse avec la mire et que vous pouvez de ce
fait laisser ouverts les deux yeux.
Attention
Un pointage laser n'est pas un jouet et peut uniquement être utilisé sous
surveillance 'adultes. Un emploi non réglementaire ou inattentif peut provoquer des graves blessures, surtout au niveau des yeux.
Montage
Attention: Afin d'éviter des blessures éteignez le laser durant le
montage.
Poussez le viseur laser sur le rail
avec, comme représenté,
l'orifice de sortie du laser en
avant jusqu'à ce qu'enclenche
le verrou de fermeture.
Démontage
Afin de desserrer poussez le verrou
de fermeture en bas et retirez le
viseur laser du rail.
Verrou de fermeture
Maniement
Allumez le laser et visez avec le
laser.
Réglage vertical et latéral
(Ajustage)
Visez avec l'hausse et le guidon à un objectif
sûr. Maintenant le point à laser devrait se trouver exactement de
manière centrique sur la ligne formée par l'hausse et le guidon
(voire illustration). Si cela n'est pas le cas, le viseur laser est réglé
comme suit avec un clé à fourche (SW 1.3):
Réglage latéral
Laser trop à gauche En sens antihoraire
Laser trop à droite En sens horaire
Höhenverstellung
Laser trop haut En sens antihoraire
Laser trop bas En sens horaire
Point à laser
Hausse
Guidon
Disjoncteur à deus positions
Réglage
latéral
Réglage
vertical
Changement de batterie
Ce Laser est livré avec des batteries 2xSR44 Silver
Oxide (oxyde d'argent).
1. Ouvrir le compartiment de batterie
2. Placer la batterie. (Tenir compte de la polarité!)
3. Fermer le compartiment de batterie.
Compartiment de
batterie
Interrupteur en haut - éteint
Interrupteur en bas - allumé
Données techniques
Laser Classe 2
Longueur d'onde 650 nanomètres
Batteries 2x piles rondes oxyde d'argent SR44 ou
SR44W ø 11,6 x 5,4 / 1,55 V
Fixation Assemblage à encliquetage en rail Weaver
Particularité Indicateur de fonctions arrière (des DELs)
Poids / Taille 35 g / 48 x 27 x 39 mm
RADIATION LASER
NE PAS REGARDER
DIRECTEMENT LE RAYON!
LASER CLASSE 2
DIN EN60825-1:2001.11
Diode laser
Longueur d'onde 650nm
Puissance de sortie
maximal<1mW
Produit laser classe 2
Laser
LaserP22umarex_DIN.qxd 02.03.2004 14:49 Seite 4
Page 5

Bedienungsanleitung
Umarex P22
Laservisier
Wir gratulieren und danken Ihnen zum Kauf des Umarex P22 Laservisiers.
Der Vorteil dieser Laservisierung ist, daß Sie Kimme und Korn nicht mit dem
Ziel ausrichten müssen und dadurch beide Augen offen lassen können.
Achtung
Eine Laservisierung ist kein Spielzeug und darf nur unter Aufsicht von
Erwachsenen benutzt werden. Unvorschriftsmäßige oder unachtsame
Verwendung kann schwere Verletzungen, insbesondere an den Augen,
verursachen.
Montage
Achtung: Den Laser bei der Montage ausschalten um Verletzungen zu
vermeiden.
Das Laservisier wie abgebildet
mit der Laseraustrittsöffnung
nach vorne auf die Schiene
schieben bis der
Verschlussriegel einrastet.
Demontage
Zum Lösen den Verschlussriegel
nach unten drücken und das
Laservisier von der Schiene ziehen.
Verschlussriegel
Bedienung
Den Laser einschalten und mit
dem Laser zielen.
Höhen- und Seitenverstellung
(Justierung)
Zielen Sie mit Kimme und Korn auf ein sicheres Ziel. Der Laserpunkt sollte sich jetzt genau mittig auf der Linie,
die Kimme und Korn bilden befinden (siehe Abbildung).
Ist dies nicht der Fall, so wird das Laservisier wie folgt mit einem
Sechskantschlüssel (SW 1,3) eingestellt:
Seitenverstellung
Laser zu weit links gegen den
Uhrzeigersinn
Laser zu weit rechts im Uhrzeigersinn
Höhenverstellung
Laser zu hoch gegen den
Uhrzeigersinn
Laser zu tief im Uhrzeigersinn
Laserpunkt
Kimme
Korn
Ein-/Ausschalter
Seitenverstellung
Höhenverstellung
Batteriewechsel
Dieser Laser wird mit 2xSR44 Silver Oxide
Batterien geliefert.
1. Batteriefach öffnen
2. Batterien einsetzen. (auf Polarität achten!)
3. Batteriefach schließen.
Batteriefach
Schalter oben – aus
Schalter unten – an
Technische Daten
Laser Klasse 2
Wellenlänge 650 nm
Batterien 2x Knopfzellen Silberoxid SR44 oder SR44W
ø 11,6 x 5,4 / 1,55 V
Befestigung Schnappverbindung in Weaverschiene
Besonderheit Rückseitige Betriebsanzeige (LED´s)
Gewicht / Größe 35 g / 48 x 27 x 39 mm
NICHT IN DEN
STRAHL BLICKEN
LASER KLASSE 2
DIN EN60825-1:2001.11
Laserdiode
Wellenlänge 650 nm
Maximale
Ausgangsleistung < 1mW
Laser Klasse 2
Laser
LaserP22umarex_DIN.qxd 02.03.2004 14:50 Seite 5
Page 6

Sportwaffen GmbH & Co. KG
Postfach 2720
D-59717 Arnsberg
Donnerfeld 2
D-59757 Arnsberg
Tel 02932 / 638-01
Fax 02932 / 638-222
E-mail: sales@umarex.de
Internet: www.umarex.com
2.1120 02/04
This product complies with 21 CFR 1040.10 and 1040.11
LaserP22umarex_DIN.qxd 02.03.2004 14:50 Seite 6
 Loading...