

Page 1

DTF521_Manual.fm Page -1 Tuesday, February 28, 2006 10:36 AM
www.wacom.com
Pen Display
Installation & User’s Guide
for DTF-521/PL-521 series
Page 2

DTF521_Manual.fm Page 0 Tuesday, February 28, 2006 10:36 AM
(This page intentionally left blank.)
Page 3

DTF521_Manual.fm Page 1 Tuesday, February 28, 2006 10:36 AM
INTRODUCTION AND OVERVIEW
The Wacom
comfort, and productivity of Wacom’s cordless, battery-free pen technology. This gives you a direct
pen-on-screen interface that can be used with a Personal Computer (PC) or Macintosh
The basic components of the pen display include a Wacom pen tablet internally mounted behind a
15.0" diagonal TFT color LCD monitor, and a cordless, battery-free Wacom pen.
The DTF-521/PL-521 also comes equipped with a VGA pass-thru (
to simultaneously connect a VGA monitor or projector to the pen display.
This guide describes how to install the DTF-521/PL-521 hardware and software. It also describes how
to use your pen display and pen. The information is common to both Windows and Macintosh
platforms, and Windows screen captures are shown unless otherwise noted. Please follow all
instructions carefully.
Note that the computer treats the pen display as two separate devices (the LCD monitor and the
pen tablet). Therefore, the installation process is completed in two stages:
• First install the DTF-521/PL-521 as a display.
• Then install the DTF-521/PL-521 as a pen tablet.
Both stages require hardware and software installations and adjustments. Please follow all
instructions carefully.
®
DTF-521/PL-521 pen display combines the benefits of an LCD monitor with the control,
®
computer.
ANALOG
RGB
OUT) port, enabling you
The following kinds of information are not included with this product: information about your specific
computer hardware or operating system, or information about your application software. Your best
source for this information is the set of manuals and disks that came with your hardware, operating
system, or application.
Refer to Unpacking your pen display on page 6 when removing the DTF-521/PL-521 from the box.
For information on using the Pen Tablet control panel to customize your pen display and pen settings,
see Customizing on page 18.
To use the pressure-sensitivity of the pen with your favorite drawing application, refer to instructions in
that application’s manuals.
Introduction and overview
page 1
Page 4
DTF521_Manual.fm Page 2 Tuesday, February 28, 2006 10:36 AM
PRECAUTIONS ON USE AND HANDLING
Be sure to follow all instructions, cautions, and warnings found within this guide. Failure to do so could
cause the loss of data or damage to your computer. Failure to do so could also void your warranty, in
which case Wacom shall have no responsibility to repair or replace the product.
Physical location
ARNING
W
Environment
AUTION
C
AUTION
C
Usage
W
ARNING
AUTION
C
Do not use the DTF-521/PL-521 pen display in a facility control system that requires
extremely high reliability; it may cause other electronic devices to malfunction, or other
devices may cause the pen display tablet to malfunction. Where use is prohibited, power off
the DTF-521/PL-521 to prevent the possibility of it causing other electronic devices to
malfunction. Wacom does not accept any liability for direct or consequential damages.
For details, please refer to your Warranty located at the end of this guide.
Temperature and humidity
• Operating temperature and humidity: 5˚ to 35˚C, 20 to 80% RH
• Storage temperature and humidity: -10˚ to 60˚C, 20 to 90% RH
Do not use or store the pen display where:
• Temperature changes are severe or exceed specifications (e.g., outdoors or inside
a vehicle).
• The pen display and pen are exposed to direct sunlight or heat from an appliance, or are
exposed to water or any other kind of liquid.
Do not use the pen display in a dusty environment; this may damage the unit.
Only use the power adapter that came with the DTF-521/PL-521. If a different type of
power adapter is used, the pen display will not work properly or may be damaged. Using a
different type of power adapter also has the potential to result in fire. Use of a different
power adapter will void your warranty.
Be sure to use a grounded power source when applying power to the pen display.
AUTION
C
AUTION
C
C
AUTION
Precautions on use and handling
page 2
Do not connect or disconnect the video or power cables while the pen display or your
computer are turned on; this may damage the LCD monitor or computer video card. In this
case, Wacom shall have no responsibility to repair or replace the product.
This product is for use with a VGA video card; using an inappropriate video card may
damage the DTF-521/PL-521.
Do not block the rear panel ventilation holes; this may overheat and damage the unit.
When not using the pen display for long periods of time, unplug the power adapter
from the AC outlet.
Page 5
DTF521_Manual.fm Page 3 Tuesday, February 28, 2006 10:36 AM
Handling
W
ARNING
W
ARNING
W
ARNING
ARNING
W
AUTION
C
AUTION
C
C
AUTION
C
AUTION
C
AUTION
C
AUTION
AUTION
C
C
AUTION
C
AUTION
High Voltage. Do not open or disassemble the DTF-521/PL-521 pen display.
There is a risk of electrical shock when the casing is open. This will also void your
warranty and Wacom shall have no responsibility to repair or replace the product.
If the LCD screen has been damaged, DO NOT touch any liquid that may be leaking
from it; this liquid is an irritant. In case of contact with skin, eyes, or mouth, rinse
immediately with running water for at least 15 minutes or more. If contact is made with the
eyes or mouth, also consult a physician.
Hg
– LAMP(S) INSIDE THIS PRODUCT CONTAIN MERCURY AND MUST BE
RECYCLED OR DISPOSED OF ACCORDING TO LOCAL, STATE OR FEDERAL
LAWS.
The DTF-521/PL-521 pen display has a backlight which contains mercury (Hg). Be sure
to dispose of properly, and to manage any disposal of this unit in accordance with your local
ordinances and laws.
Prevent children from swallowing the pen tip or side switch. The pen tip or side switch
may accidentally be pulled out if children are biting on them.
Do not disassemble the pen. This may cause the device to malfunction. In this case,
Wacom shall have no responsibility to repair or replace the product.
Do not scratch the display screen. Avoid placing sharp objects on the display screen
surface.
When adjusting the tilt angle of the pen display, be careful to avoid catching your
finger in the gap of the movable portion of the stand.
Do not lift the DTF-521/PL-521 by the stand; this may damage the stand mechanism.
When lifting or moving the pen display, always do so by grasping the main body casing.
Avoid intensive shock or vibration to the DTF-521/PL-521 or the pen. Hitting or dropping
the pen display may damage the display screen or other components.
Do not put heavy articles on the pen display or push against it with a strong force; this
may damage the display screen or bend the stand.
Do not place heavy articles on the DTF-521/PL-521 cabling, repeatedly bend the cables
sharply, or apply heavy stress to the cable connectors; this may damage the unit or
cabling.
If the pen tip becomes sharp or angular, it may damage the coating on the display
screen. Please replace the pen tip if necessary.
Do not use any organic solvent (e.g., alcohol) or even mild detergent to clean
the display screen. Use of these cleaners can damage the coating on the screen.
Please note that damage of this kind is not covered by the manufacturer's warranty.
• To clean the display screen, use an anti-static cloth or a slightly damp cloth.
When cleaning, apply only a light amount of pressure to the display screen and do not
make the surface wet.
• To clean the pen display casing or pen, use a soft cloth with mild detergent (such as dish
washing liquid) diluted with water.
Precautions on use and handling
page 3
Page 6
DTF521_Manual.fm Page 4 Tuesday, February 28, 2006 10:36 AM
C
AUTION
Do not expose the DTF-521/PL-521 to high voltage electrostatic discharges or
to a build-up of an electrostatic charge on the LCD screen. This may result in a
temporary discoloration and blotching of the LCD monitor. If discolorations occur, leave the
DTF-521/PL-521’s display on and the discolorations should disappear within a few hours.
Reuse, recycling, and recovery. You are urged to recycle this product when replacing it
with a newer product or when it has outlived its useful life by bringing it to an appropriate
collection point for recyclable materials in your community or region. By doing this, you can
help improve the environment of your community as well as minimize the potential negative
effects created should any hazardous substance that may possibly be present within waste
material reach the environment during the disposal process.
Within the European Union, users are required not to dispose of Waste Electrical and
Electronic Equipment (WEEE) as unsorted municipal waste, according to the Directive
2002/96/EC of the European Parliament and of the Council of 27 January 2003, or the
corresponding local laws of the Member States. Products for which this is applicable will be
marked with the WEEE symbol shown at the beginning of this note unless this is not feasible
because of the size or the function of the product. Wacom products are subject to the
Directive 2002/96/EC and therefore you should always collect them separately and bring
them to the appropriate collection point in your community or region.
Wacom pen display products (DTF and PL series) comply with the European Union RoHS
Directive 2002/95/EC (RoHS Directive).
Precautions on use and handling
page 4
Page 7

DTF521_Manual.fm Page 5 Tuesday, February 28, 2006 10:36 AM
Introduction and overview . . . . . . . . . . . . . . . . . . . . . . . . . . . . . . . . . . . . 1
Precautions on use and handling . . . . . . . . . . . . . . . . . . . . . . . . . . . . . . 2
Physical location . . . . . . . . . . . . . . . . . . . . . . . . . . . . . . . . . . . . . . . . 2
Environment . . . . . . . . . . . . . . . . . . . . . . . . . . . . . . . . . . . . . . . . . . . 2
Usage . . . . . . . . . . . . . . . . . . . . . . . . . . . . . . . . . . . . . . . . . . . . . . . . 2
Handling . . . . . . . . . . . . . . . . . . . . . . . . . . . . . . . . . . . . . . . . . . . . . . 3
Unpacking your pen display . . . . . . . . . . . . . . . . . . . . . . . . . . . . . . . . . . 6
Package contents . . . . . . . . . . . . . . . . . . . . . . . . . . . . . . . . . . . . . . . 6
Pen display components . . . . . . . . . . . . . . . . . . . . . . . . . . . . . . . . . . . . . 7
Front view . . . . . . . . . . . . . . . . . . . . . . . . . . . . . . . . . . . . . . . . . . . . . 7
Rear view . . . . . . . . . . . . . . . . . . . . . . . . . . . . . . . . . . . . . . . . . . . . . 8
Installation . . . . . . . . . . . . . . . . . . . . . . . . . . . . . . . . . . . . . . . . . . . . . . . . 9
System requirements . . . . . . . . . . . . . . . . . . . . . . . . . . . . . . . . . . . . 9
Step 1: LCD monitor installation . . . . . . . . . . . . . . . . . . . . . . . . . . . 10
Step 2: Pen tablet installation . . . . . . . . . . . . . . . . . . . . . . . . . . . . . 13
Working with your pen display . . . . . . . . . . . . . . . . . . . . . . . . . . . . . . . . 15
Setting up your work area . . . . . . . . . . . . . . . . . . . . . . . . . . . . . . . . 15
Using the pen . . . . . . . . . . . . . . . . . . . . . . . . . . . . . . . . . . . . . . . . . 16
Pen operations . . . . . . . . . . . . . . . . . . . . . . . . . . . . . . . . . . . . . . . . 17
Customizing . . . . . . . . . . . . . . . . . . . . . . . . . . . . . . . . . . . . . . . . . . . . . 18
Opening the control panel . . . . . . . . . . . . . . . . . . . . . . . . . . . . . . . . 18
Control panel overview . . . . . . . . . . . . . . . . . . . . . . . . . . . . . . . . . . 19
Control panel details . . . . . . . . . . . . . . . . . . . . . . . . . . . . . . . . . . . . 21
Adjusting the LCD monitor . . . . . . . . . . . . . . . . . . . . . . . . . . . . . . . 24
Troubleshooting . . . . . . . . . . . . . . . . . . . . . . . . . . . . . . . . . . . . . . . . . . . 29
Testing the DTF-521/PL-521 . . . . . . . . . . . . . . . . . . . . . . . . . . . . . . 29
Display troubleshooting . . . . . . . . . . . . . . . . . . . . . . . . . . . . . . . . . . 31
Pen tablet troubleshooting . . . . . . . . . . . . . . . . . . . . . . . . . . . . . . . 33
Technical support options . . . . . . . . . . . . . . . . . . . . . . . . . . . . . . . . 38
Obtaining driver downloads . . . . . . . . . . . . . . . . . . . . . . . . . . . . . . 39
Appendix . . . . . . . . . . . . . . . . . . . . . . . . . . . . . . . . . . . . . . . . . . . . . . . . 40
Caring for your pen display . . . . . . . . . . . . . . . . . . . . . . . . . . . . . . . 40
Using an alternate mount or stand . . . . . . . . . . . . . . . . . . . . . . . . . 41
Uninstalling the DTF-521/PL-521 . . . . . . . . . . . . . . . . . . . . . . . . . . 42
Product specifications . . . . . . . . . . . . . . . . . . . . . . . . . . . . . . . . . . . 43
Purchasing parts and accessories . . . . . . . . . . . . . . . . . . . . . . . . . 44
Radio and television interference . . . . . . . . . . . . . . . . . . . . . . . . . . 45
Warranty (Worldwide, Except for Europe, Africa and Middle East) . 46
License and Warranty (Europe, Africa and Middle East) . . . . . . . . 48
CONTENTS
Contents
page 5
Page 8

DTF521_Manual.fm Page 6 Tuesday, February 28, 2006 10:36 AM
UNPACKING YOUR PEN DISPLAY
Package contents
Your product came with the following items:
DTF-521/PL-521 pen display, main unit
Power adapter and power cable
(POW-A096 and SCD-A038-01 or SCD-A040-01 for Europe)
(POW-A096 and SCD-A039-01 for USA)
Pen with replacement nibs, pen tether,
tether connection ring, and attachment screw
(FP-320, PKB-A016, MHO-A052, and MNE-A061)
Installation & User’s Guide
(this guide)
Wacom Pen Tablet Driver CD
(contains the driver software)
Notes: Images are not shown to scale. Some product configurations may come with different pens having no side
switch. Some configurations may include additional CDs containing application software. To install these
applications, review the instructions that came with those CDs. Retain the package box for use when storing or
shipping the pen display.
USB cable (STJ-A250)
VGA to VGA cable (STJ-A228)
Next step: Familiarize yourself with the Pen display components . See page 7.
Unpacking your pen display
page 6
Page 9
DTF521_Manual.fm Page 7 Tuesday, February 28, 2006 10:36 AM
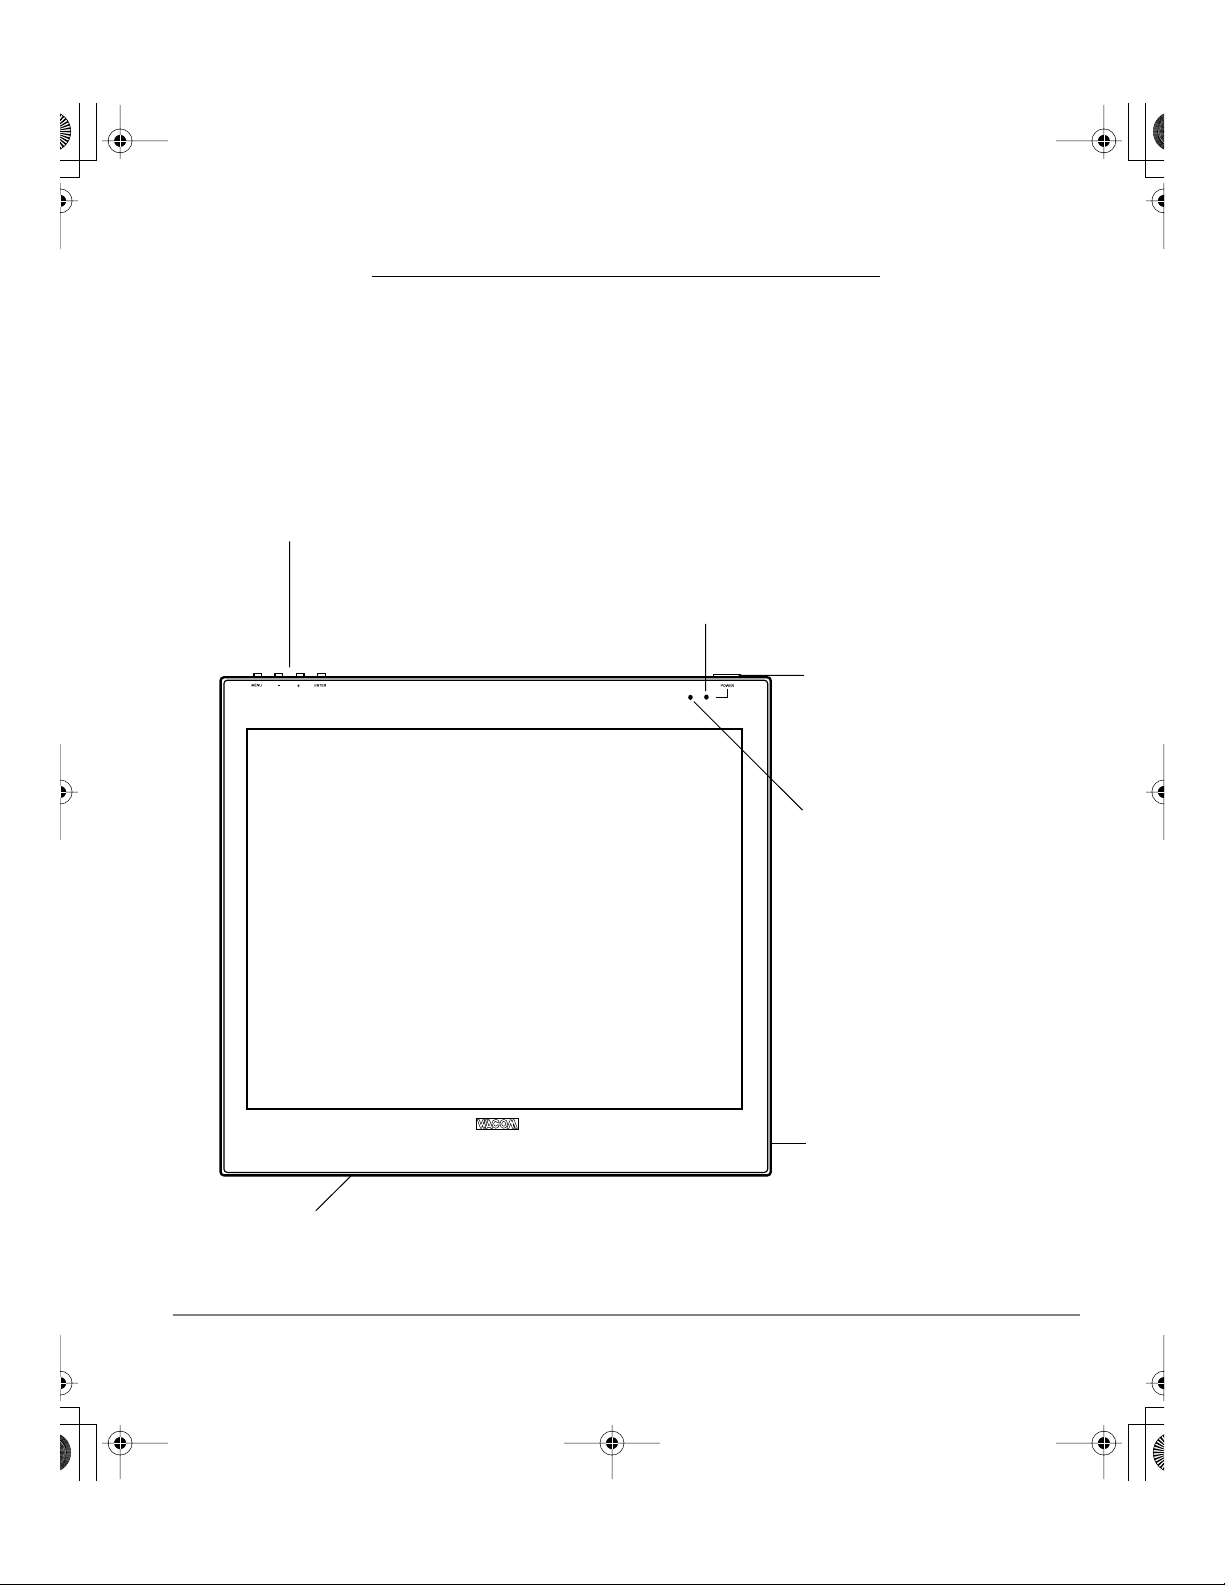
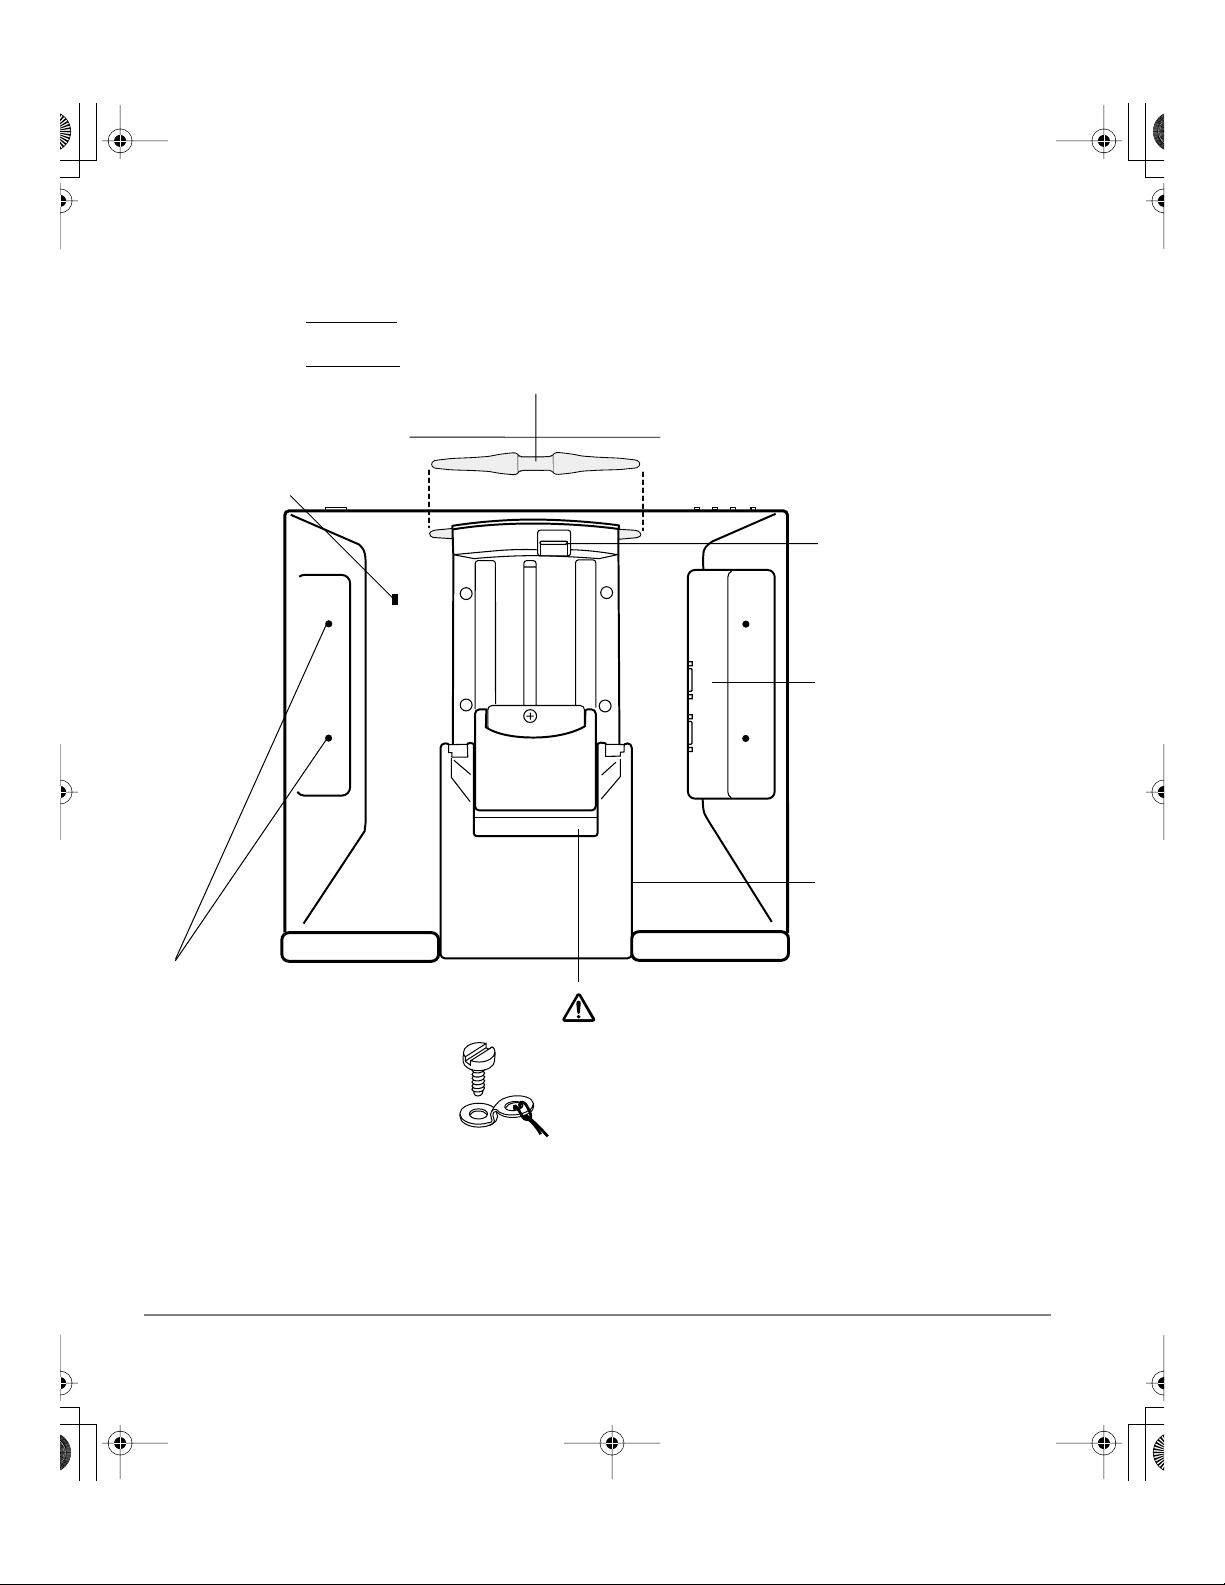
PEN DISPLAY COMPONENTS
The LCD monitor and tablet sensor function as an integrated input and output device. The LCD monitor
supports resolutions up to 1024 x 768 pixels at 16.2 million colors. The tablet sensor reports pen
coordinates, pressure, and switch information.
Front view
On Screen Display (OSD) controls
These controls, located on the upper
edge of the tablet, enable you to
adjust a variety of display settings.
See Adjusting the LCD monitor on
page 24 for more information.
Power LED
Lights blue when power has been supplied to your pen
display and a video signal is present.
Glows orange when no video signal is detected by the pen
display. (e.g., Your computer is turned off, starting up, or
has entered a power management mode in which video
signals are not sent.)
Integrated LCD monitor and tablet
Pen tray
Provides a convenient resting place for the pen. When the display
stand is set to its lowest position, place your fingers beneath the tray
(located on the bottom front edge) and slide it out.
Power switch
Turns power to the unit on or off.
Status LED
Lights blue when the pen is in
the active area of the pen
display tablet and the pen tip
or side switch are pressed.
Note that the USB cable must
also be plugged into an active
USB port before the LED will
light.
Use the integrated USB
ports (one located on each
side of the unit) to connect a
USB device (e.g., a USB
Flash Drive or a USB remote
controller).
Be sure to fully install the pen
display hardware and software
before connecting any other
devices to the unit.
Pen display components
page 7
Page 10
DTF521_Manual.fm Page 8 Tuesday, February 28, 2006 10:36 AM
Rear view
Pen storage compartment
or storage, insert one end of the pen into either side of the storage compartment.
F
Then gently press the other end of the pen into the compartment.
or removal, press in on either end of the pen. This will pop the opposite end of the
F
pen out of the compartment. You can then remove the pen.
Kensington security slot
Allows easy attachment of
a security cable.
Stand adjustment lever
Pull this lever up to adjust
the stand. Release the
lever to lock the stand in
place.
Video, USB, and
power connectors
Stand
The stand can be used
to adjust the tilt angle of
the unit.
Pen tether attachment points
AUTION
If you will be using the pen tether, use
the tether attachment ring and small
thumb screw to connect it to one of
four attachment points located on the
back of the unit.
Important: Be sure to adjust the stand to the low tilt position before packaging the DTF-521/PL-521.
If you do not close the stand, the notched mechanism may be damaged during transportation and
storage. Do not lift the unit by the stand; this may damage the stand mechanism. When lifting or
moving the pen display, always do so by grasping the main body casing.
C
Be careful to avoid catching your finger in the
gap of the movable portion of the stand.
Next step: Installation . See page 9.
Pen display components
page 8
Page 11

DTF521_Manual.fm Page 9 Tuesday, February 28, 2006 10:36 AM
INSTALLATION
System requirements
Before installing the DTF-521/PL-521 pen display, make sure your computer meets the following
system requirements:
• PC. Windows XP, XP x64, 2000, Me, or 98SE. VGA video connector, available USB port, and
CD-ROM drive.
• Macintosh. OS X, v10.2.8 or greater. VGA video connector, available USB port, and
CD-ROM drive.
Note: The DTF-521/PL-521 can be used alone or with another display. You may connect a second
VGA device such as a monitor or LCD projector to the DTF-521/PL-521
When using this port, the second device will mirror the image on the pen display. Complete the pen
display installation before connecting a projection device to the unit.
Depending on the capabilities of your video card and operating system, you may be able to set up
the DTF-521/PL-521 as a mirrored, extended, or independent display. Refer to your video card
documentation for more information on its capabilities.
When you are working with more than one monitor, the DTF-521/PL-521 will map to the monitors
based upon how your system is configured. By default, if you are in mirror mode, the pen tablet will
map to the entire space on each display or monitor. Please refer to your hardware and operating
system documentation for details on configuring your computer and operating system for use with
multiple monitors.
ANALOG
OUT port.
RGB
There are two primary steps to the installation process:
• Step 1: LCD monitor installation
• Step 2: Pen tablet installation
Be sure to follow ALL instructions carefully.
Installation
page 9
Page 12
DTF521_Manual.fm Page 10 Tuesday, February 28, 2006 10:36 AM
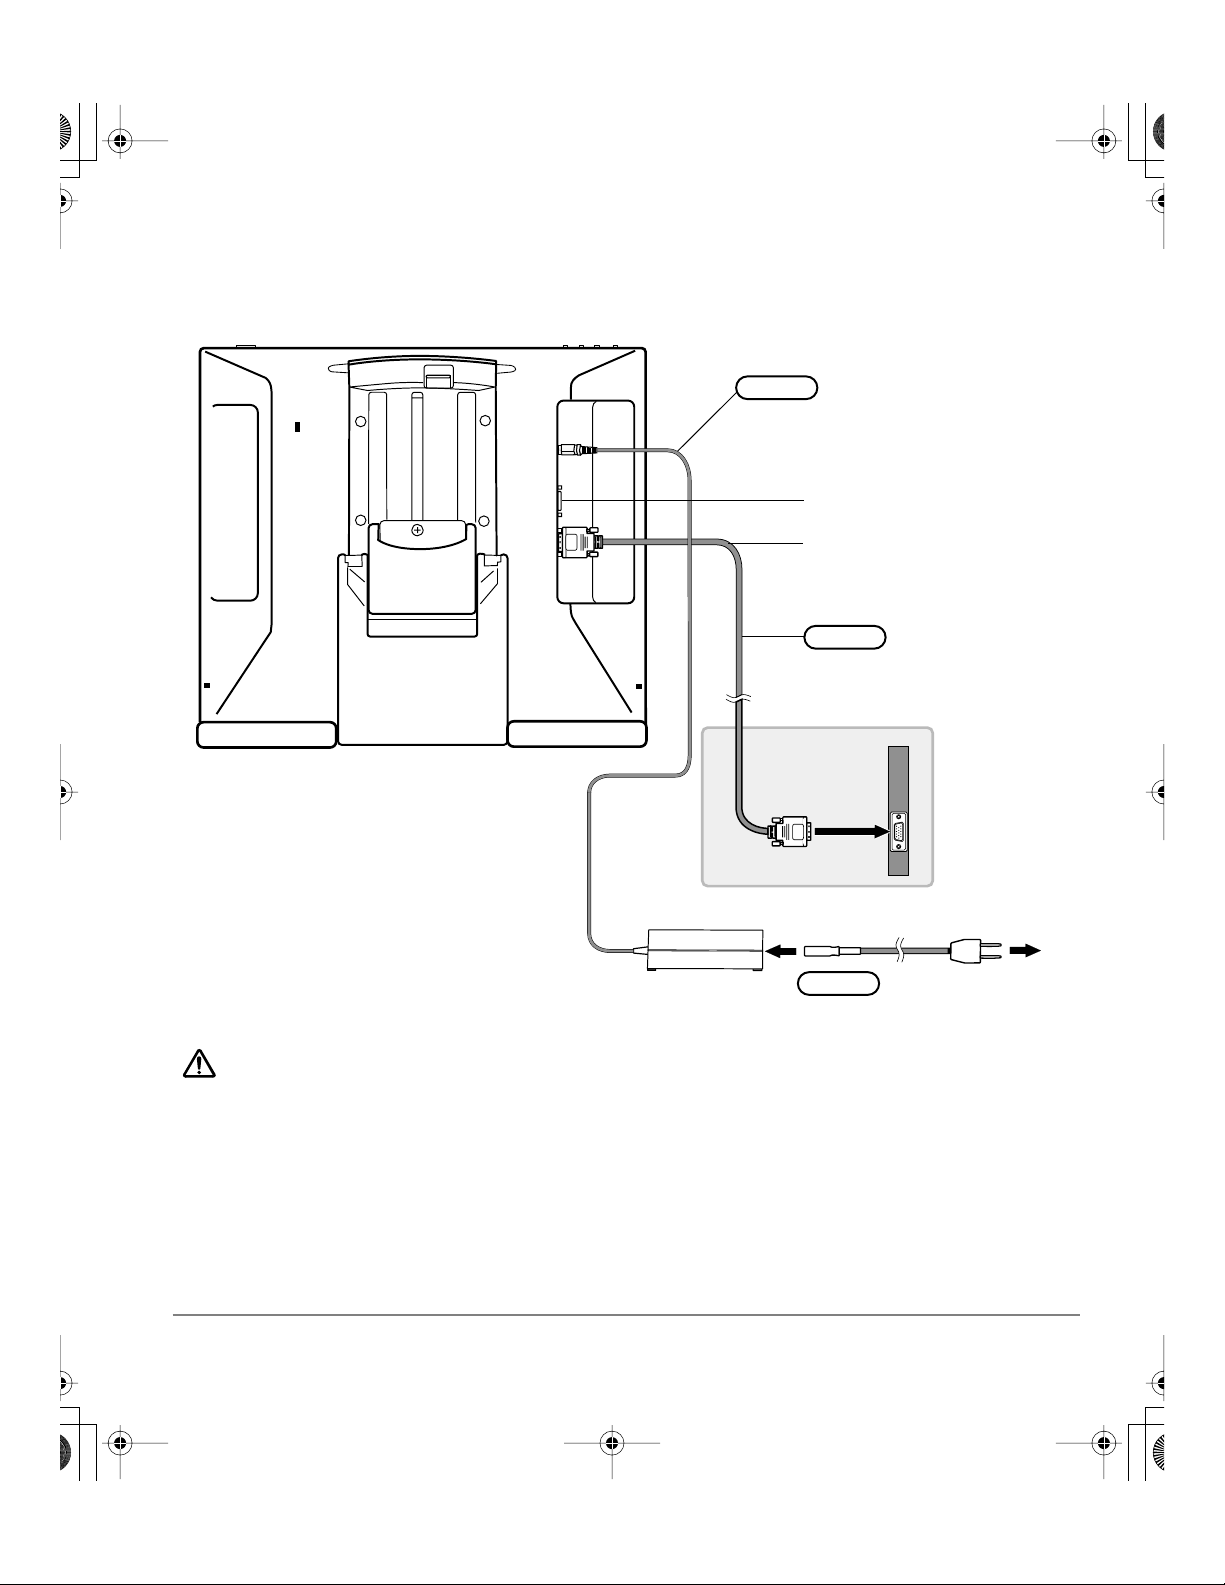
Step 1: LCD monitor installation
In the first stage of the installation process, the DTF-521/PL-521 is installed as a monitor on your
system. As you work through the first stage of the installation process, please refer to the LCD monitor
cabling diagram on the following page when making cable connections.
Important: Do not connect the USB data cable until instructed to do so.
• Turn off your computer.
Caution: Never connect or disconnect the video or power cables while your computer or pen
display are powered on – this can damage the LCD monitor or video card.
• If your computer has only one analog (VGA) video connector, you will need to unplug your previous
monitor or add a second VGA card.
• Plug one end of the VGA cable into the DTF-521/PL-521. Plug the other
end of the cable into the VGA connector on your computer’s video card.
See – A – in the connection diagram on page 11.
VGA connector
• Be sure to tighten the thumbscrews on the connectors.
• Connect the power adapter to the DTF-521/PL-521. See – B – on the next page. Then connect
the adapter’s power cable and plug the adapter into an AC outlet. See – C –
Installation
page 10
Page 13
DTF521_Manual.fm Page 11 Tuesday, February 28, 2006 10:36 AM
LCD monitor cabling diagram
DTF-521/PL-521, rear view
Do not attach the USB data
cable until instructed to do so.
– B –
DC IN
(12V)
ANALOG RGB OUT
ANALOG RGB IN
– A –
VGA cable
The ANALOG RGB OUT port is used to
connect a second VGA device such as
a projector or monitor that mirrors the
pen display. Be sure to fully install the
pen display hardware and software
before connecting a projection device
to the unit. Do not connect or
disconnect any cable while the pen
display or your computer are turned
on.
AUTION
C
Use only the power adapter that came with the DTF-521/PL-521; use of an improper power
adapter may damage the unit.
Do not connect or disconnect the video or power cables while the DTF-521/PL-521 or
your computer are turned on – this can damage the LCD monitor or computer video card.
Make sure that the display refresh rate does not exceed 70 Hz for XGA mode, or 75 Hz
for other modes.
Video card
VGA port
Rear panel of your computer
Power adapter – C –
To AC outlet
Installation
page 11
Page 14

DTF521_Manual.fm Page 12 Tuesday, February 28, 2006 10:36 AM
• Turn on the DTF-521/PL-521. The power LED will light orange.
• Next, turn on your computer.
Windows XP, XP x64, and 2000: The DTF-521/PL-521 will automatically install as a default monitor.
Windows 98SE and Me: The NEW HARDWARE WIZARD will display. Follow the prompts selecting the
default options and install the DTF-521/PL-521 as a default VGA monitor.
• As necessary, configure the display control panel settings for the proper size and color resolution.
The maximum (native) resolution of the DTF-521/PL-521 is 1024 x 768 pixels. The display size and
color resolution may be constrained by the capabilities of your video card. See the video card
manufacturer’s documentation for details.
To fine-tune the display, please refer to Adjusting the LCD monitor, beginning on page 24 for more
information.
For Windows: If you are using the DTF-521/PL-521 as a secondary display, you may first need to
enable the DTF-521/PL-521 in your Display Properties control panel.
• After the LCD monitor portion of the DTF-521/PL-521 is working to your satisfaction, move on to the
next section (Step 2: Pen tablet installation) to install the pen tablet portion of the DTF-521/PL-521.
For troubleshooting tips, please refer to page 29.
Notes:
Each DTF-521/PL-521 LCD panel is produced under very stringent quality standards.
Production techniques cannot guarantee an absolutely perfect TFT display, and some panels
may exhibit a certain number of pixels that show an incorrect color. Refer to the specifications
on page 43 for more information.
If an image has fine striping (such as screen stripes), it may appear to flicker or display a moiré
pattern.
Do not apply excessive pressure on the display surface, it may cause the appearance of a moiré or
pooling pattern. If you notice this action, use less pressure on the display screen when working
with the pen.
When a still image is displayed for a long period of time, an after-image may remain for a short time.
To prevent this, Wacom recommends using a screen saver or other power management feature.
Installation
page 12
Page 15
DTF521_Manual.fm Page 13 Tuesday, February 28, 2006 10:36 AM
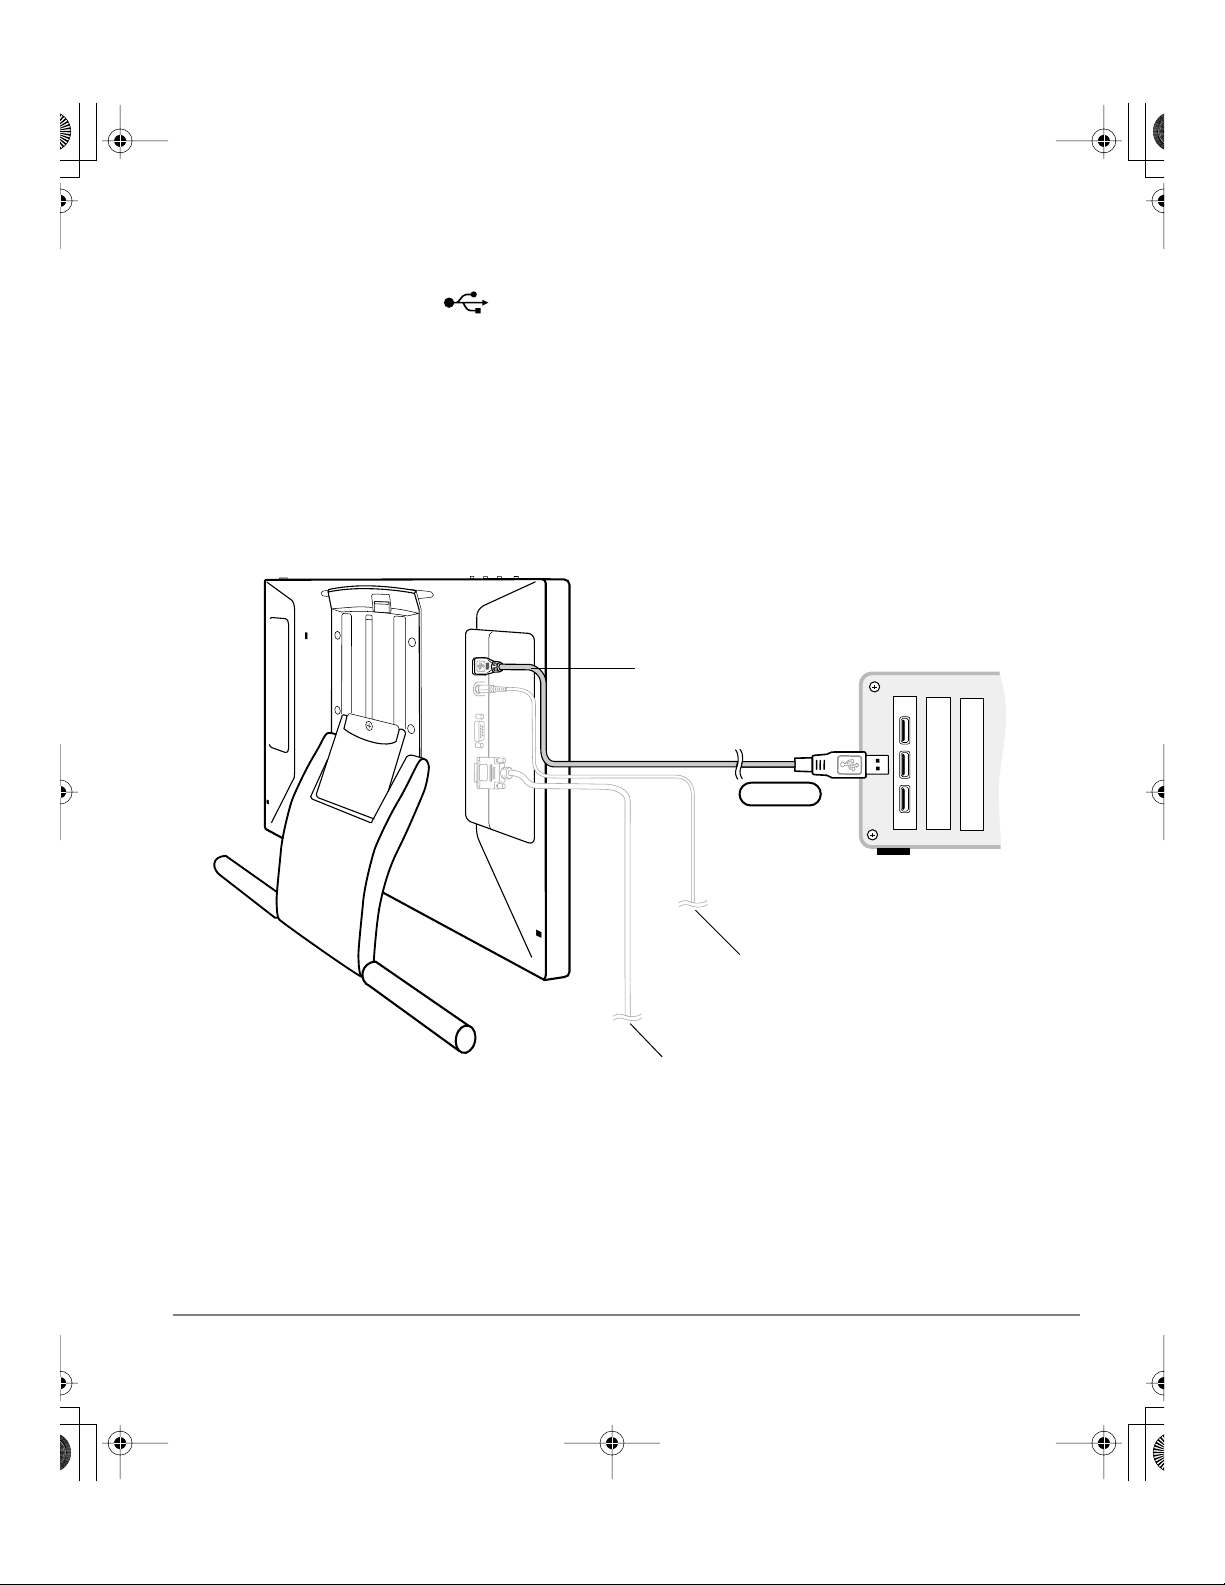
Step 2: Pen tablet installation
USB cable installation
Plug the square end of the USB cable into the DTF-521/PL-521 port labeled USB. Plug the other end
into an available USB port on your computer or on a USB hub attached to your computer. See – D – in
the connection diagram below.
Note: For Windows 98SE, the ADD NEW HARDWARE WIZARD will display. Follow the prompts,
selecting the default options. If prompted to install drivers for the USB Human Interface Device,
insert the Windows 98SE CD, click OK, and enter the location of the Windows CAB files
(e.g., D:\WIN98).
Next, move on to the pen tablet Software installation on page 14. You must install the Wacom tablet
driver software for full tablet functionality.
Pen tablet cabling diagram
USB port
DTF-521/PL-521, rear view
– D –
To USB port
Your computer
To power adapter. See page 11.
To video connection. See page 11.
Installation
page 13
Page 16

DTF521_Manual.fm Page 14 Tuesday, February 28, 2006 10:36 AM
Software installation
To install the tablet software:
• Save your work and close all open applications before installing the tablet software.
Temporarily disable any virus protection programs.
• Insert the Wacom Pen Tablet Driver CD into your computer’s CD-ROM drive. If the software
installer menu does not automatically display, double-click on the INSTALL icon located on the CD.
• Click on the INSTALL TABLET link and follow the prompts to install the driver software.
• Re-enable your virus protection program.
• After the software installation has been completed, make sure you can use your pen on the
DTF-521/PL-521 pen display to move the screen cursor.
When you place the pen tip on the display screen, the screen cursor should immediately jump to a
corresponding position approximately beneath the pen tip. Lift the pen tip and place it on the
display screen surface in a different location – the screen cursor should again jump to the new
position. This is known as absolute positioning, and enables you to position the screen cursor
without having to drag your pen across the display screen surface. To fine-tune the cursor-to-pen
relationship, see Calibrating your pen display on page 20.
Be sure to check the Read Me file for late-breaking news. If you have trouble installing your pen display,
see the Troubleshooting section beginning on page 29 of this guide.
Next steps:
Be sure to adjust the pen display tablet calibration to precisely align the screen cursor position with
the location of the pen tip. See Calibrating your pen display on page 20.
To learn more about using the DTF-521/PL-521, proceed to Working with your pen display on
page 15.
Installation
page 14
Page 17

DTF521_Manual.fm Page 15 Tuesday, February 28, 2006 10:36 AM
WORKING WITH YOUR PEN DISPLAY
As you work with the DTF-521/PL-521 pen display you can rest your hand lightly on the display screen,
just as if it were a drawing board or sheet of paper.
• Because the pen display drawing surface will be a little higher than your desk, consider adjusting
the height of your desk or chair to assure comfortable use of the device.
• When working with the pen display, maintain a good posture at all times and change your position if
you feel any discomfort due to your work position.
• Be careful that you do not pull the cables out of their connections by accidentally moving the pen
display too far from the computer.
Setting up your work area
To minimize fatigue, organize your work area so you can work comfortably. Position your pen display,
the pen, and your keyboard so they are easily accessible without unnecessary reaching. The pen
display and any other monitors should be positioned so you can view them comfortably with a minimum
of eyestrain.
Here are some other points to keep in mind:
• Take short breaks between tasks to stretch and relax your muscles.
• Use a gentle grip when working with the pen.
• Alternate tasks throughout the day.
• Minimize awkward postures and repetitive movements that cause discomfort.
• Alternate between different modes of use.
• Set your pen display on a flat surface when not using it in a hand-held or lap position.
Note: Wacom makes no representation, promise or guarantee that Wacom products will cure or prevent,
in whole or in part, mouse-induced repetitive stress symptoms, injuries or conditions. Individual results
may vary. Always obtain competent medical advice to determine the most appropriate treatment for your
specific situation.
The pen tether can be used to ensure your pen stays with your pen display. Simply loop one end of the
tether through the tether hole located on the pen, and the other end of the tether through the tether
connection ring. Then use the small thumb screw to attach the tether ring to one of the four attachment
points located on the back of the unit.
Next step: If you have not already done so, learn about the basics of customizing the pen.
See Pen operations on page 17 and Customizing on page 18.
Working with your pen display
page 15
Page 18

DTF521_Manual.fm Page 16 Tuesday, February 28, 2006 10:36 AM
Using the pen
As you work with the DTF-521/PL-521 you can rest your hand lightly on the display screen, just as if it
were a drawing board or sheet of paper. The Wacom pen is cordless, battery-free, and sensitive to the
pressure you exert upon it. Hold the pen like you would a normal pen or pencil. Make sure the
DuoSwitch is in a convenient location where you can toggle it with your thumb or forefinger, but not
accidentally press it while drawing. You can tilt the pen in any way that feels most comfortable for
drawing.
Pen tether connection point
DuoSwitch (side switch)
Some product configurations may
come with a pen that has no
DuoSwitch. In that case, you can
ignore all explanations within this
guide regarding the side switch.
Tip switch
(replaceable nib)
Note: When the pen is not in use, place
it in the pen tray, the pen storage
compartment, or lay it flat on your desk.
To maintain the sensitivity of your pen,
do not store the pen in a container
where it will rest on its tip.
Pen components
The components of your pen function in the following manner:
Pen tip: The pen becomes activated as soon as it is brought within 5 mm (0.2 inch) of the pen display
screen. This allows you to position the screen cursor or use the DuoSwitch without touching the pen tip
to the display screen. When pressure is applied to the pen tip, the tip switch is turned on and the pen
simulates a primary mouse button click. The tip click pressure can be adjusted in the Pen Tablet control
panel.
DuoSwitch: The DuoSwitch is programmable, and can be used to perform the same click and doubleclick functions as the tip switch. Toggle the DuoSwitch in either direction to activate the upper or lower
button functions. You can use the DuoSwitch whenever the pen tip is within 5 mm (0.2 inch) of the
display screen surface; you do not need to touch the pen tip to the tablet in order to use the switch.
By default, the upper switch is set to D
OUBLE CLICK and the lower switch is set to RIGHT CLICK.
Important: Use only the pen that came with your pen display. Other pens may not function
properly. Also, the DTF-521/PL-521 pen tip is specifically designed for use with the
DTF-521/PL-521 pen display – the tips on other pens could damage the protective coating on
the display screen.
See Customizing the pen on page 19 for information on customizing the pen settings.
Working with your pen display
page 16
Page 19

DTF521_Manual.fm Page 17 Tuesday, February 28, 2006 10:36 AM
Pen operations
The basic methods of working with the pen are as follows:
Pointing and selecting: Move the pen above the DTF-521/PL-521 display screen to position the
screen cursor. The pen tip needs to be within 5 mm (0.2 inch) of the pen display tablet surface; you do
not need to touch the tablet surface to move the screen cursor. The cursor jumps to the location where
you place the pen (absolute positioning). Press the pen tip on the display screen to make a selection.
Note: You will need to calibrate the pen display tablet to correctly align the screen cursor with
the pen tip. (See Calibrating your pen display on page 20.) If the screen cursor does not jump
to a position close to the pen tip when you place the pen on the display screen, then the pen
tablet driver may not be installed or is not loading. Install the pen tablet driver software if
necessary. Otherwise, refer to Troubleshooting, beginning on page 29.
Clicking: Tap the display screen once with the pen tip, or touch the pen to the display screen with
enough pressure to register a click.
Windows tip: To make navigating with the pen easier, configure Windows to select when the
pen is over an icon and to launch the icon with a single click. To turn on this feature:
Windows XP, XP x64, 2000, or Me. Open a folder, select the TOOLS pull-down menu, and
FOLDER OPTIONS.... From the GENERAL tab select the option SINGLE-CLICK TO OPEN AN ITEM
(POINT TO SELECT).
Windows 98SE. Open a folder, select the VIEW pull-down menu, and FOLDER OPTIONS....
From the GENERAL tab select the WEB STYLE option.
Double-clicking: Press the upper side switch, or quickly tap the display screen twice in the same place
with the pen tip. Double-clicking is easier when the pen is perpendicular to the tablet screen. To finetune the double-click area, see Adjusting double-click on page 21.
Dragging: Select an object, then slide the pen tip across the display screen to move the object.
Using the side switch: The pen is equipped with a DuoSwitch. This switch has two programmable
functions that can be selected by rocking the switch in either direction. You can use the DuoSwitch
whenever the pen tip is within 5 mm (0.2 inch) of the tablet surface; you do not need to touch the pen tip
to the tablet in order to use the switch. The upper switch is set to DOUBLE CLICK, and the lower switch is
set to RIGHT CLICK by default.
Drawing with pressure-sensitivity: The pen responds to the nuance and inflection of your hand
movements, enabling you to create natural-looking pen and brush strokes within applications that
support this feature. To draw with pressure, select a pressure-sensitive tool from your application’s tool
palette. As you draw on the screen surface, use various amounts of downward pressure on the tip of
the pen. Press lightly for thin lines or softer color. Press harder for thick lines or dense color.
Working with your pen display
page 17
Page 20

DTF521_Manual.fm Page 18 Tuesday, February 28, 2006 10:36 AM
CUSTOMIZING
After you master the basics of using your pen on the DTF-521/PL-521 pen display, you may want to
customize the way the pen works. The Pen Tablet control panel makes it easy to customize your pen
display and pen.
Opening the control panel
To open the control panel, use the DTF-521/PL-521 pen on your pen display:
Windows. Click on the Windows START button and choose ALL PROGRAMS. (For versions other than
Windows XP, choose the PROGRAMS group.) Then select PEN TABLET and choose the PEN TABLET
option.
Macintosh. Open SYSTEM PREFERENCES from either the Dock, the Apple menu, or from the
APPLICATIONS folder. Then click on the PEN TABLET icon.
Note: If more than one pen display tablet is installed on your system, the
control panel will change the settings for the tablet that was last used before
opening the control panel.
After opening the control panel, see Control panel overview on page 19.
Customizing
page 18
Page 21

DTF521_Manual.fm Page 19 Tuesday, February 28, 2006 10:36 AM
Control panel overview
Open the Pen Tablet control panel to customize your product. Experiment with different settings to find
what works best for you. Any changes you make will take effect immediately, but you can always click
DEFAULT to return to the factory settings.
Additionally, your keyboard tab and arrow keys can be used to navigate the control panel.
Customizing the pen
Selects the pen side switch button
functions. See page 21.
Closes the control panel.
When checked, an
audible “click” sound will
TIP FEEL.
Customizes the
amount of pressure
needed to click or
draw with the pen.
be heard whenever a pen
click occurs and your
computer speakers are
turned on.
Adjusts the size of
the double-click
area. See page 21.
Displays information about
the control panel and driver.
Hint: To create broad brush strokes or to click with a light touch, use a soft tip
setting. A soft setting provides a wider range of pressure values with most
pressure-sensitive applications. In some applications, a soft pressure setting can
make the pen overreact – any small press on the pen is magnified on the screen.
If you experience this, try a firmer tip setting.
Returns the PEN tab settings to
their factory defaults.
If more than one pen display tablet is installed on your system, the control panel will change the
settings for the tablet that was last used before opening the control panel.
Note: When customizing your pen, choose those options that match the buttons on the pen you
are working with.
Customizing
page 19
Page 22

DTF521_Manual.fm Page 20 Tuesday, February 28, 2006 10:36 AM
Calibrating your pen display
You will need to calibrate the DTF-521/PL-521 pen display tablet in order to align the screen cursor
position with the position of the pen on the display screen. This is required to adjust for parallax caused
by the acrylic display screen cover and coating. Set the pen display in its working position, then follow
the procedure below.
Important: Make sure the LCD monitor is
properly adjusted before calibrating the tablet.
See Adjusting pitch and phase on page 27, and
Adjusting the LCD monitor beginning on
page 24.
• In the Pen Tablet control panel, select the
ALIBRATE tab.
C
• If you are working with multiple monitors, select
• Click on the C
• Hold the pen and position your head as you
• Then click on the center of the cross-hairs that
• Test the alignment by positioning the pen at a
ONITOR corresponding to the
the M
DTF-521/PL-521 display. (Only monitors that
are set to one of the resolutions supported by
the DTF-521/PL-521 will appear in the list.)
calibration screen.
ALIBRATE... button to activate the
normally do when working with the tablet.
Use the pen tip to click on the center of the
cross-hairs in the upper-left corner.
are displayed in the lower-right corner.
few different points on the display. Click OK to
accept the calibration. Click T
RY AGAIN to
recalibrate.
Be sure to read the directions in the calibration
screen for detailed instructions and additional
options. The calibration setting applies to all
applications.
Crosshairs
Adjustment pattern for pitch and phase.
See Adjusting pitch and phase on
page 27 for details.
Note: If more than one pen display tablet is installed on your system, the control panel will change the settings
for the tablet that was last used before opening the control panel.
To calibrate two pen display tablets, first touch the pen to tablet #1 and open the control panel without
touching
the pen to tablet #2. In the control panel, select the correct monitor and calibrate tablet #1. Close the control
panel, touch the pen to tablet #2, and again open the control panel without
touching the pen to tablet #1.
Select the correct monitor and calibrate tablet #2.
Customizing
page 20
Page 23

DTF521_Manual.fm Page 21 Tuesday, February 28, 2006 10:36 AM
Control panel details
Adjusting double-click
Double-clicking with the pen tip can be made easier by expanding the tap area that accepts a doubleclick (the double-click distance), or by using the pen’s side switch to automatically double-click when
pressed. A large double-click distance may cause a delay at the beginning of your brushstrokes in
some drawing applications. If you notice such effects, try setting a smaller double-click distance and
using the side switch to double-click.
Hint: Press the upper switch to double-click. This is easier than tapping twice with the pen tip.
Customizing the side switch button functions
You can set the pen’s DuoSwitch to simulate a variety of functions. Just select an option from the pulldown menu for either the upper or lower side switch. Your changes take effect immediately. When you
bring the pen tip within 5 mm (0.2 inch) of the pen display tablet surface without touching the tablet and
press the side switch, the selected function occurs. The following list describes the available options.
CLICK. Default setting for the pen tip. This option simulates a primary mouse button click.
DOUBLE CLICK. Default setting for the upper position of the side switch. Simulates a primary mouse
button double-click. For easier double-clicking, use this function instead of tapping twice with your pen
tip.
MIDDLE CLICK. Simulates a middle mouse button click.
RIGHT CLICK. This is the default setting for the lower position of the side switch. Displays a context
menu (simulates a right mouse button click on Windows systems and CTRL+CLICK on Macintosh).
CLICK LOCK. Simulates holding down the primary mouse button. Press the side switch once to initiate
click lock. Press the switch again to release click lock. Click lock is useful for dragging objects or
selecting blocks of text.
4TH CLICK (FORWARD). Issues the FORWARD command in browser applications (simulates a 4th mouse
button click).
5TH CLICK (BACK). Issues the BACK command in browser applications (simulates a 5th mouse button
click).
DEFAULT. Returns a button to its default setting.
DISABLED. Disables the button function.
APPLICATION DEFINED. Allows the application to determine the button function. Use this for applications
such as CAD programs that have built-in button support.
ERASE. Sets a button so that when the button is pressed, the pen tip will act like an eraser in
applications that support the ERASE function.
INK TOGGLE. (Macintosh.) Toggles the Ink ANYWHERE function of Inkwell on and off.
Inkwell automatically recognizes and converts your handwriting into text and inserts it into a document.
Note that Ink must be turned on for this button function to work. See your Macintosh help for
information on working with Inkwell.
Customizing
page 21
Page 24

DTF521_Manual.fm Page 22 Tuesday, February 28, 2006 10:36 AM
KEYSTROKE.... Enables you to simulate keystrokes. Selecting this option displays the DEFINE
KEYSTROKE dialog box where you can enter a keystroke or keystroke sequence to play back at the press
of a button.
You can manually enter a keystroke or keystroke
combination in the K
EYS entry box. Keystroke
combinations can include letters, numbers, function
keys (such as F3) and modifier keys (such as S
TRL).
or C
HIFT
You can also select special keystrokes or keystroke
combinations from the A
DD SPECIAL drop-down
menu. When you make a selection it is added to the
EYS entry box.
K
After defining a keystroke sequence, click OK.
Important: Because the E
RETURN (Macintosh) keys can be
and
NTER (Windows)
selected as a defined keystroke, they
cannot be used to select OK. You must use
your pen to click on the OK button.
Clears the
keystroke entry
box.
Deletes only the
last entry in the
keystroke entry box.
MODIFIER.... Enables you to assign modifier key(s) (such as SHIFT or CTRL). Many applications use
modifier keys to constrain the size or placement of objects. Selecting this option displays the DEFINE
MODIFIER dialog box where you can assign one or more modifier key functions. After choosing the
modifier function(s), click OK.
In addition to choosing one or more
modifier key options, you can select the
LICK box if you want a mouse click to
C
occur whenever you press the tool button.
PRESSURE HOLD. Locks the pressure at the current pressure level until the side switch is released.
For example, you can paint with pressure-sensitivity until you reach the brush size that you like.
You can then press the switch and continue painting with the same size brush until the switch is
released.
Customizing
page 22
Page 25

DTF521_Manual.fm Page 23 Tuesday, February 28, 2006 10:36 AM
MODE TOGGLE.... Toggles between the pen tracking mode (pen mode) and mouse mode. The tracking
mode you select determines the relationship between pen movement and cursor movement.
• With the pen display tablet correctly calibrated in pen mode, the screen cursor should always follow
the physical pen tip on the screen. This is the default setting.
• When toggled to your computer’s mouse settings (mouse mode), the screen cursor is not directly
“linked” to the pen tip and is positioned like a mouse, requiring a “pick up and slide” motion to move
the cursor on the screen. On multiple monitor systems, mouse mode will allow you to access the
other monitor(s) with your pen.
Customizing
page 23
Page 26

DTF521_Manual.fm Page 24 Tuesday, February 28, 2006 10:36 AM
Adjusting the LCD monitor
Factory presets, auto-sync, and user settings
Factory presets: For optimal display quality, set your video card to the DTF-521/PL-521’s native
resolution of 1024 x 768 pixels. See page 43 for signal specifications.
Auto-sync: The DTF-521/PL-521 attempts to automatically synchronize to the incoming signal.
Auto-sync will function when the horizontal frequency is between 30 to 57 kHz and the vertical
frequency is between 45 to 70 Hz for XGA mode, or 45 to 75 Hz for other modes. If the pen display
does not automatically synchronize with the incoming signal, you can use the On Screen Display (OSD)
RESET AUTO ADJUST option to initiate display synchronization. Further screen display adjustments can
be manually made using the OSD controls.
User settings: When you manually set the display using the OSD function, the settings are stored
within the pen display for use the next time the unit receives a similar signal. This is applicable to all
display modes.
Working with on screen display settings
Your pen display is equipped with an On Screen Display (OSD) function. The OSD function enables
you to adjust and optimize a variety of display settings at the touch of a button. The OSD controls are
located on the upper left edge of the unit.
MENU button
Opens or closes the OSD menu.
–
Selection buttons
Use these buttons to select an option that can be activated
when you press the E
option, press the + button to increase a selected item value,
and press the – button to decrease it.
+
ENTER button
Activates or deactivates the
selected OSD menu option.
NTER button. After activating a selected
The basic process for working with the OSD is as follows:
• Press the M
ENU button to open the OSD main menu.
• Use the + or – buttons to select an option. When the option you want to adjust is highlighted,
press the ENTER button. The current settings and adjustment sub-menu for that option will appear.
• Use the + or – buttons to adjust the option settings.
• After making your changes, press the ENTER button to save. To exit, press the MENU button.
Note: All settings are automatically saved when the OSD menu closes. If you make changes to
the display appearance and cannot return to the original settings, use the RESET RECALL option
to return the pen display to its original factory defaults.
Customizing
page 24
Page 27

DTF521_Manual.fm Page 25 Tuesday, February 28, 2006 10:36 AM
When you open the On Screen Display, the following menu option icons are displayed:
RIGHTNESS. Select to
CONTRAST. Select to
increase or decrease
image contrast.
HASE. Select to
P
reduce or eliminate
horizontal distortion
lines.
To automatically adjust,
use the R
ESET option.
B
increase or decrease
image brightness.
P
ITCH. Select to reduce
or eliminate vertical
distortion lines.
To automatically adjust,
use the R
ESET option.
H
ORIZONTAL CENTER.
Select to move the
screen image left or
right.
To automatically adjust,
use the R
ENU POSITION.
M
ESET option.
Select to move the OSD
menu around the
display screen.
VERTICAL CENTER.
Select to move the
screen image up or
down.
To automatically adjust,
use the R
ESET. Provides two
R
options: Use A
DJUST to reset only the
A
ESET option.
UTO
image parameters.
ECALL to reset all
Use R
screen options to the
factory default.
Selecting the E
icon exits the R
XIT
ESET
window without
resetting anything.
Customizing
page 25
Page 28

DTF521_Manual.fm Page 26 Tuesday, February 28, 2006 10:36 AM
BACKLIGHT. Select to
increase or decrease
the backlight brightness
level.
LANGUAGE. Select to
choose a language
option for the OSD.
C
OLOR. Provides color
temperature settings for
9300˚, 6500˚, and 5000˚
Kelvin.
IRECT displays the
D
received signal as it is
without any adjustment.
When D
IRECT is
selected, the
RIGHTNESS and
B
ONTRAST settings are
C
also set to D
IRECT and
cannot be adjusted
manually.
The U
SER option
enables you to adjust
Red, Blue, and Green
independently.
Choose a setting and
press E
NTER to activate
your selection.
Change the U
SER
setting by selecting the
NTER icon.
E
In the user adjustment
OLOR window, change
C
Red, Green, or Blue to
calibrate color.
Customizing
page 26
Select the E
to exit.
XIT icon
Page 29

DTF521_Manual.fm Page 27 Tuesday, February 28, 2006 10:36 AM
Adjusting pitch and phase
Some computers and video cards may not allow the auto-sync function to fully work when the
DTF-521/PL-521 is first connected. If some portion of text appears blurred, adjust pitch and phase by
following the procedure below. For crisp images, set the resolution of your video card to 1024 x 768.
• In the Pen Tablet control panel,
select the C
• If you are working with multiple
displays, be sure the display
corresponding to the
DTF-521/PL-521 is selected in the
ONITOR menu.
M
• Click on the C
activate the calibration screen.
• Using the OSD controls, open the
OSD menu and select the P
icon. Then adjust the pitch level so
that the pattern of fine vertical
stripes displays evenly. (For details
on changing the OSD settings, see
Working with on screen display
settings on page 24.)
• In the OSD menu, select the P
icon. Adjust the phase level so that
the adjustment pattern shows
clearly.
• After completing these adjustments,
press the E
to exit the OSD menu.
Click on the C
ESC to exit the calibration screen.
ALIBRATE tab.
ALIBRATE... button to
ITCH
HASE
NTER and MENU buttons
ANCEL button or press
Adjustment pattern for pitch and phase.
Customizing
page 27
Page 30

DTF521_Manual.fm Page 28 Tuesday, February 28, 2006 10:36 AM
Power saving
The DTF-521/PL-521 conforms to VESA and ENERGY STAR® power saving guidelines.
When using the DTF-521/PL-521 with a Display Power Management Signaling (DPMS) compliant
computer or video card, the display will automatically comply with the below power saving parameters.
Power saving mode H-sync V-sync Video Power consumption Power lamp
Power ON Yes Yes Active 23W, max. Blue
Standby mode No Yes Blanked 2 W, max. Blue/Orange
Suspend mode Yes No Blanked 2 W, max. Blue/Orange
OFF mode No No Blanked 1 W, max. Orange
Customizing
page 28
Page 31

DTF521_Manual.fm Page 29 Tuesday, February 28, 2006 10:36 AM
TROUBLESHOOTING
Most of the time your pen display tablet will work flawlessly. But if you are having trouble, Wacom
recommends you do the following:
1. If the DTF-521/PL-521 pen display does not function properly, refer to the troubleshooting section
below. See also Display troubleshooting on page 31, or look in the Pen tablet troubleshooting on
page 33. Your problem may be described there and you can try the solution offered.
2. Open the Wacom pen display Read Me file for late-breaking information.
3. If you are having a compatibility conflict between your pen display and a new hardware or software
product, check if a newer pen tablet software driver is available. See Obtaining driver downloads
on page 39 for information on downloading an updated software driver. Wacom periodically
updates the software driver to maintain compatibility with new products.
4. Check the FAQs (Frequently Asked Questions) on the Wacom web site for your region.
5. If you have tried the suggestions in this guide and still cannot resolve the problem, then contact
Wacom for Technical Support. See the Read Me file for information on where to obtain support for
your region.
Testing the DTF-521/PL-521
1. If the pen display power LED does not light, check the following:
• First verify that the green light on the power adapter is on. If the light is not on, check that the
power cable is properly connected to the power adapter and to an active AC outlet.
• Check that the power adapter cable is securely connected to the DTF-521/PL-521 and that the
pen display power switch is turned on. The pen display power LED will glow orange or blue
whenever the DTF-521/PL-521 is on.
Important: Use only the AC adapter that came with your pen display. Other adapters may
cause damage to your product.
2. If there is no display:
• Make sure that your computer is turned on. The power LED will light blue when the proper
video signal is received, and orange if there is no video signal or if the computer is in a power
saving mode.
• Verify that the DTF-521/PL-521 is connected to an active VGA connector.
• Check that your video card has been properly installed and is functional. If you have another
display that is compatible with your video card, you can connect that display to the card in order
to verify that the video card is operating correctly.
Troubleshooting
page 29
Page 32

DTF521_Manual.fm Page 30 Tuesday, February 28, 2006 10:36 AM
3. Verify that the tablet and pen are working:
• Press the pen tip against the display and verify that the status LED lights blue.
• If the LED does not light, verify that the DTF-521/PL-521’s USB cable is plugged into an active
USB port. If the pen display is plugged into a USB hub, try plugging it directly into the USB port
on your computer.
• Be sure that the USB port to which you are connecting the DTF-521/PL-521 has not been
disabled. It may be necessary to check your system BIOS setting to verify that you have
connected the pen display to an active USB port.
• The status LED will light blue when the DTF-521/PL-521 pen display is registered as a USB
device and the pen tip is pressed against the display.
4. Check the pen. If you cannot make a selection on the display screen with the pen:
• Test the pen by pressing the pen tip against the surface of the pen display tablet. The status
LED should light blue.
• Now, without applying pressure to the pen tip but keeping the pen within 5 mm (0.2 inch) of the
pen display tablet surface, press the side switch. The status LED should again light blue.
• If the status LED does not light blue for these tests, be sure you are using the correct pen that
came with your pen display.
If you are still having problems, you may have a defective pen or pen display.
Troubleshooting
page 30
Page 33

DTF521_Manual.fm Page 31 Tuesday, February 28, 2006 10:36 AM
Display troubleshooting
If you encounter problems with the DTF-521/PL-521 display, refer to the following tables; your problem
may be described here and you can try the solution offered. For additional information about color
issues, refer to the documentation that came with your operating system or applications.
General display problems
No display. The power LED is off. • Verify that the AC power cable is connected, and that the
No display. The power LED is lit
blue.
The power LED is lit orange.
The following message appears
briefly on your display screen:
The following message appears
briefly on your display screen:
The following message appears
briefly on your display screen:
The following message appears
briefly on your display screen:
DTF-521/PL-521 power switch is turned on.
• Check the contrast, brightness, and backlight controls. Adjust as
necessary, or open the OSD menu, go to the R
ECALL option.
the R
• Your computer may be in a power management mode. Touch the
pen tip to the display screen, move the mouse, or depress any key on
your keyboard.
• Turn off both your computer and the DTF-521/PL-521 pen display,
and check the video cable for bent or broken connector pins.
Then properly connect the video cable and turn on the pen display
and your computer.
• Verify that the video card is properly installed.
• Check that your computer is turned on.
• Verify that you are using the video cable that came with the
DTF-521/PL-521.
• Check that the DTF-521/PL-521 video cable is fully connected.
• Turn off both your computer and the DTF-521/PL-521 pen display,
and check the video cable and any video adapters for bent or broken
connector pins. Then properly connect the video cable and any
necessary adapters.
• The input signal frequency is incorrectly set or not compatible with
the DTF-521/PL-521. For XGA, set the refresh rate (vertical
frequency) between 45 and 70 Hz. For other modes, set the
frequency to some value between 45 and 75 Hz. If your video card
driver supports adjustment of the horizontal frequency, make sure it
is set to some value between 30 and 57 kHz. On a single monitor
system you will need to connect a different display to change the
refresh rate.
• The resolution is set too high (1024 x 768, maximum).
• The refresh rate is set too high (70 Hz maximum for XGA, and 75 Hz
maximum for other modes).
• Set the display properties to detect plug and play monitors.
• The maximum refresh rate in XGA mode is 70 Hz. Set the refresh
rate (vertical frequency) to some value between 45 and 70 Hz.
ESET menu and select
Troubleshooting
page 31
Page 34

DTF521_Manual.fm Page 32 Tuesday, February 28, 2006 10:36 AM
The image appears multiple times
on the display.
When a still image is displayed for
• Do not extend the video cable. Do not use an input selector
switch box.
• Use a screen saver or other power management feature.
a long period of time without
refreshing the screen, an afterimage remains for a short period of
time.
The color white does not display as
white.
• Verify that the display is operating at the factory default settings.
If that is not sufficient, then adjust color as necessary. For details on
color management, refer to your operating system and application
documentation.
• Verify that the video cable and connector are fully connected.
VGA problems
The display ripples or flickers. • Open the OSD menu, go to the R
DJUST option. Then, if necessary, manually adjust pitch and phase.
A
• Verify that the display adapter or video card matches the
specifications for the DTF-521/PL-521.
• Adjust the refresh rate in the Display Properties control panel.
The display is not clear. • Set the display resolution of your video card to 1024 x 768.
• As necessary, adjust contrast or brightness, pitch and phase.
The display and LCD panel are not
lined up. The display size is not
correct.
• Open the OSD menu, go to the R
option.
• As necessary, adjust pitch and phase, and horizontal and vertical
position. Note that some video cards may not show the display in
proper sizing.
The display ripples or shows a
moiré pattern. The display color is
not even.
• Open the OSD menu, go to the R
option.
• As necessary, adjust pitch and phase.
ESET menu, and select the AUTO
ESET menu, and select the RECALL
ESET menu, and select the RECALL
Troubleshooting
page 32
Page 35

DTF521_Manual.fm Page 33 Tuesday, February 28, 2006 10:36 AM
Pen tablet troubleshooting
If you encounter problems with the DTF-521/PL-521 pen display, refer to the following tables.
Your problem may be described here, and you can try the solution offered. Be sure you refer to the
DTF-521/PL-521 Read Me file for the latest information.
For additional information, visit Wacom’s web site at http://www.wacom.com/productsupport and follow
the links to the FAQs.
General problems
The computer does not
have an available USB port.
A USB device plugged into
one of the pen display’s
integrated USB ports does
not function.
Check if there is an available USB port on a USB hub. If none are
available you will need to add a USB hub or USB card.
1. Make sure the pen display itself is properly connected to a
working USB port on your computer.
2. Then be sure the pen display is powered on and that the power
LED lights blue. The DTF-521/PL-521 contains a powered USB
hub and the integrated USB ports will not work when the power is
off.
The pen display power LED
is off.
Make sure the pen display power switch is turned on.
Check that the AC power adapter is plugged into both the pen display
and an active power outlet.
Use only the power adapter that came with the pen display; other
adapters may cause damage to your product.
The pen works only in
mouse mode, and does
not draw with pressuresensitivity.
The pen does not draw with
pressure-sensitivity.
The pen display tablet driver software was not installed or did not load
properly. Make sure the tablet driver software is installed and
functioning. Install the pen tablet driver software in accordance with
the instructions found in the Installation section of this guide.
Some applications require that you turn on the pressure capabilities
within the application or selected tool before the pen will respond as a
pressure-sensitive tool.
Clicking is difficult. Open the Pen Tablet control panel and go to the Pen tab. Try using a
IP FEEL.
The pen selects everything
or will not stop drawing.
lighter T
Open the Pen Tablet control panel and go to the PEN tab. Move the
TIP FEEL slider toward FIRM. If this does not help, see Testing the
DTF-521/PL-521 on page 29.
Double-clicking is difficult. Be sure you are quickly tapping the display screen twice in the same
place on the pen display tablet’s active area. Wacom recommends
using the side switch to double-click. See Adjusting double-click on
page 21.
Try increasing the DOUBLE CLICK DISTANCE or using a lighter TIP FEEL.
Windows: Try setting your system to launch programs with a single
click. See Pen operations on page 17.
Troubleshooting
page 33
Page 36

DTF521_Manual.fm Page 34 Tuesday, February 28, 2006 10:36 AM
You notice a delay at the
beginning of pen strokes.
You have to press hard with
the pen when clicking or
drawing.
The pen tip does not
function.
The side switch does not
work.
The pen tip and screen
cursor do not properly
line up.
The screen cursor moves
but it does not jump to the
pen tip location when the
pen is placed on the display
screen, and it does not
follow the pen tip when the
pen is moved across the
display.
Try decreasing the DOUBLE CLICK DISTANCE. See Adjusting double-
click on page 21.
Open the Pen Tablet control panel and go to the PEN tab. Move the
TIP FEEL slider toward SOFT.
Be sure you are using the pen that originally came with your pen
display. Other pens may not function properly on the
DTF-521/PL-521 pen display.
Make sure the status LED lights blue when the tip is pressed. If the
LED does not light, verify that the USB cable is plugged into an active
port on your computer or on a USB hub.
If the LED still does not light, you may have defective hardware (see
Troubleshooting on page 29).
Be sure you are using the pen that originally came with your pen
display. Other pens may not function properly on the
DTF-521/PL-521 pen display.
Be sure you press the side switch when the pen tip is within 5 mm
(0.2 inch) of the pen display tablet’s active area – do this without
pressing down on the pen tip.
From the Pen Tablet control panel, verify that the side switch is set to
the proper function you are expecting to occur.
Make sure the status LED lights blue when you press the side switch.
If the LED does not light, verify that the USB cable is plugged into an
active USB port on your computer or on a USB hub; the LED will not
light if the USB cable is not plugged into an active port.
If the LED does not light, you may have defective hardware (see
Troubleshooting on page 29).
Open the Pen Tablet control panel and select the CALIBRATE tab.
Continue with Calibrating your pen display on page 20.
Make sure the Wacom tablet driver has loaded properly by opening
the Pen Tablet control panel. If the driver did not load you will see an
error message. If an error message appears, reboot your computer.
If the problem persists, refer to the Installation instructions and
reinstall the Wacom tablet software. (For Macintosh, you must restart
your computer after installing the Wacom tablet driver for proper
tablet operation.)
If you have customized the side switch on your pen to toggle between
pen mode and mouse mode, make sure that your pen display tablet is
operating in pen mode. See Customizing the side switch button
functions, beginning on page 21.
Troubleshooting
page 34
Page 37

DTF521_Manual.fm Page 35 Tuesday, February 28, 2006 10:36 AM
When using the pen display
tablet on a multiple monitor
system, you cannot use the
pen to control the other
monitor(s).
The line you are drawing
does not line up with the
location of the screen
cursor in paint applications.
You suspect the pen tablet
preferences may be
corrupted, or want to make
certain that all settings are
at their factory defaults.
The computer does not go
to sleep.
The screen cursor jumps
back when using your
regular mouse or trackball.
The screen cursor moves
erratically or jumps around
on the display screen when
another tablet is connected
to your computer.
You can use your pen to control the other monitors in mouse mode.
To use mouse mode, first set the pen’s DuoSwitch to MODE
TOGGLE.... Then use the switch to toggle between pen mode and
mouse mode.
To function properly, some applications require that the pen is set to
pen mode. Make sure the pen has not been toggled to mouse mode.
If the pen is set to pen mode and the problem still exists, then you
may have a corrupted preferences file. Follow the instructions in the
next tip to create a new preferences file.
Delete the pen tablet preferences as follows:
Windows: Do a Search or Find for the
TABLET.DAT file and delete it.
The file should be located in your Windows or Windows\System32
folder. Then restart your computer. When the tablet driver loads, it
will create a new preferences file with the factory default settings.
Recalibrate the unit.
Macintosh OS X: For a single user, delete the tablet preferences by
first choosing your HOME folder from the GO menu. Then open your
home LIBRARY folder. Within your home LIBRARY folder, open the
PREFERENCES folder and delete the COM.WACOM.TABLETPREFERENCES
file. Log out, then log back in. When the tablet driver loads it will
create a new preferences file with the factory defaults.
For multiple users, delete all tablet preferences by first opening the
main APPLICATIONS folder. Then open the TABLET folder and run the
REMOVETABLET utility. When the utility starts, click on the REMOVE
ALL PREFERENCE FILES button. Log out, then log back in. When the
tablet driver loads, it will create new preferences files with the factory
defaults.
Recalibrate the tablet.
Note: Do not manually remove the WACOM TABLET.PREFPANE
file from the main LIBRARY PREFERENCEPANES folder. This file
is only to be removed when uninstalling the tablet software
driver, and then only when using the REMOVETABLET utility.
When you are not using the pen, remove it from the pen display
surface or the tablet will continue to send data, keeping the computer
awake.
When the pen is not in use, place it in the pen tray, the pen storage
compartment, or at some location near the pen display, but not on the
display. Leaving your pen on the display may interfere with screen
cursor positioning when using other input devices.
The tablet portion of the DTF-521/PL-521 emits electromagnetic
waves at a certain frequency. If another tablet is too closely placed to
the DTF-521/PL-521 it may interfere with screen cursor positioning.
If this occurs, move the tablet further away from the DTF-521/PL-521.
Troubleshooting
page 35
Page 38

DTF521_Manual.fm Page 36 Tuesday, February 28, 2006 10:36 AM
Windows-Specific Problems
After changing right- and
left-handed settings in the
computer’s mouse control
panel, the pen tip no longer
functions properly.
Windows 98SE or Me:
Your pen does not function
inside a full screen DOS
window.
Windows 98SE or Me:
After pressing
TRL+ALT+DEL, the screen
C
cursor cannot be controlled
with your pen.
Windows XP:
After installing the pen
display tablet on a system
with multiple users, the pen
display tablet only works on
the primary user desktop.
Restart Windows for your Wacom tool settings to be correctly
recognized.
You must use a mouse when working in a full screen DOS window.
When the CLOSE PROGRAM dialog box is active the pen tablet will not
work. Use your mouse or keyboard to continue. When this dialog
box is closed, you can again use your pen to control the screen
cursor.
Reboot the system after installing the pen display tablet on a system
with multiple users.
Troubleshooting
page 36
Page 39

DTF521_Manual.fm Page 37 Tuesday, February 28, 2006 10:36 AM
Macintosh-Specific Problems
At startup, a dialog box
appears telling you that
either the driver failed to
load or the tablet
preferences have not yet
been created.
Inkwell does not work
correctly with the pen
display tablet.
The pen display tablet was not detected at startup. Check that the
USB interface cable is securely connected to a USB port on your
computer or to a USB hub. Make sure that the pen display power
LED is on. If this does not correct the problem, see Troubleshooting
on page 29.
From the GO menu, select APPLICATIONS and open the UTILITIES
folder. Launch the APPLE SYSTEM PROFILER and select the DEVICES
AND VOLUMES tab. A USB tablet should be displayed by the profiler.
If a USB tablet was not found, check the pen display’s USB cable
connection or try plugging the pen display into a different USB port.
If you are still having problems, go to the Applications/Utilities folder,
open the Disk Utility program, and run REPAIR DISK PERMISSIONS from
the FIRST AID tab. If this does not help, contact Wacom for Technical
Support. See Technical support options on page 38.
There may be a problem with the Inkwell preferences. Remove the
damaged preference files as follows. They will be recreated when
you enable handwriting recognition.
1. From the Apple menu, choose SYSTEM PREFERENCES. From the
System Preferences menu, choose SHOW ALL and select INK.
Then turn off handwriting recognition.
2. From the GO menu, choose your HOME. Open the LIBRARY and
PREFERENCES folders. Then remove the following preferences:
• com.apple.ink.framework.plist
• com.apple.ink.inkpad.plist
• com.apple.ink.inkpad.sketch
3. Go back to SYSTEM PREFERENCES and INK, and then enable
handwriting recognition.
4. Test the Inkwell function using your Wacom pen display tablet
and pen.
5. If this procedure does not resolve your problem with Inkwell,
contact Apple Support for further assistance. Wacom is not the
software manufacturer for Inkwell and we are limited in our
abilities to support a third party software application.
Troubleshooting
page 37
Page 40

DTF521_Manual.fm Page 38 Tuesday, February 28, 2006 10:36 AM
Technical support options
If you have a problem with your pen display, first check the appropriate Installation section in this guide
to make sure the unit is installed correctly. Then review the Troubleshooting procedures within this
guide; your problem may be described there and you can try the solution(s) offered.
If you cannot find the answer in this guide, you may find updated information about your problem in the
appropriate Read Me file for your platform (located on the Wacom Pen Tablet Driver CD). You can also
check the product FAQs (Frequently Asked Questions) on the Wacom web site for your region.
If you have an Internet connection you can download the latest software drivers from the Wacom web
site for your region. See Obtaining driver downloads on page 39.
If you cannot solve the problem and you think your Wacom product is not working properly, contact the
Wacom support staff for the area where your product was purchased. See the Wacom pen display
Read Me file, located on the Wacom Pen Tablet Driver CD, for contact information.
When you call, you should be at your computer with the following information available:
• This guide.
• Pen display serial number. (Look at the label on the back of the unit.)
• Driver version number. (See the Wacom Pen Tablet Driver CD or the Pen Tablet control panel.)
• The make and model of your computer, and operating system version number.
• The make, model, and connection type of your video card.
• A list of peripheral devices attached to your computer.
• The software application and version you were using when the problem occurred.
• The exact wording of any error message that appeared on your screen.
• What happened and what you were doing when the problem occurred.
• How you tried to solve the problem.
Troubleshooting
page 38
Page 41

DTF521_Manual.fm Page 39 Tuesday, February 28, 2006 10:36 AM
Obtaining driver downloads
Wacom periodically updates the pen tablet software driver to maintain compatibility with new products.
If you are having a compatibility problem between your pen display and a new hardware or software
product, it may be helpful to download a new Wacom tablet software driver (when available) from the
Internet.
USA, Canada, Central and South America
Worldwide Web: http://www.wacom.com/productsupport Driver downloads.
Europe, Middle East and Africa
Worldwide Web: http://www.wacom-europe.com Software updates.
Anonymous FTP Site: ftp://ftp.wacom-europe.com/pub/ Software updates.
Japan
Worldwide Web: http://tablet.wacom.co.jp Software updates. (Japanese)
Asia Pacific (English)
Worldwide Web: http://www.wacom.com/ap Software updates. (English)
China
Worldwide Web: http://www.wacom.com.cn Software updates.
(Simplified Chinese)
Troubleshooting
page 39
Page 42

DTF521_Manual.fm Page 40 Tuesday, February 28, 2006 10:36 AM
APPENDIX
Caring for your pen display
Keep the pen and your pen display LCD screen surface clean. Dust and dirt particles can stick to the
pen and cause wear to the display screen surface. Regular cleaning will help prolong the life of your
LCD screen surface and pen. Keep the pen display and pen in a clean, dry place and avoid extremes in
temperature. Room temperature is best. The DTF-521/PL-521 and pen are not made to come apart.
Taking apart the product will void your warranty.
Cleaning
To clean the pen display casing or the pen, use a soft, damp cloth; you can also dampen the cloth using
a very mild soap diluted with water. Do not use paint thinner, benzine, alcohol, or other solvents to
clean the unit casing or pen.
To clean the display screen, use an anti-static cloth or a slightly damp cloth. When cleaning, apply only
a light amount of pressure to the display screen and do not make the surface wet. Do not use detergent
to clean the display screen; this may damage the coating on the screen. Please note that damage of
this kind is not covered by the manufacturer’s warranty.
Replacing the pen tip
The pen tip (nib) will wear with normal use. When the nib gets too short or develops a sharp edge, you
can replace it with one of the extra nibs that came with the pen.
To remove the old nib:
Clasp it with a pair of tweezers, needle-nosed
plier, or similar instrument and pull the old nib
straight out of the pen.
ARNING
W
Prevent children from swallowing the pen tip or side switch. The pen tip (nib)
or side switch may accidentally be pulled out if children are biting on them.
To insert a new nib:
Slide it straight into the barrel of the pen.
Firmly push the nib until it stops. The new nib
will slide into the correct position.
If the pen nib wears and becomes angular, it may damage the coating on the DTF-521/PL-521 display
screen. To avoid this, periodic nib replacement is recommended.
Important: When the pen is not in use, place it in the pen tray, the pen storage compartment,
or lay it flat on your desk. To maintain the sensitivity of your pen, do not store the tool in a
container where it will rest on its tip.
Appendix
page 40
Page 43

DTF521_Manual.fm Page 41 Tuesday, February 28, 2006 10:36 AM
Using an alternate mount or stand
If you will be using the DTF-521/PL-521
pen display in an installation that requires
the use of an alternate mounting platform,
you can remove the adjustable stand from
the unit and mount the pen display onto any
mount arm or stand conforming to the
VESA 75 standard.
Mounting screws that are 4 mm wide with a
0.7 mm pitch (M4 Regular), with a screw
clearance depth of 15 mm are required.
Exceeding the clearance depth of 15 mm
will damage the pen display internal
components.
To remove the adjustable stand and attach
the pen display to a different mounting
platform:
1. Turn off your computer and power off
the DTF-521/PL-521. Then disconnect
all cables from between the unit and
your computer.
2. Protect the display screen surface by
spreading a soft cloth onto a flat table
and placing the pen display face down
on the cloth.
3. Remove the four screws and lift the
adjustable stand assembly away from
the body of the unit.
4. Using the appropriate screws for your
mounting platform, firmly attach the
pen display to the alternate mounting
platform.
5. Refer to the Installation instructions,
beginning on page 9, and reattach the
cabling.
CAUTION
When attaching the DTF-521/PL-521 onto an alternate mounting
platform, be sure to follow all instructions in the documentation
supplied by the platform manufacturer. If improperly installed, the
unit could fall, resulting in damage to the unit or physical injury.
Appendix
page 41
Page 44

DTF521_Manual.fm Page 42 Tuesday, February 28, 2006 10:36 AM
Uninstalling the DTF-521/PL-521
Follow the appropriate procedure below to remove the Wacom tablet software and the DTF-521/PL-521
pen display from your system.
Important: When you remove the Wacom tablet driver software from your system, any other
Wacom tablet connected to your computer will no longer operate with full Wacom tablet
functionality.
Windows XP or XP x64:
1. Click START. In the start menu, select CONTROL PANEL. Then select ADD OR REMOVE PROGRAMS.
2. In the ADD OR REMOVE PROGRAMS window, choose PEN TABLET and click on the CHANGE OR
REMOVE PROGRAMS button. Follow the prompts to remove the pen tablet driver.
3. When the driver has been removed, shut down your system, power off your computer, and turn
off the DTF-521/PL-521. When your computer and the DTF-521/PL-521 are off, disconnect the pen
display from your computer.
Windows 98SE, Me, or 2000:
1. Click the Windows START button. Then choose SETTINGS and CONTROL PANEL.
2. In the CONTROL PANEL window, double-click on the ADD/REMOVE PROGRAMS icon. In the dialog box
that appears, choose the PEN TABLET option.
3. Click on the ADD/REMOVE... button and follow the prompts to remove the pen tablet driver.
4. When the driver has been removed, shut down your system, power off your computer, and turn
off the DTF-521/PL-521. When your computer and the DTF-521/PL-521 are off, disconnect the pen
display from your computer.
Macintosh OS X:
1. From the GO menu, choose APPLICATIONS and open the WACOM TABLET folder.
2. Double-click on the REMOVE PEN TABLET icon and select the REMOVE PEN TABLET SOFTWARE
button. Enter your administrator login name and password.
3. After the removal is completed, click OK.
4. Shut down your computer and turn off the DTF-521/PL-521. When your computer and the
DTF-521/PL-521 are off, disconnect the pen display from your computer.
Appendix
page 42
Page 45

DTF521_Manual.fm Page 43 Tuesday, February 28, 2006 10:36 AM
Product specifications
General specifications
Physical dimensions (W x D x H) 344.0 x 300.0 x 49.0 mm (13.6 x 11.8 x 1.9 in), excluding stand
Weight 4.6 kg (10.1 lb), including stand
Input voltage 12 VDC
Power consumption 23W or less
Operating temperature and humidity 5° to 35° C, 20 to 80% RH (non-condensing)
Storage temperature and humidity -10° to 60° C, 20 to 90% RH (non-condensing)
(maximum storage humidity is 38% at a temperature of 60° C, and
maximum storage temperature is 42° C at a humidity of 90%)
Certification and compliance FCC part 15 class B, CE, EDID 1.3, C-tick, RoHS
LCD monitor
Display a-Si TFT active matrix LCD
Screen size 15.0 in, diagonal
Signal inputs VGA (Analog RGB)
Signal outputs VGA (Analog RGB)
Resolution 1024 x 768 pixels (XGA), 800 x 600 pixels (SVGA),
Refresh rate 45 to 70 Hz (vertical) in XGA mode,
Pixel pitch 0.297 x 0.297 mm (0.012 x 0.012 in)
Color depth 16.2 million (6 bits for RGB + FRC)
Response time (refresh rate) 16 ms (rise and fall)
Brightness
Contrast ratio 500:1
Plug and Play DDC2B
LCD quality Each DTF-521/PL-521 LCD panel is produced under very stringent
640 x 480 pixels (VGA)
45 to 75 Hz (vertical) in other modes
All scan modes are non-interlaced.
2
250 cd/m
quality standards. Production techniques cannot guarantee an
absolutely perfect TFT display. Wacom does not allow any pixel to be
always white or always black. A small number of pixels (4 or less) are
allowed to show a wrong color for some parts of the color spectrum.
This does not mean the display is defective.
(typical)
Appendix
page 43
Page 46

DTF521_Manual.fm Page 44 Tuesday, February 28, 2006 10:36 AM
Pen tablet
Reading technology Electromagnetic resonance method
Active area 304.1 x 228.1 mm (11.98 x 8.99 in)
Resolution 20 lpmm (0.05 mm) (508 lpi (0.002 in))
Accuracy ±0.5 mm (0.02 in)
Reading height 5 mm (0.2 in)
Maximum report rate 100 points/sec.
Pressure levels 512 levels
Communication interface USB v2.0
Integrated USB hub USB v2.0
Powered hub with two external ports, 500 mA per port
Power adapter
Input voltage 100 to 240 VAC, 50/60 Hz
Output voltage 12 VDC, 3.33 A
Pen (model FP-320)
Pressure levels 512
Pen tip travel 0.2 mm (0.008 in) or less
Physical dimensions (L x D) 147.5 x 12.5 mm (5.81 x 0.49 in)
Weight 12 g (0.42 oz), approximately
Side switch type Rocker switch
Purchasing parts and accessories
To purchase parts and accessories, refer to the Wacom pen display Read Me file and see who to call for
your region. You can also do the following:
To purchase parts and accessories in the USA or Canada, call 1.888.884.1870 (toll-free) or visit
Wacom’s web site at http://www.wacomdirect.com (USA only).
To purchase parts and accessories in Europe, call +49 (0)180 500 03 75 or send an email to
parts@wacom-europe.com. Or, visit the Wacom web site at www.wacom-europe.com/solutionstore.
You can also contact your local dealer, distributor, or Technical Support using the appropriate number
for your region.
To purchase parts and accessories in other countries, please contact your local dealer or
distributor.
Appendix
page 44
Page 47

DTF521_Manual.fm Page 45 Tuesday, February 28, 2006 10:36 AM
Radio and television interference
The equipment described in this manual generates, uses, and can radiate radio-frequency energy. If it is not
installed and used properly – that is, in strict accordance with applicable instructions – it may cause interference
with radio and television reception.
Federal Communications Commission (FCC) notice
This device complies with Part 15 of the FCC Rules. Operation is subject to the following two conditions: (1) this
device may not cause harmful interference, and (2) this device must accept any interference received, including
interference that may cause undesired operation.
This equipment has been tested and found to comply with the limits for a Class B digital device, pursuant to Part 15
of FCC Rules. These limits are designed to provide reasonable protection against harmful interference in a
residential installation.
This equipment generates, uses and can radiate radio frequency energy and, if not installed and used in
accordance with the instructions, may cause harmful interference to radio communications. However, there is no
guarantee that interference will not occur in a particular installation.
You can determine whether the equipment is causing interference by powering it off. If the interference stops, it
was probably caused by the equipment.
If the equipment does cause interference to radio or television reception, you may be able to correct the
interference by using one or more of the following measures:
• Rotate the television or radio antenna until the interference stops.
• Move the equipment farther away from the television or radio.
• Plug the equipment and computer into an outlet that is on a different circuit from the television or radio.
If necessary, consult your Wacom dealer or an experienced radio/television technician for help.
Changes or modifications to this product not authorized by Wacom could void the FCC Certification and negate
your authority to operate the product.
CE declaration
The DTF-521/PL-521 pen display has been tested and found to comply to the following harmonized European
Norms:
• EN 55024: 1998+A1:2001+A2:2003 (electromagnetic immunity)
• EN 55022: 1998+A1:2000+A2:2003, Class B (electromagnetic emissions)
• EN 61000-3-2: 2000, Class D (electromagnetic emissions)
• EN 61000-3-3: 1995+A1:2001 (electromagnetic emissions)
The Wacom power adapters have been tested by their manufacturers and found to comply to the following
harmonized European Norms:
• EN 55024: 1998+A1:2001 (electromagnetic immunity)
• EN 55022: 1998+A1:2000, Class B (electromagnetic emissions)
• EN 61000-3-2: 2000, Class D (electromagnetic emissions)
• EN 61000-3-3: 1995+A1: 2001 (electromagnetic emissions)
• EN 60950: 2000 (safety)
Based on the results of these tests, Wacom declares that the above mentioned device conforms to the European
Council Directive 89/336/EEC, and their amendment Directive 93/68/EEC and indicates this conformity by the
CE-sign on each device.
The device must be installed and operated always in strict accordance to the instructions given in this manual.
Any changes or modifications to this product that were not specifically authorized by Wacom will invalidate this
declaration.
Appendix
page 45
Page 48

DTF521_Manual.fm Page 46 Tuesday, February 28, 2006 10:36 AM
Warranty
(Worldwide, Except for Europe, Africa and Middle East)
Limited Warranty
Wacom warrants the product, to the original consumer purchaser, except for the Software and consumable items
such as the pen nibs, to be free from defects in materials and workmanship under normal use and service for a
period of two (2) years, from the date of original retail purchase, as evidenced by a copy of the receipt and
registration with Wacom by mail or online within 30 days of purchase.
The Software is licensed “as is.” Wacom makes no warranty with respect to its quality or performance.
Wacom cannot guarantee you uninterrupted service or the correction of any errors.
Upon discovery of a defect in the product, except in the Software, within the Warranty Period, you should contact
Wacom Technical Support via telephone, email, or fax to obtain an RMA (Return Merchandise Authorization)
number and instructions for shipping the product to a service location designated by Wacom. You should send the
product, shipping charges prepaid, to the designated service location, accompanied by the return authorization
number, your name, address and telephone number, proof of purchase date, and a description of the defect.
Wacom will pay for return shipping by United Parcel Service or by an equivalent service as chosen by Wacom.
Wacom’s sole obligation and entire liability under this warranty shall be, at Wacom’s option, either the repair or
replacement of the defective product or parts thereof of which Wacom is notified during the Warranty Period;
provided, however, that you are responsible for (i) the cost of transportation of the product to the designated
service location and (ii) any loss or damage to the product resulting from such transportation.
Wacom shall have no responsibility to repair or replace the product if the failure of the product has resulted from
accident, abuse, misuse, negligence, or unauthorized modification or repair, or if it has been handled or stored
other than in accordance with Wacom’s storage instructions.
Any descriptions, drawings, specifications, samples, models, bulletins, or similar material, used in connection with
the sale of the product, shall not be construed as an express warranty that the product will conform or comply with
your requirements.
EXCEPT FOR THE LIMITED WARRANTY DESCRIBED ABOVE, THERE ARE NO OTHER WARRANTIES MADE
BY WACOM ON THIS PRODUCT. NO ORAL OR WRITTEN INFORMATION OR ADVICE GIVEN BY WACOM, ITS
DEALERS, DISTRIBUTORS, AGENTS, OR EMPLOYEES SHALL CREATE A WARRANTY OR IN ANY WAY
INCREASE THE SCOPE OF THIS WARRANTY, AND YOU MAY NOT RELY ON ANY SUCH INFORMATION OR
ADVICE. THIS WARRANTY GIVES YOU SPECIFIC LEGAL RIGHTS, AND YOU MAY ALSO HAVE OTHER
RIGHTS WHICH VARY FROM STATE TO STATE.
WACOM LIMITS THE DURATION OF ANY LEGALLY IMPLIED WARRANTIES INCLUDING IMPLIED
WARRANTIES OF MERCHANTABILITY OR FITNESS FOR A PARTICULAR PURPOSE, TO THE DURATION OF
WACOM’S EXPRESS WARRANTY. SOME STATES DO NOT ALLOW LIMITATIONS ON HOW LONG AN
IMPLIED WARRANTY LASTS, SO THE ABOVE LIMITATION MAY NOT APPLY TO YOU.
NEITHER WACOM NOR ANYONE ELSE WHO HAS BEEN INVOLVED IN THE CREATION, PRODUCTION, OR
DELIVERY OF THIS PRODUCT SHALL BE LIABLE FOR ANY DIRECT, CONSEQUENTIAL, OR INCIDENTAL
DAMAGES (INCLUDING DAMAGES FOR LOSS OF BUSINESS PROFITS, BUSINESS INTERRUPTION, LOSS
OF BUSINESS INFORMATION AND THE LIKE) ARISING OUT OF THE USE OF OR INABILITY TO USE SUCH
PRODUCT, EVEN IF WACOM HAS BEEN ADVISED OF THE POSSIBILITY OF SUCH DAMAGES. SOME
STATES DO NOT ALLOW THE EXCLUSION OR LIMITATION OF INCIDENTAL OR CONSEQUENTIAL
DAMAGES, SO THE ABOVE LIMITATION OR EXCLUSION MAY NOT APPLY TO YOU.
In the event that any of the above limitations are held unenforceable, Wacom’s liability for any damages to you or
any party shall not exceed the purchase price you paid, regardless of the form of any claim.
This Limited Warranty is governed by the laws of the United States of America and the state of Washington.
This Limited Warranty is valid for and only applies to products purchased and used inside the United States (and its
territories or possessions) and Canada.
Appendix
page 46
Page 49

DTF521_Manual.fm Page 47 Tuesday, February 28, 2006 10:36 AM
Warranty Service in the U.S.A. and Canada
To obtain Warranty service within the U.S. or Canada contact:
Wacom Technical Support
Phone: 1.360.896.9833
Fax: 1.360.896.9724
E-mail: http://www.wacom.com/productsupport/email.cfm
support@wacom.com
Warranty Service Outside of the U.S.A. and Canada
For products purchased or used outside of the United States and Canada, upon discovery of a defect in the
product, except in the Software, within the Warranty Period you should contact your local dealer or distributor. If an
authorized Wacom repair center is not available in your local country you will be responsible for all transportation
costs including duties and taxes to and from the Wacom repair center. In all other respects the terms of the
warranty as set forth above apply to such sales.
Should you have any questions about this Agreement, or if you desire to contact Wacom for any reason, please
contact in writing:
In North and South America contact:
Wacom Technology Corporation
1311 SE Cardinal Court
Vancouver, Washington 98683
U.S.A.
Appendix
page 47
Page 50

DTF521_Manual.fm Page 48 Tuesday, February 28, 2006 10:36 AM
License and Warranty
(Europe, Africa and Middle East)
Software License Agreement
Important Notice to Customers
This product contains copyrighted computer programs (“software”) which are the inalienable intellectual property of
Wacom Europe GmbH (“Wacom”). This software is both integrated within the product and also contained on the
accompanying data carrier. The purchase of this product from your dealer does not include Wacom's software and
the associated rights of usage. Wacom grants you, the user, the right to use the software solely in accordance with
the conditions of this software license agreement. By purchasing this product you agree to the terms of this
license.
Entitlement to Use the Software
Wacom grants the customer a personal, non-exclusive license to use the software solely in combination with this
product and for the proper operation of this product. This license may be transferred only in connection with this
product.
The use of this software includes solely the permanent or temporary, complete or partial copying of the software by
means of loading, displaying, executing, transmitting or saving for the purpose of executing the commands and
data it contains or of observing, examining or testing the functions of the software.
The customer may not license, lease or loan the software to a third party, nor allow a third party to access the
software in any other way. The customer may not without prior written authorization from Wacom copy, modify,
transmit or edit the software, apart from the actions of copying necessary to create a backup copy and for the
purposes outlined in section 2 above.
The customer may not decompile the software; if the software contains interfaces to software which is not supplied
by Wacom, Wacom shall make the necessary information available to the customer upon request, provided that the
customer can prove his/her entitlement to use the software and that he/she agrees to pay the copying and postage
costs.
Limited Warranty
Wacom warrants to you as the original end-user that the product hardware is free from defects in materials and
workmanship under normal use and service for a period of TWO (2) YEARS after the date of purchase (excluding
consumable items such as the pen nibs), provided that they are unused at the time of such purchase. Wacom
further warrants to you the accompanying data media against defects in materials and workmanship for a period of
SIX (6) MONTHS after the date of purchase.
The Software is licensed and distributed “AS IS”. Wacom makes no warranties, expressed or implied, with respect
to its quality, performance, merchantability and fitness for a particular purpose (including related manuals and
documentation). Wacom cannot guarantee you uninterrupted service or the correction of any errors.
Upon discovery of a defect in the product, except in the Software, within the applicable Warranty Period, you should
return them in the original packaging to the place of your original purchase, together with your name, address,
telephone number, a description of the problem and a copy of the original invoice. You are responsible for any loss
or damage to the product resulting from such transportation. Wacom’s sole obligation and entire liability under this
warranty shall be, at Wacom’s option, either the repair or the replacement of product or parts thereof that prove
defective and that were returned within the applicable Warranty Period.
Appendix
page 48
Page 51

DTF521_Manual.fm Page 49 Tuesday, February 28, 2006 10:36 AM
Wacom shall have no responsibility to repair or replace the product if (a), in the opinion of Wacom, the failure of the
product has resulted from accident, abuse, misuse, negligence, misapplication, or unauthorized modification or
repair, or (b) the product has been handled or stored other than in accordance with Wacom’s storage instructions,
or (c) the failure is due to normal wear and tear, or (d) you fail to fulfill your obligations as described above.
In case that any claim presented under warranty is found upon investigation to be either outside the duration or the
scope of this warranty, or in case that the product is found to be not defective, then the cost of such investigation
and repair shall be borne by you.
Any descriptions, drawings, specifications, samples, models, bulletins, or similar material, used in connection with
the sale of the product, shall not be construed as an express warranty that the product will conform or comply with
your requirements.
Should any provision of this agreement be declared invalid, that provision shall be treated as separate from the
agreement, and the agreement shall remain in force without limitation in all other respects.
If this product is found to be defective, the purchaser may be entitled to institute legal proceedings against the
seller on grounds of liability for deficiency. The statutory rights indicated with regard to the seller are not limited in
any way by this warranty. Rather, this warranty affords the purchaser rights in addition to those indicated in the
present text.
This limited warranty shall apply if the seller's corporate domicile is in the European Union or in Iceland, Norway,
Jersey, Switzerland, Russia, the Ukraine, Rumania, Bulgaria, Croatia, Serbia, Tunisia, Turkey, Syria, the Lebanon,
Jordan, Israel, Egypt, the United Arab Emirates, Iran or South Africa.
This Limited Warranty and Liability is governed by the laws of the Federal Republic of Germany.
Should you have any questions about this Agreement, or if you desire to contact Wacom for any reason, please
contact in writing:
Wacom Europe GmbH
Europark Fichtenhain A9
47807 Krefeld
GERMANY
Appendix
page 49
Page 52

DTF521_Manual.fm Page 50 Tuesday, February 28, 2006 10:36 AM
(This page intentionally left blank.)
Appendix
page 50
 Loading...