

Page 1
Contents
Index
1
User’s manual
Wacom Tablet (CTH-471, CTH-671)
Setting up your tablet
Customizing your tablet
Customize your pen experience
Caring for Your tablet
Troubleshooting
Product information
Technical support options
Contents Index
1
Page 2

Contents
Index
2
One by Wacom User’s Manual
Version 1.2, Rev H3013
Copyright © Co., Ltd., 2013
All rights reserved. No part of this manual may be reproduced except for your express personal use.
reserves the right to revise this publication without obligation to provide notification of such changes.
does its best to provide current and accurate information in this manual. However, reserves the right to change any
specifications and product configurations at its discretion, without prior notice and without obligation to include such
changes in this manual.
The above year indicates when this manual was prepared. However, the date of release to the users of the “manual” is
simultaneous with the introduction into the market of the applicable product.
Wacom is a registered trademark of Wacom Co., Ltd.
Adobe and Photoshop are either registered trademarks or trademarks of Adobe Systems Incorporated in the United
States and/or other countries. Microsoft, Windows, and Vista are either registered trademarks or trademarks of
Microsoft Corporation in the United States and/or other countries. Apple, the Apple logo, and Mac are trademarks of
Apple, Inc., registered in the U.S. and other countries.
Any additional company and product names mentioned in this documentation may be trademarked and/or registered
as trademarks. Mention of third-party products is for information purposes only and constitutes neither an
endorsement nor a recommendation. assumes no responsibility with regard to the performance or use of these
products.
Contents Index
2
Page 3

Contents
Index
3
TABLE OF CONTENTS
ABOUT THE MANUAL 4
GETTING STARTED 5
Your Pen tablet 5
Pen 6
Pen holder 6
SETTING UP YOUR TABLET 7
Ergonomics 7
Configuring tablet orientation 8
Working with multiple monitors 9
Control panel basics 9
USING YOUR TABLET 10
The pen experience with the tablet 11
Using the pen on the tablet 11
Positioning 12
Clicking 13
Dragging 13
Using the pen buttons 14
Writing and drawing with pressure sensitivity 15
Erasing 16
Eye-hand coordination exercise 17
Customizing pen input 17
Technical support options 38
Obtaining driver downloads 39
Product information 39
Ordering parts and accessories 39
APPENDIX 40
Caring for your tablet 40
Replacing the pen nib 41
Uninstalling 42
Managing preferences 43
Pen and digital ink capabilities in Windows 44
Product information 45
Ordering parts and accessories 46
Available accessories 46
GLOSSARY 47
Wacom international offices 49
CUSTOMIZING YOUR TABLET 18
Opening the control panel 18
Control panel overview 19
Customize your pen experience 20
Setting the tip and eraser feel, and
double-click distance 21
Setting the pen button functions 22
Setting the tablet mapping 23
Portion of screen area 25
Portion of tablet area 25
Setting the pen speed in mouse mode 26
Customizing tablet Orientation 27
Working with Display Toggle 28
Button functions 29
Testing your tablet 33
Tes ti ng a pen 33
Troubleshooting 34
General problems 34
Pen input problems 34
Windows-specific problems 36
Mac-specific problems 36
Contents Index
3
Page 4
Contents
top ic
Contents
Index
Index
4
ABOUT THE MANUAL
This manual provides quick access to information about your tablet. The information is common to
Windows and Mac computers and Windows screen captures are shown, unless otherwise noted.
• Go directly to table of contents
• Use the navigation controls to move through the manual.
Go to topic Go to front page.
Go to table of contents. Page back, or page forward.
Go to index. Go back to previous view.
• You can use your .pdf viewer zoom-in tool to increase the size of the manual on your display screen.
Most .pdf viewers include additional tools for using and printing the manual. See the viewer application
help for more information.
MALL CAPITAL LETTERS are used to identify the names of keyboard keys, dialog boxes, and control panel
•S
options.
• Be sure to see also the Important Product Information guide for the tablet, located on the tablet
Installation CD. The guide includes product safety precautions, specifications, and your license
agreement.
• The following information is not included with this product: information about your specific computer
hardware or operating system, or information about your application software. Your best source for this
information is the set of manuals and discs that came with your hardware, operating system, or
application.
• In addition to the built-in inking support found within Microsoft Windows 8, Windows 7 and Vista, many
graphics applications also support pressure sensitivity and the pen eraser. You can find a listing of
applications that support these features on Wacom’s website (see product information
• For information on how best to use tablet features within a specific application, see the instructions in
that application’s manuals.
or index topics by clicking on them.
).
Note: This manual does not describe how to install your tablet. Please refer to your product Quick Start
Guide, and use the automated software installer (located on the tablet Installation CD).
Wacom’s philosophy is to continually improve all of its products. As a result, engineering changes and
improvements are made from time to time. Therefore, some changes, modifications, and improvements
may not be covered in this manual.
Contents Index
4
Page 5
Contents
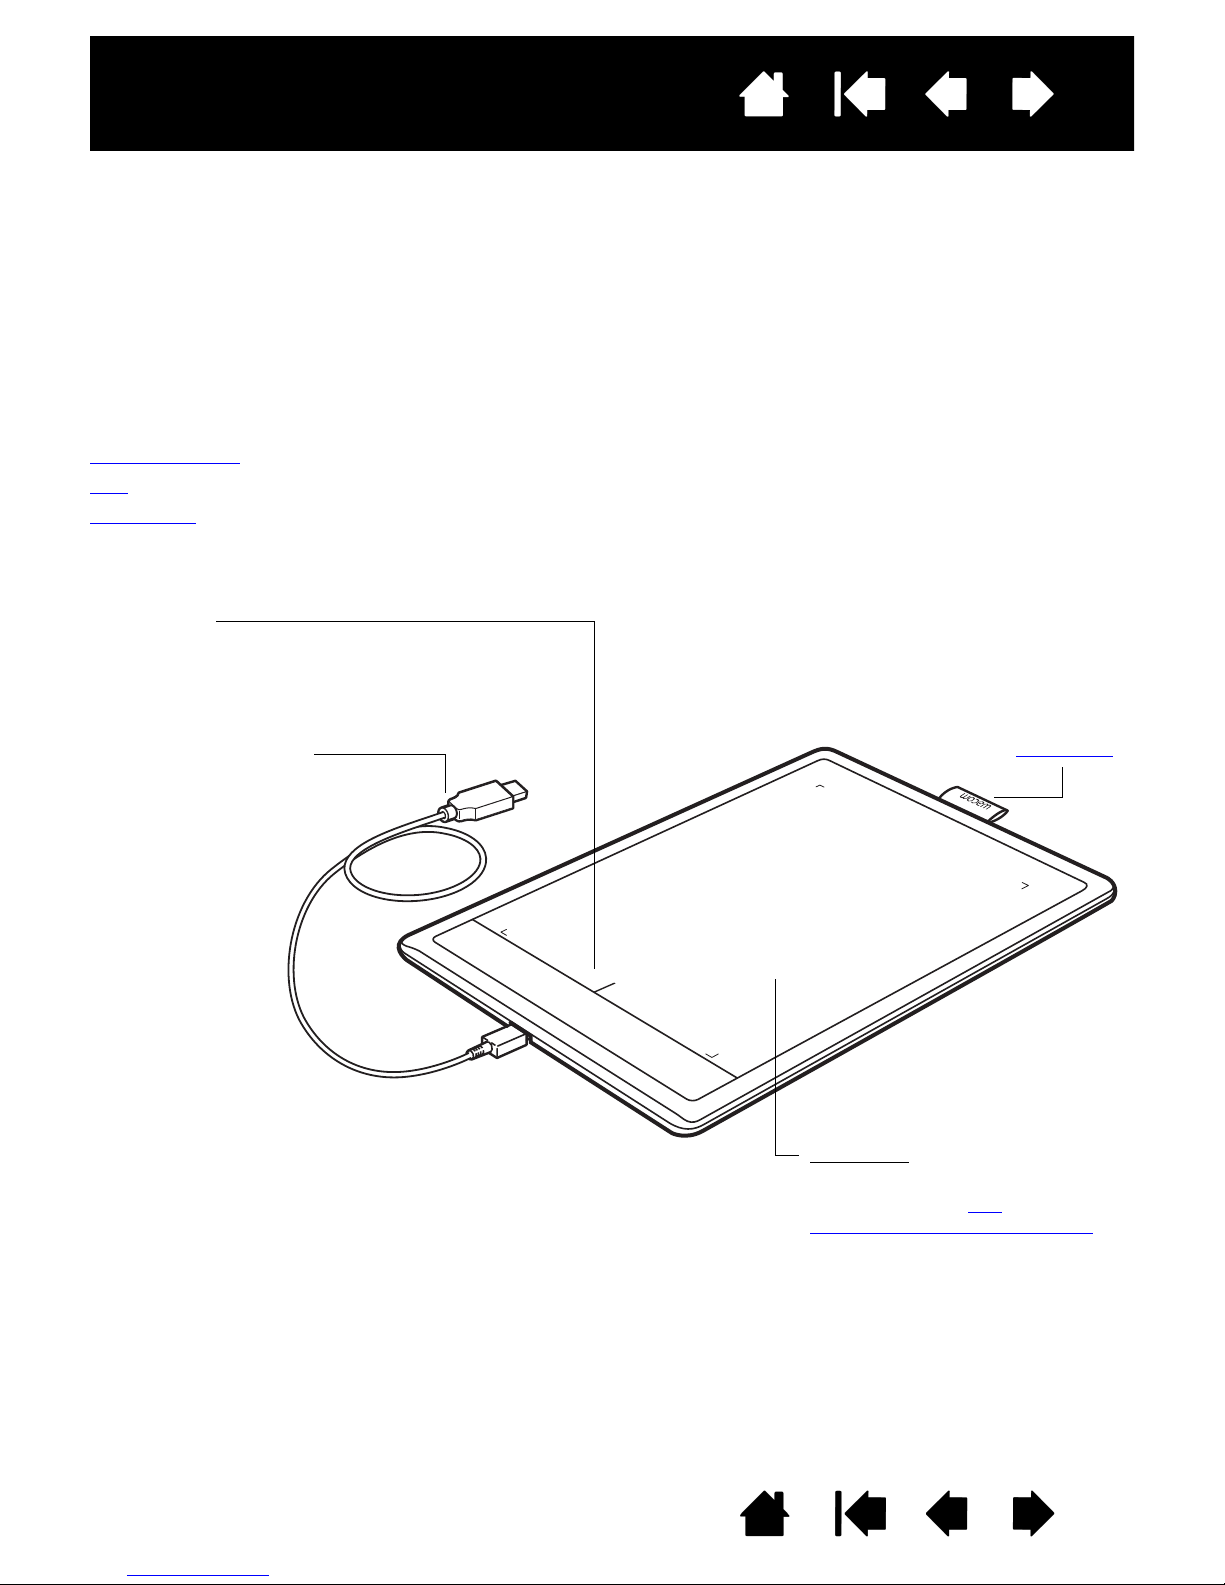
USB cable, detachable
Disconnect the USB
cable when storing the
tablet. Do not wrap the
cable around the tablet.
Status LED
Glows blue when the tablet is connected to an active
USB port.
Brightens when using the pen.
Pen holder
Active area
This is the active area for pen input.
Learn about your pen
and
Customize your pen experience
.
Index
5
GETTING STARTED
This section introduces you to your tablet, and helps you become familiar with its appearance and features.
• Not all product models are available in all regions.
• Your tablet can only be used with compatible pens or input devices. Wacom cannot guarantee
compatibility with older tablets or pens. You cannot use pens or input devices from a previous version
of the tablet. A pen from your new tablet cannot be used with other tablets.
Your Pen tablet
Pen
Pen holder
YOUR PEN TABLET
Contents Index
5
Page 6
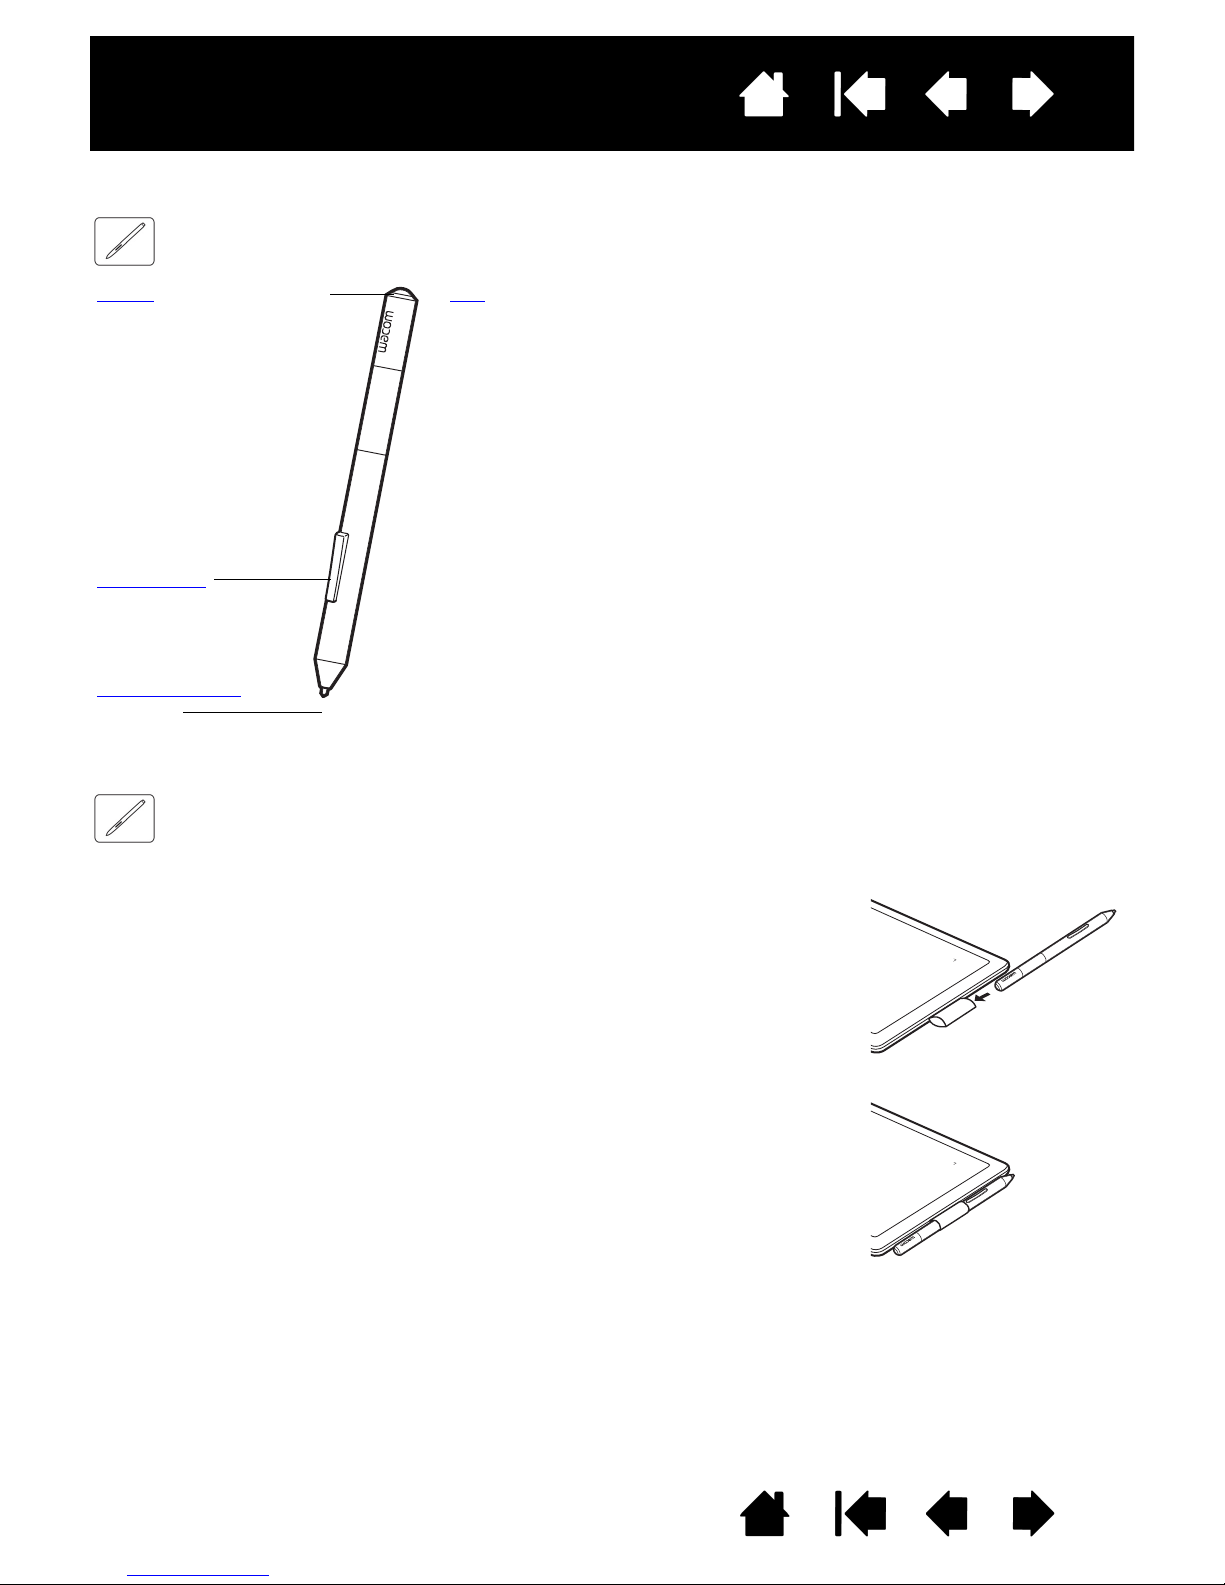
PEN
Eraser (when equipped)
Pen buttons
Replaceable nib
(pen tip)
Pen
Cordless, battery-free, and pressure sensitive. Use this freehand tool for
image editing and creating natural-looking pen strokes. It is also an efficient
tool for document annotation and taking notes in applications that support
handwriting recognition.
You will find the pen ideally suited to enhance your workflow by enabling the
pen and digital ink features found within Microsoft Windows 8, Windows 7,
Vista, and Office 2007 or later. Take advantage of digital mark-up for
collaborative editing and use digital ink to take notes in applications that
support handwriting recognition.
Important: When not in use, place the pen in the pen holder or
lay it flat on your desk. When equipped, the eraser end of the
pen should be inserted first into the loop. To maintain the
sensitivity of your pen, do not store it in a container where it
will rest on the tip or eraser.
Leaving the pen on the tablet may interfere with screen cursor
positioning when using other pointing devices, or may prevent your
computer from going to sleep.
• Insert the eraser end of the pen into the loop.
• Do not wedge the pen buttons inside the loop. Doing so may cause the
buttons to be continually depressed and possibly fail.
Important: You can also lay the pen flat on your desk. Leaving the pen
on the tablet may interfere with screen cursor positioning when using
other pointing devices, or may prevent your computer from going to
sleep.
Do not store the pen in a holder or stand other than the one provided
with your tablet or purchased from Wacom. The pen may be damaged if
it falls out of an unsuitable stand. The sensitivity of your pen may be
affected if stored in a container where it rests on the tip or eraser.
Contents
Index
6
PEN HOLDER
When not in use, store the pen in the pen holder.
Contents Index
6
Page 7
Contents
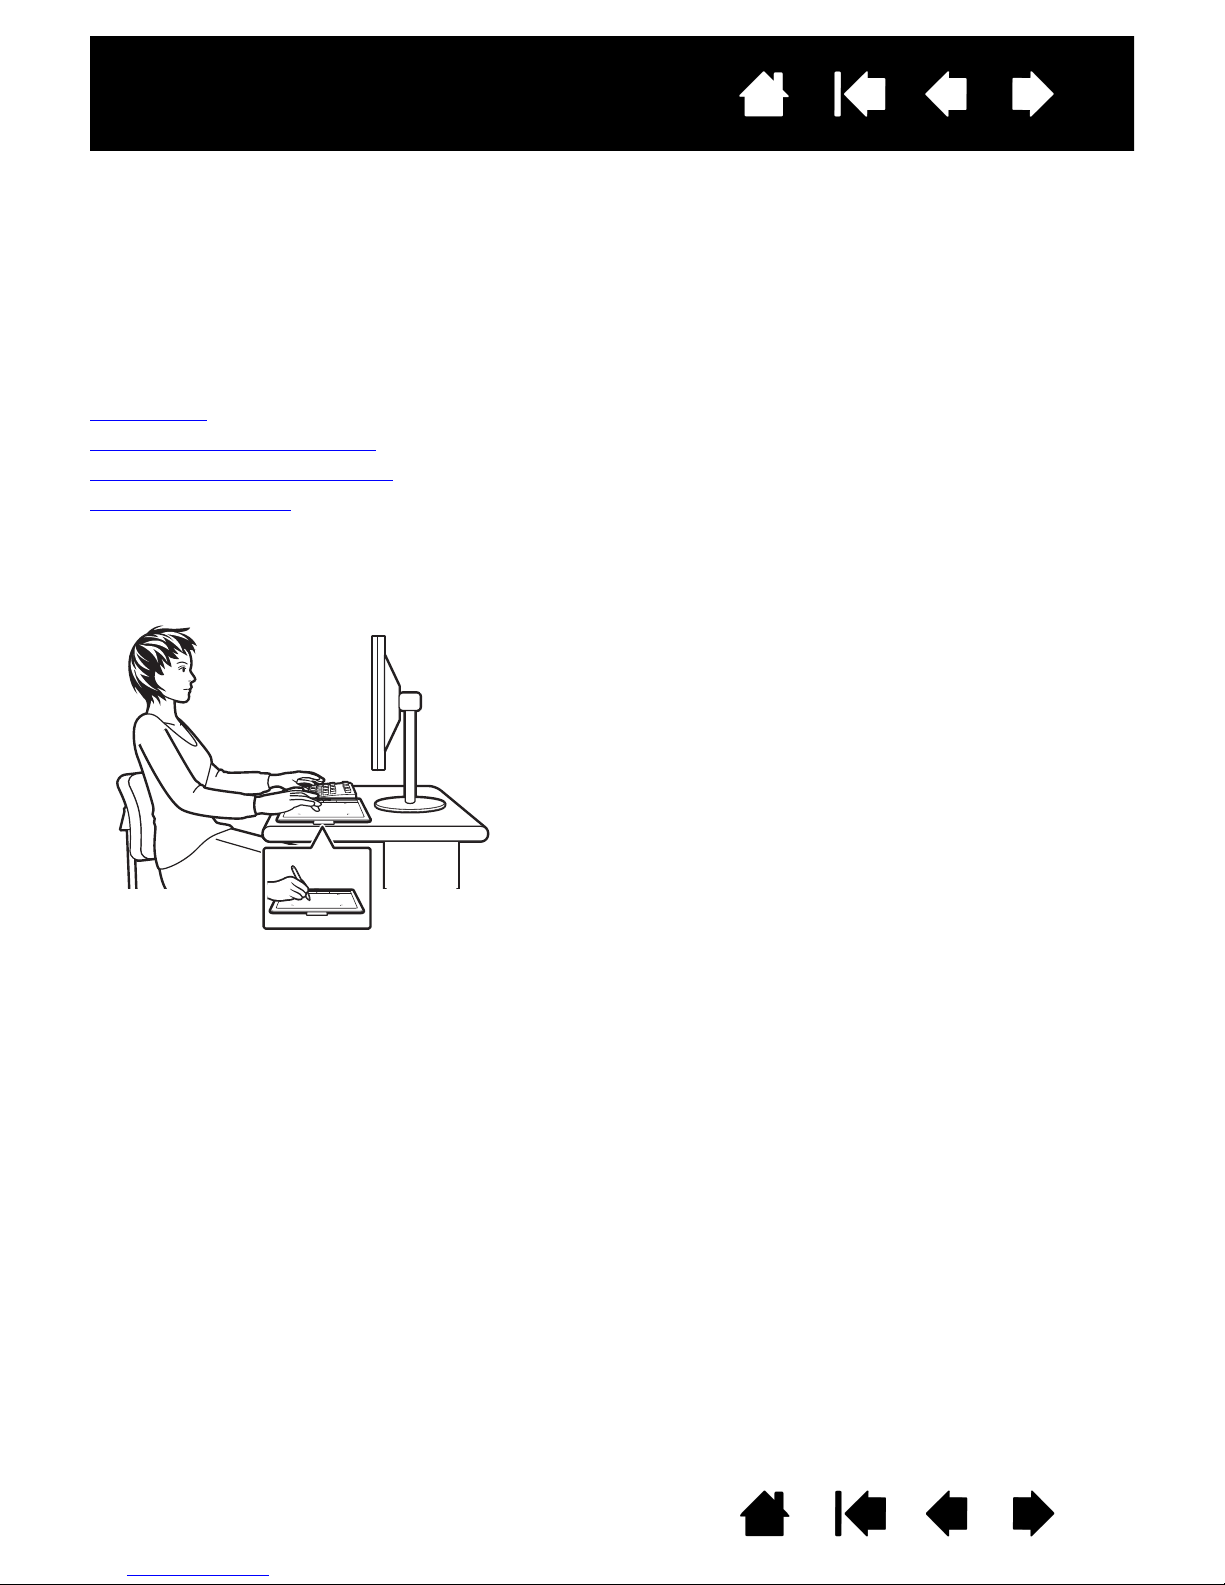
• Maintain a good posture at all times.
• Use a gentle grip when working with the pen.
• Periodically shift your gaze from your computer and focus on
other objects in the room. This will help to relax your eyes.
• Take short breaks between tasks to stretch and relax your
muscles.
• Alternate tasks and tools throughout the day. Minimize awkward
postures and repetitive movements that cause discomfort.
• Change your position if you feel any discomfort due to your work
position.
• If you are using the tablet as a primary pointing device and mouse
replacement, try placing it to the side of the keyboard nearest to
your dominant hand (for example, to the right of the keyboard if
you are right-handed).
• If you are using the tablet primarily as a creative tool, try placing
the tablet below the keyboard, centered with respect to your
monitor.
Index
7
SETTING UP YOUR TABLET
To minimize fatigue, comfortably organize your work area. Position your tablet, pen, and keyboard for easy
access without unnecessary reaching. Adjust your monitor so you can view it comfortably with minimum
eyestrain. For best results, position the tablet so the screen cursor follows the same direction as your hand
movements on the tablet.
Ergonomics
Configuring tablet orientation
Working with multiple monitors
Control panel basics
ERGONOMICS
Note regarding RSI: Wacom makes no representation, promise or guarantee that Wacom products will cure or
prevent, in whole or in part, mouse-induced repetitive stress symptoms, injuries or conditions. Individual results
may vary. Always obtain competent medical advice to determine the most appropriate treatment for your
specific situation.
Contents Index
7
Page 8
Contents
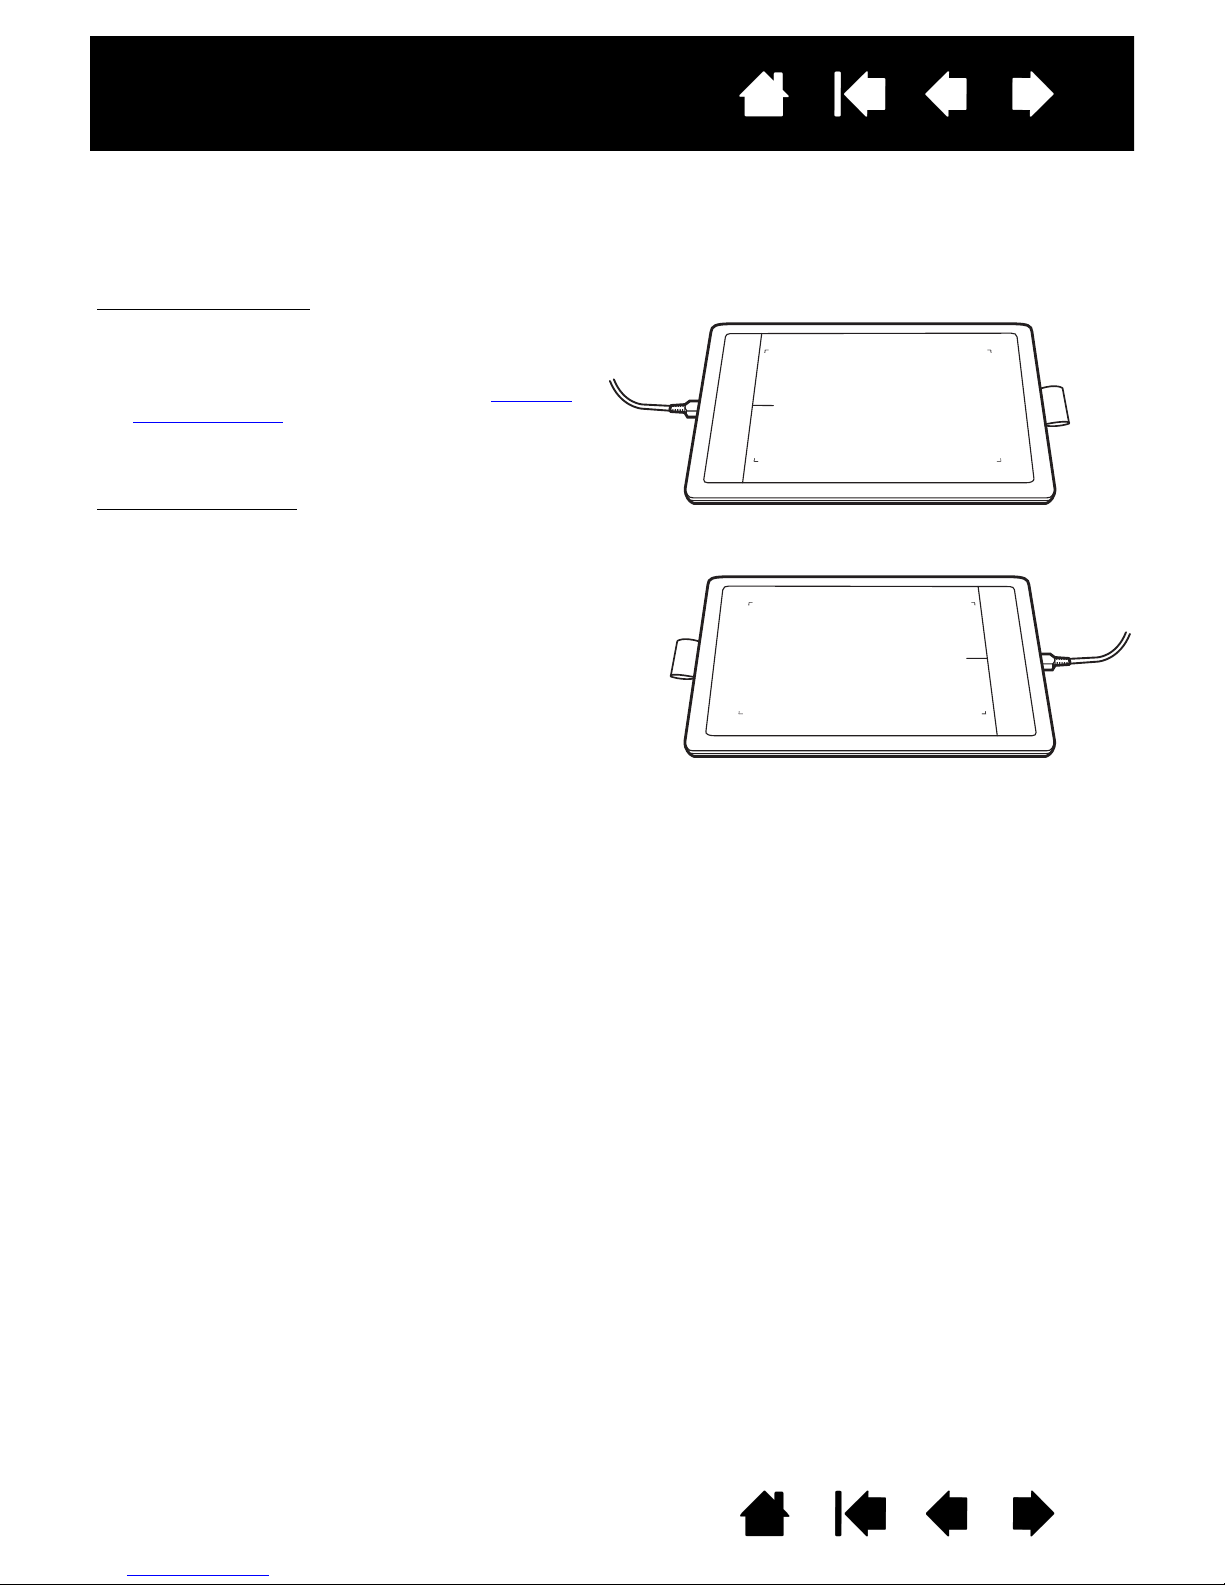
Right-handed operation:
• Open the tablet control panel and select the
T
ABLET tab. Choose RIGHT HANDED. The tablet
driver automatically configures all aspects of the
tablet for correct right-handed use. See Opening
the control panel
• Physically rotate your tablet.
Left-handed operation
:
• Open the tablet control panel and select the
T
ABLET tab. Choose LEFT HANDED. The tablet
driver automatically configures all aspects of the
tablet for correct left-handed use.
• Physically rotate your tablet.
Index
CONFIGURING TABLET ORIENTATION
When you first installed the tablet, you were prompted to choose a default tablet orientation. The
orientation you chose was used to determine the tablet default settings. However, you can easily
reconfigure the tablet for left- or right-handed users at any time.
8
Note: This procedure does not affect the default orientation. At the system log on and user switching
screens, the tablet uses the default orientation you chose during the install process. To change the
default orientation, you must re-install the tablet driver.
Contents Index
8
Page 9
Contents
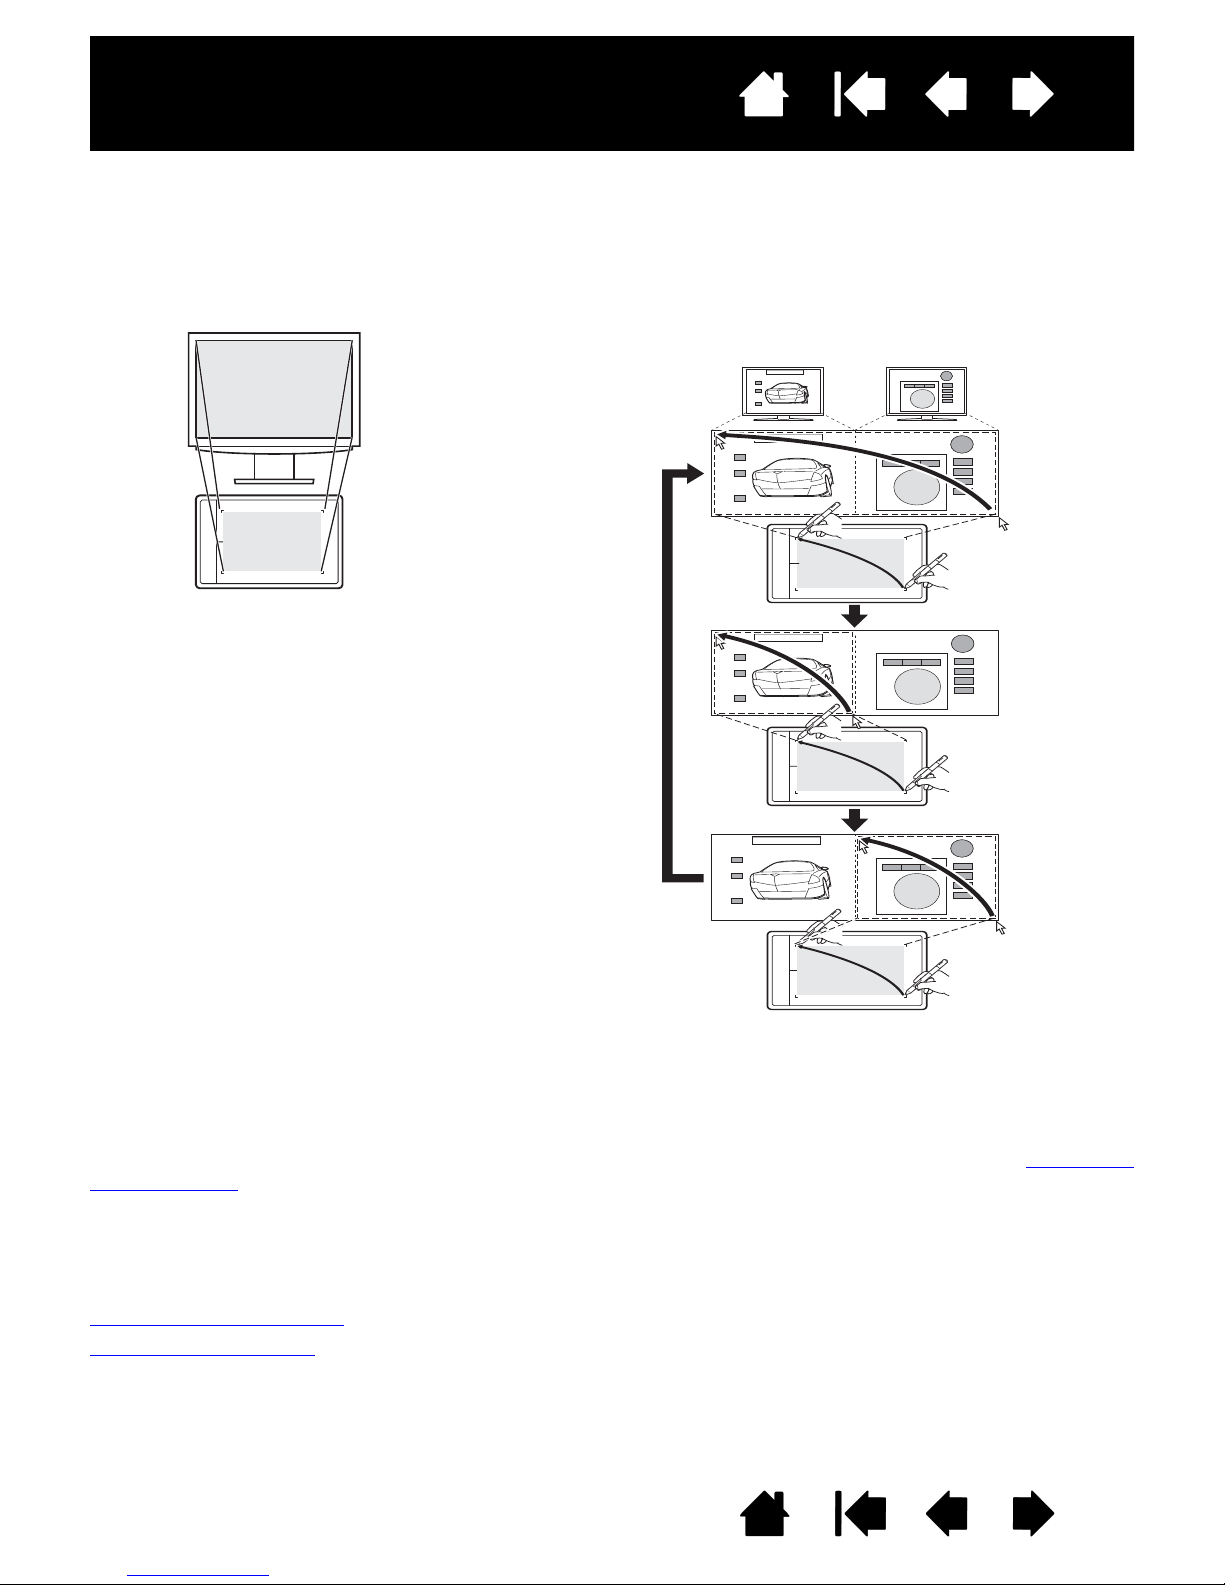
Monitor 1
Monitor 2
Example of tablet mapping to the
entire system desktop, which is
displayed on two monitors.
Example of tablet
mapping to a single
monitor.
Index
9
WORKING WITH MULTIPLE MONITORS
If your computer is equipped with more than one monitor, the tablet will map to your monitors based upon
how they are configured in the display properties control panel.
• If more than one monitor is in use and you are in extended monitor mode, the tablet maps to all
monitors as if they were one large display.
• If your monitors are in mirror mode (both monitors display the same content), the tablet maps to the
entire space on each monitor and the screen cursor is displayed on each monitor simultaneously.
See your hardware and operating system documentation for details on configuring your computer and
operating system for use with multiple monitors.
You can customize the tablet to map to a single monitor, or to a portion of the monitor area. See setting the
tablet mapping.
CONTROL PANEL BASICS
After mastering the basics of using your tablet, you may want to customize the way your pen input works.
The tablet control panel is where you customize your tablet settings.
Opening the control panel
Control panel overview
Contents Index
9
Page 10
Contents
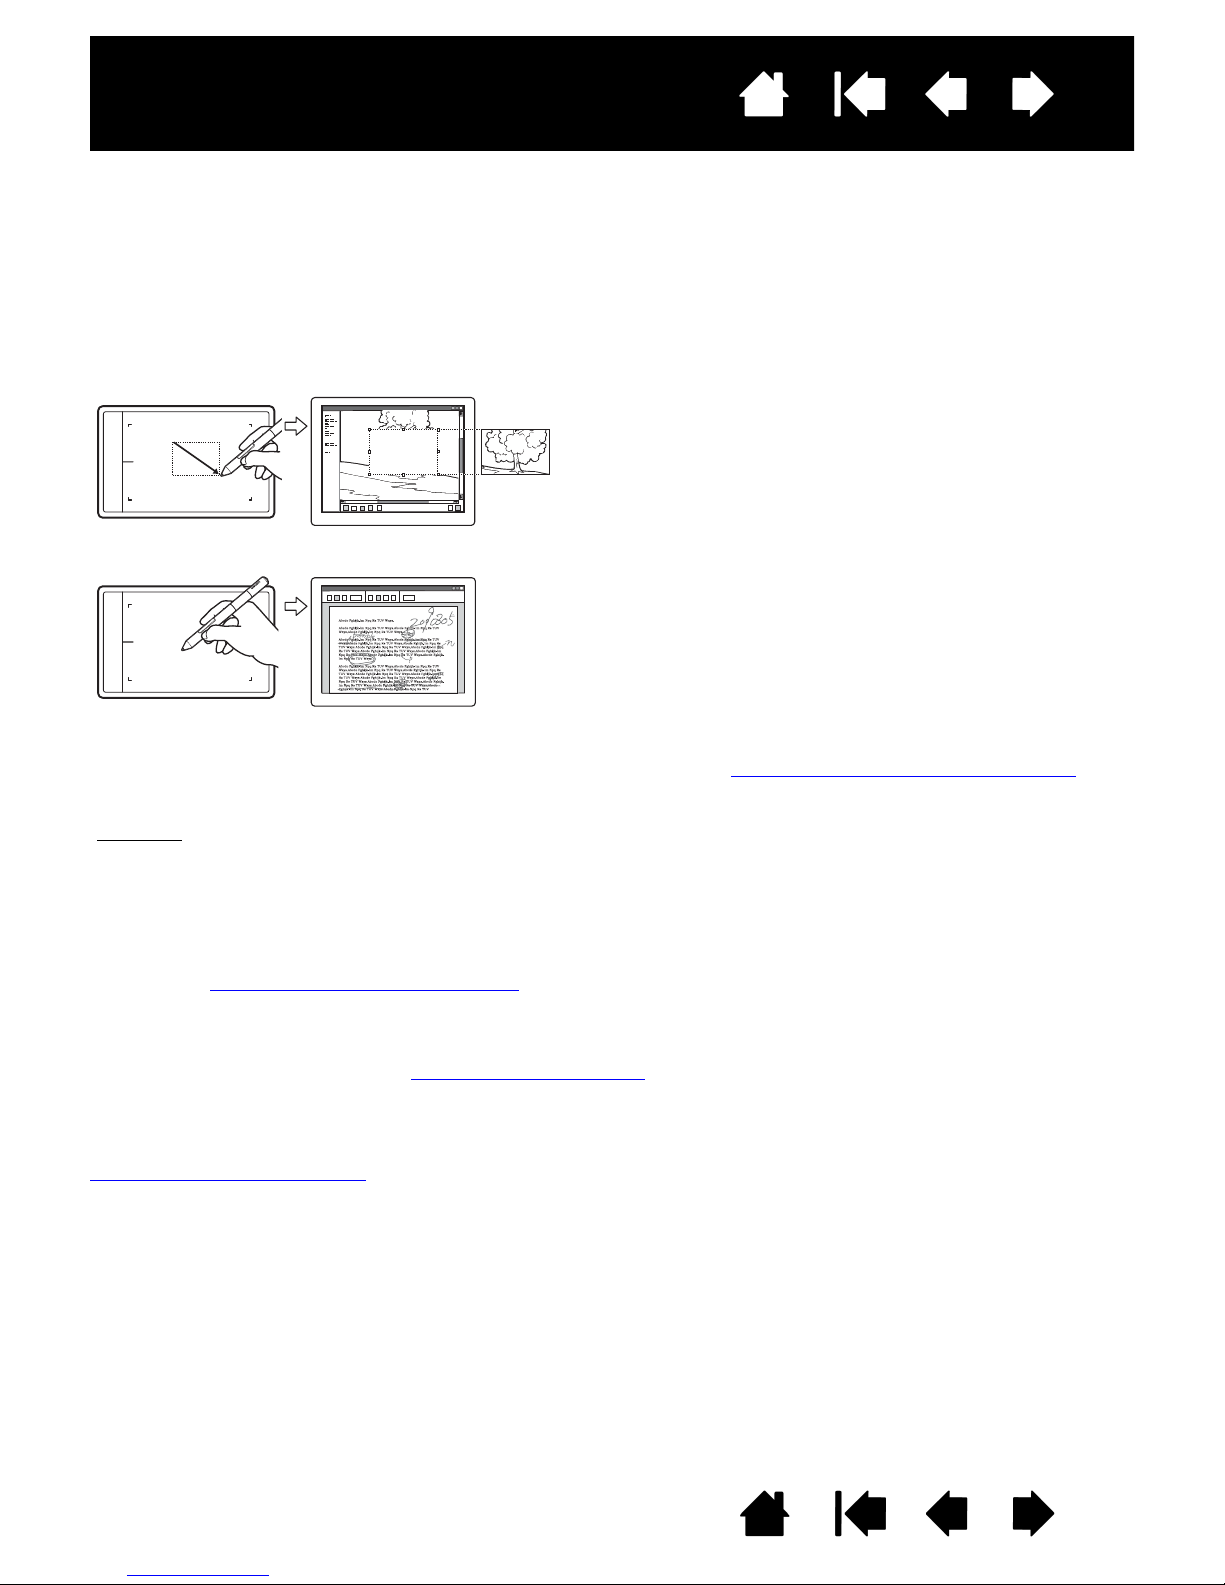
Annotation
Simplify document reviews by using the pen to
digitally mark-up and annotate documents.
Photo editing
Use the pressure-sensitive pen to edit images
within a photo or image editing application.
Pen input
The pen works only on the active area of the tablet.
Wherever you place the pen on the tablet, the screen pointer will jump
to the corresponding point on the screen. The screen pointer indicates
pen position, and follows the movement of the pen across the tablet
surface.
Learn about The pen experience with the tablet
.
Note: The active area is a mapped representation of your computer
screen(s). By default it uses the entire screen or all screens if you
have multiple displays. You can customize the mapping
relationship for pen input by setting the tablet mapping
.
Index
USING YOUR TABLET
If you are new to using the tablet, read the following sections.
As you work, you will discover many ways of interacting with your tablet. For example:
10
For details on these and other ways to work with your tablet, see The pen experience with the tablet.
.
Working with Display Toggle
Contents Index
10
Page 11

Contents
Position for drawing and navigation
Position for erasing
When you are not using the pen, store
it in the pen holder
. When equipped,
the eraser end of the pen should be
inserted first into the loop.
Index
11
THE PEN EXPERIENCE WITH THE TABLET
Your tablet is designed to enhance the way you work. Tablet models equipped for pen input enable you to
interact with a computer using the pen on the active area of the tablet.
Using the pen on the tablet
Customizing pen input
Working with Display Toggle
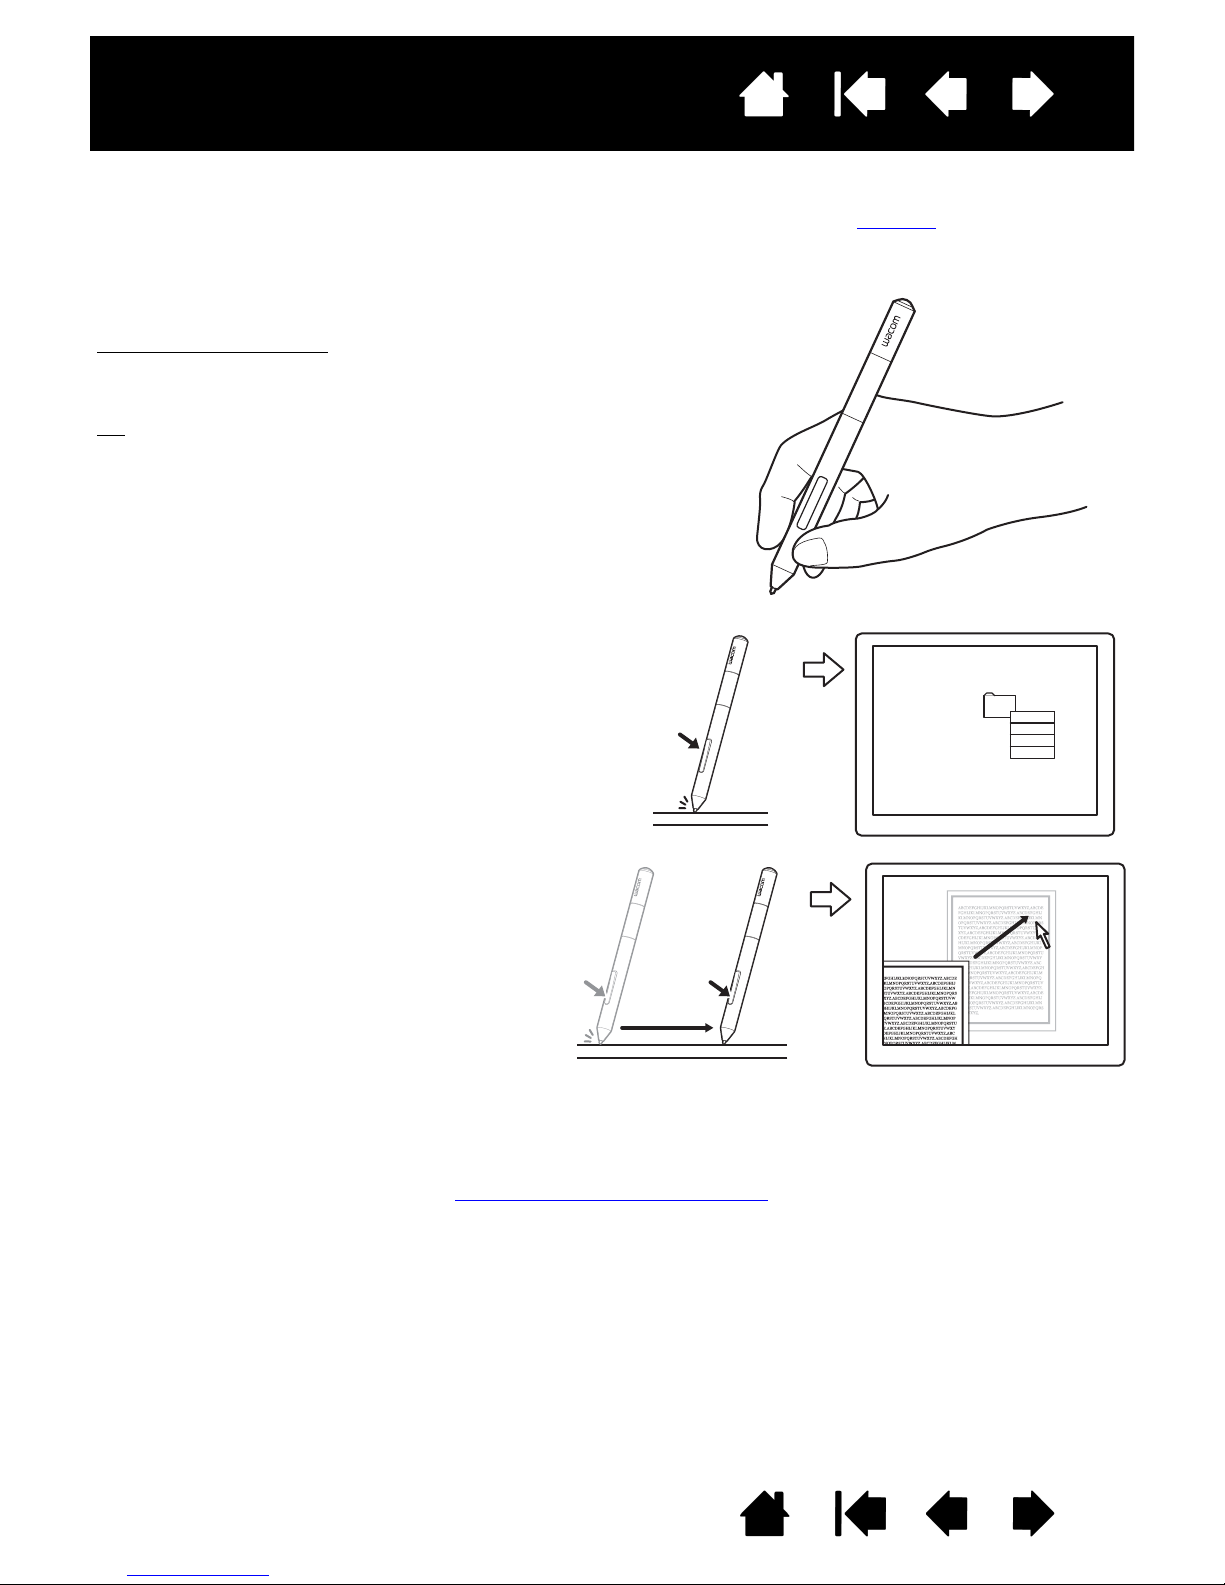
Hold the pen like you would hold a normal pen or pencil. Make sure the pen buttons are in a convenient
location where you can toggle them with your thumb or forefinger, but not accidentally press them while
drawing or positioning with the pen. Tilt the pen in any way that feels most comfortable.
Important: When not in use, place the pen in the pen holder or lay it flat on your desk. To maintain
the sensitivity of your pen, do not store it in a container where it will rest on the tip or eraser. Leaving
the pen on the tablet may interfere with screen cursor positioning when using other pointing
devices, or may prevent your computer from going to sleep.
USING THE PEN ON THE TABLET
There are four basic techniques for using the pen: positioning, clicking, double-clicking, and dragging. If
you are unfamiliar with using the pen, try the exercises on the following pages.
Positioning
Clicking
Dragging
Using the pen buttons
Writing and drawing with pressure sensitivity
Erasing
Eye-hand coordination exercise
Contents Index
11
Page 12
Contents
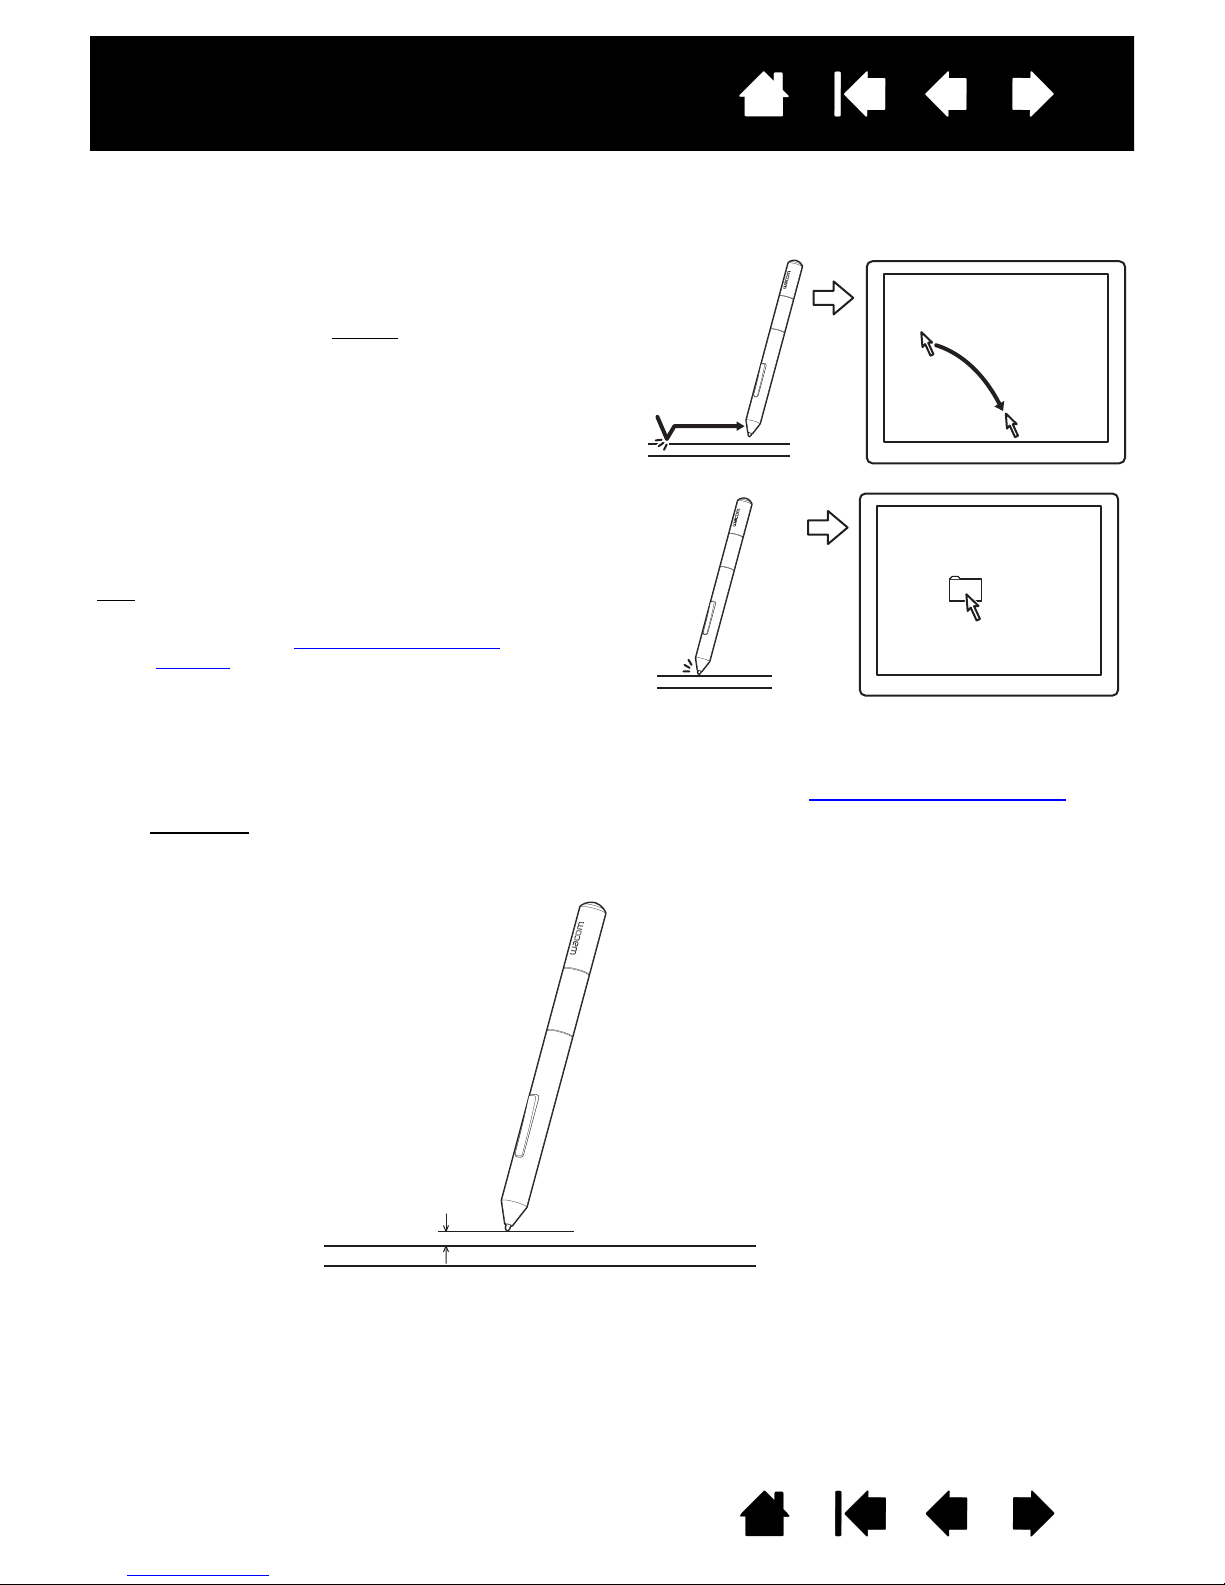
Lift the pen and place the pen tip on the tablet
active area. The cursor jumps to the new location.
Move the screen cursor by hovering the pen over
the tablet surface. Do this without
touching the
tablet surface, but while still keeping the pen tip
within proximity of the tablet.
To select an icon or folder, use your pen to position
the screen cursor over the object. Press down to
select.
Tips
:
If you find using a pen to be somewhat
difficult, try the eye-hand coordination
exercise.
Pointing is easier when you orient the tablet
square to the computer monitor so the
screen cursor follows the same direction as
your hand movements on the tablet.
7 mm (0.28 inch) proximity
16 mm (0.63 inch) proximity range
When positioning the screen cursor and operating a pen
button, the pen tip needs to be within 7 mm (0.28 inch)
of the tablet surface. The pen tip does not need to touch
the tablet in order to move the screen cursor or use a
pen button.
Index
POSITIONING
Use the pen to position the pointer (or cursor) on your screen.
12
You can set the pen to position the screen cursor two different ways (see setting the tablet mapping
• In pen mode
, wherever you place the pen on the tablet, the screen cursor will jump to a corresponding
point on the display screen. The screen pointer indicates pen position, and follows the movement of the
pen across the tablet surface. This is the default setting for the pen.
• In mouse mode, move the cursor with a “pick up and slide” motion similar to using a mouse.
).
Contents Index
12
Page 13
Contents
Tip: Configure Windows to select when hovering the pen over an icon and to launch the icon with a single click.
To turn on this feature, first open a folder.
Windows 8, Windows 7 and Vista
: From the ORGANIZE pull-down menu choose FOLDER AND SEARCH
O
PTIONS.... From the GENERAL tab select SINGLE-CLICK TO OPEN AN ITEM (POINT TO SELECT).
Windows XP
: From the TOOLS pull-down menu choose FOLDER OPTIONS.... From the GENERAL tab select
S
INGLE-CLICK TO OPEN AN ITEM (POINT TO SELECT).
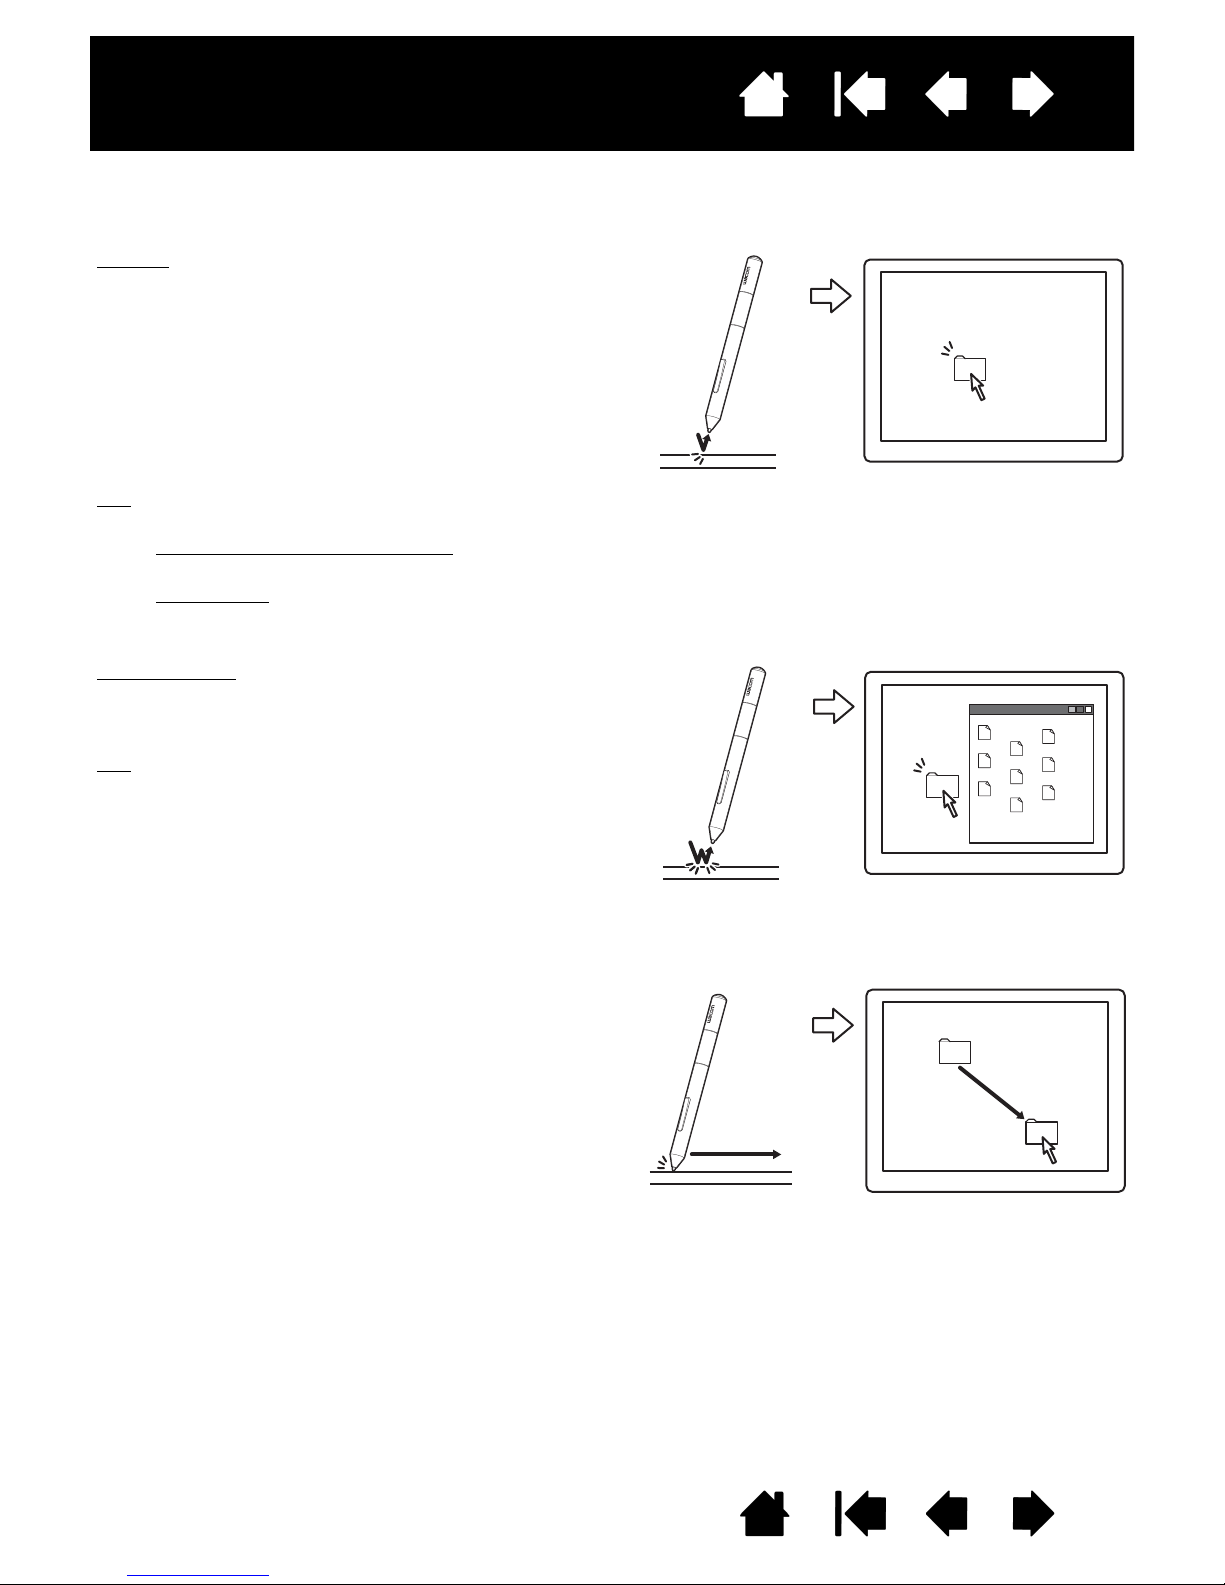
Clicking
. Tap the pen tip once on the tablet, or press the pen
tip on the tablet with enough force to register a click. Try
clicking on a folder icon by moving the screen cursor over
the icon and pressing down on the pen tip. The folder
should highlight when you press.
If C
LICK SOUND is selected in the tablet control panel and
your computer speakers are on, then you will hear a “click”
sound when the pen tip is pressed hard enough to generate
a button click. Adjust your speaker volume as necessary.
Double-clicking
. Quickly tap the tablet twice in the
same place with the pen tip. This is like clicking
twice with a mouse button. Try double-clicking on a
folder icon to open it.
Tip:
Set a pen button to DOUBLE CLICK. This is
easier than tapping twice with the pen tip,
and is the preferred method of doubleclicking with a pen.
First point to an object. Then press the pen tip to
the tablet and slide it across the tablet surface. The
selected object will move across the display
screen.
To select text within a document, move the screen
cursor to the beginning of a text line. Then drag the
pen across the tablet to highlight the text.
Index
CLICKING
Click to highlight or select an item on the screen. Double-click to open it.
13
DRAGGING
Dragging is used to select and move objects on the monitor screen.
Contents Index
13
Page 14
Contents
The default button positions are:
Tip
: Set a pen button to DOUBLE CLICK. This is easier than tapping
twice with the pen tip.
Upper: R
IGHT CLICK
Lower: PAN/SCROLL
PAN/SCROLL lets you position a document or
image in any direction within the active
window simply by pressing the pen button and
moving the pen tip across the tablet. As you
move the pen tip, the document or image is
repositioned to follow the direction of pen
movement on the tablet. Release the pen
button or lift the pen tip from the tablet surface
when done.
In some application windows the document
will precisely follow the screen cursor as you
move the pen tip. In others it will simply move
in the same general direction as the screen
cursor.
Use R
IGHT CLICK to bring up application-specific
or icon-specific menus.
Index
14
USING THE PEN BUTTONS
The pen comes equipped with two buttons. Each button has a programmable function that is selected
when you press the button. You can use a pen button whenever the pen tip is within 7 mm (0.28 inch) of the
tablet active area. You do not have to touch the pen tip to the tablet in order to use a button.
To assign new button functions, see setting the pen button functions
Contents Index
.
14
Page 15
Contents
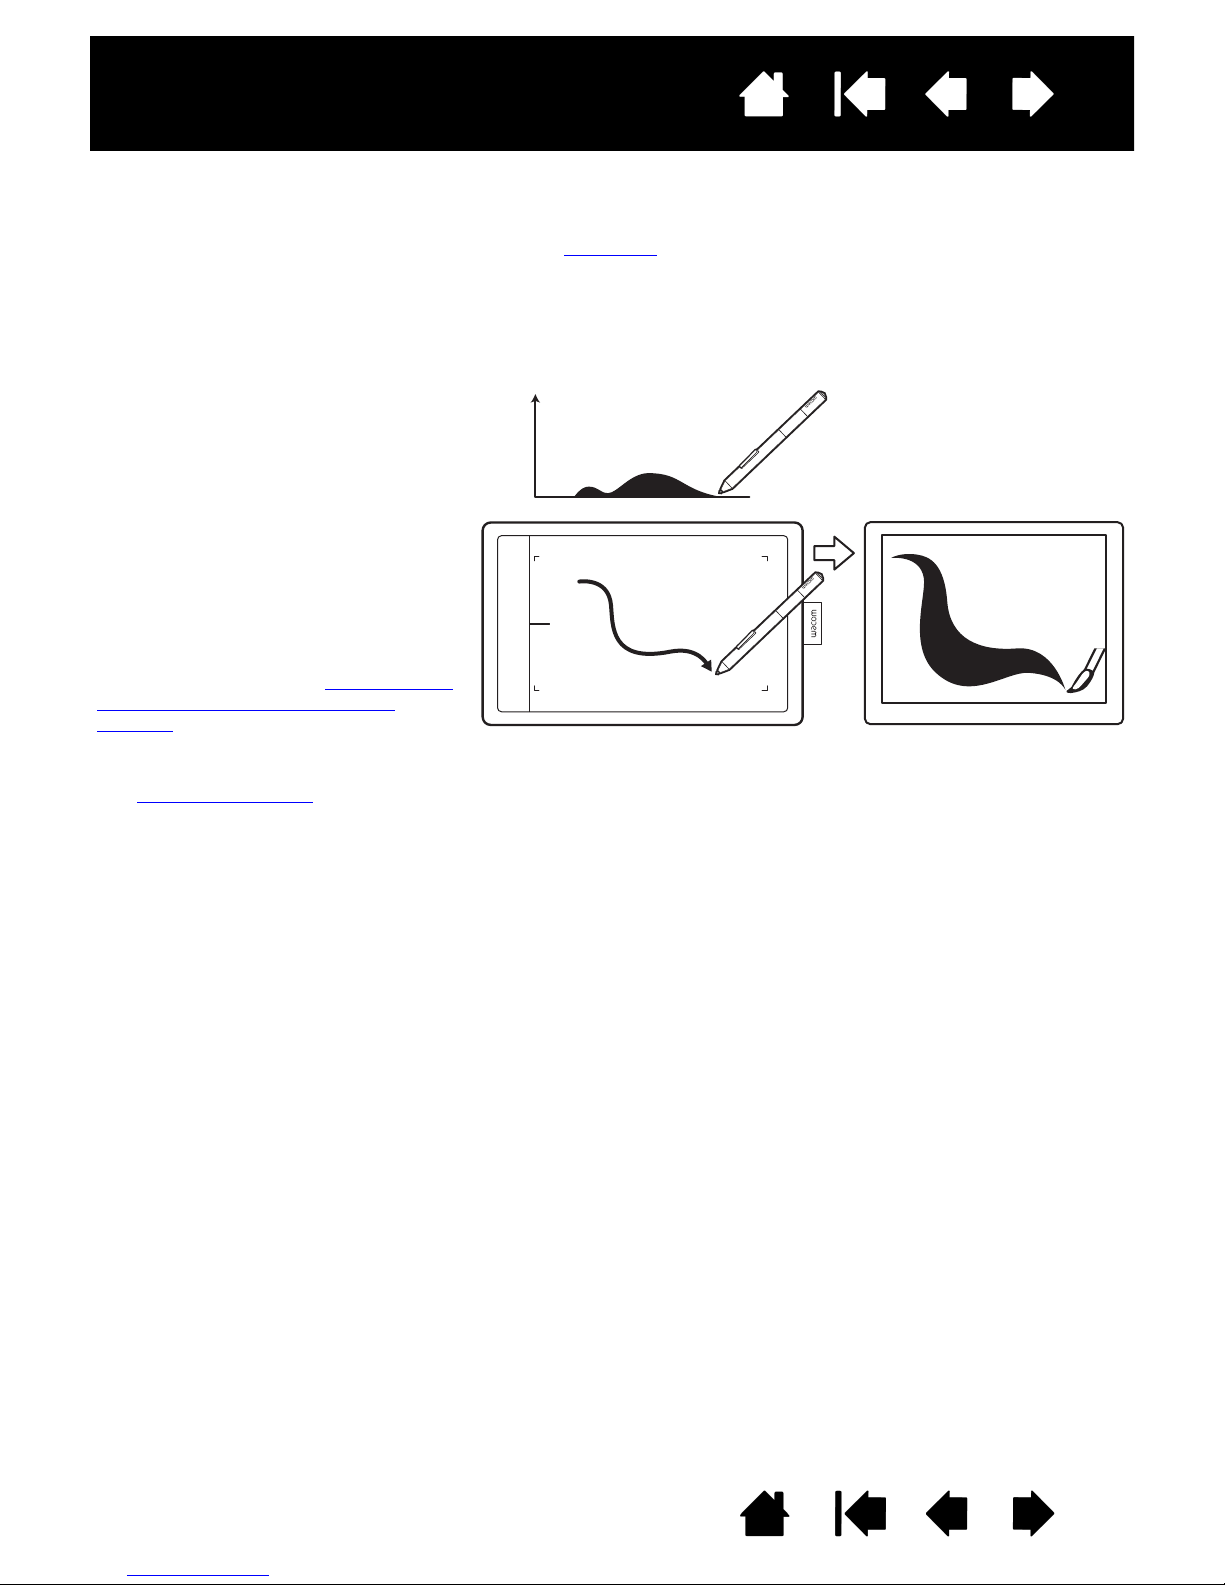
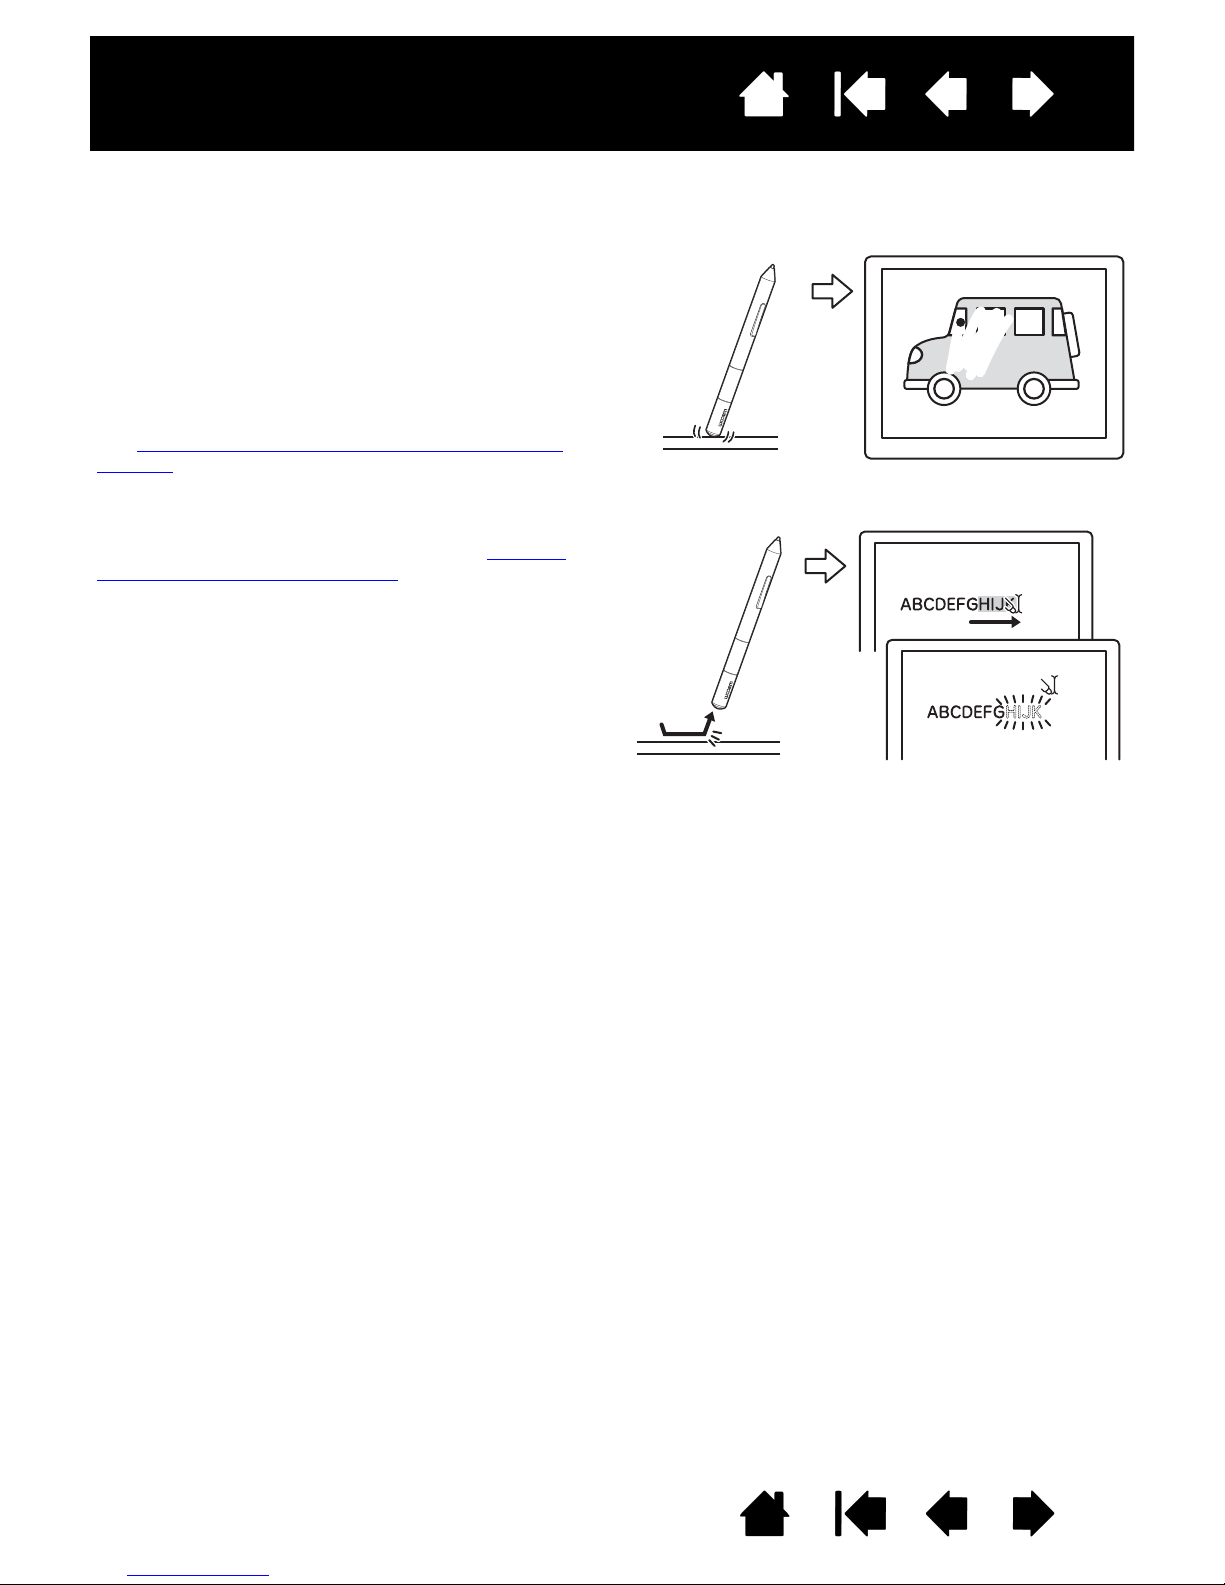
To write, ink, or draw with pressure
sensitivity, move the pen along the
surface of the tablet while applying
various amounts of pressure downward
on the tip of the pen.
• Press hard for thick lines or dense
color.
• Press gently for thin lines or softer
color.
Note that some applications require you
first select a pressure-sensitive tool from
the application tool palette.
To adjust the tip feel, see setting the tip
and eraser feel, and double-click
distance.
Visit the Wacom website to learn about
applications that support pressure.
See product information
.
Index
15
WRITING AND DRAWING WITH PRESSURE SENSITIVITY
The pen responds to your hand movements, enabling you to create natural-looking pen and brush strokes
within applications that support this feature. The digital ink
and Office 2007 or later, as well as the drawing tools in many graphics applications, respond to the
pressure you place on the pen. For example, sliders are used in some applications to vary line
characteristics such as width, color, and opacity. These characteristics can be controlled much better by
the pen’s pressure sensitivity. You can vary line width, blend colors, and change opacity with the pressure
you exert upon the pen.
tools in Microsoft Windows 8, Windows 7, Vista,
Contents Index
15
Page 16
Contents
Use the pen eraser in Windows 8, Windows 7, and
Vista to erase notes or sketches made with Pen and
digital ink capabilities in Windows, and to select and
delete text or spreadsheet cells within an application.
In supporting text applications use the eraser to
select text, then lift the eraser from the tablet to delete
the text.
You can erase intuitively and naturally in graphics
applications that support the pen eraser. When you use
the pen eraser, the application will automatically switch to
the eraser tool.
In applications that support pressure sensitivity, you can
select pressure-sensitive tools in the application tool
palette to vary the width and depth of your erasures as
you change the amount of pressure exerted upon the pen.
See setting the tip and eraser feel, and double-click
distance.
Index
ERASING
The pen eraser (when equipped) works like the eraser on a pencil.
16
Visit the Wacom website to learn about applications that support the eraser. If the eraser is not supported
in an application, you can still use the eraser for positioning, drawing, or annotation.
Contents Index
16
Page 17

Contents
Index
17
EYE-HAND COORDINATION EXERCISE
This exercise is designed to retrain your eye-hand coordination for using the pen:
1. Open any graphics application. Use the line tool to draw a rectangular grid with line spacings of about
20-25 mm (3/4 to 1 inch). You can use a standard mouse to do this.
2. Choose a free-hand tool in your application and use the pen to draw a dot at each grid intersection.
3. Draw an X at each grid intersection.
4. Clear your screen and make a simple drawing of your own. The more you use your pen, the easier
writing, drawing, and navigation will become.
CUSTOMIZING PEN INPUT
You can easily customize the pen. Use the pen to open the tablet control panel. Then select the PEN tab to
choose from the available options.
Opening the control panel
Control panel overview
Customize your pen experience
Contents Index
17
Page 18

Contents
Index
CUSTOMIZING YOUR TABLET
Use the tablet control panel to customize your tablet for the way you like work.
Opening the control panel
Control panel overview
Customize your pen experience
Working with Display Toggle
Button functions
OPENING THE CONTROL PANEL
To open the control panel:
•Windows 8:
Windows 8 Classic Desktop, press the Windows key on your keyboard, or select the Windows icon in
the Charms bar, to access the Start screen.
• Windows 7, Vista and XP
W
ACOM and the WACOM PREFERENCES option.
•Mac
. Open SYSTEM PREFERENCES from the Apple menu, or from the APPLICATIONS folder. Then click on
the W
From the Windows 8 Start screen, click the WACOM PREFERENCES tile. If you are using the
. Click on the Windows START button and choose ALL PROGRAMS. Then select
ACOM TABLET icon.
18
You can begin customizing your tablet after opening the control panel. The control panel displays only
those tabs and options that apply to your tablet model and configuration. See control panel overview
Note: User-specific preferences are supported. After logging on, each user can customize their personal
settings in the tablet control panel. Switching to another user will automatically load the settings for
that user.
.
Contents Index
18
Page 19

Contents
Customizable settings
are found on each tab.
The tabs that apply to
your tablet model and
configuration are
displayed when you
open the control panel.
Displays information about the control panel and driver.
Downloads or
displays the manual.
Resets the selected
tab to its default
settings.
Closes the control
panel.
Index
CONTROL PANEL OVERVIEW
After opening the control panel, you can begin customizing the tablet.
19
Experiment with different settings to find what works best for you. Any changes you make will take effect
immediately. Click D
Tool Tips are available for most control panel items. Position the screen cursor over an item and let it rest
there. The appropriate Tool Tip will pop up in a few moments.
Your keyboard tab and arrow keys can also be used to navigate the control panel.
The following sections provide detailed information about each control panel tab and some of the more
advanced concepts. Many of the sections also contain useful customizing tips.
Customize your pen experience
Button functions
EFAULT to return a tab to the factory settings.
Contents Index
19
Page 20

Contents
Setting the pen button functions
Setting the tip and eraser feel,
and double-click distance
Setting the tablet mapping
Index
20
CUSTOMIZE YOUR PEN EXPERIENCE
You can easily customize the pen. Use the pen to open the tablet control panel. You can then customize
your tablet for the way you like to interact with your tablet and computer when using the pen or eraser
(when equipped).
Note: If you have more than one pen (for example, a standard pen and a premium pen), any changes you
make to the pen settings will apply to both pens.
Contents Index
20
Page 21

Contents
When checked, an
audible “click”
sound will be heard
whenever a pen click
occurs and your
computer speakers
are turned on.
Adjusts the size of
the double-click area
and the double-click
speed. A larger
setting makes
double-clicking
easier.
Customizes the amount
of pressure needed to
click, draw, or ink.
Tips
:
Use a soft T
IP FEEL to reach the full pressure range with a lighter touch.
In some applications a soft pressure setting can make the pen overreact, causing any small press on the pen
to be magnified on the screen. If you experience this, try a firmer T
IP FEEL setting.
To make double-clicking easier, expand the tap area that accepts a double-click (the double-click distance).
A large double-click distance may cause a delay at the beginning of brush strokes in some drawing
applications. This may also cause a delay at the beginning of a drag action or inking stroke. If you notice such
effects, try setting a smaller double-click distance and using a pen button set to double-click (see setting the
pen button functions).
Index
21
SETTING THE TIP AND ERASER FEEL, AND DOUBLE-CLICK DISTANCE
Select the PEN tab. To create broad brush strokes or to click with a light touch, use a soft tip setting. For
maximum control while drawing thin lines, use a firm tip setting. To erase with a broad stroke or to click with
a light touch, use a soft eraser setting (when equipped with eraser). For maximum control while erasing,
use a firm eraser setting.
Contents Index
21
Page 22

Contents
Select the function to perform when
pressing the upper or lower pen button.
The selected function occurs when you
bring the pen tip within 7 mm (0.28 inch) of
the tablet surface without touching the
tablet and then press the upper or lower
pen button.
Tip:
To make double-clicking easier, set a
pen button to double-click
automatically by selecting D
OUBLE
C
LICK.
•Choose H
OVER CLICK to perform click functions without
touching the pen tip to the tablet surface.
•Choose C
LICK & TAP to enable the precise placement of
click functions. When selected, you must first press the pen
button and then touch the pen tip to the tablet surface in
order to perform the click function.
Hover click
Click tap
You can change the SIDE SWITCH MODE to best fit the way you like to use the pen
when making right-clicks or other click functions. Click the A
DVANCED button.
SETTING THE PEN BUTTON FUNCTIONS
Select the PEN tab. Each pen button can be set to simulate a variety of mouse functions.
Index
22
Contents Index
22
Page 23

Contents
TRACKING options control how the screen
cursor moves:
•P
EN MODE sets the cursor movement to
correspond with the position of your
pen on the tablet. Wherever you place
your pen on the tablet, the cursor will
jump to a corresponding point on the
screen. This is known as absolute
positioning, and is the default setting
for the pen.
Click M
APPING... to customize the tablet
mapping.
•M
OUSE MODE enables you to move the
screen cursor with a “pick up and slide”
motion similar to using a standard
mouse.
Click D
ETAILS... to set the pen speed in
mouse mode.
Note: If you frequently switch between pen mode and mouse mode,
you can assign the M
ODE TOGGLE... function to one of your pen
buttons.
Index
23
SETTING THE TABLET MAPPING
Select the PEN tab. The tablet TRACKING options enable you to define the relationship between pen
movement on the tablet surface and cursor movement on the monitor screen.
By default the entire active area of the tablet maps to the entire monitor. If more than one monitor is in use
the tablet will map to all monitors. See working with multiple monitors
.
Contents Index
23
Page 24

Contents
Use the SCREEN AREA options to select a screen
area for tablet to screen mapping.
•A
LL SCREENS. The entire monitor(s) area is
mapped. This is the default setting.
See working with multiple monitors
.
•M
ONITOR. The entire area of a single monitor
that you choose is mapped.
•P
ORTION. A portion of the desktop area is
mapped. Click S
ET... to define the portion of
screen area.
Use the T
ABLET AREA options to select a tablet
area for tablet to screen mapping.
•F
ULL. The entire active area of the tablet is
mapped. This is the default setting.
•P
ORTION. A portion of the tablet area is
mapped. Click S
ET... to define the portion of
tablet area.
Note: Although the tablet is optimized for use
with 16 : 10 aspect ratio displays, the
default settings automatically adjust for
use with other aspect ratio displays.
Returns settings to their factory defaults.
When FORCE PROPORTIONS is
unchecked, the correct scale or
proportions are not maintained.
The selected tablet area is mapped
to the selected display area.
Drawing a circle on the tablet may
create an ellipse on the display
screen. This is the default setting.
When F
ORCE PROPORTIONS is
checked, the correct vertical and
horizontal proportions are
maintained. Drawing a circle on the
tablet results in a circle on the
display screen. Depending on your
settings, some portions of the
tablet active area may no longer be
usable when this option is
selected.
Index
24
In the tablet control panel P
ETAILS dialog box.
D
EN tab, click on the PEN MODE MAPPING... button to display the PEN MODE
Contents Index
24
Page 25

Contents
In the dialog that appears, choose a method for defining a portion of the
display.
• Drag corners of the foreground graphic to select the screen area.
• Select the C
LICK TO DEFINE SCREEN AREA button and move the screen
cursor to select the screen area. Be sure to follow any M
ESSAGE
prompts.
After defining a portion of the screen, you may need to use a different
input device to access other portions of the screen area.
In the dialog that appears, choose a method for defining a portion of the
tablet:
• Drag corners of the foreground graphic to select the tablet area that
will be mapped to your selected screen area.
• Select the C
LICK TO DEFINE TABLET AREA button and use your pen on
the tablet to select the tablet area. Be sure to follow any M
ESSAGE
prompts.
Index
PORTION OF SCREEN AREA
To define which portion of the display screen your tablet will map to, click on the PEN tab PEN MODE
M
APPING... button to display the PEN MODE DETAILS box. Choose SCREEN AREA PORTION and click SET....
25
PORTION OF TABLET AREA
To define the tablet area that will be mapped to the screen area, click on the PEN tab PEN MODE MAPPING...
button to display the P
EN MODE DETAILS box. Choose TABLET AREA PORTION and click SET....
Contents Index
25
Page 26

Contents
Sets the screen cursor
acceleration when in
mouse mode.
Sets the screen cursor
tracking speed when in
mouse mode.
Notes:
The dialog box will also appear when you set a button to M
ODE TOGGLE.... Only one acceleration and speed
setting can be made.
The mouse mode acceleration and speed settings are independent of system settings. Changes you make to
these settings in the tablet control panel do not affect similar system settings. However, changes made to
similar system settings may affect your tablet settings.
Index
26
SETTING THE PEN SPEED IN MOUSE MODE
To change the screen cursor acceleration and speed when using the pen in mouse mode, click on the PEN
tab M
OUSE MODE DETAILS... button. A dialog box will be displayed where you can make your adjustments.
Contents Index
26
Page 27

Contents
Index
CUSTOMIZING TABLET ORIENTATION
Choose the TABLET tab to set the tablet orientation.
ORIENTATION: Change how your tablet is
oriented by selecting R
H
ANDED input. The tablet driver automatically
configures all aspects of the tablet for the
selected option. Next, physically rotate the
tablet to match your selection.
Note: At the system log on and user switching
screens, the tablet will use the default
orientation that was selected when the
driver was installed. If you want to
change the default orientation, you must
reinstall the driver. See configuring tablet
orientation.
IGHT HANDED or LEFT
27
Contents Index
27
Page 28

Contents
The entire display area of a multi-monitor system is set up for
extended mode and assigned to the active area of the tablet.
All monitors are selected in the toggle sequence.
• The base mapping is the tablet and display mapping
defined in the P
EN MODE DETAILS dialog. By default, this
includes all monitors unless you have defined a specific
monitor as your primary monitor.
• As you toggle to the next monitor, the active tablet area
is mapped to that monitor (in pen mode).
• Toggling one more time after the last selected monitor
returns the system to the base mapping.
Any of the following actions will return the toggle sequence
to the base mapping:
• Launching a graphics application that supports pressure
sensitivity.
• Logging out of or rebooting the system.
• Switching users (Fast User Switching).
• Placing the system in sleep mode.
• Changing the P
EN MODE DETAILS settings.
• Changing the resolution or number of displays on your
system.
•Using the M
ODE TOGGLE... function.
Index
28
WORKING WITH DISPLAY TOGGLE
Display Toggle is available when working on multiple monitor systems. This feature allows you to work with
your tablet on all displays or on one display at a time. See working with multiple monitors
.
Contents Index
28
Page 29

Contents
Customize your tablet for the way you like to work. Simply
use the tablet control panel to change the button function that
is assigned to a pen button, Button function options may
vary, depending on your tablet model.
BUTTON FUNCTIONS
Index
29
FUNCTION DESCRIPTION
C
LICKS
•CLICK Simulates a primary mouse button click. Default setting for the pen tip.
IGHT CLICK Simulates a right mouse button click, which displays a context menu.
•R
•M
IDDLE CLICK Simulates a middle mouse button click.
•D
OUBLE CLICK Simulates a double-click. For easier double-clicking, use this function
instead of tapping twice with the pen tip.
•C
LICK LOCK Simulates holding down the primary mouse button. Press the tool
button once to initiate click lock. Press the button again to release click
lock. Click lock is useful for dragging objects or selecting blocks of
text.
TH CLICK Simulates a 4th mouse button click.
•4
•5
TH CLICK Simulates a 5th mouse button click.
ACK Simulates the BACK command in browser applications.
B
F
ORWARD Simulates the FORWARD command in browser applications.
E
RASE Pen only. Sets a button so that when the button is pressed, the pen tip
will act like the eraser (when equipped) in applications that support the
E
RASE function. See erasing.
Contents Index
29
Page 30

Contents
Clears the keystroke entry box.
Deletes only the last entry
in the keystroke entry box.
Choose one or more modifier key options.
Choose a C
LICKS option to simulate
pressing a button of the selected type on
a mouse.
Index
FUNCTION DESCRIPTION
K
EYSTROKE... Enables you to simulate keystrokes. Select this option to display the
EFINE KEYSTROKE dialog box.
D
Enter a keystroke or keystroke combination in the K
EYS entry box.
Keystroke combinations can include letters, numbers, function keys
(such as F3) and modifier keys (such as S
Windows, or
SHIFT, OPTION, COMMAND, and CONTROL for Mac). You can
HIFT, ALT, or CTRL for
also choose special keystrokes or keystroke combinations from the
DD SPECIAL pull-down menu.
A
After defining a keystroke or keystroke sequence, click OK.
Important: Because the E
NTER (Windows) and RETURN (Mac)
keys can be selected as a defined keystroke, they cannot be
used to select OK. You must use your pen to click on the OK
button.
Enter a name for the keystroke definition. The name will be displayed
with the respective control.
30
M
ODIFIER... Enables you to simulate modifier key(s) (such as SHIFT, ALT, or CTRL for
To learn which keystroke shortcuts are supported by a particular
application, see the documentation that came with the application.
Windows, or
SHIFT, OPTION, COMMAND, and CONTROL for Mac). Many
applications use modifier keys to constrain the size or placement of
objects.
Contents Index
30
Page 31

Contents
When you select PAN/SCROLL, you
are prompted to set a scrolling
speed for use in applications that do
not support grabber hand (pixellevel) panning.
A slower setting reduces the scroll
rate and is useful for close-up and
detail work where you need precise
control of the image.
As you move the pen tip, the
document or image is repositioned
to follow the direction of pen
movement on the tablet.
Release the button or lift the pen tip
from the tablet surface when you are
done.
Index
FUNCTION DESCRIPTION
P
AN/SCROLL Pen only. Enables you to position a document or image in any direction
within the active pane. Do this by pressing a pen button set for P
S
CROLL and then dragging with the pen tip across the tablet active
AN/
area.
31
ACOM PREFERENCES Opens the tablet control panel.
W
S
HOW DESKTOP Minimizes all open windows to display a clean desktop.
D
ISPLAY TOGGLE For multiple monitor systems. Enables you to toggle the current tablet
SWITCH APPLICATIONS Brings up the application switching dialog with focus on the next open
mapping and screen cursor between different displays. See Working
with multiple monitors.
application. On Windows 8, Windows 7 or Vista systems running Aero,
Flip 3D will be activated with focus on the next open application.
Contents Index
31
Page 32

FUNCTION DESCRIPTION
Click BROWSE... to locate an
application, file, or script to
launch. Your selection appears in
the A
PPLICATION TO RUN box.
Click OK to accept the selection.
The dialog box will close and the O
PEN/RUN... option you have selected will be
assigned as your tool button option. Press the tool button to launch the
assigned option.
If your selection is for the Pop-up Menu, it will be displayed in the Pop-up
Menu list.
O
PEN/RUN... Opens the RUN APPLICATION dialog box.
NK TOGGLE (Mac.) Toggles the “ink in any application” function of Ink on and off. Ink
I
ABLET PC
T
ABLET PC INPUT PANEL (Tablet PCs and Windows systems that support the Tablet PC Input
•T
OURNAL (Windows 8, Windows 7 and Vista, and Tablet PC systems that include
•J
ABLET PC DEFINED (Tablet PCs and Windows systems that support the Tablet PC Input
•T
E
XPOSÉ (Mac.) Tiles all open windows. To access this option, first choose
RESSURE HOLD Locks the pressure at the current pressure level until the button is
P
ODE TOGGLE... Toggles pen input between pen mode and mouse mode. See setting
M
D
ISABLED Disables the button function.
D
EFAULT Returns a button to its default setting.
Contents
Index
32
automatically recognizes and converts your handwriting into text and
inserts it into a document. Handwriting recognition must be turned on
for this function to work. See your Mac help for information on working
with Ink.
Panel.) Opens the Tablet PC Input Panel when you press a tool button
set to this function.
Microsoft Journal.) Opens Microsoft Journal.
Panel.) Sets the button function according to settings found in the:
• Windows 8, Windows 7 and Vista T
NPUT DEVICES control panels.
I
• Windows XP Tablet Edition T
K
EYSTROKE... and then click on the ADD SPECIAL menu within the dialog
ABLET AND PEN SETTINGS control panel.
ABLET PC SETTINGS and PEN AND
box.
released. For example, you can paint with pressure sensitivity until you
reach the brush size that you like. You can then press the button and
continue painting with the same size brush until the button is released.
the pen speed in mouse mode.
Contents Index
32
Page 33

Contents
Index
TESTING YOUR TABLET
1. Turn on your computer and wait until the system has fully loaded.
2. Check the USB connection. The tablet status LED should glow whenever the tablet is properly
connected and your computer has registered it as a USB device. If not:
• Make sure the tablet USB cable is securely connected to an active USB port on your computer.
• Check the tablet USB cable for damage.
• If you are connecting the tablet to a USB hub (or hub device such as a keyboard with USB ports), be
sure the USB hub is properly connected to your computer and is active.
• If the status LED does not illuminate after your computer is on and has finished booting up, your
USB port may be disabled. Verify that you have connected the tablet to an active USB port.
• Connect the tablet to a different USB port or try connecting to the USB port on another computer.
3. Check pen input:
• Check pen input
have a pen-only tablet model, you will be able to use the pen tip to move the screen cursor and
click. You will also be able to use the pen buttons to C
other pen functionality.) Install the tablet driver software. See also te sting a p en
. If the tablet driver does not load properly, pen input will not be available. (If you
LICK and RIGHT CLICK, but there will be no
.
33
4. If any of these tests fail you may have defective hardware. See technical support options
.
After testing, use the tablet control panel to reconfigure your tablet for any custom settings you may
originally have been using.
TESTING A PEN
1. First perform the procedures for testing your tablet.
2. Check the pen by opening the tablet control panel and selecting the P
button to return the pen to its default settings. Next:
• Touch the pen tip and then the eraser (when equipped) to the tablet active area. Each time the tip or
eraser makes contact with the tablet surface, the status LED should brighten.
• Without applying pressure to the pen tip, hold the pen tip within approximately 7 mm (0.28 inch) of
the tablet surface and press each pen button in turn. For each button press, the status LED should
brighten.
• While still within proximity, but without touching the tablet surface, move your pen across the active
area of the tablet. The screen cursor should move in the corresponding direction on your monitor or
display screen.
3. If any of these tests fail you may have defective hardware. See technical support options
4. After testing, use the control panel to reconfigure your tablet and pen for any custom settings you may
originally have been using.
EN tab. Click on the DEFAULT
.
Contents Index
33
Page 34

Contents
Index
34
TROUBLESHOOTING
If you encounter problems with your tablet or pen, see the following tables. Your problem may be described
here, and you can try the solution offered.
For additional information, visit the Wacom website at http://www.wacom.com.
General problems
Pen input problems
Windows-specific problems
Mac-specific problems
GENERAL PROBLEMS
The computer does not have
an available USB port.
The tablet status LED does
not illuminate.
The computer does not go to
sleep.
The screen cursor is very
erratic or jumps around when
using the tablet.
The tablet is set for R
ANDED (or LEFT HANDED), but
H
IGHT
at the log on screen the tablet
seems to work upside down.
PEN INPUT PROBLEMS
The pen does not position the
screen cursor, or otherwise
does not work.
The pen does not draw or ink
with pressure sensitivity.
Check if there is an available USB port on a USB hub. If not available
you will need to add a USB hub or USB card.
Verify that your tablet USB cable is properly connected to an active
USB port. If you are connecting to a USB hub, make sure the hub is
connected to an active USB port and that the hub is active.
When you are not using the pen, remove it from the tablet surface or
the tablet will continue to send data, keeping the computer awake.
Note: Because some metallic or other conducting objects can also
cause the tablet to send data, it is best to keep the tablet
surface clear of all objects when not in use.
On rare occasions the tablet may receive interfering radio frequencies
from a computer monitor or nearby AM radio station. If you notice
interference from a monitor, try moving the tablet at least six (6) inches
away from the monitor, or change the monitor refresh rate or monitor
resolution.
Reinstall the tablet driver software and change the default orientation of
the tablet. See configuring tablet orientation.
If the tablet driver does not load properly, pen input will not be
available.
You will be able to use the pen tip to move the screen cursor and click.
You will also be able to use the pen buttons to C
R
IGHT CLICK (upper button), but there will be no other pen functionality.
LICK (lower button) and
Install the driver software for the tablet.
Some applications require that you turn on the pressure capabilities
within the application or selected tool before the pen will respond as a
pressure-sensitive tool.
Verify also that your application supports pressure sensitivity.
Contents Index
34
Page 35

Contents
Index
35
Clicking is difficult. Open the tablet control panel and go to the P
T
IP FEEL.
Select the C
LICK SOUND option (the check box should be checked). This
EN tab. Try using a lighter
will enable you to hear when the pen registers a mouse click. Your
computer speakers must be turned on and the volume audible before
you can hear a click sound.
Double-clicking is difficult. Be sure you are quickly tapping the tablet twice in the same place on
the tablet active area.
Using a pen button set to double-click is recommended (review the
The pen selects everything, or
will not stop selecting.
The eraser (when equipped)
selects everything or will not
techniques in clicking
Open the tablet control panel and go to the P
• Try increasing the D
• Try using a lighter T
Windows
: Try setting your system to launch programs with a single
click. See clicking
Open the tablet control panel and go to the P
slider toward F
IRM. If this does not help, see tes tin g a p en .
Open the tablet control panel and go to the P
EEL slider toward FIRM. If this does not help, see test ing a p en .
F
).
EN tab.
OUBLE CLICK DISTANCE.
IP FEEL.
.
EN tab. Move the TIP FEEL
EN tab. Move the ERASER
stop erasing.
You notice a screen delay at
the beginning of pen or inking
Open the tablet control panel and go to the P
OUBLE CLICK DISTANCE.
D
EN tab. Try decreasing the
strokes.
You have to press hard with
the pen when clicking,
Open the tablet control panel and go to the P
slider toward S
OFT.
EN tab. Move the TIP FEEL
drawing, or writing.
The pen tip does not function. Depending on your tablet model, the status LED should brighten or
change color when the pen tip is pressed to the tablet. Be sure you are
using the pen that originally came with your product. Other pens may
not function properly on the tablet.
See test ing a p en
to verify pen operation. If any of the tests fail you may
have defective hardware.
The screen cursor jumps
back.
Do not place the pen on the tablet when it is not in use or when you are
using another pointing device. Leaving your pen on the tablet may
interfere with screen cursor positioning when using other input devices.
The upper or lower pen button
does not work.
Be sure you press the pen button when the pen tip is within 7 mm (0.28
inch) of the tablet active area. Do this without pressing down on the
pen tip.
From the tablet control panel, verify that the pen button is set to the
function you are expecting to occur.
In the tablet control panel, click on the P
LICK & TAP is selected, you will need to first press the pen button and
C
EN tab ADVANCED button. If
then touch the pen tip to the tablet surface in order to perform a click
function. See setting the pen button functions
See test ing a p en
to verify pen operation. If any of the tests fail you may
.
have defective hardware.
Contents Index
35
Page 36

Contents
Index
36
Cannot move the cursor
where you want to on the
screen, or the line you are
drawing does not line up with
the location of the pointer in
Open the tablet control panel. Verify that PEN MODE is selected. If this
does not help, click on the D
tablet to screen mapping. If you are still having difficulty, remove the
tablet preferences (see Windows-specific problems
problems for details).
paint applications.
WINDOWS-SPECIFIC PROBLEMS
You suspect the tablet
preferences may be
corrupted, or want to make
certain that all settings are at
their factory defaults.
Use the Wacom Tablet Preference File Utility to work with preferences.
Close any open applications.
Windows 8:
P
REFERENCE FILE UTILITY tile. If you are using the Windows 8 Classic
Desktop, press the Windows key on your keyboard, or select the
Windows icon in the Charms bar, to access the Start screen.
Windows 7, Vista and XP
W
ACOM TABLET, then WACOM TABLET PREFERENCE FILE UTILITY.
• It is a good idea to first back up your tablet preferences. In the
W
ACOM TABLET PREFERENCE FILE UTILITY dialog box, click BACKUP...
and follow the prompts.
• Then, use the Wacom Tablet Preference File Utility to delete the
tablet preferences as follows:
Single user
preferences for the current user.
Multiple users
delete preferences for multiple users. Administrator rights are
required to delete preferences for all users. Relaunch any currently
open tablet-aware applications that you may be running.
EFAULT button to reestablish the default
or Mac-specific
From the Windows 8 Start screen, click the WACOM TABLET
: Click START and select ALL PROGRAMS. Select
. Under MY PREFERENCES, click REMOVE to delete the
. Under ALL USER PREFERENCES, click REMOVE to
You can quickly restore tablet preferences that have been backed up
by clicking R
MAC-SPECIFIC PROBLEMS
At startup, a dialog box
appears telling you that either
the driver failed to load or the
tablet preferences have not
yet been created.
The tablet was not detected at startup.
If connected with the provided USB cable
• Make sure the USB cable is securely connected to an active USB
•From the G
If you are still having difficulties, uninstall then reinstall the tablet driver
software.
If this does not help, contact Wacom for Technical Support.
See technical support options
ESTORE... under MY PREFERENCES.
:
port on your computer or USB hub. Make sure that the tablet status
LED is illuminated.
O menu, select UTILITIES and launch the SYSTEM
ROFILER. Select USB from the HARDWARE section of the CONTENTS
P
list. A Wacom USB tablet model should be listed. If a tablet model
is not listed, check the USB tablet cable connection or try plugging
the tablet into a different USB port.
.
Contents Index
36
Page 37

Contents
Index
37
You suspect the tablet
preferences may be
corrupted, or want to make
certain that all settings are at
their factory defaults.
Ink does not work correctly
with the tablet.
Use the Wacom Tablet Utility to work with preferences. Close any open
applications. Open the main A
ACOM TABLET folder and run the WACOM TABLET UTILITY.
W
PPLICATIONS folder. Then open the
• It is a good idea to first back up your tablet preferences. In the
tablet Utility, select C
B
ACKUP... and follow the prompts.
URRENT USER or ALL USERS. Then click
• Then, delete the tablet preferences as follows:
Single user
EMOVE. Log out, then log back in. When the tablet driver loads it
R
. When the utility starts, select CURRENT USER and click
will create a new preferences file with the factory defaults.
Multiple users
R
EMOVE. Log out, then log back in. When the tablet driver loads it
. When the utility starts, select ALL USERS and click
will create new preferences files with the factory defaults.
You can quickly restore tablet preferences that have been backed up
for the C
URRENT USER or ALL USERS by clicking on RESTORE... within the
utility.
Note: Do not manually remove the W
the main L
IBRARY PREFERENCEPANES folder. This file is only to be
ACOM TABLET.PREFPANE file from
removed when uninstalling the tablet software driver, and then
only when using the W
ACOM TABLET UTILITY.
There may be a problem with the Ink preferences. Remove the
damaged preference files as follows. They will be re-created when you
enable handwriting recognition.
1. Open S
YSTEM PREFERENCES, choose SHOW ALL and select INK. Then
turn off handwriting recognition.
2. From the G
REFERENCES folders. Remove the following preferences:
P
•
COM.APPLE.INK.FRAMEWORK.PLIST
O menu, choose your HOME. Open the LIBRARY and
• COM.APPLE.INK.INKPAD.PLIST
• COM.APPLE.INK.INKPAD.SKETCH
Contents Index
3. Go back to SYSTEM PREFERENCES and INK, and then enable
handwriting recognition.
4. Test the Ink function using your tablet and pen.
If this procedure does not resolve your problem with Ink, contact Apple
Support for further assistance. Wacom is not the software
manufacturer for Ink and we are limited in our abilities to support a third
party software application.
37
Page 38

Contents
Index
38
TECHNICAL SUPPORT OPTIONS
If you have a problem with your tablet, first check the tablet Quick Start Guide to be sure the unit is installed
correctly. Then review the Troubleshooting
If you cannot find the answer in this manual, you can check the product FAQs (Frequently Asked
Questions) on the Wacom Support website for your region.
Wacom periodically updates the tablet software driver to maintain compatibility with new products. If you
are having a compatibility problem between the tablet and a new hardware or software product, it may be
helpful to download a new software driver (when available) from the Wacom Support website for your
region.
If you cannot solve the problem and you think your tablet is not working properly, contact the Wacom
support staff for the area where your product was purchased.
When you call, you should be at your computer with the following information available:
• This manual.
• Tablet serial and model number. (Look on the bottom of the tablet.)
• Driver version number. (See the tablet Installation CD or click on the tablet control panel A
button.)
• The make and model of your computer, and operating system version number.
• A list of peripheral devices attached to your computer.
• The software application and version you were using when the problem occurred.
• The exact wording of any error message that appeared on your screen.
• What happened and what you were doing when the problem occurred.
• How you tried to solve the problem.
and procedures.
BOUT
You can also contact Wacom Support by visiting the Wacom website for your region and completing an
Email Inquiry form.
Contents Index
38
Page 39

Contents
Index
39
OBTAINING DRIVER DOWNLOADS
Wacom periodically updates the tablet software driver to maintain compatibility with new products. If you
are having a compatibility problem between the tablet and a new hardware or software product, it may be
helpful to download a new software driver (when available) from the Wacom Support website for your
region.
PRODUCT INFORMATION
To learn more about your tablet, visit the Wacom website for your region. You can also discover which
software applications are currently tablet enhanced to support the pressure sensitivity and other special
functionality of your tablet by checking the software applications
Specifications for your tablet are provided in the Important Product Information document included on your
product CD.
USA, Canada, Central and South America https://store.wacom.com/us
Europe, Middle East and Africa www.wacom.eu
Japan www.tablet.wacom.co.jp
Asia Pacific (English) www.wacom.asia
China (Simplified Chinese) www.wacom.com.cn
Korea www.wacom.asia/kr
Taiwan www.wacom.asia/tw
Thailand www.wacom.asia/th
ORDERING PARTS AND ACCESSORIES
For information on purchasing parts and accessories, refer to the website for your region.
You can also do the following:
• In the U.S. or Canada
http://direct.wacom.com.
•In Europe
http://shop.wacom.eu. You can also contact your local dealer, distributor, or technical support using the
appropriate number for your region.
•In Japan
support using the appropriate number for your region.
• In Australia, Singapore, Taiwan and Korea
www.BuyWacom.com.sg, www.BuyWacom.com.tw and www.BuyWacom.co.kr, respectively.
• In other countries
Some parts and accessories may not be available in all regions.
, call +49 (0)180.500.03.75 or send an email to spareparts@wacom.eu. Or visit
, visit http://store.wacom.jp. You may also contact your local dealer, distributor, or technical
, call 1.888.884.1870 (toll-free). In the U.S., you may also visit Wacom’s website at
, please visit: www.BuyWacom.com.au,
, please contact your local dealer or distributor.
Contents Index
39
Page 40

Contents
Index
40
APPENDIX
This section contains tips on caring for your tablet, instructions on how to uninstall the tablet software,
information about digital inking, and more.
Caring for Your tablet
Replacing the pen nib
Uninstalling
Managing preferences
Pen and digital ink capabilities in Windows
Product information
Ordering parts and accessories
Available accessories
CARING FOR YOUR TABLET
Keep your tablet surface and pen clean. Dust and dirt particles can stick to the pen and cause excessive
wear to the tablet surface. Regular cleaning with a soft, damp cloth will help to prolong the life of your
tablet surface and pen. You can also dampen the cloth using a very mild soap diluted with water. Do not
use volatile liquids, such as paint thinner or benzene, as they may damage the plastic case.
Keep the tablet in a clean, dry place and avoid extremes in temperature. Room temperature is best. Also,
your tablet and pen are not made to come apart. Twisting the pen case can break the pen. Taking apart the
product will void your warranty.
Important: Take care to never spill liquids onto the tablet or pen. Be especially careful not to get the
tablet, pen buttons, tip, and eraser wet. They contain sensitive electronic parts that will fail if liquid
enters them.
Contents Index
40
Page 41

Contents
Nib Replace when 1 mm
(0.4 inch) or less.
Index
41
REPLACING THE PEN NIB
The pen nib (tip) will wear with normal use. Excessive pressure will cause it to wear sooner. Replace the nib
when it gets too short or develops a flat point.
1. Clasp the old nib and pull it straight out of the pen. Use the nib removal tool, pair of tweezers, needlenosed pliers, or similar instrument.
2. Slide the end of the new nib straight into the barrel of the pen. Firmly push the nib until it stops.
Warning: Choking hazard. Prevent children from swallowing the pen nib or button part. The
pen nib or button part may accidentally be pulled out if children are biting on them.
For replacement parts, see ordering parts and accessories
.
Important: When not in use, place the pen in the pen holder or lay it flat on your desk. When
equipped, the eraser end of the pen should be inserted first into the loop. To maintain the sensitivity
of your pen, do not store the pen in a container where it will rest on the tip or eraser.
Contents Index
41
Page 42

Contents
Index
42
UNINSTALLING
Follow the appropriate procedure below to remove the tablet driver software from your system.
Important: When you remove the tablet software, your tablet will no longer operate with full tablet
functionality but will continue to function as a mouse device.
Windows 8:
the task bar. If you are using the Windows 8 Classic Desktop, press the Windows key on your keyboard, or
select the Windows icon in the Charms bar, to access the Start screen.
Windows 7 and Vista
P
ANEL window click on UNINSTALL A PROGRAM. In the dialog box that appears, choose WACOM TABLET and
click U
on name and password. Restart your computer after uninstalling the software.
Windows XP
window select A
ABLET and click REMOVE. Follow the prompts to remove the tablet driver. Restart your computer after
T
uninstalling the software.
Mac
: From the GO menu, choose APPLICATIONS and open the WACOM TABLET folder. Double-click on the
W
ACOM UTILITY icon and select the TABLET SOFTWARE: REMOVE button. Enter your administrator login name
and password. After the removal is completed, click OK. Restart your computer after uninstalling the
software.
From the Windows 8 Start screen, click the WACOM PREFERENCES tile, and click Uninstall from
: Click on the Windows START button and open the CONTROL PANEL. In the CONTROL
NINSTALL. Follow the prompts to remove the tablet driver. If prompted, enter your administrator log
: Click on the Windows START button and open the CONTROL PANEL. In the CONTROL PANEL
DD OR REMOVE PROGRAMS. In the ADD OR REMOVE PROGRAMS window, choose WACOM
Contents Index
42
Page 43

Contents
Index
43
MANAGING PREFERENCES
Use the preference file utility to manage your tablet preferences for single or multiple users.
Close any open applications.
Windows 8:
using the Windows 8 Classic Desktop, press the Windows key on your keyboard, or select the Windows
icon in the Charms bar, to access the Start screen.
Windows 7
ACOM PREFERENCE FILE UTILITY.
W
• To remove preferences for the current user, click R
• To delete preferences for multiple users, click R
rights are required to delete preferences for all users. Relaunch any currently open tablet-aware
applications that you may be running.
• To back up your preferences, click B
• To restore preferences that you had previously backed up, click R
• Carefully follow any prompts that may appear.
Mac
: Open the main APPLICATIONS folder. Then open the WACOM folder and run the WACOM UTILITY.
• To remove preferences, select C
in. When the tablet driver loads it will create a new preferences file with the factory defaults.
• To back up your preferences, select C
• To restore preferences that you had previously backed up, select C
click R
• Carefully follow any prompts that may appear.
From the Windows 8 Start screen, click the WACOM PREFERENCE FILE UTILITY tile. If you are
: Open the utility by clicking the START icon and selecting ALL PROGRAMS. Select WACOM and
EMOVE under MY PREFERENCES.
EMOVE under ALL USER PREFERENCES. Administrator
ACKUP... under MY PREFERENCES.
ESTORE... under MY PREFERENCES.
URRENT USER or ALL USERS. Then click REMOVE. Log out, then log back
URRENT USER or ALL USERS. Then click BACKUP....
URRENT USER or ALL USERS. Then
ESTORE....
Contents Index
43
Page 44

Contents
Index
44
PEN AND DIGITAL INK CAPABILITIES IN WINDOWS
Microsoft Windows 8, Windows 7 and Vista provide extensive support for pen input. Pen features are
supported in all versions of Windows 7 and Vista except Windows 7 Starter and Home Basic, and Windows
Vista Home Basic. Use your tablet and pen for quick, intuitive results.
•Note taking
to locate your handwritten content.
• Handwriting recognition
input. Convert your handwritten content to typed text at any time.
•Gestures
gestures, select the F
EVICES control panel.
D
• Digital Ink in Microsoft Office 2007
EVIEW tab within applicable applications.
R
The Windows 8, Windows 7 or Vista Input Panel enables you to use handwriting or an on-screen keyboard
to directly enter text with your pen.
There are different ways to launch the Input Panel
• Click on the Input Panel icon which appears when you move the screen cursor into a text entry area.
• Click on the Input Panel tab, located by default on the left edge of the display screen.
• Click on the Tablet PC Input Panel icon located on the Windows Taskbar. If the icon is not visible, rightclick on the Taskbar, select T
. Jot notes and capture quick sketches in Windows Journal. Use the Journal search engine
. Quickly enter handwritten information anywhere the computer accepts typed
. Make simple gestural movements on the tablet to trigger customizable actions. To customize
LICKS tab in the Windows 7 PEN AND TOUCH or Windows Vista PEN AND INPUT
. Utilize the enhanced digital mark-up and inking tools found on the
:
OOLBARS, and TABLET PC INPUT PANEL.
To disable the Input Panel
:
1. Open the Tablet PC Input Panel.
2. Select T
3. Choose the O
•F
OOLS and OPTIONS.
PENING tab and uncheck the following boxes:
OR TABLET PEN INPUT, SHOW THE ICON NEXT TO THE TEXT BOX
•SHOW THE INPUT PANEL TAB.
4. Click OK.
Note: The following workarounds in the software driver improve performance in Windows 8, Windows 7
and Vista:
• To improve performance, the Pen Flicks and ‘press-and-hold-to-right-click’ features are
disabled in some graphics applications such as Photoshop.
• There is no pressure sensitivity in Journal and other Ink features when both the Flicks and
‘press-and-hold-to-right-click’ features are disabled in the Windows 8, Windows 7 P
OUCH, or Windows Vista PEN AND INPUT DEVICES control panel.
T
EN AND
Contents Index
44
Page 45

Contents
Index
45
PRODUCT INFORMATION
To learn more about your tablet, visit the Wacom website for your region. You can also discover which
software applications are currently tablet enhanced to support the pressure sensitivity and other special
functionality of your tablet by searching software applications.
USA, Canada, Central and South America http://www.wacom.com
Europe, Middle East and Africa http://www.wacom.eu
Japan http://tablet.wacom.co.jp
Asia Pacific (English) http://www.wacom.asia
China (Simplified Chinese) http://www.wacom.com.cn
Hong Kong (Traditional Chinese) http://www.wacom.com.hk
Korea http://www.wacom.asia/kr
Taiwan http://www.wacom.asia/tw
Thailand http://www.wacom.asia/th
Contents Index
45
Page 46

Contents
Index
ORDERING PARTS AND ACCESSORIES
To p ur ch ase available accessories, see the Wacom website for your region.
You can also do the following:
• In the USA or Canada
http://direct.wacom.com (USA only).
•In Europe
dealer, distributor, or technical support using the appropriate number for your region.
• In Australia, Singapore, Taiwan and Korea
www.BuyWacom.com.sg, www.BuyWacom.com.tw and www.BuyWacom.co.kr, respectively.
• In other countries
Some parts and accessories may not be available in all regions.
, call +49 (0)180.500.03.75 or visit http://shop.wacom.eu. You can also contact your local
AVAILABLE ACCESSORIES
DESCRIPTION PART NUMBER
Pen, standard, without eraser LP-170
Pen, premium, with eraser LP-170E
Pen nibs, black, qty 5 ACK-204-01K
, call 1.888.884.1870 (toll-free) or visit Wacom’s website at
, please visit: www.BuyWacom.com.au,
, please contact your local dealer or distributor.
46
Contents Index
46
Page 47

Contents
Index
47
GLOSSARY
Active area. The navigation and drawing area of your tablet where pen input is detected.
Aspect
Click force
Digital Ink
pen-based input on a computer. This handwritten content takes the form of sketches, ink mark-up, or
handwriting. The handwriting can optionally be converted to typewritten text or simply left alone for use in
its original format. Depending on your system and application settings, the handwritten text you make with
digital ink can be converted on-the-fly or at another time.
Display Toggle
time. Available only on multiple monitor systems. See Working with Display Toggle
Double-click distance
clicks and still be accepted as a double-click. Increasing the double-click distance makes double-clicking
easier, but may cause a delay in brush strokes in some applications.
Eraser-aware application
applications take advantage of the eraser in different ways, depending on what makes sense for the
application.
Journal
advantages of digital note taking. For example, you can create quick sketches and jot handwritten notes
that can be converted to text and sent on to colleagues for digital mark-up. Journal includes a variety of
pen, marker, and highlighter tools, plus an eraser that is easily activated by the eraser of the pen.
Additionally, your handwritten content is searchable within Journal.
Mapping
screen.
Modifier
for Mac.
. The ratio between the vertical and horizontal dimension of the tablet or display.
. The amount of force you must apply to the pen tip for a click to occur.
. A broad category that typically describes handwritten content which has been created using
. A feature that allows you to work with your tablet on all displays or on one display at a
.
. The maximum distance (in screen pixels) that the screen cursor can move between
. A software application that has built-in support for the pen eraser. These
. A Microsoft Windows application that electronically simulates a physical journal pad, but with the
. The relationship between the pen position on your tablet and the cursor position on the monitor
. Modifier keys include SHIFT, ALT, and CTRL for Windows, or SHIFT, CONTROL, COMMAND, and OPTION
Contents Index
47
Page 48

Contents
Index
48
Mouse acceleration
. A setting that allows you to adjust the screen cursor acceleration when using mouse
mode.
Mouse mode
. A method for positioning the screen cursor. When you place the pen on your tablet, you can
move the screen cursor with a “pick up and slide” motion similar to using a standard mouse. This is known
as relative positioning. See also Pen mode.
Mouse speed. A setting that allows you to adjust the speed at which your screen cursor moves when using
mouse mode.
Nib
. The replaceable pen tip.
Pairing
Pen input
Pen mode
. A method of creating a virtual cable link between to devices.
. A method of controlling a computer using the pen on your tablet.
. A pen input method of positioning the screen cursor. Wherever you place the pen on your
tablet, the screen cursor will jump to the corresponding point on the screen. This is known as absolute
positioning, and is the default setting for the pen. Pen mode allows you to quickly position the screen
cursor without having to first find it and then move it across the desktop. See also Mouse mode.
Pixel. The smallest unit of measure on your monitor screen.
Pressure sensitive
. A quality of the pen tip and eraser that senses the amount of pressure being applied.
This is used to create natural-looking pen, brush, and eraser strokes in applications that are pressure
sensitive.
Pressure-sensitive application
Proximity
. The height above the tablet where pen detection occurs. See also positioning.
. Any application that supports pressure-sensitive input.
Screen cursor. The pointer on the display screen. Screen cursors come in different shapes (such as an Ibeam, arrow, or box), depending on which application you are running.
Tablet PC Input Panel (TIP)
. The Microsoft Windows Tablet PC Input Panel enables you to use your pen to
create handwritten notes or work with an on-screen keyboard. The Input Panel dynamically converts your
handwriting to text. The information you create can then be inserted into other documents, spreadsheets,
or illustrations.
USB
. Universal Serial Bus. A hardware interface standard for connecting computer peripheral devices.
USB ports support hot-plugging, which allows you to connect or disconnect a USB device without turning
off your computer.
Wintab
. An interface standard used by Windows applications for receiving tablet information. Your tablet
supports all Wintab-compatible applications under Windows.
Contents Index
48
Page 49

Contents
Index
WACOM INTERNATIONAL OFFICES
WACOM TECHNOLOGY CORPORATION WACOM EUROPE GMBH
1311 SE Cardinal Court Europark Fichtenhain A9
Vancouver, WA 98683 47807 Krefeld
U.S.A. Germany
Telephone: +1.360.896.9833 Internet: http://www.wacom.eu
Fax: +1.360.896.9724
49
WACOM CO., LTD.
JAPAN TABLET SALES DIVISION
Sumitomo Fudosan Shinjuku Grand Tower 31F Sumitomo Fudosan Shinjuku Grand Tower 31F
8-17-1 Nishi-shinjuku, Shinjuku-ku 8-17-1 Nishi-shinjuku, Shinjuku-ku
Tokyo, 160-6131 Tokyo, 160-6131
Japan Japan
Internet: http://tablet.wacom.co.jp Telephone: +81.3.5309.1513
WACOM CO., LTD.
ASIA PACIFIC DIVISION
Fax: +81.3.5309.1514
WACOM CHINA CORPORATION WACOM KOREA CO., LTD.
1103, Beijing IFC West Tower #1211, 12F KGIT Sangam Center,
No. 8 Jianguomenwai Street 1601 Sangam-dong, Mapo-gu, Seoul 121-913, Korea
Chaoyang District, Beijing 100022 Telephone: +82.2.557.3894
China Fax: +82.2.557.3895
Internet: http://www.wacom.com.cn
WACOM AUSTRALIA PTY. LTD. WACOM SINGAPORE PTE. LTD.
Unit 8, Stage 1 Cumberland Green 5 Temasek Boulevard
2-8 South Street Rydalmere #12-09 Suntec Tower Five
NSW 2116 Australia Singapore 038985
Telephone: +61.2.9422.6700 Telephone: +65.6258.8640
Fax: +61.2.9420.2272 Fax: +65.6258.8697
WACOM TAIWAN INFORMATION CO., LTD. WACOM HONG KONG LIMITED
Suite 605, 6th floor, No. 205 Tun-Hwa North Road Room 1201, Tai Tung Building
Taipei, 105 Taiwan 8 Fleming Road
Telephone: +886.2.2712.2675 Wanchai, Hong Kong
Fax: +886.2.2712.9789 Telephone: +852.25739322
Contents Index
Fax: +852.25739500
49
Page 50

Contents
Index
50
INDEX
About the manual 4
Accessories and parts
ordering 39
Accessories and parts, ordering 46
Accessories, available 46
Button functions 29
Care, for tablet 40
Click sound 13
Clicking, with pen 13
Control panel
basics 9
opening 18
overview 19
Customizing
button functions 29
double-click distance 21
eraser feel 21
ExpressKeys
functions 27
pen 20
acceleration in mouse mode 26
buttons 22
input 17
speed in mouse mode 26
tablet orientation 27
tip feel 21
Digital inking capabilities 44
Display Toggle, working with 28
Double-click distance, customizing 21
Double-clicking, how to 13
Dragging, with pen 13
Drawing with pressure 15
Driver downloads, obtaining 39
Environmental conditions 40
Eraser feel, customizing 21
Erasing, with pen 16
Ergonomics 7
ExpressKeys
setting functions 27
Eye-hand coordination exercise 17
Features
pen 6
pen holder 6
pen models 5
Functions, button 29
General problems, troubleshooting34
Information, product 39, 45
Mac-specific problems, troubleshooting 36
Manual, about 4
Mapping
tablet 23
to multiple monitors 9
Monitors, working with multiple 9
Nib, replacing 41
Ordering parts and accessories3946
Orientation
configuring for tablet 8
setting for tablet 27
Overview, control panel 19
Parts and accessories
ordering 39
Parts and accessories, ordering 46
Parts, available 46
Pen
buttons
customizing 22
using 14
clicking with 13
customizing 20
double-clicking with 13
dragging with 13
drawing with pressure 15
erasing with 16
features 6
input problems, troubleshooting 34
input, customizing 17
nib, replacing 41
pointing with 12
positioning with 12
speed, setting 26
testing 33
the experience 11
tip, replacing 41
using 11
on tablet 11
pen buttons 14
Contents Index
50
Page 51

Contents
Index
51
writing with pressure 15
Pen holder 6
Pointing, with pen 12
Positioning, with pen 12
Preferences, managing 43
Pressure
drawing with 15
writing with 15
Product
information 45
Product information 39
Proportions and scale 24
Scale and proportions 24
Set up 7
Settings, control panel 19
Software
driver downloads 39
uninstalling 42
Ta bl e t
caring for 40
configuring orientation 8
mapping 23
area 24
for portion of screen area 25
for portion of tablet area 25
to multiple monitors 9
orientation, setting 27
pen model features 5
scale and proportions 24
setting up 7
storing 40
testing 33
tracking 23
Technical support options 38
Te st i ng
pen 33
tablet 33
Tip
customizing feel 21
replacing 41
Tracking, tablet 23
Troubleshooting 34
general problems 34
Mac-specific problems 36
pen input problems 34
Windows-specific problems 36
Uninstalling tablet software 42
Wacom tablet
the pen experience 11
Windows-specific problems, troubleshooting 36
Work area, setting up 7
Writing with pressure 15
Contents Index
51
 Loading...