

Page 1

User's Guide
X-1000
Page 2
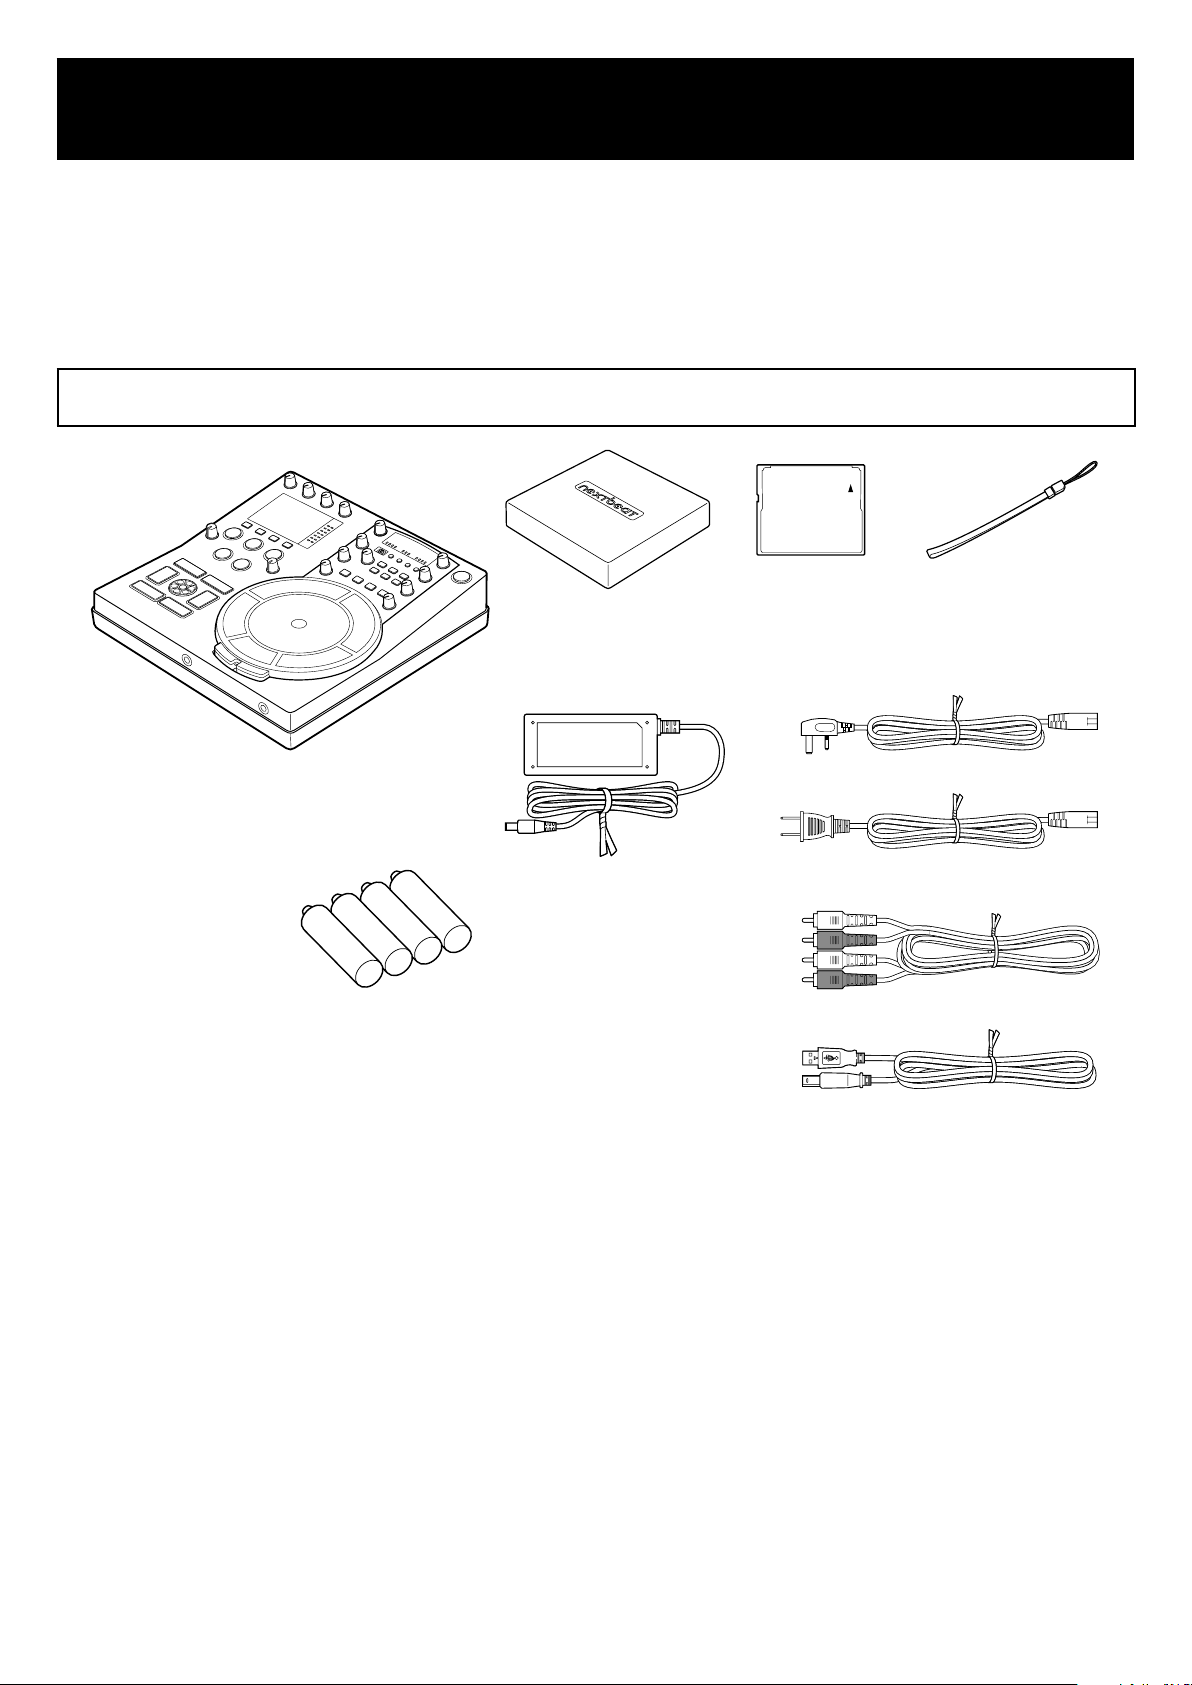
1 Introduction
Cover
CF card (1) Strap
AC adapter
AA alkaline batteries (4)
Quick Start Guide
nextbeat
Power cable (for the US)
Power cable (for the UK)
RCA cable (1)
USB cable (1)
Thank you for purchasing nextbeat X-1000 (hereafter referred to as "this product").
This product is a compact, integrated touch-type DJ system that incorporates all the functions needed
to DJ, including a turntable, mixer, sampler and effects processor.
Before using this product, read this manual carefully and follow the instructions to ensure that you get
the best possible performance from this product.
1.1 Check the package contents carefully.
1
nextbeat User's Guide
First Edition October 2009
©2009 Wacom Co., Ltd. All rights reserved.
Page 3

Contents
1 Introduction
............................................................................
1.1 Check the package contents carefully. .................................1
1.2 Safety Precautions ..................................................................
1.3 Notes on Using This Product
..................................................8
1.4 Features of nextbeat X-1000 ................................................
1.5 Supported Music File Formats .............................................
1.6 Component Names and Functions ......................................
1.6.1 Control Panel
1.6.2 Front Input/Output sockets
1.6.3 Rear Input/Output sockets
1.6.4 Display screen
..............................................................................
...........................................................
............................................................
............................................................................
1.7 Starting Up & Shutting Down ...............................................17
2 Before You Go Live
.......................................................
1
4
11
12
13
13
15
15
16
18
2.1 Transferring Tracks to CF Cards .........................................18
3 Basic Operation
...............................................................
3.1 Switching Channels ...............................................................19
3.1.1 Channel Switching and the LEDs
3.1.2 Adjusting the Headphone Sound
...................................................
....................................................
3.2 Track Selection ......................................................................20
3.3 Play/Pause .............................................................................
3.4 Fast-forward/Rewind ............................................................
3.5
Setting Cue Points/Cued Playback ......................................21
3.6 Adjusting the Playback Speed .............................................
3.6.1 Adjusting the speed with the pitch faders
3.6.2 Adjusting the speed with the centre pad
3.6.3 Master Tempo function
.................................................................
........................................
..........................................
3.7 Adjusting the Trim/EQ ...........................................................23
19
19
19
20
21
22
22
23
23
3.8 Adjusting the Volume ............................................................
3.8.1 Adjusting the volume for channel A/B
3.8.2 Other volume adjustments
............................................................
.............................................
2
24
24
24
Page 4

3.9 Cross Fader Adjustment .......................................................24
3.10 BPM Display ...........................................................................
3.10.1 Auto BPM
3.10.2 Manual BPM (Auto BPM: OFF)
3.10.3 BPM matching
3.11 Microphone Input ..................................................................26
4 Advanced Operation
4.1 Loop Function ........................................................................27
4.1.1 Setting and playing from loop points
4.1.2 Playing segments
4.2 Effects Functions ...................................................................28
4.3 Sampler Functions ................................................................
4.3.1 Sampling function
4.3.2 Sample playback function
4.3.3 Phrase recording function
...................................................................................
......................................................
............................................................................
....................................................
...............................................
........................................................................
........................................................................
.............................................................
.............................................................
25
25
25
25
27
27
27
31
31
32
33
5 Detaching and Using the Portable Unit
5.1 Detaching/Remounting the Unit ..........................................34
5.2 Attaching the Strap ...............................................................
5.3 Holding the Unit .....................................................................
5.4 Signal Reception ....................................................................
5.5 Power Supply .........................................................................
5.6 Starting Up & Shutting Down ...............................................
5.7 Portable Unit ..........................................................................
6 Appendix
6.1 Changing the Preferences ....................................................36
6.2 Troubleshooting .....................................................................
6.3 Updating the Firmware .........................................................
................................................................................
......
34
34
34
34
35
35
35
36
37
39
6.4 Replacing the Batteries
6.5 Transporting, Cleaning & Storage
6.6 Specifications ........................................................................
LIMITED WARRANTY ............................................................43
.........................................................39
........................................41
41
3
Page 5

1.2 Safety Precautions
To ensure that you use your nextbeat safely and correctly, the warning icons shown below are used in
this manual. Ensure that you understand the meanings of these icons before reading the manual and
always observe the accompanying information.
DANGER
WARNING
CAUTION
Key to Icons
Indicates a mandatory action.
Indicates that the power cable should be unplugged.
Indicates that the product or component should not be disassembled.
Indicates that the product or component should not be exposed to water.
Indicates that you should not touch the product or component with wet hands.
Indicates a prohibited action.
This icon indicates that, if this warning is ignored and the product is handled
improperly, there is serious risk of death or serious injury as a result.
This icon indicates that, if this warning is ignored and the product is handled
improperly, there is the possibility that death or serious injury could result.
This icon indicates that, if this warning is ignored and the product is handled
improperly, there is the possibility that personal injury or property damage could
result.
WARNING
Do not use this product near equipment that requires high levels of stability or reliability.
This can adversely affect other electronic equipment and can also result in this product being affected
by other electronic equipment.
Never use this product in locations where wireless communication is prohibited (such as hospitals and
public institutions).
Radio interference from this product can adversely affect equipment operation.
Turn this product off in locations where the use of electronic equipment is prohibited. In such
locations (inside aircraft, etc.), this product must be turned off to prevent adverse effects on other
electronic equipment.
Ensure that this product is kept at least 8.6 inches (22 cm) away from cardiac pacemakers when in use.
Radio interference from this product can adversely affect pacemaker operation.
Use only the dedicated AC adapter provided with this product.
The use of other AC adapters could cause a fire, electric shock or malfunction.
Do not use connection modes (multiple adaptors, etc.) that exceed the rated capacity of the power
outlet or the wiring equipment. Limits (rated current) apply to the amount of power that can be
supplied from a power outlet or extension board.
Connecting multiple devices to a power outlet or extension board and using them all concurrently so
that the rated capacity is exceeded could cause the cable or other components to overheat and
cause a fire, electric shock or malfunction.
Only remove the battery cover when replacing the batteries.
Leaving the cover removed can result in the batteries falling out and causing an accident, leading to
injury, property damage or malfunction.
During handheld playback, always use the portable unit with the dedicated strap looped around your wrist.
Using the portable unit without attaching the strap could result in the unit accidentally hitting people
or objects, causing injury, property damage or unit malfunction.
When using the portable unit for handheld playback, hold the unit firmly and take care not to drop it.
Never throw the unit or wave it around more than is necessary.
Doing so could cause the portable unit to hit people or objects resulting in an accident and leading to
injury, property damage or malfunction. This could also damage or snap the strap cord.
4
Page 6
CAUTION
Do not attempt to disassemble or modify this product as this could cause the product to emit heat,
catch fire, give an electric shock or otherwise cause injury.
Note that any disassembly of this product will void the product warranty.
Do not place cups or vases containing water or other fluids near this product.
Do not use this product in locations exposed to water.
Water or other fluids on this product could cause a malfunction, electric shock or fire.
If you operate the touch sensor with wet hands, it may cause malfunction. Also, if the sensor part is
wet, wipe it dry immediately.
Do not place this product in an unstable or uneven location, or in a location subject to strong vibrations.
This could cause the product to fall or tip over, resulting in injury or malfunction.
Do not subject this product to strong impacts.
Doing so could damage the product and cause malfunctions, electric shock or fire.
Do not climb on or place heavy objects on this product.
This could cause a malfunction.
Do not leave this product in very hot (40°C or above) or very cold (0°C or below) locations.
Also, do not leave this product in locations subject to extreme temperature variations. This will
adversely affect the product and its components and could cause malfunctions.
When a thunderstorm approaches, stop using this product and unplug the power cable. Lightning
strikes could cause a malfunction, electric shock or fire.
Disconnect the AC adapter and USB cables when cleaning this product.
Failure to do so could cause an electric shock.
Do not clean this product with organic solvents as this could cause cracking.
Do not touch the connector sockets with your hands or any metal implement.
Do not drop the base unit or portable unit as this could cause a malfunction.
If the display is accidentally broken, do not touch the broken area or any fluid that leaks out of the
display.
If you get any liquid crystal in your eyes or mouth, immediately flush the affected area with clean
water and contact a medical professional for treatment.
If you get any liquid crystal on your skin or clothing, immediately wipe it off with alcohol and then
wash the affected area with soap.
When connecting external components such as speakers, read the manuals supplied with the
components to ensure that you connect them correctly.
If you are using headphones, take care not to turn the volume up too high. Listening to music at high
volumes for long periods may result in impaired hearing.
When inserting a CF card, check that you are inserting it in the right direction.
Using the card incorrectly could damage the card or the product itself.
The use of excessive force when inserting a CF card could damage the CF card or the product itself.
When inserting a CF card, insert it straight and gently. If the CF card is at an angle or forcibly inserted,
the CF card or connector on the nextbeat may be damaged.
Do not bend, drop or apply excessive force to CF cards.
Do not attempt to disassemble or modify CF cards.
Keep CF cards dry.
Store out of the reach of small children to avoid causing injury or accidents.
Do not use in locations subject to high levels of humidity, fumes, smoke or dust as exposure to these
could cause a fire, electric shock or malfunction.
5
Page 7
1.2.1 Notes on Handling the Batteries
Note the information below when handling the batteries used in the portable unit.
Using the batteries incorrectly could cause them to leak fluid, emit heat or burst. Incorrect handling could
also cause the portable unit to malfunction.
DANGER
Fluid leaking from a battery could cause injury or loss of eyesight if it gets into your eyes. Immediately
flush out the affected eye with copious amounts of water and then contact a health professional for
further treatment. If you get battery fluid on your skin or hands, wash the affected area thoroughly
with running water.
Load the batteries correctly, ensuring that the positive (+) and negative (-) terminals are oriented
correctly.
Do not heat the batteries or throw them into a fire.
Do not attempt to disassemble or modify the batteries.
Do not attempt to charge non-rechargeable batteries.
Keep the batteries dry.
Do not use modified batteries or batteries other than those specified for use with this product.
Take care not to short-circuit the positive (+) and negative (-) battery terminals with a metal object.
When replacing the batteries, turn off this product and unplug the AC adapter from the mains power
outlet. Then check that the portable unit is turned off before opening the battery cover.
WARNING
Do not use old and new batteries together, and do not use different types of batteries together.
Do not use batteries that are damaged, misshapen or leaking fluid.
To prevent battery depletion, remove them from the product if it will not be used for a long period.
If there is any fluid leakage from a battery, immediately stop using that battery and contact a Wacom
Customer Support Centre to request repairs to the portable unit. If you continue to use the battery,
the leaked fluid will cause further damage and malfunctions.
CAUTION
The portable unit takes AA-size alkaline batteries. When using batteries other than those supplied
with the product, read the battery instructions carefully and follow those instructions to ensure that
you use the batteries correctly.
Do not subject the batteries to strong impacts.
Do not store the batteries at extreme temperatures.
Batteries should be disposed of in compliance with your local laws and regulations.
Do not replace the batteries while your hands are wet or sweaty.
6
Page 8
1.2.2 Notes on Handling the AC Adapter
Note the following information to ensure that you handle the AC adapter safely.
Improper handling can result in fire, electric shock, overheating or malfunction.
WARNING
This AC adapter is intended solely for use with the nextbeat and should not be used with any other
product.
Do not use transformers intended for overseas travel (electrical or electronic or for heating appliances)
or dimmer units designed for fluorescent light fixtures.
If the adapter is behaving abnormally (such as emitting smoke or producing an unusual noise or
odour), immediately turn the nextbeat off and unplug the AC adapter from the mains power outlet.
Once you are sure that it is no longer emitting smoke, contact your Wacom Customer Support Centre
and request that the adapter be checked.
If you do not intend to use the AC adapter for an extended period, unplug it from the mains power
outlet as a safety measure and store the adapter in a secure location out of the reach of small
children.
Never attempt to disassemble, modify or conduct your own repairs on the adapter.
Do not unplug the adapter with wet or sweaty hands.
Do not use the AC adapter if a liquid (water, juice, pet urine, etc.) has been spilled on it or if a foreign
object has been inserted into the adapter. If the adapter has been affected by liquid or a foreign
object, leave the adapter unused and contact the Wacom Customer Support Centre for assistance.
Do not use or store the AC adapter in locations exposed to high levels of humidity, dust or fumes. Be
particularly careful never to use it in locations where water is used, such as bathrooms.
Do not use the AC adapter if the plug or cord is damaged.
Do not put the plug or cord in your mouth or hold it between your teeth.
Do not touch the AC plug directly with your fingers or a metal object.
Do not step on, pull or strongly twist the AC adapter or its cord.
Do not heat the AC adapter or its cord or move them too close to a fire or heater.
Do not use the AC adapter in ways that apply excessive force to the cord (particularly close to either
end of the cord).
As a safety precaution, do not touch the AC adapter or the nextbeat during a thunderstorm.
Do not damage or attempt to modify the AC adapter or its cord.
At regular intervals, unplug the AC plug from the power outlet and use a dry cloth to remove any dust
that has accumulated on the plug.
Ensure that the AC plug is firmly pushed all the way into the power outlet.
When unplugging the AC plug for the AC adapter from the power outlet, first turn the power off on the
nextbeat and then unplug the adapter by grasping the AC plug and pulling it out.
Take care to ensure that pets do not chew on the cord.
7
Page 9

1.3 Notes on Using This Product
1.3.1 LCD Screen
●
The LCD screen is manufactured using highly advanced precision technology.
Dots that are permanently black or white may appear on the screen. This is normal and does not indicate a fault.
It is also normal for the display image to appear distorted briefly when the power is turned off.
●
A residual image may appear if the same image is left displayed on the screen for a long period (screen burn-in).
●
When the product is used in very cold conditions, images may not be displayed correctly or may appear dark.
The display will return to normal when the temperature rises.
1.3.2 Music Files
You should always make backup copies of your music files.
1.3.3 Disclaimers
●
Wacom accepts no liability whatsoever for any loss or damage arising from the use of this product during fires,
earthquakes or incidents caused by a third party, from deliberate or unintentional misuse of the product by the
customer or from its use in any other abnormal circumstances.
●
Wacom accepts no liability whatsoever for any incidental or secondary loss or damage arising from the use or
the inability to use this product (including loss of business revenues, interruption to business, and data
corruption or loss).
●
Wacom accepts no liability whatsoever for any loss or damage arising from the use of this product in ways not
described in this manual.
●
Wacom accepts no liability whatsoever for any loss or damage arising from malfunctions that occur when this
product is used in combination with other equipment.
1.3.4 FCC NOTICE (for U.S customers)
This device complies with Part 15 of the FCC Rules. Operation is subject to the following two conditions: (1) this
device may not cause harmful interference, and (2) this device must accept any interference received, including
interference that may cause undesired operation.
This equipment has been tested and found to comply with the limits for a Class B digital device, pursuant to Part
15 of FCC Rules. These limits are designed to provide reasonable protection against harmful interference in a
residential installation.
This equipment generates, uses and can radiate radio frequency energy and, if not installed and used in
accordance with the instructions, may cause harmful interference to radio communications. However, there is no
guarantee that interference will not occur in a particular installation.
If this equipment does cause interference to radio or television reception, which can be determined by turning the
equipment off and on, the user is encouraged to try to correct the interference by one or more of the following
measures:
●
Reorient or relocate the receiving antenna.
●
Increase the separation between the equipment and receiver.
●
Connect the equipment into an outlet on a circuit different from that to which the receiver is connected.
●
Consult the dealer or an experienced radio/TV technician for help.
The changes or modifications not expressly approved by the party responsible for compliance could void the
user's authority to operate the device.
1.3.5 IC NOTICE (for Canadian customers)
Operation is subject to the following two conditions: (1) this device may not cause harmful interference, and (2)
this device must accept any interference received, including interference that may cause undesired operation.
8
Page 10

1.3.6 Equipment Certification
Declaration of Conformity
Hereby, Wacom Co.,Ltd., declares that this equipment is in compliance with the essential requirements and other
relevant provisions of Directive 1999/5/EC.
Reuse, recycling, and recovery.
You are urged to recycle this product when replacing it with a newer product or when it has
outlived its useful life by bringing it to an appropriate collection point for recyclable materials in
your community or region. By doing this, you can help improve the environment of your
community as well as minimize the potential negative effects created should any hazardous
substance that may possibly be present within waste material reach the environment during the
disposal process.
Within the European Union, users are required not to dispose of Waste Electrical and Electronic
Equipment (WEEE) as unsorted municipal waste, according to the Directive 2002/96/EC of the
European Parliament and of the Council of 27 January 2003, or the corresponding local laws of
the Member States. Products for which this is applicable will be marked with the WEEE symbol shown at the
beginning of this note unless this is not feasible because of the size or the function of the product. Wacom
products are subject to the Directive 2002/96/EC and therefore you should always collect them separately and
bring them to the appropriate collection point in your community or region.
Discarding the battery in your general household waste can be harmful to the environment.
When disposing of the battery, follow appropriate local guidelines and regulations.
In accordance with the Directive on Batteries and Accumulators and Waste Batteries and Accumulators (2006/66/
EC), battery collection and recycling schemes should be in place in all EU Member States by 26th September
2008. Such schemes may already be available in your country, in which case the battery should not be disposed
of in your general household waste. For further information contact your local solid waste authority.
Nextbeat complies with the European Union RoHS Directive 2002/95/EC (RoHS Directive).
1.3.7 CE Declaration
The X-1000 touch-type DJ system has been tested and found to comply to the following harmonized European
Norms:
●
EN 55013:2001+A1:2003+A2:2006 (electromagnetic emissions)
●
EN 55020:2007 (electromagnetic immunity)
●
EN 60065-1:2002+A1:2006 (safety)
●
EN 300 440-2 V1.2.1 (electromagnetic compatibility and radio spectrum matters)
●
EN 301 489-1 V1.8.1(2008-04) (electromagnetic compatibility and radio spectrum matters)
●
EN 301 489-3 V1.4.1(2002-08) (electromagnetic compatibility and radio spectrum matters)
The Wacom power adapters have been tested by their manufacturers and found to comply to the following
harmonized European Norms:
●
EN 55024:2003 (electromagnetic immunity)
●
EN 55022:2006 (electromagnetic emissions)
●
EN 61000-3-2:2006 (electromagnetic emissions)
●
EN 61000-3-3:2005 (electromagnetic emissions)
●
IEC 60950-1:2005 (safety)
Based on the results of these tests, Wacom declares that the above mentioned device conforms to the European
Council Directive 1999/5/EC and indicates this conformity by the CE-sign on each device.
The device must be installed and operated always in strict accordance to the instructions given in this manual.
Any changes or modifications to this product that were not specifically authorized by Wacom will invalidate this
declaration.
9
Page 11

1.3.8 FCC Radiation Exposure Statement
This equipment complies with FCC radiation exposure limits set forth for an uncontrolled environment. End users
must follow the specific operating instructions for satisfying RF exposure compliance. This transmitter must not be
co-located or operating in conjunction with any other antenna or transmitter.
1.3.9 INDUSTRY CANADA (CANADA ONLY)
This Class [B] digital apparatus complies with Canadian ICES-003.
Cet appareil numérique de la classe [B] est conforme à la norme NMB-003 du Canada.
1.3.10 Trademark Information
●
Wacom and nextbeat are registered trademarks of Wacom Co., Ltd.
●
Windows is a registered trademark of the Microsoft Corporation of the U.S. registered in the U.S. and other
countries.
●
Macintosh is a registered trademark of Apple Inc. of the U.S.
●
All other product names are trademarks or registered trademarks of their respective holders. The ™ and ®
symbols are not used in this manual to indicate trademarks or registered trademarks.
1.3.11 Notes
Copyright for the firmware is retained by Wacom Co., Ltd.
1
Unauthorized copying or duplication of all or any part of the firmware or the information in this manual is strictly
2
forbidden.
The firmware, the information in this manual and the product specifications are all subject to change without
3
prior notice.
1.3.12 About This Manual
This manual explains how to connect this product and describes its functions and how to use them. For basic
information on using external equipment such as speakers, headphones or computers, refer to the instruction
manuals supplied with the respective equipment.
1.3.13 Copyright Information
Recordings you have made cannot be used without authorization from the copyright holder except where that use
is solely for the purpose of personal enjoyment.
1.3.14 Concurrently performing units
You can have up to 6 units running at the same time.
If you attempt to run 7 or more units at the same time, the base unit levels meter flashes and you cannot start up
the 7th or any further additional units.
10
Page 12

1.4 Features of nextbeat X-1000
This product is a standalone DJ console that incorporates touch sensors. It provides all the basic
functionality required by a professional DJ, as well as a portability function that allows for new ways to
play, expanding the range of options open to the DJ. It also features a lightweight, compact design that
makes it easy for the DJ to carry around and use in a range of different environments.
Touch sensor
■
The circular touch sensor allows the user the flexibility to quickly switch between an analogue style turntable,
•
an effects processor and a sampler.
It also provides separate, independent touch sensors for controlling the pitch fader, volume fader and cross
•
fader.
For the volume fader and cross fader, you can also choose between Normal mode, which is a touch slide
•
mode that utilizes fail-safes, and Absolute mode, which uses direct touch operation to provide dynamic
control.
New style
■
The nextbeat features 2 turntables, a 2-channel mixer, a sampler and an effects processor. In one machine,
•
you have all the functionality a DJ needs for playing music.
The lightweight, compact design makes it easy to carry around. You can set it up anywhere you like.
•
You can detach the portable unit and use it for extended periods via wireless communication. This provides
•
a portable play function that lets you use the console in front of your audience as if you were playing an
instrument.
Fully digital
■
The nextbeat supports the WAV, AIFF, MP3 and AAC-LC music file formats.
•
It also comes with a USB port that allows you to copy music files on a computer without removing the CF
•
card.
The Sampler function can be used to directly sample digital sound sources, letting you sample with no loss
•
of audio quality. You can even sample audio up to one full track in length.
Other Features
■
A 3-band isolator EQ is provided for each channel.
•
A total of 6 effects with BPM sync.
•
3.5-inch LCD panel with adjustable brightness and contrast and wide viewing angle. The panel displays
•
information such as the track information, waveform, cue points and loop points for control that is both
intuitive and highly sophisticated.
You can select either Auto or Manual detection for BPM.
•
The Master Tempo function lets you vary the playback speed without changing the pitch.
•
Comes with a microphone input socket that you can run through different effects.
•
Features analogue output and S/PDIF digital REC OUT sockets for the master output, allowing digital
•
recording to a DAW. Also comes with independent audio output sockets for each channel so that an external
mixer can be used for the mixing.
Supports continuous playback of the tracks from a CF card, making it a music player as well as a DJ
•
console.
11
Page 13

1.5 Supported Music File Formats
Supported music
file format
WAV Audio format
Sampling rates : 44.1 or 48 kHz
No. of channels : 1 (mono) or 2 (stereo)
Bit depth : 16/24
File extension : .wav
Tags : Track name and artist name information supported
AIFF Audio format
Sampling rates : 44.1 or 48 kHz
No. of channels : 1 (mono) or 2 (stereo)
Bit depth : 16/24
File extensions : .aif
Tags : Track name and artist name information supported
MP3 Audio format
Compliant with MPEG-1 Audio Layer 3.
Sampling rates : 32, 44.1 or 48 kHz
No. of channels : 1 (mono) or 2 (stereo)
Bit rates : 32, 40, 48, 56, 64, 80, 96, 112, 128, 160, 192, 224, 256 or 320 kbps
File extension : .mp3
Tags : ID3 tag (ID3 ver. 1.0, 1.1, 2.2, 2.3 or 2.4) track names and artist name
Details
information supported.
AAC-LC Audio format
Sampling rates : 22.05, 44.1 or 48 kHz
No. of channels : 1 (mono) or 2 (stereo)
Bit rates : Compliant with ISO/IEC 14496-3
File extensions : .mp4, .m4a
Tags : Track name and artist name information supported
*Note that this does not apply to .aac files.
The output sound format is fixed at a sampling frequency of 44.1 kHz with 16-bit quantization.
You can use tracks up to 80 minutes long.
For the best possible DJ play, we recommend using WAV or AIF files.
Operating restrictions such as those listed below apply to compressed file formats such as MP3 and AAC-LC.
There is a delay until tracks can be played after they are loaded. Also, you cannot use Time Search to jump to areas where
•
decoding has not been completed.
Fast-forward and rewind using the centre pad is at double-speed for AAC files and at 1.5x speed for MP3 files.
•
If you begin sample playback immediately after sampling, there is a delay before the sample starts playing.
•
If the sampling data includes a compressed file, there may be a delay before sample playback begins.
•
If the sampling data includes a compressed file, there may be a delay before the nextbeat starts up.
•
12
Page 14
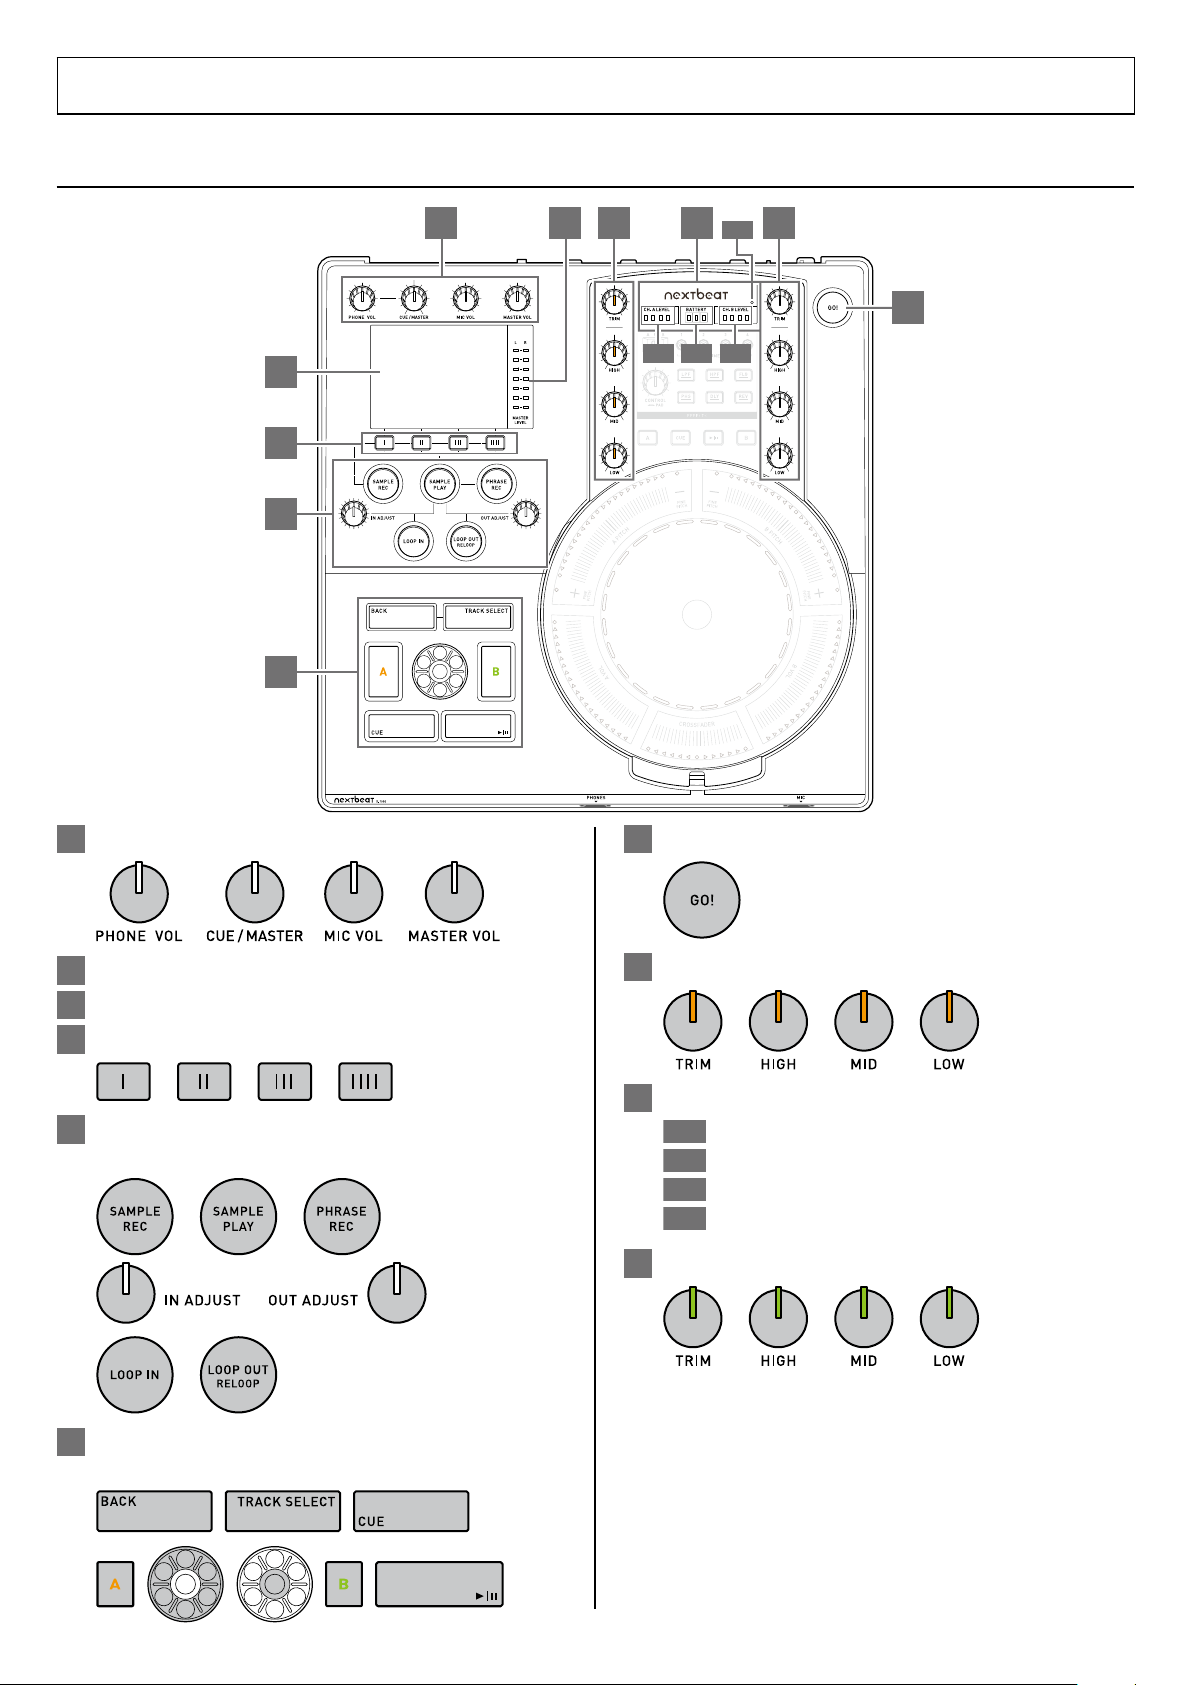
1.6 Component Names and Functions
Base unit
A H I J
G
C
B
D
E
F
I-1 I-3
I-4
I-2
A
B
C
D
E
F
G
H
I
I-1
I-2
I-3
I-4
J
1.6.1 Control Panel
Adjust the input/output volume.
LCD screen
Levels meters (master output) ➞ P.24
FUNCTION buttons (1-4)
➞
P.16
➞
Used by the sampler and loop functions.
P.27, 31-33
➞
P.19, 24, 26
➞
P.23, 25, 27, 31, 32
Press to detach the portable unit. ➞ P.34
Adjusts the EQ/trim for channel A. ➞ P.23
Levels meter area
Battery level meter ➞ P.35
Level meter (channel A) ➞ P.23-24
Level meter (channel B) ➞ P.23-24
Power indicator ➞ P.35
Adjusts the EQ/trim for channel B. ➞ P.23
Used for basic playback.
P.19-22, 25, 31, 36
➞
13
Page 15

K
L
K-2
M
K-3K-1
M-9 M-10N-1
M-7
M-5
M-8
M-6M-2
K-4
M-1
M-4
M-3
N
Portable Unit
O
P
You can detach the portable unit and use it via
wireless communication. �P.34
Portable unit
(front)
(side)
1
2
K
Used in the effects functions. ➞ P.28-30
K-1
K-2
K-3
K-4
L
M
M-1
M-2
M-3
M-4
M-5
M-6
M-7
M-8
M-9
M-
10
N
N-1
O
P
Used for basic playback. ➞ P.35
Effects channel selector switch
TIME buttons (1-4)
Effect selector buttons
Effects control
Touch sensor area
Controlled by tapping or sliding the fingers. LEDs light to show
the status.
Pitch fader (channel A) ➞ P.22
Pitch fader LED (channel A)
Volume fader (channel A) ➞ P.24
Volume fader LED (channel A)
Pitch fader (channel B) ➞ P.22
Pitch fader LED (channel B)
Volume fader (channel B) ➞ P.24
Volume fader LED (channel B)
Cross fader ➞ P.24
Cross fader LED
Centre pad ➞ P.20-23, 28-30, 32
Used to control the turntable and effects, and for sampling.
Centre pad LED
FUNCTION buttons (1-4) ➞ P.35
Used in the sampler functions. ➞ P.35
14
Page 16

1.6.2 Front Input/Output sockets
Headphone output socket
Microphone input socket
Headphones
(third-party product)
Microphone
(third-party product)
RCA cable
To connect to both
channels, use 2 cables.
POWER switch
DC input socket
Channel B L/R
output socket
Channel A L/R
output socket
Master L/R
output socket
SPDIF REC
output socket
USB port
AC adapter (accessory)
Insert into the
power outlet.
Power cable
(accessory)
Amplifier,
speakers, etc.
Recorder, etc. Computer
CF card
(accessory or
third-party
product)
Coaxial cable
(third-party product)
USB cable
(accessory)
Mixer
Connect using the RCA cable provided. To
connect 2 or more cables, purchase a third-party
cable.
*
Connect to channel A, to channel B or to both
channels.
*
Ejectbutton
Withcapremoved
CFcard
slot
USB port
1.6.3 Rear Input/Output sockets
15
Page 17

1.6.4 Display screen
Folder name
Cursor
Track selection checkmark
• On tracks that have already
been played, a track selection
checkmark is added if more
than 3/5 of the performance
time has been played.
Track name Artist
Playback time
Playback indicator
Remaining playback time
Channel A
Artist
Cue point
Current playback point
Current playback point
Cue point
Channel B
Channel name
Track name
Pitch parameter/
BPM parameter
Playback track waveform
(3 seconds before and after)
Playback track waveform
(complete)
Auto BPM settings
(channel A/channel B)
Master tempo settings
(channel A/channel B)
Centre pad position display
Start points (1-4)
End point
Memory content
(samples)
Orange indicates channel A information and green indicates channel B information.
The nextbeat cannot display double-byte characters. Use only single-byte characters.
•
Track selection screen
■
Playback screen (normal playback)
■
Playback screen (sample playback)
■
16
Page 18

1.7 Starting Up &
CF cardEject button
POWER switch
Insert into the
power outlet.
DC input socket
AC adapter
Power cable
Shutting Down
1.7.1 Preparing for Startup
Before connecting external equipment,
always ensure that this product is turned off
and unplugged from the mains power outlet.
[Important]
Always turn the nextbeat off before inserting a
CF card.
Insert a CF card containing your music into
1
the CF card slot.
Remove the CF card slot cap.
1
Connect the power to the nextbeat.
3
Connect the cables in the sequence 1 to 3 as
•
shown.
1.7.2 Starting Up
If an amplifier or speakers are connected,
always turn the nextbeat on first to avoid the
risk of damaging the other products.
2
[Important]
Inserting the CF card in the wrong direction
could damage the nextbeat or the CF card.
Insert the CF card with the front side
upwards and the card terminals facing
towards the nextbeat.
•
3
•
Connect any required external equipment to
2
the nextbeat.
➞
•
Insert the CF card.
To remove the CF card, press the eject button.
Fit the cap back onto the slot.
You can also download tracks directly from a
computer to a CF card inserted into the nextbeat.
P.18
➞
P.15
For more information on connecting external
equipment, refer to the instruction manuals
supplied with the respective equipment.
Turn the nextbeat on by pressing the POWER
1
switch.
The track selection screen appears when startup
•
is completed.
To start playing ➞ P.20 "3.2 Track Selection"
•
The information retrieval window for sampling data
•
appears at startup. Press to extract the
sampling data. Pressing discards the
sampling information.
If you provide no input for 10 seconds, information
retrieval begins.
If there are a lot of tracks on the CF card, startup
•
processing will take some time.
To change the preferences
If necessary, you can change the basic settings used by
•
the nextbeat. ➞ P.36
1.7.3 Shutting Down
If an amplifier or speakers are connected,
always turn the nextbeat off last to avoid the
risk of damaging the other products.
Turn the nextbeat off by pressing the POWER
1
switch.
If you press the POWER switch immediately after turning
•
the nextbeat off, you may not be able to start the
nextbeat up. If this happens, leave the nextbeat turned
off for a short time and then press the POWER switch.
Keeping the data from the last session
When you restart the nextbeat, the tracks selected in the last
•
session, along with the loop and cue points, are all erased.
Sounds sampled using the sampling function are retained
•
even when the nextbeat is turned off. However, if the data
on the CF card has been changed, such as by adding or
deleting tracks on the card, the data is erased when you
turn the nextbeat back on.
17
Page 19

3
nextbeat rear panel
CF card slot
USB port
USB cable (accessory)
To the USB port
on a computer
CF card
(accessory)
2 Before You Go Live
2.1 Transferring Tracks to CF Cards
You can download tracks from a computer to a
CF card that is inserted in the nextbeat.
2.1.1 System requirements
Windows
Recommended OS : Microsoft Windows Vista SP1
Microsoft Windows XP SP3
(must be pre-installed at shipment)
Ports : USB port
Macintosh
Recommended OS : Mac OS X (10.4) or later
(must be pre-installed at shipment)
Ports : USB port
•
Wacom offers no guarantee that this product will run on
all computers that satisfy these system requirements.
Connect the nextbeat to the computer.
[Important]
When connecting the USB cable, check
•
that you are inserting the connector into
the port in the correct direction. Hold the
connector level and straight and do not use
excessive force. When unplugging the
cable, ensure that you pull the connector
out level and straight.
You can also transfer music using a CF
•
card reader without using the nextbeat.
CF card (accessory)
Third-party CF cards (Type 1 cards) can also be used.
While all brands of CF card have been confirmed as
operating successfully with the nextbeat, WACOM
gives no guarantee that the nextbeat will operate
successfully with all CF cards.
[Important]
Do not use the following connection modes as
doing so could cause problems to occur:
•
Using multiple USB connections on the same
computer
•
Connecting via a hub
2.1.2 Downloading
[Important]
•
Always turn the nextbeat off before inserting a
CF card.
•
Inserting the CF card in the wrong direction
could damage the nextbeat or the CF card.
Insert the CF card with the front side upwards
and the card terminals facing towards the
nextbeat.
Turn the nextbeat off by pressing the POWER
1
switch.
Insert the CF card.
2
•
After removing the CF card slot cap and inserting
the CF card, fit the cap firmly back onto the slot.
➞
P.17 "1.7.1 Preparing for Startup", step 1.
18
Turn the nextbeat on by pressing the POWER
4
switch.
The computer recognises the nextbeat as an
•
external device and you can now edit the
information on the CF card from your computer.
Open the removable disk on your computer
5
screen.
Open the folder containing the music files you
6
want to download and then drag & drop them
to the removable disk to download them.
[Important]
Do not disconnect the USB cable while the
files are being transferred.
Once downloading is completed and it is safe
7
to disconnect the hardware, turn the nextbeat
off by pressing the POWER switch.
[Important]
When you turn the nextbeat on, it detects
•
the files on the CF card and recognises
them as music files. For this reason, you
must always restart the nextbeat before
trying to play downloaded tracks.
When you restart the nextbeat, the tracks
•
selected in the last session, along with the
loop and cue points, are all erased.
P.17 "Keeping the data from the last
➞
session"
Page 20

3 Basic Operation
Selected CUE
sound : 100%
Master
sound : 100%
Selected CUE sound : Master sound
50% : 50%
3.1 Switching Channels
Controls Used
When channel A is selected
When channel B is selected
The nextbeat has 2 channels: A and B.
You can do the following in the selected channel:
Play, pause, use cues, use the centre pad, monitor the
channel in the headphones, use the loop and sampler
functions.
3.1.1 Channel Switching and the LEDs
To switch to channel A
Press
To switch to channel B
Press
When you switch channels, the working buttons
and LEDs change to the colour for that channel
(orange for channel A and green for channel B).
Depending on the operation mode, the settings,
the circumstances of your performance and how
the nextbeat is adjusted, some LEDs and buttons
may not light up.
.
.
3.1.2 Adjusting the Headphone Sound
Adjusting the balance
■
This adjusts the balance between the selected
CUE sound (the selected channel (A or B)) and
the master sound.
19
Adjusting the volume
■
Page 21

3.2 Track Selection
Track name Artist
Previous tracks are overwritten.
•
In situations where tracks can be uploaded to both channels
•
in step 2, the tracks are uploaded to the selected channel.
Controls Used
Upload the tracks to be played to the channel.
Initial track selection
When you start up the nextbeat, the track selection screen
appears, so you don't need to press to start
selecting tracks.
Press .
1
The track selection screen appears.
•
Auto cue function
Normally, a cue point is added at the beginning of each
track when the tracks are loaded.
If "Auto CUE: OFF" is selected in the Preferences, a cue
•
point is added at the beginnings of tracks that include a
period of silence.
If "Auto CUE: ON" is selected, when tracks begin with a
period of silence, a cue point is added at the end of the
silence.
The LED light rotates around the centre pad while the
•
nextbeat is searching for an auto cue point. You cannot
play a track until a cue point is located.
If the period of silence lasts 30 seconds or longer, the cue
•
point is set at the beginning of the track.
3.3 Play/Pause
Controls Used
Turn the dial to select a track name.
2
Select a folder name and press the centre of the
•
button to open the folder. To close the folder,
press .
Press the centre to upload the track to
3
the channel.
The uploaded track is paused when you upload it.
•
"Loading...." appears while tracks are loading. You
•
cannot start playing tracks while the tracks are still
loading.
You can upload tracks one at a time to each channel.
To prevent you from accidentally stopping the
track currently being played, the track is
automatically uploaded to a vacant channel.
The following priorities are used:
Channels with no uploaded tracks (A
1
Channels with paused tracks (or where the volume or cross
2
fader volume is 0) (A ➞ B)
➞
B)
3.3.1 Playback (normal playback)
Select a channel.
1
Press .
2
The selected tracks start playing.
•
If Auto CUE is set to "ON", you cannot use
•
playback immediately after track selection.
You can begin playback only after lights
up.
Playback screen
20
Page 22

Centre pad
Lit LED rotates
during playback.
Played portion
Playback point
(paused position)
During fast-forward or
rewind, these lit LEDs also
run in the opposite direction
to the running LED.
Running LED
Fast-forward Rewind
3.3.2 Pause
While a track is playing, press .
1
The track is paused.
•
The LED flashes while the track is paused.
•
Press again to resume playback.
•
When a track is paused, the rim of the centre pad
•
represents the length of the paused track and the
LEDs light to show how much of the track has
played (time search).
3.4 Fast-forward/Rewind
During playback, slide your fingers firmly
1
around the centre pad.
Should generally be operated using at least 2
fingers.
The fast-forward/rewind speed varies according
to how fast you move your fingers.
Double-tapping moves the playback point to the
•
tapped location.
Once you start loading MP3 or AAC files, the Time
•
Search function does not work until track data
extraction is completed.
3.5 Setting Cue Points/ Cued Playback
Controls Used
Setting cue points makes it easy to skip back to
the beginning of a track (cued playback). (Cue
points are set at the beginning of each track
immediately after uploading.)
21
Page 23

3.5.1 Setting cue points
Cue point reset.
Fine pitch area
Allows still finer adjustment
(0.05% increments).
0%
Slow
0%
Current
speed
Fast
Fine pitch
area
Current speed
Speed changed in
0.05% increments
(Fine pitch adjustment)
3.6.1 Adjusting the speed with
Pause the track in the place where you want
1
to set the cue point.
Press .
2
The LED flashes twice and then stays lit.
•
Setting cue points may not be available while the
•
tracks are still loading.
3.5.2 Cued playback
the pitch faders
Adjust the speed using the left and right pitch
faders (channel A/channel B).
You can adjust the speed in 0.5% increments
(-10% to +10%).
E.g.
To increase the speed on channel A by 6.25%
Slide from the current speed in the + direction
1
by 6 LEDs.
During normal playback, press .
1
Playback pauses at the set cue point.
•
Press again (hold down the button).
2
Playback begins from the cue point.
•
When you take your finger off the button, playback
•
again pauses at the cue point.
If you press during cued playback, the
track starts playing normally.
3.6 Adjusting the Playback Speed
Controls Used
Tap the Fine pitch area (+).
2
You can check the Fine pitch using the pitch
•
parameters on the LCD screen.
To revert to 0%
Double-tap on or near 0%.
Pitch bend
While your finger is on the Fine pitch area (0.3 seconds or
more), you can use pitch bend. The speed reverts to the
original speed when you take your finger off the Fine pitch area.
22
Page 24

3.6.2 Adjusting the speed with
The speed increases in proportion
with the speed of finger movement.
Clockwise
The speed decreases in proportion
with the speed of finger movement.
Counter-clockwise
Master tempo settings (channel A/channel B)
A ????? B ?????
Levels meter
Channel A Channel B
HIGH
MID
LOW
the centre pad
3.7 Adjusting the Trim/EQ
Select the channel and slide your finger lightly
1
around the centre pad.
Should generally be operated using just 1 finger.
Controls Used
3.7.1 Adjusting the trim (gain)
You can adjust the trim while checking the effects
on the levels meter.
Turn the trim knobs (channel A/channel B) to
1
adjust the trim.
When you take your finger off the centre pad, the
playback speed reverts to the speed adjusted
using the pitch fader.
3.6.3 Master Tempo function
This function lets you maintain the same pitch as
the original sound when you change the playback
speed. (Startup setting: OFF)
Press the FUNCTION button to change the setting.
:
Toggles Master Tempo ON/OFF for channel A
:
Toggles Master Tempo ON/OFF for channel B
Adjust the trim so that the levels meter indicators
•
flash in unison.
3.7.2 Adjusting the EQ
You can adjust the intensity for each register
(high, mid or low) and use the boost and cut
functions.
Turn the EQ knobs (channel A/channel B) to
1
adjust the EQ.
Because this modifies the music file, there is some
•
loss of sound quality.
23
Page 25
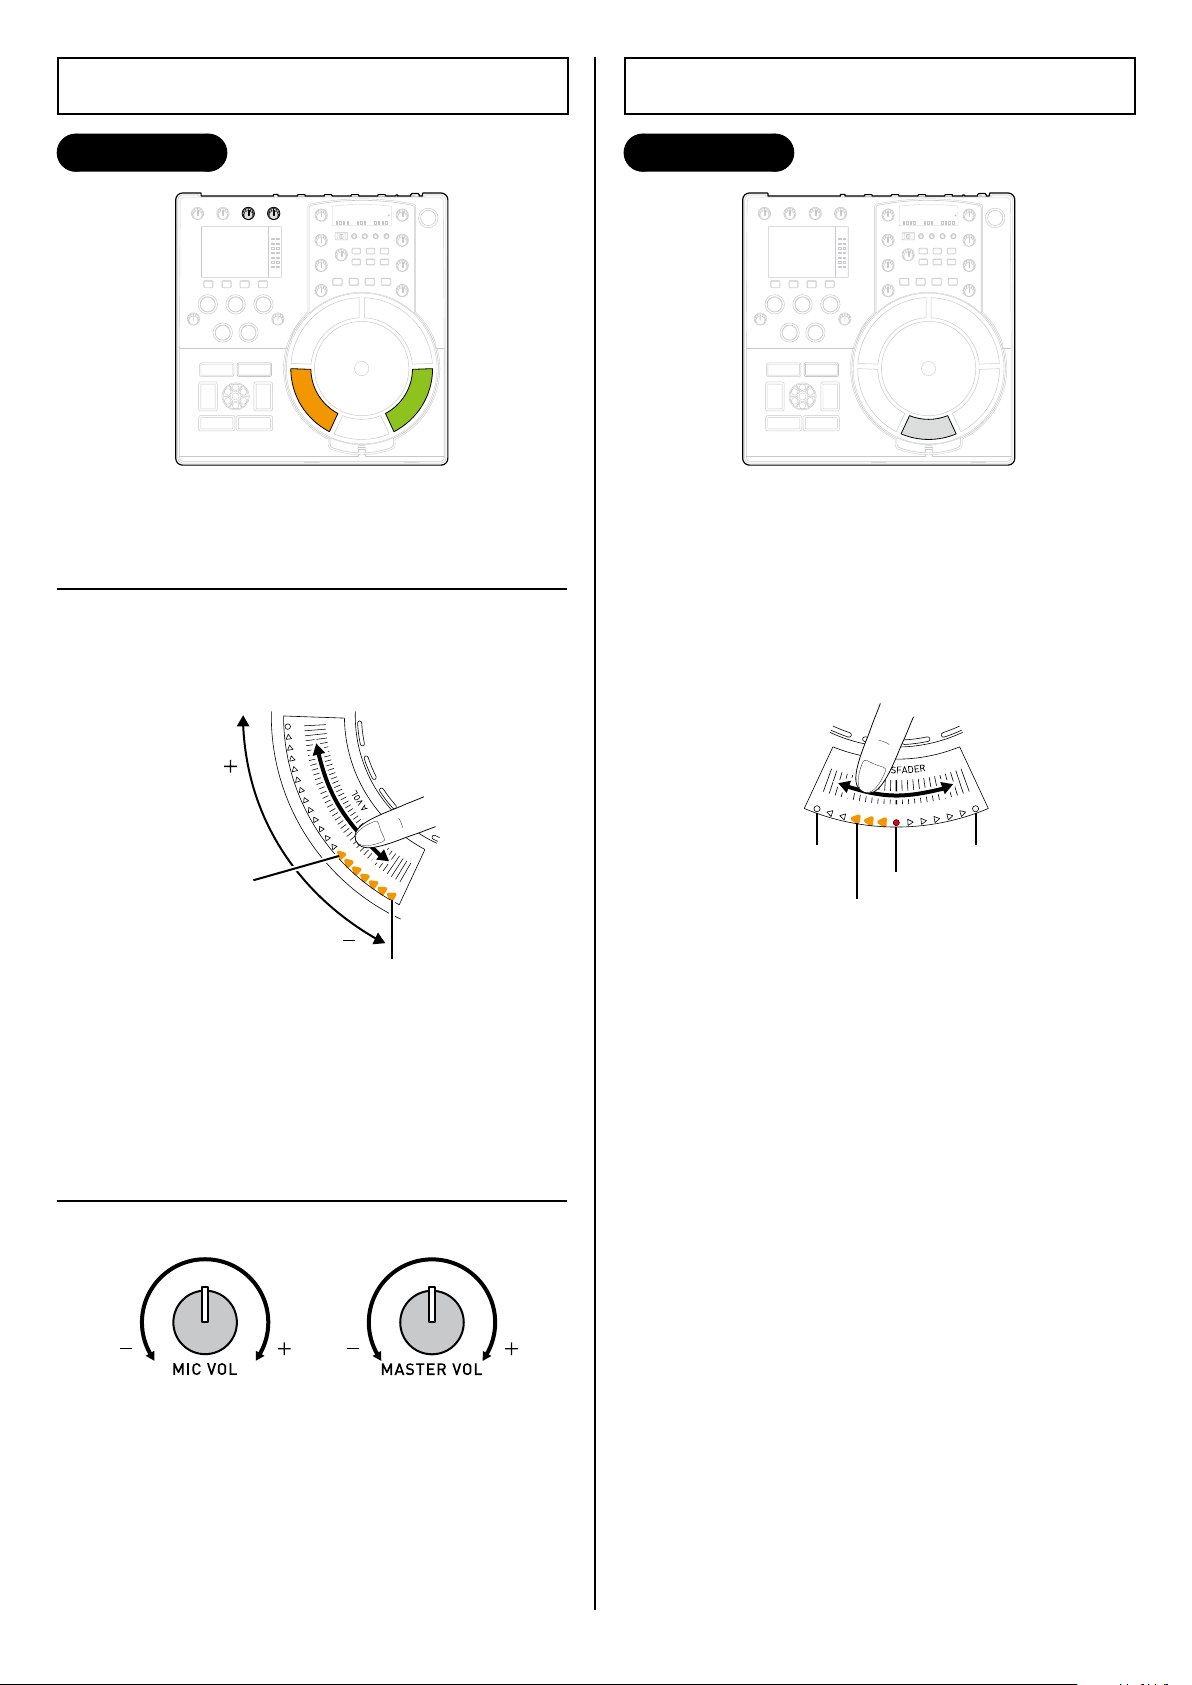
3.8 Adjusting the Volume
0
Current volume
Microphone volume Master volume
Channel A Channel B
Current volume balance
Channel A : Channel B
100% : 0%
0% : 100%
50% : 50%
3.9 Cross Fader Adjustment
Controls Used
3.8.1 Adjusting the volume for channel A/B
Touch the current position on the volume
1
fader (for channel A or channel B) and slide
your fingers up or down.
Controls Used
Use this feature to adjust the volume balance for
channel A or channel B.
Touch the current position on the cross fader
1
(for channel A or channel B) and slide your
fingers left or right.
The levels meter indicators (channel A, channel B,
•
master output) light up.
There are 2 modes of volume fader use. The mode
can be changed in the preferences. ➞ P.36
3.8.2 Other volume adjustments
To balance the volume for channels A and B at
50% each, double-tap the centre of the cross
fader.
There are 2 types of cross fader curve. You can
change the curve used in the preferences.
P.36
➞
24
Page 26

3.10 BPM Display
BPM parameter
Auto BPM settings (channels A & B)
The channel A BPM is now the same as that of
channel B.
Controls Used
This displays the BPM for the track being played.
2nd tap: Detection begins ➞ 4th tap: BPM
•
measured and displayed on the screen.
If the interval between any two taps is 3 seconds
•
or longer, BPM measurement is cancelled.
3.10.3 BPM matching
If you have already measured a BPM for channel
A or channel B, this function provides automatic
matching.
E.g.
To match channel A to the BPM for channel B
Press while holding down .
1
The nextbeat supports BPM rates between a
•
minimum of 80 through to a maximum of 180.
3.10.1 Auto BPM
Automatically measures the BPM when the track
is played. (Setting during playback uploading: ON)
Press the FUNCTION button to change the setting.
: Toggles BPM ON/OFF for channel A
: Toggles BPM ON/OFF for channel B
3.10.2 Manual BPM (Auto BPM: OFF)
This allows you to measure the BPM by tapping
a button. The BPM is based on the intervals
between the last 4 taps. (This can also be done
when Auto BPM is set to ON.)
Select a channel.
1
Tap the channel selector button ( or )
2
4 times in succession during playback.
25
Page 27

3.11 Microphone Input
Microphone input socket
Microphone
(third-party
product)
Controls Used
This allows you to connect a microphone (thirdparty product) to the nextbeat and use it to input
sound.
Use to adjust the microphone volume.
•
P.24
➞
You can only apply the selected effect to the
•
microphone sound when master output (M) is
selected on the effects channel selector switch.
Use the TIME buttons (1-4) and to adjust
the way the effect is applied.
P.28
➞
26
Page 28

Segment
playback status
Loop-out point
Loop-in point
To adjust loop points
Moves the
point forward
Moves the
point backward
Loop-in point Loop-out point
1/8
1/4
1/2
1/1
1/8 1/4 1/2 1/1
4 Advanced Operation
Turn or to adjust a loop point.
4.1 Loop Function
Reloop Function
Controls Used
This function repeatedly plays a specified
segment of a track.
Loop points remain set until the next time tracks are
selected or new loop points are set.
Pressing during normal playback begins loop
playback again using the same loop points.
Pressing during loop playback begins loop
playback again from the loop-in point.
4.1.2 Playing segments
You can use this function to split a loop into
segments and play that segment repeatedly.
4.1.1 Setting and playing from loop points
While a track is playing, press at the
1
loop-in point.
Once you have pressed , you cannot switch
•
channels until you press .
Press at the loop-out point.
2
Loop playback begins.
•
Press any of the FUNCTION buttons during
1
loop playback.
The split segment starts playing repeatedly.•
Press again to return to normal playback.
27
Page 29

4.2 Effects Functions
Channel BMaster outputChannel A
Intensifies the resonance effect
Controls Used
The nextbeat features 6 types of effects, which
can be applied to the sound from the selected
channel.
4.2.1 Applying effects
Use the effects channel selector switch to
1
select the channel.
To set the different effects parameters, see
2
each ➝ "4.2.2 Effects Parameter List" (below).
Use the 6 effects selector buttons to select an effect.
•
Use the 4 TIME buttons (1-4).
•
Use to adjust the effect.
•
Pressing the same effect selector button again
cancels the applied effect.
Controlling effects
Normally, effects control pad is set to OFF. If you push in
after selecting an effect, effects control pad is set to ON
and you can change the effects parameters using the
centre pad. (When you do this, the centre pad LED flashes
in 2 colours.)
You cannot turn effects control ON during sample
•
playback. Similarly, you cannot use sample playback
when effects control is ON.
4.2.2 Effects Parameter List
Low-pass filter/High-pass filter
Effect
Low-pass
filter
High-pass
filter
TIME
button
1 1/1 (beat)
2 4/1 (beat) 1 circuit of the centre pad
3 8/1 (beat) 2 circuits of the centre pad
4 16/1 (beat) 4 circuits of the centre pad
Effect selector
button
Adjusts the balance between the effected sound and the original sound.
Effects control: OFF Effects control: ON
1/4 circuit of the centre pad
The filter cutoff frequency
sweeps from 20 kHz to
120 Hz to 20 kHz in time
with the selected TIME
button beats (20 Hz to 8
kHz to 20 Hz for the
high-pass filter).
Function
Slide your fingers over the centre pad to
control the cut-off frequency.
Clockwise: Sweeps the filter cutoff
frequency from 20 kHz to 120 Hz to 20
kHz (20 Hz to 8 kHz to 20 Hz for the
high-pass filter).
Counter-clockwise: Sliding your fingers
from the touch start position does the
same thing with a resonance of 0%.
28
Page 30

Delay
Intensifies the effect
Intensifies the effect
Effect
Delay
TIME
button
1 1/4 (beat)
2 1/2 (beat) 1/2 (beat)
3 3/4 (beat) 3/4 (beat)
4 1/1 (beat) 1/1 (beat)
Effect selector
button
Adjusts the delay length.
Effects control: OFF Effects control: ON
1/4 (beat)
The delay sound
changes in time with
the selected TIME
button beats.
Function
Controls the delay effect by sliding around the centre
pad.
Clockwise: Allows you to adjust the feedback gain.
Counter-clockwise: Allows you to adjust the feedback
gain for the selected delay time for low-cut sound (with
120 Hz and below cut).
Flanger/Phaser
Effect
Flanger
Phaser
TIME
button
1 1/1 (beat)
2 4/1 (beat) 1 circuit of the centre pad
3 8/1 (beat) 2 circuits of the centre pad
4 16/1 (beat) 4 circuits of the centre pad
Effect selector
button
Adjusts the balance between the effects sound and the original sound.
Effects control: OFF Effects control: ON
1/4 circuit of the centre pad
The flanger/phaser
effect varies at intervals
in time with the
selected TIME button.
Function
Slide your fingers over the centre pad to
control the LFO.
Clockwise: Allows you to vary the LFO
interval for the flanger/phaser effect.
Counter-clockwise: Allows you to vary
the flanger/phaser LFO interval for lowcut sound (with 120 Hz and below cut).
29
Page 31

Reverb
Intensifies the effect
Effect
Reverb
TIME
button
1 Decay Time: 300 ms
2 Decay Time: 600 ms
3 Decay Time: 2 sec.
4 Decay Time: 4 sec.
Effect selector
button
Function
Adjusts the reverb amount.
Effects control: OFF Effects control: ON
Slide your fingers over the centre pad to control the
decay time.
Clockwise: The decay time varies from 0 to 6 seconds
in 1 circuit of the centre pad.
Counter-clockwise: The decay varies from 0 to 6
seconds in 1 circuit of the centre pad and a low-cut
effect is added (with 120 Hz and below cut).
The beat used for effects is the BPM of the channel selected when you turn effects ON. While you are using effects, the
•
BPM used does not change even if you change the selected channel.
The beat used for effects is the BPM current when you turned effects ON. Changing the BPM during nextbeat operation
•
does not change the BPM for the effects.
If no BPM is acquired, effects run at 120 BPM.
•
You cannot change the TIME button selection immediately after pressing the TIME button. The effect does not change until
•
after the effect has completed one full cycle.
30
Page 32

4.3 Sampler Functions
Unused memory
Controls Used
These functions enable you incorporate sounds
you have sampled from music tracks into your
performances and modify the sampled sound in
a variety of ways.
The nextbeat has 3 sampler functions:
At the start point, press the FUNCTION button
3
for an unused memory.
Sampling begins.
•
If you select a memory that already contains
•
samples, the new sample is recorded over the
previous samples.
Sampling function
•
Records (samples) part of a track and stores it in 4 areas
in memory.
Sampling is a function that extracts and records one
section of a track. The EQ and playback speed set when
sampling ends are applied to the sampled sound.
Sample playback function
•
Plays sampled sound using the centre pad.
Phrase recording function
•
This function plays phrases made up of sampled sounds
overlaid onto loop playback in the other channel.
4.3.1 Sampling function
Select a channel.
1
While a track is playing, press .
2
The four areas in memory are assigned to the
•
FUNCTION buttons (1-4) and the source tracks for
the sampled sounds are displayed at the bottom
of the screen.
Press the same FUNCTION button at the end
4
point.
Sampling ends.
•
To interrupt sampling
Press .
Also, if you press the buttons below, priority is given to
running the respective function.
* While you are sampling on channel A or B, pressing the
button for the same channel does not interrupt
sampling.
To sample an entire track
Hold down the FUNCTION button in step 3 for 2 seconds
or more.
(If you do this during loop playback, the nextbeat samples
everything between the loop-in point and the loop-out
point.)
Erasing sampled sound
Normally, sampled sounds are retained even when the
nextbeat is turned off. However, they are erased when you
restart the nextbeat in the following situations:
If the data on the CF card has been changed, such as by
•
adding or deleting tracks on the card
EQ and playback speed are also included in
sampled sound.
31
Page 33

4.3.2 Sample playback function
Start point 1
Start point 2
Start point 3
End point
Start point 4
Start point 4
Start point 3
Start point 1
Start point 2
Sampled sound
Played back from start
point 2.
Use this function to play sampled sound.
The selected sample is divided into 4 equal
segments and start points are allocated for each
segment on the centre pad.
Press the FUNCTION button for the sample
3
you want to play.
Trim, EQ, playback speed and volume adjustments
•
are applied to the sample.
Touch the location on the centre pad that you
4
want to play.
Playback loops sequentially from start point 2 ➞ 3
•
4 ➞ end point
➞
start point 1
➞
... and so on.
➞
When you touch the centre pad, playback begins
from the start point allocated to the place you
touch.
E.g. Playing the sample on channel A
Switch to channel A.
1
If you are playing a track on channel A, press
•
to pause the track, or set the volume fader
or cross fader volume to 0.
Press .
2
Channel A switches to sample playback mode.
•
Playback ends when you take your fingers off
5
the centre pad.
To adjust a start point
You can adjust the location of the last start point you
touched.
Adjust the start point location by turning .
To change an end point and reset a start point
If you turn to change an end point, the sample
is again divided into 4 equal segments and the start point is
reset.
To exit sample playback mode
Press .
•
You can also vary the trim, EQ and playback speed
•
settings for the sample. Setting the EQ knob to the centre
position selects the setting used during sampling.
You cannot exit sample playback mode or change the
•
channel while you are touching the centre pad.
Pressing loops playback of the sample even
•
when you are not touching the centre pad, but you
cannot exit sample playback mode while the sample is
playing. Pause the sample and then exit sample playback
mode.
You cannot turn effects control ON during sample
•
playback. Similarly, you cannot use sample playback
while effects control is ON.
32
Page 34

4.3.3 Phrase recording function
Example of phrase recording
Channel A
Channel B
Sample I playback Sample II playback Sample
III
playback
(Recording)
(Recording) (Recording)
Loop playback
(original track)
Loop playback
(original track + sample I)
Loop playback
(original track + samples I & II)
Phrase recording is a function you can use to create variations and layered loops (phrases). To create a
phrase, you play a loop on one channel and then use the other channel to overdub another sample onto
the first loop.
E.g. Phrase recording on channel A
Switch to channel A.
1
If you are playing a track on channel A, press
•
to pause the track, or set the volume fader
or cross fader volume to 0.
Press .
2
Channel A switches to sample playback mode.
•
While a track is playing on channel B, set a loop
point.
Press at the loop-in point.
3
To record a phrase during loop playback on
the other channel
The first time you press , the current loop point
becomes the loop point for phrase recording.
Press at the loop-out point.
4
Loop playback begins on channel B.
•
You cannot switch channels until you set the
•
loop-out point.
To adjust loop points
Switch to channel B.
1
Adjust the points by turning
2
Switch back to channel A.
3
or .
Press .
5
Recording begins.
•
Press the FUNCTION button for the sample
6
you want to play and then touch the centre
pad to begin sample playback.
The sound played in sample playback is recorded
•
(sampled).
The recorded sample is played in time with the
•
looped playback on the other channel.
Press again.
7
Recording ends.
•
You can overdub more original phrases by
•
repeating steps 5 to 7.
LED flashing: Recording standby
LED lit: Recording
To end phrase recording
Press .
•
The channel being used for phrase recording reverts to
•
sample playback mode.
You cannot select tracks during phrase recording.
33
Page 35

5 Detaching and Using
Loosen and
detach.
Press.
Mount in the
base unit.
Dedicated strap
(accessory)
For example, you can hold it like this:
5.3 Holding the Unit
the Portable Unit
You can take the portable unit out of the base
unit and then play from the portable unit via
wireless communication.
5.1 Detaching/Remounting the Unit
Detaching
■
5.4 Signal Reception
5.4.1 Effective signal range
The portable unit has an effective communication
range of around 10 metres.
Mounting
■
If the unit is too far from the base, performance
may falter or stop altogether.
When this happens, the levels meters on the portable unit
•
and base unit flash.
5.2 Attaching the Strap
During handheld playback, always use the
portable unit with the dedicated strap
looped around your wrist.
Using the portable unit without attaching
the strap could result in the unit accidentally
hitting people or objects, causing injury,
property damage or unit malfunction.
5.4.2 Obstacles
While the portable unit can communicate with the
base unit through a wall, note that the effective
signal range may be shortened in some
situations, such as where there is an intervening
metal door.
34
Page 36

5.5 Power Supply
Battery level meter
Power indicator
Lit: Power is being supplied from the base unit.
Off: Power is not being supplied from the base unit.
The indicator lights when the portable unit is
mounted in the base unit while turned on, and
turns off when the portable unit is removed.
PLAY/PAUSE
PHRASE REC
SAMPLE PLAY
CUE
* Parentheses ( ) indicate the corresponding buttons on the base unit.
Channel A selector
FUNCTION buttons
Channel B selector
5.6 Starting Up & Shutting Down
When it is mounted in the base unit, the portable
unit is powered from the base unit. When you
detach it from the base unit, the portable unit
runs on batteries.
When detached from the base unit, the portable
unit will run for a maximum of around 5 hours
with new alkaline batteries.
(The available time may vary slightly depending on
the room temperature and how the unit is used.)
Lighting pattern
Battery level
Starting Up
■
Mount the portable unit back in the base unit.
The portable unit starts up when you start up the
base unit.
Shutting Down
■
The portable unit shuts down when the base unit
is shut down. (This applies when the portable unit
is detached from the base unit.)
Auto power off
If you leave the portable unit unused for 15 minutes when it
is detached from the base unit, it automatically shuts itself
down.
To restart the portable unit, mount it back in the base unit.
Forced shutdown
To shut down just the portable unit, hold down the
buttons on the portable unit together for
roughly 5 seconds.
The batteries are fully charged.
The batteries are starting to lose power.
The batteries are nearly dead.
Replace the batteries now.
Running on batteries, the unit may quickly run out
of power when being used. Batteries should be
replaced quickly.
5.7 Portable Unit
Use the buttons and pads in exactly the same way as when the portable unit is mounted in the base unit.
●
Some buttons have the same function as buttons on the base unit. These are used in the same way as the
●
base unit buttons.
35
Page 37
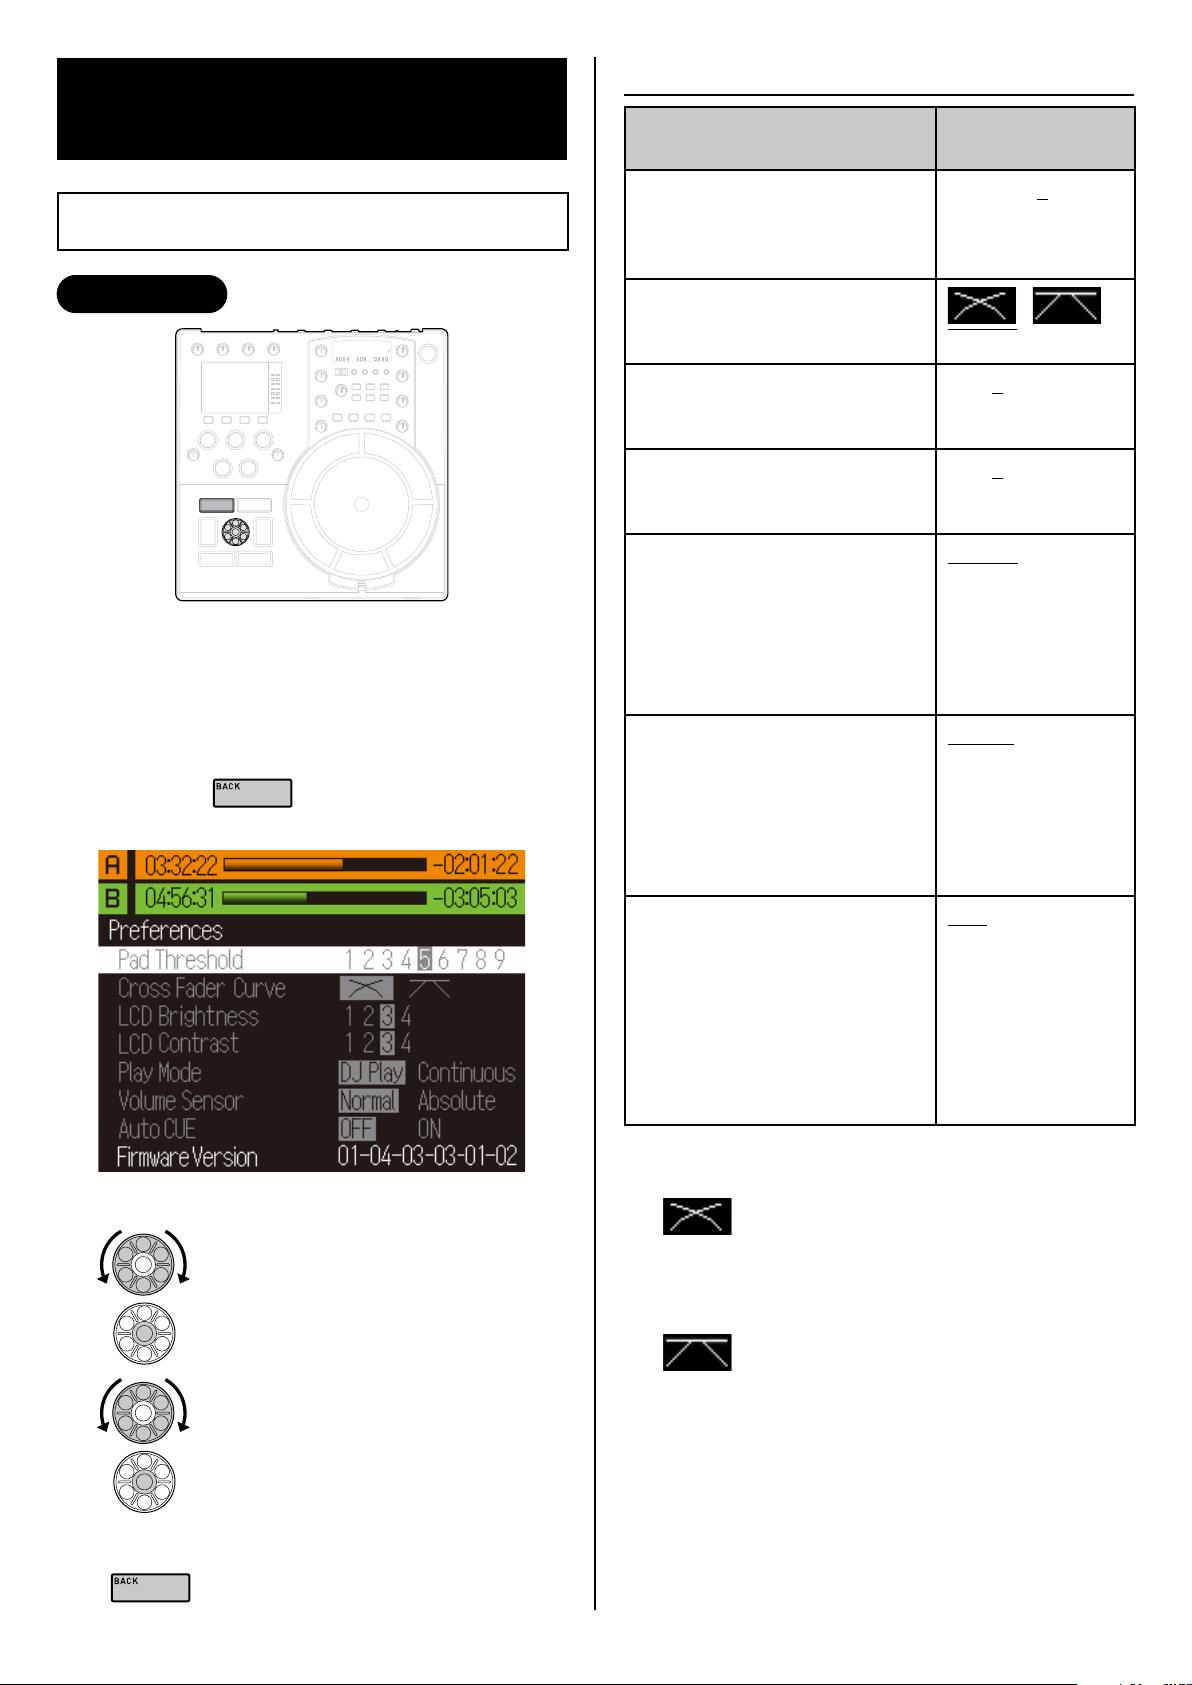
6.1.1 Preference Settings
6 Appendix
6.1 Changing the Preferences
Controls Used
You can use this procedure to change the
nextbeat's basic settings.
You cannot change the preferences during track
selection.
Hold down for 2 seconds or longer.
1
The Preferences screen appears.
•
Item
Pad Threshold
Changes the threshold value for
centre pad pitch bend or fastforward. (Low ➞ ➞ High)
Cross Fader Curve
Sets the type of cross fader
curve. (➞ "Cross fader curve")
LCD Brightness
Sets the LCD brightness.
(Low ➞ ➞ High)
LCD Contrast
Sets the LCD contrast.
(Low ➞ ➞ High)
Play Mode
DJ Play: Allows all DJ
•
operations.
Continuous: Plays the tracks in
•
a specified folder on the CF
card continuously. Disables all
DJ operations.
Volume Sensor
Normal: Sliding your fingers
•
over the touch sensors adjusts
the volume.
Absolute: Touching any point
•
on the touch sensor adjusts the
volume.
Settings (set at the
time of purchase)
1 2 3 4 5
6 7 8 9
1 2 3 4
1 2 3 4
DJ Play
Continuous
Normal Absolute
Item ➞ "Preference Settings"
•
Turn the dial to select an item.
2
•
Turn the dial to select a setting.
3
•
Press the centre to confirm your choice.
Press the centre to confirm your choice.
Auto CUE
OFF: Cue points are set at the
•
beginnings of tracks, including
those with a silent section at the
beginning.
ON: If there is a period of
•
silence at the beginning of a
track, the cue point is set at the
end of the silent section.
Cross fader curve
■
With this curve, the volume is the same
from the edge to the centre, but
gradually decreases once you pass
beyond the centre.
With this curve, moving the fader
inwards from the edge immediately
switches sound output to the other
channel.
OFF ON
To exit the Preferences
Press to exit the Preferences screen.
36
Page 38

6.2 Troubleshooting
If the nextbeat malfunctions, check the information in this table. Also check any equipment you are using
with the nextbeat.
If taking the suggested action does not remedy the problem, contact the store where you purchased
your nextbeat or your nearest Wacom Customer Support Centre.
Symptoms Probable Cause Action Ref. Page
The track names don't
show up in the track
selection screen.
I can't upload tracks to a
channel.
There's no sound. The output cable is not connected
The selected tracks are in an
unsupported audio format.
MP3: Files without tag information
are not displayed.
You have exceeded the maximum
number of files. You have exceeded
the maximum number of folders or
folder levels.
Music is being played in both
•
channels.
Sample playback is in progress.
•
•
to the output socket properly.
The cable is unplugged.
•
The plugs or connection sockets
are dirty.
The volume fader is set to 0. Check the volume fader setting. 24
The cross fader is set to the other
channel.
The trim is at the lowest setting. Check the trim setting. 23
Convert the tracks to a supported format.
Add tag information to the file.
You can have up to 9,999 music files, up
to 1,000 folders, and up to 10 folder levels
(where level 1 is the root level).
Pause one of the channels, or set the
•
volume fader or cross fader volume to 0.
Exit sample playback.
•
Connect the cable properly.
Wipe off any dirt and reconnect.
Check the cross fader setting.
12
—
—
21, 24
32
15
41
24
The sound is distorted,
or there is noise.
There's no loop playback
when I press .
TV/Radio reception is
distorted.
Cued and loop playback
don't work.
All the EQ values are at the
minimum.
The MASTER VOL or PHONE VOL
is on the lowest setting.
Playback is paused.
The cable is not connected
properly.
The plugs or connection sockets
are dirty.
The gain is higher than necessary
due to the trim.
The nextbeat is interfering with the
TV.
No loop points are set. Set loop points.
The nextbeat may be interfering with
signal reception.
The DJ functions are disabled
because the playback mode is set
to Continuous.
Check the EQ settings.
Check the MASTER VOL and
PHONE VOL settings.
Press to resume playback.
Connect the cable properly.
Wipe off any dirt and reconnect.
Check the trim value and adjust it until no
red appears on the levels meter.
Turn off the TV or move the nextbeat
further away.
Turn the nextbeat off or move it further
away from the TV/radio.
Change the playback mode in the
Preferences screen. 36
23
19, 24
20
15
41
23
—
27
17
37
Page 39

38
Symptoms Probable Cause Action Ref. Page
The nextbeat doesn't start
up when I turn it ON
immediately after setting
the POWER switch to OFF.
"Boot Error" is displayed.
The nextbeat does not start
up when I set the POWER
switch to ON when the
portable unit is removed.
"Boot Error" is displayed.
The portable unit turns
off when it's detached
from the base unit.
The BPM value is
different from the value
on the CD, etc.
The BPM is not
measured automatically.
The portable unit was not powered
up correctly.
When you start up the nextbeat,
return the portable unit to the base
unit.
The portable unit automatically turns
itself off if it is left unused for 15
minutes or more when detached
from the base unit.
A different value may be shown
because the nextbeat uses a
different processing method to
measure the BPM value.
Automatic measurement is not
possible with some tracks.
Auto BPM is set to OFF. Use the FUNCTION button to set Auto
After you set the POWER switch to OFF,
wait a short time (around 10 seconds)
before turning it ON again. 17
Return the portable unit to the base unit
and then turn the nextbeat on again.
Remount it in the base unit to start it up
again.
— —
Use the manual BPM function to measure
the BPM manually.
BPM to ON.
34
34
25
25
Sample playback doesn't
work.
Pressing the
button doesn't end
sample playback.
My samples have been
erased.
The effects don't work.
The batteries in the
portable unit run out of
power too quickly.
You cannot begin sample playback
on a channel that is already playing
music.
Sample playback is being used on
the other channel.
You cannot end sample playback
during loop playback.
Modifying the data on the CF card
will erase your recorded samples.
is turned to the lowest setting. Check the setting. 28-30
The effects channel selector switch
is set to a different channel.
Effects control pad is set to ON and
the nextbeat is in standby mode.
The batteries are dead. Replace the batteries.
Pause the track or set the volume fader or
cross fader volume to 0 and then start
sample playback.
You cannot use sample playback on both
channels at the same time. End sample
playback on the other channel and then try
again.
Press the button to pause loop
playback and then press the button
to end sample playback.
Once you have created samples, do not
change the data on the CF card.
Set the effects channel selector switch to
the channel where you want to use effects.
Use the centre pad.
21, 24, 32
32
32
31
28
28-30
39
I can't use pitch bend on
the centre pad. It fastforwards or rewinds
instead.
The track names or artist
names are not shown
correctly. The text is
garbled.
The sensor is detecting your actions
as fast-forward or rewind.
Unsupported characters (such as
kanji or hiragana) are used in the
name.
Double-byte letters are used in the
name.
Adjust the sensor sensitivity in the
Preferences screen. Set the sensitivity so
that one finger gives you pitch bend and
two fingers give you fast-forward or rewind.
Always use ASCII characters (numbers
and letters). —
The nextbeat cannot display double-byte
characters. Use only single-byte characters.
36
—
Page 40

6.3 Updating the Firmware
2
Insert new AA-size alkaline
batteries.
1
Open the battery
compartment on the back of
the portable unit.
3
Slot the battery
compartment cover back
into place.
Push in the catch on the
cover to release the lock and
push the cover upwards.
Check the orientations
of the + and - symbols.
When new firmware is released, you can use a CF card to update the firmware in the nextbeat.
You can check the nextbeat's current firmware version in the Preferences screen. ➞ P.36
•
[Important]
Have a blank CF card (Type 1 card) ready.
Download the firmware update files to your CF card from the nextbeat website
1
(http://www.nextbeat.net).
Download the files by following the instructions on the website.
•
Do not store any music files on the CF card. The update file should be the only file on the card.
•
Turn off the nextbeat.
2
Insert the CF card into the CF card slot and turn the nextbeat on.
3
The firmware update screen appears.
•
Update the firmware by following the on-screen instructions.
4
Press to start updating. Pressing any other button cancels updating.
•
[Important]
Do not remove the CF card, detach the portable unit or turn the nextbeat off during updating.
Doing so will prevent you from restarting the nextbeat.
When updating is completed, turn the nextbeat off and remove the CF card.
5
After updating ends, you cannot turn off the portable unit.
•
Use forced shutdown (P.35) or perform step 6 below.
Insert the CF card containing music tracks into the CF card slot and turn the nextbeat on.
6
Check that the track selection screen appears.
•
When updating ends, sampling data is cleared.
•
6.4 Replacing the Batteries
If the portable unit quickly runs out of power, the batteries may have run down.
Replace them with 4 AA-size alkaline batteries (commercially available).
To ensure stable, uninterrupted operation, we recommend that you load batteries into the portable unit
•
before using it.
39
Page 41

40
6.4.1 Notes on Handling the Batteries
Note the information below when handling the batteries used in the portable unit.
Using the batteries incorrectly could cause them to leak fluid, emit heat or burst. Incorrect handling could
also cause the portable unit to malfunction.
DANGER
Fluid leaking from a battery could cause injury or loss of eyesight if it gets into your eyes. Immediately
flush out the affected eye with copious amounts of water and then contact a health professional for
further treatment. If you get battery fluid on your skin or hands, wash the affected area thoroughly
with running water.
Load the batteries correctly, ensuring that the positive (+) and negative (-) terminals are oriented
correctly.
Do not heat the batteries or throw them into a fire.
Do not attempt to disassemble or modify the batteries.
Do not attempt to charge non-rechargeable batteries.
Keep the batteries dry.
Do not use modified batteries or batteries other than those specified for use with this product.
Take care not to short-circuit the positive (+) and negative (-) battery terminals with a metal object.
When replacing the batteries, turn off this product and unplug the AC adapter from the mains power
outlet. Then check that the portable unit is turned off before opening the battery cover.
WARNING
Do not use old and new batteries together, and do not use different types of batteries together .
Do not use batteries that are damaged, misshapen or leaking fluid.
To prevent battery depletion, remove them from the product if it will not be used for a long period.
If there is any fluid leakage from a battery, immediately stop using that battery and contact a Wacom
Customer Support Centre to request repairs to the portable unit. If you continue to use the battery,
the leaked fluid will cause further damage and malfunctions.
CAUTION
The portable unit takes AA-size alkaline batteries. When using batteries other than those supplied
with the product, read the battery instructions carefully and follow those instructions to ensure that
you use the batteries correctly.
Do not subject the batteries to strong impacts.
Do not store the batteries at extreme temperatures.
Batteries should be disposed of in compliance with your local laws and regulations.
Do not replace the batteries while your hands are wet or sweaty.
Page 42

6.5 Transporting, Cleaning & Storage
Cut-out
Fit the cover so that the side with the
cut-out is over the socket connectors
on the back of the nextbeat.
6.5.1 Transporting the nextbeat
As a safety precaution when transporting the nextbeat, always check that the portable unit is firmly
secured in the base unit before covering the nextbeat with the cover provided.
6.5.2 Cleaning & Storage
Disconnect the AC adapter and USB cables when cleaning this product.
Failure to do so could cause an electric shock.
Do not clean this product with organic solvents as this could cause cracking.
Clean this product with a soft, dry cloth. Take great care when handling the display and the nextbeat
•
itself as strong pressure could crack the display or the nextbeat body. Leaving water drops or other
soiling on the product may result in staining or cause the product coating to peel.
Clean the connector sockets from time to time with a dry piece of cotton. Dirt in the sockets can impair
•
the connection quality and cause interruptions to the sound.
When not in use, store this product with the cover provided in place.
•
6.6 Specifications
General specifications
Model X-1000
Power supply Base unit : AC adapter: DC 12 V
Wireless frequencies 2.4 GHz
Power consumption 12 W
Operating temperature & humidity 5-40°C, 30-80% (condensation-free)
Weight 2.6 kg
Dimensions (W x D x H) 300.0 x 300.0 x 85.0 mm
Portable unit : 4 AA alkaline batteries
41
Page 43

42
Audio unit
Frequency characteristics Master output
A
output
ch /Bch
S/N ratio
(A-weighting)
Dynamic range
(A-weighting)
Master output
A
/Bch output
ch
Master output
A
/Bch output
ch
Total harmonic distortion Master output
A
/Bch output
ch
Crosstalk Master output
A
/Bch output
ch
Output level
(Input signal, output impedance,
Master output
A
/Bch output
ch
20 Hz to 20 kHz ±0.5 dB
20 Hz to 20 kHz ±0.5 dB
104.0 dB or more
104.0 dB or more
102.0 dB or more
102.0 dB or more
0.009% (@1 kHz : THD+N)
0.009% (@1 kHz : THD+N)
90 dB or more
90 dB or more
0 dBV (-20 dBFS/600 Ω/10 kΩ)
-2 dBV ( 0 dBFS/600 Ω/10 kΩ)
load impedance)
Max. headphone output level 50 mW + 50 mW (16Ω load)
Digital output
(S/PDIF output)
Equalizer characteristics HI
Microphone input sensitivity
Output impedance
Sampling frequency
MID
LOW
75 Ω
44.1 kHz
+8 dB to -∞ dB (13 kHz)
+8 dB to -∞ dB (1 kHz)
+8 dB to -∞ dB (70 Hz)
-40 dBV, 10 kHz
(Input impedance)
Input/output sockets
Master L/R output sockets RCA pin jack L : White
Channel A L/R output sockets
Channel B L/R output sockets
DIGITAL REC socket RCA pin jack : Orange
CF card slot CF card slot
USB port USB type B
Headphone output socket 6.3 mm stereo phone jack
Microphone input socket 6.3 mm phone jack
Other
Supported display characters ASCII characters
Maximum displayable file/track name length 160 characters
Maximum displayable folder name length 160 characters
Maximum displayable artist name length 160 characters
Maximum number of files per memory card 9,999
Maximum number of folder levels per memory card 10
Maximum number of folders per memory card 1,000
File system FAT/FAT32
R : Red
Accessories
Cover 1
AA alkaline batteries 4
AC adapter 1
Power cable 1
CF card (type 1) 1
Strap 1
RCA cable 1
USB cable 1
Quick Start Guide 1
Page 44

LIMITED WARRANTY
Wacom warrants to you as the original end-user that the product hardware is free from defects in materials and
workmanship under normal use and service for a period of TWO (2) YEARS after the date of purchase, provided
that they are unused at the time of such purchase.
Wacom further warrants to you the accompanying data media against defects in materials and workmanship for a
period of SIX (6) MONTHS after the date of purchase.
The Software is licensed and distributed “AS IS”.
Wacom makes no warranties, expressed or implied, with respect to its quality, performance, merchantability and
fitness for a particular purpose (including related manuals and documentation).
Wacom cannot guarantee you uninterrupted service or the correction of any errors.
Upon discovery of a defect in the product, except in the Software, within the applicable Warranty Period, you
should return them in the original packaging to the place of your original purchase, together with your name,
address, telephone number, a description of the problem and a copy of the original invoice. You are responsible
for any loss or damage to the product resulting from such transportation.
Wacom’s sole obligation and entire liability under this warranty shall be, at Wacom’s option, either the repair or the
replacement of product or parts thereof that prove defective and that were returned within the applicable Warranty
Period.
Wacom shall have no responsibility to repair or replace the product if (a), in the opinion of Wacom, the failure of
the product has resulted from accident, abuse, misuse, negligence, misapplication, or unauthorized modification
or repair, or (b) the product has been handled or stored other than in accordance with Wacom’s storage
instructions, or (c) the failure is due to normal wear and tear, or (d) you fail to fulfill your obligations as described
above.
In case that any claim presented under warranty is found upon investigation to be either outside the duration or
the scope of this warranty, or in case that the product is found to be not defective, then the cost of such
investigation and repair shall be borne by you.
Any descriptions, drawings, specifications, samples, models, bulletins, or similar material, used in connection with
the sale of the product, shall not be construed as an express warranty that the product will conform or comply
with your requirements.
Should any provision of this agreement be declared invalid, that provision shall be treated as separate from the
agreement, and the agreement shall remain in force without limitation in all other respects.
If this product is found to be defective, the purchaser may be entitled to institute legal proceedings against the
seller on grounds of liability for deficiency. The statutory rights indicated with regard to the seller are not limited in
any way by this warranty. Rather, this warranty affords the purchaser rights in addition to those indicated in the
present text.
This limited warranty shall apply if the seller's corporate domicile is in the European Union or in Iceland, Norway,
Jersey, Switzerland, Russia, the Ukraine, Rumania, Bulgaria, Croatia, Serbia, Tunisia, Turkey, Syria, the Lebanon,
Jordan, Israel, Egypt, the United Arab Emirates, Iran or South Africa.
This Limited Warranty and Liability is governed by the laws of the Federal Republic of Germany.
Should you have any questions about this Agreement, or if you desire to contact Wacom for any reason, please
contact in writing:
Wacom Europe GmbH
Europark Fichtenhain A9
47807 Krefeld
Germany
Telephone: +49.(0)2151.361.444
Fax: +49.(0)2151.3614.111
UK call centre number: +44 (0)207 744 0831
43
 Loading...