

Page 1
Operating instructions
Type CCSXSL60c | Type CCSXSL60g
SUPREMO XSL
Automatic built-in coffee machine
Page 2

Thank you for choosing to buy one of our products. Your appliance is made to high
standards and is easy to use. Nevertheless, please take the time to read these operating
instructions in order to familiarise yourself with the appliance and get the best use out of
it.
Please follow the safety precautions.
Modifications
Text, diagrams and data correspond to the technical standard of the appliance at the
time these operating instructions went to press. The right to make technical modifications
for the purpose of the further development of the appliance is reserved.
Validity
The product family (model number) corresponds to the first alphanumerics on the identification plate. These operating instructions apply to:
Type Product family Size system
CCSXSL60c 25004 60-450
CCSXSL60g 25004 60-450
Variations depending on the model are noted in the text.
© V-ZUG Ltd, CH-6302 Zug, 2018
2
Page 3

Contents
1 Safety warnings 5
1.1 Symbols used......................................................... 5
1.2 General safety precautions.................................. 5
1.3 Appliance-specific safety precautions .............. 7
1.4 Instructions for use................................................ 8
2 Using for the first time 10
2.1 Selecting language..............................................10
2.2 Filling the water circuit with water ....................10
2.3 Cleaning the accessory parts ...........................11
2.4 Setting the water hardness ................................11
3 Appliance description 11
3.1 Construction .........................................................11
3.2 Operating and display elements.......................12
3.3 Milk frother ............................................................ 13
3.4 Hot-water/steam spout ....................................... 13
3.5 Accessories .......................................................... 13
4 Operating the appliance 14
4.1 Switching the appliance on ...............................14
4.2 Filling the water tank ...........................................14
4.3 Filling the beans container.................................15
4.4 Adjusting the coffee mill..................................... 15
4.5 Attaching the milk frother...................................16
4.6 Water softener filter * .......................................... 16
4.7 Switching the appliance off................................19
4.8 Disconnecting the appliance from the mains ......
19
5 Making beverages 20
5.1 Overview of options for making beverages.... 20
5.2 Making coffee using coffee beans ...................21
5.3 Making coffee using ground coffee ................. 22
5.4 Making drinks with milk...................................... 23
5.5 Customising the aroma and quantity............... 24
5.6 Hot water delivery................................................24
5.7 Milk froth / steam delivery ................................. 25
6 Favourites 26
6.1 Defining profile .....................................................26
6.2 Customising drinks settings ...............................26
6.3 Cancelling changes to settings..........................27
7 User settings 27
7.1 Overview of user settings....................................27
7.2 Customising user settings...................................27
7.3 Rinsing....................................................................27
7.4 Descaling ...............................................................28
7.5 Water softener filter ..............................................28
7.6 Drinks settings.......................................................28
7.7 Setting the time .....................................................28
7.8 Auto-start ................................................................28
7.9 Automatic shut-off.................................................28
7.10 Cup warmer ...........................................................28
7.11 Energy saving mode ............................................29
7.12 Coffee temperature ..............................................29
7.13 Water hardness.....................................................29
7.14 Language ...............................................................30
7.15 Acoustic signal......................................................30
7.16 Cup illumination ....................................................30
7.17 Background ...........................................................30
7.18 Demo mode...........................................................30
7.19 Factory settings.....................................................30
7.20 Statistics .................................................................30
8 Care and maintenance 31
8.1 Cleaning intervals .................................................31
8.2 Cleaning the internal circuit ................................32
8.3 Cleaning the grounds container ........................32
8.4 Cleaning the drip tray ..........................................33
8.5 Cleaning the coffee spout...................................33
8.6 Cleaning the exterior............................................33
8.7 Cleaning the inside of the appliance ................34
8.8 Cleaning the water tank.......................................34
8.9 Cleaning the ground coffee funnel....................34
8.10 Cleaning the infuser .............................................35
8.11 Cleaning the milk frother.....................................36
8.12 Cleaning the hot-water/steam spout.................38
3
Page 4

8.13 Cleaning the connection nozzle........................38
8.14 Descaling ..............................................................38
9 Trouble-shooting 41
9.1 Displayed messages...........................................41
9.2 Unsatisfactory results.......................................... 46
9.3 Other possible problems....................................47
10 Accessories 48
11 Technical data 48
12 Disposal 49
13 Notes 50
14 Service & Support 51
4
Page 5
1 Safety warnings
1.1 Symbols used
Important warnings are identified by these
symbols.
Failure to observe the Operating Instructions could result in electric shock, serious
injury, burns, fire or damage to the appliance.
Danger! Failure to observe the
warning could result in possibly life
threatening injury from electric
shock.
Important! Failure to observe the
warning could result in injury or
damage to the appliance.
Danger of burns! Failure to observe
the warning could result in scalds
or burns.
Please note: This symbol identifies
important advice or information for
the user.
Information on disposal
Information about the Operating Instructions
Remove plug from mains socket /
disconnect power supply
Insert plug into mains socket / connect power supply
Do not cut off or modify mains plug
Wear protective gloves
This appliance conforms to EC Regulation 1935/2004 on materials
and articles intended to come into
contact with food.
▸ Indicates step-by-step instructions.
– Describes how the appliance reacts
to the steps taken.
▪ Indicates a list.
1.2 General safety precautions
▪ Read the Operating Instruc-
tions before using the appliance for the first time.
▪ Keep these Operating Instruc-
tions carefully.
▪ The manufacturer is not liable
for damage deriving from failure to respect these Operating Instructions.
▪ The appliance is not intended
for use by persons (including
children) with reduced physical, sensory or mental capabilities, or lack of experience
and knowledge, unless they
have been given supervision
or instruction concerning use
of the appliance by a person
responsible for their safety.
Children should be supervised to ensure that they do
not play with the appliance.
▪ Designated use: this appli-
ance is designed and made
to prepare coffee and milk
based beverages and hot water. Any other use is con-
5
Page 6

1 Safety warnings
sidered improper and thus
dangerous. The manufacturer
is not liable for damage deriving from improper use of the
appliance.
▪ The surface of the heating
element remains hot after use
and the outside of the appliance may retain the heat for
several minutes depending
on use.
▪ Clean all the components
thoroughly, taking particular
care with parts in contact with
the coffee and milk.
▪ Cleaning and user mainten-
ance shall not be made by
children without supervision.
▪ Never immerse the appliance
in water.
▪ CAUTION: To prevent dam-
age to the appliance do not
use alkaline cleaning agents
when cleaning, use a soft
cloth and a mild detergent.
▪ This is an household appli-
ance only. It is not intended
to be used in: staff kitchen
areas in shops, offices and
other working environments;
farm houses; by clients in hotels, motels and other residential type environments; bed
and breakfast type environments.
▪ If the plug or power cable is
damaged, it must be replaced
by customer services only to
avoid all risk.
▪ Appliances with removable
cord: avoid splashes of water
on the power cord connector
or socket at the back of the
appliance.
▪ WARNING: Models with glass
surfaces: do not use the appliance if the surface is
cracked.
FOR EUROPEAN MARKETS ONLY:
▪ This appliance can be used
by children aged from 8
years and above if they have
been given supervision or instruction concerning use of
the appliance in a safe way
and if they understand the
hazard involved. Cleaning
and user maintenance shall
not be made by children unless they are older than 8 and
supervised. Keep the appliance and its cord out of the
reach of children aged less
than 8 years.
▪ Appliances can be used by
persons with reduced physical, sensory or mental capabilities or lack of experience
and knowledge if they have
been given supervision or instruction concerning use of
6
Page 7
the appliance in a safe way
and understand the hazards
involved.
▪ Children shall not play with
the appliance.
▪ When not in use and before
cleaning, always unplug the
appliance.
1 Safety warnings
Caution!
▪ Keep all packaging (plastic bags, poly-
styrene foam) away from children.
▪ Choking hazard. The appliance may
contain small parts. Certain small parts
may need to be removed for cleaning
or servicing. It is prudent to keep small
parts away from children.
Danger of burns!
▪ Surfaces marked with
this symbol become hot during use (the symbol is
present in certain models
only).
1.3 Appliance-specific safety
precautions
Danger! The appliance is operated
using electrical power. It is therefore
important to observe the following
safety warnings:
▪ Never touch the appliance with damp
hands.
▪ Never touch the plug with damp hands.
▪ Make sure the socket used is freely ac-
cessible at all times, enabling the appliance to be unplugged when necessary.
▪ Unplug directly from the plug only.
▪ Never pull the mains cable as you
could damage it.
▪ To disconnect the appliance com-
pletely, set the main switch on the side
of the appliance in the 0 position. (see
page 19)
▪ If the appliance is faulty, do not attempt
to repair.
▪ Turn it off using the main switch (see
page 19), unplug from the mains
socket and contact Customer Services.
▪ This appliance produces hot water and
steam may form while it is in operation.
▪ Avoid contact with splashes of water or
hot steam. Use the buttons, knobs and
handles.
Caution!
▪ Do not hold on to the coffee machine
when it is out of the cabinet.
▪ Do not rest receptacles containing li-
quids or inflammable or corrosive materials on top of the appliance. Place
the accessories required to make the
coffee (the measure for example) in the
special holder. Do not rest large objects which could obstruct movement
or unstable objects on the appliance.
Caution!
▪ Do not use the appliance when extrac-
ted. Make sure the appliance is
switched off before extracting it. Exception: is adjusting the coffee mill which
must be done with the appliance extracted (see page 15).
Note:
▪ Use original or manufacturer recom-
mended accessories and spare parts
only.
7
Page 8
1 Safety warnings
Caution!
▪ Do not switch the appliance off during
descaling.
1.4 Instructions for use
Correct use
▪ This appliance is designed and made
to prepare coffee and heat drinks. All
other use is considered improper.
▪ This appliance is not suitable for com-
mercial use.
▪ The manufacturer is not liable for dam-
age deriving from improper use of the
appliance.
▪ This appliance can be installed over a
built-in oven if the latter is fitted with a
cooling fan at the rear (maximum microwave power: 3 kW).
Cleaning and maintenance of materials in contact with food
▪ The first time you use the appliance, or
if it is not used for more than 3 or 4
days, rinse all removable accessories
which may come into contact with water
or milk with hot water.
▪ If the appliance is not used for more
than 3 or 4 days, before making the
first beverage, rinse the water circuit as
described in these Operating Instructions.
▪ You should carry out automatic clean-
ing and guided maintenance scrupulously when indicated by the appliance
through the display or the lights (see
page 31).
Installing the appliance
Important!
▪ Installation must be performed by a
qualified professional in compliance
with legislation in force in the country
of installation (see page 8).
▪ The packing elements (plastic bags,
polystyrene foam, etc.) should be kept
out of reach of children (see page
49).
▪ Never install the appliance in rooms
where the temperature may drop to
0°C or lower. Customise the water
hardness as soon as possible following the instructions in the “Water hardness” section (see page 29).
Connecting the appliance
Danger!
▪ Check that the mains power supply
voltage corresponds to the value indicated on the rating plate on the lefthand side of the appliance.
▪ Connect the appliance to an efficiently
earthed and correctly installed socket
with a minimum current rating of 10A
only.
▪ If the power socket does not match the
plug on the appliance, have the socket
replaced with a suitable type by a qualified professional. To comply with
safety directives, an omnipolar switch
with a minimum contact distance of 3
mm must be installed.
▪ Do not use multiple sockets or exten-
sions.
Built-in installation
Important!
▪ Verify the minimum measurements re-
quired for correct installation of the appliance. The coffee machine must be
installed in a column and the column
must be firmly fixed to the wall with
commercially available brackets.
▪ Important: all installation or mainten-
ance operations must be performed
with the appliance disconnected from
the mains electricity supply.
8
Page 9

▪ Kitchen furniture in direct contact with
the appliance must be heat resistant
(65°C min).
1 Safety warnings
9
Page 10
2 Using for the first time
1
2
Coffee has been used to factory test the appliance, and so it is possible that there
may be traces of coffee in the mill. The appliance is, however, guaranteed to be
completely new.
Before operating the appliance for the first time, the following steps should be taken:
2.1 Selecting language
▸ If you have not already done so, connect the appli-
ance to the mains electricity supply: Insert the mains
plug into a suitable mains socket.
▸ Slide the appliance out.
▸ Set the main switch to I.
▸ Touch .
– The user settings menu appears in the display.
▸ Touch or repeatedly until the user setting ap-
pears in the display.
▸ Set the language.
▸ Slide the appliance in.
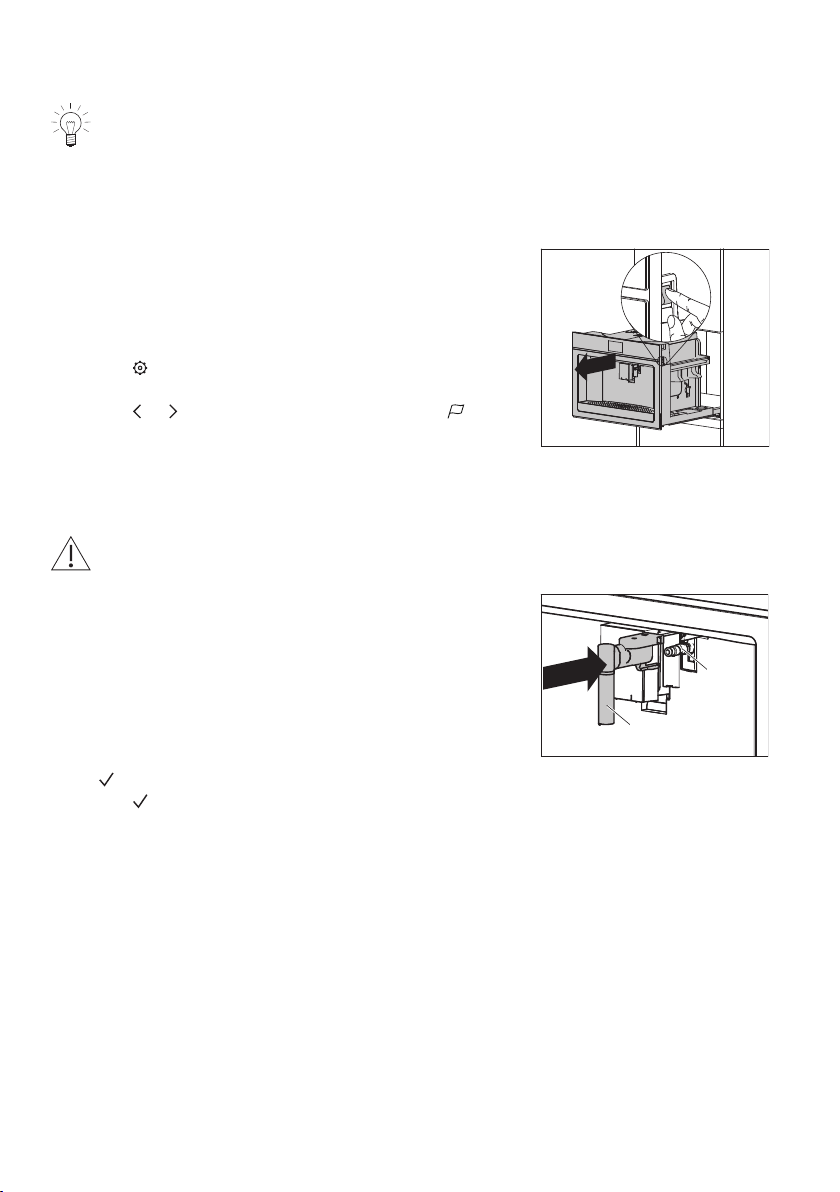
2.2 Filling the water circuit with water
Danger of burns!
Do not leave the appliance unattended while hot water is being delivered!
▸ When the corresponding message appears in the dis-
play: Fill the water tank and then place it back in the
appliance (see page 14).
▸ When the corresponding message appears in the dis-
play: Slide the hot-water/steam spout 1 on the con-
nection nozzle 2 and place a 0.5-litre receptacle un-
der the water spout.
– In the display appears: «Water circuit empty. Press
to fill»
▸ Touch .
– Hot water comes out of the hot-water/steam spout
1.
When hot water stops coming out of the hot-water/
steam spout 1:
– the main menu appears in the display.
– the appliance is ready for use.
10
Page 11
3 Appliance description
I
0
1
2
3
4
5
768
I
0
9
10
12
11
13
14
15
16
2.3 Cleaning the accessory parts
The following accessory parts can come into contact with water or milk and must therefore be rinsed with hot water before using for the first time:
▸ individual parts of the milk frother (see page 36)
▸ individuals parts of the hot-water/steam spout (see page 38).
2.4 Setting the water hardness
▸ Set the water hardness to ensure optimized descaling (see page 29).
3 Appliance description
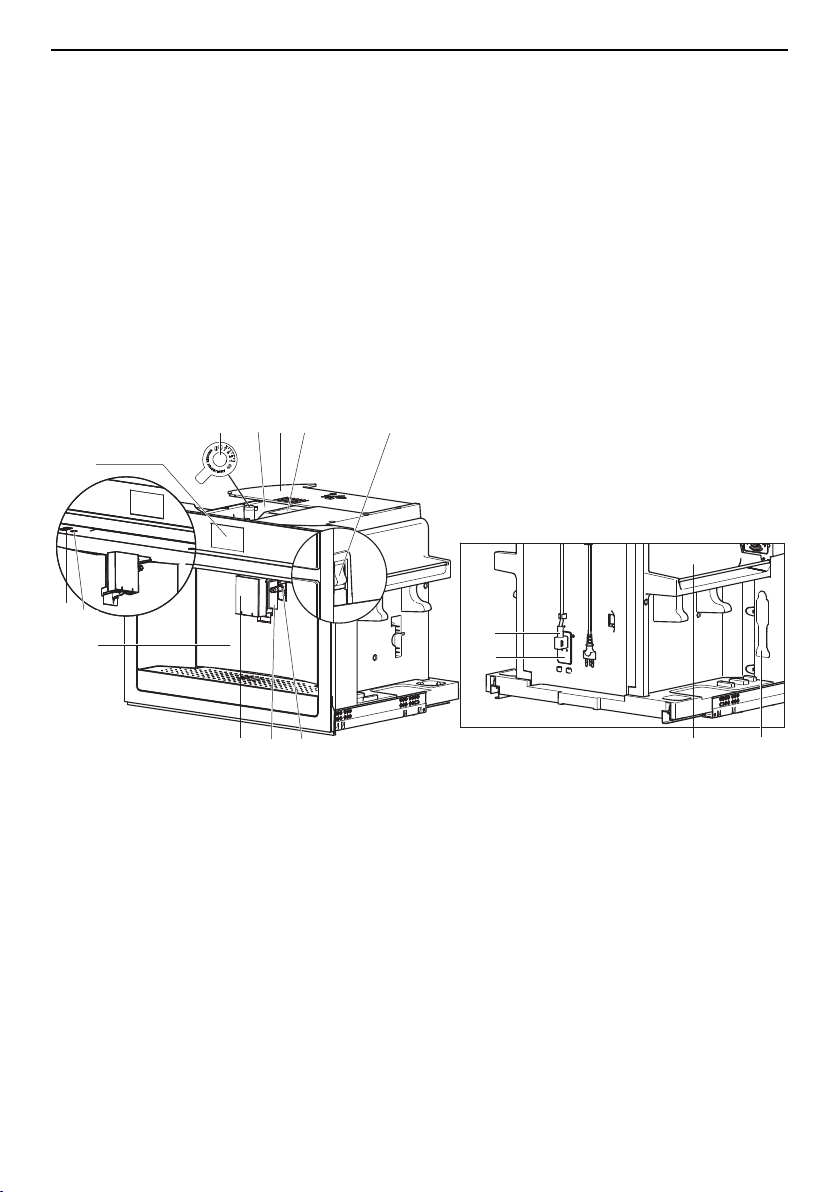
3.1 Construction
With the service door closed
Service door
1
ON/OFF button
2
Interior illumination
3
Display
4
Coffee mill
5
Beans container
6
Lid for beans container
7
Ground coffee funnel
8
Main switch
9
Connection nozzle
10
Cup illumination
11
Coffee spout
12
IEC plug
13
Mains cable
14
Measure holder
15
Heatable tray for coffee cups
16
11
Page 12
3 Appliance description
I
0
1
3
2
6
10
7
5
4
8
9
Aroma
13:51
QuantityProfile 1
Hot water Espresso
Coffee
Cappuccino
2
1
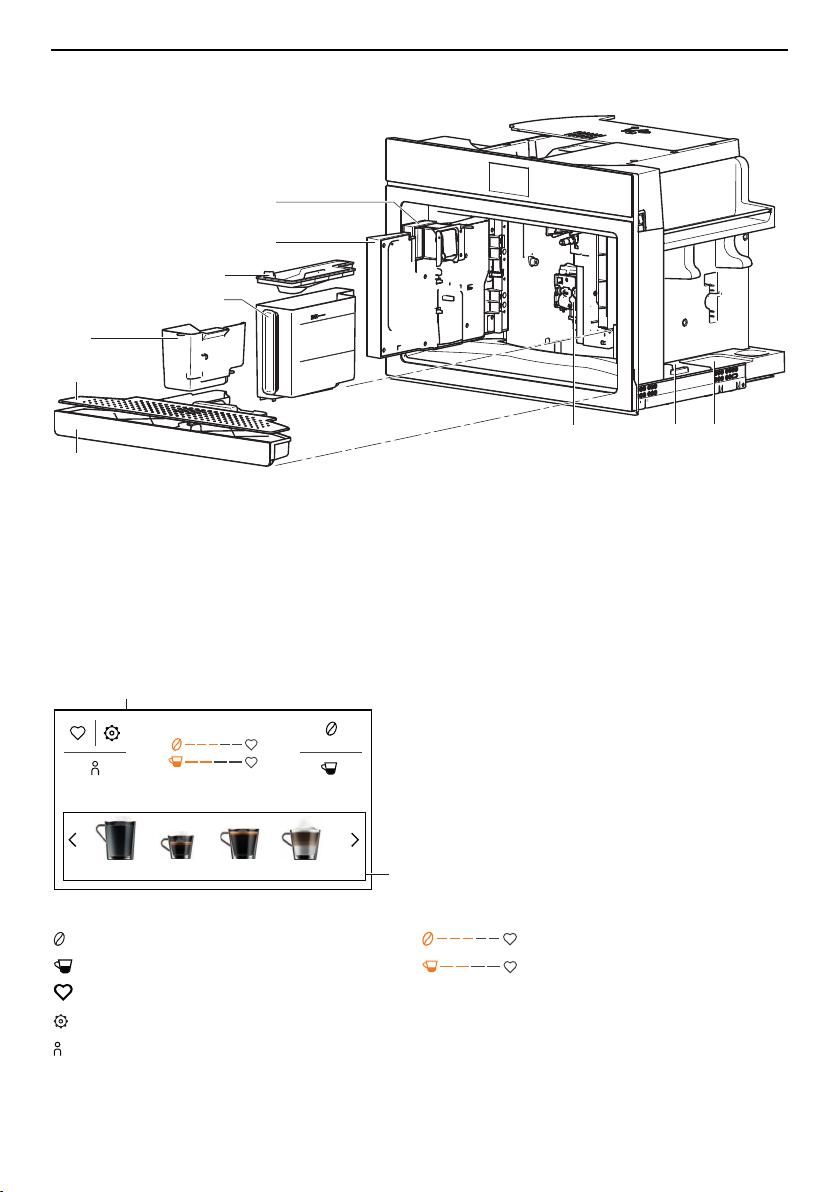
With the service door open
Drip tray
1
Drip plate
2
Grounds container
3
Water tank
4
Lid for water tank
5
3.2 Operating and display elements
Buttons Displays
Coffee aroma Coffee aroma
Coffee quantity Coffee quantity
Favourites
User settings
Profile
Service door
6
Coffee spout
7
Tray for milk jug
8
Tray for hot-water/steam spout
9
Infuser assembly
10
Display
1
Beverage selection
2
12
Page 13
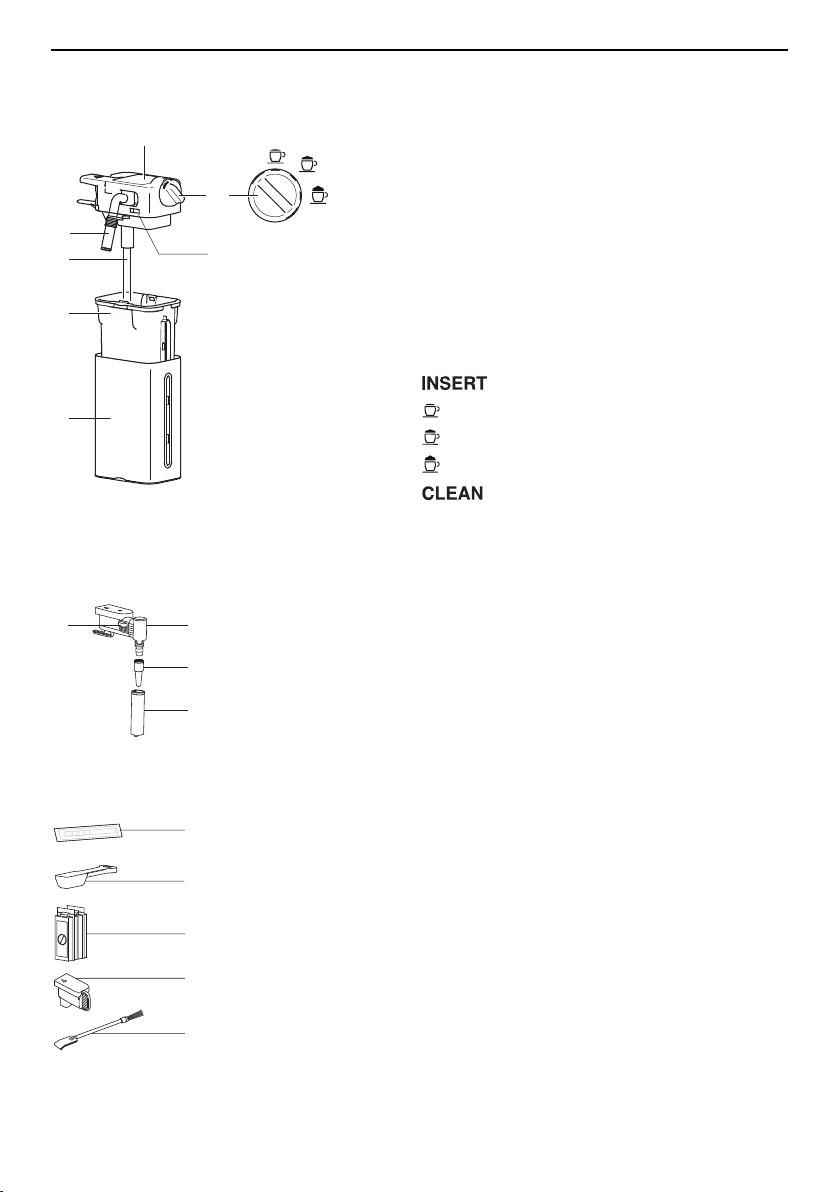
3.3 Milk frother
INSERT
CLEAN
1
2
3
4
5
7
6
1
2
3
4
1
2
3
4
5
CaCO
3
CaCO
3
3.4 Hot-water/steam spout
3 Appliance description
Thermal casing
1
Milk jug
2
Milk tube
3
Milk spout
4
Lid for milk frother
5
Adjusting knob
6
Release button
7
Adjusting knob positions
Insert adjusting knob
No milk froth
A little milk froth
A lot of milk froth
Clean milk spout and milk frother
lid
Release button
1
Connection with revolving head
2
Nozzle
3
Delivery spout
4
3.5 Accessories
Water hardness test strips
1
Measure
2
Descaler
3
Cover for connection nozzle
4
Cleaning brush
5
13
Page 14
4 Operating the appliance
1
I
0
2
1
I
0
2
3
4 Operating the appliance
4.1 Switching the appliance on
Danger of burns!
Hot water comes out of the coffee spout during rinsing.
▸ Slide the appliance out.
▸ Set the main switch to I.
▸ Slide the appliance in.
▸ Press the ON/OFF button .
– In the display appears: «Heating up underway –
Please wait».
When the heating-up process is completed:
– the following appears in the display: «Rinsing un-
derway – Hot water from spouts».
– hot water comes out of the coffee spout 1.
When rinsing is completed:
– the main menu appears in the display.
– the appliance is ready for use.
4.2 Filling the water tank
▸ Hold the coffee spout 1 with one hand and pull it for-
ward.
– The service door 2 opens .
▸ Remove the water tank 3.
▸ Remove the lid and fill the water tank 3 to the MAX
level with fresh water.
▸ Put the lid back on and place the water tank 3 back
in the appliance.
▸ Close the service door 2.
Empty the water tank on a daily basis to prevent the build-up of germs.
14
Page 15
4 Operating the appliance
1
2
2
1
4.3 Filling the beans container
Do not use green, caramelised or candied coffee beans or the like. They could
clog up the coffee mill and damage it.
▸ Twist open the lid 1 of the beans container.
▸ Fill the beans container 2 with coffee beans.
▸ Close the lid 1 of the beans container.
4.4 Adjusting the coffee mill
The coffee mill is set by default to prepare coffee correctly the first time you use the
newly installed appliance. If the coffee being prepared is too weak or not creamy enough
or is being delivered a drop at a time, the coffee mill can be adjusted manually.
Incorrect handling can result in damage to the appliance!
The adjusting knob for the coffee mill may only be turned when the coffee mill is in
operation. The appliance must remain pulled out for this.
▸ Open the lid 1 of the beans container.
▸ Make the desired coffee drink (see page 20).
▸ While the coffee mill 2 is in operation, turn the adjust-
ing knob for the coffee mill one position to the left or
right.
▸ Make at least 2× the desired coffee drink using the
new coffee mill setting.
– The effect of the new coffee mill setting will be ap-
parent after a third cup of coffee is delivered.
▸ If the new coffee mill setting does not produce the
desired result, turn the adjusting knob 2 for the coffee
mill to the next position.
Cause Adjusting knob Solution
▪ Coffee is too weak
▪ Coffee is not creamy
enough
▸ Turn the adjusting knob for the coffee
mill anti-clockwise one position (towards «1»).
▪ Coffee is delivered a
drop at a time or too
slowly
▸ Turn the adjusting knob for the coffee
mill clockwise one position (towards
«7»).
15
Page 16
4 Operating the appliance
3
2
1
4
5
6
7
8
4
4.5 Attaching the milk frother
▸ Remove the lid 1 from the milk jug.
▸ Fill the milk jug 3 with milk up to the MAX level.
▸ Insert the milk tube 2 into the lid 1 of the milk jug.
▸ Put the lid 1 back on the milk jug 3.
▸ Push the coffee spout 4 down.
▸ Press the release switch 5 and simultaneously extract
the hot-water/steam spout 6.
▸ Slide the milk frother 7 on the connection nozzle 8.
▸ Place a large cup under coffee spout 4.
▸ Make a drink with milk (see page 23).
4.6 Water softener filter *
* Not included in the scope of delivery
If you would like to fit your appliance with a water softener filter, you can obtain
one from a specialist retailer.
Installing the water softener filter
If the appliance is used regularly, the service life of the water softener filter is 2 months. If
the appliance is left unused, the water softener filter will last a maximum of 3 weeks.
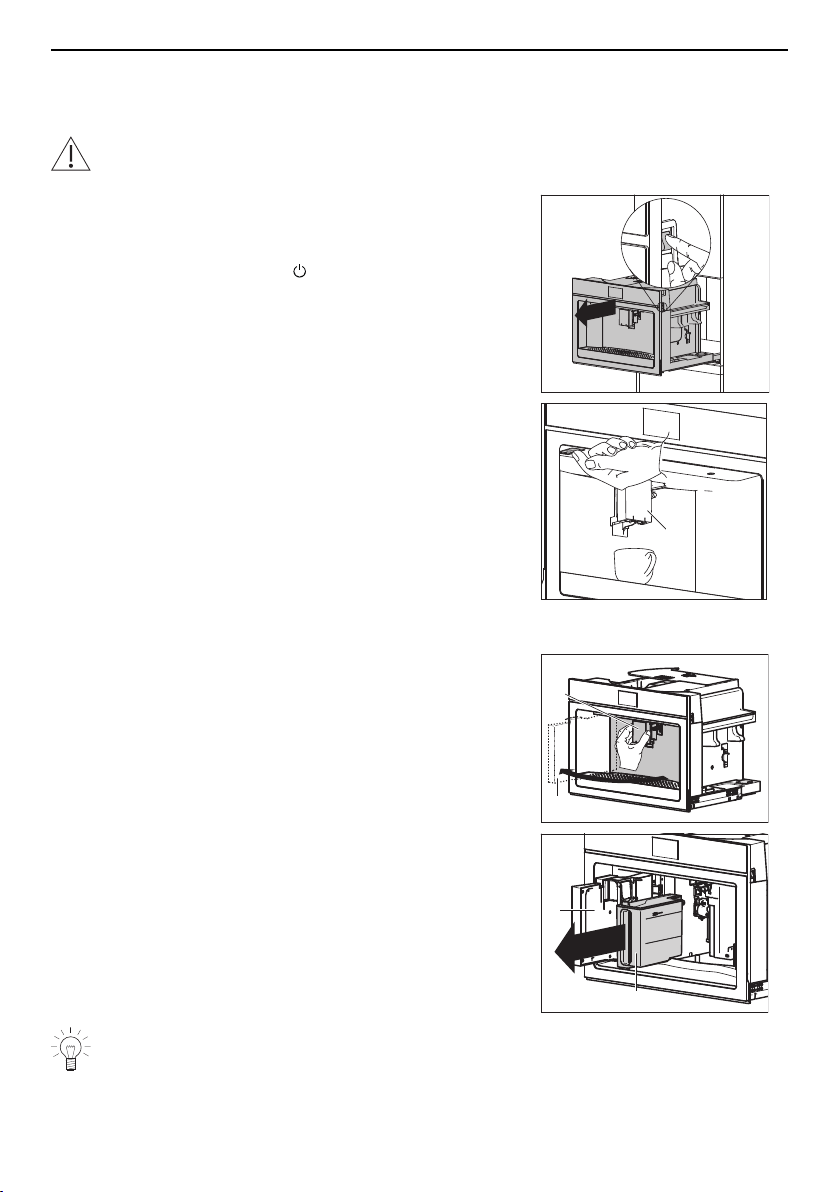
▸ If the appliance is switched off: Switch the appliance
on (see page 14).
▸ Touch .
– The main user settings menu appears in the dis-
play.
▸ Touch or repeatedly until the water softener filter
appears in the display.
16
Page 17

▸ Touch .
1
2
3
1
4
1
4
1
▸ Unpack the water softener filter 1.
▸ When the corresponding message appears in the dis-
play: Turn the date indicator 2 until the next 2 months
are displayed.
▸ Touch .
▸ When the corresponding message appears in the dis-
play: Run water into filter hole 3 until it comes out
from the side openings of the water softener filter.
▸ Touch .
▸ When the corresponding message appears in the dis-
play: Immerse the water softener filter 1 in the water
tank 4 so that the air bubbles can escape.
4 Operating the appliance
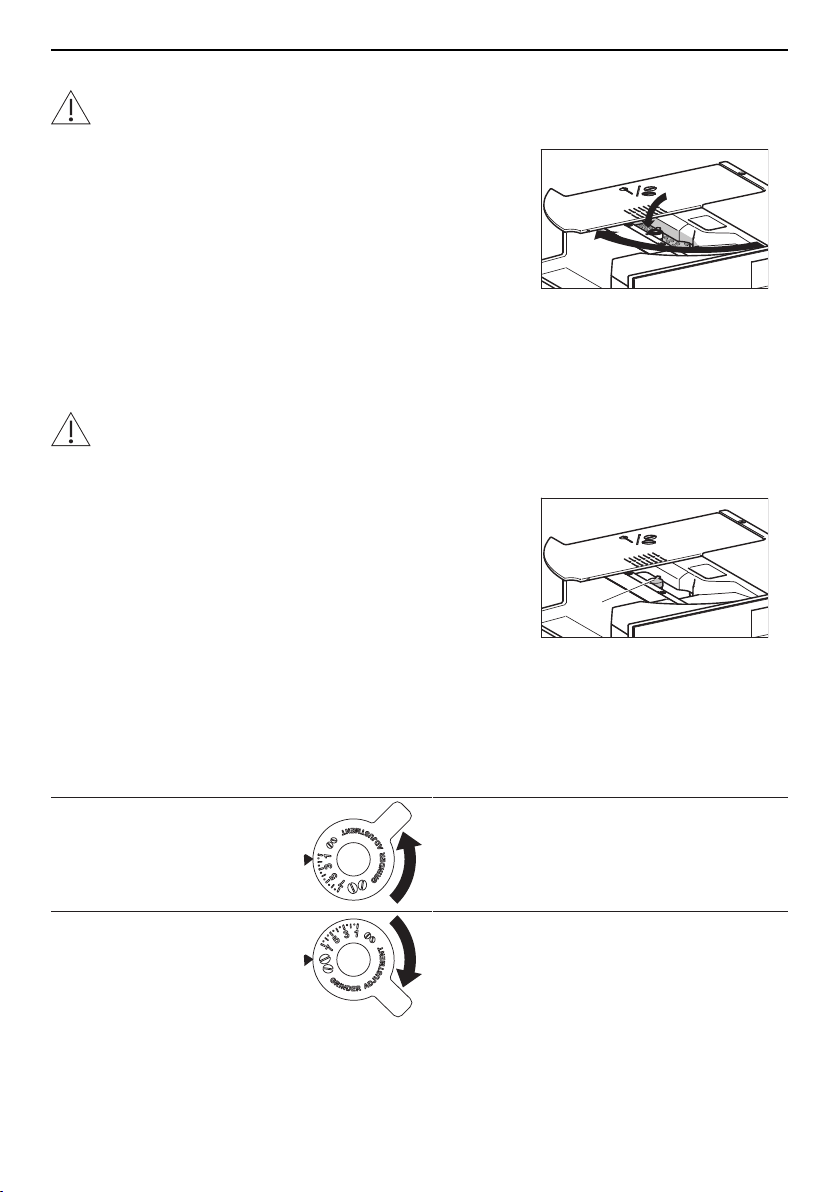
Enabling the water softener filter
▸ Touch .
▸ When the corresponding message appears in the dis-
play: Insert the water softener filter 1 into its housing
in the water tank 4 and push it down to the bottom.
▸ Touch .
▸ When the corresponding message appears in the dis-
play: Put the lid on the water tank 4 and place the wa-
ter tank back in the appliance.
17
Page 18

4 Operating the appliance
5
6
1
2
▸ Touch .
▸ When the corresponding message appears in the dis-
play: Place a 0.5-litre receptacle under the hot-water/
steam spout 5 and coffee spout 6, then touch .
– Hot water comes out of the hot-water/steam spout
5.
When hot water stops coming out of the hot-water/
steam spout 5:
– the start screen appears in the display.
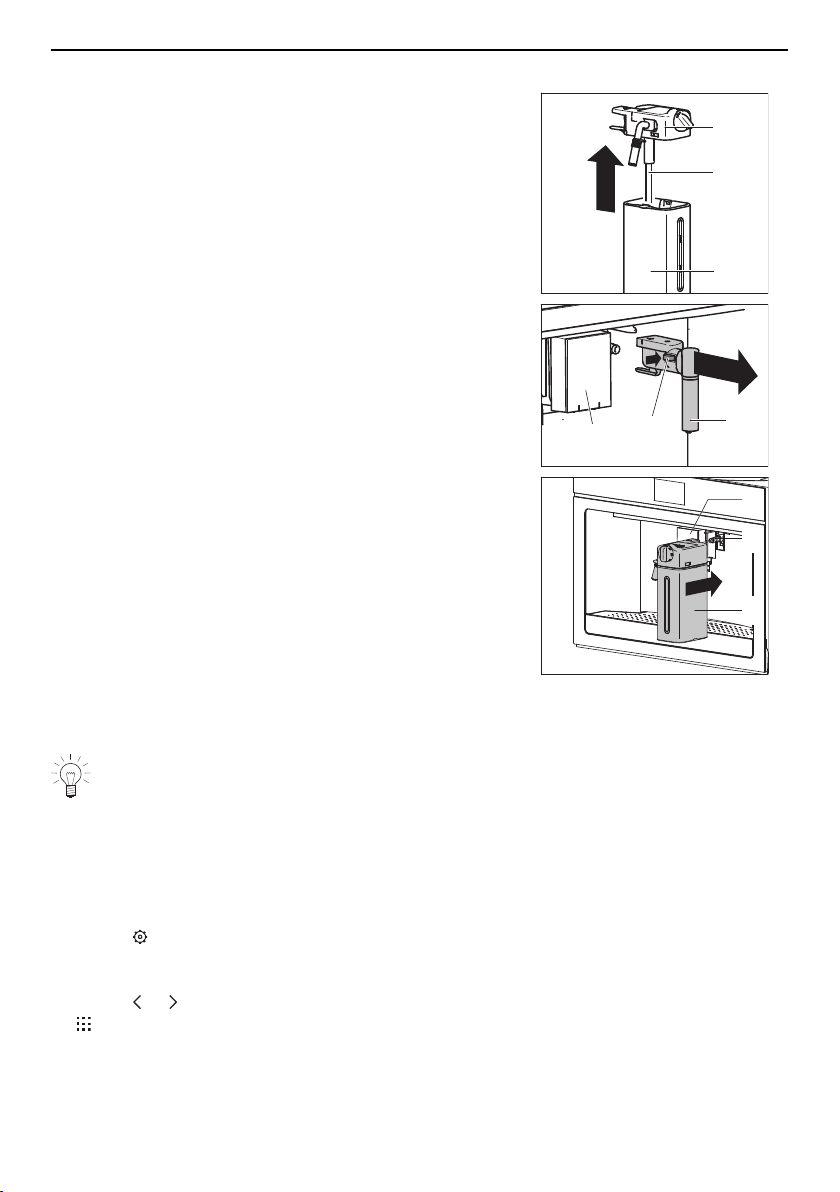
Replacing the exhausted water softener filter
A system in the appliance automatically detects when the water softener filter needs replacing and indicates this with the following message:
« Replace water filter. Press to start»
When the following message appears in the display:
▸ Touch to replace the water softener filter later.
– The symbol appears in the display and does not go out again until the water
softener filter has been replaced.
Or:
Touch to replace the water softener filter immediately.
We recommend replacing the water softener filter as soon as the message appears:
▸ Remove the water tank 1.
▸ Take off the lid and remove the exhausted water
softener filter 2.
▸ Unpack the new water softener filter.
▸ Touch or repeatedly until the user setting ap-
pears in the display.
▸ Touch .
– In the display appears: « Replace filter».
▸ Touch .
▸ Follow the instructions in the «Enabling the water
softener filter» section (see page 17).
If the appliance is used regularly, the water softener filter should be replaced at the
latest after 2 months; if the appliance is left unused, it should be replaced at the
latest after 3 weeks.
18
Page 19

Permanently removing the water softener filter
1
2
1
▸ Remove the water tank 1.
▸ Take off the lid and remove the water softener filter 2.
▸ Touch .
– The user settings menu appears in the display.
▸ Touch or repeatedly until the user setting ap-
pears in the display.
▸ Touch .
– In the display appears: « Remove filter».
▸ Touch .
– In the display appears: «Confirm remove filter?»
▸ To cancel, touch .
▸ To permanently remove the water softener filter, touch
.
– In the display appears: «Filter removed»
▸ Touch .
– The start screen appears in the display.
4.7 Switching the appliance off
Danger of burns!
Hot water comes out of the coffee spout during rinsing.
▸ Press the ON/OFF button .
– In the display appears: «Turning off underway –
Please wait».
– The appliance performs a rinse cycle.
– Hot water comes out of the coffee spout 1.
When rinsing is completed:
– the display goes out.
– the appliance switches itself off.
4 Operating the appliance
4.8 Disconnecting the appliance from the mains
▸ Slide the appliance out.
▸ Set the main switch to 0.
– The appliance is disconnected from the mains.
▸ Slide the appliance in.
19
Page 20

5 Making beverages
5 Making beverages
5.1 Overview of options for making beverages
Your appliance offers various options for making beverages. Coffee drinks can be made
using either coffee beans (see page 21) or ground coffee (see page 22).
The order in which all the beverages are displayed is based on the user's frequency of selection.
Beverage Preparation Milk froth
Espresso
Coffee
Cappuccino
Latte
macchiato
Ristretto
Doppio+
Long
Americano
Espresso
macchiato
Caffe latte
Flat white
Hot milk
2 × espresso
2 × coffee
Hot water
Steam
Compact with hazelnut-coloured crema. Balanced, intensive taste. Dense, rounded body. Rich roasted aroma.
Thinner crema than with an espresso. Balanced, fine
taste. Medium roasted aroma.
Compact, creamy milk froth. Balanced ratio between milk
froth, milk and coffee. Perfect temperature.
Single espresso shot with a medium quantity of hot milk
and a medium quantity of milk froth.
Stronger, shorter and darker variation of the espresso.
Larger than a double espresso. Made with an extra quantity of coffee powder and a deep pre-infusion. Very rich
roasted aroma
Lighter and thinner crema than with an espresso. Made
with a low brewing pressure. Aromatic taste, similar to filter coffee.
Espresso diluted with hot water. Balanced, light taste.
Single espresso shot with a large quantity of milk froth.
Single espresso shot with a large quantity of hot milk and
a small quantity of milk froth.
Single espresso shot with a medium quantity of hot milk
and a medium quantity of milk froth. Best served in a
large ceramic cup.
Hot milk with the desired froth consistency.
Double the size of an espresso. Can be made in one or
two cups.
Double the size of a coffee. Can be made in one or two
cups.
The hot water delivery is suitable for making tea (see
page 24).
The steam can be used to heat liquids and make milk
froth (see page 25).
20
Page 21

5 Making beverages
1
5.2 Making coffee using coffee beans
▸ If the appliance is switched off: Switch the appliance
on (see page 14).
▸ Place a cup under coffee spout 1.
▸ Lower the coffee spout so that it is as near as pos-
sible to the cup.
▸ Define profile (see page 26).
▸ Touch or repeatedly until the desired drink ap-
pears in the display.
▸ Touch the desired drink.
– The drink is made as defined in favourites (see
page 26).
– A bar in the display gradually fills in as preparation
progresses.
Making 2 coffee drinks
When at the start of preparation the symbol appears it is possible to make 2
coffee drinks.
▸ Place a second cup under coffee spout 1.
▸ Touch .
ð Double the quantity of coffee drink is delivered.
▸ To end drink delivery before time, touch .
▸ To increase the size of the drink as it is being de-
livered, touch .
21
Page 22

5 Making beverages
1
2
3
5.3 Making coffee using ground coffee
Never add ground coffee when the appliance is switched off. The ground coffee
can otherwise spread through the inside of the machine, damaging it.
If ground coffee is used, only one cup of coffee can be made at a time.
▸ If the appliance is switched off: Switch the appliance
on (see page 14).
▸ Place a cup under coffee spout 1.
▸ Lower the coffee spout so that it is as near as pos-
sible to the cup.
▸ Define profile (see page 26).
▸ Open the lid 2 of the beans container.
▸ If necessary: Clean the funnel 3 (see page 34).
▸ Place a maximum of one level measure of ground
coffee in the funnel 3.
▸ Close the lid 2 of the beans container.
▸ Touch repeatedly until appears in the display.
▸ Touch or repeatedly until the desired drink ap-
pears in the display.
▸ Touch the desired drink.
– The drink is made as defined in favourites (see
page 26).
– A bar in the display gradually fills in as preparation
progresses.
For long: Refilling with ground coffee
If you have selected a long coffee, «Add pre-ground coffee, maximum one measure» is displayed halfway through preparation.
▸ Add one level measure of ground coffee to the funnel 3.
▸ Touch .
▸ To end drink delivery before time, touch .
▸ To increase the size of the drink as it is being de-
livered, touch .
22
Page 23

5.4 Making drinks with milk
INSERT
CLEAN
1
2
INSERT
CLEAN
3
Ensure that the temperature of the milk is 5°C.
▸ If the appliance is switched off: Switch the appliance
on (see page 14).
▸ Attach the milk frother 1 (see page 16).
▸ Define profile (see page 26).
▸ Touch the desired drink.
– In the display appears: «Turn adjusting knob to a
milk position».
▸ Turn the adjusting knob 2 to the left or right to set it
to the recommended position for the milk froth quant-
ity.
▸ Touch .
– The drink is made as defined in favourites (see
page 26).
– A bar in the display gradually fills in as preparation
progresses.
▸ To end drink delivery before time, touch .
▸ To increase the size of the drink as it is being de-
livered, touch .
When the message «Turn adjusting knob to » appears in the display:
▸ Touch to make more drinks with milk.
5 Making beverages
Or:
▸ Place a cup under milk spout 3.
▸ Follow the instructions in the «Cleaning the internal
tubes» section (see page 36).
Wait until you have made your last drink with milk before cleaning the internal
tubes of the milk frother.
Return the filled milk frother to the refrigerator after use. The warmer the milk, the
poorer the quality of the milk froth delivered.
23
Page 24

5 Making beverages
1
1
2
5.5 Customising the aroma and quantity
The aroma and quantity of each coffee drink can be customised before preparation.
▸ If the appliance is switched off: Switch the appliance
on (see page 14).
▸ Place a cup under coffee spout 1.
▸ Lower the coffee spout so that it is as near as pos-
sible to the cup.
▸ To customise the coffee aroma, touch repeatedly
until the desired coffee aroma appears in the display.
▸ To customise the coffee quantity, touch repeatedly
until the desired coffee quantity appears in the dis-
play.
▸ Touch or repeatedly until the desired drink ap-
pears in the display.
▸ Touch the desired drink.
– The drink is delivered.
– A bar in the display gradually fills in as preparation
progresses.
5.6 Hot water delivery
Danger of burns!
Do not leave the appliance unattended while hot water is being delivered!
▸ If the appliance is switched off: Switch the appliance
on (see page 14).
▸ Slide the hot-water/steam spout 1 on the connection
nozzle 2.
▸ Place a large cup or jug as near as possible under
the hot-water/steam spout 1.
▸ Define profile (see page 26).
▸ Touch or repeatedly until «Hot water» appears in
the display.
▸ Touch «Hot water».
– As much hot water comes out of the hot-water/
steam spout 1 as has been defined in favourites
(see page 26).
– A bar in the display gradually fills in as preparation
progresses.
▸ To end hot water delivery before time, touch .
24
Page 25

5 Making beverages
1
2
5.7 Milk froth / steam delivery
Danger of burns!
The appliance produces steam! Do not leave the appliance unattended while milk
froth is being produced or liquids are being heated.
▸ If the appliance is switched off: Switch the appliance
on (see page 14).
▸ Slide the hot-water/steam spout 1 on the connection
nozzle 2.
▸ Fill a jug with the required quantity of liquid.
For milk froth: Do not fill the jug more than a third full
with milk because frothing can make the milk triple in
volume.
▸ Place the jug under the hot-water/steam spout 1.
▸ Immerse the hot-water/steam spout 1 in the liquid.
▸ Touch or repeatedly until «Steam» appears in the
display.
▸ Touch «Steam».
– Steam comes out of the hot-water/steam spout 1.
– A bar in the display gradually fills in as preparation
progresses.
▸ When the desired temperature or level of froth is
reached, touch .
▸ Clean the hot-water/steam spout 1 after use (see
page 38).
Tips for making milk froth
▸ For a denser froth, use skimmed or semi-skimmed milk (about 5°C).
▸ For a creamier froth, as the steam is being delivered, rotate the jug with slow
movements in an upward motion.
▸ For froth without large bubbles, always clean the hot-water/steam spout 1 after
use.
25
Page 26

6 Favourites
Aroma
13:51
QuantityProfile 1
Hot water Espresso
Coffee
Cappuccino
Aroma
13:51
QuantityProfile 1
Hot water Espresso
Coffee
Cappuccino
Customising coffee quantity
Press X to save
6 Favourites
The aroma and quantity of all drinks can be individually customised.
6.1 Defining profile
▸ Touch in the display.
– The profile menu appears in the display.
▸ Touch or repeatedly until the desired profile ap-
pears in the display.
▸ Select the desired profile.
– The start screen appears in the display.
6.2 Customising drinks settings
▸ Touch in the display.
▸ For drinks with milk: Attach the milk frother (see page
16).
▸ Place a cup under coffee spout.
▸ Lower the coffee spout so that it is as near as pos-
sible to the cup.
▸ Touch the desired drink.
For coffee drinks:
▸ Touch or repeatedly until the desired coffee
aroma appears in the display.
▸ Touch to confirm the selected coffee aroma.
For drinks with milk:
▸ Turn the adjusting knob to the recommended position
for the milk froth quantity.
For all drinks:
▸ Adjust the quantity of milk, coffee or hot water.
– The particular liquid is delivered.
– The quantity of liquid appears in the display in the
form of a vertical bar which gradually fills in as preparation progresses.
– appears in the display when the minimum quant-
ity is reached.
▸ Touch when the desired quantity of liquid is
reached.
– In the display appears: «Save new settings?»
▸ Touch «Yes» to save the new settings for the desired
profile.
– In the display appears: «New settings saved».
▸ Touch .
– The start screen appears in the display.
26
Page 27

6.3 Cancelling changes to settings
Rinsing Descale
13:51
Changes to settings can be cancelled at any time.
While customising:
▸ Touch .
– The vertical bars go out.
– In the display appears: «New settings not saved».
▸ Touch .
– The start screen appears in the display.
After customising:
– In the display appears: «Save new settings?»
▸ Touch «No».
– In the display appears: «New settings not saved».
▸ Touch .
– The start screen appears in the display.
7 User settings
7.1 Overview of user settings
Rinsing Automatic shut-off Acoustic signal
Descaling Cup warmer Cup illumination
Water softener filter Energy saving mode Background
Drinks settings Coffee temperature Demo mode
Time Water hardness Factory settings
Auto-start Language Statistics
7 User settings
7.2 Customising user settings
▸ Touch .
– The user settings menu appears in the display.
▸ Touch or repeatedly until the desired user setting
appears in the display.
▸ Select the desired user setting.
▸ Make the desired setting.
▸ To enable the user setting, set to .
▸ To disable the user setting, set to .
▸ Touch to accept the change.
▸ Touch to reject the change.
7.3 Rinsing
With this user setting, the internal circuit of the appliance can be cleaned or the infuser
heated.
▸ Follow the instructions in the «Cleaning the internal circuit» section (see page 32).
27
Page 28

7 User settings
7.4 Descaling
The appliance can be descaled with this user setting.
▸ Touch .
– The user settings menu appears in the display.
▸ Touch the or button until the user setting appears in the display.
▸ Touch .
▸ Follow the instructions in the «Starting descaling» section (see page 39).
7.5 Water softener filter
The following applications are available with this user setting:
▪ Insert (see page 16) and enable (see page 17) the water softener filter
▪ Replace (see page 18) the exhausted water softener filter
▪ Permanently remove (see page 19) the water softener filter
7.6 Drinks settings
It is possible to display and reset the drinks settings for each profile.
▸ Touch the current user profile, e.g. profile1 , on the display.
– The user profiles menu appears in the display.
▸ Touch or repeatedly until the desired profile appears in the display.
▸ Select the desired profile, e.g. profile 2 .
▸ Touch in the display.
▸ Touch or repeatedly until the user setting «Drinks settings» appears in the dis-
play.
▸ Touch .
– The espresso drinks settings appear.
▸ Touch repeatedly until the drink to be reset is displayed.
▸ To cancel, touch .
▸ To reset the drinks settings for profile2, touch .
7.7 Setting the time
The time shown in the display can be changed.
7.8 Auto-start
When this user setting is enabled, a time can be set for the appliance to switch on automatically (e.g. every morning). This requires that the correct time be entered in the user
setting «Time». When this user setting is enabled, appears on the start screen. This
user setting is disabled by default.
7.9 Automatic shut-off
If no drinks are being delivered but the appliance is switched on, it will turn off automatically after a set time if there is no user interaction. The automatic shut-off can be set
between 15 minutes and 3 hours; the default setting is 30 minutes.
7.10 Cup warmer
When this user setting is enabled, coffee cups are preheated on the coffee cup tray (see
page 11). The length of time it takes to preheat them depends on the thickness of the
cup walls and the number of cups. This user setting is disabled by default.
28
Page 29

7 User settings
7.11 Energy saving mode
When the user setting is enabled, energy consumption is reduced in compliance with
European regulations; appears on the start screen. This user setting is enabled by default.
7.12 Coffee temperature
The temperature of the water used for making drinks can be changed. The following setting ranges for the temperature of the water can be selected:
▪ Low
▪ Medium (default setting)
▪ High
▪ Very high
7.13 Water hardness
The appliance is equipped with a system that automatically indicates when it is time to
descale. The system can be optimized for households with soft water (also through using
a water softening appliance) and medium water hardness by changing the user settings
to the relevant range of water hardness.
There are 4setting ranges for the water hardness. The number of red squares that form
on the test strip indicates the water hardness and corresponds to the level to be set for
the appliance. The higher the number of red squares, the harder the water. The default
setting for water hardness is «Level 4».
Type Water hard-
ness [°fH]
Very
hard
Hard 25 to 37 15 to 21 18 to 26 3 3
Medium 14 to 24 8 to 14 10 to 17 2 2
Soft 1 to 13 1 to 7 1 to 9 0–1 1
Measuring the water hardness
▸ Remove the test strips from the packaging as per the instructions.
▸ Completely immerse the test strips in a glass of water for 1 second.
▸ Remove the test strips from the glass and gently shake off any excess water.
– After about 1 minute, 0–4 red squares form, depending on the hardness of the wa-
ter.
– The number of red squares corresponds to the level of water hardness to be set for
the appliance.
Setting the water hardness level
▸ Touch .
– The user settings menu appears in the display.
▸ Touch or repeatedly until the user setting appears in the display.
▸ Touch repeatedly until the desired level of water hardness, e.g. level 2, appears in
the display.
38 to 50 22 to 28 27 to 35 4 4
Water hardness
[°dH]
Water hardness
[°eH]
Red squares Level
29
Page 30

7 User settings
7.14 Language
The language in the display can be changed. Different languages are available for selection.
7.15 Acoustic signal
When this user setting is enabled, an acoustic signal is emitted whenever a symbol is
touched or a part of the appliance is removed or replaced. This user setting is enabled
by default.
7.16 Cup illumination
When this user setting is enabled, cup illumination is activated whenever a coffee drink
or hot milk is delivered and whenever a rinse cycle is running. This user setting is disabled by default.
7.17 Background
The background for the start screen can be defined using this user setting. The following
backgrounds can be selected:
▪ Midnight black (default setting)
▪ Stoney blue
▪ Roasted beans
▪ Coffea fruits
7.18 Demo mode
In the demo mode, the benefits that the appliance offers appear on the start screen. The
appliance cannot be operated in the demo mode.
▸ To exit the demo mode, touch .
7.19 Factory settings
One or more user profiles can be reset to the factory settings with this user setting.
7.20 Statistics
The following statistical data can only be retrieved with this user setting:
▪ Total coffee drinks without milk
▪ Total drinks with milk
▪ Total milk frother cleans performed
▪ Total descales performed
▪ Total litres water delivered
▪ Total water softener filters used
30
Page 31

8 Care and maintenance
8 Care and maintenance
Risk of burns from hot surfaces!
Allow the appliance and the accessories to cool down before cleaning.
Incorrect handling can result in damage to the appliance!
Do not use any abrasive, acidic or chemical cleaning agents, metal scrapers that
are sharp or scratch, steel wool, abrasive scouring pads, etc. These products will
damage the surfaces. Glass surfaces that are scratched can crack.
8.1 Cleaning intervals
Appliance part Cleaning interval
Internal circuit ▪ If not used for more than 3 days
Grounds container ▪ When prompted
▪ When necessary
▪ Whenever the drip tray is cleaned
Drip tray ▪ When prompted
▪ When necessary
Coffee spout ▪ 1× per week
Cleaning the exterior ▪ When necessary
▪ 1× per week
Cleaning the inside of the
appliance
Water tank ▪ 1× per month
Ground coffee funnel ▪ 1× per month
Infuser assembly ▪ 1× per month
Milk frother ▪ After each use
Hot-water/steam spout ▪ Each time after using milk
Connection nozzle ▪ Each time after using the milk frother
Descale the appliance ▪ When prompted
▪ 1× per week
▪ Whenever the water softener filter is replaced
31
Page 32

8 Care and maintenance
1
1
2
3
4
8.2 Cleaning the internal circuit
Danger of burns!
Do not leave the appliance unattended while hot water is being delivered!
▸ If the appliance is switched off: Switch the appliance
on (see page 14).
▸ Place the receptacle under coffee spout 1.
▸ Touch .
– The main user settings menu appears in the dis-
play.
▸ Touch or repeatedly until rinsing appears in the
display.
▸ Touch .
– The rinse cycle starts.
– In the display appears: «Rinsing underway – Hot
water from spouts».
– Hot water comes out of the coffee spout 1.
– A bar in the display gradually fills in as the process
progresses.
▸ To end the rinse cycle before time, touch .
– The start screen appears in the display.
▸ Repeat the rinse cycle.
If the appliance is not used for more than 3 days, at least 2 rinse cycles must be
performed before it is used again.
8.3 Cleaning the grounds container
Danger of clogging up!
When the following appears in the display: «Empty grounds container», it indicates
that the grounds container must be emptied and cleaned. Otherwise the next time
a coffee is made the grounds container may become overfull and clog up the appliance.
Can only be cleaned when the appliance is switched on.
Incorrect handling can result in damage to the appliance!
Do not clean the drip tray in the dishwasher.
▸ Open the service door 1.
▸ Remove the drip tray 2, grounds container 3 and drip
plate 4.
▸ Empty the drip tray 2 and grounds container 3, care-
fully removing all residues with the spatula part of the
brush.
▸ Rinse the drip tray 2, grounds container 3 and drip
plate 4 with hot water and then put them back.
▸ Close the service door 1.
32
Page 33

8 Care and maintenance
1
8.4 Cleaning the drip tray
Danger of clogging up
Whenever the drip tray is extracted, the grounds container must also be emptied.
Otherwise the next time a coffee is made the grounds container may become overfull and clog up the appliance.
Incorrect handling can result in damage to the appliance!
Do not clean the drip tray in the dishwasher.
▸ Remove, clean and put back the drip tray as de-
scribed in the «Cleaning the grounds container» (see
page 32) section.
8.5 Cleaning the coffee spout
▸ Clean the coffee spout 1 with a cloth dampened with
water.
▸ Remove any coffee deposits from the holes in the
coffee spouts with a toothpick.
8.6 Cleaning the exterior
▸ Remove any soiling or excess cleaning solution im-
mediately.
▸ Clean the surfaces with a soft cloth dampened with
water and a little washing-up liquid – for metallic sur-
faces rub in the direction of the original polish lines.
▸ Dry with a soft cloth.
33
Page 34

8 Care and maintenance
1
2
I
0
1
2
1
2
8.7 Cleaning the inside of the appliance
WARNING: Risk of electric shock!
Disconnect the appliance from the mains power supply before cleaning the inside
of the appliance!
Water ingress causes damage!
Never immerse the coffee machine in water!
▸ Switch the appliance off (see page 19).
▸ Pull the plug out of the mains socket.
▸ Open the service door 1.
▸ Remove the drip tray 2 and clean with a damp cloth.
▸ Clean coffee residues from the inside of the appli-
ance using a brush and sponge as necessary.
▸ Remove any residues from the inside of the appli-
ance using a vacuum cleaner.
▸ Put the drip tray 2 back in the appliance.
▸ Close the service door 1.
8.8 Cleaning the water tank
▸ Open the service door 1.
▸ Remove the water tank 2.
▸ Remove the water softener filter (if present) and rinse
under running water.
▸ Clean the water tank 2 with a cloth dampened with
water and a little washing-up liquid and then rinse
with water.
▸ Insert the water softener filter (if present) in the water
tank 2.
▸ Fill the water tank 2 with fresh water and place back
in the appliance.
▸ Close the service door 1.
8.9 Cleaning the ground coffee funnel
▸ Open the lid 1 of the beans container.
▸ Remove any residues of coffee or grease from the
funnel 2 using a cloth dampened with water.
34
Page 35

8 Care and maintenance
1
2
4
3
8.10 Cleaning the infuser
Removing the infuser
Switch the appliance off before removing the infuser!
▸ Switch the appliance off (see page 19).
▸ Open the service door 1.
▸ Remove the drip tray 2.
▸ Press the coloured release buttons 3 inwards and
simultaneously remove the infuser 4.
Cleaning the infuser
Incorrect handling can result in damage to the appliance!
Do not clean the infuser with detergent as it will dissolve the lubricant on the inside
of the piston.
Do not clean the infuser in the dishwasher.
▸ Place the infuser in a receptacle filled with water for 5
minutes.
▸ Rinse the infuser with water.
35
Page 36

8 Care and maintenance
1
4
2
3
1
6
5
INSERT
CLEAN
1
3
2
Inserting the infuser
▸ If necessary, compress the infuser 1 to the right size.
▸ Slide the infuser 1 on to the pin 2 of the support.
▸ At 3, depress the infuser until the infuser 1
clicks into place.
▸ Make sure the yellow release buttons 4 have
snapped out.
▸ Put back the drip tray 5.
▸ Close the service door 6.
8.11 Cleaning the milk frother
Small parts may present a choking hazard!
Keep the individual parts of the milk frother out of the reach of children!
Cleaning the internal tubes
Danger of burns!
Hot water and steam come out of the milk spout. Be careful to avoid any splashes!
▸ Place a cup under milk spout 1.
▸ Turn the adjusting knob 2 to position .
– The internal tubes are cleaned.
– In the display appears: «Cleaning milk frother un-
derway – Place a receptacle under milk spout»
– A bar in the display gradually fills in as preparation
progresses.
– The cleaning process ends automatically.
▸ Turn the adjusting knob 2 to a position for the milk
froth quantity.
▸ Remove the milk frother 3.
▸ Clean the connection nozzle (see page 38).
36
Page 37

Disassembling the milk frother
3
2
1
INSERT
CLEAN
5
4
1
6
3
H2O
6
1
6
8
7
▸ Remove the lid 1 from the milk jug.
▸ Extract the milk jug 2 from the thermal casing 3, hold-
ing it by the side grips.
▸ Remove the milk spout 4 and milk tube 5.
▸ Turn the adjusting knob 6 to position and re-
move.
Cleaning and reassembling the milk frother
The thermal casing3 must not be filled with or immersed in water!
8 Care and maintenance
▸ Clean the thermal casing 3 with a soft cloth only.
▸ Clean the other parts of the milk frother in the dish-
washer or with hot water and a mild detergent.
▸ Make sure there are no milk residues stuck to the
milk spout 4 or milk tube 5.
▸ Remove any milk residues from the groove of the ad-
justing knob6 with a toothpick.
▸ Clean the adjusting knob seat7 and the milk frother
connector hole8.
▸ Insert the adjusting knob 6 in the seat 7 and turn to
position .
▸ Insert the milk spout 4 and milk tube 5.
▸ Place the milk jug 2 in the thermal casing 3.
▸ Put the lid 1 on the milk jug 2.
▸ Clean the connection nozzle (see page 38).
37
Page 38

8 Care and maintenance
1
25%
8.12 Cleaning the hot-water/steam spout
Small parts may present a choking hazard!
Keep the individual parts of the hot-water/steam spout out of the reach of children!
▸ Remove the hot-water/steam spout and disassemble
the individual parts.
▸ Clean the individual parts in the dishwasher or with
hot water and a mild detergent.
▸ Make sure that there are no milk residues stuck to
the individual parts.
▸ Reassemble the individual parts when dry.
8.13 Cleaning the connection nozzle
▸ Wipe away any milk residues from the connection
nozzle 1 with a sponge dampened with water.
8.14 Descaling
How descaling functions
Whenever steam is produced, depending on the hardness of the local water supply (i.e.
the limescale content of the water), limescale is deposited in the boiler. A system in the
appliance automatically detects when descaling is necessary and indicates this
whenever the appliance is switched on with the following message:
«Descaling necessary. Press to start (~45 mins.)»
We recommend descaling the appliance whenever the message appears in the
display. Continued failure to descale the appliance will likely impair its functions or
cause damage to the appliance. Descaling takes about 45 minutes.
Descaler
Using the wrong descaler can damage the appliance!
Always use the descaler recommended by the manufacturer. The use of an unsuitable descaler can cause damage to the appliance which does not fall within the
scope of the manufacturer’s guarantee. Follow the manufacturer's instructions.
38
Page 39

Starting descaling
I
0
1
2
2
+
CaCO
3
A
B
1
3
4
5
6
Incorrect descaling can result in damage to the appliance
Never switch the appliance off during descaling!
When the «Descaling necessary. Press to start (~45
mins.)» message appears in the display:
▸ Touch to start descaling later.
Or:
▸ Touch to start descaling immediately.
▸ When the corresponding message appears in the dis-
play: Open the service door 1, remove the water tank
2, take out the water softener filter (if present) and
empty out the water.
▸ Touch .
▸ When the corresponding message appears in the dis-
play: Add the quantity of descaler supplied to the wa-
ter tank 2 and then top up with water (to level B).
▸ Touch .
▸ When the corresponding message appears in the dis-
play: Remove, empty and put back the drip tray 3 and
grounds container 4.
▸ Touch .
8 Care and maintenance
▸ When the corresponding message appears in the dis-
play: Place an empty 2-litre receptacle under the hot-
water/steam spout 5.
▸ Touch to start the descaling process.
– The descaling cycle starts.
– In the display appears: «Descaling underway –
Please wait».
– Hot, acidic water comes out of the hot-water/steam
spout 5.
Danger of burns!
Hot, acidic water comes out of the hot-water/steam spout 5. Be careful to avoid
any splashes!
39
Page 40

8 Care and maintenance
I
0
1
2
5
6
1
3
4
I
0
1
2
Discarding the rinsing solution
▸ When the corresponding message appears in the dis-
play: Remove the water tank 2, rinse under running
water, fill with water up to the MAX level and place
back in the appliance.
▸ Empty the rinsing solution out of the 2-litre receptacle.
▸ Touch .
▸ When the corresponding message appears in the dis-
play: Place the empty 2-litre receptacle under the hot-
water/steam spout 5 and coffee spout 6.
▸ Touch to start the rinse cycle.
– The rinse cycle starts.
– In the display appears: «Rinsing underway –
Please wait».
– Hot water comes out of the hot-water/steam spout
5.
▸ When the corresponding message appears in the dis-
play: Touch , remove the water tank 2 and place the
water softener filter in its housing.
▸ When the corresponding message appears in the dis-
play: Empty the rinsing solution out of the 2-litre re-
ceptacle and repeat the rinse cycle.
If the water tank has not been filled to the MAX level, the appliance requests a
third rinse cycle. This ensures that the descaler solution is completely eliminated
from the appliance’s internal circuits.
Completing descaling
▸ When the corresponding message appears in the dis-
play: Remove, empty and put back the drip tray 3 and
grounds container 4.
▸ Touch .
▸ In the display appears: «Descale complete – press
».
▸ Touch .
▸ When the corresponding message appears in the dis-
play: Remove the water tank 2, empty out the rinsing
solution, rinse the water tank 2 under running water,
fill with water up to the MAX level and place back in
the appliance.
▸ Close the service door 1.
▸ Empty the rinsing solution out of the 2-litre receptacle.
40
Page 41

9 Trouble-shooting
9 Trouble-shooting
This section lists faults that can be solved simply by following the instructions given. If
another fault is displayed or the fault cannot be remedied, please call Customer Services.
9.1 Displayed messages
Displayed message Possible cause Solution
Fill tank with fresh water ▪ Insufficient water in
the water tank.
▸ Fill the water tank with water
and push back in until it
clicks into place.
Insert water tank ▪ The water tank is not
installed correctly.
Empty grounds container ▪ The grounds con-
tainer is full.
Insert grounds container
and drip tray
▪ The grounds con-
tainer has not been
put back.
▸ Push the water tank back in
until it clicks into place.
▸ Empty and clean the grounds
container and drip tray (see
page 32).
▸ Put back the grounds con-
tainer and drip tray.
▸ Remove the drip tray.
▸ Put back the grounds con-
tainer and drip tray.
41
Page 42

9 Trouble-shooting
Displayed message Possible cause Solution
Add pre-ground coffee,
maximum one measure
Fill beans container ▪ The beans container
▪ The «Ground coffee»
function has been selected without placing
any ground coffee in
the funnel.
▪ The funnel is
clogged.
▪ A «long» coffee using
ground coffee has
been selected.
is empty.
▸ Place a maximum of one
level measure of ground coffee in the funnel (see page
22).
▸ Make the desired coffee
drink.
▸ Clean the funnel (see page
34).
▸ Place a maximum of one
level measure of ground coffee in the funnel (see page
22).
▸ Touch and complete the
coffee delivery.
▸ Fill the beans container (see
page 15).
Ground too fine. Set mill 1
level higher while in operation
42
▪ The grinding is set
too fine.
▪ The coffee is de-
livered a drop at a
time, too slowly or not
at all.
▪ If the message ap-
pears again:
▪ For water softener fil-
ters: An air bubble
has been released inside the circuit and is
obstructing the delivery of the drinks.
▸ During the preparation of the
coffee, turn the adjusting
knob for the coffee mill clockwise one position at a time
(towards «7») until the coffee
is delivered satisfactorily (see
page 15).
▸ Push the water tank back in
until it clicks into place.
▸ Slide the hot-water/steam
spout on the connection
nozzle.
▸ Deliver hot water until the flow
becomes regular (see page
24).
Page 43

Displayed message Possible cause Solution
Select a milder taste or
reduce pre-ground coffee
quantity
Insert water tank ▪ The hot-water/steam
▪ The quantity of coffee
beans in the beans
container is only sufficient for a milder
taste.
▪ Too much ground
coffee has been
placed in the funnel.
spout has not been
pushed on the connection nozzle correctly.
▸ Select a milder taste (see
page 24).
Or:
▸ Fill the beans container (see
page 15).
▸ Open the lid of the beans
container.
▸ Reduce the quantity of
ground coffee in the funnel
(see page 22).
▸ Slide the hot-water/steam
spout on the connection
nozzle (see page 24).
9 Trouble-shooting
Insert milk frother ▪ The milk frother is not
inserted correctly.
Insert infuser assembly ▪ The infuser has not
been inserted correctly.
▸ Slide the milk frother on the
connection nozzle and push
down as far as it will go (see
page 16).
▸ Insert the infuser (see page
36).
43
Page 44

9 Trouble-shooting
Displayed message Possible cause Solution
Water circuit empty. Press
to fill
▪ The water circuit is
empty.
▪ If the message ap-
pears again:
▸ Touch .
– Hot water comes out of the
hot-water/steam spout.
▸ Deliver hot water until the flow
becomes regular.
▸ Push the water tank back in
until it clicks into place.
Press to start cleaning
or turn adjusting knob to
a milk position
Turn adjusting knob to
to start cleaning
Turn adjusting knob to a
milk position
▪ The adjusting knob of
the milk frother has
been turned to the
position.
▪ Milk has been de-
livered; the milk tube
must be cleaned.
▪ The adjusting knob of
the milk frother was in
the position
when the milk frother
was inserted.
▸ To start the cleaning process,
touch .
– The cleaning of the milk
frother starts.
▸ To make coffee with milk, turn
the adjusting knob of the milk
frother to the , or position (see page 23).
▸ Turn the adjusting knob to
.
– The cleaning of the milk
frother starts.
▸ To make coffee with milk, turn
the adjusting knob of the milk
frother to the , or position (see page 23).
Descaling necessary.
Press to start (~45
mins.)
44
▪ The appliance must
be descaled.
▸ Touch to start descaling
immediately (see page 38).
Or:
▸ Touch to start descaling
later (see page 38).
Page 45

Displayed message Possible cause Solution
Replace water filter. Press
to start
General alarm: See instructions
▪ The water softener fil-
ter is exhausted.
▪ The inside of the ap-
pliance is very dirty.
▪ If message appears
again:
▸ Touch to replace the water
softener filter immediately
(see page 28).
Or:
▸ Touch to replace the water
softener filter later (see page
28).
▸ Clean the inside of the appli-
ance (see page 34).
▸ Call Customer Services.
9 Trouble-shooting
▪ The appliance is
scaled up.
▪ The water softener fil-
ter is exhausted.
▪ The appliance is
scaled up.
▪ The water softener fil-
ter is exhausted.
▪ The milk tube and
milk spout of the milk
frother are clogged or
dirty.
▪ The auto-start user
setting is enabled.
▪ The energy saving
mode user setting is
enabled.
▪ The user setting for
the water softener filter is enabled.
▸ Descale the appliance (see
page 38).
▸ Replace (see page 18) or re-
move (see page 19) the water softener filter.
▸ Descale the appliance (see
page 38).
▸ Replace (see page 18) or re-
move (see page 19) the water softener filter.
▸ Turn the adjusting knob of the
milk frother to position
.
▸ To disable auto-start, follow
the instructions in the «Customising user settings» section (see page 27).
▸ To disable the energy saving
mode, follow the instructions
in the «Customising user settings» section (see page 27).
▸ To remove the water softener
filter, follow the instructions in
the «Permanently removing
the water softener filter» (see
page 19).
45
Page 46

9 Trouble-shooting
9.2 Unsatisfactory results
Problem Possible cause Solution
The coffee is not hot. ▪ The cups were not
preheated.
▪ The infuser has
cooled down because over 3 minutes
have elapsed since
the last drink was
made.
▪ A low coffee temper-
ature is set.
The coffee is too weak or
not creamy enough.
The coffee is delivered a
drop at a time or too
slowly.
The coffee is only coming
out of one of the holes in
the coffee spouts or is not
coming out at all.
▪ The coffee is ground
too coarsely.
▪ The coffee is unsuit-
able.
▪ The coffee is ground
too coarsely.
▪ The holes in the cof-
fee spouts are
blocked.
▸ Enable the user setting «Cup
warmer» (see page 27).
▸ Place the cups on the heat-
able coffee cup tray.
Or:
▸ Rinse the cups with hot water
(see page 24).
▸ Start rinsing (see page 27).
– The infuser gets hot during
rinsing.
▸ Set a hotter coffee temperat-
ure (see page 29).
▸ During the preparation of the
coffee, turn the adjusting
knob for the coffee mill anticlockwise one position (towards «1») (see page 15).
▸ Use coffee for espresso ma-
chines.
▸ During the preparation of the
coffee, turn the adjusting
knob for the coffee mill clockwise one position (towards
«7») (see page 15).
▸ Clean the holes in the coffee
spouts (see page 33).
46
Page 47

Problem Possible cause Solution
The milk contains large
bubbles and squirts out of
the milk spout or there is
little froth.
The milk does not come
out of the milk spout.
▪ The milk is not cold
enough.
▪ The milk used was
not skimmed or semiskimmed.
▪ The adjusting knob
was not turned correctly to one of the
three milk positions.
▪ The lid of the milk
frother is dirty.
▪ The adjusting knob of
the milk frother is
dirty.
▪ The connection
nozzle is dirty.
▪ The lid of the milk
frother is dirty.
▪ The milk tube has not
or not correctly been
inserted.
▸ Use skimmed or semi-
skimmed milk at a temperature of 5°C.
▸ Turn the adjusting knob to the
left or right until set to the recommended position (see
page 23).
▸ Clean the lid and adjusting
knob of the milk frother (see
page 36).
▸ Clean the connection nozzle
(see page 38).
▸ Clean the lid of the milk
frother (see page 36).
▸ Insert the milk tube in the
milk frother lid (see page 13).
9.3 Other possible problems
Problem Possible cause Solution
The appliance does not
come on.
The infuser cannot be extracted.
The appliance requests a
third rinse cycle at the
end of descaling.
▪ The plug (of the
mains cable) is not
plugged into the
mains socket.
▪ The appliance is dis-
connected.
▪ The main switch is
not turned on.
▪ The appliance has
not been switched off
correctly.
▪ The water tank was
not filled to the MAX
level.
▸ Plug into the mains socket.
▸ Press the main switch (see
page 14).
▸ Press the ON/OFF button
(see page 19).
▸ Empty the drip tray.
▸ Follow the instructions dis-
played by the appliance and
perform a third rinse cycle.
9 Trouble-shooting
47
Page 48

10 Accessories
CaCO
3
CaCO
3
Problem Possible cause Solution
The appliance emits
noises or small puffs of
steam while not in use.
▪ The appliance is
ready for use or has
been recently
▸ This is normal.
▸ To limit this, empty the drip
tray.
switched off.
▪ Condensate is drip-
ping into the vaporiser.
10 Accessories
Milk frother Hot-water/steam
spout
Descaler Cover for connec-
Water hardness test
strips
Cleaning brush
Measure
tion nozzle
11 Technical data
Type of appliance – Automatic built-in coffee machine
Model designation – CCSXSL
Voltage V 220–240
Frequency Hz 50/60
Current A Max. 10
Power consumption W 1,350
Pressure MPa 1.5 (15 bar)
Capacity of water tank l 2.3
Dimensions cm 59.6×45.4×48
Weight kg 26
48
Page 49

12 Disposal
12 Disposal
12.1 Packaging
Never allow children to play with packaging material due to the danger of injury or
suffocation. Store the packaging material in a safe location or dispose of it in an
environmentally-friendly way.
12.2 Safety
Render the appliance unusable to prevent accidents caused by improper use (e.g.
through children playing):
▸ Disconnect the appliance from the mains. With a fixed appliance, this is to be carried
out by a qualified electrician. Then cut the mains cable off flush with the appliance.
12.3 Disposal
▪ The «crossed‐out wheeled bin» symbol requires the separate collection of waste
electrical and electronic equipment (WEEE). Such equipment can contain hazardous,
environmentally harmful materials.
▪ These appliances are to be handed over to a designated collection point for the recyc-
ling of electrical and electronic equipment and must not be disposed of with unsorted
household waste. And in this way, you will be helping to protect resources and the environment.
▪ For more information, please contact the local authorities.
49
Page 50

13 Notes
50
Page 51

14 Service & Support
The «Trouble-shooting» section gives you valuable tips on how to deal with minor
malfunctions yourself, saving you the time and trouble of calling out a service technician and any cost that goes along with it.
Information on the V-ZUG warranty can be found at www.vzug.com →Service
→Warranty information. Please read this information carefully.
Please register your appliance straightaway online at www.vzug.com →Service
→Warranty registration. This will allow you to take advantage of the best possible support
in the event of a fault in the appliance during the guarantee period. You will require the
serial number (SN) and appliance designation to register your appliance. You will find
them on the identification plate of your appliance.
My appliance information:
SN: _______________________ Appliance: __________________________________
Please have this appliance information to hand when contacting V-ZUG. Thank you.
Your repair order
At www.vzug.com →Service→Service number you will find the telephone number of your
nearest V‑ZUG service centre.
Technical questions, accessories, warranty extensions
V-ZUG is happy to help you with any general administrative or technical queries, to take
your orders for accessories and spare parts and to inform you about our progressive
service agreements.
51
Page 52

V-ZUG Ltd, Industriestrasse 66, CH-6302 Zug
1058314-R02
info@vzug.com, www.vzug.com
 Loading...