

V-ZUG Combair XSEP, BCXSEP, Combair XSLP, BCXSLP Operating Instructions Manual
V-ZUG Ltd
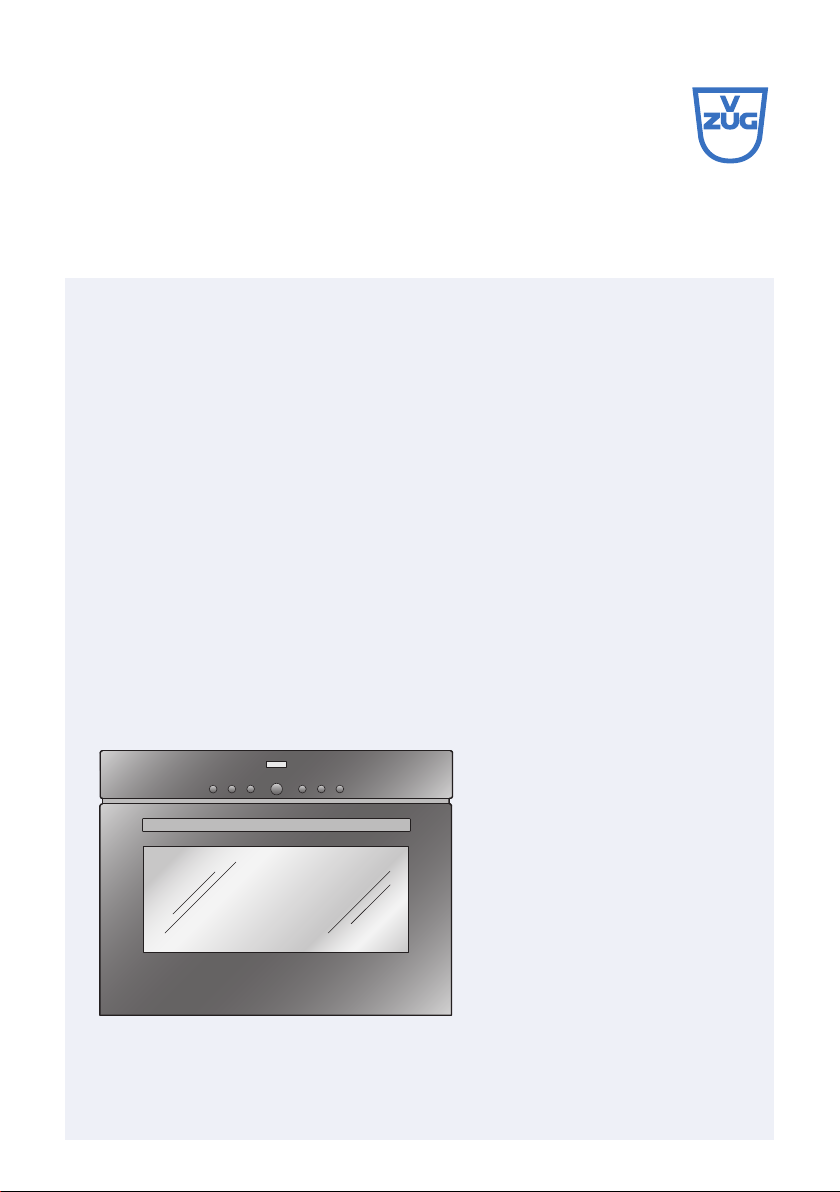
Oven
Combair XSEP
Operating instructions

Thank you for choosing to buy one of our products. Your appliance is made to
high standards and is easy to use. Nevertheless, please take the time to read
these operating instructions in order to familiarize yourself with the appliance
and get the best use out of it.
Please follow the safety precautions.
Modifications
Text, diagrams and data correspond to the technical standard of the appliance
at the time these operating instructions went to press. The right to make technical modifications for the purpose of the further development of the appliance
is reserved.
Validity
The model number corresponds to the first alphanumerics of the identification
plate. These operating instructions apply to:
Type Model no.
Size system
BCXSEP 21020 60-450
Variations depending on the model are noted in the text.
© V-ZUG Ltd, CH-6301 Zug, 2013
2

Contents
1 Safety precautions 5
1.1 Symbols used .......................................................................................... 5
1.2 General safety precautions ................................................................... 6
1.3 Appliance-specific safety precautions ................................................ 7
1.4 Instructions for use ................................................................................. 10
2 Disposal 13
3 Appliance description 14
3.1 Construction ............................................................................................. 14
3.2 Operating and display elements .......................................................... 15
3.3 Cooking space......................................................................................... 17
3.4 Accessories .............................................................................................. 18
4 Operating the appliance 20
4.1 Operating using the buttons ................................................................. 20
4.2 Using for the first time ............................................................................ 20
4.3 Selecting the operating mode .............................................................. 21
4.4 Selecting the cooking space temperature ......................................... 21
4.5 Checking and changing the cooking space temperature ............... 22
4.6 Changing the operating mode .............................................................. 22
4.7 Switching off ............................................................................................. 22
5 User settings 23
5.1 Adjusting the settings ............................................................................. 23
5.2 Childproof lock ........................................................................................ 25
5.3 Time display ............................................................................................. 25
5.4 Acoustic signal ........................................................................................ 26
5.5 Illumination ................................................................................................ 26
5.6 Temperature unit ..................................................................................... 26
5.7 Time format .............................................................................................. 26
5.8 Mains synchronization ............................................................................ 27
5.9 Factory settings ....................................................................................... 27
6 Time functions 28
6.1 Available time functions ......................................................................... 28
6.2 Setting and changing the time .............................................................. 28
6.3 Timer .......................................................................................................... 29
6.4 Operating time ......................................................................................... 30
6.5 Delayed start ............................................................................................ 32
3

7 Operating modes 35
7.1 Overview of operating modes ............................................................... 35
7.2 Top/Bottom heat ..................................................................................... 35
7.3 Bottom heat .............................................................................................. 36
7.4 Hot air ....................................................................................................... 36
7.5 Hot air humid .......................................................................................... 37
7.6 PizzaPlus ................................................................................................... 37
7.7 Grill ............................................................................................................. 38
7.8 Grill-forced convection ........................................................................... 39
7.9 Fast heating .............................................................................................. 39
8 Tips and tricks 40
8.1 Baking and roasting ............................................................................... 40
8.2 Cakes ....................................................................................................... 40
8.3 Uneven browning ................................................................................... 41
8.4 Saving energy .......................................................................................... 41
9 Care and maintenance 42
9.1 Cleaning the exterior .............................................................................. 42
9.2 Cleaning the door seal ........................................................................... 42
9.3 Cleaning the appliance door ................................................................. 43
9.4 Replacing the door seal ......................................................................... 44
9.5 Cleaning the accessories and shelf guides ....................................... 45
9.6 Cleaning the cooking space ................................................................. 45
9.7 Pyrolytic self-cleaning ............................................................................. 46
9.8 Replacing the halogen light bulb ......................................................... 48
10 Malfunctions 49
10.1 Trouble-shooting ...................................................................................... 49
10.2 What to do if ... ........................................................................................ 49
10.3 After a power failure ............................................................................... 52
11 Accessories and spare parts 53
12 Technical data 54
13 Notes 55
14 Index 56
15 Repair Service 59
4
1 Safety precautions
1.1 Symbols used
Denotes important safety precautions.
Failure to observe said precautions can result in injury or in
damage to the appliance or fittings!
Information and precautions that should be observed.
Information on disposal
Information about the operating instructions
Indicates step-by-step instructions.
– Describes how the appliance reacts to the steps taken.
• Indicates a list.
5

1 Safety precautions
1.2 General safety precautions
• Read the operating instructions before using
the appliance for the first time!
• This appliance is not intended for use by
persons (including children) with reduced
physical, sensory or mental capabilities, or
lack of experience and/or knowledge, unless
they are supervised or have been given
instruction concerning use of the appliance by
a person responsible for their safety.
• Children should be supervised to ensure that
they do not play with the appliance.
• If the mains cable of this appliance is
damaged, it must be replaced by the manufacturer or its Customer Services or a similarly
qualified person in order to avoid hazard.
6

1 Safety precautions
1.3 Appliance-specific safety precautions
• WARNING: The appliance and its accessible
parts get hot during use. Be careful not to
touch the heating elements.
• Children under 8 years of age must be kept
away unless constantly supervised.
• This appliance can be used by children aged
8 and above and by persons with reduced
physical, sensory or mental capabilities, or
lack of experience and/or knowledge,
provided they are supervised or have been
instructed on the safe use of the appliance
and have understood the hazards involved.
Children shall not play with the appliance.
Cleaning and user maintenance shall not be
undertaken by children without supervision.
• WARNING: Accessible parts can get hot
during use. Keep small children away.
7

1 Safety precautions
• Do not use aggressive or abrasive cleaning
agents or sharp metal scrapers for cleaning
the glass in the oven door as they could
scratch the surface. This can destroy the
glass.
• A warming drawer and its contents get hot.
• For appliances with pyrolysis self-cleaning,
excessive soiling and accessories must be
removed before carrying out pyrolysis selfcleaning.
• Only use the food probe recommended for
this oven.
• Do not use a steam cleaner.
• WARNING: Before replacing the light bulb,
ensure the appliance is switched off and
disconnected from the mains power supply to
avoid possible electric shock.
• See the 'Accessories' section for the proper
use of insertable parts.
8

1 Safety precautions
• WARNING: It can be dangerous to leave the
hob unattended when cooking with fat or oil,
as this can lead to fires. NEVER attempt to
extinguish a fire with water. Instead, switch the
appliance off and then carefully smother the
flames with, for example, a lid or a fire blanket.
• WARNING: Never store objects on the hob
due to the risk of fire.
9

1 Safety precautions
1.4 Instructions for use
Before using for the first time
• The appliance must be installed and connected to the electricity supply in
accordance with the separate installation instructions. Have a qualified fitter/
electrician carry out the necessary work.
Correct use
• The appliance is designed for use in the home for preparing food. Under no
circumstances flambé or cook food using a lot of fat in the cooking space!
No liability is assumed for any damage caused by improper use or incorrect
handling.
• Never use the appliance to dry animals, textiles or paper!
• Do not use the appliance as a room heater.
• The appliance should only be installed and operated in a room with an
ambient temperature of between 5 °C and 35 °C. If frost develops, residual
water left in the pumps could freeze and cause damage.
• Any repairs, modifications or manipulations to the appliance, especially any
electrically live parts, may only be carried out by the manufacturer, its
Customer Services or a similarly qualified person. Repairs if carried out
incorrectly could cause serious injury or damage to the appliance and
fittings as well as affect the functioning of the appliance. If the appliance is
not working properly or in case of a repair order, follow the instructions
given in the 'Repair service' section. If necessary, please contact our
Customer Services.
• Use original spare parts only.
• Retain these operating instructions for future reference.
• The appliance corresponds to recognized technology standards and the
relevant safety regulations. Proper use of the appliance is essential to avoid
damage and accidents. Please therefore follow the precautions given in
these operating instructions.
10

1 Safety precautions
Note on use
• Use the childproof locking facility.
• If the appliance is visibly damaged, do not use it. Contact Customer Serv-
ices.
• If the appliance is not operating properly, disconnect it from the power
supply immediately.
• Ensure there are no foreign bodies or pets in the cooking space before
closing the appliance door.
• Objects that could pose a danger if the appliance were accidentally
switched on should not be stored in the cooking space. Do not store food,
temperature-sensitive or inflammable materials, e.g. cleaning agents, oven
sprays, etc., in the cooking space.
• For appliances with a grill, keep the appliance door closed while grilling.
The heat could otherwise damage the operating and display elements or
the fitted units above.
Caution: Risk of burns!
• The appliance gets very hot when in use. The appliance door also gets hot.
• Steam may escape from the cooking space when the appliance door is
opened.
• The appliance will remain hot for some time after it is switched off and will
cool down only slowly to room temperature. Allow sufficient time for the
appliance to cool down before, for instance, cleaning it.
• Overheated fat and oil can easily catch fire. Heating oil in the cooking
space to sear meat is dangerous and should not be done. Never try to
extinguish burning oil or fat with water. Danger of explosion! Smother the
flames with a fire blanket. Keep doors and windows closed.
• Do not pour spirits (brandy, whisky, schnapps, etc.) over hot food. Danger
of explosion!
• Do not leave the appliance unattended when drying herbs, bread, mushrooms, etc. If the foodstuff dries out too much it can pose a fire hazard.
• If you notice smoke possibly coming from the appliance itself or from inside
the cooking space, keep the appliance door closed. Disconnect the appliance from the power supply.
• Accessories get hot in the cooking space. Use protective gloves or oven
cloths.
11

1 Safety precautions
Caution: Risk of injury!
• Be careful not to put fingers in the door hinges, there is otherwise a risk of
injury if the appliance door is moved. Particular care should be taken when
children are around.
• Only leave the appliance door open in the at-rest position. An open appliance door poses a danger of tripping or injury! Do not sit or rest on the
appliance door or use it as a storage surface.
• For hobs, a hob guard can be fitted to protect small children. Hob guards
are available from specialist retailers.
Caution: Risk to life!
• Packaging material, e.g. plastic film and polystyrene, can be dangerous for
children. Danger of suffocation! Keep packaging material away from children.
How to avoid damaging the appliance
• Close the appliance door carefully.
• Do not place any objects directly on the bottom heating element.
• Do not use protective aluminium inserts with appliances with no visible
bottom heating element.
• Do not use objects that can rust in the cooking space.
• Using knives or cutting wheels on the original baking tray will visibly
damage the surface.
• To prevent corrosion, leave the appliance door open in the at-rest position
until the cooking space has cooled down.
• When cleaning the appliance make sure no water gets inside it. Use a
moderately damp cloth. Do not spray the outside or the inside of the appliance with water. If water gets inside the appliance, it will cause damage.
12

2 Disposal
Packaging
• All packaging materials (cardboard, plastic film (PE) and polystyrene (EPS))
are marked and should, if possible, be collected for recycling and disposed
of in an environmentally friendly way.
Disconnection
• Disconnect the appliance from the mains. With a fixed appliance, this is to
be carried out by a qualified electrician!
Safety
• Disable the appliance to prevent accidents caused by improper use, especially through children playing.
• Pull the plug out of the mains socket or have the appliance disconnected
from the mains by an electrician. Then cut the mains cable off flush with the
appliance.
• Remove or disable the lock on the appliance door.
Disposal
• The old appliance should not be discarded as worthless rubbish. If
disposed of correctly, the raw materials can be recovered for recycling.
• The symbol on the identification plate warns that the appliance may not
be disposed of in normal household waste.
• The appliance must be disposed of in accordance with local regulations on
waste disposal. For more information on the handling, disposal and recycling of the product, please contact the local authorities, the local recycling
facilities for household waste or the retailer from whom you purchased the
appliance.
13
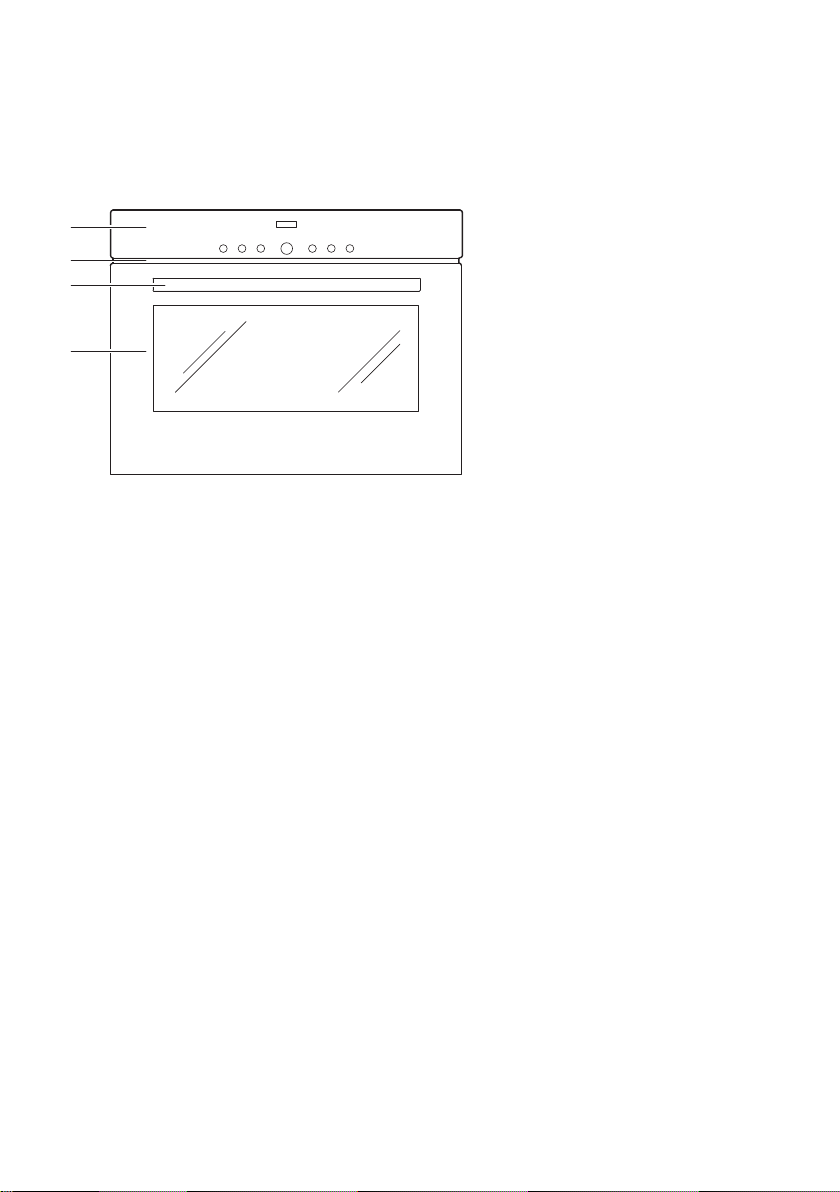
3 Appliance description
4
3
2
1
3.1 Construction
1
Operating and display elements
2
Ventilation opening
3
Door handle
4
Appliance door
14
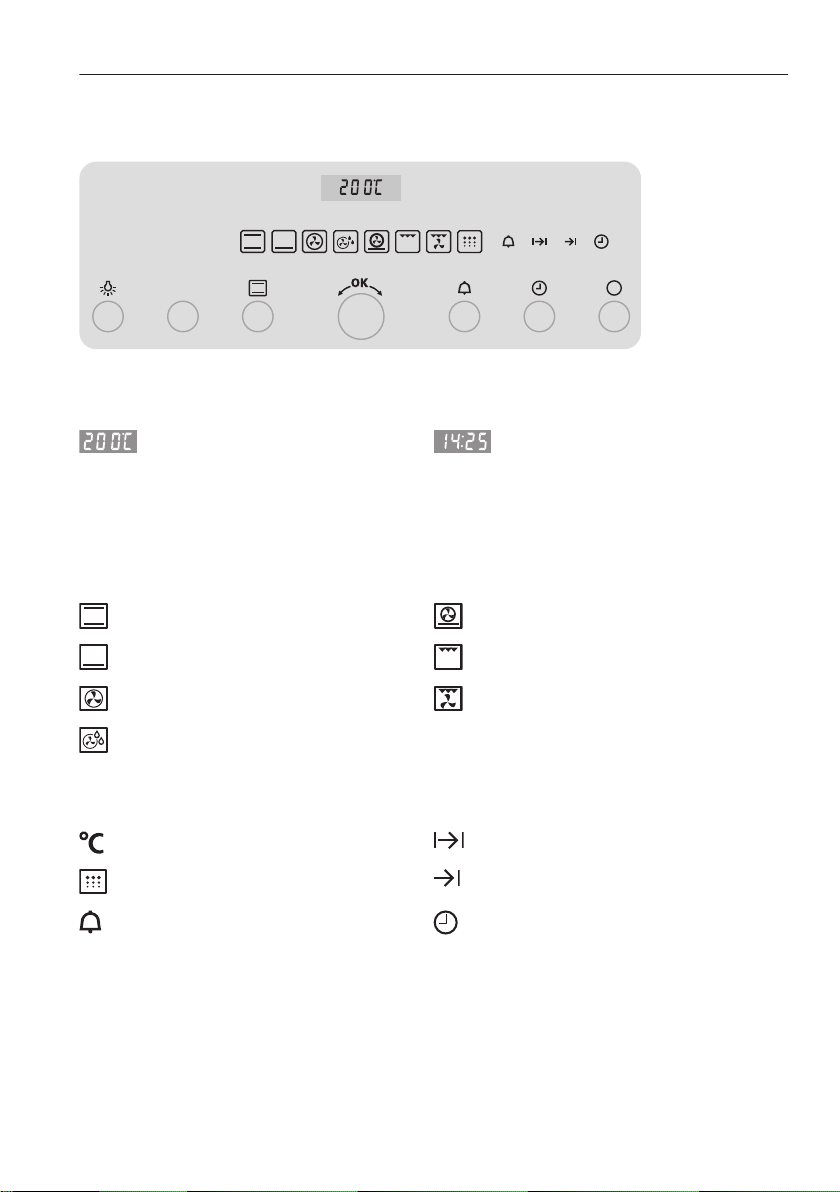
3.2 Operating and display elements
˚C
˚C
Digital displays
Temperature Time
Operating mode symbols
Top/bottom heat PizzaPlus
3 Appliance description
Operating time
Switch-off time
Timer
Symbols
Bottom heat Grill
Hot air Grill-forced convection
Hot air humid
Cooking space temperature Operating time
Self-cleaning Switch-off time
Timer Time
15

3 Appliance description
Buttons
Illumination Timer
Cooking space temperature Switch-off time
Operating mode Off
Adjusting knob
16
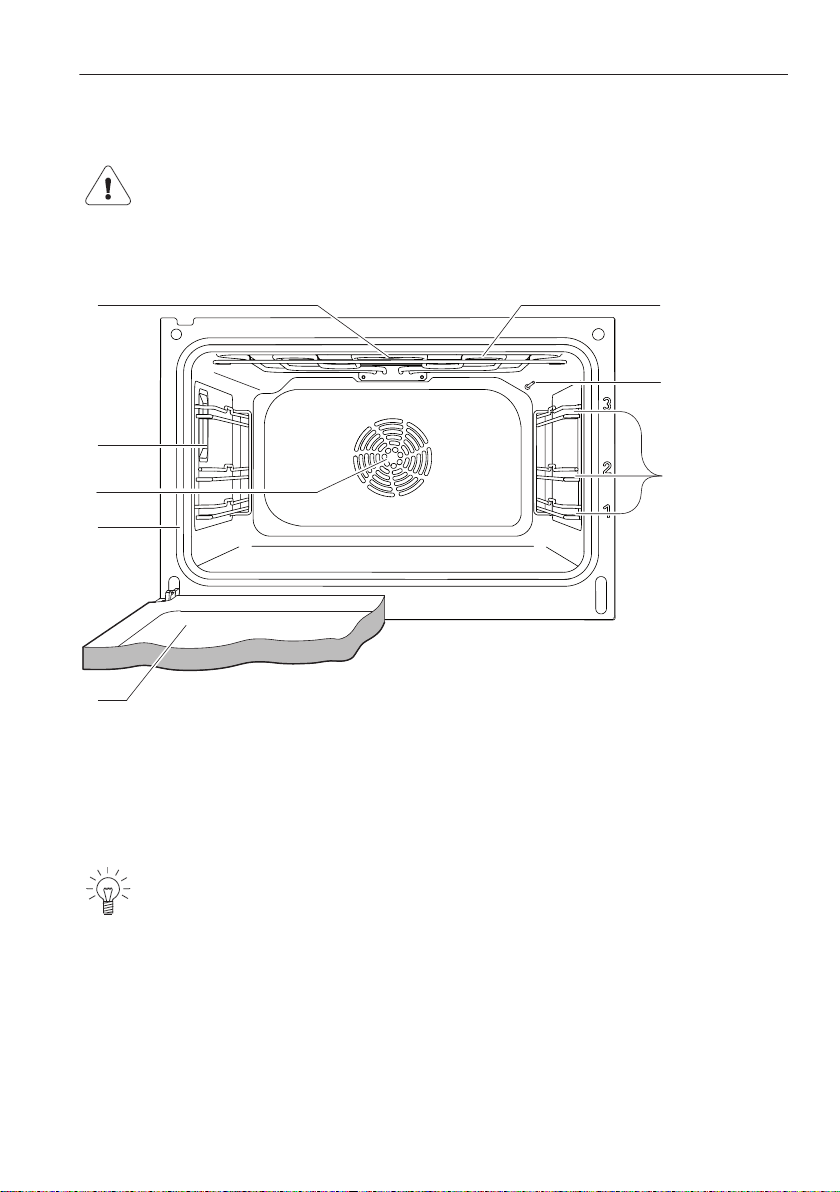
3.3 Cooking space
2
8
4
1
3
5
6
7
Using protective inserts or aluminium foil can damage the appliance.
Do not place any protective insert or aluminium foil on the floor of
the cooking space.
3 Appliance description
1
Appliance door
2
3
4
Door seal
Hot air fan
Illumination
5
Cooking space ventilation
6
Grill/Top heat
7
Cooking space temperature sensor
8
Levels (labelled)
The bottom heating element is beneath the cooking space floor.
17
1
1
3 Appliance description
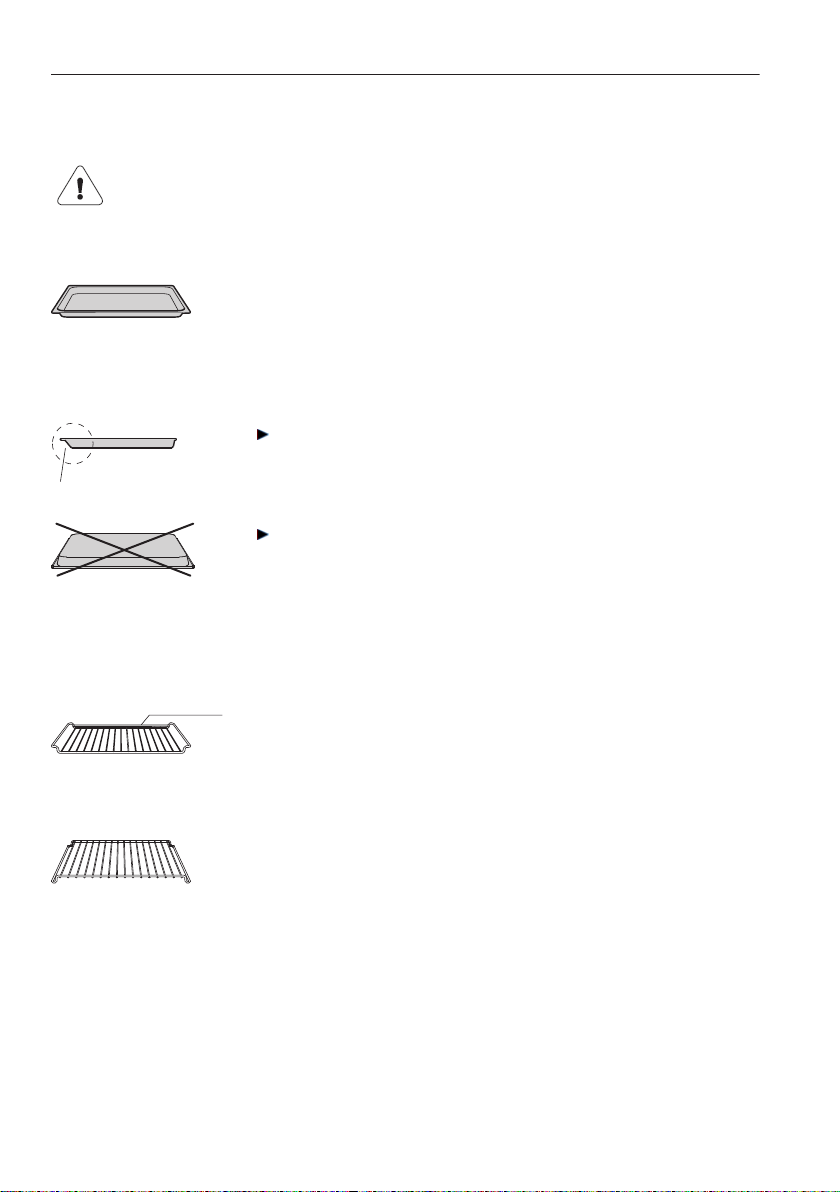
3.4 Accessories
Incorrect handling can cause damage!
Do not use knives or cutting wheels on the accessories.
Original TopClean baking tray
• Baking tin for flans and biscuits
• Use together with the wire shelf as a drip tray
• If not fully covered by the baking, its shape can
become distorted during baking. This is normal. It
will go back to its original form as it cools down.
Push the original baking tray into the cooking space
with the «sloped» side 1 to the back.
Only use the normal way round – not upside down.
Wire shelf
• For standing roasting and baking tins on
• For standing meat, frozen pizza, etc. on
• Push the bar 1 to the back of the cooking space. It
enables the food to be removed safely from the
cooking space.
• Serves as a cooling rack
18
 Loading...