

Page 1

www.vtechphones.com
i
NEED HELP?
This manual has all the feature operations and troubleshooting you need to install
and operate your new VTech telephone. Please take the time to review thoroughly
to ensure proper installation of this VTech innovative and feature rich product.
You can also visit our website at www.vtechphones.com for support,
shopping, and everything new at VTech.
In Canada, please visit www.vtechcanada.com.
VTech toll free 1 (800) 595-9511. In Canada, dial 1 (800) 267-7377
Important! Before using this telephone, you
must read the Important safety
instructions on page 68 of this manual.
Page 2

www.vtechphones.com
ii
Add new handsets to make your telephone more versatile (see page 63)
Your VTech i5871/i5873 telephone system can operate up to eight handsets. You can add new
handsets (model number i5808, sold separately) at any time, but each must be registered with the
base unit before use.
The handset provided with your telephone is automatically registered as Handset 1. Additional handsets
will be assigned numbers in the order they are registered (2, 3, 4, 5, 6, 7 and 8). A maximum of eight
handsets can be registered to each base unit.
To order additional handsets (model i5808), visit us on the web at www.vtechphones.com or call VTech
Customer Service at 1 (800) 595-9511. In Canada, call 1 (800) 267-7377.
Page 3

www.vtechphones.com
1
Installation
Parts checklist . . . . . . . . . . . . . . . . . . . . . . 3
Base unit installation . . . . . . . . . . . . . . . . . . . 6
Install handset battery . . . . . . . . . . . . . . . . . . 7
Belt clip & headset . . . . . . . . . . . . . . . . . . . . 8
Dial mode . . . . . . . . . . . . . . . . . . . . . . . . . 9
Caller ID information . . . . . . . . . . . . . . . . . . . 9
If you subscribe to DSL service . . . . . . . . . . . . 10
Telephone settings
Handset layout . . . . . . . . . . . . . . . . . . . . . 11
Base unit layout. . . . . . . . . . . . . . . . . . . . . 12
Handset screen images . . . . . . . . . . . . . . . . 13
Handset sounds . . . . . . . . . . . . . . . . . . . . 14
Handset messages . . . . . . . . . . . . . . . . . . . 16
Handset settings . . . . . . . . . . . . . . . . . . . . 18
Base settings . . . . . . . . . . . . . . . . . . . . . . 22
Basic operation
Make, answer and end calls . . . . . . . . . . . . . . 25
Options while on calls . . . . . . . . . . . . . . . . . 26
Intercom call . . . . . . . . . . . . . . . . . . . . . . 27
Advanced operation
Phonebook . . . . . . . . . . . . . . . . . . . . . . . 32
Store an entry in the phonebook. . . . . . . . . . . 32
Chart of characters . . . . . . . . . . . . . . . . . 33
Customize entries . . . . . . . . . . . . . . . . . . 34
Search the phonebook. . . . . . . . . . . . . . . . 34
Dial a phonebook entry . . . . . . . . . . . . . . .
35
Edit a phonebook entry . . . . . . . . . . . . . . . 35
Delete a phonebook entry . . . . . . . . . . . . . . 35
Call log . . . . . . . . . . . . . . . . . . . . . . . . . 36
Review the call log . . . . . . . . . . . . . . . . . 37
Dial a call log entry . . . . . . . . . . . . . . . . . 37
Save an entry to the handset phonebook . . . . . . 38
Delete an entry . . . . . . . . . . . . . . . . . . . 38
Redial list . . . . . . . . . . . . . . . . . . . . . . . . 39
Dial an entry from the redial list . . . . . . . . . . . 39
Save a redial entry to the handset phonebook . . . 40
Delete a redial entry . . . . . . . . . . . . . . . . . 40
Answering system operation
About answering system operation . . . . . . . . . . . . 41
Setting answering system . . . . . . . . . . . . . . . 42
Outgoing greeting . . . . . . . . . . . . . . . . . . . 45
Message playback . . . . . . . . . . . . . . . . . . . 47
Recording and playing memos . . . . . . . . . . . . . 48
Remote access . . . . . . . . . . . . . . . . . . . . . 49
Special features
Recordable ringer . . . . . . . . . . . . . . . . . . . 50
Picture download . . . . . . . . . . . . . . . . . . . . 52
Phonebook tab functions . . . . . . . . . . . . . . . . 55
Appendix
Handset and base indicators . . . . . . . . . . . . . . 60
Add additional handsets . . . . . . . . . . . . . . . . 63
Table of contents
Page 4

www.vtechphones.com
2
Table of contents
Charge spare battery pack . . . . . . . . . . . . . . . 66
Batteries . . . . . . . . . . . . . . . . . . . . . . . . 67
Important safety instructions . . . . . . . . . . . . . . 68
Troubleshooting . . . . . . . . . . . . . . . . . . . . 69
Operating range . . . . . . . . . . . . . . . . . . . . 75
Maintenance . . . . . . . . . . . . . . . . . . . . . . 75
About cordless telephones . . . . . . . . . . . . . . . 76
Warranty . . . . . . . . . . . . . . . . . . . . . . . . 76
FCC, ACTA and IC regulations . . . . . . . . . . . . . 77
Technical specications . . . . . . . . . . . . . . . . 80
Index . . . . . . . . . . . . . . . . . . . . . . . . . . 81
Page 5
www.vtechphones.com
3
Installation
Basic operation
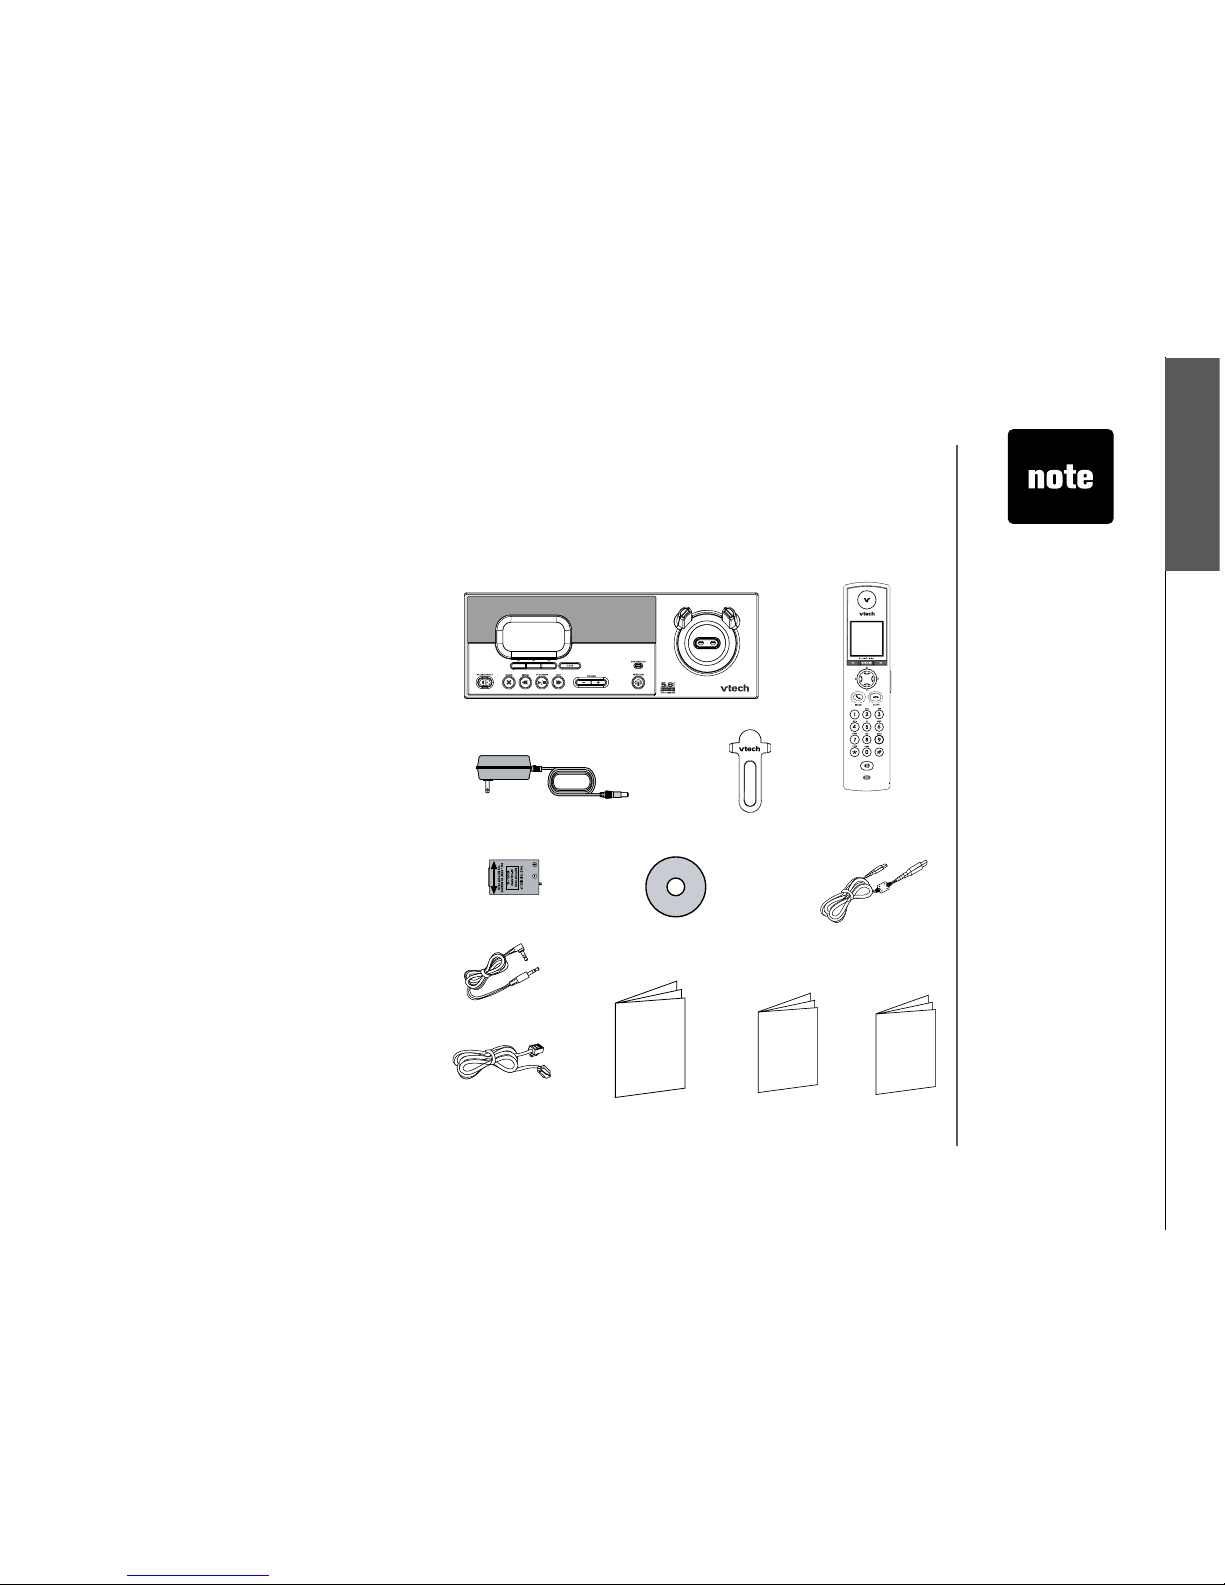
Parts checklist for i5871:
Installation
1. Base unit
2. Handset
3. Base power adapter
4. Belt clip
5. Battery
6. VTech phonebook manager CD
7. USB cable
8. Audio patch cable
9. Telephone line cord
10. User’s manual
11. Quick start guide
12. Special features guide
Remember to save your sales receipt and original packaging in case it is necessary to ship your
telephone for warranty service. Check to make sure the telephone package includes the following:
• To purcha se
re pla cem ent
ba tte rie s,
vi sit us on the
we b a t w ww.
vt ech pho nes .
co m or
call VTech
Communications,
Inc. at 1 (800)
595-9511) in the
United States. In
Canada, call 1
(800) 267-7377.
1. Base unit
2. Handset
4. Belt clip
10. User’s manual 11. Quick start guide
5. Battery
8. Audio patch cable
6. VTech phonebook
manager CD
3. Base power adapter
12. Special
features guide
9. Telephone line
cord
7. USB cable
Page 6
www.vtechphones.com
4
Installation
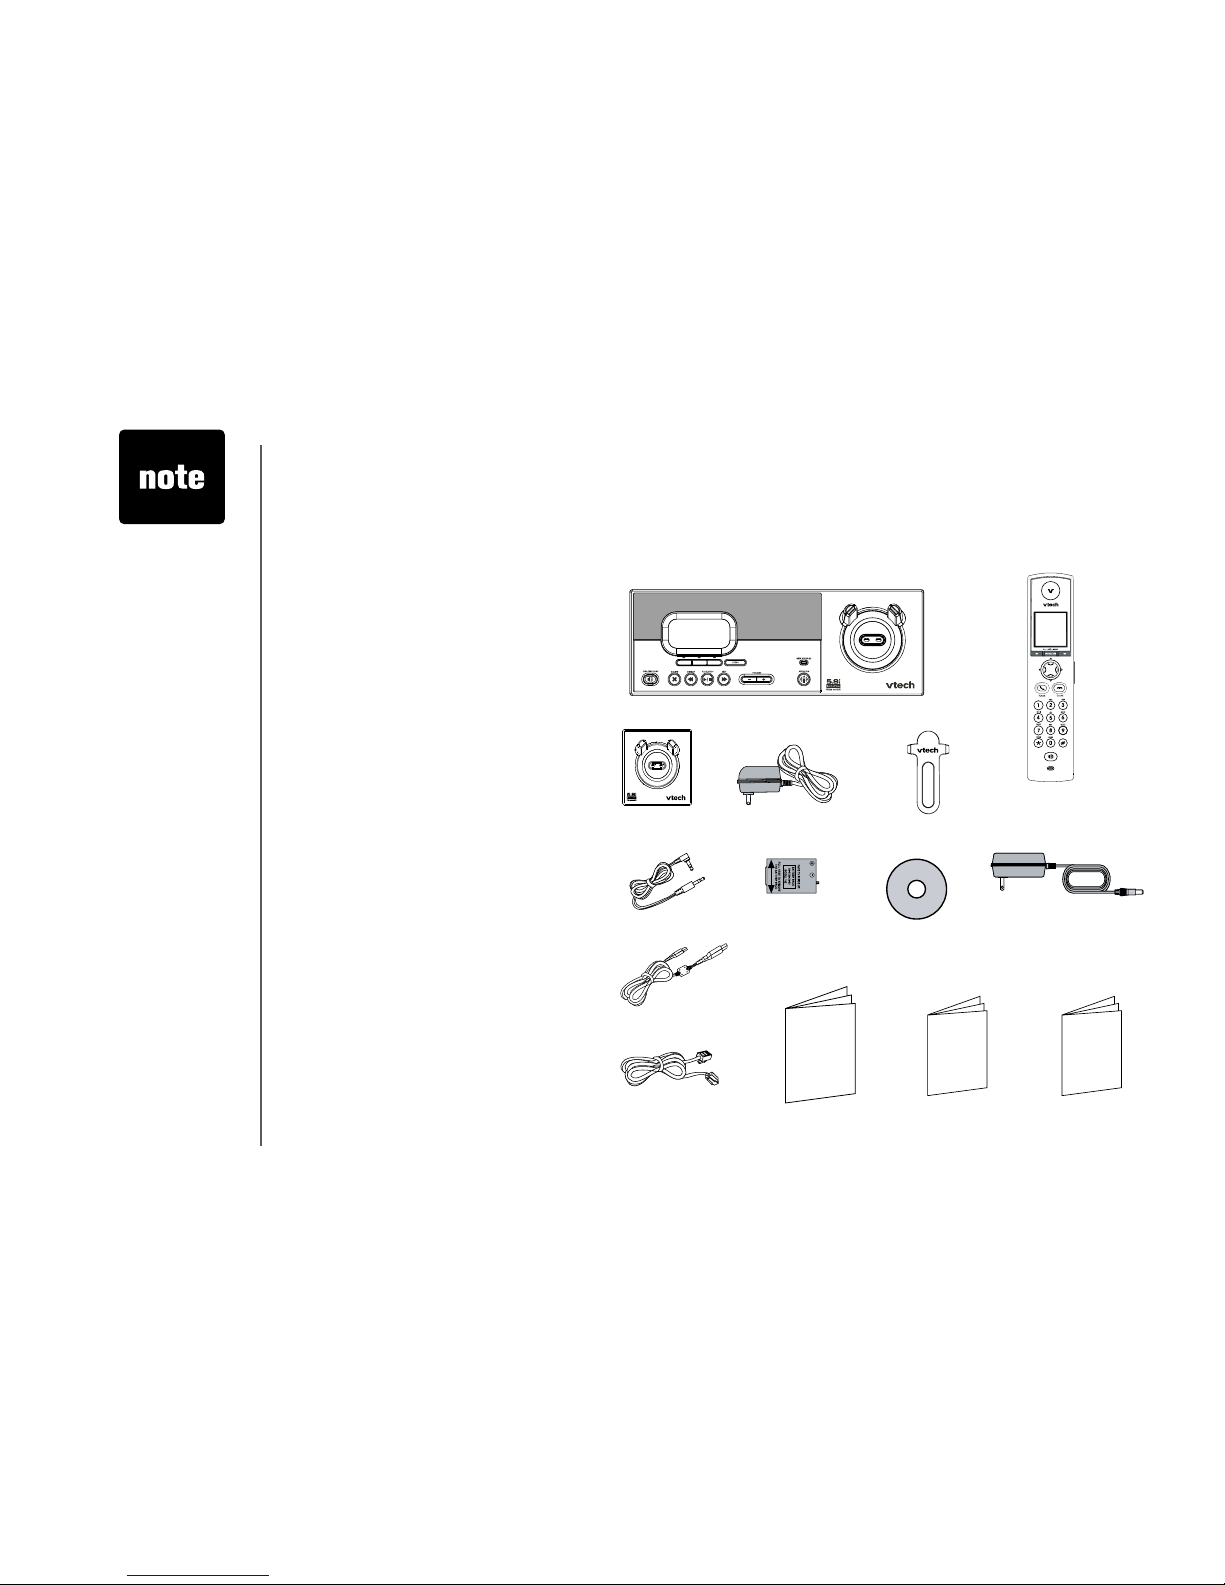
Parts checklist for i5873:
Remember to save your sales receipt and original packaging in case it is necessary to ship your
telephone for warranty service. Check to make sure the telephone package includes the following:
• To purcha se
re pla cem ent
ba tte rie s,
vi sit us on the
we b a t w ww.
vt ech pho nes .
co m or
call VTech
Communications,
Inc. at 1 (800)
595-9511) in the
United States. In
Canada, call 1
(800) 267-7377.
1. Base unit
2. Handsets (2)
11 . Tele pho ne
line cord
5. Belt clips (2)
12. User’s manual 13. Quick start guide
7. Batteries (2)
10. USB cable
6. Audio patch cable
8. VTech phonebook
manager CD
9. Base power adapter
14. Special
features guide
1. Base unit
2. Handsets (2)
3. Charger
4. Charger adapter
5. Belt clips (2)
6. Audio patch cable
7. Batteries (2)
8. VTech phonebook manager CD
9. Base power adapter
10. USB cable
11. Telephone line cord
12. User’s manual
13. Quick start guide
14. Special features guide
3. Charger
4. Charger adapter
Page 7
www.vtechphones.com
5
Installation
Basic operation
Installation
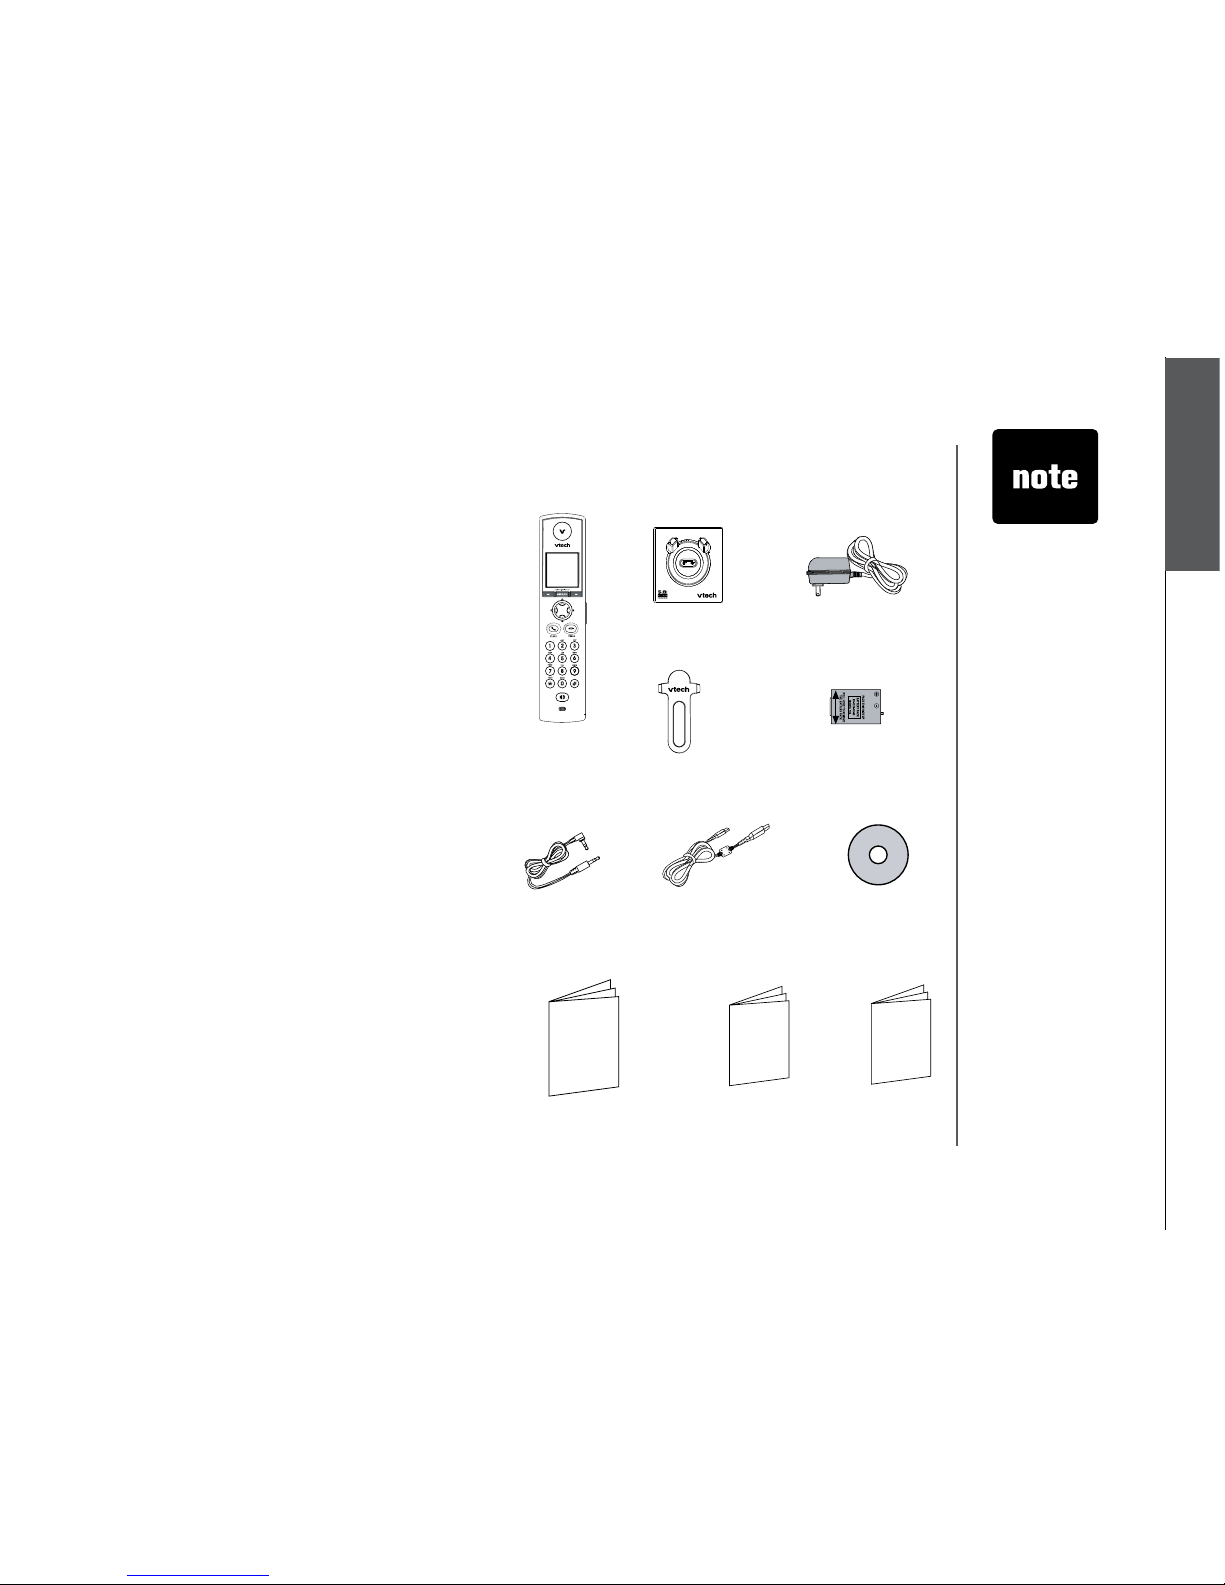
Parts checklist for i5808:
• To purcha se
re pla cem ent
ba tte rie s,
vi sit us on the
we b a t w ww.
vt ech pho nes .
co m or
call VTech
Communications,
Inc. at 1 (800)
595-9511) in the
United States. In
Canada, call 1
(800) 267-7377.
1. Handset
2. Charger
3. Charger adapter
4. Belt clip
5. Battery
6. Audio patch cable
7. USB cable
8. VTech phonebook manager CD
9. User’s manual
10. Quick start guide
11. Special features guide
1. Handset
4. Belt clip
9. User’s manual
10. Quick start guide
5. Battery
7. USB cable6. Audio patch cable
8. VTech phonebook
manager CD
11. Special
features guide
2. Charger
3. Charger adapter
Page 8
www.vtechphones.com
6
Installation
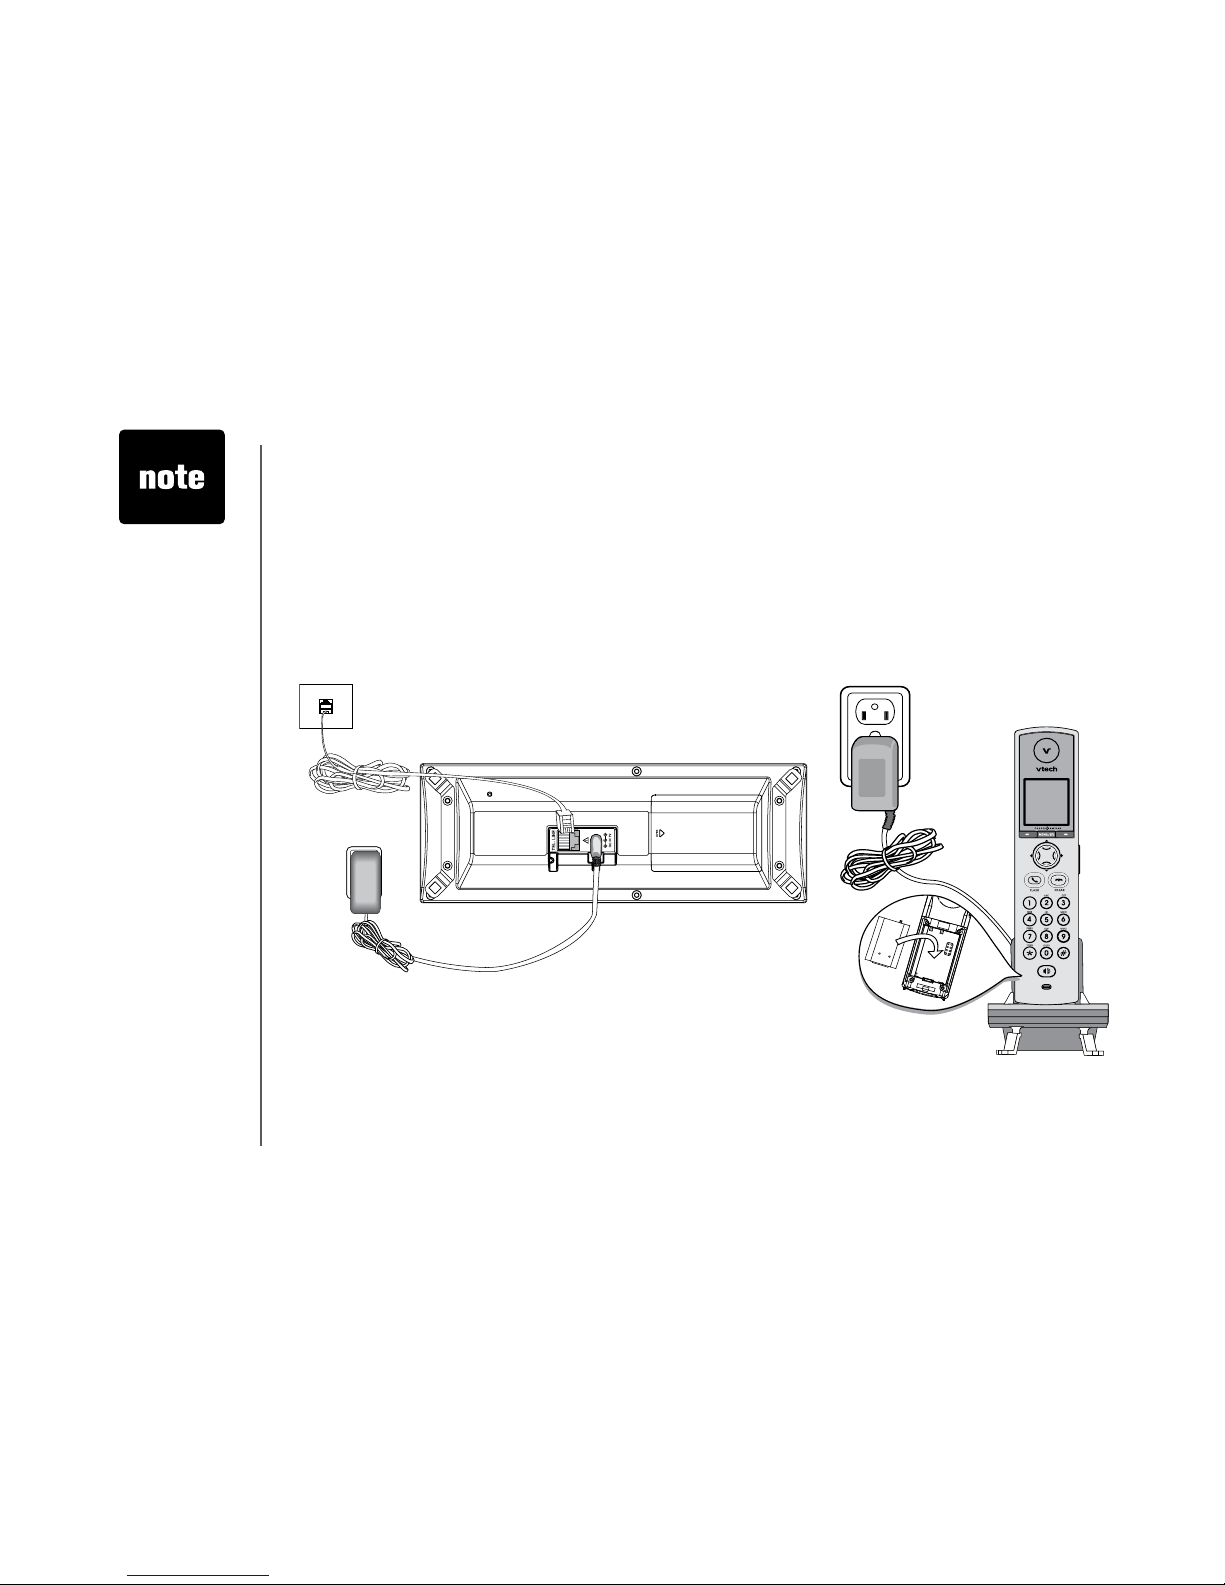
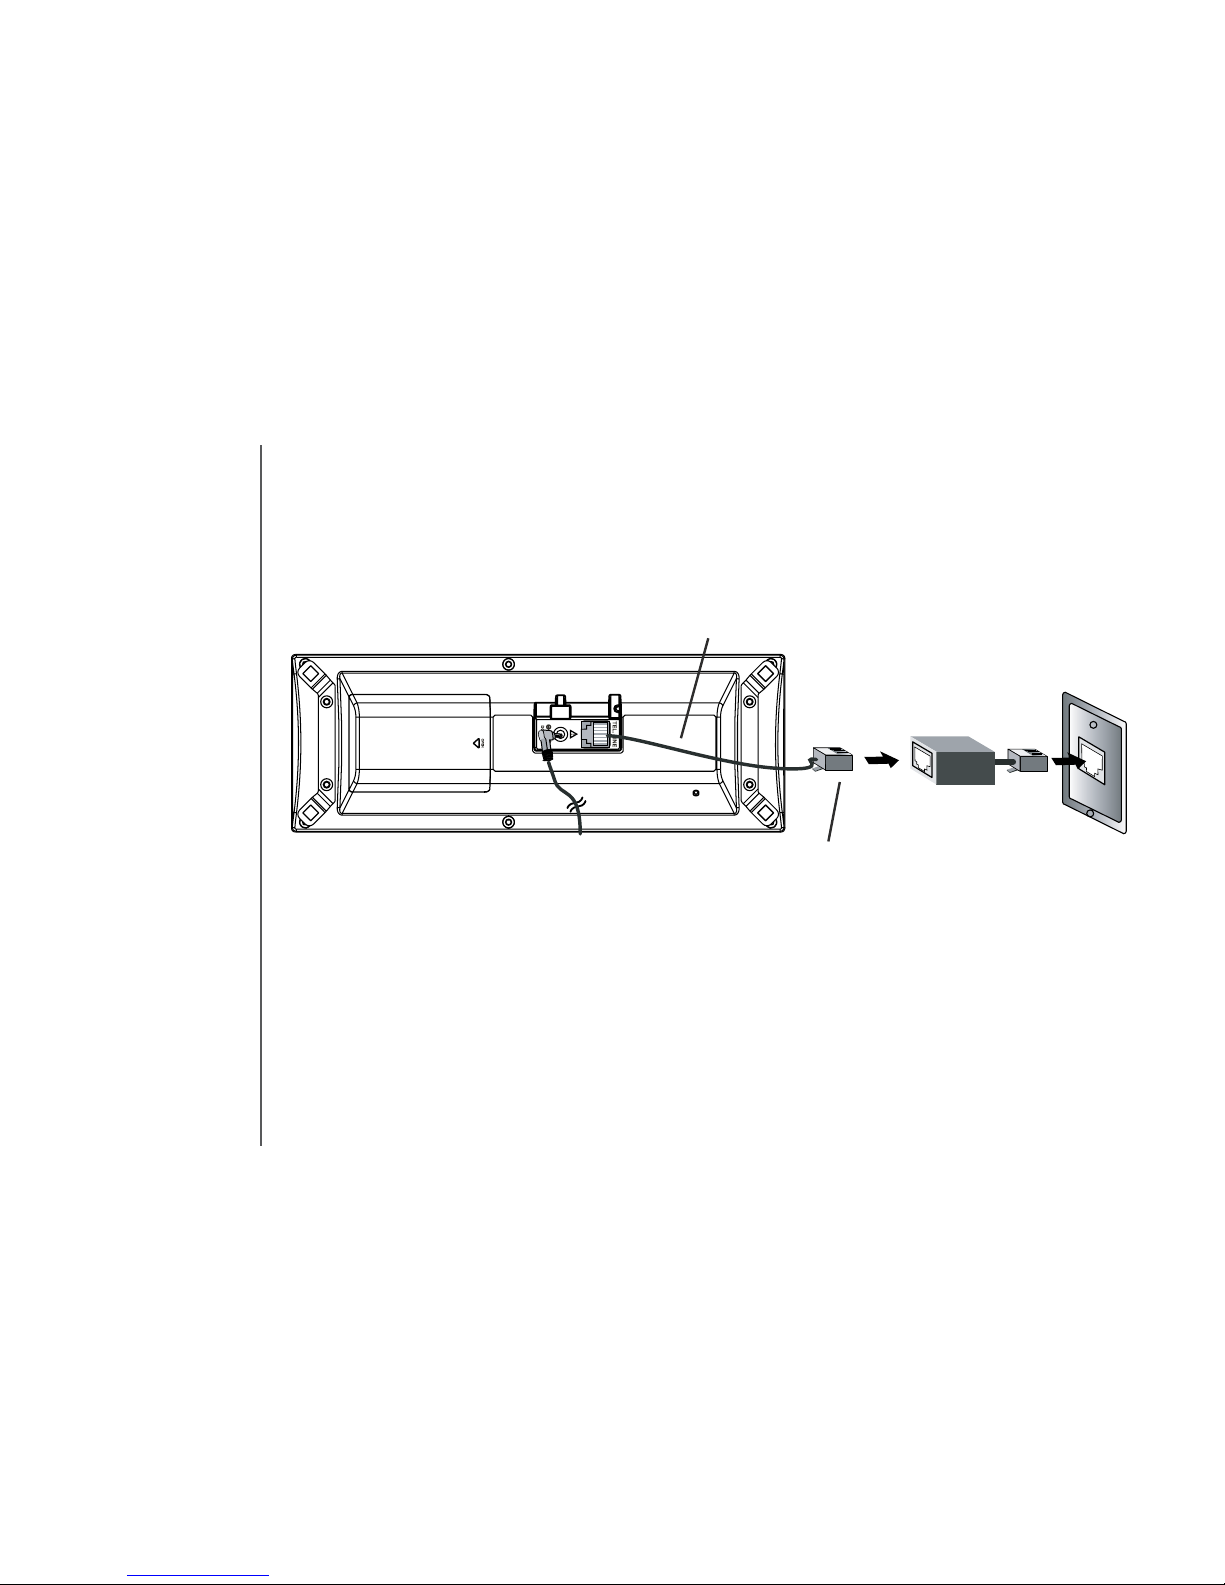
Base unit installation
Install the base unit and the charger as shown below. Choose a central location within the home, away
from any electronic equipment and appliances such as personal computers, computer routers, television
sets, microwave ovens, and refrigerators. Avoid excessive heat, cold, dust or moisture.
• Use only the
VTech battery
and AC power
adaptor supplied
with this
telephone.
• If the handset will
not be used for
a long period of
time, remove the
battery to prevent
possible leakage.
Plug power adapter into an electrical outlet not controlled by a wall switch.
Plug the telephone line cord into a
telephone jack.
Page 9

www.vtechphones.com
7
Installation
Basic operation
Installation
Install handset battery
• Press the tab and slide cover away from the battery
compartment.
• Place the battery in the compartment with the metal
contacts aligned, as shown in the diagram.
• Position the battery compartment cover and slide it
towards the unit until it clicks into place.
• Put the handset in the base unit to start charging the
new battery for at least 12 hours.
You can keep the battery charged by returning the
handset to the base unit after each use. When the
battery power is fully depleted, a full recharge takes
about 12 hours.
• Use only the
VTech battery
and AC power
adapter supplied
with this
telephone.
• If the handset will
not be used for
a long period of
time, remove the
battery to prevent
possible leakage.
• To purcha se
re pla cem ent
ba tte rie s,
vi sit us on the
we b a t w ww.
vt ech pho nes .
co m or
call VTech
Communications,
Inc. at 1 (800)
595-9511) in the
United States. In
Canada, call 1
(800) 267-7377.
Page 10
www.vtechphones.com
8
Installation
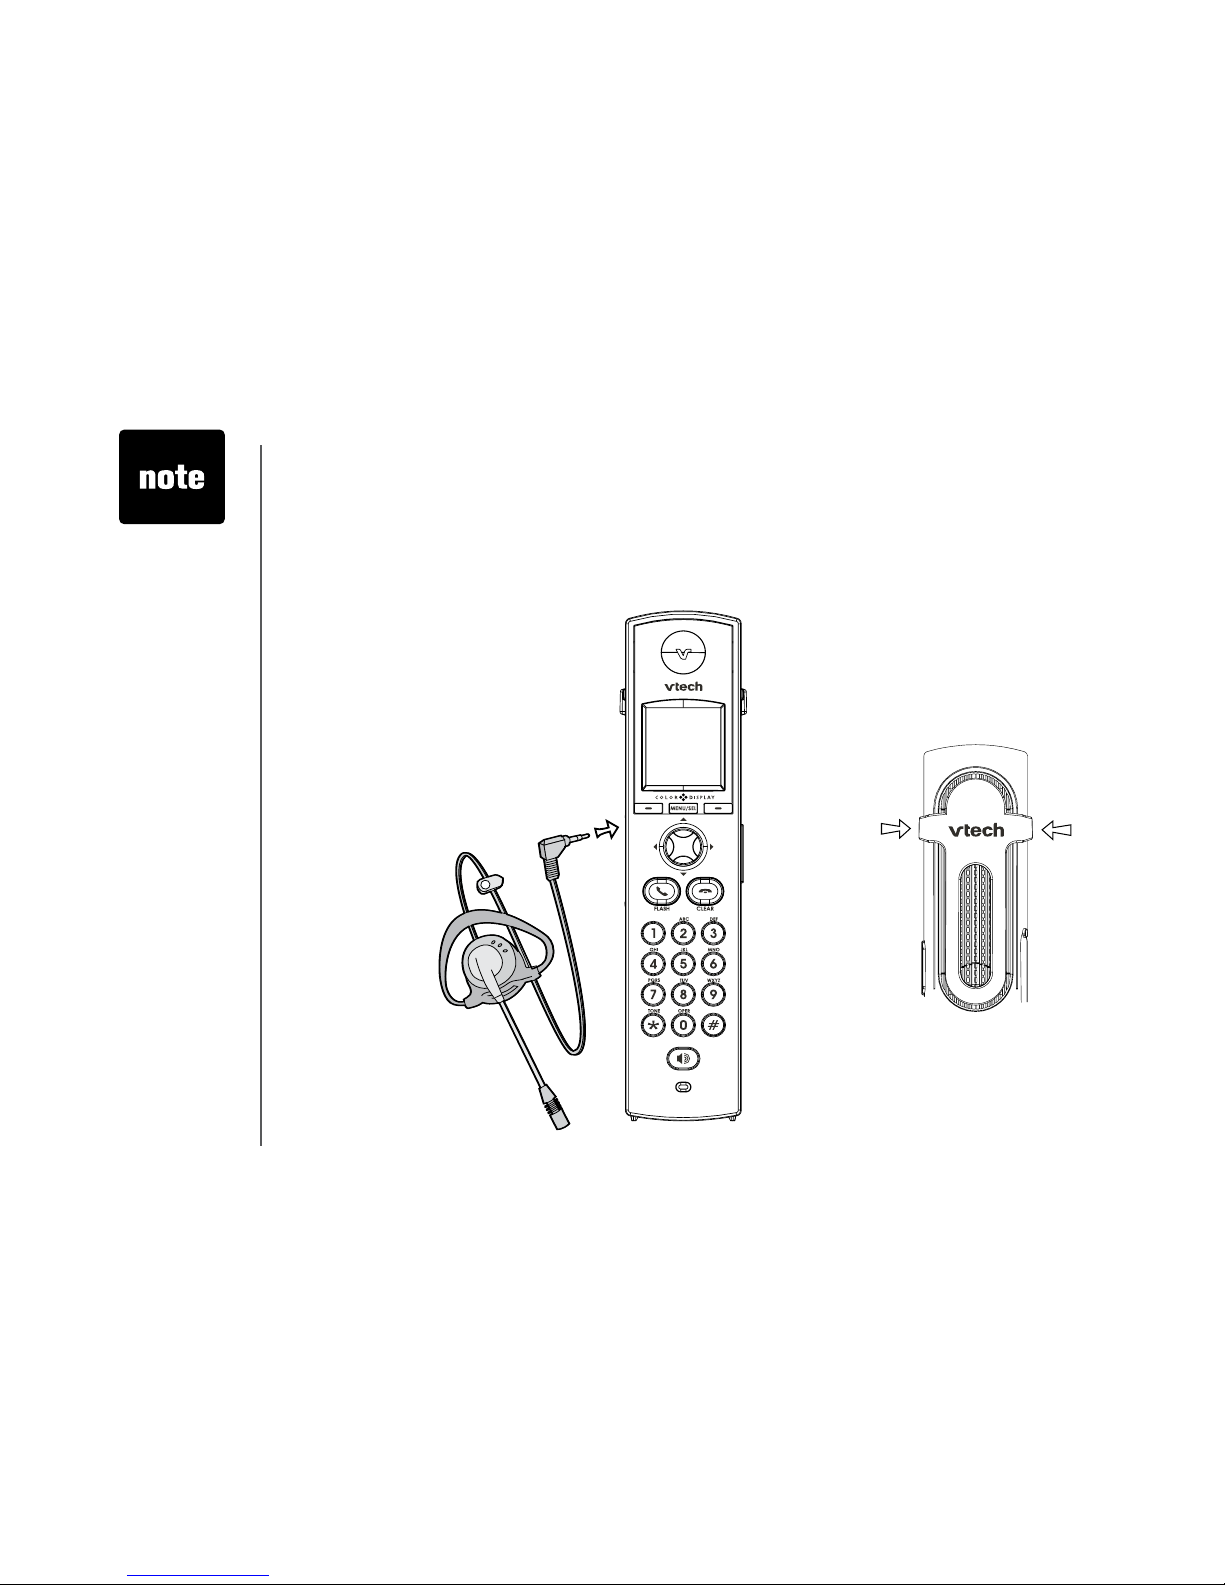
Install belt clip and headset as shown below if desired.
For hands-free telephone conversations, use any industry standard 2.5 mm headset (purchased
separately). For best result, use a VTech 2.5 mm headset.
Belt clip & headset (optional)
• To purchase
a headset,
visit us on the
web at www.
vtechphones.
com or call
VTech Customer
Service at 1
(800) 595-9511.
In Canada, call 1
(800) 267-7377.
• Whenever a
compatible
headset is
connected to the
cordless handset,
the microphone
on the handset
will be muted.
This is done to
limit the effect
of background
noise.
Belt clip
Align the pins on the inside edge of the clip
with the notches on the sides of the handset.
Plug the 2.5 mm headset into the
jack on the side of the handset (be
-
neath the small rubber cap).
Page 11

www.vtechphones.com
9
Installation
Basic operation
Installation
Dial mode
If you have touch-tone service, your telephone is ready to use as soon as the battery is charged. If
you have pulse (rotary) service, the dial mode must be changed. Press /FLASH and there should
be a dial tone. If not, refer to the Set dial mode section on page 20.
About caller ID information
The caller ID with call waiting features in this telephone let you see who is calling before answering
the call, even when on another call. These features require services provided by your local telephone
company.
Contact your telephone service provider if:
• you have both caller ID and call waiting, but as separate services (you may need combined
service),
• you have only caller ID service, or only call waiting service, or
• you do not subscribe to any caller ID or call waiting services but wish to try them now.
You can use this telephone with regular caller ID service, and you can use its other features without
subscribing to either caller ID or combined caller ID with call waiting service. There may be fees for
these services, and these services may not be available in all areas.
The caller ID features will work only if both you and the caller are in areas offering caller ID service,
and if both telephone companies use compatible equipment.
Page 12
www.vtechphones.com
10
Noise filter (for
DSL users)
To single telephone jack (RJ11C)
Telephone line cord
If you subscribe to DSL service
If there is interference during telephone conversations and/or your caller ID features are not functioning
properly, install a noise lter to the telephone line between the base unit and the telephone wall jack.
Contact your DSL provider for a noise lter.
Installation
Page 13
www.vtechphones.com
11
Basic operation
Telephone settings
Telephone settings
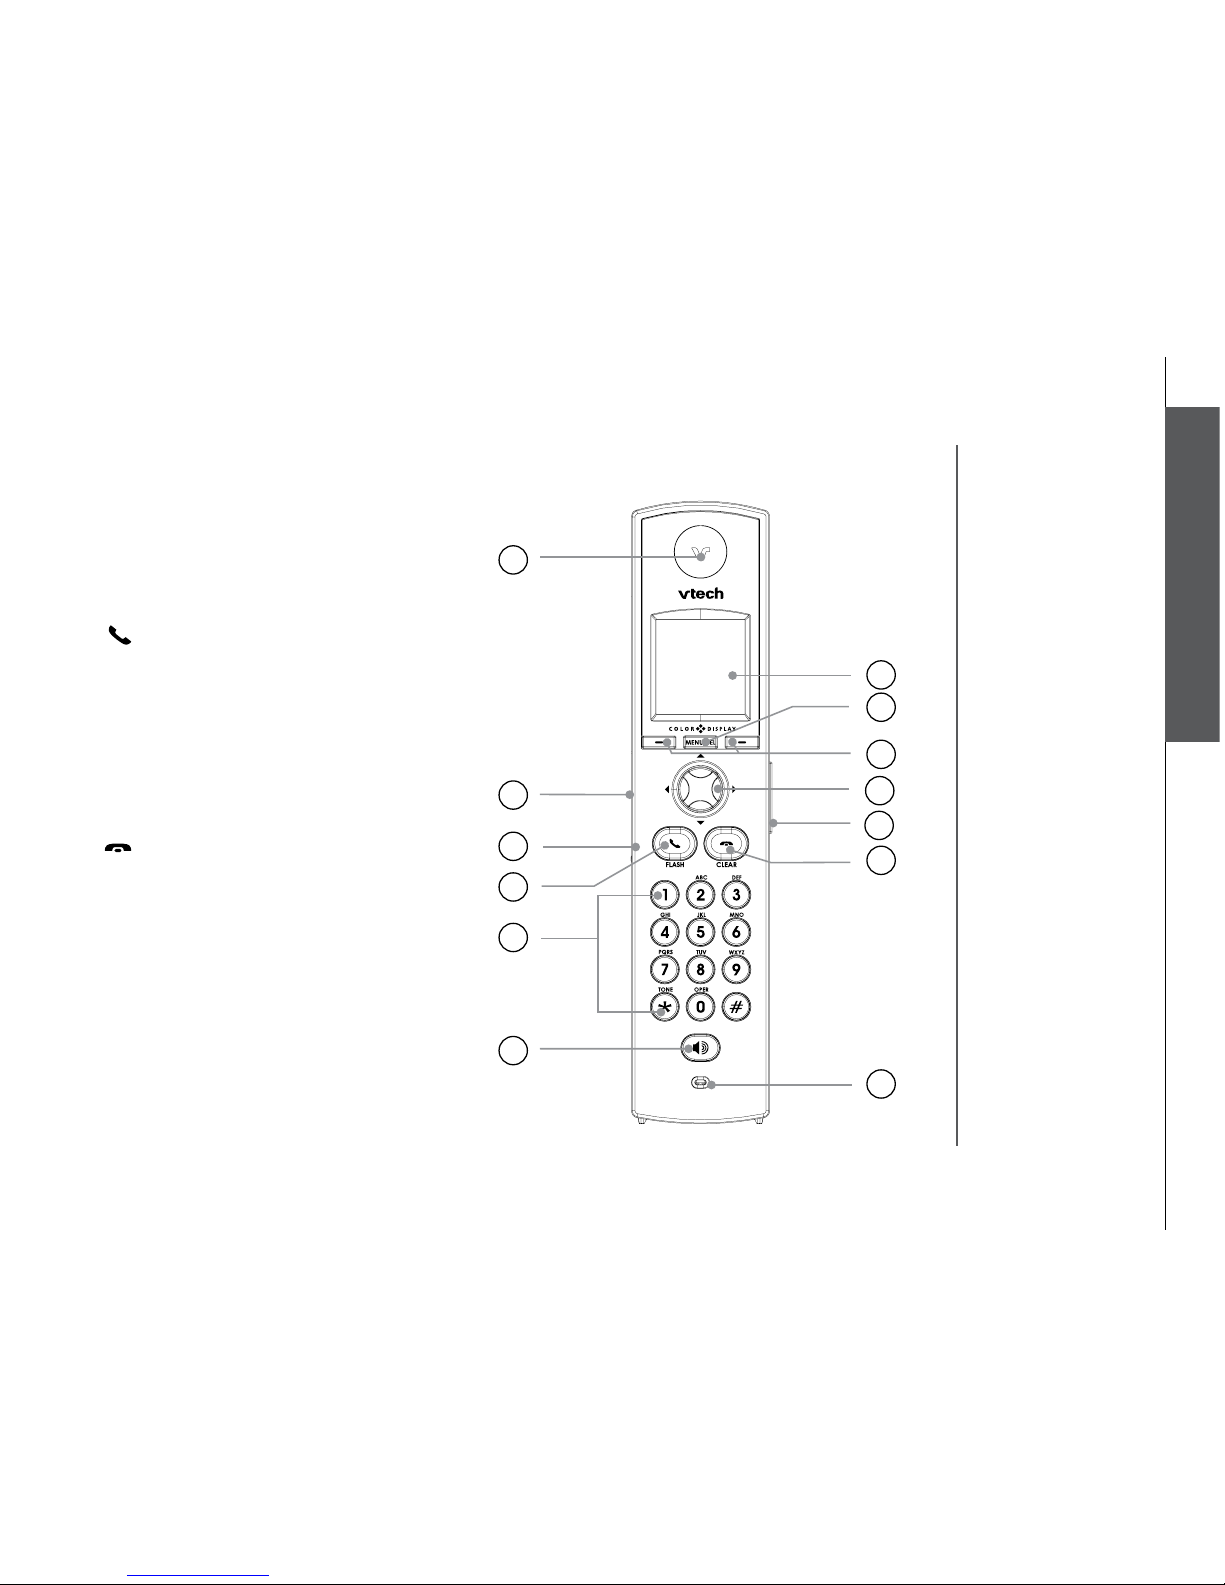
1. Earpiece
2. USB cable jack
3. Headset jack/audio patch cable jack
(2.5mm)
4.
/FLASH
5. Dialing pad (0-9, *, #)
6. Speakerphone
7. LCD display
8. MENU/SEL
9. Softkeys
10. NavKeys (navigation keys)
11. Volume keys
12.
/CLEAR
13. Microphone
Handset layout
Page 14
www.vtechphones.com
12
Telephone settings
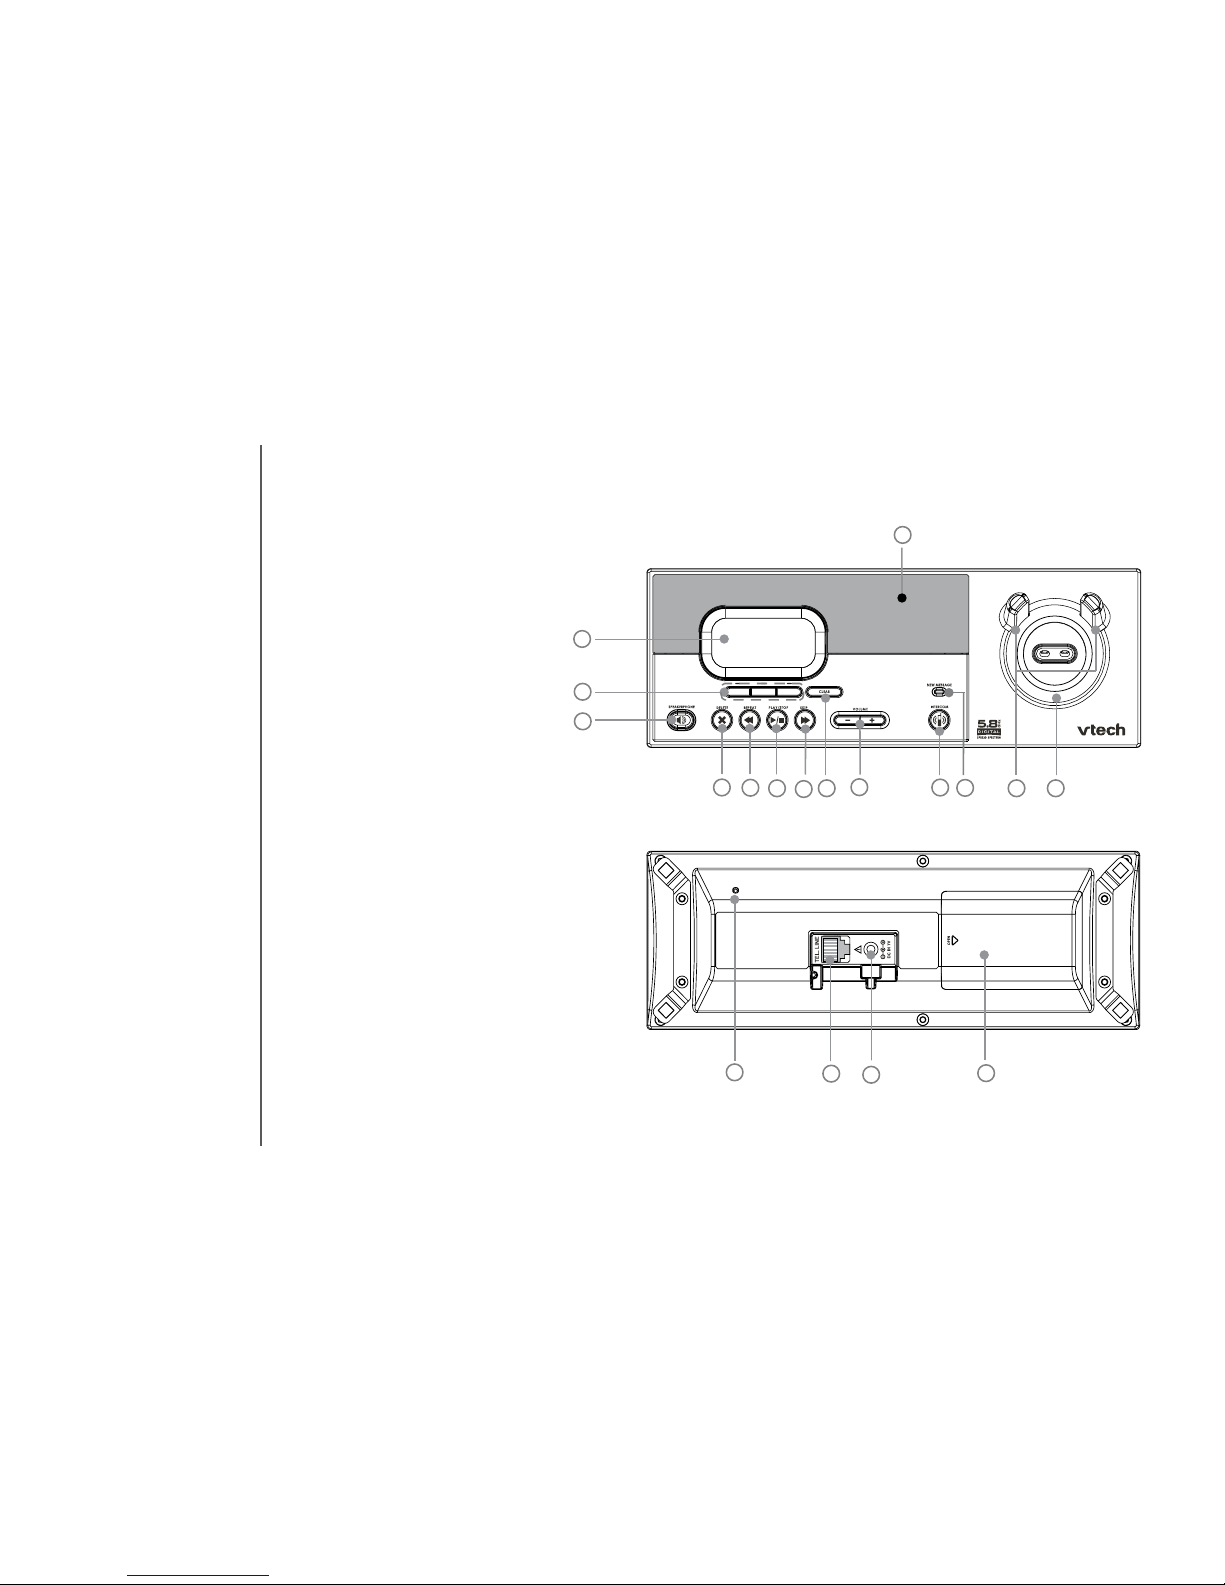
Base unit layout
3
4
8
7
6
9
10
11
12 13
17
15
16
5
2
1
18
14
1. LCD display
2. Softkeys
3. SPEAKERPHONE
4. DELETE
5. REPEAT
6. PLAY/STOP
7. SKIP
8. CLEAR
9. VOLUME
10. INTERCOM
11. New message LED
12. Antenna
13. Charging LED
14. Speaker
15. Microphone
16. Telephone jack
17. DC connector jack
18. Spare battery
compartment
Page 15

www.vtechphones.com
13
Basic operation
Telephone settings
Pictures & animations
The handset is preset with six animations and 23 pictures which can be used
as the background for your idle screen (wallpaper), or a specic animation or
picture can be assigned to a phonebook entry. You can also download your
own pictures for use as a wallpaper or with the phonebook entry (see Picture
download on page 52).
Set a wallpaper image
• Make sure the handset is in idle mode.
• Press MENU/SEL to display menu.
• Press the UP NavKey once to reach Animations or twice to reach Pictures,
and press MENU/SEL to select.
• Use the UP or DOWN NavKey or to view the available animations or
pictures.
• Press the softkey SET when finished setting the desired animation
picture.
• The screen will display Wallpaper set and there will be a conrmation
tone.
Telephone settings
Handset screen images
Screensaver
After 30 seconds of inactivity, the handset will go into screen saver mode and
will display a digital clock. To illuminate the screen and read the clock, press
any key on the dial pad.
Animations
Pictures
12:00 AM
SET
Animations
SET
Pictures
Page 16
www.vtechphones.com
14
Ringer melody
This feature allows you to assign various ringer melodies for incoming calls.
You can choose from eight preset traditional ringers or 17 preset musical ringers or the ring tones you have recorded. There will be a sample of each ringer
when you scroll through the choices.
• When in Ringer Melody menu, use the UP or DOWN NavKey or to
scroll through the choices.
• The current selection is highlighted and there will be a sample of each ringer
melody when scrolling through the choices.
• Press the softkey
SET to conrm your setting. The screen displays Choice
saved and there will be a conrmation tone.
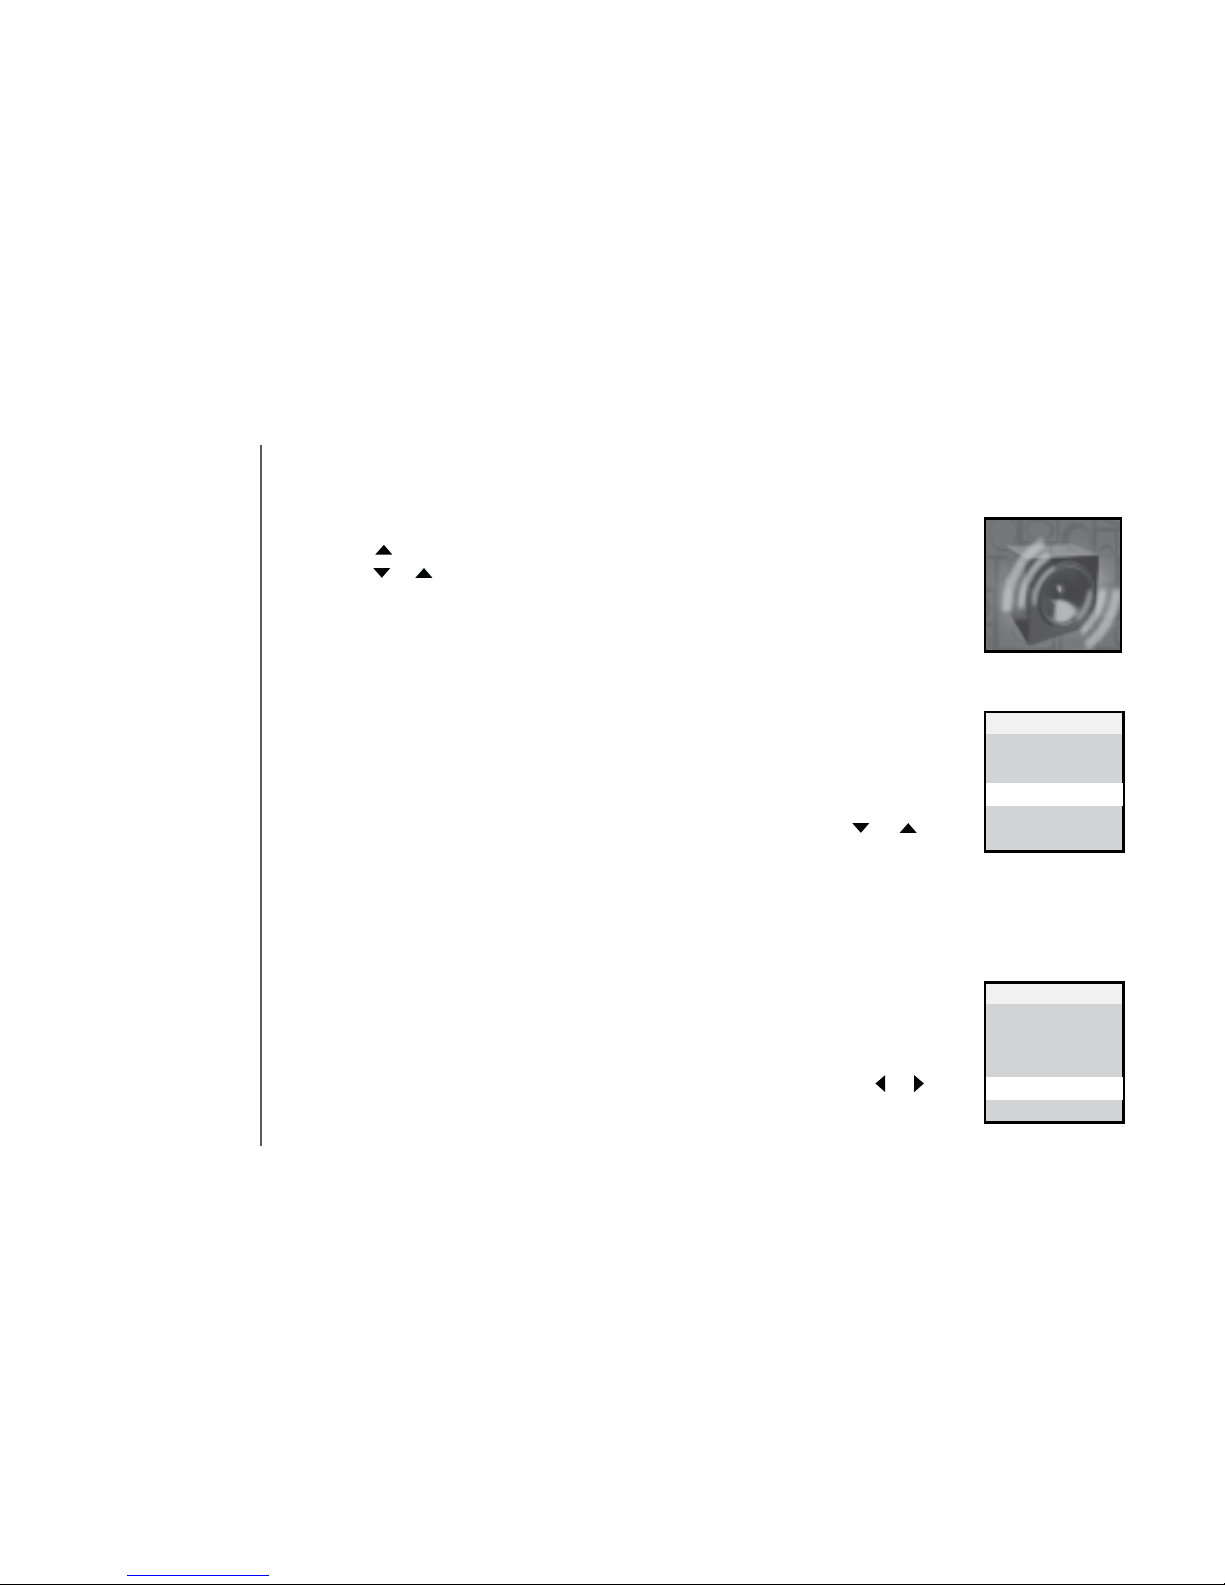
Ringer volume
There are options for ve levels of volume. There will be a sample of each
ringer volume when scrolling through the choices.
• When in
Ringer Volume menu, use the LEFT or RIGHT NavKey or to
adjust the ringer volume. The current level is shaded in green and a sample
of the ringer will be played.
Telephone settings
Handset sounds
• Press MENU/SEL in idle mode to enter the main menu, and press the UP
NavKey three times to reach the Sound menu. Use the UP or DOWN
NavKey or to scroll through the menu, then press MENU/SEL to enter
the desired menu, i.e. Play Sound Clips, Record Sound Clip, Ringer
Melody, Ringer Volume, and Ringer Vibrate.
After selecting any option, press the softkey
SET to conrm your choice. The
screen will display Choice saved and there will be a conrmation tone.
Sounds
Play Sound Clips
Record Sound Clips
Ringer Melody
Ringer Volume
Ringer Vibrate
Sounds
Ringer Melody
Play Sound Clips
Record Sound Clips
Ringer Melody
Ringer Volume
Ringer Vibrate
Sounds
Ringer Volume
Page 17

www.vtechphones.com
15
Basic operation
Telephone settings
• Press the softkey SET to conrm your setting. The screen will display Choice
saved and there will be a conrmation tone.
Ringer vibrate
This feature allows you to set the handset to vibrate when there is an incoming
call.
• When in
Ringer Vibrate menu, use the UP or DOWN NavKey or to
choose On or Off. The current choice is highlighted.
• Press the softkey
SET to conrm. The screen will display Choice saved
and there will be a conrmation tone.
Telephone settings
Handset sounds
Play Sound Clips
Record Sound Clips
Ringer Melody
Ringer Volume
Ringer Vibrate
Sounds
Ringer Vibrate
Page 18

www.vtechphones.com
16
Telephone settings
Handset messages
Play the message
From screensaver mode (if there are new messages):
• Press
/CLEAR, and the screen will display New Message. Press MENU/
SEL and the screen displays the number of new and old messages.
• Press the softkey
PLAY to play the message.
From idle mode (if there are new messages):
• Press the softkey
MESSAGE to access the message menu. The screen
displays the number of new and old messages.
• Press the softkey
PLAY to play the message (s).
From the main menu:
• Press
MENU/SEL when in idle mode.
• Press the
DOWN NavKey twice to reach Messages. Press MENU/SEL
This feature allows you to listen to messages on the answering system using
the handset.
When there are new messages on the answering system,
New Message will
be displayed on the handset screen, and the answering system icon will ash
on the handset screen in idle mode.
• The day and time the message was recorded will be announced before
playback.
• The screen on the handset will show the day and time the memo and
incoming messages are recorded, the length of the message, and a diagram
of the NavKey illustrating how to repeat or skip a message.
• If it is a memo recorded at the answering machine, the screen displays
Memo.
Messages
Messages
PLAY
DELETE
3 New Messages
19 Old Messages
Page 19

www.vtechphones.com
17
Basic operation
Telephone settings
Telephone settings
Handset messages
Options during playback
• Press
/VOLUME to adjust the speaker volume.
• Press the softkey
STOP to stop the message currently playing.
• Press the
LEFT NavKey to skip to the next message.
• Press the
LEFT NavKey to repeat the currently playing message.
• Press the
LEFT NavKey twice (quickly) to go back to the previous
message.
• Press the softkey
DELETE to delete the message currently playing.
Delete all messages
• Press
MENU/SEL when in idle mode.
• Press the
DOWN NavKey twice to reach Messages. Press MENU/SEL
to select.
• The screen displays the number of new and old messages. Press the
softkey DELETE to delete all messages.
• The screen displays
Delete all Messages Are you sure? Press the
softkey YES to conrm. Press the softkey NO if you decide to keep the
messages.
to select.
• The screen displays number of new and old messages. Press the softkey
PLAY to play the message.
• When the
telephone is
ringing, press
the softkey
SILENCE to
temporarily mute
the ringer.
Delete all
Messages
Are you sure?
Delete All Messages
YES
NO
Message 7
STOP
DELETE
VTech
1-800-595-9511
Jan 10 10:51AM
Duration 0:11
REPEAT SKIP
Page 20

www.vtechphones.com
18
Tone settings
In this menu, you can set keypad tone, low battery tone, and set the out of
range tone on or off.
• Make sure the handset is in idle mode.
• Press the
UP NavKey four times to reach Settings. Press MENU/SEL to
select.
• Press the
DOWN NavKey once to reach Tone Settings and press MENU/
SEL to select.
• Use the
UP and DOWN NavKey or to choose Keypad Tone, Low
Battery Tone, or Out of Range Tone. Press MENU/SEL to select.
Telephone settings
Handset settings
Clock setting
• Make sure the handset is in idle mode.
• Press
MENU/SEL to display menu.
• Press the
UP NavKey four times to reach Settings. Press MENU/SEL to
select.
• Press
MENU/SEL to select Clock Setting.
• Use the dial pad to enter the time digit by digit. Use the
LEFT or RIGHT
NavKey or to move to the digit you need to change.
• Use the
UP or DOWN NavKey or to choose AM or PM.
• Press the softkey
SET to conrm your selection. The screen will display
Choice saved and there will be a conrmation tone.
• Use the
UP or DOWN NavKey or to choose On or Off.
• Press the softkey
SET to conrm your selection. The screen will display
Choice saved and there will be a conrmation tone.
• The time is
automatically
set and updated
with incoming
caller ID
information if
you subscribe
this service.
Tone settings
Phone Settings
Language
Rest Settings
Settings
Clock Setting
Low Battery Tone
Out of Range Tone
Tone Settings
Keypad Tone
Off
Keypad Tone
On
SET
12:00 AM
SET
Clock Setting
1
Page 21

www.vtechphones.com
19
Basic operation
Telephone settings
Telephone settings
Edit handset name
• When in the
Edit Handset Name menu, use the dial pad (see page 33) to
enter the handset name.
• Press the softkey
BACK to backspace and press the softkey SET to conrm
the changes. The screen will display Choice saved and there will be a
conrmation tone.
Handset settings
Set contrast
• When in the
Contrast menu, use the LEFT or RIGHT NavKey or to adjust
the level of contrast on the LCD screen.
• Press the softkey
SET to conrm your setting. The screen will display Choice
saved, and there will be a conrmation tone.
Phone settings
In this menu, you can change the contrast setting, edit handset name, show
handset name, and select dial type. To enter this menu:
• Make sure the handset is in idle mode.
• Press
MENU/SEL to display menu.
• Press the
UP NavKey four times to reach Settings. Press MENU/SEL to
select.
• Press the
DOWN NavKey twice to reach Phone Settings and press
MENU/SEL to select.
• Use the
UP or DOWN NavKey or to scroll through the setting to be
changed. Press MENU/SEL to select the menu to enter.
Edit Handset Name
HANDSET 2
SAVE
ERASE
Contrast
SET
Clock Setting
Tone settings
Phone Settings
Language
Rest Settings
Settings
Phone Setting
Page 22

www.vtechphones.com
20
Telephone settings
Handset settings
Language
At this menu, you can select the language used in all menus and screen displays.
Choices are English, French and Spanish.
• Make sure the handset is in idle mode.
• Press
MENU/SEL to display menu.
• Press the
UP NavKey four times to reach Settings, then press MENU/SEL
to select.
• Press the
UP NavKey twice to reach Language. Press MENU/SEL to
select.
• Use the
UP or DOWN NavKey or to choose the language. The current
choice is highlighted.
Show handset name
• When in the
Show Handset Name menu, use the UP or DOWN NavKey
or to toggle between On or Off. The current selection is highlighted.
• Press the softkey
SET to conrm your setting. The screen will display Choice
saved and there will be a conrmation tone.
Set dial mode
The dial mode is preset to touch tone. If you would like to change the setting
to pulse:
• When the
Dial Type menu is displayed, use the UP or DOWN NavKey or
to toggle between Tone or Pulse. The current selection is highlighted.
• Press the softkey
SET to conrm your setting. The screen will display Choice
saved and there will be a conrmation tone.
Contrast
Edit Handset Name
Show Handset Name
Dial Type
Product ID
Settings
Show Handset Name
Español
Français
Language
English
SET
Pulse
Dial Type
Tone
SET
Page 23

www.vtechphones.com
21
Basic operation
Telephone settings
Telephone settings
Handset settings
Reset settings
• When in the selected menu, use the softkey
YES or NO to conrm your
change.
• The screen will display
Phonebook cleared, Call Log cleared, Redial
List cleared, Wallpaper cleared, Registration cleared, Default loaded,
in accordance with the setting you change. There will be a conrmation
tone.
Reset settings
In this menu, you can clear current settings and restore the factory settings.
You can clear the phonebook, call log, redial list, wallpaper, and registration.
To enter this menu:
• Make sure the handset is in idle mode.
• Press
MENU/SEL to display the menu.
• Press the
UP NavKey four times to reach Settings, then press MENU/
SEL to select.
• Press the
UP NavKey once to reach Reset Settings. Press MENU/SEL
to select.
• Use the
UP or DOWN NavKey or to scroll through the settings to be
changed. Press MENU/SEL to select the menu to enter.
• The Factory
Settings
option will reset
settings such as
ringer volume
and language
to the factory
defaults.
Clear entire
Phone Book
Are you sure?
Clear Phone Book
YES
NO
Clear Call Log
Clear Redial List
Clear Wallpaper
Clear Registration
Reset Settings
Clear Phone Book
• Press the softkey SET to conrm. The screen will display Choice saved
and there will be a conrmation tone.
Page 24

www.vtechphones.com
22
Telephone settings
Base settings
In this menu, you can change the setting of the clock, days of the week,
ringer volume, ringer melody, keypad tone, contrast, dial type, and factory
settings on the base unit. To enter this menu:
• Make sure the base unit is in idle mode.
• Press the softkey
MENU to display the menu.
• Press the softkey
once to reach the BASE SETTINGS, then press
SELECT to select.
• Use the softkey
or to scroll through the settings to be changed and
press the softkey SELECT to select the menu to enter.
Clock setting
• When in the
CLOCK SETTING menu, the current clock is displayed.
• Press the softkey
CHANGE to change the digit and the AM/PM. Press
the softkey NEXT to move to the next digit.
• Press the
SET softkey when nished setting the time, and there will be
a conrmation tone.
Weekday setting
• When in the
WEEKDAY SET TING menu, the current weekday is
displayed.
• Use the softkey
or to change the weekday.
• Press the softkey
SET when nished setting the weekday, and there will
be a conrmation tone.
• The time is
automatically
set and updated
with incoming
caller ID
information if
you subscribe
this service.
Page 25

www.vtechphones.com
23
Basic operation
Telephone settings
Ringer melody
There are options for ve ringer melodies. There will be a sample of each ringer
melody when scrolling through the choices.
• When in the
RINGER MELODY menu, a sample of the current ringer melody
is played.
• Press the softkey
or to change the ringer melody. A sample of that ringer
melody will be played.
• Press the
SET softkey when nished setting, and there will be a conrmation
tone.
Telephone settings
Base settings
Ringer volume
There are options for ve levels of volume. There will be a sample of each
ringer volume when scrolling through the choices.
• When in the
RINGER VOLUME menu, the current ringer volume is displayed
by the shaded bar.
• Press the softkey
or to change the ringer volume. A sample of that
volume level will be played.
• Press the
SET softkey when nished setting, and there will be a conrmation
tone.
Keypad tone
• When in the
KEYPAD TONE menu, the current choice is highlighted.
• Press the softkey
or to toggle between ON or OFF.
• Press the
SET softkey when nished setting, and there will be a conrmation
tone.
• When the
telephone is
ringing, pressing
the softkey
QUIET can
mute the ringer
temporarily.
Page 26

www.vtechphones.com
24
Telephone settings
Base settings
Contrast
• When in the
CONTRAST menu, the current contrast level is displayed by
the shaded bar.
• Use the softkey
or to adjust the contrast level.
• Press the
SET softkey when nished setting, and there will be a conrmation
tone.
Dial type
The dial type is preset to touch tone.
• When in the
DIAL TYPE menu, the current choice is highlighted.
• Use the softkey
or to toggle between TONE or PULSE.
• Press the
SET softkey when you are done setting, and there will be a
conrmation tone.
Factory settings
You can choose to reset to factory settings in this menu. All the changes made
will be cancelled and restored to the factory setting.
• When in the
FACTORY SETTINGS menu, the screen displays RESTORE
FACTORY SETTINGS, ARE YOU SURE?
• Use the softkey
YES or NO to confirm your change, there will be a
conrmation tone.
Page 27
www.vtechphones.com
25
Basic operation
Basic operation
Make, answer, and end calls with the handset
• Press /FLASH or , then dial the number.
-OR-
• Dial the number (use the
LEFT NavKey to backspace; use the softkey
PAUSE to insert a pause), then press /FLASH or, if you want to
use speakerphone.
• To answe r a call, press
/FL AS H or, if you want to us e
speakerphone.
• To end a call, press
/CLEAR, or put the handset back to the base
unit.
Make, answer, and end calls at the base unit
You can make calls from the redial list and call log at the base unit, but you
cannot dial a number directly.
From the redial list:
• Press the softkey
REDIAL to display the redial list.
• Use the softkey
or to scroll through the redial list to choose the number
to be dialed.
• Press
to dial the number.
From the call log list:
• Press the softkey
MENU to display the MENU.
• Press the softkey
SELECT to select CALL LOG. Use the softkey or
to scroll through the redial list to choose the number to be dialed.
REDAIL
M
NEW M
50 NEW
Page 28

www.vtechphones.com
26
Basic operation
Make, answer, and end calls at the base unit
• Press /SPEAKERPHONE to dial the number.
• To answer a call, press
/SPEAKERPHONE .
• To end a call, press
/SPEAKERPHONE.
Options while on calls
There are a few options while on a call, including speakerphone on the
handset, hold, mute, volume control, ringer silencing and call waiting on both
the handset and the base unit.
Speakerphone on the handset
• During a call, press
to toggle between speakerphone and normal
handset use.
Hold
• During a call, press the softkey
HOLD on the handset or at the base unit
to put a call on hold.
• To return to the call, press
/FLASH or at the handset, or
/SPEAKERPHONE at the base unit.
Mute
Using the mute function allows you to mute the microphone and the other
party cannot hear you, while you can still hear the other party.
• During a call, press the softkey
MUTE on the handset or at the base unit
to mute the microphone.
• The handset
will display Call
on Hold when
a call is placed
on hold. A
will ash and
the base unit
will ring as a
reminder that a
call is on hold.
• If a call remains
on hold for one
minute, the
handset and the
base unit will
ring to remind
you the call is on
hold. The screen
will display
Call on Hold
Ringback! You
have 30 seconds
to return to the
call before it is
disconnected.
REDAIL
M
NEW M
50 NEW
Page 29

www.vtechphones.com
27
Basic operation
Options while on calls
• Press the softkey UNMUTE to return to normal conversation.
Volume control
• During a call, use the volume control on the right side of the handset, or the
volume control on the base unit, to adjust the listening volume.
• Press
or on the volume control key to adjust the volume to a comfortable
level.
Basic operation
Ringer silencing
This feature allows you to silence the ringer temporarily when the telephone
is ringing.
• Press the softkey
SILENCING on the handset or the softkey QUIET on the
base unit to temporarily silence the ringer.
Call waiting
If you subscribe to the call waiting service, press the softkey
FLASH on the
handset or at the base unit to answer the new incoming call.
Intercom call
The intercom feature allows a conversation between the handset and the
base unit, or between handsets if additional handsets are registered for use
with the system.
From base unit to all handsets
• Press
INTERCOM at the base unit, and press the softkey SELECT to
choose GLOBAL PAGE.
• All handsets will ring and the screen will display
Global Page from
BASE.
Page 30

www.vtechphones.com
28
Basic operation
SILENCE
• You must
have at least
one additional
handset to
intercom call
from one
handset to
another handset.
Global Page from
HANDSET 1
Intercom call
• Any handset can then answer the page, and enter intercom mode by
pressing
/FLASH, , or any keys on the dialing pad.
• To end an intercom call, press
/CLEAR on the handset, or press
INTERCOM at the base unit.
From the base unit to a specic handset
• Press
INTERCOM at the base unit, and use the softkey or to scroll
to the desired handset (e.g., HANDSET 2), and press the softkey SELECT
to conrm.
• When the destination handset rings,
press /FLASH, , or any keys
on the dialing pad.
• To end an intercom call, press
/CLEAR on the handset or INTERCOM
at the base unit.
From one handset to all handsets and base unit:
• Press
MENU/SEL to display menu when in idle mode.
• Press the
DOWN NavKey three times to reach Intercom and press
MENU/SEL to enter the menu.
• Press
MENU/SEL and select Global Page.
• The base unit and all handsets will ring, and the screen displays
Global
Page from Handset 1 (if the global page is from handset 1).
• To answer the page on any handset,
press /FLASH, or any keys
on the dialing pad. To answer the page at the base unit, press INTERCOM
or /SPEAKERPHONE.
Page 31

www.vtechphones.com
29
Basic operation
Basic operation
Intercom call
• To end an intercom call on any handsets, press /CLEAR. To end it at
the base unit, press
INTERCOM or /SPEAKERPHONE at the base
unit.
From one handset to a specic handset or base unit
• Press
MENU/SEL to display menu when in idle mode.
• Press the
DOWN NavKey three times to reach Intercom and press
MENU/SEL to enter the menu.
• Use the
UP or DOWN NavKey or to scroll to the destination handset
or base unit, and press MENU/SEL to conrm.
• The destination handset or base unit will ring, and the screen displays
INTERCOM from Handset 1 (if the page is from handset 1).
• To answer the page on any handset,
press /FLASH, or any keys
on the dialing pad. To answer the page at the base unit, press INTERCOM
or /SPEAKERPHONE.
Conference call
This feature allows you to have conference calls with up to three registered
handsets and the base unit. To enter a conference call, simply access the line
with up to three handsets and the base unit by pressing
/FLASH or
on the handset or at the base unit. The icon
will be displayed.
Page 32

www.vtechphones.com
30
Basic operation
Transfer an external call
This telephone allows you to transfer an external call from the base unit to any
handset, from handset to handset, or from handset to the base unit.
From one handset to the base unit or to another handset
• During a call, press
HOLD to put the call on hold on the originating
handset.
• Press
MENU/SEL, then use the DOWN NavKey to scroll to Intercom,
and press MENU/SEL to conrm.
•
Use the UP or DOWN NavKey or to scroll to the base unit, or destination
handset. Press MENU/SEL to conrm.
• The destination handset or the base unit will ring, press
/FLASH or
on the destination handset to answer, or press INTERCOM or
/SPEAKERPHONE to answer at the base unit.
•
Press /CLEAR on the originating handset to transfer the call.
•
Press /FLASH on the destination handset or press /SPEAKERPHONE
at the base unit to pick up the call on hold.
Intercom call
• You must
have at least
one additional
handset to
intercom a
call from one
handset to
another handset.
Base
Handset 1
Handset 2
Intercom
Global Page
SET
Page 33

www.vtechphones.com
31
Basic operation
From the base unit to the handset
• During a call, press HOLD to put the call on hold.
• Press
INTERCOM, and use the softkey or to scroll to the desired
handset and press the softkey SELECT to conrm.
• When the target handset rings, press
/FLASH or on the handset to
answer.
•
Press INTERCOM on the base unit to transfer the call.
•
Press /FLASH or press on the destination handset to pick up the
call on hold.
Intercom call
Basic operation
Answer an incoming call during an intercom call
• During an intercom call, there will be an alert tone which signals an incoming
call.
• To terminate the intercom call without answering the incoming call, press
/CLEAR on the handset, or press INTERCOM at the base unit. The
base unit will ring and the incoming call can be answered normally.
• To connect the incoming call with the intercom call,
press /FLASH or
on the handset, or press /SPEAKERPHONE at the base unit to
answer the incoming call.
Page 34

www.vtechphones.com
32
Phonebook
The phonebook on the handset can store up to 100 entries, each consisting
of entry up to 32 digits and 16 characters, along with a distinctive ring and
picture for each entry.
• The phonebook menu can be assessed in idle mode by pressing the
UP
or DOWN NavKey or , or pressing MENU/SEL twice.
• Press
/CLEAR to quit the menu without saving the change.
• Phonebook is empty is displayed on screen when there is no entry in the
phonebook.
•When the phonebook is full and the softkey
NEW is pressed, Phonebook
is full will display and there will be an error tone.
Advanced operation
Store an entry in the phonebook
• When in the
Phonebook menu, press the softkey NEW.
• Use the dial pad (see the
Chart of character on page 33 for instruction) to
enter the name and telephone number for the entry, and press the softkey
SET when done.
• Press the softkey SAVE if you do not wish to assign any distinctive ringer
and picture to this entry (if you wish to assign distinctive ringer and picture,
refer to Customize entries on page 34).
Page 35

www.vtechphones.com
33
Advanced operation
Advanced operation
Phonebook
Chart of characters
Use the dial pad and the chart below to enter a name (up to 16 characters). Each press of a particular
key causes characters to be displayed in the following order:
• When editing characters, press the softkey
BACK to backspace. Press the LEFT or RIGHT NavKey
or to move the cursor. Press the RIGHT NavKey again to add a space.
• Press and hold the # key to insert a dialing pause.
Number Characters by number of key presses
Key 1 2 3 4 5 6 7 8 9
1 & ’ , . 1 Space
2 A B C a b c 2
3 D E F d e f 3
4 G H I g h i 4
5 J K L j k l 5
6 M N O m n o 6
7 P Q R S p q r s 7
8 T U V t u v 8
9 W X Y Z w x y z 9
0 0
* *
# #
Page 36

www.vtechphones.com
34
Advanced operation
Phonebook
Customize entries
This feature allows you to assign a distinctive ringer and picture/animation
to a specic entry. The distinctive ringer and picture/animation will alert you
when this person calls. You can customize the entries before saving it, either
in the phonebook, call log list, or redial list.
• When in the screen display as shown on the top right, use the
UP or DOWN
NavKey or to highlight Ringer: <Default>, or Picture: <Default>.
• Use the
LEFT or RIGHT NavKey or to choose the desired ringer, or
picture/animation.
• When scrolling through the selection, a sample of the ringer will be played,
and a sample of the picture/animation will be displayed.
• Press the softkey SAVE when done. The screen displays Entry has been
saved and there will be a conrmation tone.
Search the phonebook
Entries are sorted alphabetically, and names beginning with numbers are
presented rst. An alphabetical search can be done after entering the
phonebook.
For example, press 5 (JKL) once to nd Jenny, twice to nd Kristen, or three
times to nd Linda.
• When in the
Phonebook menu, press the softkey FIND.
• Use the dial pad to enter the alphabet and press the softkey
SET to
conrm.
• There are eight
traditional ring
tones and 17
musical ringers.
For Recordable
ringers, see
page 50.
• There are 29
preset pictures
and animations
to choose from.
For Picture
download, see
page 52.
Page 37

www.vtechphones.com
35
Advanced operation
Advanced operation
Phonebook
Dial a phonebook entry
• When in the
Phonebook menu, use the UP or DOWN NavKey or to
scroll to the desired entry, or use the softkey FIND to search for it.
• Press
/FLASH or press to dial the entry.
Edit a phonebook entry
• When in the
Phonebook menu, use the UP or DOWN NavKey or to
scroll to the entry to be edited, or use the softkey FIND to search the entry.
Press MENU/SEL to select the entry.
• Press the softkey EDIT and use the UP or DOWN NavKey or to highlight
the item (name, number, distinctive ringer, distinctive picture/animation) to
be edited.
• Use the dial pad and the softkey
BACK to edit the name and number, and
use the LEFT or RIGHT NavKey or to choose the desired ringer and
picture/animation.
• Press the softkey SAVE to save the changes. The screen displays Entry
has been saved and there will be a conrmation tone.
Delete a phonebook entry
• When in the
Phonebook menu, use the UP or DOWN NavKey or to
scroll to the entry to be deleted, or use the softkey FIND to search for it.
Press MENU/SEL to select the entry.
• Press the softkey DELETE, and there will be a conrmation tone.
Page 38

www.vtechphones.com
36
Advanced operation
Call log
If you subscribe to the caller ID service, information about each caller will be
displayed after the rst or second ring.
• The handset call log can store up to 100 entries, and the call log in the base
unit can store up to 50 entries.
• You can review, redial, and copy the entry into your phonebook.
• Entries are displayed in reverse chronological order, i.e. from the latest
entry to the earliest entry.
• When the call log is full, the earliest entry is deleted to make room for new
incoming call information.
•
New Call will be displayed on both the handset and the base unit if there are
new call log entries, i.e. missed call (including missed call waiting record)
and unreviewed calls.
• You can also listen to messages (if the callers left messages) when reviewing
the call log.
The call log can be accessed on the handset by pressing the softkey
CALL
LOG, or pressing MENU/SEL and DOWN NavKey once, and then press
MENU/SEL again. You can also access the call log at the base unit by:
• pressing the softkey
MENU to enter the menu, then
• pressing the softkey
SELECT to select CALL LOG.
• Due to regional
service
difference, the
CID information
may not be
available for
every incoming
call. In addition,
the caller may
intentionally
block their name
and/or telephone
number.
Page 39

www.vtechphones.com
37
Advanced operation
Advanced operation
Call log
Review the call log
• When in the call log, use the
UP or DOWN NavKey or to scroll through
the call log on the handset. Use the softkey or to scroll through the call
log on the base unit.
• The name, number, date and time of receiving call, and message (if the
caller left a message) are displayed on the screen.
• Press the
RIGHT NavKey to play the message on the handset. Press the
softkey SELECT on the base unit twice to play the message at the base
unit.
Dial a call log entry
On the handset:
• When in the call log, use the
UP or DOWN NavKey or to scroll to the
desired entry. Press /FLASH or to dial the number.
• Press
# or MENU/SEL to display the possible dialing options.
• Use the
UP or DOWN NavKey or to scroll through the choices, and
press the softkey DIAL or /FLASH or to dial the number.
At the base unit:
• When in the call log, use the softkey
or to scroll to the desired entry.
Press /SPEAKERPHONE to dial the entry.
• To see the dial options, press the softkey
SELECT, use the softkey or
to scroll to DIAL OPTIONS and press SELECT.
• Use the softkey or to scroll through the choice, and press the softkey
DIAL or /SPEAKERPHONE to dial.
• While reviewing
the call log,
press #
repeatedly to
display the
alternate dialing
options. The
abailable options
are: (1 + area
code + number,
area code +
number, 1 +
number, number
only).
Page 40

www.vtechphones.com
38
Advanced operation
Save an entry to the handset phonebook
• When in the call log, use the
UP or DOWN NavKey or to scroll through
the call log and highlight the entry to be saved. Press the softkey SAVE to
save the entry to the phonebook.
• Use the dial pad to enter the name, and press the softkey
SET when
done.
• If you do not wish to customize the entry, press the softkey
SAVE to conrm.
The screen displays Entry has been saved and there will be a conrmation
tone.
• If you wish to customize the entry, see the section
Customize entries on
page 34.
Delete an entry
From the handset:
• When in the call log, press the
UP or DOWN NavKey or to scroll to
the entry to be deleted. Press the softkey DELETE to conrm, and there
will be a conrmation tone.
From the base unit:
• When in the call log, use the softkey
or to scroll to the entry to be
deleted. Press the softkey SELECT to select.
• Use the softkey
or to scroll to DELETE CALL LOG, and press the
softkey SELECT to conrm.
• Press the softkey
THIS if only deleting this entry. Press the softkey ALL if
deleting all entries. Press the softkey YES to conrm, and there will be a
conrmation tone.
Call log
• The time is
automatically
set and updated
with incoming
caller ID
information if
you subscribe to
this service.
• If you have
more than one
handset, setting
the date and
time on one
handset will
automatically
update all other
handsets.
Page 41

www.vtechphones.com
39
Advanced operation
Advanced operation
Redial list
The handset and the base unit can store the ten most recently dialed
numbers in the redial list. You can review, redial, or save the number into the
phonebook.
• When there are already ten entries on the redial list, the earliest entry is
deleted to make room for the new entry.
• Entries are displayed in reverse chronological order, i.e. from the latest entry
to the earliest entry.
• Redial list is empty is displayed on screen if there is no dialed number
on the list.
The redial list can be accessed on the handset and the base unit by pressing
the softkey REDIAL in idle mode.
Dial an entry from the redial list
From the handset:
• When in the redial list, use the
UP or DOWN NavKey or to scroll to
the desired number.
• Press
/FLASH or to dial.
• To add a pause to the number, press
MENU/SEL to select the number, and
press the softkey PAUSE before dialing.
From the base unit:
• When in the redial list, use the softkey
or to scroll to the desired
number.
• Press
/SPEAKERPHONE to dial.
Redial
SAVE DELETE
Page 42

www.vtechphones.com
40
Advanced operation
Redial list
Save a redial entry to the phonebook on the handset
• When in the redial list, press the
UP or DOWN NavKey or to scroll to
the number to be saved.
• Press the softkey
SAVE.
• Use the dial pad to enter the name for the entry. Press the softkey
SET
when nished.
• If you do not wish to assign a distinctive ringer and picture/animation to the
entry, press the softkey SAVE to conrm. The screen displays Entry has
been saved and there will be a conrmation tone.
• If you wish to assign a distinctive ringer and picture/animation to the entry,
see the section
Customize entries on page 34.
Delete a redial entry
From the handset:
• When in the redial list, use the
UP or DOWN NavKey or to scroll to
the number to be deleted.
• Press the softkey
DELETE, and there will be a conrmation tone.
From the base unit:
• When in the redial list, use the softkey
or to scroll to the number to
be deleted. Press the softkey SELECT to select.
• Press the softkey
DELETE to conrm, and there will be a conrmation
tone.
Redial
SAVE DELETE
Redial
SAVE DELETE
Page 43

www.vtechphones.com
41
Advanced operation
Answering system operation
Message capacity
The answering system can record up to 99 messages, depending on the length of each message.
Individual messages can be up to 4 minutes in length, but the total maximum recording time is 15
minutes. Message will remain available for replay until they are deleted.
Handset access
In addition to the features described in this section, the handset can also be used to review or delete
messages (see Handset messages section on page 16).
REDAIL MEMOMEMU
NEW MESSAGE
Press to delete current
message playing. When
idle, press to bring
up menu to delete all
messages (see page
47).
Pr e s s to pl a y
or sto p pl ay ing
me ssa ges (se e
page 47).
Pr ess to re pea t a mess a ge or
press twice to play back previous
messages (see page 47).
Press to skip to nex t
message (see page
47).
Press to record a memo
on the answering system
(see page 48).
Shows there are new messages on the answering system.
Page 44

www.vtechphones.com
42
Answering system operation
Activate the answering system
The answering system must be turned on to function. If the answering system
is turned off, the base unit displays
ANS. OFF on the screen.
To turn on/off the answering system:
• Press the softkey
MENU in idle mode.
• Press the softkey
twice to reach ANSWERING SYSTEM. Press the
softkey SELECT to conrm.
• Press the softkey
SELECT to select ANSWER OPTIONS.
• Use the softkey
or to scroll between ON and OFF. The current setting
is highlighted. Press the softkey SELECT to conrm, and there will be a
conrmation tone.
Setting answering system
Set record options
This feature allows you to set the answering system to announce the greeting
only, or allow the callers to leave messages.
• Press the softkey
MENU in idle mode.
• Press the softkey
twice to reach ANSWERING SYSTEM. Press the
softkey SELECT to conrm.
• Press the softkey
twice to reach RECORD OPTIONS and press SELECT
to select.
• Use the softkey
or to toggle between RECORD MESSAGE and
GREETING ONLY. The current setting is highlighted. Press the softkey
SELECT to conrm, and there will be a conrmation tone.
• When in
GREETING
ONLY mode,
REC OFF will
display on
the base unit
screen.
Page 45

www.vtechphones.com
43
Advanced operation
Answering system operation
Setting answering system
Set number of rings
This feature allows you to select how many times the telephone will ring
before the answering system answers. You can choose from two, four, six
rings or toll saver. With toll saver active, the answering system answers after
two rings when there are new messages, and after four rings when there are
no new messages.
• Press the softkey
MENU in idle mode.
• Press the softkey
twice to reach ANSWERING SYSTEM. Press the
softkey SELECT to conrm.
• Press the softkey
three times to reach RINGS TO ANSWER, and press
the softkey SELECT to conrm.
• Use the softkey
or to scroll through the options. Press the softkey SELECT
to conrm, and there will be a conrmation tone.
Set call screening
This feature allows you to listen to the caller’s messages while they are
being recorded. If you wish to take the call, press
/FLASH or on the
handset or /SPEAKERPHONE at the base unit when the message is
being recorded.
• Press the softkey
MENU when in idle mode.
• Press the softkey
twice to reach ANSWERING SYSTEM. Press the
softkey SELECT to conrm.
• Press the softkey
three times to reach CALL SCREENING and press
the softkey SELECT to conrm.
Page 46

www.vtechphones.com
44
Answering system operation
Set new message tone
This feature programs the system to beep every 10 seconds to alert you of new
messages. The beep will stop when all new messages have been reviewed.
• Press the softkey
MENU when in idle mode.
• Press the softkey
twice to reach ANSWERING SYSTEM. Press the
softkey SELECT to conrm.
• Press the softkey
once to reach NEW MESSAGE TONE, and press the
softkey SELECT to conrm.
• Use the softkey
or to toggle between ON and OFF. Press the softkey
SET to conrm, and there will be a conrmation tone.
Setting answering system
Set security code
A four-digit security code is required to access the answering system from
any touch tone telephone. The factory default code is 4321.
• Press the softkey
MENU in idle mode.
• Press the softkey
twice to reach ANSWERING SYSTEM. Press the
softkey SELECT to conrm.
• Press the softkey
twice to reach SECURITY CODE, and press the softkey
SELECT to conrm.
• Press the softkey
CHANGE to change the digit. Press the softkey NEXT
to move the cursor to the next digit.
• Press the softkey
SET when nished, and there will be a conrmation
tone.
• Use the softkey or to toggle between ON and OFF. Press the softkey
SET to conrm, and there will be a conrmation tone.
Page 47

www.vtechphones.com
45
Advanced operation
Answering system operation
Outgoing greeting
Record your greeting
• Press the softkey
MENU when in idle mode.
• Press the softkey
twice to reach ANSWERING SYSTEM. Press the
softkey SELECT to conrm.
• Press the softkey
once to reach GREETING OPTION, and press the
softkey SELECT to conrm.
• Press the softkey
once to reach RECORD GREETING, and press the
softkey SELECT to conrm.
• The screen displays
RECORDING GREETING FOR RECORD MESSAGE
MODE. After the tone, speak towards the microphone at the bottom front
of the base unit from about nine inches away.
• Press the softkey
STOP when nished.
•
The answering system will automatically playback the newly recorded
greeting. Press the softkey STOP to stop the playback anytime.
Outgoing greeting is the message callers hear when calls are answered by
the answering system.
The telephone is preset with a greeting that answers calls with
“
Hello. I’m
unable to answer your call right now. Please leave you name, number and
the message after the tone.
” You can use this factory greeting, or replace
it with your own recording.
Play your greeting
• Follow the instructions in
Record your greeting to access the GREETING
OPTION menu.
• Press the softkey
SELECT to select PLAY OPTION. Press the softkey
STOP to stop the playback anytime.
• Your greeting
can be up to
4 minutes in
length.
Page 48

www.vtechphones.com
46
Answering system operation
Outgoing greeting
Restore to factory greeting
• Follow the instruction in the section
Record your greeting on page 45 to
access the GREETING OPTION menu.
• Press the softkey
once to reach FACTORY SETTING, and press the
softkey SELECT to conrm.
• The screen displays
RESTORE FACTORY GREETING, ARE YOU
SURE?
• Press the softkey
YES to conrm, and there will be a conrmation tone.
Press the softkey NO if you decide not to restore the factory greeting.
• When factory
greeting is
restored,
the greeting
recorded by you
will be deleted.
Page 49

www.vtechphones.com
47
Advanced operation
Answering system operation
Message playback
New message indication
• The base unit screen displays
NEW MESSAGE.
• The
NEW MESSAGE indicator light on the base unit ashes.
• If the new message alert tone is turned on, the base unit will beep every
ten seconds when there are unreviewed messages.
Before playback begins, the total number of messages will be announced,
allow with the day and time when the message was received.
Message playback on the base unit
• Press
/PLAY/STOP to play the message.
• Press
/PLAY/STOP to stop the playback.
Options during playback
• Press
/VOLUME to adjust the speaker volume.
• Press
/SKIP to skip to the next message.
• Press
/REPEAT to repeat the message currently playing. Press twice to
listen to the previous message.
• Press the softkey
PAUSE to pause the playback, and press the softkey
PLAY to resume playback.
• Press
/DELETE to delete the current message. The system will advance
to the next message.
Delete all messages
• Press
/DELETE when in idle mode.
• Press the softkey
YES to conrm, and there will be a conrmation tone.
Press the softkey NO if you decide not to delete any messages.
• When the
answering
system is done
playing back
messages,
it will briey
display
END OF
MESSAGES.
Page 50

www.vtechphones.com
48
Answering system operation
Recording and playing memos
Memos are your own recorded messages used as a reminder for yourself or
for others in the household using the same answering system. They are saved,
played back and deleted exactly the same way as incoming messages.
Record a memo
• Press the softkey
MEMO at the base unit. The screen displays RECORD
MEMO AFTER TONE. After the tone, speak towards the microphone at
the bottom front of the base unit from about nine inches away.
• Press the softkey
STOP when you have nished recording.
Memo playback
• Press
/PLAY/STOP to play the memo.
• See the section
Options during playback on page 47 for other options.
• Your memo
can be up to
4 minutes in
length.
Page 51

www.vtechphones.com
49
Advanced operation
Answering system operation
Remote access
You can access many features of your answering system remotely from any touch tone telephone.
A four-digit security code is required to access the system and the factory default code is 4321; see
page 44 to change it. To access remote access:
• Dial your telephone number from any touch tone telephone.
• When the system answers and announces the greeting, enter the four-digit security code.
• After hearing a double beep, enter one of the remote commands in the following table.
• Hang up or press * to end the call.
• If no key is
pressed within
10 seconds of
entering remote
access, any
new messages
will be played
automatically.
• Once the new
messages have
been played,
the system
will announce
the help menu
options. If no key
is pressed within
20 seconds,
the remote
access call is
automatically
disconnected.
Hang up Saves all messages
1 Plays all messages
2 Plays new messages only
5 Plays help menu
7 Reviews the greeting
8 Records the greeting
9 Turns greeting only on or off
0 Turns answering system on or off
3 Deletes the message currently playing and announces "Message deleted"
4 Repeats the message currently playing
4 (twice quickly) Plays the previous message
6 Skips to the next message
# Stops playing or recording
Commands during playback mode:
Commands in remote standby mode:
Page 52

www.vtechphones.com
50
Recordable ringer
You can record a unique ringer as either your default ringer or as a distinctive ringer assigned to a
specic phonebook entry. You can record with either the provided audio patch cord (not the USB cord),
or with the handset microphone.
Cued-up music typically produces the best sounding recorded ringer. It is recommended to begin
recording your ringer at the beginning of a song for optimal audibility rather than clipping a portion
from the middle.
Record a sound clip by using the audio patch cord
• Insert the 3.5mm plug (the larger end) into the headset jack of your PC or audio source. Then insert
the 2.5mm plug (the smaller end) into the headset jack on the side of the handset.
• Press
MENU/SEL when in idle mode.
• Press the
UP NavKey three times to reach Sounds, and press MENU/SEL to select.
• Press the
DOWN NavKey once to reach Record Sound Clips, and press MENU/SEL to
select.
• Press the
DOWN NavKey once to reach Using Audio Cable, and press MENU/SEL to
select.
• Listen to the music through your handset speaker. Adjust the recording volume at the audio source
to the desired volume level.
• Press the softkey
RECORD to start recording, and press the softkey STOP when nished.
• Press the softkey
STOP when nished.
• Press the softkey
PLAY to play the sound clip recorded. Press the softkey STOP to stop playing
anytime.
• Press the softkey
SAVE if you want to save this sound clip.
• Use the dial pad to enter the
Sound Clip Name.
• The handset
can store a
maximum of 50
sound clips, and
the maximum
recording time
per sound clip is
15 seconds.
• The
handset is
preset with 17
musical ringer
options as your
default ringer
or a distinctive
ringer. Four
of the ringers
are protected
and cannot be
deleted. You can
replace the other
ringers with your
own recordings.
• If the memory is
full, the handset
will show
Sound
Clip memory
full.
Special features
Page 53

www.vtechphones.com
51
Special features
Record a sound clip by using the microphone
• Press
MENU/SEL when in idle mode.
• Press the
UP NavKey three times to reach Sounds, and press MENU/SEL to select.
• Press the
DOWN NavKey once to reach Record Sound Clips, and press MENU/SEL to
select.
• Press
MENU/SEL to select Using Microphone, and the screen displays Record after tone.
• Position your audio source facing the handset microphone and the handset will start recording
after the beep.
• Press the softkey
STOP when nished.
• Press the softkey
PLAY to listen to the sound clip you just recorded. Press the softkey STOP to
stop playing anytime.
• Press the softkey
SAVE to save this sound clip.
• Use the dial pad to enter the
Sound Clip Name (up to ten characters).
• Press the softkey
SET when nished. The screen displays Sound Clip saved, and there will be
a conrmation tone.
• When you
want to use the
microphone on
the handset to
record ringers,
do not insert the
audio patch cord
into the headset
jack.
Special features
• Press the softkey SET when nished. The screen displays Sound Clip saved, and there will be
a conrmation tone.
Page 54

www.vtechphones.com
52
Getting started
The VTech Phonebook Manager allows you to download pictures and edit your handset phonebook
from your PC. It also allows you to import and export contacts to and from comma separated text
les. This feature allows you to get contacts from your existing PC applications such as Microsoft
Outlook® or Palm® programs.
One-time software installation
• Insert the enclosed VTech Phonebook Manager CD into your personal computer.
• An installation window will open on the monitor giving you three options:
1. Install/Uninstall the Phonebook Manager software.
2. Browse the Installation CD.
3. Visit VTech on the web.
• To install the software, click on the
Install/Uninstall the VTech Phonebook Manager icon
and follow the instructions for downloading.
• After the installation is complete, you will nd a VTech Phonebook Manager icon
on your PC
desktop.
Graphics tab functions
The VTech Phonebook Manager allows you to open graphic les on your PC and transfer them to
your telephone. Once the graphics are transferred, they can be used for your wallpaper image or to
be assigned to a particular phonebook entry, quickly alerting you to your caller’s identication.
With the phonebook manager, you can also modify the graphic prior to sending it to the handset.
Common graphic editing functions such as zoom, rotate, brightness/contrast adjustment and red/green
color balance adjustments can be adjusted from the VTech phonebook manager.
Picture download
Special features
Page 55

www.vtechphones.com
53
Special features
Open a graphic le
• Open the phonebook manager by double-clicking on the desktop icon:
• Click on the Graphics tab.
• Click on the
OPEN IMAGE button.
• A window will open for you to browse through the graphic le on your computer.
• Find the folder containing your graphic le and double-click to open it.
Picture download
Once a graphic le is opened, it can be transferred from your PC to your handset. There are many
images in the phonebook manager software for downloading into your handset, or you can transfer
your own pictures onto the handset. The phonebook manager supports the following graphic formats:
GIF, JPEG, BMP, TIFF and PNG.
Picture download
To transfer images from the software to the handset:
• Connect one end of the enclosed USB cable to the handset and the other end to your PC.
• If you have the phonebook manager program open, you should see from the status bar in the
bottom right corner update that the PC has detected the telephone. You are now ready to transfer
a graphic to the telephone.
• Following the steps in Open a Graphic File.
• Once you have opened the desired image, click on the
Transfer to Handset button.
• The graphic transfer will now begin and complete in approximately four seconds.
• When the graphic transfer is complete, follow the instructions given on the handset display to save
the graphic to your telephone.
Special features
Page 56

www.vtechphones.com
54
Graphic editing
The VTech Phonebook Manager allows you to perform basic graphic editing functions such as zoom,
rotate, brightness/contrast and color balance. When using these tools to edit your pictures, you can
see them on the preview panel on the left side of the phonebook manager application.
While in graphic edit mode, there is a red preview box over the center of the main graphic panel. This
preview box contains the image shown in the preview panel on the left side of the application. You
can move the preview box by:
1. Move the mouse pointer inside the red preview box.
2. Press and hold the left mouse button.
3. Use the mouse to move the red preview box to a new location on the graphic.
4. Once the preview box is on the desired graphic, release the mouse button.
Picture download
• None of the
graphic editing
functions will
alter the actual
graphic le
– they will only
modify how
the graphic
will look once
it has been
downloaded to
the handset.
Special features
Page 57

www.vtechphones.com
55
Special features
Phonebook tab functions
The VTech Phonebook Manager can be used to create, modify and backup phonebook les from
your handset. The phonebook manager has many useful functions:
• Export existing contacts from any contact manager (such as Microsoft Outlook
®
, Palm®, etc.) to
a comma separated text le. Import those contacts into the phonebook manager and transfer the
entire phonebook to your handset.
• Transfer the phonebook from your handset to your PC and save it to disk. Connect a different
handset and transfer the phonebook from your PC to the new handset. This allows you to store
a copy of the phonebook on your PC and transfer it to different handsets.
• Use the phonebook manager to backup your handset phonebook onto your PC. If you need to
restore the phonebook on your handset, there is already a copy stored on your PC.
• Use the phonebook manager to create a phonebook ofine on your PC. When nished editing,
connect your handset and transfer it from the PC to your handset.
Creating an empty phonebook
To create an empty phonebook to input data:
• Double-click on the VTech Phonebook Manager icon on your PC.
• Click on the Phonebook tab.
• Select the
CREATE PHONEBOOK button.
• Using the Phonebook Manager application, make any necessary changes to the phonebook.
You can add entries or import contacts from other PC applications such as Microsoft Outlook
®
or Palm®.
•
When nished editing the phonebook, you must either save the data to your hard drive or transfer
it to your handset:
• Select the
SAVE PHONEBOOK button to save the data to your PC’s hard drive.
-OR-
• The phonebook
manager
application does
not perform any
synchronization
of the phonebook
between the
PC and the
handset. When
the Transfer to
Handset button
is pressed, the
entire phonebook
is transferred
to the handset
replacing
the existing
phonebook on
the handset.
• This operation
will replace the
phonebook on
your handset
with the new
one currently
transferred from
the phonebook
manager.
Special features
Page 58

www.vtechphones.com
56
Edit a phonebook
You can either open an existing phonebook stored in your PC’s hard drive by pressing the
OPEN
PHONEBOOK button using the phonebook manager software, or by transferring the
phonebook from your handset to the phonebook manager software using the supplied USB cable.
To accomplish this:
• Connect your handset to your PC using the USB cable.
• Start the phonebook manager application on your PC.
• Verify the connection by ensuring the green icon on the status bar. (If it is not, re-connect the
handset to the PC with the USB cable.)
• Press the
Phonebook tab.
• Press the
Transfer button.
• Using the phonebook manager software, edit the phonebook entries. At this time you can also add
new entries or import contacts from other programs such as Microsoft Outlook
®
or Palm®, etc.
• When nished editing the phonebook, save it to your PC’s hard drive by pressing the
SAVE
PHONEBOOK button. To transfer the newly edited phonebook to your handset, use
the transfer phonebook button.
Phonebook tab functions
Special features
• Click on Transfer
Page 59

www.vtechphones.com
57
Special features
Phonebook tab functions
Import contacts into phonebook manager from other PC applications
Use this feature to import contacts from a comma separated text le into the VTech phonebook
manager software. The contacts will be merged into the currently loaded phonebook.
1.
Create a comma separated text le containing the contacts for importing into your handset. This is
accomplished by using the export function from your other contact management application (such as
Microsoft Outlook®, Outlook Express® or Palm® applications). The export function in these programs
is normally located under the le menu. Be sure to specify the export le as a text le or comma
separated le (CSV). An example of exporting contacts from Microsoft Outlook® is as follows:
a. Start Microsoft Outlook® on your PC.
b. Select
import/export from the le menu.
c. Select
export to le and press next.
d. Select a le type of comma separated values (in Windows).
e. Select the folder containing the contacts for export.
f. Once a contact folder has been selected, press
next.
g. Enter a le name to save as a contact. This will be the le importing into the phonebook manager program.
Be sure to make note of where on your PC you save the le for later reference.
2. Start the VTech phonebook manager program on your PC. Load the newly created phonebook
into the phonebook manager software using these steps:
• Press the Transfer
button.
• Press the CREATE PHONEBOOK button to create an empty phonebook.
• Press the
OPEN PHONEBOOK button to load the previously saved phonebook
from your PC’s hard drive.
• For rst time
users, try the
import operation
on an empty
phonebook
until you have
mastered the
process.
Special features
Page 60

www.vtechphones.com
58
• Press the Import/Export button.
• Select
Import Contacts and press the next button.
• Use the browse button to locate the comma separated text le saved in step one. Press
next.
• The next screen displays how the elds from the comma separated text le will be mapped to the
handset phonebook entries. There are two elds in the VTech phonebook: name and number.
However, most PC contact managers separate names into the rst and last name elds. To allow
import of this type of le, the mapping dialog allows you to decide how the name elds from your
import le will be placed in the VTech phonebook name eld. For example, the following mappings
will import the eld’s rst name and last name into the VTech name eld. The home phone eld
will be imported into the VTech phone number eld.
If the mapping displayed is not what is desired, select one of the rows and press the
Change Map
button to correct it. You can only use each of the three elds (VTech name rst, VTech name last
and VTech phone number) once. If you want to change one that has already been mapped, you must
rst select that row and use the Change Map button to remove the association.
• When nished editing the mapping, press the
Finish button. The contacts will now be imported
and merged into the currently loaded phonebook.
Phonebook tab functions
Exporting contacts to a comma separated text le
This feature allows you to export some or all of your VTech phonebook entries into a comma
separated text le. This comma separated text le can then be imported into a contact manager
software such as Microsoft Outlook® or Palm® applications.
• Load a phonebook into the phonebook manager.
• If you wish to export only some of your contacts, select the desired contacts on the list of contacts
loaded. You can use your mouse to select to a single row or hold down the CTRL key while using
your mouse to click on the rows to be selected.
• Press the
Import/Export button.
Special features
Page 61

www.vtechphones.com
59
Special features
Phonebook tab functions
• Select Export Contacts and press the next button.
• Select whether you want to
Export All Contacts or Selected Contacts.
• Enter the name of the le to be exported to. You can use the
browse button to locate the folder
and enter a le name.
• Press the
Finish button to complete the export operation.
Deleting phonebook records from the currently loaded phonebook
• Start the phonebook manager software on your PC.
• Press the Phonebook tab.
• Load a phonebook into the phonebook manager.
• Select the rows of the phonebook entries to be deleted. Use your mouse to select a single row or
hold down the CTRL key while using your mouse to click on the rows to be selected.
• Press the
Delete Selected Contacts button.
• Save the le to disk and/or transfer it to the handset.
Special features
Page 62

www.vtechphones.com
60
Handset and base indicators
Mute indicator
• Flashes when the handset microphone is muted.
Ringer off indicator
• displays when the ringer is turned off.
Battery indicator
• When the handset is removed from the charger, this lets you know the
level of charge in the battery, from FULL( ) to EMPTY ( ).
• Cycles (low, medium, and full) when handset battery is charging.
• Flashes when a low battery condition is detected.
New message indicator
• Flashes when there is a new message in the answer system.
Line in use indicator
• On when an extension handset or parallel set is in use.
Hold indicator
• Flashes when a call is on hold.
Handset LEDs
• On when the handset speakerphone is in use.
Handset icons
Page 63

www.vtechphones.com
61
Appendix
Handset and base indicators
Ringer off indicator
• displays when the base ringer is turned off.
Line in use indicator
• On when an extension handset or parallel set is in use.
Hold indicator
• Flashes when a call is on hold.
Battery indicator
• Cycles (low, medium, and full) when battery is charging in the spare battery
compartment.
• Flashes when the base unit is under power backup mode (No AC power is
detected).
Mute indicator
• Flashes when the microphone is muted.
Base icons
MUTE
Answering machine indicator
• Displays when the answer system is turned off.
Record message indicator
• Displays when the Record Message function is turned off. In this mode, the
answering system will only answer the call but not record any message.
ANS. OFF
REC. OFF
Page 64

www.vtechphones.com
62
Handset and base indicators
Base LEDs
• Flashes when there is a new message in the answer machine.
• Flashes when a call is on hold.
• Lights when the base speakerphone is in use.
• On when the handset is in the base unit.
New Message
Speakerphone
Charging
Page 65

www.vtechphones.com
63
Appendix
Add additional handsets
Your telephone can accommodate up to eight cordless handsets. You can
add new handsets (VTech i5808, purchased separately) anytime. Up to three
handsets can be on a call at the same time.
The handset provided with your telephone system is automatically registered as
Handset 1 (i5871), or Handset 1 and Handset 2 (for i5873). Additional handsets
will be assigned in numerical order (2, 3, 4, etc.) when they are registered.
Before using a separately purchased handset, it must be registered with the
base unit.
Registration of handsets
• Make sure the additional handset is fully charged before registration.
• On the base unit, press the softkey
MENU in idle mode.
• Press the softkey
three times to reach REGISTER HANDSET, and press
the softkey SELECT to select.
• The base unit screen displays
READY TO REGISTER NEW HANDSET,
press the softkey REGISTER on the handset.
• The handset screen displays
Registration in Progress. Within 15-60
seconds, the screen displays Found Base, and the base unit and handset
will beep.
The maximum number of handsets for use at any time is three, and the possible
combinations include:
• Three handsets and the base unit on an external call.
• Two handsets and the base unit on an external call, and one handset
accessing the answering system.
• One handset and the base unit are on an external call, and two handsets
are on intercom.
Page 66

www.vtechphones.com
64
Add additional handsets
Replace a handset
If you are replacing a handset on a system that has the maximum number of
registered handsets (eight) or wish to change the assigned handset number
of your registered handsets, you must rst de-register the handsets, and then
register all handsets again.
De-register a handset
• On the handset to be de-registered, press
MENU/SEL when in idle
mode.
• Press the
DOWN NavKey four times to reach Settings, and press
MENU/SEL to select.
• Press the
UP NavKey once to reach Reset Settings, and press MENU/
SEL to select.
• Press the
UP NavKey twice to reach Clear Registration, and press
MENU/SEL to select.
• The screen displays
Clear Handset Registration Are you sure? Press
the softkey YES to conrm, or press the softkey NO if you decide to keep
the registration.
• The screen will then display the instructions for registering a handset.
• The newly registered handset will be assigned the lowest extension number
which has not been previously assigned to another system handset (2
through 8 for model i5871, 3 through 8 for model i5873).
Page 67

www.vtechphones.com
65
Appendix
De-register all handsets
• On the base unit, press the softkey
MENU.
• Press the softkey
once to reach BASE SETTINGS, then press the softkey
SELECT to select.
• Press the softkey
twice to reach DELETE HANDSETS, and press the
softkey SELECT to select.
• The screen displays
DELETE REGISTRATION FOR ALL HANDSETS
ARE YOU SURE? Press the softkey YES to conrm, or press the softkey
NO if you decide to keep the registration.
To re-register a handset, see
Registration of handsets on page 63.
Add additional handsets
Page 68

www.vtechphones.com
66
Charge spare battery pack
Power guard feature
Your phone uses a spare battery charger in the base unit to provide power backup in the event of a
power failure or outage. With a fully charged battery in the spare battery charger, you will be able to
make and receive calls for up to 2.5 hours during a power outage.
The spare battery can also be used to replace a depleted handset battery to ensure uninterrupted use.
The spare battery is optional and can be purchased separately.
Installation
1. Open the spare battery compartment by pressing the release button located on the bottom of the
base unit.
2. Remove the battery cover and place the battery in the compartment with the metal contacts aligned,
as shown in the diagram.
3. Replace the compartment cover. The spare battery charger takes 20 hours to fully charge a
depleted battery.
• When using your
phone during
power backup
mode, audio
quality may be
compromised
due to
reduced power
availability.
Page 69

www.vtechphones.com
67
Appendix
Batteries
After the battery is fully charged, you can expect the following performance:
Operation Operating time
While in use (talking)
6 hours
While not in use (standby*) 96 hours (approximately 4 days)
*Handset is off the base unit but not in use.
The battery needs charging when:
• A new battery is installed in the handset.
• The telephone beeps twice once taken off the base unit.
• Battery indicator on screen is empty.
CAUTION:
To reduce the risk of re or injury to persons, read and follow these instructions:
1. Use only the battery(ies) specied.
2. Do not dispose of the battery(ies) in a re. They may explode. Check with local waste management codes for special
disposal instructions.
3. Do not open or mutilate the battery(ies). Released electrolyte is corrosive and may cause burns or injury to the eyes or
skin. The electrolyte may toxic if swallowed.
4. Exercise care in handling batteries in order not to short the battery to conductive materials such as rings, bracelets, and
keys. The battery and/or conductor may overheat and cause burns.
5. Charge the battery(ies) provided with or identied for use with this product only in accordance with the instructions and
limitations specied in this manual.
WARNING:
TO PREVENT FIRE OR SHOCK HAZARD, DO NOT EXPOSE THIS PRODUCT TO RAIN OR ANY TYPE OF MOISTURE.
The AC adapter is used as the main disconnect device, ensure that the AC outlet is located/installed near the unit and is easily accessible.
Page 70

www.vtechphones.com
68
Important safety instructions
When using your telephone equipm ent, bas ic safet y precautions should al ways be followed to reduce the risk of re, electric shock and injury, including the following:
1. Read and understan d all instructi ons.
2. Follow all warnings and instructions marked on the product.
3. Unplug this product from the wall outlet before cleaning. Do not use liqui d or aerosol cleaners. Use a damp cloth for cleaning.
4. Do not use this product near water (for example, near a bathtub, kitchen sink, or swimming pool).
5. Do not place this product on an unstable surface, such as a table, shelf or stand. This product may fall, causing serious damage.
6. Slots and openings in the back or bottom of the base unit an d handset are provided for ventilation. To protec t them from over heating, these openings must not be blocked
by placing the product on a soft surface such as a bed, sofa or rug. This product should never be placed near or over a radiator or heat register. This product should not be
placed in any area where proper ventilation is n ot provided.
7. This produc t should be operated only from the type of power source indicated on the marking label. If you are not sure of the type of power supply in your home, consult your
dealer or local power company.
8. Do not allow anything to rest on the power cord. Do not install this product where the cord may be walked on.
9. Never push obje cts of any kind into this product through slots in the base or handset as they may touch dangerous voltage points or short out par ts that could result in a risk
of re or electric shock. Never spill liquid of any kind on the product.
10. To reduce the risk of elec tric shock, do not disassemble this produc t, but take it to an authorized servi ce facility. Opening or removing parts of the base or handset other than
speci ed acc ess doors may expose you to dangerous voltages or other risks. Incorre ct reassembli ng can cause electric shock when the product is subsequently used.
11. Do not overl oad wall outlets and extension cor ds as this can result in the risk of re or electric shock.
12. Unplug this product from the wall outlet an d refer ser vicing to an authorized s ervice facility under the following c onditions:
A. When the power supply cord or plug is damaged or fraye d.
B. If liquid has been spilled onto the product.
C. If the product has been exposed to rain or water.
D. If the product does not operate normally by following the operating instructions. Ad just only those controls that are covered by the operation instruc tions, as improper
adjust ment of other controls may result in damage and often requires ex tensive work by an authorized techni cian to re store the product to normal operation.
E. If the product has been dropped and the base and /or handset has been damaged.
F. If the product exhibits a distinct change in p erfor mance.
13. Avoid using a telephone (other than cordless) during an electri cal stor m. There is a remote risk of electric shock from lightning.
14. Do not use the telephone to re port a gas leak in t he vicinity of the leak.
15. Only put the handset of your te lephone next to your ear when it is in normal talk .
CAUTION: Use only the power adapter provided with this product. To obtain a replacement, call 1(800)222-3111. In Canada, call 1(866)288-4268.
SAVE THESE INSTRUCTIONS
Page 71

www.vtechphones.com
69
Appendix
Troubleshooting
Problem Suggestion
My telephone doesn’t
work at all.
• Make sure the power adaptor is plugged in.
• Make sure the telephone line cord is plugged rmly into the base unit and the telephone wall
jack.
• Disconnect the power adaptor for a few minutes, and then reconnect it.
• Charge the battery in the handset for 16 hours. For optimum daily performance, return the
handset to its base unit when not in use.
• Reset the base unit. Unplug the electrical power. Wait for 15 seconds then plug it back in. Allow
up to one minute for the handset and base unit to reset.
• You may need to purchase a new battery, please refer to the Batteries sections in this user’s
manual.
I cannot get a dial
tone.
• Try all the suggestions above.
• Move the handset closer to the base unit. You might have moved out of range.
• Make sure the telephone is set to the correct dial mode for the type of service that you have
(pulse or touchtone). Refer to the Installation section of this user’s manual to set the dial
mode.
• Your line cord might be malfunctioning. Try installing a new line cord.
• If the previous suggestions do not work, disconnect the telephone base from the telephone
jack and connect a different telephone. If there is no dial tone on that telephone either, the
problem is in the wiring or local service. Contact your local telephone company.
If you have difculty operating your telephone, the suggestions below should solve the problem. If you still have difculty
after trying these suggestions, call VTech Communications at 1(800)595-9511. In Canada, call VTech Telecommunications
Canada Ltd. at 1(800)267-7377.
Page 72

www.vtechphones.com
70
Problem Suggestion
I cannot dial out. • Make sure there is a dial tone before dialing. It is normal for handset to take a second or two
to nd the base unit and produce a dial tone. Wait an extra second before dialing.
• Make sure the telephone is set to the correct dial mode for the type of service that you have
(pulse or touchtone). Refer to the Set dial mode (page 20) of this user’s manual to set the dial
mode.
• If the other telephones in your home are having the same problem, the problem is in your wiring
or local service. Contact your local telephone company.
• Eliminate any background noise. Noise from a television, radio or other appliance may cause the
telephone not to dial out properly. If you cannot eliminate the background noise, rst try muting
the handset before dialing, or dialing from another room in your home with less background
noise.
The batteries do not
hold a charge.
• Charge the battery in the handset for 16 hours. For optimum daily performance, return the
handset to its base unit when not in use.
• You may need to purchase a new battery, please refer to the
Batteries section in this user’s
manual.
• Your telephone might be malfunctioning. Please refer to the Warranty section of this user’s
manual for further instruction.
Troubleshooting
Page 73

www.vtechphones.com
71
Appendix
Troubleshooting
Problem Suggestion
I get noise, static, or
weak signal even when
I’m near the telephone
base.
• Other electronic products can cause interference with your cordless telephone. Try installing
your telephone away from these types of electronic devices: wireless routers, radios, radio
towers, pager towers, cell phones, intercoms, room monitors, televisions, personal computers,
kitchen appliances and other cordless telephones.
• Microwave oven operates on the same frequency as your telephone. It is normal to experience
static on your telephone while the microwave oven is running. Do not install this telephone in
the same outlet or near the microwave oven.
• If your telephone is plugged in with a modem or surge protector, plug the telephone (or modem/
surge protector) into a different location. If this solves the problem, re-locate your telephone
or modem farther apart from one another, or use a different surge protector.
• Relocate your base unit to a higher location. The telephone will likely get better reception if
not installed in a lower area.
• If the other telephones in your home are having the same problem, the problem is in your wiring
or local service. Contact your local telephone company (charges may apply).
I he a r n o i s e in the
handset, and none of
the keys or buttons
work.
• Make sure the power cord is plugged in.
I hear other calls while
using my telephone.
• Disconnect your base unit from the telephone jack, and plug in a regular telephone. If you still
hear other calls, the problem is probably in your wiring or local service. Call your local telephone
company.
Page 74

www.vtechphones.com
72
Troubleshooting
Problem Suggestion
My handset does not
ring when I re c e i v e
a call.
• Make sure you have the ringer activated. Refer to the section(s) on ringer selection in this
user’s manual.
• Make sure the telephone line cord is plugged rmly into the base unit and the telephone jack.
Make sure the power cord is plugged in.
• The handset may be too far from the base unit.
• Charge the battery in the handset for 16 hours. For optimum daily performance, return the
handset to its base unit when not in use.
• You may have too many extension telephones on your telephone line to allow all of them to
ring. Try unplugging some of the other telephones.
• The layout of your home or ofce might be limiting the operating range. Try moving the telephone
base to another location, preferably on an upper oor.
• If the other telephones in your home are having the issue, the problem is in your wiring or local
service. Contact your local telephone company (charges may apply).
• Test a working telephone at the telephone jack. If another telephone has the same problem, the
problem is the telephone jack. Contact your local telephone company (charges may apply).
• Other electronic products can cause interference with your cordless telephone. Try installing
your telephone as far away from these types of electronic devices as possible: wireless routers,
radios, radio towers, pager towers, cell phones, intercoms, room monitors, televisions, personal
computers, kitchen appliances and other cordless telephones
• Your line cord might be malfunctioning. Try installing a new line cord.
Page 75

www.vtechphones.com
73
Appendix
Troubleshooting
Problem Suggestion
My calls fade or cut in
and out while I’m using
my handset.
• Other electronic products can cause interference with your cordless telephone. Try installing
your telephone as far away from these types of electronic devices as possible: wireless routers,
radios, radio towers, pager towers, cell phones, intercoms, room monitors, televisions, personal
computers, kitchen appliances and other cordless telephones.
• Microwave oven operates on the same frequency as your telephone. It is normal to experience
static on your telephone while the microwave oven is running. Do not install this telephone in
the same outlet or near the microwave oven.
• If your telephone is plugged in with a modem or surge protector, plug the telephone (or modem/
surge protector) into a different location. If this solves the problem, re-locate your telephone
or modem farther apart from one another, or use a different surge protector.
• Relocate your telephone base to a higher location. The telephone will get better reception if
not installed in a lower area.
• If the other telephones in your home are having the issue, the problem is in your wiring or local
service.
M y c a l le r I D i s n ’t
working.
• Caller ID is a subscription service. You must subscribe to this service for this feature to work
on your telephone.
• Your caller must be calling from an area that supports caller ID.
• Both you and your caller’s telephone companies must use caller ID compatible equipment.
Page 76

www.vtechphones.com
74
Troubleshooting
Problem Suggestion
C o m mo n c ur e f o r
electronic equipment
If the unit does not seem to be responding normally, then try putting the handset in its telephone
base. If it does not seem to respond, do the following (in the order listed):
1. Disconnect the power to the telephone base.
2. Disconnect the handset battery, and spare battery, if applicable.
3. Wait a few minutes.
4. Connect power to the telephone base.
5. Re-install the battery(ies).
6. Wait for the handset to re-establish its link with the telephone base. To be safe, allow up to
one minute for this to take place.
Page 77

www.vtechphones.com
75
Appendix
Operating range
This cordless telephone operates with the maximum power allowed by the Federal Communications Commission (FCC). Even so, this handset and telephone base can communicate over only a
certain distance ----which can vary with the locations of the telephone base and handset, the weather, and the layout of your home or ofce.
When the handset is out of range, the handset will display Searching. The user can access the handset phonebook, and certain parts of the menu system, i.e. handset setting and registration, but
not the time setting and base setting. Not possible will be displayed if access is tried.
If there is a call while the handset is out of range, it might not ring, or if it does ring, the call might not connect well when you press TALK/FLASH. Move closer to the telephone base, then press
TALK/FLASH to answer the call.
If the handset moves out of range during a telephone conversation, there might be interference.
To improve reception, move closer to the base.
Maintenance
Taking care of yo ur telephone
Your cordless teleph one cont ains sop histic ated electronic parts, s o it must be treated wit h care.
Avoid rough treatment
Place the handset d own gent ly. Save the orig inal pac king materials to pr otect your telepho ne if you ever ne ed to ship it.
Avoid water
Your telepho ne can be da maged if it gets wet. Do not use the h andset outdoors in the rain, or handle i t with wet ha nds. Do not install your base unit near a sink, bathtub or shower.
Electr ical sto rms
Electr ical sto rms can so metimes cause powe r surges ha rmful to el ectronic equipment. For your own safet y, use cauti on when us ing elec tric appliances during s torms.
Cleaning your tele phone
Your telep hone h as a d urable plastic cas ing th at shou ld ret ain its luster for many year s. Cle an it only w ith a soft cloth slight ly dam pened with w ater or a mild soap. Do not use excess water or
cleani ng solven ts of any kin d.
Remember that electrical appliances can cause serious injury if used when you are wet or standing in water. If your base unit should fall into water, DO NOT RETRIEVE IT UNTIL YOU UNPLUG
THE POWER CORD AND TELEPHONE LINE CORDS FROM THE WALL. Then pull the unit out by the unplugged cords.
Page 78

www.vtechphones.com
76
About cordless telephones
• Privacy: t he same features that make a cordl ess pho ne conve nient create som e limit ations. Telephone c alls are transm itted between the base and th e cordless han dset by radio wave s, so
there is a possibilit y that your cordl ess pho ne conversations could be inter cepted by radio r eceiving equi pment within ra nge of the cordless han dset. Fo r this reason, yo u should not think of
cordless phone convers ations as b eing as pr ivate as tho se on corded phones.
•
Electrical Power: The base unit of this cordless telephone must be co nnecte d to a working elec trical outlet. The electrical outlet should not be controlled by a wall switch. Calls canno t be
made from the cord less han dset if the base unit i s unplug ged or switched of f, or if the electric al power is i nterrup ted.
•
Potent ial TV Inte rference: Some co rdless tel ephone s operate at freque ncies that may cause interference to televisions and VCRs. To minimize or prevent such interference, do not pla ce the
base unit of the cordl ess telep hone near or on to p of a TV or VCR. If inter ference is experi enced, moving the co rdless te lephon e father away from the TV or VCR will of ten reduce or elimin ate
the inter ference. (Appli es to 25 chan nel cord less phones only).
•
Recha rgeab le Bat terie s: This product cont ains ei ther Ni ckel- Cadmium or Nic kel-Metal Hydr ide re charge able batteries. Exerc ise care in handling batteries in order not to short the batter y
with conducti ng material such as r ings, bracelets, and keys. The b atter y or condu ctor may overheat and c ause harm . Obser ve proper p olarit y between the battery and t he battery charger.
•
Nickel-Me tal H ydride Rech argea ble B atter ies: D ispose of t hese b atteries in a safe manner. Do not burn or pu ncture. Like other b atteries of this t ype, if bur ned or punc tured, they c ould
releas e caustic material w hich could cause injury.
Warranty
What do es this li mited wa rrant y cover?
The manu facturer of this Vte ch product, Vtech Commu nicatio ns, warra nts to the h older of a va lid proo f of purchase (“Co nsumer ” or “you ”) that th e product and all accessories prov ided by Vtech
in the sales package (“Produ ct”) are free from material def ects in material and workmanship, pursu ant to the foll owing terms and cond itions, when installed and used norma lly and in accordan ce
with operation instruc tions. This limited warrant y extends only to th e Consum er for Products pur chased a nd used in t he United S tates of Am erica.
What will Vte ch Communications do if th e Produ ct is no t free from materia l defe cts in materials and workm anshi p durin g the limited warranty period (“Materially Defective
Produc t”)?
During the limited warranty p eriod, Vtech’s authorized serv ice rep resentative wil l repair or repl ace at Vtech’s option, wit hout ch arge, a M aterially Defec tive Pro duct. If we rep air this product, we
may use new or refurb ished re placem ent parts. If we choose to re place th is product, we may r eplace it with a new or refurb ished product of the same or similar design . Vtech wi ll return r epaired
or repla cement p roducts to you in working c onditi on. Vtech will retain defec tive par ts, mod ules, or e quipment. Repai r or repla cement o f Produc t, at Vtec h’s option, is your exclusive rem edy. You
should ex pect th e repair or replacement to take a pproxim ately 30 day s.
How long i s the limi ted warr anty period?
The limited warrant y period for the product ex tends for ONE (1) YEAR from the date of purchas e if we repair or repla ce a Material ly Defective Product under the term s of this limited warranty. This
limited warrant y also applies to repaired or replacement Products for a perio d of either (a) 90 days from th e date th e repaired or rep lacement Produ ct is shipped to you or (b) the time remainin g
on the ori ginal on e-year war ranty; w hichever is longer.
What is not c overed by th is limite d warrant y?
This lim ited warranty doe s not cover
1. Product that has been subjected to misuse, accident, shipp ing or other physical damage, improp er installation, abnormal operation or handling, negligent, inundation, re, water or other liqui d
intrus ion; or
2. Product that h as been damaged due to repair, alteration or modication by anyone other th an an autho rized ser vice representative of Vtech; or
3. Product to the extent that the problem experienced i s cause by si gnal con dition s, network reliab ility or cable or an tenna systems; or
4. Product to the extent that the problem is caused by use with non-Vte ch electrical accessories; or
5. Product whose warrant y/quality stic kers, Prod uct serial numbe rs plates or electr onic ser ial numbers have been removed, altered or rendered i llegib le; or
6. Product purc hased, us ed serv iced, or sh ipped for repair from outside the United St ates, or used for commer cial or institutio nal purpo ses (including but not limited to Product s used for rental
purposes); or
Page 79

www.vtechphones.com
77
Appendix
7. Product returned without valid proof of purchase (se e 2 below); or
8. Charges for installation or set up, ad justme nt of custo mer controls, and i nstall ation or re pair of systems outsi de the uni t.
How do you get warranty service?
• To obtain warranty servic e in the United States of Americ a, call 1(800)595-9511 for instructi ons regarding where to return the Product. Before calling for service, please che ck the user’s manual.
A check of the Produ ct controls and features may save you a serv ice call.
• E xcept as provided by applicab le law, you assume the risk of los s or damage during tran sit and tran sport ation and ar e responsible for delivery or handling c harges in curred in the transport of
Produc t(s) to the servic e locat ion. VTech will return rep aired or replaced product und er this limited warrant y to you, transportati on, del ivery o r handling char ges prepaid. V Tech assumes no
risk for d amage or lo ss of the Product in t ransit.
• I f the Product fai lure is not covered by this l imited warranty, or proof of purchase does n ot meet the terms o f this limited warranty, Vte ch will notify you and wi ll reque st that yo u author ize the
cost of re pair and return ship ping costs for the r epair of Pro ducts t hat are not covered by thi s limited w arrant y.
What must you return with the Product to get warranty service?
1. Return the enti re original package and contents inc luding t he Product to the Vte ch service loc ation along with a description of the m alfunc tion or di fculty;
2. Include “va lid proo f or purchase” (sales receipt) i dentif ying the Product purchas ed (Produ ct model) and the date of purch ase or rec eipt; and
3. Provide your nam e, compl ete and cor rect mailing addr ess, and te lephon e number.
Other Limitations
• T his warranty is the complete and exclusi ve agreement betwee n you and Vtech. It supersed es all other written or oral communicat ions related to this Product. Vtech provides no other warranties
for this product . The warra nty exclusively describ es all of Vtech’s responsibili ties regarding th e product.
There are n o other express warranties. No one is auth orized to make modi cations to this lim ited warranty and yo u should n ot rely on any s uch mod icati on.
State Law Rights: This warranty gives you specic legal rights, and you may also have other rights, which vary from state to state.
Limitations: Implied warranties, including those of tness for a particular purpose and merchantability (an written warranty that the product is t for ordinary use) are limited to one year from date of
purchase, Some states do not allow limitations on how long an implied warranty lasts, so the above limitation may not apply to you.
• In no event shall Vt ech be liab le for any indi rect, sp ecial, in cident al, consequenti al, or similar damages (i ncluding, but not limited to lost prots or reve nue, inabi lity to use the product, or other
assoc iated equipment, t he cost of substitute equipm ent, and claims by thi rd parties) resulting fr om th e use of this product , som e states do not allow exclusion or limit ation of in cident al or
consequentia l damages, so the above limitat ion or exclu sion may not apply to you.
FCC, ACTA and IC regulations
This equipment complies with Parts 15 of the Federal Communications Commission (FCC) rules for the United States. It also complies with regulations RSS210 and CS-03 of Industry and Science
Canada. Operation is subject to the following two conditions: (1) this device may not cause interference, and (2) this device must accept any interference, including interference that may cause
undesired operation of the device.
A label is located on the underside of the base unit containing either the FCC registration number and Ringer Equivalence Number (REN) or the IC registration number and Load Number. You must,
upon request, provide this information to your local telephone company.
This equipment is compatible with inductively coupled hearing aids.
Should you experience trouble with this telephone equipment, please contact:
VTech Communications Inc.
CUSTOMER SERVICE at 1(800)595-9511. In Canada, call Vtech Telecommunications Canada Ltd. at 1(800)267-7377.
For repair/warranty information. The telephone company may ask you to disconnect this equipment from the line network until the problem has been corrected.
Warranty
Page 80

www.vtechphones.com
78
FCC Part 15
Warning: Changes or modications to this unit not expressly approved by the party responsible for compliance could void the user’s authority to operate the equipment.
The equipment has been tested and found to comply with part 15 of the FCC rules. These limits are designed to provide reasonable protection against harmful interference in a residential installation.
This equipment generates, uses and can radiate radio frequency energy and, if not installed and used in accordance with the instructions, may cause harmful interference to radio communications.
However, there is no guarantee that interference will not occur in a particular installation. If this equipment does cause harmful interference to radio or television reception, which can be determined
by turning the equipment off and on, the user is encouraged to try and correct the interference by one or more of the following measures:
• R eorient or relocate the rec eiving antenna.
• Increase the separ ation bet ween the e quipme nt and rec eiver.
• C onnect the equipment into a n outlet or on a circui t different from that to which the rece iver is con nected .
• C onsult the dealer o r an experi enced ra dio/TV technician fo r help.
To ensure safety of users, the FCC has established criteria for the amount of radio frequency energy that can be safely absorbed by a user or bystander according to the intended usage of the prod
uct. This product has been tested and found to comply with the criteria. The handset has such a low power that it does not require testing. It may be safely held against the ear of the user. The base
unit shall be installed & used such that parts of the user’s body other than the hands should be maintained at a comfortable distance of approximately 20cm or more.
FCC Part 68 and ACTA
If this equipment was approved for connection to the telephone network prior to July 23, 2001, it complies with Part 68 of the Federal Communications Commission (FCC) rules. If the equipment
was approved after that date, it complies with the Part 68 rules and with Technical Requirements for Connection of Equipment to the Telephone Network adopted by the Administrative Council for
Terminal Attachments (ACTA). We are required to provide you with the following information.
1. Product ide ntie r and REN i nforma tion
The la bel on the back or bottom of th is equipment contai ns, among oth er things, an identier indicati ng pro duct approval and the Ring er Equi valence Number (REN). T his information must be
provid ed to your l ocal telephone co mpany upon request . For equipm ent approved prior to Ju ly 23, 2001, t he pro duct identi er is prec eded by the phras e “FCC Reg No.” and the REN is liste d
separately. For equipment approved after that date, the pr oduct id entie r is preced ed by “US” and a colon (:), and the REN is encoded in the product identier wit hout a decimal point as the sixth
and seventh ch aracter s following the colon. For example, the product identier US:A AAEQ3T123X YZ woul d indi cate an REN of 0.3. The REN is used to determine how many d evices you may
connect to your telephone line and still have the m ring when you are called. In most, but not all area s, the sum of all RENs should be ve (5.0) or less . You may want to contact your local telephone
company for more information.
2.
Conne ction and use wit h the nationwide t eleph one net work
The plug and jack used to connec t this equipm ent to the premises wiring and the tel ephone net work must comply with the ap plicab le Part 68 rules and technical requirem ents adopted by ACTA. A
compliant telephone cord and modular plu g is provide d with this pro duct. It is des igned to be con nected to a com patible modular jac k that is also com pliant. An RJ11 jack shou ld normally be used
for conn ecting t o a single line and an RJ14 jack f or two lines. See Ins tallati on Instruction s in the user’s manual. T his equi pment may not be used wi th Coin Telephone Line s or with Par ty Lines. If
you have specially wired alarm dialing equipment c onnected to your tele phone line, ensure th e connec tion of this equipm ent does no t disabl e your alarm equipmen t. If you have questions ab out
what will d isable a larm equipment, consult your telephone com pany or a qualied installer.
3.
Repai r instru ctions
If this equipment i s malfunctioning, it must be u nplugg ed from the m odular jack until the proble m has been correcte d. Repair s to this telephone eq uipmen t can only be m ade by the man ufactur er
or its authorized ag ents. For repair pro cedure s, follow the instruction s outlined under the Limited Warranty.
4.
Rights of the tel ephon e company
If this equipmen t is causi ng harm to t he telep hone net work, the teleph one com pany may tem porarily disco ntinue yo ur telephone ser vice. The telephone com pany is required to n otify yo u before
interru pting servic e. If advan ce notice is not p ractic al, you wi ll be notied as s oon as possible. You will be gi ven the o pport unity t o correct the pr oblem an d the tel ephone company is requir ed to
inform yo u of your rig ht to le a complian t with the FCC. Your telephone comp any may make changes in i ts facilities, eq uipment, operat ion, or procedures that cou ld affect the pro per func tionin g
of this product. The telep hone com pany is req uired to notify you i f such cha nges are planned.
FCC, ACTA and IC regulations
Page 81

www.vtechphones.com
79
Appendix
5. Hearing aid c ompatibilit y
If this pr oduct is equipped with a corded or co rdless h andset, it is heari ng aid com patible.
6.
Progra mming /testing of emergency numbers
If this product has memory dialing locations, yo u may choo se to store police, re depar tment and emerg ency medical servic e telephone numb ers in these locations. If you do, ple ase keep three
things i n mind:
a. We re commen d that you also write th e telephone numbe r on the directory card, so that you can st ill dial the emergency numb er manually if the me mory di aling feature does n’t work.
b. Thi s feature is p rovided only as a convenienc e, and the manufacturer assumes no responsibility for customer relianc e upon the memory feature.
c. Testing the emerg ency telephone numbers yo u have stored i s not reco mmende d. However, if you d o make a call to an emerge ncy numb er:
• You must remain on the line and brie y explain the reason for the call before h anging up.
• Progra mming/testin g of emergency numb ers shou ld be per formed d uring of f-peak h ours, such as in the e arly morning or late evening, wh en the emergency servic es tend to be l ess busy.
IC (Industry Canada)
This telephone is registered for use in Canada.
The term “IC” before the radio certication number only signies that Industry Canada technical specications were met.
Notice:
This equipment meets the applicable Industry Canada Terminal Equipment Technical Specications. This is conrmed by the registration number. The abbreviation, IC, before the registration number
signies that registration was performed based on a Declaration of Conformity indicating that Industry Canada technical specications were met. It does not imply that Industry Canada approved the
equipment.
Notice:
The Ringer Equivalence Number (REN) for this terminal equipment is 0.1. The REN assigned to each terminal equipment provides an indication of the maximum number of terminal allowed to be
connected to a telephone interface. The termination on an interface may consist of any combination of devices subject only to the requirement that the sum of the Ringer Equivalence Numbers of all
the devices does not exceed ve.
Before installing this equipment, user should ensure that it is permissible to be connected to the facilities of the local telecommunications company. The equipment must also be installed using an
acceptable method of connection. The customer should be aware that compliance with the above conditions may not prevent degradation of services in some situations.
Repairs to certied equipment should be made by an authorized Canadian maintenance facility designated by the supplier. Any repairs or alterations made by the user to this equipment, or equipment malfunctions, may give the telecommunications company cause to requires the user to disconnect the equipment.
Users should ensure for their own protection that the electrical ground connections of the power utility, telephone lines and internal metallic water pipe system, if present, are connected together. This
precaution may be particularly important in rural areas.
Caution:
Users should not attempt to make sue connections themselves, but should contact the appropriate electrical inspection authority, or electrician, as appropriate.
Your Cordless Phone is designed to operate at the maximum power allowed by the FCC and IC. This means your handset and base unit can communicate only over a certain distance – which will
depend on the location of the base unit and handset, weather, and the construction and layout of your home or ofce.
FCC, ACTA and IC regulations
Page 82

www.vtechphones.com
80
Technical specications
Frequency control Crystal controlled
PLL synthesizer
Frequency Base: 5725-5850 MHz
Handset: 5725-5850 MHz
Channels 95
Nominal effective range Maximum power allowed by FCC and IC. Actual operating range may vary according
to environmental conditions at the time of use.
Size
Handset: 190.0mm X 42.0mm X 31.0mm
Base: 250.0mm X 90.0mm X 84.0mm
Weight Handset: 145.0 grams (including battery)
Base: 423.8 grams
Power requirements Handset: 3 cells AAA 3.6V 800mAh NiMH battery
Base: 7V DC @ 1100mA
Memory Handset phonebook: 100 memory locations; up to 32 digits, 16 characters per location
Handset call log: 100 memory locations
Base call log: 50 memory locations
Page 83

www.vtechphones.com
81
Index
A
About caller ID information 9
About cordless telephones 76
Activate the answering system 42
Add additional handsets 63-65
Answering system operation 41-49
B
Base icons 61
Base LEDs 62
Base settings 22-24
Batteries 67
Belt clip 8
C
Call log 36-38
Call waiting 27
Charge spare battery pack 66
Chart of characters 33
Choose a location 6
Clock setting 18, 22
Conference call 29
Contrast 24
Creating an empty phonebook 55
Customize entries 34
D
De-register a handset 64
De-register all handsets
65
Delete all messages 17, 47
Delete an entry 38
Delete a phonebook entry 35
Delete a redial entry 40
Deleting phonebook records from the
currently loaded phonebook 59
Dial a call log entry 37
Dial an entry from the redial list 39
Dial a phonebook entry 35
Dial type 24
E
Edit a phonebook 56
Edit a phonebook entry
35
Edit handset name 19
Exporting contacts to a comma
separated text le 58
F
Factory settings 24
FCC, ACTA and IC regulations 77-79
FLASH 27
G
Graphic editing 54
Graphics tab functions 52
H
Handset and base indicators 60-62
Handset icons
60
Handset layout 11
Handset LEDs 60
Handset messages 16-17
Handset screen images 13
Handset settings 18-21
Handset sounds 14-15
Hold 26
I
If you subscribe to DSL service 10
Important safety instructions 68
Import contacts into phonebook
manager from other PC
applications 57
Index 81-83
Install handset battery 7
Intercom call 27-31
K
Keypad tone 23
L
Language 20
Page 84

www.vtechphones.com
82
Index
M
Maintenance 75
Make, answer and end calls on the
base unit 25-26
Make, answer and end calls on the
handset 25
Memo playback 48
Message capacity 41
Message playback 47
Message playback on the base unit
47
Mute 26
N
New message indication 47
O
One-time software installation 52
Open a graphic le 53
Operating range 75
Options during playback 17, 47
Options while on calls 26-27
Outgoing greeting
45-46
P
Parts checklist 3-5
Phonebook 32-35
Phonebook tab functions 55-59
Picture download 52-54
Pictures & animations 13
Play the message 16
Play your greeting 45
Power guard feature 66
R
Recordable ringer 50
Record a memo 48
Record a sound clip by using the
audio patch cord 50
Record a sound clip by using the
microphone 51
Recording and playing memos 48
Record your greeting
45
Redial list 39-
40
Registration of handset 63
Remote access 53
Replace a handset 64
Reset settings
21
Restore to factory greeting 46
Review the call log 37
Ringer melody
14, 23
Ringer silencing 27
Ringer vibrate
15
Ringer volume
14, 23
S
Save an entry to the handset
phonebook 38, 40
Screen saver 13
Search the phonebook 34
Set a wallpaper image
13
Set call screening 42
Set contrast 19
Set dial mode 20
Set new message tone 44
Set number of rings
43
Set record options 42
Set security code 44
Setting answering system 42-44
Show handset name 20
Speakerphone at the handset 26
Store an entry in the phonebook 32
T
Technical specications 80
To access remote access 49
Tone settings 18
To transfer images from the software
to the handset 53
Transfer an external call 30
Page 85

Index
Troubleshooting 69-74
V
Volume control 27
W
Warranty 76-77
Weekday setting 22
Page 86

VTECH TELECOMMUNICATIONS LTD.
A member of THE VTECH GROUP OF COMPANIES.
Distributed in the U.S.A. by VTech Communications, Inc. Beaverton, Oregon
Distributed in Canada by VTech Telecommunications Canada, Ltd., Richmond, B.C.
Copyright ©2006 for VTECH TELECOMMUNICATIONS LTD.
Printed in China.
91-000865-010-000
Page 87

User’s Manual
w w w . v t e c h p h o n e s . c o m
Model: i5871/5873
 Loading...