

Page 1

Page 2

Table Of Contents
GETTING STARTED. . . . . . . . . . . . . . . . . . . . . . . . . . . . . . . . . . 1
Before you begin . . . . . . . . . . . . . . . . . . . . . . . . . . . . . . . . . . . . 1
GPL License Information . . . . . . . . . . . . . . . . . . . . . . . . . . . . . . . . 2
Package Contents . . . . . . . . . . . . . . . . . . . . . . . . . . . . . . . . . . . 3
Installation Directions . . . . . . . . . . . . . . . . . . . . . . . . . . . . . . . . . 4
THE SETUP WIZARD . . . . . . . . . . . . . . . . . . . . . . . . . . . . . . . . . 11
Internet Connection Type . . . . . . . . . . . . . . . . . . . . . . . . . . . . . . . 13
Dynamic IP Address Screen . . . . . . . . . . . . . . . . . . . . . . . . . . . . . . 14
PPPoE Screen . . . . . . . . . . . . . . . . . . . . . . . . . . . . . . . . . . . . . 15
Set Static IP Address Screen . . . . . . . . . . . . . . . . . . . . . . . . . . . . . 16
Setup Completed Screen. . . . . . . . . . . . . . . . . . . . . . . . . . . . . . . . 17
MENU STRUCTURE . . . . . . . . . . . . . . . . . . . . . . . . . . . . . . . . . . 19
BASIC SETTINGS . . . . . . . . . . . . . . . . . . . . . . . . . . . . . . . . . . . 20
Setup Wizard Screen. . . . . . . . . . . . . . . . . . . . . . . . . . . . . . . . . . 20
ISP Connection Settings Screen . . . . . . . . . . . . . . . . . . . . . . . . . . 20
ADVANCED SETTINGS . . . . . . . . . . . . . . . . . . . . . . . . . . . . . . 26
Virtual Server . . . . . . . . . . . . . . . . . . . . . . . . . . . . . . . . . . . . 26
Filters . . . . . . . . . . . . . . . . . . . . . . . . . . . . . . . . . . . . . . . . . 28
DMZ . . . . . . . . . . . . . . . . . . . . . . . . . . . . . . . . . . . . . . . . . 29
ADMIN SETTINGS. . . . . . . . . . . . . . . . . . . . . . . . . . . . . . . . . . 30
Settings . . . . . . . . . . . . . . . . . . . . . . . . . . . . . . . . . . . . . . . . 30
DHCP Screen. . . . . . . . . . . . . . . . . . . . . . . . . . . . . . . . . . . . . . 31
Passwords . . . . . . . . . . . . . . . . . . . . . . . . . . . . . . . . . .33
Other Options . . . . . . . . . . . . . . . . . . . . . . . . . . . . . . . .34
Restore Settings . . . . . . . . . . . . . . . . . . . . . . . . . . . . . . .35
STATUS SCREENS . . . . . . . . . . . . . . . . . . . . . . . . . . . . .36
Broadband Telephone Information . . . . . . . . . . . . . . . . . . . . . .36
Activity Logs . . . . . . . . . . . . . . . . . . . . . . . . . . . . . . . . 37
Traffic Statistics . . . . . . . . . . . . . . . . . . . . . . . . . . . . . . .38
DHCP Client . . . . . . . . . . . . . . . . . . . . . . . . . . . . . . . . 39
HELP . . . . . . . . . . . . . . . . . . . . . . . . . . . . . . . . . . . . .40
GLOSSARY . . . . . . . . . . . . . . . . . . . . . . . . . . . . . . . . . 41
TROUBLESHOOTING . . . . . . . . . . . . . . . . . . . . . . . . . . 45
TECHNICAL SPECIFICATIONS . . . . . . . . . . . . . . . . . . . . . .49
Page 3

1
Getting Started
Before you begin
1. Pre-register with Vonage Service by logging on to www.vonage.ca.
2. Check and make sure you meet the system requirement below.
• You must have a personal computer with the following applications and
hardware:
• Microsoft® Internet ExplorerTM 5.5 or higher for Windows; or Microsoft®
Internet ExplorerTM 5.x or Apple® SafariTM 1.0 for Mac® OS 9 or higher
• CD-ROM drive
• 10/100 Base-T Ethernet Port
• DSL or two-way Cable broadband Internet Service
• Two-way broadband modem supporting a minimum of 90kbps uplink
• Ethernet port on modem; USB-only modems are not supported
3. During installation you may be required to enter a username and password
if you are a DSL user who is required to enter a user name and password
(PPPoE) to access the Internet, and you may be required to enter a specific
IP addresses if you have a static IP address. Before you begin, be sure to
contact your Internet Service Provider to obtain this information.
4. Check for package contents (see page 3 for a complete list) then follow the
step-by-step installation directions (see page 4) to install and configure the
IP8100 series telephone.
Note: you may download the latest copy of the IP8100 series
telephone User Manual by accessing the Customer Support tab on
www.vtechcanada.com.
Getting Started
Page 4

2
Getting Started
Portions of the software associated with this product are open source, and fall
within the scope of the GNU General Public License (GPL). Accordingly, those
portions of code are available to the public, consistent with the requirements
of the GPL, in either source code format or object code format, depending
upon the nature of the code at issue. If you would like to exercise your right to
receive the available code, please send a cashier’s check, payable to VTech
Communications, Inc., in the amount of $10.00 (U.S.$) to:
VTech Communications, Inc.,
9590 SW Gemini Drive, Suite 120
Beaverton OR 97008
ATTN: Information Technology Group / IP8100 GPL code request,
along with a written request for the available code. If your request does not
fully comply with the foregoing requirements, VTech reserves the right to reject
your request. Further, by requesting and receiving the available code, you
release VTech, its affiliates, and its and their officers, directors, employees,
and representatives(“VTech Parties”) from any liability or responsibility
relating to such code, and you acknowledge that the VTech Parties make no
representations with respect to the origin, accuracy, usability, or usefulness of
such code, and the VTech Parties have no responsibility to you whatsoever
concerning the code, including without limitation any responsibility to provide
explanation, support, upgrade, or any communication whatsoever. Your review
or use of the available code is at your sole risk and responsibility.
GPL License Information
Page 5

3
Getting Started
6. Charger Wall Mounting Bracket(s)
7. Belt Clip(s)
8. User Documentation CD
9. Quick Start Guide
10. Battery(ies)
1. Base Unit
2. Handset(s)
3. Handset Charger(s)
4. Ethernet Cables
5. Base Power Adapter
The IP8100 series Broadband telephone is an advanced Broadband VoIP
cordless telephone set, capable of supporting up to four handsets. Your package
contains:
Base Unit
Handset
Base AC Adapter
Handset Charger
Blue Ethernet Cable
Belt Clip
User Docu-
mentation CD
Quick Start Guide
Charger Wall
Mounting Bracket
Battery
Yellow Ethernet Cable
Package Contents
Your broadband telephone accommodates up to 4 handsets. You can add
new handset, model IP811, by visiting www.vtechcanada.com or call VTech
Communications Inc. at 800-267-7377.
Page 6

4
Getting Started
Installation Directions
Installation Without A Router
PC
DSL or Cable Modem
INTERNET
Base Unit
Handset 1 & 2
NOTE: The IP8100 series telephone is
expandable up to a total of 4 handsets.
Uses model IP811 (sold separately)
WAN Port
PC/LAN Port
Warning: Do not route the Ethernet cable to outdoors, and ensure that you are
using a safety approved DSL or Cable modem with proper electrical isolation
.
STEP 1
Unplug the power cord from your Cable or DSL modem (the device your ISP
provided which provides high-speed Internet). Make sure that you turn your
computer off and that you do NOT plug in your IP8100 series broadband
telephone until instructed to do so.
Helpful Hint: The modem should be powered off for at least 10 minutes. If it is
turned off for a shorter period of time, it may remember old information that will
prevent it from working properly.
STEP 2
Disconnect all cables between your Cable or DSL modem and your computer.
Page 7

5
Getting Started
Installation Directions
STEP 3
Connect one end of the yellow Ethernet cable to the yellow port, labeled “PC/
LAN,” located on the back of the base unit and connect the other end of the
yellow cable to the Ethernet port of your computer.
STEP 4
Connect one end of the blue Ethernet cable to the blue port, labeled “WAN,”
located on the back of the base unit and connect the other end of the blue cable
to the Ethernet port on your cable or DSL modem.
STEP 5
Reconnect power cord to the modem then turn the modem on. Please wait until
all lights on the modem stop blinking.
Helpful Hint: This should take a few minutes, but may take as long as 10
minutes.
STEP 6
Plug the power cord into the power port located on the bottom or your IP8100
series telephone and the other end into the electrical outlet. This turns the IP
8100 series broadband telephone on.
Helpful Hint: Do NOT interrupt this registration process by unplugging the
power or by using the handsets until the READY indicator light on the front of
base has gone from flashing yellow to a steady green.
Helpful Hint: Use only the power cord provided in this package; using an older
power cord can damage the broadband telephone.
STEP 7
Turn your computer on, and check your computer to see if your Internet is
working, try to visit any website. If your Internet is working, please proceed to
STEP 10. If not, please proceed to STEP 8.
STEP 8:
Cable Users
If you receive Internet access through a Cable modem, you may need to register
the IP8100 series phone with your ISP. Please contact them to update your
information; you will likely need your WAN MAC address, which is located on
the bottom of the base. Once your ISP has updated your account, proceed to
step 9.
– OR –
DSL Users
If you have DSL and are required to enter a user name and password (PPPoE)
when accessing the Internet, you may be required to authenticate the IP8100
series telephone.
Page 8

6
Getting Started
Installation Directions
A. Open a web browser such as Microsoft ® Internet Explorer using the
computer connected through your IP8100 Ethernet port. In the address of
location fi eld, type <http://192.168.15.1> and press ENTER. This displays
the login screen. Enter the default password ‘VTech’ and click on login.
B. On the Setup Wizard screen, click Run Wizard to start the set-up.
C. Follow Wizard screens to complete the setup.
STEP 9:
Check for dial tone by pressing the ON button on your handset. If you do not hear
a dial tone, please refer to the Troubleshooting section of the user manual.
Congratulations! Even if you are transferring your number, you are ready to
start taking advantage of the great savings and superior quality of Vonage right
now! Please call 800-342-1791 to setup your voicemail service and to learn
about other free Vonage features included with every Vonage calling plan.
Page 9

7
Getting Started
Existing
Network Router
Base Unit
INTERNET
DSL or Cable Modem
PC
WAN Port
Laptop
Handset 1 & 2
Installation With A Router
Installation Directions
Warning: Do not route the Ethernet cable to outdoors, and ensure that you are
using a safety approved DSL or Cable modem with proper electrical isolation.
STEP 1:
Using the blue Ethernet cable provided, connect one end into the blue port,
labeled “WAN,” located on the back of the IP8100 series broadband telephone
base unit and connect the other end into an available LAN port on your router. If
you have a wireless router, place the base unit at least three feet (36 inches) away
from your router to avoid interference.
Helpful Hint: If all the Ethernet ports on your existing router are full, disconnect
one of the attached devices from the existing router. Plug the blue Ethernet cable
into the now free port on your router. Connect the device you just unplugged
from your router to the yellow “PC/LAN” port located on the back of IP8100 series
broadband telephone base unit.
STEP 2:
Plug the power cord into the power port located on the bottom of your base unit
and the other end into the electrical outlet. This turns the broadband telephone
on.
Helpful Hint: Do NOT interrupt this registration process by unplugging the
power or by using the handsets until the READY indicator light on the front of
base has gone from flashing yellow to a steady green.
Helpful Hint: Use only the power cord provided in this package; using any other
power cord could damage the broadband phone.
NOTE: The IP8100 series telephone is expandable up to a
total of 4 handsets. Uses model IP811 (sold separately)
Page 10

8
Getting Started
STEP 3:
Check for dial tone by pressing the ON button on your handset. If you do not hear
a dial tone, please refer to the Troubleshooting section of the user manual.
Congratulations! Even if you are transferring your number, you are ready to start
taking advantage of the great savings and superior quality of Vonage right now!
Please call 800-342-1791 to setup your voicemail service and to learn about
other free Vonage features included with every Vonage calling plan.
Installation Directions
Page 11

9
Getting Started
Installation Directions
DSL or Cable Modem
INTERNET
Laptop
PC
Base Unit
Handset 1 & 2
WAN Port
Warning: Do not route the Ethernet cable to outdoors, and ensure that you are
using a safety approved DSL or Cable modem with proper electrical isolation.
STEP 1:
Using the blue Ethernet cable provided, connect one end into the blue port,
labeled “WAN,” located on the back of the IP8100 series broadband telephone
base unit and connect the other end into an available LAN port on your router. If
you have a wireless modem router, place the base unit at least 3 feet away from
your router to avoid interference.
Helpful Hint: If all the Ethernet ports on your existing router are full, disconnect
one of the attached devices from the existing router. Plug the blue Ethernet cable
into the now free port on your router. Connect the device you just unplugged
from your router to the yellow “PC/LAN” port located on the back of IP8100
series broadband telephone base unit.
STEP 2:
Plug the power cord into the power port located on the bottom of your base
unit and the other end into the electrical outlet. This turns the IP8100 series
broadband telephone on.
Helpful Hint: Do NOT interrupt this registration process by unplugging the
power or by using the handsets until the READY indicator light on the front of
the base has gone from flashing yellow to a steady green.
Helpful Hint: Use only the power cord provided in this package; using an older
power cord can damage the broadband phone.
Installation With A Modem Router
NOTE: The IP8100 series telephone is expandable up to a
total of 4 handsets. Uses model IP811 (sold separately)
Page 12

10
Getting Started
STEP 3:
Check for dial tone by pressing the ON button on your handset. If you do not hear
a dial tone, please refer to the Troubleshooting section of the user manual.
Congratulations! Even if you are transferring your number, you are ready to
start taking advantage of the great savings and superior quality of Vonage right
now! Please call 800-342-1791 to setup your voicemail service and to learn
about other free Vonage features included with every Vonage calling plan.
Installation Directions
Page 13

11
The Setup Wizard
The Setup Wizard helps setup your system. Open a web browser such as
Microsoft® Internet ExplorerTM using the computer connected to the IP8100
series telephone’s PC/LAN port, then follow the steps below.
Note: The screens you will see are stored in the IP8100 series telephone; they
are not web site pages. During setup, ignore alerts that prompt you to reconnect
to the Internet.
1. In the address bar, type http://192.168.15.1 (do NOT type www).
2. Press the Enter key to display the login screen.
The Setup Wizard
Page 14

12
The Setup Wizard
3. Enter the default password ‘VTech’ to display the initial Wizard screen.
The Setup Wizard
4. Click the Run Wizard button to display the Internet Connection Type
screen.
Page 15

13
The Setup Wizard
Type ( WAN)
At this screen you must choose an Internet connection type (you will be allowed
to choose only one). If you are not sure which to choose, ask your Internet
Service Provider. After you make a selection, click Next to display the setup
screen for the option you’ve chosen.
Internet Connection Type
Dynamic IP Address
Choose this setting if you don’t have to enter a username and password to
access the Internet. Continue on page 14.
PPPoE
Choose this setting if you have DSL and are required to enter a username and
password to access the Internet. Continue on
page 15.
Static IP
This setting is rarely required. Contact your ISP to confirm your IP address
before choosing this option. Continue on
page 16.
Page 16

14
The Setup Wizard
The following screen appears if you select Dynamic IP Address as your Internet
connection type.
Dynamic IP Address Screen
Click Next to continue or click Back to return to the previous screen. Clicking
Exit takes you back to the initial wizard screen without saving any changes.
Page 17
15
The Setup Wizard
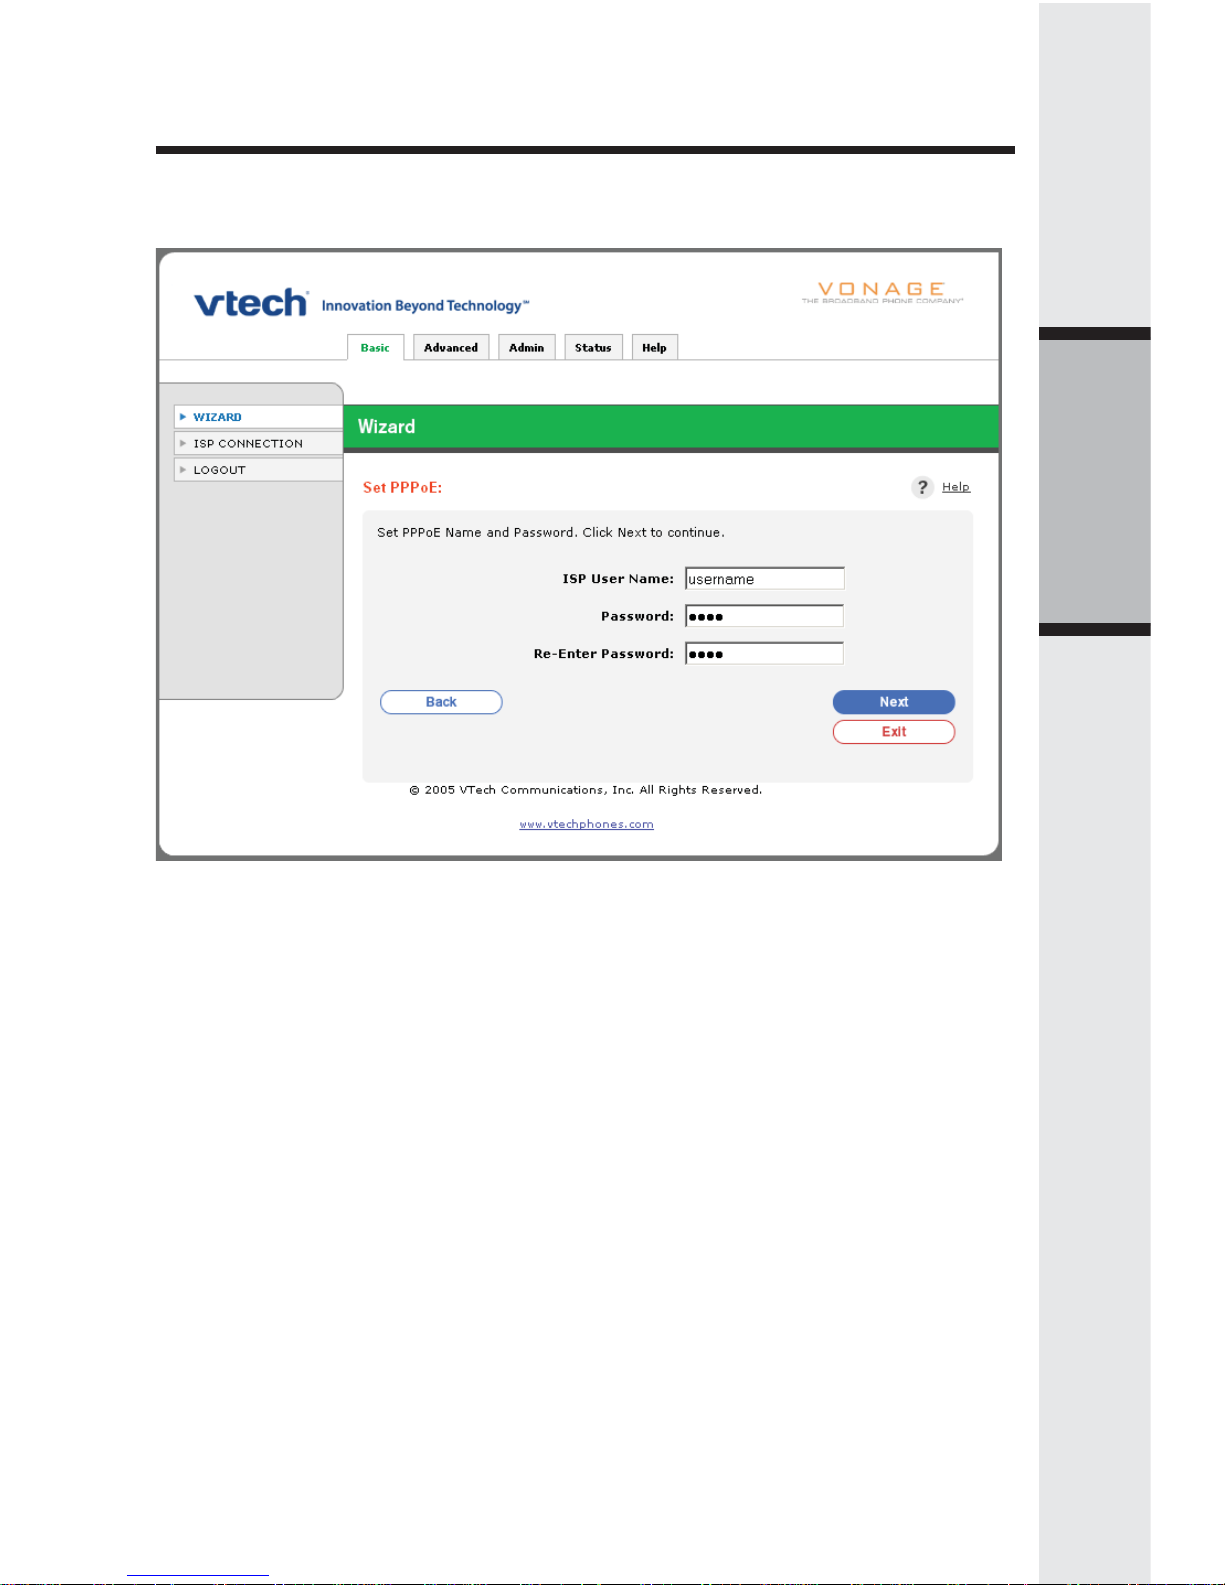
The following screen appears if you select PPPoE as your Internet connection
type.
PPPoE Screen
Enter the username and password (provided by your Internet Service Provider)
that you use when accessing the Internet. When finished, click Next to continue
or click Back to return to the previous screen. Clicking Exit takes you back to
the initial wizard screen without saving any changes.
Note: you may need to append the ISP’s domain suffix to the username, i.e.,
username@verizon.net.
Page 18

16
The Setup Wizard
The following screen appears if you select Static IP Address as your Internet
connection type.
Set Static IP Address Screen
Delete anything that appears in these fields when the screen is displayed, then
enter the WAN and DNS addresses provided by your ISP. Click Next to continue
or click Back to return to the previous screen. Clicking Exit takes you back to the
initial wizard screen without saving any changes.
Page 19

17
The Setup Wizard
Click Save Setting for the changes to take effect or click Back to return to the
previous screen. Clicking Exit takes you back to the initial wizard screen without
saving any changes.
Setup Completed Screen
Page 20

18
The Setup Wizard
Click Close Wizard to return to the initial wizard screen.
Test your connections
Re-launch your web browser. Your designated home page should appear. If
your home page does not appear, try the following:
• Reboot your computer.
• Turn off or unplug your modem for a few seconds, then turn it back on.
• If you still have no Internet access, please refer to the Troubleshooting section
of this manual.
Setup Completed Screen
Page 21

19
Menu Structure
Basic
• Wizard
• ISP Connection
• Logout
Advanced
• Virtual Server
• Filters
• DMZ
• Logout
Admin
• Settings
• DHCP
• Passwords
• Other
• Restore Settings
• Logout
Status
• Broadband Telephone Info
• Activity
• Traffic
• DHCP Client
• Logout
Help
• Basic
• Advanced
• Admin
• Status
• Glossary
• Logout
Menu Structure
Page 22

20
Basic Settings
Setup Wizard Screen
Click Run Wizard for a simple, step-by-step configuration of your IP8100 series
telephone settings. It is usually not necessary to do this after initial setup is
complete.
To re-run the Wizard to update settings, please see the Setup Wizard section
on page 12.
ISP Connection Settings Screen
Use this screen to view or change the Internet connection type required by your
Internet Service Providers. Please check with your Internet Service Provider for
the required configuration settings.
ISP Connection Settings: Dynamic IP Address
This setting is usually required for use with cable modems. Choose this setting if
you don’t have to enter a username/password to access the Internet when you
first turn on your computer. With this option, IP addresses are assigned by your
ISP automatically.
Basic Settings
Page 23

21
Basic Settings
Basic Settings
• MAC Address: This defaults to the MAC (Media Access Control) address
of the WAN port in the IP8100 series telephone. If your ISP has registered
the MAC address of your computer, you can manually enter it here, or use
the DHCP Client List to copy it.
• DHCP Client List: Lists MAC addresses of devices that have obtained a
DHCP lease from the IP8100 series telephone. If your ISP has registered the
MAC address of your computer, select that MAC address from the list, click
Copy, then click Apply to save the page settings. Clicking Restore takes you
back to the default MAC address value.
Page 24

22
Basic Settings
ISP Connection Settings: PPPoE
PPPoE stands for Point to Point Protocol over Ethernet. This setting is often
used by DSL service providers. Choose this setting if you are required to enter
a username and password when accessing the Internet.
Basic Settings
Page 25

23
Basic Settings
• User Name: Enter the user name required by your ISP when you connect to
the Internet.
Note: you may need to append your ISP’s domain suffix to the username, i.e.,
username@verizon.net.
• Password: Enter the password required by your ISP when you connect to the
Internet.
• Re-type Password: Re-type the password entered.
• Maximum Idle Time: ( Default 0) This field specifies the number of minutes of
inactivity before your IP8100 series telephone terminates the PPPoE session.
To avoid periodic disconnection from the Internet, leave this value set to
zero.
To allow your computer to disconnect after a period of inactivity, enter the
time in minutes. (For example, enter 10 to disconnect 10 minutes after you’ve
stopped using the computer.)
• MTU: (Default 1492) Data sent over networks is divided into packets of a
certain size. MTU (Maximum Transfer Unit) specifies the largest packet size
allowed for transmission over a network. This value typically does not need to
be changed. Do not c hange it unless advised to do so by your Inter net Servic e
Provider.
• MAC Address: This defaults to the MAC® (Media Access Control) address
of the WAN port in the IP8100 series telephone. If your ISP has registered
the MAC address of your computer, you can manually enter it here, or use the
DHCP Client List to copy it.
• DHCP Client List: Lists all MAC addresses of computers that have obtained
a DHCP lease from the IP8100 series telephone. If your ISP has registered
the MAC address of your computer, select that MAC address from the list,
click Copy, then click Apply to save the page settings. Clicking Restore takes
you back to the default MAC address value.
Basic Settings
Page 26

24
Basic Settings
ISP Connection Settings: Static IP Address
This connection type is rarely required. Contact your ISP to confirm IP information
before choosing this option.
Basic Settings
Page 27

25
Basic Settings
Note: When entering the numbers, remember that each number must be in the
correct format (four sets of numbers separated by periods, with no spaces).
• IP Address: Enter the value assigned by your ISP.
• Subnet Mask: Enter the value assigned by your ISP.
• ISP Gateway Address: Enter the value assigned by your ISP.
• Primary DNS Address: Enter the value assigned by your ISP.
• Secondary DNS Address: Enter the value assigned by your ISP.
• MAC Address: This defaults to the MAC (Media Access Control) address of
the WAN port in the IP8100 series telephone. If your ISP has registered the
MAC address of your computer, you can manually enter it here, or use the
DHCP Client List to copy it.
• DHCP Client List: Lists MAC addresses of devices that have obtained a
DHCP lease from the IP8100 series telephone. If your ISP has registered the
MAC address of your computer, select that MAC address from the list, click
Copy, then click Apply to save the page settings. Clicking Restore takes you
back to the default MAC address value.
Basic Settings
Page 28

26
Advanced Settings
These settings require advanced networking knowledge. Incorrectly changing
these settings may interrupt your Internet or VoIP service. These setting affect
devices connected to the PC/LAN port on your IP8100 series telephone.
Virtual Server
Virtual Server, also known as port forwarding, allows you to enable other
Internet users access to services running on your local network (such as your
web server or FTP server). The IP8100 series telephone will redirect the Internet
user requests to the appropriate server within your local network based on the
configured IP address and port number. To create a new virtual server, fill in the
fields on the screen and click Apply to save the page settings. You may also use
settings for commonly used services in the Virtual Server table at the bottom of
the screen by clicking an Edit button.
Advanced Settings
Page 29

27
Advanced Settings
• Virtual Server: (Default Off): Click On to enable or Off to disable. This indicates
whether the virtual server is initially enabled or disabled when it is created or
modified.
• Name: Enter a name for the virtual server you are setting up.
• Destination IP: Enter the private IP address of the computer that is hosting
the service/application.
Note: It is recommended that Static IP is used as the ISP Connection Setting
when Virtual Server is created.
• Protocol Type: Choose the type of protocol used to access your hosting
service.
• Port: Enter a single port or a range of ports to forward to a computer on your
local network. (Leave this field blank to deny access to all ports.)
Click Apply to save the page settings. Clicking Cancel aborts any changes you
have made on the page.
Advanced Settings
Page 30

28
Advanced Settings
Filters
Filters allow you to restrict or permit Internet access for computers on your local
network. The filter type supported on your IP8100 series telephone is IP Filter.
Advanced Settings
IP Filters
An IP filter is used to deny any specific computer from accessing the Internet
using the computer’s IP address. You can deny access by to specific services
by port numbers or by blocking all ports for the specific computer. To add a new
filter, fill in the fields above and click Apply to save the page settings. You can
block access to several of the most commonly used services by clicking an Edit
button in the IP Filter table at the bottom of the screen. This will copy the proper
settings into the IP Filter fields. You will only need to enter the IP address of the
computer to be affected by the filter (you can find this number by displaying the
DHCP screen under the Admin tab).
Page 31

29
Advanced Settings
• IP Filters: (Default to On): Click On to enable or Off to disable. This indicates
whether the IP filter is initially enabled or disabled when it is created or modified.
• Name: Enter a name the IP Filter you are setting up.
• Destination IP: Enter the private IP address that will be affected by the filter.
If left blank, any computers on your LAN will be blocked the Internet access.
• Port: Enter a single port or a range of ports that will be denied Internet access.
(Leave this field blank to deny access to all ports.)
• Protocol Type: Choose a protocol type to block.
When finished, click Apply to add the new filter which is then listed under the
IP Filter Table.
DMZ
DMZ (Demilitarized Zone) is a feature that exposes a designated computer
on your local network to the Internet. The computer designated as the DMZ
host is not affected by other security measures. Use this option with caution.
Computers designated as DMZ may be vulnerable to security risks.
Advanced Settings
• DMZ: (Defaul t O f f) Click On to allow u nrestric ted Internet a c cess to designated
computers.
• IP Address: Enter the IP address of a computer to be exposed to the Internet
access. When you are finished, click Apply to save the page settings.
Click Apply to save the page settings. Clicking Cancel aborts any changes you
have made on the page.
Page 32

30
Admin Settings
These settings can help you protect against unauthorized access and manage
your IP8100 series firmware.
Settings
Admin Settings
Page 33

31
Admin Settings
Local Network
• IP Address: (Default 192.168.15.1.) The Internet Protocol (IP) address of your IP8100
series telephone is private and cannot be seen on the Internet. You can change this
number if needed, but it is usually not necessary to do so.
• Subnet Mask: (Default 255.255.255.0.) The subnet mask (sub-network mask) is
used to define a list of IP addresses allowed to a specified network segment (i.e., the
192.168.15.x subnet).
• Local Domain Name (optional): If desired, you can enter a name here to identify
your network.
Deny WAN Ping: This option allows the IP8100 series telephone’s public WAN IP to ignore
ping commands sent by Internet users. Hackers may ping public WAN IP address to
determine whether an IP address is vulnerable. When defaults to Deny, this option instructs
your network to ignore Ping queries and to help protect against unauthorized access by
others outside your network.
VPN Pass-Through: (Default On) The IP8100 series telephone supports VPN (Virtual
Private Network) pass-through for both PPTP (Point-to-Point Tunneling Protocol) and IPSec
(IP Security). Turning both of these On prevents your IP8100 series telephone from
blocking access to another network you may wish to use.
Universal Plug and Play
• Default is On. This option makes the IP8100 series telephone compliant with the
Universal Plug and Play standard, which allows compatibility with equipment made by
different manufacturers.
Remote Web Management
Default is off. If turned on, this feature allows you to change IP8100 series telephone
settings from a remote location (i.e., via the Internet).
• IP Address: Enter the Internet IP address of a computer that has access to the IP8100
series telephone. You can use 0.0.0.0 to allow all Internet IP addresses access to your
network.
• Port: Enter the port number used for access to the IP8100 series telephone.
Example: http://x.x.x.x:8080 (Where x.x.x.x is the WAN IP address of the IP8100 series
telephone and 8080 is the port used for the web management interface.)
Remote SSH Management
If turned on, this feature allows Vonage to remotely troubleshoot the IP8100 series
telephone via a secure shell (SSH). This feature is protected with an Admin password
granted to Vonage support staff only.
• IP Address: Enter the Internet IP address of the remote computer, which will be allowed
access to remotely configure the IP8100.
Click Apply to save the page settings. Clicking Cancel aborts any changes you have
made on the page.
DHCP Screen
This screen allows you to view or change your local network IP settings.
When any device on your network is turned on, it must be assigned an IP address to
communicate with other devices on the network. DHCP (Dynamic Host Configuration
Protocol) assigns these IP addresses to devices on your network.
Admin Settings
Page 34

32
Admin Settings
Leave DHCP set to On and be sure that you have selected Obtain an IP
address Automatically in the Internet Protocol (TCP/IP) Properties dialog box
on your client computers.
Admin Settings
DHCP Server
• DHCP Server: Enable/disable DHCP.
• Starting IP address: The starting IP address for the DHCP server’s IP
assignment.
• Ending IP address: The ending IP address for the DHCP server’s IP
assignment.
• Lease Time: The length of time for the LAN IP address lease.
Click Apply to save the page settings. Clicking Cancel aborts any changes you
have made on the page.
DHCP Client Table
• This is a l is t of devices assigned the IP a ddress on your IP 810 0 series telephone LAN,
showing the host name, IP address, MAC address and expired time for each.
Page 35

33
Admin Settings
Passwords
Changing the default user password is not required by the IP8100 series
telephone, but it can help prevent unauthorized tampering with the IP8100
series telephone’s settings. Once a password is set, only those who know the
password will be allowed to change or view settings.
Note: Write down the password and store it in a secure place. If you forget, you
will not have access to any settings until you reset the IP8100 series telephone
to factory default setting. For more information on factory default setting, please
refer to Admin / Restore Settings.
Admin Settings
User Management
• Enter a new password to replace the default password VTech. Confirm by
re-entering the new password in the field below.
Click Apply to save the page settings. Clicking Cancel aborts any changes you
have made on the page.
Page 36

34
Admin Settings
Other Options
Admin Settings
Ping Test
• A troubleshooting tool. This option allows you to test the IP connectivity of the
devices on your local network. Enter the IP address of the device to be tested
then click Ping. The ping results are then displayed in the window below the
Ping button.
Page 37
35
Admin Settings
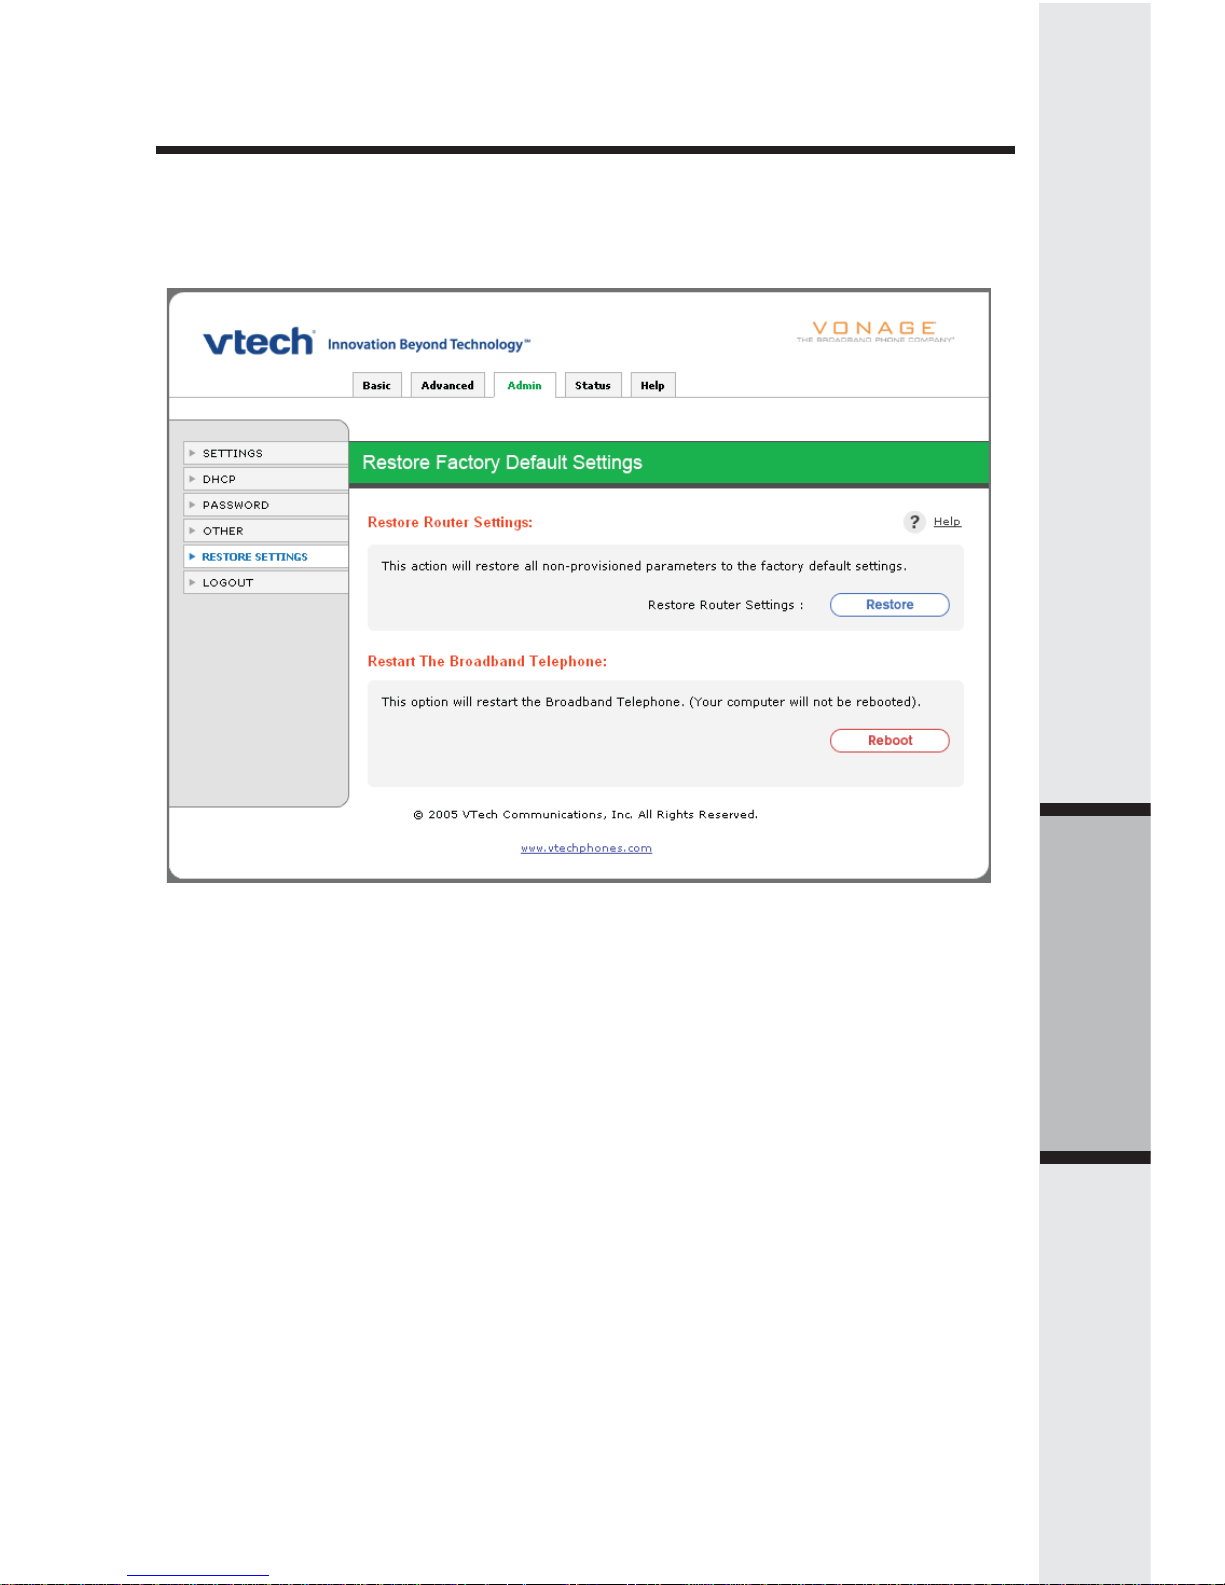
Restore Settings
At this screen you can restore saved settings if the IP8100 series telephone
becomes unstable and needs to be reset.
Admin Settings
Restore Router Settings
• Restore to Factory Default Settings: Click Restore to reset the IP8100
series telephone to its original factory default settings. Use of this option will
delete all changes you have made to all settings.
Restart The Broadband Telephone
• Reboot: This option saves all current settings, then shuts down and restarts
the IP8100 series telephone firmware to reinitialize it. This serves the same
purpose as quickly press and release the reset switch at the bottom of the
base unit.
Beware that when the reset switch is pressed and held for more than 10
seconds and then released, the phone will restore to factory defaults. This
includes clearing and resetting the password on the web configuration back
to the VTech default password.
Note: Reboot or reset switch does not affect your base unit power, RF
operation, or any of the telephone handset settings.
Page 38

36
Status Screens
Status screens display reports of network activity and traffic statistics of your
IP8100 series telephone.
Broadband Telephone Information
This screen displays the current status of the IP8100 series telephone.
Status Screens
Broadband Telephone (LAN) Information
Displays the IP8100 series telephone’s current firmware version. The IP8100
series telephone auto-provisions and upgrades to the latest versions nonintrusively and when available.
Also displays the status of your Local Area Net work connections (MAC Address
of the Ethernet LAN connection, IP Address, Subnet Mask, and DHCP server
setting).
Internet Connection (WAN) Information
Displays the status of your Wide Area Network connections (MAC Address of
the Ethernet WAN connection, IP Address, Subnet Mask, Default Gateway, and
DNS (Domain Name Server).
Page 39

37
Status Screens
• If your ISP connection type is Dynamic, buttons at the bottom of the screen
are labeled as DHCP Renew and DHCP Release. The buttons allow you to
release or renew the IP Address assigned by your Internet Service Provider.
• If your ISP connection type is PPPoE, buttons at the bottom of the screen
are labeled as Connect and Disconnect. The buttons allow you to reset the
connection to your Internet Service Provider.
• If your ISP connection type is Static IP, no button options are at the bottom of
the screen.
Activity Logs
This screen displays a record of the most recent network events. Each time the
IP8100 series telephone is reset or turned off, all entries are deleted.
Status Screens
Page 40

38
Status Screens
Traffic Statistics
This screen displays a summary of the data sent and received by your Local
Area Network and Wide Area Network.
Status Screens
• Refresh: Click to update the screen and see the most recent traffic
statistics.
Page 41

39
Status Screens
DHCP Client
This screen displays a list of IP addresses distributed to your local LAN network
by the IP8100 series telephone.
Status Screens
DHCP Server
Click DHCP Server Settings takes you back to the DHCP screen under Admin.
You may view or change your local network IP settings there.
DHCP Client Table
This is a list of devices assigned the IP address on your IP8100 series telephone,
showing the host name, IP address, MAC address and expired time for each.
Page 42
40
Help
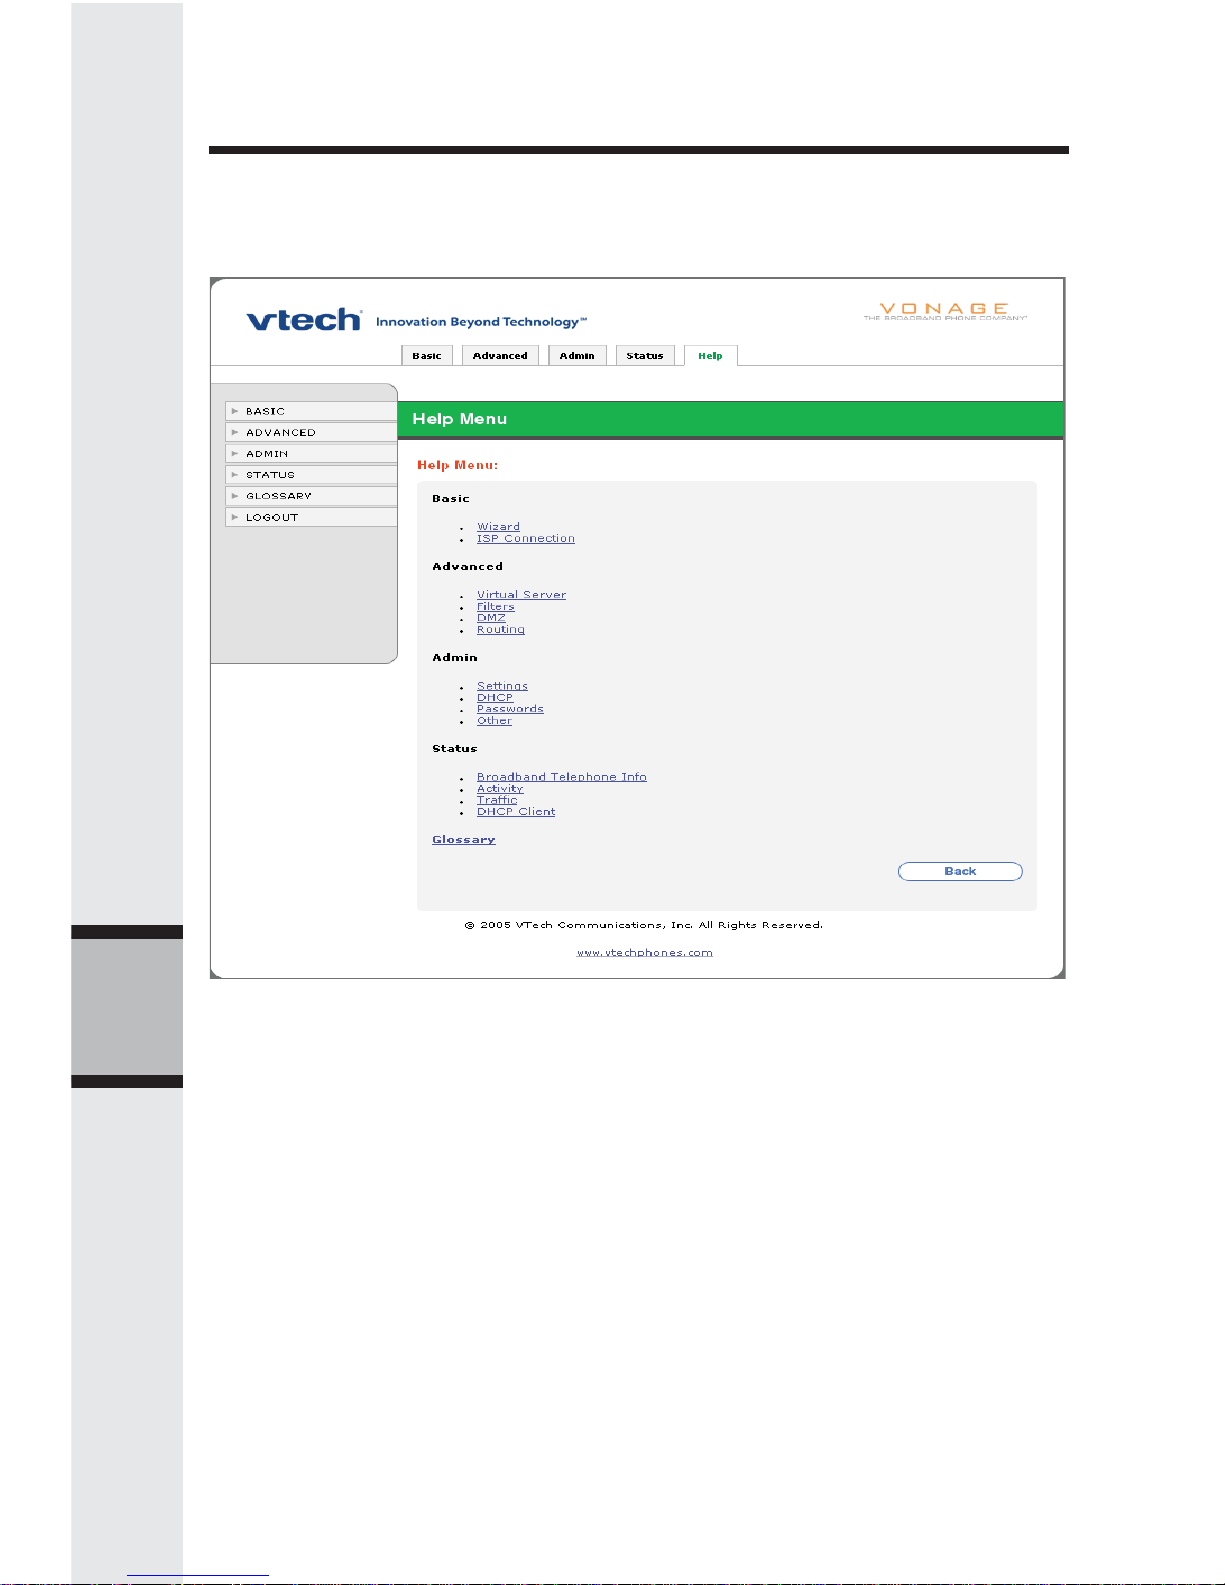
The Help menu provides on-line help to IP8100 series telephone web-based
features. Click on the available underlined topic takes you to its detailed help
page.
Help
Page 43

41
Glossary
Authentication
Authentication refers to the verification of a transmitted message’s integrity.
Broadband
Usually refers to Internet connections that provide faster data transfer rates than
standard dial-up. Cable Internet and DSL are examples of broadband.
DHCP Server
DHCP (Dynamic Host Configuration Protocol) server is a server running the
DHCP protocol to automatically assign IP addresses to client stations on a TCP/
IP network. Using DHCP eliminates the need to manually assign IP addresses
to each device on your IP8100 series telephone.
DHCP Client
The DHCP client is a device that obtained a DHCP lease from a DHCP server.
DMZ
DMZ (Demilitarized Zone) is a part of a network that is located between a secure
LAN and an insecure WAN. DMZs provide a way for some clients to have
unrestricted access to the Internet.
DNS
DNS stands for Domain Name System. DNS converts domain names to the IP
addresses that all machines on the Internet have. It translates from name to
address and from address to name.
Domain Name
The domain name is the readable version of an Internet site address. A
typical domain name has the form www.somedomainname.com or www.
somedomainname. org, etc.
Filter
Filters define how specific data is transmitted or received from the LAN port to
the WAN port. For example, the IP8100 series telephone can filter specific LAN
IP addresses from accessing certain services on the Internet.
Firewall
Firewalls are used to keep networks secure by preventing unauthorized Internet
users from accessing services on your local network. The firewall on the IP8100
series telephone can be configured to allow Internet users to access certain
services on your LAN using Virtual Servers and the DMZ Host.
Glossary
Page 44

42
Glossary
Glossary
Firmware
Firmware refers to the operating code or program that tells the IP8100 series
telephone what to do and how to do it.
Host Name
The name given to a computer or client station that acts as a source for
information on the network.
HTTP
HTTP (Hyper Text Transfer Protocol) is the communications protocol used to
connect to servers on the World Wide Web. HTTP establishes a connection
with a web server and transmits HTML pages to client browser (for example
Windows® IE). HTTP addresses all begin with the prefix http:// (for example,
http://www.somedomainname.com).
IP
IP (Internet Protocol) is the protocol in the TCP/IP communications protocol
suite that contains a network address and allows messages to be routed to a
different network or subnet. However, IP does not ensure delivery of a complete
message; TCP provides the function of ensuring delivery.
IP Address
The IP (Internet Protocol) address refers to the address of a computer attached
to a TCP/IP network. Every client and server station must have a unique IP
address. Clients are assigned either a permanent address or have one
dynamically assigned to them via DHCP. IP addresses are written as four sets
of numbers separated by periods (for example, 192.168.15.1).
ISP
An ISP (Internet Service Provider) is an organization providing Internet access
service via modems, ISDN (Integrated Services Digital Network), private lines
or other means.
LAN
LANs (Local Area Networks) are networks that serve users within specific
geographical areas, such as your home or in a company building. LANs consist of
a group of computers and related devices that share a common communication
link. A LAN allows you to share data and resources among the devices on the
LAN.
MAC Address
A MAC address is a unique serial number for hardware adapters, giving the
adapter a unique identification.
Page 45

43
Glossary
Glossary
MTU
MTU (Maximum Transmission/Transfer Unit) is the largest packet size that can
be sent over a network. Messages larger than the MTU are divided into smaller
packets.
NAT
NAT (Network Address Translation — also known as IP masquerading) enables
a LAN to present itself to the Internet with one address. NAT converts the
address of each LAN node into one IP address for the Internet (and vice versa).
NAT also provides a certain amount of security by acting as a firewall by keeping
individual IP addresses hidden from the WAN.
Ping
Ping (Packet Internet Groper) is a utility used to find out if a particular IP address
is presently online.
Port
Ports are the physical and/or logical communications pathways in and out of
computers and network devices (routers and switches). Most PCs have serial
and parallel ports, which are external sockets for connecting devices such as
printers, modems, and mice. All network adapters also use ports to connect
to the LAN. Finally, applications that communicate over the Internet also have
ports; these are the endpoints of the application and are given a specific port
number.
PPPoE
PPPoE (Point-to-Point Protocol Over Ethernet) is a protocol used to communicate
between two computers using a serial interface, such as dialup Internet
connections, over an Ethernet link.
Protocol
A protocol is a rule that governs the communication of data.
Server
Servers are typically powerful and fast computers that store programs and data.
The programs and data are shared by client computers (workstations) on the
network.
Subnet Mask
Subnet Masks (subnetwork masks) are used by IP protocol to direct messages
into a specified network segment (i.e., subnet). A subnet mask is stored in the
client machine, server or router and is compared with an incoming IP address to
determine whether to accept or reject the packet.
Page 46

44
Glossary
Glossary
TCP
(Transmission Control Protocol) is the transport protocol in TCP/IP that ensures
messages over the network are transmitted accurately and completely.
TCP/IP
TCP/IP (Transmission Control Protocol/Internet Protocol) is the main Internet
communications protocol suite. TCP ensures that data is completely sent and
received at the other end. The IP component of TCP/IP provides data routability,
meaning that data packets contain the destination station and network addresses,
enabling TPC/IP messages to be sent to multiple networks within the LAN or in
the WAN.
UDP
(User Datagram Protocol) is a protocol within TCP/IP that is used to transport
information when accurate delivery isn’t necessary (for example, realtime video
and audio where packets can be dumped since there is no time for retransmitting
the data).
Virtual Servers
Virtual Servers allow Internet users access to services, such as Web or FTP,
running on your local network via the WAN IP address of the IP8100 series
telephone. This is also referred to as opening ports or port forwarding. The
Virtual Server forwards requests for the specified service to the specified IP
address on your LAN.
VoIP
VoIP (Voice Over Internet Protocol) is a method used to deliver voice information
over the Internet. VoIP services allow telephone calls using your PC or LAN.
WAN
WAN (Wide Area Network) is a communications network that covers a wide
geographic area such as a country (contrasted with a LAN, which covers a small
area such as a company building).
Page 47

45
Troubleshooting
How do I access the web-based configuration for the IP8100 series
telephone?
It is important that you have the latest patches and bug fixes for your web browser
when attempting to connect to the configuration for your telephone adapter. We
recommend using the following:
Internet Explorer
TM
5.5 or higher
Netscape 6 or higher
Firefox 0.8 or higher
Use the following steps to gain access to the web-based configuration of your
IP8100 series telephone:
Step 1: Verify physical connectivity by checking for solid link lights on the phone
adapter. The computer that was able to access the Internet when connected to
the broadband modem or router should be connected to the PC port on the IP
8100 series telephone. If you do not get a solid link, try using a different cable. If
the computer is turned off, the link light may not be on.
Step 2: Disable any Internet security software running on the computer. Software
firewalls such as Zone Alarm, Black Ice, Sygate, Norton Personal Firewall, and
Windows XP firewall may block access to the configuration pages. If you have
DSL and use a PPPoE client such as WinPoet or EnterNet300, you should
disable this software as well. Check the help files included with these software
applications for more information on disabling or configuring them.
Step 3: Check the IP address of your computer. Your computer must have an
IP address in the same range as the router in order to communicate with it,
192.168.15.X (X = 2-254). Included in the troubleshooting section of this manual
is more detailed information on checking your IP address.
Step 4: Configure the Internet settings for your browser:
Go to Start > Settings > Control Panel. Double-click the Internet Options Icon.
From the Security tab, click the button to restore the settings to their defaults. If
this button is grayed out, then the settings are already at default.
Click the Connection tab. Set the dial-up option to Never Dial a Connection and
then click the LAN Settings button.
Verify that none of these settings are checked and then click OK.
Go to the Advanced tab and click the button to restore these settings to their
defaults.
Click OK out to the desktop and close any open windows.
Troubleshooting
Page 48

46
Troubleshooting
Troubleshooting
Step 5: Access the web-based configuration of the IP8100 series telephone.
Open your web browser and enter http://192.168.15.1 (do NOT type www), in
the address bar. Use the instructions that were provided with the IP8100 series
telephone to complete the configuration as needed. Specifically, you will need to
configure the WAN settings to connect the device to the Internet.
How do I configure TCP/IP settings for my computer to connect to the
IP8100 series telephone?
Note: The following information assumes the computer is connected to the PC
Port on the IP8100 series telephone.
Win98/ME:
Step 1: From the Desktop, right-click the Network Neighborhood icon (My
Network Places in WinME), and then select Properties.
Step 2: Highlight TCP/IP and then click the Properties button. If you have more
than one adapter installed, then there will be a TCP/IP entry for each adapter.
Highlight TCP/IP > [your network adapter] and then click Properties.
Step 3: Make sure the IP Address tab is selected. Configure the adapter to Obtain
an IP address. Then, Click OK out to the desktop to apply the changes. Reboot
the computer when prompted. When the computer reboots it should request,
and obtain, a valid IP address from the IP8100 series telephone. Included in the
troubleshooting section of this manual is more detailed information on checking
your IP address.
Win2k/XP:
Step 1 - Win2k: From the Desktop, right-click the My Network places and then
select Properties.
Step 1 - WinXP: Click on Start > Control Panel > Network and Internet
Connections > Network connections.
Step 2: Right-click on the Local Area Connection which represents your
network card and then select Properties.
Step 3: Highlight Internet Protocol (TCP/IP) and click Properties.
Step 4: Configure the adapter to Obtain an IP address. Then, Click OK out to
the desktop to apply the changes and reboot the computer when prompted. If
you are not prompted to reboot the computer, you may need to renew the IP
address of the computer manually. Included in the troubleshooting section of
this manual is more detailed information on checking your IP address.
Page 49

47
Troubleshooting
Troubleshooting
How do I check my computer’s IP address?
Note: The following information assumes the computer is connected to the PC
port on the IP8100 series telephone. It also assumes the computer’s TCP/IP
settings are configured to obtain an IP address automatically. Included in the
troubleshooting section of this manual is more detailed information on configuring
your TCP/IP settings.
Win98/ME:
Step 1: Go to Start > Run and enter winipcfg. Click OK.
Step 2: From the dropdown menu, choose the Ethernet adapter.
Step 3: After selecting the adapter, it will display the IP settings. Your adapter
should have an IP address in the same range as the IP8100 series telephone,
192.168.15.X. If it doesn’t try releasing, then renewing the IP.
a. Click the Release button to release the IP address.
b. Click the Renew button to obtain a new address.
If you are unable to obtain a valid IP address, confirm that you have a good
physical connection between the computer and the IP8100 series telephone.
Step 4: Click OK to close the IP configuration window.
Win2k/XP:
Step 1: Go to Start > Run and enter cmd. Click OK.
Step 2: From the Command prompt, enter ipconfig and then click Enter.
Step 3: It will return your IP address, Subnet Mask, and Default Gateway. Your
adapter should have an IP address in the same range as the IP8100 series
telephone,192.168.15.X. If it doesn’t try releasing, then renewing the IP.
a. Enter ipconfig/release to release the IP address.
b. Enter ipconfig/renew to obtain a new address.
If you are unable to obtain a valid IP address, confirm that you have a good
physical connection between the computer and the IP8100 series telephone.
Step 4: Type, exit and then click Enter to close the Command prompt.
I followed the Quick Start Guide for DSL, but I wasn’t able to successfully
configure the IP8100 series telephone. What else can I do?
If your DSL provider uses PPPoE, confirm that you have entered the correct
username and password in the IP8100 series telephone PPPoE settings. You
may need to append your ISP’s domain suffix to your username in order to
Page 50

48
Troubleshooting
Troubleshooting
connect. For example:
username@bellsouth.net
username@verizon.net
username@earthlink.net
Contact your ISP if you are unsure of your username or password.
Some DSL providers will issue a Dynamic IP address without using PPPoE for
authentication. If this is the case for your provider, use the setup wizard in the
IP8100 series telephone web-based configuration to configure the WAN type
to use a Dynamic IP Address. Once you have applied that setting, power down
your broadband modem and the IP8100 series telephone. Power the modem on
first and let it stabilize. When the modem is ready, then power the IP8100 series
telephone on. Wait a few seconds for the device to stabilize, and then test your
connection.
I followed the Quick Start Guide for a Static IP, but I wasn’t able to
successfully configure the IP8100 series telephone. What else can I do?
From the computer that was previously connected to the broadband modem,
access the web-based configuration for the IP8100 series telephone and clone
the MAC address. After the setting has been applied, power off the IP8100
series telephone. Wait about 30 seconds before reapplying the power. Wait a
few seconds for the device to stabilize, and then test your connection. If you still
cannot connect, confirm that you have entered all the IP information correctly.
Contact your ISP to confirm your IP address.
I followed Steps 1-6 in the Quick Start Guide, but I wasn’t able to successfully
configure the IP8100 series telephone. What else can I do?
If you didn’t need to complete step 7, then it is assumed that your ISP is issuing
you a Dynamic IP address. From the computer that was previously connected
to the broadband modem, access the web-based configuration for the IP8100
series telephone and clone the MAC address. After the setting has been applied,
poweroff the IP8100 series telephone. Wait about 30 seconds before reapplying
the power. Wait a few seconds for the device to stabilize, and then test your
connection.
Page 51

49
Technical Specifi cations
Base Physical Connectors
• 10/100Mbps RJ45 Ethernet WAN port
• 10/100Mbps RJ45 auto-MDI/MDIX Ethernet LAN port
• Power adapter jack
Cordless
• RF Frequency Band: DSSFH 5.8GHz
• Channels: 95, channel spacing: 864 KHz
• Sensitivity: -95 dBm
• 2.5mm headset jack
VoIP
• SIPv1 and SIPv2
• Symmetric RTP
• CODEC: G.711 a-law/u-law, G.723, G.726, G.729a/b
• Codec negotiation
• Silence Suppression / Voice Activity Detection (VAD)
• Comfort Noise Generator (CNG)
• Echo Cancellation G.168
• Adaptive Echo Cancellation
• DTMF generation and detection
Network
• Ethernet Standards: IEEE 802.3, 802.3u, 802.3x flow control
• TCP/IP
• NAT
• DHCP
• DNS
• PPPoE
• StaticIP
Management
• Auto-configuration
• Web-based browser
• Remote management
Weight
• Base: 1.5 lbs
• Handset: 0.5 lbs
Technical Specifications
Page 52

50
Technical Specifi cations
Technical Specifi cations
Dimension
• Base: 2” (W) x 6.25” (D) x 5” (H)
Handset: 2” (W) x 1.5” (D) x 6” (H)
Power
• Base unit voltage AC adapter voltage: 60Hz, 100 – 240 V
• Base unit voltage AC adapter output: 5.1 VDC 1700mA
• Handset voltage: 3.6 VDC
Operating Temperature
• 00 to 500C
Certification
• FCC Part 15
• Vonage Networks
Page 53

51
A
Activity Logs 37
ADMIN SETTINGS 30
ADVANCED SETTINGS 26
B
BASIC SETTINGS 20
Before you begin 1
Broadband Telephone Information 36
D
DHCP Client 39
DHCP Screen 31
DMZ 29
Dynamic IP Address Screen 14
F
Filters 28
G
GETTING STARTED 1
GLOSSARY 41
GPL License Information 2
H
HELP 40
I
Installation Directions 4
Internet Connection Type 13
ISP Connection Settings Screen 20
M
MENU STRUCTURE 19
O
Other Options 34
P
Package Contents 3
Passwords 33
PPPoE Screen 15
R
Restore Settings 35
S
Set Static IP Address Screen 16
Settings 30
Setup Completed Screen 17
Setup Wizard Screen 20
STATUS SCREENS 36
T
TECHNICAL SPECIFICATIONS 49
THE SETUP WIZARD 11
Traffic Statistics 38
TROUBLESHOOTING 45
V
Virtual Server 26
Index
 Loading...