

Page 1

CareLine
™
Quick start guide
SN1157/SN1196/SN1197/SN6146/SN6146-2/SN6147/SN6147-2/
SN6196/SN6196-2/SN6197/SN6197-2
Page 2

Register online to get an additional 3-month warranty!
Go to www.vtechphones.com to register your product for enhanced
warranty support and latest VTech product news.
This quick start guide provides you with basic installation and
setup instructions.
For complete installation and operation instructions, refer to the
Abridged user’s manual in the package, or the online Complete
user’s manual at www.vtechphones.com.
Page 3
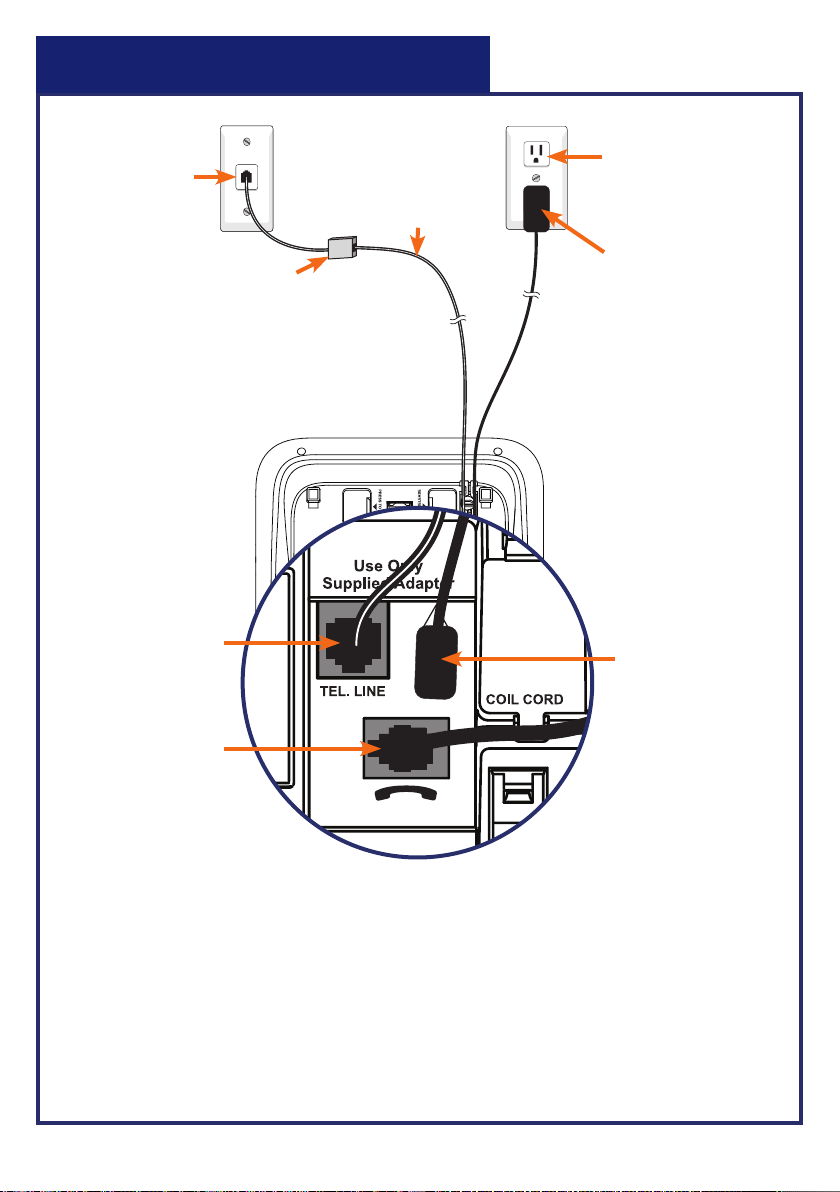
Telephone base installation
Telephone
wall jack
If you have DSL high-speed
Internet service, a DSL filter
(not included) is required.
Plug it into the telephone
wall jack.
Telephone
line jack
Telephone
line cord
Electrical outlet
not controlled by
a wall switch
Telephone base
power adapter
Power cord jack
Curly handset
cord jack
CAUTION:
If you subscribe to telephone service from a cable company or a VoIP
service provider, plug the telephone line cord into the modem/router/
terminal adapter provided by your cable/VoIP service provider. Contact
your cable/VoIP service provider if you have any difficulties in installation.
1
Page 4
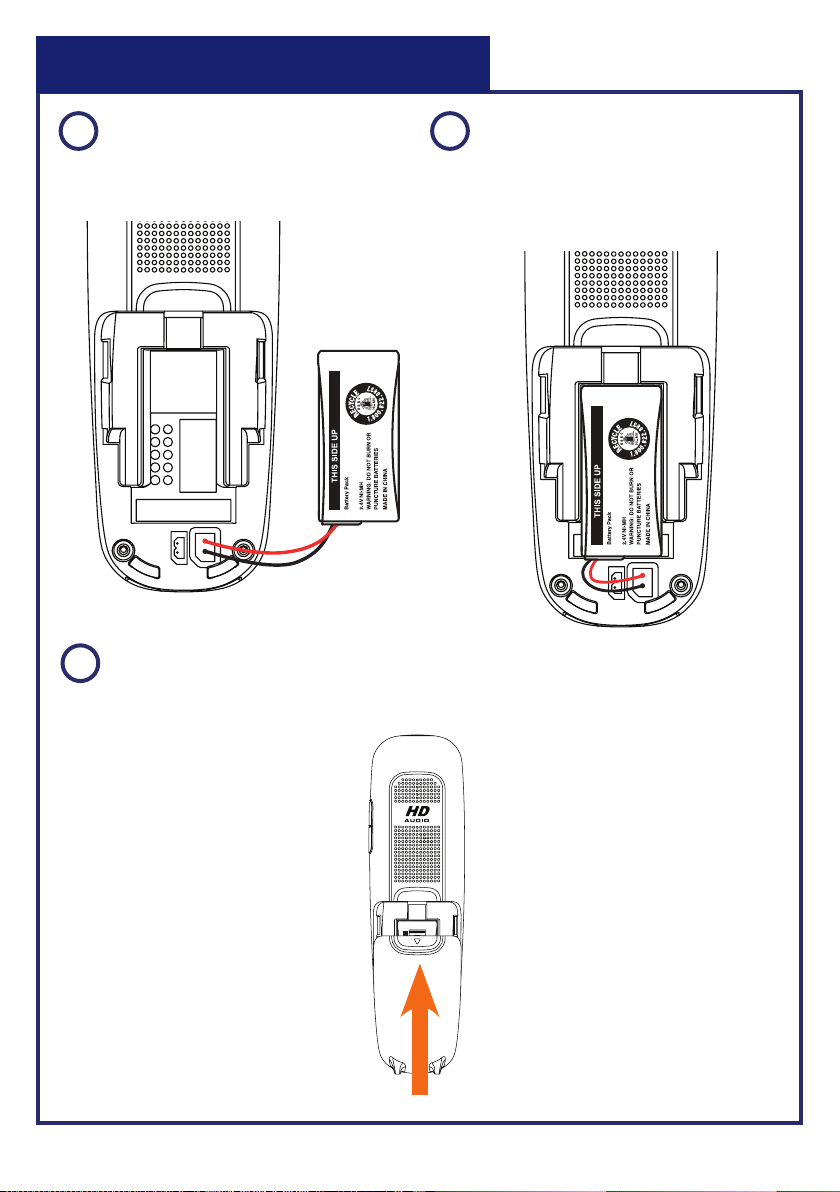
Handset battery installation
1
Plug the battery
connector securely into
the socket.
3
Slide the battery compartment cover towards the center of the
handset until it clicks into place.
2
Place the battery with the
label THIS SIDE UP facing
up and the wires inside the
battery compartment.
2
Page 5
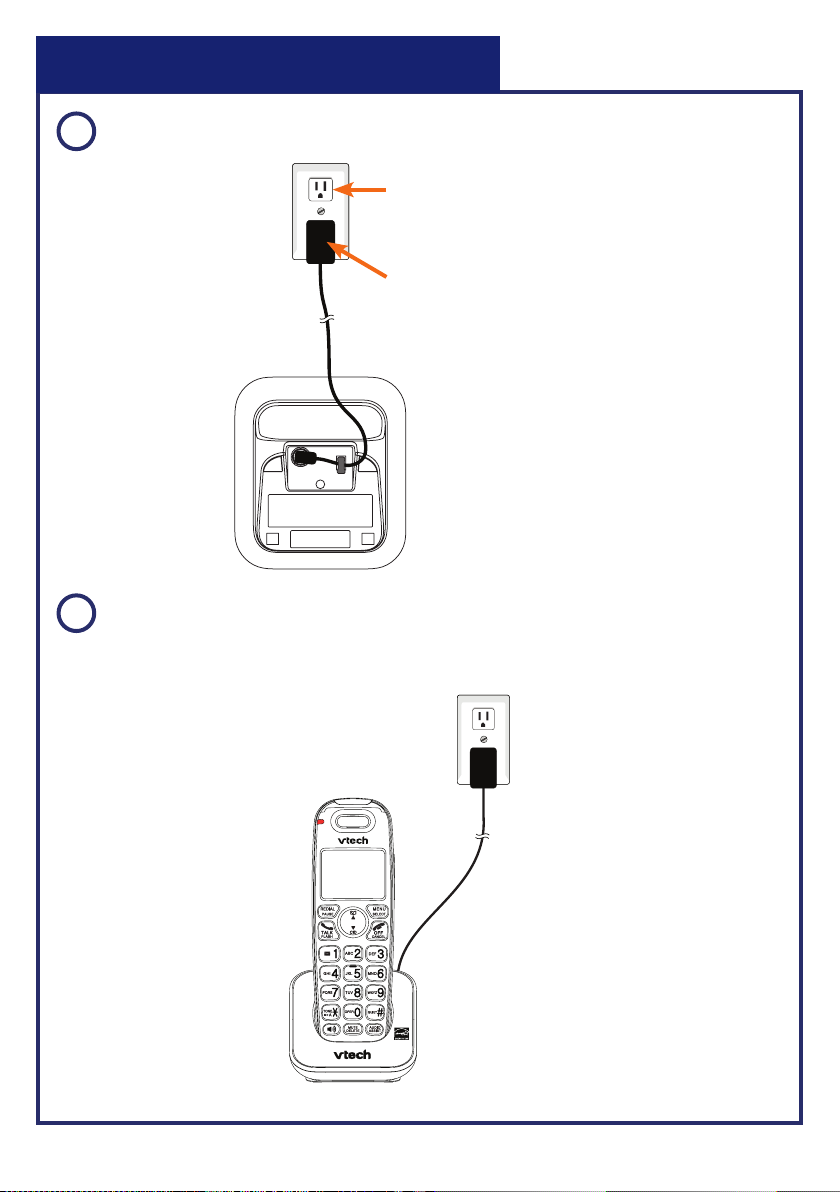
Handset charger installation
1
Install the handset charger.
Electrical outlet
not controlled by
a wall switch
Power adapter
2
Place the handset in the handset charger to charge. Charge
the handset for at least 30 minutes before use.
3
Page 6

Pendant charger installation
1
Install the pendant charger.
Electrical outlet
not controlled
by a wall switch
Power adapter
3
Place the pendant in the pendant charger to charge. Charge the
pendant for at least 30 minutes before use.
2
Switch ON the pendant.
4
Page 7

Pendant lanyard
Pinch the end of the loop string into the slot on the top of
1.
the pendant.
Insert the long end of the lanyard into the loop string.
2.
Fasten the loop string.
3.
Pendant belt clip
Push the pendant into the belt clip until it clicks in place.
When you use the pendant belt clip, remove the pendant lanyard if it
is attached to the pendant.
5
Page 8

Menu navigation
Press MENU when the phone is idle.
1.
Press or until the screen displays the
2.
desired feature menu.
Press SELECT to enter that menu.
3.
To return to the previous menu,
•
press CANCEL or BACK.
To return to idle mode,
•
press and hold CANCEL.
Set date and time
9:48am 5/20
Caller ID log
Reminder
Ringers
BACK
Press the softkey to select
the corresponding item
displayed above the key.
SELECT
The telephone base will prompt you to
set date and time when it is initially
powered up. Follow Step 3 to Step 5
below to set them.
Press MENU.
1.
Scroll to Set date/time, then
2.
press SELECT.
Enter the month, date and year, then
3.
press NEXT.
Enter the hour and minute.
4.
Scroll to select AM or PM, then
5.
press SAVE.
6
--:-- --/--
Reminder
Ringers
Set date/time
BACK
--:-- --/--
SET DATE
05/20/12
BACK
--:-- --/--
SET TIME
09:48 AM
BACK
SELECT
NEXT
SAVE
Page 9

Photo speed dial
There are four photo speed dial keys on the telephone base. The
photo speed dial keys 1 and 2 on the pendant correspond to the
photo speed dial keys 1 and 2 on the telephone base, respectively.
We recommend you store two contacts that you may need to call
them more often or immediately to photo speed dial keys 1 and 2.
Pendant
Telephone base
To set photo speed dial (only applicable to models
with a pendant):
If your product package includes a pendant, the telephone prompts
you to set photo speed dial 1 and photo speed dial 2 once it is
initially powered up.
When the telephone base displays Set
1.
Photo Speed Dial 1 and Pendant
memory 1, press YES.
Enter the number, then press NEXT.
2.
Enter the name, then press SAVE.
3.
Press NEXT.
4.
When the telephone base displays
5.
Set Photo Speed Dial 2 and Pendant
memory 2, press YES.
Enter the number, then press NEXT.
6.
Enter the name, then press SAVE.
7.
Press OK.
8.
9:48am 5/20
Set Photo
Speed Dial 1 and
Pendant memory 1
NO
9:48am 5/20
Saved Photo
Speed Dial 1 and
Pendant memory 1
YES
NEXT
7
Page 10

Photo speed dial
To set and dial a photo speed dial:
Press on a desired photo speed dial key.
1.
Enter the number, then press NEXT.
2.
Enter the name, then press SAVE.
3.
Press on the photo speed dial key to dial.
4.
To add a photo:
You can add a desired photo into the photo speed dial compartment,
or write the contact name on the photo speed dial card.
Flip open the photo speed dial compartment cover and take out
1.
the photo speed dial card.
Use the photo speed dial card as a tool to crop your desired photo.
2.
19.5 mm
22.65 mm
Put the cropped photo into the photo speed dial compartment.
3.
Then flip down the photo speed dial compartment cover.
8
Page 11

Voice command
By saying certain commands to the pendant, you can hear
information such as the date or time, or call speed dial numbers, or
even review call log, messages or reminders.
Press the VOICE key on either side of the pendant. After you hear a
beep, say your command to the pendant.
What can I say?
VOICE
Press
VOICE
Common commands:
What can I say?
To hear a list of voice commands.
What time is it?
To hear the current time.
What date is it?
To hear the current date.
Call speed dial X.
To call a photo speed dial number.
Intercom all.
To send out intercom request to all devices.
Cancel.
To return to idle mode.
9
Page 12

Voice command
Messages:
Press VOICE and say .
During the playback, press VOICE and say one of the following
commands:
What can I say?
To hear a list of voice commands.
Skip message.
To skip to the next message.
Repeat message.
To repeat the message.
Slow playback.
To slow down the message.
To resume to normal speed, press
VOICE and say .
Stop.
To stop the playback.
Review messages.Review messages.
Play normal.
Delete.
To delete the playing message.
Cancel.
To continue the playback.
10
Page 13

Voice command
Call log:
Press VOICE and say .
During the playback, press VOICE and say one of the following
commands:
What can I say?
To hear a list of voice commands
Skip call log.
To skip to the next call log entry.
Repeat call log.
To repeat the call log.
Stop.
To stop the playback.
Cancel.
To continue the playback.
Call back.
The system will ask, “Would you like to
call XXX?”
Review call log.
Say to call the number.
•
Say to return to the playback.
•
Yes.
No.
11
Page 14

Voice command
Reminders:
Press VOICE and say .
During the playback, press VOICE and say one of the following
commands:
What can I say?
To hear a list of voice commands.
Skip reminder.
To skip to the next reminder.
Repeat reminder.
To repeat the reminder.
Stop.
To stop the playback.
Cancel.
To continue the playback.
Review reminders.
12
Page 15

Make, answer or end a call
•
Lift up to the corded
handset to make or
answer a call.
•
Return the corded
handset to the telephone
base to end a call.
•
Press any dialing key to
answer a call with the
speakerphone.
•
Press to make,
answer or end a call.
Press to make or
•
answer a call.
13
During a call, press
•
to answer an incoming
call when you receive a
call waiting alert.
Press to end a call.
•
Press any dialing key to
•
answer a call.
Page 16

Make, answer or end a call
Press to answer or end a call.•
Press to call photo
•
speed dial 1.
Press to call photo
•
speed dial 2.
14
Page 17

Answering system
Turn the answering system on or off
Press ANS at the side of the telephone base to turn the
•
answering system on or off.
Record an announcement at the telephone base
Press MENU.
1.
Press SELECT three times. The system
2.
announces, “Record after the tone.
Press SAVE when you are done.”
After the tone, speak towards the
3.
microphone.
Press SAVE when done.
4.
15
Recording
announcement
BACK
SAVE
Page 18

Answering system
Message playback
Press once to repeat the
•
playing message.
Press twice to play the
•
previous message.
Press X to delete the playing
•
message.
Press to skip to the next
•
message.
Press to play messages.
•
Press to stop message
•
playback.
Press or to adjust
•
the listening volume.
Press to slow down the
•
message playback.
16
Page 19

Reminders
The reminder feature helps remind you of
important events. You can set the reminder
to remind you only once, or in daily, weekly
or monthly bases. Once you set the
reminder, the system will play your
recorded reminder to alert you at your
designated times of an important event.
Press MENU.
1.
Scroll to Reminder, then press
2.
SELECT.
Scroll to Set reminder, then press
3.
SELECT.
Enter month, date and year, then press
4.
NEXT.
Enter hour and minute.
5.
Scroll to select AM or PM, then press
6.
NEXT.
The system announces, “Record after
7.
the tone. Press SAVE when you are
done.” After the tone, speak towards the
microphone, and then press SAVE.
9:48am 5/20
REMINDER
Review reminder
Set reminder
BACK
REMINDER
SET TIME
09:30 AM
BACK
Record Reminder
BACK
FREQUENCY
Once
Daily
BACK
SELECT
NEXT
SAVE
SAVE
Scroll to the frequency you would like to set, and then press SAVE.
8.
IMPORTANT!
Refer to the online Complete user’s manual for a full set of installation
and operation instructions. For manual download or customer service,
visit our website at www.vtechphones.com or call 1 (800) 595-9511.
In Canada, go to www.vtechcanada.com or call 1 (800) 267-7377.
17
Page 20

VTECH TELECOMMUNICATIONS LTD.
A member of THE VTECH GROUP OF COMPANIES.
Distributed in the U.S.A. by VTech Communications, Inc., Beaverton, Oregon 97008.
Distributed in Canada by VTech Technologies Canada Ltd., Richmond, B.C. V6W 1L5.
VTech is the registered trademark of VTech Holdings Limited.
Copyright © 2012 for VTECH TELECOMMUNICATIONS LTD.
All rights reserved. Printed in China.
96-008924-020-100
 Loading...