

Page 1
TM
Page 2

Dear Parent:
Ever notice the look on your baby’s face when they learn something
new through their own discovery? These self-accomplished moments
are a parent’s greatest reward. To help fulfill them,
the
Infant Learning
series of toys.
VTech
®
created
These unique interactive learning toys directly respond to what
children do naturally – play! Using innovative technology, these
toys react to baby’s interactions, making each play experience fun
and unique as they learn age-appropriate concepts like first words,
numbers, shapes, colors and music. More importantly,
Infant Learning
toys develop baby’s mental and physical abilities
VTech
®
by inspiring, engaging and teaching.
At
®
VTech
, we know that a child has the ability to do great things.
That’s why all of our electronic learning products are uniquely
designed to develop a child’s mind and allow them to learn to the best
of their ability. We thank you for trusting
®
VTech
with the important
job of helping your child learn and grow!
Sincerely,
Your Friends at
To learn more about
®
VTech
Infant Learning
and other
VTech
®
toys, visit
www.vtechkids.com
’s
Page 3
INTRODUCTION
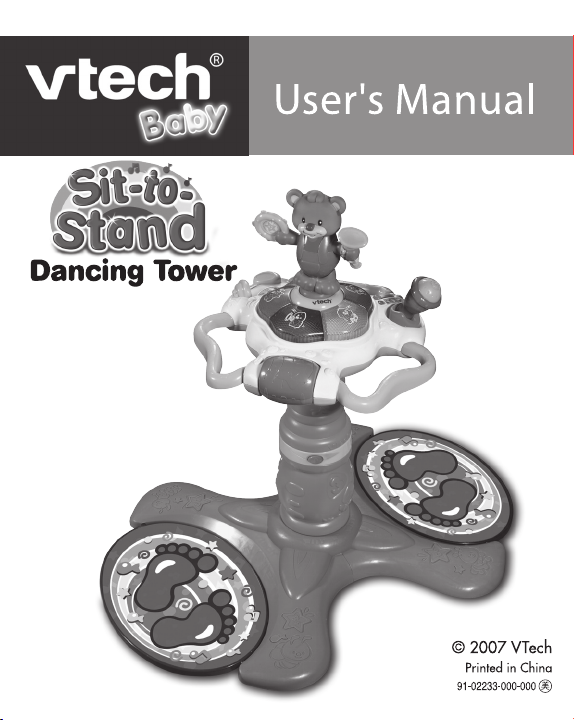
Thank you for purchasing the VTech® Sit-to-Stand Dancing Tower™
learning toy.
The Sit-to-Stand Dancing Tower™ is part of the Sit-to-Stand™ series
of toys developed to grow with baby. The fun-packed activity panel
includes 5 light-up piano keys that teach animals, colors, instruments
and styles of music. The rotating microphone encourages baby to sing
along. The dancing bear captures baby’s attention by moving to the
music. The panel can be used alone for oor play, or add the trunk pieces
at two different levels as baby grows. The toy is also motion-activated
to encourage dancing and play.
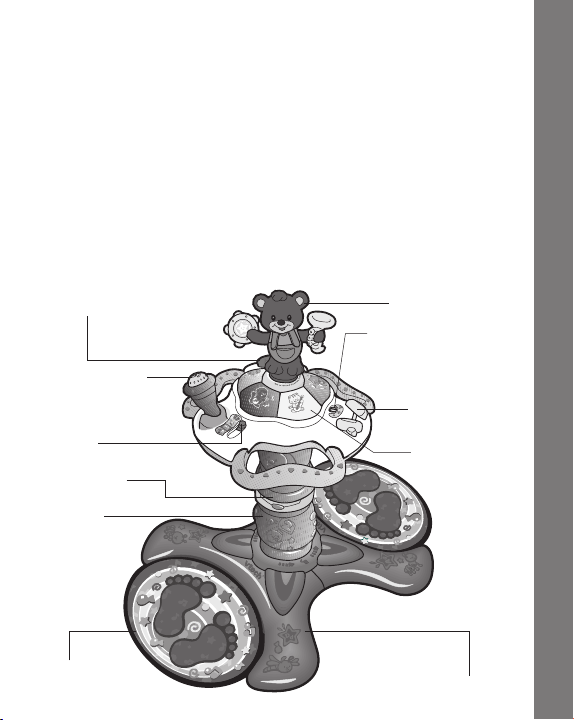
DANCING BEARTURNING ROLLER
ON/OFF/VOLUME
CONTROL SWITCH
MICROPHONE
SLIDING
MODE SELECTOR
SWITCH
TOP TRUNK
BOTTOM
TRUNK
CYMBALS
LIGHT-UP
PIANO KEYS
Introduction
2 DANCING
PLATFORMS
2 BASE PIECES
2
Page 4

INCLUDED IN THIS PACKAGE
- One dancing bear - One electronic activity panel
- Two connecting trunk pieces - Two halves of one base
- Three screws
- One user’s manual
( 0.138 x 0.63 Inch )
- Two dancing platforms
Included in This Package
33
Page 5

WARNING: All packing materials, such as tape, plastic sheets, wire
ties, tags and try-me cable are not part of this toy, and
should be discarded for your child’s safety.
GETTING STARTED
BATTERY INSTALLATION
1. Make sure the unit is turned OFF.
2. Loca te the bat tery cove r on the
bottom of the activity panel. Use a
coin or a screwdriver to loosen the
screw.
3. Ins t a l l 4 new ‘AA’ ( U M -3/LR6)
batteries following the diagram inside
the battery box. (The use of new
alkaline batteries is recommended
for maximum performance.)
4. Replace the battery cover and tighten
the screw to secure.
BATTERY NOTICE
• Install batteries correctly observing the polarity (+, -) signs to avoid
leakage.
• Do not mix old and new batteries.
• Do not mix batteries of different types: alkaline, standard (carbon-
zinc) or rechargeable (nickel-cadmium).
• Remove the batteries from the equipment when the unit will not be
used for an extended period of time.
• Always remove exhausted batteries from the equipment.
• Do not dispose of batteries in re.
Getting Started
4
Page 6

• Do not attempt to recharge ordinary batteries.
• The supply terminals are not to be short-circuited.
• Only batteries of the same and equivalent type as recommended
are to be used.
WE DO NOT RECOMMEND THE USE OF RECHARG EABLE
BATTERIES.
With the VTech® Sit-to-Stand Dancing Tower™, safety comes rst.
To ensure your child’s safety, please only assemble this product by
an adult. Please ensure that the base, top and bottom trunk pieces,
dancing platforms, dancing bear and activity panel are securely
locked into position to avoid injury. For best results in Standing
Play position, place the toy on carpet, a rug or a mat.
The activity panel can be used alone for oor play (9+ months), with
the base and top trunk piece for sitting play (12+ months) or with the
base and both the top and bottom trunk pieces for standing play (18+
months).
Floor Play Sitting Play Standing Play
(9+ months) (12+ months) (18+ months)
Getting Started
5
Page 7

Please remove and discard the try-me
cable between the dancing bear and the
activity panel before assembly.
ASSEMBLY INSTRUCTIONS
1. Place the two base pieces on the
oor. Align them with the left half
above the right half, then push down
to lock them together until you hear
a click.
Use a screwdriver to fasten the three
screws into the holes on the back of
the base to securely fasten the base
pieces together.
2. Insert the two dancing platforms into
the base by rst inserting the small
rods on one side of the platforms
into the corresponding holes on the
base. Then, line up the tags on the
top edges of the dancing platforms to
the corresponding slots in the base.
Slide the tags into the slots while at
Assembly Instructions
6
Page 8

the same time inserting the opposite
rods into the base.
3. Attach the trunk to the base by lining
it up over the hole in the center of
the base. Turn the trunk clockwise
until you hear a click. The trunk can
be separated into two parts. Remove
the top trunk piece from the bottom
trunk piece by pushing the button
on the bottom piece, then turning
the top piece counterclockwise one
revolution.
For sitting play, the top trunk piece
can be tted to the base in the same
way described above.
4. At tach the danci ng be ar to the
activity panel by placing the dancing
bear into the center of the activity
panel. Press gently while turning
the dancing bear until you hear it
click into place. Please ensure the
dancing bear is attached securely to
the activity panel. Once the dancing
bear has been attached, it cannot be
removed again.
Assembly Instructions
7
Page 9

Attaching/Removing the Activity Panel
1. To attach the activity panel, pull the
release locks located on the bottom
of the activity panel away from the
center. Insert the bottom of the panel
into the trunk, then release the locks.
Please ensure the activity panel is
attached securely to the trunk. While
attached to the trunk, the activity
panel can be turned slightly during
play.
2. To remove the activity panel, pull the
release locks located on the bottom
of the activity panel away from the
center. Pull the activity panel away
from the trunk.
Changing Sit/Stand Position
1.
Remove the activity panel from the
trunk as directed above.
Assembly Instructions
8
Page 10

2.
Remove the top trunk piece from
the bottom trunk piece by pushing
the button on the bottom piece, then
turning the top piece counterclockwise
one revolution.
3.
Remove the bottom trunk piece from
the base by pulling back the release
tab on the base.
Assembly Instructions
9
Page 11

4.
Attach the top trunk piece to the
base by lining it up over the hole in
the center of the base. Turn the trunk
clockwise until you hear a click.
5.
Attach the activity panel to the top
trunk pie ce using the dire ct ions
above.
PRODUCT FEATURES
1. ON/OFF/VOLUME CONTROL SWITCH
To turn the unit ON, slide the On/Off/
Volume Control Switch to the low
( ) or high ( ) volume position.
To turn the unit OFF, slide the On/
Off/Volume Control Switch to the
OFF ( ) position.
2. AUTOMATIC SHUT-OFF
To preserve battery life, the VTech® Sit-to-Stand Dancing Tower™
will automatically power-down after approximately 30 seconds
without input. The unit can be turned on again by pressing any
key. Rolling the roller or turning the microphone will not turn the
unit on again.
Product Features
10
Page 12

3. MODES OF PLAY
Dance
Singing
Learning
Follow-Me
Select from one of the four modes
of play including DANCE, SINGING,
LEARNING and FOLLOW-ME on
the activity panel. Slide the MODE
SELECTOR SWITCH to choose a
mode.
4. DANCING BEAR
Th e DA N C ING BEAR rew a rds
babies with a variety of animations
as it moves with music and sung
songs.
5. MICROPHONE
The MICROPHONE can be used in
any mode, and allows babies to sing
along to well-known children’s songs
in SINGING MODE.
11
Product Features
Page 13

ACTIVITIES
1. Slide the on/off/volume control
switch to low or high volume position
to turn the unit on. You will hear an
inviting sung song followed by an
encouraging phrase depending on
the mode you’ve selected. The lights
will ash with the sounds and the bear
will move to the song.
2. Sl i de the mode se l ecto r to the
Follow-Me Mode position. The unit
will automatically ask you to follow
the lights, and will ask you to press
a specic light-up piano key. Slide
the cymbals to hear cymbals sound
effects and a fun phrase. Turn the
roller to hear a phrase, a sung song
and sound effects. Activating the
internal motion sensor will launch
melodies, fun phrases and sound
effects. Use the microphone to sing
along! All along, the lights will ash
with the sounds and the dancing bear
will move to the music.
Activities
12
Page 14

3. Sl i de the mode se l ecto r to the
Learning Mode position. Press the
light-up piano keys to learn about
animals, instruments and colors.
Slide the cymbals to hear cymbals
sound effects and a fun phrase.
Turn the roller to count and hear
fun phrases. Activating the internal
motion sensor will launch melodies,
fun phrases and sound effects. Use
the microphone to sing along! All
along, the lights will ash with the
sounds and the dancing bear will
move to the music.
4. Sl i de the mode se l ecto r to the
Singing Mode position. Press the
light-up piano keys to hear sing-along
songs and animal sound effects. Use
the microphone to sing along! Slide
the cymbals to hear cymbals sound
effects and a fun phrase. Turn the
roller to hear melodies. Activating
the internal motion sensor will launch
melodies, fun phrases and sound
effects. All along, the lights will ash
with the sounds and the dancing bear
will move to the music.
Activities
13
Page 15

5. Sl ide th e mode selec tor to the
Dance Mode position. Press the
light-up piano keys to learn about
music styles and movements. Slide
the cymbals to hear cymbals sound
effects and a fun phrase. Turn the
roller to hear a phrase, a sung song
and sound effects. Activating the
internal motion sensor will launch
melodies, fun phrases and sound
effects. Use the microphone to sing
along! All along, the lights will ash
with the sounds and the dancing bear
will move to the music.
MELODY LIST
1. Hickory Dickory Dock
2. I’ve Been Working on the Railroad
3. Mulberry Bush
4. Shoo Fly
5. Turkey in the Straw
6. It’s Raining, It’s Pouring
7. Humpty Dumpty
8. Polly Wolly Doodle
9. Three Blind Mice
10. Baa, Baa, Black Sheep
11. Alouette
12. Hey, Diddle Diddle
Activities
14
Page 16

SUNG SONG 1 LYRICS: (to the tune of Alphabet Song)
Flashing lights and music, too.
It’s fun playing games with you.
SUNG SONG 2 LYRICS: (to the tune of Skip to My Lou)
The animals want to play, let’s go!
Sounding trumpet and piano,
Maracas, guitar and the banjo.
They’re a silly band, you know!
SUNG SONG 3 LYRICS: (to the tune of Row, Row, Row
Your Boat)
Come, let’s sing along,
To our favorite songs.
Grab the mic, sing with delight.
Singing all day long!
SUNG SONG 4 LYRICS: (to the tune of Bingo)
We’re dancing now, let’s turn around,
And learn how to get moo-vin’.
(clap, clap) Clap your hands!
(clap, clap) Stomp your feet!
(clap, clap) Wave your arms!
Now, shake your head, we’re groovin’!
SUNG SONG 5 LYRICS: (to the tune of Pop! Goes the
Weasel)
Round and round the cobbler’s bench,
The monkey chased the weasel.
Activities
15
Page 17

The monkey thought ‘twas all in fun,
Pop! Goes the weasel!
SUNG SONG 6 LYRICS: (to the tune of London Bridge)
London Bridge is falling down,
Falling down, falling down.
London Bridge is falling down,
My fair lady!
SUNG SONG 7 LYRICS: (to the tune of Mulberry Bush)
Here we go round the mulberry bush,
The mulberry bush, the mulberry bush.
Here we go round the mulberry bush,
So early in the morning.
SUNG SONG 8 LYRICS: (to the tune of This Old Man)
This old man, he played one.
He played knick-knack on my thumb.
With a knick-knack paddywhack, give a dog a bone.
This old man came rolling home.
CARE & MAINTENANCE
1. Keep the unit clean by wiping it with a slightly damp cloth.
2. Keep the unit out of direct sunlight and away from any direct heat
source.
3. Remove the batteries when the unit is not in use for an extended
period of time.
4. Do not drop the unit on hard surfaces and do not expose the unit
to moisture or water.
Activities/Care & Maintenance
16
Page 18

TROUBLESHOOTING
If for some reason the program/activity stops working or malfunctions,
please follow these steps:
1. Please turn the unit OFF.
2. Interrupt the power supply by removing the batteries.
3. Let the unit sit for a few minutes, then replace the batteries.
4. Turn the unit ON. The unit should now be ready to play again.
5. If the product still does not work, replace with a new set of
batteries.
6. Please replace batteries when the dancing bear begins to move
slowly and not in time with the music.
If the problem persists, please call our Consumer Services Department
at 1-800-521-2010 in the U.S. or 1-877-352-8697 in Canada, and a
service representative will be happy to help you.
Troubleshooting
17
Page 19

IMPORTANT NOTE:
Creating and developing Infant Learning products is accompanied
by a responsibility that we at VTech ® take very seriously. We make
every effort to ensure the accuracy of the information, which forms
the value of our products. However, errors sometimes can occur.
It is important for you to know that we stand behind our products
and encourage you to call our Consumer Services Department atConsumer Services Department at
1-800-521-2010 in the U.S. or 1-877-352-8697 in Canada, with with
any problems and/or suggestions that you might have. A service
representative will be happy to help you.
Note:
This equipment has been tested and found to comply with the limits for
a Class B digital device, pursuant to Part 15 of the FCC Rules. These
limits are designed to provide reasonable protection against harmful
interference in a residential installation. This equipment generates, uses
and can radiate radio frequency energy and, if not installed and used in
accordance with the instructions, may cause harmful interference to radio
communications. However, there is no guarantee that interference will
not occur in a particular installation. If this equipment does cause harmful
interference to radio or television reception, which can be determined by
turning the equipment off and on, the user is encouraged to try to correct
the interference by one or more of the following measures:
• Reorient or relocate the receiving antenna
• Increase the separation between the equipment and receiver
• Connect the equipment into an outlet on a circuit different from
that to which the receiver is connected
•
Consult the dealer or an experienced radio/TV technician for help
Caution: changes or modications not expressly approved by the party
responsible for compliance could void the user’s authority to operate
the equipment.
Other Info
18
 Loading...