

Page 1
®
USER'S MANUAL
© VTECH
Printed in China
91-01143-000
Page 2

Dear Parent:
At VTech
®
we know that children have the ability
to do great things. That’s why all of our electronic
learning products are uniquely designed to develop
a child’s mind and allow them to learn to the best
of their ability. Whether it’s learning about letters,
numbers, geography or algebra, all VTech
®
learning
products incorporate advanced technologies and
extensive curriculum to encourage children of all
ages to reach their potential.
When it comes to providing interactive products
that enlighten, entertain and develop minds, at
VTech
®
we see the potential in every child.
34
Page 3

CONTENTS
INTRODUCTION .............................................. 1
PREPARATION .............................................. 2
MOUSE CONNECTION ..............................................................2
PRINTER CONNECTION ............................................................2
POWER LINK CONNECTION ....................................................2
POWER SOURCE ......................................................................2
BATTERY INSTALLATION ........................................................... 2
BATTERY NOTICE .....................................................................3
BACKUP BATTERY INSTALLATION ............................................ 3
AC ADAPTOR CONNECTION ....................................................3
ADAPTOR OFFER .....................................................................4
ON/OFF SWITCH ......................................................................4
AUTOMATIC SHUT-OFF ............................................................. 4
CONTRAST SWITCH ..................................................................4
VOLUME SWITCH .....................................................................4
MOUSE .....................................................................................5
EARPHONE JACK .....................................................................5
KEYBOARD ..............................................................................6
SPECIAL KEYS ...................................................................... 6-8
SELECTION BUTTONS ........................................................... 8-9
SYSTEM SETUP .........................................................................9
30
Page 4

DESCRIPTION OF ACTIVITIES .................... 10
GENERAL DISPLAY.................................................................11
WORD GAMES ................................................................ 11-12
SYNONYMS............................................................................................ 11
ANTONYMS............................................................................................ 11
SPELLING ............................................................................................... 11
WORD CORRECTION ............................................................................. 11
TENSES................................................................................................... 11
PARTS OF SPEECH ................................................................................ 11
GRAMMAR ............................................................................................. 12
SENTENCE SHUFFLE ................................................................................ 12
WORD SEARCH...................................................................................... 12
CROSSWORD ......................................................................................... 12
MATHEMATICS................................................................... 12-14
ADDITION .............................................................................................. 12
SUBTRACTION ........................................................................................ 12
MULTIPLICATION ..................................................................................... 12
DIVISION ............................................................................................... 13
ALGEBRA ............................................................................................... 13
FRACTIONS............................................................................................. 13
COORDINATES ....................................................................................... 13
GEOMETRY ............................................................................................ 13
STORY PROBLEMS ................................................................................. 13
GRAPHS ................................................................................................. 14
BALANCE ................................................................................................ 14
CALCULATOR .......................................................................................... 14
TRIVIA .............................................................................. 14-15
WORLD CUSTOMS ................................................................................. 14
SCIENCE AND TECHNOLOGY ................................................................. 14
ENTERTAINMENT .................................................................................... 14
31
Page 5

ANIMAL.................................................................................................. 14
SPORTS .................................................................................................. 15
LOGIC & MUSIC ....................................................................15
MUSIC MAKER ....................................................................................... 15
FENCES................................................................................................... 15
SHAPE PUZZLE ....................................................................................... 15
3D MATCH............................................................................................. 16
TREASURE HUNT .................................................................................... 16
TIC TAC BOX ......................................................................................... 16
COMPUTER SKILLS .................................................................16
SPELL CHECKER ...................................................................................... 16
WORD PROCESSOR............................................................................... 16
FILE ................................................................................................... 16-18
EDIT ....................................................................................................... 18
TOOLS .............................................................................................. 18-19
SHORTCUT KEYS .................................................................................... 19
CHART MAKER ....................................................................................... 19
HOMEWORK LABTM................................................................................ 20
TYPING CHALLENGE .............................................................................. 21
CALENDAR.............................................................................................. 21
DAY PLANNER ....................................................................................... 21
TELEPHONE BOOK ................................................................................ 21
MEMORY BANK ..................................................................... 22
SYSTEM SETUP .........................................22
PRINTER SETUP ................................................................ 22-23
TROUBLESHOOTING FOR PRINTER ERROR .........................23
ICON SETUP ...........................................................................23
32
Page 6

NUMBER ENTRY .....................................................................23
DATE FORMAT .......................................................................23
SCREEN SAVER.......................................................................24
VTECH POWER LINK ........................................................ 24-25
HOW TO USE
AN EXPANSION CARTRIDGE ..................... 25
EXPANSION CARTRIDGE ........................... 25
READING COMPREHENSION ..................................................25
FOREIGN LANGRUAGE ................................................... 25-26
SCORING ................................................. 26
SCORING CODE ............................................................... 26-27
POWER ZONE™ ACTIVITIES ............................................ 27-28
CARE AND MAINTENANCE ........................ 28
33
Page 7

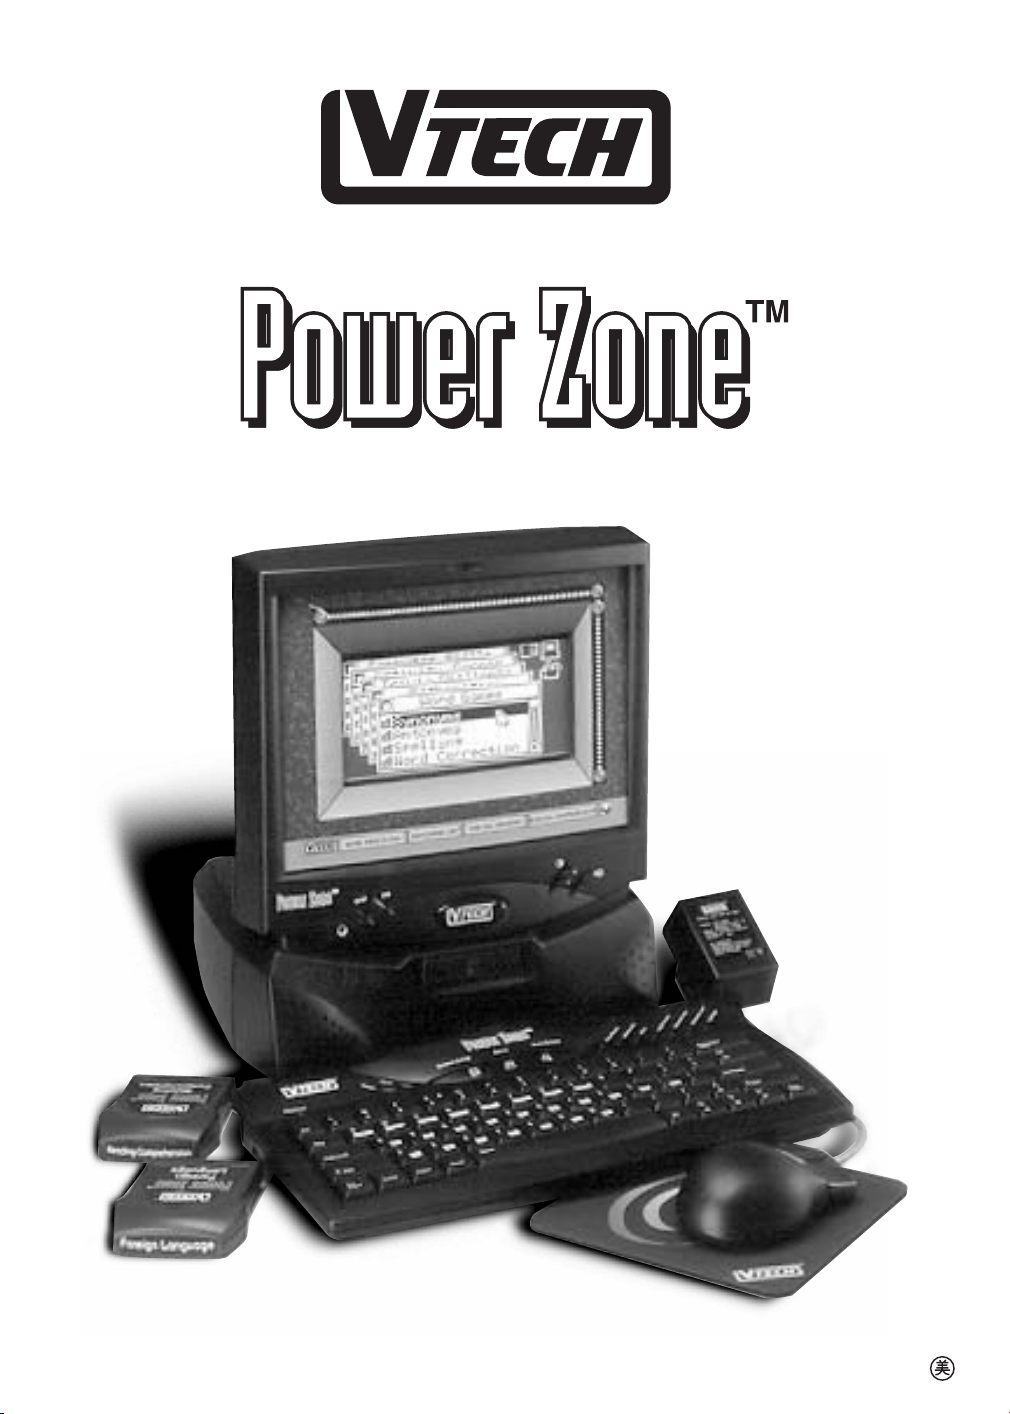
INTRODUCTION
Thank you for buying the VTECH®POWER ZONETMlearning unit! VTECH®is committed
to providing the best possible products to entertain and educate your child. Should you
have any questions or concerns, please call our Consumer Services Department at 1-800521-2010 in the U.S. or 1-800-267-7377 in Canada.
POWER ZONE
a wide range of exciting and educational activities for fun learning! The unit's 48 builtin activities encourage learning through fun play. Included in this package are READING
COMPREHENSION and FOREIGN LANGUAGE expansion cartridges.
TM
is a talking, electronic learning aid with a color enhanced display. It offers
LCD DISPLAY
ON/OFF
BUTTON
LED
TYPING
KEYBOARD
CONTRAST
SWITCH
VOLUME
SWITCH
CARTRIDGE
DOOR
MOUSE
MOUSE
PAD
CARTRIDGE
ADAPTOR
1
Page 8

PREPARATION
MOUSE CONNECTION
1. Make sure the unit is OFF.
2. Locate the mouse jack on the back of the unit.
3. Plug the mouse into the unit's mouse jack.
4. Turn the unit ON.
PRINTER CONNECTION
1. Make sure both the POWER ZONETM learning product and the printer are OFF.
2. Locate the printer port on the back of the POWER ZONETM learning toy.
3. Insert the printer plug into the printer port.
4. Turn ON the POWER ZONETM unit, then turn ON the printer.
Please refer to the printer list included in the packaging for the print drivers that POWER
ZONETM supports.
VTECH POWER LINKTM CONNECTION
1. Make sure the POWER ZONETM learning product is OFF.
2. Locate the printer port on the back of the POWER ZONETM learning product.
3. Insert the VTECH POWER LINKTM connector into the printer port.
4. Connect the VTECH Power LinkTM unit to the personal computer. Please refer to
the user’s manual of the VTECH POWER LINKTM for information regarding connection
to the personal computer.
5. Turn ON the computer.
6. Turn ON the POWER ZONETM learning product.
NOTE: The Power LinkTM is sold seperately.
POWER SOURCE
The POWER ZONETM learning product can be operated by using 4 "C" size batteries or
the standard 9V 300mA AC center-positive adaptor.
BATTERY INSTALLATION
1. Make sure the unit is OFF.
2. Locate the battery cover on the back of the unit.
3. Open the battery cover.
4. Insert 4 "C” batteries, as illustrated.
DO NOT USE RECHARGEABLE BATTERIES in this unit.
5. Close the battery cover.
2
Page 9

BATTERY NOTICE
• When installing batteries observe the polarity signs to avoid leakage.
• Do not mix old and new batteries.
• Do not use different types of batteries.
• Remove batteries from the unit when you are not going to use the unit for a long time.
• Do not dispose of batteries in fire.
• Do not short-circuit supply terminals.
• Do not attempt to recharge ordinary batteries.
BACKUP BATTERY INSTALLATION
• Make sure the unit is OFF.
• Locate the backup battery cover on the bottom of the
unit and open it.
• Insert 1 CR 2025 lithium battery as illustrated.
• Replace the battery cover.
•Turn the unit ON.
NOTE: While replacing the backup battery, the 4 "C" size batteries must be kept in the
unit or the unit must be connected to the 9V adaptor while the adaptor is plugged
in. If not, you will lose all the information stored in the following activities:
•Word Processor • Music Maker
• Calendar • Homework Lab
• Day Planner • Memory Bank
•Telephone Book
In addition to these activities, players’ names and scores will also be lost.
NOTE: If the unit suddenly stops working or the sound becomes weak, turn the unit OFF
for 15 seconds, then turn it back on. If the problem persists, it may be caused
by weak batteries. Please install a new set of batteries and try again.
TM
AC ADAPTOR CONNECTION
Use the standard 9V 300mA AC - DC adaptor with polarity that comes with
the POWER ZONETM learning unit.
1. Make sure the unit is OFF.
2. Locate the adaptor jack on the back of the unit.
3. Plug the adaptor into the unit’s adaptor jack.
4. Plug the adaptor into a wall outlet.
5. Turn the unit ON.
NOTE: Do not leave the adaptor plugged in for long periods of time if the unit is not
in use.
3
Page 10

If your AC adaptor is lost many retailers carry this type of adaptor. You can also order a replacement
by calling our Consumer Services Department at 1-800-521-2010 or send $15.00 (includes shipping
and handling) to:
ADAPTOR OFFER
c/o VTECH® Industries, LLC.
101 E. Palatine Road
Wheeling, IL 60090-6500
(Illinois residents please add 8.25% sales tax. Please do not send cash.)
ON/OFF SWITCH
Turn ON your POWER ZONETM by pressing the button located on the base unit below
and to the left of the screen. The unit will play an opening animation and then you can select
an activity. Turn the unit OFF by pressing the button located next to the ON button.
AUTOMATIC SHUT-OFF
If there is no input into the POWER ZONETM learning product for about 8 minutes, the
unit will automatically shut off to save power. After the auto power off is activated, you
need to press the ON button again. We recommend that you turn the unit OFF when
not playing with it. If the POWER ZONETM learning product is not going to be used for
a long period of time, remove the batteries and unplug the adaptor.
CONTRAST SWITCH
Adjust the image on the screen by sliding the Contrast Switch to the upper right for higher
contrast and to the lower left for lower contrast.
+
-
+
VOLUME SWITCH
-
Adjust the volume by sliding the Volume Switch to the upper right to raise the volume
and to the lower left to lower the volume.
4
Page 11

MOUSE
Left Mouse
Button
®
Right Mouse
Button
Cover
To use the mouse, push it in the direction that you would like the pointer on the screen
to move. To move the pointer to the right side of the screen push the mouse to the right.
To move the pointer to the left side of the screen, push the mouse to the left. To move the
pointer to the top of the screen push the mouse away from you. To move the pointer to the
bottom of the screen pull the mouse towards you.
Pressing the left mouse button will have the same effect as pressing . In the Shape
Puzzle and Word Search activities, the right mouse button serves as a flip key.
To clean the mouse, you need to open the cover on the bottom of the mouse. The arrow
indicator on the cover shows the unlocking direction. Once the cover is removed, the
mouse ball should be taken out, and the contents inside the mouse should be cleaned
with a dry cloth. The mouse ball should also be cleaned with a dry cloth. Once you have
finished cleaning the mouse, place the mouse ball back into the mouse, place the cover
back on the mouse and lock the cover by pushing the cover in the opposite direction
of the arrow indicator.
EARPHONE JACK
The POWER ZONE
earphones (sold separately) into the earphone jack, you can play with the POWER ZONE
unit without disturbing others.
TM
learning product has an earphone jack. By plugging any set of standard
TM
5
Page 12

KEYBOARD
The POWER ZONETM learning product has a QWERTY keyboard with 64 keys.
SPECIAL KEYS
In addition to the alphanumeric keys, there are some special function keys:
Esc key:
The Esc key allows you to exit the current activity. By repeatedly pressing the Esc key
you can go back to the main menu.
Help key:
When you are not sure about the answer, press the HELP key. HELP will give you hints,
but at the same time, you will lose a chance to answer a question. Press this key to receive
hints in some of the activities. For multiple choice activities, it will reveal one of the incorrect
answers. In activities like Synonyms, it will show one of the letters in the answers as a
hint. The
Help
key has slight variations among different activities, so for detailed usage,
please refer to the description of the activities.
Caps Lock key:
Press this key to make everything you type appear in capital letters.
Symbol key:
Press the symbol key to see a symbol menu which contains several pages of symbols . Use the
keys to select a symbol. Then press the key or the left mouse button
to confirm the selection.
Repeat key:
Press this key to repeat the instructions and the question (the unit will repeat the question
if the question on the screen is only partially visible).
6
Page 13

Add to Memory bank:
Answer
Press Shift key and the answer key together in Synonyms, Antonyms, Spelling, Word
Correction, Tenses, Part of Speech, Grammar, Word Search, Crossword, Addition, Subtraction, Multiplication, Division, Story Problems, World Customs trivia, Science and Technology
Tr ivia, Entertainment Trivia, Animal Trivia and Sports Trivia to store questions and problems
in Memory Bank activity to review later.
Answer key:
Answer
If a player is not able to answer a question, the player should press the key and
it will reveal the answer.
NOTE:
In the two-player mode, the key cannot be used during the first player's turn.
Enter key:
Press this key after typing each answer so the unit registers your input. In activities like
Word Processor, Telephone Book and Day Planner, this key will place the cursor at the
beginning of the next line for information input.
Backspace key:
To correct an answer before it has been confirmed, press the key to delete the
last character typed in.
Alt key:
Press this key together with an alphanumeric key to have the character on top right hand
corner shown on keys.
Directional keys:
These four keys will move the cursor up, down, left, and right.
Press the key and any of arrow keys together to move the cursor pointer in the
same manner as the mouse.
To move the pointer up the screen, press key and key.
To move the pointer to the bottom of the screen, press key and key.
To move the pointer to the left side of the screen, press key and key.
To move the pointer to the right side of the screen, press key and key.
7
Page 14

The key and the key can be used to simulate the left mouse button.
The key and the .; key can be used to simulate the right mouse button.
Space key:
In normal text editing, the space key acts as a character but when the repeat function is
in use, the space key is able to pause the display while the timer is still running. This pause
function gives readers more time to read the whole question before the answer appears.
Left Player/Right Player keys:
In the 2-player mode of some activities, the players are in head-to-head competition. When
a question is asked, the first person to press his or her appropriate left or right player button
will get the opportunity to answer the question first.
SELECTION BUTTONS
M
CapsLock
Player
Level
System Setup
Demo
Print Screen
rd Games
Wo
Mathematics
Trivia
Logic & Music
Computer Skills
Homework Lab
Cartridge
T
There are 48 activities in the POWER ZONE™ and they are divided into five activity groups.
Press the additional activity selection buttons on the keyboard to go directly to the groups
of activities or other special buttons to manipulate functions on the unit.
TM
Games
rd
Wo
Mathematics
Trivia
Logic & Music
Computer Skills
Homework Lab
Group activity selection buttons:
Cartridge
Activity selection buttons are available to go directly to the selected group activities for Word
Games, Mathematics, Trivia, Logic & Music and Computer Skills.
TM
Homework Lab
TM
button:
Homework Lab
When the Homework Lab™ button is pressed the unit will go directly to the Homework Lab™
activity.
8
Page 15

Cartridge button:
When the cartridge key is pressed the unit will run the activity(ies) on the cartridge. If
there is no cartridge in the door, the unit will show an error message.
NOTE: When inserting or taking out a cartridge or plugging in or removing the mouse,
please make sure the unit is turned OFF.
Player
Cartridge
Player button:
Press this button and the status window will pop up which allows a player to choose the
1-player or 2-player mode in the activities that have a 2-player mode.
Level
Level button:
Press this button and the status window will pop up which allows a player to change the level
of difficulty in some of the activities. There are six levels, with the first level being the easiest
and sixth level being the most difficult.
SYSTEM SETUP
System setup key:
Press this key and the system setup screen will pop up. For details in setting, please
refer to SYSTEM SETUP pages 22-25.
Demo key:
The demo key is available at any time to demonstrate the activity(ies) to the user. The
demo key will demonstrate five randomly selected activities and then return to the main
menu. When the demo key is pressed again, another five activities will be demonstrated
randomly. lf the demo key is pressed when a player is in an activity, it will demonstrate
that particular activity. Once the demonstration is done, it will return to either the menu
or the activity.
Print Screen key:
This key is used to print anything that appears on the screen. Press the print screen key to
send the current screen to printer (when connected to a printer) or a personal computer (when
VTECH POWER LINK™ is connected). If the unit is connected to a personal computer (using
the VTECH POWER LINK™ unit), a preview will be printed on the connected personal computer
monitor. Please refer to the VTECH POWER LINK™ utilities section for further details.
9
Page 16

DESCRIPTION OF ACTIVITIES
POWER ZONETM Activities
After turning the power ON, you will see the opening animation and the main activity
menus. Activities are grouped into five categories. Select a category first and then
select an activity by using the directional keys or the mouse to move the pointer onto
the desired activity. Press Enter or the left mouse button to start the activity. The following
is a description of levels and modes of play.
Level and Two-Player Mode
ACTIVITY LEVEL TWO-PLAYER MODE
Word Games 1-6 YES
Mathematics Games 1-6 YES
Trivia Games 1-6 YES
Music Maker NO NO
Fences 1-6 YES
Shape Puzzle 1-6 YES
3-D Match 1-6 YES
Treasure Hunt 1-6 YES
Balance 1-6 YES
Tic Tac Box NO YES
Chart Maker NO NO
Typing Challenge NO YES
Calendar NO NO
Day Planner NO NO
Telephone Book NO NO
Calculator NO NO
Spell Checker NO NO
Word Processor NO NO
Foreign Language Cartridge NO YES
Comprehension Cartridge 1-6 YES
Homework Lab
TM
NO YES
10
Page 17

GENERAL DISPLAY
In most of the activities, you will see a status display with information, as well as icons
and a working window. The status information includes the player's name or players' names,
the number of chances remaining and the score for each player. It also shows the level
and the time left in the game.
Add to memory icon
Number of chances
remaining
Name
Score
Level of play
Time left in the game
System setup
Demo
Help
Exit
WORD GAMES
SYNONYMS
A word is displayed on the screen. Type in a word with the same meaning and press
the key. The unit provides the first letter of the word and the number of letters
in the word to help you answer the question.
ANTONYMS
This activity functions in the same way as SYNONYMS except you need to enter a word
with the opposite meaning of the word shown on the screen.
SPELLING
This activity helps you to practice your spelling. An animation will appear and the
POWER ZONETM will ask for the spelling of the word. Type in the correct spelling
of the word and press the key.
WORD CORRECTION
The unit shows a misspelled word and the POWER ZONETM will ask for the correct word.
Type in the correct word and press the key.
TENSES
This activity teaches three basic tenses. They are present, past and past participle. Two
of the three tenses of the word are given and one tense is missing. Type in the missing
tense and press the key.
PARTS OF SPEECH
A sentence is displayed with a highlighted word. Choose what the correct part of speech
is for the highlighted word. You are given three parts of speech to choose from. Type
1, 2, or 3 for the answer or move the pointer to answer. Then press the key or
the left mouse button.
11
 Loading...