

Page 1
R
User’s Manual
Power Vision
TM
© 2002 VTech
Printed in China
91-01237-009-000
Page 2

Dear Parent:
At VTech® we know that a child has the ability to do great
things. That’s why all of our electronic learning products are
uniquely designed to develop a child’s mind and allow them
to learn to the best of their ability. Whether it’s learning about
letters, numbers, geography or algebra, all VTech® learning
products incorporate advanced technologies and extensive
curriculum to encourage children of all ages to reach their
potential.
When it comes to providing interactive products that en-
lighten, entertain and develop minds, at VTech®, we see the
potential in every child.
22
Page 3

INDEX
INTRODUCTION............................................................ 1
POWER SOURCE ........................................................ 1-3
EARPHONE CONNECTION............................................. 3
MOUSE CONNECTION ............................................... 3-4
PRINTER CONNECTION ................................................. 5
ON/OFF SWITCH .......................................................... 5
CONTRAST SWITCH ...................................................... 6
VOLUME SWITCH ......................................................... 6
KEYBOARD DESCRIPTION AND FUNCTIONS ............... 6-8
THE KEYBOARD ....................................................... 8-11
TO BEGIN PLAY .......................................................... 11
LEVELS ....................................................................... 12
2-PLAYER MODE ......................................................... 12
SCORING ................................................................... 13
DESCRIPTION OF ACTIVITIES .................................. 14-20
HIDDEN BAR ......................................................... 20-21
CARE AND MAINTENANCE .......................................... 21
23
Page 4

INTRODUCTION
Thank you for purchasing the VTECH® Power Vision learning toy! We at VTECH® are
committed to providing the best possible products to entertain and educate your child. Should
you have any questions or concerns, please call our Consumer Services Department at
1-800-521-2010 in the U.S. or 1-800-267-7377 in Canada.
The VTECH® Power Vision learning aid offers a sharp, viewing screen that displays
hundreds of animated pictures. 51 different activities include spelling, grammar,
mathematics, trivia, games, a friendly voice and an easy-to-use computer-like keyboard.
Get ready for hours of learning fun!
LCD DISPLAY
LOCK BUTTON LOCK BUTTON
ACTIVITY MEMBRANE
TYPING KEYBOARD
CONTRAST
SWITCH
SELECTOR
ON/OFF
BUTTON
CARTRIDGE
DOOR
VOLUME
SWITCH
MOUSE
MOUSE
PAD
POWER SOURCE
The VTECH® P ower Vision learning product operates on 4"AA” size batteries (UM-3/LR6) or
a standard 9V
300mA AC centre-positive adaptor.
1
Page 5

HOW TO INSTALL BATTERIES
1. Make sure the unit is turned OFF.
2. Locate the battery cover on the bottom of the
unit and open it.
3. Insert 4 “ AA “ batteries (UM-3/LR6) as
illustrated. DO NOT USE RECHARGEABLE
BATTERIES in this unit. (The use of alkaline
batteries is recommended for best performance.)
4. Close the battery cover.
BATTERY NOTICE
• Install batteries correctly observing the polarity (+, -) signs to avoid leakage.
• Do not mix old and new batteries.
• Do not use batteries of different types.
• Remove exhausted or new batter ies from equipment when you are not going to use
the unit for a long time.
• Do not dispose of batteries in fire.
• Do not attempt to recharge ordinary batteries.
• The supply terminals are not to be short-circuited.
• Non-rechargeable batteries are not to be recharged.
• Rechargeable batteries are to be removed from the unit before being charged.
• Rechargeable batteries are only to be charged under adult supervision.
NOTE: If the sound becomes weak or the unit suddenly stops working, turn the unit
off for 2 minutes, then turn it back on. If the problem persists it may be caused
by weak batteries. Please install a new set of batteries and tr y the unit again.
While replacing the btteries, follow one of the following rules. If not, you will lose all
information stored.
• Change the batteries within 1 minute.
• Connect the unit to the 9V adaptor while the adaptor is plugged in.
The 9V adaptor must be plugged in while connection the unit to the adaptor. Make
sure the unit is turned OFF. Otherwise, all infromation stored will be lost.
AC ADAPTOR CONNECTION
Use a standard 9V 300mA AC center-positive adaptor.
1. Make sure the unit is OFF.
2. Locate the adaptor jack on the left side of the unit.
2
Page 6

3. Insert the adaptor plug into the unit’s adaptor jack.
4. Plug the adaptor into a wall outlet.
5. Turn the unit ON.
NOTE: If the unit suddenly stops working or the sound seems weak, it may be the
result of the adaptor connection. Turn the unit off and unplug the adaptor from
the unit for 15 seconds. Next, plug the adaptor back in and turn the unit on.
If the problem continues, it may be the result of the adaptor’s wiring or the
unit. Please call our Consumer Services Department at 1-800-521-2010 in the
U.S. or 1-800-267-7377 in Canada.
Do not leave the adaptor plugged in for long periods of time if the unit is not in use .
EARPHONE CONNECTION
Use earphones with an appropriate earphone plug.
1. Make sure the unit is OFF.
2. Locate the earphone jack on the left side of the unit.
3. Insert the earphone plug into the unit’s earphone jack.
4. Turn the unit ON.
After finishing the above procedure, check if the earphones are working. If not, repeat
the above procedure.
NOTE: If the sound becomes weak or the unit suddenly stops working, turn the unit
off for 2 minutes, then turn it back on. If the problem persists it may be caused
by weak batteries. Please install new set of batteries and try the unit again.
MOUSE CONNECTION
TO CONNECT THE MOUSE
1. Turn OFF your VTECH® Power Vision unit.
2. Plug the connector at the end of the mouse cable into the mouse jack at the back
of the unit.
®
3. Turn ON the VTECH
to play. You can choose either Adventure Mode or Normal Mode. When the activity
starts, you may use the keyboard and/or the mouse to play the game.
Power Vision unit. After the opening animation, select a mode
3
Page 7
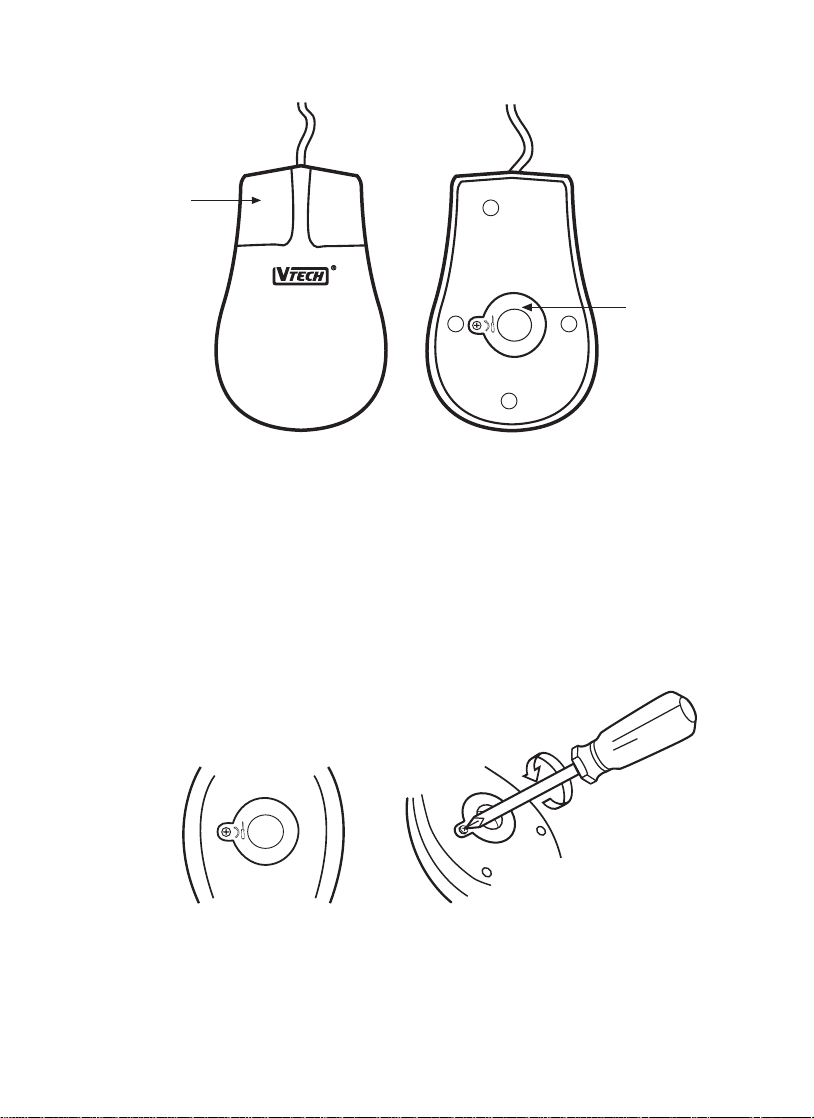
MOUSE OVERVIEW
Mouse
buttons
Cover
Once the mouse is installed you may mov e the mouse cursor around the screen freely. The
mouse has a roller ball in it and therefore it should be used on a flat surface. A mouse pad
provided is ideal, but you ma y also try a piece of paper, notebook or magazine. A clean flat
surface is important to be able to use your mouse effectively.
Your mouse is very easy to use. To use the mouse, push it in the direction that you would like
the pointer on the screen to move. To move the pointer to the right side of the screen, push
the mouse to the right. To move the pointer to the left side of the screen, push the mouse to
the left. To move the pointer to the top of the screen, push the mouse away from you. To
move the pointer to the bottom of the screen, pull the mouse towards you.
CLEANING THE MOUSE
To clean the mouse, you need to open the cover on the bottom of the mouse by using a
screwdriver. Twisting in the direction of the arrows will release the cover. Once the cover is
removed, the mouse ball should be taken out and the contents inside the mouse should be
cleaned with a dry cloth. The mouse ball should also be cleaned with a dry cloth. Once you
have finished cleaning the mouse, place the mouse ball bac k into the mouse, place the cov er
back on the mouse and screw the cover back onto the mouse.
4
Page 8

PRINTER CONNECTION
1. Turn OFF your VTECH® Power Vision learning unit.
2. Plug the connector at the end of the printer cable into the printer port on the rear
of the unit.
3. Turn ON the VTECH
animation, select an activity. If you are using another printer, press SHIFT and the
PRINTER SETUP keys together to access a list of compatible printers. We
recommend using the VTECH® Canon BJC-255, made specifically for VTECH®.
4. Scroll through the list using your mouse or the directional arrow keys. When you
have highlighted the appropriate printer, press ENTER.
5. Press SHIFT and PRINT DATA / PRINT SCREEN keys together to perform the printing
function when the option is available.
Before selecting a printer, make sure the printer is correctly connected to the VTECH
Power Vision learning unit using the printer cables. After setting up the printer , you can print
where the option is available.
Should you have any questions, please call our Consumer Services Department at 1-800-
521-2010 in the U.S. or 1-800-267-7377 in Canada.
®
Power Vision learning unit and the printer. After the opening
ON/OFF SWITCH
Turn on your VTECH® Power Vision learning product by pressing the ON button located on
the base unit below and to the right of the screen. The unit will displa y an opening animation
and ask you to select a mode to play. Turn the unit OFF by pressing the OFF b utton located
next to the ON button.
®
RESET FUNCTION
If the unit suddenly stops working, press RESET on the bottom of the unit to restart.
AUTOMATIC SHUT-OFF
If there is no input into the VTECH® Power Vision learning unit for approximately 8 minutes,
the unit will automatically shut off to save pow er. After the unit has automatically shut off , you
will need to press the ON button again to restart the unit. We recommend that you turn the
unit OFF when not pla ying with it. If the VTECH® Power Vision learning unit is not going to be
used for a long period of time, remov e the batteries and unplug the adaptor.
5
Page 9

CONTRAST SWITCH
Use this switch to change the light/dark CONTRAST on the
screen.
VOLUME SWITCH
Use VOLUME switch on the unit allows you to raise or lower the level
of sound.
KEYBOARD DESCRIPTION AND
FUNCTIONS
THE ACTIVITY SELECTOR
The VTECH® Power Vision learning unit features a convenient one-touch activity selector.
You can press the membrane selector at any time to select an activity.
Spelling
Tenses
Singulars
Plurals
Antonyms
Synonyms
Sound
Alikes
Grammar
Quiz
Word
Munch
Sentence
Builder
Word
Puzzle
Guide
Words
Analogy
Attack
Mathematics
Math
Quiz
Secret
Sequences
Fractions
Graph
Problems
Big
Buyer
Tick Tock
Clock
Geometry
Magic
Grid
3D Tic
Tac Toe
Treasure
Hunt
Rumbling
Ranks
Block
Breakout
Magic
Key
Spanish Translator
Spanish Tester
German Translator
German Tester
French Translator
French Tester
Science
Geography
Extinct or Rare
Inventions
Word
Recall
Typing
Challenge
Time
Tutor
Smart
Alarm
Calculator
Notepad
Card
Maker
Private
Pad
Art
Studio
Calendar
Day
Planner
Cartridge
Adventure
Mode
System
Setup
Quick Tag
Demo
The CARTRIDGE button is for accessing the expansion cartridges and will not work unless
an expansion cartridge has been inserted into the unit. Cartridges should be inserted when
the unit is OFF.
6
Page 10

ADVENTURE MODE
The AD VENTURE MODE button is f or accessing the activities through a challenging adv en-
ture. The goal of the Adventure Mode is to help the famous adventurer, Douglas Dar ing,
return safely home by gathering treasured jewels. These jewels are needed to successfully
operate the time machine so Douglas Daring can have a safe adventure back. The player
has to pass a round of questions and then finish a game before one jewel will be g ranted. A
timer will be set in the Adventure Mode.
Access:
The Adventure Mode can be accessed by the following two ways:
1. After turning on the unit, choose between “Normal Mode” and “Adventure Mode”.
2. Press the “Adventure Mode” key any time after the unit is turned on.
Goal:
To reach the END GAME or destination by collecting a total of at least 3 jewels from
the checkpoints on the map. You can gather only one jewel from each checkpoint on
the map.
General:
1. Starting point and Ending point do not contain any learning activities.
2. Player has to answer 10 questions in the chosen checkpoint.
3. Player has to answer correctly 6 out of 10 questions in order to get the pass mark.
4. A pass mark indicator will be shown on the status bar.
5. Pass mark bar will be reset once 10 questions are completed.
6. END GAME (destination) cannot be entered if not enough jewels are collected.
7. There are 4 difficulty levels and levels can be changed at any time during an activity.
8. The game flow will be the same as the activities in normal mode.
9. One category for each checkpoint.
The player has to complete the adventure by visiting checkpoints where questions will be
asked. F or each chec k point, 10 questions will be asked. The pla y er has to obtain the pass
mark and then finish a game before one jewel will be granted. A timer will be set in the
Adventure Mode.
The SYSTEM SETUP button is for adjusting the settings for the following:
Background Music ON / OFF
Math Input Direction Left-Right / Right-Left
Date Format DD-MM / MM-DD
Screen Saver ON / OFF
Status Bar Auto Pop Up ON / OFF
Auto Messenger ON / OFF
Time Format AM / PM / 24HR
7
Page 11

The QUICK T AG button is a function that allows the player to tag questions which they are
interested in. The VTECH
®
Power Vision learning toy provides you with 10 Quick Tags for
saving specific questions you want to pla y again later . Click the Sa ve Quic k Tag icon to store
a question in the Quick Tag and click the Delete Quick T ag icon to delete a Quick T ag. If you
want to load a saved question, clic k the Load Quick Tag icon.
The DEMO button is for accessing the demo function in the activities. If you press DEMO
while you are in the beginning screen, the unit will demonstrate selecting either the Adventure Mode or the Normal Mode to play. If you press DEMO in a category menu, all the
activities within that category will be demonstrated. If you press DEMO while you are in an
activity, that par ticular activity will be demonstrated. During the demo function, just press
any key to go back to where you started.
THE KEYBOARD
The VTECH® Power Vision learning product has a full QWERTY keyboard with 58 keys. It
combines the operation of a standard computer keyboard with several other functions.
_
)
0
?
/
>
.
Printer
Setup
-
:
;
Print
Screen
Print Data
ERASE
ENTER
"
'
Progress
Report
MENU
Player B
ESC
CAPS
LOCK
SHIFT
Player A
HELP
!
1
Q
AC
A
PLAYER
LEVEL
#
$
%
^
&
*
@
2
3
4
5
6
7
W
E
R
T
Y
U
.
÷
H
J
N
Z
ANSWER
C
SYMBOL
+
S
D
X
C
ALT
x
-
F
G
V
B
(
8
9
I
OP
=
K
L
<
M
,
SPACE
REPEAT
LETTER KEYS
QWE RT UI OP
AC
C
+
-
A
S
D
Z
X
F
C
V
Use these letter keys when inputting answer for word-related activities. The keys follow the
same pattern as a standard computer keyboard.
x
G
Y
÷
H
B
.
=
J
N
KL
M
8
Page 12

FUNCTION KEYS
ERASE
ENTER
Print
Screen
Progress
Report
MENU
REPEAT
Press this key to delete a letter or number already inputted.
Press this key to confirm your answer.
Press SHIFT and the Print Screen keys together to print the question on
screen.
Press SHIFT and the Progress Report keys together to have the statistical
reports of your scores for the activities.
Press MENU key in the Normal Mode will have the activity menu shown on
the screen.
Press MENU key in the Adventure Mode will pop up a screen with the
following options:
SAVE save the current status
LOAD load a previous saved file
CONTINUE continue the game play
GO TO MAP go to the map to select the check points
QUIT quit the adventure mode
Press the REPEAT key to repeat the voice instruction, a question or word.
Printer
Setup
Print Data
Player A
HELP
Press the SHIFT and Printer Setup keys together for a list of compatible
printers.
Press the SHIFT and Print Data keys to print the question and answer on the
screen.
Player B
Press these keys in activities with a 2-player mode. The first person to hit his
or her Player button gets to answer the question.
If the unit is not in 2-player mode, press the HELP key to receive a hint for a
question.
9
Page 13

ESC
The ESC key allows the player to exit the current activity and go to the previous screen.
CAPS
LOCK
SHIFT
PLAYER
LEVEL
SYMBOL
ANSWER
ALT
Q
AC
Press this key to generate a continuous series of capital letters without ha ving
to press the SHIFT key each time. Press once to activate this key. Press it
again to cancel this function.
Hold down the SHIFT key to type uppercase letters and the symbols located
on the number keys. The SHIFT key should be held do wn when the required
symbol or letter key is typed.
Press the SHIFT and PLAYER keys together at any time to change from the
1-player mode to the 2-player mode.
The LEVEL ke y is used to change the le vel of difficulty in multi-le v el activities.
Levels can be changed at any time during an activity.
Press the SHIFT and SYMBOL keys together to show the special symbols
table.
Press the ANSWER key to get the ans wer to the question.
Press this key together with the four directional keys to control the mouse
pointer on the screen.
The AC key is used to cancel all numbers in the calculator mode.
W
C
The C key is used to cancel the last number entered in the calculator mode.
Use this key to insert a space between words or
SPACE
numbers in many activities. Each time you press the
SPACE BAR , a space will be added.
10
Page 14

KEYS FOR MATHEMATICS ACTIVITIES
!
1
@
2
#
3
$
4
%
5
^
6
&
7
*
8
(
9
)
0
Use the number keys when inputting answers in all mathematics activities, as well as using
them during the calculator function.
QWE RTYUI
AC
C
+
-
x
÷
.
=
Use these keys to perform mathematical operations in the CALCULATOR activity.
TO BEGIN PLAY
• Press the ON button located on the base unit below and to the right of the screen.
• Choose which mode to play - Adventure Mode or Normal Mode - and click on that
icon.
• If the Adventure Mode is selected, choose a checkpoint on the map and start gathering
the treasured jewels needed for the END GAME.
• If the Normal Mode is selected, choose a category from the main menu and then
select an activity.
• Press the LEVEL key to change the level of difficulty in any of the applicable activities.
All activities begin in Level 1 unless you change the level.
• Press the SHIFT and PLAYER keys together to set either the 1 or 2-player mode
where applicable. Activities always begin in the 1-player mode.
• To change activities, simply choose a new activity on the ACTIVITY MEMBRANE
SELECTOR or press the MENU key to call out the category menu.
NOTE: If there is no response for a while, the unit will randomly select an activity.
11
Page 15

LEVELS
The VTECH® Power Vision learning product provides 4 levels of difficulty for added challenge and learning. When you ha ve entered an activity you can change the le v el at any time
by pressing the LEVEL key and typing in the level number that you want.
NOTE: Because of their nature, the following activities do not have different levels:
Word Puzzle Word Recall
Big Buyer Smart Alarm
3D Tic T ac Toe Calculator
Spanish T r anslator Notepad
Spanish T ester Card Maker
German T ranslator Private Pad
German T ester Art Studio
French Translator Calendar
French Tester Day Planner
2-PLAYER MODE
The VTECH® P ower Vision unit provides an exciting head to head competition f or many activities .
When a question is displayed, the two players need to press their corresponding player
keys, PLAYER A or PLA YER B, as quickly as possible in order to answer. The first person
to press his/her player key gets to answer first. If the first player answers incorrectly, the
other player receiv es a chance to ans wer. If the second player does not want to try ans wering the question that player can press the ANSWER key to see the correct answer. To be
fair, the HELP key does not work in the 2-player mode.
A timer will also be set for the other player. If there is no input from the other player before
time’s up, no score will be given or deducted. The answer will be shown automatically.
If the PLAYER A/B key is not pressed, ANSWER key will be available for both players.
NOTE: Because of their nature, there is no two-player mode for the following activities:
Sound Alikes Typing Challenge
Word Puzzle Smart Alarm
Big Buyer Calculator
Treasure Hunt Notepad
Block Breakout Card Maker
Magic Key Private Pad
Spanish T ranslator Art Studio
German T ranslator Calendar
French Translator Day Planner
Word Recall
12
Page 16

SCORING
1-PLAYER MODE
In the 1-player mode, there are 5 questions per round in most of the activities . The scoring is
calculated in the following way:
Correct answer on the first try 20 points
Correct answer on the second try 10 points
Correct answer on the third try 5 points
Incorrect answer / ANSWER key pressed 0 point
Total possible points 100 points
For Typing Challenge, the scoring is calculated in the following way:
Level 1 - 3: for each correct typed letter 1 point
Level 4: for each correct typed word 4 points
Total possible points 100 points
2-PLAYER MODE
Starting score 100 points
Correct answer from the first player 20 points
Wrong answer from the first player -20 points
Correct answer from the second player 10 points
Wrong answer from the second player -10 points
Total possible points 200 points
NOTE: Because of their nature, there is no scoring in the following activities:
Big Buyer Smart Alarm
3D Tic T ac Toe Calculator
Treasure Hunt Notepad
Rumbling Ranks Card Maker
Block Breakout Private Pad
Spanish T r anslator Art Studio
German T ranslator Calendar
French Translator Day Planner
Word Recall
13
Page 17

DESCRIPTION OF ACTIVITIES
LANGUAGE
1. SPELLING
There will be 5 treasure boxes that represent 5 questions. After a treasure box has been
chosen, a picture will appear on the screen and the learning unit will say the corresponding
word for you to spell. Type in the correct spelling of the word and press the ENTER key to
confirm.
2. TENSES
This activity focuses on the three major tenses: present, past and past participle. A v erb will
appear on the screen and the unit will ask you a question. Type in the correct tense of the
verb according to the question and then press the ENTER key to confirm.
3. SINGULARS
Three words will appear on the screen and the unit will then ask to select the plural one.
Once the plural word is chosen, type in the singular form of the word and then press the
ENTER key to confirm.
4. PLURALS
Three words will appear on the screen and the unit will then ask to select the singular one.
Once the singular word is chosen, type in the plural form of the word and then press the
ENTER key to confirm.
5. ANTONYMS
A word will appear on the screen. Find the word with the opposite meaning. Spell out
the antonym by typing in the correct letters or use the mouse to click on the moving
letters. Press the ENTER key to confirm.
6. SYNONYMS
A word will appear on the screen. Find the word with the same meaning. Spell out the
synonym by typing in the correct letters or use the mouse to click on the moving letters.
Press the ENTER key to confirm.
7. SOUND ALIKES
There will be a sentence shown on the screen with a word missing. Ans wer choices are scrolling on the bottom part of the screen. Choose the most suitable one to complete the sentence.
8. GRAMMAR QUIZ
This activity provides the opportunity to practice grammar skills. The screen will display a
sentence with a mistake. Find the error in the sentence by using the
Print
Screen
Print Data
Printer
Player B
Setup
keys or the mouse and then press ENTER key to confirm the error. If you are correct, 2
multiple choice answers will appear . Choose the correct answer that will make the sentence
grammatically correct and press the ENTER key to confirm.
14
Page 18

9. WORD MUNCH
A word will appear on the screen. Pic k out the extra letter in the word that does not belong.
Move the cursor to the left or right by using the
Printer
Setup
and
Player B
keys and position it under the
letter. Press the ENTER key to confirm.
10.SENTENCE BUILDER
This activity is about building a sentence by joining two sentences into one sentence. The
screen will show two short sentences. Clic k on the arrow ke ys to select the correct word that
combines the two sentences. Press the ENTER key to confirm.
11.WORD PUZZLE
The screen will show 5 missing words in the puzzle. One clue will be given for each word in
the puzzle. Try to guess the mystery words to complete the puzzle.
12. GUIDE WORDS
A word will be displayed on the screen. The play er must select where the word alphabetically
fits. Look at the 3 answer ranges and choose the correct word range which the word fits in.
13.ANALOGY ATTACK
The screen will display the first pair of words on the top part of the screen. Another pair of
words appear that are related in the same way as the top pair of words , but the second w ord
is missing. Choose the word to make a similar pair.
MATHEMATICS
14.SUM IT UP
An addition problem will appear on the screen. Type in the correct answer using the number
keys on the ke yboard, then press the ENTER key to confirm. You can click the “change” icon
to alternate between a vertical or horizontal format of the questions.
15.MINUS MADNESS
A subtraction problem will appear on the screen. T ype in the correct ans w er using the number keys on the ke yboard, then press the ENTER ke y to confirm. You can click the “change”
icon to alternate between a vertical or horizontal format of the questions.
16.MULTIPLICATION
A multiplication problem will appear on the screen. Type in the correct answer using the
number keys on the keyboard, then press the ENTER key to confirm. You can click the
“change” icon to alternate between a vertical or horizontal format of the questions.
17.DIVISION
A division problem will appear on the screen. Type in the correct answer using the number
keys on the ke yboard, then press the ENTER key to confirm. You can click the “change” icon
to alternate between a vertical or horizontal format of the questions.
15
Page 19

18.MATH QUIZ
Addition, subtraction, multiplication and division problems will appear randomly on the screen.
Input the correct answer using the number keys and press the ENTER key to confirm. You
can click the “change” icon to alternate between a vertical or horizontal format of the questions.
19.SECRET SEQUENCES
A series of numbers with one missing will appear on the screen. The numbers are displa yed
in a logical sequence. Try to find out the sequence and fill in the missing number. Three
answer choices are shown on the bottom of the screen. Use the
Printer
Setup
and
Player B
keys or click
on the answer to select the correct answer. Press the ENTER key to confirm.
20.FRACTIONS
This activity improves mathematical skills using fractions. The screen will show shapes with
some shaded areas. Three answer choices are shown on the bottom part of the screen.
Choose the correct fraction for the shaded area.
21.GRAPH PROBLEMS
A graph will appear on the screen. Then a question with 3 possible answers related to the
graph will show on the following screen. Choose the correct answer and press the ENTER
key to confirm. You can go back to view the graph by clic king on the graph icon. You can go
to the question by clicking on the question icon.
22.BIG BUYER
This is your chance to buy your favorite object. Choose one of your favorite objects and
select the correct combination of coins to buy the object. Each object has a price . Click on
the coin you want to use and click the hand to insert it into the machine. Click on the X icon
to clear your coins.
23. TICK TOCK CLOCK
There will be a clock animation on the left and the three answer choices on the right of the
screen. Look at the time on the clock and select the correct time for the clock by using the
Print Data
and
Print
Screen
keys or the mouse. Press the ENTER key to confirm.
24.GEOMETRY
A geometrical picture will display on the screen. Find the correct answer and press the
ENTER key to confirm.
25.MAGIC GRID
An incomplete number grid will appear on the screen. Try to fill in the missing numbers to
make the rows and columns add up to the target number.
16
Page 20

LOGIC
26. 3D TIC TAC TOE
A three dimensional Tic Tac Toe will appear on the screen. The player can use the arrow
keys or the mouse to choose the correct place and press the ENTER key to confirm. The
one who fills in 3 of their balls to form a horizontal, vertical or diagonal straight line first wins
the game.
27.TREASURE HUNT
This activity combines luck and logical thinking. Program will display a grid and size depends on level. The mission of this game is to find all the treasures in the grid. In the grid,
there are also enemy and bonus tiles. Click on a tile to find a treasure. If an enemy is in the
tile, you will lose a chance, but if a bonus is in the tile, you will earn an extra chance. There
are also some hint tiles on the side. You can hit the hint tile and it will tell you how many
treasures are located in that column or row. When you click on any one of the hint tiles , y ou
will lose a chance.
28.RUMBLING RANKS
The goal of this game is to “eat” all the enemy’s cards. At the beginning of the game, a grid
of covered cards will be displayed. Each player takes turns to uncover the cards. For each
turn, the player can either uncover one card or mo ve one step with an uncov ered card. Cards
with higher or same ranks can eat cards with same or lower ranks. Ranks are indicated with
the number of bars shown on the cards. The one with the last card wins the game.
29.BLOCK BREAKOUT
The goal of this game is to move the large treasure bloc k out of the grid b y moving the other
blocks around. The player can mov e the b loc ks by clicking the mouse or by using the arrow
keys. The player will win the game if the target is out from the boundary through the exit
within the time.
30.MAGIC KEY
A door is shown on the screen. The ke ys labeled 1, 2, 3, 4, …… will appear . Only one of the
keys can open the door. The screen will first show a combination of possible keys that can
open the door. The screen will then show a combination of keys that cannot open the door.
The player must find the magic key by logical elimination to open the mystery door.
FOREIGN LANGUAGES
31. SPANISH TRANSLATOR
In this activity , you will learn the translation of Spanish phrases and words . Choose a w ord or
phrase from the list and press ENTER to see the translation for the word. You can scroll up
and down the list by using the arrow keys.
17
Page 21

32. SPANISH TESTER
In this activity, you will be tested on the translation of Spanish phrases and words. A word
will appear on the screen. Try to find the correct Spanish translation f or the word. Press the
ENTER key to confirm.
33. GERMAN TRANSLATOR
In this activity , you will learn the translation of German phrases and words. Choose a word or
phrase from the list and press ENTER to see the translation for the word. You can scroll up
and down the list by using the arrow keys.
34. GERMAN TESTER
In this activity, you will be tested on the translation of German phrases and words. A word
will appear on the screen. Try to find the correct German translation for the word. Press the
ENTER key to confirm.
35. FRENCH TRANSLATOR
In this activity , y ou will learn the translation of F rench phrases and words . Choose a word or
phrase from the list and press ENTER to see the translation for the word. You can scroll up
and down the list by using the arrow keys.
36. FRENCH TESTER
In this activity , you will be tested on the tr anslation of F rench phrases and words. A w ord will appear
on the screen. T ry to find the correct French translation for the w ord. Press the ENTER ke y to confirm.
TRIVIA
37.SCIENCE
This challenging trivia game tests your knowledge of science. A question will scroll across
the screen with three multiple choice answers. Highlight the correct answer by using the
arrow keys or the mouse and press the ENTER key to confirm.
38.GEOGRAPHY
This challenging trivia game tests your knowledge of geograph y . A question will scroll across
the screen with three multiple choice answers. Highlight the correct answer by using the
arrow keys or the mouse and press the ENTER key to confirm.
39.EXTINCT OR RARE
This challenging trivia game tests your knowledge of extinct or rare animals . A question will
scroll across the screen with three multiple choice answers. Highlight the correct answer by
using the arrow keys or the mouse and press the ENTER key to confirm.
40.INVENTIONS
This challenging trivia game tests your knowledge of inventions . A question will scroll across
the screen with three multiple choice answers. Highlight the correct answer by using the
arrow keys or the mouse and press the ENTER key to confirm.
18
Page 22

HOMEWORK LAB
41.WORD RECALL
A list of words is shown on the screen in alphabetic order. The player can choose the word
by using the scroll bar on the right to scroll through the list of words and then press ENTER
to confirm. After the selection, the unit will show the meaning of the word. There are two
icons on the right side of the screen. Clic k on the voice icon to listen to the talking word and
click on the picture icon to see the animation of the word.
42.TYPING CHALLENGE
This activity will help to improve typing skills. Letters or words will f all from the top to the bottom
of the screen. Timer will start timing when you start to type. Try to type as fast as you can.
43. TIME TUTOR
There will be a clock animation on the left and a question showing the time on the right of the
screen. Move the hands of the clock to match the time by using arrow keys or the mouse.
Press the ENTER key to confirm.
TM
TOOLS
44.SMART ALARM
This is a tool that is similar to an alarm clock. The alar m bell will ring when the set time is
reached. Select a melody to use as the alarm. Set the time of the alarm. Select if the alarm
should be repeated every 5 minutes.
45.CALCULATOR
This function turns the learning unit into a fully operational 8-digit calculator for addition,
subtraction, multiplication and division. Just enter your figures using the n umber keys , press
the ENTER key or the = key and the learning unit will calculate for you.
46.NOTEPAD
This is a simple word processing function that allows you to type in your own words, messages or stories. It has some menu icons along the top left corner of the screen which giv e
you a clear understanding of the functions of this activity.
47.CARD MAKER
This is a simple card making function that allows the children to print the card with their own
typed-in messages included. The tools bar is located on the right side of the screen. Your
card can be printed if a compatible printer is connected.
48.PRIVATE PAD
This activity is like the Notepad except that the pla yer must enter the passw ord before he/she
can begin writing. To reset the password, press ANSWER then 0 then ENTER.
19
Page 23

49.ART STUDIO
This allows you to design your own pictures or type a message. Your finished work can be
printed if a compatible printer is connected.
50.CALENDAR
A calendar will appear on the screen that goes from the year 1990 up to the year 2089.
Select the month or the year that you want to see b y clicking on the arrow ke ys. You can write
a message for a certain day by clicking on that day.
51.DAY PLANNER
This activity will help to keep your own schedule. Input an e vent on a particular date and click
on the SAVE icon to save your record. A mark will be shown on the calendar after a record
is added. Press the HELP key to find out all the marked date one by one.
HIDDEN BAR
There are two hidden bars on the screen, Activity Status Bar and the Date & Time Bar . When
the mouse pointer is at the top edge of the screen, the Activity Status Bar will pop up. When
the mouse pointer is at the bottom edge of the screen, the Date & Time Bar will pop up.
ACTIVITY STATUS BAR
NORMAL MODE: ONE-PLAYER MODE
Chances Timer
Level
Score
NORMAL MODE: TWO-PLAYER MODE
Timer
Player A Player B
ADVENTURE MODE
Pass mark
indicator
Chance
Timer
Jewels gained
20
Page 24

DATE & TIME BAR
Alarm Enable
Date Current Time
CARE AND MAINTENANCE
1. Keep the unit clean by wiping it with a slightly damp cloth.
2. Keep the unit out of direct sunlight and away from direct sources of heat.
3. Remove batteries when the unit will not be in use for a long period of time.
4. Do not drop the unit on hard surfaces or try to dismantle it.
5. Do not immerse the unit in water or get the unit wet.
IMPORTANT NOTE:
Creating and developing electronic learning aids is accompanied by a responsibility
that we at VTECH
the information which forms the value of our products. However , errors sometimes can
occur. It is important for you to kno w that we stand behind our products and encourage
you to call our Consumer Services Department at 1-800-521-2010 in the U.S. or 1800-267-7377 in Canada with any problems and/or suggestions that you might ha ve. A
service representative will be happy to help you.
®
take very seriously . We mak e ev ery effort to ensure the accuracy of
NOTE:
This equipment generates and uses radio frequency energy and if not installed and used
properly , that is, in strict accordance with the manuf acturer’ s instructions , it may cause interference to radio and television reception. It has been tested and found to comply within the
limits for a Class B computing device in accordance with the specifications in Subpart J of
Part 15 FCC Rules, which are designed to provide reasonable protection against such
interference in a residential installation. How ev er, there is no guarantee that interference will
not occur in a particular installation. If this equipment does cause interference to radio or
television reception, which can be determined by turning the equipment off and on, the user
is encouraged to try to correct the interference by one or more of the following measures:
• reorient the receiving antenna
• relocate this product with respect to the receiver
• move this product away from the receiver
21
 Loading...