

Page 1
Page 2
INSTRUCTIONSPERTAININGTOA
RISKOFFIRE,ELECTRICSHOCK,
ORINJURYTOPERSONS
IMPORTANTSAFETYINSTRUCTIONS
WARNING
tions should always be followed, including the following:
1) Read all the instructions before using the product.
2) Do not use this product near water-for example , near a bathtub, washbowl, kitchen sink, in a wet basement, or near a swimming pool, or
the like.
3) This product should be used only with a cart or stand that is recommended by the manufacturer.
4) This product, either alone or in combination with an amplifier and
headphones or speakers, may be capable of producing sound levels that could cause permanent hearing loss. Do not operate for a
long period of time at a high volume level or at a le v el that is uncomfortable. If you experience any hearing loss or ringing in the ears,
you should consult an audiologist.
5) The product should be located so that its location or position does
not interfere with its proper ventilation.
6) The product should be located away from heat sources such as radiators, heat registers, or other products that produce heat.
7) The product should be connected to a power supply only of the type
described in the operating instructions or as marked on the product.
8) The power-supply cord of the product should be unplugged from the
outlet when left unused for a long period of time.
9) Care should be taken so that objects do not fall and liquids are not
spilled into the enclosure through openings.
10) The product should be serviced by qualified service personnel when:
a) The power-supply cord or the plug has been damaged; or
b) Objects have fallen, or liquid has been spilled onto the product; or
c) The product has been exposed to rain; or
d) The product does not appear to operate normally or exhibits a
e) The product has been dropped, or the enclosure damaged.
11) Do not attempt to service the product beyond that described in the
user-maintenance instructions. All other servicing should be referred
to qualified service personnel.
SAVETHESEINSTRUCTIONS
—
When using electric products, basic precau-
marked change in performance; or
GROUNDINGINSTRUCTIONS
This product must be grounded. If it should malfunction or breakdown,
grounding provides a path of least resistance for electric current to reduce the risk of electric shock. This product is equipped with a cord having an equipment-grounding conductor and a grounding plug. The plug
must be plugged into an appropriate outlet that is properly installed and
grounded in accordance with all local codes and ordinances.
DANGER—Improper connection of the equipment-grounding conductor
can result in a risk of electric shock. Check with a qualified electrician or
serviceman if you are in doubt as to whether the product is properly
grounded. Do not modify the plug provided with the product—if it will not
fit the outlet, have a proper outlet installed by a qualified electrician.
The lightning flash with arrowhead symbol within an equilateral triangle, is intended to alert the user to the presence of uninsulated “dangerous voltage” within the product’s
enclosure that may be of sufficient magnitude to constitute
a risk of electric shock to persons.
The exclamation point within an equilateral triangle is intended to alert the user to the presence of important operating and maintenance (servicing) instructions in the literature accompanying the product.
THE FCC REGULATION WARNING (for U.S.A.)
This equipment has been tested and found to comply with the limits
for a Class B digital device, pursuant to Part 15 of the FCC Rules.
These limits are designed to provide reasonable protection against
harmful interference in a residential installation. This equipment generates, uses, and can radiate radio frequency energy and, if not installed and used in accordance with the instructions, may cause harmful interference to radio communications. Howe ver, there is no guarantee that interference will not occur in a particular installation. If this
equipment does cause harmful interference to radio or television reception, which can be determined by turning the equipment off and
on, the user is encouraged to try to correct the interference by one or
more of the following measures:
• Reorient or relocate the receiving antenna.
• Increase the separation between the equipment and receiver.
• Connect the equipment into an outlet on a circuit different from
that to which the receiver is connected.
• Consult the dealer or an experienced radio/TV technician for help.
Unauthorized changes or modification to this system can void the
user’s authority to operate this equipment.
CE mark for European Harmonized Standards
CE mark which is attached to our company’s products of AC mains
operated apparatus until December 31, 1996 means it conforms to
EMC Directive (89/336/EEC) and CE mark Directive (93/68/EEC).
And, CE mark which is attached after January 1, 1997 means it conforms to EMC Directive (89/336/EEC), CE mark Directive (93/68/
EEC) and Low Voltage Directive (73/23/EEC).
Also, CE mark which is attached to our company’s products of Battery operated apparatus means it conforms to EMC Directive (89/
336/EEC) and CE mark Directive (93/68/EEC).
IMPORTANT NOTICE FOR THE UNITED KINGDOM
WARNING—THIS APPARATUS MUST BE EARTHED
As the colours of the wires in the mains lead of this apparatus may
not correspond with the coloured markings identifying the terminals
in your plug, proceed as follows:
• the wire which is coloured green and yellow must be connected to
the terminal in the plug which is marked with the letter E or by the
earth symbol , or coloured green or green and yellow.
• the wire which is coloured blue must be connected to the terminal
which is marked with the letter N or coloured black.
• the wire which is coloured brown must be connected to the termi-
nal which is marked with the letter L or coloured red.
Page 3

Table of Contents
Introduction....................................................................................... 1
Welcome Aboard!............................................................................ 1
The Best of Both Worlds ................................................................. 1
Valve Reactor Technology: ............................................................. 2
Enough Talk Already...Shut Up and Let Me Play My Guitar! (a.k.a.
“Quick Start”).................................................................................... 4
Checking Out the 32 Factory Preset Programs............................... 4
The Guitarist’s Guided Panel Tour ................................................. 8
A. The Top Panel ...................................................................................... 8
1. Input Section ............................................................................... 8
2. Pedal Section .............................................................................. 9
3. Preamp Section......................................................................... 10
4. Power Amp Controls ................................................................. 12
5. Modulation Section.................................................................... 13
i) Modulation FX.................................................................... 13
ii) External Control OF Modulation Speed ............................ 14
iii) Programmable Noise Reduction (NR).............................. 14
6. Delay Section ............................................................................ 15
7. Reverb Section.......................................................................... 16
8. Bypass & Original Value Section............................................... 16
9. Bank/Manual/Write/Tuner/Channel Section .............................. 17
10. Power Switch........................................................................... 18
B. The Rear Panel ................................................................................... 19
Storing Stuff, Writing Stuff & More... ............................................ 21
Program Select Mode.................................................................... 21
Recalling A Program ..................................................................... 22
Switching Between Programs ....................................................... 23
Writing and Storing Your Own Program ........................................ 23
Tweaking an Existing Program ............................................. 23
Starting From Scratch ........................................................... 24
Original Value Led: What’s being used here, man? ...................... 26
Manual Mode: What You See Is What You Get! ........................... 28
Tuner Mode ..................................................................................... 30
Tuning your Axe with your Amp! ................................................... 30
i
Page 4

Silent Tuning Mode ....................................................................... 31
Calibrating the Tuner..................................................................... 31
Factory Preset Programs............................................................... 32
What’s on the Factory Preset Program Menu? ............................. 32
Preset Program Recipes ............................................................... 34
Recalling the Factory Preset Programs......................................... 35
Model Behaviour: What’s What? And What Does What? ........... 36
A. Pedal Points ....................................................................................... 36
B. Amp Models........................................................................................ 39
Troubleshooting ............................................................................. 50
Techno Talk (yawn!):
General Valvetronix Specifications ............................................. 53
*A United States patent has been obtained for Valve Reactor technology.
Patents are pending in other countries. (As of July 2001)
* Company names, product names, and names of formats etc. are the trademarks or registered
trademarks of their respective owners.
ii
Page 5

Introduction
WELCOME ABOARD!
any thanks for adding a VOX Valvetronix amp to your sonic arsenal. We’re sure
it’ll give you countless hours of great guitar tones that will feel as good as they
M
(and it’s as easy as falling off a log, believe me!), let’s take a quick look at why the Valvetronix unit you’re about to plug into is the real deal as opposed to yet another “jack of
all trades, master of none” digital modeling amp....
different ones out there to choose from. And, of course, it goes without saying that each
and every one of them claims to be the best thing since sliced bread! Being guitar nuts,
we’ve played ‘em all and, as far as we’re concerned, the vast majority of them fall way
short of their bold advertising claims. This is because pretty much all digital modeling
amps out there fall into one of two categories: they’re either made by a company that
specializes in making digital, guitar gadgets and has little or no experience in building
amps. Or the exact opposite: they’re made by an established amp manufacturer that’s
attempted to become a credible digital engineering concern in a couple of years or less!
Think about these two truths for a second...scary or what!?
sound! Before we show you how to get the most out of your brand new combo
Digital modeling amps? Yep, we know, they’re nothing new and there’s a bunch of
You don’t have to be a genius to realize that for someone to make a great sounding and feeling digital modeling amp, they have to possess experience and expertise in
both digital engineering/modeling and amp design/manufacture. After all, if they fall short
in either area, the end product is not gonna be all it can be and, as a result, both its tone
and its “guitar friendly” nature (hey, you want an easy-to-operate guitar amp, not a complex computer, right?) will suffer - big time! We’re happy to report that your new Valvetronix amp was designed and built by experienced experts in both of these vitally
important fields. The result...
THE BEST OF BOTH WORLDS
alvetronix is the brainchild of a mind-meld between the digital expertise of Korg’s
critically acclaimed ToneWorks team (a bunch of axe addicts who’ve spent the last
V
gurus behind one of the most revered names in guitar amplification - Vox! As you are no
doubt aware, Vox’s all-valve, AC30 amps have been the first choice of countless professional players for the past four decades and have been heard on numerous hits.
decade, their many digital guitar devices have proven to be a firm favourite with both the
guitar loving press and guitar loving public. They were also the first folk to master the art
of using oversampling to create digital distortions that sounded and felt real and didn’t
have those evil, dissonant overtones (a.k.a. aliasing) that made most guitarists feel that
“digital distortion” was a rival to “jumbo shrimp” in the oxymoron charts! The most recent
ToneWorks breakthrough is their proprietary REMs (Resonant structure and Electronic
ten years living, breathing and dreaming in digital!) and the world-renowned amp
Korg’s ToneWorks team has a pretty impressive track record too; for over a
1
Page 6

circuit Modeling System), the stunning realism of which has deservedly earned an avalanche of critical acclaim and has been welcomed with open arms by serious guitarists all
over the globe.
The result of this perfect marriage is a digital modeling amp that sounds, feels,
looks and operates like a guitar amp...what an amazing concept! It isn’t merely a multieffects device hooked up to a stiff sounding, solid-state power amp driving some ho-hum
speakers that can’t cut through a band, even when turned up to “11”! And it isn’t a guitar
amp stuffed with some hurriedly built, “catch-up” digital stuff either. No sir, Valvetronix is
the real deal - the best of both worlds.
What is ?
(Resonant structure and Electronic circuit Modeling System) is KORG’s proprietary sound modeling technology which precisely reproduces the complex character
and nature of both acoustic and electric instruments as well as electronic circuits in
real world environments. emulates a wide variety of sound generation characteristics including instrument bodies, speakers & cabinets, acoustic fields, microphones, vacuum tubes, transistors, etc.
VALVE REACTOR TECHNOLOGY:
THE POWER (AMP) AND THE GLORY!
n keeping with Vox’s brave, pioneering spirit, the Valve Reactor circuitry that drives the
power amp in your new VOX combo is a groundbreaking piece of technology. Without
I
getting overly technical, here’s what’s going on...
While much of the tone creation and shaping carried out in this amp is done in the
digital domain, its Valve Reactor power amp is 100% analogue. The resulting journey
your guitar’s signal takes through the analogue world of the power stage plays a major
role in providing the all-important feel and tone of the original amps we modeled.
The Valve Reactor power stage is, to all intents and purposes, a bona fide valve
(tube) push-pull power amplifier, but in miniature. It utilizes a 12AX7 valve (a dual triode
device - meaning “two valves in one”) and is equipped with an output transformer, just
like a “real” valve amp. Instead of connecting directly to the loudspeaker though this
transformer is connected to a specially designed VariAmp Power Circuit that increases
the magnitude of the transformer output from its lowest level (1 Watt) up to the maximum
output of 60 Watts per channel.
Because VariAmp Power Circuit stage is completely transparent (doesn’t colour or
change the signal in any way), the resulting output tone is pure valve. It also ensures that
the output signal maintains the high dynamic range associated with traditional valve
amps - something most solid-state amplifiers cannot deliver, and one of the main factors
why valve guitar amps normally sound and feel so much louder and more alive than a
solid-state amp boasting the same output power.
2
Page 7

The output of your Valve Reactor power amp is also designed to “read” the constantly changing “impedance” curve of the loudspeaker system it is hooked up to and
then “report” this reactive information back to the output transformer - just like its “bigbrother” valve amplifiers do. This information permits the behaviour of the valve stage of
the amp to vary with the speaker load (impedance), which is another important part of
“real world” valve tone.
Apart from the vital valve tone this ingenious power amp design provides, it also
allows us to replicate various “circuit characteristics” that are unique to the all-valve
power stages of the amps we’ve modeled. These “characteristics” include: Class A or
Class A/B operation, Presence and Resonance (low end) control circuitry (both found in
the negative feedback circuit that some, but not all, valve power amps have) and power
output. Being able to match such vital characteristics (except power output, which is user
defined) helps ensure that each and every one of our models is as tonally authentic as
possible - as opposed to the usual “close but definitely no cigar” norm of digital modeling.
And just so you know, this paterted in USA power amp technology is unique to VOX Valvetronix.
But hey, talk is cheap and ultimately the proof of this particular pudding lies in the
way the amp sounds and feels when you play it. So, let’s cut to the chase and get you
started. What are you waiting for, bud? Grab your guitar and brace yourself for a whole
bunch of toneful fun!
3
Page 8

Enough Talk Already...Shut Up and Let Me Play My Guitar!
a.k.a.
“Quick Start”
ep, you’re right, the vast majority of manuals are about as interesting as watching
paint dry and we know that you’re anxious to plug in to your new amp and give it a
Y
running in a heartbeat.
ual a chance - it’s been written by a fellow guitar nut and this amp boasts some killer bells
‘n’ whistles that warrant your interest. In short, it’ll be worth your while, we promise. This
said, here’s the “Quick Start” - enjoy! I look forward to talking you through the amp in
more detail once you’re done....
whirl in the comfort of your own home. So, here’s a “Quick Start” to get you up and
Once you’ve satisfied your primal urge to play, I’d like to urge you to give this man-
HINT: Want life to be easy? Of course you do! For this reason I suggest you fold out the
inside back cover of this “Guitarist’s Guide” before you go any further. Why? So you can
see the pretty pictures of the Top Panel and Rear Panel it contains while you’re going
through the “Quick Start,” that’s why!
CHECKING OUT THE 32 FACTORY PRESET PROGRAMS
1. Turn the MASTER Volume Control on the amp all the way down.
2. Plug one end of the supplied power cord into the AC POWER CONNECTOR
on the rear panel of the amp and the other end into the wall.
3. Make sure the AC wall socket you’ve plugged into is switched on!
4. While you’re around the back of your amp, take a quick look at the POWER
SELECT switch and dial in the output power you’d like to start with...yep,
you have a choice! How cool is that?
5. Plug your guitar into one of the two INPUT JACKS (HIGH or LOW- take your
choice &, if unsure, I recommend you take the HIGH road!).
Right, now we’ve got to this point, there are two ways you can go - you can
either check out the factory presets (32 killer programs that will give you a
darned good taste of the plethora of great tones that lurk within your Valvetronix amp) or you can dive right in and start writing your own programs
4
Page 9
from scratch. We’re gonna take the easiest of the two options (and they’re
both pretty simple!) and go through the factory presets first BUT hey, if
you’d rather start by writing a program of your own right off the bat, skip to
the “STARTING FROM SCRATCH” section that starts on page 23 and carry
on from there...
6. Let’s start at the very beginning by playing program 1-1 which is a fat, easy
to play, high gain lead sound called “Flying High.” First though, let’s reset
your amp to the factory presets, just incase someone has messed with
‘em...and don’t panic, it’s a piece of cake!
IMPORTANT NOTE: If you do a “factory preset recall” you’re gonna permanently
erase all the programs you may have already written/tweaked yourself. So please
make double sure that you don’t mind losing your programs before you reset your
Valvetronix’s memory to its “virgin,” factory default state...’cos once you do a “reset”
there’s no turning back!
ANOTHER IMPORTANT NOTE: If there are some programs you’ve written that
you’d like to remember, jot ‘em down on the “Programmer’s Cheat Sheet” that can be
found on the back of the fold-out rear cover of this manual before you “reset” the
amp. See the “ORIGINAL VALUE LED” section on page 26 if you wanna know how
to do this.
7. Hold down the Up (▲) and Down (▼) Cursor Buttons (the ones right next to
the BANK DISPLAY window) and the TUNER/CANCEL Button that is next to
‘em and, while you’re holding all three of them down at the same time,
switch the amp’s POWER Switch to the “ON” position. If you’ve done this
correctly, a “ ” will be flashing in the BANK DISPLAY window so move on
to STEP 8.
8. If a “ ” isn’t flashing - don’t fret. Just switch the amp off and try
again...making sure you’re holding all three buttons down when you hit the
POWER SWITCH this time! The “ ” is flashing in the BANK DISPLAY window now, right? Good!
9. Press the WRITE Button (just above the TUNER/CANCEL one) and watch the
BANK and the CHANNEL Button lights do a little dance. Once they both stop
jumping, you’re done...your reset mission is a success. And, as luck would
have it, doing this leaves your amp armed and ready with the exact program
we’re looking for: 1-1! See, I told you it was easy!! So, get ready to rock by
switching your guitar’s pickup selector to the lead (bridge) position and
turning its Volume and Tone controls up full. Right, let’s go “Flying High,”
bro...
5
Page 10

IMPORTANT NOTE: As already stated, your Valvetronix combo comes with 32 preset programs. FYI, these are stored in 8 Banks, each of which consists of 4 Channels
(8 x 4 = 32!). The Bank number is shown in the BANK DISPLAY window while the
Channel number is indicated by one of the four LEDs above the CHANNEL Buttons.
This means that program 1-1 is indicated by a “1” appearing in the BANK DISPLAY
window and the LED above the CHANNEL 1 Button being lit up. Geddit?
10. Turn the amp’s MASTER VOLUME control up to the level you’re after and
start wailing!
MOVIN’ ON...
11. Once you’ve had your fill of “Flying High” (which might take a while, it’s a
highly addictive program), check out program 1-2. This one is called “Def
Tone” and is a lush, clean program that is best suited for your neck (rhythm)
pickup. How do you get to it? Easy, just press the CHANNEL 2 button and
you’re there! And notice how seamless the transition from program 1-1 to 12 was...none of those horrible “holes of silence” that plague the switching
on so many digital devices...this bad boy switches instantly!
12. To get to the next program, 1-3, all you do is hit the CHANNEL 3 button...duh! Before you do though, be warned, as its name “Breakin’ Stuff”
suggests, this one ain’t for the faint hearted - it’s a fat sounding, aggressive,
modern crunch. So, switch back to your lead (bridge) pickup, chunk out a
heavy riff and watch out for stage-divers!
13. Phew! After the mayhem of “Breakin’ Stuff,” program 1-4 is a little mellower.
To check it out, just hit the CHANNEL 4 button. Titled, “Tie Mama Down,”
this is a regal sounding VOX AC30 crunch that has classic rock written all
over it.
6
Page 11

CHANGING BANKS...
14. Right, now we’ve played programs 1-1, 1-2, 1-3 and 1-4, our next step is to
move to Bank 2 and do the same exact thing. So, let’s move from program1-
4 to 2-1...and, once again, don’t fret, it’s a breeze. Hit the Up (▲) Cursor But-
ton (next to the BANK DISPLAY window - remember!?) one time and “2” will
start flashing in the Display. Having done this, to get to program 2-1, “Clean
Edge,” just hit the CHANNEL 1 button and you’re there!
NOTE: While “2” was flashing in the Display Window, did you notice that Program 1-
4 was still up and running? This cool feature ensures seamless program switching in
between any of the Banks - your next program isn’t chosen until you hit a Channel
button.
STEP ON IT! If you get yourself the optional VC-4 VOX Foot Controller, you’ll be able
to switch seamlessly between all 32 programs with it. So, what are you waiting for,
get one!
15. There is no step 15, amigo. This is the end of the line! You know how to
switch channels and you know how to change banks, so you’re on your own
from here on in! You’ve still got 27 more programs to explore, so use the
PRESET PROGRAM listing on the back of the fold-out rear cover as your
map and go exploring. Enjoy...
7
Page 12
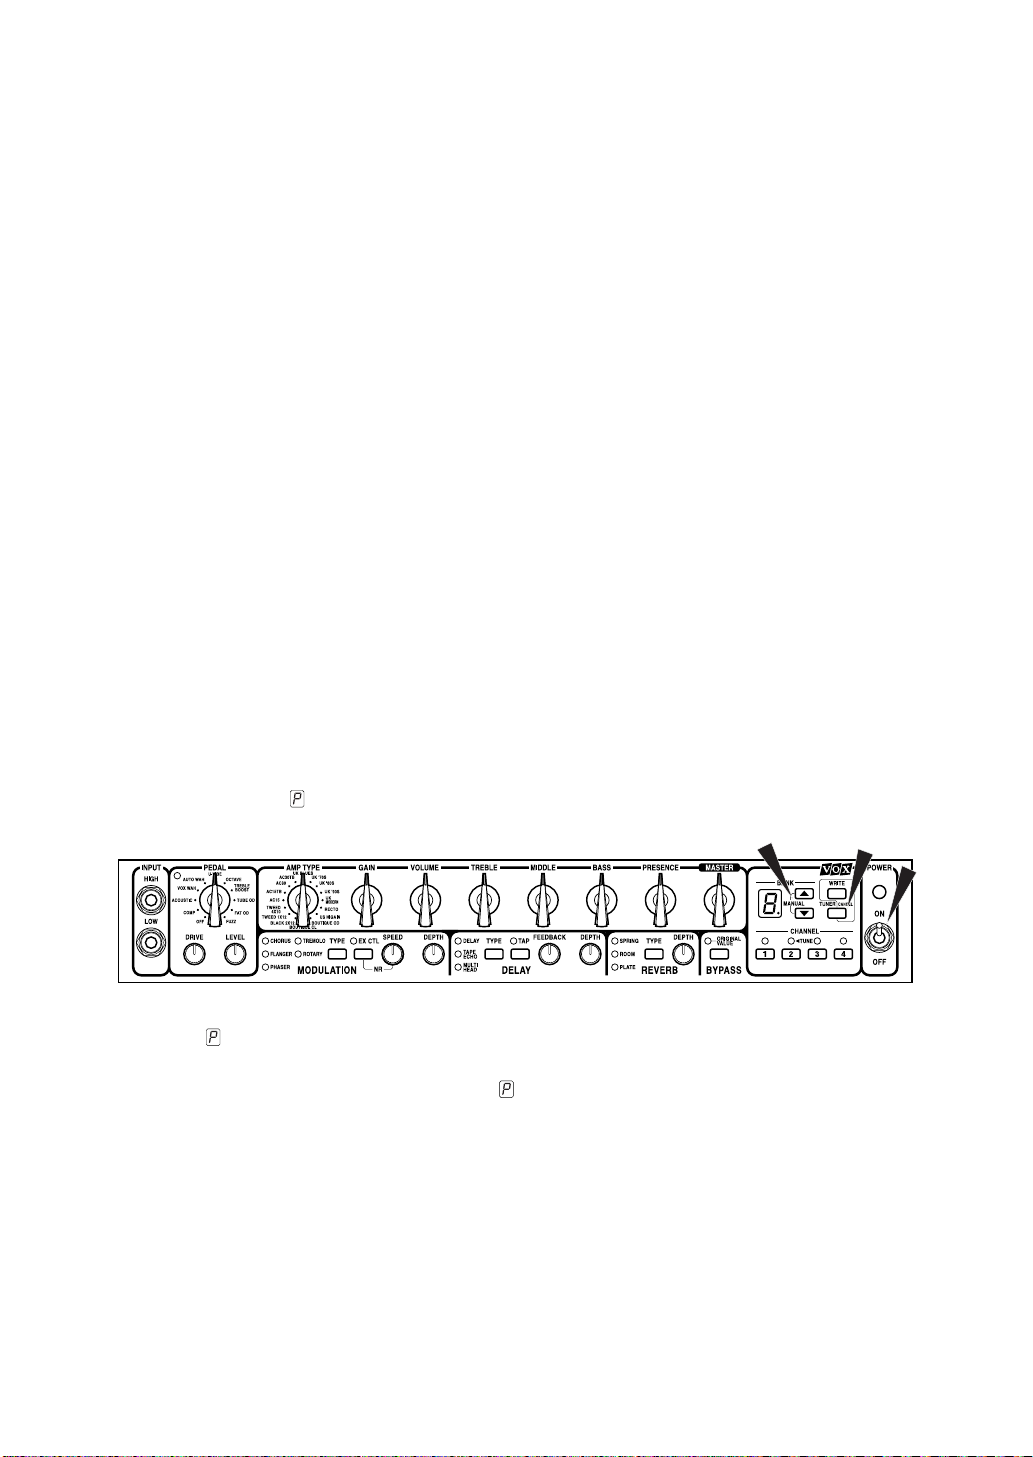
The Guitarist’s Guided Panel Tour
O
ver the next 13 pages we’re gonna take a quick peek at the Top and Rear panels
of your Valvetronix amp. If you haven’t already noticed, you’re gonna quickly find
out that this unit is laid out exactly like a “real” guitar rig - what a concept! By this I
mean that your signal path is as follows:
Virtual FX loop
one of 10
Stompboxes
To help make this manual “Guitarist’s Guide” as painless to use as possible, we’ve
given it an inside back cover that folds out. And, when you fold it out you’ll see nice big
pictures of the amp’s Top Panel, Rear Panel and more. Why did we do this? So you can
have pictures of both panels staring you in the face while you read about ‘em - thus
avoiding the annoying “flicking between pages” that most manual’s require you to do
because there’s only one picture of a panel and it’s never on the same page you’re reading when you want to refer to it! So, fold out that useful back cover and let’s go...
one of 16
Preamp models
Modulation
Delay
Reverb
FX loop
Master Vol
Power Amp model
Class A
Class A/B
depending on the
preamp model chosen
Celestion
guitar speaker(s)
A. The Top Panel
1. INPUT SECTION
This, believe it or not, is where you plug your guitar into the amp! There are two (2) input
jacks to choose from: High & Low...
8
HIGH (high sensitivity)
Strictly speaking (yeah, right!), a high-sensitivity input jack such as this is always
recommended for use with a guitar loaded with low-output pickups, such as single-coils. This said, most guitarists ignore this recommendation (imagine that!)
and use this input for axes boasting hot (high output) pickups. Why? ‘Cos doing
this helps ensure your guitar’s signal is as big ‘n’ beefy as it can be...works for me!
WARNING: If you plug a guitar that has high output pickups into the HIGH input and
you select the Acoustic Pedal, unless you turn your guitar down, you could well end
up with some nasty, unwanted, high frequency distortion. This is NOT an indication
that your Valvetronix amp is faulty - it is merely telling you that you’re driving the
Acoustic Pedal too hard! And just so you know, all “acoustic simulation” pedals and
Page 13

“acoustic emulation” channels will do the same thing if (ab)used in this way. Why? To
make an electric guitar sound like an acoustic you have to boost the high frequencies
by ridiculous amounts and so, if you slam such a device too hard, unwanted distortion can result. Geddit?! Good...
LOW (low sensitivity)
Once again, the “experts” will tell you that a low sensitivity input is best suited for
guitars with high output pickups - such as over-wound humbuckers or active pickups. We say “balderdash!” There are no rules, so try both and use the one your
ears like the best!
2. PEDAL SECTION
This area allows you to add a pedal effect to your set up, if you wish. All ten (10) of the
effects on offer here are models of classic stompbox effects and, as a result, are meant to
be added to your guitar’s signal before it hits the actual amp. Whenever a pedal is
selected, the red LED in the upper left corner of this section lights up. So, whenever you
call up a program and this LED is off, it means the Pedal Section is “OFF” (bypassed).
Just in case some of the abbreviations we’ve used aren’t 100% clear, the ten pedals on
offer are:
COMP: Compressor OCTAVE: Octave Divider
ACOUSTIC: Acoustic Simulation TREBLE BOOST: Er, a Treble Booster!
VOX WAH: The classic V847 TUBE OD: Tube Overdrive
AUTO WAH: Exactly that! FAT OD: Ballsy Overdrive
U-VIBE: Uni-Vibe FUZZ: Hot & nasty!!!
PEDAL Selector Switch
This lets you select one of the ten stompboxes on offer, or bypass the section
(OFF). Turn to page 36 for more information on each of the pedals modeled here.
STEP ON IT! If you get yourself the optional VC-4 VOX Foot Controller, you can
switch it to “individual” mode and use it to switch the selected pedal on and off. And,
as you’ll soon discover, the VC-4 will enable you to do a bunch more things too making it a “must have” item for any serious axeman or axewoman!
STEP ON IT! When you select VOX WAH or U-VIBE, you can control the effect (Wah
and Uni-vibe speed, respectively) using the VC-4 Foot Controller. Very cool...
9
Page 14

DRIVE Control
This sets the DRIVE amount when TREBLE BOOST, TUBE OD, FAT OD or FUZZ
are selected. For the other six (6) stompboxes the exact function of this knob
depends on the effect. For specific details please refer to the table that follows.
PEDAL TYPE DRIVE LEVEL
COMP Sensitivity Level
ACOUSTIC Treble Bass
VOX WAH Pedal N/A
AUTO WAH Attack Sensitivity
U-VIBE Speed Mix
OCTAVE Direct Level Octave Level
TREBLE BOOST Drive Level
TUBE OD Drive Level
FAT OD Drive Level
FUZZ Drive Level
LEVEL Control
This knob enables you to adjust the overall level of COMP, TREBLE BOOST,
TUBE OD, FAT OD and FUZZ. It is “disconnected” (does nothing!) on VOX WAH.
See the table for what it does on the other five pedal models.
3. PREAMP SECTION
As the title of this section suggests (imagine that!?), this is the “preamp” control section of
your Valvetronix combo. And, in keeping with what it is supposed to be, it looks and acts
exactly like (wait for it)...an amp! Plus, in true VOX tradition, it boasts our instantly recognizable, “chicken-head” (pointer) knobs...no soft touch, control pads or up and down cursors have been allowed to invade this sacred, tone shaping area. C’mon, this is a guitar
amp, not a computer game!
AMP TYPE Selector Switch
This allows you to select any one of our sixteen (16), stunningly accurate amp
models - each of which is based on an accepted all-tube classic, including the legendary VOX AC30TBX. As already mentioned in the intro to this manual, each
model not only replicates the exact gain and tonal characteristics of the original
amp’s preamp circuit, it also reconfigures the all-important power amp stage too in terms of both Class (A or A/B) and negative feedback circuit (or lack thereof).
Not only is this a cool feature, to us it’s essential! After all, how can you claim to
have modeled an amp if you’ve just zoned in on the preamp and ignored the
power amp? C’mon! Peanut butter alone (regardless of how good it tastes) does
not a great peanut butter and jelly sandwich make - you need some jelly and
bread too! Never make the mistake of thinking the power stage is not an important
part of any amp - it’s vital, in fact it can make or break it. Anyway...
10
Page 15

The amp types on offer are:
VOX AC15 UK MODERN
VOX AC15TB RECTO
VOX AC30 US HIGAIN
VOX AC30TB BOUTIQUE OD
UK BLUES BOUTIQUE CL
UK ’70S BLACK 2x12
UK ’80S TWEED 1x12
UK ’90S TWEED 4x10
Turn to the “AMP MODELS” Section on page 39 for some specific information on
each of the amps modeled here.
GAIN Control
This adjusts the preamp gain of the amp model chosen.
NOTE: Some of the amp models are capable of extreme gain levels (e.g. UK MODERN, RECTO & US HIGAIN) while others (e.g. BOUTIQUE CLEAN, TWEED 1x12 &
AC15) are tamer yet toneful.
VOLUME Control
Amazingly enough, this one determines the volume of the amp model being used.
TREBLE, MIDDLE & BASS Controls
This trio of “chicken-heads,” allow you to dial in the exact amount of high, mid and
low frequencies you’d like. Also, as you’d expect (and hope!), the exact manner in
which each one of these controls behaves and also interacts with the others is
dependant on the amp model selected. Once again, please turn to the “AMP
MODELS” Section on page 39 for more information concerning this.
NOTE: In keeping with the originals, certain models will produce almost no sound
when these three tone controls are turned all the way down (counterclockwise).
NOTE: Not all of the original amps that we modeled house controls for Treble, Middle
and Bass. For example, the amp we based TWEED 1x12 on only boasted a single
tone control which was labeled - yes, you’ve guessed it - TONE! In such cases, rather
than mimic this knob using just one of our three, leaving the other two unemployed,
we allow you to use all three to effectively increase the tonal range of the original.
And, of course, within this increased flexibility you can duplicate the full tonal range of
the original. See page 39 for more details.
11
Page 16

4. POWER AMP CONTROLS
PRESENCE Control
This control allows you to adjust the amount of Presence (high frequency “sparkle”) in your sound. Like all of the preamp knobs we’ve just looked at, the PRESENCE control is programmable.
NOTE: Presence is a function of a power amp containing a negative feedback circuit
and not all the original amps we modeled contain one - for example, none of the four
Vox amps we modeled (AC15, AC15TB, AC30 & AC30TB) feature a negative feedback circuit. Furthermore, FYI, not all amps that have a negative feedback circuit
necessarily feature a Presence control. For example, the original BLACK 2x12 - negative feedback in the power amp? Yes. Presence Control? Nope.
Whenever a modeled amp didn’t have a Presence control, rather than have
this knob do absolutely nothing, we used it to mimic the behavior of another of the
amp’s variables - like the BRIGHT switch on a BLACK 2x12 or the CUT control found
on all of the VOX originals. See page 39 for more details on exactly what the PRESENCE control does on each model.
MASTER (Volume) Control
As is the case with all Master Volume controls, this knob enables you to adjust the
overall volume of your Valvetronix combo.
VERY IMPORTANT NOTE: The MASTER (Volume) Control is NOT programmable.
COOL ‘N’ IMPORTANT ASIDE: The Valvetronix Virtual FX loop.
he next three areas we’re gonna look at are the MODULATION, DELAY &
REVERB sections of your amp. And, just so you know, all three of ‘em are placed
T
Because that’s where such effects are generally placed in the vast majority of professional guitar rigs - in the FX loop, that’s why! Wanna know more? Good, read on...
front of the amp as a “stompbox” is simple. To most people’s ears, they sound better and
more realistic when placed in the loop. Think about it - REVERB emulates the sound created by a room or a hall. So, logic dictates that if we’re going to add it to our sound, the
closer to the end of the signal chain we put it, the more “real” and natural it’s gonna
sound. Ditto DELAY (duh!) and many MODULATION effects too - their very nature dictates that they should be added near the end of your signal path, not at its beginning.
Geddit?
in a “virtual FX loop” - namely, in between the preamp and power amp. Why?
The reason why such effects are invariably set-up in the FX loop rather than in
12
Page 17

Also, if you think about it, if you’re using a crunch or high gain lead sound then it
makes much more sense to add effects like ROTARY, ROOM (reverb) or DELAY to the
signal after it’s been distorted, rather than before. I mean, does it make any sense to add
an effect like reverb and then mash the heck out of your signal (i.e. distort it)? Not
really...right!? Good, case closed. Now our little detour’s over - let’s get on with the front
panel tour...
STEP ON IT! With the optional VC-4 Foot Controller, it is possible for you to switch
each of the MODULATION, DELAY and REVERB sections on and off with your foot.
This incredibly useful function is just one of the many reasons you should own a VC-
4. Stay tuned to this channel for more...
5. MODULATION SECTION
This section enables you to add a modulation effect into the aforementioned “virtual FX
loop” (in between the preamp and the power amp - remember?) for each and every program, if you so wish. It also allows you to assign external control over the SPEED control
and set noise reduction (NR) too.
i) MODULATION FX
TYPE Button
This button enables you to select a Modulation effect - or not! When a particular
effect is chosen, the red LED to its left will light up. If no effect type is selected (i.e.
none of the five LEDs are on), the Modulation Section is bypassed (turned off).
STEP ON IT! If you own the optional VC-4 Foot Controller, you can use the foot pedal
it houses to vary the Speed of any one of the five Modulations on offer. Wow! The
(im)possibilities the VC-4 will open up for you are endless - get one immediately!
The five Modulation effects you can choose from are:
CHORUS: A model of a lush sounding, analogue chorus unit that many consider
to be the industry standard. In the case of the AD120VT, this effect is stereo.
FLANGER: A model of a truly classic analogue Flanger that “unchained” a highly
influential modern guitarist who many hail as the “godfather of two handed tap-
ping.”
PHASER: A model of a much respected and popular analogue phaser, housed in
a banana yellow box!
TREMOLO: This effect is based on the highly acclaimed tremolo circuit found in a
BLACK 2x12.
ROTARY: An incredibly realistic model of a rotary speaker (stereo in the case of
the AD120VT).
13
Page 18
NOTE: When you awhile adjust the “Speed” control on ROTARY (either via the front
panel or the optional VC-4 Foot Controller) the effect takes awhile to react - just like a
real Rotating speaker. Why? Because, in the real world, it takes a second or two for
the motor controlling the speaker rotation to speed up or slow down - that’s why!
SPEED Control
This knob enables you to adjust the modulation speed of the chosen effect.
DEPTH Control
This knob adjusts the Modulation depth on CHORUS, TREMOLO & ROTARY and
feedback on FLANGER & PHASER as listed in the chart below.
MODULATION TYPE SPEED DEPTH
Chorus Speed Depth
Flanger Speed Feedback
Phaser Speed Feedback
Tremolo Speed Depth
Rotary Speed Depth
HINT: If you add a MODULATION effect to a program and you can’t hear the effect,
make sure the BYPASS BUTTON (8) isn’t engaged. If it is, the ORIGINAL VALUE
LED directly above it will be on and this means that everything in the “virtual FX loop”
(Modulation, Delay & Reverb) is, er, bypassed. So, in order to, er, “bypass the
bypass,” press the BYPASS BUTTON, the LED will go out and all will be good in “virtual FX loop” land!
14
ii) EXTERNAL CONTROL OF MODULATION SPEED
EX CON (External Control) Button
As already hinted, when this button is activated (the LED above it will light up
when it is), you can adjust the Speed of your chosen MODULATION effect using
the pedal on the optional VC-4 VOX Foot Controller. Told you this pedal was
cool...so what are you waiting for, man? Drop everything and buy one NOW!!
iii) PROGRAMMABLE NOISE REDUCTION (NR)
NR (Noise Reduction) Button
Want to add noise reduction (NR) to a program? No problem, amigo! Merely,
press the EX CTL button and, while you’re holding it down, rotate the SPEED
knob. The NR will increase the further clockwise you turn the knob. Simple
stuff...just don’t forget to keep the EX CTL button pressed down while you’re set-
ting the amount of NR you want with the SPEED knob. If you let go of the button,
you’ll mess with the speed setting of whatever Modulation effect you have on the
program you’re editing.
NOTE: When using high Gain settings on amp types such as RECTO or US HIGAIN,
NR is highly recommended! Why? Because high gain = noise (hiss)! Just like on the
originals!
Page 19

6. DELAY SECTION
Here you can insert one of three (3) distinctly different delay effects in the “virtual FX
loop” of your Valvetronix amp. In all three cases, the maximum delay time possible is two
(yes, 2!) seconds.
TYPE Button
This button enables you to select the Delay type you’d like to use. When a particu-
lar Delay type is chosen, the red LED to its left will light up. If a Delay type isn’t
selected (i.e. none of the three LEDs are on), the Delay Section is bypassed
(turned off).
The three Delays you can choose from are:
DELAY: When this high quality digital delay effect is employed, the tone of
each repeat is so good it is indistinguishable from the original note(s).
TAPE ECHO: This is an incredibly accurate model of one of the most
respected analogue tape echo machines ever made. In the original the
“echo” is produced by a playback head and the exact “delay time” is set by
varying the motor speed. Many professionals prefer these “lo-fi” units
because of the warm, dark echoes they produce.
MULTI HEAD: This is a model of a tape echo unit boasting two playback
heads and both are being used. Furthermore, each of the two resulting “echoes” (one from each head) has its own feedback loop. The result? A complex
and warm “multi-tap” echo effect.
TAP Button
This button enables you to set the delay time by merely tapping your finger on it at
the desired tempo (speed). Hitting the TAP button twice or more will set the delay
time.
HINT: To set a precise delay time that matches a song’s tempo, tap your finger on the
TAP button in time with the song’s beat.
STEP ON IT! The optional VC-4 Foot Controller allows you to set the delay tempo by
merely tapping your foot.
FEEDBACK Control
This control determines the number of times each echoed note or chord is
repeated. The further clockwise you turn this knob, the more repeats you’ll hear.
WARNING! WARNING! If you crank up the FEEDBACK knob too much, an uncontrollable, cascading “runaway” of echoes will occur. So, use your ears and your common sense when setting this bad boy!
15
Page 20

DEPTH Control
This allows you to adjust the depth (relative volume) of the delay effect.
REPEATED HINT: If you add a DELAY to a program and you can’t hear the effect,
make sure the BYPASS BUTTON (8) isn’t engaged. If it is, the ORIGINAL VALUE
LED directly above it will be on and this means that everything in the “virtual FX loop”
(Modulation, Delay & Reverb) is, er, bypassed. So, in order to “bypass the bypass,”
press the BYPASS BUTTON, the LED will go out and all will be good in “virtual FX
loop” land!
7. REVERB SECTION
This allows you to use one of three (3) different reverb types.
TYPE Button
This enables you select one of the three Reverbs or bypass this section com-
pletely. The trio of Reverb types on offer here are:
SPRING: A model of the most popular spring reverb system used in guitar
amps.
ROOM: Emulates the natural reverberation that takes place in a medium
sized room/small hall.
PLATE: An unerringly accurate model of the plate reverb used in countless,
professional recording studios
DEPTH Control
This knob enables you to adjust the depth (level) of the chosen Reverb - from sub-
tle to cavernous!
REPEATED HINT...FOR THE THIRD AND LAST TIME! If you add REVERB to a
program and you can’t hear the effect, make sure the BYPASS BUTTON (8) isn’t
engaged. If it is, the ORIGINAL VALUE LED directly above it will be on and this
means that everything in the “virtual FX loop” (Modulation, Delay & Reverb) is, er,
bypassed. So, in order to “bypass the bypass,” press the BYPASS BUTTON, the LED
will go out and all will be good in “virtual FX loop” land!
8. BYPASS & ORIGINAL VALUE SECTION
BYPASS Button
Engaging this button will bypass the entire “virtual FX loop.” How can I tell when
it’s on, do I hear you ask? Easy. The ORIGINAL VALUE LED directly above it will
light up, and stay lit up. Why is this a useful function? Well, if you’re editing a pro-
gram that is using MODULATION and/or DELAY and/or REVERB, and you want
to hear what it sounds like “dry”...all you do is hit this button. Man, that’s a whole
lot easier and quicker than trying to switch one or more of those three Sections off
and then back on again! Try it if you don’t believe me...
16
Page 21

VERY IMPORTANT NOTE: The BYPASS Button is NOT programmable.
ORIGINAL VALUE LED
When the position of any one of the programmable knobs or switches matches the
values stored in a channel’s program, this LED will let you know by either lighting
up or turning off for a second. It will do so by lighting up if the BYPASS Button
immediately below it isn’t activated. If, however, the BYPASS Button is “on” (which
is indicated by the LED in question being lit up), the LED will switch off for a sec-
ond whenever a knob or switch matches an “original value” in the program being
used.
9. BANK/MANUAL/WRITE/TUNER/CHANNEL SECTION
Phew, the “Bank/Manual/Write/Tuner/Channel Section?” What a mouthful! Don’t stress
though - just because this area houses a few different things doesn’t mean it is complicated. In fact, as you’re about to discover, it’s both logical and simple...honest!
BANK Display
This display indicates either a bank number (1, 2, 3, 4, 1., 2., 3., 4.) or a note
name during tuning. (See page 30 for more details on tuning)
▲ (UP) and ▼ (DOWN) Buttons
Use these buttons to select one of the eight (8) program banks.
MANUAL Mode
Press both ▲ (UP) and ▼ (DOWN) buttons simultaneously to enter Manual Mode.
(See page 28 for specific details of this highly useful mode)
WRITE Button
This button is used when you want to store a new program. FYI, storing a new
program is a two-step process - see page 23 for specific details.
TUNER/CANCEL Button
This button has two (2) functions:
1. It turns the built-in, chromatic tuner on and off. (See page 30)
COOL FEATURE ALERT: If you hold down this button for more than one second, the amp’s sound will be muted. This is very useful during a live show
when you wish to tune your guitar “in silence!”
2. This button is also used to cancel “storing a program” (see page 22) or to
get the amp out of “mute mode” (see “Cool Feature Alert” above)
CHANNEL Select Buttons (1 - 4)
Pressing these buttons selects a channel. And, if the number in the BANK Display
is flashing (an indication that you intend to change Banks - see page 23), it selects
the chosen bank too.
17
Page 22

Also, if you are using the built-in tuner (see page 30), the CHANNEL Select LEDs
are used in the tuning process.
10. POWER SWITCH
As amazing as it may seem, this switch turns the power to the unit on or off!
And, get this - when the power switch is “on,” the indicator above the switch lights up!!
Providing the amp’s power cord is plugged into a working outlet, of course...
18
Page 23

B. The Rear Panel
1. AC POWER CONNECTOR
Yes, you’ve guessed it; this is where you connect the included power cord.
2. EXTERNAL SPEAKER OUT Jack(s)
This is where you can hook up external speaker cabinet(s) if you’d like to. The
AD60VT has one (1) EXTERNAL SPEAKER OUT jack, while the AD120VT has
two (2). Why does it have two? Because the AD120VT is a stereo amp!
IMPORTANT NOTE: The internal speaker(s) in your Valvetronix combo remain connected when external speakers are connected. For optimum performance we
strongly advise the following:
1. Only use extension speaker cabinets of 8 Ohms impedance or less (e.g. 4
Ohms) with these combos. And, if you’re using a stereo cabinet with the
AD120VT make sure each side (Left & Right) has an impedance of 8
Ohms or less.
ANOTHER IMPORTANT NOTE: The VOX AD-212 2x12 stereo extension cabinet is available and matches the AD120VT perfectly in both looks and sound.
2. Do NOT use a speaker cabinet with a Wattage rating that is less than 60
Watts, or less than the output power you’ve selected with the POWER
SELECT Control (5). If you ignore this warning, you could end up blowing
a speaker - and that’s not recommended!
3. ALWAYS use speaker cables (unshielded) to connect external speakers NEVER use a guitar (shielded) cable.
WARNING: If a cabinet with an impedance higher than 8 Ohms - like a 16
Ohm one for instance - is used in conjunction with your Valvetronix amp, the
amp will suffer from an audible drop in output power, due to the nature of the
external speaker jack circuit.
3. POWER SELECT Control
This incredibly cool feature enables you to choose from four (4) different output
Wattages. The selections are:
AD60VT: 60 Watts (W), 30W, 15W and 1W.
AD120VT: 60W + 60W (60 Watts per side), 30W + 30W, 15W + 15W, 1W +
1W.
This means you can get that highly desirable, fat, warm sound of the Valvetronix
power stage being driven hard (a common trait of all great valve power amps), at
various levels - very loud, not quite so loud, reasonable and relatively quiet! This
19
Page 24

will enable you to play a small room without deafening your audience or compromising your all-important tone. It will also allow you to add even more realism to
the smaller output amps we modeled - like the AC15 (15 Watts) or the Tweed 1x12
(18 Watts) for example.
4. LOOP Jacks
These allow you to hook up an external effects processor to your amp’s Series
Effects Loop. The AD60VT has a Mono loop while the AD120VT has a Stereo one
with Left (L) and Right (R) SENDS and L and R RETURNS.
SEND Jack(s)
Connect the input(s) of an external effect processor here.
RETURN Jack(s)
Connect the output(s) of an external effect processor here.
VERY IMPORTANT NOTE: If have an external effects processor that only has
a single, Mono input and you want to use it in the LOOP of the AD120VT,
please use the amp’s Left (L) SEND not the Right (R) one.
5. LEVEL Control
This enables you to adjust the output level (volume) of the PHONE OUT jack (6)
and the LINE OUT jack(s) (7)
6. PHONE OUT Jack
Connect your headphones here. The output is Mono on the AD60VT and Stereo
on the AD120VT.
IMPORTANT NOTE: Connecting the headphones here mutes the internal
speaker(s).
7. LINE OUT Jack(s)
This Output carries a cabinet simulated signal for connection to a soundboard or
recording console. The AD60VT has as a single, Mono LINE OUT jack while the
stereo AD120VT boasts a pair - Left (L) and Right (R).
8. FOOT CONTROLLER Jack
For connecting the optional VC-4 VOX Foot Controller pedal...a must have item,
as you’ll soon discover!
20
Page 25

Storing Stuff, Writing Stuff & More...
A
s mentioned earlier, your Valvetronix combo can store and instantly recall 32 programs. These 32 programs are stored in 8 Banks, each of which contains 4 chan-
nels (8 x 4 = 32!). The bank numbers (shown in the BANK display...clever stuff,
huh!?) are 1, 2, 3, 4, 1. (“1” with a DOT after it), 2. (“2” with a DOT after it, etc,), 3. and 4..
The 4 channels (each of which has its own CHANNEL Select Button and “I’m selected”
LED indicator - remember?) are cunningly numbered 1 to 4.
NOTE: Whenever we refer to a program in this Guitarist’s Guide we do so as follows:
“bank number - channel number.” For example: 3 - 2 means the program stored in bank 3,
channel 2. Likewise, 2. - 4 refers to the program located in Bank 2., channel 4. Geddit?
Although your unit comes with 32 preset programs already stored in it (see
page 34), each and every one of ‘em can either be totally rewritten or “custom tweaked”
to your heart’s content. And, once you’ve done that, if you ever want to recall the original
32, that’s easy to do...in fact, we already did that in the QUICK START section (see also
page 4).
In this section we’re gonna get into recalling programs, switching between programs and even writing your own. And, don’t worry, it’s all so simple even your drummer
could do it! So, let’s get to it...
PROGRAM SELECT MODE
Providing you aren’t using the built-in tuner (page 30), in Manual Mode (page 28) or halfway through either recalling (see below) or writing a program (page 25), then your Valvetronix amp will be in “Program Select Mode.” How can you tell if it is? Simple, amigo –
just look at the BANK Display. If it doesn’t show “ ” (meaning it’s in “Manual Mode”), “ ”
(meaning it’s in “Tuner Mode”), “ ” (meaning it’s in “Silent Tuner Mode”) or is flashing a
number (meaning you’re either halfway through recalling or writing a program), it’s in
“Program Select Mode.” Let’s assume it isn’t in “Program Select Mode” for a second…
GETTING TO “PROGRAM SELECT MODE.”
So, your BANK Display is either flashing or displaying either “ ”, “ ” or “ ” and
you wanna be in “Program Select Mode,” huh? Well, to get there all you do is one
of the following:
1. If the BANK Display is flashing a number, merely hit the TUNER/CANCEL
button and you’ll be back in “Program Select Mode.” How do you know?
21
Page 26

‘Cos the BANK display will now be displaying a bank number (1 – 4, 1. –
4.) and it won’t be flashing!
2. If your amp is in either “Tuner Mode” (BANK Display shows “ ”) or “Silent
Tuner Mode” (BANK Display shows “ ”), hitting the TUNER/CANCEL button will get you back into whatever mode you were in before you started
tuning – namely, “Manual Mode” (BANK Display shows “ ”) or “Program
Select Mode” (BANK display will show a bank number (1 – 4, 1. – 4.) and it
won’t be flashing).
To get from “Manual Mode” to “Program Select Mode” merely press the ▲
(UP) and ▼ (DOWN) Buttons at the same time.
IMPORTANT NOTE: A one-step, foolproof way of getting back to “Program
Select Mode” is to merely press any CHANNEL Button (1, 2, 3 or 4).
WARNING: By doing pressing any CHANNEL Button though, you might not go
back to the Program you were using before entering “Program Write,” “Program Recall”, “Tuner Mode” or “Manual Mode” – this will only happen if you
can remember the channel number of the program you were previously using
and press that CHANNEL button. If you can’t remember the channel number,
the only way can you ensure you return to the program you were using is by
following steps 1 & 2, above.
RECALLING A PROGRAM
The easiest way to do this is by running through an example together. So let’s recall Program 2. - 3 (the program stored in bank 2., channel 3).
STEP 1: Make sure the amp is in Program Select Mode (i.e. a bank number
appears in the BANK Display and isn’t flashing).
STEP 2: Use the ▲ (UP) and ▼ (DOWN) buttons to the right of the BANK Display
to scroll to Bank 2.. At this point 2. will be flashing in the display.
STEP 3: Hit the CHANNEL 3 select button and, as soon as you do, program 2. - 3
will be instantly recalled.
See, I told you it was a breeze!
22
STEP ON IT! If you’ve got the optional VC-4 Foot Controller, you can recall a program with your foot.
Page 27

SWITCHING BETWEEN PROGRAMS
You’re not going to believe this but to do this, you simply follow the 3 simple steps we’ve
just gone through.
COOL PLAYING HINT: When you’re halfway through switching programs (i.e. you’ve
selected the Bank but not the Channel), the program you’re about to change is still
selected and will remain this way until you select the channel. So, if you’re playing
live and your next program change requires you to switch to a different bank, you can
select that bank ahead of time, ensuring a timely change.
STEP ON IT! If you’ve got the optional VC-4 Foot Controller you can switch between
programs with your foot...told you it was a “must have” item.
WRITING AND STORING YOUR OWN PROGRAM
This is a cakewalk, honest! There are two ways you can go about doing this - by “tweaking an existing program” or by “starting from scratch.” Let’s tweak an existing program
first.
TWEAKING AN EXISTING PROGRAM
Lets say that you really like the crunchy, modern rhythm sound of preset 1-3
(“Breakin’ Stuff”) and you’d like to write a complimentary lead sound that is louder,
has a tad more gain, more mids, Chorus and Tape Echo. Here’s what you do:
STEP 1: Turn the MASTER VOLUME down and then switch the amp
on...duh!
STEP 2: Plug your guitar into the amp...bigger duh!
STEP 3: Use the TYPE Button in the MODULATION Section to select CHO-
RUS and then set the SPEED and DEPTH controls to taste.
STEP 4: Use the TYPE Button in the DELAY Section to select TAPE ECHO.
Tap on the TAP button to set the delay time you want and then set the FEEDBACK and DEPTH controls to taste.
STEP 5: Hit the WRITE Button once - this puts you into “where do you want
to store your new program?” mode which is indicated by the number in the
BANK Display flashing.
“ABORT MISSION” NOTE: If you get as far as “where do you want to store
your new program?” mode and then decide your “tweaked” program sucks, all
you’ve gotta do is hit the TUNER/CANCEL Button and you’re outta “write
mode”...phew!
23
Page 28

STEP 6: Use the ▲ (UP) and ▼ (DOWN) Buttons to select the bank you want
to use and the CHANNEL Select Buttons to select the channel.
STEP 7: Hit WRITE again and you’re done!
STARTING FROM SCRATCH
Why the heck not, huh!? Lets go:
STEP 1: Set the amp’s MASTER Volume at a minimum level. Then plug your
guitar into the amp...duh!
STEP 2: Switch the amp on...bigger duh!
STEP 3: Set the amp’s MASTER Volume at a reasonable level.
STEP 4: Select any program (see page 21) - it doesn’t matter which once
‘cos we’re starting from scratch.
STEP 5: Switch the PEDAL Selector Switch to “OFF” - if you wanna use a
pedal, we’ll add that sucker last.
STEP 6: Hit the BYPASS Button so MODULATION, DELAY and REVERB
are bypassed (the ORIGINAL VALUE LED above it will light up) - we’ll add
that stuff after we’ve dialed in our amp model.
STEP 7: Using the AMP TYPE Selector Switch, choose the amp you wanna
use.
STEP 8: Dial in the GAIN, VOLUME, TREBLE, MIDDLE, BASS and PRESENCE controls to taste.
STEP 9: If you want to add any MODULATION, DELAY and/or REVERB, hit
the BYPASS switch again (so the ORIGINAL VALUE LED above it goes off)
and then select and dial in the effect(s) you want.
REMINDER: to switch off MODULATION, DELAY or REVERB, simply keep
hitting the appropriate TYPE Button until the “effect selected” LED is switched
off.
STEP 10: If you want to use a pedal, select it using the PEDAL Selector
Switch and then dial it in using the DRIVE and LEVEL controls.
PROGRAMMING HINT: You might find it easier to dial in a PEDAL without
hearing any MODULATION, DELAY or REVERB effects you may have already
added in. If so, simply hit the BYPASS button (so the ORIGINAL VALUE LED
goes on) to bypass them all. Just don’t forget to hit the BYPASS button again
(so the LED goes off) when you’re done!
24
Page 29

STEP 11: Happy? Good, let’s store this bad boy. Hit the WRITE Button once this puts you into “where do you want to store your new program?” mode
which is indicated by the number in the BANK Display flashing.
“ABORT MISSION” NOTE: If you get as far as “where do you want to store
your new program?” mode and then decide your “tweaked” program sucks, all
you’ve gotta do is hit the TUNER/CANCEL Button and you’re outta “write
mode”....phew!
STEP 12: Use the ▲ (UP) and ▼ (DOWN) Buttons to select the bank you
want to use and the CHANNEL Select Buttons to select the channel.
STEP 13: Hit WRITE again and you’re done! Hey, who decided 13 was an
unlucky number anyway? It wasn’t me...
25
Page 30

ORIGINAL VALUE LED: What’s being used here, man?
So, you’re flipping through the programs on your new Valvetronix combo, you come
across one you really dig and you decide you wanna know exactly how the amp is dialed
in to get such a killer tone. Sounds like a reasonable plan but how on earth do you do it?
Prepare to meet your saviour, the incredibly useful ORIGINAL VALUE LED. Yes sir, with
the aid of this little red light you’re gonna be able to find out exactly what Pedal and Amp
models are being used and where each and every one of the 15 programmable knobs on
the Top Panel is set - which is all of the front panel ones with the exception of the MASTER.
“Hold on a minute, what about the MODULATION, DELAY and REVERB models
being used? You talked about the 15 programmable knobs but you didn’t say anything
about how to tell if any of these effects are being used,” do I hear you ask? Good question, bro. Here’s your answer: the amp will tell you! What do I mean by this? Well, whenever you call up a program y’see, you can tell if it’s using a MODULATION, DELAY &/or
REVERB by simply looking at the pretty lights in each section and seeing if they’re on or
off. For example, program 2 - 1, “Clean Edge,” uses CHORUS, MULTI and PLATE. And
as soon as you call it up, the LEDs for CHORUS, MULTI and PLATE will automatically
light up. Can you say “user friendly?”
We’ll get into finding out exactly how the controls for any MODULATION, DELAY
& REVERB effects being used are dialed in shortly. Detour over; let’s get back to the
wondrous workings of the ORIGINAL VALUE LED...
As mentioned earlier when we were going through the Top Panel of your amp, the
ORIGINAL VALUE LED also acts as the indicator for the BYPASS Button which, when
engaged, bypasses the MODULATION, DELAY and REVERB sections of the amp. So,
as you’d expect, when the BYPASS Button is activated, the ORIGINAL VALUE LED
lights up, and stays lit until the BYPASS is switched off again. So, the ORIGINAL VALUE
LED is either “off” or “on.” If it’s “off” it will light up for a second when an original value is
found. Likewise, if it’s “on” it will turn off for a second when an original value is found. Logical enough, right? Good, now that’s loud ‘n’ clear, lets get on to the business of finding
out exactly what’s dialed in on a particular program.
To make life easier, let’s start at the far left of the Top Panel and work our way
through it. First up is the PEDAL Section...
STEP 1: Look at the LED in the top left hand corner of the PEDAL Section.
Is it lit up? If it is it means a pedal is being used so go to STEP 2. If
it isn’t lit up, skip to STEP 5.
STEP 2: So, the PEDAL LED is on, meaning a pedal is being used - let’s
find out which one. Simply keep your eye on the ORIGINAL
VALUE LED and slowly click through the 10 pedal model choices.
When you reach the one that’s being used the ORIGINAL VALUE
light will either go on or off for a second, depending on whether the
BYPASS button is engaged or not. Like I said, simple stuff...
26
Page 31

STEP 3: Now that we’ve found which PEDAL is being used, let’s find where
the DRIVE Control for it is set. So, watch the ORIGINAL VALUE
LED and slowly but surely sweep the DRIVE Control through its
full range of motion. When you reach the setting, the ORIGINAL
VALUE LED will tell you.
STEP 4: Do the same thing with the LEVEL Control in the PEDAL Section.
STEP 5: The AMP SECTION is next. Let’s find out what model’s being used
by slowly clicking the AMP TYPE Selector Switch through the 16
choices while keeping an eye on the ORIGINAL VALUE LED.
When you reach the one that’s being used the ORIGINAL VALUE
light will either go on or off for a second, depending on whether the
BYPASS button is engaged or not. Wow, easier than falling off a
log isn’t it? And far less painful too!
STEP 6: Right, we’ve found the amp model, now let’s figure out where each
of the programmable amp controls are set - namely, GAIN, VOLUME, TREBLE, MIDDLE, BASS and PRESENCE. Let’s start with
GAIN and move right, one knob at a time...and you already know
what to do, right? Yes, you’ve got it - slowly but surely rotate the
GAIN control through its full range of movement while keeping an
eagle eye on our helpful pal, the ORIGINAL VALUE LED. When
you reach the setting, the ORIGINAL VALUE LED will let you
know.
STEP 7: Do exactly the same for the VOLUME, TREBLE, MIDDLE, BASS
and PRESENCE controls...duh!
STEP 8: So, we’ve already done the Pedal and Amp Sections, now all that’s
left are the three sections in our “virtual effects loop” - MODULATION, DELAY and REVERB. Let’s start with MODULATION ignoring the EX CTL LED, is an LED lit up in this section? If an
LED is “on” it means the effect it’s next to is being used so we
need to find out where the SPEED and DEPTH controls are set for
the effect in question. And you know what to do by now when it
comes to finding the “original setting” for a control knob don’t you!?
So start twisting a way on that fine pair of knobs and keep your
eye on the ORIGINAL VALUE LED...
STEP 9: Repeat STEP 8 with the DELAY and REVERB sections.
STEP 10: There isn’t one. You’re done pal! Congratulations - you now know
exactly how the program you were interested in was set up.
27
Page 32

MANUAL MODE: What You See Is What You Get!
When your Valvetronix amp is put into MANUAL MODE it “forgets” whatever program it
was on and behaves like a “regular” amp - meaning that the sound you hear is a direct
reflection of all the knob settings on the top panel, including the PEDAL and AMP TYPE
selector switches. Yes sir, “what you see is what you get” in MANUAL MODE - just like on
a “normal” guitar amp.
The only things MANUAL MODE “remembers” (stores) are:
1. Any changes you make regarding the type of MODULATION, DELAY and/
or REVERB being used. For example: if you’re in MANUAL MODE and
you select CHORUS, TAPE ECHO and SPRING, they will be remembered
and recalled the next time you call up MANUAL MODE.
IMPORTANT NOTE: MANUAL MODE does NOT remember any control knob
settings in the MODULATION, DELAY and REVERB section. As far as they go
“what you see is what you get,” remember?
2. The delay time you set up for the DELAY - providing you tap one in, of
course!
3. Whether or not EX CTL is selected in the MODULATION section.
4. Any NOISE REDUCTION (NR) changes you make.
SWITCHING TO MANUAL MODE
To get to MANUAL MODE from either Program Select Mode or Tuner Mode, sim-
ply press the ▲ (UP) and ▼ (DOWN) buttons in the BANK section simultaneously
(at the same time). The BANK display will show “ ” to let you know the amp is in
MANUAL MODE.
STORING YOUR MANUAL MODE SETTINGS
If you create a tone in MANUAL MODE that you’d like to keep, you can save it in
the same exact way as you would do any program edit - namely hit the WRITE
Button; select a bank with the ▲ (UP) and ▼ (DOWN) buttons; select a channel
with the CHANNEL SELECT Button and then hit WRITE again. Doing this stores
the MANUAL MODE setting you’ve just created in the program you selected and
then returns the amp to Program Select Mode.
28
Page 33

GETTING OUT OF MANUAL MODE
There are two ways of doing this...
1. Press either the ▲ (UP) and or the ▼ (DOWN) button. Doing this will auto-
matically take you back to the last program you were using.
or
2. Hit any one of the CHANNEL SELECT Buttons - this will take you to the
last bank you were using and whatever channel number you press to get
out of MANUAL MODE.
...take your choice!
29
Page 34

Tuner Mode
TUNING YOUR AXE WITH YOUR AMP!
or your convenience, your Valvetronix combo houses a built-in auto chromatic tuner
that can be calibrated between 438Hz and 445Hz. To access the tuner, simply
F
press the TUNER/CANCEL button and “ ” will appear in the BANK Display to let
you know that the tuner is activated and ready to go.
When you play a note, the pitch it is nearest to will be shown in the BANK Display.
And if the note being played is a sharp (e.g. C#), a “ ” will appear at the bottom right of
the letter shown in the BANK Display. For example, “ ” means F#. Because your built-in
tuner is chromatic it recognizes all 12 notes and indicates them as shown below.
Note Name BANK Display Note Name BANK Display
CF#
C# G
DG#
D# A
EA#
FB
How close the note you are playing is to the exact pitch of the note name that
appears in the BANK Display is indicated by the LEDs for CHANNEL 1, CHANNEL 2 and
CHANNEL 3. These three LEDs act as the built-in tuner’s “needle” When the note you’re
playing is exactly in tune with the note name indicated in the BANK Display, the CHANNEL 2 LED is the only one that lights up. If it is slightly flat, the CHANNEL 1 LED will light
up to tell you. Likewise, if the note you are playing is slightly sharp, the CHANNEL 3 LED
lights up to tell you. Obviously, the goal here is to fine-tune the string in question until the
note name in the BANK Display is the one that you want to be tuned to and the CHANNEL 2 LED is the only one that is “on.”
Pitch is flat Correct tuning Pitch is sharp
GETTING OUT OF TUNER MODE
When you’re happy that your guitar is in tune, simply press the TUNER/CANCEL Button
again and you’ll be back to where you were before you entered Tuner Mode.
30
Page 35

SILENT TUNING MODE
If you want to tune in silence (and if you’re checking your tuning halfway through a gig,
you’re definitely gonna want to do that), simply hold down the TUNER/CANCEL button
for more than a second and it will mute the amp’s output. To let you know that “silent tuning mode” has been activated a “ ” will appear in the BANK display.
GETTING OUT OF SILENT TUNING MODE
When you’re happy that your guitar is in tune, simply press the TUNER/CANCEL Button
again and you’ll be back to where you were before you entered Silent Tuning Mode.
CALIBRATING THE TUNER
The built-in tuner is automatically calibrated to A = 440Hz (a.k.a. “concert pitch”) every
time you switch your Valvetronix combo on. If desired, you can recalibrate the tuner in the
range of A = 438Hz to A = 445Hz. Here’s how you do it:
Activate the Tuner and then, while holding down the TUNER/CANCEL button, use
the ▲ (UP) and ▼ (DOWN) buttons in the BANK section to scroll through the recalibra-
tion options. The lowest digit of the “A =” frequency will appear in the BANK display as
shown below
BANK Display Calibration Frequency
438Hz
439Hz
440Hz
441Hz
442Hz
443Hz
444Hz
445Hz
When the BANK display indicates the Calibration frequency you require, let go of
the TUNER/CANCEL button and you’re ready to tune using your amp’s recalibrated
tuner.
IMPORTANT NOTE: When you turn on the amp’s power, the tuner automatically calibrates itself to A = 440Hz. So, if you’ve recalibrated the tuner please remember that
your recalibration will be “lost” as soon as you switch the amp off.
31
Page 36

Factory Preset Programs
elcome to our menu of tasty tonal morsels - a veritable sonic smorgasbord of
chef-prepared delicacies. Each one is a satisfying meal in its own right but we
W
the vast variety of wholesome, satisfying tones you can prepare in the comfort of your
own home. And, the only extra items you need in addition to your Valvetronix amp, is your
guitar, a guitar cord and, of course, your ears, fingers and taste buds!
So, what are you waiting for? Dive in. This sort of gluttony is definitely not bad for your
health! Bon appetite...
WHAT’S ON THE FACTORY PRESET PROGRAM MENU?
heartily recommend that you try all 32, as doing so will give you a good idea of
IMPORTANT “TASTE TEST” NOTE: When working on these 32 presets we used a
bunch of different guitars, loaded with a wide variety of pickups - from the hottest
humbucker to the tamest single-coil. This all said, only one player will ever sound
exactly like you and that is you - which is a good thing (hey, if we all sounded exactly
the same, what would be the point!?). So, if you feel a program needs tweaking then
go ahead and tweak the sucker! After all, it’s your amp, right? In short: USE YOUR
EARS!!!!!
HEALTHY PLAYING NOTE: None of the below dishes contain any cheese!
BANK 1
1 - 1 “Flying High” Screaming lead tone that’s bound to cause eruptions!
1 - 2 “Def Tone” Nice ‘n’ clean. Perfect for AOR, “power ballad” hysteria.
1 - 3 “Breakin’ Stuff” Mayhemic, modern, “rip yer face off” crunch.
1 - 4 “Tie Mama Down” A regal sounding, classic AC30 crunch.
BANK 2
2 - 1 “Clean Edge” An AC30 clean that’ll make you think it’s a beautiful day.
2 - 2 “Crunchy Trem” A bluesy AC15 crunch, tastefully garnished with Tremolo.
2 - 3 “Paperback Author” You don’t have to be from Liverpool to appreciate this one!
2 - 4 “Keep Alive” AC30 crunch + flange will definitely rock you.
BANK 3
3 - 1 “Puppet Master” Mid-scooped aggression that launched a million mosh pits.
3 - 2 “Angus Beef” Dust off your old school uniform, strap on an SG and let’s go!
3 - 3 “Viable” Shreddingly good tone, spiced up with Auto Wah.
3 - 4 “British Steel” This classic metal tone will make you scream for vengeance.
BANK 4
4 - 1 “Finger Pickin’ Good” Been to Nashville lately?
4 - 2 “Sand Castles” An upside down Strat might prove useful on this U-Vibed beauty.
32
Page 37

4 - 3 “Crossfire Crunch” Texas tinged rhythm ‘n’ blues.
4 - 4 “Clean Trem” Er, a clean tone with a touch o’ tremolo - believe it or not!
BANK 1.
1. - 1 “Dirt” In reverence to some chained-up guys called “Alice”...
1. - 2 “Mr. Clean” They don’t come any cleaner or more chorused than this.
1. - 3 “Unchain” Flanged ‘n’ brown - a drop-D, chuggers delight.
1. - 4 “Sweet Child” Flip to your neck humbucker, put on your top hat ‘n’ wail!
BANK 2.
2. - 1 “Alabama’s Home” Compressed, clean and free as a bird.
2. - 2 “Large Led Balloon” An essential tone for heartbreaking rock riffage.
2. - 3 “Vulgar” To get any closer you’ll need a purple goatee. Hostile...
2. - 4 “Dirty Ol’ Man” Filthy...but cleans up nicely when you turn your axe down.
BANK 3.
3. - 1 “Tasty Flange” Clean, compressed ‘n’ flanged.
3. - 2 “Cream Badge” A tried ‘n’ tested Rotary recipe, topped with a creamy sauce.
3. - 3 “Nativity in Black” The metal tone that started it all. None more black...
3. - 4 “Super Natural” A spicy, Latin dish - overdriven to the max, yet tasty.
BANK 4.
4. - 1 “Funked Up” Clean and, oh so chic!
4. - 2 “Mista Scary” A high gain lead tone so fat and fluid, it almost plays itself..
4. - 3 “Jimi’s Fuzz Chile” Think the first Woodstock...what an unforgettable experience.
4. - 4 “Unplugged” Will make your electric think it’s got a hollow body!
33
Page 38

Preset Program Recipes
PROGRAM PEDAL AMP TYPE MODULATION DELA Y REVERB
1 - 1 “Flying High” UK MODERN CHORUS TAPE ROOM
1 - 2 “Def Tone” COMP BLACK 2x12 FLANGER TAPE ROOM
1 - 3 “Breakin’ Stuff” RECTO SPRING
1 - 4 “Tie Mama Down” TREBLE B. AC30 CHORUS
2 - 1 “Clean Edge” COMP AC30 CHORUS MULTI PLATE
2 - 2 “Crunchy Trem” TREBLE B. AC15 TREMOLO SPRING
2 - 3 “Paperback Author” AC30TB TAPE
2 - 4 “Keep Alive” TREBLE B. AC30 FLANGER ROOM
3 - 1 “Puppet Master” UK MODERN
3 - 2 “Angus Beef” UK BLUES ROOM
3 - 3 “Viable” AUTOWAH UK ’90S TAPE SPRING
3 - 4 “British Steel” UK ’80S ROOM
4 - 1 “Finger Pickin’ Good” COMP TWEED 1x12 DELAY PLATE
4 - 2 “Sand Castles” U-VIBE BLACK 2x12 SPRING
4 - 3 “Crossfire Crunch” TUBE OD TWEED 4 x10 TAPE SPRING
4 - 4 “Clean Trem” BLACK 2 x12 TREMOLO SPRING
PROGRAM PEDAL AMP TYPE MODULATION DELA Y REVERB
1. - 1 “Dirt” RECTO
1. - 2 “Mr. Clean” BOUTIQ CL CHORUS SPRING
1. - 3 “Unchain” US HIGAIN FLANGER TAPE ROOM
1. - 4 “Sweet Child” TUBE OD BOUTIQ OD TAPE ROOM
2. - 1 “Alabama’s Home” COMP TWEED 1x12 PHASER SPRING
2. - 2 “Large Led Balloon” UK ’70S ROOM
2. - 3 “Vulgar” TREBLE B. US HIGAIN CHORUS
2. - 4 “Dirty Ol’ Man” BOUTIQ OD CHORUS PLATE
3. - 1 “Tasty Flange” COMP TWEED 4x10 FLANGER PLATE
3. - 2 “Creamy Badge” UK ’70S ROTARY SPRING
3. - 3 “Nativity in Black” TREBLE B. US HIGAIN
3. - 4 “Super Natural” TUBE OD. RECTO CHORUS ROOM
4. - 1 “Funked Up!” COMP BLACK 2x12 PHASER TAPE PLATE
4. - 2 “Mista Scary” US HIGAIN MULTI ROOM
4. - 3 “Jimi’s Fuzz Chile” FUZZ UK ’70S PHASER PLATE
4. - 4 “Unplugged” ACOUSTIC BLACK 2x12 ROOM
34
Page 39

RECALLING THE FACTORY PRESET PROGRAMS
If you went through the “Quick Start” section (page 4), you already know how to do this. If
you didn’t, here’s how you can recall the 32 Factory Preset Programs that are described
on page 32
IMPORTANT NOTE: If you do a “factory preset recall” you’re gonna permanently
erase all the programs you’ve written/tweaked yourself. So please make double sure
that you don’t mind losing your programs before you reset your Valvetronix’s memory
to its “virgin,” factory default state...’cos once you do a “reset” there’s no turning back!
ANOTHER IMPORTANT NOTE: If there are some programs you’ve written that
you’d like to remember, jot ‘em down on the “Programmer’s Cheat Sheet” on the
back of the fold-out rear cover before you “reset” the amp.
YET ANOTHER IMPORTANT NOTE: Resetting the amp will also wipe out any MODULATION, DELAY and REVERB type changes you’ve made in MANUAL MODE.
Right, now that the “important notes” are taken care of, let’s run through how you
reset your Valvetronix combo back to the original factory programs...
1. If your amp is on, switch it off.
2. Hold down the ▲, ▼ and TUNER/CANCEL Buttons at the same time and
then switch the amp on while you’re still pressing the three buttons. If
you’ve done this correctly, a “ ” will be flashing in the BANK Display. If it
is skip to step 4, if it isn’t...
3. Switch the amp off and try again...making sure you’re holding all three buttons down when you turn the amp on this time! The “ ” is flashing in the
BANK Display now, right? Good, read on...
4. Press the WRITE Button and watch the BANK and the four CHANNEL
LEDs do a little dance as they indicate each one of the 32 programs being
reset to its factory preset. Once they both stop “dancing,” you’re
done...your reset mission is a success, the amp will automatically enter
Program Select Mode with Program 1 - 1, “Flying High,” selected and
you’re ready to rock!
WARNING: Do not turn off the power to the amplifier during this reset process!
35
Page 40

Model Behaviour: What’s What? And What Does What?
n this section we’re gonna take a quick look at the 16 great sounding amps and 10
stompbox models your Valvetronix amp has to offer. Let’s start on the floor by looking
I
at what’s on offer in the PEDAL section.
NOTE: On any pedal where the DRIVE and/or LEVEL controls don’t literally
control “drive” and “level,” their function will be described in CONTROL
QUIRKS.
A. PEDAL POINTS
1. COMP (Compressor)
Gotta play a clean passage that needs to be nice, smooth and even? Need a hair
more sustain on a lead line? Then, look no further; COMP is the pedal for you.
Modeled on a compressor pedal that is hugely popular due to the percussive
clean sound it can produce - making it perfect for ’80S and ’90S pop and funk
rhythm work. It can also add a singing, mellow sustain to lead lines - clean or dirty.
CONTROL QUIRKS
DRIVE: Adjusts the sensitivity of the compressor (i.e. when its “smoothing”
effect kicks in). The amount of compression/sustain will increase the more
you turn this control up.
2. ACOUSTIC (Acoustic Simulator)
Wanna go “unplugged” without the hassle of switching guitars and amps? Enter
the acoustic guitar simulator - a clever effect that magically converts an electric
guitar’s sound into that of an acoustic. It works best with a single coil (read: low
output) pickup in the neck position, especially when paired with the BLACK 2x12
amp model.
CONTROL QUIRKS
DRIVE: Adjusts treble.
LEVEL: Adjusts bass.
WARNING: If you plug a guitar that has high output pickups into the HIGH
input and you select the ACOUSTIC Pedal, unless you turn your guitar down,
you could well end up with some nasty, unwanted, high frequency distortion especially if you’ve got the DRIVE (treble) control of the Pedal Section
cranked. This is NOT an indication that your Valvetronix amp is faulty - it is
36
Page 41

merely telling you that you’re driving the Pedal too darned hard! And just so
you know, all “acoustic simulation” pedals and “acoustic emulation” channels
will do the same thing if (ab)used in this way. Why? To make an electric guitar
sound like an acoustic you have to boost the high frequencies by ridiculous
amounts and so, if you slam such a device too hard, unwanted distortion can
result. Geddit?! Good...
3. VOX WAH
This effect is modeled on the legendary VOX Wah pedal, the V847. Thanks to its
unique “throaty” tone, the V847 is the only Wah pedal many professionals will consider stepping on. When used wisely, this pedal that can either make your guitar
cry like a baby or howl like a man possessed!
CONTROL QUIRKS
DRIVE: Mimics the “sweep” of the V847’s pedal - from open to closed.
LEVEL: Set this one wherever you wish ‘cos it does absolutely nothing!
USEFUL TONE HINT: A great tonal trick that’s employed by many guitarists,
including some who are household names, is to find a “sweet spot” within the
range of their Wah pedal and then leave it there. This is often called stuck-Wah
(imagine that!) and, when used tastefully, can be very effective as it produces a
very distinctive sound that will cut through any mix. You can dial in a stuckWah “sweet spot” with your DRIVE control in a heartbeat. Try it, it’s cool...
STEP ON IT! Reason to buy a VC-4 number 174! Yep, you’ve guessed it - you
can use the “pedal” part of the VC-4 to control VOX WAH. So get one...now!
4. AUTO WAH
The lazy man’s Wah pedal! Only kidding...this quirky but useful effect allows you
to create an automatic “Wah” effect that varies with your picking dynamics (i.e.
how hard or soft you hit the strings).
CONTROL QUIRKS
DRIVE: Adjusts the Auto Wah’s response speed.
LEVEL: Adjusts the sensitivity of the effect.
5. U-VIBE (Uni-Vibe)
Modeled on the famous Univox Uni-Vibe - a phase/vibrato effect that was
designed to simulate a rotating speaker and produces a wonderfully seductive
and “watery” tone. Interestingly enough, the guy responsible for this great pedal is
also responsible for the birth of the remarkable Valve Reactor Technology used in
the power amp of your Valvetronix combo.
CONTROL QUIRKS
DRIVE: Adjusts the speed of the Uni-Vibe effect.
37
Page 42

LEVEL: Adjusts the depth of the Uni-Vibe effect.
STEP ON IT! With the optional VC-4 Foot Controller (you’ve bought one by
now, right!?) you can control the speed of the Uni-Vibe model. The result? It’s
groovy baby!!
6. OCTAVE
This effect generates a note one octave lower than the one you’re playing, adding
thickness and “weight” to single note lines.
CONTROL QUIRKS
DRIVE: Adjusts the level of the original note.
LEVEL: Adjusts the level of the octave note.
WARNING! Like all pedals of this type, OCTAVE only works with single
notes...chords confuse the heck out of it! NOT a fault - that’s just the way these
pedals are...deal with it, dude!
7. TREBLE BOOST
This pedal effect is modeled after a treble booster that was designed with the VOX
AC30 specifically in mind. It is a great way of adding “teeth” to an overdriven
sound - check out presets 1-3 (“Tie Mama Down”: classic rock) 3.-3 (“Nativity in
Black”: old school metal) & 2.-2 (“Vulgar”: modern, hi-gain fueled brutality) if you
don’t believe me.
8. TUBE OD
This model is based on an overdrive pedal that’s housed in a garish, “seasick
green” box and is considered an all-time classic due to the wonderfully warm
tones it produces.
9. FAT OD
Based on a pedal named after one of the most disliked rodents to ever walk the
planet! The result is a smooth distortion rich in harmonics...nasty but nice.
10. FUZZ
Retro, rude ‘n’ raw...get the picture!? The name says it all.
38
Page 43

B. Amp Models
hich amps did we painstakingly model for our seductive selection of 16?
Believe me when I say it wasn’t easy ‘cos, as I’m sure you know, there’s a
W
searching, earnest discussions (not to mention the occasional friendly argument!), calls
to tone-wise friends (some professional players, some not...but all blessed with great
ears) plus, of course, listening and playing, a top 16 list was finally drawn up. As you’re
about to discover, the ones we went with are not only the cream of the crop but also offer
up the widest possible array of the greatest guitar tones known to man - from pristine
clean to outrageous overdrive and all points in-between. First though, some stuff you
should know...
CONTROLLING FACTORS
As already touched on in this manual “Guitarist’s Guide,” although the top panel of your
Valvetronix amp houses controls for GAIN, VOLUME, TREBLE, MIDDLE, BASS, PRESENCE and MASTER, not all of the amps we’ve modeled have as many controls. In such
cases, rather than leave you with knobs that do nothing (what on earth would be the point
of that!?), we’ve made full use of all six (6) Valvetronix amp controls without compromising the accuracy of any of our models. This means you’ll be able to mimic the full tonal
spectrum of each and every one of the originals we’ve modeled...and then some, thanks
to the extra flexibility and additional control the six Valvetronix amp controls give you.
plethora of great sounding amps out there. After countless hours of soul
For example, if an original doesn’t have a Gain Control (AC15, AC15TB, AC30,
AC30TB, UK BLUES, UK ’70S, BLACK 2x12, TWEED 1x12 and TWEED 4x10), the Valvetronix’s GAIN control will mimic the original’s Volume control. This, of course leaves
you with two “extra” volume controls - VOLUME and MASTER. As you already know, the
MASTER is a universal, non-programmable control that allows you to set the overall volume of the amp. So, the programmable VOLUME control (the knob right next to GAIN)
effectively acts as a second “Master Volume,” allowing you to ensure that the volume of
each of your programs compliments the rest. Cool stuff, I’m sure you’ll agree...
Also, if an original amp doesn’t have a complete 3 band EQ network then we’ll set
up the “missing” tone controls on our model to be “neutral” (i.e. as the original) when set
at 12 o’clock - thus giving you extra tonal flexibility in those EQ areas, if you so wish. Just
so you know, the amps we modeled that don’t have individual controls for Treble, Middle
and Bass are:
AMP ORGINAL TONE CONTROLS
AC15/AC30 (channel 2) Top Cut only
AC15TB Treble & Bass
AC30TB Treble, Bass and Cut
TWEED 1x12 Just one, called Tone!
39
Page 44

Also, as you’d probably expect, we do the same exact thing with the Valvetronix’s
PRESENCE control too - namely, if one isn’t present (bad pun, not intended!) on the original then PRESENCE will be an added control on our model. This time though, the “neutral” position is when the control is all the way off (turned fully counterclockwise). The two
models this applies to are BLACK 2x12 and Tweed 1x12.
IMPORTANT NOTE: As you’ll discover when you read their descriptions, in the case
of the AC15, AC15TBX, AC30 and AC30TB models, we’ve utilized the PRESENCE
control to mimic the TOP CUT control - whether it was present on the original or not.
Lastly, if an original amp features a unique switch or control we make sure that we
cover it! Such things will be revealed in the model descriptions that follow shortly...
TUBE TALK
Us Brits call ‘em valves while our US cousins call ‘em tubes...as the saying goes:
England and America are merely two countries divided by a common language! Anyway,
call ‘em what you will, these wondrous glass bottles lie at the tonal heart of each of our 16
models. As all the amps we’ve modeled hail from one of the two countries just mentioned,
in honour of their heritage, the descriptions of all English amps will employ the words
“valve” and “valves”, while the American ones will be tubular!
QUESTION: What’s the difference between an ECC83 preamp
valve and a 12AX7 preamp tube?
ANSWER: Nothing! They’re the same exact thing – namely the
most popular preamp tube in ampland. ECC83 is the British name,
12AX7 (a.k.a. 7025) is the American. See, I told you we were two
countries divided by a common language!
40
Page 45

POWER AMP ACCURACY
As already touched on a couple of times, what happens in the power stage of any good
tube amp is of paramount importance to the way the amp sounds, feels and behaves.
The way the power amp operates (Class A or Class A/B), the power tubes used (EL84s,
EL34s, 6L6s, 6V6s), the exact nature of the negative feedback loop circuitry (if one even
exists) and how the power stage interacts (a relationship called damping) with the
speaker(s) it is driving - all these things play a vital role in the creation of tone. And,
thanks to our patented in USA Valve Reactor Technology all these important bases are
faithfully and accurately covered. For example: if you choose amp model AC30TB - an
amp with a Class A power stage, EL84 output tubes and no negative feedback, that’s
exactly what your Valve Reactor power amp reconfigures itself to emulate.
And, as an added bonus, thanks to our rear panel POWER SELECTION switch
you can adjust the output power (Wattage) to best suit the model in question (e.g. the
original AC15 is 15 Watts, the TWEED 1x12 is 18 Watts and the AC30TB is 30 Watts) or
the size of the room you’re playing in.
TURN IT UP!
All truly great, all-valve amps have one thing in common - they invariably sound at their
best when they’re cranked to the max! It’s got nothing to do with eardrum shattering decibels either, it’s just that when the power valves are driven hard, they definitely impart a
unique tone and width to the overall sound. Thanks to the awesome accuracy of our
Valve Reactor power amp, the same is also true of your Valvetronix combo. For this reason, we heartily recommend that you crank the sucker up as often as possible. And, as
I’ve literally just pointed out, thanks to our unique POWER SELECT control, you have a
choice of output Wattages that’ll suit every occasion - from bedroom, to garage, to
gig...and all points in-between. So, what are you waiting for - select, crank ‘n’ enjoy!
This all said, let’s take a look at each of our amp models...
1. AC15
This is modeled on Channel 2 of an amazing sounding 1962 VOX AC15, which is
part of our vast amp collection. This 1x12”, 15 Watt, valve driven, dual channel
combo was unleashed on the market in 1958 and was the first ever VOX amplifier.
The reason for it being named the AC15 is simple: AC stands for Amplifier Combi-
nation while 15 indicates the Wattage. Thanks to its compactness, power, built in
tremolo/vibrato effects (on Channel 1 only) and tremendous tone, this combo was
a huge hit with the popular British guitar bands of the time, including several chart
topping acts, the majority of whom were only too happy to endorse Vox.
One of the biggest reasons for the unique, signature tone of this amp is the
fact that it employs EL84 output valves in a Class A circuit with no negative feedback. This is also true of the other three VOX amps, we’ve modeled - the AC15TB,
AC30 and AC30TB. In a nutshell, the result of this design is more power and
more distortion - the latter of which gets thick with second and third harmonics that
become more and more prevalent as the amp is cranked. Thanks to our unique
41
Page 46

Valve Reactor Technology the power stage of your Valvetronix amp is automatically switched to its “EL84s in a Class A circuit with no feedback” emulation whenever AC15, or any of the other three Vox models, is chosen.
Like most amps of its era, the AC15 is the very essence of simplicity. In fact,
the Channel we modeled, Channel 2 (remember!?), only has two controls - Volume and Top Cut. When you select AC15, the Valvetronix’s GAIN control mimics
the original’s Volume control, while the PRESENCE control acts as the Top Cut.*
FYI, the AC15’s Top Cut control affects the high frequencies in a very different way
than a “regular” Treble control. Deft use of it will help you dial in the exact amount
of that instantly recognizable, world-famous VOX “sparkle.”
As for what the “extra” TREBLE, MIDDLE and BASS controls on our AC15
model do: as already mentioned earlier, they’re exactly that - “extra!” Set them at
12 o’clock and they’re “neutral” (i.e. they mimic the exact tone of the original) or
tweak them for extra tonal flexibility.
*CONTROL NOTE: The original AC15’s Top Cut control works in the opposite
way you’d expect - it “cuts” when you turn it up! You’ll be glad to read that our
model of the Top Cut control (the PRESENCE knob) works in a much more
logical fashion - turn it up for more “sparkle”, turn it down for less.
Original’s valve compliment: 1 x EF86, 3 x ECC83s, 1 x ECC82 in preamp,
1 x EZ81 rectifier, 2 x EL84s in power amp.
2. AC15TB
While the AC15 was born in the late ’50S, the AC15TB is a modern-day child of
the ’90S which combines the sweet ‘n’ desirable tonal characteristics of the
AC15’s low Wattage power stage, with the increased tonal flexibility that the Top
Boost (TB) channel of an AC30 has to offer. Then, to sweeten the pot even further,
a 12” Celestion “Blue” speaker (what else?), Reverb and a Master Volume control
were thrown in too. The result is a highly flexible 15 Watt, all-valve, 1x12 combo
that successfully marries the pureness of great vintage VOX tone with modern
features.
The original has two tone controls - Treble and Bass. So, as is the norm, the
Valvetronix’s TREBLE and BASS controls mimic their namesakes while the MIDDLE (“neutral” at 12 o’clock) and PRESENCE add further tonal flexibility...should
you want it. To ensure maximum “Voxiness,” we’ve made sure that the PRESENCE control behaves exactly like the “Top Cut” on the original AC15 - except in
reverse (“off” = cut) to make it more logical, just like on our AC15 model.
In trademark VOX fashion, our AC15TBX model oozes clean tones that “jangle” and “chime,” while its overdrives are smooth yet pulsating with desirable harmonic overtones. Enjoy!
Original’s valve compliment: 5 x ECC83s in the preamp, 1 x 5Y3GT recti-
fier, 2 x EL84s in power amp.
42
Page 47

3. AC30
As already stated, the VOX AC15 was a huge hit with the British guitar bands of
the late ’50S. However, as the popularity of the AC15 using bands grew, so did
their need for a more powerful amp. Sure, the AC15 was loud for a 15 Watt amp darned loud in fact - but it was no match for 1,000 + screaming fans! Remember
folks, back in the late 50S/early ’60S, guitar amps weren’t being fed through the
PA - that was reserved purely for vocals, the band’s backline had to do the rest.
Clearly VOX needed to come up with a louder amp and the company was only too
happy to rise to the challenge...
The fruit of VOX’s labour was unveiled to the world in 1959 - the 30 Watt,
2x12, AC30. Several top British bands graduated up to the AC30 instantly and,
within months, one of them had scored a number one single with a stirring guitar
instrumental. Not surprisingly, pretty much every other UK act worth its salt immediately followed suit and the AC30 became the amp behind the so-called “Beat
Boom” of the time. More importantly, it also became the driving force behind the
now legendary “British Invasion” - the name given to the huge wave of success
that several English bands enjoyed in America during the ’60S. This charge was
led by a quartet hailing from Liverpool who quickly became Vox’s most famous
ambassadors ever.
We’ve modeled the sterling sounds of the AC30’s Normal channel as they
definitely encapsulate those classic tones that defined the aforementioned British
invasion. Just like its smaller brother, the AC15, the AC30’s Normal channel
boasts the bare minimum of knobs - Volume and Top Cut (modeled by GAIN and
PRESENCE* respectively). Although the AC30 can be considered an AC15 on
steroids, the additional sonic characteristics and spread a pair of Celestion, 12”
“Blue” speakers bring to the table cannot and should not be ignored. Rest
assured, we did everything but ignore the all-important role these speakers play
and spent countless hours ensuring we captured said magic in our AC30 model.
*CONTROL NOTE: Once again, our PRESENCE control models the “Top Cut”
on the original AC30 exactly - except in reverse (“off” = cut) to make it more
logical, just like on our AC15 model.
Original’s valve compliment: 4 x ECC83s, 1 x ECC82 in the preamp, 1 x
GZ34 rectifier, 4 x EL84s in power amp.
43
Page 48

4. AC30TB
Even though the AC30 was a runaway success, several artists expressed a desire
for the amp to have more tonal flexibility and a pinch of extra gain too. VOX
reacted quickly and came up with some clever extra tone circuitry which featured
an additional ECC83 valve and was called “Top Boost.”* When “Top Boost” was
added to an AC30 it increased the gain of the combo’s Brilliant channel, and
added two extra EQ controls, giving the amp three tone controls -Treble, Bass and
Cut. To say it was an instant hit with the guitar playing public would be a gross
understatement! In fact, its gutsy tone became an instantly recognisable signature
sound of many major groups in the mid ’60S.
NERDY HISTORICAL NOTE: VOX initially called this their “Brilliance Unit” but
it quickly became known as “Top Boost.” When Top Boost was first introduced
it was only available as a retrofit assembly. Even though this modification was
not particularly difficult to add, it was beyond most folk (hey, I dunno about you,
but messing around with electricity is hardly my idea of fun!). Consequently, in
1964, Top Boost was fitted to the AC30 as standard.
Once again, the PRESENCE control of our model acts as the original’s Cut
(but in reverse: “off” = cut) while the GAIN, TREBLE and BASS mimic the original’s Volume, Treble and Bass controls. The MIDDLE is an “extra” with 12 o’clock
being its “neutral” position.
Our AC30TB model produces clean sounds that are rich and jangly with a
smooth yet detailed top end, and overdrives that have a glorious, throaty bark just like those classic, “Class A” tones that have made the original a “must have” in
any serious player’s amp collection.
Original’s valve compliment: 5 x ECC83s & 1 x ECC82 in preamp, 1 x
GZ34 rectifier, 4 x EL84s in power amp.
5. UK BLUES
Our UK BLUES model is based on the “High Treble” channel of an extremely rare,
handwired head made in jolly old England in the early ’60S. Although the TWEED
4x10 circuit was used as a basic template for this amp, several fundamental
changes (e.g. different tubes, different transformers, a higher output impedance
and vastly different speakers in a closed-back cab), give UK BLUES its own
unique and highly desirable character. Indeed, when cranked-up* this 30 Watt
baby produces a crunch that forever changed the sound of rock ‘n’ roll - which is
why it is still highly revered to this very day.
Original’s valve compliment: 3 x ECC83s in preamp, 1 x GZ34 rectifier, 2 x
KT66 in power amp.
44
Page 49

6. UK ’70S
This is based on the “High Treble” channel of a 1969, 100 Watt, all-valve head,
boasting a Plexiglas front panel and four (4) inputs. The no-nonsense original
doesn’t feature a Master Volume control so the best and, arguably, only way to set
it up is to max out the volume and let rip! And, that’s exactly what everyone did and still does!
As great as the original sounds when cranked wide open, it is so deafening
loud that it can peel paint off a wall at 100 paces! This means it is hardly the ideal
amp for small gigs, let alone late-night practice sessions in your bedroom! This
however, is not a problem with the UK ’70S model that lurks in your Valvetronix
amp. Thanks to it having programmable controls for GAIN (which models the original’s “High Treble” Volume control) and VOLUME plus an overall MASTER, the
glorious “cranked “ tone of the original can be achieved at a volume level that
matches your other programs - and, more importantly, won’t cause premature
deafness or force your “friendly” neighbours to call the cops! And let’s not forget
that incredibly useful POWER SELECTION switch that resides on the rear panel
either...
So, wind the GAIN control all the way up and immerse yourself in an instantly
recognizable, organic overdrive that responds beautifully to the subtle dynamics of
your playing and dominates “classic rock.” Rolling back your guitar’s volume control results in a unique and highly useable clean sound.
Original’s valve compliment: 3 x ECC83s in preamp, 4 x EL34s in power
amp.
7. UK ’80S
This is modeled on a 1983, all tube, single channel 100 Watt head that boasts a
Master Volume control - a wonderful feature that allows the user to dial in a decent
crunch tone without having to max out the amp’s volume.* Invariably played with
it’s (preamp) Gain control cranked to the max, this amp was responsible for the
fat, roaring sound that dominated ’80S hard rock and heavy metal. Yes sir, from
spandex clad Europeans who rocked like hurricanes, to American speed freaks
who rode the lightning and reigned in blood, UK ’80S was the only amp of
choice...and, for many, still is!
Although UK ’80S became famous for it’s distinctive, cranium-crushing
crunch, it isn’t merely a “one trick pony” and neither is our model - just like the
original, when you roll back your guitar’s volume knob you’ll get a bright, clean
sound that’s perfect for chord work and will cut through any mix like a hot knife
through butter.
Original’s valve compliment: 3 x ECC83s in preamp, 4 x EL34s in power
amp.
45
Page 50

8. UK ’90S
This model is based on the “lead” channel of a 100 Watt, dual channel head that is
capable of so much preamp distortion it houses a Gain control that goes all the
way up to a Nigel Tufnel approved “20, dunnit!” This amp replaced UK ’80S and
was developed to satisfy the ever-evolving rock guitarists’ insatiable lust for more
gain, features and flexibility. Was this amp popular? Judging by the fact it quickly
became the “industry standard” for the decade in question, the answer is a
resounding “yes!”
Original’s valve compliment: 4 x ECC83s in preamp, 4 x EL34s in power
amp.
9. UK MODERN
This is modeled on the High Gain channel of a modern, all-tube 100 Watter that is
effectively a hybrid of the UK ’80S and UK ’90S amps. It combines the toneful,
high gain preamp stage and modern features of UK ’90S with the unmistakable,
“snarling” punch and girth the UK ’80S power stage had to offer. The result is a
highly aggressive, tone-breathing monster capable of mondo-gain while retaining
individual note definition. With the GAIN control on full, UK MODERN allows lead
lines to soar into soulful feedback, while its low-end “chunk” remains tight and
punchy. Wimps beware!
Original’s valve compliment: 4 x ECC83s in preamp, 4 x EL34s in power
amp.
10. RECTO
This bad boy is based on the “Modern High Gain” channel of a brutal, 150 Watt,
armour-plated beast hailing from California. Its deep, dark, loose low-end, somewhat “fizzy” top and Godzilla-like gain has made this all-tuber a mainstay for many
modern, metal acts who either tune their guitars down as low as they can possibly
go, or wield 7-string axes.
At low GAIN settings, RECTO produces a distinctive, bright clean sound bolstered by some rich, upper harmonics that add fullness and dimension. This said,
RECTO is definitely not recommended for Country ‘n’ Western picking. But, if you
play slamming, “nu-metal” that’s tuned lower than whale droppings, then RECTO
could well be the only way to go!
Original’s tube compliment: 5 x 12AX7s in preamp, 3 x 5U4G rectifier
tubes, 6 x 6L6s in power amp.
46
Page 51

11. US HIGAIN
This is modeled on the Overdrive Channel of an all-tube, 100 Watt head built in
1991 and covered in snakeskin! This high gain, power house was designed by a
guy who also builds and drives Hot Rod cars so it should come as no surprise that
the originals controls all go to eleven - after all, “that’s one louder innit!” (© Nigel
Tufnel!)
US HIGAIN is capable of a powerful, heavily saturated sound that combines
an open low-end with compressed mids and highs. The result is a tone that
remains focused and well defined at even the most extreme gain settings. These
attributes have made this head a favorite with several of the world’s leading players, and its versatility make it ideal for a wide variety of purposes and styles.
Original’s tube compliment: 4 x 12AX7s in preamp, 4 x 6L6s in power amp.
12. BOUTIQUE OD
For this one we modeled the Overdrive channel of a very rare, very expensive and
very respected 100 Watt head named the Overdrive Special. This custom-order,
handwired beauty has a spectacular overdriven sound that’s perfect for sax-like,
legato soloing. With its GAIN control wide-open, BOUTIQUE OD produces a stunning sustain which is very smooth and very soulful - can you say “woman tone!?”
Original’s tube compliment: 3 x 12AX7s in preamp, 4 x EL34s in power
amp.
13. BOUTIQUE CL
For this amp type, we modeled the Clean channel of another very expensive,
handwired, custom amp made by the same boutique builder as BOUTIQUE OD.
We auditioned several top-shelf boutique amps for this model but this amp was
the clear winner. Even though its garish, fuzzy red covering wasn’t to everyone’s
taste, it’s beautiful clean sound was! Its beautifully rounded low-end, delightfully
transient mid-range attack and sweet treble make it the perfect partner for singlecoil pickups. It is also incredibly responsive and extremely sensitive to picking
styles and pickup selection. And, as an added bonus, strummed chords just ring
out and blossom.
Original’s tube compliment: 3 x 12AX7s in preamp, 4 x 6L6s in power amp.
47
Page 52

14. BLACK 2x12
The dual channel, blackfaced beauty we modeled here is considered a “musthave” 2x12 combo for country and blues players, and rightfully so - after all, its
celebrated clean sound is very tight ‘n’ twangy, with a deep, taut, piano-like bass.
Pristine clean tones aside, BLACK 2x12 is also capable of producing that
classic Chicago blues tone - especially with single coil pickups. In keeping with the
original, when pushed hard the bass on our model tends to crumble. So, to emulate this classic, BLACK 2x12 overdrive, here’s what you dial in on your Valvetronix: full GAIN, no BASS, full MIDDLE and set TREBLE to taste. Because the
EQ network of BLACK 2x12 lies before the main gain stage of its preamp y’see,
pushing the mids in this way emphasizes the distortion in that frequency range
and the result is a lovely, singing blues tone.
As already mentioned elsewhere, the original amp doesn’t have a Presence
control but does have a Bright Switch. The PRESENCE control on your AD60VT/
AD120VT emulates this switch when “off” and “on,” plus all points in-between!
Original’s tube compliment: 4 x 12AX7s & 2 x 12AT7 (a.k.a. ECC81) in
preamp, 4 x 6L6s in power amp.
TONAL HINT: BLACK 2x12 is the perfect partner for ACOUSTIC (Acoustic
Guitar Simulator) in the Pedal section.
15. TWEED 1x12
The original we modeled here was born in Fullerton, California, in 1958, and clad
in “tweed” - hence its name! Just like the AC15, this 18 Watt, 1x12, all-tube combo
is the very essence of simplicity. Aside from the obligatory Volume knob, it only
housed one other knob - a single Tone control creatively named (wait for it!) Tone!
This Tone control is merely a treble cut and boost, and its behaviour can be mimicked by using the Valvetronix’s TREBLE, MIDDLE and BASS EQ network as follows:
Original Tone control turned all the way down (off) = BASS on full; TRE-
BLE and MIDDLE at 9 o’clock (PRESENCE “off”).
Original Tone control turned up “full” (on 10) = TREBLE on full; MIDDLE
and BASS at 9 o’clock (PRESENCE “off”).
NOTE: As the original doesn’t have a Presence control, PRESENCE is “neutral” when “off,” but can be used to add “extra” sparkle and cut to the model if
you so wish.
48
Page 53

In keeping with the original, the TWEED 1x12 produces an open, relatively uncoloured sound when clean, but starts to “snarl” beautifully when pushed into overdrive. Its highly desirable “snarl” is rich with harmonic content and cranking this
puppy up will produce those classic, old rockabilly and rock ‘n’ roll sounds of the
’50S and ’60S, at the drop of a 10 gallon hat - especially when a single coil pickup
is used.
TONAL HINT: To duplicate this “big sounding” little amp even more accurately,
turn the POWER SELECT to 15W on the AD60VT and 15W x 2 on the
AD120VT.
Original’s tube compliment: 1 x 12AY7, 2 x 12AX7s in preamp, 1 x 5Y3GT
rectifier, 2 x 6V6s in power amp.
16. TWEED 4x10
The 4x10 combo we modeled here was built in 1959 and originally intended for
bass guitar. This said, six-stringers were quick to embrace its smooth-yet-cutting
overdrive which is perfect for R&B (rhythm ‘n’ blues) guitar. TWEED 4x10 is also
very sensitive and responsive to both picking strength and the volume setting on
your guitar. This means that by backing-off your axe’s volume when the amp is
cranked, you can produce a beautifully clean and full tone. It also means that
dynamic picking control allows you to make notes or chords more distorted or
clean than others, depending on how hard or how soft you pick ‘em.
Another cool tonal quirk of TWEED 4x10 is the classic, vintage tube amp sag
its GZ34 rectifier tube adds to your notes whenever the amp is driven really hard.
“What is sag?” Do I hear you ask? Well, crank the Gain control on this model, dig
in hard with your pick and you’ll soon find out! Can you hear how the note literally
“sags” when you first hit it and then it opens up? That’s sag, geddit?
TONAL NOTE: Just like on the original, the Middle and Treble control of
TWEED 4x10 are highly interactive and high settings of the Middle control
automatically add treble to your sound. As a result, you may want to turn down
the Treble control as a counter measure. Conversely, low Middle settings
reduce treble so you might wanna crank the Treble a little more in such
instances.
Original’s tube compliment: 1 x 12AY7, 2 x 12AX7s in preamp, 1x GZ34
rectifier, 2 x 5881s in power amp.
49
Page 54

Troubleshooting
1. The amp isn’t powering up when the POWER switch is “on”
➢ Is the power cable plugged into the AC POWER CONNECTOR on the rear panel
of the amp?
➢ Is the power cable plugged into an AC outlet?
➢ Is the AC outlet switched on?
➢ Does the AC outlet being used actually work?
➢ Does the power cable work?
2. There’s no sound coming from the amp
➢ Is your guitar turned up?
➢ Are both ends of your guitar cable plugged into where they should be?
➢ Is your guitar cable working?
➢ Is the amp’s MASTER volume turned up?
➢ Do you have headphones or anything else plugged into the amp’s PHONE OUT
jack? If “yes,” unplug!
➢ Is the amp in “Silent Tuning Mode” (this is indicated by “ ” in the BANK Display)?
If “yes,” get out of it by hitting the TUNER/CANCEL button.
➢ Using the ORIGINAL VALUE LED, check the settings of the GAIN, VOLUME,
TREBLE, MIDDLE and BASS (on certain AMP TYPES, if the EQ controls are all
turned down, there will be little or no sound coming from the amp due to the way
the circuit of the original works). And, if a PEDAL is being used, check the DRIVE
and LEVEL settings.
➢ Are you in MANUAL MODE (this is indicated by “ ” in the BANK Display)? If yes,
turn the following controls above their minimum setting: PEDAL DRIVE & PEDAL
LEVEL, GAIN, VOLUME, TREBLE, MIDDLE, BASS & MASTER.
3. The amp doesn’t seem very loud
➢ Is your guitar turned up?
➢ Is the amp’s MASTER volume turned down low?
➢ How is the POWER SELECT knob on the rear panel set?
➢ Have you connected a high impedance (eg: 16 Ohms) speaker cabinet to the
EXTERNAL SPEAKER OUT(s)?
➢ Using the ORIGINAL VALUE LED, check the settings of the GAIN, VOLUME,
TREBLE, MIDDLE and BASS controls (on certain AMP TYPES, if the EQ controls
are all turned down, there will be little or no sound coming from the amp due to the
way the circuit of the original works). And, if PEDAL is being used, check the
DRIVE and LEVEL settings.
50
Page 55

➢ Are you in MANUAL MODE (this is indicated by “ ” in the BANK Display)? If yes,
make sure the following controls aren’t turned down low: GAIN, VOLUME, TREBLE, MIDDLE, BASS & MASTER. And, if a PEDAL is selected also check the
PEDAL DRIVE & PEDAL LEVEL knobs.
4. There’s no sound heard from the LINE OUT or PHONE OUT jacks when you use
them.
➢ Check that the LEVEL control knob that adjusts their output isn’t turned all the way
down.
➢ Make sure sound is coming from the amp (IMPORTANT NOTE: you have to
unplug your headphones from the PHONE OUT to do this as plugging something
into it automatically mutes the amp’s speakers). If it isn’t, go to question 2. If it is,
check the headphones/cables you are hooking up to these jacks.
5. You can’t hear any MODULATION, DELAY or REVERB effects even though
they’re dialed in...
➢ Check that the BYPASS button isn’t engaged (indicated by the ORIGINAL VALUE
LED remaining on). If it is, disengage it by pressing it again so that the ORIGINAL
VALUE LED goes off.
6. You’re using the optional VC-4 Foot Controller and you can’t hear the PEDAL,
MODULATION, DELAY and/or REVERB effects you’ve got dialed in...
➢ Make sure the VC-4 isn’t in “Individual Mode” which means it can switch off any
(or all) of the above.
7. You’re using the ACOUSTIC pedal setting and you’re getting some nasty, high
frequency distortion happening.
➢ This is NOT a fault! It just means that you’re driving this pedal model too darned
hard! To cure this problem try turning down your guitar, turning down the DRIVE
(treble) control of the Pedal Section &/or plugging into the LOW input of the amp.
As already stated in the “PEDAL POINTS” Section (page 36), to make an electric
guitar sound like an acoustic you have to boost the high frequencies by ridiculous
amounts. As a result, if you drive such a circuit too hard, unwanted distortion in the
high frequencies can and will result. Like I’ve already said, this is NOT a fault - it’s
just the nature of the beast!
51
Page 56

If your problem persists after going through all the above suggested solutions, please
contact your authorized VOX dealer for further assistance, or visit www
NOTICE: VOX products are manufactured under strict specifications and voltages as required by each country. These products are
warranted by the VOX distributor in the country where they are purchased. Any VOX product not sold with a warranty card or carrying
a serial number disqualifies that product sold from the manufacture’s / distributor’s warranty and liability. This requirement is for
your own protection and safety.
.voxamps.co.uk.
52
Page 57

Techno Talk (yawn!):
General Valvetronix Specifications
NUMBER OF AMP TYPES: 16
NUMBER OF EFFECTS:
DRIVE TYPES 10
MODULATION TYPES 5
DELAY TYPES 3
REVERB TYPES 3
NOISE REDUCTION 1
NUMBER OF PROGRAMS: 32 (8 BANKS x 4 CHANNELS)
NUMBER OF INPUTS:
TOP PANEL 2 (HIGH & LOW)
REAR PANEL AD60VT 1 x LOOP RETURN
1 x FOOT CONTROLLER JACK
REAR PANEL AD120VT 2 x LOOP RETURN (L & R)
NUMBER OF OUTPUTS:
REAR PANEL AD60VT 1 x LOOP SEND
REAR PANEL AD120VT 2 x LOOP SEND (L & R)
POWER OUTPUT:
AD60VT 60 Watts RMS @ 8 ohm
AD120VT 2 x 60 Watts RMS @ 8 ohm
SPEAKERS:
AD60VT 1 x VOX Original 12-inch, 8ohm (made by Celestion)
AD120VT 2 x VOX Original 12-inch, 8ohm (made by Celestion)
1 x FOOT CONTROLLER JACK
1 x PHONE OUT
1 x LINE OUT
1 x EXTERNAL SPEAKER OUT
1 x PHONE OUT
2 x LINE OUT (L & R)
2 x EXTERNAL SPEAKER OUT (L & R)
53
Page 58

TUNING RANGE: A0-C7 (27.5HZ-2093HZ)
TUNER CALIBRATION: A = 438HZ - 445HZ
SIGNAL PROCESSING:
A/D conversion 20bit
D/A conversion 20bit
Sampling frequency 48KHz
POWER SUPPLY REQUIREMENTS: AC, Local Voltage
POWER CONSUMPTION:
AD60VT 73W
AD120VT 135W
DIMENSIONS:
AD60VT (W X D X H) 530 x 267 x 559 (mm)/ 20.87 x 10.51 x 22.00 (inches)
AD120VT (W X D X H) 699 x 267 x 559 (mm)/ 27.52 x 10.51 x 22.00 (inches)
WEIGHT:
AD60VT 19.6 Kg
AD120VT 26.2 Kg
ACCESSORIES:
INCLUDED Power cable
OPTIONAL VC-4 VOX Foot Controller
* Appearance and specifications of this product are subject to change with-
out notice.
54
Page 59

1
2
3
4
AD120VT
1 2 3 4 5 6 7 8
AD60VT
765
8
9
10
1 2 3 4 5 6 7 8
Page 60

Wanna remember how you set up your favourite programs? Well this is the place to do it! Simply do as follows:
1. Indicate where all the knobs are set by drawing a line in the empty circles.
2. Indicate which MODULATION, DELAY & REVERB effects are being used by colouring in the relevant
LED (including EX CON)
3. Don’t forget to make notes on NR, TAP TEMPO and POWER SELECTION in the areas indicated!
WORD TO THE WISE: There’s only four panels you can fill out here so do yourself a favor by
photocopying it and then keep a blank master so you can make more copies whenever you like
PROGRAM NAME:
NOISE REDUCTION (NR): TAP TEMPO: POWER SELECTION Switch Setting:
PROGRAM NOTES:
PROGRAM NAME:
NOISE REDUCTION (NR): TAP TEMPO: POWER SELECTION Switch Setting:
PROGRAM NOTES:
PROGRAM NAME:
NOISE REDUCTION (NR): TAP TEMPO: POWER SELECTION Switch Setting:
PROGRAM NOTES:
PROGRAM NAME:
NOISE REDUCTION (NR): TAP TEMPO: POWER SELECTION Switch Setting:
PROGRAM NOTES:
Page 61

 Loading...