

Page 1

AC30S1
GUITAR AMPLIFIER
Owner’s Manual
Manuel d’utilisation
Bedienungsanleitung
Manual de Usuario
取扱説明書
EFGSJ 2
Page 2
IMPORTANT SAFETY INSTRUCTIONS
1) Read these instructions.
2) Keep these instructions.
3) Heed all warnings.
4) Follow all instructions.
5) Do not use this apparatus near water.
6) Clean only with dry cloth.
7) Do not block any ventilation openings. Install in accordance
with the manufacturer’s instructions.
8) Do not install near any heat sources such as radiators,
heat registers, stoves, or other apparatus (including
ampliers) that produce heat.
9) Do not defeat the safety purpose of the polarized or
grounding-type plug. A polarized plug has two blades with
one wider than the other. A grounding type plug has two
blades and a third grounding prong.
The wide blade or the third prong are provided for your
safety. If the provided plug does not t into your outlet, consult an electrician for replacement of the obsolete outlet.
10) Protect the power cord from being walked on or pinched
particularly at plugs, convenience receptacles, and the
point where they exit from the apparatus.
11) Only use attachments/accessories specied by the
manufacturer.
12) Use only with the cart, stand, tripod,
bracket, or table specied by the manufacturer, or sold with the apparatus.
When a cart is used, use caution when
moving the cart/apparatus combination
to avoid injury from tip-over.
13) Unplug this apparatus during lightning storms or when
unused for long periods of time.
14) Refer all servicing to qualied service personnel.
Servicing is required when the apparatus has been
damaged in any way, such as power-supply cord or plug
is damaged, liquid has been spilled or objects have fallen
into the apparatus, the apparatus has been exposed to
rain or moisture, does not operate normally, or has been
dropped.
The lightning ash with arrowhead symbol within an
equilateral triangle, is intended to alert the user to the
presence of uninsulated “dangerous voltage” within the
product’s enclosure that may be of sufcient magnitude
to constitute a risk of electric shock to persons.
The exclamation point within an equilateral triangle is
intended to alert the user to the presence of important
operating and maintenance (servicing) instructions in
the literature accompanying the product.
THE FCC REGULATION WARNING (for USA)
NOTE: This equipment has been tested and found to comply with
the limits for a Class B digital device, pursuant to Part 15 of the FCC
Rules. These limits are designed to provide reasonable protection
against harmful interference in a residential installation. This equipment generates, uses, and can radiate radio frequency energy and, if
not installed and used in accordance with the instructions, may cause
harmful interference to radio communications. However, there is no
guarantee that interference will not occur in a particular installation. If
this equipment does cause harmful interference to radio or television
reception, which can be determined by turning the equipment off and
on, the user is encouraged to try to correct the interference by one or
more of the following measures:
• Reorient or relocate the receiving antenna.
• Increase the separation between the equipment and receiver.
• Connect the equipment into an outlet on a circuit different from
that to which the receiver is connected.
• Consult the dealer or an experienced radio/TV technician for help.
If items such as cables are included with this equipment, you must
use those included items.
Unauthorized changes or modication to this system can void the
user’s authority to operate this equipment.
• WARNING—This apparatus shall be connected to a mains
socket outlet with a protective earthing connection.
• WARNING—The mains plug or appliance coupler is used
as the disconnect device, the disconnect devices shall
remain readily operable.
• Mains powered apparatus shall not be exposed to dripping
or splashing. No objects lled with liquids, such as vases
or drinking glasses, shall be placed on the apparatus.
• Turning off the power switch does not completely isolate
this product from the power line.
• Keep the power plug easily accessible. Do not install this
equipment far from a power outlet and/or power strip.
• Do not install this equipment in a conned space such as
a box for the conveyance or similar unit.
• Excessive sound pressure from earphones and headphones can cause hearing loss.
• This apparatus is for moderate climates areas use, not
suitable for use in tropical climates countries.
• The ventilation should not be impeded by covering the
ventilation openings with items, such as newspapers,
table-cloths, curtains, etc.
• No naked ame sources, such as lighted candles, should
be placed on the apparatus.
SUPPLIER’S DECLARATION OF CONFORMITY (for USA)
Responsible Party : KORG USA INC.
Address : 316 SOUTH SERVICE ROAD, MELVILLE, NY
Telephone : 1- 631-390-6500
Equipment Type : GUITAR AMPLIFIER
Model : AC30S1
This device complies with Part 15 of FCC Rules.
Operation is subject to the following two conditions:
(1) This device may not cause harmful inter ference, and
(2) this device must accept any interference received,
including interference that may cause undesired operation.
Notice regarding disposal (EU only)
When this “crossed-out wheeled bin” symbol is displayed on
the product, owner’s manual, battery, or battery package,
it signies that when you wish to dispose of this product,
manual, package or battery you must do so in an approved
manner. Do not discard this product, manual, package or
battery along with ordinary household waste. Disposing in
the correct manner will prevent harm to human health and
potential damage to the environment. Since the correct method of
disposal will depend on the applicable laws and regulations in your
locality, please contact your local administrative body for details.
If the battery contains heavy metals in excess of the regulated
amount, a chemical symbol is displayed below the “crossed-out
wheeled bin” symbol on the batter y or battery package.
*
All product names and company names are the trademarks or registered trade-
marks of their respective owners.
2
Page 3
INTRODUCTION
Congratulations on your purchase of the VOX Custom Series AC30S1 Guitar Amplier.
This amp is the culmination of over 60 years of manufacturing expertise and high quality guitar
amplier design. We’ve taken our most iconic amplier, the classic AC30 and re-engineered it to
become the AC30S1.
A streamlined, single channel design with more than enough exibility to satisfy your tonal desires and playing requirements. Whilst retaining the unmistakable AC30 sound!
Your AC30S1 is equipped with a number of modern features and conveniences, including a
master volume, Celestion VX12 speaker and custom VOX reverb to name a few. Please read this
manual carefully so that you can familiarize yourself with them.
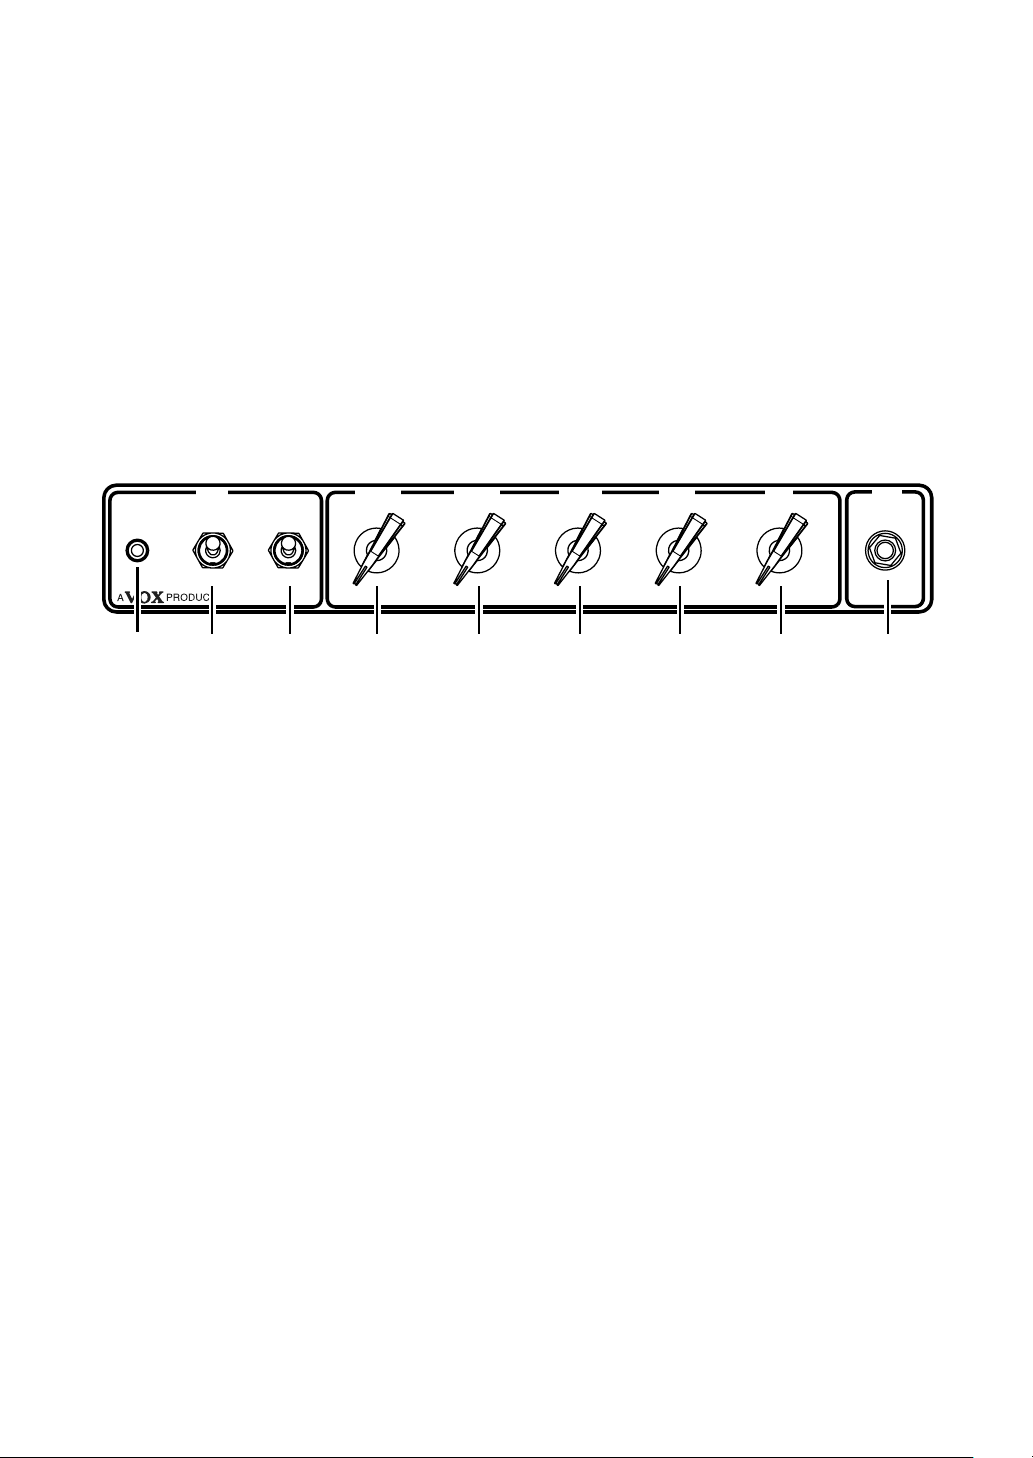
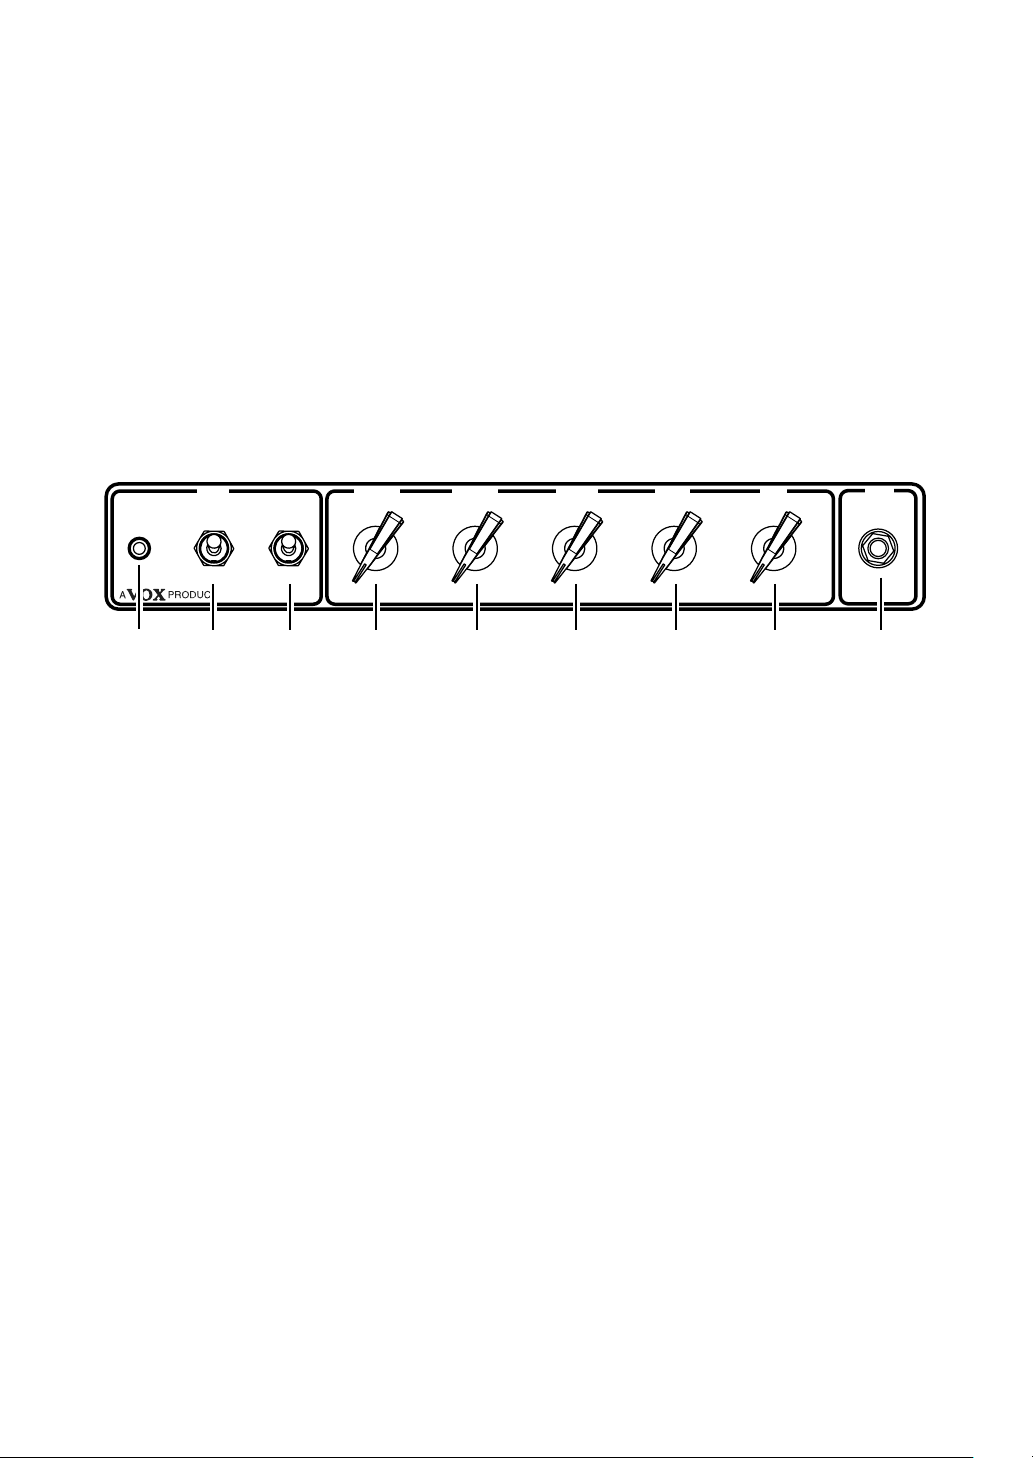
FRONT PANEL LAYOUT
MAINS
ON
OFF
HT
ON
STANDBY
VOLUME
REVERB
TREBLE
BASS
GAIN
1234 5678 9
1. MAINS Indicator
2. MAINS Power switch
3. STANDBY switch
4. VOLUME Control
This will tell you if your amp is on or off!
This is the ON/OFF switch for the power to the amplier. Please ensure
the amplier is switched off and unplugged before being moved.
Puts the amplier into STANDBY Mode. Meaning no output, just nicely
warmed tubes.
This controls the overall VOLUME of your amplier. Cleaner sounds can
be achieved by lowering the GAIN and raising the VOLUME. Setting the
VOLUME lower and the GAIN higher will give you a fatter, more distorted
tone at a lower volume. As with all the controls of this amplier, please experiment with different congurations to nd the tones that t your guitar
and playing style.
INPUT
5. REVERB Control
6. TREBLE Control
7. BASS Control
This controls the level of reverb in your sound. Ranging from subtle ambience to a spacious swell, the new Custom VOX reverb adds great sonic
depth to your tone.
This controls the high frequencies in your sound—from soft and round
when turned down (counter clockwise) to bright and cutting when cranked
(clockwise) and all points in-between.
This controls the low frequencies in your sound—from thin and light when
turned down (counter clockwise) to warm and heavy when turned up full
(clockwise) and all points in-between.
3
Page 4
8. GAIN Control
This determines the sensitivity of the preamp. Increase the volume and
distortion by turning it clockwise or you can turn it anticlockwise for a quieter, cleaner sound. The GAIN control should be used in conjunction with
the VOLUME to get the perfect balance between distortion and output
volume.
NOTE:
9. INPUT Jack
EXTERNAL SP FX LOOP
16 ohm
Because of the nature of the design of this amplier, it may take a few
minutes until the circuit becomes stable after the power is turned on.
Some noise might occur during this time but it soon disappears.
Plug your guitar in here!
SEND RETURN
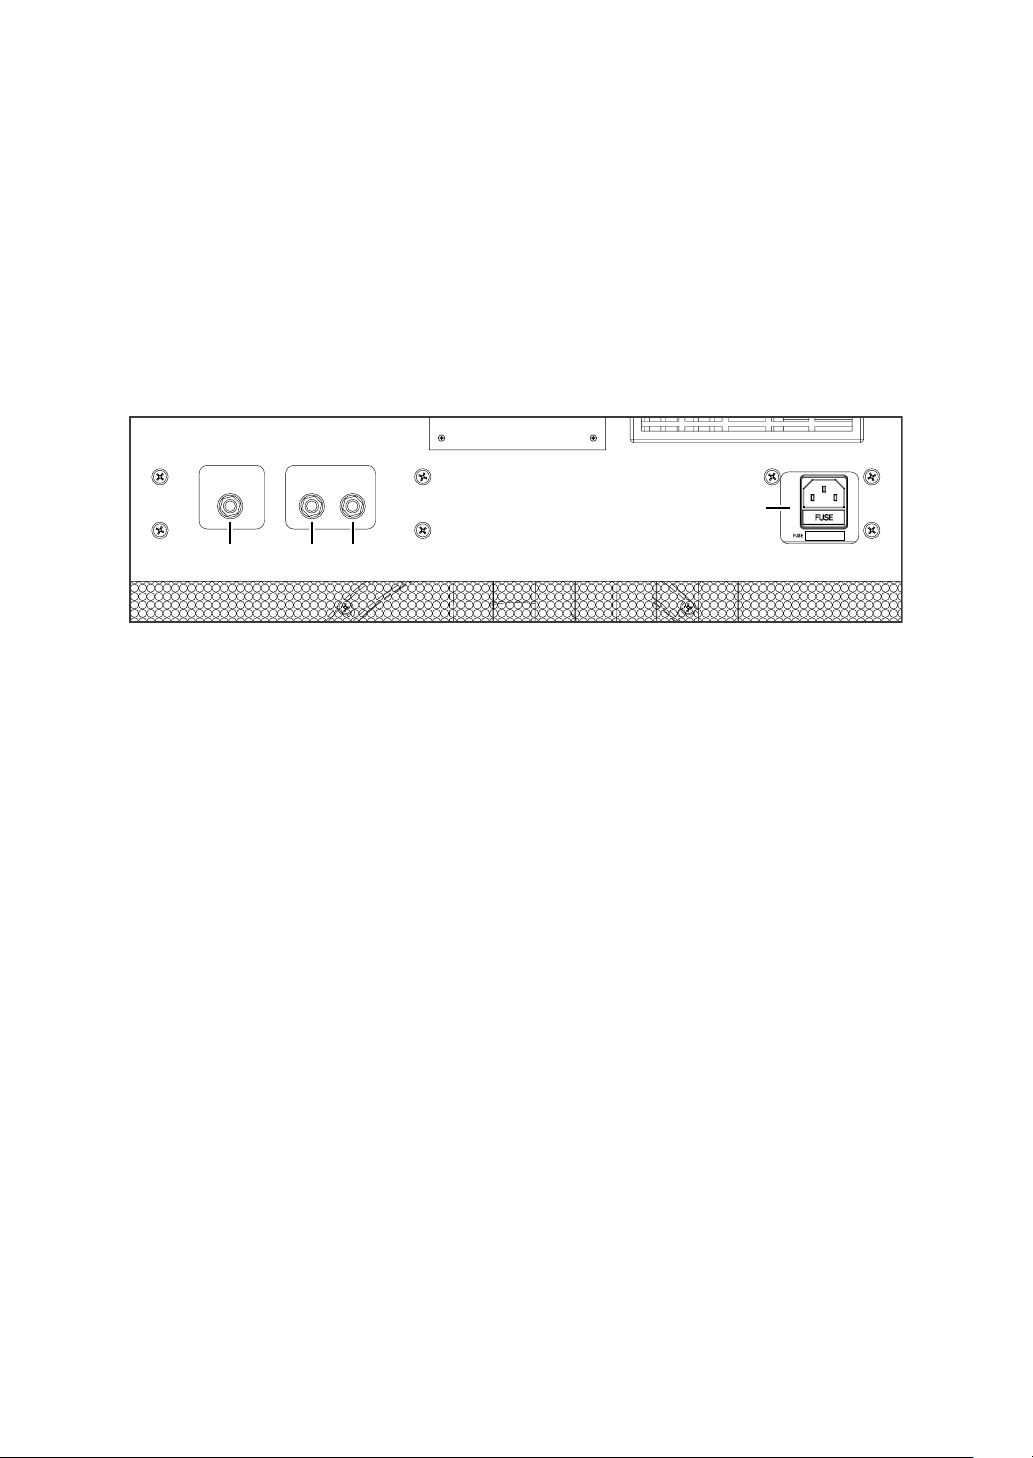
12
1. EXTERNAL SP Jack
This speaker jack will mute (disconnect) the internal speaker and you can
hook up a 16 Ohm cabinet of your choice.
WARNING:
To ensure that your system works correctly, you must observe the following points.
REAR PANEL LAYOUT
4
3
a) Don’t connect a speaker whose rated input capacity is less than 30 Watts.
The speaker may be destroyed if you ignore this caution—not recommended!
b) You must use a speaker cable to connect an external speaker. Don’t use a
shielded cable like the one you use to connect a guitar to an amp.
c) You must turn off the power before connecting the cable. Connecting the
cable while the power is turned on may damage your amp.
NOTE:
2. FX LOOP SEND Jack
3. FX LOOP RETURN Jack
It is recommended that all audio cables, with the exception of the speaker
lead, used to connect to the AC30S1 are of a high quality, screened type.
These should not exceed 10 metres in length. Always use a non-screened
Vox approved speaker lead with the AC30S1 Amplier and external cabinets.
Connect this to the input of your effect. (NOTE: This is a series effects
loop.)
Connect this to the output of your effect.
4
Page 5

4. MAINS INPUT
This is where the supplied, detachable Mains (power) cord is connected.
The specic mains input voltage rating that your amplier needs to run at is
located on the rear panel of your amplier. Before making any connections
or powering up the amplier, make sure the mains supply voltage matches
your amplier. If you have any doubt, refer to your local VOX dealer.
WARNING:
WARNING:
Use only the included power cord. Using any different power cord may
cause malfunctions or other issues.
Before opening the fuse holder, the mains supply must be disconnected,
by pull out the plug from the socket outlet. Fuse must be IEC 60127 certied and with below ratings:
* for 100-120V version - T2AL 250VAC
* for 220-240V version - T1.25AL 250VAC
(fuse characteristic - T:time-delay; L:low-breaking capacity)
Always refer servicing to qualied service personnel or the manufacturer/
related dealer.
Auto Power-Off Function (Only 230V version)
To comply with the European wide ErP regulation, this amplier has been tted with an automatic
power down function.
By default the function is engaged, and is designed to power down the amplier when a period 2
hours of no audio input is detected.
NOTES:
1. The Power switch is a momentary type. Momentarily move the switch
up for On and Down for Off. The switch will return to the centre position
once released.
2. The Auto Power-Off function can be disabled by moving the ECO switch
to the OFF position. The switch is located on the back panel next to the
Mains Inlet.
3. Power may not turn on or off if the switch is released in a very short time.
4. If the Gain or Volume is set to minimum, no input signal will be detected. This will mean the
auto power-off function will be enabled.
SPECIFICATION
Controls:
•
Input:
•
Output:
•
Tube compliment:
•
Output Power:
•
Speaker:
•
Dimensions:
•
Weight:
•
Included Items:
•
*Specications and appearance are subject to change without notice for improvement.
GAIN, BASS, TREBLE, REVERB, VOLUME
1 X INPUT Jack, FX LOOP RETURN Jack
1 X EXTERNAL SP jack, FX LOOP SEND Jack
2 x 12AX7, 4 x EL84
30 W RMS (16Ω)
1 x 12” VX12 (16Ω)
658 x 265 x 550 mm / 25.9 x 10.4 x 21.7 inches (W x D x H)
24.5 kg / 54.0 lbs.
Power Cord, Owner’s Manual
5
Page 6
CONSIGNES IMPORTANTES DE SÉCURITÉ
1) Veuillez lire ces consignes.
2) Conservez ces consignes.
3) Tenez compte de tous les avertissements.
4) Suivez toutes les instructions.
5) N’utilisez pas ce produit à proximité d’eau.
6) Nettoyez le produit avec un chiffon sec uniquement.
7) N’obstruez aucun orice d’aération. Installez le produit
conformément aux consignes du fabricant.
8) Ne l’installez pas à proximité de sources de chaleur
comme des radiateurs, des bouches d’air chaud, des
poêles ou d’autres appareils générateurs de chaleur
(amplicateurs compris).
9) Ne supprimez pas la sécurité offerte par la che polarisée ou dotée d’une broche de terre. Une che polarisée
dispose de deux lames dont une plus large que l’autre.
Une che avec broche de terre dispose de deux lames (ou
broches) et d’une broche de terre. La lame plus large ou la
troisième broche est conçue pour votre sécurité. Si la che
fournie ne s’adapte pas à votre prise de courant, consultez
un électricien pour faire remplacer cette ancienne prise.
10) Protégez le cordon d’alimentation pour éviter qu’il ne soit
piétiné ou abîmé notamment à la hauteur des ches, des
rallonges et au point de connexion du produit.
11) Utilisez exclusivement des xations ou accessoires
spéciés par le fabricant.
12) Utilisez cet appareil exclusivement avec
un chariot, stand, pied, support ou table
du type spécié par le constructeur ou
livré avec l’appareil. Si vous utilisez
un chariot, soyez prudent lors de son
déplacement an d’éviter que le produit
ne bascule et ne blesse quelqu’un.
13) Débranchez cet appareil en cas d’orage ou s’il doit rester
inutilisé durant une période assez longue.
14) Pour tout dépannage ou entretien, veuillez consulter un
service ou un technicien qualié. Il est impératif de faire
appel à un technicien qualié si l’appareil a été endom-
magé d’une quelconque façon, notamment, si le cordon
d’alimentation ou la che est endommagée, si du liquide
s’est renversé ou si des objets sont tombés dans l’appareil,
si l’appareil a été exposé à la pluie ou à l’humidité, s’il ne
fonctionne plus normalement ou s’il est tombé.
• AVERTISSEMENT—Ce produit doit être branché à une prise
secteur disposant d’une connexion de sécurité à la terre.
• AVERTISSEMENT—Si la che du cordon d’alimentation ou
un multi-prise est utilisé pour débrancher l’appareil du sec-
teur, veiller à ce que la che ou le multi-prise soit facilement
accessible.
• Un produit branché au secteur ne peut pas être exposé à des
gouttes ou des éclaboussures. Ne placez aucun conteneur
de liquide (vase, verre) sur le produit.
• Le fait de couper l’interrupteur n’isole pas complètement le
produit de la source de courant.
• Maintenez un accès facile à la prise d’alimentation.
N’installez pas ce produit trop loin d’une prise secteur et/ou
d’un multiprise.
• N’installez pas ce produit dans un espace conné comme un
ightcase ou autre meuble de ce type.
• Une pression sonore excessive en provenance d’oreillettes ou d’un
casque peut entraîner une perte auditive.
• Cet instrument est conçu pour être utilisé dans des régions au
climat tempéré et ne convient pas pour les pays au climat tropical.
• Veillez à ne jamais bloquer les orices de ventilation en les couvrant d’objets tels que des journaux, nappes, rideaux, etc.
• Ne placez aucune source de amme nue, telle qu’une bougie
allumée, sur l’instrument.
Le symbole d’éclair dans un triangle équilatéral est
destiné à avertir l’utilisateur de la présence d’une
tension dangereuse non isolée au sein du produit.
Cette tension est sufsante pour constituer un
risque d’électrocution.
Le point d’exclamation dans un triangle équilatéral
avertit l’utilisateur de la présence d’importantes
consignes de manipulation ou d’entretien dans la
documentation accompagnant ce produit.
Note concernant les dispositions (Seulement EU)
Quand un symbole avec une poubelle barrée d’une croix
apparait sur le produit, le mode d’emploi, les piles ou le
pack de piles, cela signie que ce produit, manuel ou
piles doit être déposé chez un représentant compétent,
et non pas dans une poubelle ou toute autre déchetterie
conventionnelle. Disposer de cette manière, de prévenir
les dommages pour la santé humaine et les dommages
potentiels pour l'environnement. La bonne méthode d'élimination
dépendra des lois et règlements applicables dans votre localité,
s’il vous plaît, contactez votre organisme administratif pour plus
de détails. Si la pile contient des métaux lourds au-delà du seuil
réglementé, un symbole chimique est afché en dessous du
symbole de la poubelle barrée d’une croix sur la pile ou le pack
de piles.
*Tous les noms de produits et de sociétés sont des marques commerciales ou déposées de leur détenteur respectif.
6
Page 7
INTRODUCTION
Félicitations pour votre achat de l’amplicateur de guitare VOX AC30S1.
Cet ampli est l’aboutissement de plus de 60 ans d’expertise dans la conception et la fabrication d’amplis
guitare de haute qualité. Nous avons choisi notre ampli le plus épique, l’AC30 classique, et l’avons réinventé pour obtenir l’AC30S1.
Cet ampli monocanal de conception épurée offre toute la exibilité nécessaire pour satisfaire à toutes vos
préférences en termes de son et de jeu. Et cela en conservant l’inimitable son de l’AC30 !
Votre AC30S1 est équipé d’une série de fonctions modernes et de petits plus pratiques, notamment une
commande de volume master, un haut-parleur Celestion VX12 et une réverbération custom VOX pour n’en
citer que quelques-uns. Veuillez lire attentivement ce mode d’emploi pour vous familiariser avec chacune
des fonctions.
FACE AVANT
MAINS
ON
OFF
HT
ON
STANDBY
VOLUME
REVERB
TREBLE
BASS
1234 5678 9
1. Témoin MAINS
2. Interrupteur d’alimentation MAINS
3. Commutateur STANDBY
4. Commande VOLUME
Il indique si l’ampli est sous ou hors tension!
C’est l’interrupteur On/Off de l’alimentation électrique de l’amplicateur.
que l’amplicateur est bien éteint et débranché avant de le déplacer.
Met l’amplicateur en mode STANDBY. Ce qui signie aucun son, mais des lampes
bien chaudes.
Contrôle le VOLUME général de votre amplicateur. Les sons clairs peuvent être
obtenus en baissant la commande GAIN et en montant la commande VOLUME. Un
réglage bas de la commande VOLUME et un réglage haut de la commande GAIN
vous donneront un son plus gros, avec plus de distorsion, même à bas volume.
Comme avec toutes les commandes de cet amplicateur, veuillez essayer différentes congurations pour trouver les sons qui conviennent à votre style de jeu.
GAIN
INPUT
Vériez
5. Commande REVERB
Contrôle le niveau de réverbération de votre son. Conçue spécialement pour cet
ampli, cette nouvelle réverbération VOX ajoute une superbe touche de profondeur
à votre son, du subtil à l’extrême.
6. Commande TREBLE
Contrôle les hautes fréquences de votre son—d’un son doux et rond en position
basse (sens anti-horaire) à un son brillant et tranchant avec un réglage poussé à
fond (sens horaire) en passant par tous les intermédiaires.
7. Commande BASS
Contrôle les basses fréquences de votre son—d’un son ténu et léger en position
basse (sens anti-horaire) à un son chaud et lourd avec un réglage à fond (sens
horaire) en passant par tous les intermédiaires.
7
Page 8
8. Commande GAIN
Contrôle la sensibilité du préampli. Tournez-la à droite pour augmenter le volume et la distorsion ou à gauche pour obtenir un son plus doux et moins saturé.
Utilisez la commande GAIN en conjonction avec la commande VOLUME pour
obtenir un équilibre parfait entre distorsion et niveau de sortie.
REMARQUE:
9. Prise INPUT
EXTERNAL SP FX LOOP
16 ohm
12
1. Prise EXTERNAL SP
AVERTISSEMENT:
De par la nature de son design, le circuit a besoin de quelquesminutes pour
se stabiliser une fois l’ampli mis en sous tension. Il se peut que vous entendiez
des bruits au cours de ce laps de temps, mais ils disparaîtront très rapidement.
Branchez-y votre guitare!
FACE ARRIÈRE
SEND RETURN
4
3
Cette prise coupe le son du haut-parleur interne quand vous y branchez
une enceinte externe. Branchez-y une enceinte de 16 ohms.
Pour garantir un fonctionnement correct de votre système, vous devez respecter les points suivants.
REMARQUE:
2. Prise FX LOOP SEND
3. Prise FX LOOP RETURN
4. MAINS INPUT
a) Ne branchez pas de bafe d’une puissance admissible inférieure à 30 watts.
Le bafe peut être détruit si vous ne respectez pas cette mise en garde — ce
n’est pas recommandé !
b) Vous devez utiliser un câble de bafe pour brancher un bafe externe. N’utilisez
pas de câble blindé comme ceux reliant une guitare à un ampli.
c) Vous devez couper l’alimentation électrique avant de brancher le câble. Bran-
cher le câble avec l’ampli sous tension peut endommager celui-ci.
Pour les connexions de l’AC30S1; il est recommandé que tous les câbles au-
dio, à l’exception du câble de bafe, soient de type blindé et de haute qualité.
Ils ne doivent pas dépasser 10 mètres de longueur. Servez-vous toujours d’un
câble d’enceinte non blindé, pour relier l’ampli AC30S1 et l’enceinte externe.
Connectez cette sortie à l’entrée de votre effet. (REMARQUE: Ceci est une
boucle d’effet en série)
Reliez cette prise à la sortie d’un processeur d’effets externe.
C’est ici que se branche le cordon d’alimentation secteur détachable (fourni).
La tension d’alimentation nécessaire à votre amplicateur est indiquée en face
arrière de l’amplicateur. Avant d’effectuer toute connexion ou de mettre l’ampli
8
Page 9

sous tension, vériez que la tension à la prise de courant que vous comptez
utiliser correspond bien à la tension requise pour votre ampli. En cas de doute,
demandez conseil à votre revendeur VOX.
AVERTISSEMENT:
Utilisez exclusivement le cordon d’alimentation secteur fourni. L’utilisation de
tout autre cordon d’alimentation secteur peut endommager l’ampli ou causer
d’autres problèmes.
AVERTISSEMENT:
Avant d’ouvrir le porte-fusible, s’assurer de débrancher l’appareil du secteur en
retirant la che du cordon d’alimentation de la prise de courant.
Le fusible doit être conforme à la norme IEC 60127 et aux spécications suivantes:
* pour la version 100-120V - T2AL 250VAC
* pour la version 220-240V - T1,25AL 250VAC
(spécications du fusible - T:temporisé; L:à basse résistance)
Coner tout travail d’entretien ou de réparation à un technicien qualié ou au fabri-
cant/à un revendeur.
Fonction de coupure automatique d’alimentation
(Uniquement pour la version de 230V)
Nous avons équipé cet amplicateur d’une fonction de mise hors tension automatique an de répondre à
la directive ErP européenne d’efcacité énergétique.
Cette fonction activée par défaut met automatiquement l’amplicateur hors tension si ce dernier ne reçoit
aucun signal pendant 2 heures.
REMARQUES:
1. L’interrupteur d’alimentation est de type ‘momentané’. Actionnez l’interrupteur
vers le haut pour mettre l’ampli sous tension et vers le bas pour le mettre hors
tension. L’interrupteur retourne en position centrale quand vous le relâchez.
2. Vous pouvez désactiver la fonction de coupure automatique d’alimentation en
plaçant le commutateur ECO sur la position ‘OFF’. Cet interrupteur se trouve
sur la face arrière de l’ampli, à côté de la prise pour le cordon d’alimentation.
3. Il se pourrait que l’instrument ne se mette pas sous tension ou hors tension si
l’interrupteur est relâché après un délai trop bref.
4. Si la distorsion ou le volume est réglé sur la valeur minimum, l’instrument ne détectera aucun signal
d’entrée. Dans ce cas, la fonction de coupure automatique d’alimentation sera activée.
FICHE TECHNIQUE
Contrôles:
•
Entrée:
•
Sortie:
•
Lampes:
•
Puissance de sortie:
•
Haut-parleur:
•
Dimensions:
•
Poids:
•
Accessoires fournis:
•
* Les caractéristiques et l’aspect du produit sont susceptibles d’être modiés sans avis préalable en vue d’une amélioration.
GAIN, BASS, TREBLE, REVERB, VOLUME
Prise INPUT, Prise FX LOOP RETURN
Prise EXTERNAL SP, Prise FX LOOP SEND
2 x 12AX7, 4 x EL84
30 watts RMS (16Ω)
1 x 12” VX12 (16Ω)
658 x 265 x 550 mm (L x P x H)
24.5 kg
Cordon d’alimentation, Manuel d’utilisation
9
Page 10

WICHTIGE SICHERHEITSHINWEISE
1) Bitte lesen Sie sich die Hinweise durch.
2) Bewahren Sie diese Hinweise auf.
3) Befolgen Sie alle Warnungen.
4) Führen Sie alle Anweisungen aus.
5) Verwenden Sie das Gerät niemals in der Nähe von Wasser.
6) Reinigen Sie es nur mit einem trockenen Tuch.
7) Versperren Sie niemals die Lüftungsschlitze. Stellen Sie das
Gerät nur den Herstelleranweisungen entsprechend auf.
8) Stellen Sie das Gerät niemals in die Nähe von Wärmequellen
wie Heizkörper, Öfen bzw. Geräte (darunter auch Verstärker),
die ausgesprochen heiß werden.
9) Versuchen Sie niemals, die Erdung des Netzkabels zu
umgehen. Ein polarisierter (englischer) Stecker weist zwei
unterschiedlich breite Stifte auf. Ein geerdeter Stecker ist
hingegen mit drei Stiften versehen. Der Erdungsstift dient
Ihrer Sicherheit. Wenn der beiliegende Stecker nicht in Ihre
Steckdose passt, bitten Sie einen Elektriker,
10) Sorgen Sie dafür, dass das Netzkabel nicht gequetscht wird
(was vor allem in der Nähe des Steckers passieren kann) und
dass man nicht darüber stolpern kann.
11) Verwenden Sie nur Halter und Ständer, die ausdrücklich vom
Hersteller empfohlen werden.
12) Ver wenden Sie nur Wagen, Ständer, Halterungen usw., die vom Hersteller vertrieben
oder empfohlen werden. Bei Verwendung
eines Wagens ist darauf zu achten, dass er
während des Transports nicht umkippt.
13) Lösen Sie im Falle eines Gewitters oder wenn das Gerät
längere Zeit nicht verwendet werden soll, den Netzanschluss.
14) Überlassen Sie alle Wartungsarbeiten einem qualizierten
und befugten Techniker. Das ist z.B. notwendig, wenn das
Produkt Schäden aufweist (z.B. beschädigtes Netzkabel,
Eintritt von Flüssigkeit oder Fremdkörpern, wenn das Gerät im
Regen gestanden hat), sich nicht erwartungsgemäß verhält
oder hingefallen ist.
• WARNUNG—Dieses Gerät darf nur an eine geerdete
Steckdose angeschlossen werden.
• WARNUNG—Der Netzstecker oder die Gerätesteckdose
sollten frei zugänglich sein, um das Gerät jederzeit vom
Stromnetz trennen zu können.
• Ein netzgespeistes Gerät darf niemals Regen- oder
Wassertropfen ausgesetzt werden. Außerdem darf man
keine Flüssigkeitsbehälter wie Vasen, Gläser usw. auf das
Gerät stellen.
• Auch nach dem Ausschalten bleibt die Netzverbindung
dieses Gerätes bestehen.
• Sorgen Sie dafür, dass man den Netzstecker jederzeit
problemlos erreichen kann. Stellen Sie das Gerät niemals weit
von der Steckdose/Anschlussleiste entfernt auf.
• Dieses Gerät darf sich während des Betriebs nicht in einem
geschlossenen Behälter/einem Flightcase benden.
• Ein hoher Schalldruck kann bei Verwendung von Ohrhörern bzw.
eines Kopfhörers zu einem bleibenden Hörschaden führen.
• Dieses Gerät ist für den Betrieb in gemäßigten Klimazonen
ausgelegt und nicht zur Verwendung in Ländern mit tropischem
Klima geeignet.
• Sorgen Sie stets für eine einwandfreie Lüftung, indem Sie die
Lüftungsöffnungen freihalten –Zeitungen, Tücher und andere
Gegenstände haben auf den Lüftungsöffnungen nichts verloren!
• Stellen Sie niemals Gegenstände mit offener Flamme wie
brennende Kerzen, Wunderkerzen usw. auf das Gerät!
diese zu ersetzen.
Der als Pfeil dargestellte Blitz in einem Dreieck
weist den Anwender auf nicht isolierte,
„gefährliche Spannungen“ im Geräteinneren hin,
die so stark sein können, dass sie einen
Stromschlag verursachen.
Das Ausrufezeichen in einem Dreieck weist den
Anwender darauf hin, dass zum Lieferumfang des
Gerätes wichtige Bedienund Wartungshinweise
(eventuell Reparaturhinweise) gehören.
Hinweis zur Entsorgung (Nur EU)
Wenn Sie das Symbol mit der „durchgekreuzten Mülltonne“
auf Ihrem Produkt, der dazugehörigen Bedienungsanleitung,
der Batterie oder dem Batteriefach sehen, müssen Sie das
Produkt in der vorgeschriebenen Art und Weise entsorgen.
Dies bedeutet, dass dieses Produkt mit elektrischen und
elektronischen Komponenten nicht mit dem normalen
Hausmüll entsorgt werden darf. Für Produkte dieser Art
existiert ein separates, gesetzlich festgelegtes Entsorgungssystem.
Gebrauchte elektrische und elektronische Geräte müssen separat
entsorgt werden, um ein umweltgerechtes Recycling sicherzustellen.
Diese Produkte müssen bei benannten Sammelstellen abgegeben
werden. Die Entsorgung ist für den Endverbraucher kostenfrei! Bitte
erkundigen sie sich bei ihrer zuständigen Behörde, wo sie diese
Produkte zur fachgerechten Entsorgung abgeben können. Falls ihr
Produkt mit Batterien oder Akkumulatoren ausgerüstet ist, müssen sie
diese vor Abgabe des Produktes entfernen und separat entsorgen
(siehe oben). Die Abgabe dieses Produktes bei einer zuständigen
Stelle hilft ihnen, dass das Produkt umweltgerecht entsorgt wird.
Damit leisten sie persönlich einen nicht unerheblichen Beitrag zum
Schutz der Umwelt und der menschlichen Gesundheit vor möglichen
negativen Effekten durch unsachgemäße Entsorgung von Müll.
Batterien oder Akkus, die Schadstoffe enthalten, sind auch mit dem
Symbol einer durchgekreuzten Mülltonne gekennzeichnet. In der Nähe
zum Mülltonnensymbol bendet sich die chemische Bezeichnung des
Schadstoffes. Cd oder NiCd steht für Cadmium, Pb für Blei und Hg für
Quecksilber.
*Alle Produkt- und Firmennamen sind Warenzeichen oder eingetragene
Warenzeichen der betreffenden Eigentümer.
10
Page 11

VORWEG
Herzlichen Glückwunsch zu Ihrer Wahl eines VOX AC30S1 Custom-Gitarrenverstärkers.
Dieser Verstärker stellt so etwas wie den Höhepunkt einer bereits 60 Jahre währenden Erfolgsgeschichte jener Firma dar, der man viel Fachwissen und noch mehr Spürsinnen für einen guten Sound
nachsagt. Wir haben uns unseren berühmtesten Verstärker, den klassischen AC30, vorgenommen
und ihn zum AC30S1 überarbeitet.
Schlankes Ein-Kanal-Design mit mehr als genügend Flexibilität, um Ihre Klangvorstellungen und
musikalischen Anforderungen zufriedenzustellen. Natürlich weiterhin mit dem unverwechselbaren
Sound des AC30!
Ihr AC30S1 verfügt zudem über diverse praktische moderne Features, darunter einen Master-Lautstärke-Regler, Celestion VX12 Lautsprecher und ein Custom-VOX-Reverb. Bitte lesen Sie vorliegende
Anleitung sorgfältig durch, damit Sie sich mit diesen Features vertraut machen können.
BEDIENFELD
MAINS
ON
OFF
HT
ON
STANDBY
VOLUME
REVERB
TREBLE
BASS
GAIN
1234 5678 9
1. MAINS-LED
2. MAINS-Schalter
3. STANDBY-Schalter
4. VOLUME-Regler
Leuchtet, wenn der Verstärker eingeschaltet ist.
Hiermit schalten Sie die Stromversorgung des Verstärkers ein und aus. Vor
Lösen des Netzanschlusses und dem anschließenden Transport müssen Sie
den Amp unbedingt ausschalten.
Hiermit schalten Sie den Verstärker in den STANDBY-Modus. Es wird kein
Signal ausgegeben, aber die Röhren werden schön vorgewärmt.
Hiermit regeln Sie die Gesamtlautstärke Ihres Verstärkers. Zum Erzeugen
reinerer Klänge senken Sie die GAIN-Regler und heben Sie die VOLUMERegler an. Durch Senken der VOLUME-Regler und Anheben der GAIN-Regler
erhalten Sie bei niedriger Lautstärke einen satteren, verzerrteren Ton. Experimentieren Sie ruhig ein bisschen mit allen Reglern Ihres Verstärkers, bis Sie
diejenigen Kongurationen entdecken, die am besten zu Ihrer Gitarre und zu
Ihrer Spielweise passen.
INPUT
5. REVERB-Regler
6. TREBLE-Regler
7. BASS-Regler
Hiermit regeln Sie den Halleffektanteil Ihres Sounds. Vom stimmigen
Ambiente bis hin zur bombigen Räumlichkeit, der neue Custom VOX Reverb
verleiht Ihrem Klang einen besondere akustische Tiefe.
Hiermit können die Höhen angehoben und abgesenkt werden – von
„geschmeidig und rund“ (ganz links) bis „beißend“ (ganz rechts).
Hiermit können die Bassfrequenzen angehoben und abgesenkt werden – von
„dünn und leicht“ (ganz links) bis „warm und fett“ (ganz rechts).
11
Page 12

8. GAIN-Regler
Hiermit regeln Sie die Empndlichkeit des Vorverstärkers. Drehen Sie den
Regler im Uhrzeigersinn, um Lautstärke und Verzerrung zu erhöhen, bzw.
gegen den Uhrzeigersinn, um einen leiseren, reineren Klang zu erzielen.
Stimmen Sie GAIN und VOLUME aufeinander ab, bis Sie das perfekte Gleichgewicht zwischen Verzerrung und Ausgangslautstärke erreichen.
HINWEIS:
9. INPUT-Buchse
EXTERNAL SP FX LOOP
16 ohm
Schaltungs bedingt kann es nach Einschalten des Verstärkers einige Minuten
dauern bis der Betriebszustand erreicht ist. Währenddessen können einige
Störgeräusche auftreten, die nach kurzer Zeit wieder nachlassen.
Hier muss die Gitarre angeschlossen werden.
SEND RETURN
12
1. EXTERNAL SP-Buchse
Wenn Sie einen 16-Ohm-Lautsprecher Ihrer Wahl an dieser Buchse anschließen, wird der verstärkereigene Lautsprecher stummgeschaltet (d.h. ausgeschaltet).
RÜCKSEITE
4
3
WARNUNG:
a)
Das System funktioniert nur ordnungsgemäß, wenn Sie folgende Punkte
beachten.
Verwenden Sie niemals eine Box mit einer Eingangskapazität von weniger als
30W. Lautsprecher, die diese Anforderungen nicht erfüllen, sind in kürzester
Zeit kaputt!
b)
Für die Verbindung der Box benötigen Sie ein Lautsprecherkabel. Geschirmte,
d.h. Gitarrenkabel eignen sich hierfür nicht.
c) Schalten Sie den Verstärker vor Anschließen der Box aus. Wenn Sie das
nicht tun, überlebt der Amp den Anschlussversuch eventuell nicht.
HINWEIS:
2. FX LOOP SEND-Buchse
3. FX LOOP RETURN-Buchse
Prinzipiell sollten alle Kabel (bis auf die Lautsprecherkabel), die man an den
AC30S1 anschließt, geschirmt und von guter Qualität sein.Verwenden Sie
niemals Kabel mit einer Länge von mehr als 10 Metern. Für die Verbindung
des AC30S1 mit einer Erweiterungsbox muss ein nicht geschirmtes Kabel
verwendet werden, die von Vox ausdrücklich empfohlen werden.
Schließen Sie hier den Eingang Ihres Effektgerätes an. (Anmerkung: Dies ist
ein serieller Effektloop).
Schließen Sie hier den Ausgang des externen Effektgeräts an.
12
Page 13

4. MAINS INPUT
Hier muss das beiliegende Netzkabel angeschlossen werden. Die vorausgesetzte Netzspannung wird auf der Geräterückseite erwähnt. Vergewissern Sie
sich vor dem Herstellen von Verbindungen und dem Einschalten des Verstärkers, dass die Versorgungsspannung stimmt. Richten Sie etwaige Fragen an
Ihren VOX-Händler.
WARNUNG:
Verwenden Sie ausschließlich das beiliegende Netzkabel. Die Verwendung
anderer Netzkabel kann zu Störungen und Fehlfunktionen führen.
WARNUNG:
Trennen Sie vor Öffnen des Sicherungshalters das Gerät vom Stromnetz,
indem sie den Stecker aus der Steckdose ziehen.
Verwenden Sie nur IEC 60127 zertizierte Sicherungen mit folgenden Werten:
* für 100-120V-Version - T2AL 250VAC
* für 220-240V-Version - T1.25AL 250VAC
(Auslösecharakteristik - T: träge; L: niedriges Ausschaltvermögen)
Wenden Sie sich zur Wartung an qualizierte Fachkräfte oder an den Hersteller
bzw. Fachhandel.
Energiesparfunktion (nur 230-V-Modell)
Gemäß der europaweit gültigen ErP-Richtlinie ist dieser Verstärker mit einer automatischen Ausschaltfunktion ausgestattet.
Die Funktion ist werksseitig aktiviert und schaltet den Verstärker aus, wenn über einen Zeitraum von
2 Stunden kein Eingangssignal anliegt.
HINWEISE:
1.
Der MAINS-Schalter ist als federnder Schalter ausgelegt. Schieben Sie den
Schalter nach oben zum Einschalten (ON) und nach unten zum Ausschalten (OFF).
Sobald Sie den Schalter loslassen, federt er in die mittlere Position zurück.
2. Sie können die Energiesparfunktion deaktivieren, indem Sie den ECOSchal-
ter auf OFF stellen. Sie nden diesen Schalter auf der Rückseite neben der
Netzanschlussbuchse.
3. Bei nur sehr kurzer Betätigung des Netzschalters kann es vorkommen, dass
sich das Gerät nicht ein- bzw. ausschaltet.
4. Wenn Gain oder Lautstärke auf den Minimalwert eingestellt sind, wird kein Eingangssignal erkannt.
In diesem Fall wird die automatische Energiesparfunktion aktiviert.
TECHNISCHE DATEN
Steuerung:
•
Eingang:
•
Ausgang:
•
Röhrenbestückung:
•
Ausgangsleistung:
•
Lautsprecher:
•
Abmessungen:
•
Gewicht:
•
Lieferumfang:
•
* Änderungen der technischen Daten und des Designs ohne vorherige Ankündigung vorbehalten.
GAIN, BASS, TREBLE, REVERB, VOLUME
INPUT-Buchse, FX LOOP RETURN-Buchse
EXTERNAL SP-Buchse, FX LOOP SEND-Buchse
2 x 12AX7, 4 x EL84
30 watts RMS (16Ω)
1 x 12” VX12 (16Ω)
658 x 265 x 550 mm (B x T x H)
24,5 kg
Netzkabel, Bedienungsanleitung
13
Page 14

INSTRUCCIONES DE SEGURIDAD
IMPORTANTES
1) Lea estas instrucciones.
2) Guarde estas instrucciones.
3) Tenga en cuenta todas las advertencias.
4) Siga todas las instrucciones.
5) No use este equipo cerca del agua.
6) Límpielo únicamente con un paño seco.
7) No bloquee los oricios de ventilación. Instálelo siguiendo las instrucciones del fabricante.
8) No lo instale cerca de radiadores, aparatos de cale-
facción, estufas ni ningún tipo de aparato (incluyendo
amplicadores) que genere calor.
9) Tenga en cuenta los nes de seguridad de los conectores con derivación a masa y / o polarizados. Los
conectores polarizados tienen dos contactos, uno de
mayor tamaño que el otro. Un conector con derivación
a masa tiene dos contactos con un tercero para derivar
a masa. El contacto ancho o el tercer contacto se insta-
lan con nes de seguridad. Si el conector del equipo no
encaja en la toma de corriente disponible, acuda a un
técnico electricista cualicado para que le substituya la
toma obsoleta.
10) Procure no pisar ni aplastar el cable de alimentación,
especialmente en los conectores, los receptáculos y en
el punto donde salen del equipo.
11) Use sólo los accesorios/conexiones especicados por
el fabr cante.
12) Úselo sólo con la mesilla con ruedas,
el soporte, el trípode, la abrazadera o
la mesa indicados por el fabricante, o
que se venden junto con el equipo. Si
utiliza una mesilla con ruedas, tenga
cuidado al desplazar el conjunto de la
mesilla y el equipo, ya que si se cae podría provocar
lesiones.
13) Desconecte este equipo si hay tormenta o cuando no
vaya a ser utilizado por largos períodos de tiempo.
14) Deje que el mantenimiento lo lleve a cabo personal
cualicado. Es necesario reparar el equipo cuando ha
sufrido algún daño, como por ejemplo si el cable de
alimentación o el conector han sufrido daños, si se ha
derramado algún líquido o ha caído algún objeto en el
interior del equipo, si éste ha sido expuesto a la lluvia
o la humedad, si no funciona normalmente o si se ha
caído al suelo.
• ATENCIÓN—Este aparato debe conectarse a una
toma de corriente con una conexión a tierra protectora.
• ATENCIÓN—La clavija de enchufe o el conector IEC
del cable de corriente se utilizan como dispositivos de
desconexión, por lo que deberán permanecer fácilmente accesibles.
• Los equipos conectados a la red no deben exponerse a gotas ni a salpicaduras. No coloque objetos que
contengan líquidos, como oreros o vasos, encima del
equipo.
• El equipo no queda totalmente aislado de la red eléctri-
ca si se desactiva con el conmutador de alimentación.
• Procure que el conector de alimentación sea fácilmente
a cesible. No instale este equipo en un lugar alejado de
tomas de corriente y/o regletas.
• No instale este equipo en un espacio cerrado, como una
caja móvil u otro espacio similar.
• Una presión de sonido excesiva de los auriculares puede
provocar una pérdida de audición.
• Este equipo está destinado al uso en zonas de clima templado, y no es adecuado para su uso en países con clima
tropical.
• No se debe obstruir la ventilación cubriendo las aberturas
de ventilación con objetos como periódicos, manteles, cortinas, etc.
• No se deben colocar llamas vivas, como por ejemplo velas,
sobre el equipo.
El símbolo de un relámpago con punta de echa,
dentro de un triángulo equilátero, tiene la función de
avisar al usuario de la presencia de un “voltaje
peligroso” no aislado dentro del mueble del producto,
que puede ser de magnitud suciente para suponer
un riesgo de descarga eléctrica para las personas.
El signo de exclamación dentro de un triángulo
equilátero tiene la función de avisar al usuario de la
presencia de instrucciones importantes de funcionamiento y mantenimiento (servicio técnico) en la
documentación que se adjunta con el producto.
Nota respecto a residuos y deshechos (solo UE)
Cuando aparezca el símbolo del cubo de basuratachado
sobre un producto, su manual de usuario, labatería, o el
embalaje de cualquiera de éstos, signica que cuando
quiere tire dichos artículos a la basura, ha de hacerlo en
acuerdo con la normativa vigente de la Unión Europea.
No debe verter dichos artículos junto con la basura de
casa. Verter este producto de manera adecuada ayudará a
evitar daños a su salud pública y posibles daños al medioam-
biente. Cada país tiene una normativa especíca acerca de
cómo verter productos potencialmente tóxicos, por tanto le
rogamos que se ponga en contacto con su ocina o ministerio
de medioambiente para más detalles. Si la batería contiene
metales pesados por encima del límite permitido, habrá un
símbolo de un material químico, debajo del símbolo del cubo de
basura tachado.
* Todos los nombres de productos y compañías son marcas comer-
ciales o marcas registradas de sus respectivos propietarios.
14
Page 15

INTRODUCCIÓN
¡Felicidades por la adquisición del AC30S1 amplicador de guitarra VOX Custom Series!
Este amplicador es la culminación de más de 60 años de experiencia en la fabricación y diseño
de Amplicadores de guitarra de gran calidad. Hemos tomado nuestro amplicador más emblemático, el clásico AC30, y lo hemos rediseñado para convertirlo en el AC30S1.
Un diseño simplicado y de un solo canal con exibilidad más que suciente para obtener el
sonido que desee y responder a sus exigencias al tocar. ¡Y, por supuesto, conservando el inconfundible sonido AC30!
Su AC30S1 está equipado con una serie de modernas y prácticas prestaciones que incluyen
volumen general, altavoz Celestion VX12 y reverberación VOX especialmente diseñada, por
nombrar solo algunas. Lea atentamente este manual para familiarizarse con ellas.
PANEL FRONTAL
MAINS
ON
OFF
HT
ON
STANDBY
VOLUME
REVERB
TREBLE
BASS
GAIN
1234 5678 9
1. Indicador MAINS
2. Interruptor MAINS
3. Interruptor STANDBY
4. Control VOLUME
¡Indica si el amplicador está activado o desactivado!
Este es el interruptor ON/OFF de la alimentación del amplicador. Asegúrese de que el amplicador está apagado y desconectado de la red antes de
moverlo.
Coloca el amplicador en modo STANDBY, lo que signica que no hay salida, pero las válvulas están encendidas.
Este control de Volumen Principal determina el nivel de salida del ampli-
cador. Si sube este nivel a la vez que mantiene el nivel de control GAIN
bajo, irá perfecto para sonidos claros. Baje este control y suba el volumen
de control GAIN para un sonido grueso y distorsionado. Lo mejor es experimentar para encontrar el sonido perfecto para cada caso.
INPUT
5. Control REVERB
6. Control TREBLE
7. Control BASS
Permite controlar el nivel de reverberación en el sonido. La nueva reverberación Custom VOX, que abarca desde un ambiente sutil hasta un crescendo espacioso, incorpora una estupenda profundidad sónica al tono.
Ajusta el nivel de agudos, desde suave a brillante y todos los puntos intermedios.
Ajusta el nivel de graves, desde cálido y ligero cuando está hacia la izquierda, hasta oscuro y fuerte cuando está hacia la derecha y todos los puntos
intermedios.
15
Page 16

8. Control GAIN
Determina la sensibilidad del preamplicador. Aumente el volumen y la distorsión girándolo hacia la derecha; también puede girarlo hacia la izquierda
para obtener un sonido más nítido y tranquilo. El control GAIN se debe utilizar junto con VOLUME para lograr el equilibrio perfecto entre la distorsión y
el volumen de salida.
NOTA:
9. Jack INPUT
EXTERNAL SP FX LOOP
16 ohm
Debido a la naturaleza del diseño de este amplicador, puede que sean necesarios algunos minutos tras su encendido hasta que el circuito se estabilice.
Se puede producir algún ruido durante esta fase, pero desaparecerá rápidamente.
conecta aquí usted guitarra!
12
1. Jack EXTERNAL SP
Este jack de altavoz silenciará (desconectará) el altavoz interno y puede
conectar una caja acústica de 16 Ohm a su elección.
PANEL TRASERO
SEND RETURN
4
3
ADVERTENCIA:
a) No conecte un altavoz que no pueda soportar al menos 30 vatios de potencia.
b) Asegúrese SIEMPRE de que usa cables de altavoz de alta calidad (no apan-
c) Debe apagar el amplicador antes de conectar los altavoces. Si conecta el
NOTA:
Para asegurar que su sistema funciona correctamente, debe observar los
siguientes puntos.
Si ignora esta advertencia podría destruir el altavoz –no recomendado.
tallados). No use nunca cables de guitarra (apantallados).
cable con el amplicador encendido puede dañar el amplicador.
Asegúrese que usa cables de audio de alta calidad apantallados para
AC30S1 (con la excepción de los cables de altavoz que no deben ser apantallados). No deben exceder de 10 metros de longitud. Utilice siempre un cable
de altavoz no apantallado con el amplicador AC30S1 y las cajas externas.
2. Jack FX LOOP SEND
Conéctalo a la entrada de tu efecto. (NOTA: se trata de un bucle de efectos
en serie).
3. Jack FX LOOP RETURN
Conecta esta toma a la salida de tu efecto.
16
Page 17

4. MAINS INPUT
El amplicador se suministra con un cable de alimentación extraíble que
debe conectarse aquí. El voltaje adecuado para el amplicador está indica-
do en el panel posterior. Antes de realizar conexiones o encender el ampli-
cador, asegúrese de que la tensión de la toma de corriente coincide con la
del amplicador. En caso de duda, consulte con su distribuidor VOX local.
ADVERTENCIA:
ADVERTENCIA:
Función de desactivación automática (solo versión de 230 V)
Utilice únicamente el cable de alimentación incluido. El uso de otro cable de
corriente diferente puede causar anomalías de funcionamiento y otros problemas.
Antes de abrir el portafusible, debe desconectarse el suministro eléctrico desenchufando la clavija de enchufe del cable de corriente de la red.
El fusible debe tener certicación IEC 60127 con las siguientes especicaciones:
* Para la versión 100-120 V: T2AL 250VAC
* Para la versión 220-240 V: T1.25AL 250VAC
(Características del fusible - T: retardo de tiempo; L: baja capacidad de ruptura)
Solicite asistencia técnica solo a personal técnico cualicado o al fabricante/distribuidor correspondiente.
Para cumplir con la normativa europea ErP, este amplicador incluye una función de desactivación automática.
Por defecto esta función está activada, y se ha diseñado para desactivar el amplicador cuando
se detecta un periodo de 2 horas sin ninguna entrada de audio.
NOTAS:
1. El interruptor MAINS es de tipo momentáneo. Permite mover momentáneamente el interruptor hacia arriba para activar y hacia abajo para des-
activar. El interruptor regresará a la posición central una vez liberado.
2. La función de desactivación automática se puede desactivar desplazando el interruptor ECO a la posición de desactivado. El interruptor está
situado en el panel posterior, junto a la entrada principal.
3. La alimentación puede no conectar ni desconectarse si el interruptor se
suelta en un tiempo muy corto.
4. Si la Ganancia o el Volumen están ajustados al mínimo, no se detectará señal de entrada.
Esto signicará que se activará la función de desactivación automática.
ESPECIFICACIONES
Controles:
•
Entrada:
•
Salida:
•
Válvulas incluidas:
•
Puissance de sortie:
•
Altavoz:
•
Dimensiones :
•
Peso:
•
Accesorios incluidos:
•
GAIN, BASS, TREBLE, REVERB, VOLUME
Jack INPUT, Jack FX LOOP RETURN
Jack EXTERNAL SP, Jack FX LOOP SEND
2 x 12AX7, 4 x EL84
30 Vatios RMS (16Ω)
1 x 12” VX12 (16Ω)
658 x 265 x 550 mm (ancho x alto x profundo)
24,5 kg
Cable de alimentación, manual de usuario
* Las especicaciones y el aspecto están sujetas a cambios sin previo aviso por mejora.
17
Page 18

安全上のご注意
ご使用になる前に必ずお読みください
ここに記載した注意事項は、製品を安全に正しくご使用いただき、あ
なたや他の方々への危害や損害を未然に防ぐためのものです。
注意事項は誤った取り扱いで生じる危害や損害の大きさ、または切
迫の程度によって、内容を「警告」、「注意」の2つに分けています。こ
れらは、あなたや他の方々の安全や機器の保全に関わる重要な内容
ですので、よく理解した上で必ずお守りください。
マークについて
製品には下記のマークが表示されています。
マークには次のような意味があります。
このマークは、機器の内部に絶縁されていない「危険な電
圧」が存在し、感電の危険があることを警告しています。
このマークは注意喚起シンボルであり、取扱説明書などに
一般的な注意、警告、危険の説明が記載されていることを
表しています。
火災・感電・人身障害の危険を防止するには
図記号の例
記号は、注意(危険、警告を含む)を示しています。
記号の中には、具体的な注意内容が描かれています。
左の図は「一般的な注意、警告、危険」を表しています。
記号は、禁止(してはいけないこと)を示しています。
記号の中には、具体的な注意内容が描かれることがあります。
左の図は「分解禁止」を表しています。
記号は、強制(必ず行うこと)を示しています。
記号の中には、具体的な注意内容が描かれることがあります。
左の図は「電源プラグをコンセントから抜くこと」を表していま
す。
以下の指示を守ってください
警告
この注意事項を無視した取り扱いをすると、
死亡や重傷を負う可能性があります。
・電源プラグは、必ずAC100Vの電源コンセントに差し込む。
・電源プラグにほこりが付着している場合は、ほこりを拭き取る。
感電やショートの恐れがあります。
・本製品はコンセントの近くに設置し、電源プラグへ容易に手が
届くようにする。
・次のような場合には、直ちに電源を切って電源プラグをコンセ
ントから抜く。
○ 電源コードやプラグが破損したとき
○ 異物が内部に入ったとき
○ 製品に異常や故障が生じたとき
修理が必要なときは、お客様相談窓口へ依頼してください。
・本製品を分解したり改造したりしない。
・修理、部品の交換などで、取扱説明書に書かれていること以外
は絶対にしない。
・電源コードを無理に曲げたり、発熱する機器に近づけない。
また、電源コードの上に重いものをのせない。
電源コードが破損し、感電や火災の原因になります。
・大音量や不快な程度の音量で長時間使用しない。
大音量で長時間使用すると、難聴になる可能性があります。
万一、聴力低下や耳鳴りを感じたら、専門の医師に相談し
てください。
・本製品に異物(燃えやすいもの、硬貨、針金など)を入れない。
・温度が極端に高い場所(直射日光の当たる場所、暖房機器の
近く、発熱する機器の上など)で使用や保管をしない。
・振動の多い場所で使用や保管をしない。
・ホコリの多い場所で使用や保管をしない。
・風呂場、シャワー室で使用や保管をしない。
・雨天時の野外のように、湿気の多い場所や水滴のかかる場
所で、使用や保管をしない。
・本製品の上に、花瓶のような液体が入ったものを置かない。
・本製品に液体をこぼさない。
・濡れた手で本製品を使用しない。
注意
この注意事項を無視した取り扱いをすると、傷害を負う
可能性または物理的損害が発生する可能性があります。
・正常な通気が妨げられない所に設置して使用する。
・ラジオ、テレビ、電子機器などから十分に離して使用する。
ラジオやテレビ等に接近して使用すると、本製品が雑音を
受けて誤動作する場合があります。また、ラジオ、テレビ
等に雑音が入ることがあります。
・外装のお手入れは、乾いた柔らかい布を使って軽く拭く。
・電源コードをコンセントから抜き差しするときは、必ず電源
プラグを持つ。
・長時間使用しないときは、電源プラグをコンセントから抜
く。
電源スイッチをオフにしても、製品は完全に電源から切断
されていません。
・付属の電源コードは他の電気機器で使用しない。
付属の電源コードは本製品専用です。他の機器では使用で
きません。
・他の電気機器の電源コードと一緒にタコ足配線をしない。
本製品の定格消費電力に合ったコンセントに接続してくだ
さい。
・スイッチやツマミなどに必要以上の力を加えない。
故障の原因になります。
・外装のお手入れに、ベンジンやシンナー系の液体、コンパウ
ンド質、強燃性のポリッシャーを使用しない。
・不安定な場所に置かない。
本製品が落下してお客様がけがをしたり、本製品が破損し
たりする恐れがあります。
・本製品の上に乗ったり、重いものをのせたりしない。
本製品が落下または損傷してお客様がけがをしたり、本製
品が破損したりする恐れがあります。
・本製品の隙間に指などを入れない。
お客様がけがをしたり、本製品が破損したりする恐れがあ
ります。
・地震時は本製品に近づかない。
・本製品に前後方向から無理な力を加えない。
本製品が落下してお客様がけがをしたり、本製品が破損し
たりする恐れがあります。
* すべての製品名および会社名は、各社の商標または登録商標
です。
18
Page 19

はじめに
このたびは、VOXカスタム・シリーズ・ギター・アンプAC30S1をお買い上げいただきまして、まこと
にありがとうございます。
このアンプは、60年以上にわたり高品質なギター・アンプを作り続けてきたVOXの1つの頂点となる
アンプです。私たちはオリジナルの素晴らしい回路設計に、現在のテクノロジーを加えて、よりモダ
ンに仕上げました。本機は音質とプレイアビリティを満たすのに十分なフレキシビリティを持つ最新
のシングル・チャンネル設計です。そしてAC30サウンドはそのまま継承されています。
AC30S1は、Celestion VX12スピーカーと最適化されたVOXリバーブやマスター・ボリュームなど、
たくさんの機能を備えています。はじめに本書を注意深くお読みいただき、これらの機能を使いこな
してください。
フロント・パネル
MAINS
ON
OFF
HT
ON
STANDBY
VOLUME
REVERB
TREBLE
BASS
GAIN
INPUT
1234 5678 9
1.
MAINSインジケーター
アンプの電源がオンのときに点灯します。
2.
MAINS電源スイッチ
アンプの電源をオンまたはオフにします。本機を移動するときは、このスイッ
チをオフにした後、すべてのケーブルを抜いてから移動してください。
3.
STANDBYスイッチ
過大な負荷による真空管のダメージを防止するため、MAINS電源スイッチを
オンにする前にこのスイッチがSTA NDBYの位置にあることを確認してくだ
さい。MAI N S電源スイッチをオンにしてから数分後にこのスイッチをオンに
します。
4.
VOLUMEノブ このアンプの全体の音量を調節します。クリーンな音色を出すためにはGAIN
を下げてVOLUMEを必要な音量まで上げてください。VOLUMEを下げて
GAINを上げれば太く、歪んだ(オーバー・ドライブ)音色を小さな音量で楽し
むことができます。
5.
REVERBノブ リバーブのかかり具合を調節します。最適化されたVOXリバーブは繊細な臨
場感から雄大な広がりまで音に豊かな深みをあたえます。
6.
TREBLEノブ 高音域を調節します。左に回すとやわらかく丸い音色、右に回すと明るく通り
のよい音色が得られます。
7.
BASSノブ 低音域を調節します。左に回すと薄く軽い音色、右に回すと暖かく重い音色が
得られます。
19
Page 20

8.
GAINノブ プリアンプの音量を調節します。左に回すとクリーン・サウンド、右に回すと
ディストーション・サウンドが得られます。VOLUMEノブと組み合わせて使
うことで、プリアンプやパワー・アンプでの歪み方と全体の音量がコントロー
ルできます。
注 意 : 電源投入後数分間は回路が安定しないため、ボリュームのガリ等のノイズが発
生する事があります。
9.
INPUT端子 ギターを接続する端子です。
リア・パネル
EXTERNAL SP FX LOOP
16 ohm
SEND RETURN
4
12
1.
EXTERNALSP端子
16Ωのスピーカー・キャビネットを接続します。本機内部では内蔵スピーカーが切
り離され、接続したスピーカー・キャビネットのみを使用することになります(内部
スピーカーからは音が出ません)。
アンプを正しく使用するためには、以下の点に注意してください。
a) 30W未満のスピーカー・キャビネットは接続しないでください。
スピーカーが損傷する場合があります。
b)
アンプとスピーカー・キャビネットの接続には、必ずスピーカー・ケーブルをご
使用ください。一般的なギター用シールド・ケーブルは使用しないでください。
c) スピーカー・ケーブルを接続する場合は、電源を切った状態で行ってください。
2.
FXLOOPSEND端子
外部エフェクト機器の入力端子と接続します。
3.
FXLOOPRETURN端子
外部エフェクト機器の出力端子と接続します。
3
4.
電源端子
付属の電源コードを接続する端子です。
警 告:
ヒューズはお客様ご自身で交換しないでください。ヒューズの交換は、メーカー及び
販売代理店指定のサービスマンにご依頼ください。
ヒューズホルダーからヒューズを取り出す場合、電源コードを電源端子から抜いて電源が入ら
ないようにしてください。
ヒューズ は、 必ず IEC60127 準拠の下記の定格のものをご使用ください。
T2AL 250VAC (ヒューズ特性: T- タイムラグ、L- 低遮断容量)
20
Page 21

電源コードの接続について
感電と機器の損傷を防ぐために、アース接続を確実に行ってください。
注 意 : 電源コードは必ず付属のものをお使いください。他の電源コードを使用した場合、故障
などの原因となります。
注 意 : 電源は必ずAC100Vを使用してください。
接地極付きコンセントに接続する場合
接地極付きコンセントに電源コードのプラグをその
まま差し込んでください。
アース端子付きコンセントに接続する場合
電源コードのプラグに、2P-3P変換器を取り付けま
す。そして、コンセントのアース端子にアース線を接
続し、2P-3P変換器のプラグを差し込みます。
警 告 : アース接続は、コンセントにプラグを差し込む
前に行ってください。また、アース接続を外す
ときは、コンセントからプラグを抜いてから
行ってください。
2P-3P変換器のアース線のU字端子にカバーが付い
ている場合は、カバーをはずして使用してください。
注 意 : スタンバイ状態は、電源ラインから完全に切り離されていません。この状態で本機の内
部を触るのは非常に危険です。本機の電源を完全に切るときは、壁のコンセントから電
源コードを必ず抜いてください。
仕様
コントロール: GAIN, BASS, TREBLE, REVERB, VOLUME
入力端子: INPUT×1、FX LOOP RETURN×1
出力端子: EXTERNAL SP×1、FX LOOP SEND×1
真空管構成: 12AX7×2、EL84×4
出 力 : 30ワット RMS (16Ω)
スピーカー: Celestion製VX12 12インチ・スピーカー (16Ω)
外形寸法: 658×265×550mm (W×D×H)
質 量 : 24.5kg
付属品: 電源コード、取扱説明書
*仕様および外観は、改良のため予告無く変更することがあります。
21
Page 22

保証規定(必ずお読みください)
本保証書は、保証期間中に本製品を保証するもので、付属品類(ヘッドホンなど)は保証の対象に
なりません。保証期間内に本製品が故障した場合は、保証規定によって無償修理いたします。
1. 本保証書の有効期間はお買い上げ日より1か年です。
2. 次の修理等は保証期間内であっても有料修理となります。
・ 消耗部品(スピーカー、真空管、電池など)の交換。
・ お取扱い方法が不適当のために生じた故障。
・ 天災(火災、浸水等)によって生じた故障。
・ 故障の原因が本製品以外の他の機器にある場合。
・ 不当な改造、調整、部品交換などにより生じた故障または損傷。
・ 保証書にお買い上げ日、販売店名が未記入の場合、または字句が書き替えられている場合。
・ 本保証書の提示がない場合。
尚、当社が修理した部分が再度故障した場合は、保証期間外であっても、修理した日より3か月
以内に限り無償修理いたします。
3. 本保証書は日本国内においてのみ有効です。
This warranty is valid only in Japan.
4. お客様が保証期間中に移転された場合でも、保証は引き続きお使いいただけます。詳しくは、
お客様相談窓口へお問い合わせください。
5. 修理、運送費用が製品の価格より高くなることもありますので、あらかじめお客様相談窓口へ
ご相談ください。発送にかかる費用は、お客様の負担とさせていただきます。
6. 修理中の代替品、商品の貸し出し等は、いかなる場合においても一切行っておりません。
本製品の故障、または使用上生じたお客様の直接、間接の損傷につきましては、弊社はいっさい
の責任を負いかねますのでご了承ください。
本保証書は、保証規定により無料修理をお約束するためのもので、これよりお客様の法律上の権
利を制限するものではありません。
■ お願い
1. 保証書に販売年月日等の記入がない場合は無効となります。記入できないときは、お買い上げ
年月日を証明できる領収書等と一緒に保管してください。
2. 保証書は再発行致しませんので、紛失しないように大切に保管してください。
保証書
VOXAC30S1
本保証書は、上記の保証規定により無償修理をお約束するものです。
お買い上げ日 年 月 日
販売店名
22
Page 23

アフターサービス
0570-666-569
■ 保証書
本製品には、保証書が添付されています。
お買い求めの際に、販売店が所定事項を記入いたしますので、「お買い上げ日」、「販売店」等の記
入をご確認ください。記入がないものは無効となります。
なお、保証書は再発行致しませんので、紛失しないように大切に保管してください。
■ 保証期間
お買い上げいただいた日より一年間です。
■ 保証期間中の修理
保証規定に基づいて修理いたします。詳しくは保証書をご覧ください。
本製品と共に保証書を必ずご持参の上、修理を依頼してください。
■ 保証期間経過後の修理
修理することによって性能が維持できる場合は、お客様のご要望により、有料で修理させていた
だきます。ただし、補修用性能部品(電子回路などのように機能維持のために必要な部品)の入手
が困難な場合は、修理をお受けすることができませんのでご了承ください。また、外装部品(パネ
ルなど)の修理、交換は、類似の代替品を使用することもありますので、あらかじめお客様相談窓
口へお問い合わせください。
■ 修理を依頼される前に
故障かな?とお思いになったら、まず取扱説明書をよくお読みのうえ、もう一度ご確認ください。
それでも異常があるときは、お客様相談窓口へお問い合わせください。
■ 修理時のお願い
修理に出す際は、輸送時の損傷等を防ぐため、ご購入されたときの箱と梱包材をご使用ください。
■ ご質問、ご相談について
修理および商品のお取り扱いについてのご質問、ご相談は、お客様相談窓口へお問い合わせくだ
さい。
お客様相談窓口
PHS等一部の電話ではご利用できません。固定電話または携帯電話からおかけください。
受付時間 月曜~金曜 10:00 ~ 17:00 (祝祭日、窓口休業日を除く)
● サービス・センター:〒168 ー 0073 東京都杉並区下高井戸1-18-16 2F
WARNING!
This Product is only suitable for sale in Japan. Properly qualied service is not available for this product
if purchased elsewhere. Any unauthorised modication or removal of original serial number will disqualify
this product from warranty protection. (この英文は日本国内で購入された外国人のお客様のための注意事項です)
輸入販売元: KORG Import Division
〒206-0812 東京都稲城市矢野口4015-2
www.korg-kid.com
23
Page 24

IMPORTANT NOTICE TO CONSUMERS
© 2018 VOX AMPLIFICATION LTD.
Vox Amplification Ltd.
Published 6/2018 Printed in China
This product has been manufactured according to strict specications and voltage requirements that are applicable in the country in which it is intended that this product
should be used. If you have purchased this product via the internet, through mail order,
and/or via a telephone sale, you must verify that this product is intended to be used in
the country in which you reside.
WARNING: Use of this product in any country other than that for which it is intended
could be dangerous and could invalidate the manufacturer´s or distributor´s warranty.
Please also retain your receipt as proof of purchase otherwise your product may be disqualied from the manufacturer´s or distributor´s warranty.
REMARQUE IMPORTANTE POUR LES CLIENTS
Ce produit a été fabriqué suivant des spécications sévères et des besoins en tension
applicables dans le pays où ce produit doit être utilisé. Si vous avez acheté ce produit
via l´internet, par vente par correspondance ou/et vente par téléphone, vous devez vérier que ce produit est bien utilisable dans le pays où vous résidez.
ATTENTION: L´utilisation de ce produit dans un pays autre que celui pour lequel il a
été conçu peut être dangereuse et annulera la garantie du fabricant ou du distributeur.
Conservez bien votre récépissé qui est la preuve de votre achat, faute de quoi votre
produit ne risque de ne plus être couvert par la garantie du fabricant ou du distributeur.
GUITAR AMPLIFIER
AC30S1
WICHTIGER HINWEIS FÜR KUNDEN
Dieses Produkt wurde unter strenger Beachtung von Spezikationen und Spannungsanforderungen hergestellt, die im Bestimmungsland gelten. Wenn Sie dieses Produkt
über das Internet, per Postversand und/oder mit telefonischer Bestellung gekauft haben,
müssen Sie bestätigen, dass dieses Produkt für Ihr Wohngebiet ausgelegt ist.
WARNUNG: Verwendung dieses Produkts in einem anderen Land als dem, für das es
bestimmt ist, verwendet wird, kann gefährlich sein und die Garantie des Herstellers oder
Importeurs hinfällig lassen werden. Bitte bewahren Sie diese Quittung als Kaufbeleg
auf, da andernfalls das Produkt von der Garantie des Herstellers oder Importeurs ausgeschlossen werden kann.
NOTA IMPORTANTE PARA EL CONSUMIDOR
Este producto ha sido fabricado de acuerdo a estrictas especicaciones y requerimientos de voltaje aplicables en el país para el cual está destinado. Si ha comprado este
producto por internet, a través de correo, y/o venta telefónica, debe usted vericar que
el uso de este producto está destinado al país en el cual reside.
AVISO: El uso de este producto en un país distinto al cual está destinado podría resultar peligroso y podría invalidar la garantía del fabricante o distribuidor. Por favor guarde
su recibo como prueba de compra ya que de otro modo el producto puede verse privado de la garantía del fabricante o distribuidor.
1 Harrison Close, Knowlhill, Milton Keynes, MK5 8PA. UK
EFGSJ 2
www.voxamps.com
 Loading...