


THERMOMIX
USER’S GUIDE

IMPORTANT SAFEGUARDS
Read all instructions carefully before beginning to use your Thermomix. This will help you achieve a high level of safety and security.
1.Close supervision is necessary when the appliance is used by or near children.
2.Do not use the Thermomix for anything other than its intended use.
3.Do not place the Thermomix on or near a hot gas or electric burner, or in a heated oven.
4.Do not use outdoors.
5.Do not let cord hang over edge of table or counter or touch hot surfaces.
6.Unplug from outlet when not in use, before putting on or taking off parts, and before cleaning.
7.Do not operate any appliance with a damaged cord or plug or after the appliance malfunctions, or is damaged in any manner. Return appliance to the nearest authorized service facility for examination, repair or adjustment.
8.To protect against risk of electrical shock do not immerse the main appliance in water.
9.Use only Thermomix accessory attachments in the mixing bowl while blending.
The use of accessories or attachments not recommended by Thermomix may cause injuries.
10.The mixing bowl must be properly in place before operating the Thermomix.
11.Blades are sharp. Handle carefully.
12.Avoid contacting moving parts.
13.Do not operate the Thermomix on any heat setting when the mixing bowl is empty.
14.Do not touch hot surfaces.
15.If you use hot liquids, do not press the Turbo button.
16.When blending hot liquids, always put the Thermomix measuring cup in place
on the lid.
17.Extreme caution must be used when moving the appliance containing hot liquids.
18.Do not clean the coating of the heating element with cleanser or metal scouring pad.
19.To avoid spillage, do not fill the mixing bowl above the recommended maximum capacity.
20.Follow the important safeguards on page 24 regarding using the Varoma.
SAVE THESE INSTRUCTIONS
Contents
Description of parts |
|
4 |
Cleaning before your first use |
|
5 |
|
|
|
Assembling your Thermomix |
|
6 |
|
|
|
Description of functions |
7 |
- 10 |
|
|
|
Working with your Thermomix |
11 |
- 16 |
|
|
|
Tips on individual recipes |
|
17 |
|
|
|
Cleaning your Thermomix |
|
18 |
|
|
|
Using and caring for your Varoma |
19 |
- 20 |
|
|
|
Cooking with your Varoma |
21 |
- 22 |
|
|
|
Using your Varoma |
|
23 |
|
|
|
Important Varoma Safeguards |
|
24 |
|
|
|
Troubleshooting tips |
|
25 |
|
|
|
Technical specifications |
|
26 |
|
|
|
Recipes |
|
28 |
|
|
|
Tables of cooking times |
|
29 |
|
|
|
Vegetables and accompaniments |
|
30 |
|
|
|
Fish, poultry and meat |
|
33 |
|
|
|
Desserts |
|
38 |
|
|
|
3
Description |
|
|
|
|
|
|
|
After opening the package, take the parts out |
|||
|
2 |
of the box and spread them out on the table to |
|||
|
familiarize yourself with the description of the |
||||
|
6 |
||||
|
parts as shown below. The following items |
||||
12 |
3 |
should be included. |
|||
|
|
|
|||
|
4 |
• Thermomix TM 21 including mixing bowl |
|||
|
|
and lid |
|
||
|
5 |
|
|
||
11 |
• Basket |
|
|||
|
|
• Stirring attachment (butterfly/whisk) |
|||
9 |
7 |
• Thermomix measuring cup |
|||
• Spatula |
|
||||
1 |
|
||||
|
• Varoma (lid and inner tray) |
||||
10 |
8 |
||||
• Recipe book |
|
||||
|
|
|
|||
|
|
• User’s guide |
|
||
14 |
|
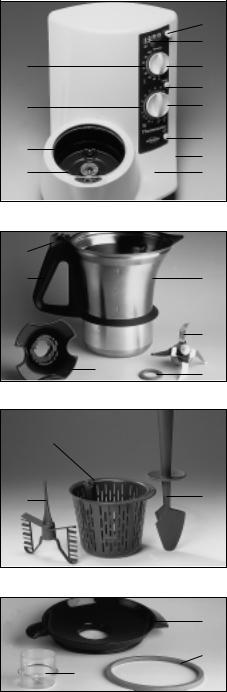
Details of the TM 21 |
|||
|
|
||||
15 |
13 |
1 |
= |
Main switch (lower, right side) |
|
|
|
||||
|
|
2 |
= |
Time selector |
|
|
|
3 |
= |
Temperature selector |
|
|
16 |
4 |
= |
Turbo button |
|
|
5 |
= |
Speed selector |
||
|
|
||||
|
|
6 |
= |
Time/Scale display |
|
18 |
17 |
7 |
= |
Electronic scale button |
|
|
8 |
= |
Housing |
||
|
|
||||
|
|
9 |
= |
Temperature sensor |
|
|
|
10 |
= |
Drain opening |
|
|
|
11 |
= |
Motor speed setting |
|
19 |
|
12 |
= |
Temperature setting |
|
|
|
|
|
||
|
|
Accessories |
|
||
|
|
13 |
= |
Mixing bowl |
|
20 |
21 |
14 |
= |
Locking lever |
|
|
15 |
= |
Handle |
||
|
|
||||
|
|
16 |
= |
Cutting/mixing blade unit |
|
|
|
|
|
(blades are sharp) |
|
|
|
17 |
= |
Sealing ring for |
|
|
|
|
|
cutting/mixing blade unit |
|
|
|
18 |
= |
Mixing bowl foot & blade |
|
|
|
|
|
unit retainer |
|
|
|
19 |
= |
Basket |
|
|
22 |
20 |
= |
Stirring attachment |
|
|
|
|
(butterfly/whisk) |
||
|
|
|
|
||
|
|
21 |
= |
Spatula |
|
|
23 |
22 |
= |
Lid |
|
24 |
|
23 |
= |
Sealing ring for lid |
|
|
24 |
= |
Thermomix measuring cup |
||
|
|
||||
|
|
4 |
|
|
|
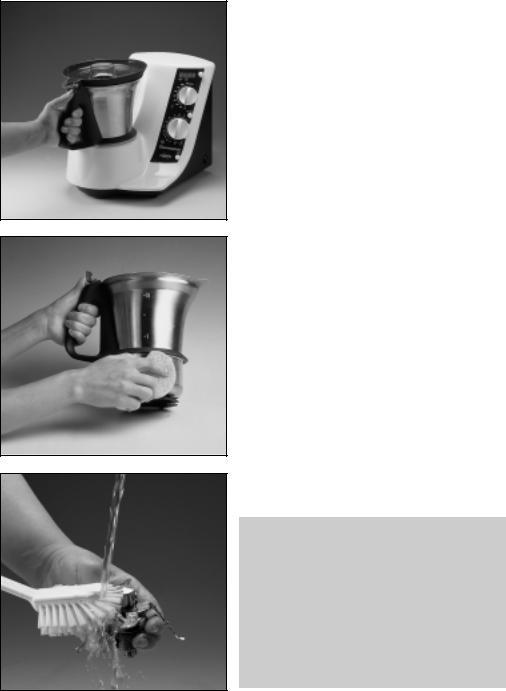
Cleaning before your first use
The Thermomix must be thoroughly cleaned before it is assembled and used for the first time. To clean the mixing bowl (13) turn the locking lever (14) to the right and remove the lid (22). Next, remove the stirring attachment
(20), the Thermomix measuring cup (24) and the basket (19). Now remove the mixing bowl (13) from the appliance. Remove the cutting/mixing blade unit (16) next. To do this, turn the foot of the mixing bowl (18) 180° to the left and remove it by pulling downwards. This will enable you to carefully pull out the cutting/mixing blade unit (16) with the sealing ring (17) from the inside of the mixing bowl (13).
Thoroughly clean the mixing bowl (13) with a stainless steel cleaning agent and rinse. Then, clean the outside of the mixing bowl (13) with the same cleaner and rinse.
Carefully clean the cutting/mixing blade unit
(16) under running water by using a sponge or brush.
Caution
Blades are sharp. Handle carefully.
Important
1.Do not leave the cutting/mixing blade unit in water for any length of time or clean in a dishwasher because the detergents may have an adverse affect on the sealing ring or the cutting/mixing blade unit itself.
2.To avoid scratches, use only a soft, moist cloth to clean the non-stick coated heating ring.
5
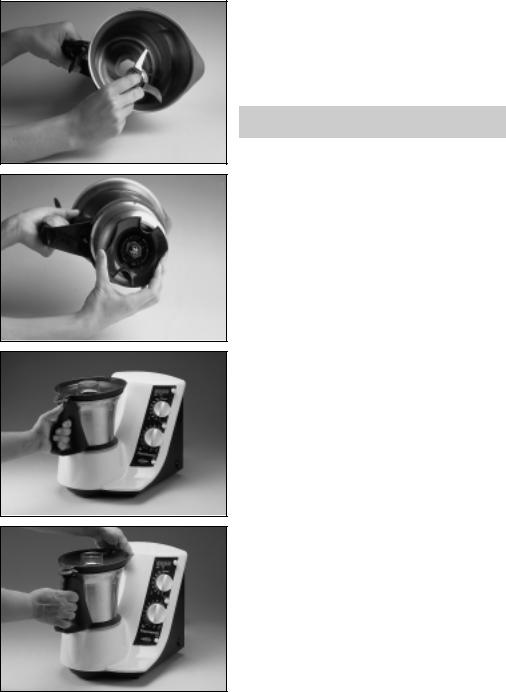
Assembling your Thermomix
1. Fitting the cutting/mixing blade unit (16)
Before assembling the mixing bowl, check to make sure that the sealing ring is correctly fitted to the cutting/mixing blade unit. Now carefully insert the cutting/mixing blade unit into the mixing bowl.
Caution
Blades are sharp. Handle carefully.
Now attach the mixing bowl foot to the cutting/mixing blade unit from below. This foot is secured by turning it 180° to the right until it will go no further. Now the mixing bowl is ready to place in the base unit.
2. Inserting the mixing bowl (13)
Check to see that the locking lever is pushed fully to the right. Insert the mixing bowl into the base unit with the handle to the front. Make sure that the mixing bowl is securely seated in the base unit.
Fit the lid into the spout of the mixing bowl and push it down gently until it slips into place. Push the locking lever fully to the left until it can go no further.
The Thermomix will not turn on unless the mixing bowl is in place and the lid is fitted and locked properly.
6
Description of functions
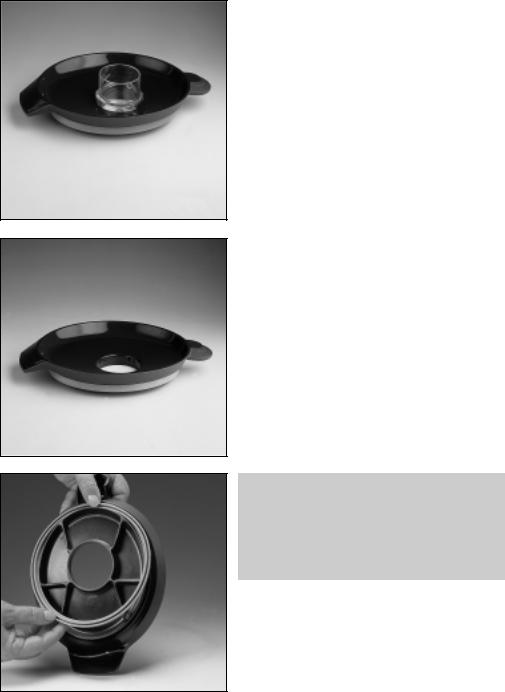
Thermomix measuring cup (24)
The measuring cup has three functions:
1. To close the lid opening to avoid heat loss when heating.
2. To prevent food from splashing out when being processed.
3. To measure ingredients. The content of the measuring cup when full to the rim with liquids is 1 dl (100 ml).
Always insert the measuring cup with the open end up.
Liquids can be added in small amounts without having to remove the measuring cup by pouring them directly on the lid. Other ingredients can be added during mixing simply by lifting the measuring cup.
Lid (22)
When working with the Thermomix, the lid together with the sealing ring must be properly positioned on the mixing bowl.
Caution
The lid and the sealing ring must be properly fitted to prevent contents from splashing out between the mixing bowl lid and the mixing bowl itself. When properly fitted, you will see the grooved side of the sealing lip (see picture on left). If fitted incorrectly, there is a risk of scalding.
7
Mixing bowl (13)
The maximum capacity of the mixing bowl is 2 liters.Do not under any circumstances exceed this amount.
There are 4 marks on the inside of the mixing bowl. Each mark stands for approx. ½ litre.
Important
Make sure to remove the cutting/mixing blade unit before cleaning the mixing bowl in a dishwasher.
Basket (19)
The basket has multiple functions.
For example:
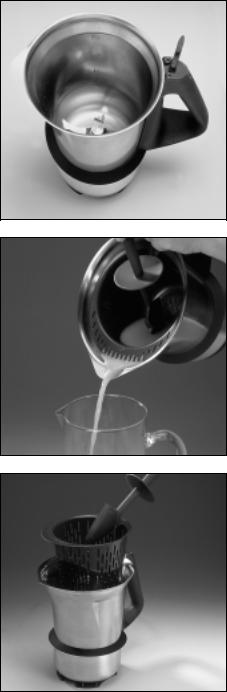
1.It will filter fruit and vegetable juices. To do this, after the juice is made, place the basket in the mixing bowl. Insert the spatula into the groove in the basket. Pour the juice out by holding the basket in place with the spatula.
2.It will hold ingredients for heating or cooking. To do this, place any ingredients that you do not want to be brought into contact with the cutting/mixing blade unit into the basket. Then place the basket into the mixing bowl.
To remove the basket, insert the spatula into the groove and pull it out gently. Practice carrying the basket with the spatula before doing this with hot food inside.
8

Mixing bowl foot (18)
The mixing bowl foot serves to secure the cutting/mixing blade unit in the mixing bowl.
The mixing bowl foot is made of a heat-insulating plastic material so that the hot mixing bowl can be safely placed on any kitchen surface.
Caution
The mixing bowl foot must be tightened until it will go no further. If this is not done, the temperature sensor will not be in contact with the mixing bowl and the appliance will not function properly. Improper seating of the mixing bowl could lead to damage to the Thermomix.
Spatula (21)
You can insert the spatula through the lid opening during mixing to stir ingredients. The safety disk prevents any contact with the blades.
The special shape of the spatula makes it suitable for scraping the mixing bowl.
You can also use the spatula to lift out the basket as well as to hold the basket down when pouring out juices.
The scraper (bottom portion of the spatula) can be pulled off from the shaft for cleaning.
Caution
For safety reasons never insert any other objects (spoons, forks, etc.) into the mixing bowl. Only insert the spatula from the opening in the lid.
9
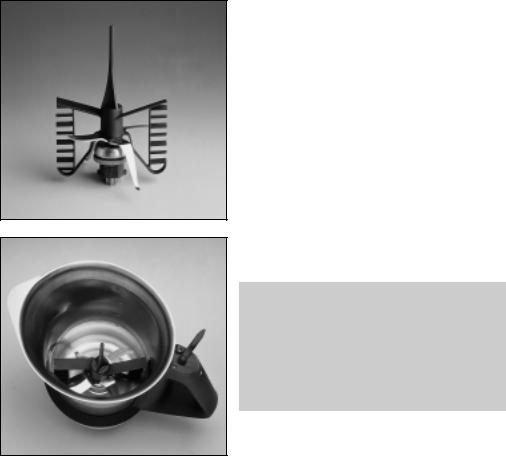
Stirring attachment (butterfly/whisk) (20)
The stirring attachment is normally used to make such items as whipped cream and whipped egg whites. It may also be used to prevent burning or scalding of liquids when heating them at low motor speeds (speed settings 1-3). When using the stirring attachment, always increase speed gradually.
To use the stirring attachment simply push it onto the upper part of the cutting/mixing blade unit and push it down gently until seated.
Caution
1.Never use the spatula when the stirring attachment is attached.
2.When using the stirring attachment, do not exceed the speed setting of 3. Increase speed gradually.
3.Only turn on the speed setting after fitting the stirring attachment.
Cooking with Varoma (see also pages 19 - 24)
The Varoma is a unique cooking method designed to steam fruit, vegetables, poultry, fish and other meats. The heating of the liquid in the mixing bowl combined with the turning action of the blades produces condensed steam which cooks the food in the Varoma while retaining the vitamins and minerals in the food.
When working with the Varoma, the lid (22) together with the sealing ring must be properly positioned on the mixing bowl. To use the Varoma, first remove the TM measuring cup from the lid and place the Varoma on top of the lid of the mixing bowl. Generally, the Varoma inner tray is used for steaming fruits and vegetables and the Varoma (bottom tray) is used for poultry, fish and other meats.
To cook with the Varoma, select the Varoma setting on the temperature selector. On the Varoma setting, temperatures of up to 100°C may be achieved.
10
Working with your Thermomix
Useful hints
The Thermomix should be placed on a permanent, level surface in your kitchen so it can be used frequently and easily.
Important
1.Always make sure that the air vents on the back of the appliance are not covered or blocked to prevent overheating of the appliance.
2.Never carry the Thermomix by the handle of the mixing bowl.
Explanation of symbols:
=Time selector
=Temperature selector
=Speed selector
=Stirring mode
=Bread mode
=Scales
Putting your Thermomix into operation
The electrical cord can be pulled out of the appliance and pushed back in again depending upon your needs. Plug in the appliance to a 230 Volt / 50 Hz outlet.
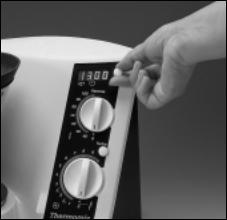
Turn on the main switch (I = ON, O = OFF). The time display and the decimal point on the digital display should now be illuminated. The
Thermomix is now ready for operation.
1.Always turn on the operating elements (switches, buttons) by starting at the top and working down. For example, set the time selector first, then the temperature selector and then the speed selector.
2.An audible signal is emitted if the mixing bowl is not properly fitted and a safety interlock prevents the Thermomix from starting. Set the speed selector to 0 again and properly lock in the mixing bowl.
3.The scale works correctly when the appliance is within 5° - 40°C. However, do not worry if the appliance cools down to below 0°C. For example, this could happen when you transport your Thermomix in the winter. Simply wait until it has warmed up to room temperature before using the scale.
4.Unplug the Thermomix when it is not in use for extended periods.
11
Time selector (2) and time display (6)
The timer can either 1) count up and be turned off manually, or 2) be preset and turn off automatically. A time period must be selected in order to heat. The time selector can also be used for cold mixing functions.
Time selection
The operating period can be set for up to a maximum of 60 minutes by using the time selector. The timer can be set as follows:
0 |
to |
59 |
seconds in |
1 |
second increments, |
1 |
to |
10 |
minutes in |
30 |
second increments, |
10 |
to |
60 |
minutes in |
60 |
second increments. |
To set the time, turn the time selector to the right to the desired time.
If you preset the timer, a countdown of the operating time is shown in 1-second increments to zero. In hot mixing operations or heating, at the end of the preset time period, the mixer continues to rotate at a speed of 100 r.p.m. to prevent the food from burning. In cold mixing operations (temperature must be set at 0) the mixer switches off and an audible signal indicates that the food has been
processed.
Changing or interrupting the pre-selected time
The time indicated can be changed during either cold or hot mixing operations simply by turning the time selector to the right or to the left.
If during operation the appliance is switched off at the speed selector before the selected time has expired, the remaining time blinks in the display until the appliance is switched on again.
To stop mixing, first turn the speed selector to 0 and then turn the time selector to the left until 0 appears.
Timer function (only for cold mixing operations)
If you do not pre-select a time period,the Thermomix will automatically shut itself off after 60 minutes.
12
 Loading...