

Operating Instructions
Powertronic
T0008277


Contents
Introduction .......................................................................................... 1
Powertronic, general ........................................................................... 1
Instruments and controls .................................................................... 2
Info Display ......................................................................................... 2
Gear selector ....................................................................................... 4
Driving .................................................................................................. 5
Automatic gear change ....................................................................... 5
Manual gear change ............................................................................ 5
Kick-down. .......................................................................................... 5
Driving programme ............................................................................. 6
Reversing with a laden vehicle ........................................................... 7
If the vehicle gets stuck ...................................................................... 7
Auxiliary brakes .................................................................................. 7
Parking ................................................................................................. 7
Parking ................................................................................................. 7
In case of gearbox malfunction .......................................................... 8
Oil .......................................................................................................... 9
Oil Temperature .................................................................................. 9
Checking the oil level ....................................................................... 10
Index .................................................................................................... 11


Introduction 1
Powertronic, general
Powertronic is a fully automatic gearbox
which changes gear without loss of power.
The gearbox is available with five gears or
with six gears. It has a torque converter
with direct engagement, lock-up, effective
with all the gears. The gearbox can be
equipped with a retarder and with a power
take-off which can be engaged and which
can remain engaged while driving. A control unit takes care of changes between the
different change steps of the gearbox.

2 Instruments and controls
Info Display
Select the GAUGES menu from the display
to view information on Powertronic (applies to both a stationary vehicle and one in
motion). The display provides information
on current gear position and which gears
that are available.
”The Powertronic display” is divided into
smaller sections showing:
1 Driving programme
2 Current gear
3 Available gears (down/up)
4 Lever position
T3014303
1. Driving programme
The section to the far left of the display
shows the driving programme. The following modes are available:
E = economy
P = power
B = auxiliary brake
1
K = kick-down
L = limp-home mode
1 = start with 1st gear forward and 1st
gear in reverse (in vehicles with a 6gear gearbox)
Z = Engine speed too high to move
from neutral
E1 A
1
C1
1
Only on vehicles with VEB or Retarder.

Instruments and controls 3
2. Current gear
The section furthest to the right in the window shows the current gear and shows
whether the torque converter is engaged.
1st - 6th gear forward (1 - 5)
2
1st - 2nd gear reverse (1)
2
C = converter (torque converter)
EN = Emergency Neutral
When ”EN” is shown in the display an
electronic fault has been indicated on the
solenoid valves, which can result in damage to the gearbox. The electronic system
will then engage neutral.
∇
E A C2
3. Available gears
To the left of the lever position section the
number of lower gears which are available
are shown with the help of arrows. To the
right of the lever position section is a section showing the number of higher gears
that are available in the same way.
In order to be able to use the available
gears, the gearbox must be in manual position.
∇
∇
E A
1
4
4. Lever position
The section in the middle of the display
shows the selector lever position.
A = automatic
M = manual gear changing
N = neutral
R = reverse gear
E N 0
2
5 speed version

4 Instruments and controls
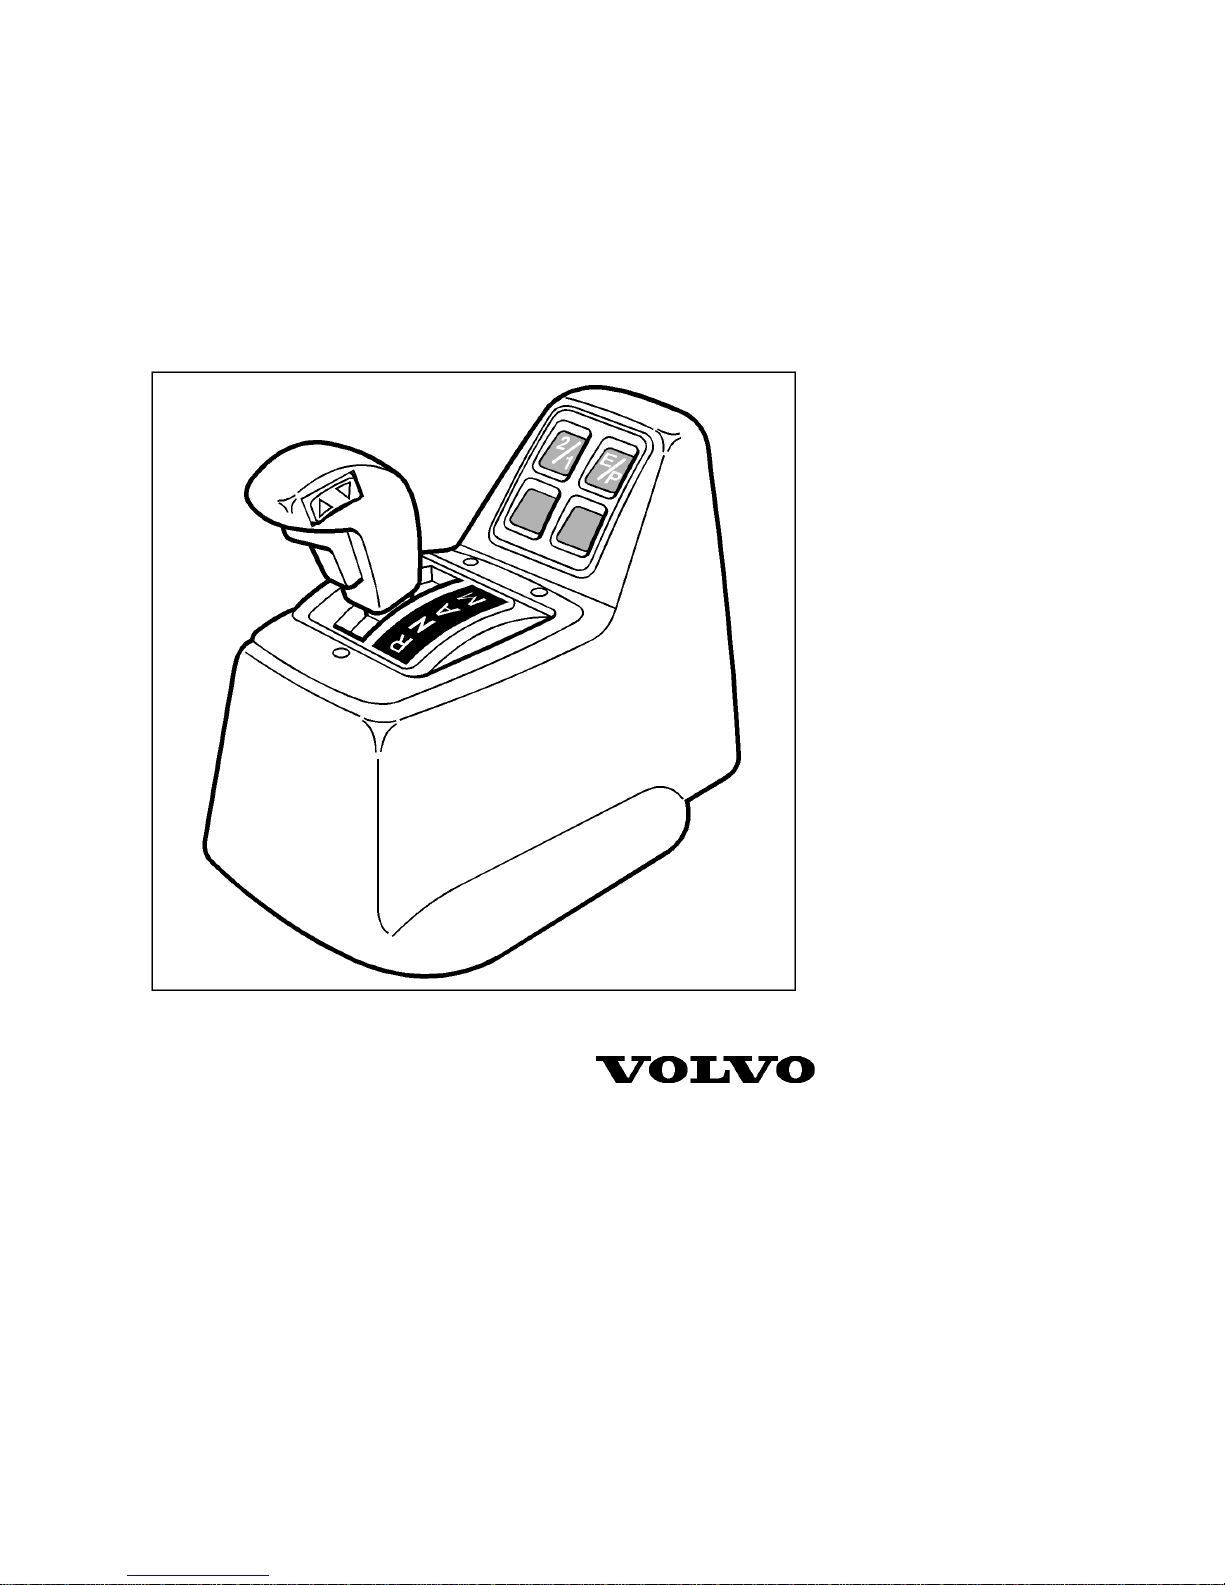
Gear selector
T0008278
On the gear selector lever is a springloaded three-way switch the positions (
1
)
and (∇) plus a zero-position in the middle.
There is also a gear selector lock to prevent
inadvertent engagement of a gear. The lock
must be pressed in during the following
gear changes:
•
From N to R.
•
From N to any one of the forward
gears.
The lock does not need to be pressed when
the gear selector lever is moved from A to
M.
Gear selector positions
Two different programmes for driving forward plus neutral or reverse can be selected
with the gear selector lever.
Note! The engine can be started only when
the gear selector lever is in position N.
A Automatic programme. This position
is the normal drive position.
M Manual programme. Changing gear up
and down is done with the toggle
switch. (If the engine speed is too high
or too low, the control unit will change
gear automatically.)
N Neutral, no gear engaged. The engine
can only be started with the gear selector lever in position N.
R Reverse gear. The vehicle should be at
a standstill when selecting gear position R.

Driving 5
Automatic gear change
Gear changing is fully automatic.
If the selector lever is moved to (M) - when
driving with the automatic programme engaged (A) - gear change will be inhibited
and the current gear will remain engaged
through the entire engine operating range.
Manual gear change
Gear change is done manually in 5 or 6
stages depending on the type of gearbox
using the three-way button on the gear selector lever.
1
Change up.
∇ Change down.
T0008280
Kick-down.
Pressing down the accelerator pedal all the
way, past the normal full throttle position
and providing the engine speed allows it,
will activate ”Kick-down”. When ”Kickdown” is operated an automatic change
down to a lower gear occurs. A higher gear
will be engaged automatically once the
maximum speed for the current gear is attained or the accelerator pedal is released
slightly. ”Kick-down” is used to obtain
maximum engine power when overtaking
or driving up steep hills, for example.
T2012347
Position A = full throttle
Position B = kick down

6 Driving
Driving programme
Pressure switch E/P is only used during automatic gear change and this switch is used
to select the economy programme or the
performance programme. The 2/1 switch is
available for 6 speed variants only. Pushbutton 2/1 changes between 1st and 2nd
gear as starting gear.
E The economy programme gives lower
fuel consumption.
P The power programme is used when
time has priority over fuel. Gears are
changed at high engine speeds.
2 Indicates starting in 2nd gear when
driving forward and in R2 when reversing. The latest selected starting
gear is saved when the ignition is
turned off and is used for the next
start.
1 Indicates starting in 1st gear when
driving forward and in R1 when reversing. The latest selected starting
gear is saved when the ignition is
turned off and is used for the next
start.
T0008282
T0008281
Changing manually between reverse gears
1 and 2 is performed with the three-way
switch on the gear selector lever.
When ranging, on steep hills and with a
high laden weight, start in 1st gear. Do not
drive with the torque converter engaged for
too long, instead select a lower gear.
1st gear must be selected in good time before driving up a steep hill. The automatic
system will then change to 1st gear at the
right time if it becomes necessary.
Changing starting gear from 1st to 2nd
while the vehicle is at a standstill is done
by pressing the pushbutton switch and
moving the gear selector lever temporarily
to neutral.

Driving 7
Reversing with a laden vehicle
When reversing down steep inclines with a
laden vehicle there is a risk of the front
wheel locking. On these occasions use forward gear 1 or 2 (depending on how steep
the hill is) and brake at low road speed,
with the accelerator.
If the vehicle gets stuck
If the vehicle gets stuck it can be ”it is
swung out” by the gear selector lever being
moved between the R and A positions during light acceleration. This may only be
done at low engine speeds (below 1100
rpm) and a maximum road speed of 5 km/h.
Auxiliary brakes
The auxiliary brakes also function while reversing.
Parking
When parking, give throttle and brake at
the same time. Use the lowest gear.
Parking
As the gearbox does not have any ”parking
position” the vehicle’s parking brake
must always be used when the vehicle is
stationary and the driver leaves the cab.
During longer stops and when the driver
leaves the driving seat, the gear selector
lever should also be moved to position N.

8 Driving
In case of gearbox malfunction
An ”L” on the display and a yellow information lamp indicate that a data link to the
engine has been broken. The Powertronic
system will then activate limp-home mode.
This function makes it possible to drive the
vehicle for short distances in case of a malfunction, to the nearest garage for example.
The gears can only be changed manually
when limp-home is active. The driver can
change gears when the gear selector lever
is in position M or R by using the up/down
button.
The power take-off is disengaged automatically when limp-home is activated. It is
possible to re-engage it as long as the engine speed is kept below 1000 rpm. All
special functions on the vehicle will be terminated and cannot be activated.
Limp home will be disengaged automatically once the fault has been rectified.
Important! The accelerator pedal must be
released before changing gear so that the
engine torque is reduced. This also applies
when engaging the lock-up function.
Important! The auxiliary brakes must be
turned off when changing down.

Oil 9
Oil Temperature
Normal working temperature for the gearbox is approximately 80-95½C. When
driving at full throttle for long periods with
the torque converter working, the oil temperature may rise and overheat.. Continuous
retarder operation will also have this effect.
If the oil temperature becomes too high in
operation, the yellow information lamp will
come on and the associated symbol will be
shown on the display. The retarder’s braking force will deteriorate when it is engaged
and the yellow information lamp comes on.
If the temperature rises even higher, the red
warning lamp will come on and the retarder
will be turned off to protect the gearbox.
Slow down when the yellow warning lamp
comes on and engage a lower gear until the
gearbox has attained normal operating temperature.
If the oil temperature becomes too high in
normal operation, check the oil level in the
gearbox and replace the filter.
Retarder temperature
If the temperature in the retarder exceeds
140½C, the yellow central warning lamp
will come on and a symbol will be shown
on the display. The retarder braking force
will start to deteriorate. If the temperature
rises even higher, the red warning lamp will
come on and the retarder will be turned off
to protect the gearbox.
Slow down when the yellow warning lamp
comes on and engage a lower gear until the
gearbox has attained normal operating
temperature.

10 Oil
Checking the oil level
Oil grades: gearbox oil complying with
Dexron requirements
®
III and Allison C-4
for automatic transmissions.
Check the oil level at operating temperature
to ensure the correct level is obtained.
1 Clean round the oil filler cap and dip-
stick.
2 Stand on level ground, apply the
parking brake and start the engine.
3 Put the gear selector into neutral with
the engine running at approximately
1000 r/m.
4 Wipe the dipstick on clean, lint-free
paper.
5 Check the oil level on the dipstick.
The level should be between the markings on the dipstick. Top up as
necessary with oil of the right grade.
If the oil level is too high it may cause
a high oil temperature in the gearbox.
Pay attention to the cleanliness of
the oil!
T1007408
Oil filler cap with dipstick

Index 11
Index
2/1 switch . . ......... 6
A
Automatic programme . . . . . 4
Auxiliary brakes ........ 7
Available gears ......... 3
C
Changing up and down with toggle
switch ............. 4
Checking oil level .......10
D
Dipstick . . . .........10
Driving . . . ......... 5
Driving programme ....... 2
F
Front wheel locking ...... 7
G
Gear selector ......... 4
Gear selector lock ....... 4
I
Info Display . ......... 2
Instruments and controls . . . . 2
Introduction . ......... 1
K
Kick-down . ......... 5
L
Lever position ......... 3
M
Manual position (M) ...... 5
Manual programme ....... 4
N
Neutral ............ 4
Normal drive position ...... 4
O
Oil.............. 9
Oil Temperature ........ 9
P
Parking ............ 7
Parking position ........ 7
Position A . . . ........ 4
Position M . . ........ 4
Position N . . . ........ 4
Position R . . . ........ 4
Pressure switch E/P ....... 6
R
Ranging ............ 6
Retarder temperature ...... 9
Reverse gear . . ........ 4
Reversing with a laden vehicle . . 7
S
Selected gear . ........ 3
Swung out . . . ........ 7
U
Under or over speed ...... 4
W
Working temperature ...... 9

Volvo Truck Corporation
Göteborg, Sweden
20157642 English .01.2002 Printed in Sweden
 Loading...