

Page 1

Operating Instructions
Multifunctional charger “V-Charge Field 60”
Item No. 1597950
Page 2

Table of contents
Page
1. Introduction .......................................................................................................................................................... 4
2. Explanation of symbols ........................................................................................................................................ 4
3. Intended use ........................................................................................................................................................ 5
4. Package contents ................................................................................................................................................ 5
5. Safety information ................................................................................................................................................ 6
a) General information ....................................................................................................................................... 6
b) Setup location ................................................................................................................................................ 6
c) Operation ....................................................................................................................................................... 7
6. Battery information ............................................................................................................................................... 9
a) General information ....................................................................................................................................... 9
b) Additional information about lithium rechargeable batteries ........................................................................ 10
7. Compatible battery types ................................................................................................................................... 12
8. Product overview ............................................................................................................................................... 13
9. Operation ........................................................................................................................................................... 14
a) Connecting the charger to the power supply ............................................................................................... 14
b) Connecting a battery to the charger ............................................................................................................ 15
c) General information on the control menu .................................................................................................... 16
d) Charging and discharge power .................................................................................................................... 17
10. Menu structure ...................................................................................................................................................18
11. Lithium batteries (LiPo, Li-ion, LiFe, LiHV) ........................................................................................................19
a) General information ..................................................................................................................................... 19
b) Charging a battery without a balancer connection ("CHARGE") ................................................................. 20
c) Charging a battery with a balancer connection ("BALANCE") ..................................................................... 21
d) Fast charge ("FAST CHG") ..........................................................................................................................22
e) Storage mode ("STORAGE").......................................................................................................................22
f) Discharging a battery ("DISCHARGE") ....................................................................................................... 23
2
Page 3

Page
12. NiMH and NiCd batteries ...................................................................................................................................24
a) General information .................................................................................................................................... 24
b) Charging a battery ("CHARGE") .................................................................................................................. 24
c) Automatic charging mode ("Auto CHARGE") .............................................................................................. 25
d) Recharging a battery ("RE-PEAK) ............................................................................................................... 26
e) Discharging a battery ("DISCHARGE") ....................................................................................................... 27
f) Cycle program ("CYCLE") ........................................................................................................................... 28
13. Lead-acid batteries (Pb) ....................................................................................................................................29
a) General information ..................................................................................................................................... 29
b) Charging a battery ("CHARGE") .................................................................................................................. 29
c) Discharging a battery ("DISCHARGE") ....................................................................................................... 30
14. DJI Mavic batteries ............................................................................................................................................31
15. Saving/loading battery data ...............................................................................................................................32
a) Saving battery data ...................................................................................................................................... 32
b) Saving battery data ...................................................................................................................................... 35
c) Loading battery data .................................................................................................................................... 36
16. Displaying the voltage for lithium batteries ........................................................................................................37
17. Measuring the internal resistance ......................................................................................................................38
18. Connecting the charger to a PC ........................................................................................................................38
19. System settings .................................................................................................................................................39
20. Warning messages on the display ..................................................................................................................... 43
21. Charger status information ................................................................................................................................44
22. Care and cleaning ..............................................................................................................................................45
23. Disposal ............................................................................................................................................................. 45
a) Product ........................................................................................................................................................ 45
b) Batteries ......................................................................................................................................................45
24. Technical data ....................................................................................................................................................46
3
Page 4
1. Introduction
Dear customer,
Thank you for making the excellent decision to purchase a Voltcraft® product.
Voltcraft® - This name stands for above-average quality products in the areas of measuring, charging and grid technology, characterised by technical competence, extraordinary performance and permanent innovation.
Whether you are an ambitious hobby electronics or a professional user - a product of the Voltcraft® brand family will
provide you with the best solution for even the most sophisticated of tasks. Special features: We offer the sophisticated technology and reliable quality of our Voltcraft® products at a near-unbeatable price/performance ratio. We lay
the groundwork for long, good and successful cooperation.
Enjoy your new Voltcraft® product!
All company and product names are trademarks of their respective owners. All rights reserved.
If there are any technical questions, please contact:
International: www.conrad.com/contact
United Kingdom: www.conrad-electronic.co.uk/contact
2. Explanation of symbols
The symbol with an exclamation mark in a triangle is used to highlight important information in these oper-
ating instructions. Always read this information carefully.
The arrow symbol indicates special information and advice on how to use the product.
This product must only be used in dry, enclosed areas; it must not become damp or wet.
Always follow the instructions in this manual.
4
Page 5

3. Intended use
The charger features a charging/discharging channel with an XT60 connection. It also comes with a built-in balancer
for multi-cell lithium batteries. It can be controlled via a two-line backlit display and four control buttons.
The charger is designed to charge and discharge NiMH/NiCd batteries (1 - 15 cells), LiPo/LiIon/LiFe/LiHV batteries
(2 - 6 cells) and lead-acid batteries (1 - 10 cells, 2 - 20 V).
The charging current can be adjusted from 0.1 A to 6.0 A (depending on the number of cells/battery voltage). The
maximum total charging power is 60 W.
The discharge current can be adjusted from 0.1 A to 2.0 A (depending on the number of cells/battery voltage). The
maximum total charging power is 5 W.
The charger features a connection for a temperature sensor (not included, available separately), which can be used
to monitor the charging process.
The charger is powered by a 11 - 18 V/DC stabilized direct voltage (e.g. an external car lead battery or a suitable
power adapter).
Always observe the safety information and all other information in these operating instructions!
Read the operating instructions carefully and keep them in a safe place for future reference. Always provide these
operating instructions when giving the product to a third party.
Using this product for any purposes other than those described above may damage the product and result in a short
circuit, re or electric shock. This product must not be modied or reassembled. Do not attempt to open the device
housing.
This product complies with statutory national and European regulations.
4. Package contents
• Multi-functional charger
• Connection cable with crocodile clips
• CD with operating instructions
• Information sheet with safety instructions
Up-to-date operating instructions
To download the latest operating instructions, visit www.conrad.com/downloads or scan the QR
code on this page. Follow the instructions on the website.
5
Page 6

5. Safety information
Read the operating instructions and safety information carefully. If you do not follow the safety
instructions and information on proper handling in this manual, we will assume no liability for any
resulting personal injury or damage to property. Such cases will invalidate the warranty/guarantee.
a) General information
• The unauthorized conversion and/or modication of the product is prohibited for safety and approval
reasons. Never dismantle the product.
• Maintenance, modications and repair work must be done by a technician or a specialist repair centre.
This product does not contain any components that require maintenance.
• This product is not a toy and must be kept out of the reach of children.
The product must be installed, used and stored in areas that are inaccessible to children. The same
applies to rechargeable batteries.
Exercise particular caution when children are present. Children may accidentally short-circuit the re-
chargeable battery/batteries, which can cause a re or explosion. Fatal hazard!
• In schools, educational facilities, hobby and DIY workshops, the product must be operated under the
supervision of qualied personnel.
• Always comply with the accident prevention regulations for electrical equipment when using the product
in industrial facilities.
• Do not leave packaging material lying around carelessly, as it may become dangerous playing material
for children.
• Handle the product with care. Impacts or falls (even from a low height) may damage the product.
• If you are not sure how to operate the product correctly, or if you have any questions that are not an-
swered in these operating instructions, contact us or another specialist.
b) Setup location
• The charger must only be used in dry, enclosed indoor areas. It must not become damp or wet. Never
place the product next to a bathtub, shower or other sources of moisture.
• Avoid direct sunlight, intense heat and cold temperatures. Keep the product away from dust and dirt. The
same applies to connected batteries.
• Do not use the product in rooms or areas where ammable gas, vapours or dust may be present, as this
may cause an explosion!
• Place the charger on a clean, level surface. Do not place the charger on ammable materials (e.g. a
carpet or tablecloth). Always use a non-ammable, heatproof surface.
• Keep the charger away from ammable or combustible materials (e.g. curtains).
• Never cover the product, as this may cause it to overheat and catch re. Do not insert any objects into
the ventilation slots on the charger. Never interfere with the built-in fan.
6
Page 7

• Always use suitable protection when placing the charger on valuable furniture, otherwise it may cause
scratch/pressure marks or discolour the furniture. The same applies to connected batteries.
• Do not use the charger inside vehicles.
• The charger must be installed, used and stored in areas that are inaccessible to children. Children may
accidentally short-circuit the rechargeable batteries, which can cause a re or explosion. Fatal hazard!
• Do not use the charger in the immediate vicinity of strong magnetic/electromagnetic elds, transmitter
aerials or HF generators. These may affect the electronic control system.
• Make sure that the cables are not pinched or damaged by sharp edges. Do not place any objects on
the cables.
• Do not place any objects that contain liquid (e.g. vases or plants) on or next to the charger, battery or
cable.
Liquids that get into the interior of the charger (or inside the connection sockets) may destroy the charger
and cause a re.
If liquid does get inside the device or the connection sockets, disconnect the charger from the power
supply. Remove the battery from the charger. Discontinue use and take the charger to a specialist repair
centre.
c) Operation
• The charger is powered by a 11 - 18 V/DC stabilized direct voltage (e.g. an external car lead-acid battery
or a suitable mains adapter).
• Never wear metal or conductive objects (e.g. jewellery such as necklaces, bracelets or rings) when handling the charger or rechargeable batteries. This may cause a short circuit in the rechargeable battery or
charging cable, which can lead to a re or explosion.
• Never leave the product unattended during use. The charger comes with a range of safety mechanisms
to ensure safe use. However, malfunctions may still occur from time to time.
• Ensure there is sufcient ventilation during use; never cover the charger. Ensure that there is a sufcient
distance (min. 20 cm) between the charger and other objects, otherwise the charger may overheat and
cause a re!
• The charger is only designed to charge (and discharge) NiMH, NiCd, Li-ion/LiPo/LiFe/LiHV and lead-acid
batteries. Never charge other types of batteries or non-rechargeable batteries, as this may cause a re
or explosion!
• Always connect the cable to the charger before connecting a battery.
When disconnecting, proceed in the reverse order – disconnect the rechargeable battery from the charging cable, and then unplug the cable from the charger.
Disconnecting the battery in the wrong order may result in a short circuit in the charging cable, which
can cause a re or explosion!
• Do not connect several chargers together.
• Only connect a single battery/battery pack to the charger.
• Only use the product in temperate climates. It is not suitable for use in tropical climates. Refer to the
"Technical data" section for information on the permitted ambient conditions.
7
Page 8

• Never use the product immediately after it has been brought from a cold room into a warm one. This may
generate condensation, which can cause the charger to malfunction or damage the interior components.
Allow the product to reach room temperature before using it. This may take several hours.
• Do not use the charger in the immediate vicinity of strong magnetic or electromagnetic elds, transmitter
aerials or HF generators. These may affect the electronic control system.
• If you suspect that safe operation is no longer possible, discontinue use immediately and prevent unauthorized use.
Disconnect the charger from the power supply. Discontinue use immediately and take the product to a
specialist repair shop, or dispose of it in an environmentally friendly manner.
• Safe operation is no longer possible if the product is visibly damaged or stops working, or if the product
was stored in unfavourable conditions for an extended period or mishandled during transport.
• Keep the product in a cool, dry place out of the reach of children.
8
Page 9

6. Battery information
There are numerous hazards associated with the use of rechargeable batteries. Compared with
conventional NiCd or NiMH rechargeable batteries, LiPo/Li-ion-/LiFe-/LiHV rechargeable batteries
have a high energy content. For this reason, it is essential to comply with safety regulations to
prevent the risk of a re or explosion.
Always observe the following safety information when handling rechargeable batteries.
In addition, ensure that you observe any additional safety information provided by the battery
manufacturer.
a) General information
• Rechargeable batteries are not toys. Keep batteries out of the reach of children.
• Do not leave batteries lying around, as they constitute a choking hazard for children and pets. Seek im-
mediate medical advice if a battery is swallowed.
• Rechargeable batteries must never be short-circuited, dismantled or thrown into re. This may cause a
re or explosion!
• When handling leaking or damaged batteries, always use suitable protective gloves to avoid burning
your skin.
• Do not attempt to recharge disposable, non-rechargeable batteries. This may cause a re or explosion!
Non-rechargeable batteries are only designed to be used once and must be disposed of properly when
they are empty.
Only recharge compatible rechargeable batteries and ensure that you use a suitable battery charger.
• Batteries must not become damp or wet.
• Place the charger and rechargeable battery on a non-ammable, heat-resistant surface (e.g. stone tiles).
Keep the charger and battery away from ammable objects. Maintain a sufcient distance between the
charger and the battery. Never place the battery on top of the charger.
• The charger and battery may heat up during the charging process. Always ensure that there is sufcient
ventilation. Never cover the charger or the battery!
• Never use battery packs that are made of different types of cells.
• Never charge/discharge a battery when the charger is unattended.
• Never charge/discharge a rechargeable battery when it is inside a model. Remove the battery from the
model before charging it.
• Always ensure that the battery is connected in the correct polarity (observe the plus/+ and minus/-
symbols). Connecting the battery incorrectly may damage the model and the battery and cause a re
or explosion!
The charger features a safety mechanism to prevent the battery from being connected in the wrong polarity. However, connecting the battery in the wrong polarity may still cause damage in certain scenarios.
• Only connect a single battery/battery pack to the charger.
9
Page 10

• If you do not plan to use the charger for an extended period, disconnect any connected batteries from
the charger, and then disconnect the charger from the power supply.
• Do not charge a battery when it is still hot (e.g. due to a high discharge current in your model). Allow the
battery to cool down to room temperature before charging or discharging it.
• Never damage the casing of a rechargeable battery. This may cause a re or explosion!
• Never charge or discharge damaged, leaking or deformed batteries. This may cause a re or explosion!
Discontinue use immediately and dispose of the battery in an environmentally friendly manner.
• Disconnect the battery from the charger when the battery is fully charged.
• Rechargeable batteries should be charged at least once every 3 months to prevent damage due to
overdischarge.
• Store rechargeable batteries in a suitable location. Install a smoke detector in the room. Batteries pre-
sent a re hazard and may generate toxic fumes. This applies in particular to batteries for model toys,
which are subjected to high charging/discharge currents and vibrations.
b) Additional information about lithium rechargeable batteries
Modern lithium rechargeable batteries have a signicantly higher capacity than NiMH and NiCd batteries
and are more lightweight. This makes lithium batteries (especially lithium polymer batteries) particularly
suitable for use in model making.
However, lithium batteries require particular care to ensure safe charging/discharging, operation and handling.
The following section provides an overview of the potential hazards associated with lithium batteries and
explains how these hazards can be avoided to ensure a long lifespan.
Please also refer to the battery safety information in section 6a.
• The casing of many lithium batteries is made of a thick lm, which is very sensitive.
Do not dismantle, drop or insert any objects into lithium batteries. Do not apply mechanical loads or pull
on the battery’s connection cables. This may cause a re or explosion!
Always observe these instructions when inserting or removing a battery from your model.
• Ensure that the battery does not overheat during use, recharging, discharging, transport or storage. Do
not place rechargeable batteries next to sources of heat (e.g. a speed controller or motor) or expose
them to direct sunlight. This may cause the battery to overheat, which can cause a re or explosion!
The temperature of the battery must not exceed 60 °C (or the maximum temperature stated in the
manufacturer’s instructions).
• If there are any signs of damage (e.g. if your model is subjected to an impact), or the battery casing is
swollen, discontinue use immediately. Do not attempt to recharge the battery, as this may cause a re or
explosion!
Exercise caution when handling the damaged battery and use suitable protective gloves. Dispose of the
battery in an environmentally friendly manner.
Never store damaged batteries in an apartment or in a house/garage. Damaged or swollen lithium bat-
teries may catch re.
10
Page 11

• Always use a compatible charger to charge lithium batteries and ensure that the charging specications
are correct. Do not use NiCd, NiMH or lead-acid battery chargers, as these may cause a re or explo-
sion.
Always select the correct charging specications for your rechargeable battery.
• Always use a balancer when charging a lithium battery with more than one cell (the charger comes with
a built-in balancer).
• The charge rate for LiPo batteries must not exceed 1 C (or the value stated in the battery specications).
This means that the charging current must not exceed the battery capacity (e.g. battery capacity =
1000 mAh, max. charging current = 1000 mA = 1 A).
Always refer to the manufacturer's specications when using LiFe, Li-ion and LiHV batteries.
• The discharge current must not exceed the value stated on the battery.
For example, if "20C" is printed on the LiPo battery, the maximum discharge current is 20 times the battery's capacity (e.g. battery capacity = 1000 mAh, max. discharge current = 20C = 20 x 1000 mA = 20 A).
Exceeding the maximum current may cause the battery to overheat or become deformed, which can
lead to a re or explosion!
The printed value (e.g. 20C) indicates the maximum current that the battery can deliver for a short period.
The continuous current should not be higher than one half of the stated value.
• Do not allow the individual cells of a lithium battery to become fully discharged. This may destroy the
battery or cause permanent damage.
If your model does not have overdischarge protection or a low battery indicator, stop using it before the
battery becomes empty.
11
Page 12
7. Compatible battery types
Battery type LiPo Li-ion LiFe LiHV NiCd NiMH Pb
Rated voltage (V/cell) 3.7 3.6 3.3 3.7 1.2 1.2 2.0
Max. charging voltage
(V/cell)
Voltage for storage
(V/cell)
Charging current for
fast charging
Min. voltage after
discharge (V/cell)
The voltages in the above table are for one cell. The values may vary depending on the manufacturer (refer
to the manufacturer's instructions for details).
The maximum charging and discharge currents are marked with the letter "C" (capacity).
A charging current of 1C corresponds to the capacity value printed on the battery (e.g. if the stated battery
capacity is 1000 mAh, the max. charging current is 1000 mA = 1A).
When using multi-cell battery packs, check that the voltage setting is correct. For example, if you use a
two-cell battery pack, the individual cells can be connected in parallel and series.
Exceeding the maximum permitted charging current or selecting the wrong cell number/voltage setting may
destroy the battery. It may also cause a re or explosion!
For more information on the maximum charging current and the cell number/voltage, refer to the data
sheets or the battery label. This data takes precedence over the information in the table above.
Important!
• Never charge battery packs with different types of cells (e.g. cells from different manufacturers).
• Never charge non-rechargeable batteries.
• Never charge batteries that are not listed in the table above.
• Never charge batteries with integrated electronic components.
• Never charge batteries that are connected to other devices (e.g. a speed controller).
• Never charge damaged or deformed batteries.
4.2 4.1 3.6 4.35 1.5 1.5 2.46
3.8 3.7 3.3 3.85 - - -
<= 1C <= 1C <= 4C <= 1C 1C - 2C 1C - 2C <= 0.4C
3.0...3.3 2.9...3.2 2.6...2.9 3.1...3.4 >= 1.0 >= 1.0 >= 1.8
12
Page 13
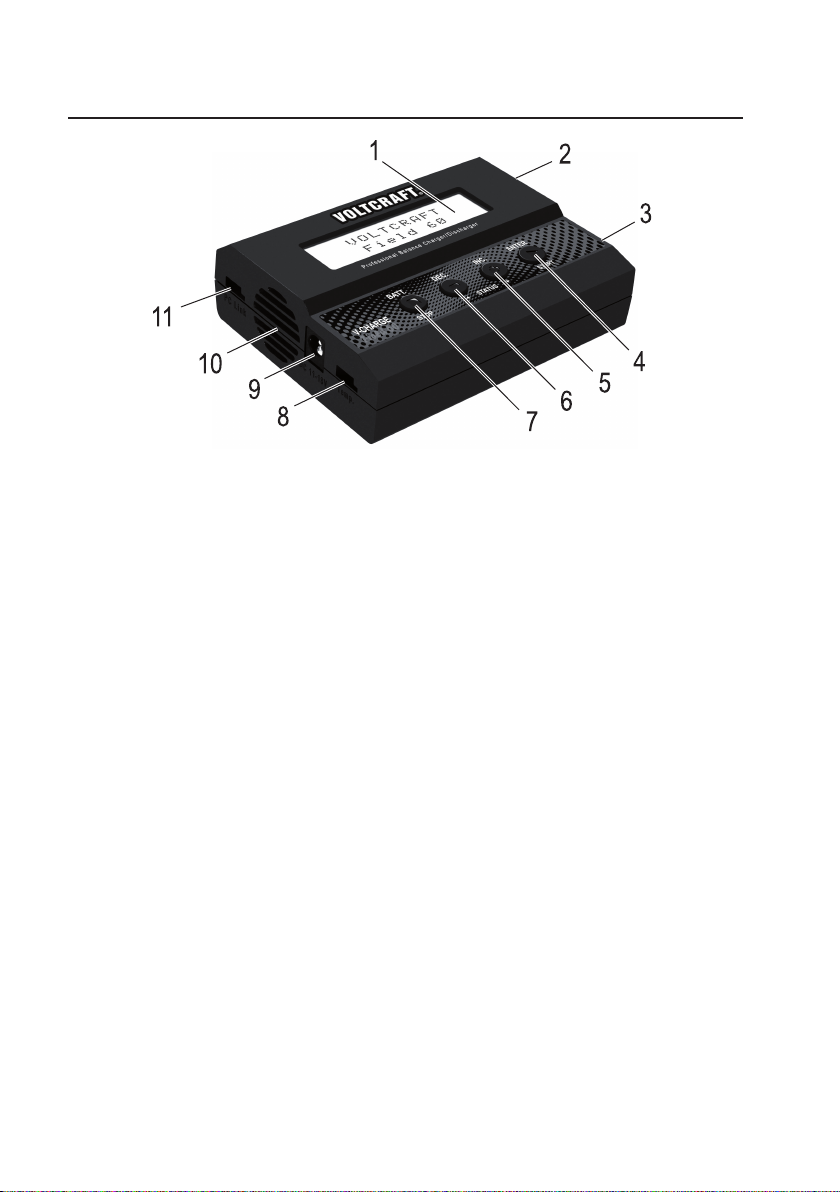
8. Product overview
1 Illuminated LC display
2 Balancer port for connecting the balancer cable on a lithium battery or an external balancer board (not included)
3 XT60 battery connection
4 "ENTER/START" button: Start/resume charging, conrm a setting
5 "INC" button: Select a battery program in the main menu, increase a value, menu selection (forwards), display the
voltage of the individual cells when charging a lithium battery with a balancer connection
6 "DEC" button: Select a battery program in the main menu, decrease a value, menu selection (back), display
charging data during the charging/discharge process
7 "BATT./STOP" button: Go to a sub-menu, pause the charging process, stop
8 Socket for external temperature sensor (not included, available separately)
9 DC input (11 - 18 V/DC stabilised voltage), e.g. for connecting to an external car lead-acid battery
10 Fan
11 Socket for connection to a USB port on a computer (connection cable and software not included, available se-
parately)
13
Page 14

9. Operation
a) Connecting the charger to the power supply
Important!
Always connect the charger to the power supply before connecting a battery.
The charger can be powered with a suitable mains adapter or a car lead-acid battery via the direct voltage input
(11 - 18 V/DC).
The charger has a maximum total charging power of 60 W. The power supply must be chosen accordingly.
When the charger delivers the maximum charging power of 60 W, the power consumption will be approxi-
mately 20 - 30 % higher due to conversion losses.
If the charger is powered with a xed voltage mains adapter (rather than a 12 V car lead-acid battery), it
Ensure that the charger is inserted in the correct polarity (observe the plus/+ and minus/- symbols). The connection
cable has two crocodile clips (red = positive/+, black = negative/-).
The charger turns on automatically when it is connected to the power supply. The display will turn on and display a
startup message. The charger will play a short beep.
The charger is now ready for use.
must be able to deliver a sufciently high current.
14
Page 15

b) Connecting a battery to the charger
Please read the following section carefully before connecting or charging/discharging a battery:
• If you have not already done so, read the information in sections 5, 6 and 7.
• Do you know the battery's specications? Do not connect, charge or discharge a battery if the specica-
tions are not printed on the casing!
• Have you selected the correct charging/discharge mode for the type of battery you are using? Selecting
the wrong mode may damage the charger and the battery and cause a re or explosion!
• Have you selected the correct charging/discharge current?
• Have you selected the correct voltage (e.g. for multi-cell LiPo batteries)? In certain scenarios, a dual-cell
LiPo battery can be connected in parallel (3.7 V) or series (7.4 V).
• Are all cables and plugs intact? Do the plugs t securely into the sockets? Worn-out plugs and damaged
cables must be replaced.
• Only connect a single battery/battery pack to the charger. Never connect several batteries/battery packs
at the same time.
• Always connect the cable to the charger before connecting a battery. When disconnecting, proceed in
the reverse order – disconnect the rechargeable battery from the charging cable, and then unplug the
cable from the charger.
Disconnecting in the wrong order may lead to a short circuit, which can cause a re or explosion!
• If you wish to charge a self-assembled battery pack, the cells must be identical (same type, capacity
and manufacturer).
The cells must also be charged to the same level (lithium batteries can be balanced out using the balancer, but this is not possible with other battery packs such as NiMH or NiCd).
• Before connecting a battery/battery pack to the charger, disconnect the battery from your device (e.g
speed controller).
Important information on charging/discharging a lithium battery pack with a balancer connection:
Multi-cell lithium battery packs normally have a balancer connection. This enables the charger to monitor the voltage
of each individual cell.
The charger balances the voltages of the cells in the event that the voltage is different. This prevents the cells from
over or undercharging. The balancer therefore prevents individual battery cells from overcharging (which could cause
a re or explosion) and overdischarging and ensures that the battery pack provides optimal performance.
15
Page 16

Connecting a battery pack to the charger:
1. Connect the charger to the power supply.
2. Connect the charging cable to the XT60 socket on the charger. Ensure that the cable is inserted in the correct
polarity; this is indicated on the XT60 socket on the charger.
Do not connect the charging cable to the battery at this stage. This may result in a short circuit in the charg-
ing cable, which can cause a re or explosion!
3. Connect the charging cable to the battery, ensuring that it is connected in the correct polarity (red cable =
positive/+, black cable = negative/-).
4. If you wish to connect a multi-cell lithium battery with a balancer cable to the charger, connect it to the balancer
socket on the charger. If the plug does not t, use a suitable adapter cable or an external balance board (not
included).
Ensure that the cable is inserted in the correct polarity; this is indicated on the charger next to the balancer
connection.
To disconnect a battery, proceed as follows:
1. If you have connected a lithium battery with a balancer cable to the charger, disconnect the balancer cable from
the charger.
2. Disconnect the charging cable from the battery
3. Finally, disconnect the charging cable from the charger.
4. If there is no battery connected to the charger, you can now disconnect the charger from the power supply.
c) General information on the control menu
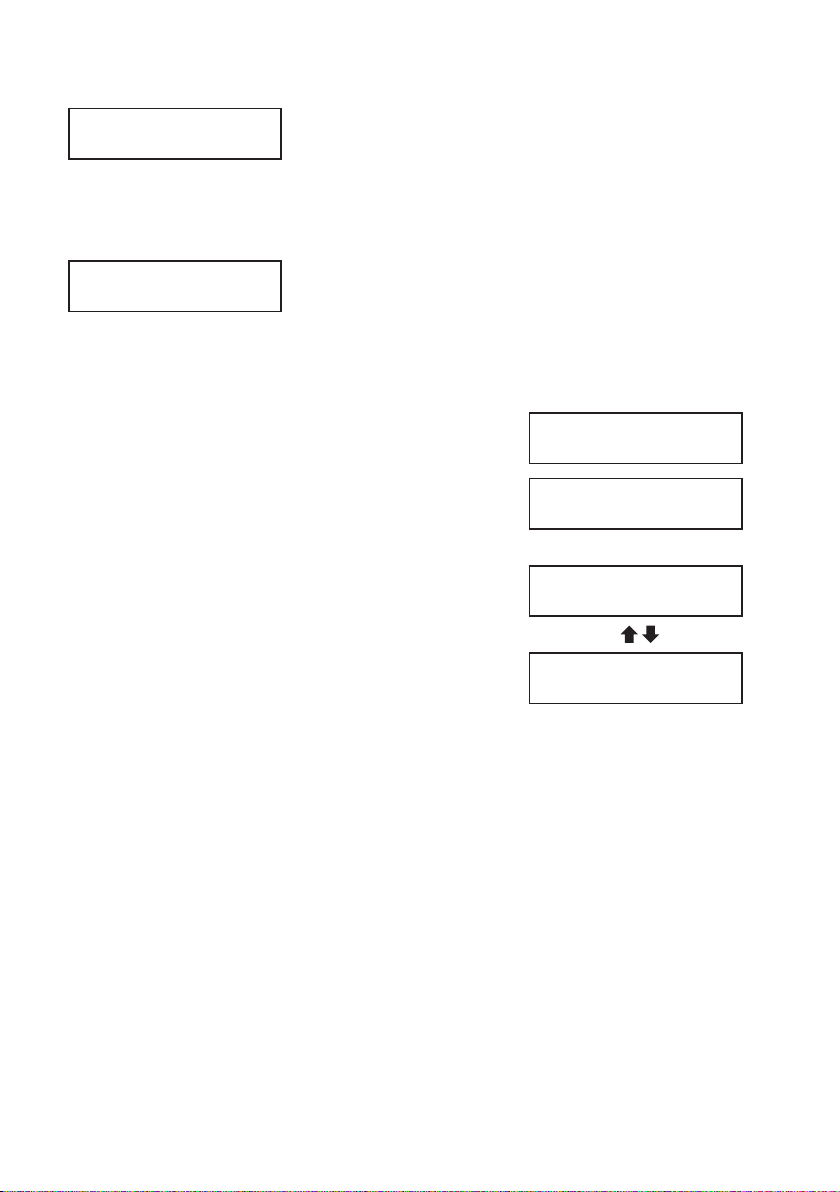
• From the main menu, use the "INC." or "DEC." buttons to select the desired sub-menu, and then press the "ENTER/
START" button to conrm.
• Use the "INC." and "DEC." buttons to select the desired setting from the sub-menu.
• Press the "ENTER/START" button to change a setting. The selected setting will ash on the display. Use the "INC."
and "DEC." buttons to change the setting (e.g. charging current). Hold down the "INC." or "DEC." buttons to move
through the values more quickly.
• Press the "ENTER/START" button to save the modied setting.
• Press the "BATT./STOP" button to exit the settings menu. The charger will revert to the main menu.
Press the "DEC." button repeatedly when the battery is charging/discharging to display a range of different
information. The charger reverts to the home screen if no button is pressed for a few seconds.
When a lithium battery with a balancer plug is connected to the charger, you can press the "INC." but-
ton during the charging/discharge cycle to display the voltage of the individual cells. Press the "ENTER/
START" button to go back to the home screen.
16
Page 17

d) Charging and discharge power
The charger has a maximum charging capacity of 60 W and a discharge capacity of max. 5 W.
Important:
The charging capacity limits the possible charging current (depending on the battery type) and number of
Example for charging a battery:
The charger provides a maximum charging current of 6.0 A. However, when you use a LiPo battery with
Example for discharging a battery:
The charger provides a maximum discharge current of 2.0 A. With a 2-cell LiPo battery (7.4 V rated voltage,
cells. The same applies to the discharge capacity.
more than two cells, the actual charging current is lower, otherwise the 60 W charging capacity would be
exceeded. (End of charge voltage for a 3-cell LiPo battery = 3 x 4.2 V = 12.6 V, 60 W / 12.6 V = 4.78 A).If
you select a higher current, the charger automatically decreases the current to protect against overload.
8.4 V when fully charged) and a maximum discharge capacity of 5 W, the maximum possible discharge
current at the start of the discharge cycle is 5 W / 8.4 V = 0.6 A. If you set a higher discharge current, the
charger automatically reduces the current to protect against overload.
17
Page 18
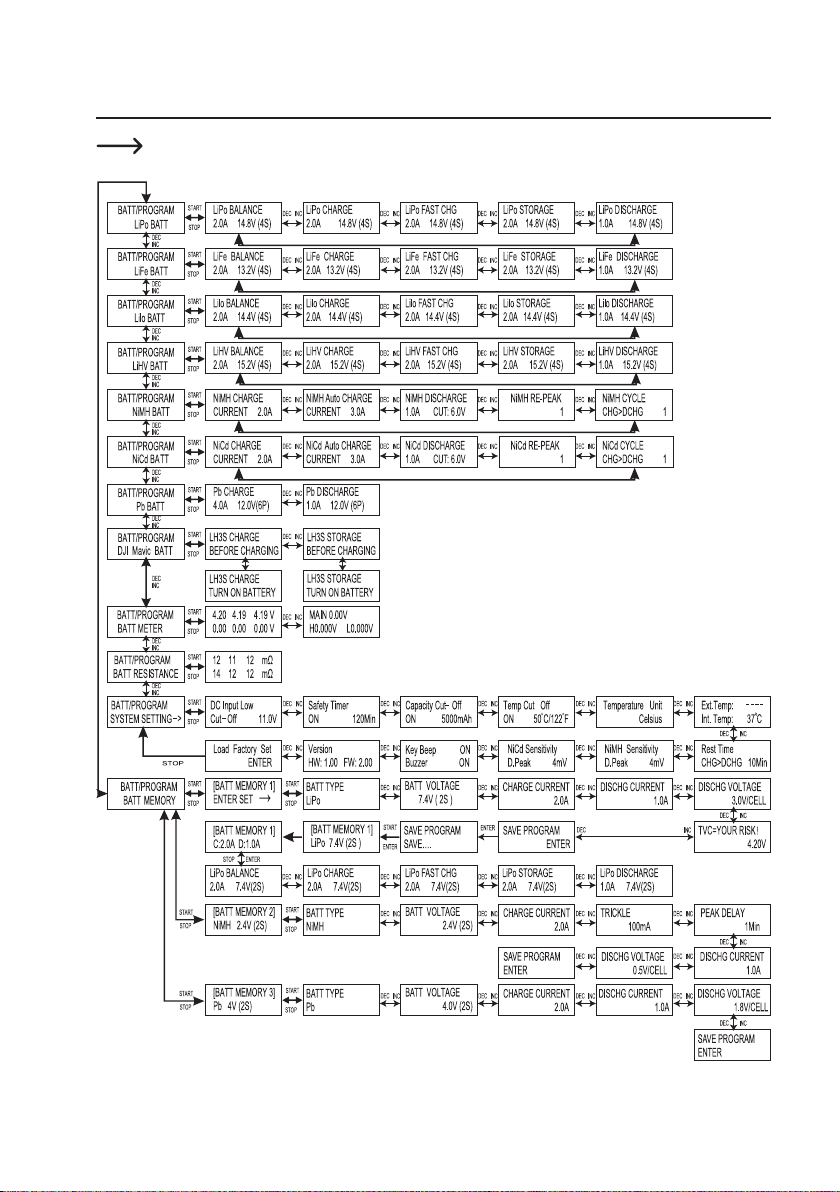
10. Menu structure
The menu structure and screenshots shown on the following pages may differ for newer rmware versions.
18
Page 19

11. Lithium batteries (LiPo, Li-ion, LiFe, LiHV)
a) General information
The battery programs for LiPo, Li-ion, LiFe and LiHV batteries only differ in terms of the voltage and maximum charging current (see table in section 7).
The charging process for LiPo batteries consists of two stages. During the rst stage, the battery is charged with a
constant current. When the maximum permitted cell voltage is reached (e.g. 4.2 V for a LiPo battery), the voltage is
kept constant, which causes the charging current to drop. When the charging current drops below a certain threshold,
the battery stops charging and the charging process is complete.
If the battery has a balancer connection (this is the case for nearly all lithium batteries with more than one
cell), the balancer connection must also be connected to the charger during the charging/discharge cycle
(in addition to the battery connection cable).
There are different types of balancer plug. Do not attempt to force the plug into the charger if it does not t!
Occasionally, some batteries with more than one cell have separate connections for each cell. These bat-
When you use a multi-cell battery pack, a balancer (built into the charger) is the only way to ensure that all
The charging current depends on the battery capacity and type (see section 7). Always refer to the speci-
Follow the steps below:
The charger must display the main menu.
Use the "INC." or "DEC." buttons to select the battery type (LiPo, Li-ion, LiFe
or LiHV, see right-hand screenshots).
Press the "ENTER/START" button to conrm your selection.
Use the "INC." and "DEC." buttons to select the desired battery program:
• "BALANCE": Charge lithium battery with balancer connection
• "CHARGE": Charge lithium battery without balancer connection
• "FAST CHG": Charge a battery quickly
• "STORAGE": Charge/discharge a lithium battery to a certain voltage (e.g.
• "DISCHARGE": Discharge a lithium battery
If necessary, purchase a suitable adapter to connect the balancer plug to the charger.
teries are not strictly speaking ‘multi-cell’ batteries. Always refer to the design and voltage specications
provided by the battery manufacturer.
cells have the same voltage after the charging cycle is complete and prevent the cells from overcharging
(risk of re or explosion) or overdischarging (damages the battery).
cations in the manufacturer's instructions.
BATT/PROGRAM
LiPo BATT
BATT/PROGRAM
LiFe BATT
BATT/PROGRAM
LiIo BATT
for storage)
BATT/PROGRAM
LiHV BATT
19
Page 20

b) Charging a battery without a balancer connection ("CHARGE")
In theory, you could also use the "CHARGE" program to charge multi-cell lithium batteries with a balancer
connection.
In this mode, however, the cell voltages are not balanced and the cells may overcharge, which could cause
For this reason, always charge multi-cell lithium batteries with a balancer connection using the "BALANCE"
• From the main menu, use the "INC." and "DEC." buttons to select the battery type (LiPo, Li-ion, LiFe or LiHV, see
• Use the "INC." and "DEC." buttons to select the "CHARGE" program.
• To change the settings, press the "ENTER/START" button. The charging current will ash. Press the "INC." and
• Press the "ENTER/START" button to conrm the charging current.
• The voltage setting will start to ash. Use the "INC." and "DEC." buttons to change the setting.
• Press the "ENTER/START" button to conrm the setting.
Press the "BATT./STOP" button to return to the previous settings menu.
a re or explosion!
program. Do not use the "CHARGE" program!
section 11. a), and then press the "ENTER/START" button.
LiPo CHARGE 0.4A
The number on the left of the bottom line indicates the charging current; the
right-hand number indicates the number of cells in the battery pack (in this
example, a 3-cell LiPo battery pack is used with a rated voltage of 11.1 V).
Use the "INC." and "DEC." buttons to select another battery program; press the "BATT./STOP" button to go
back to the main menu.
"DEC." buttons to change the charging current. Hold down the button to move through the values more quickly.
The maximum possible charging current depends on the battery type, number of cells and the maximum
charging power.
The voltage should be changed based on the number of cells (e.g. one cell = 3.7 V, two cells = 7.4 V). The
indicated voltage is the rated voltage of the battery (see section 7). The actual battery voltage is higher
when the battery is fully charged.
Hold down the "ENTER/START" button for approximately 3 seconds to start
the charging cycle.
The charger will check specications of the connected battery.
If the settings are wrong, or if the charger detects a problem, the charger will beep and a message will be
shown on the display. Press the "BATT./STOP" button to silence the charger and go back to the previous
settings menu.
If no error was detected, the right-hand screenshot will be displayed (example screenshot).
The "R:" value indicates the number of cells detected by the charger (in this
example, a 3-cell battery).
The "S:" value indicates the number of cells that you congured in the menu
(in this example, a 3-cell battery).
If these two numbers do not match, check the settings on the charger and the battery. The LiPo battery may
be overdischarged, or one of the cells may be defective. If this occurs, do not charge the battery, as this
may cause a re or explosion!
11.1 V (3 S)
BATTERY CHECK
................
R: 3SER S: 3SER
CANCEL(STOP)
R: 3SER S: 3SER
CONFIRM(ENTER)
20
Page 21

• If the two numbers match, press the "ENTER/START" button to start the charging cycle.
• The display shows a range of information about the charging status when
the battery is charging.
Example:
The battery type and number of cells are shown in the top-left of the display ("LP3s" - LiPo battery with 3 cells).
The charging current is shown in the middle of the top line, and the current battery voltage is shown in the top-right
corner
The current battery program is shown in the bottom-left of the display ("CHG" = "CHARGE"). The elapsed time
is shown in the middle of the bottom line, and the charged capacity (in mAh) is shown in the bottom-right corner.
Press the "DEC." button during the charging/discharge cycle to display a range of information about the
charging status (see section 21). The display reverts to the home screen if no button is pressed for a few
seconds.
• The charger beeps when charging is complete (provided that this feature has not been disabled).
To stop the charging cycle, press the "BATT./STOP" button.
LP3s 1.2A 12.59V
CHG 022:43 00682
c) Charging a battery with a balancer connection ("BALANCE")
In contrast to the simple "CHARGE" battery program (see section 11. b), the "BALANCE" program monitors the voltage of each cell in a multi-cell battery and corrects differences in voltage accordingly.
In addition to the two conventional battery connections (positive/+ and negative/-), the balancer connection on the
battery must be connected to the charger.
The balancer connection can be directly connected to the charger. If the connector does not t, purchase an adapter
cable or a balancer board.
When using self-assembled batteries, always ensure that the balancer plug is connected correctly.
Example: The rst pin is the negative pole for the rst cell. The next connection pin is the positive pole for
The last connection pin on the balancer plug is the positive pole of the last cell. This means that the voltage
The remaining charging procedure is described in section 11. b).
Only a battery pack with exactly the same voltage per cell can deliver the maximum power and battery life
Variations in the quality of the materials used and the internal structure of multi-cell lithium battery packs
If you charge a multi-cell lithium battery without a balancer, there may be very big differences in the voltage
In addition, charging a lithium battery with different cell voltages without a balancer may cause one of the
the rst cell; the subsequent connection pins are the positive poles for the second, third, fourth, fth and
sixth cells (depending on the number of cells).
between the two outer pins on the balancer plug is the same as the voltage on the two battery connections.
When a lithium battery with a balancer plug is connected to the charger, you can press the "INC." button to
display the voltage of the individual cells. Press the "ENTER/START" button to go back to the home screen.
Important!
for a model aeroplane/vehicle.
mean that the cells may have different voltages at the end of the discharge cycle.
of each cell. This shortens the battery life (as one cell stops working) and causes deep discharge, which
damages the battery.
cells to overcharge, which can cause a re or explosion.
21
Page 22

Example:
A dual-cell LiPo battery pack charged without a balancer has a voltage of 8.4 V and thus appears to be fully charged.
However, the two cells have a respective voltage of 4.5 V and 3.9 V (one cell is dangerously overcharged, the other
is half-empty).
Overcharged cells may leak, expand or even catch re or explode!
If this LiPo battery was inserted into a model aeroplane, the battery life would be very short, because the voltage of
the half empty cell would drop very quickly and the battery would stop delivering a current.
If the lithium battery has a balancer connection, it must always be connected to the charger (in addition to
the two conventional positive/+ and negative/- terminals). Select the "BALANCE" program for this type of
battery.
d) Fast charge ("FAST CHG")
When you charge a lithium battery, the charging current drops continuously as the battery charges (when the battery reaches its maximum voltage and the charger switches from constant current to constant voltage mode). This
increases the charging time.
Quick charge mode delivers a higher charging current when the voltage is constant. However, this reduces the charging capacity, as the charging cycle is stopped earlier by the charger's built-in safety mechanism.
This means that the battery (e.g. LiPo battery) cannot be fully charged in quick start mode. The battery is only charged
to 90 % capacity compared with the standard charge mode.
Quick charge mode should only be used when you need to charge a battery as quickly as possible.
The charging current and voltage/number of cells can be congured in the same way as the "CHARGE" program
(see section 11. b).
e) Storage mode ("STORAGE")
Use this program when you need to store a battery for an extended period. Depending on the battery type, the battery will be charged/discharged to a certain voltage (LiPo = 3.8 V, Li-ion = 3.7 V, LiFe = 3.3 V, LiHV = 3.9 V per cell).
Depending on the cell voltage, the battery will be charged or discharged. If you are using a multi-cell battery
pack, the battery should have a balancer connection that is connected to the charger.
When storing a lithium battery for an extended period (e.g. when storing a model aeroplane battery during
The charging current and voltage/number of cells can be congured in the same way as the "CHARGE" program
(see section 11. b).
the winter), the battery must be checked every 3 months and complete the "STORAGE" program to avoid
damaging the battery due to deep discharge.
The selected current is used to charge and discharge the battery.
22
Page 23

f) Discharging a battery ("DISCHARGE")
It is not normally necessary to discharge a lithium battery before starting a charge cycle (in contrast to NiCd batteries).
The battery can be charged at any time, regardless of the remaining charge. However, if you do wish to discharge the
battery, you can congure the discharge current accordingly.
The maximum possible discharge current depends on the battery type, battery capacity and number of
cells. The charger has a maximum discharge capacity of 5 W. This limits the maximum possible discharge
current for batteries with more than one cell.
Do not discharge a lithium battery below the minimum permitted cell voltage (refer to the table in section
7 and the manufacturer's specications). This will result in deep discharge, which will damage the battery
and render it useless!
The discharge current and voltage/number of cells can be congured in the same way as standard charge mode (see
section 11. b). The only difference is that the battery is discharged rather than charged.
The display shows a range of information about the charging status when the
battery is discharging.
The battery type and number of cells are shown in the top-left of the display
("LP3s" - LiPo battery with 3 cells). The discharge current is shown in the
middle of the top line, and the current battery voltage is shown in the top-right
corner.
The current battery program is shown in the bottom-left of the display ("DCH" = "DISCHARGE"). The elapsed time
is shown in the middle of the bottom line, and the discharged capacity (in mAh) is shown in the bottom-right corner.
The voltage at the end of the discharge cycle varies depending on the battery type and is preset by the charger.
• LiPo: 3.0 V per cell
• Li-on: 2.9 V per cell
• LiFe: 2.6 V per cell
• LiHV: 3.2 V per cell
When a multi-cell battery is connected to the balancer connections, you can press the "INC." button during
the discharge cycle to display the individual cell voltages. Press the "ENTER/START" button to go back to
the home screen.
LP3s 0.4A 12.59V
DCH022: 43 00132
23
Page 24

12. NiMH and NiCd batteries
a) General information
The programs for NiMH and NiCd batteries have the same menu settings. The only difference is the internal charging
specications.
The charger must display the main menu.
Use the "INC." or "DEC." buttons to select the battery type (NiMH or NiCd, see
right-hand screenshots).
Press the "ENTER/START" button to conrm your selection.
Use the "INC." and "DEC." buttons to select the desired battery program:
• "CHARGE": Charge the battery
• "Auto CHARGE": Charge the battery, the charging current is selected
automatically
• "DISCHARGE": Discharge the battery
• "RE-PEAK": Recharge a full battery
• "CYCLE": Multiple charge/discharge or discharge/charge cycles
Press the "BATT./STOP" button to return to the main menu.
b) Charging a battery ("CHARGE")
The charging current depends on the battery capacity and should normally be 1C (see section 7). High-quality batter-
ies can also tolerate a charging current of up to 2C. Always refer to the battery specications.
"1C" means that the charging current is equivalent to the battery's capacity. For example, this equates to a
current of 3 A for a 3000 mAh NiMH battery.
A value of 0.5C means that the charging current is half of the battery's capacity. This equates to a charging
current of 1.5 A for a 3000 mAh NiMH battery.
In general, smaller batteries (individual cells) have a lower maximum charging current.
For example, conventional NiMH AA cells with a capacity of 2000 mAh do not permit a charging current
of 1C (equivalent to 2 A). To charge these types of cells quickly (e.g. In receiver batteries), the charging
current must not exceed 0.5C.
To charge a NiMH or NiCd battery, proceed as follows:
• From the main menu, use the "INC." and "DEC." buttons to select the battery type (NiMH or NiCd, see section 12a),
and then press the "ENTER/START" button.
• Use the "INC." and "DEC." buttons to select the "CHARGE" program.
The number on the bottom-right of the display indicates the selected charging current.
Use the "INC." and "DEC." buttons to select another battery program; press the "BATT./STOP" button to go
back to the main menu.
BATT/PROGRAM
NiMH BATT
BATT/PROGRAM
NiCd BATT
NiMH CHARGE
CURRENT 2.0A
NIMH CHARGE
CURRENT 2.0A
24
Page 25
• To change the charging current, press the "ENTER/START" button. The charging current will start to ash. Press the
"INC." and "DEC." buttons to change the current. Hold down the button to move through the values more quickly.
• Press the "ENTER/START" button to conrm the charging current.
The maximum possible charging current depends on the battery type, number of cells and the maximum
charging capacity of the charger.
• Hold down the "ENTER/START" button for approximately 3 seconds to start
the charging cycle.
The charger will check the specications of the connected battery.
If the settings are wrong, or if the charger detects a problem, the charger will beep and a message will be
shown on the display. Press the "BATT./STOP" button to silence the charger and go back to the previous
settings menu.
• The display shows the following data during the charging cycle:
The battery type is shown in the top-left of the display ("NiMH" = NiMH battery). The charging current is shown in the middle of the top line, and the
current battery voltage is shown in the top-right corner.
The current battery program is shown in the bottom-left of the display ("CHG" = "CHARGE"). The elapsed time
is shown in the middle of the bottom line, and the charged capacity (in mAh) is shown in the bottom-right corner.
• The charger beeps when charging is complete (provided that this feature has not been disabled).
To stop the charging cycle, press the "BATT./STOP" button.
BATTERY CHECK
................
NiMH 2.0A 7.42V
CHG 022:45 00690
c) Automatic charging mode ("Auto CHARGE")
In automatic mode, the charger checks the status of the battery (e.g. the internal resistance) and calculates the charging current accordingly. An upper limit
for the charging current must be set to avoid damaging the battery.
Depending on the battery and its internal resistance, the charging time for "Auto CHARGE" mode may be shorter than
"CHARGE" mode (see section 12. b).
Congure the settings in the same way as "CHARGE" mode (see section 12. b).
The only difference is that you do not need to select the actual charging current. You only need to set a limit
for the maximum charging current.
NIMH Auto CHARGE
CURRENT 5.0A
25
Page 26

d) Recharging a battery ("RE-PEAK)
When you charge a NiMh or NiCd battery, the charger stops charging automatically when the battery is fully charged.
The charger uses Delta-V control to detect when the battery is fully charged.
The "RE-PEAK" program detects the voltage of the battery several times to verify that the battery is fully charged and
check how well the battery can handle quick charge mode.
Ensure that the battery is fully charged (see sections 12. b) and 12. c) before starting the "RE-PEAK" program.
Follow the steps below:
• Select the battery type (NiMH or NiCd, see section 12. a), and then select
the "RE-PEAK" program.
The value on the bottom-right of the display indicates the number of detection cycles.
Use the "INC." and "DEC." buttons to select another battery program; press the "BATT./STOP" button to go
back to the main menu.
• To change the number of detection cycles for the Delta-V control, press the "ENTER/START" button. The number
will ash on the display.
• Use the "INC." or "DEC." buttons to change the number.
• Press the "ENTER/START" button to conrm the setting. The number will stop ashing.
• To start the "RE-PEAK" program, press and hold the "ENTER/START" but-
ton for 3 seconds.
The charger will check the specications of the connected battery.
If the settings are wrong, or if the charger detects a problem, the charger will beep and a message will be
shown on the display. Press the "BATT./STOP" button to silence the charger and go back to the previous
settings menu.
The display shows the following data during the charging cycle:
The battery type is shown in the top-left of the display ("NiMH" = NiMH battery). The charging current is shown in the middle of the top line, and the
current battery voltage is shown in the top-right corner.
The current battery program is shown in the bottom-left of the display ("RPC" = "RE-PEAK"). The elapsed time
is shown in the middle of the bottom line, and the charged capacity (in mAh) is shown in the bottom-right corner.
• The charger beeps when charging is complete (provided that this feature has not been disabled).
To stop the charging cycle, press the "BATT./STOP" button.
NiMH RE-PEAK
2
BATTERY CHECK
................
NiMH 2.0A 9.59V
RPC 000:33 00017
26
Page 27

e) Discharging a battery ("DISCHARGE")
Use this mode to discharge partly-charged NiMH/NiCd batteries to a preset level. Special NiCd batteries should not
be charged when they are partly-charged, as this can reduce their capacity (memory effect).
This program can also be used to measure a battery's capacity.
The maximum possible discharge current depends on the battery type, battery capacity and number of
cells. The charger has a maximum discharge capacity of 5 W. This limits the maximum possible discharge
current for batteries with more than one cell.
To discharge a NiMH or NiCd battery, proceed as follows:
• Select the battery type (NiMH or NiCd, see section 12a), and then select the
"DISCHARGE" program.
The selected battery type is shown on the top-left of the display next to the
battery program. The selected discharge current is shown in the bottom-left
corner, and the bottom-right corner displays the power-off voltage.
Use the "INC." and "DEC." buttons to select another battery program; press the "BATT./STOP" button to go
back to the main menu.
• To change the discharge current and shut-off voltage, press the "ENTER/START" button. The discharge current
will ash on the display.
• Press the "INC." and "DEC." buttons to change the discharge current. Hold down the button to move through the
values more quickly.
• Press the "ENTER/START" button. The power-off voltage will ash on the display.
• Press the "INC." and "DEC." buttons to change the setting. Hold down the button to move through the values more
quickly.
• Press the "ENTER/START" button to conrm the setting. The number will stop ashing.
If necessary, follow the steps above to change the discharge current/power-off voltage again.
• Hold down the "ENTER/START" button for approximately 3 seconds to start the discharge cycle.
If the settings are wrong, or if the charger detects a problem, the charger will beep and a message will be
shown on the display. Press the "BATT./STOP" button to silence the charger and go back to the previous
settings menu.
The display shows the following data during the discharge cycle:
The battery type is shown in the top-left of the display ("NiMH" = NiMH battery). The discharge current is shown in the middle of the top line, and the
current battery voltage is shown in the top-right corner.
The current battery program is shown in the bottom-left of the display ("DCH" = "DISCHARGE"). The elapsed time
is shown in the middle of the bottom line, and the discharged capacity (in mAh) is shown in the bottom-right corner.
• The charger beeps when the discharge cycle is complete (provided that this feature has not been disabled).
To stop the discharge cycle, press the "BATT./STOP" button.
NIMH DISCHARGE
0.1A CUT: 6.0V
NiMH 0.5A 7.42V
DCH 022:45 00180
27
Page 28
f) Cycle program ("CYCLE")
The charger can automatically complete up to 5 cycles to test batteries, charge new batteries and refresh old batteries. You can choose between charge/discharge ("CHG>DCHG") and discharge/charge ("DCHG>CHG").
This mode uses the charging/discharge current that you congured in charge ("CHARGE") and discharge
("DISCHARGE") mode.
Follow the steps below:
• Select the battery type (NiMH or NiCd, see section 12. a), and then select
the "CYCLE" program.
The battery type is shown in top-left corner of the display, next to the battery program.
The bottom-left corner displays the selected combination (charge/discharge, "CHG>DCHG" or discharge/charge,
"DCHG>CHG"). The number of cells is displayed in the bottom-right corner.
Use the "INC." and "DEC." buttons to select another battery program; press the "BATT./STOP" button to go
back to the main menu.
• To select another cycle mode or change the number of cycles, press the "ENTER/START" button.
"CHG>DCHG"/"DCHG>CHG" will ash on the display.
• Use the "INC." and "DEC." buttons to select the desired order:
"CHG> DCHG" = Charge + discharge
"DCHG> CHG" = Discharge + charge
• Press the "ENTER/START" button. The number of cycles will ash on the display (the number of cycles indicates
how many times the charger will complete the selected cycle).
• Use the "INC." and "DEC." buttons to set the number of cycles (1 - 5).
• Press the "ENTER/START" button to conrm the setting. The number will stop ashing.
• Hold down the "ENTER/START" button for approximately 3 seconds to start the cycle.
If the settings are wrong, or if the charger detects a problem, the charger will beep and a message will be
shown on the display. Press the "BATT./STOP" button to silence the charger and go back to the previous
settings menu.
The display shows the following data during the charge/discharge cycle:
The battery type is shown in the top-left of the display ("NiMH" = NiMH battery). The charging/discharge current is shown in the middle of the top line,
and the current battery voltage is shown in the top-right corner.
The selected cycle is shown in the bottom-left corner of the display ("C>D" = charge/discharge, "D>C" = discharge
charge). The elapsed charge/discharge time is shown in the middle of the bottom line, next to the charged/
discharged capacity (in mAh).
• The charger beeps when the cycle is complete (provided that this feature has not been disabled).
To stop the cycle, press the "BATT./STOP" button.
NIMH CYCLE
DCHG>CHG 1
NiMH 2.0A 7.42V
C>D 022:45 00890
28
Page 29

13. Lead-acid batteries (Pb)
a) General information
Lead acid batteries are completely different to lithium, NiMH or NiCd batteries. Despite their high capacity, they only
deliver a low current. The charging specications are also different.
The charging current for modern lead-acid batteries must not exceed 0.4C. The optimal charging current is 1/10C.
A higher charging current must not be used, as this can overload the battery and cause a re or explosion.
In addition, the acids in the battery may cause an injury.
Always observe the specications printed on the battery and the manufacturer's specications regarding
The charger must display the main menu.
Use the "INC." or "DEC." buttons to select the battery type ("Pb BATT", see
right-hand screenshot).
Press the "ENTER/START" button to conrm your selection.
Use the "INC." and "DEC." buttons to select the desired battery program:
• "CHARGE": Charge the battery
• "DISCHARGE": Discharge the battery
b) Charging a battery ("CHARGE")
The charging current depends on the battery capacity and should normally be 0.1C (see section 7). High-quality lead-
acid batteries can also tolerate a charging current of up to 0.4C. Always refer to the battery specications.
To charge a lead-acid battery, proceed as follows:
• From the main menu, use the "INC." and "DEC." buttons to select the battery type ("Pb BATT", see section 13. a),
• Use the "INC." and "DEC." buttons to select the "CHARGE" program.
the charging current.
BATT/PROGRAM
Pb BATT
Pb CHARGE
2.0A 12.0V(6P)
"0.1C" means that the charging current is equivalent to 1/10 of the battery's capacity. This equates to a
charging current of 0.5 A for a 5000 mAh (= 5 Ah) lead-acid battery.
and then press the "ENTER/START" button.
The battery type is shown in top-left corner of the display, next to the battery program.
The selected charging current is displayed in the bottom-left corner. The voltage/number of cells is shown in the
bottom-right corner (in this example, a 6-cell lead-acid battery (6 x 2.0 V = 12.0 V)).
Use the "INC." and "DEC." buttons to select another battery program; press the "BATT./STOP" button to go
back to the main menu.
Pb CHARGE
2.0A 12.0V(6P)
29
Page 30

• To change the charging current, press the "ENTER/START" button. The charging current will start to ash. Press the
"INC." and "DEC." buttons to change the current. Hold down the button to move through the values more quickly.
• Press the "ENTER/START" button to conrm the charging current.
The maximum possible charging current depends on the number of cells and the maximum charging
power.
• Hold down the "ENTER/START" button for approximately 3 seconds to start the charging cycle.
If the settings are wrong, or if the charger detects a problem, the charger will beep and a message will be
shown on the display. Press the "BATT./STOP" button to silence the charger and go back to the previous
settings menu.
The display shows the following data during the charging cycle:
The battery type is shown in the top-left of the display ("P" = lead-acid battery). The charging current is shown in the middle of the top line, and the
current battery voltage is shown in the top-right corner.
The current battery program is shown in the bottom-left of the display ("CHG" = "CHARGE"). The elapsed time
is shown in the middle of the bottom line, and the charged capacity (in mAh) is shown in the bottom-right corner.
• The charger beeps when charging is complete (provided that this feature has not been disabled).
To stop the charging cycle, press the "BATT./STOP" button.
P-6 3.0A 12.59V
CHG 022:45 00980
c) Discharging a battery ("DISCHARGE")
Use this mode to discharge partly-charged lead-acid batteries to a preset level.
This program can also be used to measure a battery's capacity.
The maximum possible discharge current depends on the battery type, battery capacity and number of
cells. The charger has a maximum discharge capacity of 5 W. This limits the maximum possible discharge
current for batteries with more than one cell.
To discharge a lead-acid battery, proceed as follows:
• From the main menu, use the "INC." and "DEC." buttons to select the battery type ("Pb BATT", see section 13. a),
and then press the "ENTER/START" button.
• Use the "INC." and "DEC." buttons to select the "DISCHARGE" program.
The battery type is shown in top-left corner of the display, next to the battery program.
The selected discharge current is displayed in the bottom-left corner. The voltage/number of cells is shown in the
bottom-right corner (in this example, a 6-cell lead-acid battery (6 x 2.0 V = 12.0 V)).
Use the "INC." and "DEC." buttons to select another battery program; press the "BATT./STOP" button to go
back to the main menu.
Pb DISCHARGE
0.1A 12.0V(6P)
30
Page 31

• To change the discharge current, press the "ENTER/START" button. The discharge current will start to ash. Press
the "INC." and "DEC." buttons to change the current. Hold down the button to move through the values more quickly.
• Press the "ENTER/START" button to conrm the discharge current.
• Hold down the "ENTER/START" button for approximately 3 seconds to start the discharge cycle.
If the settings are wrong, or if the charger detects a problem, the charger will beep and a message will be
shown on the display. Press the "BATT./STOP" button to silence the charger and go back to the previous
settings menu.
The display shows the following data during the discharge cycle:
The battery type is shown in the top-left of the display ("P" = lead-acid battery). The discharge current is shown in the middle of the top line, and the
current battery voltage is shown in the top-right corner.
The current battery program is shown in the bottom-left of the display ("DCH" = "DICCHARGE"). The elapsed time
is shown in the middle of the bottom line, and the discharged capacity (in mAh) is shown in the bottom-right corner.
• The charger beeps when the discharge cycle is complete (provided that this feature has not been disabled).
To stop the discharge cycle, press the "BATT./STOP" button.
P-6 0.4A 12.59V
DCH 022:45 00132
14. DJI Mavic batteries
This feature is designed to charge DJI Mavic batteries. It is similar to the specications used for charging LiHV batteries. A suitable charging cable is required to connect the battery (not included).
The charger must display the main menu.
Use the "INC." or "DEC." buttons to select the battery type ("DJI Mavic BATT",
see right-hand screenshot).
See section 11 for more information on the available battery programs.
After you have connected the battery and enabled the battery pro-
gram, switch on the battery when "TURN ON BATTERY BEFORE
CHARGING" is displayed.
BATT/PROGRAM
DJI Mavic BATT
Li3S CHARGE
TURN ON BATTERY
Li3S CHARGE
BEFORE CHARGING
31
Page 32

15. Saving/loading battery data
The charger has 10 memory slots that you can use to save frequently used settings. For example, you can save the
charging specications for different LiPo model aeroplane batteries (number of cells, charging settings, charging current) so that you do not need to reset them each time.
a) Saving battery data
• From the main menu, use the "INC." or "DEC." buttons to select "BATT
MEMORY".
• Press the "ENTER/START" button to conrm your selection. The memory
slot will ash on the display.
• Use the "INC." and "DEC." buttons to select one of the 10 memory slots.
If the memory slot already contains battery data, the display will
show the battery type and number of cells as well the charging and
discharge current.
If the memory slot is empty, "ENTER SET ->" will be displayed.
• Press the "ENTER/START" button to conrm your selection. The battery
type will be displayed (see right-hand picture).
• Use the "INC." or "DEC." buttons to select the desired setting (e.g. battery
type, number of cells, charging current). A description of the various settings
is provided on the following pages.
To exit settings mode (the previous settings will not be saved), keep pressing the "BATT./STOP" button until
the main menu is displayed.
• To change a setting, press the "ENTER/START" button. The corresponding setting will ash on the display.
• Press the "INC." and "DEC." buttons to change the setting. Hold down the button to move through the values more
quickly.
• Press the "ENTER/START" button to conrm the setting. The congured setting will stop ashing. To congure
another setting, repeat the steps above.
• To save the settings to the selected memory slot, use the "INC." or "DEC."
buttons to select "SAVE PROGRAM", and then press the "ENTER/START"
button.
If you do not select "SAVE PROGRAM", the settings will not be saved!
• The display will revert to the screen with the ashing memory slot. You can now program another memory slot.
To exit programming mode, press the "BATT./STOP" button. The charger will revert to the main menu.
BATT/PROGRAM
BATT MEMORY
[ BATT MEMORY 1]
ENTER SET->
BATT TYPE
LiPo
SAVE PROGRAM
ENTER
32
Page 33

The following settings are available:
The available settings depend on the selected battery type (LiPo, Li-on, LiFe, LiHV, NiMH, NiCd, Pb). For
example, you can only congure the end charging voltage per cell for lithium batteries.
Select the battery type rst, and then congure the other settings to ensure that the charger displays the
Battery type
correct settings options.
BATT TYPE
LiPo
Select the battery type ("LiPo", "LiIo", "LiFe", "LiHV", "NiMH", "NiCd" or "Pb").
As stated above, the battery type must be selected rst to ensure that the charger displays the correct
settings options.
Battery voltage
BATT VOLTAGE
7.4V(2S)
This setting allows you to congure the battery voltage for the selected battery type.
The available voltage settings depend on the rated voltage of an individual cell (see section 7).
For example, if the rated voltage of a cell in a LiPo battery is 3.7 V, the voltage can only be adjusted in
Charging current
increments of 3.7 V (3.7 V, 7.4 V, 11.1 V etc.).
CHARGE CURRENT
2.0A
Congure the desired charging current. This must be selected according to the battery type.
The charging capacity of the charger (max. 60 W) limits the maximum possible charging current (see sec-
tion 9d).
Discharge current
DISCHG CURRENT
1.0A
Congure the desired discharge current. This must be selected according to the battery type.
The discharge capacity of the charger (max. 5 W) limits the maximum possible discharge current (see
section 9d).
33
Page 34

Discharge voltage per cell at the end of the discharge cycle
DISCHG VOLTAGE
3.0V/CELL
Use this setting to congure the voltage per cell at the end of the discharge cycle.
Important!
Never select a voltage that is too low. This can cause lithium batteries to overdischarge and result in per-
Refer to the table in section 7 or the manufacturer's specications.
End-of-charge voltage per cell
manent damage to the battery.
TVC=YOUR RISK!
4.20V
Use this setting to congure the voltage per cell for lithium batteries at the end of the charging cycle.
Important!
Never select a voltage that is too high. In the case of lithium batteries, the battery may explode or cause a
Refer to the table in section 7 or the manufacturer's specications.
Over-temperature protection
re!
TEMPERATURE
CUT-OFF 50C
The charger can be set to automatically stop the charging/discharge cycle when the battery exceeds a preset temperature.
An external temperature sensor is required to use this feature (not included). This must be connected to the
corresponding socket on the charger.
Trickle charge current (only for NiMH and NiCd batteries)
TRICKLE
100mA
Use this feature to set the trickle charge current. When a NiMH or NiCd battery is fully charged, it loses some of its
capacity due to self-discharge. The trickle charge feature (short charge impulses, the charger does not deliver a
continuous current!) ensures that the battery stays fully charged and prevents crystals from forming inside the battery.
34
Page 35
Delay time for delta-V detection (only for NiMH and NiCd batteries)
PEAK DELAY
1Min
The charger stops the charging cycle for NiMH and NiCd batteries using Delta-V control.
Use this setting to congure how long the charger should continue charging after the Delta-V detection.
Save the settings
SAVE PROGRAM
ENTER
See the next section (section 15. b) for details.
b) Saving battery data
To save the settings, select "SAVE PROGRAM", and then press the "ENTER/
START" button, otherwise the settings will be deleted.
The charger will display a message ("SAVE...") and beep to indicate that the
settings have been saved.
SAVE PROGRAM
ENTER
SAVE PROGRAM
SAVE....
When you select "BATT MEMORY" mode from the main menu followed by a
precongured memory slot, the charger will display the most important data
(see right-hand screenshot).
This gives you an overview of which data is stored in the memory.
If the memory slot is empty, "ENTER SET ->" will be displayed.
[ BATT MEMORY 1]
LiPo 7.4V(2S)
[ BATT MEMORY 1]
C:2.0A D:1.0A
35
Page 36

c) Loading battery data
• From the main menu, use the "INC." or "DEC." buttons to select "BATT
MEMORY".
• Press the "ENTER/START" button to conrm your selection. The memory
slot will ash on the display.
• Use the "INC." and "DEC." buttons to select one of the 10 memory slots.
If the memory slot already contains battery data, the display will
show the battery type and number of cells as well the charging and
discharge current.
If the memory slot is empty, "ENTER SET ->" will be displayed.
• To load the battery data in a memory slot, press and hold the "ENTER/
START" button until the charger beeps and the corresponding battery program is shown on the display.
When you press the "ENTER/START" button for an empty memory slot, the charger enables selection/
settings mode (see section 15a).
BATT/PROGRAM
BATT MEMORY
[ BATT MEMORY 1]
LiPo 7.4V(2S)
[ BATT MEMORY 2]
ENTER SET->
ENTER CHARGE
LOAD....
36
Page 37

16. Displaying the voltage for lithium batteries
The charger can display the voltages of cells in a lithium battery (LiPo, Li-ion, LiFe, LiHV).
To display the cell voltages, the lithium battery must have a balancer connection that is connected to the
corresponding socket on the charger.
Follow the steps below:
• From the main menu, use the "INC." or "DEC." buttons to select "BATT
METER".
• Press the "ENTER/START" button to conrm your selection.
The voltage will be displayed.
• Press the "INC." or "DEC." buttons to switch between the individual cell voltages/total voltage and the maximum/minimum cell voltage.
The number of cell voltages displayed depends on the number of battery
cells. The right-hand screenshot may indicate a 3-cell LiPo battery (or a
multi-cell LiPo battery with defective cells/defective balancer sockets).
After you press the "INC."/"DEC." button to switch to voltage display mode,
the total voltage of the connected battery pack will be displayed on the top
line.
The maximum cell voltage ("H") will be displayed in the bottom-left corner.
The minimum cell voltage ("L") will be displayed in the bottom-right corner.
This enables you to view the difference in voltage between the cells.
Press the "BATT./STOP" button to return to the main menu.
BATT/PROGRAM
BATT METER
4.19 4.15 4.18 V
0.00 0.00 0.00 V
MAIN: 12.52V
H4.190V L4.150V
37
Page 38

17. Measuring the internal resistance
The charger can display the internal resistance of the connected battery.
When a lithium battery is connected, the charger can also display the internal resistance of each cell, provided that
the battery has a balancer terminal that is connected to the charger.
Follow the steps below:
• From the main menu, use the "INC." or "DEC." buttons to select "BATT
RESISTANCE".
• Press the "ENTER/START" button to conrm your selection.
• The charger will measure the internal resistance of the connected battery.
• The internal resistance will appear on the display after a few seconds.
• If a lithium battery with a balancer terminal is connected to the battery,
"Total" will appear on the display rather than "Main". To view the internal
resistance of the individual cells, press the "INC." or "DEC." buttons.
• The right-hand picture indicates a 4-cell lithium battery ("0" appears when
no cells are detected).
• To measure the internal resistance of another battery, press the "BATT./
STOP" button to exit measuring mode and return to the main menu, and
then repeat the above steps.
If the internal resistance of the connected battery is too high, the measuring function will not work and no
measurements will be displayed. This may occur with old or defective batteries or excessive contact resistances in the battery connector.
BATT/PROGRAM
BATT RESISTANCE
Main: 86m
Total: 76m
19 20 17 m
20 0 0 m
18. Connecting the charger to a PC
The USB connection cable and Windows software is not included with the product and is available sepa-
rately.
For instructions on how to use the software, refer to the information on the software CD or the help feature.
38
Page 39
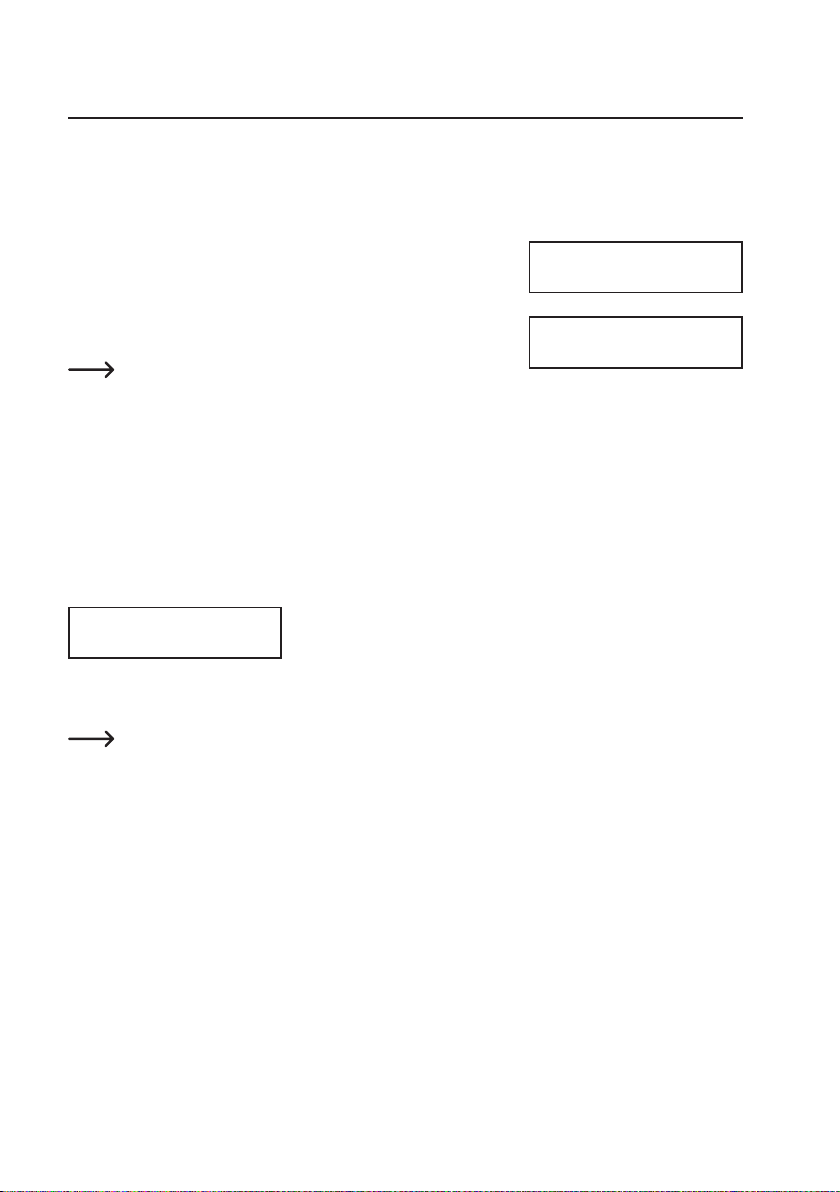
19. System settings
The system settings cover a range of basic settings for the charger. By default, these settings are set to the most
frequently used values.
You may need to change the settings depending on the batteries that you wish to charge/discharge.
Follow the steps below:
• From the main menu, use the "INC." or "DEC." buttons to select "SYSTEM
SETTING ->".
• Press the "ENTER/START" button to conrm your selection.
The feature for monitoring the input voltage will be displayed rst (see right-
hand picture).
Use the "INC." or "DEC." buttons to select the desired setting.
To change a setting, press the "ENTER/START" button. The corresponding setting will ash on the display.
Press the "INC." and "DEC." buttons to change the setting. Hold down the button to move through the
values more quickly.
Press the "ENTER/START" button to exit the settings. The selected setting will stop ashing. To congure
another setting, repeat the above steps.
Press the "BATT./STOP" button to return to the main menu.
The following section describes the different settings.
Input voltage monitoring
DC Input Low
Cut-Off 11.0V
This function monitors the voltage at the charger input. This is useful when a 12 V car lead-acid battery is used to
power the charger. If the voltage drops below the preset value, the charging cycle will stop to prevent the car battery
from overdischarging.
When using a mains adapter to power the charger, select a voltage that is lower than the voltage delivered
by the mains adapter. The charger cannot detect whether it is powered by a car lead-acid battery or a mains
adapter.
For example, if you use a mains adapter with an output voltage of 12 V/DC to power the charger, congure
a voltage of 11 V/DC in the charger settings. The charger will not charge if you select the same or a higher
voltage.
BATT/PROGRAM
SYSTEM SETTING->
DC Input Low
Cut-Off 11.0V
39
Page 40

Safety timer
Safety Timer
ON 120Min
The safety timer starts automatically when a charging cycle beings. If the charger cannot detect whether the battery is
fully charged (e.g. with Delta-V control), the charging cycle is stopped automatically after the preset time has elapsed.
This stops the battery from overcharging.
The safety timer can be switched on or off. You can also change the preset time.
Do not select a time that is too short, otherwise the battery will not charge fully before the time has elapsed.
Calculate the time for the safety timer as follows:
Example:
Battery capacity Charging current Time
2000 mAh 2.0 A 2000 / 2.0 = 1000 / 11.9 = 84 minutes
3300 mAh 3.0 A 3300 / 3.0 = 1100 / 11.9 = 92 minutes
1000 mAh 1.2 A 1000 / 1.2 = 833 / 11.9 = 70 minutes
Factor 11.9 is used to ensure that the battery can be charged to 140 % capacity before the preset time
elapses (i.e. guarantee that the battery will be fully charged).
Automatic power-off at a preset capacity
Capacity Cut-Off
ON 5000mAh
This feature stops the charging process when the battery has been charged by a certain amount (capacity).
This feature can be switched on or off. You can also congure the preset capacity.
Do not select a capacity that is too low, otherwise the battery will not be fully charged.
Enabling/disabling over-temperature protection and temperature limit
Temp Cut-Off
ON 50 C/122 F
The charger features a socket for a temperature sensor (not included, available separately).
When over-temperature protection is enabled ("ON"), the charger stops the charging/discharge cycle when the preset
temperature is reached.
Set the desired power-off temperature.
Disable over-temperature protection ("OFF") if no temperature sensor is connected.
40
Page 41
Setting the temperature unit
Temperature Unit
Celsius
The temperatures measured by the internal and external sensor can be displayed in Celsius (°C, degrees Celsius) or
Fahrenheit (°F, degrees Fahrenheit).
Displaying the battery and charger temperature
Ext.Temp: ---Int.Temp: 28 C
This feature displays the external battery temperature and the internal charger temperature.
The external temperature can only be displayed when an external temperature sensor is connected to the
charger (not included, available as an accessory).
Setting the pause duration between charge/discharge cycles
Rest Time
CHG>DCHG 10Min
The battery will warm up during the charging process (depending on the charging current). In cycle mode, you can set
the charger to pause between charging and discharging to allow the charger to cool down.
Setting the voltage for Delta-V detection (only for NiMH or NiCd batteries)
NiMH Sensitivity
D.Peak 4mV
The charger uses Delta-V control for NiMH and NiCd batteries to detect when the battery is fully charged. The voltage
setting can be changed (in mV per cell).
If the voltage setting is too high, the charger may not detect that the battery is fully charged. In this case, the
protective circuit for the charging time or maximum capacity is normally activated (if congured correctly).
If the voltage setting is too low, the charger will turn off before the battery is fully charged.
Change the voltage step-by-step and monitor the charging process. Due to the large variety of different
batteries, it is not possible to recommend an optimal setting.
NiCd Sensitivity
D.Peak 4mV
41
Page 42

Enabling/disabling button conrmation/notication tones
Key Beep ON
Buzzer ON
Use the "Key Beep" function to enable ("ON") or disable ("OFF") button conrmation tones.
Use the "Buzzer" function to enable ("ON") or disable ("OFF") notication/warning tones.
Displaying the rmware version
Version
HW:1.00 FW:2.00
The hardware version is displayed in the bottom-left of the display (1.00 in this example). The current rmware version
is displayed in the bottom-right corner (2.00 in this example).
Restoring factory settings
Load Factory Set
ENTER
This feature enables you to restore factory settings.
When the above screen is displayed, press and hold the "ENTER/START" button for 3 seconds. "COMPLETE" will
appear on the bottom line of the display. The charger will restart and load the main menu.
All previously congured settings will be restored to the factory defaults. The data in the 10 memory slots
(see section 15) will also be deleted.
42
Page 43

20. Warning messages on the display
REVERSE POLARITY
CONNECTION BREAK
CONNECT ERROR
CHECK MAIN PORT
BALANCE CONNECT
ERROR
DC IN TOO LOW
DC IN TOO HIGH
CELL ERROR
LOW VOLTAGE
CELL ERROR
HIGH VOLTAGE
CELL ERROR
VOLTAGE-INVALID
CELL NUMBER
INCORRECT
The polarity of the battery connections is incorrect.
The battery is not connected (e.g. the battery was disconnected during the
charging cycle).
The battery was connected in the reverse polarity.
The balancer terminal on the battery was not connected properly or was connected in the reverse polarity.
The input voltage (on the direct voltage input) for the charger is too low
(<11 V).
The input voltage (on the direct voltage input) for the charger is too high
(>18 V).
The voltage of one of the lithium battery cells is too low.
The voltage of one of the lithium battery cells is too high.
The voltage of one of the lithium battery cells cannot be measured.
The selected number of cells is incorrect.
INT.TEMP.TOO HI
EXT.TEMP.TOO HI
OVER CHARGE
CAPACITY LIMIT
OVER TIME LIMIT
BATTERY WAS FULL
The internal charger temperature is too high.
The temperature measured by the external temperature sensor (not included,
available separately) is too high.
The preset capacity limit (see section 19) was exceeded.
The preset time limit for the charging cycle (see section 19) was exceeded.
The connected battery is fully charged. If necessary, check the setting for the
number of cells.
43
Page 44
21. Charger status information
Press the "DEC." button repeatedly when the battery is charging/discharging to display a range of different information. The charger reverts to the home screen if no button is pressed for a few seconds.
Battery voltage at the end of the charge/discharge cycle
End Voltage
12.60V(3s)
Input voltage
IN Power Voltage
12.56V
Temperature measured by the external and internal temperature sensor
Ext.Temp: ---Int.Temp: 37 C
Temperature limit for over-temperature protection
Temp Cut-Off
50 C/122 F
Safety timer duration
SAFETY TIMER
ON 200Min
Battery capacity for power-off safety feature
Capacity Cut-Off
ON 5000mAh
44
Page 45

22. Care and cleaning
This product does not require any maintenance. Never attempt to dismantle the charger. Maintenance and repair work
must be completed by a technician or a specialist repair centre.
If there is a battery connected, remove it before cleaning the charger.
After removing the battery, disconnect the charger from the power supply.
Never use aggressive detergents, rubbing alcohol or other chemical solutions, as these may damage the housing or
cause the product to malfunction.
Use a dry, lint-free cloth to clean the product.
Dust can be removed using a clean, soft brush and a vacuum cleaner.
23. Disposal
a) Product
Electronic devices are recyclable waste and must not be placed in household waste. At the end of its
service life, dispose of the product according to the relevant statutory regulations.
b) Batteries
You are required by law to return all used batteries (Battery Directive). They must not be placed in household waste.
Batteries containing harmful chemicals are labelled with this symbol to indicate that disposal in household
waste is forbidden. The abbreviations for heavy metals in batteries are: Cd = Cadmium, Hg = Mercury,
Pb = Lead (indicated on the battery, e.g. below the trash icon on the left).
Used batteries can be returned to local collection points, our stores or battery retailers.
You thus full your statutory obligations and contribute to the protection of the environment.
45
Page 46

24. Technical data
Operating voltage ....................................... 11 - 18 V/DC
Charging/discharge channels ...................... 1
Charging current .......................................... 0.1 - 6.0 A (depending on the number of cells and the battery type)
Charging power ........................................... Max. 60 W
Discharge current ........................................ 0.1 - 2.0 A (depending on the number of cells and the battery type)
Discharge power .......................................... Max. 5 W
Compatible recharge batteries .................... NiMH/NiCd, 1 - 15 cells
LiPo/Li-ion/LiFe/LiHV, 1 - 6 cells
Pb, 1 - 10 cells (2 - 20 V rated voltage)
Balancer discharge current .......................... 200 mA per cell
Delta-V detection ......................................... Yes (for NiMH/NiCd batteries, adjustable)
Trickle charging current ............................... Yes (for NiMH/NiCd batteries, adjustable, can be switched off)
Safety timer ................................................. Yes (can be disabled)
Memory slots ............................................... 10
Integrated fan .............................................. Yes
Ambient conditions ...................................... Temperature 0 °C to 40 °C; Relative air humidity 0% to 90 % (non-
Weight ......................................................... Approx. 170 g
Dimensions .................................................. 103 x 80 x 34 mm (W x D x H)
condensing)
46
Page 47

47
Page 48

This is a publication by Conrad Electronic SE, Klaus-Conrad-Str. 1, D-92240 Hirschau (www.conrad.com).
All rights including translation reserved. Reproduction by any method, e.g. photocopy, microlming, or the capture in
electronic data processing systems require the prior written approval by the editor. Reprinting, also in part, is prohibited.
This publication represent the technical status at the time of printing.
Copyright 2019 by Conrad Electronic SE.
1597950_V3_0119_02_VTP_m_en
 Loading...