

Page 1
THE CAMPER CONVERSION MANUAL
1-1-3. A van with high mileage but lots of regular
maintenance and a full service history will generally
be more desirable than one that shows a lower
mileage but which has been knocked about and not
properly maintained.
carry out the conversion to a camper for us.
After all, Leisuredrive had converted our
previous VW Camper and six years of use
had seen nothing break, come loose or fall
off! And that’s where this book began.
There was once an advert for razors
where some smug-looking feller held up
a razor to the camera and said something
like, “I tried this razor and liked it so much,
I bought the company.” Well, I’m fortunate
enough to test drive quite a few vehicles in
the course of my work as a motoring writer
and I can honestly say, “I test drove the van
and liked it so much, I bought one!” Not as
spectacular a claim, perhaps – but at least
it’s true ...
SECTION 1. MODEL TYPES
Ninety-six models – which is right
for you?
A VW press release of 2006 posed the
above question of the T5 Transporter
– and it wasn’t even including the Caravelle
MPV range! However, it’s not as daunting
a choice as you might think and, buying
second-hand, you won’t have the detailed
choice that the new vehicle buyer enjoys.
However, there are several major categories
of Transporter available at the time of writing
and you’ll need to know which version you
want before you start looking because their
detail characteristics are quite different.
All the engines are powerful and
economical TDI engines and feature
Volkswagen’s ‘Pumpe Duese’ (PD) unitinjector technology. Other main features
include: long service and maintenance
intervals; independent suspension on all four
wheels and agile handling; superb, slick gear
change; ergonomic cab design with car-like
qualities and comfort levels.
Gross vehicle weights, at time of
launch, ranged from the T26 (2.6 tonne);
T28 (2.8 tonne); T30 (3.0 tonne) to T32
(3.2 tonne). The vehicle we chose is a T28,
to provide 200kg more carrying capacity
than the base vehicle, plus, we assumed,
more resilient suspension for a vehicle
carrying the kitchen sink around with it the
whole time but at very little extra cost.
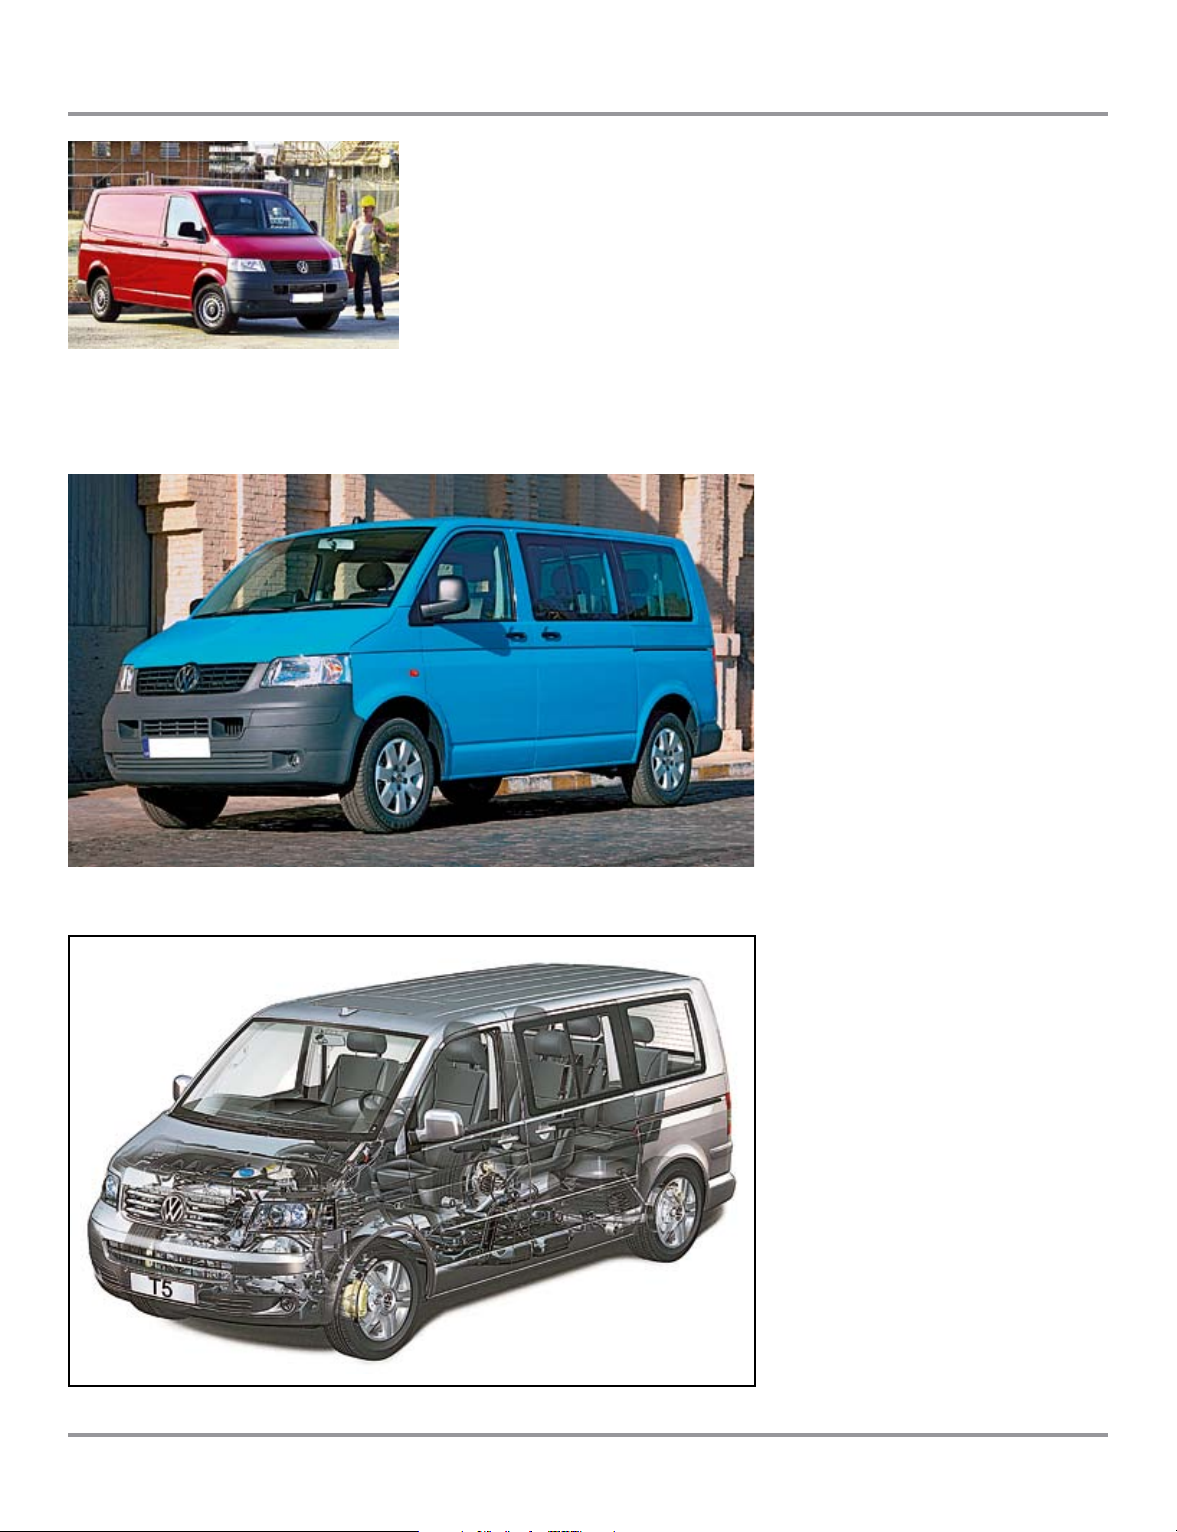
1-1-4. The window van which has windows behind the cab but not at the very rear could be a good basis for
a conversion, but this is the Shuttle which has a sliding door on each side that makes it unsuitable.
All have:
• two wheelbases: 3m or 3.4m.
• three roof heights (only one for the
Shuttle).
VW’s designated model types are currently:
• The Transporter Panel Van.
• four gross vehicle weights.
• load compartment volumes of 5.8m3 to
3
9.3m
• seating for 3
The Transporter Kombi
• designed to carry up to 6 people in
comfort, and a sizeable load at the same
time.
• two gross vehicle weights.
• payloads of 1200kg or 1400kg.
• a range of door and window options.
• rubber flooring in load compartment.
The Transporter Window Van
• Volkswagen’s heavy duty answer to
passenger-carrying for up to nine people.
• range of seating up to nine, arranged in up
to three rows.
• a range of door and window options.
• tough rubber flooring.
• suitable base for conversions.
1-1-5. This cutaway of the Caravelle’s internal components gives a good idea of the vehicle’s structure.
14
Page 2
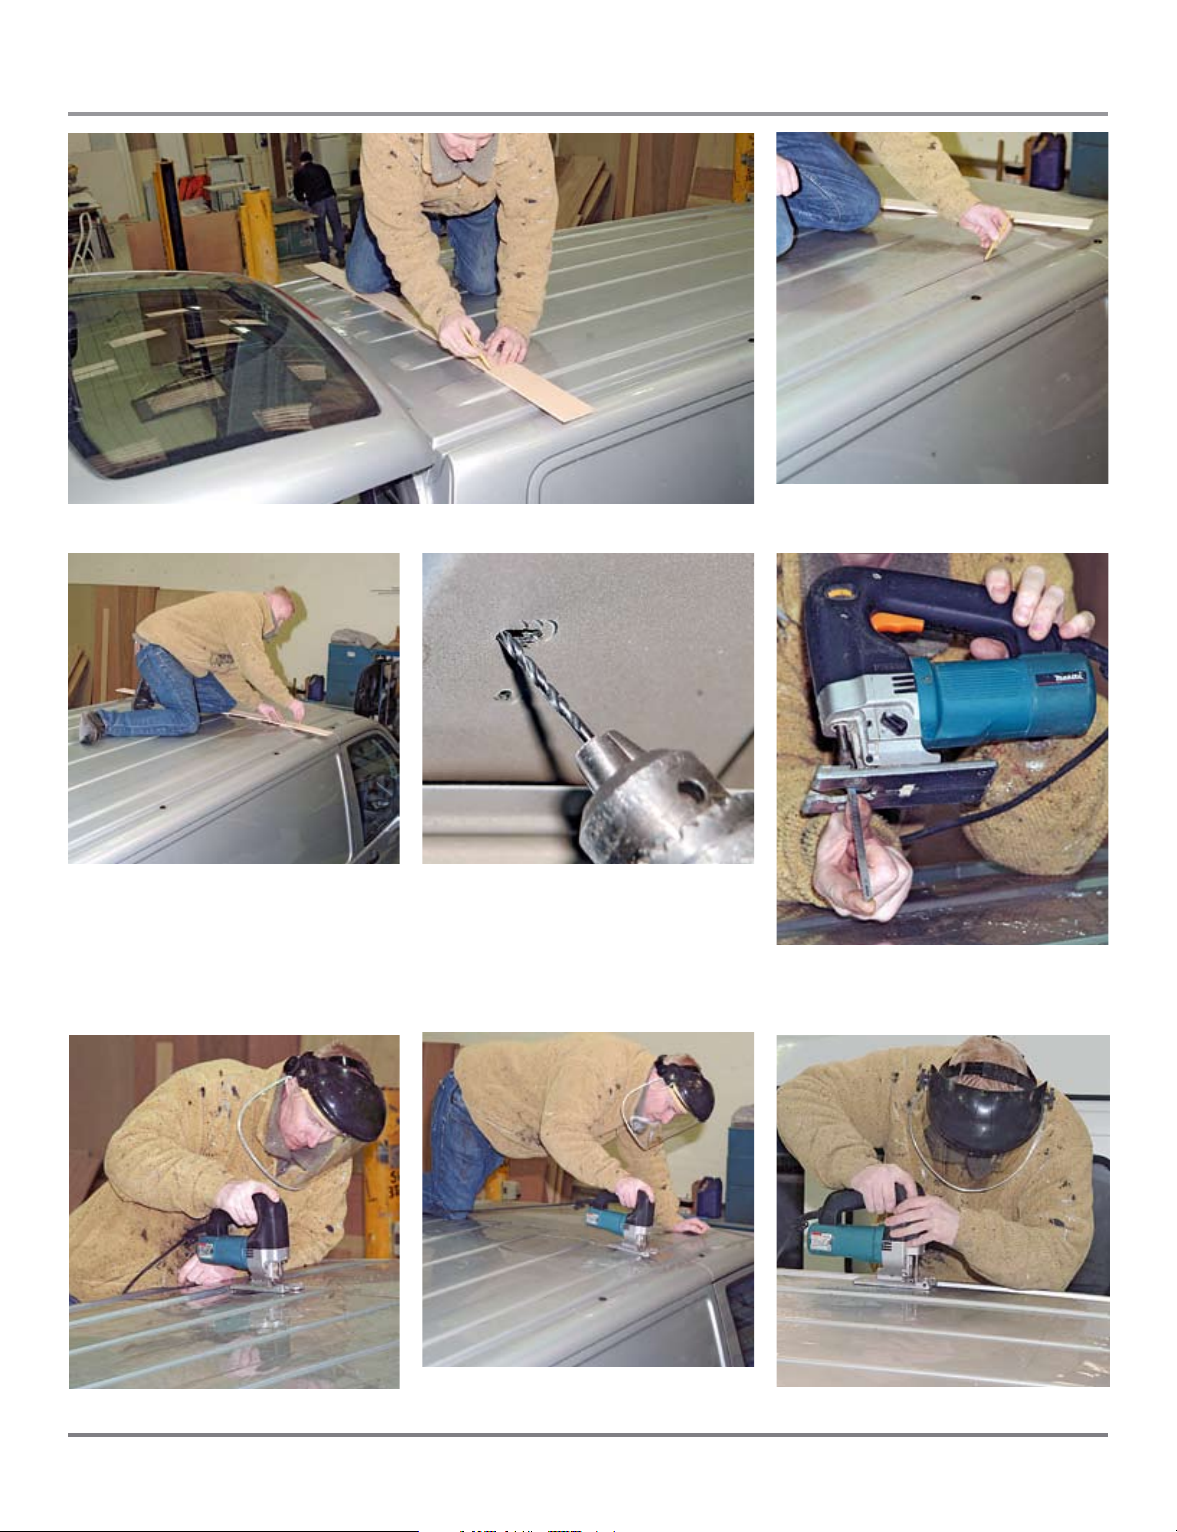
EXTERIOR STRUCTURAL WORK
2-5-A12. Those cut lines are now connected up, across the back of the roof …
2-5-A13. … following this rib down the length of
the roof …
2-5-A14. … and across the front, just behind the
front door. Anyone carrying out this work for the
first time will need to refer to the Reimo fitting
instructions and the dimensions of the reinforcing
sections supplied, as well as noting the variations
that Barry built into this particular job as shown later
in this chapter.
2-5-A17. Barry started at the front …
2-5-A15. Barry used his drill to make a series of
holes which he then linked together by pushing
sideways carefully on the drill (if you’re not careful
the drill will break!). Note that in this instance,
where he needed to begin cutting through a double-
sided panel, a slot needed to be made in both
sections.
2-5-A18. … and cut straight across to the other
side. 2-5-A19. He cut down the length towards the back …
2-5-A16. Barry pointed out that the jigsaw blade
he used had to be long enough to cut through the
widest box section.
49
Page 3

THE CAMPER CONVERSION MANUAL
Leakage Circuit Breaker), 15 amp main
switch and double-pole, 13 amp MCB
(Miniature Circuit Breakers) to protect the
mains electrical circuits in your vehicle.
“The charger-and-voltage transformer
unit provides the link between the mains
and the 12 volt system. It is fed from the
230 volt Consumer Unit, which is normally
fitted in the base of the wardrobe or bedbox
and which must be earthed to the chassis to
provide the correct protection.
“The 12 volt system is the heart of the
vehicle’s conversion. The connections for
the vehicles existing battery, the one it uses
for starting the engine, will be referred to as
‘AUTO’ or ‘B1’ on the control panel. It is
best not to connect any ‘caravan’ items to
this battery because if you drain it, you will
be unable to start your engine.
“You must install a second battery
which will be referred to as ‘LEISURE’ or
‘B2’ on the control panel. This can be one
battery of between 75 and 110 A/hr or for
bigger electrical needs, a pair of 110 A/hr
batteries in parallel, which means connecting
positive terminal to positive terminal and
negative to negative. By joining them this
way you double up the batteries’ capacity
(such as 2 x 110 A/hr) but retain the voltage
at 12 volts. (If you join them in series
positive to negative you will get 24 volts!).
“You will “split charge” your leisure
battery by connecting a relay (R228)
between B1-and-B2 and the relay signal
wire to the D+ terminal on your alternator.
When the engine is started and the alternator
is charging, both the vehicle battery (B1)
and the leisure (B2) battery will be charged
up via the relay but the vehicle battery will
not be drawn down for appliances in the
caravan-section of the vehicle.
“The main 12 volt system needs to
be monitored and controlled from a control
panel and distribution system (C860, PC100
or PC200). The system has control switches
and built-in circuit protection fuses to protect
key equipment. All items and their cable
runs must be fused to the correct rating.
Additional fused circuits can be provided
using the blade fuse holders (BFH4, 6, 8
and R420/421). This system also has a
charger to charge the leisure battery from the
mains 240v connection – see above.
“To ensure the auto battery remains
topped up when stationary for long periods
or when using cab fitted equipment such
as radio, DVD player or Sat. Nav. unit, use
a CAK Battery Charge Manager (BCM12)
which trickle charges excess charge from the
leisure battery back to the auto battery when
the leisure battery is being charged. For ‘wild
camping’ the most effective way maintain
charge in your batteries is by fitting a solar
panel on your roof.”
4-5-2. This is the kit of parts supplied by CAK Tanks. On the left is the Consumer Unit seen earlier; in the
centre, the Control System and on the right a CBE battery charger, especially designed for lead-acid and
gel-type leisure batteries. The beauty of the CBE system is that it is microprocessor based and electrically
integrated – the supplied cables with ready-fitted plugs on their ends providing simple connections between
the units and saving a lot of an electrician’s time and expertise. Better still, the system is integrated with the
water level gauge which is also simply plugged in.
4-5-3. This is one of the units made by Zig Electronics Ltd. which manufactures a well established range of
electricity units for all types of caravan and motor caravan. This is the CF8 battery charging and distribution
system. The charger is built-in and can certainly become rather warm – though not dangerously so, we are
assured – at the back of the cupboard where it is fitted. Zig recommends that the inside of the cupboard
to which the unit is fitted must allow a free space of at least 25mm all the way around the unit, and that
includes a space from the back of the unit to any cover that may be fitted.
126
Page 4

THE CAMPER CONVERSION MANUAL
6-5-12. He used the tyre fitting machine to push the
tyre down sufficiently to insert one half of the Tyron
band, ensuring that it was the correct way up, as
described in the excellent instructions.
6-5-15. After tightening evenly by hand, using the long-reach Allen key supplied by Tyron ...
6-5-13. This tyre compression device is available
from Tyron. Fitting and removal is a two-minute
job, compared with the 15 minutes or more it can
take when you have to struggle with the tyre fitting
machine.
6-5-14. With both band-halves in place and the
opposite joint symmetrically placed each side of the
tyre valve, Mick fitted the screw-up clamp to each
side.
184
6-5-16. ... he used this lovely little Britool torque wrench to tighten the screws to the specified low torque
figure of 7.5Nm.
6-5-18. Mick inflated our new Michelins to the
6-5-17. The tyres were to be inflated with Nitrogen,
for reasons fully explained in the main text. If
an already inflated tyre was being ‘converted’ to
Nitrogen, ATS first jack up the vehicle, so there
will be no weight on the tyres, then let all the
compressed air out.
prescribed pressure using a gauge that looks
identical to one used for compressed air but which
is, in fact, attached to ATS’s nitrogen pump and
reservoir. (You will need to call ATS on the number
given at the end of this manual to see where this
service is offered.)
Page 5

THE CAMPER CONVERSION MANUAL
6-19-19. In the case of a Leisuredrive conversion,
there isn’t enough depth for the standard water
outlet (held in left hand) to be used so an elbow has
to be fitted in its place.
6-19-23. The casing is simply screwed onto the
back of the unit.
Top tips!
• If the pipe needs to be straightened
and rebent, it will work harden.
In this case, scrap the pipe and use
new.
• You may be able to use an
automotive brake or fuel pipe bender
if you don’t have access to the correct
plumber’s tool.
6-19-21. If you do fit the pipe temporarily in place
to check its position, don’t tighten the union or the
olive will be squashed onto the pipe. Leave that to
the professional fitter.
6-19-24. You should use reinforced good quality
hose. Note that the HOT and COLD connections
are clearly marked and it’s essential that they are
connected correctly.
6-19-20. You can carry out this part of the work
yourself but you should not make the final gas
fittings. The gas pipe will have to make some tight
bends in order to fit neatly within the cupboard
space.
236
6-19-22. With the pipe in place and taken in this
particular direction, it was necessary to open out
and, in one place, to cut away part of the casing.
6-19-25. The electrical cable, not to be fully
connected unless you are a qualified electrician, can
be held in place with cable clips.
 Loading...