

Volkswagen RNS 310, RNS 315 User Manual

RNS 310, RNS 315
Navigation system
US Edition
Navigationssystem_111.5U6.N31_23.book Seite i Donnerstag, 22. April 2010 5:16 17
Signs and symbols
DANGER
Texts with this symbol contain information regarding hazardous situations which will cause
death or severe injuries if ignored.
WAR NI NG
Texts with this symbol contain information regarding hazardous situations which could cause
death or severe injuries if ignored.
CAUTION
Texts with this symbol contain information regarding hazardous situations, which could
cause minor or severe injuries if ignored.
Note
Texts with this symbol contain information regarding hazardous situations which could cause
damage to the vehicle or the vehicle equipment
when ignored.
Texts with this symbol contain information
about the environment and how you can
help to protect it.
Texts with this symbol contain supplementary information.
Indicates a reference to a section within
a chapter containing important information and safety instructions that
should always be heeded.
Indicates that the section is continued
on the next page.
Identifies the end of a section.
Indicates situations in which the vehicle
must be stopped as quickly as possible.
® Indicates registered trademarks. How-
ever, the absence of this symbol does not
constitute a waiver of any rights associated with intellectual property.
⇒
Cross-reference to a warning within the
same section or on the same page, in
order to point out possible risks of accidents and injuries and ways to prevent
them.
⇒
⇒
⇒
Cross reference to potential property
damage, in the same section or on the
given page.
Navigationssystem_111.5U6.N31_23.book Seite ii Donnerstag, 22. April 2010 5:16 17

Volkswagen AG is constantly working to improve
all types and models. Therefore, please understand that changes to the delivery scope in design,
equipment and technology are possible at any
time. The information regarding the scope of delivery, appearance, performance, dimensions,
weights, fuel consumption, standards and functions of the vehicles correspond to the information
available as of the editorial deadline. Some of the
equipment may possibly not be available until
later (visit your local Volkswagen dealer for information) or may only be available in certain markets. No legal commitment can be derived from
the various information, illustrations and descriptions in this book.
Reprinting, reproducing or translating, even excerpts, is not permitted without the written consent of Volkswagen AG.
Volkswagen AG expressly reserves all rights based
on the law regarding copyrights. Subject to
changes.
Produced in Germany.
© 2010 Volkswagen AG
This paper was made from chlorine-free,
bleached pulp.
Navigationssystem_111.5U6.N31_23.book Seite iii Donnerstag, 22. April 2010 5:16 17

RNS 310, RNS 315:
Navigation system
Print status: 07.04.2010
Ausgabe: englisch USA: 05.2010
| Art.-Nr.: 111.5U6.N31.23
Navigationssystem_111.5U6.N31_23.book Seite iv Donnerstag, 22. April 2010 5:16 17
Table of contents 1
111.5U6.N31.23
Table of contents
About this manual . . . . . . . . . . . . . . . . . . . .
Introduction . . . . . . . . . . . . . . . . . . . . . . . . . . . .
Before using . . . . . . . . . . . . . . . . . . . . . . . . . . . . . . .
Safety instructions . . . . . . . . . . . . . . . . . . . . . . . . . .
Device overview . . . . . . . . . . . . . . . . . . . . . . . . . . .
Basic operating instructions . . . . . . . . . . . . . . . .
Audio mode . . . . . . . . . . . . . . . . . . . . . . . . . . . .
Radio mode . . . . . . . . . . . . . . . . . . . . . . . . . . . . . . .
Media mode . . . . . . . . . . . . . . . . . . . . . . . . . . . . . . .
MEDIA-I N multimedia interface . . . . . . . . . . . .
External CD changer . . . . . . . . . . . . . . . . . . . . . . .
Navigation . . . . . . . . . . . . . . . . . . . . . . . . . . . . .
Introduction to navigation . . . . . . . . . . . . . . . . . .
Destination input . . . . . . . . . . . . . . . . . . . . . . . . . . .
Destination memory . . . . . . . . . . . . . . . . . . . . . . . .
Route guidance . . . . . . . . . . . . . . . . . . . . . . . . . . . .
Telephone operation (Phone) . . . . . . .
Introduction . . . . . . . . . . . . . . . . . . . . . . . . . . . . . . . .
Saved phone numbers . . . . . . . . . . . . . . . . . . . . .
Calling . . . . . . . . . . . . . . . . . . . . . . . . . . . . . . . . . . . .
Settings (SETUP) . . . . . . . . . . . . . . . . . . . . . . .
Sound, volume and system settings . . . . . . . . .
Abbreviations . . . . . . . . . . . . . . . . . . . . . . . . . .
Alphabetical index . . . . . . . . . . . . . . . . . . . .
2
3
3
3
6
8
12
12
21
31
34
37
37
41
45
49
58
58
62
64
67
67
71
72
Navigationssystem_111.5U6.N31_23.book Seite 1 Donnerstag, 22. April 2010 5:16 17
RNS 310, RNS 315
About this manual
• At the end of this manual, you will find an al-
phabetical index.
• A list of abbreviations explains technical abbre-
viations and terminology.
• Directions are usually from the point of view of
the direction of travel.
• Illustrations are used for orientation and
should be considered only as conceptual illustrations.
• For vehicles with right-hand drive, controls are
sometimes arranged differently to how they shown
in the illustrations or described in the text.
All options and models are described without
being identified as optional extras or model variants. It is therefore possible that equipment that is
not present in your vehicle may be described.
Please contact your Volkswagen dealer for further
information.
All information in this manual was correct at the
time of printing and only applies to factory fitted
devices. Discrepancies between the displays and
features of the device and the descriptions in this
manual may be due to continued development of
the device and possible firmware updates. No legal
commitment can be derived from the information,
figures or descriptions in this manual.
If you sell or rent out your vehicle, please ensure
that this manual is in the vehicle and that any information or files saved on the device have been
deleted.
Navigationssystem_111.5U6.N31_23.book Seite 2 Donnerstag, 22. April 2010 5:16 17

Introduction 3
111.5U6.N31.23
Introduction
Before using
Prior to the first use of the device, the following steps should be carried out in order to operate the device safely
and to enjoy the use of all functions to their full capacity:
Follow all basic safety instructions ⇒ page 8.
Familiarize yourself with the device overview ⇒ page 6.
In the device system settings, reset it the to the default settings (factory settings) ⇒ page 67.
Use data media suitable for Media mode ⇒ page 21.
Safety instructions
WAR NI NG
Operating the radio navigation system while
driving can distract from traffic and lead to accidents.
• Always drive attentively and responsibly.
• Set volume settings to levels that ensure that
acoustic signals from outside the vehicle are audible at all times (for example, the sirens of
emergency rescue vehicles).
• Excessively high volume settings may lead to
hearing loss. This can also extend to short exposure of the ears to loud volumes.
WAR NI NG
Driving recommendations given and traffic
signs displayed by the navigation system may
vary from the actual traffic situation.
• Traffic signs and regulations take precedence
over navigation driving recommendations.
• Adjust your speed and driving style ac-
cording to visibility, weather, road and traffic
conditions.
WAR NI NG
Unmounted or improperly mounted external
devices may be thrown around the vehicle's interior in the event of a sudden driving or braking
maneuver or an accident.
• Always mount or stow external devices away
properly before driving, making sure that they
are outside the operational area of the airbags.
• Place cables so as not to interfere with the
driver.
WAR NI NG
Sudden volume fluctuations may occur when
the audio source is changed or connected.
• Please lower the volume before changing or
connecting an audio source ⇒ page 9.
WAR NI NG
Injuries can be caused by invisible laser radiation if the housing of the CD player is opened.
• Have the CD player repaired only by a spe-
cialist.
Note
Improper insertion or insertion of a improperly
fitting memory card can damage the locking
mechanism in the memory card slot!
• Pay attention to the proper insertion position
⇒ page 21.
• Excessive pressure can break the locking the
memory card slot locking mechanism.
• Only use suitable memory cards ⇒ page 21.
Note
• Always insert and remove CDs into the slot
straight, perpendicular to the front of the device,
without tilting and scratching them ⇒ page 24.
WARNING (continued)
2
Navigationssystem_111.5U6.N31_23.book Seite 3 Donnerstag, 22. April 2010 5:16 17
RNS 310, RNS 315
• Inserting a second CD while a CD is in the
drive or being ejected from it can destroy the CD
drive. Always wait for the CD ejection to finish!
Note
Contaminants on a disc and warped discs can
damage the CD drive.
• Only use clean, standard 12 centimeter CDs!
− Do not affix labels or similar items to CDs.
Labels can become loose and damage the
drive.
− Do not insert 8 centimeter single CDs or
non-circular CDs (shape CDs).
− Do not insert DVD-Plus, Dual Discs and Flip
Discs, as these are thicker than standard
CDs.
Note (continued) Note (continued)
Navigationssystem_111.5U6.N31_23.book Seite 4 Donnerstag, 22. April 2010 5:16 17

Introduction 5
111.5U6.N31.23
4
Navigationssystem_111.5U6.N31_23.book Seite 5 Donnerstag, 22. April 2010 5:16 17
RNS 310, RNS 315
Device overview
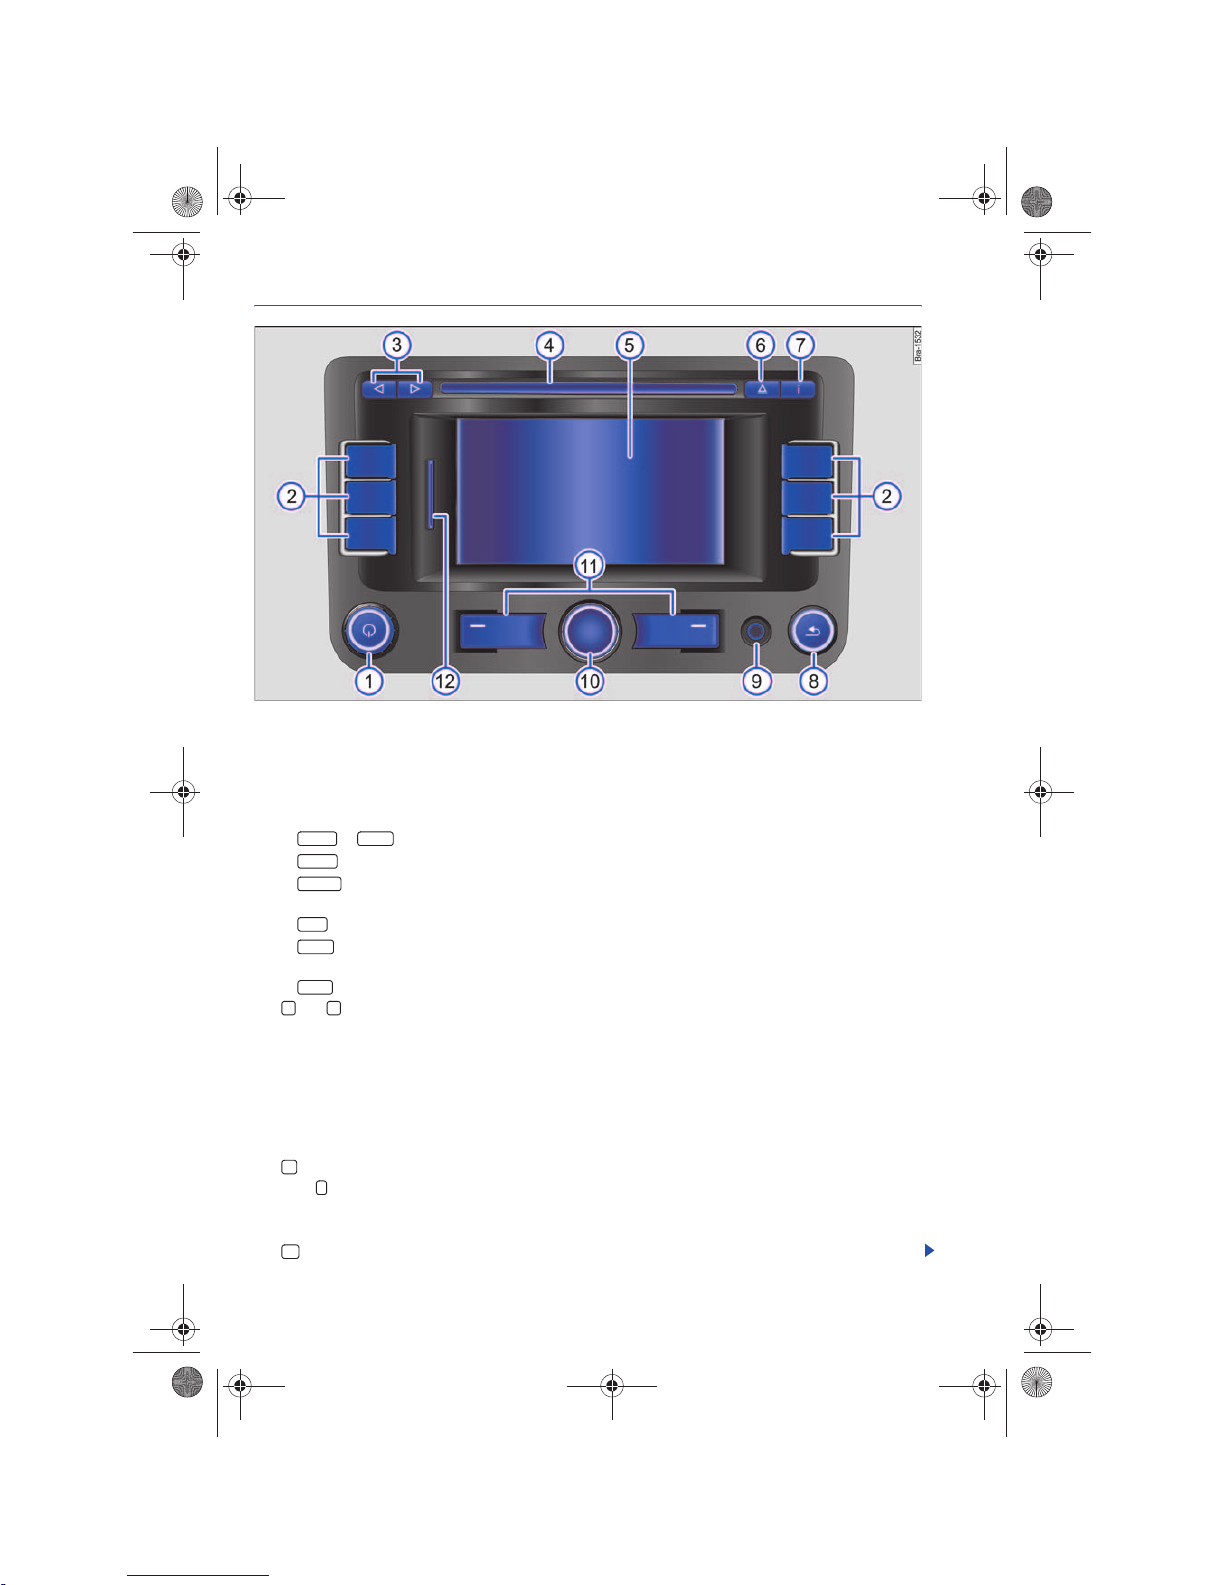
Fig. 1 Overview of the controls.
Rotary and push button.
− Press to switch on or off ⇒ page 8.
− Tu rn to adjust the volume ⇒ page 8.
Press to open a function area. Labeling and functions depend on the specific device.
− or : Switch to Radio mode and change frequencies ⇒ page 12.
− : Switch to Media mode ⇒ page 21.
− : Start Telephone mode ⇒ page 58. OR: Mute the audio source if a mobile phone package has
not been installed ⇒ page 8.
− : Open Navigation main menu ⇒ page 37.
− : Opens sound or system settings and a context-based setup menu for the selected device
mode ⇒ page 67.
− : Mute the device ⇒ page 8.
and arrow buttons always work for the active audio source, regardless of the menu being dis-
played.
− To change the station or channel in all Radio modes, briefly press (and, if necessary, pay attention
to the display) ⇒ page 12.
− To change the chapter or track in Media mode, briefly press or hold to rewind or fast forward
⇒ page 21.
CD slot ⇒ page 21.
Touch screen ⇒ page 8.
CD eject button ⇒ page 21.
Press the Info button to display additional menu-related information:
− Display additional track information (location) in Media mode ⇒ page 21.
− Show the current vehicle position and/or destination during Navigation ⇒ page 37.
Press Return in order to close menus and pop-up windows.
A1A
2
RADIO BAND
MEDIA
PHONE
NAV
SETUP
MUTE
A
3
A4A
5
A
6
A
7
A
8
Navigationssystem_111.5U6.N31_23.book Seite 6 Donnerstag, 22. April 2010 5:16 17
Introduction 7
111.5U6.N31.23
AUX IN socket to connect an external audio source ⇒ page 21.
Adjustment knob: Function depends on the current operating mode.
− Turn in all Radio modes ⇒ page 12 to manually set channel or frequency settings.
− In Media mode, turn to change title manually and press to start and stop scanning (SCAN)
⇒ page 21.
− Turn to change the map scale ⇒ page 49.
− Pre ss to repeat a navigation instruction during route guidance ⇒ page 49.
Function buttons: The current function is displayed on the screen via the respective function button.
⇒ page 8.
Memory card slot ⇒ page 21.
A9A10A
11
A
12
6
Navigationssystem_111.5U6.N31_23.book Seite 7 Donnerstag, 22. April 2010 5:16 17

RNS 310, RNS 315
Basic operating instructions
Introduction
In this section you’ll find information on the following:
Switching on or off . . . . . . . . . . . . . . . . . . . . . . . . . . .
Changing the default volume . . . . . . . . . . . . . . . . . .
Additional displays and options . . . . . . . . . . . . . . .
Function buttons and device buttons . . . . . . . . . . . .
Browsing lists and selecting items . . . . . . . . . . . . . .
When settings are changed, the device characteristics might be different from what is described in
this manual. Therefore Volkswagen recommends
that you reset the device to the its Factory settings
prior to first use ⇒ page 67.
Supplementary information:
• Safety instructions ⇒ page 3
• Device overview ⇒ page 6
• Multi-function steering wheel to change tracks
or stations ⇒ Booklet Owner's manual, chapter
Vehicle overview
A light keystroke or tap on the touch screen is
sufficient to operate the device.
Never hold a button for longer than 10 minutes. Otherwise, the device will interpret this
as a malfunction (jammed key).
Due to country-specific legal requirements,
some functions are not selectable on the
screen above a certain driving speed.
Operating a mobile phone in the vehicle can
cause noise in the speakers.
In some vehicles with park distance control,
the volume of the current audio source is au-
tomatically reduced when shifting into reverse.
Some countries may have restrictions re-
garding the use of Bluetooth devices. Information can be obtained from the local
authorities.
Switching on or off
Please first read and observe the safety instructions on page 3 and the introduc-
tory information on page 8.
Press the rotary and press button ⇒ page 6, fig. 1
to switch the device on or off manually.
After being switched on, the system will resume
play of the most recently used audio source.
When the motor is turned off, the device will
switch itself off automatically after about 30 minutes (timeout).
Anti-theft coding
The anti-theft code number remains stored in the
vehicle after initial input (convenience radio
coding). Only if the device is installed in a different
vehicle does the anti-theft coding have to be cancelled manually. When the device is switched on, a
keypad pops up requesting the code. Please contact your Volkswagen dealer in this case.
If the vehicle battery has been disconnected,
please switch on the ignition before switching the
device back on.
8
9
9
10
11
A
1
Navigationssystem_111.5U6.N31_23.book Seite 8 Donnerstag, 22. April 2010 5:16 17
Introduction 9
111.5U6.N31.23
Changing the default volume
Please first read and observe the safety instructions on page 3 and the introductory information
on page 8.
Volume adjustments are indicated on the screen
by a “bar”. Meanwhile, device operation is
blocked.
The device is muted by pressing “0” (Display: )
and the current media source is stopped.
Alternatively, the ⇒ page 6, fig. 1 button
can be pressed to mute or unmute the device. The
button serves the same purpose in vehicles
which have not been fitted with a mobile phone
package.
Some volume settings and adjustments can be
preset ⇒ page 67.
WAR NI NG
Operating the radio navigation system while
driving can distract from traffic and lead to accidents.
• Always drive attentively and responsibly.
• Set volume settings to levels that ensure that
acoustic signals from outside the vehicle are audible at all times (for example, the sirens of
emergency rescue vehicles).
• Excessively high volume settings may lead to
hearing loss. This can also extend to short exposure of the ears to loud volumes.
Note
Excessively loud or distorted playback can
damage the vehicle speakers.
Where the default volume for the playback of
an audio source has been increased significantly (for example due to playback of a very quiet
external audio source), be sure to reduce the
volume again before changing audio sources.
Additional displays and options
Please first read and observe the safety instructions on page 3 and the introduc-
tory information on page 8.
Displays on the screen may vary or be different
from the displays described here, depending on
the settings.
All displays can be shown only after a complete
system start of the radio navigation system.
Depending on the vehicle, adjustments of air conditioning settings or displays regarding factory-installed driver assistance systems are temporarily
shown on the screen. The displays are automatically closed when they are no longer required.
Function Operation
Increase volume.
Turn the volume control ⇒ page 6, fig. 1 to the right or press the button
on the multi-function steering wheel ⇒ Booklet Owner's manual, chapter ve-
hicle overview.
Reduce volume.
Turn the volume control to the left
or press the button on the multi-function steering wheel.
MUTE
A
2
PHONE
WARNING (continued)
8
Navigationssystem_111.5U6.N31_23.book Seite 9 Donnerstag, 22. April 2010 5:16 17
RNS 310, RNS 315
Function buttons and device buttons
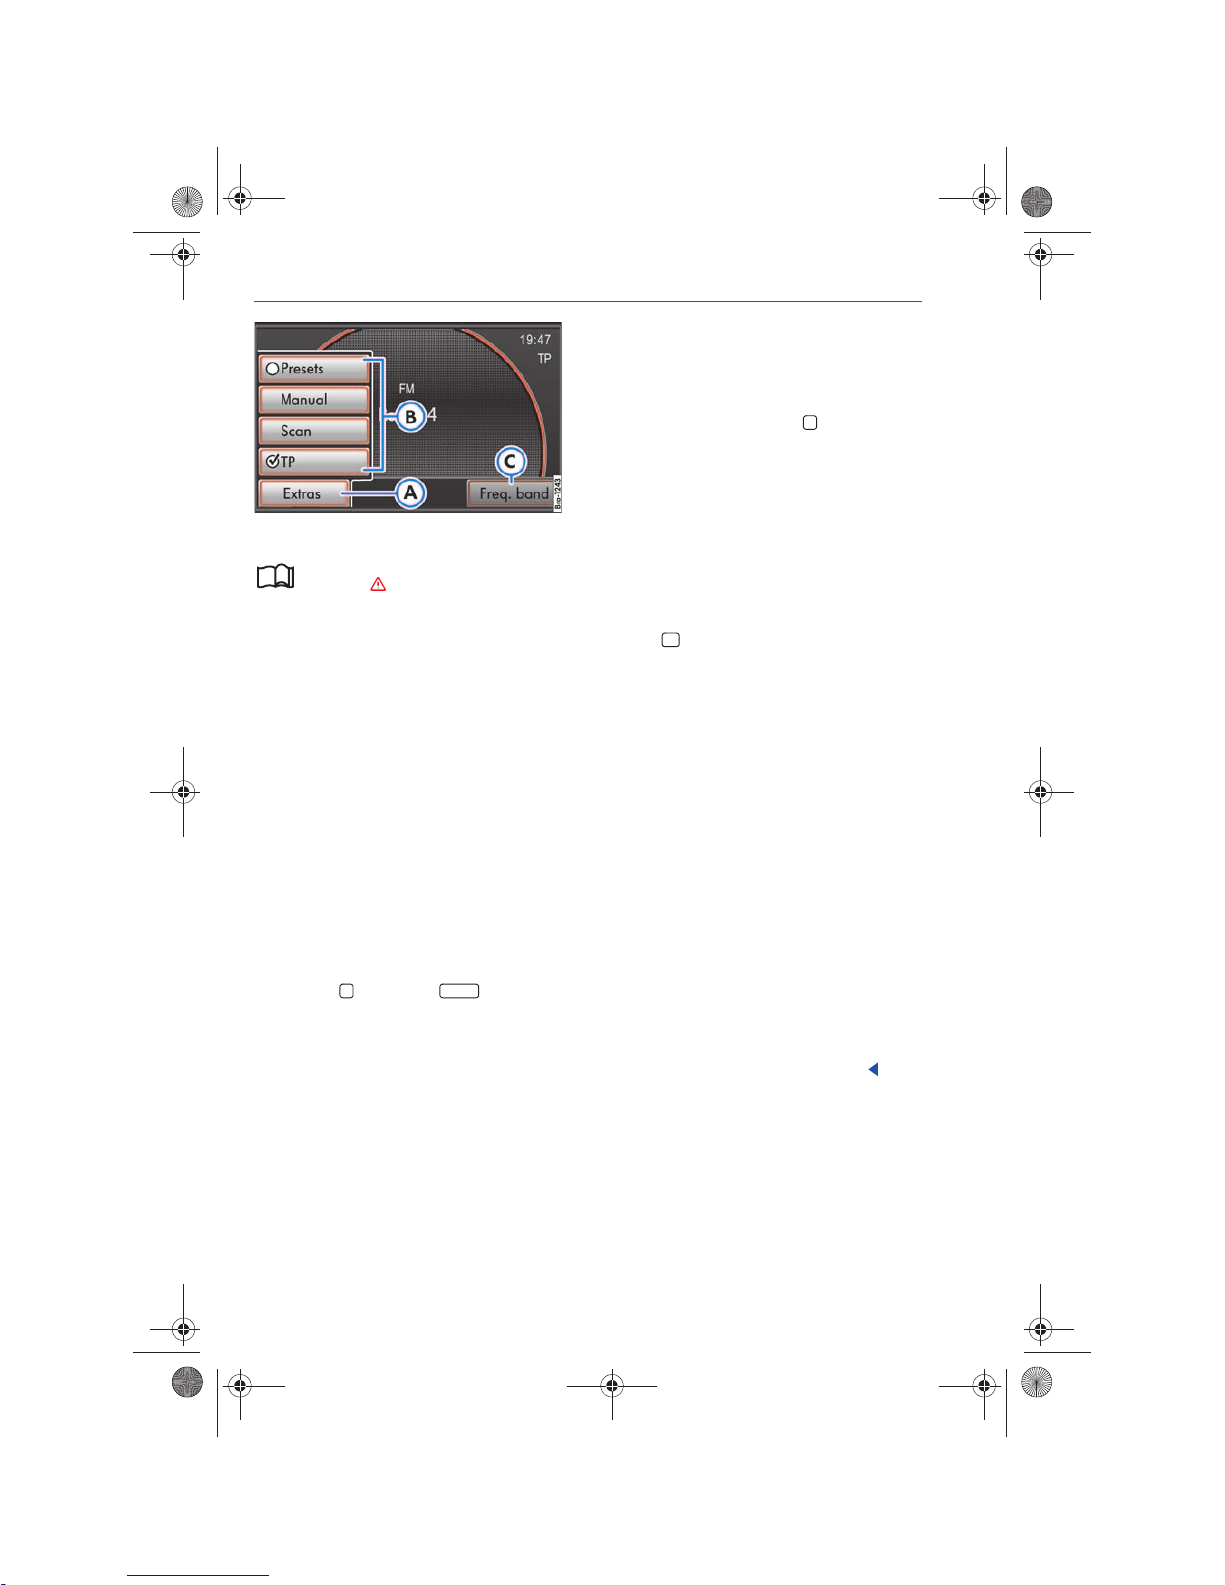
Fig. 2 RADIO main menu with pop-up window.
Please first read and observe the safety instructions on page 3 and the introduc-
tory information on page 8.
The device is equipped with a touch screen.
The menu that is currently selected is displayed In
the middle of the bottom screen line.
Controls
• Rotary and push buttons.
• Labeled device buttons.
• Function buttons on the device.
• Function buttons shown on the screen.
Rotary and push buttons
The left rotary and push button ⇒ page 6, fig. 1
is designated Volume control or On-Off switch.
The center rotary and push button ⇒ page 6, fig. 1
is designated Tuning knob.
Device buttons
Buttons on the device are identified in this manual
as “buttons” and are represented as a symbol with
blue content , for example button.
Underneath the screen are two unlabeled device
buttons ⇒ page 6, fig. 1 . Operation and function correspond to the respective function buttons
⇒ fig. 2 and shown at the top of the screen.
Device buttons are operated by pressing or
holding.
Function buttons on the screen
Active areas of the screen which represent a function are labeled as “function buttons” and are operated by a brief press on the screen or holding.
Function buttons are described in the manual as
“function button” and with the button symbol.
A function button that is grayed-out cannot be selected, e.g. .
Pop-up window
A “pop-up window” is a small window that appears for a short time prior to the current menu
and contains additional function buttons.
A function button in a pop-up window can be accessed by pressing it. The pop-up window then
closes.
Press the button in order to close the pop-up
window without a change.
Launching or activating functions using the
“checkboxes”
Some functions are started or stopped by pressing
the related button, for example the Scan function
⇒ page 14.
Other functions or displays are permanently activated or deactivated and are marked with a
checkbox.
A check mark in a checkbox indicates that the
function is activated, an empty checkbox , that
it is deactivated.
Functions activated via checkboxes can only be
deactivated by opening the pop-up window again
and deactivating the checkbox.
Selecting function buttons via the tuning knob
With the exception of the two lower function buttons and , function buttons that are shown
in the display can also be selected by turning the
tuning knob ⇒ page 6, fig. 1 . Pressing accesses
the respective function button ⇒ page 11.
A1A
10
... RADIO
A
11
AAA
C
...
A
C
A
B
AAA
C
A
10
Navigationssystem_111.5U6.N31_23.book Seite 10 Donnerstag, 22. April 2010 5:16 17
Introduction 11
111.5U6.N31.23
Browsing lists and selecting items
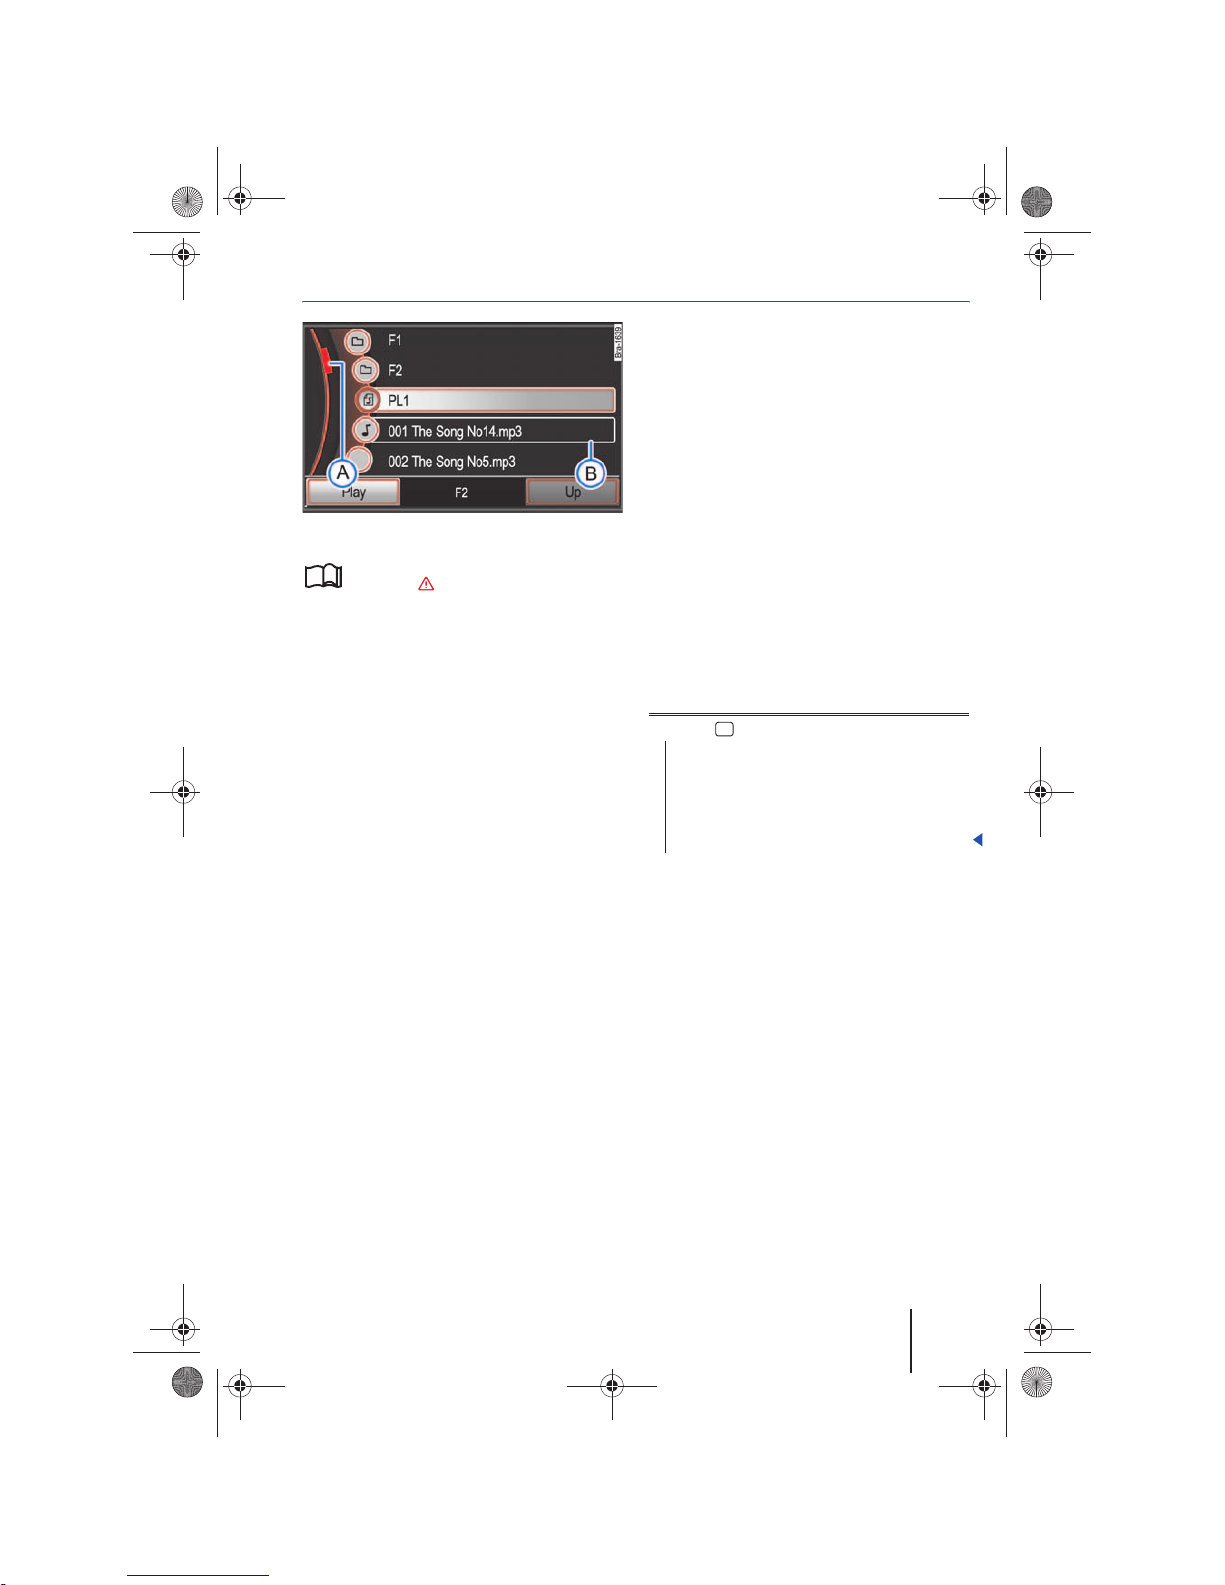
Fig. 3 Track list of an MP3 CD.
Please first read and observe the safety instructions on page 3 and the introduc-
tory information on page 8.
Available stations and selectable tracks are displayed as items in lists. The current station or track
is highlighted ⇒ fig. 3.
List items are accessed by pressing, the same way
as function buttons.
Tagging and accessing list items (tuning knob)
• Select list items: Move the selecting frame using
the tuning knob ⇒ page 6, fig. 1 .
When the selection frame is moved to the end of
the displayed list segments, the next items will be
displayed.
• Launch marked list items: Press the tuning
knob.
Rapid list browsing (scroll marker)
If more items are selectable than can be displayed,
a “scroll bar” is shown on the left side of the screen.
The colored semi-circle indicates the scope of the
complete list and the “scroll marker” ⇒ fig. 3
indicates the position of the displayed list segments. The size of the scroll marker corresponds to
the size of the displayed list segment proportional
to the complete list. The smaller the scroll marker,
the longer the list.
• Browse long lists page-by-page: Press the screen
briefly above or below the scroll marker.
• Browse long lists quickly: Manually move the
scroll marker. To do this, place a finger on the scroll
marker and move downward over the screen
without removing it. When the desired position is
reached, lift the finger from the screen.
Closing lists and sub-menus
A
10
Operation: Effects
Press the button.
Closes an open pop-up window.
OR: Moves up one menu all the way to the
Main menu.
OR: Undoes navigation address entries step
by step.
A
A
10
Navigationssystem_111.5U6.N31_23.book Seite 11 Donnerstag, 22. April 2010 5:16 17
RNS 310, RNS 315
Audio mode
Radio mode
Introduction
In this section you’ll find information on the following:
Opening the RADIO main menu . . . . . . . . . . . . . . .
Changing frequency bands . . . . . . . . . . . . . . . . . . .
Changing radio stations or selecting from the FM
station list . . . . . . . . . . . . . . . . . . . . . . . . . . . . . . . . . .
Automatic scan/tune . . . . . . . . . . . . . . . . . . . . . . . . .
Manually selecting a station frequency . . . . . . . . .
Displaying and hiding station preset buttons and
storing stations . . . . . . . . . . . . . . . . . . . . . . . . . . . . . .
Accessing stations stored on station preset buttons
Satellite radio mode (SAT) . . . . . . . . . . . . . . . . . . . . .
Satellite radio main menu . . . . . . . . . . . . . . . . . . . . .
Changing Sirius stations . . . . . . . . . . . . . . . . . . . . . .
Selecting stations from a particular category . . . . .
Radio settings menu (SETUP) . . . . . . . . . . . . . . . . . .
Supplementary information:
• Safety instructions ⇒ page 3
• Device overview ⇒ page 6
Parking garages, tunnels, high buildings or
mountains can interfere with the radio
signal.
Decals or metal-coated stickers on the vehicle windows can affect radio reception in
vehicles with window antennas.
Opening the RADIO main menu
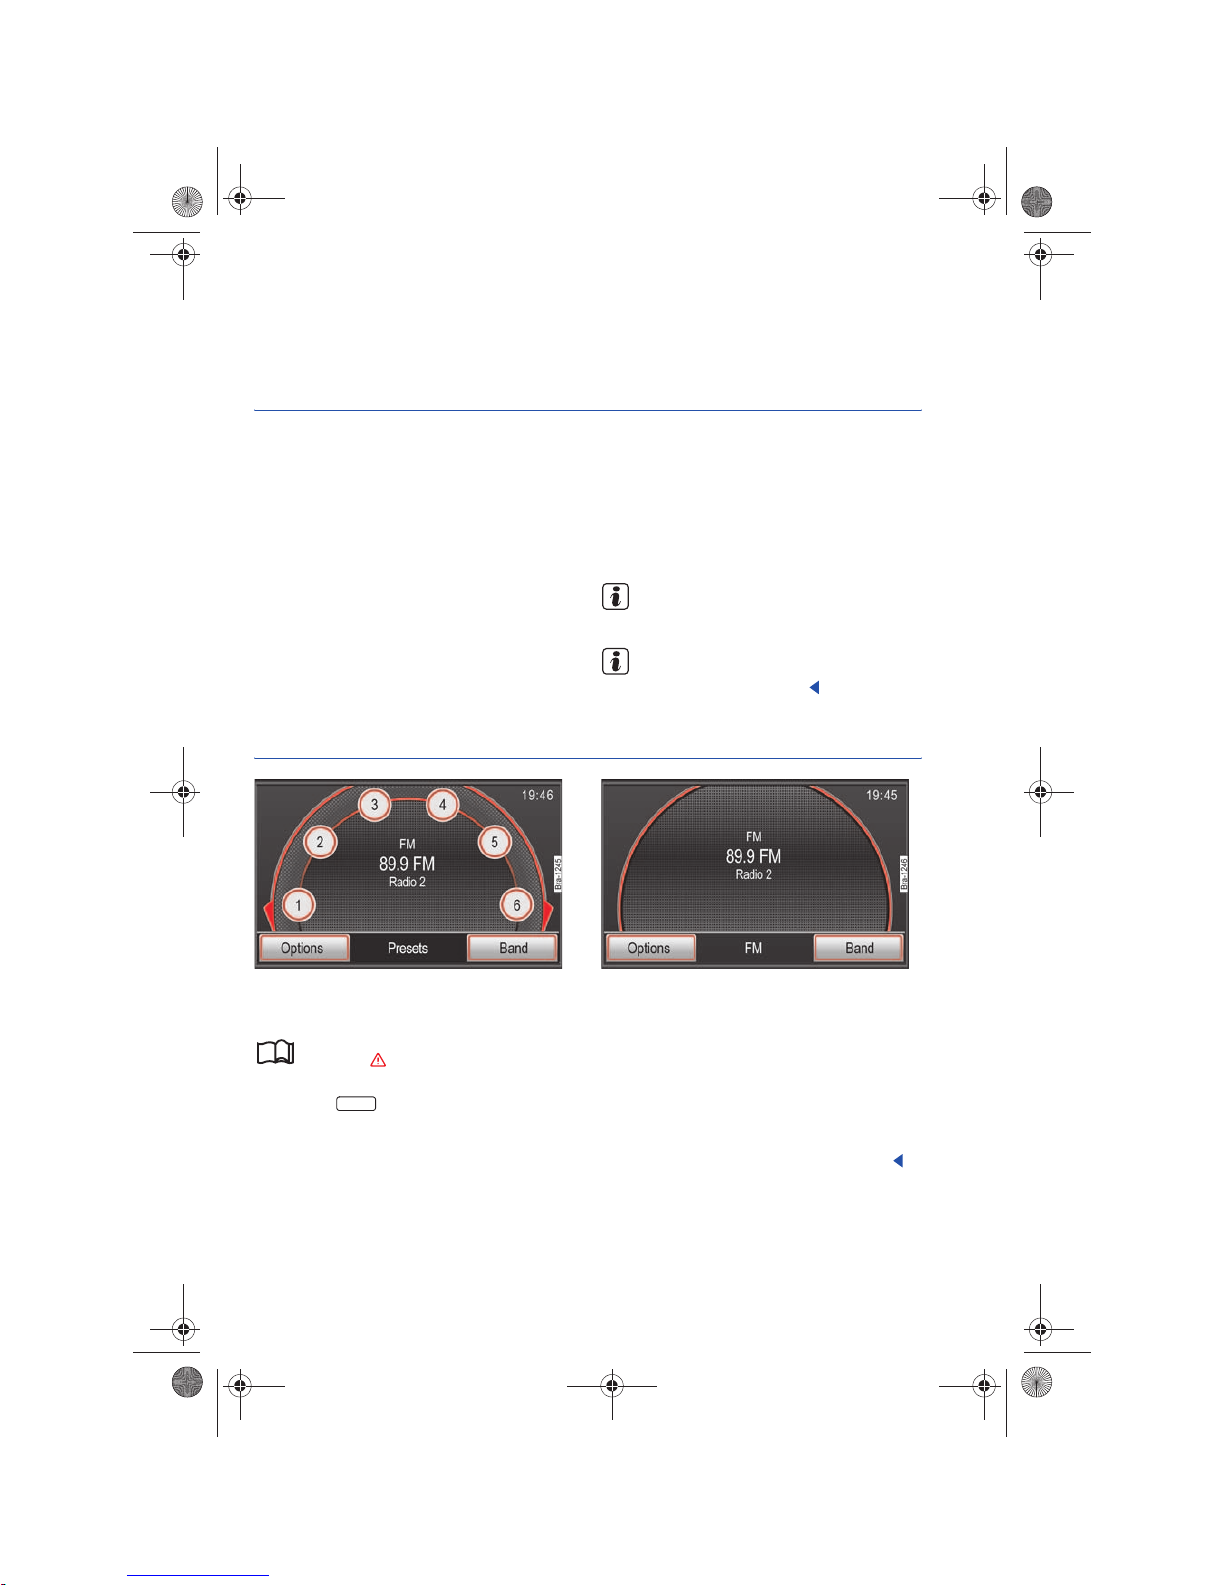
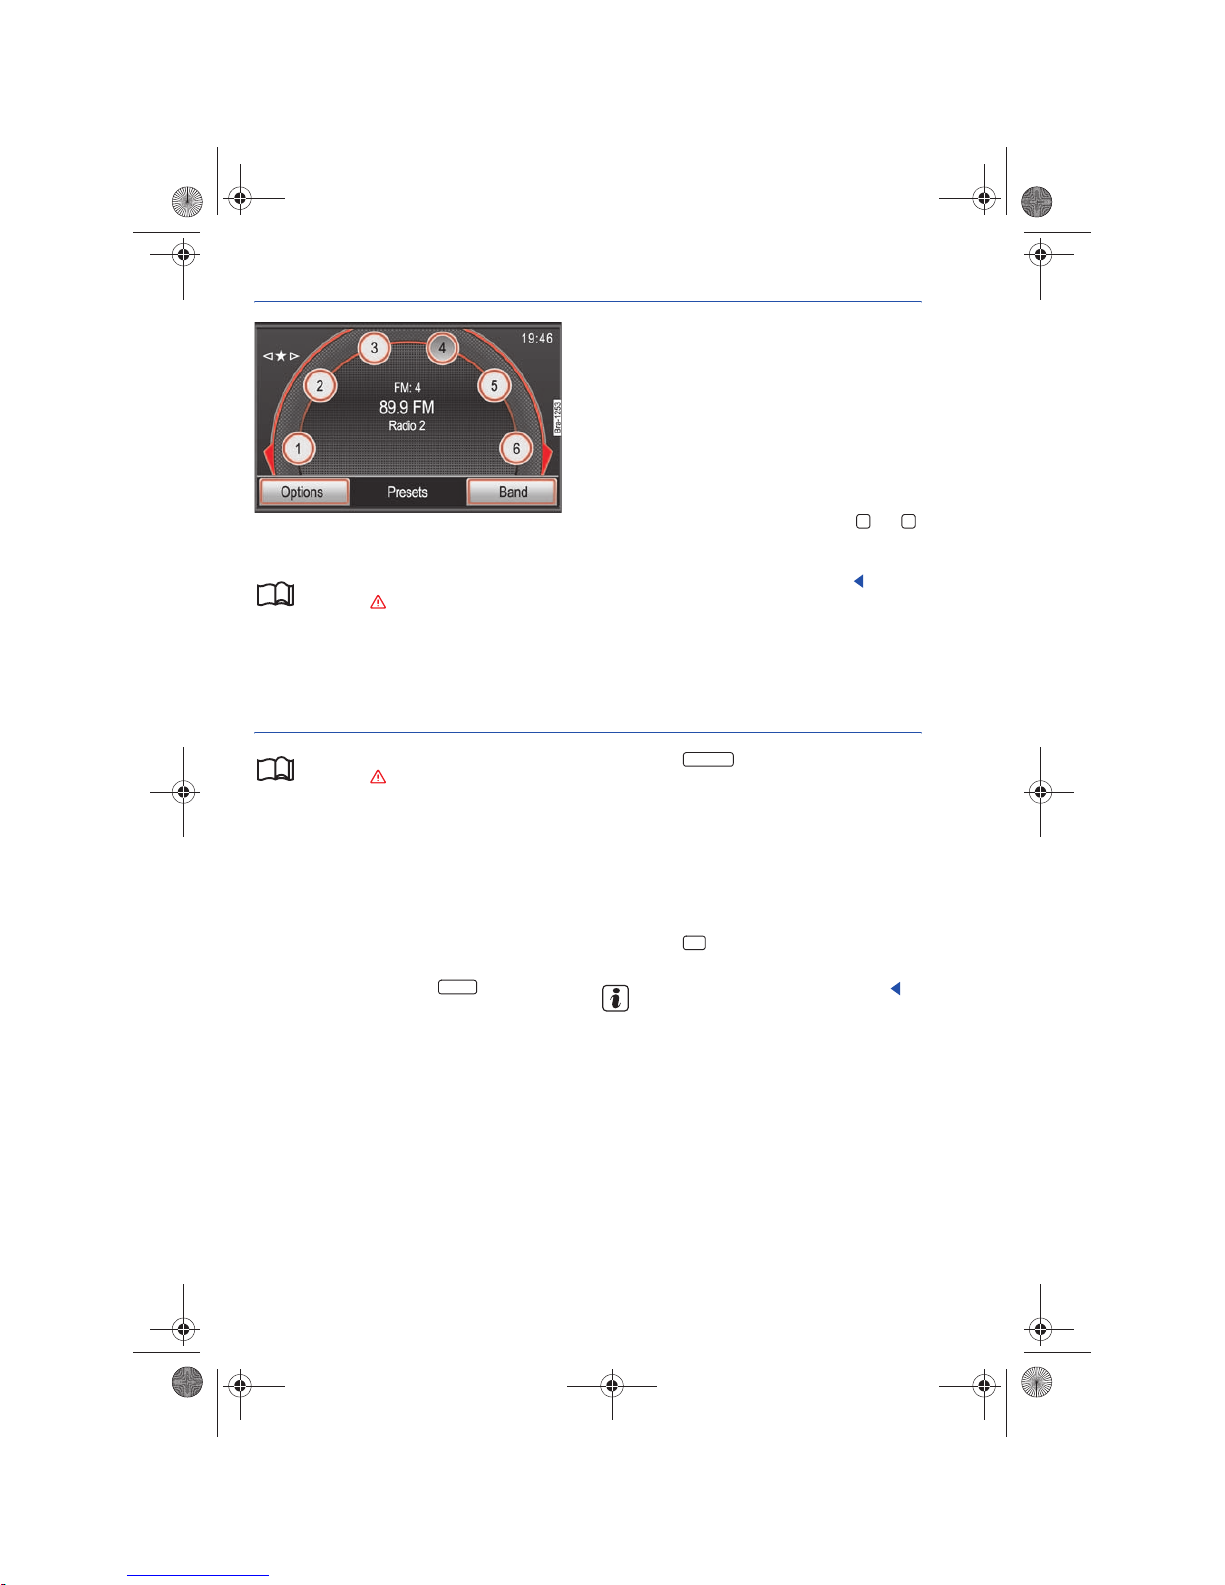
Fig. 4 RADIO main menu with displayed station
preset buttons.
Fig. 5 RADIO main menu without station preset buttons.
Please first read and observe the safety instructions on page 3 and the introduc-
tory information on page 12.
• Press the button.
The radio station currently playing is displayed in
the center of the screen.
The “Station button” display can be switched on
and off in the RADIO ⇒ fig. 4 main menu
⇒ page 15.
Displaying radio station names (RDS)
If RDS is available and the reception is good
enough, the name of the radio station may be displayed (in fig. 5: Radio 2).
RDS (Radio Data System) is a radio data service
which is not supported by all devices and may not
be accessible everywhere or for every station.
12
13
13
14
14
15
16
16
17
18
19
20
RADIO
Navigationssystem_111.5U6.N31_23.book Seite 12 Donnerstag, 22. April 2010 5:16 17
Audio mode 13
111.5U6.N31.23
Changing frequency bands
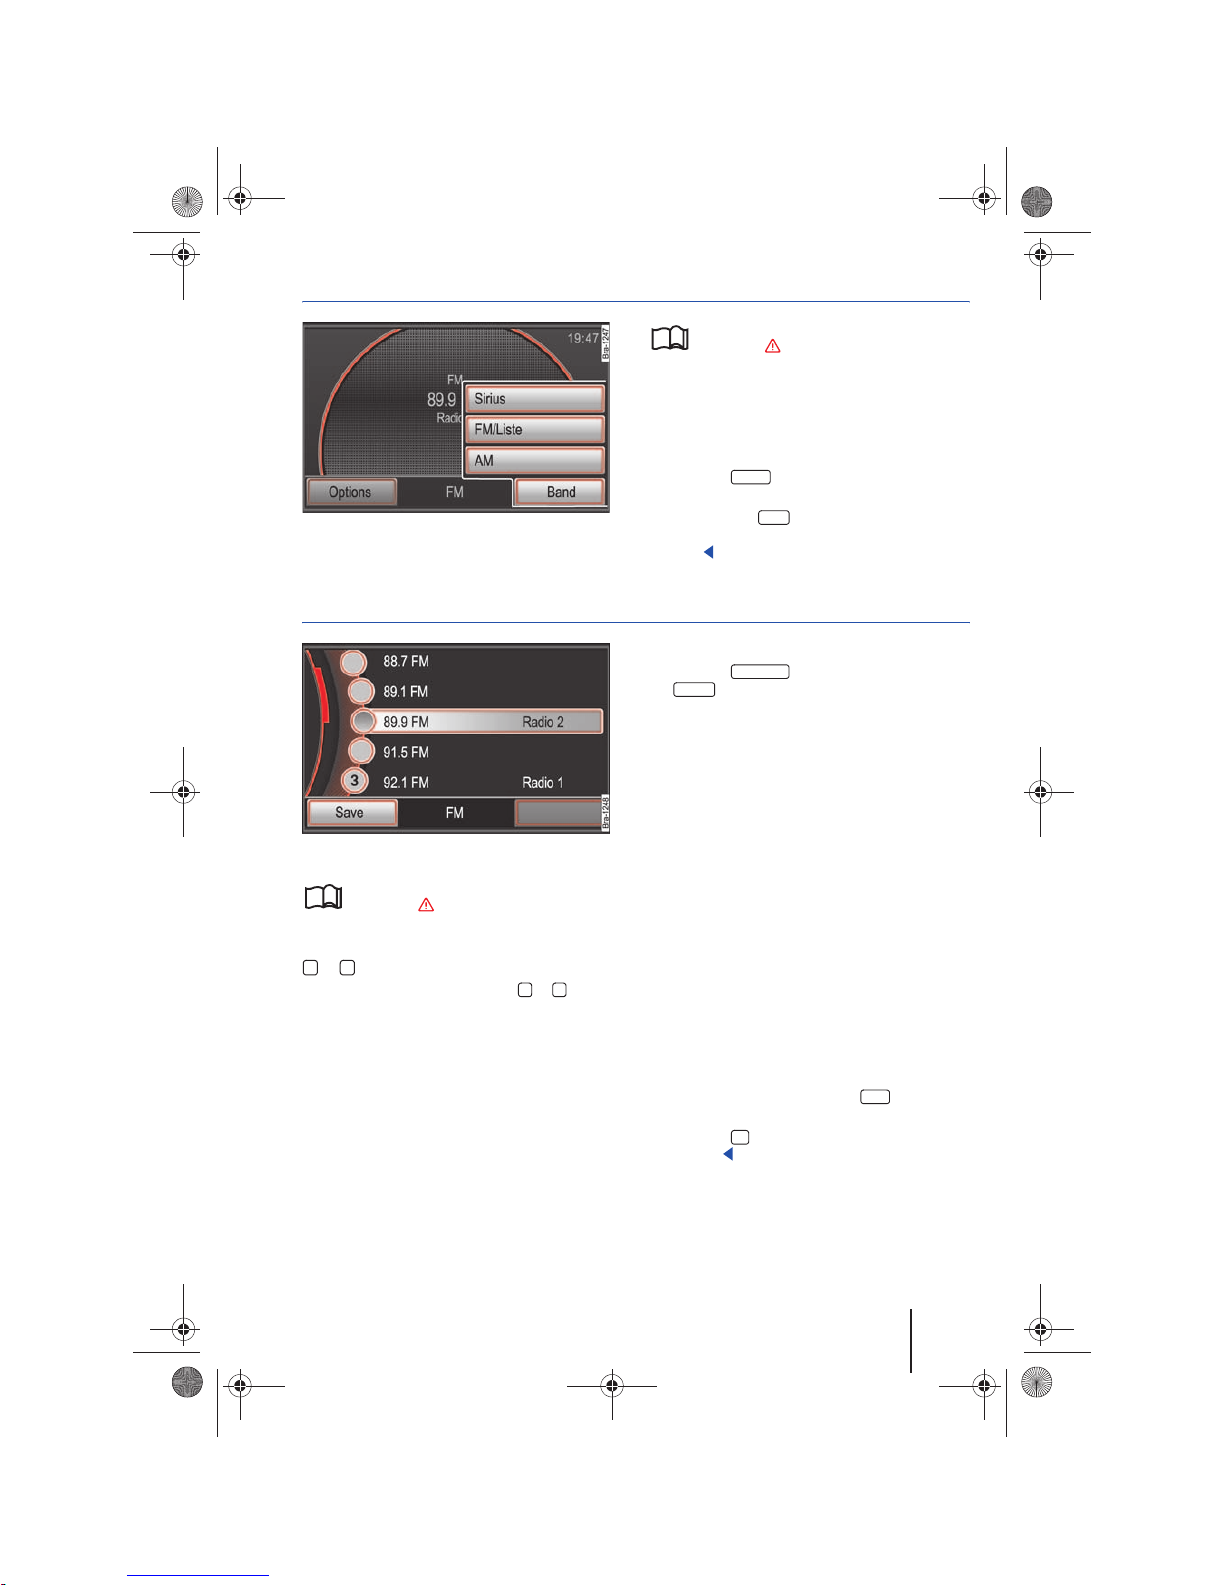
Fig. 6 RADIO main menu: Frequency function button.
Please first read and observe the safety instructions on page 3 and the introduc-
tory information on page 12.
The currently selected frequency band (FM or AM)
is indicated above the station name and in the
bottom screen line.
Changing the frequency band
• Press the button in the RADIO main
menu.
• OR: Press the function button and select
the frequency band by pressing a function button
⇒ fig. 6.
Changing radio stations or selecting from the FM station list
Fig. 7 Station List: The current station is highlighted.
Please first read and observe the safety instructions on page 3 and the introduc-
tory information on page 12.
Changing the radio station using the arrow button
or .
• Briefly press the arrow button or .
Depending on the the arrow button settings,
⇒ page 20 will only allow you to change between
saved stations (Display:
in ⇒ page 16, fig. 13).
Opening the FM station list
In the FM station list, all FM radio stations with
strong reception are stored automatically. These
can be accessed sequentially or can be selected directly from the FM station list.
• Change to the FM frequency band ⇒ page 13.
• Press the function button and press
the function button in the pop-up window
⇒ fig. 6.
• ODER: If the display of the station buttons is
deactivated ⇒ page 15, you can go directly to the
station list using the tuning knob ⇒ page 6, fig. 1
.
After one minute of inactivity, the FM station list
display is closed. The FM station list is automatically updated.
No station list is available for the AM frequency
band.
Selecting stations from the FM station list
• Open the FM station list.
• Tag stations one after another by rotating the
tuning knob. Access tagged stations by pressing
the knob ⇒ page 8.
• OR: Move the scroll marker in order to search
the list and press the desired station on the screen
⇒ page 8.
• To save the tagged station, press the station
preset button and then press the ⇒ fig. 7
function button ⇒ page 15.
• Press the button in order to close the FM
station list.
RADIO
Band
Freq. band
FM/ Lis t
A
10
Save
12
Navigationssystem_111.5U6.N31_23.book Seite 13 Donnerstag, 22. April 2010 5:16 17

RNS 310, RNS 315
Automatic scan/tune
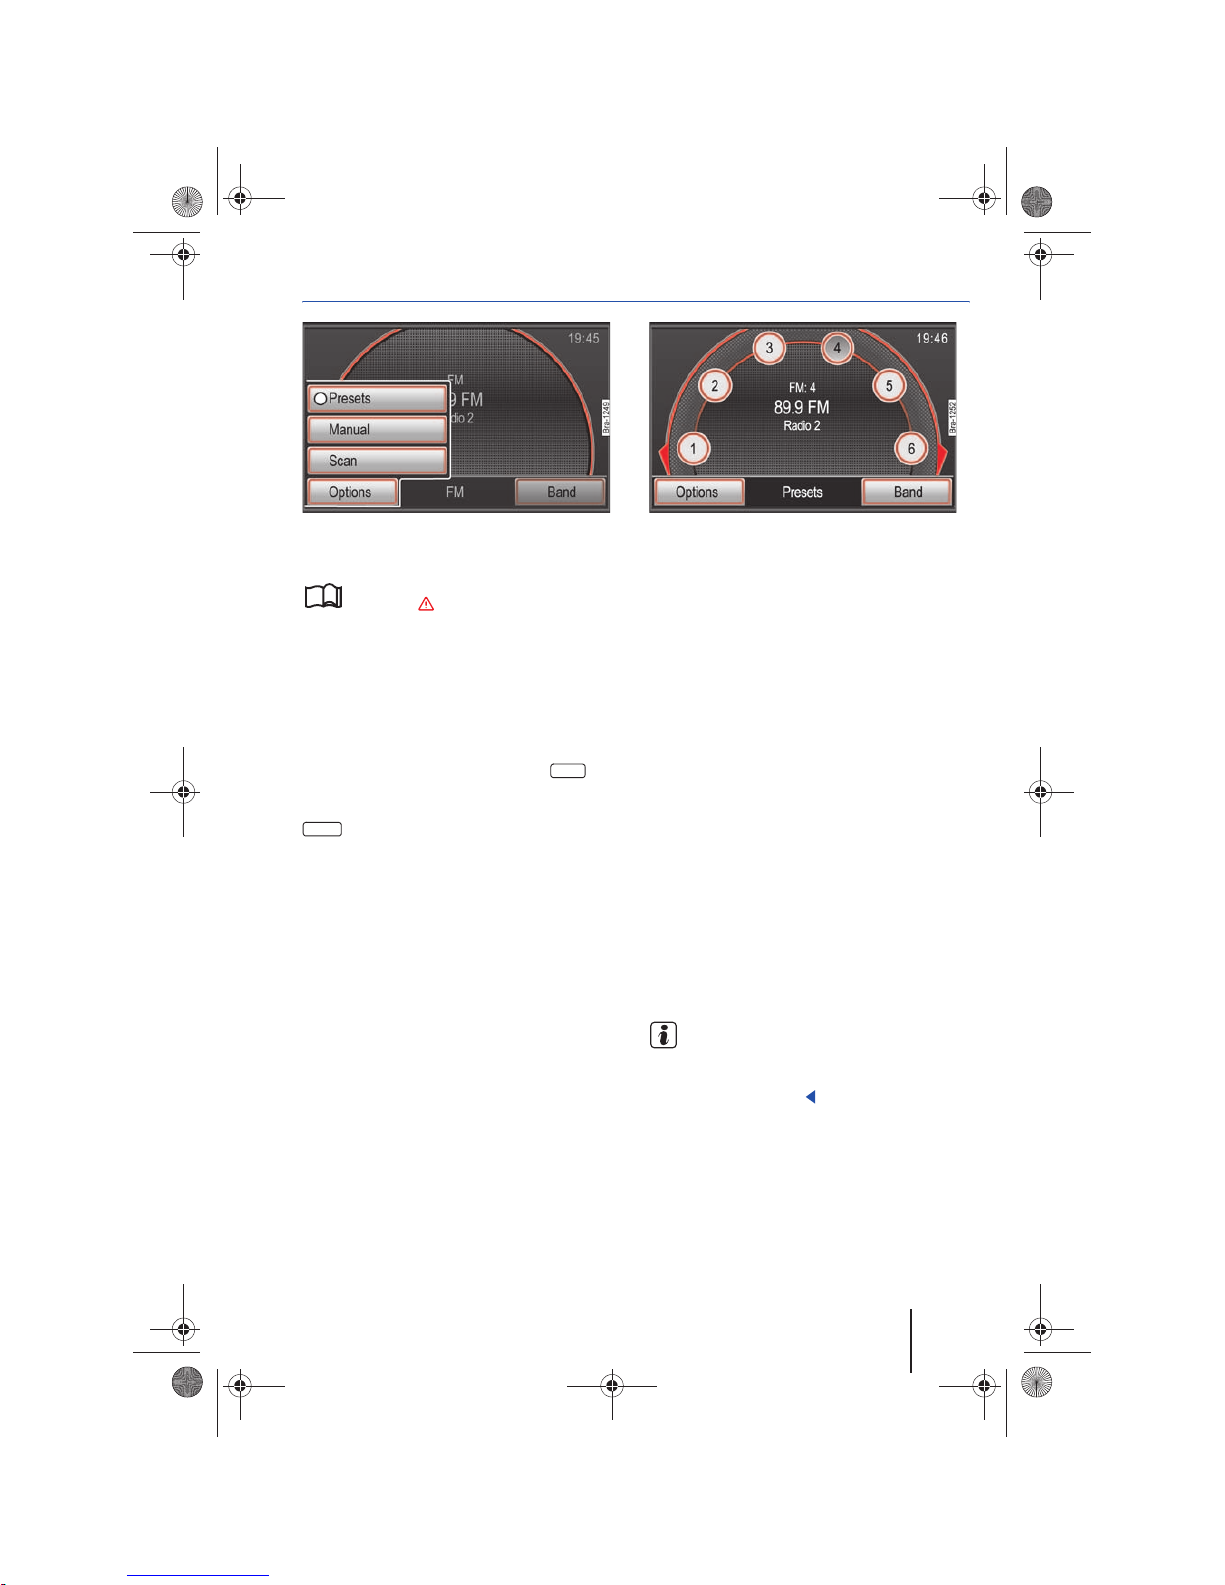
Fig. 8 RADIO main menu: Extras function button. Fig. 9 RADIO main menu with station scanning func-
tion.
Please first read and observe the safety instructions on page 3 and the introduc-
tory information on page 12.
When station scanning is running, all stations of
the current frequency band which can be received
are played for about 5 seconds each.
Starting and stopping station scanning
• Open the RADIO main menu and select the fre-
quency band ⇒ page 13.
• Press the function button.
• Press the function button in the pop-up
window ⇒ fig. 8.
• Station scanning starts and the function
button switches to ⇒ fig. 9.
• Press the function button or press the
tuning knob ⇒ page 6, fig. 1 in order to stop sta-
tion scanning at the current station.
Station scanning is also stopped if a station is manually selected via the arrow or station buttons, .
Manually selecting a station frequency
Fig. 10 Select radio stations manually.
Please first read and observe the safety instructions on page 3 and the introduc-
tory information on page 12.
• Open the RADIO main menu and select the fre-
quency band ⇒ page 13.
• Press the function button.
• Press the function button in the pop-up
window ⇒ fig. 8.
• The frequency of the selected station is indi-
cated and the function button switches to
⇒ fig. 10.
• Change the frequency incrementally:Turn the
tuning knob ⇒ page 6, fig. 1 .
• Rapid scan of the frequency band: Keep the
arrow button pressed . After releasing the
button, the next receivable radio station is automatically set.
• Press the function button in order to
end manual frequency selection.
After about 10 seconds of inactivity, manual frequency selection stops automatically.
Manual frequency selection is also stopped if a station is selected via a station preset button or the
display is changed to the FM station list.
For RDS-capable stations, the station name is displayed underneath the frequency
⇒ fig. 10 (Radio 2).
Extras
Scan
Extras
Scan
Scan
A
10
Extras
Manual
Extras
Manual
A
10
Manual
Navigationssystem_111.5U6.N31_23.book Seite 14 Donnerstag, 22. April 2010 5:16 17
Audio mode 15
111.5U6.N31.23
Displaying and hiding station preset buttons and storing stations
Fig. 11 RADIO main menu: Extras function button. Fig. 12 RADIO main menu with display of the station
preset buttons.
Please first read and observe the safety instructions on page 3 and the introduc-
tory information on page 12.
Radio stations can be assigned numbered function
buttons in the RADIO main menu ⇒ fig. 12. These
function buttons are called “station preset buttons”. Station preset buttons can be shown or
hidden.
Showing and hiding station preset buttons
• In the RADIO main menu, press the func-
tion button ⇒ fig. 11.
• Activate and deactivate the checkbox in the
function button in order to display or hide
the station preset buttons.
• If the checkbox is activated , six station preset
buttons are displayed in the RADIO main menu
⇒ fig. 12.
• Turn the tuning knob ⇒ page 6, fig. 1 in
order to tag the station preset buttons one after the
other. If the first or last station preset button displayed is tagged and the tuning knob is turned further, the next six station preset buttons will be displayed.
If .
Storing stations to station preset buttons
Storing a station on a station preset button overwrites the previously saved station.
• Show station preset buttons and select a sta-
tion.
• Press the desired station preset button until a
signal tone sounds.
• The station currently being heard is saved on
this station preset button ⇒ page 16, fig. 13.
• OR: Tag a station preset button by turning the
tuning knob and pressing the tuning knob until a
signal tone sounds.
Alternatively, stations can be saved exclusively by
using the tuning knob.
• Hold the tuning knob until the next free station
preset button is automatically offered for the current station.
• Turn the tuning knob to select another station
preset button.
• Briefly press the tuning knob to save the station.
Stations can also be saved via the station list view
⇒ page 13.
All stations stored on station preset buttons can be
deleted individually or collectively ⇒ page 20.
If the station preset buttons are usually not
used for station selection, Volkswagen recommends hiding them. It is then possible to
switch to the station list directly by rotating the
tuning knob. ⇒ page 13.
Extras
Presets
A
10
14
Navigationssystem_111.5U6.N31_23.book Seite 15 Donnerstag, 22. April 2010 5:16 17
RNS 310, RNS 315
Accessing stations stored on station preset buttons
Fig. 13 RADIO main menu with display of the station
preset buttons.
Please first read and observe the safety instructions on page 3 and the introduc-
tory information on page 12.
• Open the RADIO main menu and display sta-
tion preset buttons if necessary ⇒ page 15.
• Turn the tuning knob ⇒ page 6, fig. 1 in
order to tag the station preset buttons one after the
other. The station stored on the respective station
preset button is displayed.
• Press the tuning knob to access the displayed
station.
• OR: Briefly press the displayed station preset
button on the screen to directly access the stored
station.
• OR: If is displayed ⇒ fig. 13, all stations
can be accessed with the arrow buttons and
browsed ⇒ page 20.
A stored station can only then be played if it can
still be received at the current location.
Satellite radio mode (SAT)
Please first read and observe the safety instructions on page 3 and the introduc-
tory information on page 12.
A wide variety of audio programs from various categories (music, news, sports, entertainment, etc.)
can be accessed in the US and Canada via satellite
radio.
Satellite radio is subject to fees and requires activation by providing the device-specific SIRIUS ID
over the phone or via the Internet prior to use.
Displaying the SIRIUS ID
• In Radio mode, press the button
⇒ page 6, fig. 1 .
• Press the function button.
The SIRIUS ID for the activation of audio services,
as well as the necessary web address or phone
number needed for activation are displayed in a
pop-up window.
Different packages can be ordered. Please ask your
Volkswagen dealer for more information about
Satellite radio mode, or refer to the web address
displayed.
• Press the function button to close the pop-
up window.
The Sirius ID is displayed on channel 0.
A
10
MENU
A
2
SIRIUS I D
OK
Navigationssystem_111.5U6.N31_23.book Seite 16 Donnerstag, 22. April 2010 5:16 17

Audio mode 17
111.5U6.N31.23
Satellite radio main menu
Fig. 14 Satellite radio main menu.
Please first read and observe the safety instructions on page 3 and the introduc-
tory information on page 12.
• In the main menu press the RADIO button and
quickly one after the other in order to view
all available frequency bands.
• OR: Press the function button, then press
the function button in the pop-up window
⇒ fig. 14.
The most recent station will be played, if it is still
receivable on the channel in question.
Information regarding the selected station (type of
station, station name and channel number) is displayed in the Satellite radio main menu, with information regarding the current program also displayed (in fig. 14: Track, Artist and Album Name).
Service display on the screen
The method for storing and accessing preset
stations is the same as in Radio mode
⇒ page 12.
The Satellite radio provider is responsible for
the content of the broadcasts.
BAND
BAND
Sirius
Display: Meaning
Channel Update: Updates the Sirius program structure. Satellite radio reception is not necessary for the
duration of the update. After this, some stations may broadcast on a different channel.
Invalid: Station is no longer available on the saved or manually configured channel.
Unsubscribed: Station is not included in the current subscription or the subscription has expired.
LINKING: There is currently no satellite radio reception, for example, due to location under a thick
canopy of leaves or in an underground garage.
ANTENNA: Antenna malfunction. Please contact a Volkswagen dealer .
16
Navigationssystem_111.5U6.N31_23.book Seite 17 Donnerstag, 22. April 2010 5:16 17

RNS 310, RNS 315
Changing Sirius stations
Fig. 15 Station selection options. Fig. 16 Station list in the selected category.
Please first read and observe the safety instructions on page 3 and the introduc-
tory information on page 12.
Changing stations using the arrow buttons
• Press one of the arrow buttons on the device
⇒ page 6, fig. 1 to switch to the next station in
the selected category.
If is displayed, only the stations saved on the
station preset buttons are browsed through
⇒ page 15.
Configuring station selection options
• Press the function button in the Satel-
lite radio main menu ⇒ fig. 15.
• Activate the function button in the
pop-up window to show the station buttons in the
Satellite radio main menu ⇒ page 15.
• OR: Activate the checkbox in the func-
tion button to browse through the channels using
the tuning knob ⇒ page 6, fig. 1 .
• OR: Activate the checkbox in the
function button to open the station list view with
the tuning knob and open stations there.
Selecting satellite stations from the station list
All the activated stations in the chosen category
are displayed in the station list.
• Turn the tuning knob to open the list of avail-
able satellite stations in the selected category
⇒ fig. 16.
• Change category if required ⇒ page 19.
• Browse list and launch the desired station by
turning the tuning knob to select, then pressing it
⇒ page 8.
• Press the ⇒ page 6, fig. 1 button to close
the station list.
The list will close automatically after a a period of
inactivity.
SCAN
• Press the function button in the Satel-
lite radio main menu ⇒ fig. 15.
• Press the function button in the pop-up
window.
The function button switches to . All
stations are played for about 5 seconds each.
• Press the function button in order to stop
station scanning at the current station.
Scanning will also be stopped if a station is selected manually using the arrow or station
buttons.
A
3
Options
Presets
Tun e
A
10
Channel List
A
8
Options
Scan
Options Scan
Scan
Navigationssystem_111.5U6.N31_23.book Seite 18 Donnerstag, 22. April 2010 5:16 17
Audio mode 19
111.5U6.N31.23
Selecting stations from a particular category
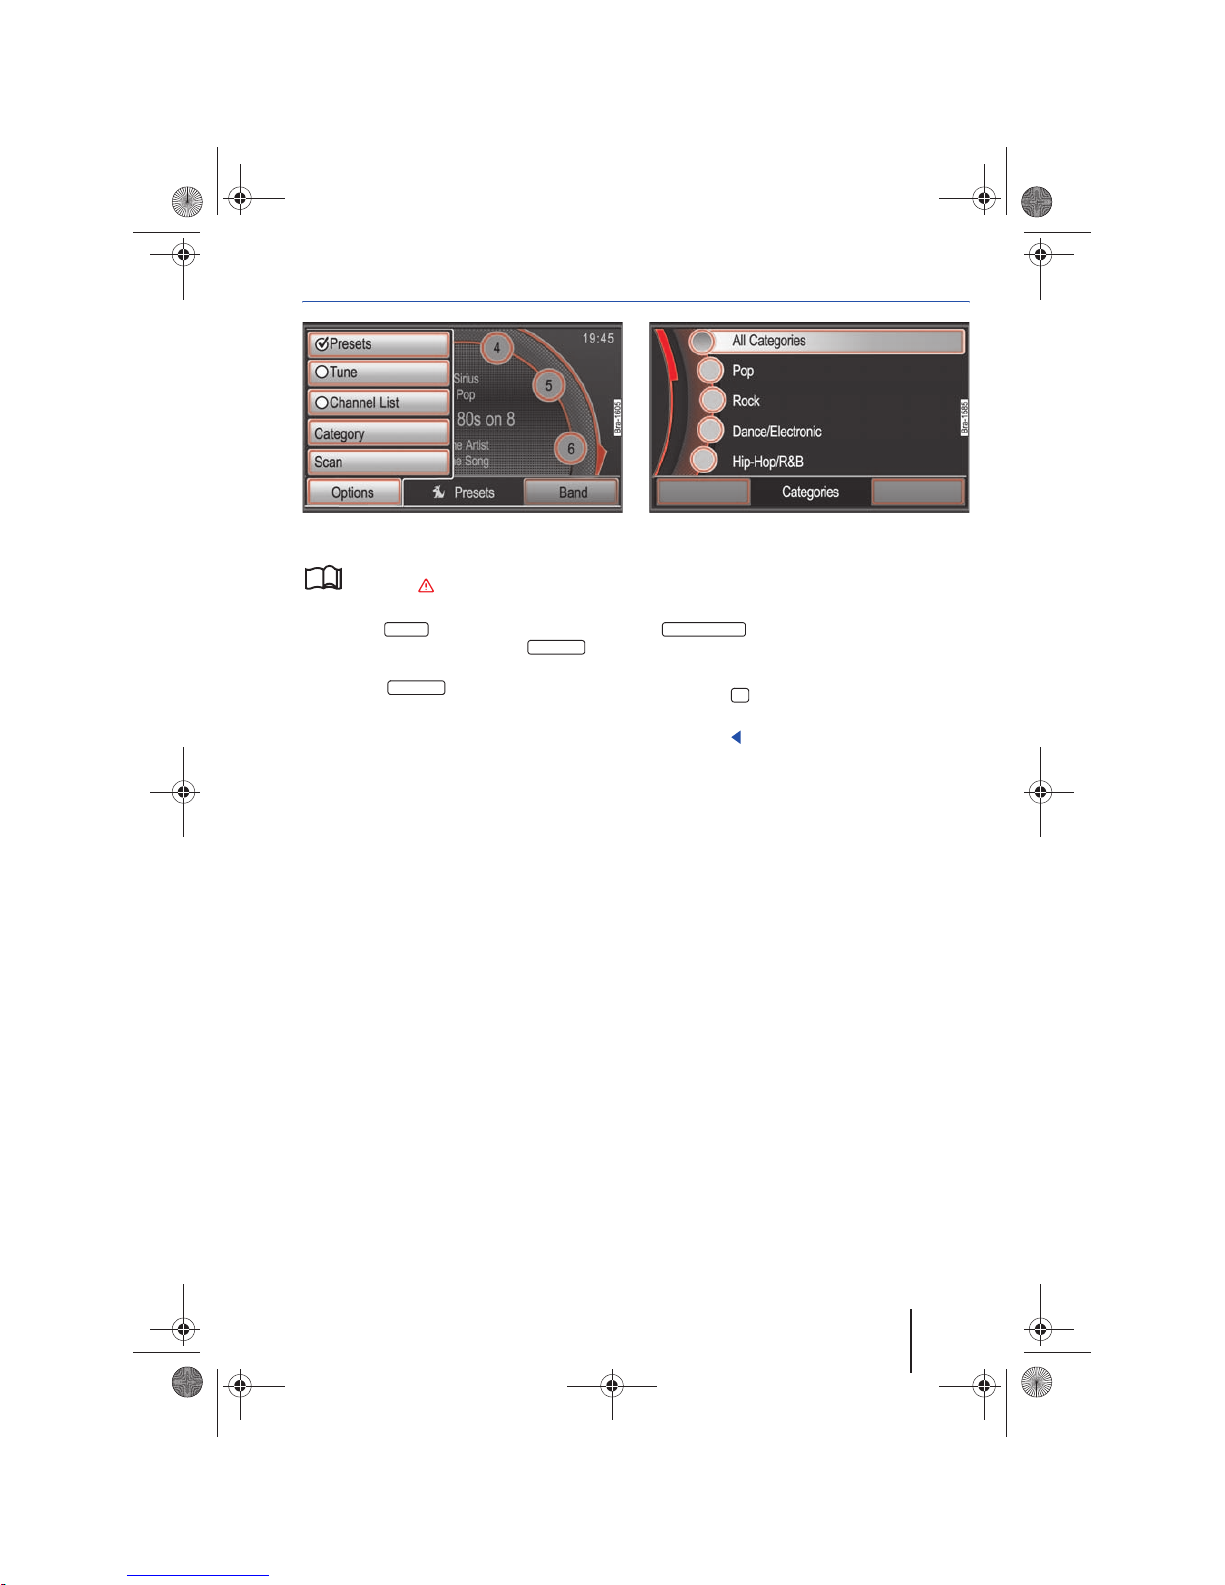
Fig. 17 Station selection options. Fig. 18 Select a category.
Please first read and observe the safety instructions on page 3 and the introduc-
tory information on page 12.
• Press the function button in the Satel-
lite radio main menu and press the func-
tion button in the in the pop-up window ⇒ fig. 17.
• OR: Press function button in the sta-
tion list view ⇒ page 18, fig. 16
Opens the list of available categories ⇒ fig. 18.
• Open the desired category by marking it (by
turning the tuning knob) and selecting it (by
pressing the knob) ⇒ page 8
The station list corresponding to the chosen category will be opened. Only the stations in the selected category will be displayed.
If is selected, stations of all categories will be displayed ⇒ page 18, fig. 16.
• Access stations as described ⇒ page 18.
• Press the button to close a list.
The list view will close au tomatically after a period
of inactivity.
Options
Categories
Categories
All Categories
18
Navigationssystem_111.5U6.N31_23.book Seite 19 Donnerstag, 22. April 2010 5:16 17
RNS 310, RNS 315
Radio settings menu (SETUP)
Please first read and observe the safety instructions on page 3 and the introduc-
tory information on page 12.
In the RADIO main menu, press the button
in order to open the Radio Settings menu.
SETUP
Function button: Effect
: Define station selection for arrow buttons and .
: All stations within reach in the selected frequency band can be browsed using the
arrow buttons ⇒ page 13.
: Only the stored stations can be browsed using the arrow buttons ⇒ page 1 6 (Display:
⇒ page 16, fig. 13).
a)
, , : Delete stations for a frequency band Stored on the
station preset buttons.
: All stored stations in the frequency band are deleted.
: Turn the frequency knob ⇒ page 6, fig. 1 , to display the stored stations one after the
other, and press to delete the displayed station.
a)
: Shows the Sirius Audio ID as well as the web site and phone number for activation ⇒ page 16.
Press the button to cancel ⇒ page 6, fig. 1 .
a)
For devices with SIRIUS satellite radio tuners.
Arrow buttons
Station List
Presets
Deleting Sirius Presets Delete FM Presets Delete AM Presets
All
Single
A
10
Sirius ID
A
8
Navigationssystem_111.5U6.N31_23.book Seite 20 Donnerstag, 22. April 2010 5:16 17
Audio mode 21
111.5U6.N31.23
Media mode
Introduction
In this section you’ll find information on the following:
Requirements for media sources and audio files . .
Playback sequence of files and folders . . . . . . . . . .
MEDIA main menu . . . . . . . . . . . . . . . . . . . . . . . . . . .
Inserting or ejecting a CD . . . . . . . . . . . . . . . . . . . . .
Inserting or removing a memory card . . . . . . . . . . .
External audio sources: (AUX-IN) input . . . . . . . . . .
Connecting external audio sources via Bluetooth®
Selecting a media source . . . . . . . . . . . . . . . . . . . . . .
Manual track change . . . . . . . . . . . . . . . . . . . . . . . . .
Changing playback mode ( function key) . . . . . . . .
Media settings menu(SETUP) . . . . . . . . . . . . . . . . . . .
In the following text, audio sources which contain
audio files on different data media (CDs, SD
memory cards, external MP3 players, etc.) are refer red to a s “media sources”. These audio files can
be played back via the related drives or audio in-
puts of the radio navigation system (internal CD
drive, external CD changer, SD memory card slot,
AUX-IN socket, etc.).
In the following, the listed playable data formats
are referred to as “audio files”. A CD containing
such audio files are referred to as an “audio data
CD”.
Supplementary information:
• Safety instructions ⇒ page 3
• Device overview ⇒ page 6
• Multimedia interface ⇒ page 31
• External CD changer ⇒ page 34
WAR NI NG
Connecting or inserting data media while
driving can distract from traffic and lead to
accidents.
Requirements for media sources and audio files
Please first read and observe the safety in-
structions on page 3 and the introductory information and safety instructions on
page 21.
Factory-installed CD players comply with the
safety class 1 according to DIN IEC 76 (CO)
6/ VDE 0837.
Only 12 cm standard CDs and memory cards with
physical dimensions of 32 mm x 24 mm x 2.1 mm
or 1.4 mm should be inserted into the device.
21
22
23
24
24
25
26
27
28
29
30
Media source Requirements for playback
Audio CDs with the CD Digital Audio
trademark
∀.
– Digital audio specification.
CD-ROM, CD-R, CD-RW audio data
CD up to maximum 700 MB (megabyte)
according to ISO 9660 or in the Joliet
data system.
SD and MMC memory cards up to
maximum 2 GB (gigabyte) and SDHC
memory cards up to maximum 32 GB.
MP3 files (.mp3) with bit rates from 48 to 320 kbit/s or variable bit rate.
WMA files (.wma) up to 9.2 mono/stereo without copy protection.
Play lists in PLS, M3U and WPL formats.
File name and file path not longer than 256 characters.
Directory structures with maximum eight levels.
On MP3 CDs maximum 50 folders and maximum 500 files.
On memory cards maximum 5000 folders and
maximum 15000 files, per folder maximum 6000 files.
20
Navigationssystem_111.5U6.N31_23.book Seite 21 Donnerstag, 22. April 2010 5:16 17
 Loading...