

Volker Kepler 5384, E2486, E2478, E2476 Brief Instructions
Brief instructions for use Model 5384 Kepler - Style, Select
from year of manufacture 03/2016 onwards
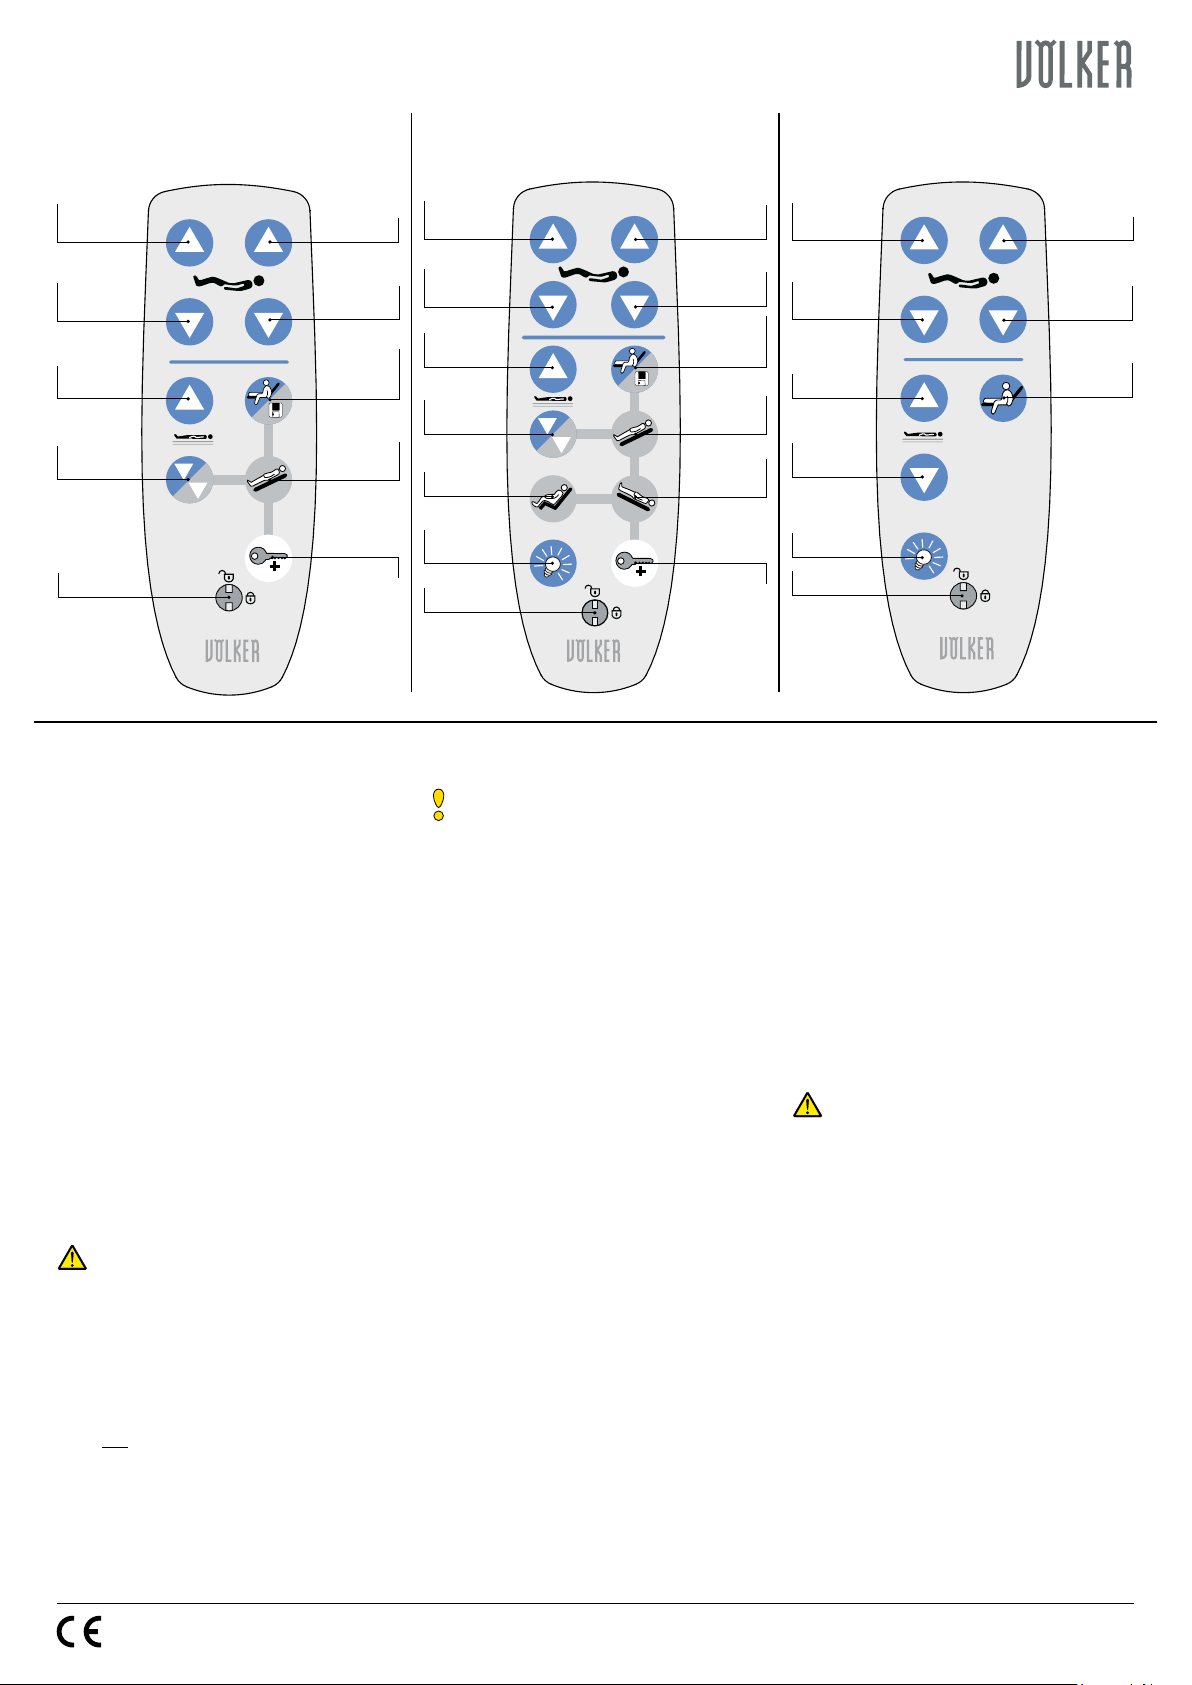
Hand control E2476
Style model
Upper leg
section up
Upper leg
section down
Lying surface
up
Lying surface
down
Lock switch
Back section up
Back section
down
Egress
position/
Height saving
Anti-Trendelen-
burg position
Enable button
Hand control E2486
Select model (optional for style model)
Upper leg
section up
Upper leg
section down
Lying surface
up
Lying surface
down
Cardiac Chair
Under-bed
light
Lock switch
Height saving
Anti-Trendelen-
burg position
Trendelenburg
Enable button
Back section
up
Back section
down
Egress
position/
position
Patient hand control E2478
Optional (in addition and only in conjunction
with another hand control)
Upper leg
section up
Upper leg
section down
Lying surface
up
Lying surface
down
Under-bed light
Lock switch
Back section up
Back section
down
Egress
position
Cleaning, disinfection
In order to maintain the functionality of the bed,
the bed should be cleaned, disinfected and tested
• at regular intervals,
• as required,
• after each occupant/patient change,
• according to the guidelines of the relevant hygiene plan,
so that it can be reused immediately without risk.
Incorrect cleaning/disinfection of the bed can
cause danger.
The detergents used must contain one of the following ingredients:
• Quaternary ammonium compounds
• Hydrogen peroxide
• Peroxides
Please observe the information provided by
the detergent manufacturer. Failure to observe
these instructions can lead to personal injury
or material damage.
WARNING
"Risk of electric shock / fire and
functional failure"
The bed must always be disconnected
from the power supply before cleaning
and disinfection.
Cleaning
Depending on the degree of soiling, we recommend cleaning the bed with a damp cloth or similar. A soft brush can also be used for stubborn
dirt or stains. Do not get the bed too wet whilst
cleaning.
Wipe disinfection
The dilution ratio specied by the detergent manufacturer in the corresponding instructions for
use must be used.
NOTE Solvents are not permitted.
• Grinding agents, scouring pads or other
dulling substances must not be used.
• Organic solvents such as halogenated / aromatic hydrocarbons and ketones must not be
used.
The following instructions must be observed
when using cleaning and disinfecting agents:
• As a general rule, the working solutions should
be freshly prepared.
• The concentrations used should be neither
higher nor lower than those indicated. The
so-called "shot" method should not be used
under any circumstances. Under no circumstances should someone using a disinfectant
follow their own judgement in adding a cleaning agent such as soap or washing-active substances (leads to soap failure).
• There is a risk of re or explosion from alcoholic spray disinfectants when these are used
over large areas.
• Detergents must not contain any corrosive or
irritant components.
• They must not contain any substances that
change the surface structure or gripping properties of the materials.
•
Lubricants must not be affected
• The pH value of the water must be no higher
or lower than 6 - 8.
• Water should not exceed a total water hardness of 0.9 mmol/l (corresponding to 5°dH).
The specications we have issued, do not absolve
the user of the obligation to carry out his or her
own checks and tests, since the ratios (e.g. water
hardness) can vary depending on the geographical location. It is therefore impossible to offer
legally binding assurance of certain properties.
.
The plugs of the cables and the sockets of the
control box are only protected against splash
water when plugged together and with the cover
(securing clamp) provided.
• Prevent water and detergents from getting into
unused connections.
• Labels and markings may not be brushed or
cleaned with high pressure.
• Dry the bed with special care and test it before
reuse.
• Stubborn dirt or stains should be soaked before cleaning (please check beforehand).
Spray lances and automatic washing systems
WARNING Cleaning and disinfection
using spray lances from high-pressure
cleaning equipment and in automatic bed
washing systems is not permissible.
If unsuitable washing and disinfecting agents are
used, if the mixing ratio is incorrect or if the beds
are not adequately cared for, damage can occur
to the surface coating for which Völker GmbH is
not liable.
Cleaning the hand controls
To avoid so-called "cross-contamination" between the occupant/patient and nursing staff, the
hand controls must be cleaned daily!
Völker GmbH • Wullener Feld 79 • 58454 Witten/Germany
Telefone +49 2302 960 96-0 • Telefax +49 2302 960 96-16 • www.voelker.de • info@voelker.de KA282 Rev. 5 (03.2018)

Brief instructions for use Model 5384 Kepler - Style, Select
CLICK
CLICK
from year of manufacture 03/2016 onwards
Continuous side rails, style model
Raising the side rails
To raise the side rails, take hold of the top rail and lift it rst at the head end
and then at the foot end until the rail audibly engages (1, 2).
Lowering the side rails
Starting at the foot end, take hold of the top rail and lift it slightly. Press the
button on the side and lower the side rail at the foot end by hand. Repeat
at the head end (3).
To prevent the patient from falling out, the continuous side rails must always
be raised at the head end rst and always lowered again rst at the foot
end! (4)
1 2 3
Divided side rails, select model
Raising the side rails
Pull the side rail out horizontally until the end stop, and raise it upwards (1).
To adjust the height of the side rail, pull the telescopic section upwards until
it reaches its end stop (2).
Lowering the side rails
Press both buttons on the outside of the frame at the same time to bring the
1 2 3 4
height-adjustable side rail to its lowest position (3).
Press the "Drücken / Press" trigger at the lower edge of the side rail and tilt
it sideways into a horizontal position, so that it lies parallel to the oor. Push
the side rail completely underneath the lying surface (4).
When using the raised side rails 43.5 - 45 cm, the mattress holder must be
folded in or out.
Rail inll panels
The rail inll panels close the middle gap between the divided side rails on
Völker beds so as to enable a continuous side rail solution.
NOTE Please observe the detailed instructions for use for the rail infill
panels.
The rail infill panels are inserted in the insertion sleeves of the upper leg
section.
WARNING Make sure that the side rails are fully set up and latched
into place. When activating the electric lying surface adjustment
or side rails, it must be ensured that the patient/occupant is not in
contact with the side rails and that no part of the body is protruding
through the side rails. We strongly recommend that you lock the functions of the hand control.
4
To remove the rail inll panel from
the holder, move the pendulum into
a vertical position and pull the rail
inll panel out upwards at the same
time.
Rapid lowering of the back section / CPR function
Both models of the bed have a mechanical rapid lowering of the back section for reanimation as standard.
WARNING The CPR function (Cardiopulmonary Resuscitation function)
may only be executed in an emergency and only by trained specialist personnel!
WARNING The CPR function may not be used instead of the hand
control for lowering the back section!
Völker GmbH • Wullener Feld 79 • 58454 Witten/Germany
Telefone +49 2302 960 96-0 • Telefax +49 2302 960 96-16 • www.voelker.de • info@voelker.de KA282 Rev. 5 (03.2018)
Lever for rapid lowering of the back
section for reanimation, both sides
below the seat area.
Pull the yellow lever forwards for rapid lowering of the back section. The
back section now quickly moves
downwards.
 Loading...