

Page 1

HE S Series
TUBE-ICE
MACHINE
INSTALLATION
&
START-UP
INSTRUCTIONS
Part Number: 12A4171S0702
5/2/2011
Page 2

Installation & Start-up – HES Series
Blank Page
2
Page 3

Installation & Start-up – HES Series
Revision Date: April 2011
Table of Contents
Bin Installation ----------------------------------------------------------- 5
Setting the Ice Machine on the Bin ----------------------------------- 5
Figure-1 Ice Bin to Machine Layout ------------------------------- 5
Figure-2 Forklift-&-Blocks Method -------------------------------- 6
Figure-3 Forklift-&-Rope or Lifting Straps Method ------------- 7
Sealing Instructions-Ice Machine to Bin Top ----------------------- 8
Figure-4 Machine to Bin Top Installation ------------------------- 8
Connecting Electrical, Water & Drains ----------------------------- 9
Figure-5 Rear Utility Connection Layout -------------------------- 9
Wiring & Electrical Connection -------------------------------------- 10
Figure-6 Terminal Block Connections ----------------------------- 10
Table-1 Electrical Specifications ------------------------------------ 10
Piping & Drain Connections ------------------------------------------- 11
Table-2 Water Supply & Drains ------------------------------------ 11
Figure-7 Water Connections ----------------------------------------- 11
Figure-8 Typical Space Diagram ----------------------------------- 12
Air-Cooled Installation Instructions --------------------------------- 13
Table-3 Pounds R-404A to Add vs Liquid Line Length ---------- 14
Table-4 Air-Cooled Condenser Data -------------------------------- 15
Table-4A Cold Weather Kit Parts ----------------------------------- 16
Figure-9 Condenser Dimensions ------------------------------------- 16
Figure-9A Condenser Field Piping, 50/25/25 Split --------------- 17
Figure-9B Condenser Field Piping, 50/50 Split ------------------- 18
Condenser Equivalent Line Size Worksheet ----------------------- 19
Table-5 Fitting factors ------------------------------------------------ 19
Figure-10 Minimum Traps for Discharge Lines ------------------ 19
Air-Cooled Condenser Wiring-----------------------------------------
Figure-11 Condenser Wiring to Ice Machine ---------------------- 20
20
Figure-12 Wiring for Single Fan, 50/50 Split --------------- 20
Figure-12A Wiring for Single Fan, 50/25/25 Split --------- 21
Figure-12B Wiring for Dual Fan, 50/50 Split --------------- 22
Refrigerant Connections to Air-Cooled Condenser --------------- 23
Figure-13 Field Attachment for Refrigerant Tubing ------------- 23
Table-6 Torque Ratings for Rotalock Connectors ---------------- 23
Ice Bin Thermostat Sensor Installation ------------------------------ 24
Figure-14 Location of Thermostat Sensors ------------------------ 24
Programming the Electronic Bin Thermostat ---------------------- 25
Figure-15 Electronic Thermostat ------------------------------------ 25
3
Page 4

Installation & Start-up – HES Series
Initial Start-Up & Installation Procedure --------------------------- 26
Figure-16 Piping Schematic, Air-Cooled -------------------------- 26
Figure-17 Piping Schematic, Water-Cooled ----------------------- 27
Figure-18 Switch Plate ------------------------------------------------ 28
Figure-19 Control Circuit Breakers --------------------------------- 29
General Machine Information ----------------------------------------- 31
Refrigerant Charge ----------------------------------------------------- 31
Total Pump down Mode----------------------------------------------- 31
Adding Refrigerant ---------------------------------------------------- 31
Adjustable Blowdown ------------------------------------------------- 32
Automatic Blowdown ------------------------------------------------- 32
Figure-20 Automatic Blowdown / Petcock ------------------------- 32
Troubleshooting -------------------------------------------------------- 33
Table-7 PLC Inputs, Outputs & Fault Codes ----------------------- 33
Figure-21 Fault Indicator / Selector switch Location ------------- 33
Figure-22 Copeland Performance Alert Wiring ------------------- 34
Figure-23A Control Panel Layout ----------------------------------- 35
Figure-23B Control Panel Layout (Hoffman Enclosure) --------- 35
Table-9 Control Panel Parts List ------------------------------------- 36
Figure-24 HES Wiring Schematic, Single Ice --------------------- 37
Figure-25 HES Wiring Schematic, Dual Ice ----------------------- 38
Figure-26 HES Wiring Schematic, Single Ice (Dual Voltage)--- 39
Figure-27 HES Wiring Schematic, Single Ice (400/460V) ------ 40
Figure-28 Casing Installation ---------------------------------------- 41
Convert from Cylinder Ice to Crushed Ice ------------------------- 42
Table-10 Recommended Freezer Pressure Settings --------------- 42
Table-11 Recommended Ice Weights per cycle ------------------- 42
Table of Contents (Cont.)
Review Checklist --------------------------------------------------- 43
Warranty Registration / Start-up Form ---------------------- 44
4
Page 5

Installation & Start-up – HES Series
Installing Your Tube-Ice Machine
! WARNING !
Only service personnel experienced and certified in refrigeration and qualified to work
with high voltage electrical equipment should be allowed to install or work
on this Tube-Ice® machine.
! WARNING !
Important Notice.
The Warranty Registration / Start-Up Form must be completed and returned
to Vogt Tube-Ice® to initiate and assure a full warranty. A postage paid
envelope is provided or you may fax the report to 800-770-8648.
Bin Installation.
legs. Screw these legs to the bottom of the bin. You can make MINOR leveling adjustments by
using these legs as leveling screws, as outlined in the manufacturer’s instructions.
Setting the ice machine on the ice bin.
machine can be elevated and placed on the bin top. Using the dimensions in FIGURE-1 below,
mark the machine footprint on the bin top by measuring over from the ice chute opening.
Note: Above machine footprint shown with stainless casings
Set the bin on solid, level footing. Inside the bin you will find the four
Once the ice storage bin is level, the Tube-Ice®
Machine footprint with no casings: 40” X 26”
Machine footprint with plastic casings: 41” X 27 1/2”
FIGURE - 1
Ice Bin to Machine Layout
5
Page 6

Installation & Start-up – HES Series
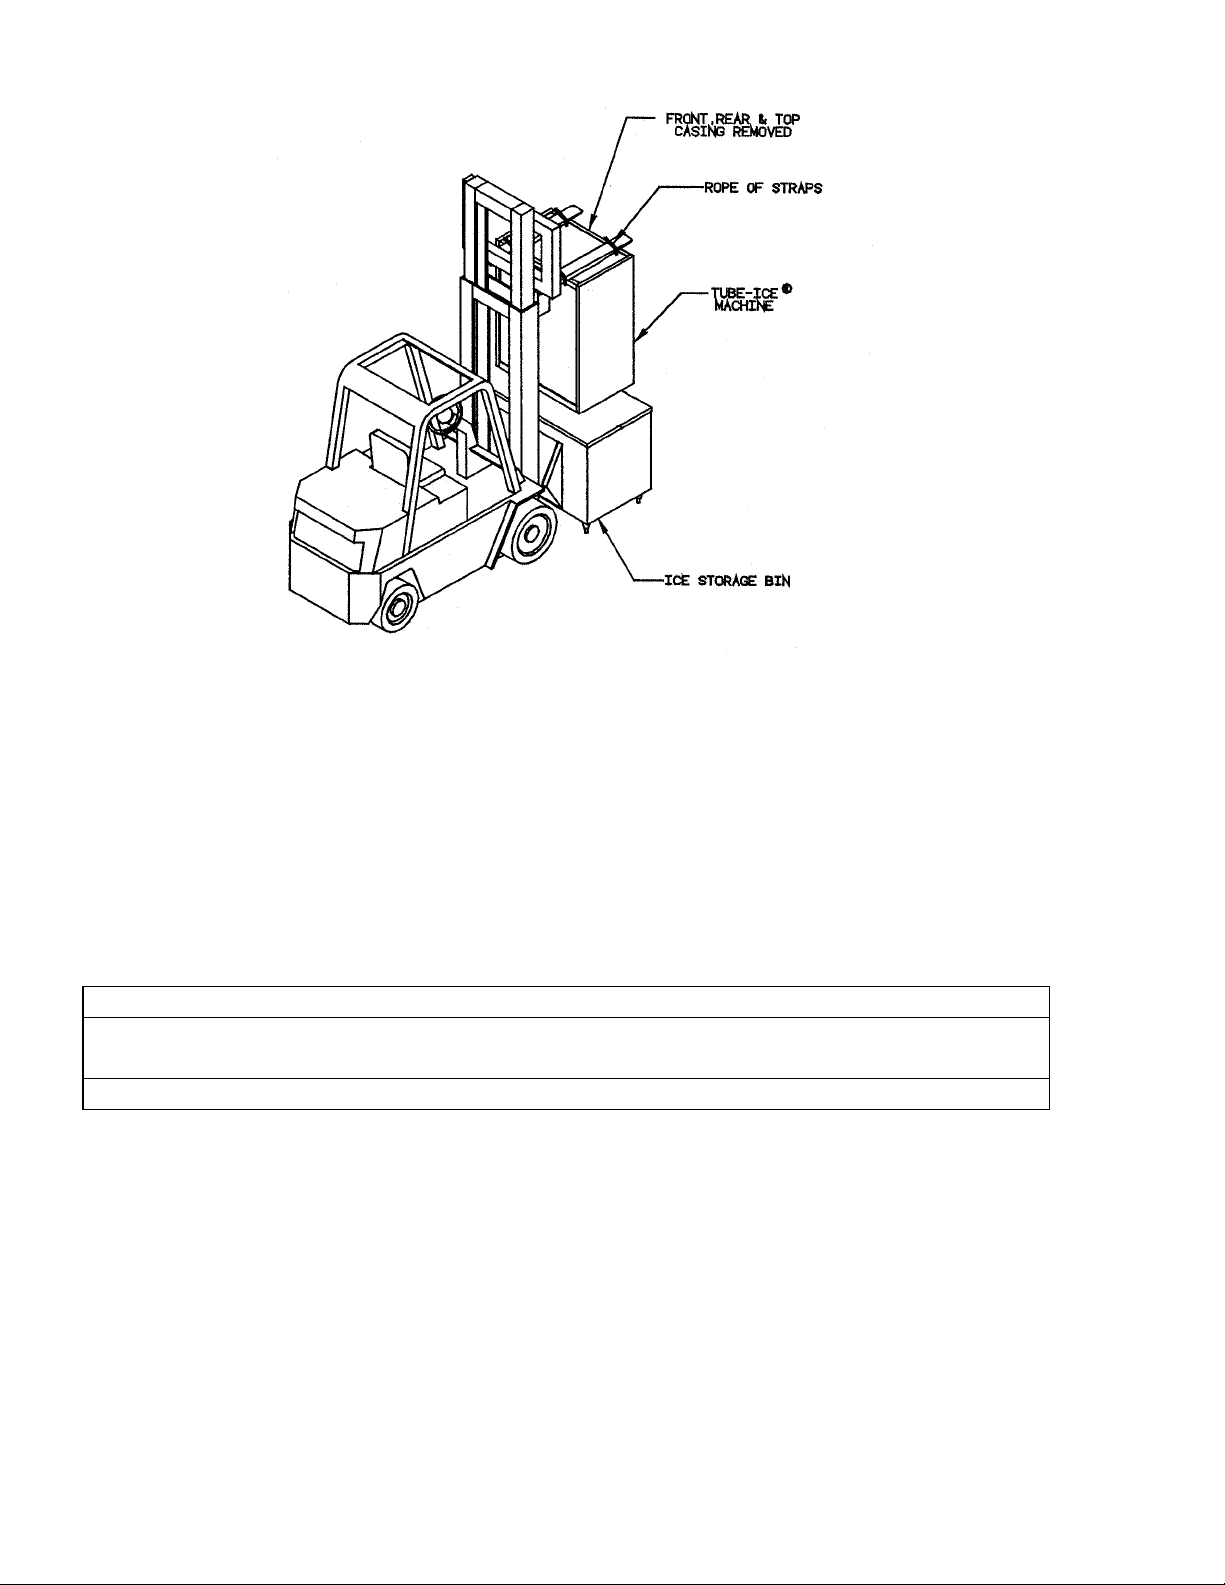
FIGURES 2 and 3 illustrate two methods of lifting & setting Tube-Ice® machine on a ice storage bin.
! CAUTION !
The approximate weight of the machine is 1360 pounds.
Always use equipment with adequate load-carrying capacity.
! CAUTION !
FIGURE - 2
Forklift-&-Blocks Method
You need: + forklift truck with adequate load and height capacities
+ (8) 2X4 wood blocks 8 in. long
+ (2) wooden 2X4’s measuring 3-ft. long
+ pry bar
Step 1. Position Tube-Ice® machine on forks.
! CAUTION !
The Tube-Ice® machine may be somewhat top heavy on the rear.
! CAUTION !
Step 2. Stack wood blocks in each corner of the drip pan on top of the ice storage bin.
Step 3. Lift and set Tube-Ice® machine on wood blocks.
Step 4. Remove forklift.
Step 5. Stack 3-ft. long 2X4’s beside drip pan, overlapping front and back of bin.
Step 6. Using a pry bar with fulcrum on 2X4’s, raise side of machine enough to remove TOP
wood blocks.
! CAUTION !
Do not remove top AND bottom blocks at the same time.
! CAUTION !
Step 7. Repeat steps 5 and 6 on other side.
Step 8. With machine sitting on one (1) block under each corner, repeat steps 5, 6, and 7 remove
remaining blocks. Drip pan flanges may bend slightly.
Step 9. Straighten bent drip pan flanges.
Step 10. Check alignment of ice chute to bin opening.
6
Page 7
Installation & Start-up – HES Series
FIGURE - 3
Forklift-&-Rope or Lifting Straps Method
You need: + extra headroom
+ Forklift with adequate load and height capacities
+ 1/2” rope or four lifting straps to bind forks to top angles
Step 1. Remove front, rear, and top access panels.
Step 2. Position fork truck so that forks are resting flat on top angles of Tube-Ice®
machine.
Step 3. Use the rope or straps to securely bind forks to the top angles.
! CAUTION !
Be sure the bin is level and is set in its proper location.
See the space diagram, FIGURE 6.
! CAUTION !
Step 4. Lift Tube-Ice® machine and set into drip pan of bin.
Step 5. Remove rope or straps and fork truck.
Step 6. Check alignment of ice chute to bin opening.
7
Page 8
Installation & Start-up – HES Series
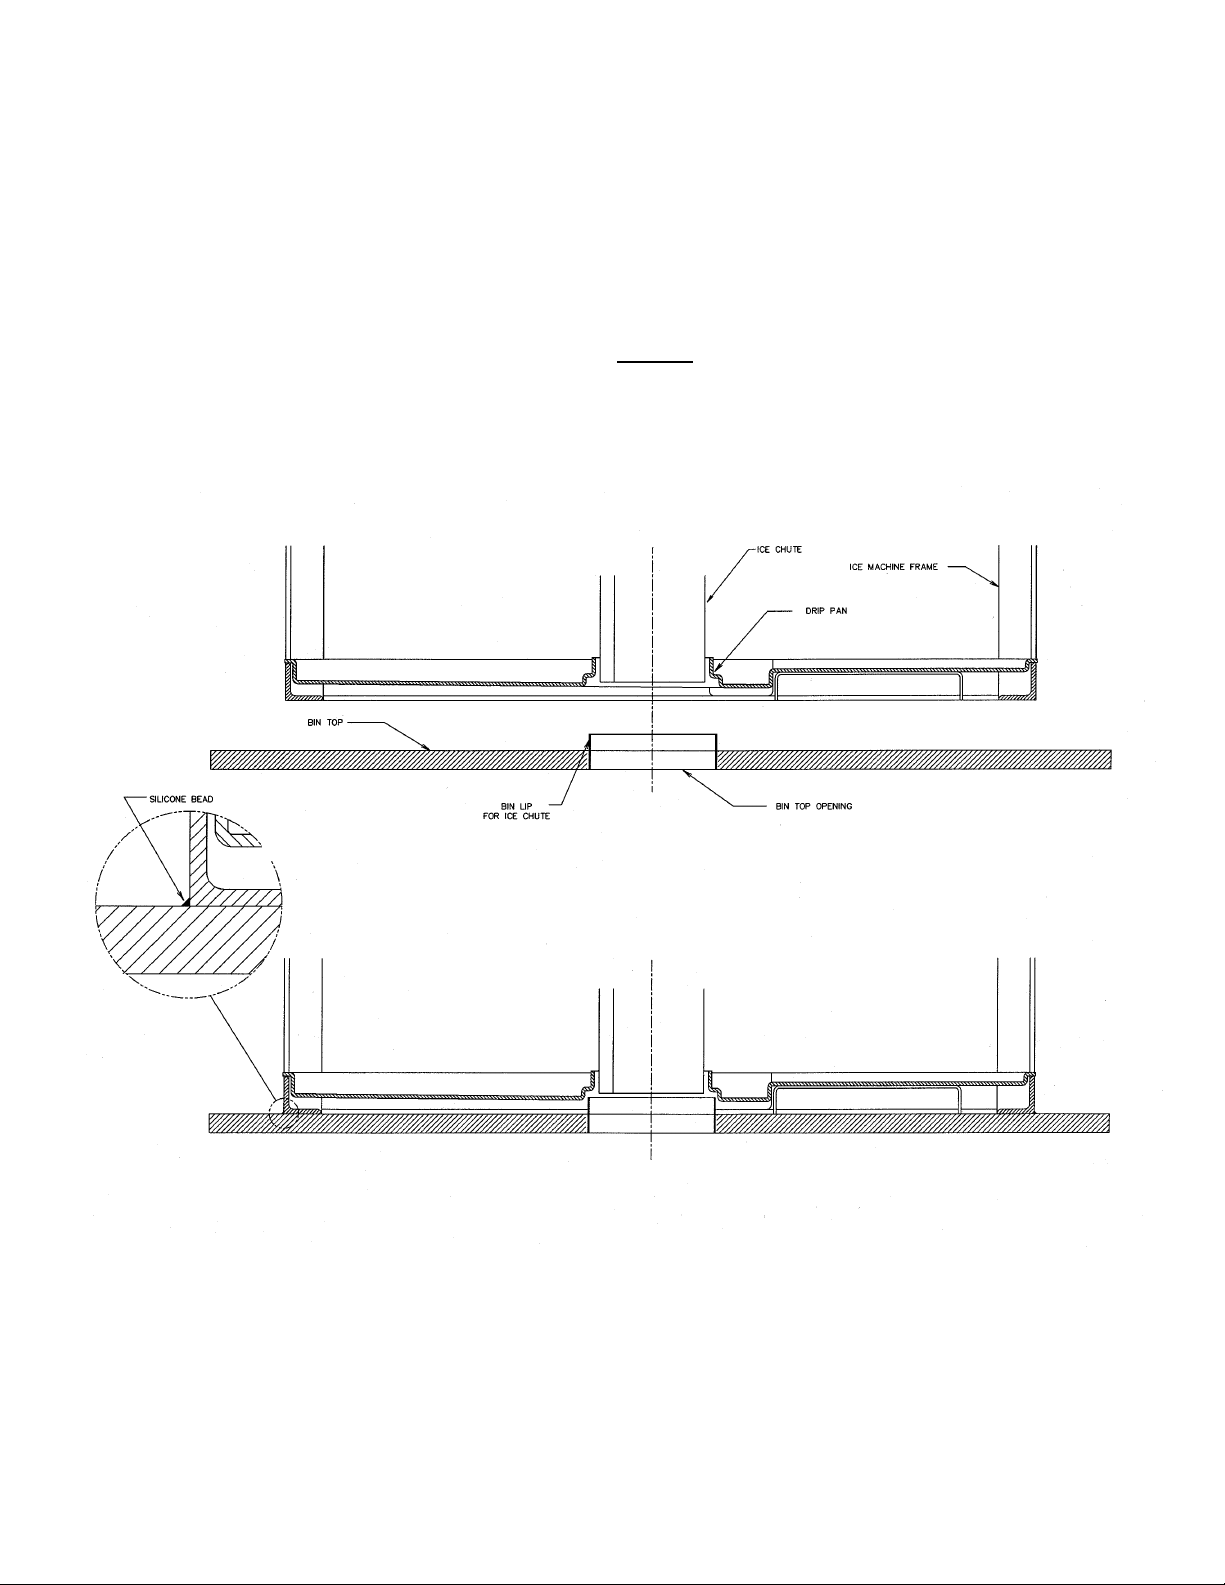
Sealing Ice Machine to Bin Top.
For machines installed on bins that do not have a drip pan, the perimeter of the ice machine
must be sealed with silicone. A tube of silicone sealant, and instructions are shipped inside the
ice machine for this purpose. (See FIGURE-4 and the instructions below)
1. Set machine on bin making sure that ice discharge chute is centered over bin
top opening.
2. Apply approximately 1/8” fillet bead of silicone to all sides of frame where it
meets bin top as shown in Detail “A”. NOTE: make sure that silicone bead on
frame does not interfere with proper casing fitup.
FIGURE – 4
Machine to Bin Top Installation
8
Page 9
Installation & Start-up – HES Series
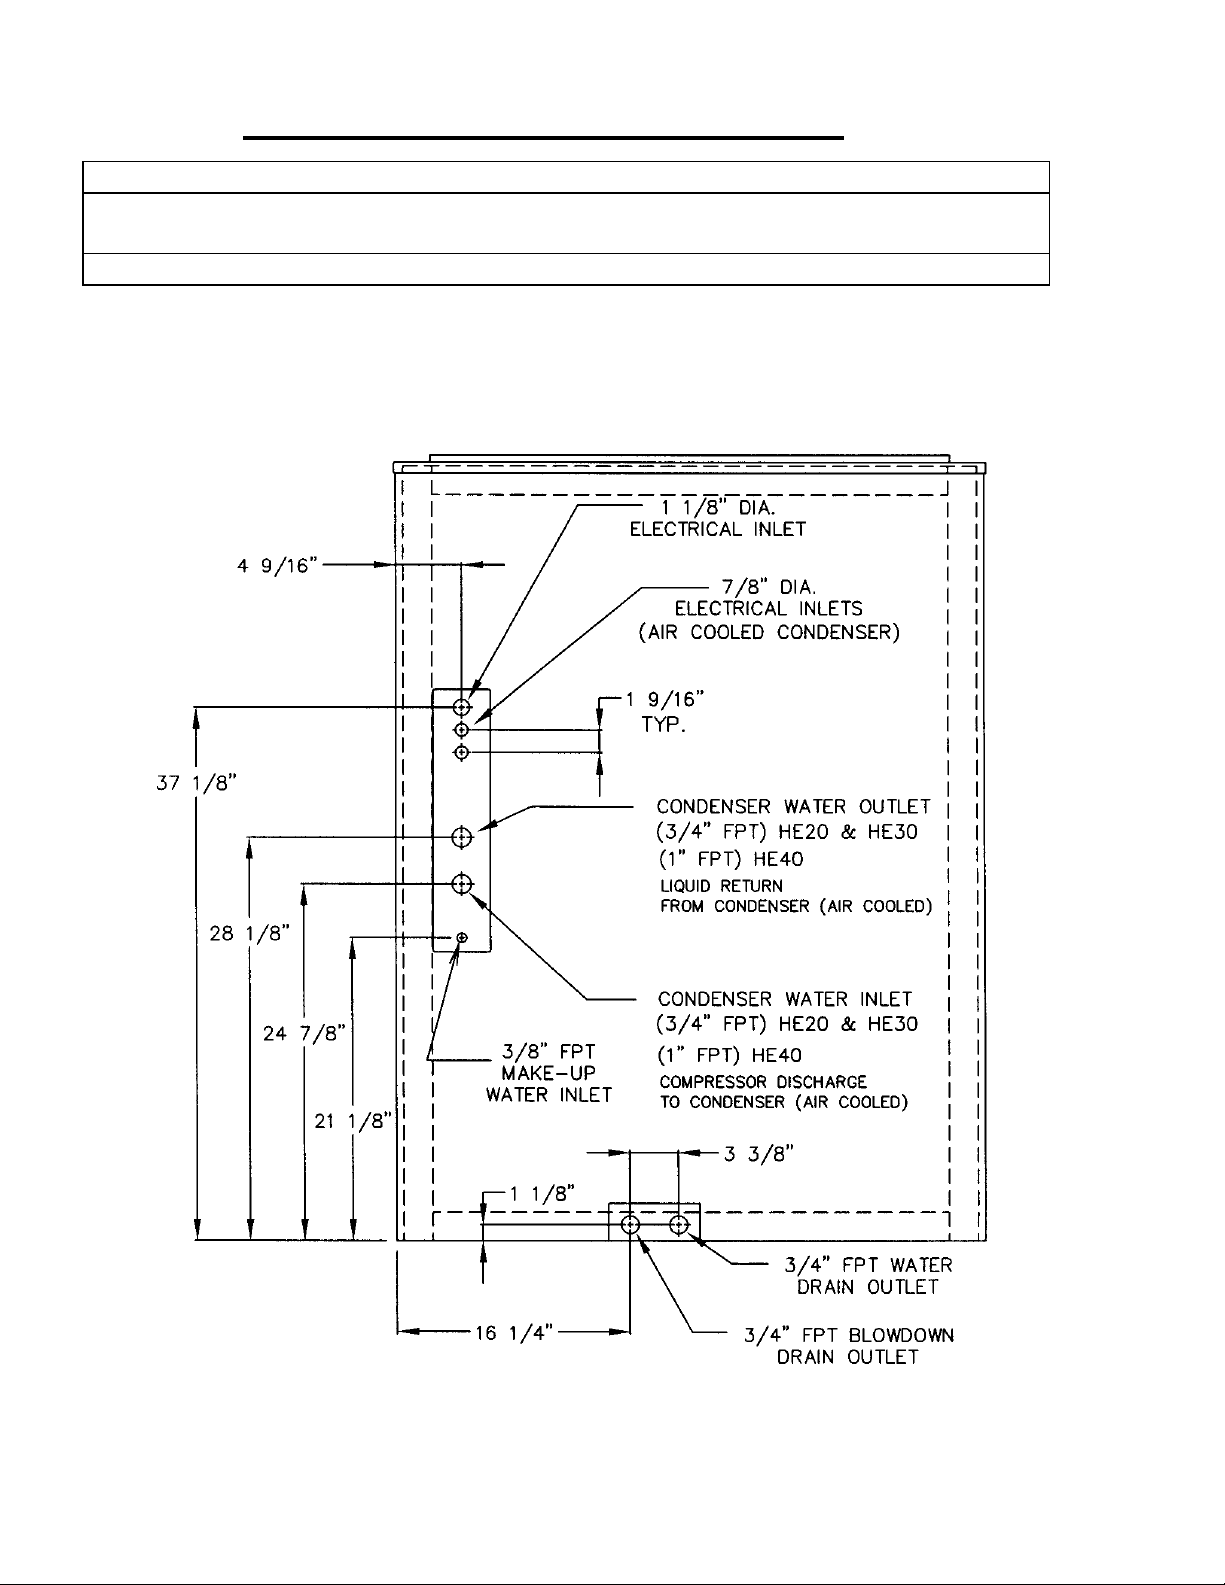
Connecting Electrical, Water & Drains
! WARNING !
The scroll compressor is phase sensitive. The compressor rotation must be checked before
the unit is operated. Failure to do so may affect compressor warranty.
! WARNING !
All electrical, water, drains, and air-cooled condenser connections are made at the rear of the ice
machine. See FIGURE-5 below for location information of all connecting points.
FIGURE – 5
Rear Utility Connection Layout
9
Page 10
Installation & Start-up – HES Series
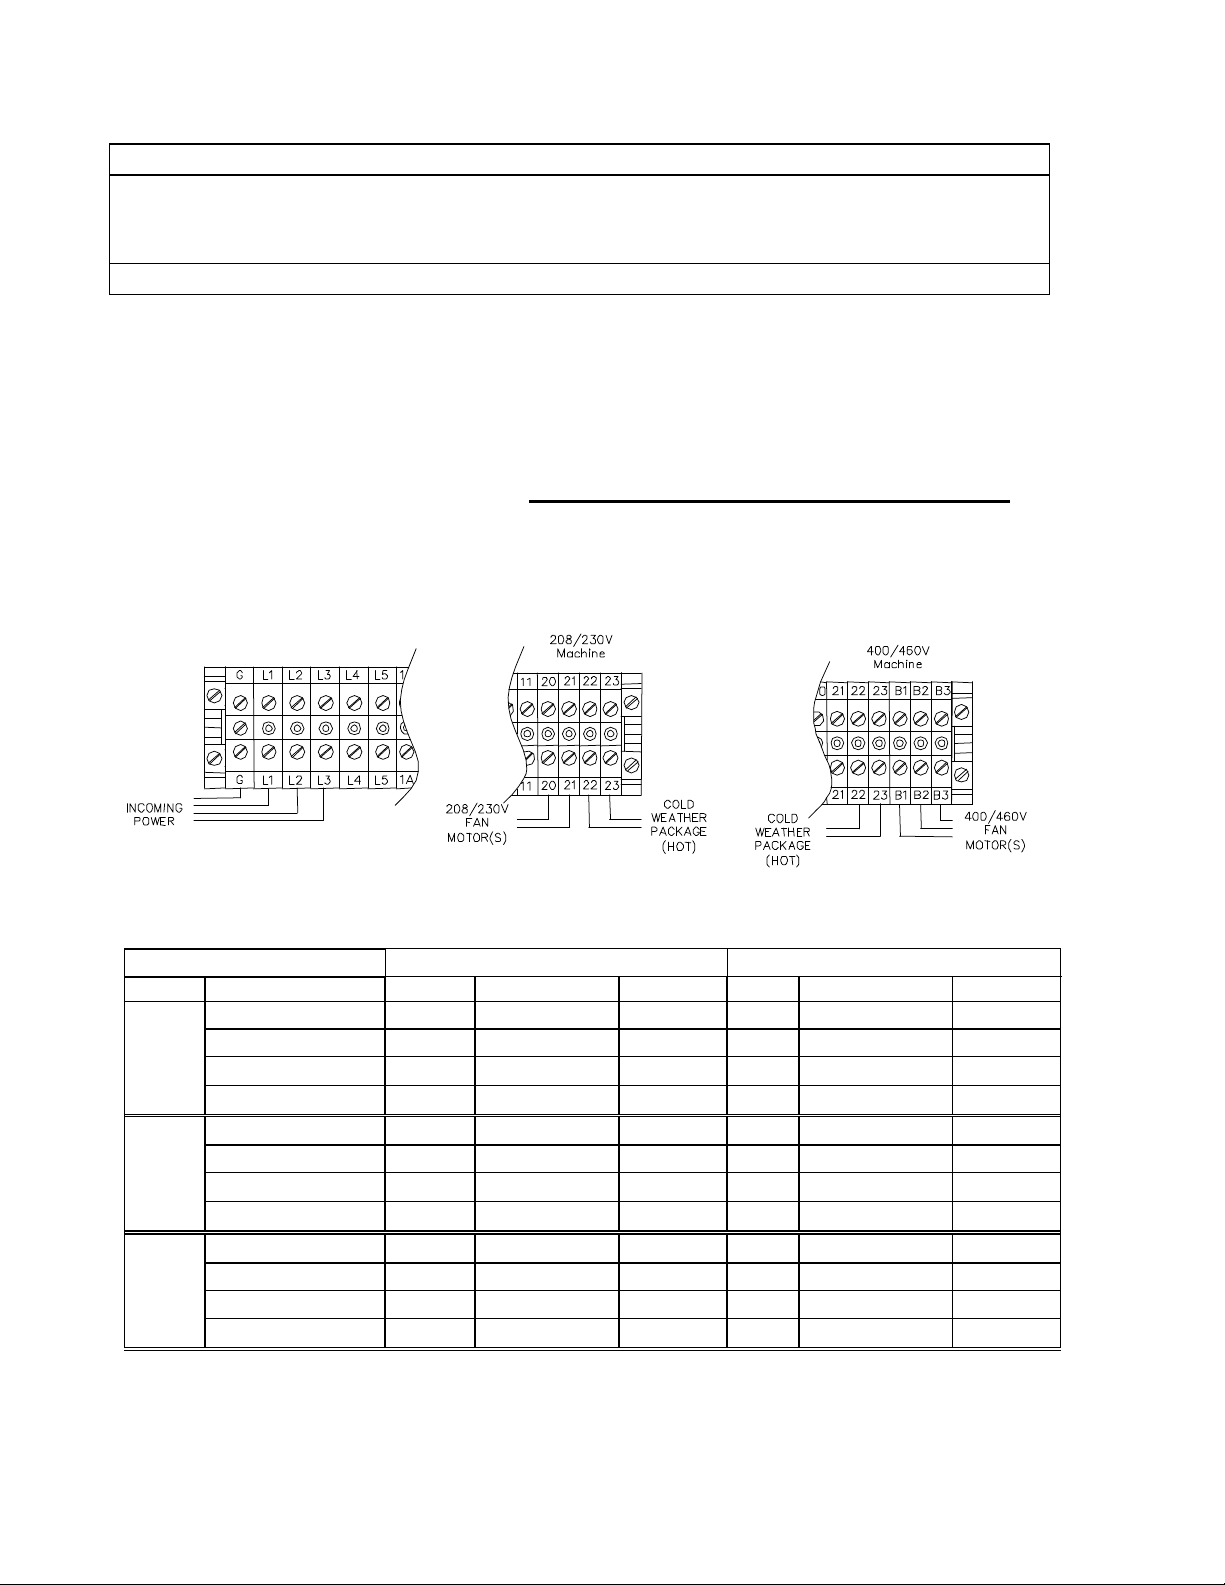
Wiring And Electrical Connection.
Only service personnel experienced in refrigeration and qualified to work with high
voltage electrical equipment should be allowed to install or work on the Tube-Ice®
Refer to TABLE-1 below to properly size wiring connections. A fused disconnect must be
provided near the Tube-Ice® machine. Connect 3-phase power to terminals L1, L2, L3 for
operation of the Tube-Ice® machine and its controls. (See FIGURE-6) If one leg of the 3 phase
power is higher or lower (“Wild”), then it should be connected to terminal #L2. Connect the
“Ground” wire to the “Ground” terminal provided. On dual voltage, 50 Hz machines, the 220V
single phase should be connected to terminals L4 and L5.
Note: When initially starting the machine, the scroll compressor must be phased properly. If
the compressor is run backwards for an extended period of time, the compressor may be
damaged.
208/230V Air-cooled condenser should be wired to terminals 20,21,22 and 23. (see FIG. 11 &
12). 460V air cooled condensers should be wired to terminals B1, B2, B3, 22 & 23.
! WARNING !
machine.
! WARNING !
FIGURE – 6
Terminal Block Connections
Standard Voltages: Water Cooled Air Cooled
Model Voltage F.L.A. Min. Ampacity Max. Fuse F.L.A. Min. Ampacity Max. Fuse
HES20
HES30
HES40
208/230, 3p, 60 hz 18.0 20.9 30 21.4 24.3 35
460, 3p, 60 hz 9.0 10.4 15 10.3 11.7 20
220, 3p, 50 hz 19 21.0 35 22.4 25.3 35
400, 3p, 50 hz 9.5 10.9 15 10.8 12.2 15
208/230, 3p, 60 hz 21.6 25.4 40 25.5 29.3 40
460, 3p, 60 hz 10.7 12.6 15 12.0 13.9 20
220, 3p, 50 hz 22.6 26.4 40 26.5 30.3 45
400, 3p, 50 hz 11.2 13.1 20 12.5 14.4 20
208/230, 3p, 60 hz 27.3 32.5 50 35.1 40.3 60
460, 3p, 60 hz 13.3 15.8 30 17.3 19.8 30
220, 3p, 50 hz 28.3 33.5 50 36.1 41.3 60
400, 3p, 50 hz 15.3 18.2 25 17.9 20.8 30
TABLE – 1
Electrical Specifications
10
Page 11
Installation & Start-up – HES Series
Make Up Water In
3/8” FPT
3/8” FPT
3/8” FPT
Water Tank Drain
3/4” FPT
3/4” FPT
3/4” FPT
Drip Pan Drain
3/4” FPT
3/4” FPT
3/4” FPT
Condenser Water In
3/4” FPT
3/4” FPT
1” FPT
Condenser Water Out
Piping and Drain Connections.
All connections are located at the rear of the machine. Water-cooled machines will have five
water connections (air cooled will have three water connections) on the freezing unit. See
FIGURE-7 to locate connections.
! CAUTION !
Exterior shut-off valves must be provided in the water inlet lines.
The minimum inlet water pressure for satisfactory operation of the machine is 30 psig.
The maximum allowable pressure is 100 psig.
! CAUTION !
Model 20 30 40
3/4” FPT 3/4” FPT 1” FPT
TABLE - 2
Water Supply and Drains
The condenser water outlet, water tank drain, drip drain and ice storage bin drain connections
must be extended to an open drain or sump and arranged for visible discharge. See FIGURE-7
for water and drain connections on machine. See FIGURE-8 of typical space diagram drawing
for ice storage bin drain connection.
! CAUTION !
These lines must NOT be connected into a pressure tight common header
due to the possibility that warm condenser water
may back up into the water pan, drip pan or the ice storage bin. The
condenser water outlet MUST be piped separately to the drain.
! CAUTION !
Note: Above drawing shown with plastic side casings (1/2” thick)
FIGURE –7
Water Connections
11
Page 12
Installation & Start-up – HES Series
FIGURE - 8
Typical Space Diagram
12
Page 13

Installation & Start-up – HES Series
Air-Cooled Condenser Installation Instructions
! WARNING !
These installation guidelines must be followed to obtain reliable operation
from air-cooled ice machines. If these guidelines are not followed, the
compressor warranty will not be honored.
! WARNING !
1. Use only Vogt approved condensers. Any exceptions to this policy must be obtained in
writing prior to installation and operation of the ice machine.
2. Outdoor condensers must be installed with vertical airflow. Indoor condensers used for
heat recovery may be installed with either horizontal or vertical airflow.
3. The condenser must be mounted above the ice machine, with liquid refrigerant from the
condenser outlet draining freely (1/4” per foot slope) in the direction of normal operating
flow (back to the ice machine) with no traps in the liquid line.
4. Flooding head pressure controls such as Alco Headmaster are not to be used, since they cause
excessive subcooling of the returned liquid refrigerant and interfere with reliable ice harvest.
5. The discharge and liquid lines must be insulated with 1/2” thick Armaflex insulation or equal.
6. Horizontal runs in the discharge line should slope 1/4” per foot in the normal direction
of flow (away from the ice machine).
7. Traps must be installed in discharge lines at the base of all vertical risers. There should be
no intentional traps in liquid lines. Trap volume should be kept to a minimum. Typical
details are shown in FIGURE-10. Long vertical runs should have traps every 20 feet.
8. Use only ACR grade copper pipe, Type L. Recommended line sizes are shown in TABLE-3.
9. Distance between ice machine and condenser must not exceed 150 equivalent feet. Refer
to Condenser Equivalent Line Size worksheet. (See TABLE-5)
10. Condensers must be provided with a cold weather valve kit per FIGURE-9A. These valves
allow one-half of the condenser to be disabled in cold weather. Running the ice machine
with one half the condenser in cold weather makes it easier to maintain minimum necessary
condensing pressure, particularly in windy conditions. The coil thermostat should be set to
close at 35°F. for multiple fan condensers or 50°F for single fan condensers.
11. Condensers with multiple fans must be provided with a thermostat to turn off unneeded
fans in cold weather. Turning off unneeded fans reduces on-off cycling of the fan(s) and
allows for a steadier condensing pressure. The fan thermostat should be set at 50°F.
12. When extreme cold conditions are expected or encountered (temperatures below 0°F and
wind greater than 15 MPH), it may be necessary to install a protective enclosure around
the condenser. Other apparatuses such as louvers may be used. Contact the factory for
suggestions.
13
Page 14
Installation & Start-up – HES Series
13. After installation, the field-installed lines are to be evacuated to a vacuum of 500 microns
or less and held for at least one hour. Use ¼” access connection located on compressor
discharge line and liquid return line (32). After the vacuum pump is removed, vacuum
should hold at 500 microns or less for at least 5 minutes and the lines pressurized with R22 to 25-psig minimum.
14. The volume of refrigerant supplied with the machine is sufficient to fill the condenser and
condenser lines when length of pipe (one way) is 75 feet or less. When the length of lines
is longer than 75 feet, additional refrigerant must be added as noted below. Instructions
for adding refrigerant are included further in these instructions.
Liquid Line Size 75 ft. 100 ft. 125 ft. 150 ft.
1/2” none None None 2
5/8” none 2 4 6
7/8” none 4 8 12
1-1/8” none 6 12 18
15. All piping must be done in accordance with applicable local and national codes. Such
codes may include “The Safety Code for Mechanical Refrigeration (ANSI B9.1), and “The
Code for Refrigerant Piping” (ANSI B31.5).
16. The following installation guidelines are strongly suggested. While they do not affect the
machine warranty, they may be required for safe operation, and to comply with all
applicable electrical and mechanical codes.
17. Local electrical code must be checked for wiring method.
18. The installer must provide a lockable disconnect switch(s) adjacent to the condenser. The
power is fused at the machine by a 15 amp breaker.
19. Electrical connections between the condenser and the Tube-Ice® machine require
minimum 12 ga. wire. See FIGURE-11 &12.
20. All electrical fittings and components exposed to the weather must be suitable for outdoor
installation.
The design total heat rejection for each Tube-Ice® machine, the recommended air-cooled
condenser, and condenser physical and electrical data are shown in TABLE-4. Only the
condensers shown are UL listed with the ice machines. Other condensers may be individually
UL listed, but are not UL listed with the Tube-Ice® machines, and cannot be recommended by
Vogt Tube-Ice. Catalog energy efficiency ratings of the ice machines are based on use of the
recommended condenser.
Condensers supplied by Vogt must be utilized. The use of non-Vogt condensers will void the
compressor warranty. For continuous operation at ambient above 95°F, consult the factory
about using a larger condenser.
TABLE - 3
Pounds R-404A to Add Vs. Liquid Line Length
14
Page 15

Installation & Start-up – HES Series
Ice Machine Model HE20 HE30 HE40
Recommended Condenser DVT005
Note: For continuous operation at ambient above 105 °F, use larger condenser shown in parenthesis
Total Heat Rejection:
BTU/hr at 60 Hz.
(15°F TD)
BTU/hr at 50 Hz.
Fans:
Number
HP, Each
Total, CFM
5,050
Full Load Amps:
1 ph., 208/230V, 60 Hz
3 ph., 208/230V, 60 Hz
3 ph., 460V, 60 Hz
1 ph., 200/220V, 50 Hz
3 ph., 200/220V, 50 Hz
3 ph., 400V, 50 Hz
Weight, lbs.:
Net
Shipping
Operating
(maximum flooded)
Condenser dimensions, inches:
A (Width)
B (Length)
39.75”
C (Height)
D (Leg centerline)
E (Leg centerline)
F (Clearance below)
Recommended Line Sizes, OD:
Liquid
(All lengths and orientations)
Discharge Gas
Vertical Up, All lengths
Horizontal Or Down, < 75 ft.
Horizontal Or Down, > 75 ft.
Connections at Condenser:
Liquid (ODC)
Discharge Gas (ODC)
Connections at Machine
Liquid & Discharge Gas (ODC)
35,700
32,800
1/3
3.4
N/A
1.3
3.4
N/A
1.3
180
320
195
30”
17”-3
30”
24.5”
1/2”
5/8”
5/8”
7/8”
5/8”
7/8”
1-1/8”
(DVT008)
1
(1/2)
(6,450)
(3.9)
(1.3)
(3.9)
(1.3)
(260)
(390)
(285)
43”
(49.75”)
(40”)
(40”)
(7/8”)
(1 1/8”)
DVT008
58,800
54,100
1 (2)
1/2
6,450
3.9
N/A
1.3
3.9
N/A
1.3
260
390
285
43”
49.75”
40”
17” - 3
40”
24.5”
5/8”
7/8”
7/8”
1-1/8”
7/8”
1 1/8”
1-1/8”
(DVT012)
(12,400)
(7.8)
(2.6)
(7.8)
(2.6)
(470)
(520)
(500)
(69.75”)
(60”)
(60”)
DVT012
12,400
1-1/8”
(DVT016)
117,500
108,100
2
1/2
(12,900)
7.8
(7.8)
N/A
2.6
(2.6)
7.8
(7.8)
N/A
2.6
(2.6)
470
(530)
520
(680)
500
(560)
43”
69.75”
60”
17” - 3
60”
24.5”
7/8”
1-1/8”
1-1/8”
1-3/8”
7/8”
(1-3/8”)
1-1/8”
TABLE - 4
Bohn Air-Cooled Condenser Data
15
Page 16

Installation & Start-up – HES Series
Condenser Description
Valve Valve Rebuild Kit Replacement Coil Fan Solenoid
Solenoid Valve Thermostats
DVT005 5/8” N.O. 12A4200A0503 12A4199V42 12A2105C04
DVT008 7/8” N.O. 12A4200A0704 12A4199V44 12A2105C04
DVT012
DVT016
Note: Sporlan Solenoid Valves
1 1/8” N.O. 12A4200A0902
12A4200A09021
Sporlan Solenoid valve OE34S290 (12A4200A0902) discontinued in Aug 2006
12A4199V45
12A4199V55
12A2105C04
12A2105C25
TABLE – 4A
Cold Weather Kit Replacement Parts
Penn
A19
Penn
A319
FIGURE - 9
Condenser Dimensions (Condenser pictured: DVT012 or DVT016)
Machine Bohn Part # Vogt Part # Coil Split
HE20 DVT005 12A2115B03 50/50
HE30 & HE20 (High Ambient) DVT008 12A2115B04 50/25/25
HE40 & HE30 (High Ambient) DVT012 12A2115B05 50/50
HE40 (High Ambient) DVT016 12A2115B06 50/50
P112 BNHS02A011 12A2115B07 50/50
P112 (High Ambient) BNHS02A011(12) 12A2115B08 50/50
P118 BNHS02A015(8) 12A2115B09 50/25/25
P118 (High Ambient) BNHS02A015(12) 12A2115B10 50/25/25
P18XT BNHS04A029 12A2115B11 50/50
16
Page 17

Installation & Start-up – HES Series
Note: Check Valves in the return line (labeled “Output Liquid Return Line”) is supplied with
the condenser.
FIGURE – 9A
Condenser Field Piping / 50-25-25 Coil Split
17
Page 18

Installation & Start-up – HES Series
Note: Check Valve in the return line (labeled “Output Liquid Return Line”) is supplied with the
condenser.
FIGURE – 9B
Condenser Field Piping / 50-50 Coil Split
18
Page 19

Installation & Start-up – HES Series
CONDENSER EQUIVALENT
LINE SIZE WORKSHEET
Discharge Gas Line O.D. _____________
Fitting Type Number Used Factor Total
Globe Valve (open)
Angle Valve (open)
45° Elbow
90° Elbow
Feet of Straight Copper Used
Total Fitting Factor
Total Equivalent Feet
Fitting Factors
Copper Tube O.D. Type “L”
Globe Valve (open)
Angle Valve (open)
45° Elbow
90° Elbow
1/2” 5/8” 7/8” 1 1/8”
14 16 22 28
7 9 12 15
.5 1 1 1.5
1 2 2 3
TABLE - 5
FIGURE - 10
Minimum Traps for Discharge Lines
19
Page 20

Installation & Start-up – HES Series
Power
Motor (s)
Wiring Connections to Air-Cooled Condenser.
HE Air-cooled condenser should be wired to terminals 20, 21, 22 and 23 (see FIGURE - 12).
NOTE: All four wires must be run from the ice machine to the remote air-cooled condenser.
Main
Wiring For BOHN DVT005 with Cold Weather Valve and Single Fan,
FIGURE - 11
FIGURE - 12
50/50 Condenser Split
Fan
Condenser Connections
Cold
Weather
Package
(Hot)
20
Page 21

Installation & Start-up – HES Series
FIGURE – 12A
Wiring For BOHN DVT008 with Cold Weather Valve and Single Fan,
50/25/25 Condenser Split
21
Page 22

Installation & Start-up – HES Series
Wiring For BOHN DVT012 /DVT016 with Cold Weather Valve and Two Fan,
FIGURE – 12B
50/50 Condenser Split
22
Page 23

Installation & Start-up – HES Series
Refrigerant Connections to Air-Cooled Condenser.
FIGURE - 13
Field Attachment, Air Cooled Condenser Refrigerant Tubing
FOLLOW THESE PROCEDURES TO MAKE A TIGHT JOINT
1. Solder or braze condenser-tubing ends to the female Rotalock connectors.
1 1/8” IDS X 1 1/4” – 12 Threads
2. Remove dust caps if used, making sure that component plastic seals are intact.
3. Wipe off connector and spud-threaded surfaces with a clean cloth to prevent the inclusion of
dirt, or any foreign material in the system.
4. Connector coupling nut should be screwed onto Rotalock spud using the proper amount of
torque (See TABLE-4).
Spud Size Amount of Torque
1/2” – 5/8” 30-40 FT LBS
7/8” 50-60 FT LBS
1 1/8” 80-100 FT LBS
TABLE – 6
Torque Ratings
23
Page 24

Installation & Start-up – HES Series
Ice Bin Thermostat Sensor Installation.
Each machine is equipped with an electronic ice bin thermostat. To assure proper protection for the
machine, the sensor of the ice bin thermostat must be located so that ice will contact it when the bin is
full (See FIGURE-14). The distance between the ice chute and the sensor allows space for the machine
to make an additional discharge of ice AFTER the ice contacts the probe WITHOUT the ice building
up into the discharge opening of the chute.
Note: The probe should also be mounted on the backside of the bracket, opposite of the front of the bin
to reduce the possibility of damage from ice removal equipment.
The control panel is electrically connected so that the bin thermostat will stop the machine only upon
the completion of a harvest period and a partial pump down cycle.
When both cylinder and crushed ice are produced and separately stored in a divided bin, the control
sensor of thermostat BC1 is placed in the crushed ice section of the storage bin (left side) and the
control sensor of thermostat BC2 is placed in the cylinder ice section (right side of bin).
FIGURE - 14
Location Of Thermostat Sensors In Ice Storage Bin
Note: Drip loop not necessary for Electronic Thermostat
24
Page 25

Installation & Start-up – HES Series
Programming the Electronic Bin Thermostat.
The electronic bin thermostat has a LCD readout that displays the temperature in the bin at the sensor.
The control has been preset and locked out at the factory to shut the machine down at 38°°°°F and to
re-start at 40°°°°F. The control retains the program even if power is cut to the machine. Under special
conditions, the settings may need to be changed. The lockout switch is located on the inside of the
control. Removal of the four screws on the face of the control will reveal the lock-switch.
Follow the instructions below to reset the switch.
1)
Press the “SET” button to enter the sensors setup mode
2)
Select between “C”- Celsius and “F” - Fahrenheit
Use the up ↑ or down ↓ key to select “F”
3) Press the “SET” button to set the Set point (S1 will be blinking)
Use the up ↑ or down ↓ key to set the temperature at 38°F
4) Press the “SET” button to set the Differential (DIF 1 will be blinking)
Use the up ↑ or down ↓ key to set the differential at 2°F
5)
Select between “C1”- Cooling mode and “H1” - Heating mode
Use the up ↑ or down ↓ key to select “C1”
Machine will shut off when temperature drops to 38°F and come on when temperature reaches 40°F.
Note: The sensor will automatically exit the programming mode if no keys are depressed for a period of
thirty seconds. Any settings that have been input to the control will be accepted at that point.
FIGURE – 15
Electronic Thermostat
Note: If damaged, the sensor can be replaced without replacing entire unit.
Replacement sensor part #: 12A 2117G0901. Electronic temperature control part #: 12A2117G09.
Sensor cable can be extended up to 400 feet. For more information, consult Tube-Ice® Technical
Service Department.
25
Page 26

Installation & Start-up – HES Series
FIGURE – 16
Piping Schematic, Air-Cooled
26
Page 27

Installation & Start-up – HES Series
FIGURE -17
Piping Schematic, Water Cooled
27
Page 28

Installation & Start-up – HES Series
NOTICE: The Warranty / Registration Start-Up Form located at the back of the manual must be
completed and returned in the postage paid envelope or faxed to 800-770-8648 to initiate the
warranty.
In order to prepare the machine for start-up, it will be necessary to remove the front and right side
panels for access to the various valves and for observation. To remove any side panels, the top cover
must be removed first. The side panels have a top flange that hangs over the top angle of the machine
frame. The panels are secured to the sides of the machine with industrial magnets. To remove a side
panel, first pull the lower section of the panel away from the machine to disengage the magnets, then
lift up and away to clear the top angle of the machine.
For valve number reference, see FIGURES 16 & 17 for piping schematics.
1. _____ The machine is shipped with the total refrigerant charge isolated in the receiver. Open the
upper and lower gage cock valves on the receiver sight glass to check the refrigerant level. The
level should be within ½” of the pumpdown level indicated on the receiver. If the level is OK,
close the valves and continue with the checklist. If the level is not right, immediately contact the
Tube-Ice Technical Service Department at 502-635-3510.
Initial Start-Up & Operation
Start-Up Checklist
2. _____ See that water-inlet connections are attached to the proper couplings (water cooled units) and
to water for ice making. The inlet shutoff valves should be open. The water level in the water pan
should be at a height where the make-up water float valve will be closed when the machine is idle.
3. _____ See that compressor crankcase oil level is at proper height of 1/8 to 1/4 of the sight glass
with the compressor off. While running, the level should between 1/2 and 7/8 of the sight glass.
! NOTE !
IMPORTANT -
In most installations, it will be necessary to add oil to the compressor of air-
cooled machines. An oil charging port (1/4” access fitting with schrader) is located on the
compressor. Compressor oil should be checked after 24 to 48 hours of operation.
! NOTE !
4. _____ See that the “Ice-Off-Clean” selector switch is in the “Off” position. See FIGURE-18.
FIGURE - 18
Switch Plate
5. _____ Open compressor service valves (34 and 35), the hand-stop valve (90A) in the thawing gas
line, (91) in the condenser return line, and the hand-stop valve (58) in the liquid line. These valves
are tagged to indicate that they were closed for shipping purposes.
28
Page 29

Installation & Start-up – HES Series
6. _____ Open the hand stop valve (90B) in the thawing gas at the inlet to the evaporator. After fully
opening the valve, make 1/2 turn to the closed position to open the port to the freezer pressure
switch. IMPORTANT – The machine will not operate if this valve is not set properly.
7. _____ CHECK TO SEE that the charging valve (28) is the only stop valve in the various refrigerant
lines in the closed position.
! NOTE !
All valves are tagged with instructions.
! NOTE !
8. _____ Immediately after opening all tagged valves, entire machine should be checked for refrigerant
leaks with electronic leak detector. Flare fittings may work loose during shipment and valve packing
may leak after opening.
! WARNING !
The warranty does not cover leaks of this type after the initial start-up of the unit.
! WARNING !
9. _____ Close exterior disconnect switch to energize crankcase heater and power the PLC.
! CAUTION !
The crankcase heater should be energized for a MINIMUM of
2 HOURS before attempting to operate the compressor.
! CAUTION !
10. _____ Prime the water pump using the following procedure: Connect a suction gage to low-
pressure test connection and a high-pressure gage to the high-pressure test connection. After the
crankcase heater has been energized for TWO HOURS, remove the control panel cover and locate
the control circuit breakers to the left of the PLC (see FIGURE-19). Move the selector switch to the
“Clean” position and push the “Harvest/Start” switch. The water pump should start, however, do not
be alarmed if pressure in the evaporator causes the compressor to start also. If the compressor starts,
check the compressor rotation. If the compressor is turning in the wrong rotation, immediately stop
the machine using the control circuit breaker and correct wiring as outlined in step 11. Prime
the water pump by using the control circuit breaker to start and stop the pump motor.
CONTROL CIRCUIT
CONDENSER FAN MOTOR BREAKER
(
AIR COOLED ONLY)
BREAKER
HARVEST TIMER
(BEHIND ACCESS DOOR – TOP SCREW)
PUMP / CUTTER
BREAKER
CB1 CB2 CB3/CB4
PLC
FIGURE - 19
Circuit Breakers
29
Page 30

Installation & Start-up – HES Series
11. _____ Check compressor rotation of the scroll compressor using the following procedure:
Move the selector switch to the “Ice” position and press the “Harvest/Start” switch. The liquid line
solenoid valve (20) will open and feed liquid into the evaporator for approximately 2 minutes. The
machine will not operate until the low pressure rises sufficiently (to approximately 40 psig) to close
the low-pressure switch (4PS) & open the cylinder ice freezer pressure switch (FPS2). Suction
pressure must decrease and discharge pressure increase immediately. A scroll compressor will also
be very noisy when rotating in the opposite direction. To change rotation, reverse two (2) of the
three (3) compressor wires L1, L2, and L3 either at the control panel terminal block, or at the
compressor junction box. CAUTION: Always disconnect power to the machine before attempting
electrical modifications.
If the compressor runs backwards for an extended period of time, damage may occur
12. _____ Once the water has been primed, move the selector switch to the “Ice” position and push the
“Harvest/Start” switch. The liquid line solenoid valve (20) will open and feed liquid into the
evaporator for approximately 2 minutes. The machine will not operate until the low pressure raises
sufficiently (to approximately 40 psig) to close the low-pressure switch (4PS) & open the cylinder
ice freezer pressure switch (FPS2).
13. _____ Operate the machine several cycles while completing the Warranty/Registration Start-up
Form. Mail the completed report in the postage paid envelope or fax to 800-770-8648.
If it should ever become necessary to add refrigerant to the system, charging valve (28)
is provided for this purpose. Be sure to follow all local and federal regulations regarding
the handling of refrigerants and their illegal emission into the atmosphere.
! CAUTION !
to the compressor and the warranty may be voided.
! CAUTION !
! CAUTION !
! CAUTION !
30
Page 31

Installation & Start-up – HES Series
General Machine Information
Refrigerant Charge. Each HES Series Tube-Ice machine is charged with refrigerant and test operated
at the factory before shipment. The total charge of R-404A is approximately 90lbs. This is not a critical
charge. The operating level indicated on the receiver is intended as an approximate level only. As long
as the machine is operating satisfactorily, there should be no need to add refrigerant. However, as
indicated in the instructions for air-cooled condenser installation, it may be necessary to add refrigerant
to the system for line sets over 75 feet in length.
! CAUTION !
Refrigerant should only be added in the total pumpdown mode.
! CAUTION !
Total Pumpdown Mode. Total pumpdown is initiated by setting the selector switch to the “Clean”
position. The machine will continue to run in the current cycle and proceed to the Total Pumpdown
Mode at the completion of the next harvest cycle. At this time the compressor and water pump will run,
the “A” (liquid feed) solenoid valve will close and the freezer will begin to pump down. As the suction
pressure decreases, the freezer pressure switch will initiate a harvest cycle to clear the partially formed
ice cylinders from the freezer. This harvest cycle will end after one minute and the total pumpdown will
resume, continuing until the compressor cycles off by the low-pressure switch. At this time, only the
water pump will be running. Note: The liquid line will contain refrigerant from the receiver to the liquid
feed “A” valve (20). Move the selector switch to the “Off” position. The machine is now pumped down.
Note: If the machine is in the Total Pumpdown mode for an extended period of time, (over 15
minutes for HES-40, over 20 minutes for HES-30, over 25 minutes for HES-20) and the
compressor does not shut off, a problem exists.
If freezer pressure is not pulling down, one of the following problems may be true: liquid feed,
“A” valve (20) or Thaw gas, “D” valve (18) is leaking, or the compressor may be damaged.
If freezer pressure is pulling down but the compressor does not shut off, a problem may exist
with the High/Low pressure safety switch.
Adding Refrigerant. Once total pumpdown mode is achieved, open the upper and lower gage cock
valves to view the level of refrigerant in the system. Connect a charging hose to the charging valve (28)
located at the base of the evaporator. It is important that no air or other non-condensable gases enter the
system when charging refrigerant into the unit. Open the charging valve to the refrigerant cylinder to
begin feeding liquid. Turn the selector switch back to the “Clean” position and push the “Harvest/Start”
switch. The water pump will start immediately. The compressor will start as soon as the pressure rises
sufficiently to reset the low-pressure switch. The compressor will pump refrigerant into the receiver as
it is fed into the evaporator. The refrigerant level should rise accordingly in the sight glass. One inch
(1”) is equivalent to 5 lbs. in the receiver. Once the level is within an inch of the target level, close the
charging valve and the compressor will continue until tripping the low-pressure switch. Repeat the
procedure if necessary.
To restart the machine after a total pumpdown, set the selector switch to the “Ice” position and push the
“Harvest/Start” switch. At this time, the “A” (liquid feed) solenoid valve will open for 2 minutes and the
machine will start in a freeze cycle.
! CAUTION !
If the power has been turned off to the machine, make sure the compressor crankcase is warm and
there is no liquid refrigerant in with the oil before restarting the unit.
! CAUTION !
31
Page 32

Installation & Start-up – HES Series
Adjustable Blowdown (for clearer ice). A petcock is installed on the overflow from water pump to
provide means for obtaining blowdown from the water tank during the freezing period. This
supplements the blowdown that is discharged during the thawing period through the bypass piping
connected to the drain of the water tank. (See “Automatic Blowdown” below).
The petcock was set at the factory to discharge enough water during the freeze cycle to produce clear
ice for operating conditions. After installation it should be adjusted to the minimum rate required to
maintain production of clear ice and checked after a few days of ice making. See FIGURE-20,
automatic blowdown / petcock
Automatic Blowdown (harvest cycle). A patented feature of this machine is the automatic blowdown
(40), which is provided to eliminate or reduce the necessity for frequent flushing or cleaning of the
water tank (7) to remove accumulated salts or solids in the water as a result of the freezing action.
A principle feature of the blowdown arrangement is a drain by-pass effect which is initiated during
each thawing period when the water pump is stopped and the water in the freezer tubes returns to the
water tank thereby raising the water level higher than the by-pass piping (40) and causing a portion of
the water to drain from the bottom of the tank (approximately 1 gal/cycle).
The water level, controlled by the float valve (12), regulates the quantity of blowdown during the
thawing period. An optional solenoid valve can be furnished in place of the drain valve to permit
additional if required.
FIGURE - 20
Automatic Blowdown / Petcock
32
Page 33

Installation & Start-up – HES Series
Troubleshooting. The HES Series (“S” for Smart) is equipped with a PLC (programmable logic
controller) that controls all aspects of the operation. One of the functions of the PLC is to shut down
the machine when a problem arises and send a signal to the fault indicator light located on the far-left
side of the electrical panel. The red light is visible through the opening in the front casing and will
blink when a problem has caused the machine to shut down (See FIGURE-21).
Note: The Fault Light will flash the designated number of times ONLY if the fault is a not a auto
restart fault or a auto-restart fault that has occurred three consecutive times. For your reference,
TABLE-7 contains a list of the PLC Inputs, Outputs, and fault codes.
PLC Inputs
# Description
0 Cylinder Ice Indicator
1 Crushed Ice Indicator
2 Freezer Pressure Switch
3 Start / Manual Harvest
4 Clean Switch
5 Pump / Cutter Overload
6 High / Low Pressure safety
(“off” when tripped)
(“off” when tripped)
PLC Outputs
# Description
0 Machine Fault Indicator Light
1 "A" valve
2 Compressor
3 Reversing Relay
4 Water Pump
5 Cutter / "D" valve / Suction Stop
7 N/A
Machine Faults
# Description Restart Off Delay
1 High / Low Press – Freeze No N/A
2 High / Low Press – Harvest No N/A
3 High / Low Press - Partial Pumpdown
4 High / Low Press - Total Pumpdown No N/A
5 Short Cycle Yes 2 hrs
6 Long Cycle No N/A
7 Pump Motor Overload Yes 30 min
8 Cutter Motor Overload Yes 30 min
N/A Power Failure Yes 2 hrs
No N/A
Note: The machine may be off on a fault and not flashing an error code if the fault is an auto-
restart fault and it is not the third consecutive occurrence of this fault.
TABLE – 7
PLC Inputs, Outputs, and Fault Codes
FIGURE - 21
Fault Indicator / Selector Switch Location
33
Page 34

Installation & Start-up – HES Series
Copeland Performance Alert (CPA). This device is used to monitor the compressor discharge
temperature, compressor current and phase, as well as control voltage to the compressor contactor. If a
problem is detected, the compressor will shut off. The fault light on the CPA will flash a certain
number of times to indicate the fault that occurred. See table below.
NOTE: When this occurs, the ice machine will continue to run but the compressor will not be on. The
ice machine will eventually shut off on a “Long Cycle Fault”.
Some faults, referred to as “lockout” faults, will require cycling power to the Performance Alert to
reset. This can be done by switching CB1 to the “off” position for 5 seconds, then back “on”.
NOTE: If ice machine has a High/Low pressure fault, the Performance Alert can detect low control
voltage at the compressor contactor and flash 9 times. This will clear when the machine is re-start.
Alert Codes System Conditions Description
1 High Discharge Temperature
4 Lock Rotor
6 Missing Phase
7 Reverse Phase (Scroll only)
8 Welded Contactor No demand signal but current has been detected in one
or both phases
9 Low Voltage Control voltage dips below 85V for 110V or 170V for
11 DLT Sensor Failure Discharge Temperature Sensor short or open circuit
Note:
Faults 1, 4, 6, 7, 9 will shut off compressor with a off time of 20 minutes (adjustable from 10 to 40 minutes).
If fault 1, 4, 6 or 7 occurs ("LOCKOUT"), fault must be manually reset by cycling power to the Performance Alert.
Lockout Configuration
Code Minimum Maximum Default
1 High Discharge Temp 2 6
4 Locked Rotor 2 10
6 Missing Phase 1 10
7 Reverse Phase 1 1
FIGURE 22
Copeland Performance Alert Wiring
Discharge Temperature above set point
(default 230 Deg F) adjustable 170 to 281
4 Consecutive Compressor trips after run time of 1 to
15 seconds indicating compressor won't start
Demand signal is present but current is missing in
one phase
Demand signal is present but current is not detected in
the correct sequence
220V
TABLE 8
Copeland Performance Alert Codes
4
4
10
1
34
Page 35

Installation & Start-up – HES Series
Note: Machines manufactured after May 1999 will use Allen-Bradley controls
Figure – 23A
Control Panel Layout
Figure – 23B
Control Panel Layout with Hoffman Enclosure (Door Open)
35
Page 36

Installation & Start-up – HES Series
Vogt Part #
Reference Cutler-Hammer Allen-Bradley Description
12A2117G09
BC1
12A2117G09 SAME CYLINDER ICE BIN CONTROL
BC2
C
CB1
CB2
CB3 & CB4
CPA
CU
FPS1
FPS2
FU1-FU3
FU10 & FU20
P
PB1
PLF
PLC
R
SS
TB
TEST
1LT
12A7516E10
12A7518E15
12A7515E18
12A7515E19 SAME * CONDENSER FAN MOTOR CIRCUIT BREAKER (15 AMP)
12A7515E20 (QTY 2) 12A7515E21 CONTROL CIRCUIT BREAKER (3 AMP)
N/A 12A7700P02 COPELAND PERFORMANCE ALERT
12A7530E11
12A7508H2108
12A2117E04
12A2117E04
N/A 12A7504E13 CONDENSER FAN MOTOR FUSES, 6A, 600V (400/460V MACH)
N/A 12A7504E14 CONTROL CIRCUIT FUSES, 7A, 600V (400/460V MACH)
12A7530E11
12A7508H2109
12A7500E45
N/A 12A7537S06 POWER LINE FILTER (CE MACHINES ONLY)
SAME 12A7536M01 PROGRAMMABLE CONTROLLER
12A7517E18
12A7500E43
12A7500E44
N / A
N / A N / A TEST BLOCK (ON CUTLER-HAMMER - FACTORY USE ONLY)
12A7500E46
*Note: AIR COOLED ONLY
SAME CRUSHED ICE BIN CONTROL (DUAL ICE ONLY)
12A7516E26 COMPRESSOR CONTACTOR
12A7518E30 COMPRESSOR AUX CONTACT
SAME PUMP / CUTTER MOTOR CIRCUIT BREAKER (10 AMP)
12A7516E23 CUTTER MOTOR STARTER / CONTACTOR
12A7538E01 CUTTER OL HEATERS (3.38-5.54 A) / OL RELAY (3.2-16 A)
SAME FREEZER PRESSURE SWITCH (DUAL ICE ONLY)
SAME FREEZER PRESSURE SWITCH
12A7516E23 PUMP MOTOR STARTER / CONTACTOR
12A7538E01 PUMP O.L. HEATERS (4.96-8.16 A) / OL RELAY (3.2-16 A)
12A7500E56
12A7500E75
12A7517E27 REVERSING RELAY (DUAL ICE ONLY)
SAME 5 POSITION SELECTOR SWITCH (DUAL ICE)
12A7500E61
12A7500E73
N / A
12A7500E65 FAULT INDICATOR LIGHT
HARVEST / START BUTTON
CONTACT BLOCK (FOR ALLEN-BRADLEY ONLY)
3 POSITION SELECTOR (SINGLE ICE)
CONTACT BLOCK (FOR ALLEN-BRADLEY ONLY)
TERMINAL BLOCK
TABLE – 9
Control Panel Parts
36
Page 37

Installation & Start-up – HES Series
NOTE:
USE COPPER CONDUCTORS RATED 60 °C OR HIGHER
Machines w/Copeland Performance Alert
* Standard on machines manufactured after January 2010
FIGURE – 24
HES Wiring Schematic, Single Ice
37
Page 38

Installation & Start-up – HES Series
NOTE:
USE COPPER CONDUCTORS RATED 60 °C OR HIGHER
Machines w/Copeland Performance Alert
* Standard on machines manufactured after January 2010
FIGURE – 25
HES Wiring Schematic, Dual Ice
38
Page 39

Installation & Start-up – HES Series
NOTE:
USE COPPER CONDUCTORS RATED 60 °C OR HIGHER
Machines w/Copeland Performance Alert
* Standard on machines manufactured after January 2010
FIGURE – 26
HES Wiring Schematic, Single Ice
(50 HZ, 400V compressor, 200V controls)
39
Page 40

Installation & Start-up – HES Series
NOTE:
USE COPPER CONDUCTORS RATED 60 °C OR HIGHER
Machines w/Copeland Performance Alert
* Standard on machines manufactured after January 2010
FIGURE – 27
HES Wiring Schematic, Single Ice (400V / 460V)
40
Page 41

Installation & Start-up – HES Series
Casing Installation
FIGURE – 28
Stainless Casing Installation
41
Page 42

Installation & Start-up – HES Series
Convert from Cylinder Ice to Crushed Ice
Remove jumper from #5 and #6 on terminal block and put on #5 and #4. This will reverse the rotation
of the cutter motor.
Adjust Freezer Pressure switch (FPS2) – See table below for recommended pressure settings
Cylinder Ice (psig) Crushed Ice (psig)
Machine R22 404A R22 404A
HES-20S 43 - 45 56 – 58 46 - 48 59 – 61
HES-20M 38 - 40 49 – 52 41 – 43 53 – 56
HES-30S 38 - 40 49 – 52 41 – 43 53 – 56
HES-30M 35 - 37 46 – 48 39 – 41 50 – 53
HES-40S 31 - 33 42 – 44 36 – 38 47 – 49
HES-40M 25 - 27 34 – 37 31 – 33 42 - 44
TABLE 10
Recommended Freezer Pressure Settings
Turn top screw to adjust the pressure setting
(also referred to as the Range)
Clockwise = increase pressure setting
Counterclockwise = decrease pressure setting
The bottom screw is used to set the
Differential –
DO NOT ADJUST
Freezer Pressure Switch (FPS2)
The pressure switch should be adjusted until the desired ice thickness is obtained--See table below for
recommended ice weights
Machine
Cylinder Ice (lbs.) Crushed Ice (lbs.)
HES-20S 41 – 43 30 – 32
HES-20M 40 – 42 29 – 31
HES-30S 41 – 43 30 – 32
HES-30M 40 – 42 29 – 31
HES-40S 41 – 43 30 – 32
HES-40M 40 – 42 29 – 31
TABLE 11
Recommended Ice Weights per cycle
Note:
Single to Dual Ice Conversion kit available – part #: 12AHES01
42
Page 43

Installation & Start-up – HES Series
Installation Review: A CHECKLIST
Make a visual check to be sure these steps have been taken BEFORE continuing.
CHECK: _____ PRIOR TO OPENING VALVES, check all joints for leaks which may have
developed during shipment. {NOTE: The required charge of Refrigerant 22 has been isolated
in the Receiver (15R).}
CHECK: _____ All water supply and drain connections for conformity to requirements
stipulated in this manual. See FIGURES 5, 7, and TABLE 2.
CHECK: _____ Electrical supply for proper size of fuses and for compliance to local and
national codes. See the machine nameplate for minimum circuit ampacity and maximum fuse
size.
CHECK: _____ All field installed equipment (air-cooled condenser, ice storage bin, ice
spreader, etc.) for proper installation.
CHECK: _____ The applicable portion of the Warranty Registration/Start-up Form for
proper completion.
NOTE: This machine is controlled by a PLC and can automatically start with power to the
machine after a two hour time lapse if the ice switch is in the on position and all other
requirements are met.
43
Page 44

Tube Ice L.L.C.
Installation & Start-up – HES Series
1000 W. Ormsby
Louisville, KY 40210
(502) 635-3235
THIS FORM MUST BE SENT TO
VOGT TO ACTIVATE WARRANTY
Vogt Order Number: _______________
FAX #502-635-3024
Warranty Registration / Start-Up Form
HES20, HES30, HES40
Model Number: __________________________ Serial Number: __________________________
This form must be filled out completely and signed by the customer in order to assure acceptance by Vogt.
Date of Start-Up: ___________________ Form Completed By: _____________________________________
AC Condenser Model Number: ____________________ AC Condenser Serial Number: _____________________________
Water Treatment System? Yes No Manufacturer: ____________________ Model: ________________________
Bin Manufacturer: _______________________ Model: _________________________ Bin Capacity: _______ lbs.
Distributor
Company Name: ____________________________________________ Phone: _______________________
Address: ____________________________________ City: _________________________ State: ___________ Zip: ___________
Service Company
Company Name: ____________________________________________ Phone: _______________________
Address: ____________________________________ City: _________________________ State: ___________ Zip: ___________
Customer (location of equipment)
Company Name: ____________________________________________ Phone: _______________________
Address: ____________________________________ City: _________________________ State: ___________ Zip: ___________
PRE-OPERATION CHECK
______ V _____ PH _____ HZ Power (check supply (actual) at machine)—Notice: Call Vogt if under 195 V
Crankcase heater on for 2 hours minimum, prior to start
All valves opened or closed as tagged
Water supply and drains connected properly
AC condenser cold weather temperature setting(s) Solenoid ________ Fan (HES30 & HES40 only)________
AC condenser installed above machine: Yes No Approx. _____ ft.
AC condenser properly piped—are all lines insulated (see installation and start-up instructions)?
AC condenser line length (in equivalent feet (see installation instructions)) ____________
Leak checked entire system including AC condenser and lines (if applicable)
Sufficient make-up water supply (minimum 30 PSIG) Incoming potable water temperature: _____°F
Make-up water float valve adjustment
Compressor oil level, i.e. 1/4 – 1/2 – 3/4: ______
Compressor amps (check at start of freeze cycle) L1 _________ L2 _________ L3 _________
Cutter motor amps __________ (Should not be over 4.1 amps cutting ice—if over, call Vogt)
Water pump amps __________ (Should not be over 5.0 amps—if over, call Vogt)
Condenser motor amps (if applicable) _________
Inside ambient _______ °F (If temperature is below 50°F, call Vogt)
Bin control (s) installed properly
Bin control (s) operate properly to stop and start machine with ice on them
Average hole diameter of ice ______ Clear ice Yes No
Freezing cycle time: CYL ________ CRU ________ Harvest cycle time: CYL _______ CRU _______
First ice out: CYL ________ CRU ________ All ice out time: CYL _______ CRU _______
Instruction manual and warranty certificate left on-site Name of person left with: ______________________________
Remarks:_______________________________________________________________________________________________________
Technician Signature: ______________________________ End User Signature: _____________________________
I certify that I have performed all of the above procedures.
44
 Loading...