

Page 1

UNIVERSAL WIRELESS
HD VIDEO & AUDIO KIT
XWH200 – QUICK START GUIDE
Page 2
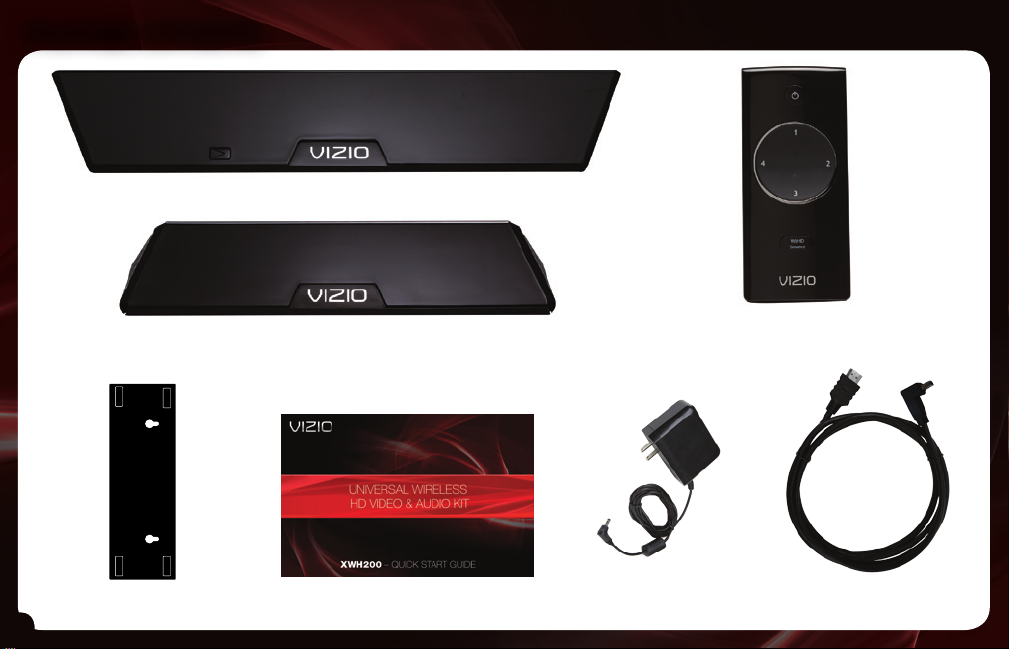
PACKAGE CONTENTS
Transmitter
WALL MOUNT TEMPLATE FOR RECEIVER
Wall Mounting Template
1
Receiver
Remote Control
Power Adapter (2) HDMI Cable (2)Quick Start Guide
Page 3
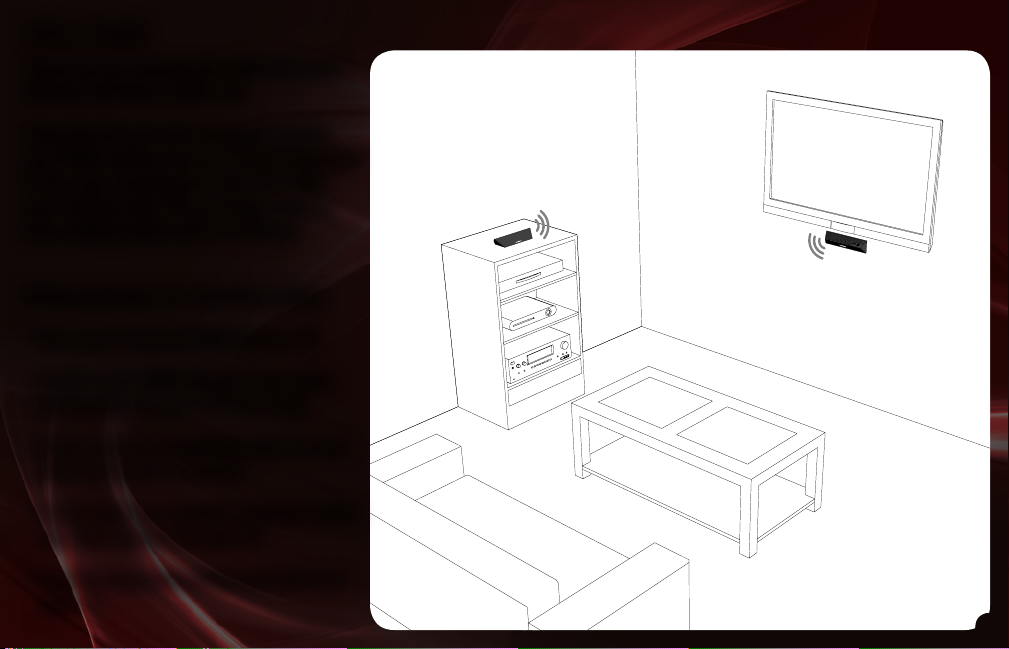
WELCOME!
Thank you for choosing the VIZIO Universal
Wireless HD Video & Audio Kit.
Using this kit, you can wirelessly connect
your HDMI devices to your TV from anywhere
in the room, keeping your entertainment
area looking clean. You no longer need to
hide cabling behind walls or ceilings!
Before you begin the first-time setup:
• Turn your TV and all HDMI devices off.
• Position your HDMI devices in the same
room as the TV (up to 30 feet away).
• Ensure you have one HDMI cable for each
device you want to connect.
• Ensure there are available electrical outlets
near your devices and your TV.
• Read the important safety instructions on
page 14.
2
Page 4
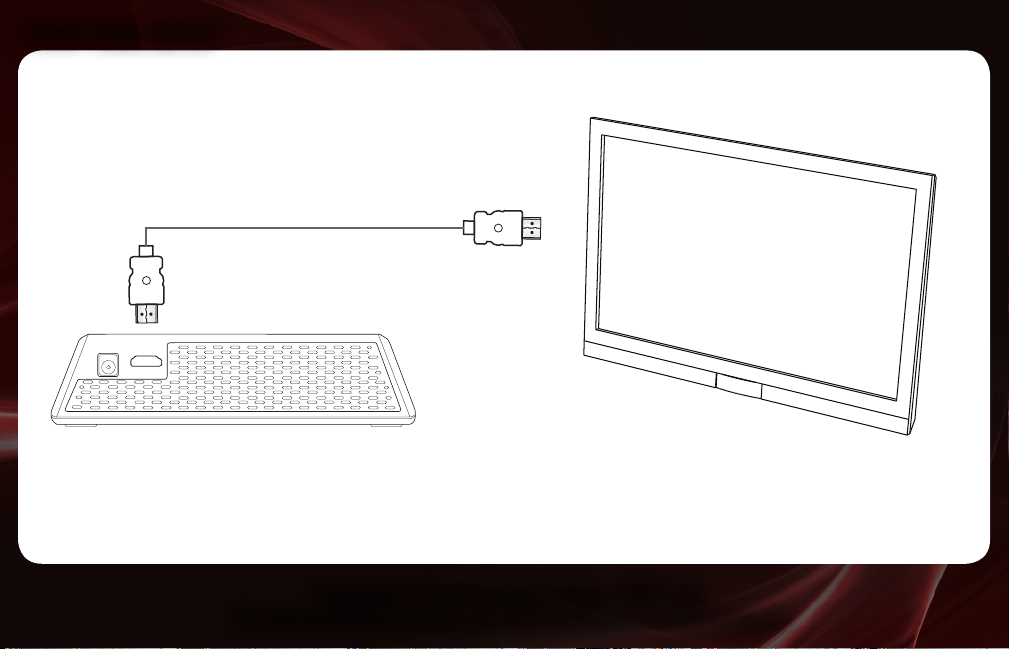
FIRST-TIME SETUP
1
3
HDMI Cable
Receiver TV
Connect your TV to the receiver using an HDMI cable.
For wall mounting instructions, see
Wall Mounting the Receiver
on page 9.
Page 5
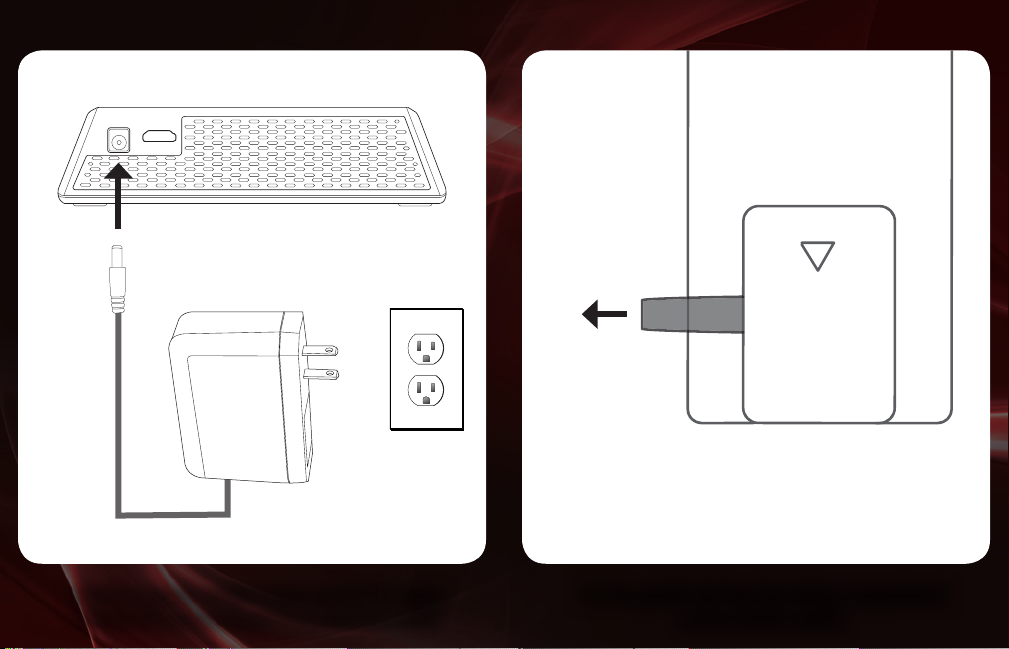
2
Receiver
3
Remote Control
Connect a power adapter to the receiver as shown.
Connect the power adapter to an electrical outlet.
Pull the plastic tab from the battery compartment
on the remote control.
4
Page 6

4
HDMI Cables
DVD/Blu-ray™ Player Game Console ComputerCable/Satellite Box
Connect up to 4 HDMI devices to the transmitter using HDMI cables.
(Devices shown are examples. Any HDMI devices can be connected.)
5
Transmitter
Page 7

5
Transmitter
6
Connect a power adapter to the transmitter as shown.
Connect the power adapter to an electrical outlet.
Place the transmitter in a location where it is free from
obstructions. Face it toward the receiver.
6
Page 8

7
Receiver
Wait for light to stop blinking.
This may take up to 30 seconds.
Transmitter
8
Check the transmitter and receiver power lights. If the lights
are blinking, move the transmitter for a better signal.
7
Turn on your TV and change the display input to the
receiver’s port (HDMI-1 or HDMI-2, etc).
Page 9

1
2
3
4
WiHD
Source
9
Input Selector
Press the number that
matches the transmitter
HDMI input you wish to
view. (Press 1 to view
the HDMI 1 device, etc.)
OR
Input
Touch repeatedly to cycle
through available devices.
10
Use the INPUT SELECTOR button on the remote or the INPUT
touch control on the transmittter to display your device.
Your TV displays the output from the selected device.
8
Page 10

WALL MOUNTING THE RECEIVER
WALL MOUNT TEMPLATE FOR RECEIVER
1 2
Place the included wall template on the wall where you want
to hang the receiver, then mark the points where
9
screws must be fixed. (Screws not included.)
Fix the screws to the wall, then hang the reciever.
Page 11

USING THE REMOTE
1
2
3
4
WiHD
Source
Input Selector
Press the number that
matches the transmitter
HDMI input you wish to
view. (Press 1 to view the
HDMI 1 device, etc.)
Point Remote at Receiver
Power/Standby
Press to put transmitter and
receiver in or out of standby
mode.
WiHD Source
Press to display output from
a 2nd WiHD transmitter. This
button is only used when 2
transmitters are used together.
To replace the battery, gently press
down on the battery cover and slide
it away from the remote.
Insert a new CR2032 battery.
Slide the battery cover until it snaps
back into place.
10
Page 12

TROUBLESHOOTING, FAQ, & TECHNICAL SUPPORT
Products are often returned due to a technical problem rather than a defective
product. Our trained support personnel can often resolve the problem over the
phone. For more information on service or repair after the warranty period,
please contact our Support Department.
Customer support and quality service are integral parts of VIZIO’s commitment to
service excellence. For technical assistance contact our VIZIO Technical Support
Department via email or phone. Please have your VIZIO model number, serial
number, and date of purchase available before your call.
• Ensure your TV is set to display the HDMI input to which the receiver is connected.
• Ensure the transmitter is set to the proper HDMI port. The light below the active port will be on.
The receiver is not
responding to the
transmitter.
Can I use more than
one transmitter if
I have 5 or more
HDMI devices?
11
• Try to reposition the transmitter. Place it in an area free from obstructions, facing the receiver. You
may need to place the transmitter closer to the receiver.
• Unplug the transmitter and receiver from the electrical outlet. Plug them back in.
• Press and hold the INPUT button on the front of the transmitter for 5 seconds. Wait until the
power lights on the transmitter and receiver stop blinking. This may take up to 30 seconds.
• Ensure your TV and HDMI devices are using the latest rmware from the manufacturer’s website.
• Yes. Connect a second transmitter in the same way as the rst. Press and hold the INPUT button
on the front of the new transmitter for 5 seconds. When the light next to the power port is solid
(not blinking), the new transmitter is linked to the receiver. Use the WiHD Source button on the
remote to switch the input source from one transmitter to another.
Phone:
Email:
Hours of operation:
Monday - Friday: 6 am to 9 pm (PST)
Saturday - Sunday: 8 am to 4pm (PST)
(877) 698-4946
Fax:
(949) 585-9563
techsupport@vizio.com
Web:
www.VIZIO.com
Page 13

What do the
lights below the
HDMI ports on the
transmitter mean?
• If the light is solid (not blinking), the HDMI connection is good and the input is set to that port.
• If the light is blinking, check the cable for a secure connection. Ensure your device is on and is
playing content. Ensure your device is set to output to its HDMI port.
The light next to
the power port is
blinking.
Are 3D movies
and 3D gaming
supported?
I am having trouble
changing inputs.
There is a delay
when I change
inputs (1, 2, 3, 4).
• The transmitter and receiver may not be positioned for the best connection. Move the transmitter
to a new location. Ensure the transmitter and receiver are in areas free from obstructions. Do not
place the transmitter or receiver inside enclosures built from metal or other dense materials.
• When the light is solidly lit (stops blinking), the transmitter and receiver are linked.
• Yes, 3D is supported on 3D-capable TVs and devices. See your device’s user manual for details.
• Be sure to point the remote directly at the receiver when pressing the INPUT SELECTOR buttons.
When you press the buttons, the light below the selected HDMI port should turn on. If the remote
does not work, touch the INPUT control on the front of the receiver. Do not wear gloves when
using this control.
• You may need to replace the battery in the remote. See
Using the Remote
on page 10.
• This is normal. When changing the input, you may experience a delay of up to 20 seconds before
the picture is displayed on your TV.
12
Page 14

ONE-YEAR LIMITED WARRANTY
ON PARTS AND LABOR
Covers units purchased as new in United States and Puerto Rico Only
VIZIO provides a warranty to the original purchaser of a new Product against defects in
materials and workmanship for a period of one year of non-commercial usage and ninety
(90) days of commercial use. If a Product covered by this warranty is determined to be
defective within the warranty period, VIZIO will either repair or replace the Product at its sole
option and discretion. To obtain warranty service, contact VIZIO Technical Support via email:
TechSupport@VIZIO.com or via phone at 877 MY VIZIO (877.698.4946) from 6:00AM to
9:00PM Monday through Friday and 8:00AM to 4:00PM Saturday and Sunday, Pacific Time,
or visit www.VIZIO.com. PRE-AUTHORIZATION MUST BE OBTAINED BEFORE SENDING ANY
PRODUCT TO A VIZIO SERVICE CENTER. Proof of purchase in the form of a purchase receipt
or copy thereof is required to show that a Product is within the warranty period.
Parts and Labor
There will be no charge for parts or labor during the warranty period. Replacement parts and
Products may be new or recertified at VIZIO’s option and sole discretion. Replacement parts
and Products are warranted for the remaining portion of the original warranty or for ninety
(90) days from warranty service or replacement, whichever is greater.
Type of Service
Defective Products must be sent to a VIZIO service center to obtain warranty service.
VIZIO is not responsible for transportation costs to the service center, but VIZIO will cover
return shipping to the customer. PRE-AUTHORIZATION IS REQUIRED BEFORE SENDING ANY
PRODUCT TO A VIZIO SERVICE CENTER FOR WARRANTY SERVICE. Product returns to VIZIO’s
service centers must utilize either the original carton box and shipping material or packaging
that affords an equal degree of protection. VIZIO Technical Support will provide instructions
for packing and shipping the covered Product to the VIZIO service center.
Limitations and Exclusions
VIZIO’s one-year limited warranty only covers defects in materials and workmanship. This
warranty does not cover, for example: cosmetic damage, normal wear and tear, improper
operation, improper voltage supply or power surges, signal issues, damages from shipping,
acts of God, any type of customer misuse, modifications or adjustments, as well as
installation and set-up issues or any repairs attempted by anyone other than by a VIZIO
authorized service center. Products with unreadable or removed serial numbers, or requiring
routine maintenance are not covered. This one year limited warranty does not cover Products
sold “AS IS”, “FACTORY RECERTIFIED”, or by a non-authorized reseller.
13
THERE ARE NO EXPRESS WARRANTIES OTHER THAN THOSE LISTED OR DESCRIBED ABOVE.
ANY IMPLIED WARRANTIES, INCLUDING ANY IMPLIED WARRANTY OF MERCHANTABILITY AND
FITNESS FOR A PARTICULAR PURPOSE, SHALL BE LIMITED IN DURATION TO THE PERIOD OF
TIME SET FORTH ABOVE. VIZIO’S TOTAL LIABILITY FOR ANY AND ALL LOSSES AND DAMAGES
RESULTING FROM ANY CAUSE WHATSOEVER INCLUDING VIZIO’S NEGLIGENCE, ALLEGED
DAMAGE, OR DEFECTIVE GOODS, WHETHER SUCH DEFECTS ARE DISCOVERABLE OR
LATENT, SHALL IN NO EVENT EXCEED THE PURCHASE PRICE OF THE PRODUCT. VIZIO SHALL
NOT BE RESPONSIBLE FOR LOSS OF USE, LOSS OF INFORMATION OR DATA, COMMERCIAL
LOSS, LOST REVENUE OR LOST PROFITS, OR OTHER INCIDENTAL OR CONSEQUENTIAL
DAMAGES. SOME STATES DO NOT ALLOW LIMITATIONS ON HOW LONG AN IMPLIED
WARRANTY LASTS OR THE EXCLUSION OF INCIDENTAL OR CONSEQUENTIAL DAMAGES, SO
THE ABOVE LIMITATIONS OR EXCLUSIONS MAY NOT APPLY TO YOU. THIS WARRANTY GIVES
YOU SPECIFIC LEGAL RIGHTS, AND YOU MAY ALSO HAVE OTHER RIGHTS, WHICH VARY FROM
STATE TO STATE. THIS WARRANTY IS SUBJECT TO CHANGE WITHOUT NOTICE.
CHECK www.VIZIO.com FOR THE MOST CURRENT VERSION.
SPECIFICATIONS
RF Frequency: 60 GHz
Bandwidth: HRP - 1.76 GHz
Max Throughput: 4 Gbps
Supported 2D Resolutions: 480i, 480p, 720p, 1080i, 1080p,
Supported 2D Refresh Rates: 23.976/24 Hz, 59.94/60 Hz
3D Video Mode Compatibility: 720p 50/59.94 Hz, 1080p 23.98/24 Hz,
Audio Mode Support: 2-8ch LPCM, 32-192 KHz,
HDMI Support: HDMI 1.4a (3D) with CEC
LRP - 92 MHz
Range: Up to 65 feet (Line of Sight)
Up to 30 feet (Non-Line of Sight)
VGA, XGA, SXGA, WSXGA+
Sensio, RealD
Dolby Digital 5.1 @ 44.1 / 48 / 96 KHz,
DTS 5.1 @ 44.1 / 48 / 96 KHz
Page 15

LEGAL NOTICES
FCC Class B Radio Interference Statement
This equipment has been tested and found to comply with the limits for a Class B digital device,
pursuant to Part 15 of the FCC Rules. These limits are designed to provide reasonable protection
against harmful interference in a residential installation. This equipment generates, uses and can
radiate radio frequency energy, and if not installed and used in accordance with the instructions,
may cause harmful interference to radio communications. However, there is no guarantee that
interference will not occur in a particular installation. If this equipment does cause harmful
interference to radio or television reception, which can be determined by turning the equipment off
and on, the user is encouraged to try to correct the interference by one or more of the following
measures:
1. Reorient or relocate the receiving antenna.
2. Increase the separation between the equipment and receiver.
3. Connect the equipment into an outlet on a circuit different from that to which the receiver is
connected.
4. Consult the dealer or an experienced radio/TV technician for help.
This device complies with Part 15 of the FCC Rules. Operation is subject to the following two
conditions: (1) this device may not cause harmful interference, and (2) this device must accept
any interference received, including interference that may cause undesired operation.
Notice
1. Any changes or modifications not expressly approved by the party responsible for compliance
could void the user’s authority to operate the equipment.
2. Shielded interface cables and AC power cord, if any, must be used in order to comply with the
emission limits.
IMPORTANT SAFETY INSTRUCTIONS
• Heed all warnings.
• Follow all instructions.
• Clean only with a dry cloth.
• Do not block any ventilation openings. Install in accordance with the accompanying instructions
and/or wall mounting template. Only use accessories specified by VIZIO.
• Do not install near any heat sources such as radiators, heat registers, stoves, or other heat
generating devices (including amplifiers).
• To reduce the risk of re or electric shock, do not use near water or expose to rain or moisture.
Your device should not be exposed to dripping or splashing.
3. The manufacturer is not responsible for any radio or TV interference caused by unauthorized
modification to this equipment. It is the responsibility of the user to correct such interference.
FCC Radiation Exposure Statement
This equipment complies with FCC radiation exposure limits set forth for an uncontrolled
environment. This equipment should be installed and operated with minimum distance 20cm
between the radiator & your body.
IC Statement
Operation is subject to the following two conditions: (1) this device may not cause interference,
and (2) this device must accept any interference, including interference that may cause undesired
operation of the device.
IC Radiation Exposure Statement
This equipment complies with IC RSS-102 radiation exposure limits set forth for an uncontrolled
environment. This equipment should be installed and operated with minimum distance 20cm
between the radiator & your body.
HDMI, the HDMI logo and High-Definition Multimedia Interface are
trademarks or registered trademarks of HDMI Licensing LLC.
WiHD and WiHD logo are trademarks licensed for use by WirelessHD,
LLC.
• Protect the power cord from being walked on or pinched, particularly at plugs, and where they
exit from your player.
• Unplug your device during lighting storms or when unused for long periods.
• Refer all servicing to qualied service personnel. Servicing is required when your device has been
damaged in any way, such as when the power supply cord or plug is damaged, when liquid has
been spilled or objects have fallen into your device, when your device has been exposed to rain or
moisture, or when your device does not operate normally or has been dropped.
• Do not place items with ames, such as candles, on or near your device.
• Dispose of batteries according to local hazardous waste regulations.
14
Page 16

TRADEMARKS SHOWN ARE THE PROPERTY OF THEIR RESPECTIVE OWNERS. IMAGES USED ARE FOR ILLUSTRATION PURPOSES ONLY. VIZIO, THE V LOGO, WHERE VISION MEETS VALUE,
AND OTHER VIZIO TRADEMARKS ARE THE INTELLECTUAL PROPERTY OF VIZIO INC. PRODUCT FEATURES AND SPECIFICATIONS ARE SUBJECT TO CHANGE WITHOUT NOTICE.
© 2010 VIZIO INC. ALL RIGHTS RESERVED.
101207ST-NC
 Loading...