

Page 1

VIZIO VBR100 User Manual
Dear VIZIO Customer,
Congratulations on your new VIZIO VBR100 Blu-ray DVD Player purchase.
Thank you for your support. For maximum benefit of your Blu-ray DVD
Player, please read these instructions before making any adjustments, and
retain them for future reference. We hope you will experience many years
of enjoyment from your new VIZIO Blu-ray DVD Player.
For assistance, please call (877) 668-8462 or e-mail us at www.vizio.com.
To purchase or inquire about accessories and installation services for your
VIZIO Blu-ray DVD Player, please visit our website at
www.vizio.com or
call toll free at (888) 849-4623.
We recommend you register your VIZIO Blu-ray DVD Player either at our
website
www.VIZIO.com or fill out and mail your registration card. For
peace of mind and to protect your investment beyond the standard
warranty, VIZIO offers on-site extended warranty service plans. These
plans give additional coverage during the standard warranty period. Visit
our website or call us to purchase a plan.
Write down the serial number located on the back of your Blu-ray DVD
Player.
__ __ __ __ __ __ __ __ __ __ __ __ __
Purchase Date _____________________
VIZIO is a registered trademark of VIZIO, Inc. dba V, Inc.
HDMI logo and “High Definition Multimedia Interface” are registered trademarks of HDMI Licensing LLC.
Manufactured under license from Dolby Laboratories.
Dolby and the double-D symbol are trademarks of Dolby Laboratories.
ENERGY STAR and the ENERGY STAR mark are registered U.S. marks.
THE TRADEMARKS SHOWN HEREIN ARE THE PROPERTY OF THEIR RESPECTIVE OWNERS; IMAGES USED ARE FOR
ILLUSTRATION PURPOSES ONLY. BRAVO, VIZIO AND THE V LOGO AND WHERE VISION MEETS VALUE AND OTHER VIZIO
TRADEMARKS ARE THE INTELLECTUAL PROPERTY OF VIZIO INC. PRODUCT SPECIFICATIONS ARE SUBJECT TO
CHANGE WITHOUT NOTICE OR OBLIGATION. © 2009 VIZIO INC. ALL RIGHTS RESERVED.
Version 6/8/2009 1
www.VIZIO.com
Page 2

VIZIO VBR100 User Manual
Important Safety Instructions
Your Blu-ray DVD Player is designed and manufactured to operate within defined design limits,
and misuse may result in electric shock or fire. To prevent your Blu-ray DVD Player from being
damaged, the following rules should be observed for the installation, use, and maintenance of
your Blu-ray DVD Player. Read the following safety instructions before operating your Blu-ray
DVD Player. Keep these instructions in a safe place for future reference.
1. Read these instructions.
2. Keep these instructions.
3. Heed all warnings.
4. Follow all instructions.
5. Do not use your player near water.
6. Clean only with a dry cloth.
7. Do not block any ventilation openings. Install in accordance with the manufacturer's instructions.
8. Do not install near any heat sources such as radiators, heat registers, stoves, or other heatgenerating devices (including amplifiers) that produce heat.
9. Do not defeat the safety purpose of the polarized or grounding-type plug. A polarized plug has two
blades with one wider than the other. A grounding type plug has two blades and a third grounding
prong. The wide blade or the third prong are provided for your safety. If the provided plug does not fit
into your outlet, consult an electrician for replacement of the obsolete outlet.
10. Protect the power cord from being walked on or pinched particularly at plugs and convenience
receptacles and the point where they exit from your player.
11. Only use attachments/accessories specified by the manufacturer.
12. Use only with the cart, stand, tripod, bracket, or table specified by the manufacturer or sold with your
player. When a cart is used, use caution when moving the cart and player combination to avoid injury
from tip-over.
13. Unplug your player during lightning storms or when unused for long periods of time.
14. Refer all servicing to qualified service personnel. Servicing is required when your player has been
damaged in any way, such as when the power-supply cord or plug is damaged, when liquid has been
spilled or objects have fallen into your player, when your player has been exposed to rain or moisture,
or when your player does not operate normally or has been dropped.
15. To reduce the risk of fire or electric shock, do not expose your player to rain or moisture. Your player
should not be exposed to dripping or splashing and no objects filled with liquids, such as vases, shall
be placed on your player.
16. The main power plug is the disconnect device and should easy to access. Make sure that the plug is
easy to remove.
17. Make sure that you allow at least 4 inches (10 cm) of space on all sides of your player to allow for
ventilation.
18. Do not install your player in a confined space, such as a bookcase without allowing enough space for
ventilation. Do not cover the ventilation openings with items such as newspaper, tablecloths, or
curtains.
19. Do not place items with flames, such as candles, on your player.
20. Dispose of batteries according to local hazardous waste regulations.
21. Use your player in mild climates. Excessive heat or cold can damage your player.
22. Use of controls or adjustments other than these specified in this guide may result in hazardous
radiation exposure.
2
www.VIZIO.com
Page 3

VIZIO VBR100 User Manual
Table of Contents
Important Safety Instructions.....................................................................................................................2
Table of Contents ......................................................................................................................................3
Opening the Package................................................................................................................................5
Package Contents ..................................................................................................................................... 5
Additional certified accessories for your Blu-ray DVD Player are sold separately:...................................5
Setting Up Your Blu-ray DVD Player.........................................................................................................5
CHAPTER 1 FEATURES & FORMATS ............................................................... 6
Features ....................................................................................................................................................6
Supported Discs ........................................................................................................................................ 6
Supported file extensions .......................................................................................................................... 6
Region codes............................................................................................................................................. 6
CHAPTER 2 BASIC CONTROLS AND CONNECTIONS ......................................... 7
Front .......................................................................................................................................................... 7
Rear Panel Connections............................................................................................................................8
VIZIO Remote Control...............................................................................................................................9
Insertion of Batteries in the Remote Control........................................................................................ 10
Remote Control Range ........................................................................................................................ 10
VIZIO Remote Control Precautions .....................................................................................................11
CHAPTER 3 CONNECTING EQUIPMENT ........................................................... 11
Which Video Connection Should I Use? ................................................................................................. 11
Connecting to a TV..................................................................................................................................12
Using HDMI (Best) ...............................................................................................................................12
Using Component Video (Better)......................................................................................................... 13
Using Composite (AV) Video (Good)................................................................................................... 14
Connecting to a LAN ...............................................................................................................................15
Ethernet cable connection ...................................................................................................................15
Connecting a USB Storage Device .........................................................................................................15
USB connection to use BD-Live capability .......................................................................................... 15
USB connection to view multimedia files............................................................................................. 16
CHAPTER 4 PLAYING A DISC ......................................................................... 17
CHAPTER 5 ACCESSING BD-LIVETM CONTENT ............................................... 18
CHAPTER 6 VIEWING JPEG FILES .................................................................. 19
USB Device ............................................................................................................................................. 19
Data Disc .................................................................................................................................................19
Viewing JPEG Properties ........................................................................................................................ 19
Controlling JPEG Playback .....................................................................................................................19
Viewing JPEG Files in a Slide Show....................................................................................................... 19
Adding Music to a Slide Show................................................................................................................. 20
Setting Slide Show Duration....................................................................................................................20
CHAPTER 7 PLAYING MP3 FILES ................................................................... 21
USB Device ............................................................................................................................................. 21
Data Disc .................................................................................................................................................21
Controlling MP3 playback........................................................................................................................21
Creating an MP3 play list ........................................................................................................................ 22
Deleting a file from an MP3 play list........................................................................................................ 22
Controlling MP3 Play list Playback.......................................................................................................... 22
CHAPTER 8 USING THE SETUP MENU............................................................ 23
Version 6/8/2009 3
www.VIZIO.com
Page 4

VIZIO VBR100 User Manual
Language Menu....................................................................................................................................... 24
Audio.................................................................................................................................................... 24
Subtitle .................................................................................................................................................24
Menu ....................................................................................................................................................24
OSD ..................................................................................................................................................... 24
Display Menu........................................................................................................................................... 25
TV Type ...............................................................................................................................................25
TV Aspect ............................................................................................................................................25
Resolution ............................................................................................................................................26
Film Mode ............................................................................................................................................ 26
Audio Menu .............................................................................................................................................26
Digital Output ....................................................................................................................................... 26
PCM Downsampling ............................................................................................................................ 27
Dynamic Range Control.......................................................................................................................27
Parental Menu ......................................................................................................................................... 27
Parental Control ...................................................................................................................................27
Parental Level ......................................................................................................................................27
Parental Password............................................................................................................................... 28
System Menu........................................................................................................................................... 28
Reset Settings...................................................................................................................................... 28
Clear BD Storage................................................................................................................................. 28
BD-Live Internet Access ...................................................................................................................... 28
Optical Disc AutoPlay ..........................................................................................................................28
Network Menu .........................................................................................................................................29
IP Mode................................................................................................................................................ 29
Test Connectivity .................................................................................................................................29
Current IP............................................................................................................................................. 29
CHAPTER 9 MAINTENANCE AND TROUBLESHOOTING .................................... 30
Maintenance ............................................................................................................................................30
FAQ & Troubleshooting...........................................................................................................................31
Telephone & Technical Support.............................................................................................................. 35
FCC Class B Radio Interference Statement ........................................................................................... 36
SPECIFICATIONS ............................................................................................ 37
LEGAL NOTICES ............................................................................................. 38
ONE-YEAR LIMITED WARRANTY...................................................................... 39
INDEX ............................................................................................................. 40
4
www.VIZIO.com
Page 5
VIZIO VBR100 User Manual
Opening the Package
Your Blu-ray DVD Player and its accompanying accessories are carefully packed in a cardboard carton
that has been designed to protect it from transportation damage. Once you have opened the carton,
check that your Blu-ray DVD Player is in good condition and that all of the contents are included.
IMPORTANT: Save the carton and packing material for future shipping.
Package Contents
! VIZIO VBR100
! VIZIO remote control
! AA batteries for the remote control (2)
! Composite (AV) cables
! This User’s Manual
! Quick Setup Guide
Additional certified accessories for your Blu-ray
DVD Player are sold separately:
! High Definition Video cables (HDMI or Component)
! High Definition Audio cables (HDMI, Coaxial, or Optical)
! Extra or replacement remote
VIZIO also offers installation services and extended warranty services for your Blu-ray DVD Player.
To purchase or inquire about additional accessories and services for your VIZIO Blu-ray DVD Player, visit
our web site at www.VIZIO.com or call us toll free at 888-VIZIOCE (888-849-4623)
Setting Up Your Blu-ray DVD Player
! Read this user manual carefully before installing your Blu-ray DVD Player.
! The power consumption of your Blu-ray DVD Player is about 25W (average). Use the included
power cord. When an extension cord is required, use one with the correct power rating. The cord
must be grounded and the grounding feature must not be compromised.
! For proper ventilation, you must allow space between the back of your Blu-ray DVD Player and
the wall.
! Avoid installing your Blu-ray DVD Player in places with high humidity, dust, or smoke so you do
not shorten the service life of the electronic components.
VIZIO offers professional installation services. Contact VIZIO for more information on these services at
888-VIZIOCE (888-849-4623) or www.VIZIO.com.
Version 6/8/2009 5
www.VIZIO.com
Page 6
VIZIO VBR100 User Manual
Chapter 1 Features & Formats
Features
! Full, high-definition video playback at up to 1080p resolution for an amazing viewing experience
! Up-conversion of standard-definition DVDs for enhanced picture quality at up to 1080p over an
HDMI connection
! Rich multi-channel surround sound
! Easy HDTV connection using a single HDMI cable (cable not included)
! Multiple outputs for connecting your home theater system or amplifier
! PIP functionality that lets you display primary and secondary video at the same time (if available
on the Blu-ray Disc)
! Pop-up menu display without interrupting playback (if available on the Blu-ray Disc)
! HDMI 1080p output (Blu-ray Disc only) that provides smooth playback of video with a frame rate
of 60 frames per second (TV must be connected with an HDMI cable and be compatible with
1080p 60 frame)
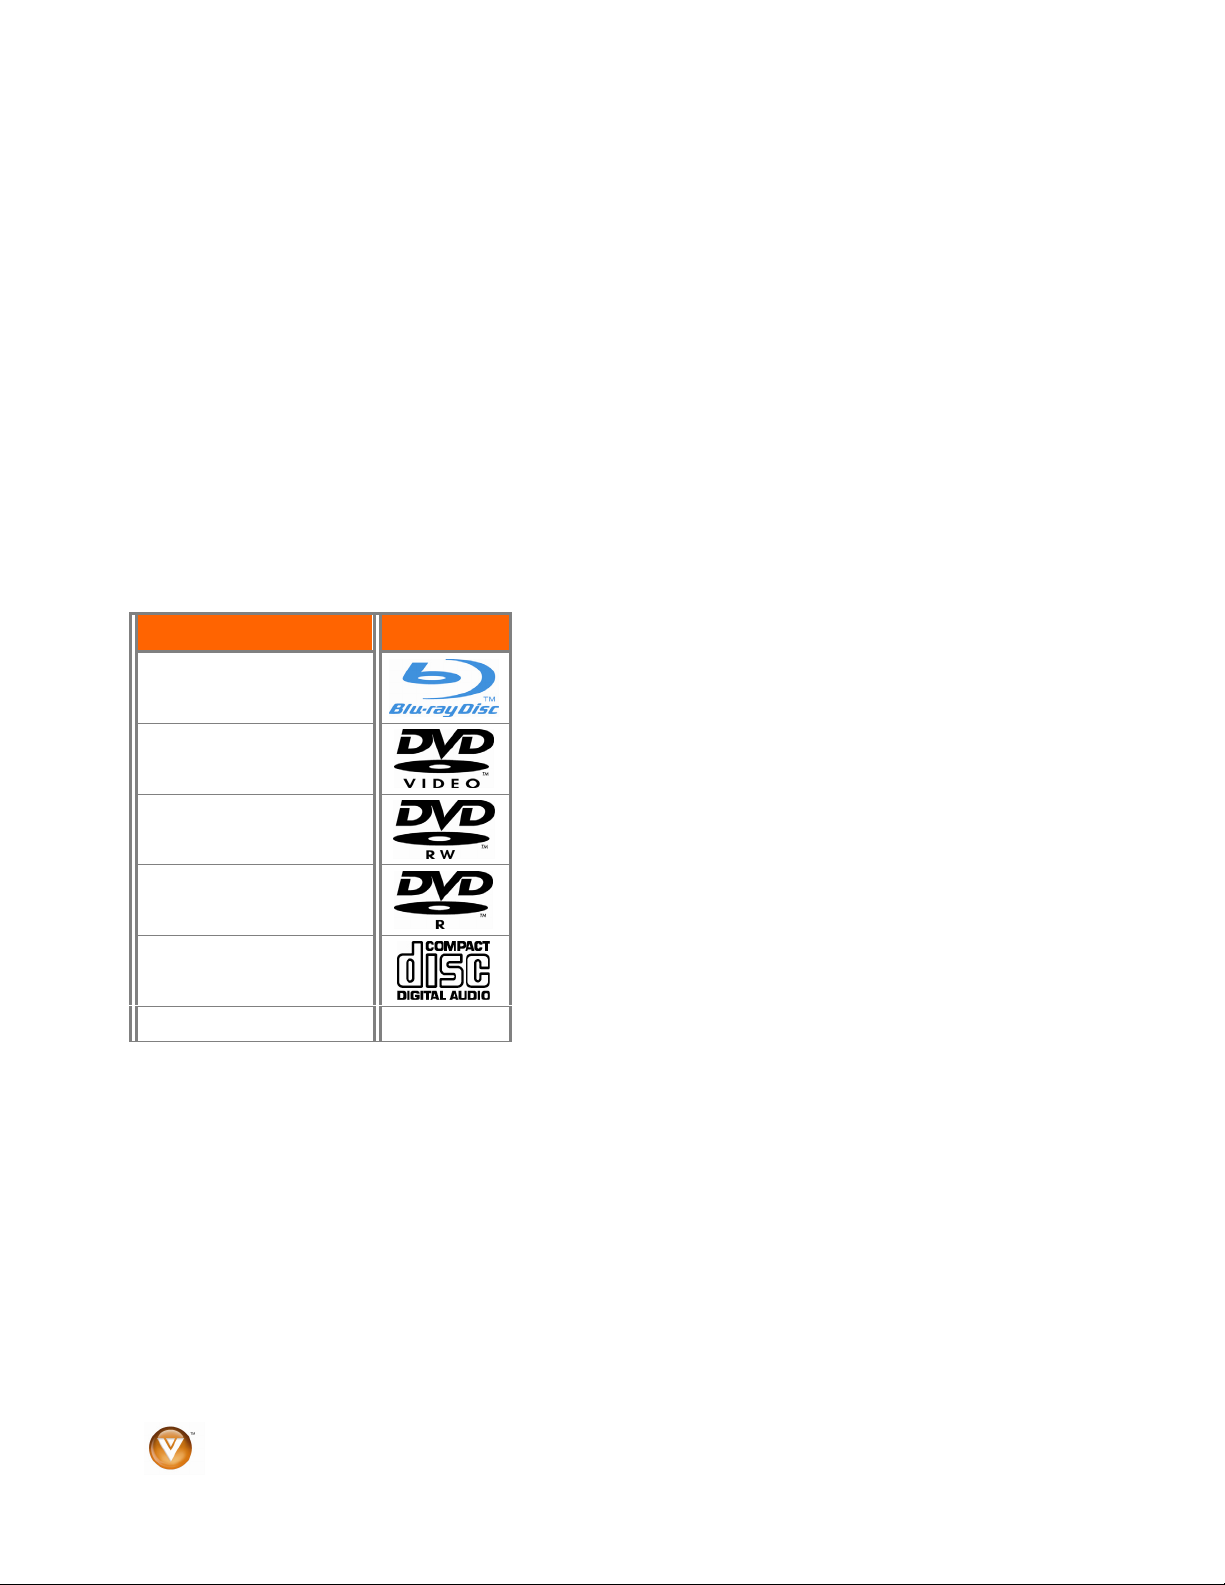
Supported Discs
Disc Type Logo
Blu-ray Disc
DVD-video (DVD-ROM)
Note:
! Your player can play CD-Rs, CD-RWs, DVD-RWs,
and DVD-Rs recorded with UDF or ISO9660 format.
! Writeable DVDs (DVD-RW, DVD-R) must be finalized
(VR mode only).
DVD-RW
DVD-R
Audio CDs (CDDA)
MP3/JPEG/Data CD
Supported file extensions
! .mp3
Note: High bit-rate or variable bit-rate .mp3 files may not play
back correctly.
! .jpegs
! .jpg
Region codes
Blu-ray Discs and DVDs have region codes to help prevent illegal distribution of discs. If the disc’s region
code does not match your player’s region code, the disc will not play. Your player’s region code is
displayed on the back of your player. The disc’s region code is displayed on the disc or disc packaging.
6
www.VIZIO.com
Page 7
VIZIO VBR100 User Manual
Chapter 2 Basic Controls and Connections
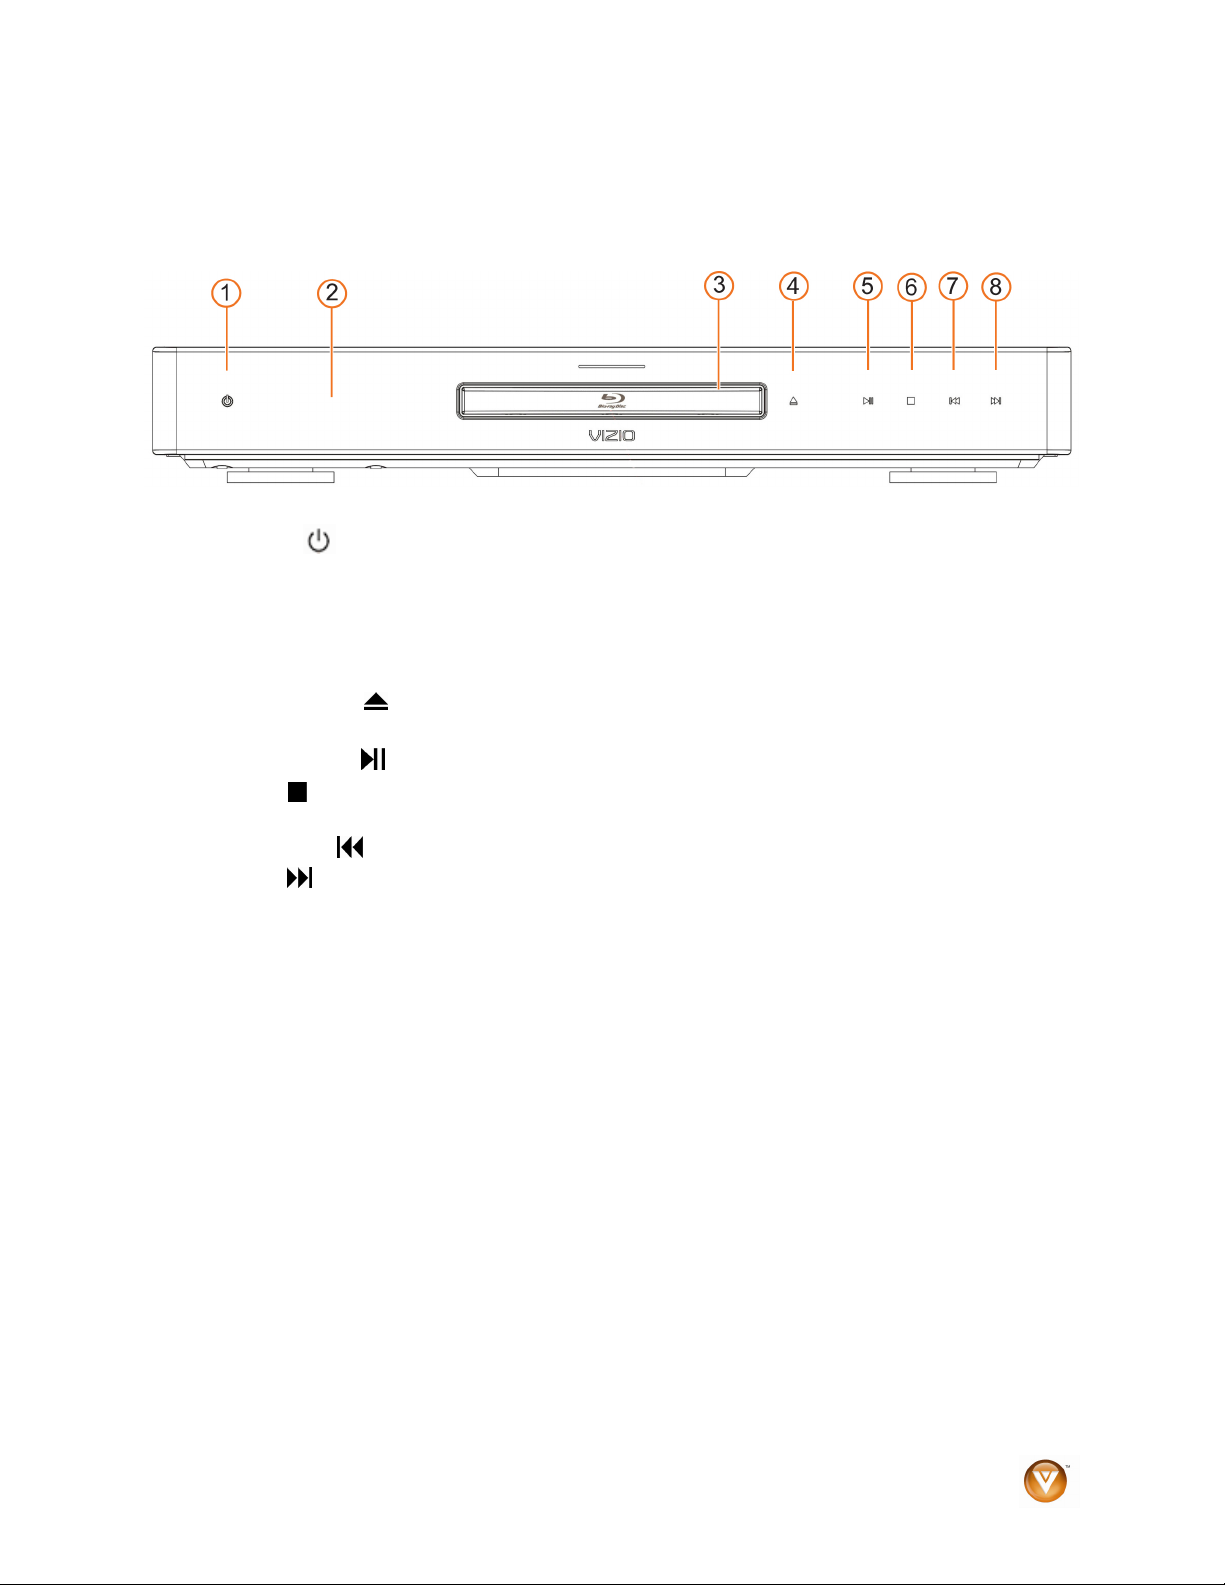
Front
1. POWER (
standby mode. When your Blu-ray DVD player is in standby mode, power is still entering your
Blu-ray DVD player.
2. REMOTE CONTROL SENSOR – Point the remote control directly at this sensor for the best
response to the remote signal.
3. DISC TRAY – Insert a disc with the label side up into this tray.
4. OPEN/CLOSE (
Note: Due to the nature of Blu-ray discs, the OPEN/CLOSE may take a moment to respond.
5. PLAY/PAUSE (
6. STOP (
the disc.
7. PREVIOUS (
8. NEXT (
) -- Press to turn on your Blu-ray DVD player or put your Blu-ray DVD player in
) -- Press to open or close the disc tray.
) -- Press to start or pause playback.
) – Press to stop playback and then press !II to begin playback at the beginning of
) -- Press to go to the previous title, chapter, or track.
) -- Press to go to the next title, chapter, or track.
Version 6/8/2009 7
www.VIZIO.com
Page 8
VIZIO VBR100 User Manual
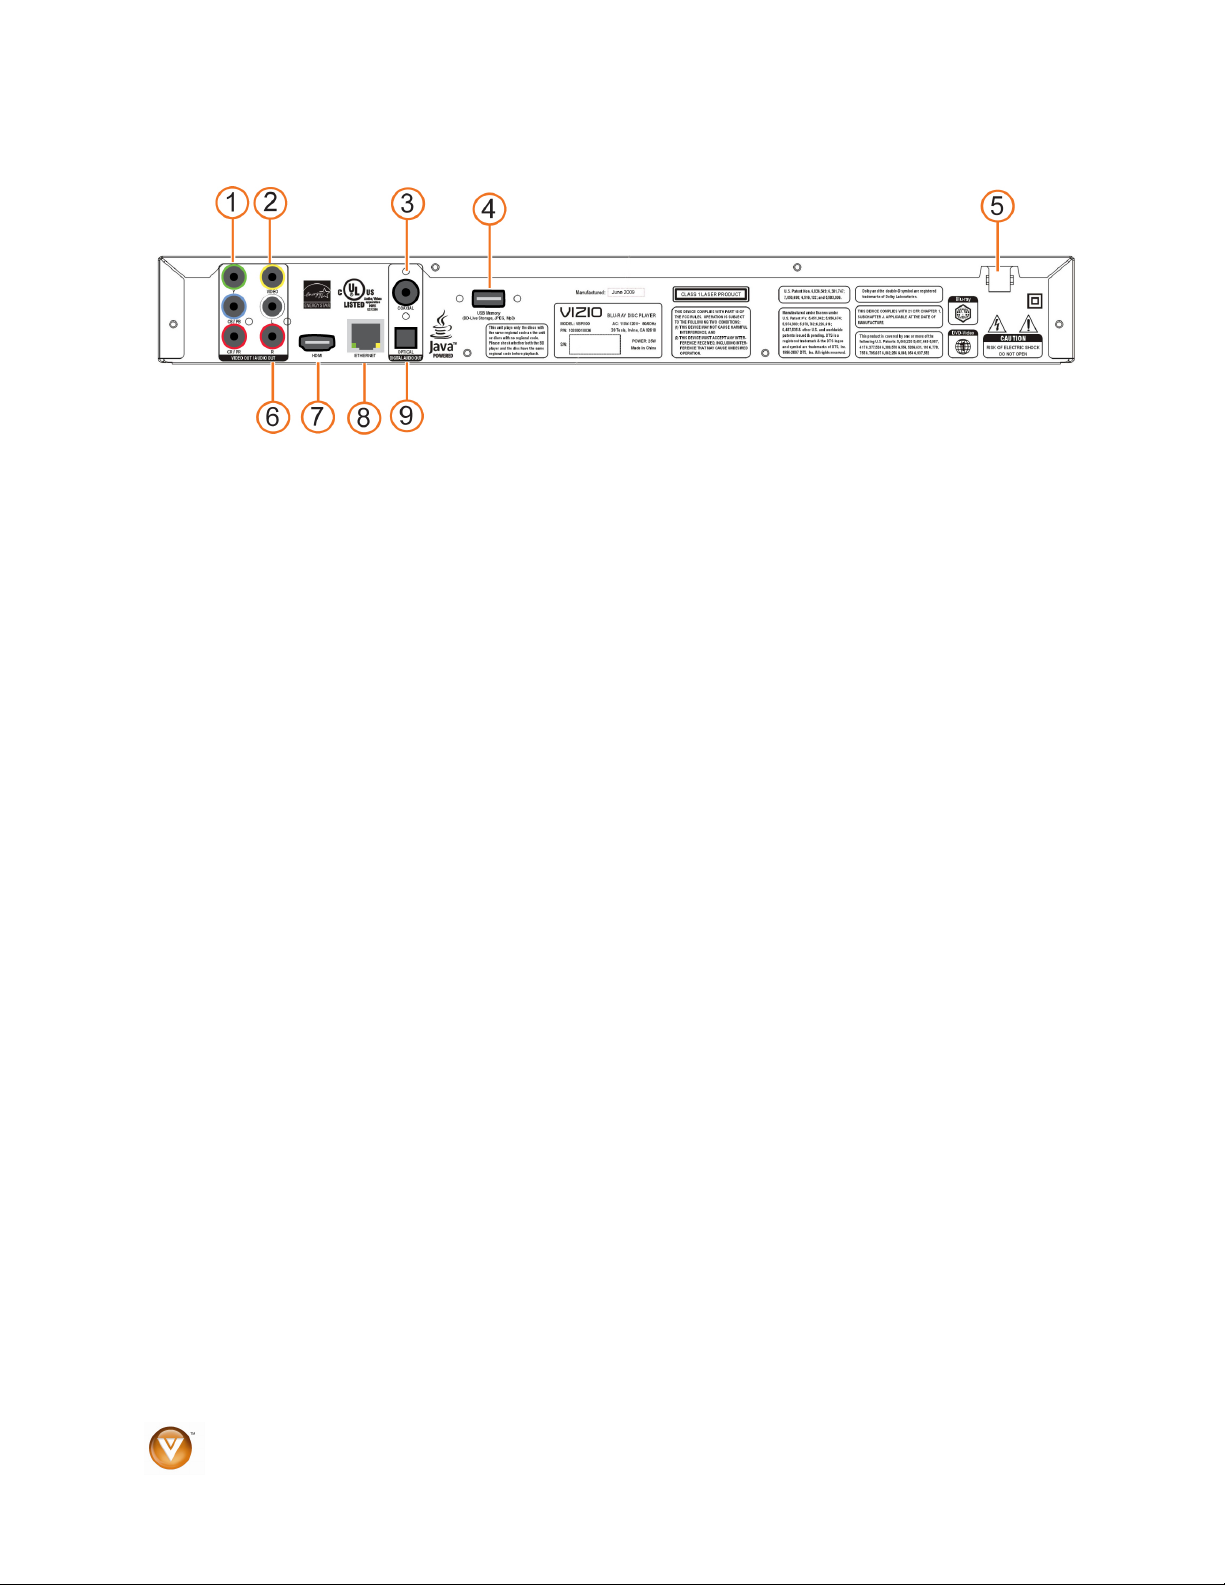
Rear Panel Connections
1. COMPONENT (Y/CbPb/CrPr with Audio L/R) – Connect component video devices such as a
TV. For component TVs, you will also need to connect the red and white audio jacks (see #6
below) to the Analog L/R Audio Out jacks.
2. VIDEO OUT – Connect a standard AV TV directly here. For composite TVs, you will also need
to connect the red and white audio jacks (see #6 below) to the Analog L/R Audio Out jacks.
3. COAXIAL DIGITAL AUDIO OUT – Connect a sound system that has a coaxial audio jack
directly here.
4. USB– Connect a USB flash drive to view multimedia content or save BD-Live Content.
5. POWER – Connect this cord into a power outlet.
6. ANALOG L/R AUDIO OUT – Connect the audio for the TV you connected to the
COMPONENT or VIDEO OUT jacks to these audio jacks. You can connect the audio for a
component TV to a sound system instead of to the TV.
7. HDMI – Connect digital video and audio devices such as TV through this all digital connector.
No additional audio connection is needed.
8. ETHERNET – Used to connect to the Internet to access BD Live Content.
9. OPTICAL AUDIO OUT – Connect a sound system that has an optical audio jack directly here.
8
www.VIZIO.com
Page 9

VIZIO Remote Control
OPEN/CLOSE (
Note: Due to the nature of Blu-ray discs, the
OPEN/CLOSE may take a moment to respond.
) – Press to open or close the disc tray.
VIZIO VBR100 User Manual
STANDBY/ON (
ray DVD player on from the Standby mode. Press it again
to return to the Standby mode.
A (red), B (green), C (yellow), D (blue) -- Press these
buttons to control playback of Blu-ray Discs that have a
Java™ application. For more information, see the
documentation that came with the Blu-ray Disc.
SETUP – This button opens the setup menu to adjust
various options.
DISC MENU – This button stops playback and returns to
the main Blu-ray/DVD title menu. It also opens a menu to
control playback of MP3 or JPEG files.
) – Press this button to turn the Blu-
"#$ ! – These buttons are used to navigate the disc
menu when playing a Blu-ray disc or DVD. These buttons
also navigate the pop-up menu when playing MP3 or
JPEG files.
SELECT – Pressing this button will select the option after
it has been highlighted in the menu.
RETURN – Press this button return to the previous menu
during MP3 or JPEG playback.
POPUP MENU/TITLE MENU – During Blu-ray Disc
playback, press this button to open a menu that lets you
control Blu-ray Disc playback. During DVD playback, press
this button to open the DVD menu (if available).
PREVIOUS (
chapter, or track.
NEXT (
FAST REVERSE( )– Press repeatedly to increase the
fast reverse speed from Fast x 2, Fast x 4, Fast x 8, Fast x
16, Fast x 32, Fast x 64, to Fast x 128. Press !II to
resume playback.
) – Press to go to the previous title,
) – Press to go to the next title, chapter, or track.
Play/Pause
playback.
FAST FORWARD (
fast forward speed from Fast x 2, Fast x 4, Fast x 8, Fast x
16, Fast x 32, Fast x 64, to Fast x 128. Press !II to
resume playback.
STOP (!) – Press to stop playback and then press !II to
begin playback at the beginning of the disc.
STEP ( ) – Press to advance the disc one frame at a
time. Press
VIZIO TV VOLUME DOWN (–) – Press to turn your Vizio TV volume down.
Version 6/8/2009 9
(!II) – Press this button to start or pause
) – Press repeatedly to increase the
!II to resume normal playback.
www.VIZIO.com
Page 10
VIZIO VBR100 User Manual
MUTE – Press to mute your Vizio TV volume.
VIZIO TV VOLUME UP (
INFO – Repeatedly press this button to display this disc information Title Elapsed, Title Remain, Chapter
Elapsed, Chapter Remain, and Display Off.
PIP – Press to turn picture-in-picture (PIP) mode on or off. PIP is only available on supported Blu-ray
discs.
SUBTITLE – Press this button to select a subtitle language. SUBTITLE X of XX XXX appears on the
screen. The first X is the number of the current language. XX is the total number of languages available.
XXX is the letter abbreviation for the country. Press again to turn Subtitles off.
AUDIO – Some discs are recorded with multiple audio languages. When pressed, X of X XXX appears.
The first X shows the current audio language number. The next X shows the total number of audio
languages available. And XXX describes the current audio language.
TV RES – Press to select the video resolution. Choose from 480i, 480p, 720p, 1080i, 1080p, or AUTO.
ANGLE – Press this button to select a viewing angle if multiple angles are available on the disc. X of X
appears on the screen. The first X is the current viewing angle. The second X is the total number of
viewing angles available.
A-B – Pressing this button creates a playback loop. Play the disc until it reaches the place where you
want the loop to start, and then press A-B. Play the disc until it reaches the place where you wan the loop
to stop, and then press A-B again. Your player plays that loop continuously. Press A-B again to resume
normal playback.
REPEAT – Press once to repeat the current title. Press again to repeat the current chapter. Press a third
time to resume normal playback.
NUMBER BUTTON PAD – While searching, use these buttons to enter a title, chapter, track, or time. If
parental control function is enabled, use these buttons to enter or set a password.
SEARCH – Press to search for a title, chapter, or specific time on a disc.
CANCEL – Press to clear an input error.
+) – Press to turn the volume on your Vizio TV up.
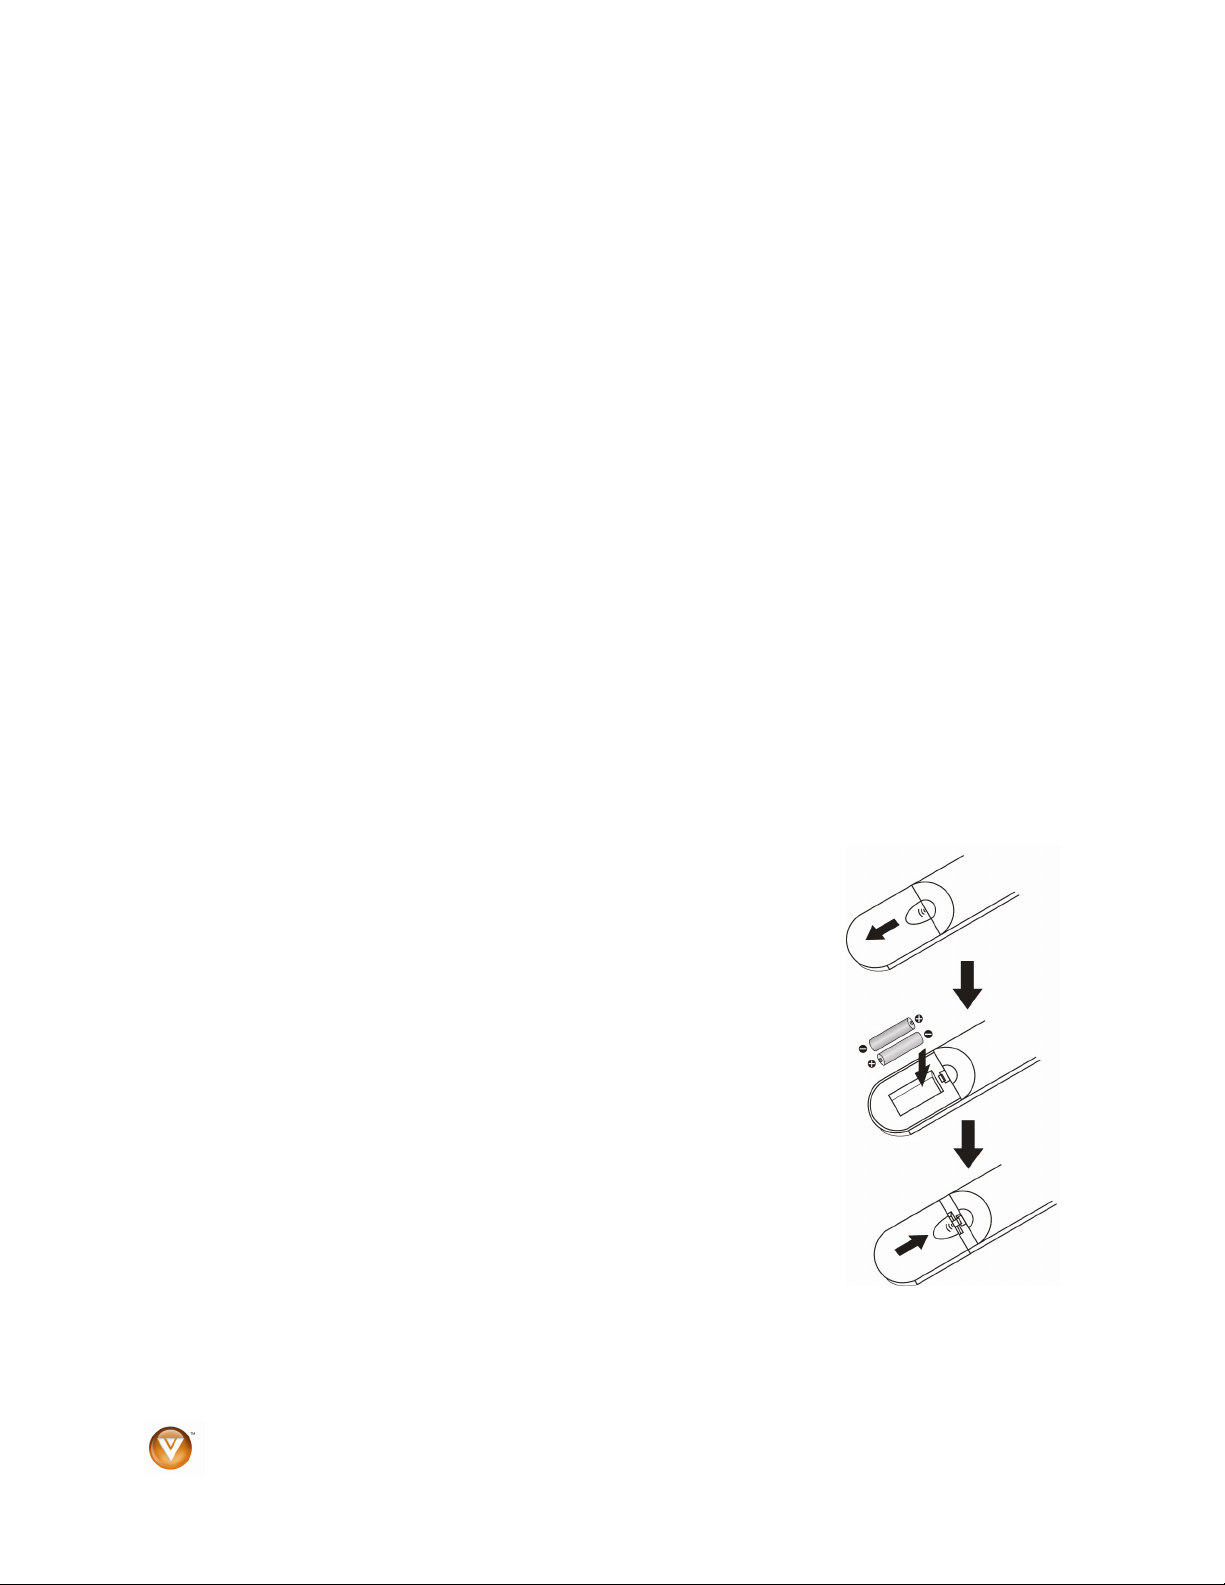
Insertion of Batteries in the Remote Control
Insert two AA batteries into the remote control. Make sure that you match
the (+) and (-) symbols on the batteries with the (+) and (-) symbols inside
the battery compartment. Re-attach the battery cover.
Precautionary Tips for Inserting the Batteries:
! Only use the specified AA batteries.
! Do not mix new and old batteries. This may result in cracking or
leakage that may pose a fire risk or lead to personal injury.
! Inserting the batteries incorrectly may also result in cracking or
leakage that may pose a fire risk or lead to personal injury.
! Dispose of the batteries in accordance with local laws and
regulations.
! Keep the batteries away from children and pets.
Remote Control Range
! The effective range of the remote control is approximately 23 feet (7 meters) from the front of the
receiver window, 30° to the left and right, 30° up and down.
! Point the remote control at the remote control sensor to transmit the commands.
! Do not place any obstacles between the remote control and the receiver window.
10
www.VIZIO.com
Page 11

VIZIO VBR100 User Manual
VIZIO Remote Control Precautions
! The remote control should be kept dry and away from heat sources. Avoid humidity.
! If the player responds erratically to the remote control or does not respond at all, check the
batteries. If the batteries are low or exhausted, replace them with fresh batteries.
! When not using the remote control for a long period of time, remove the batteries.
! Do not take the batteries apart, heat them, or throw them into a fire.
! Do not subject the remote control to undue physical stress, such as striking or dropping it.
! Do not attempt to clean the remote control with a volatile solvent. Wipe it with a clean, damp
cloth.
Chapter 3 Connecting Equipment
Which Video Connection Should I Use?
You have three options for connecting your TV to your Blu-ray DVD Player: HDMI, Component, or
Composite. Based on your home theater configuration, you can decide which option is the right one for
you. TVs that have a HDMI digital interface should be connected to the HDMI input of the Blu-ray DVD
Player for optimal results.
High definition video is only available through HDMI and Component connections. To view high definition
content, your TV must support high definition video. Consult your TV user manual regarding high
definition video support.
Connection
Quality (type)
Best
(digital)
Better
(analog)
Good
(analog)
Note:
! To maintain the display quality, use a VIZIO certified HDMI cable. This cable is available in 6, 8,
and 12 foot lengths. See www.vizio.com or call 1-888-VIZIOCE (1-888-849-4623) for details.
Connector Description
HDMI provides a digital interface between your Blu-ray DVD Player
and your TV over a single cable.
Component - Component video provides a sharper image than
composite video because the three video signals are transmitted via
three separate channels.
Composite (AV) - All three video signals are combined into one
channel, thus making the image less sharp than Component.
High definition video is not supported through Composite. Your player
will only output 480i.
Version 6/8/2009 11
www.VIZIO.com
Page 12
VIZIO VBR100 User Manual
Connecting to a TV
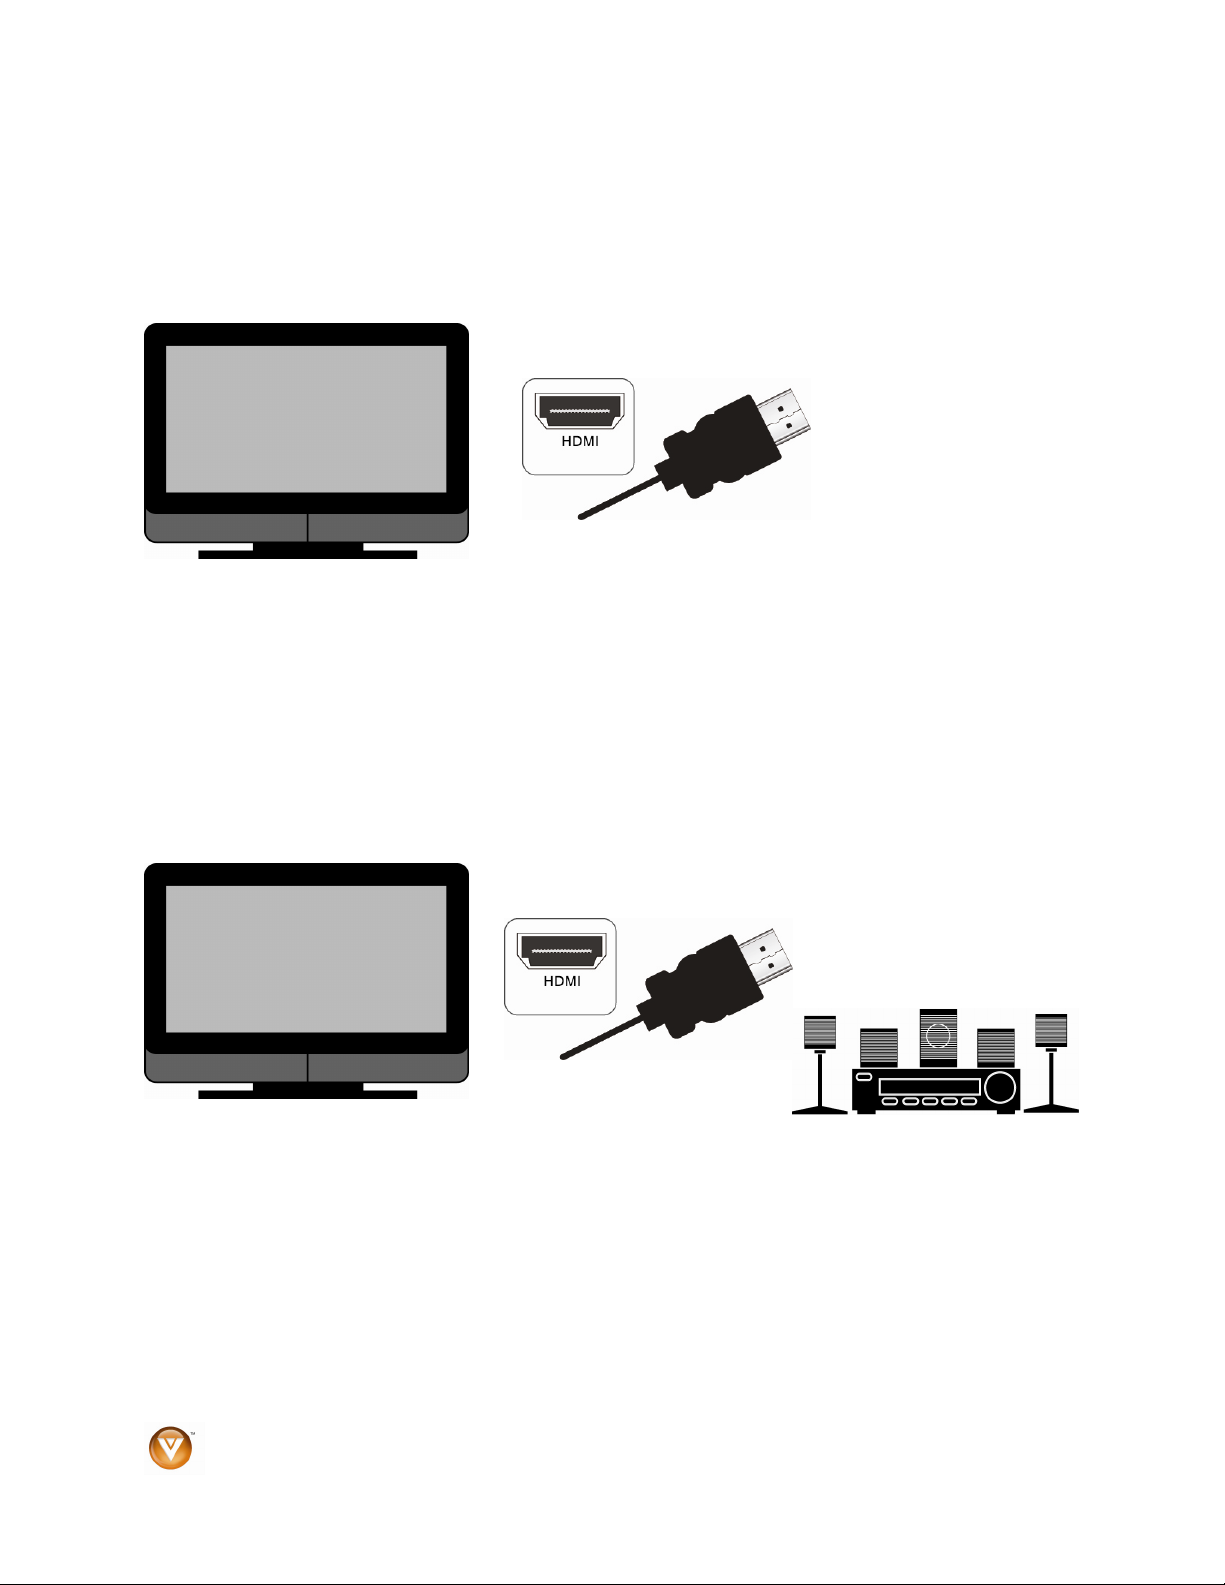
Using HDMI (Best)
HDMI with no home theater sound system
1. Connect an HDMI cable from the HDMI IN on your TV to the HDMI OUT on the back of your
Blu-ray DVD Player.
2. Turn on the power to the Blu-ray DVD Player.
3. Select the HDMI input on your TV to view the disc.
HDMI with a home theater sound system
1. Connect the HDMI OUT on your Blu-ray DVD Player to the HDMI IN on the home theater
system.
2. Use another HDMI cable (not supplied) to connect the HDMI OUT on the home theater
system to the HDMI IN on the TV.
3. Turn on the power to your Blu-ray DVD Player.
4. Select the HDMI input on your TV to view the disc.
12
www.VIZIO.com
Page 13

Using Component Video (Better)
Component Video with no home theater sound system
1. Connect the component cables (green, blue, and red) from your TV to the COMPONENT
jacks on the back of your Blu-ray DVD Player.
2. Connect the audio cables (white and red) from your TV to the adjacent L and R AUDIO OUT
jacks on the back of your Blu-ray DVD Player.
3. Turn on the power to your Blu-ray DVD Player.
4. Select the Component input on your TV to view the disc.
Component Video with a home theater sound system
VIZIO VBR100 User Manual
1. Connect the component cables (green, blue, and red) from your TV to the COMPONENT
jacks on the back of your Blu-ray DVD Player.
2. Connect the audio cables (white and red) from your TV to the L and R AUDIO OUT jacks on
the home theater system.
3. Turn on the power to your Blu-ray DVD Player.
4. Select the Component input on your TV to view the disc.
Version 6/8/2009 13
www.VIZIO.com
Page 14

VIZIO VBR100 User Manual
Component Video with a home theater sound system using digital audio
Your Blu-ray Player has two digital audio jacks: coaxial and optical. If your home theater system
is equipped with one of these jacks, connect your digital home theater system from your Blu-ray
DVD Player to one of these jacks. To determine which type of digital jack your sound system has,
see the documentation that came with your home theater system.
1. Connect the component cables (green, blue, and red) from your TV to the COMPONENT
jacks on the back of your Blu-ray DVD Player.
2. Connect a coaxial digital audio cable (not provided) to the COAXIAL DIGITAL AUDIO OUT
jack on the back of your Blu-ray DVD Player, and then connect the other end to the
COAXIAL IN jack on the home theater system.
OR
Connect an optical digital audio cable (not included) to the OPTICAL DIGITAL OUT jack on
the back of your Blu-ray DVD Player, and then connect the other end cable to the OPTICAL
IN jack on the home theater system.
3. Turn on the power to your Blu-ray DVD Player.
4. Select the Component input on your TV to view the disc.
Using Composite (AV) Video (Good)
1. Connect the video cable (yellow) from your TV to the AV jack (yellow) on the back of your
Blu-ray DVD Player.
2. Connect the audio cables (white and red) on your TV to the corresponding L and R AUDIO
OUT jacks on the back of your Blu-ray DVD Player.
3. Turn on your Blu-ray DVD Player and set-top box.
4. Select the AV input on your TV to view the disc.
14
www.VIZIO.com
Page 15

VIZIO VBR100 User Manual
Connecting to a LAN
Ethernet cable connection
! Connect an Ethernet cable (not supplied) from the Ethernet jack on your Blu-ray DVD Player to a
corresponding port on your router.
The Ethernet function on the Blu-ray player is used to access BD-Live content. BD-Live is available on
supported discs. Consult the documentation that came with the Blu-ray disc. To access BD-Live™
content, you must have a USB storage device 1GB or larger formatted to FAT32 and broadband Internet
access over an Ethernet connection such as cable or DSL.
Connecting a USB Storage Device
USB connection to use BD-Live capability
1. Turn OFF your Blu-ray DVD player.
2. Connect a USB storage device to the USB port on your Blu-ray DVD Player.
Note: The USB storage device should be 1GB or larger with at least 1 GB of free space and
formatted FAT32. NTFS and other file systems are not supported.
3. Turn on your Blu-ray DVD Player. The Media Launcher menu appears.
4. Press ! or " on the remote control to select USB, then press SELECT. The USB Function
Select menu opens.
5. Press ! or " on the remote control to select BD-Live Storage, then press SELECT.
6. A message appears stating, “Your device will be used for BD-Live Storage until you unplug it from
your system”. Press SELECT. The Media Launcher menu opens.
7. Press
"#$ or ! to choose from: Optical Disc or Setup.
! Optical Disc – Plays the disc inserted in the Blu-ray DVD Player.
! Setup – Opens the Setup menu.
Version 6/8/2009 15
www.VIZIO.com
Page 16

VIZIO VBR100 User Manual
USB connection to view multimedia files
1. Turn OFF your Blu-ray DVD player.
2. Connect a USB storage device to the USB port on your Blu-ray DVD Player.
Note: The USB storage device should be 1GB or larger with at least 1 GB of free space and
formatted FAT32. NTFS and other file systems are not supported.
3. Turn on your Blu-ray DVD Player. The Media Launcher menu appears.
4. Press ! or " on the remote control to select USB, then press SELECT. The USB Function
Select menu opens.
5. Press ! or " on the remote control to select File Playback, then press SELECT. A message
appears stating, “Your device will be used for file navigation until you unplug it from your system”.
6. Press SELECT. The USB Navigation menu opens.
7. Press !"# or $ to choose from: Videos, Pictures, Music, or Go Back.
! Videos – Opens video menu.
! Pictures – Opens picture menu.
! Music – Opens music menu.
! Go back – Opens Media Launcher menu.
16
www.VIZIO.com
Page 17

VIZIO VBR100 User Manual
Chapter 4 Playing a Disc
1. Connect the power cord to the power cord connector on the back of the Blu-ray DVD Player, and
then plug the power cord into an AC wall socket.
2. Connect Audio and Video Cables to the Blu-ray DVD Player. (see Connecting Equipment for
detailed steps)
3. Once all the devices are connected, press the Power ON buttons on your Blu-ray DVD Player
and TV.
4. Press
5. Place a disc on the tray with the label facing up, then press to close the tray. It may take a
few seconds for the disc to load.
to open the disc tray.
6. If the disc does not start playing automatically, press !II. If a menu opens, press
to select !II, and then press SELECT.
a. Press !II to pause playback. Press it again to resume playback.
b. Press
c. Press
d. Press once to go to the beginning of the current chapter or track. Press twice to
e. Press
f. Repeatedly press
g. To open a menu, press POPUP MENU/TITLE MENU, press
7. When you are finished playing the disc, press
Notes:
! If Prohibited and a red circle
to do is not allowed by your player or the disc. For example, most discs will not allow you to fast
forward through the warning information at the beginning of a movie.
! Due to the nature of Blu-ray discs, the Eject function may take a moment to respond.
! Some Blu-ray and DVD discs play movie trailers before the movie. You may skip these trailers by
pressing the next chapter button or the disc menu button on the remote control.
% to stop playback and then press !II to begin playback at the beginning of the
disc.
or to fast forward or fast reverse, Press repeatedly to increase the speed
from Fast x 2, Fast x 4, Fast x 8, Fast x 16, Fast x 32, Fast x 64, to Fast x 128. Press !II
to resume playback.
go to the previous chapter or track.
to go to the next title, chapter, or track.
to advance the disc forward one frame at a time. Press !II to
resume playback.
"#$, or ! to select an
option, and then press SELECT.
to remove the disc.
with a slash appear on the screen, the operation you are trying
"#$, or !
Version 6/8/2009 17
www.VIZIO.com
Page 18

VIZIO VBR100 User Manual
Chapter 5 Accessing BD-LiveTM Content
1. Connect the power cord to the power cord connector on the back of the Blu-ray DVD Player, and
then plug the power cord into an AC wall socket.
2. Connect Audio and Video Cables to the Blu-ray DVD Player. (see Connecting Equipment for
detailed steps).
3. Connect your Blu-ray player to a LAN (see Connection to a LAN for details).
4. Connect a USB flash drive to the USB port on the back of your Blu-ray DVD Player. (see
Connecting a USB Storage Device for detailed steps)
5. Once all the devices are connected, press the Power ON buttons on your Blu-ray DVD Player
and TV.
6. Press
7. Place a BD-LiveTM capable disc on the tray with the label facing up, then press to close the
tray. It may take a few seconds for the disc to load.
8. If the disc does not open the Disc Menu, wait for the movie to begin playing and press DISC
MENU.
9. Press
of your Internet connection, it may take several seconds to connect to the BD-Live
Note:
! You must have a USB storage device connected and formatted for BD-Live
access BD-Live content.
to open the disc tray.
"#$ or ! to select the BD-Live
TM
option, then press SELECT. Depending on the speed
TM
content.
TM
storage in order to
18
www.VIZIO.com
Page 19

VIZIO VBR100 User Manual
Chapter 6 Viewing JPEG Files
USB Device
1. Turn OFF your Blu-ray DVD player.
2. Connect a USB storage device to the USB port on your Blu-ray DVD Player.
Note: The USB storage device must be formatted FAT32. NTFS and other file systems are not
supported.
3. Turn on your Blu-ray DVD Player. The Media Launcher menu appears.
4. Press ! or " on the remote control to select USB, then press SELECT. The USB Function
Select menu opens.
5. Press ! or " on the remote control to select File Playback, then press SELECT. A message
appears stating, “Your device will be used for file navigation until you unplug it from your system”.
6. Press SELECT. The USB Navigation menu opens.
7. Press
"#$, or ! to select the file you want to view.
Data Disc
1. Turn on your Blu-ray DVD Player.
2. Press
3. Place a disc that contains JPEG files on the tray with the label facing up, then press to close
the tray. A disc navigation menu opens.
4. Press
to open the disc tray.
"#$, or ! to select the file you want to view.
Viewing JPEG Properties
1. Select a file you want to view properties for.
2. Press DISC MENU. A pop-up menu opens.
3. Press
"#$, or ! to select Properties, then press SELECT. Properties for the file, such as
dimensions, along with other information (if present in the JPEG file), appear.
Controlling JPEG Playback
1. To go to the next or previous file, press or .
2. To return the previous menu, press RETURN.
Viewing JPEG Files in a Slide Show
1. Press DISC MENU. A pop-up menu opens.
2. Press
3. Press
4. To change the slide show effect, press DISC MENU, then press ! or " to select Slide Show
Version 6/8/2009 19
"#$, or ! to select Start Slide show and then press !. A pop-up menu opens with a
list of effects you can choose for the slide show.
" or # to select Blend, Film, Shutter, Fade, Curtain, or None, then press SELECT. The
slide show starts.
Effect. Press $ and then a pop-up menu opens with a list of effects you can choose for the slide
show. Press ! or " to select Blend, Film, Shutter, Fade, Curtain, or None, then press SELECT.
www.VIZIO.com
Page 20

VIZIO VBR100 User Manual
Adding Music to a Slide Show
1. Make sure you have inserted a disc containing both pictures and music.
2. Select a music file you want to have as the background music to the slide show and press DISC
MENU. A pop-up menu opens.
3. Press
4. Press " or # to select a location on the list, then press SELECT. The song is added to the
5. Select one of the picture files and press DISC MENU. A pop-up menu opens.
6. Press "#$, or ! to select Start Slide show, then press !. A pop-up menu opens with a list
7. Press
8. Once the slide show begins, press DISC MENU. A pop-up menu opens.
9. Press
10. Press
" or # to select Set as BGM, then press !.
background music list.
of effects you can choose for the slide show.
" or # to select Blend, Film, Shutter, Fade, Curtain, or None, then press SELECT. The
slide show starts.
" or # to select Slide Show BGM, then press !. A pop-up menu opens with the list of
songs selected as background music.
" or # to select a song, then press SELECT. The slide show begins with the background
music playing. The background song will continue to play as long as the slide show is showing.
Only one song can be selected to play with the slide show.
Setting Slide Show Duration
1. Select one of the picture files and press DISC MENU. A pop-up menu opens.
2. Press
3. Press " or # to select Blend, Film, Shutter, Fade, Curtain, or None, then press SELECT. The
4. Once the slide show begins, press DISC MENU. A pop-up menu opens.
"#$, or ! to select Start Slide show, then press !. A pop-up menu opens with a list
of effects you can choose for the slide show.
slide show starts.
5. Press
6. Press
20
" or # to select Slide Show Duration, then press !. A pop-up menu opens with the list
of various durations.
" or # to select 3s, 5s, 10s, 30s, 1min, 5min, or 30min, then press SELECT. The Slide
Show starts and will play for the duration selected.
www.VIZIO.com
Page 21

VIZIO VBR100 User Manual
Chapter 7 Playing MP3 files
USB Device
1. Turn OFF your Blu-ray DVD player.
2. Connect a USB storage device to the USB port on your Blu-ray DVD Player.
Note: The USB storage device must be formatted FAT32. NTFS and other file systems are not
supported.
3. Turn on your Blu-ray DVD Player. The Media Launcher menu appears.Press ! or " on the
remote control to select USB, then press SELECT. The USB Function Select menu opens.
4. Press ! or " on the remote control to select File Playback, then press SELECT. A message
appears stating, “Your device will be used for file navigation until you unplug it from your system”.
5. Press SELECT. The USB Navigation menu opens.
6. Press
"#$ or ! to select the file you want to play, then press SELECT. The file plays and
information about the file appears.
Data Disc
1. Turn on your Blu-ray DVD Player.
2. Press
3. Place a disc that contains MP3 files on the tray with the label facing up, then press to close
the tray. A disc navigation menu opens.
4. Press
information about the file appears.
to open the disc tray.
"#$ or ! to select the file you want to play, then press SELECT. The file plays and
Controlling MP3 playback
! Press !II to pause playback. Press it again to resume playback.
! Press
! Press
! Press once to go to the beginning of the current file. Press twice to go to the previous file.
! Press
! Press RETURN to go back to the previous menu.
% to stop playback and return to the song menu.
or to fast forward or fast reverse. Press !II to resume playback.
to go to the next file.
Version 6/8/2009 21
www.VIZIO.com
Page 22

VIZIO VBR100 User Manual
Creating an MP3 play list
1. Press DISC MENU. A pop-up menu opens.
2. Press
3. Press
4. There are three different ways to add songs to your play list. Press
"or # to select Play list, then press !.
"or # to select Add To Play list, then press !.
"or # to select:
! This – Adds the current file to the play list. Press SELECT to confirm your selection.
! All – Adds all music files to the play list. Press SELECT to confirm your selection.
! Select – Allows you to select the files you wish to add to the play list. Press
to navigate to MP3 files, then press SELECT to mark the desired songs. Press DISC
MENU when finished.
"#$ or !
Deleting a file from an MP3 play list
1. Press DISC MENU. A pop-up menu opens.
2. Press
3. Press
4. Press "or # to select:
5. Press SELECT to confirm your selection, then press RETURN to go back to the previous menu.
"or # to select Play list, then press !.
! to enter the Remove from Play list options.
! This – Deletes the current file from the play list.
! All – Deletes all music files from the play list.
! Select – Allows you to select the files you wish to delete from the play list.
Controlling MP3 Play list Playback
1. Press DISC MENU. A pop-up menu opens.
2. Press
3. Press
4. To play a play list, press DISC MENU, then press "or # to select Play.
5. To set the play mode, press DISC MENU, then press
6. To set the audio mode, press DISC MENU, then press
"or # to select Play list, then press !.
"or # to view Play list, then press SELECT.
"or # to select Set Play Mode. Press !
to enter Play Mode sub-menu. Press
in the order they were added to the list. Shuffle plays the files in random order.
"or # to select Normal or Shuffle. Normal plays the files
"or # to select Set Audio Mode. Press
! to enter Audio Mode sub-menu. Press "or # to select None, Repeat or Loop. None plays
the files in the order they were added to the list, and when the last file plays, playback stops.
Repeat repeats the current file. Loop plays the file in the order they were added to the list, and
when the last file plays, playback begins again with the file at the beginning of the list.
22
www.VIZIO.com
Page 23

VIZIO VBR100 User Manual
Chapter 8 Using the Setup Menu
The remote control can control all the function settings. The Setup Menu allows you to adjust language,
display, audio, and other settings. The Blu-ray DVD Player will save changes made to the settings, even if
the Player is turned off.
1. Press the SETUP button on the remote control and the Language menu will be shown on the
screen.
2. Press
3. Press $ to move to the list of sub-menu options.
4. Press
5. Press $ to move to the list of sub-sub-menu options.
6. Press
7. Press # once to return to the sub-menu OR press SETUP to exit the Setup Menu.
" or # on the remote control to select
one of the menu options:
! Language
! Display
! Audio
! Parental
! System
! Network
" or # on the remote control to select
one of the items to adjust.
" or # on the remote control to make your selection and then press SELECT to select it.
Version 6/8/2009 23
www.VIZIO.com
Page 24

VIZIO VBR100 User Manual
Language Menu
1. Press the SETUP button on the remote control.
2. Press " or # on the remote control to select
Language.
3. Press $ to move to the list of sub-menu options.
4. Press ! or " on the remote control to select
one of the items to adjust.
5. Press $ to move to the list of sub-sub-menu
options.
6. Press ! or " on the remote control to make
your selection and then press SELECT to select
it.
7. Press # once to return to the sub-menu OR
press SETUP to exit the Setup Menu.
Audio
Some Blu-ray Discs and DVDs are recorded with multiple audio languages. The number of languages
depends on the disc.
Subtitle
Some Blu-ray Discs and DVDs are recorded with subtitles. The number of languages depends on the
disc.
Menu
Some Blu-ray Discs and DVDs allow you to select the menu language for the disc. The number of
languages depends on the disc.
OSD
Select the Setup Menu language. Choose from English, Français, or Español.
24
www.VIZIO.com
Page 25

VIZIO VBR100 User Manual
Display Menu
1. Press the SETUP button on the remote control.
2. Press " or # on the remote control to select
Display.
3. Press $ to move to the list of sub-menu options.
4. Press
5. Press $ to move to the list of sub-sub-menu options.
6. Press ! or " on the remote control to make your
7. Press # once to return to the sub-menu OR press
TV Type
Select NTSC for TVs purchased in North America. Select PAL for TVs purchased in other parts of the
world such as Europe or Japan.
TV Aspect
Choose from 16:9 Wide, 16:9 Pillarbox, 4:3 Letterbox, or 4:3 Pan and Scan to set the picture size. If
you have a wide-screen TV, select one of the 16:9 aspect ratios. If you have a standard TV, select one of
the 4:3 aspect ratios.
" or # on the remote control to select one of
the items to adjust.
selection and then press SELECT to select it.
SETUP to exit the Setup Menu.
TV Aspect Menu Selection
Disc Contents
Movie in
widescreen
format
HD television
episodes in
widescreen
format
SD (4:3)
television
episodes
Cropped Movie
(Movie put on
disk in 4:3
Aspect
Ratio)
If your TV is more rectangular (16:9), choose: If your TV is more square (4:3), choose:
16:9 Full 16:9 Pillarboxed 4:3 Letterboxed 4:3 Pan and Scan
Movie will fill entire
screen
Episode will fill entire
screen
Episode will be
stretched horizontally
to fit entire screen
Movie will be
stretched Horizontally
to fit entire screen
No effect - Movie will fill
entire screen
No effect – Episode will
fill entire screen
Episode will be shown
in center of screen;
vertical bars will appear
on sides of screen
Movie will be shown in
center of screen;
vertical bars will appear
on sides of screen
Movie will be shown in
rectangular “wide”
aspect ratio (Horizontal
bars will be shown
above/below movie)
Episode will be shown
in rectangular “wide”
aspect ratio (Horizontal
bars will be shown
above/below movie)
No effect – Episode will
fill entire screen
No effect – Cropped
movie will fill entire
screen
Center of movie will
be shown on TV. Left
and right portion of
movie contents will
not be shown
Center of episode will
be shown on TV. Left
and right portion of
episode contents will
not be shown
No effect – Episode
will fill entire screen
No effect – cropped
movie will fill entire
screen
Note: Setting the player for one of the 16:9 settings when connected to a 4:3 TV could result in the
inability to see video on your TV.
Version 6/8/2009 25
www.VIZIO.com
Page 26

VIZIO VBR100 User Manual
Resolution
Set the video output resolution. Select the option that best fits the type of TV you have connected to the
player:
! HDMI Auto – Automatically set the resolution if the TV is connected to the HDMI jack
! 1080p – If the TV is a HDTV that can display 1080p (any frame rate) and is connected to the
HDMI jack
! 1080i – If the TV is a HDTV capable of 1080i only
! 720p – If the TV is a HDTV capable of 720p only
! 480p – If the TV is an EDTV (enhanced-definition TV)
! 480i – If the TV is a standard TV
Note:
! Only the HDMI jack supports 1080p video output at any frame rate.
! The component jacks are limited to 1080i.
! If an HDMI cable is connected to the HDMI jack, the component jacks are limited to 480i.
Film Mode
Choose from On or Off. Many movies recorded on Blu-ray discs are recorded at 24 frames per second
but not all TVs can display 24 frames per second. If this is the case with your TV, turn Film Mode Off.
Audio Menu
1. Press the SETUP button on the remote control.
2. Press " or # on the remote control to select
Audio.
3. Press $ to move to the list of sub-menu options.
4. Press
5. Press $ to move to the list of sub-sub-menu
6. Press ! or " on the remote control to make
7. Press # once to return to the sub-menu OR
" or # on the remote control to select
one of the items to adjust.
options.
your selection and then press SELECT to select
it.
press SETUP to exit the Setup Menu.
Digital Output
Select from PCM, Bitstream HD, Bitstream Legacy, or Bitstream mixed.
! PCM sends mixed digital audio over HDMI in 7.1 channel PCM (if supported by HDMI device)
and SPDIF in two-channel PCM format.
! Bitstream HD sends the bitstream from the disc over HDMI and SPDIF using the highest quality
possible. HDMI has higher quality capabilities with advanced audio codecs like TrueHD and DTSHD. Blu-ray disc audio is limited to the soundtrack for the main movie and does not send PiP
audio or audio effects.
! Bitstream Legacy sends the audio from the disc over HDMI or SPDIF using legacy DVD audio
formats. Blu-ray disc audio is limited to the soundtrack for main movie and does not send PiP
audio or audio effects.
! Bitstream mixed, Blu-ray disc audio streams are mixed with director’s commentary and PiP
audio (if enabled) and menu sound effects, and encoded into a single DTS bitstream. Use this
option if you want to enjoy mixed Blu-ray Disc audio in surround sound.
26
www.VIZIO.com
Page 27

VIZIO VBR100 User Manual
PCM Downsampling
Select from 48KHz, 96KHz, or Off. When connecting the digital out from the S/PDIF on the Blu-ray player
to a surround sound audio receiver, set the PCM downsampling rate to match your audio receiver
capabilities. Consult your audio receiver documentation for details on PCM sampling.
Dynamic Range Control
Applies when a Dolby audio track is selected from the Disk menu. If set to On, the louder portions of the
movie’s Dolby track are reduced in volume. If set to Auto this turns on Dynamic Range Control for all
Dolby Blu-ray movie soundtracks except DolbyTruHD. If you have selected a true HD track on the Blu-ray
disc, the Auto selection tells the Blu-ray player to only turn on Dynamic Range Control if information
embedded in the TruHD soundtrack tells it to do so. If set to Off, listen to movies at the dynamic range in
which they were recorded.
Parental Menu
1. Press the SETUP button on the remote control.
2. Press
3. Press $ to move to the list of sub-menu options.
4. Enter your password. The default password set
5. Press " or # on the remote control to select
6. Press $ to move to the list of sub-sub-menu
7. Press ! or " on the remote control to make
8. Press # once to return to the sub-menu OR press SETUP to exit the Setup Menu.
" or # on the remote control to select
Parental.
in the factory is 0 0 0 0.
one of the items to adjust.
options.
your selection and then press SELECT to select
it.
Parental Control
If you want to restrict certain program viewing, you can do this by setting Parental Controls. Selected
programs, movies and channels can then be made available only after an authorized password has been
entered and accepted. Choose from On or Off.
Parental Level
Select one of the following parental ratings to restrict program viewing:
! 1 [Kid Safe] – suitable for all children
! 2 [G] – General audiences
! 3 [PG] – Parental guidance suggested
! 4 [PG-13] – Not suitable for anyone under 13
! 5 [PG-R] – Parental guidance recommended
! 6 [R] – Not suitable for anyone under 17 unless supervised by a parent or adult guardian
! 7 [NC-17] – Not suitable for anyone under 17
! 8 [Adult] – All DVDs can be played
Version 6/8/2009 27
www.VIZIO.com
Page 28

VIZIO VBR100 User Manual
Parental Password
To change the password, select User Define and enter a new, 4-digit password using the number
buttons on the remote. To use the default password of 0 0 0 0, choose Default.
Note: Make sure you write down and store the new password in a secure place. The System Reset
feature DOES reset the password.
System Menu
1. Press the SETUP button on the remote control.
2. Press
3. Press $ to move to the list of sub-menu options.
4. Press
5. Press $ to move to the list of sub-sub-menu
6. Press ! or " on the remote control to make
7. Press # once to return to the sub-menu OR
" or # on the remote control to select
System.
" or # on the remote control to select
one of the items to adjust.
options.
your selection and then press SELECT to select
it.
press SETUP to exit the Setup Menu.
Reset Settings
Use this function to reset the Blu-ray DVD Player to the default factory settings.
The screen will display a message to confirm that you want to reset the values to factory settings.
Note: This DOES reset the Parental Control Password.
Clear BD Storage
This option clears the data placed on the USB storage device during download of BD-Live content.
BD-Live Internet Access
Use this menu item to tell the Blu-ray player which websites it is allowed to visit in order to download BDlive content from the Internet.
! Limit Access will only allow the Blu-ray player to download content from a website which has a
valid online certificate. This will reduce the chances of downloading malicious content onto the
player.
! Always Allow Access allows the Blu-ray player to download content from any BD-live website
whose Internet address is encoded onto the disk. There is no danger of malicious code download
from valid commercial BD disks, but choosing this option and downloading BD-live content via
illegally authored BD disks, or disks obtained from questionable sources, could result in malicious
code being downloaded onto the player.
! Prohibit Access prevents the Blu-ray player from downloading content from any BD-live website.
Optical Disc AutoPlay
Turn this option On if you would like to automatically start playback when a disc is inserted. Select Off if
you do not.
28
www.VIZIO.com
Page 29

VIZIO VBR100 User Manual
Network Menu
1. Press the SETUP button on the remote control.
2. Press " or # on the remote control to select
Network.
3. Press $ to move to the list of sub-menu
options.
4. Press
5. Press $ to move to the list of sub-sub-menu
6. Press ! or " on the remote control to make
7. Press # once to return to the sub-menu OR
IP Mode
Select from Dynamic, Manual, or Off. When set to Dynamic an IP address is automatically assigned.
When set to Manual, you will enter the IP address manually, and when set to Off no IP address is entered.
Consult your Router user manual or Internet Service Provider for more information on dynamic or manual
IP address settings.
" or # on the remote control to select
one of the items to adjust.
options.
your selection and then press SELECT to
select it.
press SETUP to exit the Setup Menu.
Test Connectivity
Test to see if the network connection is working properly.
Current IP
Displays the Blu-ray DVD Player’s current IP Address.
Version 6/8/2009 29
www.VIZIO.com
Page 30

VIZIO VBR100 User Manual
Chapter 9 Maintenance and
Troubleshooting
Maintenance
Cleaning the Housing and Remote Control
! Use a soft cloth for cleaning.
General guidelines
! The top and back panels of your player may become hot after a long period of use.
! Remove the disc and put your player into standby mode when you are not using your player.
Condensation
! If condensation forms inside your player, your player will not work correctly. Turn on your player,
remove the disc and leave the tray open, then leave your player on for two to three hours.
! To minimize condensation problems, keep the power cord connected to a power outlet.
Storing discs
! Do not store discs in a place that is exposed to direct sunlight or heat.
! Do not store discs in a place that is exposed to moisture and dust, such as a bathroom or near a
humidifier.
! Store discs vertically in their cases. Stacking discs or placing objects on discs when not in their
cases may cause warping.
Cleaning & Handling discs
! Before playback, wipe the disc outwards from the center (not in a circle) with clean cloth.
! To keep a disc clean, do not touch the play side of the disc.
! Do not attach paper or tape to the disc.
30
www.VIZIO.com
Page 31

VIZIO VBR100 User Manual
FAQ & Troubleshooting
If the Blu-ray DVD Player fails or the performance changes dramatically, check the FAQ and
Troubleshooting solutions below. If the player still fails to perform as expected, contact the VIZIO for
assistance by calling 1-877-MYVIZIO (698-4946) or e-mail us at techsupport@vizio.com.
Frequently Asked Questions
FAQ Answer
How do I play multi-channel
surround sound?
Can I connect headphones or
speakers to my player?
My TV has Composite In,
Component In, and HDMI In
jacks. Which should I use to
connect my player?
Can I play Blu-ray Discs or
DVDs that I bought in another
country?
Can I play Blu-ray Discs or
DVDs that do not have region
codes?
What types of discs will my
player play?
! Connect a home theater system to the HDMI, DIGITAL OPTICAL AUDIO OUT,
or DIGITAL COAXIAL AUDIO OUT.
! You cannot connect headphones and speakers directly to your player. If you
want to use headphones or speakers, connect a sound system to your player,
and then connect the speakers or headphones to the sound system.
! HDMI video provides the best picture and should be the first choice if your TV
has HDMI jacks.
! Component video is the next best choice and provides a better picture than
composite video.
! A high-definition picture is not possible using the composite video output.
! You can play the discs if the video was recorded in standard NTSC format. You
cannot play:
o Blu-ray Discs that do not have a region code of A
o DVDs that do not have a region code of 1 or ALL
! The region management information for Blu-ray discs and DVDs video proves
that the disc conforms to industry standards. You cannot play discs that do not
conform to industry standards or do not have a region code or number.
! Your player can play the following discs:
o Blu-ray Disc-video
o DVD-video
o CD
o JPEG
o DVD-R/RW (DVD video format and DVD video recording format)
o DVD-R DL (DVD video format and DVD video recording format)
o DVD+R
o DVD+RW
o DVD+R DL
! Your player can also play CD-Rs and CD-RWs that have been recorded in one
of the following standards:
o CD-DA
o MP3
o JPEG
! You must close the session when you record CDs.
! You cannot record discs with your player.
Version 6/8/2009 31
www.VIZIO.com
Page 32

VIZIO VBR100 User Manual
Troubleshooting Guide
Power Problems Solution
No power.
Player switches to standby
mode.
! Make sure the power is ON.
! Make sure AC power cord is securely connected to the AC socket.
! Plug another electrical device to the power outlet to verify that the outlet is
working.
! If your player has not received a signal for several seconds, it automatically
goes into standby mode to save power. Press STANDBY/ON to turn take your
player out of standby mode.
Operating Problems Solution
Remote control does not
work.
Player does not work.
Blu-ray Disc or DVD does not
play.
Receive the error message
“No Signal” on my TV.
Playback will not start, or
playback starts then stops.
Subtitles do not display.
Resume feature does not
work.
Startup is slow.
! Point the remote directly at the remote sensor on your player.
! Remove any obstacles between the remote control and the remote sensor.
! Make sure that bright light does not shine on the remote control sensor or that
colored glass is not in front of the sensor. Bright light and colored glass can
interfere with signal reception.
! Replace dead batteries with new ones.
! If you see
player or the disc.
! A built-in safety device may have been activated. Press STANDBY/ON on the
front of your player to turn it off, and then turn it on again. If your player still
does not turn on, unplug the power cord, wait about one minute, plug it in again,
and then press STANDBY/ON on the front of your player.
! Condensation may have formed inside your player. Turn on your player,
remove the disc and leave the tray open, then leave your player on for two to
three hours.
! Make sure that the disc has the same region code as your player.
! Make sure that the disc is not dirty or defective.
! The Parental Controls rating may be blocking the disc. Change the parental
controls to allow the rating to play.
! Some Blu-ray Discs can only be output with HDMI.
! Press the input or source button on the TV remote control to select the input
source for the player.
! Make sure that the disc is inserted with the label facing up.
! Make sure that the disc is not dirty or defective.
! The disc may be blank or not compatible with your player. For a list of
compatible discs, see “Playable discs”.
! Subtitles are not recorded on the disc.
! Turn the subtitles on.
! Resume information is lost when you press
! Some discs do not support the resume feature.
! Startup may be slow if the player is connected to the TV with an HDMI cable.
! Startup may be slow the first time you plug in the power cord or after a power
failure.
Prohibited , the action you are trying to do is not allowed by your
% or when you open the disc tray.
32
www.VIZIO.com
Page 33

Operating Problems Solution
VIZIO VBR100 User Manual
Disc tray opens automatically
while playing a disc.
The player is on and displays
the start logo and menu, but
there is no image from the
disc displayed.
The player freezes when
reading a CD-R or DVD-R.
! Make sure that the disc is not dirty or defective.
Make sure there are no obstacles blocking the tray.
!
! The disc may be blank or not compatible with your player. For a list of
compatible discs, see “Playable discs”.
! Press STANDBY/ON, wait five seconds, then press STANDBY/ON again to
reset the player.
! Clean the disc if it is dirty.
! Press STANDBY/ON, wait five seconds, then press STANDBY/ON again to
reset the player.
! When you see “loading” on the screen, press
then try again.
Audio Problems Solution
No sound.
Audio pauses momentarily.
You can see a picture but you
cannot hear sound.
Cannot switch audio.
Incorrect audio type.
! Press Volume + (Up) on the TV remote control.
! Press MUTE on the TV remote control to make sure that MUTE is not ON.
! Make sure headphones are not connected to the TV or home theater system.
! Check the audio connections of external devices that may be connected.
! This occurs normally between play list chapters or scenes.
! Audio momentarily pauses when your player switches between layers on a
dual-layer disc.
! Press Volume + (Up) on the TV remote control.
! Press MUTE on the TV remote control to make sure that MUTE is not ON.
! Press AUDIO to select the audio.
! Make sure headphones are not connected to the TV or home theater system.
! Check the audio connections of external devices that may be connected.
! Audio may not be heard when more than four devices are connected with HDMI
cables. Reduce the number of connected devices.
! Some discs do not let you change the audio.
! When connecting a home theater system using a coaxial digital cable, optical
digital audio cable, or an HDMI cable, set Digital Audio Output to PCM or
connect the home theater system using a standard audio cable.
! Depending on the connected equipment, not all audio tracks may be available if
your player is connected with an HDMI cable, and the TV or receiver does not
support the audio track selected.
! Sound effects are only sent to the audio outputs (HDMI jack or the DIGITAL
AUDIO OUT jack) if Bitstream Mixed is selected from the audio menu.
! Dolby Digital Plus, Dolby TrueHD, and DTS-HD are not allowed to be output
from the DIGITAL AUDIO OUT jacks, due to licensing restrictions. Instead,
these BD audio tracks, if present, are output as Dolby Digital or DTS Digital
Surround bitstreams. (The HDMI still outputs Dolby Digital Plus, Dolby TrueHD,
and DTS-HD bitstreams, as long as the HDMI receiver supports these formats).
! Some audio tracks may be changed prior to being sent to the audio jack,
depending on the Audio settings and the receiver capabilities. For instance,
selecting “Bitstream Mixed” will cause the BD player to output a (remixed) DTS
stream, regardless of the audio track selected.
, remove the disc and clean it,
Version 6/8/2009 33
www.VIZIO.com
Page 34

VIZIO VBR100 User Manual
Video Problems Solution
Video is not in high definition.
Video pauses momentarily.
4:3 aspect ratio picture
expands left and right or
screen size is incorrect.
No sound.
The screen is black.
PIP does not work with a
Blu-ray Disc.
Cannot change the viewing
angle.
Power is ON but there is no
image on the screen.
You see a distorted picture.
! Connect using HDMI or Component. Composite cannot output in high definition.
! If you have connected the TV to the HDMI or component video jacks, make
sure that you have selected the correct resolution in the setup menu.
! Almost all commercial DVDs (but not Blu-ray discs) limit component video
resolution to 480p. Upscaling of commercial DVD content is only possible over
HDMI.
! Your TV is not capable of displaying HD video. Consult your TV documentation.
! This occurs normally between play list chapters or scenes.
! Video momentarily pauses when your player switches between layers on a
dual-layer disc.
! Use the TV to change the aspect ratio. See the documentation that came with
the TV.
! If the TV is connected to the component video jacks, set TV Aspect to 4:3 Pan
& Scan.
! If the TV is connected to HDMI, set the TV Aspect to 16:9.
! Press Volume + (Up) on the TV remote control.
! Press MUTE on the TV remote control to make sure that MUTE is not ON.
! Make sure that headphones are not connected to the TV or home theater
system.
! Check the audio connections of external devices that may be connected.
! Make sure the power is ON.
! Press the input or source button on the TV remote control to select the input
source for the player.
! Check the connections of external devices that may be connected.
! Make sure that the disc is not dirty or defective.
! Press STANDBY/ON, wait five seconds, then press STANDBY/ON again to
reset the player.
! Make sure that the Blu-ray disc allows PIP. See the documentation that came
with the disc.
! Not all discs or scenes are recorded with multiple viewing angles.
! Check the connections of external devices that may be connected.
! Adjust brightness, contrast, or backlight on the TV.
! Press the input or source button on the TV remote control to select the input
source for the player.
! Press STANDBY/ON, wait five seconds, then press STANDBY/ON again.
! Check the video cables to make sure they are securely connected.
34
www.VIZIO.com
Page 35

VIZIO VBR100 User Manual
BD-Live & USB
Solution
Problems
I cannot connect to the
Internet.
I cannot download files now
that I am connected to BD-
Live content.
The file I downloaded keeps
pausing during playback.
! Make sure the Internet connection is setup correctly. For more information, see
the Connecting to a LAN section.
! Test the Internet connection to make sure it is working. For more information,
see the Network Menu section.
! Make sure the BD-Live Internet Access option is not set to Prohibit Access.
For more information, see the System Menu section.
! Make sure the disc you are playing is a legal copy.
! Test the Internet connection to make sure it is working. For more information,
see the Network Menu section.
! The USB storage device should be 1GB or larger with at least 1 GB of free
space and formatted FAT32. NTFS and other file systems are not supported.
! Try a different USB drive.
! Make sure the USB storage device is a USB 2.0 device. If the device is a USB
1.1 device, pausing can occur.
Telephone & Technical Support
Products are often returned due to a technical problem rather than a defective product that may result in
unnecessary shipping charges billed to you. Our trained support personnel can often resolve the problem
over the phone. For more information on warranty service or repair, after the warranty period, please
contact our Support Department at the number below.
Customer support and quality service are integral parts of VIZIO’s commitment to service excellence.
For technical assistance contact our VIZIO Technical Support Department via email or phone.
Email: techsupport@vizio.com
(877) 698-4946 Fax: (949) 585-9563
Hours of operation: Monday - Friday: 6 am to 9 pm
Saturday – Sunday: 8 am to 4 pm
Please have your VIZIO model number, serial number, and date of purchase available before you call.
VIZIO
Address:
39 Tesla
Irvine, CA 92618, USA
Telephone: (949) 428-2525 Fax: 949-585-9514
Web: www.vizio.com
Version 6/8/2009 35
www.VIZIO.com
Page 36

VIZIO VBR100 User Manual
FCC Class B Radio Interference Statement
NOTE: This equipment has been tested and found to comply with the limits for a Class B digital device,
pursuant to Part 15 of the FCC Rules. These limits are designed to provide reasonable protection against
harmful interference in a residential installation. This equipment generates, uses and can radiate radio
frequency energy, and if not installed and used in accordance with the instructions, may cause harmful
interference to radio communications. However, there is no guarantee that interference will not occur in a
particular installation. If this equipment does cause harmful interference to radio or television reception,
which can be determined by turning the equipment off and on, the user is encouraged to try to correct the
interference by one or more of the following measures:
1. Reorient or relocate the receiving antenna.
2. Increase the separation between the equipment and receiver.
3. Connect the equipment into an outlet on a circuit different from that to which the receiver is
connected.
4. Consult the dealer or an experienced radio/TV technician for help.
Notice:
1. The changes or modifications not expressly approved by the party responsible for compliance
could void the user’s authority to operate the equipment.
2. Shielded interface cables and AC power cord, if any, must be used in order to comply with
the emission limits.
3. The manufacturer is not responsible for any radio or TV interference caused by unauthorized
modification to this equipment. It is the responsibilities of the user to correct such
interference.
36
www.VIZIO.com
Page 37

VIZIO VBR100 User Manual
Specifications
Playable media BD-ROM, BD-JAVA 1.1, DVD-video, DVD+RW/+R, DVD-RW/-R, CD-RW/-R
Resolution
Supported
Video Features HDCP, HDMI 1.3c, MPEG-2/VC-1, H.264/AVC, Macrovision 7.1/Macrovision ACP, 108MHz/10-bit
Audio Features CD, CD-R, CD-RW, MP3 CD Support, 192KHz/24-bit Audio D/A Converter, 7.1 Digital Audio via
Outputs 1x HDMI 1.3
VBR100 Features Blu-ray Disc Resolutions of 1080p (HDMI Out) 1080i/720p/480p/480i (Component Out) DVD,
Power
Voltage Range 110~240Vac at 50/60 Hz
Power Consumption <25W (average), <1W Standby
Environmental Conditions
Operating Temperature: 5°C~41°C, Relative Humidity: 10~80%, Altitude: 0~14,000 ft
Dimensions 16.9 × 10.9 × 2.4 inches (43 × 27.7 × 6.2 cm)
Net Weight 6.94 lbs. (3.15 kg)
Gross Weight 8.82 lbs. (4kg)
Certifications CSA, CSA-US, FCC Class B, UL, HDMI, BDA
Compliances Energy Star 3.0, ROHS
Blu-ray Disc Resolutions of 1080p (HDMI Out) 1080i / 720p / 480i / 480p (HDMI / Component Out)
DVD, DVD-R, DVD-RW Selectable Resolutions of 1080p (HDMI) 1080i / 720p / 480i / 480p (HDMI
/ Component Out),
Video D/A Converter
HDMI
1x Stereo Audio
1x Component Video
1x Composite Video
1x USB 2.0
DVD+/-R, DVD+/-RW Selectable Resolutions of 1080p (HDMI) 1080i/720p/480p/480i (HDMI /
Component Out),CD, CD-R, CD-RW, MP3 CD Support, Dolby Digital / Dolby Digital Plus / Dolby
Digital TrueHD, DTS Digital Surround, BD Live, JPG
1x Optical Audio
1x Coaxial Audio
1x RJ-45
*Product specifications may change without notice or obligation.
Version 6/8/2009 37
www.VIZIO.com
Page 38

VIZIO VBR100 User Manual
Legal notices
FCC Part 15
This device complies with Part 15 of the FCC Rules. Operation of this product is subject to the
following two conditions: (1) this device may not cause harmful interference, and (2) this device
must accept any interference received, including interference that may cause undesired operation.
This equipment has been tested and found to comply within the limits for a class B digital device,
pursuant to Part 15 of the FCC Rules. These limits are designed to provide reasonable protection
against harmful interference in a residential installation. This equipment generates, uses, and can
radiate radio frequency energy and, if not installed and used in accordance with the instructions,
may cause harmful interference to radio communications. However, there is no guarantee that
interference will not occur in a particular installation. If this equipment does cause harmful
interference to radio or television reception, which can be determined by turning the equipment
off and on, the user is encouraged to try to correct the interference by one or more of the
following measures:
! Reorient or relocate the receiving antenna.
! Increase the separation between the equipment and receiver.
! Connect the equipment into an outlet on a circuit different from that to which the receiver
is connected.
! Consult the dealer or an experienced technician for help.
FCC warning
Changes or modifications not expressly approved by the party responsible for compliance with
the FCC Rules could void the user’s authority to operate this equipment.
DHHS and FDA safety certification
This product is made and tested to meet safety standards of the FCC, requirements and
compliance with safety performance of the U.S. Department of Health and Human Services, and
also with FDA Radiation Performance Standards 21 CFR Subchapter J.
Canada ICES-003 statement
This Class B digital apparatus complies with Canadian ICES-003.
Copyrights
Macrovision
This product incorporates copyright protection technology that is protected by methods
claims in certain U. S. Patents and other intellectual property rights owned by Macrovision
Corporation and other rights owners. Use of this copyright protection technology must be
authorized by Macrovision Corporation, and is intended for home and other limited
viewing uses only unless otherwise authorized by Macrovision Corporation. Reverse
engineering or disassembly is prohibited.
Dolby Digital
Manufactured under license from Dolby Laboratories. “Dolby” and the double-D symbol
are trademarks of Dolby Laboratories.
DTS, Inc.
Manufactured under license under U.S. Patent #’s: 5,451,942; 5,956,674; 5,974,380;
5,978,762; 6,226,616; 6,487,535 and other U.S. and worldwide patents issued and
pending. DTS is a registered trademark and the DTS logos and symbol are trademarks of
DTS, Inc. 1996-2007 DTS, Inc. All rights reserved.
38
www.VIZIO.com
Page 39

VIZIO VBR100 User Manual
ONE-YEAR LIMITED WARRANTY
ON PARTS AND LABOR
Covers units purchased as new in United States and Puerto Rico Only
VIZIO provides a warranty to the original purchaser of its products against defects in materials and
workmanship for a period of one year of non-commercial usage and ninety (90) days of commercial use.
If a VIZIO product is defective within the warranty period, VIZIO will either repair or replace the unit at its
sole option and discretion.
To obtain warranty service, contact VIZIO Technical Support via email: TechSupport@VIZIO.com or via
phone at 877 MY VIZIO (877.698.4946) from 6:00AM to 9:00PM Monday through Friday and 8:00AM to
4:00PM Saturday and Sunday, Pacific Time, or visit www.VIZIO.com
purchase receipt or copy thereof is required.
Parts and Labor
There will be no charge for parts or labor during the warranty period. Replacement parts and units may be
new or recertified at VIZIO’s option and sole discretion. Replacement parts and units are warranted for
the remaining portion of the original warranty or for ninety (90) days from warranty service or replacement,
whichever is later.
Type of Service
Units must be sent to a VIZIO service center. VIZIO is not responsible for transportation costs to the
service center, but VIZIO will cover return shipping to the customer. PRE-AUTHORIZATION IS
REQUIRED BEFORE SENDING ANY UNIT IN FOR SERVICE.
Any returns to VIZIO’s service centers must utilize either the original carton box and shipping material or a
replacement box and material provided by VIZIO, which may be provided free of charge. VIZIO technical
support will provide instructions for packing and shipping the unit to the VIZIO service center.
Limitations and Exclusions
VIZIO’s one-year limited warranty only covers defects in materials and workmanship. Items not covered
include but are not limited to cosmetic damage, normal wear and tear, misuse, signal issues, power
surges, damages from shipping, acts of God, any type of customer misuse, installation, customer
modifications, adjustments, and set-up issues. Units with unreadable or removed serial numbers, “image
burn-in”, and routine maintenance are not covered. This warranty does not cover products sold “AS IS”,
“FACTORY RECERTIFIED”, or by a non-authorized reseller.
THERE ARE NO EXPRESS WARRANTIES OTHER THAN THOSE LISTED OR DESCRIBED ABOVE.
ANY IMPLIED WARRANTIES, INCLUDING ANY IMPLIED WARRANTY OF MERCHANTABILITY AND
FITNESS FOR A PARTICULAR PURPOSE, SHALL BE LIMITED IN DURATION TO THE PERIOD OF
TIME SET FORTH ABOVE. VIZIO'S TOTAL LIABILITY FOR ANY AND ALL LOSSES AND DAMAGES
RESULTING FROM ANY CAUSE WHATSOEVER SHALL IN NO EVENT EXCEED THE PURCHASE
PRICE OF THE COVERED PRODUCT. VIZIO SHALL NOT BE RESPONSIBLE FOR LOSS OF USE,
COMMERCIAL LOSS, LOST REVENUE OR LOST PROFITS, OR OTHER INCIDENTAL OR
CONSEQUENTIAL DAMAGES. SOME STATES DO NOT ALLOW LIMITATIONS ON HOW LONG AN
IMPLIED WARRANTY LASTS OR THE EXCLUSION OF INCIDENTAL OR CONSEQUENTIAL
DAMAGES, SO THE ABOVE LIMITATIONS OR EXCLUSIONS MAY NOT APPLY TO YOU. THIS
WARRANTY GIVES YOU SPECIFIC LEGAL RIGHTS, AND YOU MAY ALSO HAVE OTHER RIGHTS,
WHICH VARY FROM STATE TO STATE. THIS WARRANTY IS SUBJECT TO CHANGE WITHOUT
NOTICE. CHECK www.VIZIO.com FOR THE MOST CURRENT VERSION.
. Proof of purchase in the form of a
Version 6/8/2009 39
www.VIZIO.com
Page 40

VIZIO VBR100 User Manual
Index
16:9 ..........................................................................25
4:3 ............................................................................25
Accessories................................................................5
Aspect Ratio.............................................................25
Audio Menu
Digital Output .......................................................26
Dynamic Range Control .......................................27
PCM Downsampling.............................................27
BD-Live ..............................................................15, 18
Accessing.............................................................18
Internet Access ....................................................28
USB......................................................................15
Bitstream
HD........................................................................26
Legacy .................................................................26
Legacy .................................................................26
Cleaning...................................................................30
Connecting
Digital Audio.........................................................14
Home Theater ................................................12, 13
LAN ......................................................................15
TV with a component cable..................................13
TV with a composite(AV) cable ............................14
TV with HDMI .......................................................12
USB......................................................................15
Connecting Equipment
Rear Panel Connections ........................................8
Controls
Front Panel.............................................................7
Disc
Format....................................................................6
Display Menu
Film Mode ............................................................26
Resolution ............................................................26
TV Aspect ............................................................25
Ethernet connection .................................................15
FAQ..........................................................................31
Features.....................................................................6
Film Mode ................................................................26
Inputs
Connectors...........................................................11
IP Address ...............................................................29
IP Mode....................................................................29
LAN connection........................................................15
Language Menu
Audio....................................................................24
Menu ....................................................................24
OSD .....................................................................24
Subtitle .................................................................24
Legal notices............................................................38
Maintenance ............................................................30
Menu ........................................................................23
Audio Menu..........................................................26
Display Menu .......................................................25
Language Menu ...................................................24
Network Menu ......................................................29
Parental Menu......................................................27
System Menu .......................................................28
MP3 Playlist .............................................................22
Multimedia
JPEG files ............................................................19
Multimedia Files
USB......................................................................16
Viewing ................................................................16
Network Menu..........................................................29
Current IP.............................................................29
IP Mode................................................................29
Test Connectivity..................................................29
Package
Contents.................................................................5
Opening .................................................................5
Parental Controls .....................................................27
Password .................................................................28
PCM .........................................................................26
PCM Downsampling.................................................27
Playing a Disc ..........................................................17
Prohibited Message .................................................17
Region Codes ............................................................6
Remote ......................................................................9
Batteries...............................................................10
Range ..................................................................10
Reset........................................................................28
Resolution ................................................................26
Safety instructions......................................................2
Setting up...................................................................5
Setup Menu..............................................................23
Slideshow.................................................................19
Specifications ...........................................................37
Subtitle .....................................................................24
Supported Discs.........................................................6
Supported File Extensions .........................................6
System Menu
BD-Live Internet Access.......................................28
Clear BD Storage .................................................28
Optical Disc AutoPlay...........................................28
Reset Settings......................................................28
Technical Support ....................................................35
Troubleshooting .......................................................31
USB connection .......................................................15
Viewing
JPEG files ............................................................19
Warranty ..................................................................39
40
www.VIZIO.com
 Loading...