

Page 1
loT
VIZIO
WHERE VISION MEETS VHEUE’
Before You Begin
• Verify all of the contents of your accessory pack
• Review safety guidelines in User Manual
• Place TV so the rear connectors are accessible
• Install AA batteries into the Vizio Remote Control
VRsbL
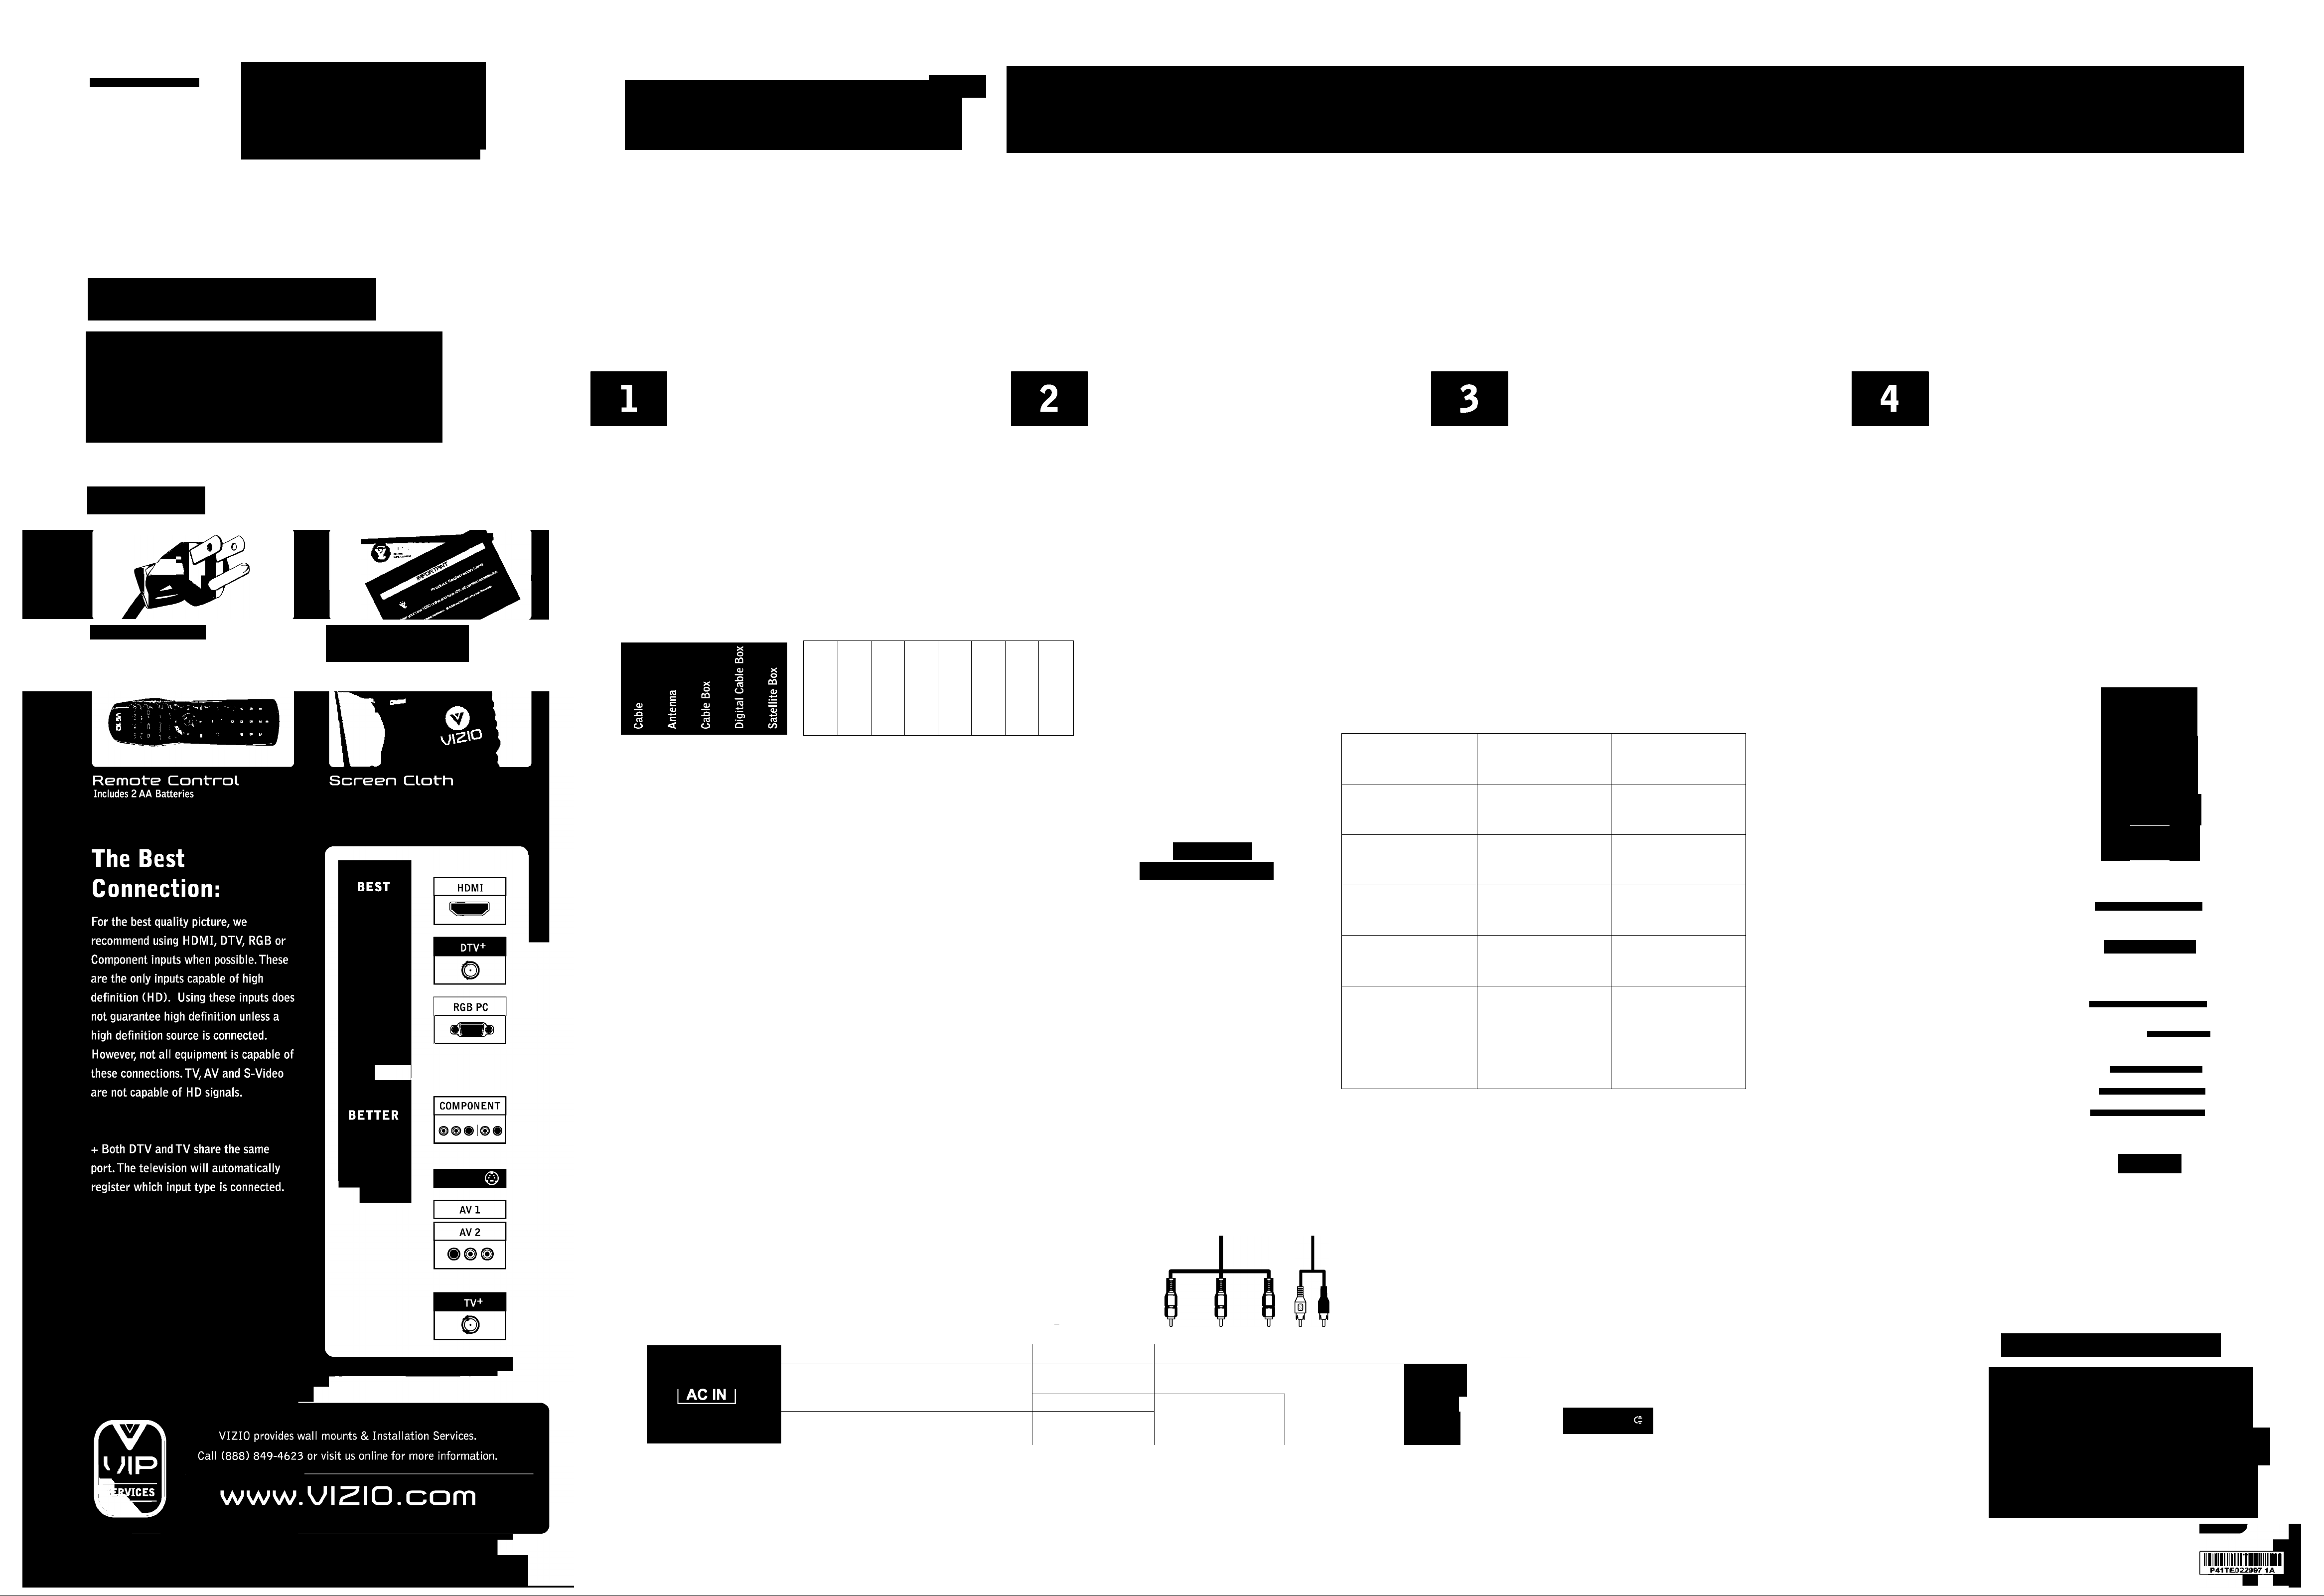
HDT'J QUICKSTRRT GUIDE
Four Easy Steps; Simply follow our color-coded Step Charts and you^Kjfdine
Choose items to connect
to your VA26L
Choose equipment
connection methods
Seiect cabies and
make connections
T
1
Begin using
/
your VA26L
• Write down your VA26L"s Serial Number (located on the back)
Contents:
Power Cord Document's
VIZIO VA26L User Manual,VIP
Brochure and Registration Card
Determine which type of Signal Source and any Additional Equipment you
wish to connect to your VA26L (Refer to reverse side for TV Source Setup).
The colored dots under each Signal Source and Additional Equipment
indicate which type of connections you may use to connect to your VA26L.
Signal Sources Additional Equipment
ca
o>
•Ц-I
Q.
E
o
o b
O) E
E
ca
o
CO
> >
0)
CO
>«
CO
O)
E
CO
C5 CO
CO
Using the colored dots from Step One, follow the row across to Step Two to
match up the colored dots to the same colored connection method.
Chose ONLY one method for each piece of equipment.
> >
CO
CO
O
E
o
o
o
Connection Methods My Equipment Has MyVA26LHas Cable Needed Connection Reference
E
O)
CO
T3
3
o
on
o
Once you have determined the connection methods from Step Two, follow
the row to Step Three to determine what kind of cables you need and what
the connections look like on your equipment.
Following the color-coded system, use the appropriate cables and connect
your Signal Source and Additional Equipment to the color-coded inputs on
your VA26L (Refer to Connection Map at bottom of page.)
Once connected, turn on your VA26L and all your equipment.
Fill in the Connection Reference Chart below, noting how you
will connect your equipment/signal source to your VA26L.
Press the INPUT button on your remote.The Input Menu
will display on-screen
Continue pressing the INPUT button until you reach
the corresponding connection.
n
•
1
2 3
c!)
O
O
O O
O O
o o
o o
o o o o o o
o o o o o o
HDMI 1
TYPE: Digital High Definition
QUALITY: Best Digital
HDMI 2
TYPE: Digital High Definition
QUALITY: Best Digital
DTV/TV
TYPE: Cable/Antenna
QUALITY: Best Digital/Good Analog
RGB
TYPE: RGB Analog
QUALITY: Best Analog
COMPONENT
TYPE: Component Analog
QUALITY: Better Analog
AVI
TYPE: Analog
QUALITY: Good Analog
AV2 or S-VIDEO
TYPE: Analog
QUALITY: Good Analog
^
-----------------
#00°''
HDMI
HDMI DVI
LI^BU 01 ^|!!!!!!!
m"®
©
V Ontional
0
®@® ®® ®®® ®®
0 #00
#00°'(^
©
HDMI* ^HDMI* to DVI*^^
Coaxial iRF )
VGA Cable*^^ ^
& stereo
mini-jack
Component & Stereo RCA Cable*
A/V RCA Cable
A/V RCA Cable
& RCA Audio^^^
or
///
HDMI 1
HDMI 2
DTV/TV
RGB PC
COMPDNENT
AVI
AV2
Connected Equipment
Connected Equipment
Connected Equipment
Connected Equipment
Connected Equipment
Connected Equipment
Connected Equipment
4 5
7 8
iriPIIT
CH
MENU A INFO
^ QK ►
WIDE SLEEP MTS CC
ZOOM + FREEZE RGB
PIP - PIPCH + AUDIO
O
LAST
COMPONENT HDMI
6
9
—
VOL
To Use This Chart: Write your equipment or signal source into the squares corresponding to your connection method. HDMI Cable, DVI-HDMI cable, AV cable, VGA cable. Audio mini-jack and Component Cable are not included.These cables are available at www.VIZIO.com (View back for more details).
SIDE OF TV
BACK OF TV
fm
i
I
□
III
HDMI RGB PC COMPONENT
-------------- ------------------------------
HDMI1 HDMI 2
^
0
'uu
I I 0
RGB PC
y(^ Pb/Cb® Pr/Cr(^
AV1
L R
0
«0
o
UJ
0
9
>
-AUDIO - a
II
For interactive connections guide
to connecting your components
to your VIZIO TV, visit
www.ceaconnectionsguide.com
9
>
^^^imr|^|p=>
È
O
o
DTV/TV
o
CABLE/ANTENNA
PtP INPUT PIP SIZE MODE SWAP
VIZIO
3 WAYS TO GET HDTV
1 Off-Air antenna (using the DTV antenna input)
To see if you are able to receive HD signals
off-air and for help choosing the right antenna,
visit
www.antennaweb.org.
2 Cable Subscribe to HD programming through your
local cable company (HD cable box required).
For more information, see your User Manual, Chapter 2, CONNECTING EQUIPMENT.
3 Satellite Subscribe to HD programming through
DirecTV or Dish Network (HD satellite receiver
required).
(g)2008 VIZIO Inc.
Page 2
\j\z\a
WHERE V^ISIÜN MEETS 'JRLUE"
WHERE
V^ISIGN
MEETS
Connect your TV: Choose of the following three options to connect your TV to your Satellite/Cable Box
URLUE
If your satellite or cable box has:
CJ
RGB PC
OR
RGB PC
AUDIO
OR
COMPONENT
Y Pb/Cb Pr/Cr
AV 1
VIDEO («9 L R (
Connect to your TV using:
Program your TV:
Programming your VA26L is a simple
OR
Connect your Signal Source to the
Analog HDTV
Component
connection.
NON-HDTV
OR
AV Component
TV Tuner Setup
TWO STEP process. All you need
is your Remote Control.
Please Note:
• Be sure the batteries in your remote are inserted correctly.
For advanced setups, refer to chapter 3 of your VA26L User Manual.
On your Remote Control...
n Turn on the TV, the Initial Setup screen
should appear. If this screen does not appear
see User Manual Chapter 3 for TV Tuner Setup.
B Select Language; English, Français, Español.
B Press O or O once to select Cable or Antenna.
Select Cable if you are using cable from the
wall or Air if you are using an antenna.
□ Press ^ to continue to the next screen.
Press ^ on remote to scan for channels.
Scanning for available channels could take
several minutes.
Program your Cable/Satellite Box Remote
Consult your Cable or Satellite Owner's Manual to determine if you need a 3-, 4-, or 5-digit code.
If your Cable or Satellite Box requires:
• 3-digits, please use "627" (This code usually works with DISH Network)
• 4-digits, please use "1758" or "0178"
• 5-digits, please use "11758" or "10178" (These codes usually work for DIRECTV)
Once scanning is finished, programming is
complete.
For more detailed information see Chapter 3
of your User Manual.
(§>2008 VIZIO, Inc.
 Loading...